BluePrint Engines

Visit our community sponsor

Thanks Thanks:  0
Likes Likes:  0
Page 9 of 24 FirstFirst ... 789101119 ... LastLast
Results 321 to 360 of 925

Thread: Brando's Newbie 818R Build Thread

  1. #321
    Senior Member Brando's Avatar
    Join Date
    Oct 2013
    Location
    Irvine, Ca
    Posts
    566
    Post Thanks / Like
    Blog Entries
    1
    Ouch. You were at 16 psi and 275 hp iirc
    You think 65 whp was in your reach? That's quite a jump.

  2. #322
    Senior Member Doowop's Avatar
    Join Date
    Jan 2014
    Location
    Denver, CO
    Posts
    208
    Post Thanks / Like
    Quote Originally Posted by Scargo View Post
    As an R owner, functional comes to mind. Pretty does nothing. Perhaps sexy could make it faster.
    There is a few things between pretty and ugly. I really don't car about carbon fiber stuff, I actually wish that FFR would supply all their CF stuff in 100% fiberglass so I could just paint it and be done with it, but anyway, it is not because it is a race car that it has to look unfinished. Adding a couple pieces of trim around the raw fiberglass cuts looks more professional and finished, that's all.

  3. #323
    Senior Member Brando's Avatar
    Join Date
    Oct 2013
    Location
    Irvine, Ca
    Posts
    566
    Post Thanks / Like
    Blog Entries
    1

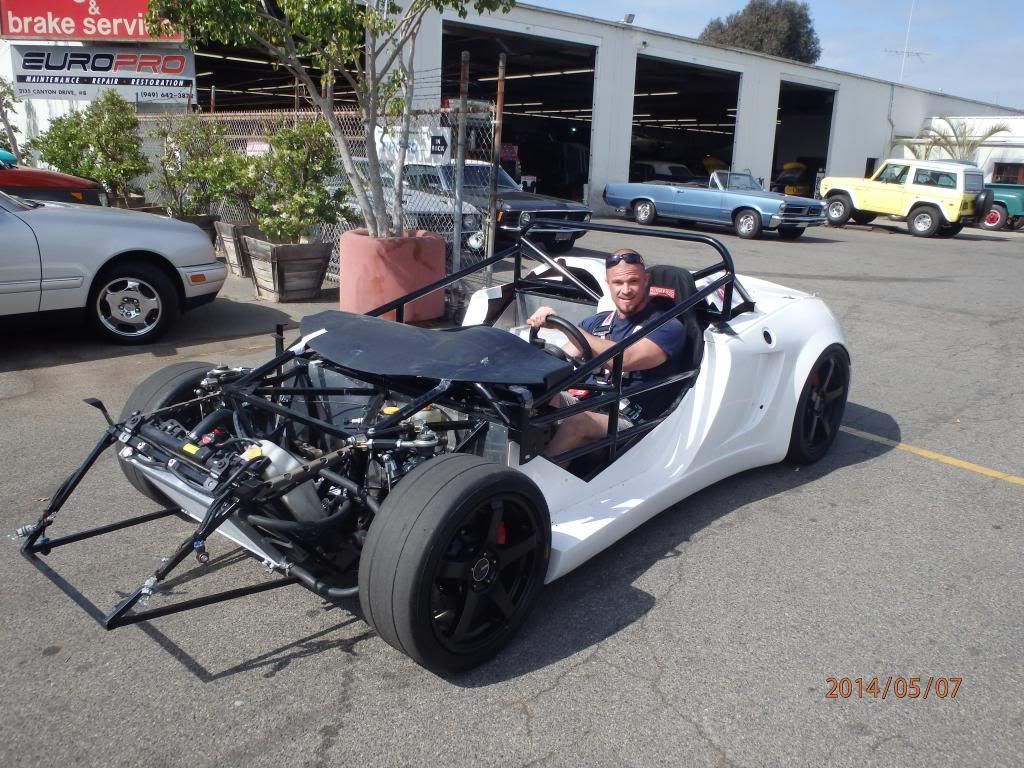
    California DMV SB100 Registration Step 1 - COMPLETE

    Granted I have no mirrors, front panels, windshield and a few other nick nacks, what I do have is a 2 month temporary registration!

    Whoohoo!

    Perhaps I'm begging for a fix-it ticket driving around but the only items ticket-able can be signed off at the CHP visit (step 2). At least my car wont get impounded if I get pulled over.

    Car is getting aligned today and instead of renting ANOTHER uhaul ($800 in rentals to date) I am just driving it from the alignment shop to the muffler shop. Super sweet!!


  4. #324
    Senior Member wleehendrick's Avatar
    Join Date
    Jul 2012
    Location
    Encinitas, CA
    Posts
    1,653
    Post Thanks / Like
    Blog Entries
    2
    Awesome! Any issues at the DMV? I'll be doing the same hopefully not too long from now...

  5. #325
    fasterer and furiouser longislandwrx's Avatar
    Join Date
    Aug 2012
    Location
    Long Island
    Posts
    2,540
    Post Thanks / Like
    Blog Entries
    6
    set up on the dynopack there's not much left of the car! lol.
    A well stocked beverage fridge is the key to any successful project.

  6. #326
    Senior Member Brando's Avatar
    Join Date
    Oct 2013
    Location
    Irvine, Ca
    Posts
    566
    Post Thanks / Like
    Blog Entries
    1
    Actually yes. The first lady I spoke with told me I needed the car present at the DMV location. I insisted this wasn't correct and pulled out documentation I had printed out (Eric Hansons post on SB100) on the subject. She didn't budge so I asked to speak with her supervisor. The supervisor had a much better understanding of the process although I still found myself educating her frequently. In fact they borrowed the guidelines I had printed out and used them as a reference. Kinda scary.

    At one point they asked me if i had paid taxes on the purchase. Surprisingly they didn't look at the receipts. I opted for the safe and honest route and paid $1,300 in taxes (10,990 + $3500 motor&trans) but probably could have slid by if integrity didn't prevail.

    I had all my documentation filled out prior, a neatly organized folder and was as humble and kind as possible. I tried to present like I was an organized guy, i sure fooled them.

  7. #327
    fasterer and furiouser longislandwrx's Avatar
    Join Date
    Aug 2012
    Location
    Long Island
    Posts
    2,540
    Post Thanks / Like
    Blog Entries
    6
    What was your baseline power before the tune?
    A well stocked beverage fridge is the key to any successful project.

  8. #328
    Senior Member Brando's Avatar
    Join Date
    Oct 2013
    Location
    Irvine, Ca
    Posts
    566
    Post Thanks / Like
    Blog Entries
    1
    Quote Originally Posted by longislandwrx View Post
    set up on the dynopack there's not much left of the car! lol.
    I didn't have the exhaust routed out the 4" exit hole i cut. I didn't want to cook my panel nor have the motor ingest anything but fresh O2. I had to remove all the body panels at the Dyno and put them back on after. I have sheet screws still securing the sides & back so it only took 20 minutes.

    I did leave the engine hatch on though. AKA spoiler

  9. #329
    Senior Member Brando's Avatar
    Join Date
    Oct 2013
    Location
    Irvine, Ca
    Posts
    566
    Post Thanks / Like
    Blog Entries
    1
    Quote Originally Posted by longislandwrx View Post
    What was your baseline power before the tune?
    A tid under 200, but it had added 750cc injectors and the engine was noticeably choking. I never got the engine dyno'd in its stock form. It is a JDM with avcs so i would like to think its a 220 HP at the crank. Now its somewhere around 333 CHP

  10. #330
    Senior Member wleehendrick's Avatar
    Join Date
    Jul 2012
    Location
    Encinitas, CA
    Posts
    1,653
    Post Thanks / Like
    Blog Entries
    2
    Quote Originally Posted by Brando View Post
    Actually yes...
    Thanks for the info on your first hoop to jump through. I usually get frustrated with bureaucratic incompetence, so I'll have to remind myself to go prepared, expect the run-around and be nice.

  11. #331
    Senior Member FFRSpec72's Avatar
    Join Date
    Feb 2011
    Location
    Kirkland, WA
    Posts
    2,255
    Post Thanks / Like
    Quote Originally Posted by Brando View Post
    A tid under 200, but it had added 750cc injectors and the engine was noticeably choking. I never got the engine dyno'd in its stock form. It is a JDM with avcs so i would like to think its a 220 HP at the crank. Now its somewhere around 333 CHP
    If it's a EJ207 then should be somewhere around 280 stock at the crank
    Tony Nadalin
    2018 SOVREN Big Bore Champion
    2015 SCCA Oregon Region VP3 Champion
    2012 ICSCC ITE Class Champion
    FFR MkII Challenge Car, Spec Racer, Street Legal, SCCA, ICSCC and NASA Racing
    818R Build in progress

  12. #332
    818 builder metalmaker12's Avatar
    Join Date
    Mar 2012
    Location
    Exeter R.I
    Posts
    2,834
    Post Thanks / Like
    Blog Entries
    1
    Depending on ej207 version, if it's a v7 or v8. V7 about 286-290crank hp and like 290 torque and v8 is about 290-300 crank hp and 300 torque. They are surprising more powerful than one would think due to the large head ports. With 20 psi and no mods my friend just made 325whp and 304wtorue on his Gc. With the 818 and the same tune you can get like 335whp +and 310w torque all day.

    What version you have: I have a version 8 with the vf37 twinscroll. I had around 260-280 whp on a base map of only 16 max psi. Btw I am doing my body work a bit more and than tearing the engine out for its rebirth. This time it's going to get some extra metal love. CP Forged pistons, maybe 2.2 stroker build , rebuilt heads with a little more porting with a Dom 1.5. This is only if I need to. If it's just a head gasket or something stupid I will just repair and move on.
    Your power is about where you should be and it's a safe tune for this engine cause most guys crank it past 20psi on em.

    Congrats on dmv thing
    Last edited by metalmaker12; 05-06-2014 at 09:55 PM.

  13. #333
    Senior Member C.Plavan's Avatar
    Join Date
    Mar 2011
    Location
    Clovis, Ca
    Posts
    2,225
    Post Thanks / Like
    EDIT- I found what you did in another thread. I'm going to do the same. F those metric adapters

    Brando- Did you notice the metric adapters for the Wilwood flex lines only have less than a turn before it engages? Kinda concerning. What did you do? I cant see on your brake line pictures.

    Last edited by C.Plavan; 05-06-2014 at 09:24 PM.
    Thanks- Chad
    818R-SOLD!!!- Go Karted 7/20/14/ Officially raced NASA ST2- 2/28/15
    2016 Elan NP01 Prototype Racecar Chassis #20
    1969 Porsche 911ST Vintage Race Car
    1972 Porsche 911T (#'s matching undergoing nut & bolt resto in my garage)

  14. #334
    Senior Member Brando's Avatar
    Join Date
    Oct 2013
    Location
    Irvine, Ca
    Posts
    566
    Post Thanks / Like
    Blog Entries
    1
    EDIT: I just noticed your edit, but here it is again

    Went from Wilwood Caliper -->-3 to 1/8in Pipe Straight Fitting --> 18in -3 Brake Line


    RAYH14572 Brake Fitting Clip (4pk) $4.95
    4 x XRP981603 -3 to 1/8in Pipe Straight Fitting $13.88
    2 x SBL318 18in -3 Brake Line $19.90
    2 x SBL316 16in -3 Brake Line $19.90
    Last edited by Brando; 05-06-2014 at 10:08 PM. Reason: I just noticed your edit

  15. #335
    Senior Member Brando's Avatar
    Join Date
    Oct 2013
    Location
    Irvine, Ca
    Posts
    566
    Post Thanks / Like
    Blog Entries
    1

    Riding Dirty

    Went for my first drive this morning. Made it from the alignment shop to the muffler shop. 2 miles during rush hour.
    I don't think I will be doing that again until the car is legit, not worth the impound. It did make for a good adrenaline rush


    At least the tail lights were in working order


    Got some items back from the powder coater. Came out perfect


    Almost done cutting and sanding the vent holes. Not my favorite part of the build


    Used a 1/2 - 20 tap to extend the threads for the rear engine hatch


    Off topic but got my Evolve board setup for all terrain today. 23 MPH is too fast to run it out... no bailing allowed


  16. #336
    fasterer and furiouser longislandwrx's Avatar
    Join Date
    Aug 2012
    Location
    Long Island
    Posts
    2,540
    Post Thanks / Like
    Blog Entries
    6
    I'm always amazed at how much power those LiPo batteries have.

    congrats on your joyride!
    A well stocked beverage fridge is the key to any successful project.

  17. #337
    Senior Member Brando's Avatar
    Join Date
    Oct 2013
    Location
    Irvine, Ca
    Posts
    566
    Post Thanks / Like
    Blog Entries
    1

    Air Vents

    I stumbled a bit on the vents but ended up with following working best for me.
    The sharpie was a must IMO

    1. bend outside piece and test fit
    2. mark any exposed fiberglass
    3. fine tune & trim fiberglass to remove any reveal
    4. black sharpie inside reveal edge between vents
    5. silicon inside vent securing with zips
    6. silicon outside vent securing with zips
    7. remove excess silicon


  18. #338
    Mechie3's Avatar
    Join Date
    May 2012
    Location
    Indianapolis
    Posts
    5,174
    Post Thanks / Like
    I dislike how the radius of the hood ring isn't concentric with the radius of the hood. Not something you did, just how its made.

    Driving in half go kart mode must have been head turning in traffic. Lol
    Zero Decibel Motorsports
    Check out my new website!
    www.zerodecibelmotorsports.com
    www.facebook.com/zero.decibel.motorsports

  19. #339
    Senior Member wleehendrick's Avatar
    Join Date
    Jul 2012
    Location
    Encinitas, CA
    Posts
    1,653
    Post Thanks / Like
    Blog Entries
    2
    Quote Originally Posted by Brando View Post
    [*]black sharpie inside reveal edge between vents
    I did the same.

  20. #340
    Senior Member wleehendrick's Avatar
    Join Date
    Jul 2012
    Location
    Encinitas, CA
    Posts
    1,653
    Post Thanks / Like
    Blog Entries
    2
    Also, I found weights worked better than zip-ties and allen keys to secure during bonding. I used my primal-bells!


    0419141835.jpg

  21. #341
    Senior Member Brando's Avatar
    Join Date
    Oct 2013
    Location
    Irvine, Ca
    Posts
    566
    Post Thanks / Like
    Blog Entries
    1
    That's a good idea. I didn't even think of using my weights. That only would work for the inside vent however. It would be tough to get the outside edge of the outer vent with weights.

    Craig, i noticed that as well. There is no easy way to fix that is there?
    And yes...huge head turner. That's why it was sketchy...no way the popo would miss that one

  22. #342
    Senior Member C.Plavan's Avatar
    Join Date
    Mar 2011
    Location
    Clovis, Ca
    Posts
    2,225
    Post Thanks / Like
    Just out run them. I wanna see the chase on TV. Haha
    Thanks- Chad
    818R-SOLD!!!- Go Karted 7/20/14/ Officially raced NASA ST2- 2/28/15
    2016 Elan NP01 Prototype Racecar Chassis #20
    1969 Porsche 911ST Vintage Race Car
    1972 Porsche 911T (#'s matching undergoing nut & bolt resto in my garage)

  23. #343
    Mechie3's Avatar
    Join Date
    May 2012
    Location
    Indianapolis
    Posts
    5,174
    Post Thanks / Like
    Brandon, you'd have to do fiberglass work or have new trim rings made.
    Zero Decibel Motorsports
    Check out my new website!
    www.zerodecibelmotorsports.com
    www.facebook.com/zero.decibel.motorsports

  24. #344
    Senior Member Brando's Avatar
    Join Date
    Oct 2013
    Location
    Irvine, Ca
    Posts
    566
    Post Thanks / Like
    Blog Entries
    1

    How do dial in the brake bias

    I will leave the fiberglassing to Aloha818. Man he is going DEEP on the glass work.

    I picked up my car from the muffler shop during lunch today. When i dropped it off at home I went for another joy ride around the neighborhood. This time I ran 1st and 2nd with all she had. All I can say is all you guys must have REALLY fast cars outside of your 818 because not nearly enough people are taken back by how fast this thing is. I can say with 100% confidence I have never driven a quicker car. It's intoxicating and I'm so incredibly stoked on how this car is feeling so far.

    I am trying to set my brake bias. I have it set to minimize front brakes. I can't seem to get the rear tires to lock or even get a chirp out of them. I was doing a full panic stop at 45mph. If i set the bias to maximum front I CAN get the fronts to lock up however. Do i need to find a slicker surface, go faster or what is the best practice when setting the bias? I realize my tire choice isn't going to help, they're pretty soft. Any tips?

  25. #345
    818 builder metalmaker12's Avatar
    Join Date
    Mar 2012
    Location
    Exeter R.I
    Posts
    2,834
    Post Thanks / Like
    Blog Entries
    1
    The 818 is sick fast, I am not only a builder of one but a happy owner lol

  26. #346
    Senior Member Bob_n_Cincy's Avatar
    Join Date
    Sep 2012
    Location
    Cincinnati OH
    Posts
    3,905
    Post Thanks / Like
    Quote Originally Posted by Brando View Post
    I will leave the fiberglassing to Aloha818. Man he is going DEEP on the glass work.

    I picked up my car from the muffler shop during lunch today. When i dropped it off at home I went for another joy ride around the neighborhood. This time I ran 1st and 2nd with all she had. All I can say is all you guys must have REALLY fast cars outside of your 818 because not nearly enough people are taken back by how fast this thing is. I can say with 100% confidence I have never driven a quicker car. It's intoxicating and I'm so incredibly stoked on how this car is feeling so far.

    I am trying to set my brake bias. I have it set to minimize front brakes. I can't seem to get the rear tires to lock or even get a chirp out of them. I was doing a full panic stop at 45mph. If i set the bias to maximum front I CAN get the fronts to lock up however. Do i need to find a slicker surface, go faster or what is the best practice when setting the bias? I realize my tire choice isn't going to help, they're pretty soft. Any tips?
    Did you drill the hole 3/4" higher in the brake pedal. Erik (ehanson007) had this same issue.
    Bob
    Last edited by Bob_n_Cincy; 05-08-2014 at 08:40 PM.

  27. #347
    Senior Member
    Join Date
    Jan 2012
    Posts
    1,112
    Post Thanks / Like
    What muffler shop did you use and what setup are you running if you don't mind saying.

  28. #348
    Senior Member Brando's Avatar
    Join Date
    Oct 2013
    Location
    Irvine, Ca
    Posts
    566
    Post Thanks / Like
    Blog Entries
    1
    Quote Originally Posted by Bob_n_Cincy View Post
    Did you drill the hole 3/4" higher in the brake pedal. Erik (ehanson007) had this same issue
    Yes I did re-drill the hole for better a fulcrum. I will check with Erik, he is right down the road. Thanks

    Quote Originally Posted by 07FIREBLADE View Post
    What muffler shop did you use and what setup are you running if you don't mind saying.
    When you say setup can you be more specific? I went to Mesa Muffler in Costa Mesa. He did a good job. $250 included the muffler, welding and bending, as well as fabricating 3 mounts for my AWIC and also bending/tweaking the fuel fill tube to work with the boyd gas tank.

    4" exit hole


    You can see one the brackets for the AWIC as well as the muffler work


    One more AWIC bracket (3 total)


    Fuel fill tube for Boyd tank


    I also purchased 2 side view mirrors from a 944 race car. The combined weight of both mirrors was under 1lb. Impressive but frail. After drilling into my doors to install i snapped the drivers mirror adjusting it.
    I think I found a similar shaped replacement so i won't have a 1/4" hole on a focal point of the car. Below are the 944 mirrors. Here are the Black Baby Turbo Mirrors i'm going to use to replace the 944 mirrors in the pics below


  29. #349
    Senior Member Doowop's Avatar
    Join Date
    Jan 2014
    Location
    Denver, CO
    Posts
    208
    Post Thanks / Like
    Hey Brandon,
    awesome you went for a ride!! I think I'd be too chicken to do that, especially since the police station is a few blocks from my house!!
    What are you thinking for the rear view mirror in the center. Anybody knows what is the one they are using on the blue car? It mounts on the dash.
    So, How quiet is it with that big *** muffler? I do like the location of the exit pipe.

  30. #350
    fasterer and furiouser longislandwrx's Avatar
    Join Date
    Aug 2012
    Location
    Long Island
    Posts
    2,540
    Post Thanks / Like
    Blog Entries
    6
    Quote Originally Posted by Brando View Post
    Any tips?
    Did you follow Wilwoods procedure for bedding your pads?

    Once the brake system has been tested and determined safe to operate the vehicle, follow these steps for the bedding of all new pad materials. These procedures should only be performed on a race track, or other safe location where you can safely and legally obtains speeds up to 65 MPH, while also being able to rapidly decelerate.

    •Begin with a series of light decelerations to gradually build some heat in the brakes. Use an on-and-off the pedal technique by applying the brakes for 3-5 seconds, and then allow them to fully release for a period roughly twice as long as the deceleration cycle. If you use a 5 count during the deceleration interval, use a 10 count during the release to allow the heat to sink into the pads & rotors.

    •After several cycles of light stops to begin warming the brakes, proceed with a series of medium to firm deceleration stops to continue raising the temperature level in the brakes.

    •Finish the bedding cycle with a series of 8-10 hard decelerations from 55-65 MPH down to 25 MPH while allowing a proportionate release and heat-sinking interval between each stop. The pads should now be providing positive and consistent response.

    •If any amount of brake fade is observed during the bed-in cycle, immediately begin the cool down cycle.

    •Drive at a moderate cruising speed, with the least amount of brake contact possible, until most of the heat has dissipated from the brakes. Avoid sitting stopped with the brake pedal depressed to hold the car in place during this time. Park the vehicle and allow the brakes to cool to ambient air temperature.


    Also, you've got big brakes... you're going to need to get some serious heat in them before they are going to grab hard enough to rip your face off.
    Bed the pads, then take it to a place where you can drive hard enough to get some heat built up.
    Last edited by longislandwrx; 05-09-2014 at 07:52 AM. Reason: grammargh!
    A well stocked beverage fridge is the key to any successful project.

  31. #351
    Senior Member
    Join Date
    Jan 2012
    Posts
    1,112
    Post Thanks / Like
    When you said you went to a muffler shop I thought you might of changed your setup since the HB show. For 250 that's crazy good.

  32. #352
    Senior Member Brando's Avatar
    Join Date
    Oct 2013
    Location
    Irvine, Ca
    Posts
    566
    Post Thanks / Like
    Blog Entries
    1
    Quote Originally Posted by Doowop View Post
    Anybody knows what is the one they are using on the blue car? It mounts on the dash.
    So, How quiet is it with that big *** muffler? I do like the location of the exit pipe.
    I stumbled upon a nearly identical dash mounted mirror as the FFR Blue R car. I'm struggling to find it now and wish I had just purchased while I was on the page. If you find one like it please share the link, I will do the same.
    The car isn't as quiet as you would think. It's pleasant at idle, but still plenty loud when you get on it. I have been meaning to get some cockpit video and a flyby. Perhaps after work.


    Quote Originally Posted by longislandwrx View Post
    Did you follow Wilwoods procedure for bedding your pads?
    Good stuff. I haven't bedded my pads, in fact I didn't know there was a procedure for it. Will do
    Thanks brotha

  33. #353
    fasterer and furiouser longislandwrx's Avatar
    Join Date
    Aug 2012
    Location
    Long Island
    Posts
    2,540
    Post Thanks / Like
    Blog Entries
    6
    A well stocked beverage fridge is the key to any successful project.

  34. #354
    Senior Member
    Join Date
    Sep 2013
    Location
    Chicago, IL
    Posts
    571
    Post Thanks / Like
    Quote Originally Posted by Brando View Post
    Good stuff. I haven't bedded my pads, in fact I didn't know there was a procedure for it. Will do
    What pads are you running? Bedding pads isn't such a big deal for street pads, 50 miles of normal street driving will do it fine (don't get on them hard until then). Race pads are another story. You need to bed these or they will not perform up to their potential.

    The same goes for heat. For a street pad, they are designed to operate at their full potential from ambient to 500-600 deg. F (maybe more for something like a Hawk HP+). Race pads however don't get into their optimum range until 200 deg or more, but they'll perform happily up to 1,000 - 1,600+ deg F depending on the pads you get.

    Keep in mind, we're talking about "optimum" performance. All pads will stop the car at ambient, just not as well as they might be able to should their optimal range be higher. Note, even at sub-optimal levels, a good race pad will stop the car better than an everyday street pad. I used to run my Carbotech XP10s & XP12s on the street for short durations and was always nervous that the cars around me couldn't stop as fast as those things would bring my car down from speed. I've heard that Hawk's line of race pads are not nearly as capable at ambient compared to higher temp ranges.

    The real concerns with running more aggressive pads on the street is that they do unhappy things, like make hellish noise, and leave lots of dust (some of which is highly corrosive depending on the pad compound). Also, often (because they're not in their optimal temp range) they start wearing away the transfer layer that should previously have been deposited via proper bedding...then they start re-depositing it in uneven ways, leading to pulsing and generally poor braking performance (no, they don't "warp" the rotor, they're just leaving uneven deposits, which makes the unsuspecting tech-goon at your local parts store claim he's measuring "warping"). If you get on the brakes hard after this has happened, its not a pretty sight (mmm...yup, ask me how I know). Different pad compounds are apt to do this to different degrees, so there are no real absolutes here (it is friction after all, and that's always compound/condition specific).

    Moral of the Story: Don't run your super-kill, ultra-awesome, race-only pads on the street.

    Best,
    -j
    "Weight transfer is the enemy."

    Executive Director
    The Community Garage

  35. #355
    Mechie3's Avatar
    Join Date
    May 2012
    Location
    Indianapolis
    Posts
    5,174
    Post Thanks / Like
    I ran DTC-60's on the street before. The low end operating temp was the same as the Hawk HP+, but they stopped much better. They were stupid loud, and stupid dusty. People half a city block away would turn and look to see what sort of wreckage was going to occur when they heard the squeal.
    Zero Decibel Motorsports
    Check out my new website!
    www.zerodecibelmotorsports.com
    www.facebook.com/zero.decibel.motorsports

  36. #356
    Tazio Nuvolari wannabe Scargo's Avatar
    Join Date
    Nov 2013
    Location
    south-central CT
    Posts
    1,611
    Post Thanks / Like
    Quote Originally Posted by Mechie3 View Post
    I ran DTC-60's on the street before. The low end operating temp was the same as the Hawk HP+, but they stopped much better. They were stupid loud, and stupid dusty. People half a city block away would turn and look to see what sort of wreckage was going to occur when they heard the squeal.
    Weren't they hard on the rotors? I thought I read that somewhere, since you are supposed to be working against the material you transfer to the rotor when bedded in properly.
    Last edited by Scargo; 05-09-2014 at 01:20 PM.

  37. #357
    Senior Member D Clary's Avatar
    Join Date
    Aug 2013
    Location
    Santa Rosa CA
    Posts
    407
    Post Thanks / Like
    I have Baer brakes on my Mustang, the fronts are 13 inch rotors and the rear are 10 inch. I change the high performance pads for stock because of their poor street performance. I have tracked the car several times and have had no terrible wear or fade. The car weighs about 2800lbs. I think with the 818s weight you should not have to run a rotor killing pad to stop. Another side effect with race only pads is the metal particles get embedded in your wheels, kinda uglies them up.

  38. #358
    Senior Member
    Join Date
    Sep 2013
    Location
    Chicago, IL
    Posts
    571
    Post Thanks / Like
    Quote Originally Posted by Mechie3 View Post
    I ran DTC-60's on the street before. The low end operating temp was the same as the Hawk HP+, but they stopped much better. They were stupid loud, and stupid dusty. People half a city block away would turn and look to see what sort of wreckage was going to occur when they heard the squeal.
    See, I've heard conflicting stories on Hawk's line of race pads. I tend to believe the folks with your experience (some local folks have done/reported the same as you). But there's always "that guy" on the web decrying them as horrible safety hazards on the street. They're all like, "You can't do that, you'll die!" Meh.

    What they really are is damn embarrassing. In the paddock everybody knows what's up, but on the street you get looked at like you're stuff is all jacked up.

    -j
    "Weight transfer is the enemy."

    Executive Director
    The Community Garage

  39. #359
    818 builder metalmaker12's Avatar
    Join Date
    Mar 2012
    Location
    Exeter R.I
    Posts
    2,834
    Post Thanks / Like
    Blog Entries
    1
    Stop Tech pads worked great for my autocross. 80-20, smoked the tires and was even and very nice. My brakes stopped on a dime and did not fade at all, they outlasted my motor lol. Stock brakes are all you need on this car. Anything more and you might have too much braking clamp.

  40. #360
    Senior Member waruaki's Avatar
    Join Date
    Aug 2013
    Location
    Salem, Oregon
    Posts
    168
    Post Thanks / Like
    Wrong post, my bad.

Page 9 of 24 FirstFirst ... 789101119 ... LastLast

Tags for this Thread

Posting Permissions

  • You may not post new threads
  • You may not post replies
  • You may not post attachments
  • You may not edit your posts
  •  

Stewart Transport

Visit our community sponsor