Midwest Classic Insurance

Visit our community sponsor

Thanks Thanks:  0
Likes Likes:  0
Results 1 to 18 of 18

Thread: New FFR Dash with Glovebox - Hinge Challenge

  1. #1
    Junior Member
    Join Date
    Jul 2013
    Posts
    11
    Post Thanks / Like

    New FFR Dash with Glovebox - Hinge Challenge

    Hi All,

    Has anyone else also purchased the "new" dash from FFR that has the glovebox included? If so, am I the only knucklehead who can't make the hinges and glovebox door work???


    Shannon

  2. #2
    Junior Member
    Join Date
    Aug 2015
    Posts
    18
    Post Thanks / Like
    You are not alone. I just put the hinges together last night. First problem was that one foot would not lay flat on the glovebox door. After playing with alternatives i decided to drill a new hole in the glovebox opening to allow for the foot to rsst properly. Epoxied it together last night and started assembling the box this afternoon and within 10 minutes, the epoxied foot separated from the box door. Im not happy and am questioning this purchase.

  3. #3
    Member Pirate's Avatar
    Join Date
    Aug 2013
    Location
    Georgia
    Posts
    68
    Post Thanks / Like
    I just saw this dash a couple of days ago on FFR's catalog page. Does the dash already come fully assembled and vinyl wrapped? I was thinking about purchasing it but if y'all are having problems with it might change my mind.

  4. #4
    Junior Member
    Join Date
    Aug 2015
    Posts
    18
    Post Thanks / Like
    Yes it comes wrapped and ready to go. It's a nice looking product but I'm not sure if it will stand the test of time. I tried epoxying it again tonight with a different brand of epoxy. Will let you know how that goes. The other issue I had with it was that there is a lip at the top edge of it and one of the FFR guys told me that I can grind it down in order to make it fit flush on the dash hoop. I did that and now it looks pretty crappy. Some of the vinyl is now delaminating. I'm hoping that the body lip is going to cover that. Be advised that you will need to add additional supports at the bottom, which would probably be a good idea with the aluminum dash also so I'm not being critical of the structural integrity of this part. I'm just bummed to have received a new piece of hardware only to have to take a grinder to the thing and now banged it up. I should have known better but if you ask me, it should have been made without the lip so this would not be necessary.

  5. #5
    Senior Member edwardb's Avatar
    Join Date
    Feb 2011
    Location
    Lake Orion, Michigan
    Posts
    10,643
    Post Thanks / Like
    Quote Originally Posted by Porky View Post
    Yes it comes wrapped and ready to go. It's a nice looking product but I'm not sure if it will stand the test of time. I tried epoxying it again tonight with a different brand of epoxy. Will let you know how that goes. The other issue I had with it was that there is a lip at the top edge of it and one of the FFR guys told me that I can grind it down in order to make it fit flush on the dash hoop. I did that and now it looks pretty crappy. Some of the vinyl is now delaminating. I'm hoping that the body lip is going to cover that. Be advised that you will need to add additional supports at the bottom, which would probably be a good idea with the aluminum dash also so I'm not being critical of the structural integrity of this part. I'm just bummed to have received a new piece of hardware only to have to take a grinder to the thing and now banged it up. I should have known better but if you ask me, it should have been made without the lip so this would not be necessary.
    I've seen this dash in person installed in the prototype 20th Anniversary Roadster and also have a new one in the box that came with my recent kit. It looks decent and if you're using the street layout along with a glovebox I think it's a good option for builders who don't want to apply the padding and vinyl. Personally, I don't like the advice FF tech gave you to trim back the lip on the top/back. I wonder if that's what they did on the anniversary car? I would look at adding spacers instead, and leave the lip intact. I can say it's not any more flimsy than the .040 aluminum dash. It too needs reinforcement along the bottom. As you mentioned the hinges need to be glued to the inside of the glovebox door. The hinges are metal with holes through them, so bonding there wouldn't be an issue. But the inside of the door is shiny plastic. So the right kind of adhesive is going to be important. Something that will bond to that type of material, plus has some flex to it. I would also rough up the plastic in the area being bonded.
    Build 1: Mk3 Roadster #5125. Sold 11/08/2014. Build 2: Mk4 Roadster #7750. Sold 04/10/2017. Build Thread
    Build 3: Mk4 Roadster 20th Anniversary #8674. Sold 09/07/2020. Build Thread and Video. Build 4: Gen 3 Type 65 Coupe #59. Gen 3 Coyote. Legal 03/04/2020. Build Thread and Video
    Build 5: 35 Hot Rod Truck #138. LS3 and 4L65E auto. Rcvd 01/05/2021. Legal 04/20/2023. Build Thread. Sold 11/9/2023.

  6. #6
    Junior Member
    Join Date
    Aug 2015
    Posts
    18
    Post Thanks / Like
    I took a look at the second epoxy job this morning and it looks much better. Used a JB Weld high strength product and it appears to have bonded nicely. I roughed up the plastic the first time but the second time I took a small drill bit on a cordless drill to it and created a nice profile to bond to. Also did some light grinding of the backside of the hinge feet to make sure there was a good profile there also. It this lets go I would be very surprised. I would be interested to know if others have removed the lip or if it was done on the Anniversary car also. I thought about using spacers at the time and if I had to do it again, that would have been my approach.

  7. #7
    Member Pirate's Avatar
    Join Date
    Aug 2013
    Location
    Georgia
    Posts
    68
    Post Thanks / Like
    Do you guys have better pictures of the dash than what's on the FFR site? I am either going to go with this new dash or just order me another pre cut dash and try it again. I think powder coating my first dash was a no-no cause the vinyl doesn't want to stay stuck to it. I also wouldn't mind a second shot at the glove box opening, kinda made it a little too big. oops. I like the way the FFR new dash looks but if it is cheaply made or doesn't look like it will hold up I think I'll pass on it. If y'all can post some pictures of it, it would be greatly appreciated. Oh yeah, did you add any holes to the dash for switches? It only comes with holes for ignition, horn and one toggle. Well what about the headlight, plus I need three more toggles and another hole for the clutch cut out switch.

    Chris

  8. #8
    cobra Handler skullandbones's Avatar
    Join Date
    Jul 2011
    Location
    Superstition Mtn foothills 5 miles west of Gold Canyon AZ
    Posts
    2,686
    Post Thanks / Like
    Blog Entries
    19
    Hi Holgate,
    I
    Could you post some pics of your work? I was curious to see exactly what it looked like to see if there is a right way to do this or is it difficult to get it just right. This also might be a good place for tech support to explain exactly how they made it work. I'm looking at adding this to my roadster some time in the future so I want to know as much as possible about it.

    Thank you,

    WEK.
    FFR MkIII 302 (ATK), EFI 75mm TB with custom box plenum chamber, 24# injectors, 4 tube BBK ceramic, cold air sys, alum flywheel, crane roller rockers, T5, Wilwood pedals, custom five link with Watt's link, 4 rotors, coil overs, power steering with Heidt valve, alum FFR rad, driver's crash bar mod, mini dead pedal mod, quick release steering wheel hub #6046

  9. #9
    Senior Member edwardb's Avatar
    Join Date
    Feb 2011
    Location
    Lake Orion, Michigan
    Posts
    10,643
    Post Thanks / Like
    Quote Originally Posted by Pirate View Post
    Do you guys have better pictures of the dash than what's on the FFR site? I am either going to go with this new dash or just order me another pre cut dash and try it again. I think powder coating my first dash was a no-no cause the vinyl doesn't want to stay stuck to it. I also wouldn't mind a second shot at the glove box opening, kinda made it a little too big. oops. I like the way the FFR new dash looks but if it is cheaply made or doesn't look like it will hold up I think I'll pass on it. If y'all can post some pictures of it, it would be greatly appreciated. Oh yeah, did you add any holes to the dash for switches? It only comes with holes for ignition, horn and one toggle. Well what about the headlight, plus I need three more toggles and another hole for the clutch cut out switch. Chris
    Quote Originally Posted by skullandbones View Post
    Hi Holgate, Could you post some pics of your work? I was curious to see exactly what it looked like to see if there is a right way to do this or is it difficult to get it just right. This also might be a good place for tech support to explain exactly how they made it work. I'm looking at adding this to my roadster some time in the future so I want to know as much as possible about it.

    Thank you, WEK.
    As I mentioned in one of my posts, I have one of these NIB that was delivered with my 20th Anniversary kit. I'm still on the fence about using it because I strongly prefer the competition layout. So I want to keep it basically NIB since I will likely try to sell it. But based on this discussion, plus a similar one on the other forum, I'm going to spend a little more time looking at it and can post some pictures. I'm also going to look at the geometry of the hinges and see how they work. But it won't be for several days at least. We're on vacation and away from home until this Friday. To these specific points, yes you could easily add more holes for switches, etc. One of the weak links seems to be gluing the hinges to the inner side of the glovebox door. That's not surprising. I wasn't too pleased when I saw that design decision. What I would do (if I use it) would be to make an inner liner for the door. Not sure what material, but wouldn't be too critical. That would serve two purposes. One to look better. The inside of the door looks pretty unfinished IMO, although it's exactly like the ********** glovebox door if you've seen that one. Second to give a much better mechanical hold on the hinges by sandwiching them between the door and liner. Problem solved.
    Last edited by edwardb; 09-08-2015 at 06:48 PM.
    Build 1: Mk3 Roadster #5125. Sold 11/08/2014. Build 2: Mk4 Roadster #7750. Sold 04/10/2017. Build Thread
    Build 3: Mk4 Roadster 20th Anniversary #8674. Sold 09/07/2020. Build Thread and Video. Build 4: Gen 3 Type 65 Coupe #59. Gen 3 Coyote. Legal 03/04/2020. Build Thread and Video
    Build 5: 35 Hot Rod Truck #138. LS3 and 4L65E auto. Rcvd 01/05/2021. Legal 04/20/2023. Build Thread. Sold 11/9/2023.

  10. #10
    Junior Member
    Join Date
    Aug 2015
    Posts
    18
    Post Thanks / Like
    Well I got mine together tonight. As I said, the fit on the hinges was far from perfect so I needed to drill a new hole in the box to compensate for that. Upshot is that it now fits, but the hinge action is not smooth and the door rubs the edges of the opening no matter how I adjust it. Again, time will tell. Ed, your suggestion to add a plate on the back of the door is a good one and would give the necessary structural integrity while allowing you to screw the hinges down for a positive fit with some adjustability I might add. I'm going forward but remain disappointed with the finished product. I know one thing, I won't be slamming this box closed like I do on all my other vehicles....

  11. #11
    Member Pirate's Avatar
    Join Date
    Aug 2013
    Location
    Georgia
    Posts
    68
    Post Thanks / Like
    No one has any pictures to post?

  12. #12
    Senior Member edwardb's Avatar
    Join Date
    Feb 2011
    Location
    Lake Orion, Michigan
    Posts
    10,643
    Post Thanks / Like
    Quote Originally Posted by Pirate View Post
    No one has any pictures to post?
    If no one else does, I'll take a closer look at it and post some pics early next week after I get home.
    Build 1: Mk3 Roadster #5125. Sold 11/08/2014. Build 2: Mk4 Roadster #7750. Sold 04/10/2017. Build Thread
    Build 3: Mk4 Roadster 20th Anniversary #8674. Sold 09/07/2020. Build Thread and Video. Build 4: Gen 3 Type 65 Coupe #59. Gen 3 Coyote. Legal 03/04/2020. Build Thread and Video
    Build 5: 35 Hot Rod Truck #138. LS3 and 4L65E auto. Rcvd 01/05/2021. Legal 04/20/2023. Build Thread. Sold 11/9/2023.

  13. #13
    Member Pirate's Avatar
    Join Date
    Aug 2013
    Location
    Georgia
    Posts
    68
    Post Thanks / Like
    Thanks Ed. I'm considering it, just not sure how it's wrapped for cutting extra holes for switches. $300 is a good chunk of money when I can buy the regular aluminum dash for a third of the price. But The wife wants a glove box for some reason.

  14. #14

    Join Date
    Mar 2014
    Location
    Louisville, KY
    Posts
    29
    Post Thanks / Like
    Quote Originally Posted by edwardb View Post
    As I mentioned in one of my posts, I have one of these NIB that was delivered with my 20th Anniversary kit. I'm still on the fence about using it because I strongly prefer the competition layout. So I want to keep it basically NIB since I will likely try to sell it. But based on this discussion, plus a similar one on the other forum, I'm going to spend a little more time looking at it and can post some pictures. I'm also going to look at the geometry of the hinges and see how they work. But it won't be for several days at least. We're on vacation and away from home until this Friday. To these specific points, yes you could easily add more holes for switches, etc. One of the weak links seems to be gluing the hinges to the inner side of the glovebox door. That's not surprising. I wasn't too pleased when I saw that design decision. What I would do (if I use it) would be to make an inner liner for the door. Not sure what material, but wouldn't be too critical. That would serve two purposes. One to look better. The inside of the door looks pretty unfinished IMO, although it's exactly like the ********** glovebox door if you've seen that one. Second to give a much better mechanical hold on the hinges by sandwiching them between the door and liner. Problem solved.
    edwardb, I also bought the new dash for my kit. I cant wait to see what you come up with for the door liner. I think its a great idea. I was also thinking of using the original aluminium dash to line the new dash panel to add a little more stiffness to it.
    Build 1: MkIV Roadster #8675. Deliv: 8/15/2015.
    FFR MkIV complete kit. / 5.0 Coyote Motor / T56 Magnum Trans / 3.73 Torsen IRS / 18' Halibrand w/Michelin Pilot Sport PS2 Tires
    FFMetal: Firewall Forward, Trans Tunnel top, Battery Box, Fan Shroud
    Russ Thompson: Turn signal Assembly, Trunk Box Mod.
    Breeze: SS Roll Bars(2), Power Steering rack, and much more.
    Mike Forte: supplied 5.0 Coyote & T56 Magnum Trans

  15. #15
    Senior Member edwardb's Avatar
    Join Date
    Feb 2011
    Location
    Lake Orion, Michigan
    Posts
    10,643
    Post Thanks / Like

    Pre-Assembled Dash Observations

    As promised, I spent a little time looking at the Factory Five pre-assembled dash supplied with my new 20th Anniversary Edition Roadster. This is a relatively new part FF offers for sale here: http://www.factoryfiveparts.com/road...with-glovebox/ Several have asked questions about what it looks like, how it works, how the glovebox hinges work, etc. I'm still 99% sure I will not use the dash for my build solely because I prefer the competition layout. The dash is the street layout, same as the aluminum dash supplied with kits. Otherwise, based on my review, I would use the dash without hesitation. Unfortunately, the dash is not provided with any instructions and the pictures on FF's website don't show every detail. Here are some observations and opinions:

    1. The first thing I noticed is the dash is not pure black like the supplied vinyl for the built-up version. It's a very dark grey. You don't notice it at first, but when held against true black, you can see it. Not a deal breaker at all, but be informed.

    2. The base material is not aluminum but some type of plastic, about 1/8 inch thick. In my opinion, very similar to the .040 aluminum in rigidity. When attached along the top, and braced along the bottom, as per good practice on the aluminum version, it would be just as rigid. I doubt you would be able to tell the difference.

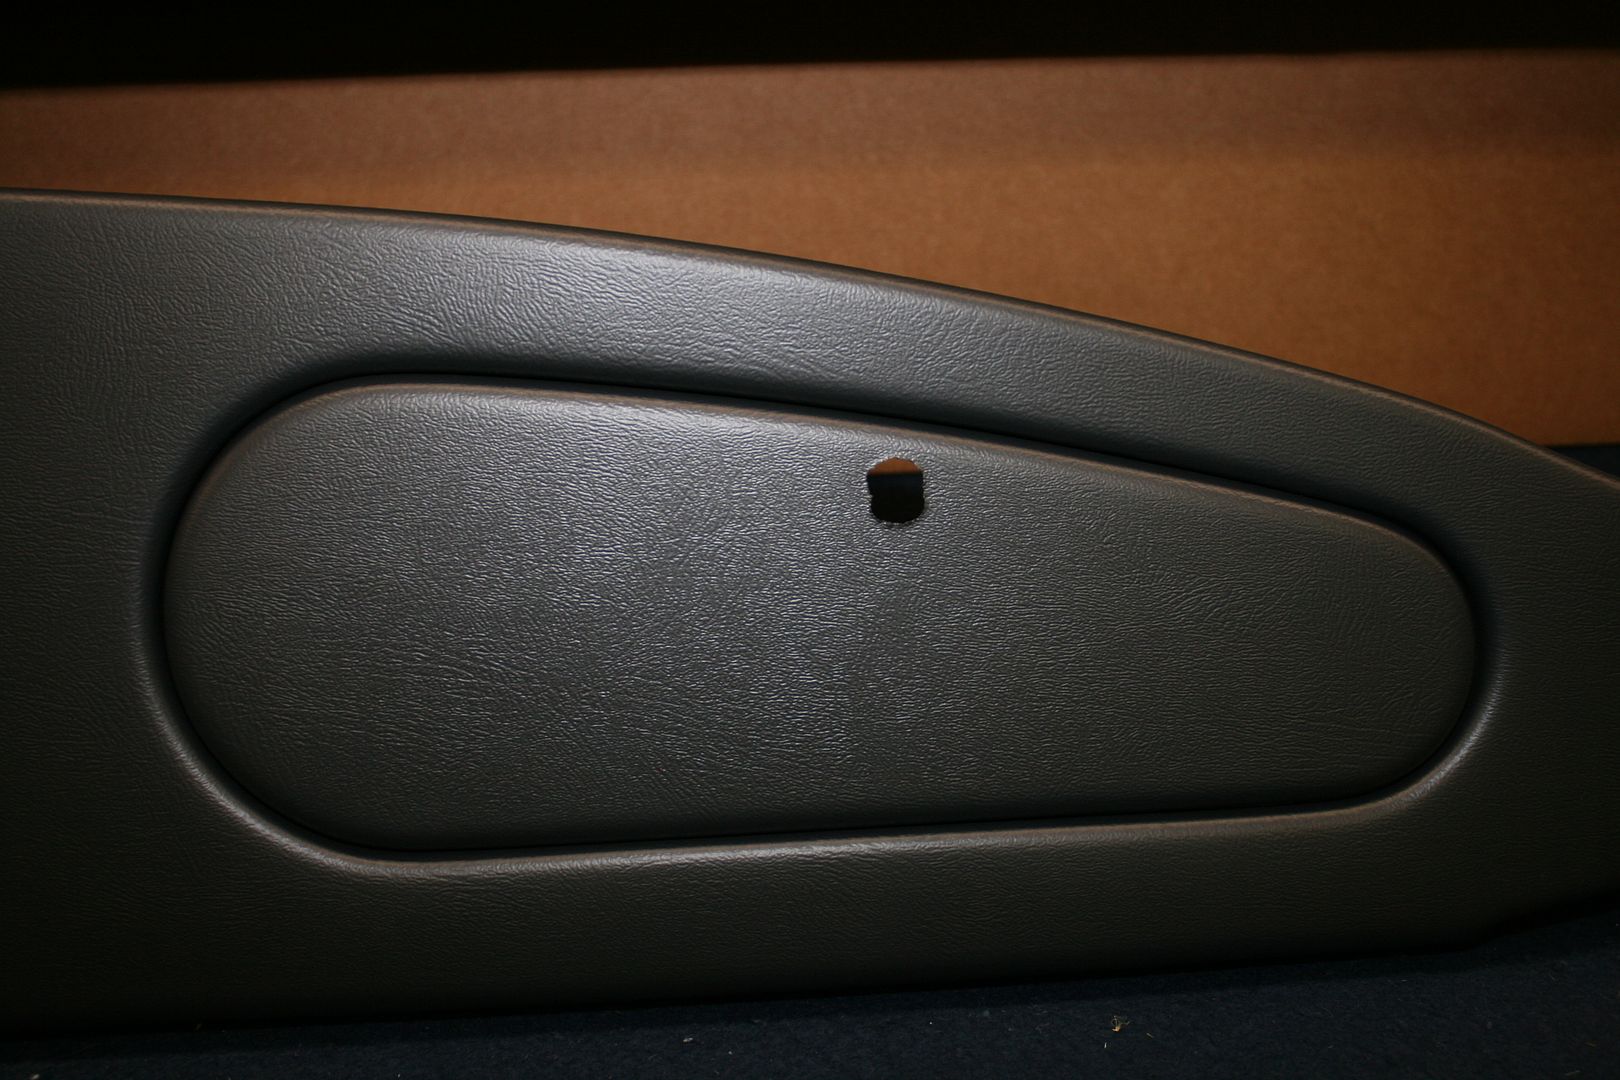
    3. The vinyl is very nicely molded to the dash and glovebox door. Tight and flat. There is a slight amount of "give" but not much. It's not nearly as padded as the built-up dash with the foam layer.

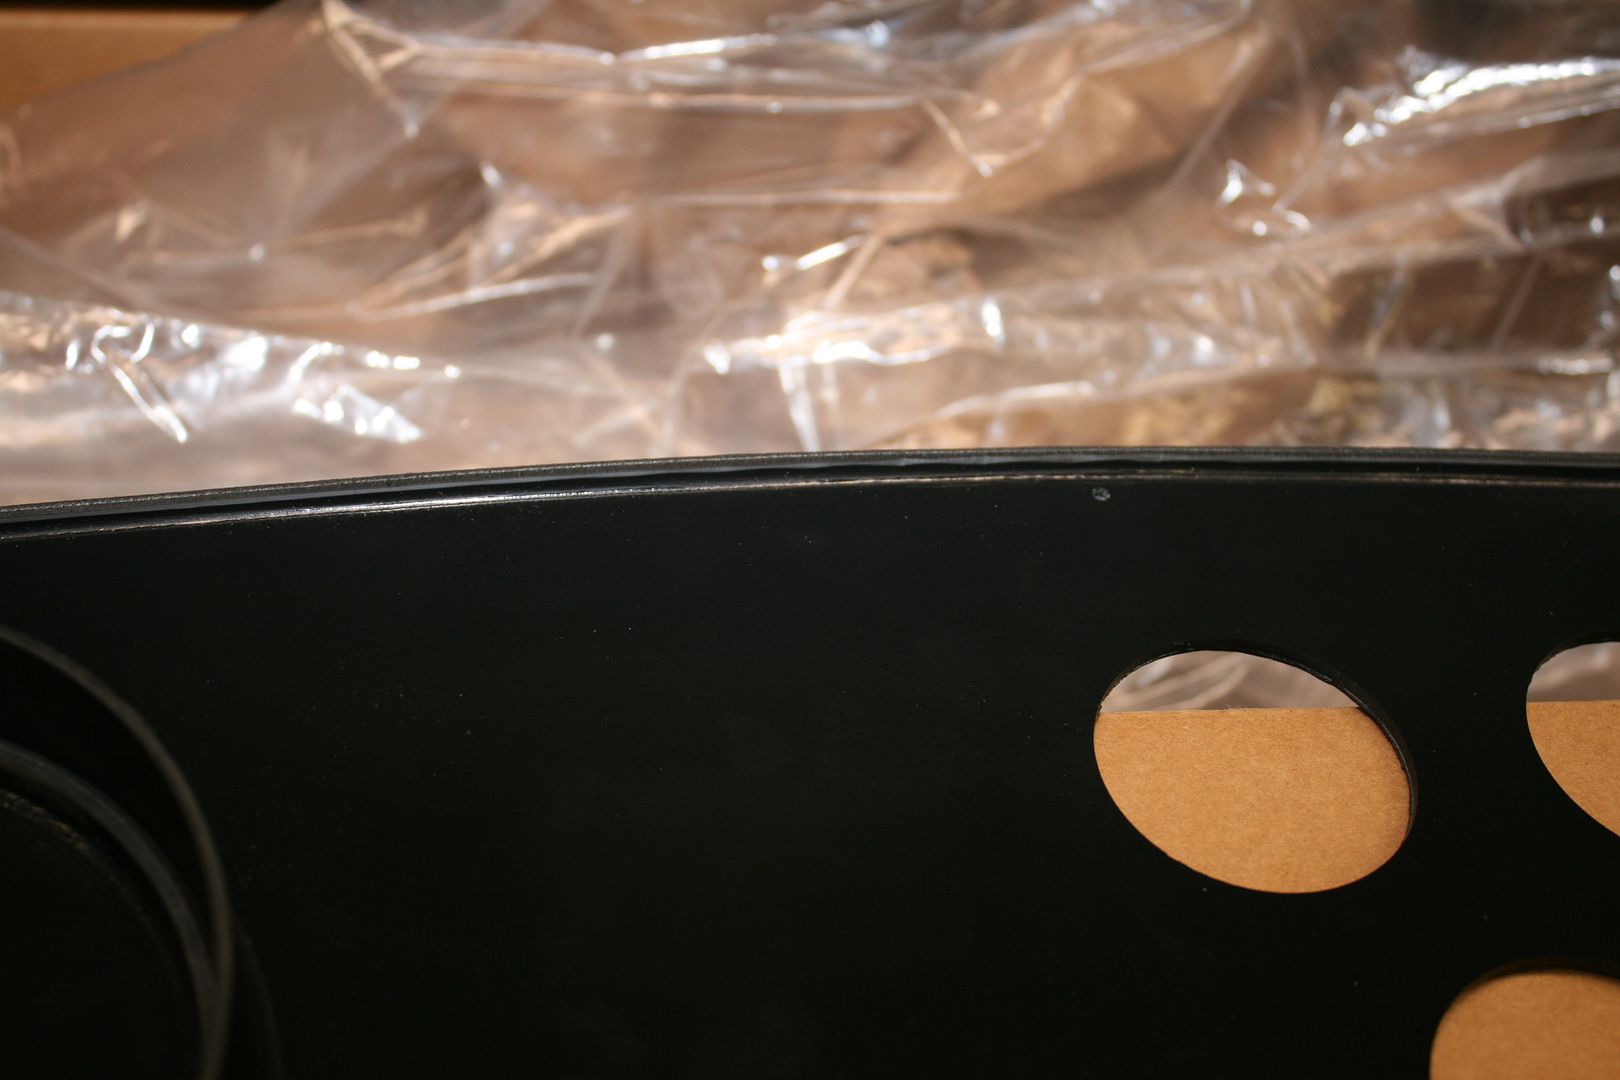
    4. There is the usual lip along the bottom, same as the aluminum version, but also a lip around the entire dash. It's trimmed back, but still there. Along the top, where it would rest against the chassis dash hoop, the thickness of the dash including the lip measures .2785 inches. Just over 1/4 inch. Very similar to a wrapped aluminum dash. But it won't sit flat against the chassis dash hoop because of the lip. I would not trim the lip to make it sit flush. Bad idea IMO. Just add some spacers behind where it's attached and it will work fine.


    5. The ends are pre-curved, which is nice. I set it in place on my Mk4 chassis, and the ends go nicely behind the hinges.


    6. I compared the shape of the dash to the aluminum blank dash I have on hand. It's within 1/8 of an inch or so of the same profile. Plenty close enough to fit under the body lip. It doesn't match the curve of the chassis dash hoop, but then neither does the aluminum one.

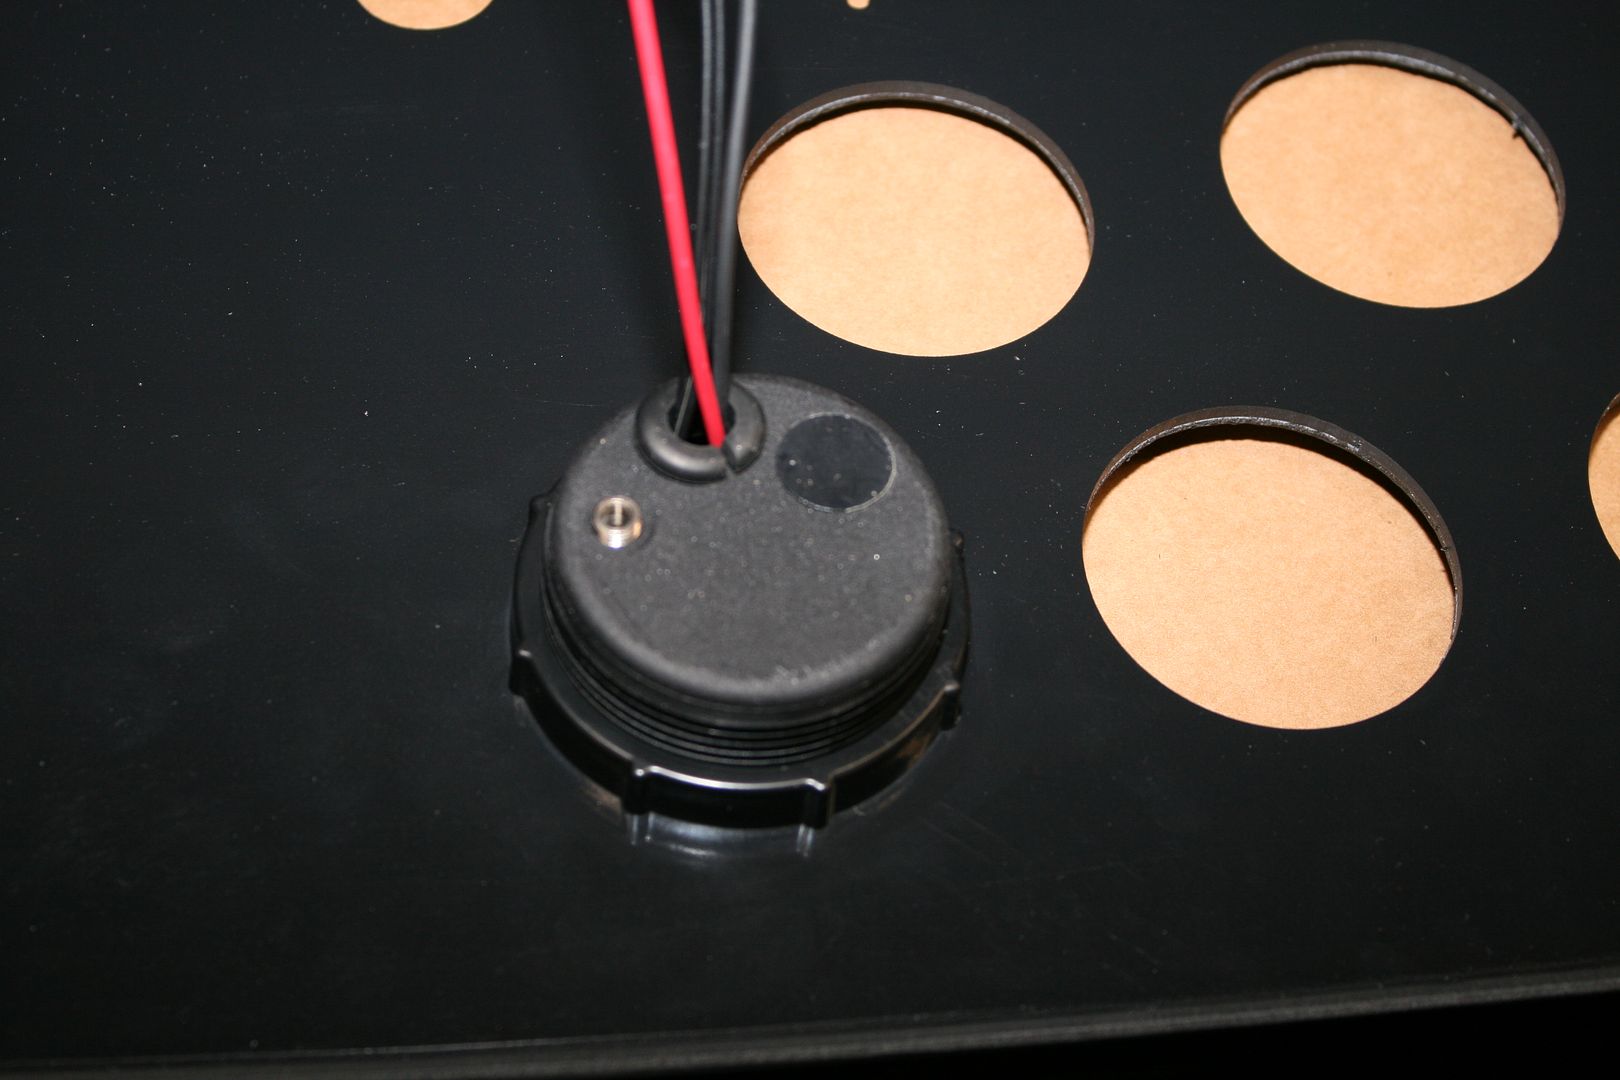
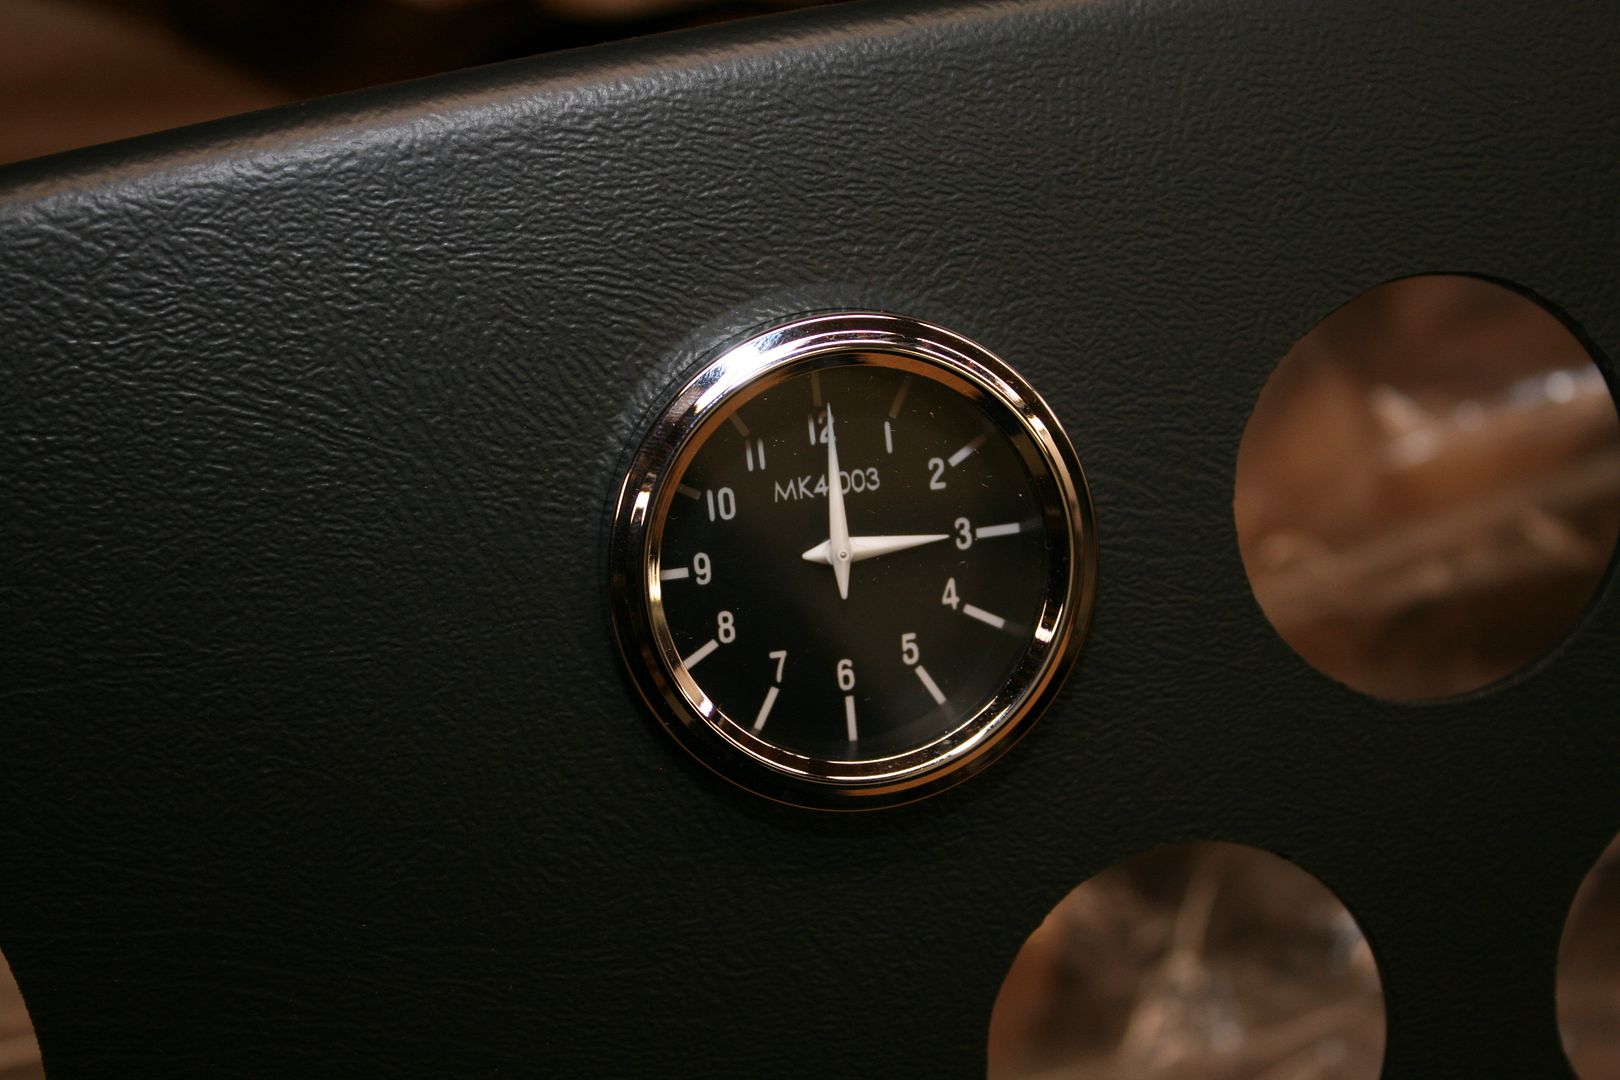
    7. I tried fitting the Speedhut gauges I have on hand. The larger size is a tight fit, and would probably screw in. But I didn't go that far. I little clearancing of the hole (easy) and it would slip in. The smaller size drops right in. (pictures).


    8. There are several pre-cut holes, I assume for the ignition switch, headlight switch, etc. I didn't try them. It would be easy to add more holes. Just like with the aluminum wrapped version, you would want to make sure anything you add has a flange or overhang to cover the edge of the holes since it wouldn't be possible to pull the wrap through the hole.

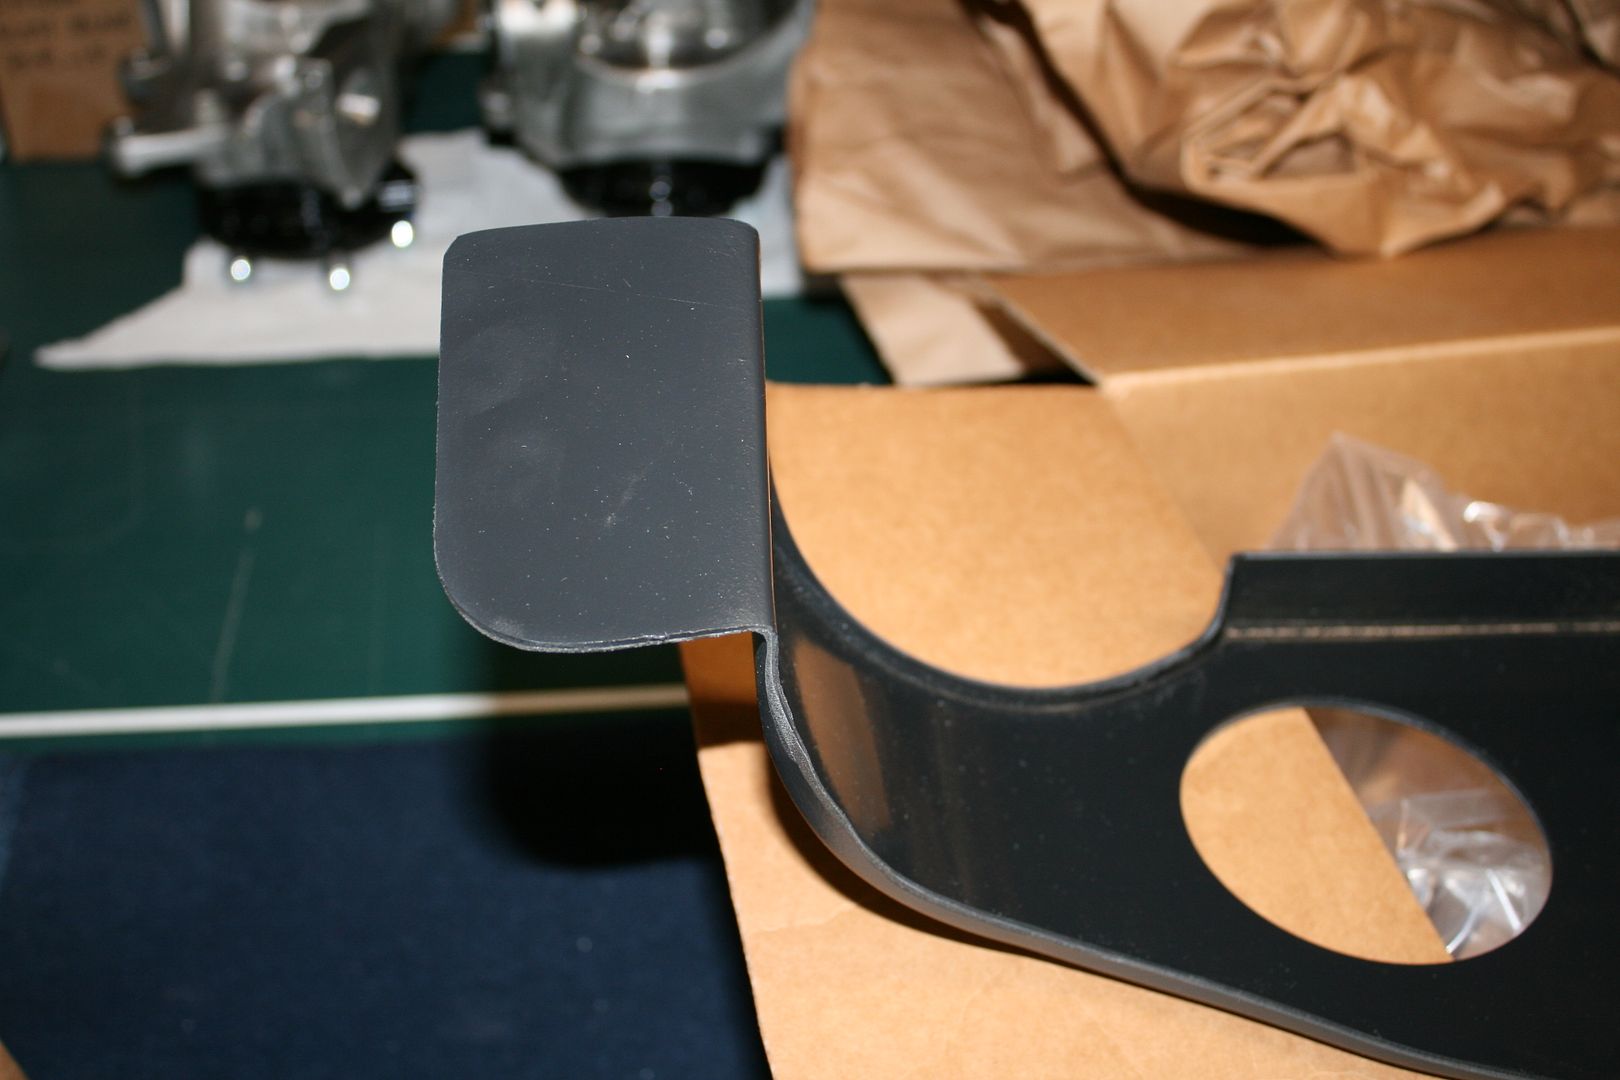
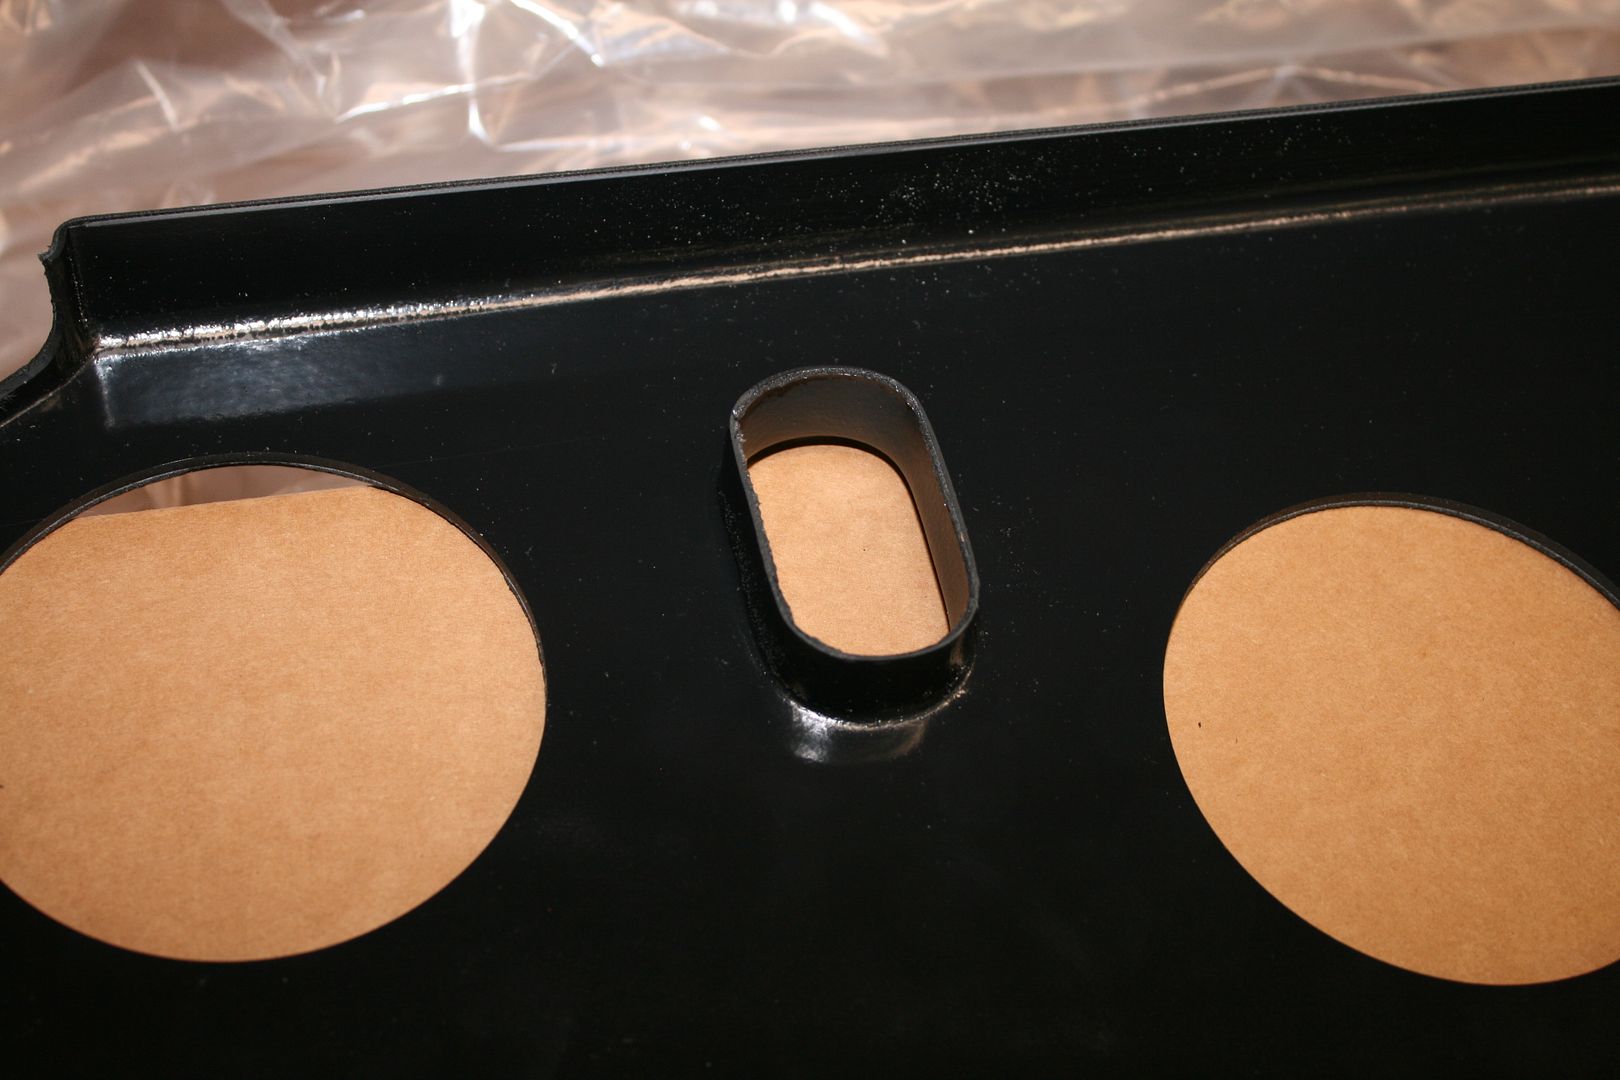
    9. One point worth mentioning. The steering column is an oval, again similar to the aluminum dash, but it has a lip behind (picture). This is fine if you're using only the stock steering column. But if adding something like the Russ Thompson turn signal assembly (something I've used and plan to again) then this hole will need to be opened and it will cut into the lip. No big deal. I would use a bezel on the front, like the one from Mike Everson, and it will be fine.

    Build 1: Mk3 Roadster #5125. Sold 11/08/2014. Build 2: Mk4 Roadster #7750. Sold 04/10/2017. Build Thread
    Build 3: Mk4 Roadster 20th Anniversary #8674. Sold 09/07/2020. Build Thread and Video. Build 4: Gen 3 Type 65 Coupe #59. Gen 3 Coyote. Legal 03/04/2020. Build Thread and Video
    Build 5: 35 Hot Rod Truck #138. LS3 and 4L65E auto. Rcvd 01/05/2021. Legal 04/20/2023. Build Thread. Sold 11/9/2023.

  16. #16
    Senior Member edwardb's Avatar
    Join Date
    Feb 2011
    Location
    Lake Orion, Michigan
    Posts
    10,643
    Post Thanks / Like

    Pre-Assembled Dash Observations (continued)

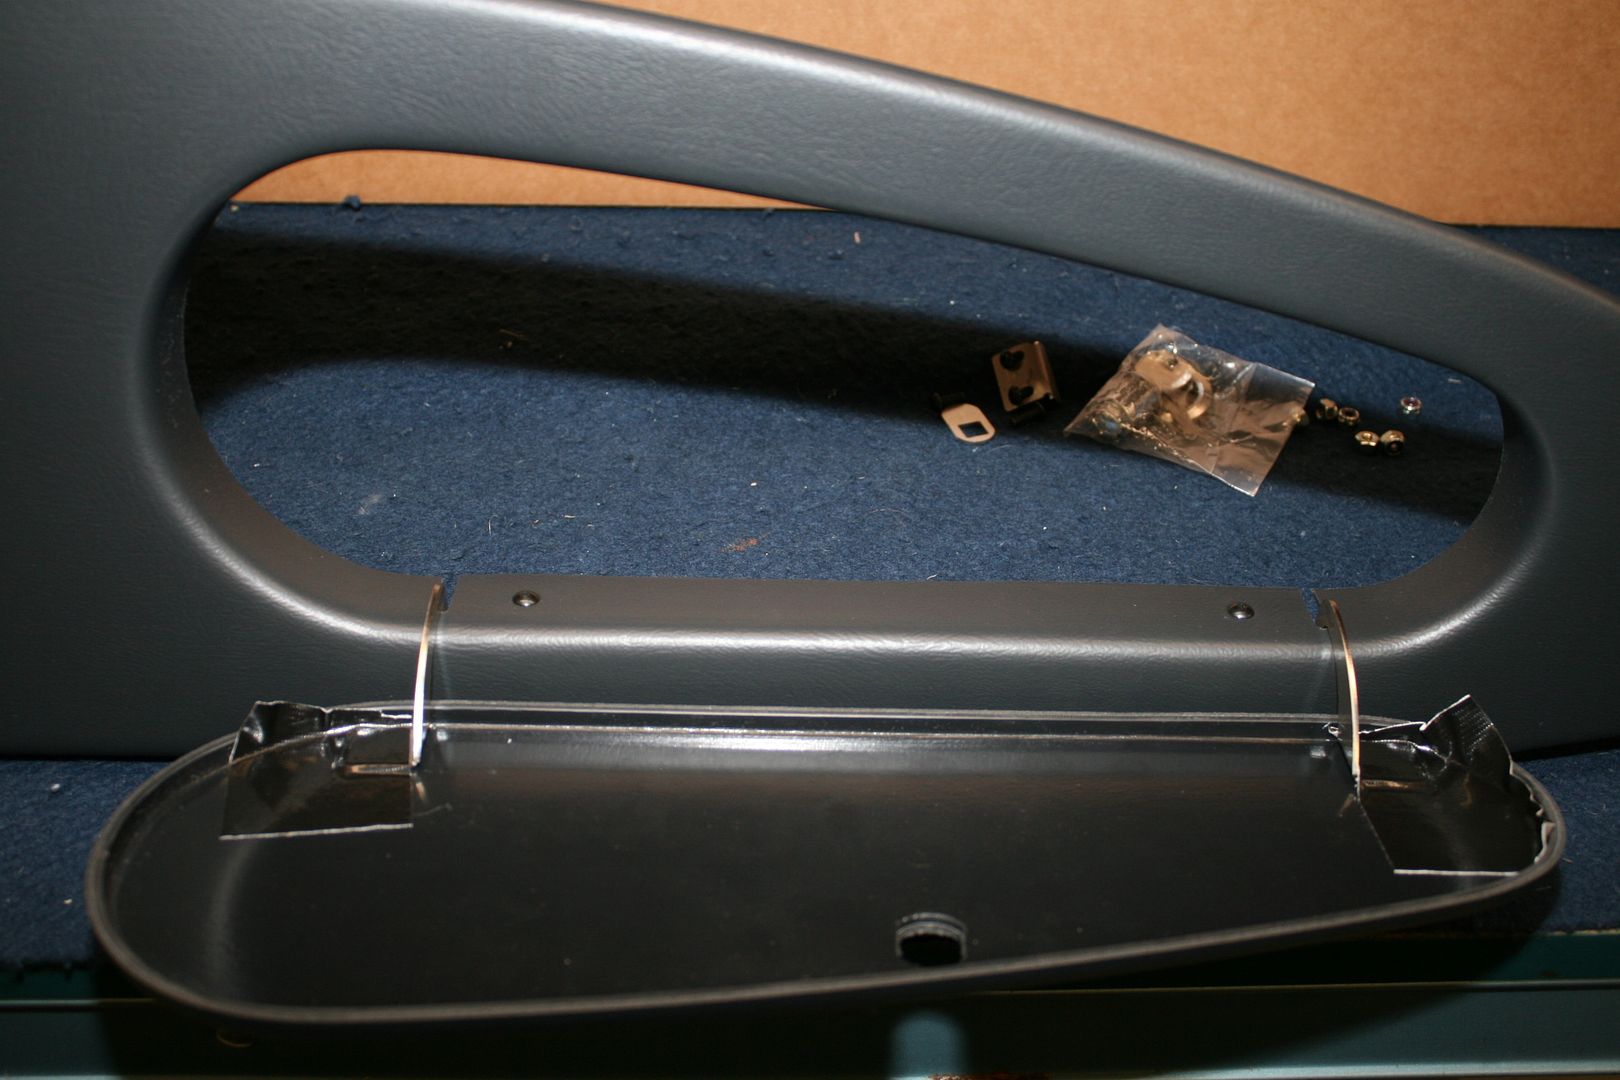
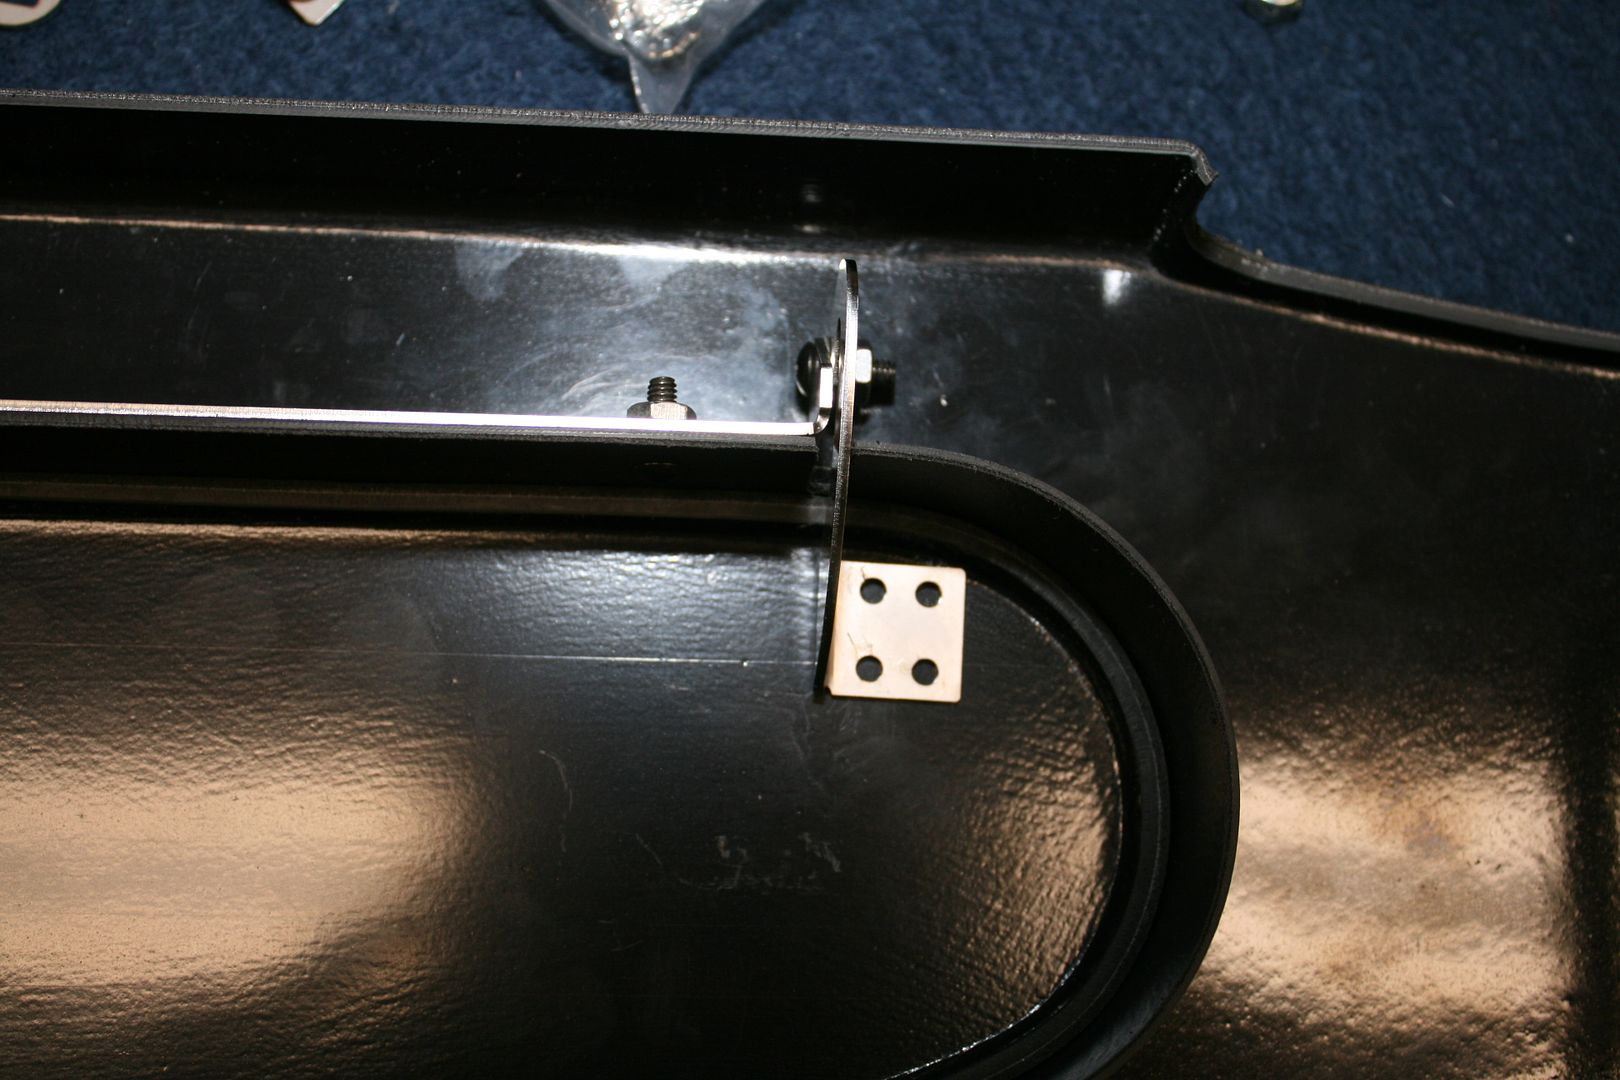
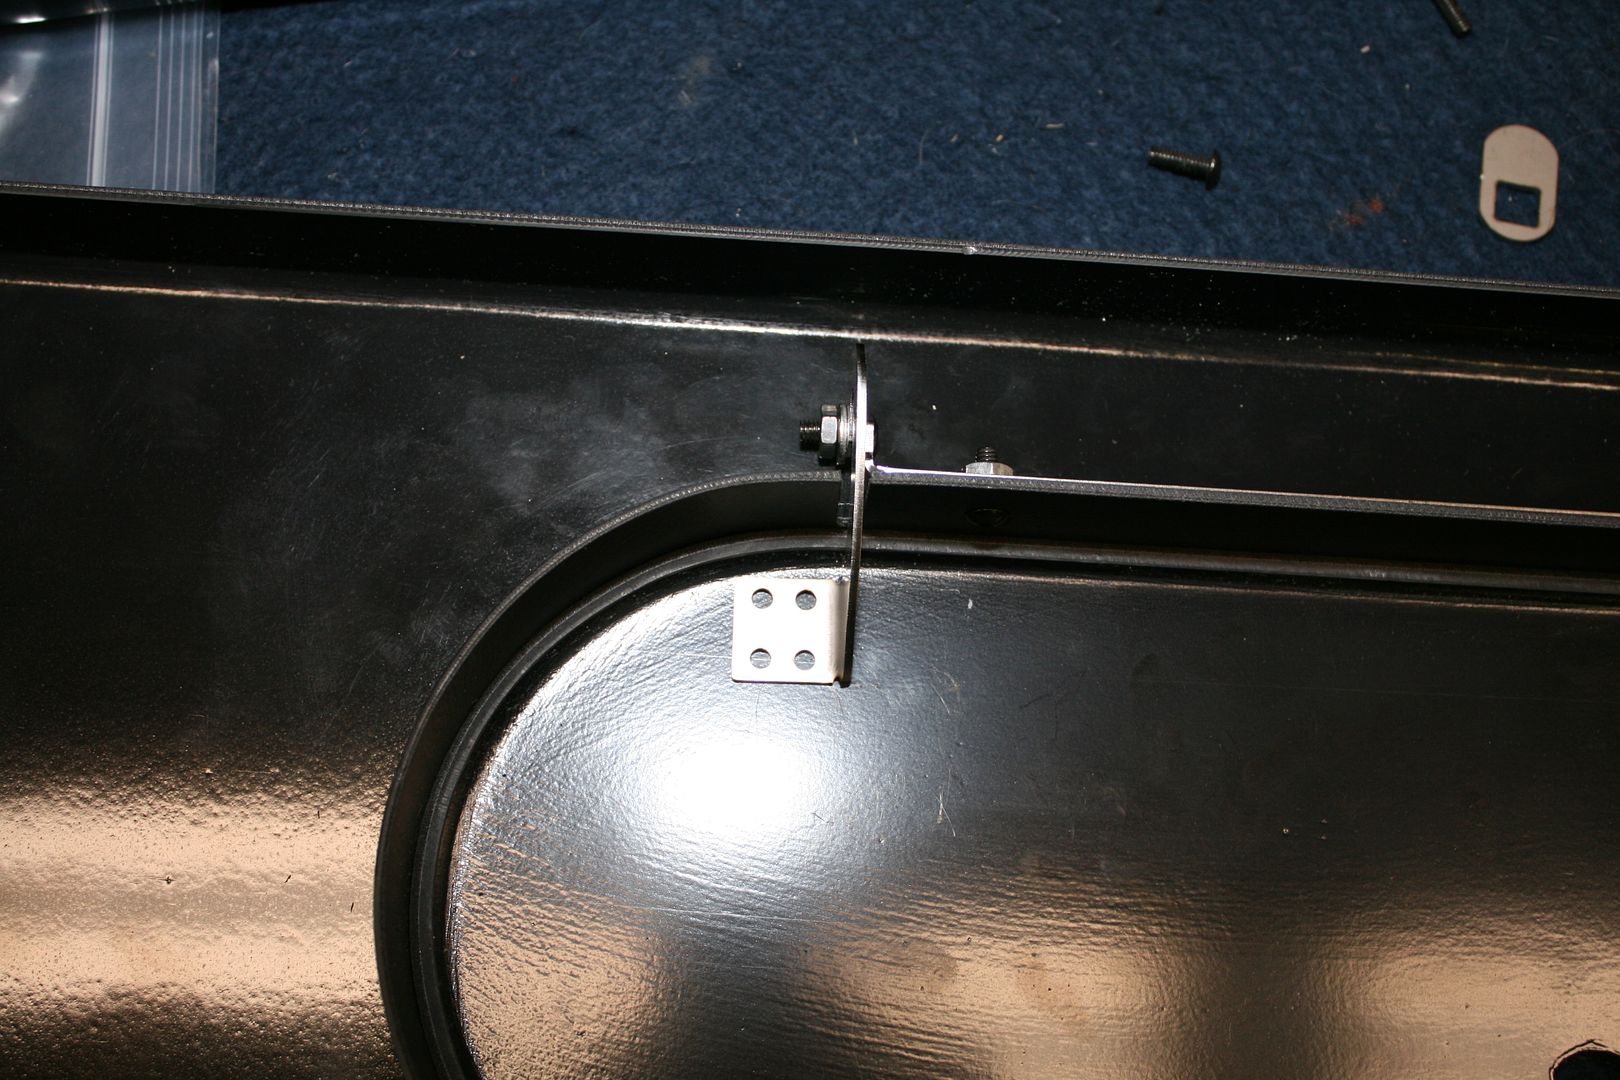
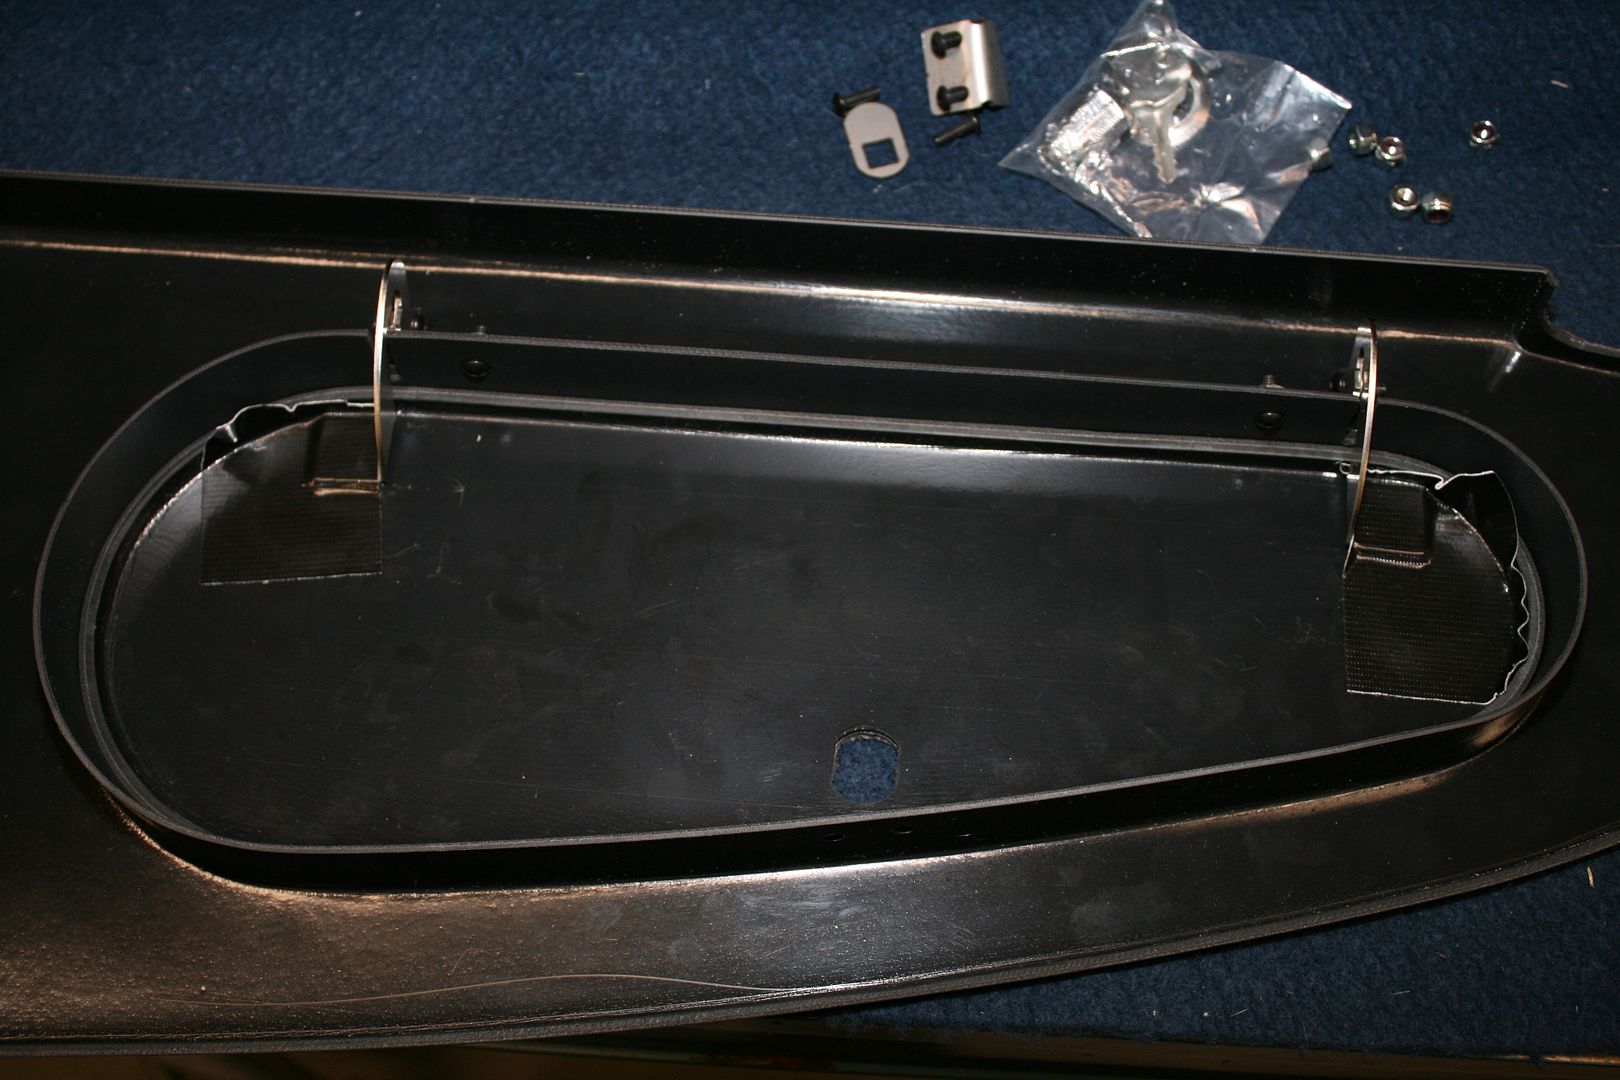
    10. I spent the most time on the hinges for the glovebox door. Again, with no instructions you're left trying to figure out what goes where. At first I thought the geometry was wrong, but then realized I had them assembled wrong. After several attempts, they go as pictured here, and the geometry is perfect. The door sits perfectly flush in the opening with it closed and the hinges are flat on the inside of the door. It drops out cleanly and is flat when open. The door is a slight friction fit when in the dash opening, so it drags very lightly when opening and closing. No problem. The hinges don't drag or catch anywhere during operation. All good.


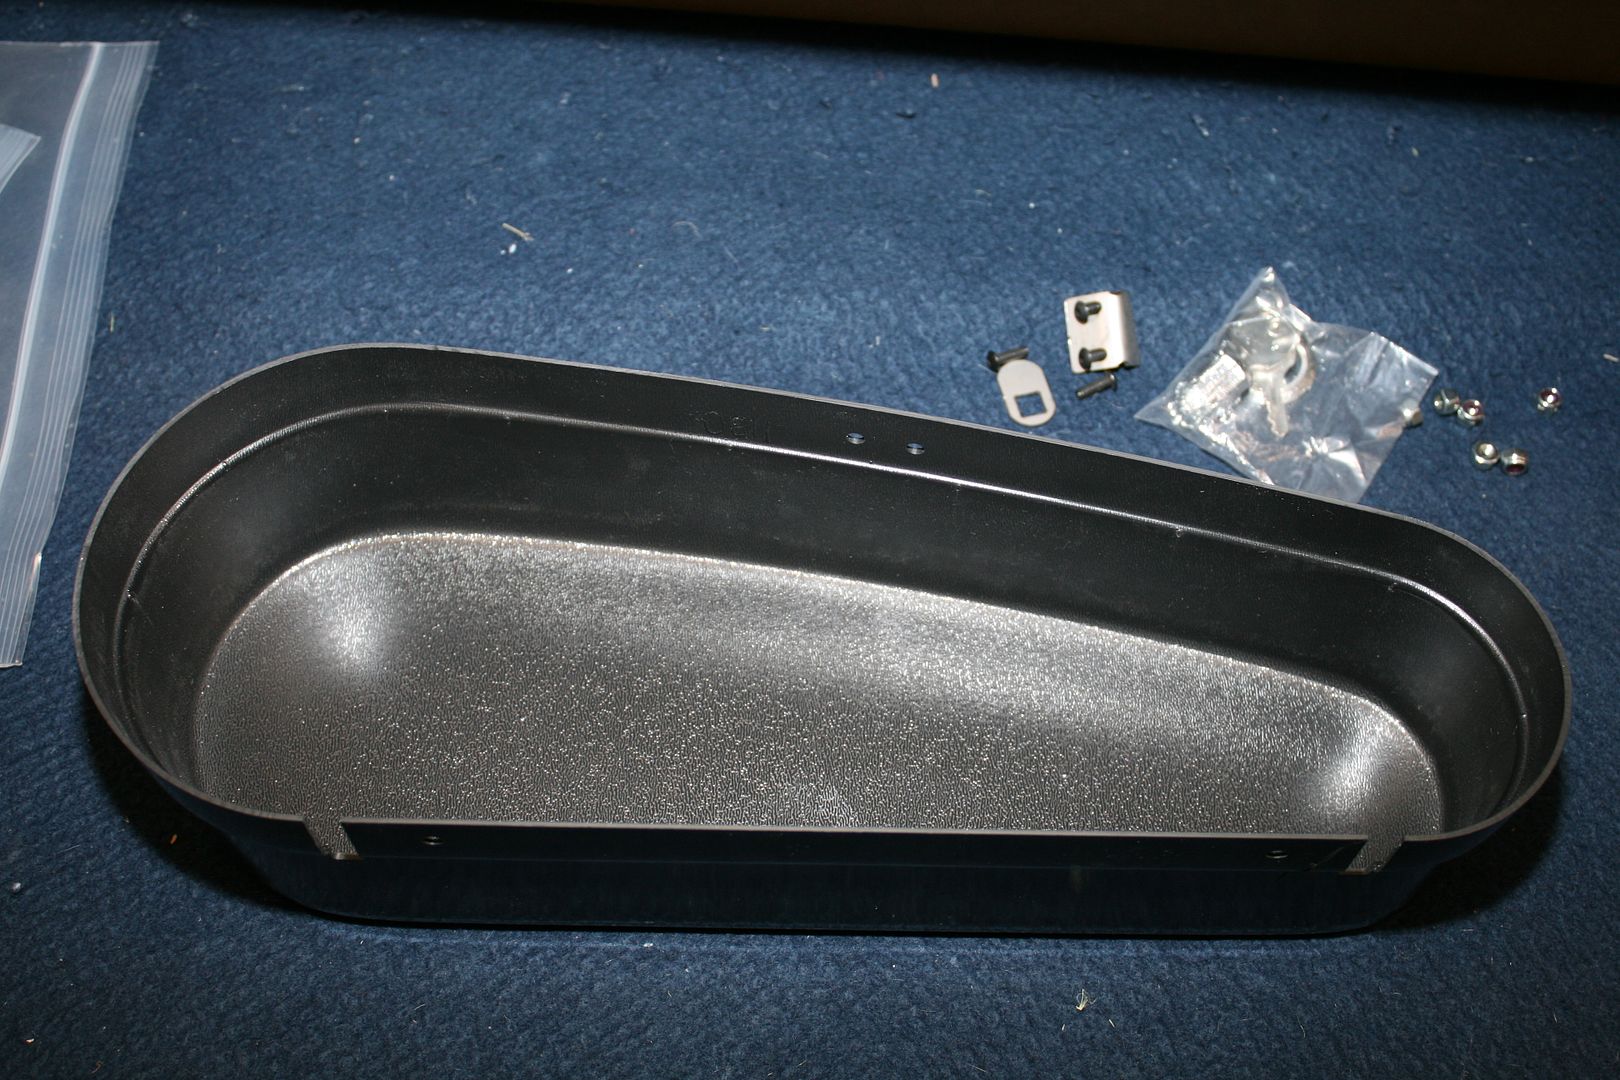
    11. Two observations from working on the glovebox door. (1) I don't like having to glue the hinges to the inside of the door. This is the kind of plastic (very shiny) that is difficult to get good adhesion to, plus there's quite a lot of stress on those points with opening and closing the door, inevitably setting something on the open door, etc. Here's what I would do: Rough the plastic where the hinges contact along with the hinges themselves, and glue them with a compatible adhesive of some kind. Keep the glue below the thickness of the hinges. Then make an insert for the back of the door. The door has a lip around it, and a properly sized insert would drop in perfectly. I would probably use .040 aluminum, but other materials could be used. Finish to match the interior of the glovebox. Notch the insert where it fits around the hinges. Glue into the back of the door with a thick adhesive that would handle the roughly 1/16 thickness of the hinges. Make sure the insert is tight against the back of the hinges with plenty of adhesive trapping them in place. This insert should make the hinges durable and make the door look much more finished. IMO, this is the main shortcoming of the new dash. Note the ********** glovebox door is similar. It's just raw plastic inside. But the hinges are a little more firmly attached. Another version of the liner approach would be to actually rivet the hinges to the liner with flush rivets. This would take several steps to get the hinge location just right, but would be even better. Although I think adhesive would do it. (2) It's nearly impossible to locate the hinges properly with the glovebox interior box in place. In fact, I would challenge anyone to find the right location if assembled that way. Easy fix: Locate the hinges without the interior box in place. This is what I pictured, temporarily holding the hinges with Gorilla tape, just to see how they worked. I put some washers temporarily under the mounting screws for the bottom hinge bracket simulating the thickness of the box and then mocked up the assembly. I also put thin #10 washers between the door hinges and where they attach to the bottom hinge bracket. Makes the hinge work more smoothly. Put the door in the opening, and the location for the hinges falls right into place. Glue them there, take back apart, remove the spacer washers, and then assemble with the interior box installed. Should be perfect. Note it comes with nylon lock nuts. I didn't use them for these pictures. Wanted to keep them like new plus was easier for just mocking up.

    Hopefully this helps. Now back into the box. If they only offered a competition version…
    Last edited by edwardb; 09-13-2015 at 01:46 PM.
    Build 1: Mk3 Roadster #5125. Sold 11/08/2014. Build 2: Mk4 Roadster #7750. Sold 04/10/2017. Build Thread
    Build 3: Mk4 Roadster 20th Anniversary #8674. Sold 09/07/2020. Build Thread and Video. Build 4: Gen 3 Type 65 Coupe #59. Gen 3 Coyote. Legal 03/04/2020. Build Thread and Video
    Build 5: 35 Hot Rod Truck #138. LS3 and 4L65E auto. Rcvd 01/05/2021. Legal 04/20/2023. Build Thread. Sold 11/9/2023.

  17. #17
    Senior Member
    Join Date
    Sep 2014
    Location
    Farmington, Maine
    Posts
    122
    Post Thanks / Like
    Wow, I don't know how I missed this well worded tutorial on this new dash/glove box. The best epoxy I have in my inventory is T-88 structural epoxy. Still, throw in the heat soaking it will get in the sun, along with the inevitable stress it will see in normal use, I am not sure it will hold.

    Now Paul's idea of backing the entire back side of the door, thus covering the epoxied hinge tab, I believe is the cure all to the above issue of bonding. I will implement that right away. Pretty sure that will solve that particular problem.

    With regards to the lip on top, I cut a 3/4 inchx1/8 inch spacer strip, that runs the full length of the panel top edge, then I contact cemented it to the top edge of the panel. The provides a nice flat surface that mates up nicely with the 3/4 inch tube.

    The bottom of the panel needs both the two end supports, but also a nice wide center support. Make the dash very solid and a good place to mount your outlets of choice.

    rick

  18. #18
    RR20AC's Avatar
    Join Date
    Jul 2015
    Location
    Puyallup/WA
    Posts
    394
    Post Thanks / Like
    Blog Entries
    1
    When I get ready to do this glove box I will use 3m marine adhesive sealant 5200. The stuff lasts forever. I applied it on a small boat I use off shore in the salt water that I got back in 1989. Still the same ridged but slightly flexible texture needed for a fix like this.

Posting Permissions

  • You may not post new threads
  • You may not post replies
  • You may not post attachments
  • You may not edit your posts
  •  

Brown County Customs

Visit our community sponsor