BluePrint Engines

Visit our community sponsor

Thanks Thanks:  0
Likes Likes:  0
Results 1 to 19 of 19

Thread: Factory five Radiator question

  1. #1

    Join Date
    Feb 2016
    Location
    Accord NY
    Posts
    520
    Post Thanks / Like

    Factory five Radiator question

    just installed the FF5 radiator after giving up on getting my 1997 cobra style radiator to fit. On the FF5 radiator there are two small threaded outlets on either side of the radiator. What are they for and what gets attached to them?

    Thank you

  2. #2

    Join Date
    Feb 2011
    Location
    Norton, MA USA earth
    Posts
    3,443
    Post Thanks / Like
    They should have come with petcocks. One is a drain one is an air release
    Mike

  3. #3

    Join Date
    Feb 2016
    Location
    Accord NY
    Posts
    520
    Post Thanks / Like
    I only received a radiator. i did not buy the complete radiator cooling system from F5. I guess i will need to purchase those.

  4. #4

    Join Date
    Feb 2011
    Location
    Norton, MA USA earth
    Posts
    3,443
    Post Thanks / Like
    Still think it should have come with them. Every one I have installed, they were already in place.
    Mike

  5. #5
    Member
    Join Date
    May 2011
    Posts
    35
    Post Thanks / Like
    Even with just the radiator, it should have come with petcocks. Give FFR a call and I'll bet they'll have them in the mail tomorrow.

  6. #6
    Senior Member cgundermann's Avatar
    Join Date
    Feb 2011
    Location
    Chino Valley, Arizona
    Posts
    1,077
    Post Thanks / Like
    I purchased their radiator & the petcocks came installed...

  7. #7
    Senior Member
    Join Date
    Oct 2015
    Posts
    328
    Post Thanks / Like
    I just purchased the radiator 2 months ago, and it came with the petcocks installed.... Call them.

  8. #8
    Senior Member
    Join Date
    Apr 2016
    Location
    Ohio
    Posts
    249
    Post Thanks / Like
    Peacocks should have come with it. My first radiator leaked before the car was even running. FFR sent me another but I already had the Breeze upper and lower mounts and shroud installed. These are the things that happen with these projects.
    JRL16
    Mk4 delivered 4/28/16. First start 10/15/16. First gocart 11/10/16. Engine Factory 427W. 750 carb. Tremec TKO600. 2015 IRS. Power steering. Whitby power brakes. Wilwood brakes. 18" wheels. Falken tires. Sway bars front and rear. Forte hydraulic clutch and mechanical throttle linkage. Scott's Hot Rods triple reservoir. Ceramic coated headers. Gas’n sidepipes. Heated seats. Herb Fraser walnut door panels. Wipers. Console.

  9. #9

    Join Date
    Feb 2016
    Location
    Accord NY
    Posts
    520
    Post Thanks / Like
    OK. Maybe because I'm a novice and didn't understand what a petcock looked like but now I do. The petcocks are already there. I guess my real question is does anything get hooked up to either the drain or the air release? Also when installing the overflow tank there are two outlets on the bottom. Where do they go to? I just assumed that some how they got connected back to the radiator.

  10. #10
    Not a waxer Jeff Kleiner's Avatar
    Join Date
    Feb 2011
    Location
    Bloomington, Indiana
    Posts
    8,533
    Post Thanks / Like
    The petcocks don't connect to anything. Open the upper when filling the system to allow air to bleed. Use the lower to drain the system. On the overflow the tube that is open at the bottom goes to the nipple below the cap on the "T" filler and the one connected to the standpipe vents to atmosphere.

    Jeff

  11. #11

    Join Date
    Feb 2016
    Location
    Accord NY
    Posts
    520
    Post Thanks / Like
    Thanks everyone for the help! Simple things are not so simple when you don't know.

  12. #12
    Senior Member
    Join Date
    Oct 2012
    Location
    Tybee Island, GA
    Posts
    505
    Post Thanks / Like
    Quote Originally Posted by Jeff Kleiner View Post
    The petcocks don't connect to anything. Open the upper when filling the system to allow air to bleed. Use the lower to drain the system. On the overflow the tube that is open at the bottom goes to the nipple below the cap on the "T" filler and the one connected to the standpipe vents to atmosphere.

    Jeff
    Just a small hijack here, but on the same subject. I purchased 1/4" hose to connect the bottom of the overflow to the nipple below the cap on the T filler. Hose fits snug on the overflow, but way too small for the T nipple. I think it's too small to muscle that thing on the T nipple.
    Dave
    Mk 3.1 - #6882 - 5.0L 302 - FiTech EFI - 3-Link - 3.08 Ratio - 15" Wheels
    Greenhorn and doing the best I can
    My photos are at: My Flickr acct
    Videos are at: YouTube Videos

  13. #13
    Senior Member
    Join Date
    Apr 2016
    Location
    Ohio
    Posts
    249
    Post Thanks / Like
    I originally used the FFR provided overflow tank but it didn't have enough capacity. Totally drained out when engine was cooled off and I filled it to max when engine was warmed up. I know a lot of people say it's not an issue but I wound up buying a different one from canton racing. Nice thing about this tank is it has a sight tube. Plenty of capacity too. Dadofthree- try 1/4 inch heater hose. It's thicker than regular 1/4 tubing normally used for overflow and it will stretch enough for the tee. A little oil helps here.
    JRL16
    Mk4 delivered 4/28/16. First start 10/15/16. First gocart 11/10/16. Engine Factory 427W. 750 carb. Tremec TKO600. 2015 IRS. Power steering. Whitby power brakes. Wilwood brakes. 18" wheels. Falken tires. Sway bars front and rear. Forte hydraulic clutch and mechanical throttle linkage. Scott's Hot Rods triple reservoir. Ceramic coated headers. Gas’n sidepipes. Heated seats. Herb Fraser walnut door panels. Wipers. Console.

  14. #14
    Senior Member phileas_fogg's Avatar
    Join Date
    Jun 2015
    Location
    Fairfax Station VA
    Posts
    1,273
    Post Thanks / Like
    Quote Originally Posted by JRL16 View Post
    I originally used the FFR provided overflow tank but it didn't have enough capacity. Totally drained out when engine was cooled off and I filled it to max when engine was warmed up. I know a lot of people say it's not an issue but I wound up buying a different one from canton racing. Nice thing about this tank is it has a sight tube. Plenty of capacity too. Dadofthree- try 1/4 inch heater hose. It's thicker than regular 1/4 tubing normally used for overflow and it will stretch enough for the tee. A little oil helps here.
    If the heater hose is still too tight, try boiling the first couple of inches in a pot on the stove to soften it up.

    Cheers,


    John
    MK IV Roadster #8631
    Ford 302, Holley Terminator EFI, T5z, 3.55 Rear End, IRS, 17” Halibrand Replicas (9” front, 10.5” rear), Nitto 555 G2’s (275/40ZR17 front, 315/35ZR17 rear), Fast Freddie’s Power Steering, F5 Wilwood Brakes, FFMetal’s Firewall Forward, Forte’s Hydraulic Clutch & Throttle Linkage
    https://www.ffcars.com/threads/phile.../#post-4776313

  15. #15
    Senior Member
    Join Date
    Apr 2016
    Location
    Ohio
    Posts
    249
    Post Thanks / Like
    Just checked my build. I used 5/16 heater hose not 1/4. Sorry about that.
    JRL16
    Mk4 delivered 4/28/16. First start 10/15/16. First gocart 11/10/16. Engine Factory 427W. 750 carb. Tremec TKO600. 2015 IRS. Power steering. Whitby power brakes. Wilwood brakes. 18" wheels. Falken tires. Sway bars front and rear. Forte hydraulic clutch and mechanical throttle linkage. Scott's Hot Rods triple reservoir. Ceramic coated headers. Gas’n sidepipes. Heated seats. Herb Fraser walnut door panels. Wipers. Console.

  16. #16
    Senior Member
    Join Date
    Oct 2012
    Location
    Tybee Island, GA
    Posts
    505
    Post Thanks / Like
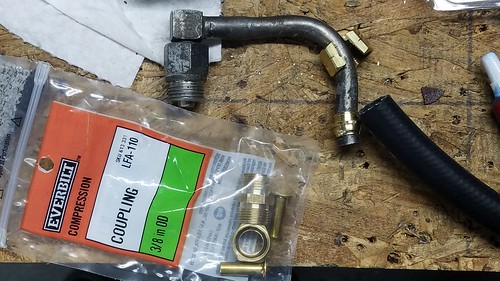
    To connect the overflow nipple to the fill cap nipple, i put a 3/8 internal compression fitting internal sleeve into the 1/8" hose. Then slid the 1/8" hose inside the 3/8" hose and held with a clamp. Then put the heat gun to the 3/8" and muscled it into the nipple at the fill cap. Worked well (even upside down)
    Attached Images Attached Images
    Last edited by DadofThree; 06-09-2017 at 10:17 PM.
    Dave
    Mk 3.1 - #6882 - 5.0L 302 - FiTech EFI - 3-Link - 3.08 Ratio - 15" Wheels
    Greenhorn and doing the best I can
    My photos are at: My Flickr acct
    Videos are at: YouTube Videos

  17. #17
    Not a waxer Jeff Kleiner's Avatar
    Join Date
    Feb 2011
    Location
    Bloomington, Indiana
    Posts
    8,533
    Post Thanks / Like
    A quick trip to True Value for a barbed hose adapter and 2 clamps...DONE!


    Cheers,
    Jeff

  18. #18
    Senior Member
    Join Date
    Apr 2011
    Location
    Shawnee KS< KC Burb
    Posts
    844
    Post Thanks / Like
    I put two layers of electrical heat shrink tubing on the smaller nipple. I heated the first layer to shrink it, added a layer and heated again.
    Those two layers made the small nipple the right size for the bigger hose all the way, No extra fittings or clamps and an invisible fix.
    HTH
    Dale

  19. #19
    Senior Member
    Join Date
    Oct 2012
    Location
    Tybee Island, GA
    Posts
    505
    Post Thanks / Like
    Quote Originally Posted by Jeff Kleiner View Post
    A quick trip to True Value for a barbed hose adapter and 2 clamps...DONE!


    Cheers,
    Jeff
    I did look for that sucker last week, but couldn't find it. I had the compression fitting parts laying around from your Kleiner mod (for fuel line) that I did on my power steering return line.

    Last edited by DadofThree; 06-10-2017 at 06:29 AM.
    Dave
    Mk 3.1 - #6882 - 5.0L 302 - FiTech EFI - 3-Link - 3.08 Ratio - 15" Wheels
    Greenhorn and doing the best I can
    My photos are at: My Flickr acct
    Videos are at: YouTube Videos

Posting Permissions

  • You may not post new threads
  • You may not post replies
  • You may not post attachments
  • You may not edit your posts
  •  

Brown County Customs

Visit our community sponsor