-
Senior Member


Originally Posted by
toadster

well you're officially past my progress Travis!

I love that hammered powdercoat - did you end up going to Orangevale? or other PC place?
I wont be doing much more over the next few weeks, work is ramping up and hopefully a vacation planned with my family if things continue to open up. I ended up taking my panels to a place in Auburn called Advanced Performance Coatings, they had great reviews online. They quoted me $250 for all my panels I brought to them which I thought was a fair price. Hopefully everything turns out well, I will post up some pics of the final product. He was thinking about two weeks before I get them back.
I still can't finish my front end, I have no LCA's. I heard factory five is now beginning to open production again so hopefully I will see them sooner than later. Your build is looking great, I am following you and quite a few others on the forum which is definitely helping me! :-)
Panels drilled, cleco'd ready to be dropped off for powder coat

For my foot pedal access cover I chose to only rivnut lower section, it seems plenty tight. I am planning on using some type of rubber gasket on the inside cover to help with any vibrations. If need be I will add a few more rivnuts on upper section.

Last edited by Fman; 05-11-2020 at 12:36 AM.
-
Post Thanks / Like - 0 Thanks, 1 Likes
-
Senior Member
-
Post Thanks / Like - 0 Thanks, 1 Likes
-
Senior Member
Could someone please clarify this for me, is this panel for the Wilwood or Mustang pedal box? From what I can tell in the FFR manual this is for the Wilwood pedal box, just wanted to confirm. I had the other panel sent with my kit out for powder coating, I ended up taking this one over today and fortunately the PC shop said he would just throw it in and do both.

-
Senior Member
-
Post Thanks / Like - 0 Thanks, 2 Likes
-
25th Anniversary #9772

Originally Posted by
Fman
Russ Thompson Drop trunk and Kleiner coupling mod
My son and I were able to get the drop trunk installed today and Jeff Kleiner mod bolted up (Edwardb also recommended it). Really enjoying doing a few projects on the Cobra with him, he is heading back home soon so wanted to take advantage of the time with him!
Definitely nice to have a second set of hands for the drop trunk, once we figured out how the process went for installation it overall was not that bad. The process for installing the drop trunk is first you assemble/rivet the sides of the box, next you transfer the I.D. of the box on top of the aluminum trunk panel. Russ Thompson provides some general measurements to get you in the ballpark. One thing to consider if using a jigsaw is to leave enough space along the backside to allow the jigsaw to fit for cutting. After the large hole is cut you can file it down smooth and place the 4 sided box up under the cross members to get the exact cuts you will need. We used a 4" grinding wheel to cut the notches into the lower box approx 3/4" deep. Once you make the notches you will attach the bottom of the box and then cleco/rivet the top section. I am planning on using rivnuts for the inspection cover.
Here are the part numbers from McMaster-Carr for the Kleiner mod (thank you JohnK for the links).
https://www.mcmaster.com/90268A340-90268A340
https://www.mcmaster.com/92196A685-92196A685
I did use anti seize and a lock washer for installation, I was on fence about using blue loctite but decided to use a lockwasher instead, it seems plenty tight not expecting it to loosen up.
Hole cut with jigsaw
My son assembling the box, the pnuematic rivet gun from Harbor Freight has been working great
Upper box cleco'd
Inspection panel - I do have a question about this. Is there enough room between the tank and lower section of the drop trunk to use rivnuts? Was not sure how close the tank will be the bottom of the drop trunk?
Kleiner coupling mod
looks great! it's nice that you and your son are getting time to work on it!
my son has been busy with work so not as much time, but in today's market - I'm glad he's working!
Last edited by toadster; 06-02-2020 at 09:30 AM.
-
Senior Member
Originally Posted by
toadster
looks great! it's nice that you and your son are getting time to work on it!
my son has been busy with work so not as much time, but in today's market - I'm glad he's working!
Thanks Todd, the drop trunk was a fun project. First task on the Cobra where it kind of felt like we were fabricating a little.
Glad your son is also still employed, my son thankfully works in the financial market and still has a job he took the week off to visit us. Him and his wife live out of state so it was nice to have them with us this week and I got to spend some time with my grand daughter as well!
-
Post Thanks / Like - 0 Thanks, 1 Likes
-
Senior Member

Originally Posted by
Fman
Thanks Todd, the drop trunk was a fun project. First task on the Cobra where it kind of felt like we were fabricating a little.
Glad your son is also still employed, my son thankfully works in the financial market and still has a job he took the week off to visit us. Him and his wife live out of state so it was nice to have them with us this week and I got to spend some time with my grand daughter as well!
Fman, your build is looking great! I had to chuckle when I saw this post because my son came home yesterday under slightly different circumstances. He's been furloughed by his company (temporarily, they say). So I told him to come home so we can work on the Roadster together. Despite the circumstances, I'm glad to have him home!
-
Post Thanks / Like - 0 Thanks, 2 Likes
-
Senior Member
-
Senior Member
Originally Posted by
JB in NOVA
Fman, your build is looking great! I had to chuckle when I saw this post because my son came home yesterday under slightly different circumstances. He's been furloughed by his company (temporarily, they say). So I told him to come home so we can work on the Roadster together. Despite the circumstances, I'm glad to have him home!
Thanks, having a lot of fun with the build. I have picked up so many build tips from Edwardb, Papa, Jeff Kleiner, GodadGo and many other build threads out there. Sorry to hear about your sons furlough but definitely enjoy the time building with him! My oldest son just headed back home, miss him already... was nice to turn some wrenches with him.
Last edited by Fman; 05-18-2020 at 12:04 AM.
-
Post Thanks / Like - 0 Thanks, 1 Likes
-
Senior Member

Responses from some of your questions:
CNC reservoirs: Top of caps no higher than the top of 3/4-inch tube and you'll be fine for height. Your distance from the footbox is fine. Just don't go any further away. Personally, I prefer through bolts holding the reservoirs to the bracket and the bracket to the 3/4-inch tube. It's not light and really something you don't want coming loose. The top of the 3/4-inch tube is covered by the body. I use flat head screws with a countersink. Nuts on the back of the bracket aren't visible. No downside and just more insurance than 10-32 nutserts.
There's room on the underside of the dropped trunk for nutserts. The tank isn't that close.
The DS footbox front you pictured is the correct one for a Wilwood pedal box setup. The donor version has a second large hole near the steering column hole for the brake master cylinder and a different location for the clutch cable.
Build 1: Mk3 Roadster #5125. Sold 11/08/2014.
Build 2: Mk4 Roadster #7750. Sold 04/10/2017.
Build Thread
Build 3: Mk4 Roadster 20th Anniversary #8674. Sold 09/07/2020.
Build Thread and
Video.
Build 4: Gen 3 Type 65 Coupe #59. Gen 3 Coyote. Legal 03/04/2020.
Build Thread and
Video
Build 5: 35 Hot Rod Truck #138. LS3 and 4L65E auto. Rcvd 01/05/2021. Legal 04/20/2023.
Build Thread. Sold 11/9/2023.
-
Senior Member
Originally Posted by
edwardb
Responses from some of your questions:
CNC reservoirs: Top of caps no higher than the top of 3/4-inch tube and you'll be fine for height. Your distance from the footbox is fine. Just don't go any further away. Personally, I prefer through bolts holding the reservoirs to the bracket and the bracket to the 3/4-inch tube. It's not light and really something you don't want coming loose. The top of the 3/4-inch tube is covered by the body. I use flat head screws with a countersink. Nuts on the back of the bracket aren't visible. No downside and just more insurance than 10-32 nutserts.
There's room on the underside of the dropped trunk for nutserts. The tank isn't that close.
The DS footbox front you pictured is the correct one for a Wilwood pedal box setup. The donor version has a second large hole near the steering column hole for the brake master cylinder and a different location for the clutch cable.
Thanks for all the clarification, very much appreciated. Got a few more for you...
Could I move the reservoir a little closer to the pedal box? What is the min clearance I need there? What size bolt do you recommend for mounting through the frame tube? I was thinking a 1/4-20 1" with a nylock nut?
-
Senior Member
Originally Posted by
Fman
Thanks for all the clarification, very much appreciated. Got a few more for you...
Could I move the reservoir a little closer to the pedal box? What is the min clearance I need there? What size bolt do you recommend for mounting through the frame tube? I was thinking a 1/4-20 1" with a nylock nut?
Move it as close as you want. You just need to leave enough room to route the hoses through the footbox front. I'd suggest mocking that up before settling on the final location. 1/4-20 would be fine. Pretty sure that's what I used, if that matters.
Build 1: Mk3 Roadster #5125. Sold 11/08/2014.
Build 2: Mk4 Roadster #7750. Sold 04/10/2017.
Build Thread
Build 3: Mk4 Roadster 20th Anniversary #8674. Sold 09/07/2020.
Build Thread and
Video.
Build 4: Gen 3 Type 65 Coupe #59. Gen 3 Coyote. Legal 03/04/2020.
Build Thread and
Video
Build 5: 35 Hot Rod Truck #138. LS3 and 4L65E auto. Rcvd 01/05/2021. Legal 04/20/2023.
Build Thread. Sold 11/9/2023.
-
Post Thanks / Like - 1 Thanks, 1 Likes
 Fman
Fman thanked for this post
 Fman
Fman liked this post
-
Senior Member

Originally Posted by
Fman
Russ Thompson Drop trunk and Kleiner coupling mod
My son and I were able to get the drop trunk installed today and Jeff Kleiner mod bolted up (Edwardb also recommended it). Really enjoying doing a few projects on the Cobra with him, he is heading back home soon so wanted to take advantage of the time with him!
Definitely nice to have a second set of hands for the drop trunk, once we figured out how the process went for installation it overall was not that bad. The process for installing the drop trunk is first you assemble/rivet the sides of the box, next you transfer the I.D. of the box on top of the aluminum trunk panel. Russ Thompson provides some general measurements to get you in the ballpark. One thing to consider if using a jigsaw is to leave enough space along the backside to allow the jigsaw to fit for cutting. After the large hole is cut you can file it down smooth and place the 4 sided box up under the cross members to get the exact cuts you will need. We used a 4" grinding wheel to cut the notches into the lower box approx 3/4" deep. Once you make the notches you will attach the bottom of the box and then cleco/rivet the top section. I am planning on using rivnuts for the inspection cover.
Here are the part numbers from McMaster-Carr for the Kleiner mod (thank you JohnK for the links).
https://www.mcmaster.com/90268A340-90268A340
https://www.mcmaster.com/92196A685-92196A685
I did use anti seize and a lock washer for installation, I was on fence about using blue loctite but decided to use a lockwasher instead, it seems plenty tight not expecting it to loosen up.
Hole cut with jigsaw
My son assembling the box, the pnuematic rivet gun from Harbor Freight has been working great

Upper box cleco'd
 Inspection panel - I do have a question about this.
 Is there enough room between the tank and lower section of the drop trunk to use rivnuts? Was not sure how close the tank will be the bottom of the drop trunk?

Kleiner coupling mod


plenty of room for rivnuts under the fuel sender panel.
-
Post Thanks / Like - 0 Thanks, 1 Likes
Fman liked this post
-
Senior Member
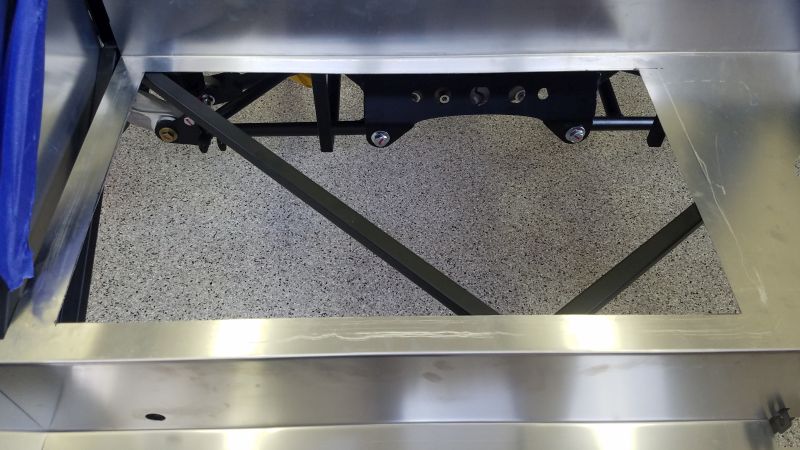
I was also able to get my fuel tank mounted. Looking back I probably should have mocked up the drop trunk to make sure the access hole aligned with sending unit. I was pleasantly surprised (and some dumb luck) the access hole is only about 1/4" off, appears to be plenty of space to access the sending unit. I am going to call it good and rivnut the cover.

Access panel in drop trunk

-
Post Thanks / Like - 0 Thanks, 1 Likes
-
Senior Member
-
Post Thanks / Like - 0 Thanks, 1 Likes
-
Senior Member

Originally Posted by
Fman
I was able to get all of my cockpit and trunk pre drilled today, went through a lot of drill bits and a lot of battery recharges on the porter cable. I am glad to have that over, I will be taking some more items to my powder coater next week. I will not have a glove box so I decided after seeing BB767's cubby storage I would do the same.
Got the Breeze cubby hole cut today and the divider panel installed, this is going to be some nice extra storage behind the seat. Breeze specs the hole for 17 1/2", I ended up narrowing it to 14". I think it is plenty wide and I am also considering making some type of hinged door that will open and close, more to come on this.
Bonus was I got to meet Vspeeds today, Eddie came by my house while cruising up the 80 and I got to check out his sweet 289. What a beautiful car and that Roush 427 is all business, really nice to meet Eddie. He gave me some good tips and I was able to pick up some ideas looking at his car. Really nice to have such a cool network of Cobra owners, so far everyone I have met has been awesome.
Link to Breeze cockpit storage cubby
https://www.breezeautomotive.com/sho...-mk3-roadster/
Also just realized I am one month into my build, time flies when your having fun

Ended up using the trunk fuel pump cover to make my template. The bend is about perfect an easy to trace out.
I'm late in the game, but welcome to the community. I have to do a better job on visiting this forum. I finished my MKIV about two months ago and am in EDH. I'm driving all over the place while I work out bugs, get miles on the chassis, etc. Available to share ideas, tips, tricks, etc.
- m
20200331_133416.jpg
-
Senior Member
Originally Posted by
Mark K
I'm late in the game, but welcome to the community. I have to do a better job on visiting this forum. I finished my MKIV about two months ago and am in EDH. I'm driving all over the place while I work out bugs, get miles on the chassis, etc. Available to share ideas, tips, tricks, etc.
- m
20200331_133416.jpg
Mark, beautiful ride! I sent you a PM. If your ever cruising around the 80 look me up!
-
Senior Member
Originally Posted by
Fman
Got the Breeze cubby hole cut today and the divider panel installed, this is going to be some nice extra storage behind the seat. Breeze specs the hole for 17 1/2", I ended up narrowing it to 14". I think it is plenty wide and I am also considering making some type of hinged door that will open and close, more to come on this.
I was thinking about installing a cubby but was on the fence. I'm doing a glove box, but I also hate letting all that rear space go to waste. I think you've just pushed me off the fence. Looking great!
-
Post Thanks / Like - 0 Thanks, 1 Likes
Fman liked this post
-
Senior Member
Originally Posted by
JB in NOVA
I was thinking about installing a cubby but was on the fence. I'm doing a glove box, but I also hate letting all that rear space go to waste. I think you've just pushed me off the fence. Looking great!
I got the glove box, as well, but wanted someplace to store windbreakers, wife's purse, etc. So I wound up opening the rear deck completely between the 3/4" tubes. May not work for everyone, but it's another option.
20200522_162458.jpg
FFR9280RD MK4 base kit, 2004 Mach 1 donor, PS, PB, ABS, TC, CC, PATS, Summit heater, DIY wire diet, RT pedal/trunk/turn signal, FFR LCAs, FFR 3-link, 17x9 FR500s all around, Ford Magnetic Gray with custom Kandy Orange stripes (Ken's Custom Auto Body)
-
Post Thanks / Like - 0 Thanks, 2 Likes
-
Senior Member
Originally Posted by
Mark K
I got the glove box, as well, but wanted someplace to store windbreakers, wife's purse, etc. So I wound up opening the rear deck completely between the 3/4" tubes. May not work for everyone, but it's another option.
20200522_162458.jpg
Looks great! that is basically the same idea I just cut my hole down to 14". I was thinking the same thing, hats, jackets, purse, wallet, etc. will be able to be stored behind the seat. I am running a heater which is going to even limit more space behind the dash so I figured this would help out.
-
I put the cubby kit on my car, love it. I am still in gel coat, less than 500 miles.
It may be in the instructions, but be sure the opening lower lip is high enough to accept the pinch trim used to line the opening.
I lucked out and my trim bottoms out on the cubby hole inside floor.
20th Anniversary Mk IV, A50XS Coyote, TKO 600, Trunk Drop Box, Trunk Battery Box, Cubby Hole, Seat Heaters, Radiator hanger and shroud.
-
Senior Member
Originally Posted by
Railroad
I put the cubby kit on my car, love it. I am still in gel coat, less than 500 miles.
It may be in the instructions, but be sure the opening lower lip is high enough to accept the pinch trim used to line the opening.
I lucked out and my trim bottoms out on the cubby hole inside floor.
I have about 1" on lower lip which is what Mark recommended so hopefully the trim piece will be fine.
-
Senior Member
-
Senior Member
Did your upper steering shaft come with the wavy washers included in the hardware? Those are what go into the indentations on the upper steering shaft as you insert it into the lower steering shaft.
Upper Steering Shaft.JPG
FFR9280RD MK4 base kit, 2004 Mach 1 donor, PS, PB, ABS, TC, CC, PATS, Summit heater, DIY wire diet, RT pedal/trunk/turn signal, FFR LCAs, FFR 3-link, 17x9 FR500s all around, Ford Magnetic Gray with custom Kandy Orange stripes (Ken's Custom Auto Body)
-
Senior Member
Originally Posted by
Mark K
Did your upper steering shaft come with the wavy washers included in the hardware? Those are what go into the indentations on the upper steering shaft as you insert it into the lower steering shaft.
Upper Steering Shaft.JPG
Hi Mark, I did not see any of those washers with my steering kit. So I guess I have to figure that one out. I will have to pull out of the upper shaft and double check all my inventory again. That will be my Monday project... thanks for the help, very much appreciated.
When it is fully assembled how far should the shaft be sticking out of the column from the bearing?
-
Senior Member
I temporarily clamped my dash to the top hoop and used that to judge the spacing (with the steering wheel mounted to it, as well). That said, I have the RT turn signal hub, but the same method should work.
FFR9280RD MK4 base kit, 2004 Mach 1 donor, PS, PB, ABS, TC, CC, PATS, Summit heater, DIY wire diet, RT pedal/trunk/turn signal, FFR LCAs, FFR 3-link, 17x9 FR500s all around, Ford Magnetic Gray with custom Kandy Orange stripes (Ken's Custom Auto Body)
-
Senior Member
Originally Posted by
Mark K
I temporarily clamped my dash to the top hoop and used that to judge the spacing (with the steering wheel mounted to it, as well). That said, I have the RT turn signal hub, but the same method should work.
That is a great idea, I also have the RT turn signal hub and unfortunately I do not have a steering wheel yet (one of many parts on my POL). If you are ever around your car could you take a measurement so I can get an idea of what the general measurement would be? I am a little confused because I cant see how any washer would fit in that sleeve, I feel like there would be no way that upper sleeve could ever come out or slip in there with as tight of a fit as it is and set screw tightened down. I won't be able to take a look until Monday next week, will have to take a closer look again.
-
Senior Member
No prob. I can't measure the shaft directly, but with everything mounted (turn signal, modified hub, etc.), this is the spacing from the dash panel.
Steering Spacing.jpg
FFR9280RD MK4 base kit, 2004 Mach 1 donor, PS, PB, ABS, TC, CC, PATS, Summit heater, DIY wire diet, RT pedal/trunk/turn signal, FFR LCAs, FFR 3-link, 17x9 FR500s all around, Ford Magnetic Gray with custom Kandy Orange stripes (Ken's Custom Auto Body)
-
Originally Posted by
Fman
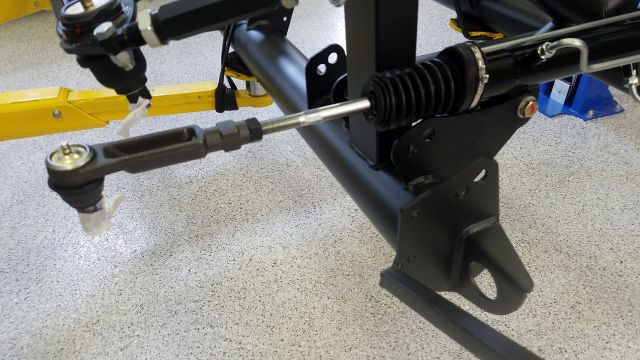
My oldest son is visiting this week so we wanted to get a few hours in on the Cobra together. We installed the steering rack today with Breeze offset rack mounting kit. Overall the rack went in relatively easy, as others have recommended starting on the left side (driver) first makes it much easier. We did have to slightly chase out the back holes to accommodate the 1/2" bolts.
I want to also say Mark at Breeze automotive has been awesome to deal with. He answers his phone and is always willing to help you out when needed, cant say enough good things about him and how he treats his customers! I also upgraded to Moog tie rod ends after comparing the two the Moog definitely seem like better quality than what FFR sends out.
Breeze Automotive Offset rack mounting kit
https://www.breezeautomotive.com/sho...ter-and-coupe/
Moog tie rod
https://www.summitracing.com/parts/MOG-ES2150RL
Steering rack installed

Breeze aluminum bushing, the notch allows to move the rack right or left once it is installed. It fit perfectly in the rack.

To center the rack we measured from tip of inside tie rod to outside of the frame on both sides then split the difference to find dead center. Mark explains this in the direction he sends with the mounting kit.

Moog tie rod end, As you can see the Moog on top is beefier and also has a much better rubber boot. Moog is also MADE IN THE USA


Moog tie rod installed
Unfortunately no LCA yet from FFR the reason my front end is incomplete.
I too have the SR installed with the breeze, no LCA or Shocks from FFR as of yet so, I am doing things as much as I can. I find the breeze instructions a bit cumbersome, as I am a visual person where I need to see it done then the verbiage makes sense, but I think I got it.
Overall, your build is looking great and am following. having my panels PC's sating black, I like the sleek look, and your panels look great.
-
Senior Member
Originally Posted by
jiriza84641
I too have the SR installed with the breeze, no LCA or Shocks from FFR as of yet so, I am doing things as much as I can. I find the breeze instructions a bit cumbersome, as I am a visual person where I need to see it done then the verbiage makes sense, but I think I got it.
Overall, your build is looking great and am following. having my panels PC's sating black, I like the sleek look, and your panels look great.
Thank you, I was really happy with the Powder coating the shop I used did a great job.
I also am a visual/hands on kind of guy so I too have some struggles with Breeze directions, I usually end up calling Mark to confirm everything before I move forward. He always takes my call and is more than willing to help which is awesome. I am going to give FFR a call today to see if I can get any updates on my parts on back order. I am hopeful it will be happening sooner than later, I am starting to reach a point where I cant do much more on the car without some parts I need. Trying to be patient because I realize the C19 shutdown has definitely had a huge impact on there staffing.
-
Senior Member
Originally Posted by
Mark K
No prob. I can't measure the shaft directly, but with everything mounted (turn signal, modified hub, etc.), this is the spacing from the dash panel.
Steering Spacing.jpg
Thank you for the pic, this gives me a general range of where I should be.
-
Senior Member
After reviewing my parts bag I discovered the two missing spring washers for the steering shaft. The upper shaft definitely has a small indentation for the washers. I am not going to not install them right now until I have the dash assembled and can set the proper shaft length. Appreciate the help from everyone!

-
Post Thanks / Like - 0 Thanks, 1 Likes
-
Senior Member
-
Senior Member
Your build is looking great. I like the powder coat you chose. One comment about what you said about rivet nuts. I assume you've used them before? In my experience, and I do use quite a few in varying sizes, the right size installed properly is just as strong as a regular nut and washer. They expand or collapse (varying styles) on the back side of where they're mounted and provide a mechanical clamp. So I wouldn't worry a bit about them holding your cooling fan or any other component. The issue I've observed is there is variation in the products, the method used, and the operator when they're installed. Sometimes not in a good way. The failure mode is they spin when tightened or even worse maybe when loosened. Not going to fall out, but can be a real problem nonetheless. Not suggesting you need to go back and change what you did. Your choice. But done right they're totally acceptable.
Keep up the good work.

Last edited by edwardb; 06-05-2020 at 06:51 AM.
Reason: Added pictures from #8674 build
Build 1: Mk3 Roadster #5125. Sold 11/08/2014.
Build 2: Mk4 Roadster #7750. Sold 04/10/2017.
Build Thread
Build 3: Mk4 Roadster 20th Anniversary #8674. Sold 09/07/2020.
Build Thread and
Video.
Build 4: Gen 3 Type 65 Coupe #59. Gen 3 Coyote. Legal 03/04/2020.
Build Thread and
Video
Build 5: 35 Hot Rod Truck #138. LS3 and 4L65E auto. Rcvd 01/05/2021. Legal 04/20/2023.
Build Thread. Sold 11/9/2023.
-
Senior Member
Originally Posted by
edwardb
Your build is looking great. I like the powder coat you chose. One comment about what you said about rivet nuts. I assume you've used them before? In my experience, and I do use quite a few in varying sizes, the right size installed properly is just as strong as a regular nut and washer. They expand or collapse (varying styles) on the back side of where they're mounted and provide a mechanical clamp. So I wouldn't worry a bit about them holding your cooling fan or any other component. The issue I've observed is there is variation in the products, the method used, and the operator when they're installed. Sometimes not in a good way. The failure mode is they spin when tightened or even worse maybe when loosened. Not going to fall out, but can be a real problem nonetheless. Not suggesting you need to go back and change what you did. Your choice. But done right they're totally acceptable.
Keep up the good work.
Paul, thanks for the words of encouragement... trying to go slow and take my time, so far I am really happy with the powder coating I selected it seems to be exceptionally durable and does not scratch easily. I am definitely taking your build thread documentation to move me forward in my build process, along with many others on this forum. This place is such a great resource.
I do not have any experience with riv nuts, building this car is my first time ever using them. If I need to remove the fan after the car is completed assuming I will just remove the entire fan shroud? Not sure how difficult this would be with the body on? I was just concerned about the bolt possibly backing off with vibrations from engine and fan running.
-
Senior Member
Originally Posted by
Fman
I do not have any experience with riv nuts, building this car is my first time ever using them. If I need to remove the fan after the car is completed assuming I will just remove the entire fan shroud? Not sure how difficult this would be with the body on? I was just concerned about the bolt possibly backing off with vibrations from engine and fan running.
If you put regular nuts on the inside of the shroud, yes you would need to remove the whole shroud to remove the fan. With rivnuts, just back out the four fan screws and remove the fan. I use just a touch of blue Loctite on the screws and have never had a problem in 10+ years with several builds. You're right to be concerned about vibration. But with good practices you shouldn't have any problems.
Build 1: Mk3 Roadster #5125. Sold 11/08/2014.
Build 2: Mk4 Roadster #7750. Sold 04/10/2017.
Build Thread
Build 3: Mk4 Roadster 20th Anniversary #8674. Sold 09/07/2020.
Build Thread and
Video.
Build 4: Gen 3 Type 65 Coupe #59. Gen 3 Coyote. Legal 03/04/2020.
Build Thread and
Video
Build 5: 35 Hot Rod Truck #138. LS3 and 4L65E auto. Rcvd 01/05/2021. Legal 04/20/2023.
Build Thread. Sold 11/9/2023.
-
Post Thanks / Like - 0 Thanks, 1 Likes
Fman liked this post
-


Just a note of caution about the use of Loctite around plastic parts (in this case the fan body). Loctite will damage plastic, especially ABS. The warning on the bottle says not to use Loctite on screws that go into plastic, but my experience is that even if the screw is going into metal but there is plastic nearby, there is the potential for damage. I've learned this lesson the hard way on dirt bikes. Loctite coming in contact with plastic is a definite no-no, but my understanding is that as Loctite cures, it gives off vapors that can damage plastic even if it never came directly in contact with the plastic. You can minimize this risk by using it very sparingly on any fasteners that are anywhere near plastic. As Paul said, he uses just a touch of it. One small drop is plenty on a small screw. I also think (but have no evidence to back up my hunch) that using the stick version of Loctite, rather than the liquid, gives off fewer vapors as it cures, and therefore less potential for damage of plastic parts as well as eliminating the possibility that it accidentally drips onto plastic as you're installing the screw.
https://www.amazon.com/Loctite-50616.../dp/B0053ZNMDE
MkIV Roadster build: Gen 2 Coyote, IRS, TKO600. Ordered 10/24/18. Delivered 1/29/19. Engine installed 8/8/21. First start 9/12/21. First go-kart 9/17/21. Off to paint 4/11/22. Back from paint 12/30/22.
Build thread here.
-
Post Thanks / Like - 0 Thanks, 1 Likes
-
Senior Member
Originally Posted by
JohnK
Just a note of caution about the use of Loctite around plastic parts (in this case the fan body). Loctite will damage plastic, especially ABS. The warning on the bottle says not to use Loctite on screws that go into plastic, but my experience is that even if the screw is going into metal but there is plastic nearby, there is the potential for damage. I've learned this lesson the hard way on dirt bikes. Loctite coming in contact with plastic is a definite no-no, but my understanding is that as Loctite cures, it gives off vapors that can damage plastic even if it never came directly in contact with the plastic. You can minimize this risk by using it very sparingly on any fasteners that are anywhere near plastic. As Paul said, he uses just a touch of it. One small drop is plenty on a small screw. I also think (but have no evidence to back up my hunch) that using the stick version of Loctite, rather than the liquid, gives off fewer vapors as it cures, and therefore less potential for damage of plastic parts as well as eliminating the possibility that it accidentally drips onto plastic as you're installing the screw.
Very good point. Thanks for making it. Agree Loctite should be used very sparingly if at all around plastic. I haven't had any problems with the cooling fan. But as stated I used just a small amount plus I think that's some kind of reinforced or glass filled plastic. Pretty tough stuff. If you really want to see the effect of Loctite, use it around acrylic. Like wind wings or whatever. It crazes and breaks down the acrylic. Really makes a mess. Ask me how I know.
Build 1: Mk3 Roadster #5125. Sold 11/08/2014.
Build 2: Mk4 Roadster #7750. Sold 04/10/2017.
Build Thread
Build 3: Mk4 Roadster 20th Anniversary #8674. Sold 09/07/2020.
Build Thread and
Video.
Build 4: Gen 3 Type 65 Coupe #59. Gen 3 Coyote. Legal 03/04/2020.
Build Thread and
Video
Build 5: 35 Hot Rod Truck #138. LS3 and 4L65E auto. Rcvd 01/05/2021. Legal 04/20/2023.
Build Thread. Sold 11/9/2023.
-
Post Thanks / Like - 0 Thanks, 1 Likes
-
Senior Member
-
Post Thanks / Like - 1 Thanks, 1 Likes
-
Great craftsman you are Travis
Looks as perfection is in your blood
Have you checked out the airflow the screen might decrease.
Seems along time ago I did some research with airflow into
motorhome generator compartments and was surprised of the decrease screens vs louves on the door.


 Thanks:
  Likes:


 Reply With Quote