Before I took all the aluminum panels off (as per build manual), I sat down in the roadster with seats in to get a feel for the footbox. Even without the pedal assembly I can tell this is going to be a tight fit.
So I did some searching and didn't find much in this forum about footbox mods. I did find Greg's build site has a few good photos... so let's see yours and if you have plans/drawings post em!
Are you aware of the "Other" forum? If not, PM me. Go there and search, there are many threads, pictures, ideas, and templates available. Also, there is a mkiii build site/wiki that has stuff on it. Footboxes are probably one of if not the most commonly modified part of these cars. Don't worry, there is a ton of information to draw from.
KC if this is the most popular modification done, and I believe you, wouldn't this be a change that could be incorporated into the design right from the get go? I am not sure what different engine and transmission combinations would mean that there would be a "one size fits all", or have a different aluminum panel(s) that would be engine specific. I know making an engineering change is not a 15 minute thing, but I do not think it would be that hard to incorporate this change.
I know you asked KC, but......
The MK4 does have expanded footboxes from the 3.1, which was an improvement from the 2 (they are tight).
The mods I made were specific to my MK4, 302, with BBK 4-into-4 headers.
They would be different for a 351, BBF, and especially for a Mod motor (they provide different alum. panels for them (smaller FBs).
The size would also be different for Hooker 4-into-4 headers and shortie headers.
I think FFR pretty much maximized the FBs (by expanding them to the body as far as they can go) to fit all of these variables.
They are marginally comfortable as-is, but there is room for improvement. (I'm sure my wife will be happy, but she doesn't even know it yet). It's one of those mods that only you and a knowledgeable FFR builder will know and appreciate.
Besides, where would the fun be if all of these mods were included!?!?
F5R #7446: MK4, 302, T5 midshift, 3.55 Posi IRS, 17" Halibrands
Delivered 4/4/11, First start 9/29/12, Licensed 4/24/13, off to PAINT 2/15/14!! Wahoo!
Hey Jake,
As you are reviewing driver's side footbox mods you can disregard most that are not for a Mk4. The boxes were enlarged by FFR and the left wall was pushed as close to the body as possible. If you try to do the left side expansion that was often incorporated on the earlier cars it will collide with the body. However when using a Windsor engine you can gain some valuable room on the right side of the footbox. Here are some photos and description of what I did to an early Mk4. In the end the results are much like what MPTech Mark did but I executed it differently.
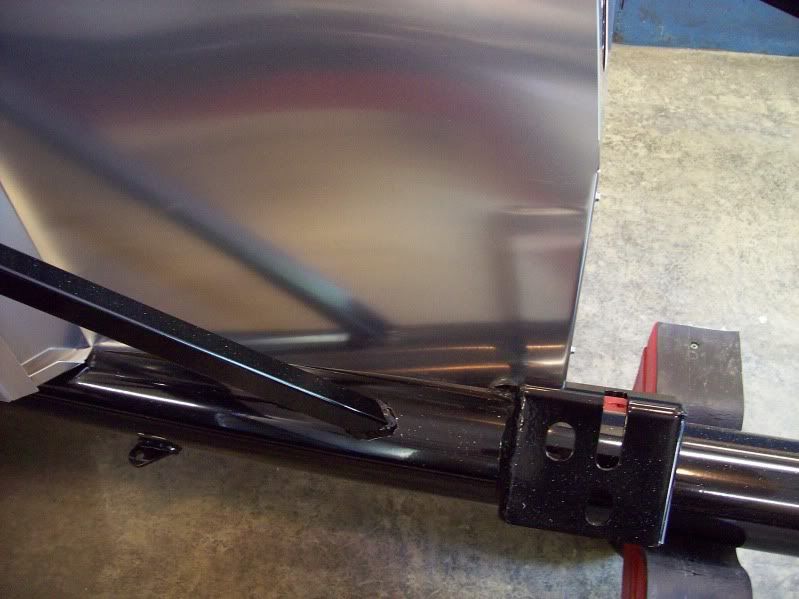
Before, with the flat panel:
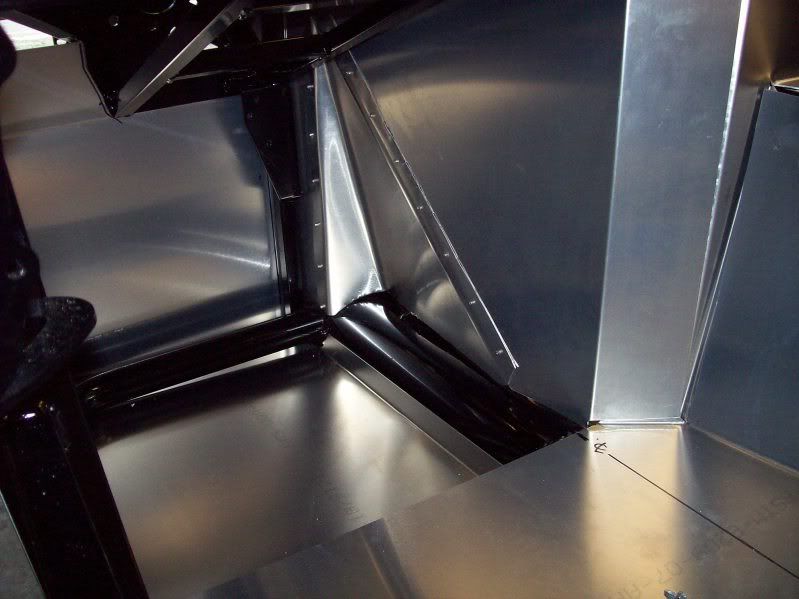
And after I cut a triangle out of the lower engine side panel and bent up "pyramid" to provide some extra room around the throttle pedal:
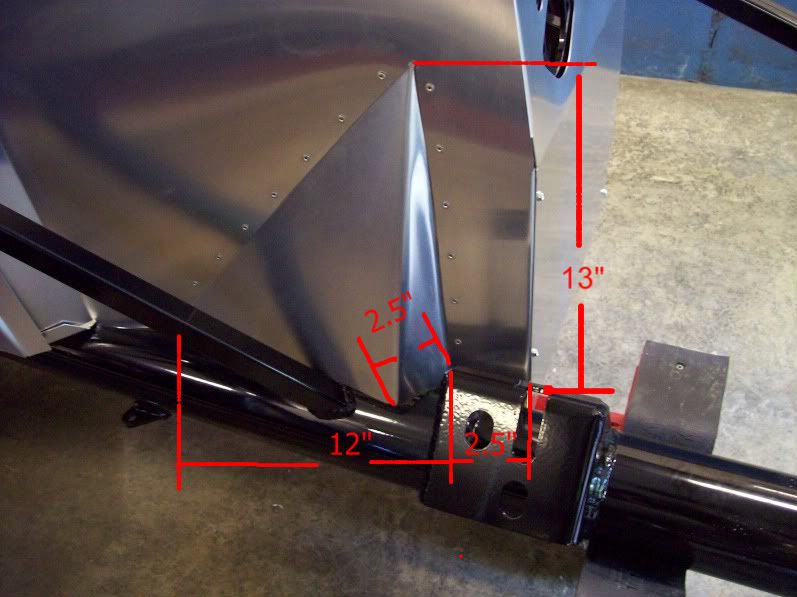
Here are the dimensions:
Anything you can do to gain some extra room is worth every bit of the effort.
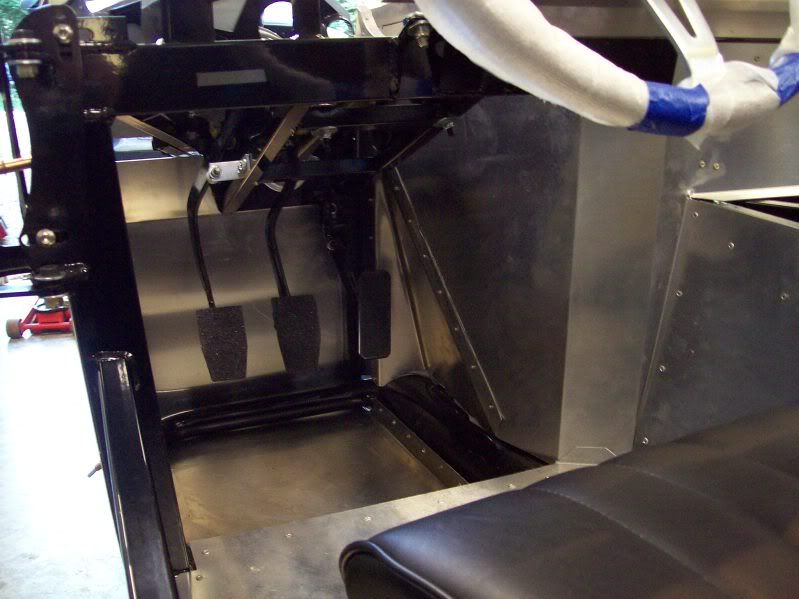
I know you are using a donor pedal box so the other half of the equation is adjusting/bending the pedals to position them for your preference and comfort. This is best done with the seat and steering wheel in place. I do not use one of the pedal benders; I actually remove the pedal arms, straighten them and then rebend (cold) using a big bench vise and 24" pipe wrench. You'll probably end up moving both clutch and brake to the left approximately 2 inches or so. What I do before bending is after removing the arms from the box assembly I trace the shape of the pedal arm on a piece of cardboard as a reference of the original shape. Then as you bend you can lay the pedals on the tracing to see how your changes compare without having to reinstall the arms. You'll still probably wind up putting them in and out a couple of times before all is said and done but it is well worth the effort to get them in the most comfortable position. Just to give you an idea of how the arms end up after bending here is a look at them in the Mk4:
And on my Mk3 (that box to the left is what you CAN NOT DO on the Mk4):
In my opinion getting the footbox and pedals optimized for the driver is one of the most important and personalized parts of the build.
Jeff - yes, doing a MKIV with Windsor 302. Your advice is well noted. I'll focus on right side only.
MPTech - nice one piece expansion. Any drawings or did you eyeball this?
KC - yes, familiar with ffcars site... I'll check it out. But I assumed it wouldn't apply much to MKIV since it's older.
Yes, on the Mkiv, the room to be had is on the right side - room around the Go pedal. While you are at it, look at the passenger footbox...Nice to give them as much room as possible. As for why FFR does not just make the bigger...as you surmise and has been touched on above...so many engine and exhaust choices. They have enlarged them some from previous models.
My suggestion to look at threads on the other site is not about finding a cookie cutter solution - yes there are some out there, but that is not where I was going. Many people choose to come up with their own modifications to the footboxes - adding space where they want it. Some have big, wide feet and put bump outs for max width by the pedals. Some lengthen it to the extreme. I believe this is space to gain, but it only makes sense to do it where it is usuable (since you might be taking away from space that could be used for something else. My philosophy is look at what all the other people are doing and then determine what is best for my needs...be it an existing solution or perhaps a combination of several solutions. While some threads are how tos and perfect fits, most contain bit and pieces that can help make your build truly YOUR build, unique and special to you.
MP, I knew there wouldn't be a one size fits all. That being said I also didn't know, or really think about that many different engine and header combinations. Now I am schooled. I too appreciate all this information because this is something I will have to do in the future, with size 12 1/2 EE shoes I am gonna need all the help I can get. I am taking notes !!
Here is a link to some photos of the modification I made. Similar to others but a bit different. Look at page 2 and 3 for the specifics. Shows several steps in progress to end including paper model/template.
Rough dimensions - about 9" square cut out - just over 2" out at largest point - about 2" up from bottom of panel in center of cutout - just over 4" back from front of panel.
Rich, I think you see why I asked. Unless he's using some tight fitting shorties I am afraid Dan may have a problem.
If you look at my picture with dimensions it is 13" tall but it has gone from 2.5" at the frame rail to nothing at the top.
Hey, just got online to post an update about my punch out - turns out you are correct. I dropped the engine in this weekend and tried to fit up the drive side shorty header and boom - punch out is too tall. Ooooops. So, I am going to have to remove it and modify it a bit. Shorter and/or angled similar to the one Jeff shows up above. Oh, well. I did this as a way to learn about cars, and you always learn from mistakes - I guess I am not being disappointed.
As far as the bends in the metal, I bought a sheet metal brake at harbor freight and used that for the main ones. Unfortunately once you have some short bends in it becomes increasingly difficult to use the brake because the piece is no longer flat where it needs to be. Since I had the paper template I used that to determine the best sequence of steps. Then, where needed I used sheet metal pliers to grab and bend smaller pieces and for some of the longer ones, I "c" clamped the piece on the edge of the brake and used pliers and soft hammer taps to make the bends. Really not that hard once I got the template correct.
I guess I get the chance now to do it again. Practice makes perfect, right!!
As usual, Jeff has sage advice. I believe the footbox is the most important area besides the engine for detail. So, Jeff do you happen to have measurement for the other mod you made on the left side of the footbox. I didn't find them in your build thread. I could have missed it though. I did a mod to move the crash bar out farther to the end of the box on my MKIII. It gives a lot of room for the left foot and use of a dead pedal but not for the outside of your left foot. Thanks, WEK.
FFR MkIII 302 (ATK), EFI 75mm TB with custom box plenum chamber, 24# injectors, 4 tube BBK ceramic, cold air sys, alum flywheel, crane roller rockers, T5, Wilwood pedals, custom five link with Watt's link, 4 rotors, coil overs, power steering with Heidt valve, alum FFR rad, driver's crash bar mod, mini dead pedal mod, quick release steering wheel hub #6046
So, Jeff do you happen to have measurement for the other mod you made on the left side of the footbox.
Yes I do! For anyone who comes across this be aware that you CAN NOT do this on a Mk4---FFR already pushed the LH side out to the limit and any more will contact with the body.
Note that it has to be narrower at the rear than the front. If I were doing it again I think I'd keep the front dimension but simply angle the bumpout all the way back to nothing where it meets the 2X2 vertical tube.
Thanks a lot. That will be very helpful to keep me within the available space. I'm thinking that if I just cut two sides (front and top), I might be able to bend it out enough to just add wedge shaped flanges to complete the bump out. It's only that one spot where your foot hits the side that is a problem anyway.
By the way, what did you do for the carpet with the changes? Does that require surgery as well? I have a sewing machine that will sew binding onto leather, carpet, etc. WEK.
FFR MkIII 302 (ATK), EFI 75mm TB with custom box plenum chamber, 24# injectors, 4 tube BBK ceramic, cold air sys, alum flywheel, crane roller rockers, T5, Wilwood pedals, custom five link with Watt's link, 4 rotors, coil overs, power steering with Heidt valve, alum FFR rad, driver's crash bar mod, mini dead pedal mod, quick release steering wheel hub #6046
Thanks to this thread and primarily Jeff's DS images, I took Jeff's advice and made my DS left side kickout flush mount by the door on my MKIII. I got ambitious and made the entire kickout of one piece of sheet Al. I thought about uploading drawings, but it just seemed easier to just write them on the car and sheet metal. I hope it is not too messy that if someone wants to follow these measurements, they will be able to reproduce them on their own. I used a Habor Freight break, which worked ok. I strongly suggest making a cardboard template first as it took me a few iterations to get it right. Cardboard was much easier to work with and more forgiving!
Since this thread has been resurrected I'll add some more. I'm now working on a previously ownedMk3 that had been sitting unbuilt and untouched for a few years. I made the modification to the outside of the driver's footbox that I mentioned above; slicing the panel and moving it outward at the front then tapering back to the 2x2:
It was simple to just bend up a couple of wedges for the front and top:
Again, remember you CAN NOT do this on a Mk4!
Also made a mod to the engine side by making a new panel that reverses the Mk3's center bend from top to bottom then adds the triangulated bends going forward and back:
Inside:
Most of our discussion here has been about the driver's side but on this car I also did the passenger side expansion:
Here is another thought about getting the most comfort from your footboxes. Place a 2X4 under the front of the seat and sit back down in your car. It changes both the angle of your legs and how deep your knees sit in the box. I had another member without this mod sit in my car and he said it was day and night difference between the two.
Steve
MK 3.1 #6422, Complete Kit, 340hp Ford Racing Crate Engine, WC T-5 Trans, 3.55 Rear, Barcelona Red Mica Metallic, Silver Stripes
Thanks Jeff! That would have been much easier! Since I have not put the body on yet, I wasn't sure the body would clear that low on the left side. Still debating about trying to do the right side of the DS or not. I have enough room for me (only size 8 feet) so I should be able to tap dance in there compared to the size 16 feet I have read about.
Now working on the PS footbox. My dad already has all the panels riveted in, so I debating between taking all of the sheet metal out and expanding the footbox the same way you did above. Or widenand lengthen the footbox to the same dimensions by adding some patch panels. My design will have one patch panel on the top of the footbox, one on the bottom and one piece for all three sides. Just not sure if I will like the way it will look. I am really trying minimize undoing dads work!
I tried the 2x4 trick, which convinced me to expand the PS footbox without a doubt! Night and day difference yes, still too cramped! The high back FF seats seem to take up at least 2-4 inches due to their curvature in the back.


 Thanks:
  Likes:


 Reply With Quote


 )
)


