-
11-22-2023, 06:21 AM
#121
Member


Originally Posted by
crash

Goose neck trailers ride better, for sure. The draw backs are that the bed of the truck is largely used up, and interference with the truck cab is sometimes an issue.
I personally have 9 trailers. 3 of them are goose neck.
My current race car trailer that I take to the track all the time is a tag. Sway can be an issue so I have two sway arrestors on the hitch. It is rated for 15,000 lbs. I need a class A after 10,000 lbs in CA and have one. If I was buying new I would have likely gone for a less than 30' goose neck, but I got a deal on this at $4500 and it has a $10,000 awning on it. I kid you not. I went to Larson Sails to get a quote on just replacing the canvas on this awning and it was $7,000. The trailer is a Carson and I have to tell you, it needed quite a bit of work. Seems to me like they took their standard 10,000 lbs trailer and just put another axle on it and called it a 15,000 lbs rated trailer. At least that is what the purchase receipt from the previous buyer states. I have reinforced the frame significantly as the beaver tail was sagging and there was no support under where the actual race car tires were sitting which had led to the plywood warping and drooping over time. Basement was a joke, and I welded in wall supports for full length E Track on the walls. Again, just the fact that it came with an 18' X 28' awning made the effort worth while.
The tag trailer works well enough, but I would recommend a goose neck if you are not worried about price. If you are worried about price, then a used tag might make a lot of sense if the right deal comes around like in my case.
I think you can go a max of 108" wide? That makes a difference and I would go the max trailer width with any full size desert vehicle being towed. Also nice to have the rails on the sides so you don't load off the side when it is near impossible to see where you are on the trailer when loading a high vehicle like a desert truck. Drive over fenders are pretty much standard when you are trying to tow a large truck, but the higher deck trailers can be cheaper to find since they are a more equipment type of a trailer. I have a 40' flat deck equipment trailer and it was a relatively cheap 26,500 lbs rated trailer. Goose neck. The problem with it is that when it comes time to replace the tires, which I just did, it is 8 tires which costs a couple thousand bucks. On the other hand, it allowed me to just buy a 20,000 lbs piece of equipment at auction and move it around. I wasn't planning on owning something this large but was glad I had the extra capacity when the need arose. I would definitely recommend going larger than you think you need.
A non commercial Class A was not that hard to get in CA and well worth not having to worry about being pulled over for weight/incorrect license issues. In CA that is a game stopper and the vehicle will not be allowed to move until a properly licensed person shows up to move it. If you cannot arrange this quickly, the rig will be towed and storage and towing WAY surpass the costs of a Class A.
IIRC my big trailer is made by Brute, but I don't think you can go wrong with Texas Pride. You might want to look at some of the "Dirt Monkey" YouTube videos as he goes to the trailer shows every year and gets into them pretty deep. Crawling under, on top, visiting manufacturing facilities, etc.
THANKS Crash!
Thats the type of experience I was looking for.
While I don't want to pay a high price, I know I will own this trailer for a long time. My 24 foot 10k enclosed race trailer has served me well. Id like about that size in a goose neck as well. Hauling two trucks, even the XTF and a lighter shorter Jeep is going to be pushing the 26,000 lb weight combined GVW weight limit in NY.
Unfortunately getting a CDL in NY is a little annoying. It means signing up for a commercial drivers license training course that includes rental of the rig for taking the test. I wouldn't mind learning how to drive a Semi, however its a time investment.
It looks like getting a de rated goose neck might be my best bet. I can get a 16k trailer de rated to 14,000k which will keep me under the combined 26,000 lb GVW limit. It sounds like even if I have a heavier than 14,000 trailer empty , I could be ticketed because the combined rating is above the CDL limit.
Oh well. Seems that the DMV laws have not kept up with the capability of todays pickups.
XTF #2
build start date June 19 2023
GTM # 344
Build Start December 2010
First track day April 2013
-
11-22-2023, 10:58 AM
#122
I would check the actual weight rating of the axles and tires on that, or any trailer you are considering. A lot of times they will rate the trailers higher and just up the tongue weight allowance. That trailer may have as low as 5K axles on it. In my experience the axles are really the limiting factor on most trailers, and usually that is about brake component size. Once you jump up to the 10K axles everything gets "industrial".
As far as the CDL, you should talk to somebody, maybe at a trailer place, near you that can advise on what the actual laws are. Be cautious about talking to people at trailer places about proper licensing as their goal is to sell you a trailer, not have you licensed properly. Probably better to enquire with your local Highway Patrol/State Trooper/etc. Most of the local trailer sales people probably do know the laws to the T, but getting them to explain them, especially if you are not buying a trailer from them, might be difficult. Surely though, there is at least one person at every trailer business that knows exactly what is required for you to legally drive their trailers off their lot.
I have a couple friends that are CHP and they were helpful in telling me what I needed and how to "work the system". When I showed up to take the CDL driven the ride along tried to tell me I did not need a CDL. I was prepared and explained the "grey area" that my buddies told me about and why I actually did need a CDL. Also, there are "secret" things about CA law that lets you get a "non-commercial Class A" CDL with no medical exam by a Dr.
This Class A process in CA is much like the SB100 licensing of kit cars. You need to know what the process is, what your specific requirements are for specifically what you are trying to do, and then be prepared to educate the DMV on all of it...in a way that doesn't piss anybody off.
I took no classes, studied for the written test online with free materials available from both the DMV and others, aced the written test, and passed the driving test with my 33' RV trailer. The length of my RV and where the trailer wheels were at made the dock parking test difficult. This is the shortest goose neck trailer I have though, and it did work.
Things get very technical. In CA there is an exemption for 5th wheel RV trailers that makes towing a 5th wheel RV legal up to 15,000 lbs without a CDL. One of my CHP buddies pointed out that since I had converted my RV 5th wheel to a goose neck it now required me to have a CDL because it is rated at 13,500 GVW, which is over the 10k blanket law. This is what I had to explain to the ride along when I showed up for the driving test. Obviously something that would be near impossible for anyone to know unless you had researched in detail what the specific laws and exemptions are. This is why I recommended talking to local people about how to do what you want, as well as figure out specifically what you need.
Beware, in CA if you show up for a drivers test and you fail they take your license on the spot. This includes if you are simply trying to up your license class from C to A. If you don't pass the written test you will not be able to drive yourself home legally from the DMV, and you will not have a drivers license until you can retake and pass the test. There is a way around this also, although I have never actually done it, but I understand you can then pay your fees for a Class C learners permit and be able to leave the DMV with the ability to drive again, but study up exactly what is needed and what consequences are before going down this path to avoid getting stuck without a license.
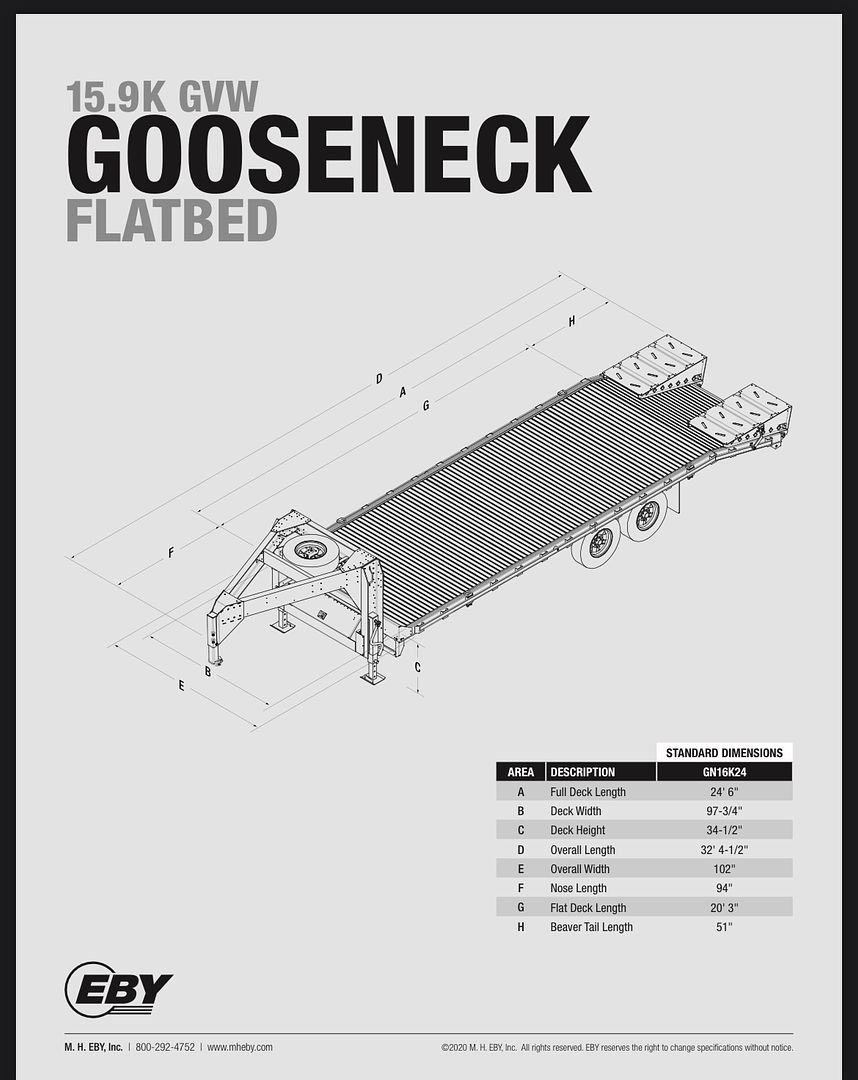
BTW- I do not think you will be able to fit two vehicles on that trailer you have shown there.
EDIT: I looked up what I did on the last trailer I built and indeed the deck/frame width is 102". There is a clause that accessories like fender lips and marker lights can stick out further, and I think my trailer is at about 104"-106" when the 1-2 inches of fenders are included, but you are correct with the 102" max width.
Last edited by crash; 11-28-2023 at 04:30 PM.
-
12-07-2023, 06:16 AM
#123
Member
Originally Posted by
crash
As far as the CDL, you should talk to somebody, maybe at a trailer place, near you that can advise on what the actual laws are. Be cautious about talking to people at trailer places about proper licensing as their goal is to sell you a trailer, not have you licensed properly. Probably better to enquire with your local Highway Patrol/State Trooper/etc. Most of the local trailer sales people probably do know the laws to the T, but getting them to explain them, especially if you are not buying a trailer from them, might be difficult. Surely though, there is at least one person at every trailer business that knows exactly what is required for you to legally drive their trailers off their lot.
BTW- I do not think you will be able to fit two vehicles on that trailer you have shown there.
EDIT: I looked up what I did on the last trailer I built and indeed the deck/frame width is 102". There is a clause that accessories like fender lips and marker lights can stick out further, and I think my trailer is at about 104"-106" when the 1-2 inches of fenders are included, but you are correct with the 102" max width.
You are exactly right on all counts. After much research, the local and national break point is 26,000 lbs GVWR. The rated weight from the sticker on your truck plus the rated weight of the sticker on your trailer must be less than 26,000 lbs or you need a class A license.
Annoyingly pulling two trucks puts me very near that limit. Two cars is easy.
The other problem as you rightly point out is getting a trailer that is rated to carry 10,000 lbs means your total package gets near the 26,000 lb limit. A heavy duty trailer with 7,000 lb or 8000 lb axles and a goose neck will weigh 3500 lbs at least.

This setup that factory five use is full on CDL class A. The two trucks loaded with fuel, two spare tires, off road jacks, and tools, actually are near this trailers rated GVWR. Which is exactly my problem.
Yes I could get a jeep and an XTF empty on a 14,000 GVWR trailer add my tow truck and still be under 26,000 lbs combined but after adding all the junk we always bring along. I dont know if its reasonable.
XTF #2
build start date June 19 2023
GTM # 344
Build Start December 2010
First track day April 2013
-
12-07-2023, 11:57 AM
#124
Senior Member

In my province we can get a heavy trailer endorsement added to our non CDL license which allows us to tow any sized trailer as long as the tow vehicle can handle it and that neither the trailer, nor tow vehicle, is equipped with air brakes. It does take a driver's test, but it is an option. Is there such a thing in your state?
-
12-08-2023, 05:46 AM
#125
Member
Originally Posted by
narkosys
In my province we can get a heavy trailer endorsement added to our non CDL license which allows us to tow any sized trailer as long as the tow vehicle can handle it and that neither the trailer, nor tow vehicle, is equipped with air brakes. It does take a driver's test, but it is an option. Is there such a thing in your state?
Hey Narkosys, I wish there was such an allowance for a heavy trailer. I know that some states have a carve out for farm equipment but those only allow you to move things locally and of course your load needs to be something like farm equipment. In the same way some states allow for a heavier RV trailer. But New York does not have either of these things.
The fact is many folks pulling big RV trailers are overweight and they don't know it. Seems like the weight limits are not strictly enforced for people pulling an RV.
While I don't like that getting a class A license is difficult, a rig weighing over 26,000 lbs is no joke. Its probably good that folks need some training to do so.
XTF #2
build start date June 19 2023
GTM # 344
Build Start December 2010
First track day April 2013
-
12-11-2023, 12:24 PM
#126
My quote function does not seem to work so this is in regards to John's last statement about getting training...
In CA no training is required. I did nothing for my Class A other than take the written test and take the driving test with the DMV.
I have driven relatively heavy rigs for many decades and I can tell you from going thru this process to actually get my Class A that the acquiring of the license will not make you any better of a heavy load driver, but it will make you legal.
I learned everything I needed to know about heavy load hauling many decades ago by riding along with other truck drivers. That is where you will learn things like how to go down grades without burning up your brakes, how to communicate with other truck drivers, what to do in emergencies, etc. If you haven't done some right seat driving with an experienced truck driver, I would highly recommend it.
Also just an FYI, CA just started restricting Class A licenses to "automatic transmission only" if you take your test in an automatic transmissioned truck. I had a stick, older Cummins diesel powered pickup and the ride along told me it was a good thing or he would have had to check the box for the auto trans restriction. I believe a lot of the full size semis are "automatic" these days, and probably why the restriction came about. Also we have a lot of hills in CA and people not using their engine braking abilities as well as using their friction brakes improperly leads to frequent brake fires and run away trucks.
My biggest worry with driving a heavy load is going down long steep grades. I inspect and service my brakes regularly. Also, Porterfield Brakes has really good pad materials for severe duty use. Not a big thing if you are driving around relatively flat areas in the middle of the country, but if you go over mountains then do not disregard your brakes. This can literally save your life, and maybe those of others.
Also, the reason I stated that you will not get two vehicles on the GN16K24 trailer that you have posted there is because of the ramps. Those have to flip up and therefore make the rear part of that trailer unusable for vehicles like cars and trucks. Works fine to put an excavator on the trailer, flip up the ramps and then tuck the boom down on the back of that trailer, but you won't be able to put two trucks on that trailer and then flip up those ramps. You could change over to slide in or removable ramps and the rear will become usable, but it is not usable for your application as it is equipped for two trucks like on the FFR trailer.
Last edited by crash; 12-11-2023 at 12:29 PM.
-
Post Thanks / Like - 0 Thanks, 1 Likes
-
12-11-2023, 08:21 PM
#127
Member
Originally Posted by
crash
, but you won't be able to put two trucks on that trailer and then flip up those ramps. You could change over to slide in or removable ramps and the rear will become usable, but it is not usable for your application as it is equipped for two trucks like on the FFR trailer.
I agree fully on your statements regarding truck drivers. There is much to be learned. I have even more respect for class A drivers now that I know more about what they need to deal with every day.
Regarding the trailer. Yeah I kinda like the ramps that flip up and make the bed flat as it becomes more useful, but I agree it does not work with two trucks. I am going to weigh and measure both trucks to see what Im exactly working with regarding load as well as exactly how long the trailer needs to be so that I have all the wheels on the trailer bed. Of course a bigger trailer would allow for better load placement, but at least I will have a minimum specification.
XTF #2
build start date June 19 2023
GTM # 344
Build Start December 2010
First track day April 2013
-
12-15-2023, 06:11 AM
#128
Member
-
12-15-2023, 09:00 AM
#129
Kind of a cliff hanger there. I hope you are using a high temp filament like ABS, Nylon, or ASA. If you print that out of PLA or PETG it's going to soften up and lose shape.
-
12-15-2023, 12:41 PM
#130
I am sure you have already done this, but since you stated that the truck will not function properly without that unit, I would think that would be important information for FFR to know and they should come up with some sort of fix for that? Doesn't look like that diagonal is doing much and may be able to be eliminated, but FFR should be able to come up with something "official". After all, these are the types of issues Beta users are supposed to identify and get remedied.
-
12-15-2023, 05:48 PM
#131
Member
Originally Posted by
Ajzride
Kind of a cliff hanger there. I hope you are using a high temp filament like ABS, Nylon, or ASA. If you print that out of PLA or PETG it's going to soften up and lose shape.
Haha sorry for the cliff hanger ! I ran out of time. But yes I am using ASA for both the UV and temperature resistance.
Originally Posted by
crash
I am sure you have already done this, but since you stated that the truck will not function properly without that unit, I would think that would be important information for FFR to know and they should come up with some sort of fix for that? Doesn't look like that diagonal is doing much and may be able to be eliminated, but FFR should be able to come up with something "official". After all, these are the types of issues Beta users are supposed to identify and get remedied.
100% Crash. As the first XTF built on the Gen 14 F150 platform I was a beta builder ++. The gen 13 F150 did not come with the pro power option so provision for mounting the outlet was not included in the XTF frame.
I have reported everything that changed in the All new gen 14 f150 to factory five. The changes and feedback were incorporated into new kits with the idea that it sure would be cool to buy a gen 13 F150 and turn it into a Gen 15 plus the XTF good parts.
As you can imagine the F150 is not all new. The computer systems are all new. I will give Ford that. My 2021 F150 can self drive. The Steering rack is capable of 100% servo control as are the brakes and accelerator. To be honest Im not a fan of all the gizmos getting between me and driving . Ford released all the blue cruise technology in the gen 14. The cameras are amazing. The 360 view is perfect for driving on to a trailer or just in tight spaces. I can see exactly how close i am anywhere around the truck. It has radar
I could easily and very quickly modify the factory five frame so the factory pro power housing will fit. That would be too easy. While I have some time I figured lets redesign something that works perfectly just to see if I can. You know how that goes.
Oh one last thing. The Ford pro power housing is actually half air inside . Its made bigger so when installed on the lightning you can have more outlets with higher amperage. The racer in me cant have that. We have a giant housing for no reason. I needed to make better use of space.
XTF #2
build start date June 19 2023
GTM # 344
Build Start December 2010
First track day April 2013
-
12-15-2023, 06:28 PM
#132
Member
-
12-20-2023, 05:59 AM
#133
Member
-
12-20-2023, 10:52 AM
#134
I have to just say, that is very cool.
The more I see people doing with 3D printers the more I want one.
Now to convince the wife I NEED one.
-
12-20-2023, 12:15 PM
#135
Just keep in mind that the "printer" part of the equation is the easy part. Learning to design the part you want is much harder along with the fact that computer programs that allow you to do the design can be very expensive and have a steep learning curve.
-
12-21-2023, 05:57 AM
#136
Member
You need a 3D printer
Originally Posted by
crash
I have to just say, that is very cool.
The more I see people doing with 3D printers the more I want one.
Now to convince the wife I NEED one.
While Im not trying to crate domestic unrest. You need one. I cant tell you how many things I use the printer for. From making a housing like this, to printing a housing that makes the truck think the grill shutters are still attached to making holders for the shock remote reservoirs to making a replacement cap for a bearing cover that was lost.
Yes you need to consider the heat your part will deal with and strength of the plastic you are printing, but i have found with a little creativity and material choice you really can solve many problems that formerly were not in the realm of an weekend warrior.
Originally Posted by
Namrups
Just keep in mind that the "printer" part of the equation is the easy part. Learning to design the part you want is much harder along with the fact that computer programs that allow you to do the design can be very expensive and have a steep learning curve.
Yes you are correct Scott, the printing part is the easy part. But you can get software that works well for free. Fusion 360 has a free version that will allow you to make everything I did, and you can get Solid works for 99 dollars a year. Both programs could draw this part easily.
I only started using fusion 360 for drawing stuff a few years ago and am 100% YouTube taught. I would encourage anyone who has the desire to put a little time into learning to take the plunge.
Crash, download fusion 360 and start to play around and see if you like the drawing part of this process. Once you can make the software do what you want, the world is your oyster.
My post makes it look like i fired these parts out first try in a few days, but i actually went through several iterations trying solutions and revising the design. Printer filament is super cheap and I set the printer going over night or when Im at work and I wake up or come home to a finished part.
The next frontier is making castings in aluminum from the plastic parts. I dont have a good problem to solve that needs this process yet, but Im sure Ill find one.
XTF #2
build start date June 19 2023
GTM # 344
Build Start December 2010
First track day April 2013
-
12-21-2023, 09:12 AM
#137
East Coast Speed Machines

FFR 1879, Blown DSS 306,REDLINE management, VeryCoolParts Tuned 460RWHP
FFR 818S, The Flash, Chassis #5, 2.0L, LSD, Electromotive TEC-S, VCP Tuned, 278RWHP 265 RWTQ
FFR 6651, Green Lantern, 408W Crate, Hellion 66mm Turbo, JGS Waste gate / Blowoff valve, Tec-GT management, VCP Tuned, 575 RWHP, 690 RWTQ
FFR 8335, Black Mamba, 289 FIA CSX 2001 tribute car, 347, 48 IDA webers, VCP Tuned, 311 RWHP 386 RWTQ, 3-link, Trigo's
FFR 0004, Gen 3 , Hawk Coupe, Coyote twin turbo, 683 RWHP 559 RWTQ, IRS, VCP Tuned. "not too shabby"
US ARMY Maintenance Test Pilot (CW4 Retired)
-
Post Thanks / Like - 1 Thanks, 0 Likes
-
12-24-2023, 07:22 AM
#138
Member
I was doing some suspension setup adjusting the limits of travel on the rear of the truck this weekend. The travel on this truck amazes me every time.

then fully compressed.

I want to make sure that I have every last bit of travel available in the setup before I start off road testing.
With the super long travel its important that I have located wires and hoses out of the way and also allowed for suspension movement in the brake lines and wires.
XTF #2
build start date June 19 2023
GTM # 344
Build Start December 2010
First track day April 2013
-
12-26-2023, 12:31 PM
#139
You probably have already, but don't forget about articulation. With off road and solid rear axle suspension in particular the articulation can be extreme and can cant the rear tires greatly. Need to make sure there is plenty of clearance for that. Does this truck have sway bars?
-
12-27-2023, 06:26 PM
#140
Member
XTF #2
build start date June 19 2023
GTM # 344
Build Start December 2010
First track day April 2013
-
12-28-2023, 10:44 AM
#141
Couple of observations...
The front ARB looks good.
The rear? Not so much. Maybe a suggestion for FFR to try a rear ARB where the bar is actually up on the frame and only the links go up and down to the fixed points on the rear axle? Yes you need some room above and below the ARB, but it can be a straight piece of 4130 tube and it solves a lot of issues.
Also, be very careful using those single point jack stands. They do not handle lateral loads very well, if at all. I would not feel comfortable working under the truck with those.
I'm guessing the Fox Shox have a lot to do with how well the truck handles. Very happy to see FFR using those units. We dropped 3 seconds a lap (!) when we installed some custom Fox Shox on the FFR GTM race car.
Last edited by crash; 12-28-2023 at 02:27 PM.
-
12-29-2023, 09:48 AM
#142
Member
Originally Posted by
crash
Couple of observations...
The front ARB looks good.
The rear? Not so much. Maybe a suggestion for FFR to try a rear ARB where the bar is actually up on the frame and only the links go up and down to the fixed points on the rear axle? Yes you need some room above and below the ARB, but it can be a straight piece of 4130 tube and it solves a lot of issues.
I think FFR were aiming for an ARB setup that would work for the street. I think they hit the mark they’re considering how well the truck turns on the road. There is no way you could ever get that much suspension articulation on the street … well driving legally…
For off road use, yeah a rear bar that is mounted higher would work.

Here is a design i grabbed from a trophy truck.
It seems like there is enough room for a design like this. It’s much more complex and expensive, but I’m pretty sure I could bolt it on using sprint car parts like I did on my GTM.

Last edited by kabacj; 12-29-2023 at 11:42 AM.
XTF #2
build start date June 19 2023
GTM # 344
Build Start December 2010
First track day April 2013
-
01-17-2024, 06:07 PM
#143
Member
-
Post Thanks / Like - 0 Thanks, 1 Likes
-
01-17-2024, 07:04 PM
#144
Heat inserts are okay if the forces are not trying too much to pull them straight out. I’m a huge fan of square nuts because they can be inserted into prints from any orientation, hexagonal nuts only go in flat. Design a hole into your part, pause the print before the first layer closing the hole, drop the nut in to have it fully enclosed.
-
Post Thanks / Like - 1 Thanks, 0 Likes
-
01-18-2024, 05:53 PM
#145
Member
Originally Posted by
Ajzride
Heat inserts are okay if the forces are not trying too much to pull them straight out. Im a huge fan of square nuts because they can be inserted into prints from any orientation, hexagonal nuts only go in flat. Design a hole into your part, pause the print before the first layer closing the hole, drop the nut in to have it fully enclosed.
Thanks AJ. Yeah i agree with your point.
My problem was that Im printing with ASA filament. Just keeping everything attached to the build plate and avoiding any warping required a preheat of the enclosure. Opening the enclosure and letting in a draft of cold air would surely make the print turn into a potato chip instantly .
Even pausing the print might be a problem based on how touchy the setup is . I get the enclosure up to 30 degrees Celsius (86 degrees F) and keep it there for the duration of the 4 hour print. That seems to avoid any warping.
When the print is finished if i am waiting there and open the enclosure as soon as the print is done I can hear the print pulling off the build plate with the draft of cold air.
Thanks for the feedback. I am going to try the captured nut method using some PLA filament .
XTF #2
build start date June 19 2023
GTM # 344
Build Start December 2010
First track day April 2013
-
01-18-2024, 06:44 PM
#146
Originally Posted by
kabacj
Thanks AJ. Yeah i agree with your point.
My problem was that I’m printing with ASA filament. Just keeping everything attached to the build plate and avoiding any warping required a preheat of the enclosure. Opening the enclosure and letting in a draft of cold air would surely make the print turn into a potato chip instantly .
Even pausing the print might be a problem based on how touchy the setup is . I get the enclosure up to 30 degrees Celsius (86 degrees F) and keep it there for the duration of the 4 hour print. That seems to avoid any warping.
When the print is finished if i am waiting there and open the enclosure as soon as the print is done I can hear the print pulling off the build plate with the draft of cold air.
Thanks for the feedback. I am going to try the captured nut method using some PLA filament .
It's much colder in Long Island than Houston, but I've found I can cut out 90% of warping by just using a raft. It wastes a little filament, but not as much as ruining a print or two. Once you dial in your raft settings they peel right off and don't require any clean up.
-
01-20-2024, 01:05 PM
#147
Member
Originally Posted by
Ajzride
It's much colder in Long Island than Houston, but I've found I can cut out 90% of warping by just using a raft. It wastes a little filament, but not as much as ruining a print or two. Once you dial in your raft settings they peel right off and don't require any clean up.
Thanks AJ. Yeah Im near the capacity of my build plate, but I can try a raft. It will not hurt thats for sure.

XTF #2
build start date June 19 2023
GTM # 344
Build Start December 2010
First track day April 2013
-
Post Thanks / Like - 0 Thanks, 1 Likes
-
01-23-2024, 06:10 AM
#148
Member
-
Post Thanks / Like - 0 Thanks, 2 Likes
-
01-23-2024, 11:38 AM
#149
Just curious...what do you think that part has cost you in time and materials so far?
-
01-23-2024, 06:06 PM
#150
Member
Originally Posted by
crash
Just curious...what do you think that part has cost you in time and materials so far?
Well a whole spool of PLA filament costs about 12 bucks. I use that for my prototypes. I could make 4 or 5 complete housings from each spool. The black parts I printed from ASA filament since its UV stable and will tolerate the heat of the sun. ASA is just like ABS you are probably familiar with. ASA is a bit more expensive about $30 per spool. So I would estimate less than 5 dollars per completed housing .
If I were making these as a business. I could make and complete 2 housings per day. Kicking off the prints over night and again when I wake up.
You probably noticed I made each part with quick and flawless assembly in mind. Each part quickly registers into position even if you carelessly push it together.
I also have not spent any time optimizing material used, or production speed. I am sure I could use half as much filament and have plenty of strength. The current housing is much stronger than the Ford housing.
Regarding my time.
A few hours drawing and re drawing the parts as I modified the prototypes so they work and fit exactly as I wanted.
3D printed parts are very fun. This is actually my first complex project, so clearly is not that hard to learn.
I have functional 3d printed parts all over the truck
XTF #2
build start date June 19 2023
GTM # 344
Build Start December 2010
First track day April 2013
-
Post Thanks / Like - 0 Thanks, 2 Likes
-
01-24-2024, 11:46 AM
#151
Good to hear that the filament material is cheap. Are there any other consumables on the printer?
Sounds like your time, and probably the upfront cost of the equipment, are the biggest expenses?
-
01-24-2024, 07:30 PM
#152
Originally Posted by
crash
Good to hear that the filament material is cheap. Are there any other consumables on the printer?
Sounds like your time, and probably the upfront cost of the equipment, are the biggest expenses?
At some point, everything on the printer is a consumable item. 
But in terms of print-to-print, just the filament cost.
So yeah, time on the CAD is the biggest "cost" on any new part, assuming hardware and CAD license are already shored up.
On the note of CAD, Fusion 360 has a hobby license that makes it free. They don't make it easy to find the link to do the registration for such, but it can be done. Also, veterans can pick up a 1yr license for SolidWorks for cheap, I think it was $25 for me last year. I don't think SolidWorks has another cheap license for hobbyists, so if you're not a veteran and your employer doesn't have it, you're out of luck.
Both Autodesk and SolidWorks have training plans that'll get you started using the product enough to make some easy objects. Also, "Google University" has been pretty good to me.
-
01-25-2024, 06:04 AM
#153
Member
Originally Posted by
crash
Good to hear that the filament material is cheap. Are there any other consumables on the printer?
Sounds like your time, and probably the upfront cost of the equipment, are the biggest expenses?
Yes the equipment is the biggest expense. In order to print ASA which is one of the more useful plastics for outside or use on cars you will also need an enclosure. The enclosure stabilizes the temperature around the part you are printing and avoids drafts. You can buy pre made enclosures for about $250 - $350 dollars or DIY one for much less.
Regarding the printers. You can get hobby printers for cheap $300 or so , but they are projects vs a professional tool . Professional printers are $800-$1000.
I went with a Prusa printer. Its made to print around the clock for long periods of time and has great software and hardware support.
XTF #2
build start date June 19 2023
GTM # 344
Build Start December 2010
First track day April 2013
-
01-25-2024, 06:12 AM
#154
Member
Originally Posted by
Windsor
I don't think SolidWorks has another cheap license for hobbyists, so if you're not a veteran and your employer doesn't have it, you're out of luck.
Both Autodesk and SolidWorks have training plans that'll get you started using the product enough to make some easy objects. Also, "Google University" has been pretty good to me.
Hey Rob,
Although its difficult to find on their site. I found a hobby solidworks license for $99 per year.
Many professionals prefer solid works. Its what Factory Five use to model their products . Personally, I like Fusion 360 a bit better as its a one stop shop for everything I want to do from Modeling to production. That said, I am far less familiar with solid works so its possible I just dont know how to use the solidworks software and the same features are available in both platforms.
XTF #2
build start date June 19 2023
GTM # 344
Build Start December 2010
First track day April 2013
-
01-25-2024, 12:56 PM
#155
Rob,
Not to side track this thread too much, but that is great info.
Thanks so much.
John,
Thanks for telling us exactly what you are using.
-
01-25-2024, 06:40 PM
#156
Originally Posted by
kabacj
Hey Rob,
Although it’s difficult to find on their site. I found a hobby solidworks license for $99 per year.
Many professionals prefer solid works. It’s what Factory Five use to model their products . Personally, I like Fusion 360 a bit better as it’s a one stop shop for everything I want to do from Modeling to production. That said, I am far less familiar with solid works so it’s possible I just dont know how to use the solidworks software and the same features are available in both platforms.
Yeah, every Mechanical Engineer (by paid profession) that I know first-hand or second-hand uses SolidWorks, which fits in well with F5's use of it.
My introduction to Fusion 360 was from Dallas Makerspace, which has a (low-end and old) Haas CNC mill. They only had tool libraries for Fusion360 so you were required to use F360 for the CAM setup. I got into 3D printing after that.
-
01-31-2024, 06:14 AM
#157
Member
-
01-31-2024, 10:48 AM
#158
Anodize those black and they will stay looking good forever.
-
01-31-2024, 08:37 PM
#159
Member
Originally Posted by
crash
Anodize those black and they will stay looking good forever.
Yes thats a good point.
As you may remember a few projects ago I welded up some anodizing tanks that would work perfectly for these rails.

Ill add some anodizing to the list of things to do. Great idea.
XTF #2
build start date June 19 2023
GTM # 344
Build Start December 2010
First track day April 2013
-
02-02-2024, 05:47 AM
#160
Member
With the aircraft style L track installed now it was time to get some mounting hardware. I found two styles that seemed to work well.
One is this style where it has has a wide base locking into two holes in the track.

This seems to work pretty well and I would trust it to hold a motorcycle or something of that size.

Then there is this style that fits into one hole on the track . Also plenty strong , but probably for lighter loads.

With 4 of each type in the truck as well as some ratchet straps at all times I’ll be ready to haul whatever I need at a moments notice.
Last edited by kabacj; 02-02-2024 at 07:35 AM.
Reason: Mistake
XTF #2
build start date June 19 2023
GTM # 344
Build Start December 2010
First track day April 2013
-
Post Thanks / Like - 0 Thanks, 1 Likes


 Thanks:
  Likes:


 Reply With Quote


_IMG_1906.png?width=1920&height=1080&fit=bounds)
_IMG_1907.png?width=1920&height=1080&fit=bounds)
_IMG_1908.png?width=1920&height=1080&fit=bounds)
_IMG_1909.png?width=1920&height=1080&fit=bounds)
_IMG_1911.png?width=1920&height=1080&fit=bounds)


