BluePrint Engines

Visit our community sponsor

Thanks Thanks:  0
Likes Likes:  0
Results 1 to 5 of 5

Thread: Cylinder Head Spring Upgrade

  1. #1
    Tool Baron frankeeski's Avatar
    Join Date
    Feb 2011
    Location
    "The I.E." SoCal
    Posts
    1,358
    Post Thanks / Like

    Cylinder Head Spring Upgrade

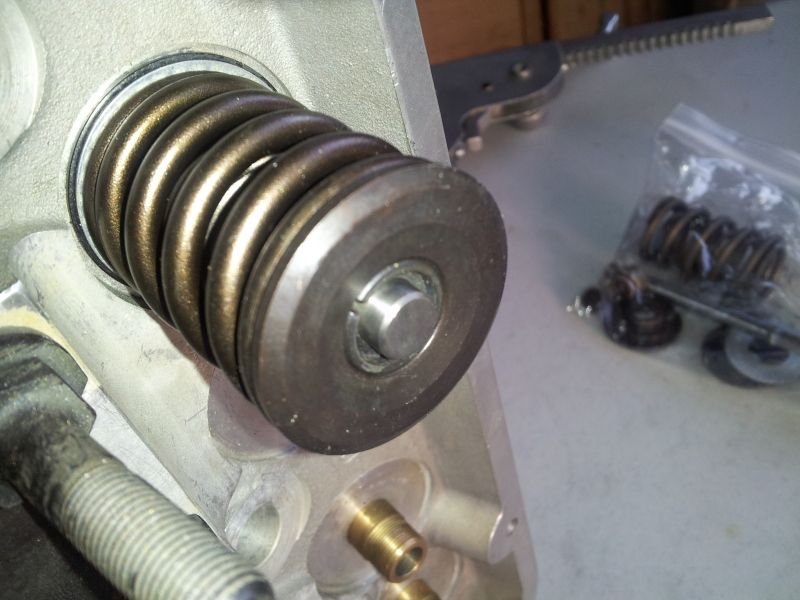
    As some of you may know, I have been running a donor motor in my Roadster for the past 3 years. It was never intended to live in the engine bay for that long but life happens. I have, over that time, been accumulating parts to put together a new 347 to take the place of the well used bullet currently residing under the hood. I picked up a set of heads from one of the locals a couple of year ago. They were/are brand new but as many of you know most assembled cylinder heads only allow you to run a cam with .500 max lift. The cam I am going to be running surpasses that by .065. Knowing I had to replace the springs for the cam to operate I figured it would be a good opportunity to take my "as cast" heads and massage them a bit. I've got a bit more than 40 hours of porting time smoothing out the intake and exhaust runners and taking all of the sharp edges of of the combustion chambers. That brings us current. I am of the school that once the seals are removed they are trash so I ordered up a set of Howard Cams Flouro-somthing or other seals (DuPontŪ fluoropolymer). I can't say enough about these so far. Easy install with no special tools, they install with just your fingers. They seem to have a nice seal to both the guides and the stems. Here is a step by step for any of you that plan on tackling this job yourselves.

    Here are the parts I started with. New springs from Comp, Seals from Howard Cams,one .030 shim, one .015 shim, the original valve and my existing retainers and lock. Remember to coat the valve stem liberally with Moly-Lube before inserting into the guide. Just gives it some lubrication at start up the first time.

    Seals being installed with just fingers on the stem and guide. Be careful to push it on straight as to not booger up the inside of the seal.

    Stem installed all the way down on the guide. Now it is ready for the spring, retainer and the lock.

    Valve spring micrometer used to measure the installed height of the valve spring. I installed the two shim to sneak up on the 1.80 installed height measurement I need for the springs. Note the micrometer is not yet at 1.8 for the picture, it is showing 1.780 and still not quite snug.
    Last edited by frankeeski; 06-15-2012 at 01:09 AM.
    Frank
    __________________________
    Factory Five Racing MKIII Super Snake Replica. Cannonball Cobra Drop Trunk Box, Horn Button and other machined Do Dads.
    i.e.427 Chromed Full Width Roll Bar with integrated LED Third Brake Light.
    I will never forget My Buddy Paul.

  2. #2
    Tool Baron frankeeski's Avatar
    Join Date
    Feb 2011
    Location
    "The I.E." SoCal
    Posts
    1,358
    Post Thanks / Like
    Valve spring compressed with the retainer on the top, ready for the locks. This part can be a bit tricky as one side is always tight and the other wants to fall out. Release the compressor slowly and be careful not to launch the locks across the garage floor.

    After the locks are installed the ceremonial whack with the dead blow. This is actually important as it seats the locks into the retainer. Don't skip this step!

    And finally the finished spring upgrade.

    Now just repeat this 16 more times and you are all done.

    Although this is not the first time I have done springs on a set of heads, it is the first time I have been this meticulous about how it was done. After receiving the springs I took them over to Dan Zoil's place. His shop is right next door to BMR Racing and the guys there (Thanks Doug!) were kind enough to lend us their valve spring scale to check the spring rates. I'll say this for Comp Cams, every one of the springs was spot on the measurement. I don't know if the 40 or so hours I spent porting the heads will make a noticeable difference but I had the time while I was saving pennies to get some parts for this project and the engine project in general. Was it time well spent??? I guess we will see. But I sure enjoyed doing it.
    Last edited by frankeeski; 06-14-2012 at 11:53 PM.
    Frank
    __________________________
    Factory Five Racing MKIII Super Snake Replica. Cannonball Cobra Drop Trunk Box, Horn Button and other machined Do Dads.
    i.e.427 Chromed Full Width Roll Bar with integrated LED Third Brake Light.
    I will never forget My Buddy Paul.

  3. #3
    Tool Baron frankeeski's Avatar
    Join Date
    Feb 2011
    Location
    "The I.E." SoCal
    Posts
    1,358
    Post Thanks / Like
    A refresher as to where these cylinder heads are destine for.
    http://thefactoryfiveforum.com/showt...ghlight=bullet
    Last edited by frankeeski; 06-14-2012 at 11:53 PM.
    Frank
    __________________________
    Factory Five Racing MKIII Super Snake Replica. Cannonball Cobra Drop Trunk Box, Horn Button and other machined Do Dads.
    i.e.427 Chromed Full Width Roll Bar with integrated LED Third Brake Light.
    I will never forget My Buddy Paul.

  4. #4
    Senior Member riptide motorsport's Avatar
    Join Date
    Feb 2011
    Location
    Fort Lauderdale Fl.
    Posts
    3,296
    Post Thanks / Like
    Looks good. Be worth it in the end.
    FFR Daytona Type 65 Coupe
    67 427 Cobra
    57' Belair
    72 Pinto Wagon ,306" 1/4 miler
    34 5 window coupe Ford
    2003 Mustang GT
    99' ZX9
    85 Goldwing

    All toys still in the Scuderia!


    Every Saint has a past..................every sinner a future

    Don't take yourself so seriously........no one else does.

    You never see a motorcycle parked outside a Psychiatrists office.

  5. #5

    Join Date
    Feb 2011
    Location
    Colorado Springs
    Posts
    1,386
    Post Thanks / Like
    Nice "How To" article with some excellent photos. This is the way it's supposed to be done. I would add little things to this thread.

    - Simply pressing the seals over the end of the valve stem can damage the seal. The grooves in the stem are sharp enough to cause damage. Valve seal seats usually come with a thin, short, plastic cap that you drop over the end of the stem, and then slide the seal over that past the groove. If you don't have one, you can use scotch tape.

    - I like to lube the valve stems before inserting into the head. I use engine assembly lube, but a lot of people use motor oil.

    - It's important that you never set the spring into a bare spring pocket in an alum head. The spring will chew up the alum in no time.

    - It's important to use the micrometer, but make sure you're setting it to the correct height.
    -- Coil bind height + valve lift + .060" = installed height.
    -- you should calculate this out before buying springs.

    - If you have a high lift cam and a head set up for a hydraulic roller cam, the spring pockets are often not deep enough. It's a fairly simple matter to shave off a little material to give you the room you need. Ir you can replace all the valves with longer stems.

    .boB "Iron Man"
    NASA Rocky Mountain, TTU #42, HPDE Instructor
    BDR 1642: Coyote, 6 Speed Auto, Edelbrock Supercharger
    Member: www.MileHiCobraClub.com
    www.RacingTheExocet.com

Posting Permissions

  • You may not post new threads
  • You may not post replies
  • You may not post attachments
  • You may not edit your posts
  •  

Martin's Dent and Collision Shop

Visit our community sponsor