Forte's

Visit our community sponsor

Thanks Thanks:  0
Likes Likes:  0
Page 3 of 12 FirstFirst 12345 ... LastLast
Results 81 to 120 of 470

Thread: Sponaugle's H6 EZ30R 818S

  1. #81
    Research Calibrator sponaugle's Avatar
    Join Date
    Apr 2013
    Location
    Portland, OR
    Posts
    401
    Post Thanks / Like
    Time to start the wire diet.

    Since the 06 STI I bought had a pretty hacked up main wire harness I purchased a second complete wire harness from another wrecked 06 STI. As a result I have two of most of the major harnesses.

    Here is how the shop floor looked starting out:


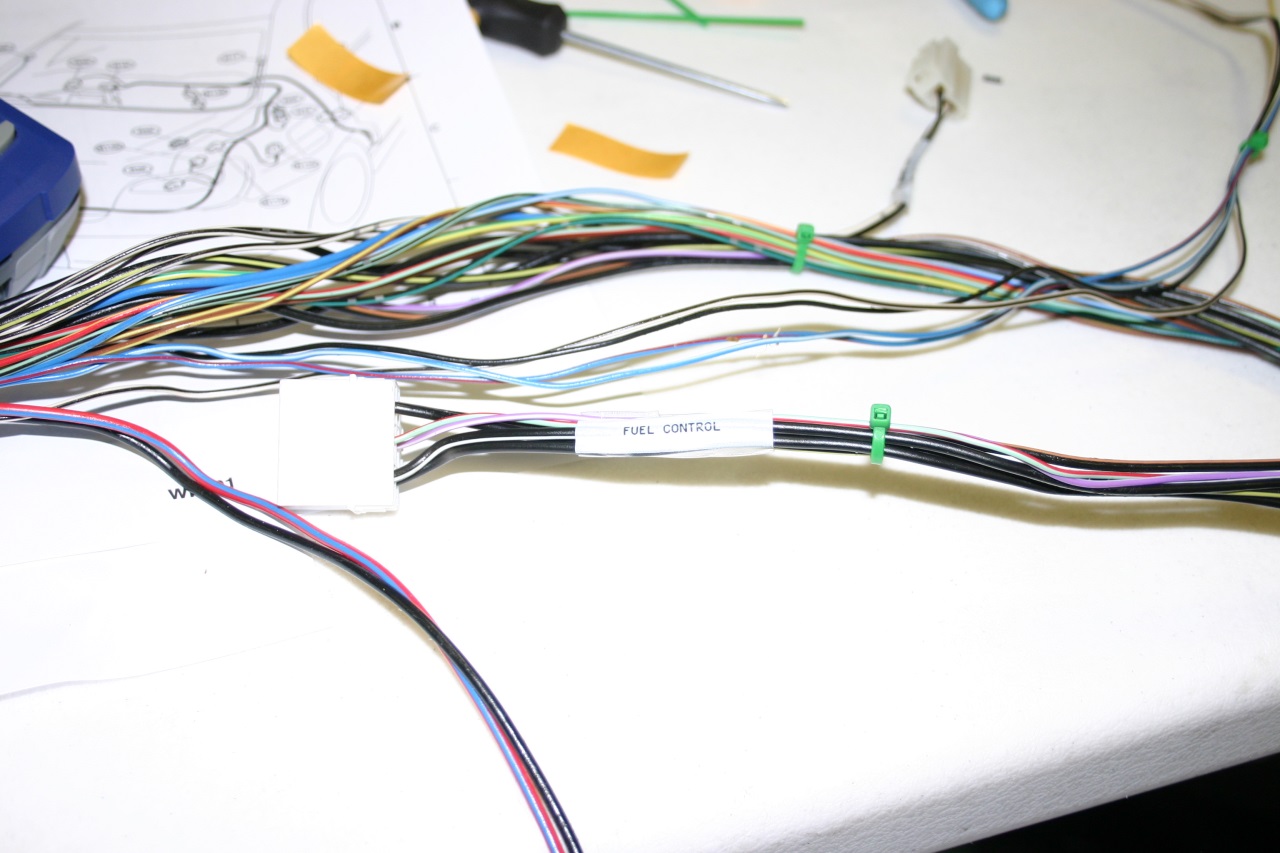
    Here is a picture of the two main bulkhead harnesses. (Both are the same harness, once from my car and one from another car). This is the primary bulkhead harness that is really the backbone of the wiring.


    In case you are curious as to what it plugs into, here is a small annotated picture:


    Of the two main harnesses, one of them has a pretty hacked up ECU side, so I will be using the other main harness which has a very clean ECU connector.

    You can see the hacked up one here:


    Unfortunately this harness does have one problem, the ABS connector was cut off during removal:


    The other harness doesn't have the problem so I can transfer over that connector. Since the ABS will probably be in the front, I would likely have to extend the wires anyways.

    I also have two of the 'rear bulkhead' harnesses:


    However I have only one dash harness:


    I'll document the process for each harness, showing which connectors and wires I have removed how it is repackaged for installation.

    Jeff

  2. #82
    Mechie3's Avatar
    Join Date
    May 2012
    Location
    Indianapolis
    Posts
    5,174
    Post Thanks / Like
    Here's my writeup for an 06 WRX harness. The STI harness will be similar in many respects. You can probably piggy back off of that and save yourself some work.

    http://thefactoryfiveforum.com/showt...h-Auto-AC-HVAC
    Zero Decibel Motorsports
    Check out my new website!
    www.zerodecibelmotorsports.com
    www.facebook.com/zero.decibel.motorsports

  3. #83
    Research Calibrator sponaugle's Avatar
    Join Date
    Apr 2013
    Location
    Portland, OR
    Posts
    401
    Post Thanks / Like
    Quote Originally Posted by Mechie3 View Post
    Here's my writeup for an 06 WRX harness. The STI harness will be similar in many respects. You can probably piggy back off of that and save yourself some work.

    http://thefactoryfiveforum.com/showt...h-Auto-AC-HVAC
    Yea, I have read that thread many times, and lots of good info there. I'll document what is unique to the STI where possible in case people end up using an STI harness. Great Stuff!!

    Jeff

  4. #84
    Research Calibrator sponaugle's Avatar
    Join Date
    Apr 2013
    Location
    Portland, OR
    Posts
    401
    Post Thanks / Like
    For those Subaru nerds out there:

    I was flying into the Purdue University Airport and spotted the Subaru of American facility out of the window.


    It is the home of all of the Legacys and Forresters. Pretty big place. Just think of all the Subaru goodness in those walls!

    Jeff

  5. #85
    Senior Member Frank818's Avatar
    Join Date
    Jun 2013
    Location
    QC, Canada
    Posts
    5,732
    Post Thanks / Like
    Personal plane, that was?
    Frank
    818 chassis #181 powered by a '93 VW VR6 Turbo GT3582R
    Go-karted Aug 5, 2016 - Then May 19+21, 2017
    Tracked May 27/July 26, 2017
    Build time before being driveable on Sep 27, 2019: over 6000h
    Build Completed Winter 2021

  6. #86
    Research Calibrator sponaugle's Avatar
    Join Date
    Apr 2013
    Location
    Portland, OR
    Posts
    401
    Post Thanks / Like
    Quote Originally Posted by Frank818 View Post
    Personal plane, that was?
    Private plane thru XOJet yeah. I think American used to have commercial service at Purdue, but that ended a few years back. It was (is actually since I'm still in the midwest right now) a family trip to visit my parents and my wife's family It is a Citation X, which is sort of the GT-R of private jets. Actually it was the fastest I think I have ever been at 706mph. On the way back to PDX I'm going to see if we can push it a bit more get the the planes top speed of Mach 0.92. Even cooler it can cruise at 51,000 feet which is sweet.


    Jeff
    Last edited by sponaugle; 05-22-2014 at 07:52 PM.

  7. #87
    Senior Member Frank818's Avatar
    Join Date
    Jun 2013
    Location
    QC, Canada
    Posts
    5,732
    Post Thanks / Like
    51k feet, wow that's pretty high, I didn't know those little Cessna's could go that high. For 23 million a piece, you gotta have something good, right? lolll

    You're not planing on flying with your 818, I hope? Install the aero parts on the correct side to keep it on the ground.
    Frank
    818 chassis #181 powered by a '93 VW VR6 Turbo GT3582R
    Go-karted Aug 5, 2016 - Then May 19+21, 2017
    Tracked May 27/July 26, 2017
    Build time before being driveable on Sep 27, 2019: over 6000h
    Build Completed Winter 2021

  8. #88
    Mechie3's Avatar
    Join Date
    May 2012
    Location
    Indianapolis
    Posts
    5,174
    Post Thanks / Like
    You're not far from my house right now.
    Zero Decibel Motorsports
    Check out my new website!
    www.zerodecibelmotorsports.com
    www.facebook.com/zero.decibel.motorsports

  9. #89
    Research Calibrator sponaugle's Avatar
    Join Date
    Apr 2013
    Location
    Portland, OR
    Posts
    401
    Post Thanks / Like
    Quote Originally Posted by Frank818 View Post
    51k feet, wow that's pretty high, I didn't know those little Cessna's could go that high. For 23 million a piece, you gotta have something good, right? lolll
    You're not planing on flying with your 818, I hope? Install the aero parts on the correct side to keep it on the ground.
    Haha.. yea I'll try to keep the 818 on the ground where possible... although I must admit it would be cool to do wheelies in it.

    Quote Originally Posted by Mechie3 View Post
    You're not far from my house right now.
    Sweet.. Yea I see you are in Indianapolis. I grew up in Kokomo and got my BSEE at Purdue, so I know the area well. My parents live in Attica, and my sister is an Attorney in West Lafayette. Lots of long straight roads here!

    Jeff

  10. #90
    Research Calibrator sponaugle's Avatar
    Join Date
    Apr 2013
    Location
    Portland, OR
    Posts
    401
    Post Thanks / Like
    Ok.. Back on track.. Before I left I did make some more progress on the wire harness diet.

    I marked every connector with either blue or red electrical tape, red to remove, blue to keep. I then removed all the sheathing and tape, and started unwinding the wires not in use. I started with the rear and front harness.

    The rear harness before and after:


    With the extra connectors removed I labeled all the remaining connectors:


    The front and rear harnesses didn't lose that much stuff as they have more critical things on them. The primary bulkhead harness has most of the removed stuff like HVAC, Doors, lights, etc. I have left in the harness what is needed for ABS, plus for steering controls like lights, turn signals, horn, etc to still work.

    I started on the primary bulkhead harness, but will have to complete once I am back from vacation. There are a lot of wires in that harness.

    I have to admit I was tempted to just cut off the connectors I need and make my own harness.. it would be so much cleaner. It is clear that there are a good number of connectors that will need to be either cut shorter or extended.

    I assume that most people are doing the wire diet method instead of the building a new harness using the connectors?

    I'll keep the excel sheet posted above up to date as I get things cut down. There might be a few changes.
    Last edited by sponaugle; 05-22-2014 at 02:03 PM.

  11. #91
    Mechie3's Avatar
    Join Date
    May 2012
    Location
    Indianapolis
    Posts
    5,174
    Post Thanks / Like
    I did the diet. Mainly because I wanted to keep as many systems as possible (mostly security) and I'm not talented enough in the EE dept to make my own wiring harness and have it work the first time. Looking back, if I had the skills, I'd much rather make my own. Would be cleaner and take less time.
    Zero Decibel Motorsports
    Check out my new website!
    www.zerodecibelmotorsports.com
    www.facebook.com/zero.decibel.motorsports

  12. #92

    Join Date
    Oct 2013
    Location
    Puyallup, WA
    Posts
    576
    Post Thanks / Like
    Have you tackled the removal of the DCCD wiring?

  13. #93
    Research Calibrator sponaugle's Avatar
    Join Date
    Apr 2013
    Location
    Portland, OR
    Posts
    401
    Post Thanks / Like
    Quote Originally Posted by Kurk818 View Post
    Have you tackled the removal of the DCCD wiring?
    I removed the dccd from the harness, and I have the connectors and the controller. If it turns out that I need it installed, I'll wire it directly. I did verify that the private CAN bus is just for the ABS , DCCD, and the steering angle sensor.

    I will power up the DCCD on the bench and see what traffic it generates.

    Jeff

  14. #94
    Research Calibrator sponaugle's Avatar
    Join Date
    Apr 2013
    Location
    Portland, OR
    Posts
    401
    Post Thanks / Like
    I am now about 90% done with the wire diet of the factory harnesses. The main bulkhead harness is the largest and the biggest pain.

    Here is what it looks like now:


    This harness still has a number of relays as well as the interior fuse panel connections. To make things easier while I am installing things, I labeled all of the connectors and relays:


    For anyone else about to start the wire diet, here is the procedure I used:

    I started by mapping out all of the connectors on all of the harnesses, and figuring out which things I wanted to delete. See the spreadsheet a few posts up for the details of how that looks.

    Once I knew what I wanted to keep and remove, I went around the harness and put blue tape on everything I wanted to keep and red tape on the things I wanted to delete. I then cut off the red marked connectors and used a label maker to put labels on all of the remaining blue marked ones. I removed all of the black tape and wire protectors, which left a harness with a ton of extra cut wires laying around. Starting at one end and threaded each cut wire throughout the harness until it either came out because it was already cut on both ends, or terminated into a connector.

    Once all of the dead wires were removed, I took note of what color wires were on each connector that were free floating. These were from circuits I removed, but were still going through some of the bulkhead connectors. (for example if you remove security there are a number of wires that go to the dash that will now be disconnected. I then went through the wire diagrams and made sure the cut wire colors on those connectors went with circuits I removed. This is really just a step to double check that what I wanted to remove got removed without taking anything else with it.

    I did discover one error I made where I removed a diode used in the headlight circuit.

    There are a number of buried 'joint connectors' where wires are joined together. When you are unwrapping and cutting, be sure to tape or seal up these joints. You don't want to leave exposed wire ends from the wires you cut out. In some cases I used heat shrink, and in some cases just black tape.

    Now that the harness is smaller, I need the 818 chassis to start working on layout. The factory harness is not a perfect match because on the primary bulkhead harness one end is near the steering column, but that same end needs to connect to the 'front engine bulkhead harness' which on the 818 will be partially in the rear. I will probably have to extend some of those wires to reach back to the engine area. The other end of the primary bulkehad harness goes to a rear harness ( fuel tank, etc) so that is well located.

    I can see how it would be better to just build a new harness from scratch. Since I am going to run a 4 cylinder engine to get registered and then switch to the H6, I may just do a new custom build harness for the H6 since it needs a number of extra connections anyways.

    Also, my straight cut synchro PPG transmission should be done this week from Andrewtech. Woot!

    Jeff
    Last edited by sponaugle; 05-26-2014 at 03:10 PM.

  15. #95
    Senior Member R.Spec's Avatar
    Join Date
    May 2014
    Location
    Portland, Oregon
    Posts
    136
    Post Thanks / Like
    Cool to have another 818 so close! I just ordered mine last week and can't wait to get it! We will have to connect sometime. I work at Horizontal Motorsports in Tualatin/Sherwood. We are gonna build it at the shop there.

  16. #96
    Senior Member Frank818's Avatar
    Join Date
    Jun 2013
    Location
    QC, Canada
    Posts
    5,732
    Post Thanks / Like
    Quote Originally Posted by sponaugle View Post
    Are these from the steering column? The brackets look like they are. Too bad I am at work and can't check on my column now.
    Frank
    818 chassis #181 powered by a '93 VW VR6 Turbo GT3582R
    Go-karted Aug 5, 2016 - Then May 19+21, 2017
    Tracked May 27/July 26, 2017
    Build time before being driveable on Sep 27, 2019: over 6000h
    Build Completed Winter 2021

  17. #97
    Mechie3's Avatar
    Join Date
    May 2012
    Location
    Indianapolis
    Posts
    5,174
    Post Thanks / Like
    No. They come from under the glove box and console.
    Zero Decibel Motorsports
    Check out my new website!
    www.zerodecibelmotorsports.com
    www.facebook.com/zero.decibel.motorsports

  18. #98
    Research Calibrator sponaugle's Avatar
    Join Date
    Apr 2013
    Location
    Portland, OR
    Posts
    401
    Post Thanks / Like
    Quote Originally Posted by R.Spec View Post
    Cool to have another 818 so close! I just ordered mine last week and can't wait to get it! We will have to connect sometime. I work at Horizontal Motorsports in Tualatin/Sherwood. We are gonna build it at the shop there.
    Absolutely. I'm just about to start organizing an 818 NW get together for sometime in July, so stay tuned. What delivery date did you get, since you just ordered.. curious what the lead time is now.

    Quote Originally Posted by Frank818 View Post
    Are these from the steering column? The brackets look like they are. Too bad I am at work and can't check on my column now.
    As Mechie said, passenger footwell area:

    In Red circles:


    There are two relays attached to the side of the inside fuse panel, but those get removed since they are for DCCD and something else I removed. There is also a starter block relay which I still have in the circuit, but could be removed since I removed the factory security.. however I plan to use that for my own security switch.

    Jeff

  19. #99
    Senior Member R.Spec's Avatar
    Join Date
    May 2014
    Location
    Portland, Oregon
    Posts
    136
    Post Thanks / Like
    Quote Originally Posted by sponaugle View Post
    Absolutely. I'm just about to start organizing an 818 NW get together for sometime in July, so stay tuned. What delivery date did you get, since you just ordered.. curious what the lead time is now.


    Jeff
    They told me november the day before I ordered. I havent got a call yet. I will be giving them a call tomorrow probably. I just talked to Matt Kincaid one of my coworkers and he said he remembers you from way back in the early subaru days of pdx tuning etc.

  20. #100
    Research Calibrator sponaugle's Avatar
    Join Date
    Apr 2013
    Location
    Portland, OR
    Posts
    401
    Post Thanks / Like
    Woot! Time to start building.. my car has arrived!


    The car being delivered at Perrin Performance.


    The chassis sitting in my trailer ready to be unloaded at my house.

    Now the real fun begins!

    Jeff

  21. #101

    Join Date
    Oct 2013
    Location
    Puyallup, WA
    Posts
    576
    Post Thanks / Like
    Congrats!. The fun starts now

  22. #102
    Mechie3's Avatar
    Join Date
    May 2012
    Location
    Indianapolis
    Posts
    5,174
    Post Thanks / Like
    Very nice! Looking forward to seeing this build.
    Zero Decibel Motorsports
    Check out my new website!
    www.zerodecibelmotorsports.com
    www.facebook.com/zero.decibel.motorsports

  23. #103
    Senior Member
    Join Date
    Jan 2014
    Location
    USA
    Posts
    587
    Post Thanks / Like
    Very cool, Jeff. The initial assembly is a lot of fun. I even found the wire diet enjoyable. Things slowed down when I got to mounting the body panels. That's something I would love to have outsourced.

  24. #104
    Research Calibrator sponaugle's Avatar
    Join Date
    Apr 2013
    Location
    Portland, OR
    Posts
    401
    Post Thanks / Like
    I started doing inventory today of everything. My car was complete on 5/10 but didn't get picked up by Stewart until 6/1 because I was traveling.... it seems that extra bit of time waiting there made a difference in terms of backorder stuff. Take a look at the Backorder BOM:


    When my car was originally packed up there was a pretty large list of backorder stuff, but by the time it got picked up there were only 4 items on the list left: a 3/8s rod, the transmission cover, the headlights, and the radiator hose set. I can get quite a bit done without those items! I guess FF is catching up on backorder stuff now.

    I got the chassis out of my trailer and into the shop:


  25. #105
    Senior Member waruaki's Avatar
    Join Date
    Aug 2013
    Location
    Salem, Oregon
    Posts
    168
    Post Thanks / Like
    Congratulations

  26. #106
    Senior Member Frank818's Avatar
    Join Date
    Jun 2013
    Location
    QC, Canada
    Posts
    5,732
    Post Thanks / Like
    Yeah they are catching up pretty good on BO stuff, mine was last end of April and nothing on the BO list was useful for me (did upgrades or not using cuz I am using another engine).

    That blue subbie could have been the donor.
    Frank
    818 chassis #181 powered by a '93 VW VR6 Turbo GT3582R
    Go-karted Aug 5, 2016 - Then May 19+21, 2017
    Tracked May 27/July 26, 2017
    Build time before being driveable on Sep 27, 2019: over 6000h
    Build Completed Winter 2021

  27. #107
    Research Calibrator sponaugle's Avatar
    Join Date
    Apr 2013
    Location
    Portland, OR
    Posts
    401
    Post Thanks / Like
    Quote Originally Posted by Frank818 View Post
    That blue subbie could have been the donor.
    Haha.. yea... it is sitting there thinking... that could be me!

    So I finished up the inventory, only one mistake on FFRs part ( a small part ), so all is good. I didn't realize how many aluminum panels there were. I am fortunate that my wife has let me convert our guest house into a man cave/ham shack/reloading station/electronics prototyping lab and now body panel storage!


    I do have a question for people who have done powder coating; Did you powder coat every aluminum panel, or just the ones in the cockpit area? Given you have to fit each panel and drill for the rivets, you would have to do all of the fitting first then remove every panel to send off to coating. That seems like a lot of work, but it would be nice to have everything coated.

    I suppose I could powder coat all of the internal panels and just paint the other ones.

    Jeff

  28. #108
    Senior Member AZPete's Avatar
    Join Date
    Feb 2011
    Location
    Scottsdale, AZ
    Posts
    2,374
    Post Thanks / Like
    Jeff, I powder coated only the alum panels that will be seen and not the ones to be covered. Coated were the wheel well panels, front compartment sides & floor, panel under the seats, rear wheel well panels, and others that will be seen. Not coated were the rear firewall, cockpit sides, dead pedal pieces, center console, door frames and any other interior pieces that I will later cover with leather or vinyl.
    818S/C : Chassis #25 with 06 WRX 2.5 turbo, ABS, cruise, PS, A/C, Apple CarPlay, rear camera, power windows & locks, leather & other complexities. Sold 10/19 with 5,800 miles.
    Mk3 Roadster #6228 4.6L, T45, IRS, PS, PB, ABS, Cruise, Koni's, 17" Halibrands, red w/ silver - 9K miles then sold @ Barrett-Jackson Jan 2011 (got back cash spent).

  29. #109
    Senior Member
    Join Date
    Jan 2014
    Posts
    617
    Post Thanks / Like
    I second the leather or vinyl on the interior. I plan on using body filler under the vinyl so the rivets don't show.

  30. #110
    Member CptTripps's Avatar
    Join Date
    Jun 2014
    Location
    Cleveland, OH
    Posts
    51
    Post Thanks / Like
    Quote Originally Posted by Jaime View Post
    I second the leather or vinyl on the interior. I plan on using body filler under the vinyl so the rivets don't show.
    That's going to be a LOT of filler, and I'm not sure it'll work out how you want. Maybe a better idea would be to use a closed-cell foam like a yoga mat. You could use a regular paper hole punch where the rivets are so the vinyl will smooth over them.

    Just a thought...

  31. #111
    Tazio Nuvolari wannabe Scargo's Avatar
    Join Date
    Nov 2013
    Location
    south-central CT
    Posts
    1,611
    Post Thanks / Like
    There are flush-headed rivets.

  32. #112
    Senior Member
    Join Date
    Jan 2014
    Posts
    617
    Post Thanks / Like
    Quote Originally Posted by CptTripps View Post
    That's going to be a LOT of filler, and I'm not sure it'll work out how you want. Maybe a better idea would be to use a closed-cell foam like a yoga mat. You could use a regular paper hole punch where the rivets are so the vinyl will smooth over them.

    Just a thought...
    I was going to do something like that. Probably one layer of vinyl with holes and body fill the holes, then a second layer. I don't think any rivets are flush enough not to show through.

  33. #113
    Senior Member Triathletedave's Avatar
    Join Date
    Sep 2012
    Location
    Calgary
    Posts
    232
    Post Thanks / Like
    Quote Originally Posted by sponaugle View Post
    Haha.. yea... it is sitting there thinking... that could be me!

    So I finished up the inventory, only one mistake on FFRs part ( a small part ), so all is good. I didn't realize how many aluminum panels there were. I am fortunate that my wife has let me convert our guest house into a man cave/ham shack/reloading station/electronics prototyping lab and now body panel storage!


    I do have a question for people who have done powder coating; Did you powder coat every aluminum panel, or just the ones in the cockpit area? Given you have to fit each panel and drill for the rivets, you would have to do all of the fitting first then remove every panel to send off to coating. That seems like a lot of work, but it would be nice to have everything coated.

    I suppose I could powder coat all of the internal panels and just paint the other ones.

    Jeff
    When I received my kit, the first thing I did was to take all of the aluminum parts and panels plus any uncoated steel parts in for powder coating. A wee bit excessive, but I got a good price for the whole kit, and I never have to worry about powder coating anything last-minute as I install parts. It was just a lot easier this way.
    TriguyDave
    818 noobie builder
    First start: Sept 28, 2014
    Go-carted: Oct 4, 2014
    Registered and Street legal Sept 30, 2015
    Calgary, Alberta

  34. #114
    Senior Member
    Join Date
    Feb 2011
    Location
    Orange, CA, USA
    Posts
    739
    Post Thanks / Like
    Quote Originally Posted by sponaugle View Post
    I do have a question for people who have done powder coating; Did you powder coat every aluminum panel, or just the ones in the cockpit area? Given you have to fit each panel and drill for the rivets, you would have to do all of the fitting first then remove every panel to send off to coating. That seems like a lot of work, but it would be nice to have everything coated.

    I suppose I could powder coat all of the internal panels and just paint the other ones.

    Jeff
    My frame ran $425 to powder coat, plus another $80 for the front radiator support and rear chassis brace. At the same time, I asked for a price for all of the aluminum and was quoted $1100. I didn't know what would show and what wouldn't so I didn't bother with any of it. Also, if you have the coated before drilling the rivet holes, the powder coater may want to drill some holes for hanging the panels.

  35. #115
    Research Calibrator sponaugle's Avatar
    Join Date
    Apr 2013
    Location
    Portland, OR
    Posts
    401
    Post Thanks / Like
    Quote Originally Posted by Triathletedave View Post
    When I received my kit, the first thing I did was to take all of the aluminum parts and panels plus any uncoated steel parts in for powder coating. A wee bit excessive, but I got a good price for the whole kit, and I never have to worry about powder coating anything last-minute as I install parts. It was just a lot easier this way.
    Interesting... did you have any cracking when you then drilled for the rivets?

    Quote Originally Posted by Evan78 View Post
    My frame ran $425 to powder coat, plus another $80 for the front radiator support and rear chassis brace. At the same time, I asked for a price for all of the aluminum and was quoted $1100. I didn't know what would show and what wouldn't so I didn't bother with any of it. Also, if you have the coated before drilling the rivet holes, the powder coater may want to drill some holes for hanging the panels.
    Thanks. that gives me a good ball park. I need to figure out what things I will put carpet on etc. I could also just paint the aluminum panels, but of course that is easy to scratch so not as good as a real powder coat.

    Jeff

  36. #116
    Senior Member AZPete's Avatar
    Join Date
    Feb 2011
    Location
    Scottsdale, AZ
    Posts
    2,374
    Post Thanks / Like
    Quote Originally Posted by Scargo View Post
    There are flush-headed rivets.
    To make a rivet head flush: drill a 1/4" hole in a piece of wood, drill a 1/8" or 3/16" hole in the aluminum panel and then place the panel on the wood so both holes line up. Place a phillips-head flat-head wood screw in the hole and place the tip of a phillips-head screwdriver on the screw. Tap the screwdriver gently to make a small recess in the panel. When you rivet the panel in place the rivet head will be flush. This is especially good for panels you cover without any padding.
    818S/C : Chassis #25 with 06 WRX 2.5 turbo, ABS, cruise, PS, A/C, Apple CarPlay, rear camera, power windows & locks, leather & other complexities. Sold 10/19 with 5,800 miles.
    Mk3 Roadster #6228 4.6L, T45, IRS, PS, PB, ABS, Cruise, Koni's, 17" Halibrands, red w/ silver - 9K miles then sold @ Barrett-Jackson Jan 2011 (got back cash spent).

  37. #117
    Research Calibrator sponaugle's Avatar
    Join Date
    Apr 2013
    Location
    Portland, OR
    Posts
    401
    Post Thanks / Like
    I took a look at the Front Suspension brackets that attach to the spindles. They are designed to work with the 5x100 spindles not the 5x114.5 ones. The 5x114.5 brackets I am using are a bit thicker and the bolt holes are a bit farther apart.

    Here is a picture of the bracket and the spindle from the side:


    And the top


    You can see the newer brackets have a second smaller bracket inside, and that bracket seems to be held in place with two thru-hole spot welds. It looks like if I drill out those welds the inside brackets will come off. I would then have to enlarge the upper hole, and potentially cut a washer shim to fill part of the now larger hole.

    Anyone else done this mod yet?

    Jeff

  38. #118
    Senior Member Triathletedave's Avatar
    Join Date
    Sep 2012
    Location
    Calgary
    Posts
    232
    Post Thanks / Like
    [QUOTE=sponaugle;158247]Interesting... did you have any cracking when you then drilled for the rivets?

    Not so far. The fellow who did my powder coating is pretty fussy, and did a good job. No regrets on my side. Total cost was $800 CAD
    TriguyDave
    818 noobie builder
    First start: Sept 28, 2014
    Go-carted: Oct 4, 2014
    Registered and Street legal Sept 30, 2015
    Calgary, Alberta

  39. #119
    Administrator
    Wayne Presley's Avatar
    Join Date
    Feb 2011
    Location
    Enterprise Alabama
    Posts
    2,804
    Post Thanks / Like
    Blog Entries
    3
    Quote Originally Posted by sponaugle View Post
    I took a look at the Front Suspension brackets that attach to the spindles. They are designed to work with the 5x100 spindles not the 5x114.5 ones. The 5x114.5 brackets I am using are a bit thicker and the bolt holes are a bit farther apart.

    Here is a picture of the bracket and the spindle from the side:


    And the top


    You can see the newer brackets have a second smaller bracket inside, and that bracket seems to be held in place with two thru-hole spot welds. It looks like if I drill out those welds the inside brackets will come off. I would then have to enlarge the upper hole, and potentially cut a washer shim to fill part of the now larger hole.

    Anyone else done this mod yet?

    Jeff

    There have been a couple that have done it, Pull the inner plates out and put them outside and redrill. The kit is designed around the WRX spindle.
    Wayne Presley www.verycoolparts.com
    Xterminator 705 RWHP supercharged 4.6 DOHC with twin turbos

  40. #120
    Research Calibrator sponaugle's Avatar
    Join Date
    Apr 2013
    Location
    Portland, OR
    Posts
    401
    Post Thanks / Like
    Quote Originally Posted by Wayne Presley View Post
    There have been a couple that have done it, Pull the inner plates out and put them outside and redrill. The kit is designed around the WRX spindle.
    Thanks Wayne! I found the note from Kurk818: http://thefactoryfiveforum.com/showt...k-with-the-818

    I'll give it a try. It looks like in his case the inner bracket was welded on the edge in a few spots, not the thru-hole spot welds on mine. I'll drill them out tonight and see how it looks.

    Thanks!!

    Jeff
    Last edited by sponaugle; 06-20-2014 at 11:55 PM.

Page 3 of 12 FirstFirst 12345 ... LastLast

Posting Permissions

  • You may not post new threads
  • You may not post replies
  • You may not post attachments
  • You may not edit your posts
  •  

FFMetal

Visit our community sponsor