BluePrint Engines

Visit our community sponsor

Thanks Thanks:  0
Likes Likes:  0
Results 1 to 25 of 25

Thread: Joining the madness!

  1. #1
    Member
    Join Date
    Nov 2014
    Posts
    45
    Post Thanks / Like

    Joining the madness!

    Picked up my 33' kit this past weekend in a snowstorm! Luckily brought some tarps with me to cover the frame and boxes. Excited to get started.

    IMAG1119.jpgIMAG1130.jpgIMAG1133.jpgIMAG1140.jpg

    I guess one of the boxes was too close to the frame and rubbed off a section of powder coating. Has anyone touched up theirs? I was looking at http://www.orbittx.com/index.php?opt..._id=3&Itemid=1

    Does anyone know the correct color?

    thanks
    Last edited by gumbya55; 03-24-2015 at 08:21 PM.

  2. #2
    Administrator David Hodgkins's Avatar
    Join Date
    Feb 2011
    Location
    Corona del Mar, CA
    Posts
    6,086
    Post Thanks / Like
    Blog Entries
    7
    Congratulations!

    I updated your account so you can edit your profile and now have full access.

    You are in for the time of your life.


    FFR 5369 Pin Drive, IRS, Trigos, Torsen, Wilwoods, FMS BOSS 302 "B" cam , Mass-flo. CA SB100 (SPCN) Registered
    Delivered 4/23/06. "Finished" 4/2012 (still not done!)


  3. #3
    Senior Member 68GT500MAN's Avatar
    Join Date
    Feb 2011
    Location
    Fresno, CA
    Posts
    1,808
    Post Thanks / Like
    Congratulations on the new arrival. I have always used Eastwood Chassis Black gloss finish. Looking at the link, I would try the gloss black color.
    Doug
    Built FFR5196 MKII in 2003, 427w
    Building FFR0058HR, Edlebrock 347-AOD

  4. #4
    33 Hot Rod #664 BrentM's Avatar
    Join Date
    May 2013
    Posts
    63
    Post Thanks / Like
    Nice Fountain banner, those boats are bad ***. Had a 32' with twin 502's best time on the water ever.

    I use POR-15 on the chips. I have not put any paint over it, but the match is nearly exact. I will need to cover it with paint at some point, I think any gloss black should be good.

    Enjoy the build!!

  5. #5
    Senior Member
    Join Date
    Apr 2011
    Location
    Shawnee KS< KC Burb
    Posts
    844
    Post Thanks / Like
    Quote Originally Posted by gumbya55 View Post
    Picked up my 33' kit this past weekend in a snowstorm! Luckily brought some tarps with me to cover the frame and boxes. Excited to get started.
    Does anyone know the correct color? thanks
    Welcome and enjoy the build. The most helpful thing I bought for my build was one of those storage platforms for the garage ceiling. They crank up and down for storing and retrieving items.
    I use mine to lift off and drop on the body by myself. It makes it a 1 man job, it's easy to do and it stores the body up out of the way while you build the chassis.
    Tell us where you are so builders close to you can chime in and tell us about your build plan.
    Dale B
    7L Hemi 33

  6. #6
    Member
    Join Date
    Nov 2014
    Posts
    45
    Post Thanks / Like
    Thanks for the input, I'll definitely use it. As of now, plans are for a T5 5 speed and 302 combo. Looking into going fuel injected, but the issues might outweigh the benefits/cost of going carb. Looking to get my inventory done this weekend, and hopefully will receive the rest of my parts (including the build manual!) from FF soon.

  7. #7
    Member
    Join Date
    Sep 2014
    Location
    Forsyth, Georgia
    Posts
    65
    Post Thanks / Like
    Congratulations on the arrival of your kit! I have started my parts collection consisting of a 302 and T-5 also. My rear end is being built by MPS. I ordered the instruction manual several months ago, will fly to Michigan tomorrow night for the 3 day build school and hopefully place my order during the next FFR sale! Good luck and have fun!

  8. #8
    Member
    Join Date
    Nov 2014
    Posts
    45
    Post Thanks / Like
    Quote Originally Posted by Warden View Post
    Congratulations on the arrival of your kit! I have started my parts collection consisting of a 302 and T-5 also. My rear end is being built by MPS. I ordered the instruction manual several months ago, will fly to Michigan tomorrow night for the 3 day build school and hopefully place my order during the next FFR sale! Good luck and have fun!
    Yea that sounds great. What rear are you going with? And I'm going to be looking for a trans too. Wondering what years and models everybody is running?

  9. #9
    Junior Member
    Join Date
    Mar 2015
    Posts
    2
    Post Thanks / Like
    Congrats! I've been reading tons of threads but this is the most current that I have found. Excited to see your progress in the near future. I am currently gathering parts myself and hoping to purchase my kit by the end of this year. Much luck to you!


    66' Mustang Hard Top
    Last edited by 33 Dreamin'; 04-10-2015 at 10:26 AM.

  10. #10
    Member TigerBill's Avatar
    Join Date
    Jan 2013
    Location
    Kingsport, TN
    Posts
    93
    Post Thanks / Like
    Congrats. Just finished mine. Though I am excited to be driving it, I will really miss the daily work on the build - wife has a different opinion :-) . I had a blast! Would love to do another. Enjoy the "ride"!
    Bill
    '33HR #522, LS3, TKO 500, Boyd's Tank, QA1 Shocks, Double Roll Bars

  11. #11
    Member
    Join Date
    Nov 2014
    Posts
    45
    Post Thanks / Like
    Quote Originally Posted by TigerBill View Post
    Congrats. Just finished mine. Though I am excited to be driving it, I will really miss the daily work on the build - wife has a different opinion :-) . I had a blast! Would love to do another. Enjoy the "ride"!
    Wow bill that looks great in the icon! I like the color scheme. I am going fenderless too. Which rear did you go with?

  12. #12
    Member
    Join Date
    Nov 2014
    Posts
    45
    Post Thanks / Like
    Just finished painting all of the front end parts with Eastwood's Extreme Chassis Primer and Paint. Looks really nice, and matches the powder coating color of the frame pretty closely. I am glad that I did this instead of powder coating, just because of the amount of parts that I can all match up (like the backs of the spindles, and steering knuckles) without having to run back and forth to the powder coater. I do have a compressor and nice paint gun, so I was able to do a pretty good job on these. Was happy with the product as long as the shine and durability holds up!

    IMAG1241.jpg

  13. #13
    Senior Member bil1024's Avatar
    Join Date
    Feb 2011
    Location
    NY
    Posts
    1,435
    Post Thanks / Like
    Nice! I have used Eastwoods stuff on my muscle cars, it will be fine

  14. #14
    Member
    Join Date
    Sep 2014
    Location
    Forsyth, Georgia
    Posts
    65
    Post Thanks / Like
    I know there are other suppliers but take a look at the MPS Salvage website or eBay stores. I'm going with the Mustang 8.8 with 3.55s. But they will build what ever you want.

  15. #15
    Member TigerBill's Avatar
    Join Date
    Jan 2013
    Location
    Kingsport, TN
    Posts
    93
    Post Thanks / Like
    Quote Originally Posted by gumbya55 View Post
    Wow bill that looks great in the icon! I like the color scheme. I am going fenderless too. Which rear did you go with?
    Actually it's not fenderless. It has black bike fenders. The black makes it appear open wheel but still have the rock and splash protection of fenders. Hard to see in the thumbnail. attached is the larger version of the pic.
    image.jpg
    image.jpg

    For the rear, I got mine from MPS Auto salvage in Atlanta (EBay). It is from a 96 - 98 Mustang GT and has a 3.08 rear end. works well with the Tremec TKO 500 which has a lower first gear than most. The hub to hub distance is 61.5" I think this is 1.5" longer than the earlier years that most people get due to the fact that Ford started using the antilock brake sensing ring. Anyway, the length was no problem for me - this is dealt with in your wheel backspacing.
    Bill
    '33HR #522, LS3, TKO 500, Boyd's Tank, QA1 Shocks, Double Roll Bars

  16. #16
    Member
    Join Date
    Nov 2014
    Posts
    45
    Post Thanks / Like
    Quote Originally Posted by TigerBill View Post
    Actually it's not fenderless. It has black bike fenders. The black makes it appear open wheel but still have the rock and splash protection of fenders. Hard to see in the thumbnail. attached is the larger version of the pic.
    image.jpg
    image.jpg

    For the rear, I got mine from MPS Auto salvage in Atlanta (EBay). It is from a 96 - 98 Mustang GT and has a 3.08 rear end. works well with the Tremec TKO 500 which has a lower first gear than most. The hub to hub distance is 61.5" I think this is 1.5" longer than the earlier years that most people get due to the fact that Ford started using the antilock brake sensing ring. Anyway, the length was no problem for me - this is dealt with in your wheel backspacing.
    Nice bill, that looks great. Yea I am thinking those years as well, because it already comes with the disc brakes and 5 lug. Are your wheels tucked under the body in the wheelwell though? Were you able to do that with the backspacing?

    Thanks

  17. #17
    Member TigerBill's Avatar
    Join Date
    Jan 2013
    Location
    Kingsport, TN
    Posts
    93
    Post Thanks / Like
    yes, inside edge of tire has about 1" clearance with the wheel well wall, so you wouldn't want to bring it in any closer. my wheels are 18" X 10" with a 25 mm offset and tires are 275-35-18. I ended up cutting some width off of the fenders to get the edge of the tire to be just inside the edge of the fender. of course this all depends on wheels and tires you use. see dwg for my particular set-up.
    image.jpg
    image.jpg
    image.jpg
    Last edited by TigerBill; 04-17-2015 at 04:50 PM.
    Bill
    '33HR #522, LS3, TKO 500, Boyd's Tank, QA1 Shocks, Double Roll Bars

  18. #18
    Member
    Join Date
    Nov 2014
    Posts
    45
    Post Thanks / Like
    Been working when I can on the rod, now that it's finally warm and can spend some more time in the garage. Got the front end together, and starting to put the pedal assembly together. Also looking to do my firewall this week. Everyone seems to have some different opinions on how to go about it, but was wondering if there was any advice out there? Plan is to square the body best I can, then clamp the footboxes and firewall, make adjustments to the body to make the firewall fit better (not the panel). Then fasten with some 1/4 allen head bolts and rivnuts in the body and frame. That way I can remove the panels later to paint, and polish the bolts.

    Any advice?

    IMAG1298.jpg
    IMAG1301.jpg
    IMAG1302.jpg
    IMAG1303.jpg

  19. #19
    Senior Member Barrel's Avatar
    Join Date
    Aug 2011
    Location
    Mornington, Victoria, Australia
    Posts
    162
    Post Thanks / Like
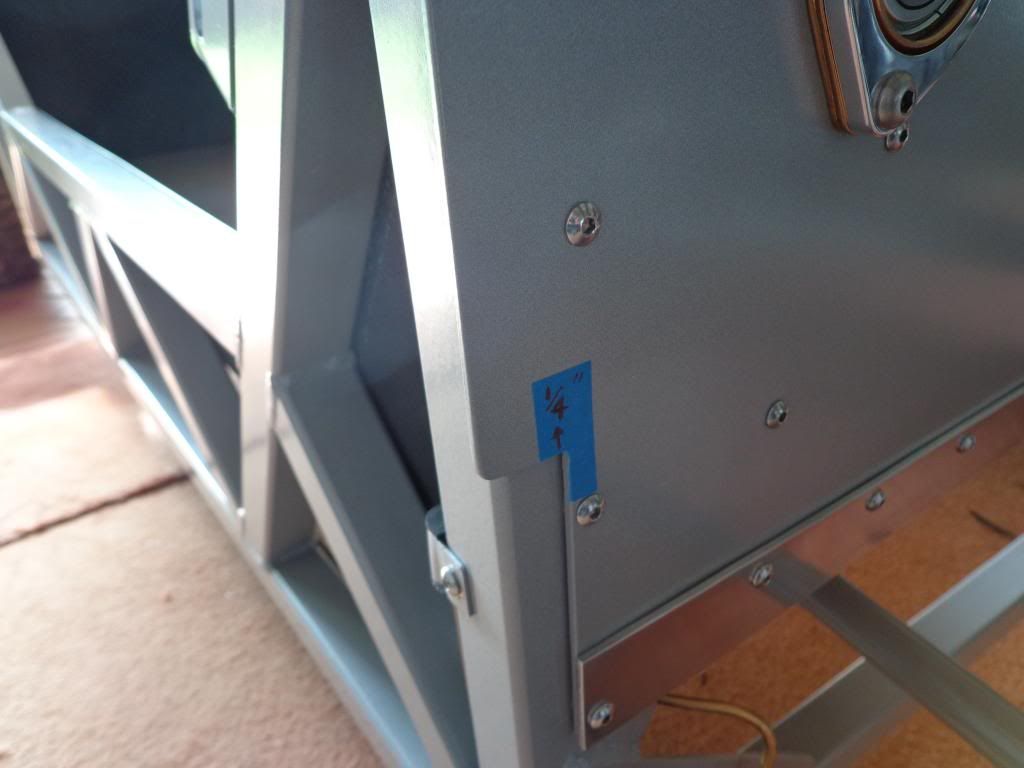
    The firewall/cowl interface will work better if you increase the height of the notch on the passenger side (only) footbox by 1/4" as in the attached pic. By doing this you will be able to lift the body up enough when mounting it for the top of the firewall to fit under the lip of the cowl and it will be square. I'm sure that you're going to enjoy your build. Cheers, Neil.

    Last edited by Barrel; 07-11-2015 at 05:12 PM.

  20. #20
    Member
    Join Date
    Nov 2014
    Posts
    45
    Post Thanks / Like
    Quote Originally Posted by Barrel View Post
    The firewall/cowl interface will work better if you increase the height of the notch on the passenger side (only) footbox by 1/4" as in the attached pic. By doing this you will be able to lift the body up enough when mounting it for the top of the firewall to fit under the lip of the cowl and it will be square. I'm sure that you're going to enjoy your build. Cheers, Neil.


    Great advice, thanks. I see you used an allen head bolt as well, did you use the rivnuts or tap the frame? Looks like 1/4'' stainless?

  21. #21
    Senior Member 68GT500MAN's Avatar
    Join Date
    Feb 2011
    Location
    Fresno, CA
    Posts
    1,808
    Post Thanks / Like
    I used 12-28 stainless socket head screws on mine. They polish up nice and match the aluminum firewall.
    Doug
    Built FFR5196 MKII in 2003, 427w
    Building FFR0058HR, Edlebrock 347-AOD

  22. #22
    Senior Member maczter's Avatar
    Join Date
    Feb 2013
    Location
    Xenia, OH
    Posts
    277
    Post Thanks / Like
    Blog Entries
    1
    Most of us drilled and tapped the frame. I used a slow battery powered drill with a well lubricated tap, and only broke one...lol. Saved a lot of hand aches. Map out where you want to put the holes while it is in place on the frame so you can make a nice pattern amongst the three pieces...I did not and wish I had.
    FFR HR #530
    Race car theme, Tim Whitaker roll bar, Autometer Autolite Gauges, Satin Black, SBC 383/700R4, 8.8 rear with Cobra Brakes, 3.29 gear, Boyd Tank, QA1 springs and shocks,

    My build blog: http://jacks33hotrod.blogspot.com/

  23. #23
    Senior Member Barrel's Avatar
    Join Date
    Aug 2011
    Location
    Mornington, Victoria, Australia
    Posts
    162
    Post Thanks / Like
    I used rivnuts throughout my build and went metric. Stainless M5's on the firewall and footboxes and mainly M4's for the rest of the car. We are "metric" in Australia and so much easier to source when it comes to fasteners.

  24. #24
    Member
    Join Date
    Nov 2014
    Posts
    45
    Post Thanks / Like
    Thanks for the input. I am thinking of tapping the frame, and rivnut the body. Using 1/4'' button heads and polishing them. Going to line everything up this weekend, and plot out my "hole locations" before getting started. Maybe run them like every 4-5" for a cleaner look...

  25. #25
    Senior Member
    Join Date
    Apr 2011
    Location
    Shawnee KS< KC Burb
    Posts
    844
    Post Thanks / Like
    The passenger compartment portion of the chassis is very true and square but the forward extension runs off center line an 1/8" and the rear extension even though it is much shorter ran off 5/16" on mine.
    Since the chassis are all built in a jig they are going to be very consistent, but check yours just be sure it's the same way. They do quite a bit of finish welding on every chassis after they take it out of the jig but I don't believe that heat draw is the culprit. I think the beta chassis was crooked and the jig was built around it ensuring that every one would be just like the first one.

    I suggest using a laser level/ line tool to mark a centerline everywhere you can on the chassis. The body is not symmetrical at all but it does help to know where the true centerline is on quite a few components.
    One example is the spacer at the very back top frame tab between the rear fenderwells. IF you know ahead of time that the spacer for one side will be much thicker than the other the body will line up better.

    The centerline will also help center the rearend housing in the chassis. The best way is to put the rotors on and measure from those to the centerline on the chassis. I suspect some of the guys running a spacer on one side in the back skipped the centerline process and have their body pushed off to one side because they used equal spacers instead of a centerline measurement.

    The 1/4" firewall notch mentioned in a post above is because the body is very different height at the front of the door openings from one side to the other. Because of this you will also need a long 1/4" thick shim on top of the chassis tube on the passenger side all the way along the door opening. On the drivers side the body sits on the tube but on the passenger side it needs the shim between the body and that tube.
    YRMV
    Dale
    Hemi33

Posting Permissions

  • You may not post new threads
  • You may not post replies
  • You may not post attachments
  • You may not edit your posts
  •  

Replica Parts

Visit our community sponsor