FormaCars

Visit our community sponsor

Thanks Thanks:  0
Likes Likes:  0
Results 1 to 33 of 33

Thread: FFR MK4 #8634 build thread

  1. #1
    Member
    Join Date
    Apr 2015
    Location
    Colorado
    Posts
    42
    Post Thanks / Like

    FFR MK4 #8634 build thread

    Greetings from N. Colorado. Been working on my build for about three months. I thought I would finally post some progress. I must say first, This has been a great experience so far. A project that helps hone all my skills, making new (cobra) friends, getting re antiquated with old friends and seeing this beast slowly come to life. My garage has become the regular gathering place. I have watched these threads for some time now. There are great people, ideas, advice and direction. Glad to be part of this community.

    I first ordered my kit on April 27th 2015. I ordered The base kit, but took advantage of the 50/50. All the complete kit add ons became options so they were 50% off. Saved a bundle.
    Base kit
    powdercoated chassis
    body cut outs
    front lower control arm kit
    3 link sus
    Stainless side pipes
    manual steering rack
    ultralite gauges
    17" hailbrand replicas W/10.5" rear
    wind wings
    Chrome roll bar
    sunvisors
    12.88 wilwood front brake package
    12.19 rear wilwood brake package
    wilwood pedal box
    rollbar grommet set
    hood hinge
    Wiring package
    FFR spindles
    driveshaft

    Originally I was Going to do a 351C, stroked to 408. 4V heads, TKO600. Blue and white. As you guys know, plans change rather quickly. I have sold my 351C block and heads. I have now decided on a 351W stroker. Block is now at the machine shop(fingers crossed it all turns out well). Aftermarket alum heads. I have not decided which, but leaning towards the Edelbrock Vic jrs. Still doing the TKO trans.

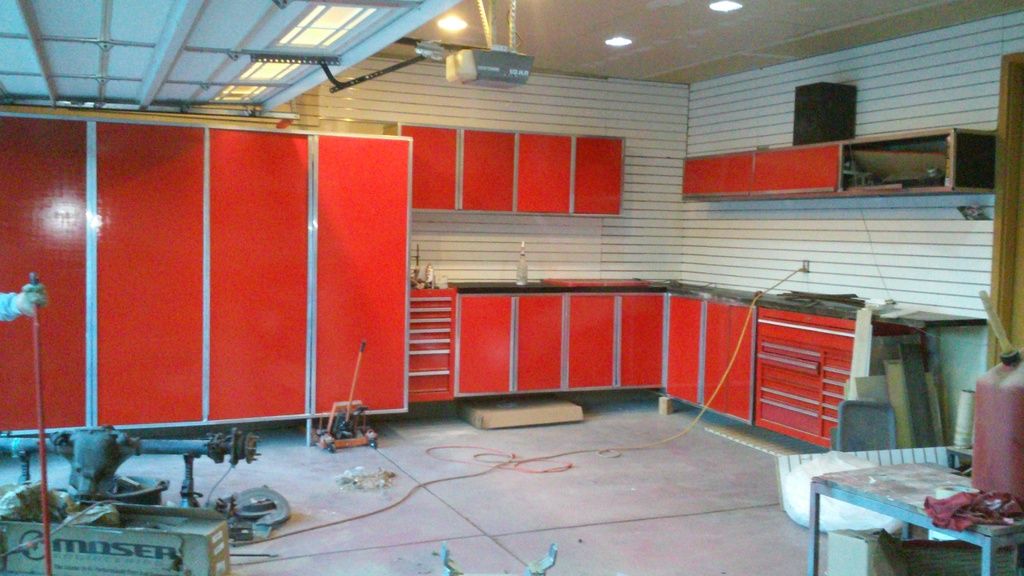
    So to get started I had to prep the garage. finished up building my cabinets and mounting the tool boxes. cleaned, organized and got everything ready for the arrival of my MK4

    Last edited by Joe Procopio; 09-23-2015 at 01:54 PM.

  2. #2
    Administrator David Hodgkins's Avatar
    Join Date
    Feb 2011
    Location
    Corona del Mar, CA
    Posts
    6,089
    Post Thanks / Like
    Blog Entries
    7
    Great looking shop!

    Here's a couple of threads to help you with posting images:

    How to use the Image Gallery to embed pictures in posts

    How to use an external site to host pics

    I'm looking forward to following your build!


    FFR 5369 Pin Drive, IRS, Trigos, Torsen, Wilwoods, FMS BOSS 302 "B" cam , Mass-flo. CA SB100 (SPCN) Registered
    Delivered 4/23/06. "Finished" 4/2012 (still not done!)


  3. #3
    Member
    Join Date
    Apr 2015
    Location
    Colorado
    Posts
    42
    Post Thanks / Like

    Kit arrives

    On June 29th ,Steve From Stewart Transport arrived with My MK4. He was great. Of coarse my car was last on the truck, but when you wait 20 years to order one of these cars, whats another few days?


    First glimpse of my car


    Last edited by Joe Procopio; 09-23-2015 at 01:59 PM.

  4. #4
    Member
    Join Date
    Apr 2015
    Location
    Colorado
    Posts
    42
    Post Thanks / Like
    Thanks Dave. Great advise and threads
    Last edited by Joe Procopio; 09-23-2015 at 10:59 AM.

  5. #5
    Senior Member KDubU's Avatar
    Join Date
    May 2015
    Location
    Kennebunkport, ME
    Posts
    1,193
    Post Thanks / Like
    Congrats on delivery! I'm just a bit ahead of you and moving onto brake and fuel lines, should be interesting.
    Kyle

    Complete Kit pickup 09/05/2015, 351w, QF680, 3.55, 3-Link, 15" Halibrands with MT's, Painted Viking blue with Wimbledon white stripes on 03/15/2017. Sold in 08/2018 and totally regret it.

  6. #6
    Member
    Join Date
    Apr 2015
    Location
    Colorado
    Posts
    42
    Post Thanks / Like
    Congrats Kyle. Eager to see your progress. I am actually further than this, Just behind on posting.

  7. #7
    Member
    Join Date
    Apr 2015
    Location
    Colorado
    Posts
    42
    Post Thanks / Like
    Next, was braking out the bling


    Hey, There's my keys


    Then getting the body on the buck


  8. #8
    Member
    Join Date
    Apr 2015
    Location
    Colorado
    Posts
    42
    Post Thanks / Like

    Rear End rebuild

    Started striping the 8.8. Got new axle shafts all new bearings and seals. Also got those new fancy carbon discs and shims for the traction lok


    Cut off all the un necessary housing links. Check out the balding head... Nice


    Had to fill in some of the over grinding.


    Striped


    Primed


    Painted single stage Gloss black.


    Built, setting the backlash


  9. #9
    Member
    Join Date
    Apr 2015
    Location
    Colorado
    Posts
    42
    Post Thanks / Like

    Rear done and in


  10. #10
    Member
    Join Date
    Apr 2015
    Location
    Colorado
    Posts
    42
    Post Thanks / Like

    Wilwood footbox

    So, as many of you guys know there is a problem with the Clutch pedal on the Wilwood foot box, hitting the Frame. I notched out both sides(frame and pedal). Hopefully this can help someone in the future. Always grind off galvanized finish before welding that metal...


  11. #11
    Member
    Join Date
    Apr 2015
    Location
    Colorado
    Posts
    42
    Post Thanks / Like

    Double check all new parts

    Ran into issues with the MOSER axle shafts. They were bend at the flanges. Sent them back and got another set from Moser. These were bent even worse. The packing is pure S#$%. The axles have about 4" of space in the box to bounce around. After installing 2 bent sets, I called Moser and spoke with a guy named Brian. He blamed the issue on UPS, When I asked him to pack up a set for me, as I did not want to continue to get bent axles, He said" they would not do that" . I then told him, I would need to return these axles and buy from a company who packages their axles shafts properly, He said, " O.K"
    Got a set of U.S.A alloys. They were perfect.

    https://youtu.be/RmQaSK0C7m0

  12. #12
    Member
    Join Date
    Apr 2015
    Location
    Colorado
    Posts
    42
    Post Thanks / Like

    moving forward

    With the axle dilemma behind me, I could move forward. Got the rear brakes and hard lines in. Pedal box is in.


  13. #13
    Member
    Join Date
    Apr 2015
    Location
    Colorado
    Posts
    42
    Post Thanks / Like

    Fuel tank system

    I was Still waiting for the spindles to arrive so I had decided to install the fuel system. I did decide to drop the trunk floor for a bit more space, I know i'll thank myself later for this


    Poor mans metal brake


    Mocked up

  14. #14
    Member
    Join Date
    Apr 2015
    Location
    Colorado
    Posts
    42
    Post Thanks / Like

    Aluminum panels / heat treat

    While I was waiting on the rest of the front end to arrive from FFR, I began heat treating the aluminum panels. I got some advice from Derald rice. He built his FFR a while back and lives here in town. Very helpful. I picked up some Lizard skin. It is a ceramic coating to help with heat. I coated all the front firewall panels with this stuff and sanded it down.


    Started putting in what panels I could at the time. My buddy Mikey giving me a hand

  15. #15
    Member
    Join Date
    Apr 2015
    Location
    Colorado
    Posts
    42
    Post Thanks / Like

    E Brake

    Under Deralds advice, I also moved the E brake location. Apparently it is impossible to release it when you are full strapped in


  16. #16
    Member
    Join Date
    Apr 2015
    Location
    Colorado
    Posts
    42
    Post Thanks / Like

    Spindles and steering rack finally arrived

    Three months after my kit arrived. My spindles finally made it. So, The front end goes together


    Once the steering rack got here, I was now able to put on the firewall panels and steering shaft.


  17. #17
    Member
    Join Date
    Apr 2015
    Location
    Colorado
    Posts
    42
    Post Thanks / Like

    Visitors

    I must say, It is very cool the first time a FFR pulls up out in front of your house. Derald came by to check my progress

    Last edited by Joe Procopio; 11-01-2015 at 04:21 PM.

  18. #18
    Administrator David Hodgkins's Avatar
    Join Date
    Feb 2011
    Location
    Corona del Mar, CA
    Posts
    6,089
    Post Thanks / Like
    Blog Entries
    7
    Those pics are great! Keep it up!

    Quick question: Where are you mounting the battery? I used a hidden battery box from FFMetal on my current 3-link build and it interfered with the aluminum rear axle housing. I had to switch to a stamped steel one instead...


    FFR 5369 Pin Drive, IRS, Trigos, Torsen, Wilwoods, FMS BOSS 302 "B" cam , Mass-flo. CA SB100 (SPCN) Registered
    Delivered 4/23/06. "Finished" 4/2012 (still not done!)


  19. #19
    Member
    Join Date
    Apr 2015
    Location
    Colorado
    Posts
    42
    Post Thanks / Like

    Stop! Shop clean

    I had to stop this weekend to clean and organize the garage again. Thought I would post a few pics of the progress.

    My tires arrive tomorrow. Once I get them mounted I gotta drop this thing on its own 4 legs. Will post more pics


  20. #20
    Member
    Join Date
    Apr 2015
    Location
    Colorado
    Posts
    42
    Post Thanks / Like
    Hi David, Thanks. As far as the battery, I was just thinking about that... I will mount it in the trunk. I would be giving up some space I just gained but, Thats how it goes sometimes. The thought did cross my mind, maybe I'll cut out a section in the upper trunk deck to make a battery box, but I am a bit unsure of the clearance issues I'll have with the rear. I can investigate the clearance further once I get this thing on the ground tomorrow.

  21. #21
    Member
    Join Date
    Apr 2015
    Location
    Colorado
    Posts
    42
    Post Thanks / Like

    Stop! Shop clean

    I had to stop this weekend to clean and organize the garage again. Thought I would post a few pics of the progress.

    My tires arrive tomorrow. Once I get them mounted I gotta drop this thing on its own 4 legs. Will post more pics


  22. #22
    Member
    Join Date
    Apr 2015
    Location
    Colorado
    Posts
    42
    Post Thanks / Like

    On the ground

    Got my Tires yesterday, had them mounted and balanced and got it on the ground.


  23. #23
    Member
    Join Date
    Apr 2015
    Location
    Colorado
    Posts
    42
    Post Thanks / Like
    Today, I am working on the parking brake. I decided to relocate it to the drivers side and I am using a lever from a 2011. With a bit of cutting it should be a nice tight fit. I need to change the tranny tunnel steel too. I will have to fab up the side and top center console later, thinking 1/4 MDF and fiberglass for the curved contours then vinyl top. I already see how it should finish up on the center console mentally. Hopefully it all goes as planned. I got a parking brake with a leather grip and leather boot. Just got it mocked up right now. You guys see any issues with this location?


  24. #24
    Member
    Join Date
    Apr 2015
    Location
    Colorado
    Posts
    42
    Post Thanks / Like
    Got it mocked up and the new piece of frame tacked in.


  25. #25
    Carl carlewms's Avatar
    Join Date
    May 2012
    Location
    Nokesville, VA
    Posts
    1,125
    Post Thanks / Like
    Joe,

    Very interesting brake handle mod. It sure will be in a more convenient location.

    Carl
    Mk 4 Roadster
    October 25, 2012 - Kit Arrives
    April 8, 2013 - Build Starts
    August 23, 2015 - Rolling Chassis/Engine & Transmission Installed
    March 26, 2016 - Go Cart

  26. #26
    Member
    Join Date
    Apr 2015
    Location
    Colorado
    Posts
    42
    Post Thanks / Like
    Quote Originally Posted by carlewms View Post
    Joe,

    Very interesting brake handle mod. It sure will be in a more convenient location.

    Carl
    Hi Carl,
    I think it would be difficult to release the parking brake from the original location once your all strapped in.
    joe

  27. #27
    Member
    Join Date
    Apr 2015
    Location
    Colorado
    Posts
    42
    Post Thanks / Like

    Just for fun

    I have a few more updates, We threw the body on the frame, just for fun. Very cool to see it starting to take shape.

  28. #28
    Member
    Join Date
    Apr 2015
    Location
    Colorado
    Posts
    42
    Post Thanks / Like

    Heads arrived

    Finally decided on the Edelbrock E205, Just came in last week

  29. #29
    Member
    Join Date
    Apr 2015
    Location
    Colorado
    Posts
    42
    Post Thanks / Like

    Trunk

    Got the rear harness in and the fuel filter installed, So, I am now getting the trunk done. I decided to go with 1/4 MDF panels instead of the aluminum. I was a car stereo installer many years ago. Using some of those tricks to finish out the trunk. Once I got all the panels cut, I undercoated them, used nutserts to install them and wrapped them in vinyl. Looking pretty good so far.

  30. #30
    Member
    Join Date
    Apr 2015
    Location
    Colorado
    Posts
    42
    Post Thanks / Like

    More trunk

    [/URL][URL=http://s610.photobucket.com/user/jprocopio/media/20151020_164259_zpstscuxaif.jpg.html]
    Last edited by Joe Procopio; 10-20-2015 at 09:59 PM. Reason: One more pic

  31. #31
    Member
    Join Date
    Apr 2015
    Location
    Colorado
    Posts
    42
    Post Thanks / Like

    Brakes/ res

    I also got the reservoirs i wanted. One is for the brake and one for the clutch. I like the reservoir I got with the kit, but I could not find a second one for under 60$. These were $60 for both including the mount. Not bad. I also managed to get the brakes bled and the parking brake fully functional last week.

  32. #32
    Member
    Join Date
    Apr 2015
    Location
    Colorado
    Posts
    42
    Post Thanks / Like

    Radiator

    I wound up going with an aftermarket radiator for a late model mustang 2009 - 2015. It is a good fit. The two upper mount poles have to be ground off and it fits pretty easily. I have to mock up the body anyway so, I can mount the sidepipes so I can fab the headers once the engine is in. I figure at that time I can mock up the lower rad mounts.


  33. #33
    Member
    Join Date
    Apr 2015
    Location
    Colorado
    Posts
    42
    Post Thanks / Like

    Battery

    Quote Originally Posted by David Hodgkins View Post
    Those pics are great! Keep it up!

    Quick question: Where are you mounting the battery? I used a hidden battery box from FFMetal on my current 3-link build and it interfered with the aluminum rear axle housing. I had to switch to a stamped steel one instead...

    Hey David, I decided to move the battery to the front. I fabbed up a battery box for the D51 Optima. Thought it would be nice to keep all the trunk space I just gained.


Posting Permissions

  • You may not post new threads
  • You may not post replies
  • You may not post attachments
  • You may not edit your posts
  •  

Martin's Dent and Collision Shop

Visit our community sponsor