-
05-17-2021, 02:35 PM
#881
Senior Member

Sgt, your experience would obfuscate static pressure, there would be a reading but the source would be unknown. Dynamic pressure translates to air speed and direction. In either case the magnitude is small, inches of water. An instrument or data collector must have an appropriate (low pressure) range. I used Omegas that would register peak for testing at speed.
jim
-
05-17-2021, 06:10 PM
#882
Senior Member


Originally Posted by
Sgt.Gator

Taping wool tufts at the entrance and exit and recording them with a GoPro may be very interesting.
This is my video when I was testing a rear-mounted radiator. The fans on the radiator was running.
-
Post Thanks / Like - 0 Thanks, 1 Likes
-
05-17-2021, 06:10 PM
#883
Senior Member
Here is another video of rear airflow.
-
Post Thanks / Like - 0 Thanks, 1 Likes
-
05-19-2021, 04:59 PM
#884
Senior Member

Break-in at Watkins Glen
This is kind of long so if you want the juicy stuff, skip to the pics 
So I've spent the last two days at Watkins Glen International breaking in the new motor, clutch etc...
First the good parts:
I got ~300 miles on the new motor and it ran perfectly. It's not tuned so it didn't make great power with only about 3.5 psi of boost, but from a mechanical perspective it could not have gone better. Starts and idles smoothly, BOV makes a cool woosh... sound when you shift or let off the throttle. Runs super smooth and revs quick thanks to the shorter stroke and balanced internals. I kept the revs under 5200 and throttle below 70% all while managing to get passed by everybody .... sometimes twice in a single session ")
Temps and pressures were all good except the IAT's are a little higher than I would like at ~105 F. I will have to add some heat shielding and maybe work on my ducting a bit more.
Oil consumption and blow by are nonexistent. After 300 miles, zero oil in the catch can. I must have gotten the ring gaps right.
Now the bad parts:
At the end of the second day I backed out of the garage and the car abruptly stopped. Kind of felt like a wheel chock was left behind my tire. I tried moving forward and the car would go about 3 feet and abruptly stop again. The car would only move 3 feet forward and back, no more.
After some poking around myself and a few other determined it was something in the transaxle. Well that's something I can not fix at the track so my day was over. Hard part now was getting the car in the trailer! We ended up removing the under body panels at the rear and using two floor jacks to raise the rear tires off the ground and then winched the car into the trailer backwards.
Fast forward to today:
I drained the transaxale and metal chunks started falling into the bucket. Not a good sign I thought to myself, probably ate a ring and pinion gear set.

After getting into the tear down I was shocked to discover that every single ring gear bolt was loose and most were sticking up. One of the the bolts was so far out it was digging into the sun dial and that was what was causing the car to stop. The inside of the case has some scars but nothing that will effect functionality once its cleaned up. I need to order new ring gear bolts, clean evenything thoughly and reassemble.
All in all it could have been much worse. If one of those bolts came out, or a head broke off, it would have destroyed the transmission.


As it is I'm only out some new bolts and my time. What do you think could have made this happen? I have my theories but I'd like to hear yours.
Last edited by Hobby Racer; 05-19-2021 at 05:05 PM.
-
05-19-2021, 05:35 PM
#885
Possibly the ring gear was not seated when the bolts were torqued.
-
Post Thanks / Like - 0 Thanks, 1 Likes
-
05-19-2021, 08:31 PM
#886
Senior Member
Mine came loose while going 70 mph on the highway.
Dumped all the oil down the middle lane.
My transmission case had never been opened.
-
05-19-2021, 09:47 PM
#887
This is not good news at all. It would be nice if they were a lot easier to get to for a re-torque.
-
05-19-2021, 10:08 PM
#888
Senior Member
Originally Posted by
SnailFoot
Possibly the ring gear was not seated when the bolts were torqued.
Doubtful as this was a factory untouched unit.
Originally Posted by
Bob_n_Cincy
Mine came loose while going 70 mph on the highway.
Dumped all the oil down the middle lane.
I count myself lucky as it could have been much worse.
Originally Posted by
jforand
This is not good news at all. It would be nice if they were a lot easier to get to for a re-torque.
Yes, a complete tear down is the only way to get to them.
Given the way that all the fasteners were loose about the same amount. This is most likely a vibration issue, operating near the resonate frequency of the assembly and that caused them to back out.
I am considering either Nord-Lock washers if there is space and grip length on the bolts to accommodate them, or I'm going to try to drill the heads and use safety wire. The issue with drilling them is that they are thin external Torx heads with a large flange so not an easy thing to drill.
-
05-20-2021, 09:31 AM
#889
Senior Member
John, I have heard it said that Loctite will not fix a defect, but I am interested to know if you found Loctite on the threads. Is thread locker speced by Subaru?
Are these the original bolts? Have they or the assembly procedure been updated (TSB)? For instance has the bolt been redesigned with a necked-down shaft to provide more stretch at design torque? Short bolts do not stretch much.
Is the gear tooth pattern consistent? Is there a "spot" anomaly that could set-up a vibration? Bearings OK?
jim
Last edited by J R Jones; 05-20-2021 at 09:33 AM.
Reason: typo
-
05-20-2021, 03:33 PM
#890
Originally Posted by
Hobby Racer
What do you think could have made this happen? I have my theories but I'd like to hear yours.
The answer is simple: Because Racecar.
Something is vibrating. Do you have an aftermarket lightened flywheel?
"Good Judgement comes from Experience. Experience comes from Bad Judgement"
Owner: Colonel Red Racing
eBAy Store:
http://stores.ebay.com/colonelredracing
818R ICSCC SPM
2005 Subaru STI Race Car ICSCC ST and SPM
Palatov DP4 - ICSCC Sports Racer
-
05-20-2021, 04:13 PM
#891
Can you ‘stake’ or ‘peen’ the outside circumference of the flange to the ring gear flange? The idea is to make enough of a deformity that it will not easily rotate past. Ultimately the Nord-Lock washers need that dig into the ring gear flange (causing some deformity) so that the base washer does not rotate and then of course any rotation of the bolt head would bring the top masher with it and the inclined planes would prevent the loosening. Perhaps you could make a small dimple in the flange that you could stake a bit of the bolt flange down into. Putting a serious wrench on it would drive past the point without issue for removal.
-
05-20-2021, 04:27 PM
#892
Senior Member
John,
I reread your post and see "balanced internals" and "shorter stroke". My SBF and Mazda rotary had balanced flywheels. Any chance the short stroke is not compatible with the flywheel?
That is a reach. I have a hard time connecting engine to this failure. How about the axles/CVs? Can a drive shaft shop spin them?
jim
-
05-20-2021, 04:55 PM
#893
Senior Member
Originally Posted by
J R Jones
Is the gear tooth pattern consistent? Is there a "spot" anomaly that could set-up a vibration? Bearings OK?
jim
Gear tooth pattern looks good and I have not looked at the bearing yet.
Originally Posted by
Sgt.Gator
The answer is simple: Because Racecar.
Something is vibrating. Do you have an aftermarket lightened flywheel?
In fact I do have an Exedy lightened flywheel that I just added last year ... hmm....
Originally Posted by
J R Jones
John,
I reread your post and see "balanced internals" and "shorter stroke". My SBF and Mazda rotary had balanced flywheels. Any chance the short stroke is not compatible with the flywheel?
jim
I don't think so as the flywheel has a neutral balance. Boxer engines are internally balanced and do not require any external weighting like most american V8's do.
Last edited by Hobby Racer; 05-20-2021 at 05:03 PM.
-
05-20-2021, 04:59 PM
#894
Senior Member
-
Post Thanks / Like - 0 Thanks, 3 Likes
-
05-21-2021, 08:20 PM
#895
I found a forum post about this and how one person handles the problem. https://forums.nasioc.com/forums/sho...2831498&page=3 #59
It looks like other people have had a similar problem with the ring gear coming loose.
Last edited by SnailFoot; 05-21-2021 at 08:25 PM.
-
Post Thanks / Like - 1 Thanks, 1 Likes
 DSR-3
DSR-3 thanked for this post
-
05-21-2021, 09:50 PM
#896
Senior Member

Well, crap. Wishing I had done something about this when we had our transmission apart. Guess we’ll just cross our fingers for now.
-
05-23-2021, 05:54 PM
#897
Senior Member
-
05-23-2021, 06:44 PM
#898
Looks great. I see you decided to go through the full bolt on the centerline. I was wondering how the safety wire was going to work on your ring gear bolts. It seems that might be a bit more tricky and will depend on where the holes end up once torqued. Are you thinking about revising the way you drill the ring gear bolts?
-
05-23-2021, 07:06 PM
#899
Senior Member
Originally Posted by
SnailFoot
Thanks for posting this. I did not know that 5MT ring gear bolts would work on a 6MT.
Originally Posted by
jforand
Looks great. I see you decided to go through the full bolt on the centerline. I was wondering how the safety wire was going to work on your ring gear bolts. It seems that might be a bit more tricky and will depend on where the holes end up once torqued. Are you thinking about revising the way you drill the ring gear bolts?
I am going to use 5MT ring gear bolts as they are normal hex head and I can drill straight thru them.
-
05-26-2021, 04:46 PM
#900
Senior Member
AWIC on the way
I was not happy with the IAT's I was seeing during the break-in at Watkins Glen. Even though the engine was under medium load and speeds were 100+ mph, the IAT's were over 100 F. I could not think of a way to dramatically improve the cooling flow through the intercooler core without major alterations to the bodywork, which I do not want to do.
So a trip to https://www.frozenboost.com got me all the major component I need. The car is now almost completely apart again. But, this should fix the problem and it will be done before VIR in June!
-
05-26-2021, 05:42 PM
#901
Senior Member
John, What was the delta, ambient to IAT?
What was the delta, intercooler IAT "in" to intercooler IAT "out"?
What performance does the intercooler manufacturer predict? Maybe your results are within manufacturer expectations.
The data above can be compared to AWIC. Every track event is a new day.
jim
-
05-26-2021, 06:02 PM
#902
Senior Member
Originally Posted by
J R Jones
John, What was the delta, ambient to IAT?
What was the delta, intercooler IAT "in" to intercooler IAT "out"?
What performance does the intercooler manufacturer predict? Maybe your results are within manufacturer expectations.
The data above can be compared to AWIC. Every track event is a new day.
jim
The ambient air temp was ~75 F, so I was seeing a delta of 25-30 degrees which is not acceptable as once its tuned and I turn up the wick I will be generating more heat which would put the IAT's in the danger zone.
I do not have a sensor pre-intercooler so no data for that.
The manufacturer does not give predicted deltas because there are so many variables. Like most mid-engined cars, cooling an intercooler is a challenge without large bodywork modifications. I do not want to alter the body that much as I like the looks of it now.
-
05-26-2021, 07:42 PM
#903
Senior Member
John, Intercooling is not an expertise for me. I had to look up AWIC when I saw it on this forum. My interpretation is it is water to core to intake charge for cooling. I anticipate that it is a stand alone system, not sharing engine coolant.
So both intake systems are dependent on ambient air. The difference is ambient to core to intake charge is supplanted by ambient to core to water to core to intake charge.,
The assumption is there is more temperature drop across a water cooled core. Still the AWIC system is dependent on ambient and heat soak of the independent cooling system. The system will start at ambient but will heat soak over time.
Ambient is an infinite medium.
In the end it is IAT delta across the (intercooler) core after system temperature stabilization.
jim
If you like the 818 styling, you mway not like mine. I have not given thought to the intercooler yet. Eventually I will be NA.staggered shims.jpgstaggered shims2.jpg
-
Post Thanks / Like - 0 Thanks, 1 Likes
-
05-26-2021, 10:23 PM
#904
Hey Hobby
The past weekend at Summit Point I was seeing peak intake air temps around 150 degrees on my Cobb. It was a hot day of between 85-90 so that didnt help. I have a water temp gauge on my heat exchanger and it was at 90 degrees before I even left the pits. I am sure I was seeing the peak temp at top speed of above 120 for this track with my turbo set to make 18 psi. On cooler days the temp is lower for sure but if you run it hard on a hot day even my huge heat exchanger cannot keep up with keeping the temps down. I dont know what you got from Frozen Boost but if you got there normal single pass one inch thick heat exchanger you will find out real fast it cant keep up. We will have to compare our setups at VIR and see whos does a better job.
Last edited by taco20; 05-26-2021 at 10:25 PM.
-
05-27-2021, 06:43 AM
#905
Senior Member
Originally Posted by
taco20
Hey Hobby
The past weekend at Summit Point I was seeing peak intake air temps around 150 degrees on my Cobb. It was a hot day of between 85-90 so that didnt help. I have a water temp gauge on my heat exchanger and it was at 90 degrees before I even left the pits. I am sure I was seeing the peak temp at top speed of above 120 for this track with my turbo set to make 18 psi. On cooler days the temp is lower for sure but if you run it hard on a hot day even my huge heat exchanger cannot keep up with keeping the temps down. I dont know what you got from Frozen Boost but if you got there normal single pass one inch thick heat exchanger you will find out real fast it cant keep up. We will have to compare our setups at VIR and see whos does a better job.
Good information. With most people on the forum posting temps 10 - 15 degrees above ambient with their AWIC systems I thought 30 degrees above ambient with my air to air was way too high. Hope I didn't jump the gun
And yes, I got the 1" thick radiator that's 24"x14"x1". It's the same size as my coolant radiator, just thinner. How long does yours take to heat up on track? Do you have an additional reservoir?
-
05-27-2021, 09:35 AM
#906
IMG_20140802_154510_494.jpgIMG_20140802_154525_925.jpg526671979.jpg
Hey Hobby
I attached some old pics I have of my reservoir when I first put it on. Plus I included a newer picture of my bigger heat exchanger. I had to go with a bigger radiator and heat exchanger to try to keep things cool. I even had to lower the front panels down to included the lower hole above the front spliter to get more air for the radiator.
-
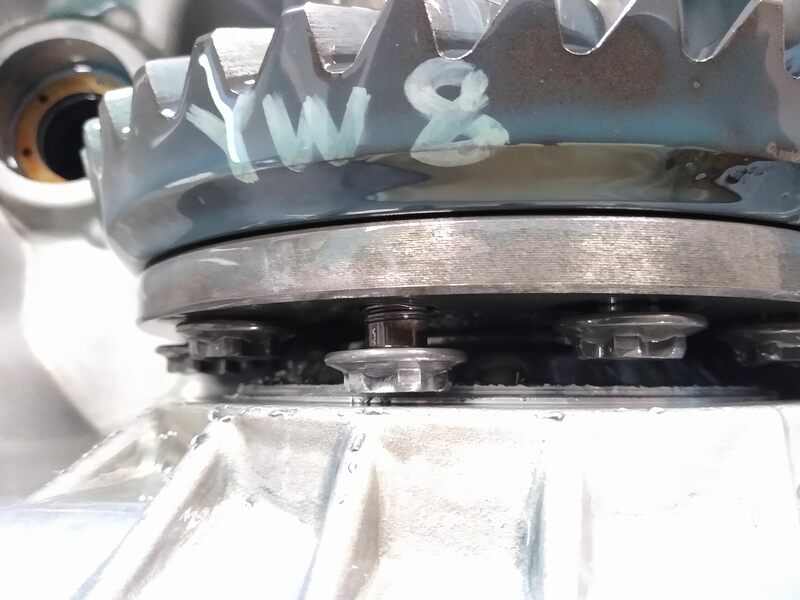
05-28-2021, 04:35 PM
#907
Senior Member
And that's how you secure a ring gear!
Loctite 263 + Safety Wire
5MT ring gear bolts finally came in. Drilling them was challenging. I broke 3 cobalt drill bits in three different bolts. Miraculously I was able to drill them from the opposite side and knock out the broken bits with a small punch.

-
Post Thanks / Like - 0 Thanks, 3 Likes
-
05-28-2021, 05:14 PM
#908
Did you run both radiator lines on the passenger side and both intercooler lines on the drivers side to keep the radiator lines from heating the intercooler lines?
-
05-28-2021, 08:15 PM
#909
Senior Member
Originally Posted by
SnailFoot
Did you run both radiator lines on the passenger side and both intercooler lines on the drivers side to keep the radiator lines from heating the intercooler lines?
I have not run the intercooler lines yet, but yes both coolant lines are on the passenger side and both intercooler lines will be on the drivers side.
-
05-28-2021, 08:38 PM
#910
Senior Member
John,
Years ago in a development shop I heard the suggestion of using retaining compound in extraordinary thread retention circumstances. I might have tried it myself. Interesting detail is the shear strength of 263 thread nlocker is 1305 PSI and tensile strength of 275 PSI. Loctite 680 (green) retaining compound has a shear strength of 4000 PSI, no tensile strength listed. It is considered permanent. I think I saw retaining compound listed earlier in this thread.
Getting broken drill bits out as you did means you lead a charmed life.
-
05-29-2021, 06:53 AM
#911
Senior Member
Originally Posted by
J R Jones
Years ago in a development shop I heard the suggestion of using retaining compound in extraordinary thread retention circumstances. I might have tried it myself. Interesting detail is the shear strength of 263 thread nlocker is 1305 PSI and tensile strength of 275 PSI. Loctite 680 (green) retaining compound has a shear strength of 4000 PSI, no tensile strength listed. It is considered permanent. I think I saw retaining compound listed earlier in this thread.
I have retaining compound but its general only for very close fitment object like bearing races in a housing or press fit items. Realatively loose fitting things like threads generally don't work well with retaining compounds.
Originally Posted by
J R Jones
Getting broken drill bits out as you did means you lead a charmed life.
Your not kidding! I was amazed I got them out. When it happened 3 times I was sure I'd have to order new bolts and wait another week to finish.
Last edited by Hobby Racer; 05-29-2021 at 07:14 AM.
-
05-29-2021, 10:34 AM
#912
Senior Member
John, The "gap" has to be tight enough to be anaerobic. Applications are all over, and I have witnessed miracles. Loctite says:
Loctite 680 retaining compound is a high strength, high viscosity room temperature curing adhesive used to join fitted cylindrical parts. It fixtures in 10 min and provides a shear strength of 4000 psi. Capable of filling diametral gaps up to 0.015 Inch (0.38 mm). - Loctite 680 is designed for the bonding of cylindrical fitting parts, particularly where low viscosity is required. The product cures when confined in the absence of air between close fitting metal surfaces and prevents loosening and leakage from shock and vibration.
Intercooler topic: I have discussed 33 Rod overheating on another post and NAZ came up with a stunning cooling system analysis: https://www.enginebasics.com/Engine%...20Cooling.html
The facts about flows and temperature drops are applicable to intercooling devices. Not a casual read.
MY SW20 Series II MR2 has an upgraded turbo with a larger intercooler flush to the right side air inlet and it has a full size fan sucking on it. Putting a fan on your intercooler might work with your air ducting or position the intercooler as I described on my MR2. Again, IAT deltas in and out of the intercooler would be the metric.
-
05-29-2021, 06:41 PM
#913
Senior Member
Originally Posted by
J R Jones
MY SW20 Series II MR2 has an upgraded turbo with a larger intercooler flush to the right side air inlet and it has a full size fan sucking on it. Putting a fan on your intercooler might work with your air ducting or position the intercooler as I described on my MR2. Again, IAT deltas in and out of the intercooler would be the metric.
I thought about adding a sucker fan to the top of the intercooler but I only had a little over 1.5" from the top of the intercooler to the underside of the rear hatch so I could not fit any sizable fan on top and since the intercooler and duct were almost touching the top of the transmission there was no room to move it down either.
That also played into my decision to go AWIC.
-
05-29-2021, 08:33 PM
#914
Senior Member
John, Displaying his nether-fan to competitors did not discourage Jim Hall with the Chaparral. Then again his downfall was competitors complained that it sucked.
I am partial to the Carrier roof top A/C look.
-
06-08-2021, 05:11 PM
#915
Senior Member
-
Post Thanks / Like - 0 Thanks, 2 Likes
-
06-08-2021, 05:54 PM
#916
Senior Member

Awesome!
I plan on fitting a solid FW like yours one day (I use a thick heat shield sheet at the moment), but I need 2 triangles, that one and the one behind the driver.
I did leave just enough space to remove the serpentine belt though, but other maintenance is not possible and I need to remove the entire old rear FFR FW every single time, which is about once a week.
Now, are you sure you calculated that 90mm right or will it be wrong again? 
And when are we going to know?
From 3.5psi to 12psi, that is a huge difference in power!
Frank
818 chassis #181 powered by a '93 VW VR6 Turbo GT3582R
Go-karted Aug 5, 2016 - Then May 19+21, 2017
Tracked May 27/July 26, 2017
Build time before being driveable on Sep 27, 2019: over 6000h
Build Completed Winter 2021
-
06-09-2021, 01:46 PM
#917
I think I would still put cover plates over the engine firewall to separate it from the gas tank. Something simple with Dzus fasteners or similar.
-
06-10-2021, 08:35 PM
#918
Senior Member
AWIC install complete

Finally got the last part I was waiting for to finish the AWIC install. Retrofitting an AWIC is much more time consuming than doing it when your building the car!
The AWIC radiator sits nicely in front of the main coolant radiator. Both are sealed in on all sides to ensure all the air is forced through the cores. There are a few inches of air gap between the radiators to keep the hot coolant radiator away from the cooler AWIC radiator. The pump is mounted low in the nose compartment and the 3/4" heater hoses are routed down the driver's side pod. I installed temperature sensors in both the inlet and outlet of the AWIC radiator so I can log temperature deltas.
IMG_20210606_121515366.jpg IMG_20210606_121531494.jpg IMG_20210607_142548462.jpg IMG_20210606_121546805.jpg
The intercooler support bracket was quite challenging to make on the fly without CAD drawings. Odd shapes and crazy angles, but it turned out nice. I wanted to mount the intercooler to the engine/trans instead of securing it to the chassis. This way it moves with the motor and does not stress any of the connections, plus it's easier to remove the drive line this way.
IMG_20210610_194252222.jpg IMG_20210610_194939431.jpg IMG_20210610_194421189.jpg IMG_20210610_195215142.jpg
Last edited by Hobby Racer; 06-10-2021 at 08:39 PM.
-
Post Thanks / Like - 0 Thanks, 5 Likes
-
06-11-2021, 05:40 AM
#919
Senior Member

John: I ended up with a radiator cap fitting and an expansion tank in my AWIC loop. The level in the tank goes up a bit when running and the water gets "hot". It might be overkill, but hasn't caused me any issues, either.
-
06-11-2021, 07:04 AM
#920
Senior Member
Originally Posted by
Rob T
John: I ended up with a radiator cap fitting and an expansion tank in my AWIC loop. The level in the tank goes up a bit when running and the water gets "hot". It might be overkill, but hasn't caused me any issues, either.
Since the water should never get near boiling my thought is it should be ok without an overflow tank. I'll see how it goes.


 Thanks:
  Likes:


 Reply With Quote

 .
. .
.