-
Senior Member

Impressive! Someday I'd like to be able to run fuel lines as cleanly as this.
MKIV Complete Kit #9822 l BluePrint 347 EFI l TKO600 l Power Steering l Heater/Defrost l
Build Thread
-
Post Thanks / Like - 1 Thanks, 0 Likes
-
Senior Member

Thanks JB. But while you say that, you also have a really impressive looking car that's seen more change in weeks than mine has seen in years ... so there's that ")
And, thanks for the detailed build thread with photos, questions and discoveries. I've gotten a lot from it (along with serious motivation to move a little faster!). Threads from experienced builders are great for ideas and examples to follow (and build quality to strive for), but first-time builder threads are great for solutions a lot of problems that first-time builders struggle with - plus their own share of good ideas. Reading a mix of both is a great way to figure where to go next.
And, people read 'em even if they don't respond. For example, from your build thread:
- post #36 ... I have a note to get to that this week ...
- post #43 ... you'll see closeups of my rack in post #13 thru 15 ... I didn't see this as a problem, light contact and not much travel, should be okay.
- post #50 ... I asked a related question and got an answer from Fixit in post #20 ... hope that helps.
Good luck with the final prep for first start! Got the jitters yet?
MK4 #7838: IRS 3.55 TrueTrac T5z Dart 347
The drawing is from ~7th grade, mid-1970s
Meandering, leisurely build thread is
here
-
Post Thanks / Like - 0 Thanks, 1 Likes
-
Senior Member
Getting Started on Wiring
I got some quality time in yesterday, although not a huge amount to show for it. I ordered some tools for finishing up the flex fuel lines and pressure testing, and ordered some electrical tools to get ready for digging into the wiring harness. I got the rear harness approximately in place and put in tie wrap anchors to route around the gas tank and the drop trunk.
Also, I got some blowups of the electrical schematics so I have more room for scribbling and notes (and so my aging eyes can actually read the thing!).

MK4 #7838: IRS 3.55 TrueTrac T5z Dart 347
The drawing is from ~7th grade, mid-1970s
Meandering, leisurely build thread is
here
-
Senior Member

Originally Posted by
John Ibele

Also, I got some blowups of the electrical schematics so I have more room for scribbling and notes (and so my aging eyes can actually read the thing!).
That is an excellent idea. I practically made myself blind studying those schematics. I've gotten in the habit of wearing TWO pairs of reading glasses while staring at it. My wife says I look like an insane person. But I've really enjoyed the wiring aspect of this project. Lots of immediate gratification -- wire it, test it . . . rewire it . . . re-test it, etc.
Last edited by JB in NOVA; 10-26-2020 at 07:29 PM.
MKIV Complete Kit #9822 l BluePrint 347 EFI l TKO600 l Power Steering l Heater/Defrost l
Build Thread
-
Senior Member
Originally Posted by
JB in NOVA
That is an excellent idea. I practically made myself blind studying those schematics. I've gotten in the habit of wearing TWO pairs of reading glasses while staring at it. My wife says I look like an insane person. But I've really enjoyed the wiring aspect of this project. Lots of immediate gratification -- wire it, test it . . . rewire it . . . re-test it, etc.
I think the first few sessions with the schematic and harness lasted about 30 minutes for me ... stare at the RF manual, stare at the maze of wires, stare at the manual ... head back to the house. Plenty of reading threads and posts, a few short sessions, and now its starting to come into focus.
MK4 #7838: IRS 3.55 TrueTrac T5z Dart 347
The drawing is from ~7th grade, mid-1970s
Meandering, leisurely build thread is
here
-
Post Thanks / Like - 0 Thanks, 1 Likes
-
Senior Member
Getting Started on Electrical + Helpful Links
While I'm getting panels in the cockpit riveted in place in the evenings this week, I've been reading build threads and posts related to the next chapter: wiring. I got this far with the wiring harness a few weeks ago:
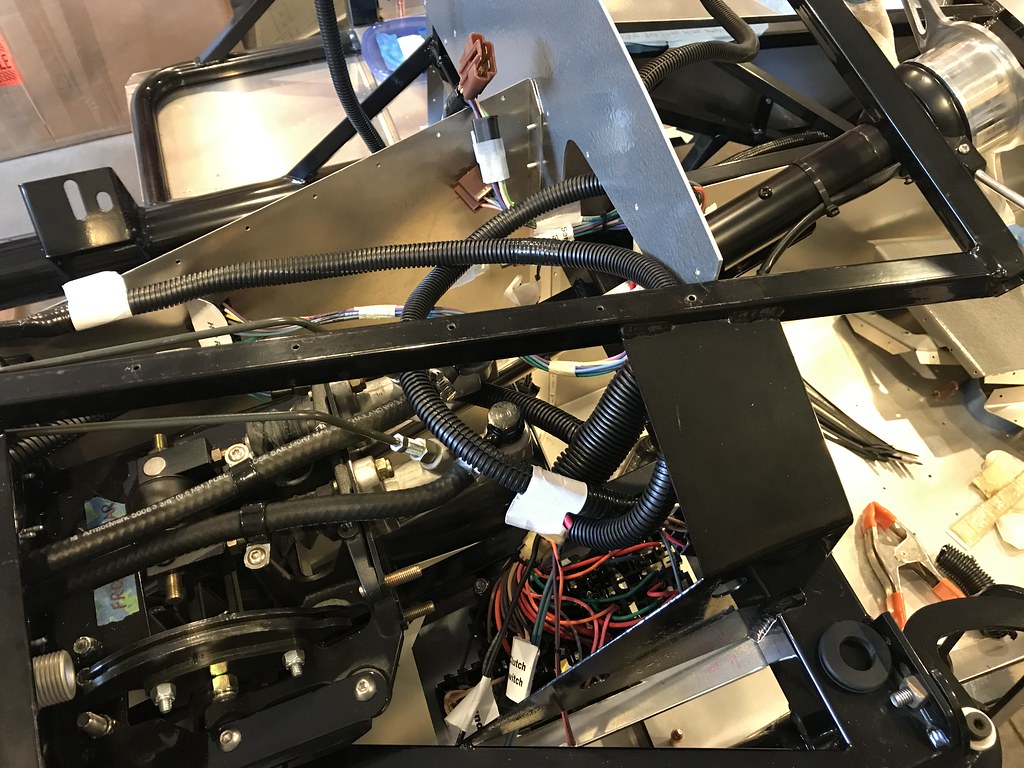
That was enough for me to realize I was eventually going to strip back a lot of the harness, lighten in some spots, and add wires in others. And to do that I would need to understand where each individual wire goes and what it does, and the basics of how the circuit works. Deflating to think about in the first few 30 minute sessions, but completely reasonable once I thought about it for a bit (like this would be the first part of the car that I slapped in place without understanding it??). Just go one bit at a time. In other words, understand the small part you're about to work on, then work on just that. Then repeat.
Based on what I've learned so far, I think it's going to make sense to work from both directions (the 'from' and the 'to') so that both ends of the harness wiring are defined and physically on the car. That way the harness has some real work to do (connecting things), and I have a much better sense of how to route it and lay things out.
I've got the front and rear wiring harnesses in place, and I'll probably get the lights out to give the front & rear harnesses something to plug into eventually. I can add a few wires to the rear harness for a trunk courtesy light. I'll lay out the dash, which will be fun and something mechanical that I know how to do. I may also get the engine / trans dropped in place, so the sending units are all in their final locations.
Anyway, that's my plan for now, but if there's a better way I'm all ears. Just doing my best to hack away at it.
As for getting started, I know everyone who uses the forum has their own ways of gathering information from it ... and there's a ton out there. I'm an engineer by training, but while the basic principles are old hat, the practical parts (tooling, materials, tools, technique) are still completely new to me. I had to remind myself about the difference between an insulated and uninsulated connector, and where you would use each. The difference between a ratcheting and non-ratcheting crimper. Which loom material is best. (I got the simple Klein tool for insulated and uninsulated terminals, I'll so some practice to verify I can do crimps where the wire doesn't pull out and the terminal isn't wrecked. If that's not satisfactory, I'm not out much money or time.)
So if it helps at all, I gathered the most helpful links I found on the forum in case they help anyone else. The most helpful one was the post in response to a request for help from a first time builder (can't remember whose post ... ) which offered the reminder about knowing what every wire does, and where its going, and how the circuit works, and take it one step at a time. On the one hand, really obvious. On the other hand, the right reminder at the right time ... that we're the ones that got ourselves into this mess, we're the only ones that are going to get us out, and we're responsible for ourselves and our own safety. Part of what we wanted from the very beginning! Anyway, that one set me straight.
Oh, heck, more more small diversion ... reminds my of my favorite quote from one of my favorite engineers, someone kinda famous back in his day, Paul MacCready:
"Sometimes if you're lucky and you choose the right goals, it's enough just to know that something worked. I am not a philosopher, nor am I intellectually gifted. There are lots of people around with more talent. You can do all kinds of things if you just plunge ahead. It doesn't mean you're any good at them, but you can be good enough."
I just think that's a wonderfully positive thing to say about human potential. Gets me out of thinking mode and into doing mode every time. (And yeah, he was good enough, as it turns out.)
Okay, links I found helpful:
- Questions about electrical ground. I think I'll follow this approach (sorry, lots of quotes from a certain frequent poster & frequent builder ), make the welded steel frame a solid ground by establishing connections at multiple points. In the four corners I'll likely give the lights an alternate path to ground by adding a wire from ground at the terminal directly to ground at the corner of the frame, and also leave the harness ground wire hooked up. Correct me if that doesn't make sense. Matches the suggestions I got in build school years ago (and no, my memory's not that good ... I took notes
 )
) - Starter Connections. I ordered a terminal block, and will mount it on the frame behind the dash.
- More on starter connections. Okay, good to know. Should I use a main disconnect? There's a long thread on the merits pro and con. I didn't attach it here. Lots of strong opinion from very experienced folks that a main disconnect, unless you need it for racing, just adds needless complexity. But plenty who do it. After some thought ... I decided I do want one, for the convenience, and will mount it in the typical position on the 'A' panel. I may build a cubby box in this spot, so then the switch would be inside the cubby, but I think that's okay.
- Clean ways to handle start and main power. Lots of good stuff in here, post #2 and the follow up are helpful.
- Dash Wiring. Good start to understanding how to tackle what goes behind the dash.
- Ignition switch current. Not sure I need this, but there are multiple examples of it, and as these things get easier, probably not hard or time-consuming to just include. Leave that decision for later.
- RF Main Disconnect. Shows a typical spot for a disconnect switch, and the boots included with the Ron Francis switch. I ordered one.
- Dash components, getting started. A great question from Yama-bro with some really good information in response. I too have a blank dash and plan to lay out the position of all my gauges. Bookmark, save for later.
- Dash wiring approach. Jeff's note from the other forum is worth following after all the gauges are resting in their proper spots on the dash, and its time to work on dash wiring.
- Getting started. This is the one that got me thinking about where to go next after laying a rats nest of wires down on my just-completed bench bleeding job on the master cylinders. What's this about a mega fuse? Did more research and decided it was the last item which could fry multiple components in my car, so good insurance for not much time or money. Ordered one.
- Power for accessories. Good question from Terry produced a good thread for background on this topic. Paul's post #4 and post #15 convinces me I can add a trunk light to the courtesy light circuit without much trouble at all.
- Nice Pic of Bus Bar and Fuse Block
- Alternate Kill Switch Locations? This is from the coupe, I decided there's no better place than the A panel in roadster.
- Battery cable routing. Good images / examples of how to get the power where it needs to go. Karlos did a super clean job on his build.
There we go ... now I have 'em all in one place for myself, and hopefully they're helpful for a few other folks too.
MK4 #7838: IRS 3.55 TrueTrac T5z Dart 347
The drawing is from ~7th grade, mid-1970s
Meandering, leisurely build thread is
here
-
Post Thanks / Like - 0 Thanks, 1 Likes
-
Senior Member
Yep, this forum is an absolute goldmine of information. I keep a running Word document with links to the forum for things I know will be important going forward. It has saved me a lot of time trying to figure out "where did I see that?"
MKIV Complete Kit #9822 l BluePrint 347 EFI l TKO600 l Power Steering l Heater/Defrost l
Build Thread
-
Post Thanks / Like - 1 Thanks, 1 Likes
-
Senior Member

Thanks for putting this list together in one place, John! I will take a note of it. I use a Google Sheet for my notes with columns for builder name, post number, and the meat of the info. I want to capture for future reference. Sometimes I copy/paste the URL for the specific post for easy navigation in the future. Thanks again for sharing!
Chris
Coupe complete kit delivered: 4/22/24.
Build Thread. Coyote. T-56. IRS w/3.55. Wilwoods. PS. HVAC. Side windows.
MK4 Complete kit.
Build Thread Index. Delivered: 10/15/2020. Legal: 7/25/23. Coyote Gen3. TKO600 (0.64 OD). IRS w/3.55. PS. Wilwoods. Sway bars. This build is dedicated to my son, Benjamin.
Build Thread.
-
Senior Member
Originally Posted by
460.465USMC
Thanks for putting this list together in one place, John! I will take a note of it. I use a Google Sheet for my notes with columns for builder name, post number, and the meat of the info. I want to capture for future reference. Sometimes I copy/paste the URL for the specific post for easy navigation in the future. Thanks again for sharing!
I’m glad if it can be a help to anybody. As a first time builder, I can’t imagine building the car without all the friendly, helpful expertise here on the forum!
MK4 #7838: IRS 3.55 TrueTrac T5z Dart 347
The drawing is from ~7th grade, mid-1970s
Meandering, leisurely build thread is
here
-
Senior Member
I got in a few hours over the weekend, and got to focus a bit more on the wiring harness and dash. I was overwhelmed for the first few sessions focused on the wiring, but definitely feel like I'm making some forward progress now. Progress for the weekend:
- I got all the main harness portions approximately where they will sit behind the dash. To get there, I removed a fair amount of tape and loom to gain flexibility and get parts to 'sit' where I wanted them to go.
- The front harness is in place, and I removed some loom so I could bring the PS light / fan portion across to the PS side right where the upper mount for the radiator is. 2012 kit, remember ... I think this may be standard on newer harnesses. Questions that came up:
- Where precisely is the best route to take this branch over to the PS side? I figured I'd leave this for now, until I have the radiator in place.
- What is best practice for splicing in a new section of wire? To move the 'Y' in the front harness further up, I needed to cut the ground wire for the PS portion, and will need to splice in a new / longer section of wire. I'm not a fan of butt connectors, and I'm assuming wrap / solder / shrink tubing is probably best, but I'll need input on this.
- I dieted the Hot Rod harness and will put shrink tubing on all dead ends when I have the harness back out of the car.
- I ran into these questions before setting the harness aside:
- Do I need the connectors and the 'Y' in the alternator portion of the harness if I have a single wire alternator
- How much length will I need on the portion leading to the bus bar I'm installing on the fire wall, seems like this can be plenty shorter
- Ditto for ignition portion
- Where to drill additional holes into the engine bay ... middle of firewall, enlarge the hole in the DS footbox.
I figured most of these questions would answer themselves when I had the destinations for all the wires more firmly identified on car. Current placement looks like this:


I also got out the blank dash and got a very first look at what gauge placement might look like:

Even these three aren't much more than slapped into place, in a spot where I can see them clearly. But, very satisfying to see the mockup through the steering wheel.
I didn't get as much done as I had planned on, partially because this showed up in the driveway in the middle of the afternoon:


Of course, that required an extended cruise with the buddy who's finishing up the car, followed by some rattle-chasing after the ride, and a tour of the roadster. The blue / gray combination on that car is just stunning. Fun day!
Last edited by John Ibele; 11-09-2020 at 03:24 PM.
MK4 #7838: IRS 3.55 TrueTrac T5z Dart 347
The drawing is from ~7th grade, mid-1970s
Meandering, leisurely build thread is
here
-
Post Thanks / Like - 0 Thanks, 1 Likes
-
-
Senior Member
Initial Dash Layout
Just a minor update. While I'm waiting for supplies to come in for wiring and finishing the dashboard, I began dashboard layout starting with a pdf file and a number of saved images from other builders. I started with my own ideas about placement, but made a lot of changes in line with what others have done once I saw what things actually looked like on the dash. This is after several iterations of laying things out and wiping the slate clean. I started with lights to the left of the steering wheel, swapped it out for the hazard switch, and eventually moved everything away from the DS door. I eventually ended up with knobs on the bottom row, and switches above that. I still need to settle on the final layout for the glovebox. I'll probably set the body on the frame to double check how things look on the dash and stare at it for a day or two before I finally commit with drilling and covering. Also, you'll notice that unlike what other kits have seen, my dash actually is even with the top of the hoop on the ends and low in the middle. Not sure if that has anything to do with the age of the frame vs. the new blank dash I ordered, but I don't think its a big deal. I figured I have plenty of overlap with the frame to set the angle of the dash and fasten it, and I didn't need anything sticking above the hoop. Anything else I need to know I should find out when I set the body on the frame. I have the ends of the dash tucked in the inside of the hinges, but it will take more than that to give them a permanent bend. I'm assuming I'll have to do this before covering with foam & leather to avoid damaging or separating the covering.

MK4 #7838: IRS 3.55 TrueTrac T5z Dart 347
The drawing is from ~7th grade, mid-1970s
Meandering, leisurely build thread is
here
-
Senior Member
Originally Posted by
copythat
Thank you for the list!
You're welcome - I'm glad someone found it helpful!
MK4 #7838: IRS 3.55 TrueTrac T5z Dart 347
The drawing is from ~7th grade, mid-1970s
Meandering, leisurely build thread is
here
-
Senior Member
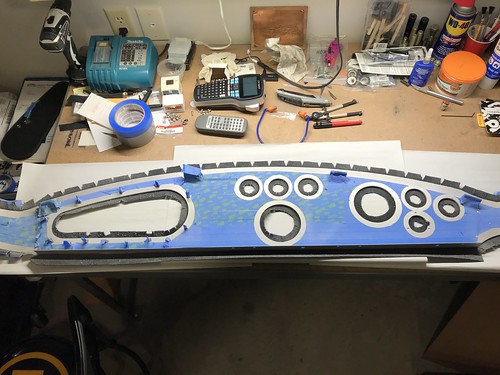
I've been making steady progress on the dash. After moving gauge, indicator and control locations around a number of times the layout seems to be settling down ... the driver's-eye view now looks like this:

I cut four sections of aluminum L-bracket material to use for hanging the dash, as documented in other threads. You can see the flat head screws in a couple locations on the dash. I ran into one interference with the leftmost hanger which interferes with the water temp gauge. Lucked out there, as the bracket can be moved about 1" left and the errant hole falls within the gauge cutout location.
Other changes:
- Moved switches around a bit, now in final locations
- Left the L/R indicator lights up on top, but moved the high beam and warning lights down low on the dash but still clearly visible to the driver. I wanted more room for the gauges with the limited field of view through the steering wheel than I could get with the diamond shape of all for lights together.
- The two circles close to each other next to the speedo are for DS seat heater and indicator light. I'll need to lay those out a bit differently since the two cannot physically fit that close together.
I got a separate sheet of 0.040" 6061 to use as a second layer to stiffen the dash. I got that cut to size, and drilled both layers for the steering column, using the Mike Everson bezel as a guide.
I made some brackets to brace the bottom of the dash:

Those were easy to make with the brake that I have, plus a hand seamer to do the last bend. Installed they look like this:


I installed a grab rail for underneath the glove box:

I made braces from steel L-bracket to attach the grab rail so that both the dash and the grab rail are solidly mounted to the frame. The second bracket isn't yet installed in this view:
I have a few more things to receive in the mail (the water gauge, returned with temperature in F rather than C, and some switch bezels), and then I can start drilling the dash. The additional time required to brace the dash wasn't huge, and i'm really happy with how solid it feels.
MK4 #7838: IRS 3.55 TrueTrac T5z Dart 347
The drawing is from ~7th grade, mid-1970s
Meandering, leisurely build thread is
here
-
Post Thanks / Like - 0 Thanks, 1 Likes
 Fman
Fman liked this post
-
Senior Member
John, I like how you're dash is coming together. Good view of the tach., H2O, and oil pressure through the limited viewing space available. Going to bookmark your example for my reference when I get to this point. Thanks!
Chris
Coupe complete kit delivered: 4/22/24.
Build Thread. Coyote. T-56. IRS w/3.55. Wilwoods. PS. HVAC. Side windows.
MK4 Complete kit.
Build Thread Index. Delivered: 10/15/2020. Legal: 7/25/23. Coyote Gen3. TKO600 (0.64 OD). IRS w/3.55. PS. Wilwoods. Sway bars. This build is dedicated to my son, Benjamin.
Build Thread.
-
Post Thanks / Like - 1 Thanks, 0 Likes
-
Senior Member
Thanks Chris! Glad it helps. This is a part Ive really enjoyed so far. Lots of good examples to follow, but with a blank sheet of aluminum theres the option to just go your own way in spots. Im getting better at metal fab (finally) so thats faster and less frustrating than initial attempts. Plus - I get to put off thinking about wiring.
MK4 #7838: IRS 3.55 TrueTrac T5z Dart 347
The drawing is from ~7th grade, mid-1970s
Meandering, leisurely build thread is
here
-
Senior Member

Nice work! I like your modified competition layout... you will be into wiring before you know it.
-
Senior Member
Originally Posted by
Fman
Nice work! I like your modified competition layout... you will be into wiring before you know it.
Thanks, Fman! When I only get an hour or so a night to work on the car it can sometimes seem like a long haul, but its been great getting some bigger chunks of time to dig in ... put some Zep on the stereo and go to work!
MK4 #7838: IRS 3.55 TrueTrac T5z Dart 347
The drawing is from ~7th grade, mid-1970s
Meandering, leisurely build thread is
here
-
Senior Member
More forward progress on the dash, which is coming together nicely.
I went through a bunch more layouts and finally ended up with this, which better be the final one, because the holes are now drilled!
On the bottom are the horn button, ignition, lights, and heater knob. I'll get a replacement knob for the heater to match the headlight pull.
Next are a pair of toggle switches on either side of the speedo. L to R: wiper, hazard, DS seat heater, PS seat heater
Above that are the indicator lights for the seat heaters. I'll replace the rocker switches with the lucas type switches for the seat heaters, and do a 50% on / 100% on with the indicator lights for the lo / high heater positions.
I talked myself in circles about getting genuine Lucas switches and finally decided to stay with the one larger wiper switch and three of the smaller FFR-provided switches. I was almost sold on getting all genuine switches until I determined that for the seat heaters, I was planning on using the ON-OFF-ON switch which they use for turn indicator applications. The genuine Lucas switches use a longer toggle on this switch ... then I'm picturing taking apart switches to get all the same length toggles ... not gonna do that. While they feel different (wiper switch has a nice chunky mechanical feel on actuation, the others have a 'tighter' click), the FFR provided switches feel plenty solid and look nice when installed on the dash, so in they go. I also geeked out on bezels to match the look of the dash, but more on that later. I think the motivation there was to enjoy picking out something with $3 cost AND $3 postage ... when does THAT happen with a roadster?!
I spent enough time with the layout so that I'm really happy with the end result. It has a nice balanced look and 'supports' the gauge layout above it. Its got the most important controls and indicators in nearest proximity to the driver. The only compromise of sorts was putting the headlight switch to the right side of the speedo. It was either there or under the steering wheel (or perhaps to the left of the wheel), and I didn't feel comfortable with that, plus liked the layout better this way. Its still within easy reach, even if reaching in from outside the car.

I drilled the smaller holes with a step drill, and went oversized on the holes in the back stiffener panel where I needed to. Be super careful about drilling undersized and getting the needle files out for any keys and flats you need to file into place. Yep, ask me how I know. Not a big deal ... I can add braces on either side of the heater control behind the dash if I need to.
Favorite tool of the week: hand countersink which I had in my woodworking toolbox, which works great to deburr holes in the aluminum.

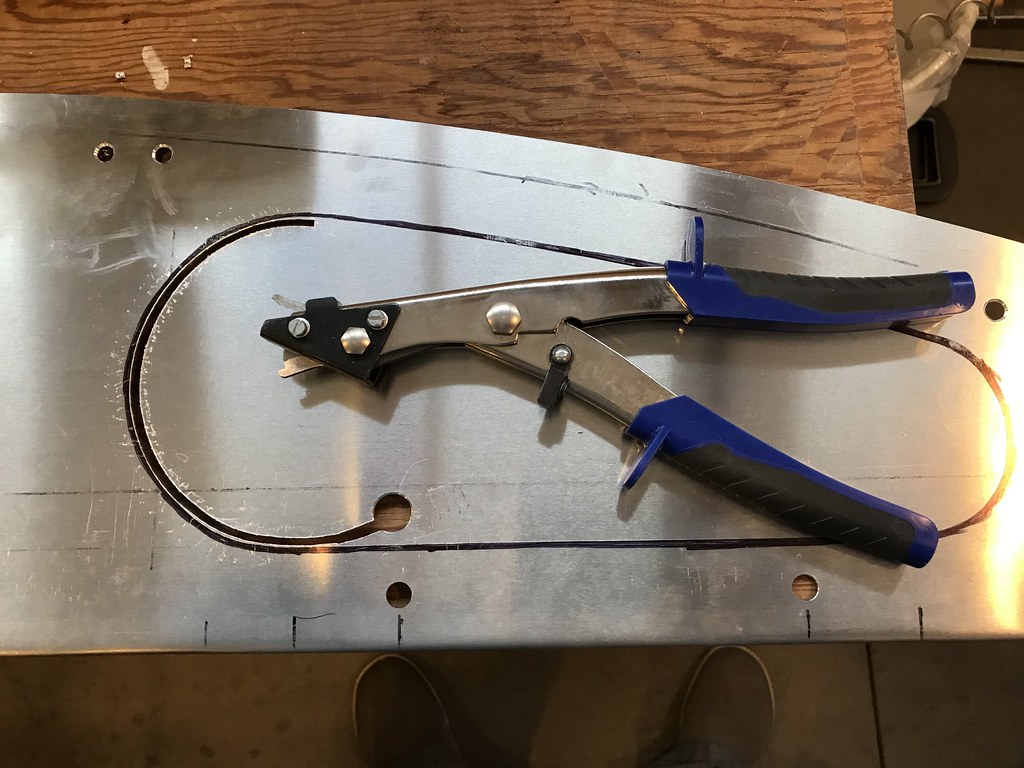
After putting in this much time on the dash I got a little gun-shy about using the jigsaw so I went with the hand nibbler to do the glovebox cutout. This much took me about 10 minutes, and actually went around the corner without much trouble. The smaller radius took a little backtracking, but not bad. Add in working with the rasp and file and doing the back panel as well ... probably between 2 and 3 hours total. Not fast. But faster than having to do it over I guess, and it turned out great. Be careful with the dash if its unsupported once you cut the glovebox out. Very flimsy.
I found these Soss 106 hinges, and I'm pretty pleased with how they look like they'll work. They are made for use with metal, are completely hidden inside the glovebox, and don't take up much space. They have a nice look and are plenty sturdy. Like European-style cabinet hinges, their center of rotation is in front of the box (which is what you want).
Here's the approximate layout of the hinges from the backside of the dash, with the bolts from the grab bar coming through the dash. I still need to figure out exactly how the bottom of the glovebox will work out ... I left myself with a bit of head-scratcher there, but I think there's a solution.

Here's a side view of the hinge in the closed position. Dash would be where my thumb is, and glovebox door would be just above that.
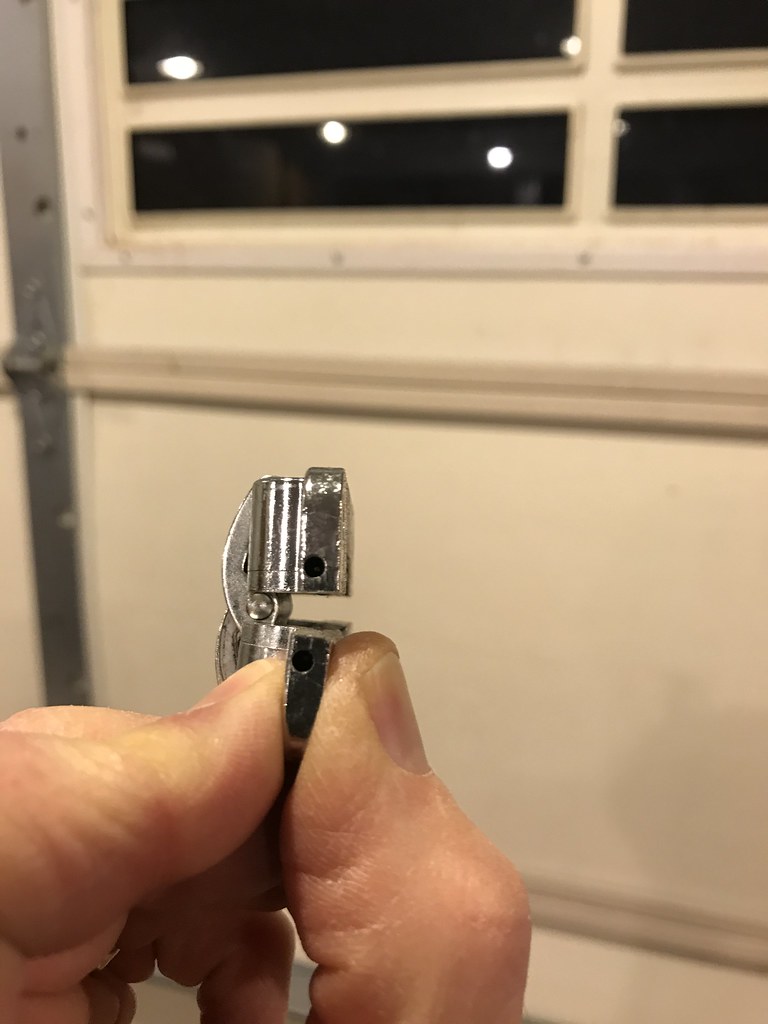
Here's the same view, open about 135 degrees.

There are limits on panel thickness and minimum gap between panels, but as far as I can see those can be ignored if you're only planning on opening the door 90 degrees, as I am. Pretty cool hinge mechanism. I'll show how they work in this application in the next post (hopefully not more than a few days from now!).
MK4 #7838: IRS 3.55 TrueTrac T5z Dart 347
The drawing is from ~7th grade, mid-1970s
Meandering, leisurely build thread is
here
-
Post Thanks / Like - 0 Thanks, 2 Likes
-
Senior Member

Best debur solution I’ve ever seen. The hinges are interesting and look like they could be a very nice improvement, where did you get them? Did you mention already what the plan is for attaching them?
Bradley
Build thread - Mk4, Coyote, IRS, Wilwood brakes, old-style soft top and accessories.
The distance between "finished" and finished is literally infinite.
-
Senior Member
Originally Posted by
GTBradley
Best debur solution Ive ever seen. The hinges are interesting and look like they could be a very nice improvement, where did you get them? Did you mention already what the plan is for attaching them?
Thanks, GT! I'd have to check which site on Amazon but I think its this one. The satin chrome finish looks fine, better than the unfinished hinges. That Amazon site also has this PDF as well as other CAD format prints.
I'll attach them the same way I am attaching the dash hanger brackets and fastening the glovebox: flathead countersunk phillips head screws, with nyloc nuts on the back or stainless acorn nuts if I want it to look fancy. I'll sink the screw heads in JBWeld, then sand it all flush with the dash face before covering with foam and leather.
MK4 #7838: IRS 3.55 TrueTrac T5z Dart 347
The drawing is from ~7th grade, mid-1970s
Meandering, leisurely build thread is
here
-
Post Thanks / Like - 2 Thanks, 0 Likes
-
Senior Member
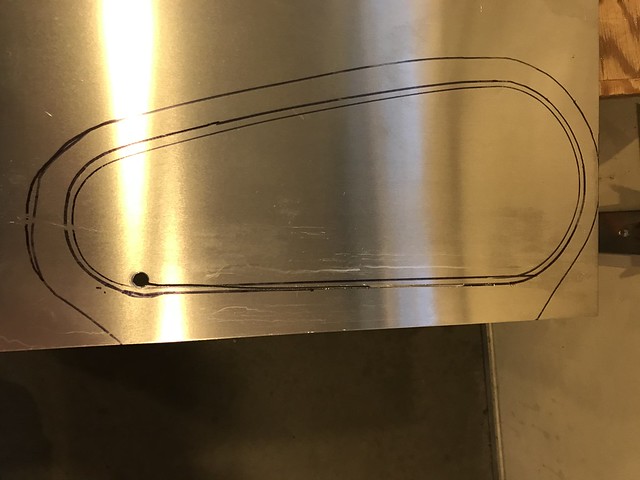
Glovebox Fab
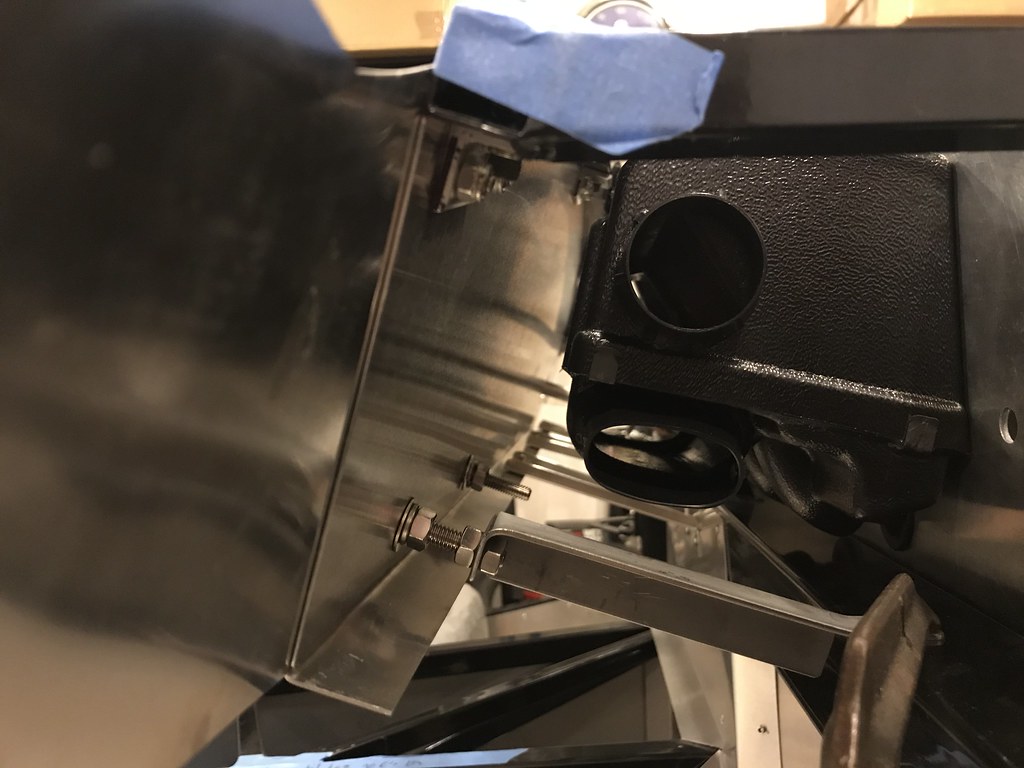
I'm going to have the shallow glovebox since I didn't choose the firewall forward, and have the VintageAir heater / defroster taking up space behind the dash. I really liked Fixit's approach to getting more space around the heater, but had my lifetime dose of fiberglass / polyester with some boat sheathing several decades ago, and decided to take a different route.
While you can't do complex curves when you're working in sheet metal without more fancy tools, you can still grab a bit more space as you go under the heater - here's what I ended up with for a jig:


I decided to cover the glovebox interior in leather before assembly, because I just couldn't see how that was going to happen well after. The back was simple, and the edges not bad ...


After gluing the leather on I masked it with painter's tape to protect it until after final assembly and glue-up. Here's a dry-fit before assembly:

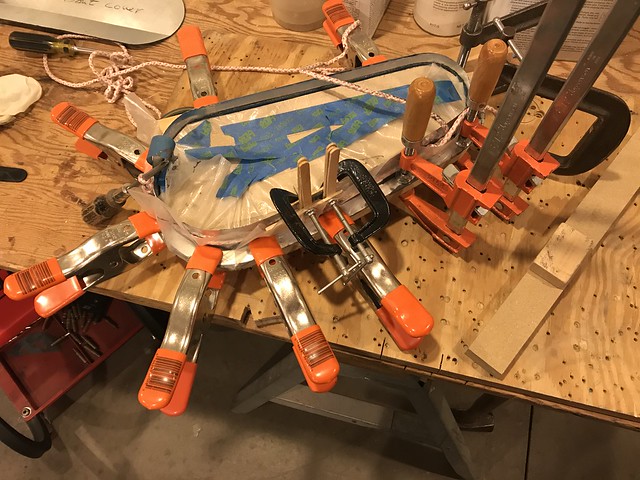
One more needed piece was a 'clamp ring' out of 0.090" aluminum plate ... started cutting with the 45-year-old Black and Decker inherited from my father, finally died 3-4 inches into the cut, replaced with the cordless Makita jigsaw ... wow, a 5 decade jump forward in technology! Should have done that long ago. Oh well, working great now. The right blade and a little grease on the bottom of the cut to make it last longer and I get none of the kickbacks I was getting before. Making cuts like this without drama in a minute or so, big step forward in fabbing capability. School of hard knocks can be painful, but all part of the fun I guess. Roughing it out ...
I attached the jig to a 'clamp board' so I could pull the 'clamp ring' down tight over the dash face of the glove box. Put a sheet of plastic between the two jig pieces, wrapped the top piece in plastic ... all to keep the JB Weld where I want it, and not where I don't ... here's the glue-up of the edge and clamp ring:
Last edited by John Ibele; 01-20-2021 at 01:09 PM.
MK4 #7838: IRS 3.55 TrueTrac T5z Dart 347
The drawing is from ~7th grade, mid-1970s
Meandering, leisurely build thread is
here
-
Post Thanks / Like - 0 Thanks, 1 Likes
Fman liked this post
-
Senior Member
The last gluing step was a bit messy on the back but will clean up just fine. I've got a little trim of the sheet metal around the hinges and need to tack that leather down on the back, but otherwise I'm good to move on. A test fit shows the glovebox coming right up to the heater with nothing left over. Perfect.


MK4 #7838: IRS 3.55 TrueTrac T5z Dart 347
The drawing is from ~7th grade, mid-1970s
Meandering, leisurely build thread is
here
-
Post Thanks / Like - 0 Thanks, 2 Likes
-
Senior Member

John D. - Minneapolis 'Burbs
1965 El Camino - LT-1, 4L60e, 4wh discs, SC&C susp.
2013 F-150 Platinum - Twin Turbo 3.5
2018 Mk4 Roadster w/ Coyote - #9365 - Build Thread Delivery 7/3/18, 1st Start 1/4/19, 1st Road Mile 5/5/19, Legal 6/18/19, In Paint 2/25/21, Done (?) 4/2021
-
Post Thanks / Like - 0 Thanks, 1 Likes
-
Senior Member
Originally Posted by
Fixit
... yeah, to be honest I wasn't thinking about that when I mentioned yours ... you had a novel approach that really worked out well in the end.
With all that polyester resin in my brain from decades ago, I'm not sure how I skated by the first time!
Last edited by John Ibele; 01-20-2021 at 05:58 PM.
MK4 #7838: IRS 3.55 TrueTrac T5z Dart 347
The drawing is from ~7th grade, mid-1970s
Meandering, leisurely build thread is
here
-
Senior Member
Originally Posted by
John Ibele
The last gluing step was a bit messy on the back but will clean up just fine. I've got a little trim of the sheet metal around the hinges and need to tack that leather down on the back, but otherwise I'm good to move on. A test fit shows the glovebox coming right up to the heater with nothing left over. Perfect.
Wow, John! You have some serious fab skills. Looks great. I want to do a glove box too, but not sure yet what I will do/capable of. Thanks for sharing!
Chris
Coupe complete kit delivered: 4/22/24.
Build Thread. Coyote. T-56. IRS w/3.55. Wilwoods. PS. HVAC. Side windows.
MK4 Complete kit.
Build Thread Index. Delivered: 10/15/2020. Legal: 7/25/23. Coyote Gen3. TKO600 (0.64 OD). IRS w/3.55. PS. Wilwoods. Sway bars. This build is dedicated to my son, Benjamin.
Build Thread.
-
Post Thanks / Like - 1 Thanks, 0 Likes
-
Senior Member
Thanks Chris. Just hackin' away the best I can. I was happy with the way it turned out - wasn't a do-over, or something I had to grit my teeth to move ahead with.
MK4 #7838: IRS 3.55 TrueTrac T5z Dart 347
The drawing is from ~7th grade, mid-1970s
Meandering, leisurely build thread is
here
-
Senior Member
I made more progress over the weekend on the dash and thought I would leave a brief update. I glued two thicknesses of aluminum together to make up the door. These panels have holes for the door handle (countersunk flush from the back), the hinges (screws countersunk flush from the front and covered with epoxy), and a hole for the lock.
I made a back panel slightly smaller sized to have finished leather on the inside of the door. This has cutouts to go around the hinges, and only the hole for the lock. I bought a magnetic catch and drilled a hole through the back panel to hold the steel catch plate. Roughed up the edges of the hole and left a bit extra JB Weld on the inside face of this panel to hold the catch, and sanded the epoxy flat on the leather-covered side. Its not going anywhere. Make sure you get a powerful enough magnet to hold through the leather. This is the 13 lb round catch from McMaster and its on the weak side. I may beef up the holding power with a separate magnet against the steel washer / catch I embedded in the panel. Work in progress, gluing up the inside panel:

I've been using 3M 77 for gluing panels, and it seems to be working fine. Masking doesn't take much time, the odor is low and there's not too much overspray. I looked at the many other options that folks are using but I know some experienced folks vouch for it and its been working for me.
Here's the end result:


It's great to see the first part of the finished interior. Very happy with how the leather and foam went on, and the how the handle and lock look against the leather. The hinges are offset to work around the grab rail I have just below the glovebox door, but they work just fine and obviously won't show from the front. They would be best in a case where you have the bottom of the glovebox extend below the opening for the door, in which case the hinges would be fully contained within the box (no cutouts in the bottom of the glovebox). But, not a unique problem to this hinge. These are compact, very stout, and have a cool look when you open the door.
Next it's on to (take a deep breath) cutting the gauge holes with the fly cutter, first with the back panel, then with the dash itself. Everything is locked down to a piece of plywood, 1/4" pilot holes drilled through panel and plywood, screws drilled in to hold the 'interior' pieces I'll be drilling out, 1/4" shaft put in place of the drill bit on the cutter ... no more excuses to put off cutting holes now! Should be able to do that this week, and be ready for covering the dash by the weekend.
MK4 #7838: IRS 3.55 TrueTrac T5z Dart 347
The drawing is from ~7th grade, mid-1970s
Meandering, leisurely build thread is
here
-
Senior Member
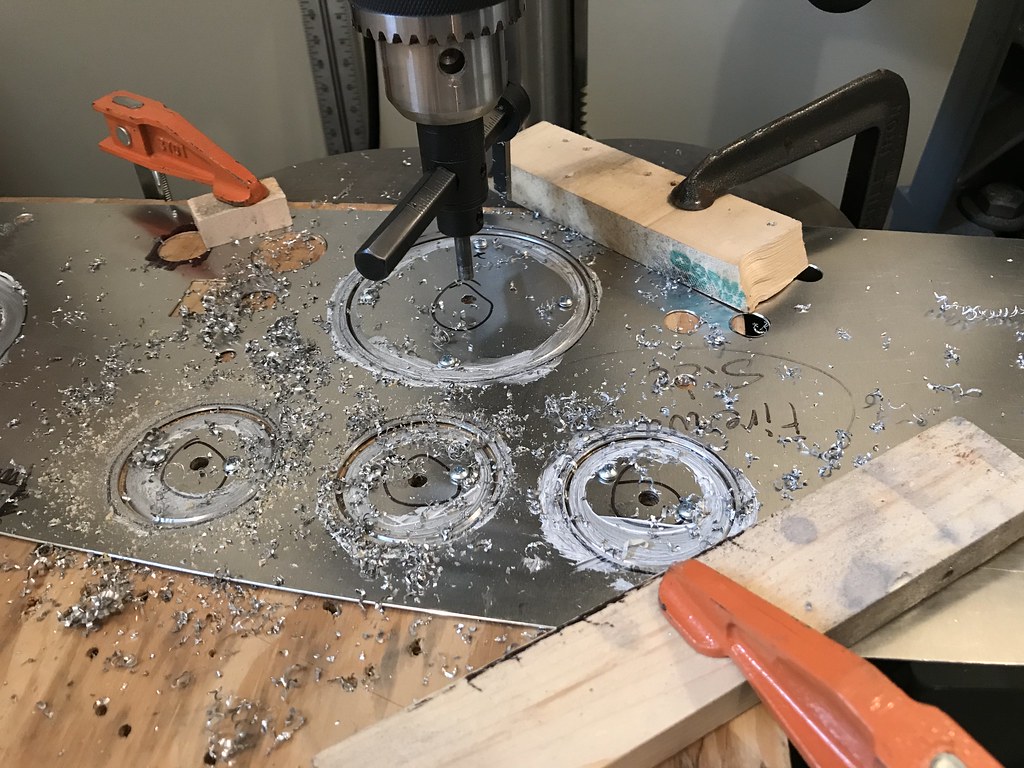
I had run out of excuses and am WFH this week, so I drilled the gauge holes in the dash backing panel over lunch. With everything clamped down, absolutely no drama. I wiped some white lithium grease on the panel because that's what I had available - figured it wouldn't hurt and might help. There was no squealing, cutting was consistent, and there was a very clean cut on both entry and exit. I went with 2.1" diameter for the small holes and 4" for the large ones; I'll check again with leather wrapped around a large and a small gauge before drilling the dash itself.
MK4 #7838: IRS 3.55 TrueTrac T5z Dart 347
The drawing is from ~7th grade, mid-1970s
Meandering, leisurely build thread is
here
-
Post Thanks / Like - 0 Thanks, 1 Likes
Fman liked this post
-
Senior Member
Originally Posted by
John Ibele
I made more progress over the weekend on the dash and thought I would leave a brief update. I glued two thicknesses of aluminum together to make up the door. These panels have holes for the door handle (countersunk flush from the back), the hinges (screws countersunk flush from the front and covered with epoxy), and a hole for the lock.
I made a back panel slightly smaller sized to have finished leather on the inside of the door. This has cutouts to go around the hinges, and only the hole for the lock. I bought a magnetic catch and drilled a hole through the back panel to hold the steel catch plate. Roughed up the edges of the hole and left a bit extra JB Weld on the inside face of this panel to hold the catch, and sanded the epoxy flat on the leather-covered side. Its not going anywhere. Make sure you get a powerful enough magnet to hold through the leather. This is the 13 lb round catch from McMaster and its on the weak side. I may beef up the holding power with a separate magnet against the steel washer / catch I embedded in the panel. Work in progress, gluing up the inside panel:
I've been using 3M 77 for gluing panels, and it seems to be working fine. Masking doesn't take much time, the odor is low and there's not too much overspray. I looked at the many other options that folks are using but I know some experienced folks vouch for it and its been working for me.
Here's the end result:
It's great to see the first part of the finished interior. Very happy with how the leather and foam went on, and the how the handle and lock look against the leather. The hinges are offset to work around the grab rail I have just below the glovebox door, but they work just fine and obviously won't show from the front. They would be best in a case where you have the bottom of the glovebox extend below the opening for the door, in which case the hinges would be fully contained within the box (no cutouts in the bottom of the glovebox). But, not a unique problem to this hinge. These are compact, very stout, and have a cool look when you open the door.
Next it's on to (take a deep breath) cutting the gauge holes with the fly cutter, first with the back panel, then with the dash itself. Everything is locked down to a piece of plywood, 1/4" pilot holes drilled through panel and plywood, screws drilled in to hold the 'interior' pieces I'll be drilling out, 1/4" shaft put in place of the drill bit on the cutter ... no more excuses to put off cutting holes now! Should be able to do that this week, and be ready for covering the dash by the weekend.
Great job on the glove box, looks pro level. I like the handle addition and your dash is really looking great, keep up the nice work!
-
Post Thanks / Like - 1 Thanks, 0 Likes
-
Senior Member
I was going to offer a tip, but you've already done it... running a screw into what will be "waste" on the hole.
John D. - Minneapolis 'Burbs
1965 El Camino - LT-1, 4L60e, 4wh discs, SC&C susp.
2013 F-150 Platinum - Twin Turbo 3.5
2018 Mk4 Roadster w/ Coyote - #9365 - Build Thread Delivery 7/3/18, 1st Start 1/4/19, 1st Road Mile 5/5/19, Legal 6/18/19, In Paint 2/25/21, Done (?) 4/2021
-
Senior Member
Originally Posted by
Fixit
I was going to offer a tip, but you've already done it... running a screw into what will be "waste" on the hole.
Pretty sure that was something I picked up from your build thread ... good tips in there.
MK4 #7838: IRS 3.55 TrueTrac T5z Dart 347
The drawing is from ~7th grade, mid-1970s
Meandering, leisurely build thread is
here
-
Post Thanks / Like - 1 Thanks, 0 Likes
 Fixit
Fixit thanked for this post
-
Senior Member
I made a lot of progress on the dash over the weekend; when its below zero out its not like there's a lot competing for your time. During the pandemic there's been more people outside even in cold weather, but ... <<0 windchill is a little different. We live across from one of the city lakes in Minneapolis and there's plenty of ice fishing, just like always. But this year, there's probably 3-4 shoveled pond hockey rinks, and kids and adults out there at all times of day and night. There's been one group that has brought out a pole, a rope and a chain saw, marked out a circle with the rope, then cut a 40 foot diameter circle out of the ice. Put a bench and few camp chairs on it, and had the family slowly rotating around on their ice carousel. Pretty cool. Needless to say it freezes back in place overnight, and with the weather we've been having it's probably back to more than a foot of ice.
Okay, meanwhile I was in the garage

.
I read quite a bit on the forum and while there are plenty of options, it's clear that super 77 can work fine for doing the dash and I was pretty used to the stuff by now. It's really forgiving in terms of coating thickness, doesn't have much overspray, and a 10 minute wait was all I needed to go from 'goo' to 'aggressively tacky but stays where you put it'. So, spray it is.
I cleaned both panels well before applying some JB Weld in a few spots between the panels, and then glued up the brackets, getting some glue behind the countersinks as I went. Same for the screws for the glove box and hinges. I held these in place with panel nuts, but I like Fixit's approach of using tape which also worked well.

Untitled by
John Ibele, on Flickr
I laid the foam flat and held it to the table overnight to relax after being rolled up. I didn't do anything special other than taping the foam down on the ends, and after spraying, set the dash down on the foam and ran over the back with a J-roller. It went on perfectly flat, nothing I would do differently here.

Untitled by
John Ibele, on Flickr
Same deal with the leather. Here I was just a bit more aggressive in terms of holding the leather just to make sure it went on evenly. I taped it with duct tape in the 4 corners, stretching it just so it wouldn't have wrinkles but not taut. I wanted to do this in two steps so I did some masking first, which was quick work with some poster board and the cutouts loosely taped onto the leather:

Untitled by
John Ibele, on Flickr
After spraying:

Untitled by
John Ibele, on Flickr
Same deal, I just set the dash down carefully in position using the paper cutouts as a guide, and then used the J-roller on the back of the dash.
Last edited by John Ibele; 02-09-2021 at 12:36 PM.
MK4 #7838: IRS 3.55 TrueTrac T5z Dart 347
The drawing is from ~7th grade, mid-1970s
Meandering, leisurely build thread is
here
-
Senior Member
I cut the leather 3/4" or so oversize, and then cut the pie slits. I masked off the back where I didn't want the 77, and it looked like this while I was waiting a few minutes for the glue to set up:
Untitled by
John Ibele, on Flickr
Same as others have noted, when I pulled each of the tabs up and pressed in place there was no question they were staying for good. Some tips:
- You don't want the slits to start until the leather is up on the back face. To do this you can pull the leather 'up' through the hole, and poke the x-acto blade thru just above the level of the back panel.
- When you're pulling tabs on an inside curve (all the dash cutouts), 'wipe' the tab from the front face of the dash to the back, putting pressure on the middle of the tab. By doing this firmly and by pulling on the middle of the tab as you push it down, you'll avoid the curve looking like a series of straight segments when you look at it from the front. The point here is to have even tension across the width of the tab.
- For cutting slits and particularly for cutting the small holes, you want the steep stiletto blade for your x-acto knife, a utility knife won't cut it here. Sorry, I rarely do that
- And as Paul noted somewhere in his thread, you want lots of blades.
The back when done:
 Untitled
 by
John Ibele, on Flickr
By the way, I ordered a 1/2 hide, and I have a rectangle of 17" x 96" left. That's plenty of width to do the tranny cover and a console box, and perhaps enough width to do Herb's door panels - I need to check that.
A nod to Paul's build threads and refinements from many others here; I don't think I broke any new ground. Just tried to add some detail based on using the spray approach. I was nervous about getting the foam and the leather to lay flat, and it was much less dicey in practice than I anticipated.
Here's the finished dash.

Untitled by
John Ibele, on Flickr

Untitled by
John Ibele, on Flickr

Untitled by
John Ibele, on Flickr
I couldn't be happier with the results. I was after a nod to the vintage look but with some of my own touches and with all the controls where I wanted them, and it turned out just the way I hoped.
I enjoyed this part of the build more than any build phase so far. I think there are a number of reasons for that. I've had no travel recently, so there's been better flow to the work. I've gotten good enough with metal fab so it has been easier to meet my own work standards. Most of all, I liked the combination of design / aesthetics, functionality, and fab work. It was a great feeling starting with a blank sheet of aluminum, some foam and some leather.
MK4 #7838: IRS 3.55 TrueTrac T5z Dart 347
The drawing is from ~7th grade, mid-1970s
Meandering, leisurely build thread is
here
-
Post Thanks / Like - 0 Thanks, 5 Likes
-
Senior Member

Very nice layout John. This was one of my most enjoyable parts of the build as well. I like the small LED's above the switches (assuming for seat heaters). Now the fun part of wiring it all.. 
MKIV #7275 Acquired June 2019 (2010 partial build), Gen 2 Coyote by Forte w/TK600- PRO 5.0 - McLeod RST twin Clutch-QT Bell, old style IRS, 8.8 3.55 Rear, Gas'n Headers/Pipes, Power Steering, Hydroboost by Forte, Breeze Roll Bar, Heated Seats, 17" halibrand w/ Nitto G2, Maradyne Fan Controller, Paul Proe Vent Kit, Russ Thompson Signal w/ FTP- Received June 2019/First Start April 2020/Go Cart May 2020/Legal September 2020/PAINT BY SPOTLIGHT CUSTOMS JAN 2021
-
Senior Member
Originally Posted by
nuhale
Very nice layout John. This was one of my most enjoyable parts of the build as well. I like the small LED's above the switches (assuming for seat heaters). Now the fun part of wiring it all..
Yeah, I forgot to mention ... part of the satisfaction was putting off wiring!
MK4 #7838: IRS 3.55 TrueTrac T5z Dart 347
The drawing is from ~7th grade, mid-1970s
Meandering, leisurely build thread is
here
-
Senior Member
Forgot to include a shot showing how the hinges worked out. They should work fine - I calculated clearance without foam and leather, so they get slightly compressed at the bottom of the glovebox door when you open it. But, its only a slight compression and leaves no marks. The required cutout inside the box is no bigger than for the hinges others have used, and these are compact, sturdy and have a nice look. I would use them again (and will probably do so on a console box under the dash).

Untitled by John Ibele, on Flickr
MK4 #7838: IRS 3.55 TrueTrac T5z Dart 347
The drawing is from ~7th grade, mid-1970s
Meandering, leisurely build thread is
here
-
Senior Member
John D. - Minneapolis 'Burbs
1965 El Camino - LT-1, 4L60e, 4wh discs, SC&C susp.
2013 F-150 Platinum - Twin Turbo 3.5
2018 Mk4 Roadster w/ Coyote - #9365 - Build Thread Delivery 7/3/18, 1st Start 1/4/19, 1st Road Mile 5/5/19, Legal 6/18/19, In Paint 2/25/21, Done (?) 4/2021
-
Senior Member
Originally Posted by
Fixit
Looks beautiful!!
Hey thanks John! Got quite a few ideas from your thread, tons of practical advice in there.
Yep, relief to have that done and feeling good about it.
And my reward is .... wiring
MK4 #7838: IRS 3.55 TrueTrac T5z Dart 347
The drawing is from ~7th grade, mid-1970s
Meandering, leisurely build thread is
here
-
Senior Member
John, very nice work on your dash, that looks awesome! What did you do for dash material, did you pick up a hyde or use supplied FFR material?


 Thanks:
  Likes:


 Reply With Quote