-
03-29-2023, 10:53 PM
#321
Senior Member

I'm continuing to work toward putting the body on for what I hope is the last time, so working on the before-body punchlist items.
First up was the windshield posts. The mounting surfaces of the side posts when mounted on the windshield are definitely not parallel, whereas the mounting surfaces on the car are. Some folks have bent theirs to match the chassis, or at least get them parallel. Without making this a recommendation (you always need to know your limits), I can describe what I did, which has worked out well for me so far.
I set the windshield in the curved foam cradle it was shipped in, which is a really handy caddy until the windshield is in its final home on the car. I leveled the table the windshield was sitting on, and centered the windshield in the cradle. That way I could use the angle gauge directly on the side posts and work toward 0* on each post separately. Here's a picture of the PS post dialed into a 0* angle (or close enough).

Untitled by John Ibele, on Flickr
After taking an initial reading, the next step was bending (or twisting, actually). To do the bending, I taped the posts to keep any incidental contact with any other metal from scratching the chrome. I did all bending below the body line only. And always had the posts captured on each side with either soft wood or metal cushioned with a few thicknesses of tape. Here's a shot of a post in the vise:

Untitled by John Ibele, on Flickr
While I was at it, I figured I would try to hit the distance between the mounting surfaces on the chassis, which for me is 50-3/4". I was able to accomplish some of this with my twist on each side post, with only 1/16" - 1/8" to get in place with a couple of bends after getting the mounting surfaces parallel.
I now have two posts parallel to each other, and the desired distance apart along their length. Warning, this is slow, methodical work, and took several hours. I can't tell you that your chrome won't peel off the brass or that other bad things won't happen. You need to be very careful with the screws holding the side posts in the brass strip, as many others have mentioned. But for me, it worked and worked well. Here's a shot showing both the twist and the kink to get to 50-3/4".

Untitled by John Ibele, on Flickr
While that was going on, my vinegaroon tea was brewing, eventually reaching a nice mahogany color after 7 days or so. I used part of a roll of 0000 steel wool in a pint mason jar filled with white vinegar, and cling wrap perforated with a few holes to keep the excitement level to a minimum. I did need to push the steel wool back down into the vinegar for a few days, and regularly tapped the jar and swirled it around a bit each time I went out into the garage.

Untitled by John Ibele, on Flickr
I waited for the right opportunity, with the wife out and about, to bring the operation into the laundry room, stopping in the kitchen for a few coffee filters. I filtered the stuff 3 times or so ... the first one was very slow, and it went quite a bit faster the additional two times. I'm not sure this makes much of a difference to the leather, but I'm pretty sure that the more it's filtered the whiter your stitching is going to be. That's one of the things I was after using this approach vs. black polish.
I skipped any brushwork, figuring I'd just dip the parts briefly into the vinegaroon until they turned dark gray. Then into warm water with a few heaping spoonfuls of baking soda dumped in, then a long rinse under cold water. Those bright dots are actually the original natural leather, which hasn't seen the vinegaroon yet for some reason.

Untitled by John Ibele, on Flickr
You can see how bright the stitching is, even with the leather already black. They didn't quite stay that way, and I think it may have been from whatever happened when turning them face down in the vinegaroon, or when I swirled them around in the baking soda mix. Wish I could give a more solid direction there (and have that nice bright stitching back) - but still, I think they turned out quite nice. Seat belts were just as easy, and I didn't worry about the belts spending a short time in vinegar and baking soda. With a night to dry out and with some neutral shoe cream I had sitting around, they took a nice shine. That could be the cheapest thing I've done on this car.
Just one word of warning: you'll read that vinegaroon stinks. Mine didn't smell bad while brewing, and even when I poured it out ... initially. But, wet leather that's been soaked in the stuff stinks, and it kept on stinking until it had completely dried out. Once you get them dried out and a bit of shoe cream on them, they'll once again smell like things you'd let near the rest of your car.

Untitled by John Ibele, on Flickr
Last edited by John Ibele; 03-30-2023 at 08:08 AM.
MK4 #7838: IRS 3.55 TrueTrac T5z Dart 347
The drawing is from ~7th grade, mid-1970s
Meandering, leisurely build thread is
here
-
Post Thanks / Like - 0 Thanks, 2 Likes
-
03-29-2023, 11:02 PM
#322
Senior Member
Continuing with the punchlist items, I never did get that tranny tunnel fastened down. My fake fastener strips on the side of the tranny tunnel do absolutely nothing - other than try to look pretty. So I needed another way to hold the cover on, preferably from the underside. I borrowed my approach from one of Paul's build threads, and it worked out quite well. It's a bit of an adventure getting the screws in place, but I figured one last session flat on my back on the creeper for old time's sake wasn't so bad. One highlight, I did manage to dodge the anti-seize treated screws every time they fell to the floor, although my nylon creeper is nicely adorned with silver highlights now. Okay, done with one more item. The picture's a bit wonky due to the wide angle setting, but it shows the front two mounting brackets on the underside of the tranny tunnel, with my ashtray in between. I have a third bracket in the back as well.

Untitled by John Ibele, on Flickr
And, checking one more item off the list - bumpers to hold the body up at the front of the car. I took some 3/4" chunks of wood and slipped them under the body just before I took it off the last time, and that seemed to be what was going to be needed to get the body in the right vertical position for the front mounts to line up. I grabbed some rubber rings that came with some of the air intake components I purchased for my fresh air vents and sliced them into sections. Getting close to putting that body on for good.

Untitled by John Ibele, on Flickr
Last edited by John Ibele; 03-29-2023 at 11:24 PM.
MK4 #7838: IRS 3.55 TrueTrac T5z Dart 347
The drawing is from ~7th grade, mid-1970s
Meandering, leisurely build thread is
here
-
Post Thanks / Like - 0 Thanks, 2 Likes
-
03-30-2023, 07:15 AM
#323
Not a waxer

-
Post Thanks / Like - 1 Thanks, 0 Likes
-
03-30-2023, 06:05 PM
#324
I like the rubber body bumpers 
Craig C
-
Post Thanks / Like - 1 Thanks, 0 Likes
-
03-31-2023, 09:38 AM
#325
Senior Member

Originally Posted by
cc2Arider

I like the rubber body bumpers
Craig C
Pro tip (see poster directly above you ") ). Just doin' my best hacking away, trying to follow whatever expert advice I run across!
). Just doin' my best hacking away, trying to follow whatever expert advice I run across!
In this case, it was obvious the body was hanging low with the quickjack bolts in front holding it up. Remove the bolts, and the body was just dangling free with the last support some 1/3 the way up the hood opening. So when the bolts are in place, that foam tape wasn't doing any good on the front 1/3. The bumpers will get you better support, taking some of the weight of the front of the body off the quickjack / overrider bolts & grommets, and also giving you the clearance you need for the hood hinge hardware.
MK4 #7838: IRS 3.55 TrueTrac T5z Dart 347
The drawing is from ~7th grade, mid-1970s
Meandering, leisurely build thread is
here
-
Post Thanks / Like - 1 Thanks, 0 Likes
-
04-04-2023, 11:03 AM
#326
Senior Member

I just like saying the word Vinegaroon
MK4 #10008 - Ordered 10/06/20, Delivered 03/03/21, First Start 7/22/21, First Go Kart 7/24/21
Paint by Metal Morphous 5/14/22, Legally registered 6/8/22, Graduated 7/20/22
Build Thread
https://thefactoryfiveforum.com/show...been-delivered
Complete Kit, Ford 306, Sniper/Dual Sync, T5, Hydraulic clutch
-
Post Thanks / Like - 0 Thanks, 3 Likes
-
04-16-2023, 11:30 AM
#327
Senior Member
It's been a bit since I've updated the build thread, but fortunately the car's gotten attention over the past few weeks.
The first item needs some explanation, otherwise anyone who wandered into the build thread to learn something (fat chance!), or more likely just thought they might be entertained, would conclude that I really never wanted to finish this car in the first place.
The context is: Meeenahsotah, as we say it here. People get a little wobbly here in the end of winter. Michiganders (especially the Yoopers!) and a few others can sympathize. Those with sufficient funds, planning skills and a stack of unread best-sellers in their suitcase flee to someplace warm. Others say something about 'building character' and try to tough it out. Once the state hockey tournament is over and all reasonable risk of another blizzard is behind us, it's just a matter of eying the forecast for the first real spring day.
Then April Fools Day arrived. And the house looked like this:

Untitled by John Ibele, on Flickr
Such events bring dark thoughts into the minds of even the hardiest of Minnesotans. For me, blissfully without gainful employment for the first time in 32 years and enjoying it all immensely, thoughts turned to what life would be like if I didn't have the car to occupy my time. This in turn conjured up disturbing images of 'running errands' or, God forbid, doing jigsaw puzzles all day with my lovely wife. Who isn't the type to sit around all day doing jigsaw puzzles - just one of the many reasons I think she's lovely.
So after 3 hours of attending to the white stuff, I retreated to the garage, and figured I should come up with a list of truly inconsequential things to attend to so that the build could last forever. Just in case winter did.
Perfect task: the cheesy panel nut that sits under the cheesy knob that comes with the Vintage Air heater. I replaced the knob with a nice chrome one to match the one on the headlight switch. But the cheap panel nut doesn't serve as a decent bezel, and isn't even a distant cousin to the headlight switch panel nut that I polished up, and sits right next to it.
A visit to Ace revealed that the panel nut isn't a 7/16" UNC or UNF, it's actually a 7/16" UNEF. Back to the phone, and the Grainger site, which brought up a nice stainless steel nut of the right thread.
Fortunately, its 3/8" thick - beefy! But too beefy. So I cut it in half ...

Untitled by John Ibele, on Flickr
Which was great ... except while it was the right thickness, it was still too beefy in the other dimensions. Not gonna take much time, mark and shave a bit off each face ... then polish it up ...

Untitled by John Ibele, on Flickr
Okay, better ... winter done yet? We got another inch this morning, I could keep this up forever ... for instance, notice how I now have a chrome knob, a stainless nut, sitting next to a polished aluminum nut right next door? See what I mean?
Last edited by John Ibele; 04-17-2023 at 08:25 AM.
MK4 #7838: IRS 3.55 TrueTrac T5z Dart 347
The drawing is from ~7th grade, mid-1970s
Meandering, leisurely build thread is
here
-
04-16-2023, 12:00 PM
#328
Senior Member
Seriously, though, I do want to be driving this car by Memorial Day or thereabouts. And while there's snow on the ground today, ice-out was this week, so pretty soon I'm going to get antsy about being on the road. Without further ado ...
Heater got buttoned up. The defrost on the passenger side is going to be fake ...I'm just not going to come up with some custom thing to get above the heater box. So I used the upper opening on the passenger side for passenger heat.

by John Ibele, on Flickr
I actually don't know the best method to keep the hoses on their connections but I figured HVAC tape would do. It's engineered to stick and stay, and it doesn't let air through, so I'm calling it good. I also don't know where the heater outlets are supposed to go ... none of my under dash panels are big enough or empty enough, so this will have to do.

by John Ibele, on Flickr

by John Ibele, on Flickr
Last edited by John Ibele; 04-16-2023 at 12:48 PM.
MK4 #7838: IRS 3.55 TrueTrac T5z Dart 347
The drawing is from ~7th grade, mid-1970s
Meandering, leisurely build thread is
here
-
04-16-2023, 12:40 PM
#329
Senior Member
Next up was the wipers, and I spent a lot of time tweaking these. You can find a number of threads where people have made these work well, many of which leave the details out. So I'll tell you what I did. For me, this was somewhat like the e-brake: not ideal, but with some blueprinting or more significant modifications, can be made to work decently well.
Here's what one looks like when it's been sitting around in a garage for 10 years.

Untitled by John Ibele, on Flickr
Shockingly (or maybe not), I'm not cleaning them up. Most importantly, notice that the cable isn't forced to engage with the gear by the housing. I bent the center curved piece of the housing to keep the cable against the gears, with a small allowance for clearance, figuring that if there was any binding when I tightened things up, it was the tubing alignment that needed to be adjusted, not the center piece of the housing. After doing that, it looked like this:

Untitled by John Ibele, on Flickr
That's a good start, but there was a lot of additional bending, filing, creative language ... used to get the tubing in line with cable when positioned this way. One tip, make sure that when your tubing flares are done, there is no way the cable can touch any part of the flared part of the tube: just shouldn't happen. Take any offending material off with a small round file or your favorite Dremel attachment.
When all done, the finished housing looked like this:

Untitled by John Ibele, on Flickr
I ditched the brass 8-32 screws that came with the wipers and tapped for some 10-32 button head hex screws. Same pitch, larger diameter should give me more engagement surface area. There aren't many threads there but I trust myself not to over-torque. When properly tweaked the setup doesn't bind, and there's no way the cable can pull away from the gear teeth.
One more mod: when you tighten the gear housings onto the car, the threads really want to pull the housing into a 90* entrance / exit with respect to the body, and you don't want that. Anything you can do maintain the angle defined by the drilling jig is worth it. Here's a Paul (edwardb) tip that works well - go to Ace and get some of the square aluminum channel that fits nicely over the housing. Use the drilling jig or a bevel gauge to mark the angle on the channel, and cut it at that angle. You get something that looks like this:

Untitled by John Ibele, on Flickr
I epoxied mine in place after dry fitting everything. No need to have anything moving that shouldn't be moving. Anything you can do to keep these housings at the right angle w.r.t. the body and not moving is worth it.
In addition, I cut out some 1/16" neoprene rubber to go over the square channel, so that the channel doesn't rest directly on the bottom side of the body.

Untitled by John Ibele, on Flickr
The end result is a system that doesn't make a machine-gun noise when I turn it on, works without any binding, but also can't be stalled out with any amount of finger pressure on the rotating studs coming up from the gear housing. Once I had gotten that far, I stuck on the wipers and ran it dry, and got the same satisfying smooth action. These are as bullet-proof as I can get with what I have on hand, and I can't think of what could make them better (other than getting packed with grease, which I'll do before the last install), so I'm calling it good, and moving on.
Last edited by John Ibele; 04-16-2023 at 12:54 PM.
MK4 #7838: IRS 3.55 TrueTrac T5z Dart 347
The drawing is from ~7th grade, mid-1970s
Meandering, leisurely build thread is
here
-
Post Thanks / Like - 2 Thanks, 0 Likes
-
04-17-2023, 10:43 AM
#330
Senior Member
Hey pal, not to give you anything else to fiddle with but I have the exact same setup for my heater. I have my cockpit vents in the same location. Here is the issue, when it's cold the heater works fantastic. I really like it. But when it's hot and I have it off REALLY hot engine air moves through the blower fan and puts hot air on your lap when in motion. It was 85 this weekend (ducks behind a desk) and I finally figured out what was happening.
There are 2 possible solutions. One is cover the inlet to the blower fan. This is fine, although it requires finding something that already fits or fabricating something. I don't like the idea of needing to go into the engine bay and removing something in order to use my heater. 2nd option is to replace the louvers with something that closes. This is what I am doing I have ordered these and should have them this week. I can't promise this will work but I bet it will. These were the only closing louvers I could find that were the same size and shape. I am assuming I can remove the old ones and replace them in the same plastic holder. I will let you know.
https://www.oldairproducts.com/produ...er-2-duct-hose
Either way this may be something you want to get in front of before paint if possible. I plan to do a general post after I finish to update the community but wanted to give you a heads up.
MK4 #10008 - Ordered 10/06/20, Delivered 03/03/21, First Start 7/22/21, First Go Kart 7/24/21
Paint by Metal Morphous 5/14/22, Legally registered 6/8/22, Graduated 7/20/22
Build Thread
https://thefactoryfiveforum.com/show...been-delivered
Complete Kit, Ford 306, Sniper/Dual Sync, T5, Hydraulic clutch
-
Post Thanks / Like - 1 Thanks, 0 Likes
-
04-17-2023, 12:31 PM
#331
Senior Member
Originally Posted by
Blitzboy54
Hey pal, not to give you anything else to fiddle with but I have the exact same setup for my heater. I have my cockpit vents in the same location. Here is the issue, when it's cold the heater works fantastic. I really like it. But when it's hot and I have it off REALLY hot engine air moves through the blower fan and puts hot air on your lap when in motion. It was 85 this weekend (ducks behind a desk) and I finally figured out what was happening.
There are 2 possible solutions. One is cover the inlet to the blower fan. This is fine, although it requires finding something that already fits or fabricating something. I don't like the idea of needing to go into the engine bay and removing something in order to use my heater. 2nd option is to replace the louvers with something that closes. This is what I am doing I have ordered these and should have them this week. I can't promise this will work but I bet it will. These were the only closing louvers I could find that were the same size and shape. I am assuming I can remove the old ones and replace them in the same plastic holder. I will let you know.
https://www.oldairproducts.com/produ...er-2-duct-hose
Either way this may be something you want to get in front of before paint if possible. I plan to do a general post after I finish to update the community but wanted to give you a heads up.
Hey Jesse, thanks for looking out for me ... good news or bad, it's always best to deal with the reality in front of you! I'll think on that and look for your broader note.
Edit: did a brief search, and I think something like this is what's needed. You'd cut into both hoses, not just the one. In closed position, the coolant would cycle right back to the pump, and the heater would have its own loop (of non-moving coolant). In open position, you have the heater included in the loop, with a bit of a jog through the bypass valve for each hose. Make sure to get the pull to open version, not pull to close.
Old Air Products 25-1018 - Heater Valve
Further edit: not Jesse's problem, exactly. His valve seems to work fine in closing off the heater core. The problem is that forward movement of the car pushes hot engine bay air through the blower and through the vents. I can't think of a better solution than closeable louvers like he mentioned. I will drive in gelcoat this summer, and will leave what I have in place to see what I experience.
Last edited by John Ibele; 04-18-2023 at 08:58 AM.
MK4 #7838: IRS 3.55 TrueTrac T5z Dart 347
The drawing is from ~7th grade, mid-1970s
Meandering, leisurely build thread is
here
-
04-23-2023, 01:57 PM
#332
Senior Member
I've been going through my "last time with body off" punch list (at least until Jeff works his magic). The major item left is the radiator screen, which I can hopefully get to later today.
- Steering column is double-checked with blue Loctite on the set screw and jam nut connecting the column to the rack.
- I noticed when go-karting that the wheel wasn't pointing straight when the car was heading straight. I know I had everything dialed in prior to that, so I must have done toe-in all on one side. Reset so I have exact same number of threads exposed on each tie rod, and I'll recheck toe-in when it's back on the ground. And remember to do the same turning on both inner tie rods.
- DS footbox is all buttoned up. No going back now, at least not without drilling out rivets
- I found one item which has been kinda handy. In setting ride height, I was sitting at 4 1/2 inches in back with the collars just making contact with the spring. So no spring compression required for now (although that may change with settling and body on). In the front, I needed to rotate the collars two full turns to hit 4". I could turn the PS side that far, but the DS side was having none of it.
In doing some reading about what lubricant to use to make the collars rotate more easily, I found a coil-over brand (not Koni) which recommended something called Boeshield T-9. It's a light, penetrating lubricant like WD-40, but it has a wax in it which holds lubricant in place. It's become popular with the biking crowd for lubricating chains and yet not picking up grit, dust and dirt. I called the local bike shop, and although they didn't stock it, they were able to order it and have it for me in a few days. I'm at the point of really enjoying not paying shipping when I can.
I applied to all four coil-overs, was able to get the DS front easily to 2 turns, and with the rears, I have to really pay attention because when the collar now makes contact with the spring, there's really no change in friction, it just starts smoothly compressing the spring. So check one more thing off; I'll just have to recheck alignment when I set the car down again. - One final thing, I did some checking on MN's process for getting your car titled, registered and licensed. The state does have a kit car / custom / street rod law, which at least gives you an established path to getting to the result you want. Not surprisingly, no one in the DMV is really an expert on the process, since it gets used so little. So I got a slightly different answer each time I called for information. I finally got someone to send me the 8 step process in email, which isn't necessary to bore anyone with, but to give you an idea, required two trips with the car on a trailer to get inspected - and fail - before getting to the desired end result. Well, if Fixit could do it in 1/2 day and one trip, that's what I'm shooting for.
But I could get behind step one at least, which was to go to the local DMV office with what I had in hand to 'get the registration started'. Photos of all 4 sides of the car, photos of the frame number, engine block stamped number, and transmission tag. Receipts for the major items, but I wasn't interested in bringing in the whole 3 ring binder. So copies of the FFR 'big' order, the engine invoice from my local builder, and the trans / bell / flywheel / clutch ... receipt. Well, the helpful lady behind the counter just kept on going, and I wasn't about to stop her ... I ended up walking out with the registration complete, a VIN assigned (the FFR frame number, which is handy), and temporary plates, all without paying the big tax bill. As far as I can tell almost none of this was by the book, but I'm old enough to know when to stop asking questions.
The permanent plates should come before the temporary plates expire, so that just leaves me with the inspection, after which I should be able to get my title. I'm assuming I'll have to pay the tax pill at that point, but again ... did I say I'm old enough to know when to stop asking questions? Considering how often public official lack of knowledge works in your favor ... I'm taking this as a win 

Untitled by John Ibele, on Flickr

Untitled by John Ibele, on Flickr
Last edited by John Ibele; 04-23-2023 at 02:05 PM.
MK4 #7838: IRS 3.55 TrueTrac T5z Dart 347
The drawing is from ~7th grade, mid-1970s
Meandering, leisurely build thread is
here
-
Post Thanks / Like - 0 Thanks, 2 Likes
-
04-24-2023, 04:01 PM
#333
Senior Member

Congrats on such an excellent start on your MN title/licensing process. That's a win. Thanks for the tip/picture on the T-9 lubricant.
My steering wheel points approx. one hour CCW. It's been that way since I did the alignment. I've been holding off thinking I would wait until final alignment with body on, right before it's licensed and road worthy. Before the alignment, I centered my steering rack and checked lock-to-lock (added spacer to one side to equalize). I assume I can disconnect the steering shaft from the splined shaft at the rack, and rotate it a spline or two CW to center the steering wheel. I believe my tie rod thread exposure is equal. Is my thinking wrong?
Chris
Coupe complete kit delivered: 4/22/24.
Build Thread. Coyote. T-56. IRS w/3.55. Wilwoods. PS. HVAC. Side windows.
MK4 Complete kit.
Build Thread Index. Delivered: 10/15/2020. Legal: 7/25/23. Coyote Gen3. TKO600 (0.64 OD). IRS w/3.55. PS. Wilwoods. Sway bars. This build is dedicated to my son, Benjamin.
Build Thread.
-
Post Thanks / Like - 1 Thanks, 0 Likes
-
04-24-2023, 04:14 PM
#334
Senior Member

That is sometimes the easiest way to fix a small steering wheel alignment, especially if the rack is pretty well centered.
-
Post Thanks / Like - 1 Thanks, 0 Likes
-
04-24-2023, 05:28 PM
#335
I think you will do well to insulate the fresh air duct and or the header tubes, where they intersect.
That metal sleeve will turn into a heater for your fresh air, IMO.
20th Anniversary Mk IV, A50XS Coyote, TKO 600, Trunk Drop Box, Trunk Battery Box, Cubby Hole, Seat Heaters, Radiator hanger and shroud.
-
Post Thanks / Like - 1 Thanks, 0 Likes
-
04-24-2023, 07:38 PM
#336
Senior Member
Originally Posted by
460.465USMC
Congrats on such an excellent start on your MN title/licensing process. That's a win. Thanks for the tip/picture on the T-9 lubricant.
My steering wheel points approx. one hour CCW. It's been that way since I did the alignment. I've been holding off thinking I would wait until final alignment with body on, right before it's licensed and road worthy. Before the alignment, I centered my steering rack and checked lock-to-lock (added spacer to one side to equalize). I assume I can disconnect the steering shaft from the splined shaft at the rack, and rotate it a spline or two CW to center the steering wheel. I believe my tie rod thread exposure is equal. Is my thinking wrong?
Chris, I think your thinking is right. You should be fine. I did the same thing when setting up my steering, and then marked the rack / steering column connection with an ink pen, so I know which spline was exact center, and have it Loctited in. But then I did all my adjusting for toe-in on one side for some reason. When I counted exposed threads on the inner tie rods I had two fewer threads on the side where I did the adjusting. So I've backed that one out by one turn, turned the other in one turn, and should be close to where I need to be once I set it down. Am minor goof and easily corrected.
Originally Posted by
F500guy
That is sometimes the easiest way to fix a small steering wheel alignment, especially if the rack is pretty well centered.
Thanks, I figured I wasn't going to run into to trouble that way, particularly since I know how I got there in the first place!
Originally Posted by
Railroad
I think you will do well to insulate the fresh air duct and or the header tubes, where they intersect.
That metal sleeve will turn into a heater for your fresh air, IMO.
Thanks Railroad. I've been keeping tabs on Blitzboy's adventures in hot air, and I'm going to try his approach first (blocking off the vent in the summer). I'm driving in gel coat this summer, so there would be other opportunities to work on the stuff under the hood with it fully open later. The ducts can also be insulated if hot air in the cabin is a problem. I think that one on the DS would be fine since the duct material is good to 450F, but it's only a few inches away from the header. I'll probably wrap that with some Relect-a-Gold tape.
MK4 #7838: IRS 3.55 TrueTrac T5z Dart 347
The drawing is from ~7th grade, mid-1970s
Meandering, leisurely build thread is
here
-
Post Thanks / Like - 1 Thanks, 0 Likes
-
04-26-2023, 10:38 PM
#337
Senior Member
I got the body prepped for putting on the car for good (at least until paint) yesterday, knocking off the mold ridges with an 80 grit pad on the angle die grinder, clearancing the windshield side post openings just a bit, and giving the body a good wash.
Today I got the last item on the "body on" punch list done: radiator protection. After scouting out several build threads for ideas, I pretty much copied Toadster's take on a screen, using #6 stainless mesh for the screen, and 1/16" x 1/2" aluminum strip for the frame. It worked out great. Thanks, Toadster!
23" wide x 19-1/2" tall worked well for overall dimensions. The short rivets barely make it through the frame but hold just fine, leaving just a small protrusion on the back of the frame. I used 1/2" nylon spacers with #8 screws to hold the frame on top, drilling through the Breeze upper radiator bracket hinge. On the bottom, I drilled all the way through the Breeze square channel that is part of the lower bracket, and you'll need 2" screws to go through the frame, the 1/2" spacers, the radiator aluminum flange, and the Breeze bracket.

Untitled by John Ibele, on Flickr
It's handsome as is, but I am planning on getting the screen powder coated black. The screen is worth considering in place of the mesh I got as an option with the kit for the brake vents. I'll have to do a side by side comparison to see which looks better.
And, to cap off the day, I grabbed a couple of family members after dinner to put the body on one last time. They've gotten to be pros at that. So the body is sitting in just the right spot for the front and rear 7/16" threaded rod to get spun in, and is sitting 1/4" in front of each door latch plate. All set up for fitting doors, trunk and hood next, and a great way to end the day.
MK4 #7838: IRS 3.55 TrueTrac T5z Dart 347
The drawing is from ~7th grade, mid-1970s
Meandering, leisurely build thread is
here
-
Post Thanks / Like - 0 Thanks, 3 Likes
-
05-28-2023, 04:06 PM
#338
Senior Member
Yikes, I haven't posted in forever. The combination of spring actually showing up in MN and wanting to get this car on the road ... something's gotta give! So I figure I should at least get some photos stuffed in here to prove it happened, and maybe there will be a build tip or two in there somewhere.
The body's on for the last time until bodywork and paint. Great to see it in place, and starting to get locked in with threaded rod front and back. All lights are hooked up and function as they did when tested in the go-kart stage. Love that 10* thing going on with the blinker lights ... at least enough to get on the road, but will probably get them straight up and down before body and paint.

Untitled by John Ibele, on Flickr
Rollbars are in with grommets, which really give a nice finished look. I was stressed about the lineup of everything since I did my own cutouts and just cut to Sharpie line made by FFR. Not usually quite that trusting, but worked out great.

Untitled by John Ibele, on Flickr
The fasteners on the DS worked fine, but on the PS, I ended up with one right in line with my weatherstripping on top of the trunk side. With enough persuasion I was able to get a nut (taped into a wrench) under the screw. One of those fun parts of the job, but worked out fine. Better than the photo, which is blurry, but you get the idea.

Untitled by John Ibele, on Flickr
While I was in the wheel wells, I put a breather filter on the end of my gas tank vent hose, which I led over to the DS (you should do that if you haven't), and then looped. With the loop I figured gas isn't going to be lighter than air to get to the top of the loop, then turn heavier than air to get out. I never smelled any gas odor and neither did the MSN (Most Sensitive Nose) in the house, so I'm not concerned. But I don't want spiders in my gas tank, so the breather filter should do it.

Untitled by John Ibele, on Flickr
Hood is hooked up and in place. I won't go into detail here since I think it's been covered sufficiently in many other threads. I was pleased with the hinge assemblies and the gas shocks that came with the kit. Installation of the shocks caused the hood to sit a bit high in front, but that was quickly addressed with minor hinge mounting adjustments. I gapped all my panels a bit tight ... enough for clearance plus a bit, but leaving Mr. Kleiner room to work the gaps to final dimension. I'll get around to the latches ... someday soon.

Untitled by John Ibele, on Flickr
MK4 #7838: IRS 3.55 TrueTrac T5z Dart 347
The drawing is from ~7th grade, mid-1970s
Meandering, leisurely build thread is
here
-
05-28-2023, 04:32 PM
#339
Senior Member
Next up: overriders. I've been a bit cavalier about checking the manual for instructions on everything lately, and realized I'm going to get bit if I 'assume' I know what I'm doing. So I did my homework in this case, and checked to see if I was missing anything by not checking the FFR manual for overrider installation. Here we have it:

Screenshot 2023-05-28 153720 by John Ibele, on Flickr
Hey, thanks FFR! Okay, back to my current, possibly-overconfident approach.
First thing you do need to know about the overriders is that there is indeed a front and a rear overrider (which I found out the time-consuming way). The mounting plates are tilted on the front overriders, so they can follow the line of the radiator.
I grabbed the rear units, and had fun torturing my wrists drilling stainless one last time, drilling the threads out and enlarging for my 7/16" threaded rod. I winged it a little in terms of distance from bumper to car (which can be easily changed), but set it up so that I could (1) protect the lights and (2) still get a nut behind the mounting plate. Mission accomplished.

Untitled by John Ibele, on Flickr
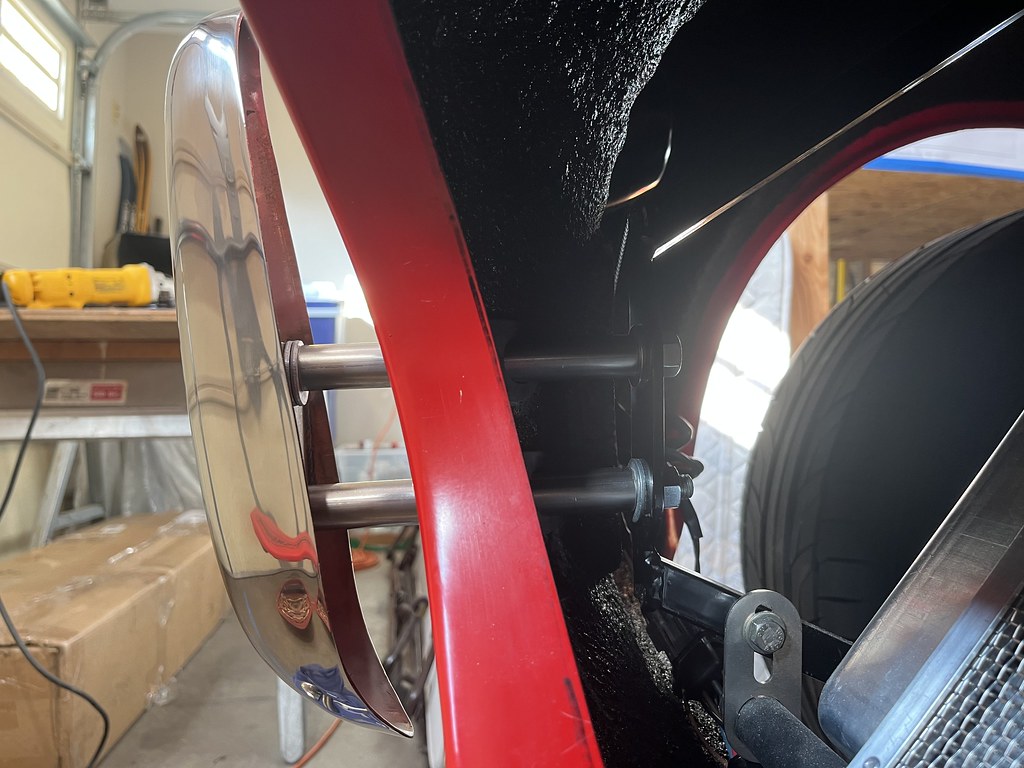
The sequence of nuts / washers / threaded rod is pretty straightforward, but here's a couple photos for the archives. In final assembly I'll use sealed washers against the body and sections of stainless tubing for a more finished look. I have some grommets from Finish Line which would allow tubing to go straight through the body, but was advised not to use those. The nuts on either side of the body allow another front / back anchor point for the body, and allow the body to be meshed up with trunk valance. I'll get nyloc nuts in some of those locations, in case you're wondering. And no, the chord isn't permanent either

Untitled by John Ibele, on Flickr

Untitled by John Ibele, on Flickr
In front, I am using the body grommets, and as a result, do need to use my 3/4" stainless tubing now. This edwardb tip helps a lot: use some of that aluminum HVAC tape you used to seal the cockpit and wrap it around the threaded rod to keep it centered.

Untitled by John Ibele, on Flickr
Here's the finished product, you can see I used some extra washers to get the rake of the overrider to match the line of the radiator exactly. I'll get those on the inside end of the tubing, minimum, or if I'm super-OCD, cut some exact lengths of ss tubing. Did I mention I'm trying to get on the road??
Untitled by John Ibele, on Flickr
Last edited by John Ibele; 05-28-2023 at 05:01 PM.
MK4 #7838: IRS 3.55 TrueTrac T5z Dart 347
The drawing is from ~7th grade, mid-1970s
Meandering, leisurely build thread is
here
-
05-28-2023, 04:54 PM
#340
Senior Member
Next up ... fitting the doors. Nice to see my DS door has the common symptoms, which confirms I'm on the right track. This is before I've done any manipulation of the body under the door, so this is worse than what I ended up with.

Untitled by John Ibele, on Flickr
This is a step that requires patience, but you eventually get to a point where you convince yourself you're not going to do any better. I figure you basically want to split the difference between door in on the lower front and door out on the lower rear. With the door in the final location, I did need to bevel the inside edge of the door to keep it from rubbing when opened. It's a little tough to interpret the photo, but the dark portion of the edge is the beveled part, and the bright edge is the very little bit of the edge left 'as gapped'.

Untitled by John Ibele, on Flickr
Here's the final gap on the PS, again leaving some material for Mr. Kleiner to work with.

Untitled by John Ibele, on Flickr
That means its time for latches. Mine were thoroughly blueprinted - make sure you do that, following the numerous threads on the forum. With those in hand the rest is actually kind of a breeze. I mounted the strike plate on the PS side and hung the latch from it, as advised. Marked the holes to mount the latch to the door, drilled, mounted, and everything worked as it should. One thing though. When I made some black nylon spacers of the right length to replace my stack of washers, I couldn't get the same free movement of the latch. It would engage, but not all the way. I put the washer stack in place ... again, great action. So I'll get some aluminum spacer material, cut it to length, powdercoat it black, and I should be set.

Untitled by John Ibele, on Flickr
Same drill on the DS, here's a shot of the door after adjusting for the final time and fastening the body below the door. Much better in terms of body filler required, and as good as I'm gonna get.

Untitled by John Ibele, on Flickr
Okay, doors in, latches in ... gotta do the straps now. Pretty straightforward stuff. I know ... slotted screws. I just think they look right when in a visible spot. And they fit best of all the Ace options for stainless fasteners. I did countersink just a bit deeper into the brackets to get the screws to sit a bit better.

Untitled by John Ibele, on Flickr

Untitled by John Ibele, on Flickr
So, that's it for now. I've got a trunk to fit, some hood latches, and some side pipe cutouts to enlarge. There's a mid-June wedding for our eldest to keep an eye on, but I wouldn't mind take folks for a ride that weekend if I can make it. It's registered, licensed and ready to be insured, so no obstacles there. Just a matter of finding the time. As the neighbor says, it's always reassuring to see the light in our garage burning bright when everyone else has gone to bed ...
Last edited by John Ibele; 05-28-2023 at 05:07 PM.
MK4 #7838: IRS 3.55 TrueTrac T5z Dart 347
The drawing is from ~7th grade, mid-1970s
Meandering, leisurely build thread is
here
-
Post Thanks / Like - 0 Thanks, 2 Likes
-
05-28-2023, 05:00 PM
#341
Senior Member

Looking great! It’s hard to keep a build thread going when the free time could be spent building instead of documenting. You’re almost there!
-
Post Thanks / Like - 1 Thanks, 0 Likes
-
05-28-2023, 10:00 PM
#342
Senior Member
Originally Posted by
John Ibele
Yikes, I haven't posted in forever. The combination of spring actually showing up in MN and wanting to get this car on the road ... something's gotta give!
Good progress, John. I'm routing for you to get it drivable in time for the big day. Keep those garage lights burning brightly at night. 
Originally Posted by
John Ibele
Rollbars are in with grommets, which really give a nice finished look. I was stressed about the lineup of everything since I did my own cutouts and just cut to Sharpie line made by FFR. Not usually quite that trusting, but worked out great.
Are those the F5 grommets? I ordered from Replicaparts and the rubber washers doesn't look like they will fit tightly around the roll bar like yours do.
Chris
Coupe complete kit delivered: 4/22/24.
Build Thread. Coyote. T-56. IRS w/3.55. Wilwoods. PS. HVAC. Side windows.
MK4 Complete kit.
Build Thread Index. Delivered: 10/15/2020. Legal: 7/25/23. Coyote Gen3. TKO600 (0.64 OD). IRS w/3.55. PS. Wilwoods. Sway bars. This build is dedicated to my son, Benjamin.
Build Thread.
-
Post Thanks / Like - 1 Thanks, 0 Likes
-
05-28-2023, 10:52 PM
#343
Senior Member
Yes Chris, FFR grommets. Turns out I ordered only one set way back when, so I was hoping they’d match, and they do. I’d recommend them.
MK4 #7838: IRS 3.55 TrueTrac T5z Dart 347
The drawing is from ~7th grade, mid-1970s
Meandering, leisurely build thread is
here
-
05-29-2023, 06:09 AM
#344
Senior Member

John D. - Minneapolis 'Burbs
1965 El Camino - LT-1, 4L60e, 4wh discs, SC&C susp.
2013 F-150 Platinum - Twin Turbo 3.5
2018 Mk4 Roadster w/ Coyote - #9365 - Build Thread Delivery 7/3/18, 1st Start 1/4/19, 1st Road Mile 5/5/19, Legal 6/18/19, In Paint 2/25/21, Done (?) 4/2021
-
Post Thanks / Like - 1 Thanks, 0 Likes
-
05-31-2023, 11:34 AM
#345
Senior Member
MK4 #10008 - Ordered 10/06/20, Delivered 03/03/21, First Start 7/22/21, First Go Kart 7/24/21
Paint by Metal Morphous 5/14/22, Legally registered 6/8/22, Graduated 7/20/22
Build Thread
https://thefactoryfiveforum.com/show...been-delivered
Complete Kit, Ford 306, Sniper/Dual Sync, T5, Hydraulic clutch
-
Post Thanks / Like - 1 Thanks, 0 Likes
-
06-03-2023, 06:18 PM
#346
Senior Member
Continuing to hang jewelry on the car ...
Trunk is in place, gapped a bit tight all around, and the latch is fit. It takes a while to become convinced that you can get your hands up and in between the frame and the gas tank to get the nut on the end of the latch striker bolt. But it can be done. I still have to do the license plate mod.

Untitled by John Ibele, on Flickr
Gas tank fill cap is in place and hooked up. Slotted screws are temporary; I found some McMaster Fasteners (99926A121) that should fit the shallow counterbore nicely. The black dot is where a ball bearing stopped rolling around in the indented part of the body, so that's where the drain hole goes. And thus was the gas cap oriented ... sounds kinda biblical actually ... but heck, at least it saves me from staying awake at night pondering the 'ideal' orientation for the gas cap. Plus, I figured there's not a single pair of parallel or perpendicular lines on this body to begin with ... well, wait ... are there lines, period?? Just curves everywhere! So any orientation is good as long as the paint doesn't get chipped when you spring that latch and let the cap fly open to hear that satisfying 'thunk'.

Untitled by John Ibele, on Flickr
The kit mirror mounted to the body suits me just fine, and I can see everything I want to see. Getting nuts up to the underside of the body was an adventure, but I was able to thread through all the wiring behind the dash with my longest socket extension. Whew! Not sure what plan B was going to be. If you're fine with self tapping screws this won't be problem.

Untitled by John Ibele, on Flickr
Same deal with the side mirror ... I like the look of the kit mirror, and I can see everything I want to see when it's properly adjusted. I'll order a convex one for the PS. Getting the washers and nuts on the inside was aided greatly by taping nut and washer into the right size box wrench.
I'm trying to keep as much as possible off the windshield for now, and I'll add what I have to later. I like the clean look. I'm sure there are a lot of folks who start this way, and end up adding.

Untitled by John Ibele, on Flickr
Today starts the work of getting these beauties mounted:

Untitled by John Ibele, on Flickr
Last edited by John Ibele; 06-03-2023 at 06:36 PM.
MK4 #7838: IRS 3.55 TrueTrac T5z Dart 347
The drawing is from ~7th grade, mid-1970s
Meandering, leisurely build thread is
here
-
Post Thanks / Like - 0 Thanks, 1 Likes
-
06-04-2023, 05:35 AM
#347
Hi John,
I like the ball bearing trick -- clever!
Craig C
-
Post Thanks / Like - 1 Thanks, 1 Likes
-
08-06-2023, 02:50 PM
#348
Senior Member
I'll own up to it right at the beginning of this post. I wandered a bit away from the proper order of things. See, I went to the MN DMV, and quite surprisingly, walked away with a registration, and this:

Untitled by John Ibele, on Flickr
I know, I like the painter's tape too. It adds a super professional-looking touch. But with all the necessary mechanical stuff buttoned up, it was time to take a few cautious drives mixed in with the final pieces of building.
I'll get to initial driving impressions in a minute, but will briefly mention a few items finishing off the build.
Side pipes: I ordered the GasN side pipes in the touring length, and certainly wasn't displeased by what finally arrived - they're gorgeous. Mounting them required a bit of fiddling here and there. First, while the PS fit reasonably well in terms of exit position from the body, DS was quite high. I was limited by the pin on the PS side ... just couldn't move it any higher to drop the DS side. I swallowed hard and went back for the engine hoist rental one more time, and carefully lifted the engine just off the mounts, and did some work to lengthen the slot for the PS pin, taking care to keep all human body parts out of harm's way if gravity did its worst and for some reason the engine came down the fast way.
Before:

Untitled by John Ibele, on Flickr
After:

Untitled by John Ibele, on Flickr
So, a little touchup paint required, but otherwise no harm done, and it allowed me to get the headers within 1/2" of each other in terms of height relative to body at the exit point.
So far so good, mounted the driver's side first after removing a bit of body in the cutout area and it looked good from just about all angles ... parallel to the body front to back, could level it even with the bottom of the body when looking from the side. Nice.

Untitled by John Ibele, on Flickr

Untitled by John Ibele, on Flickr
I marked it, removed it and had the O2 bung welded in the narrow portion of the side pipe after the collector. Nice job by the guy, protected the pipe, cleaned up the weld so it looks nice, fair charge. I thought about depinning the O2 connector, feeding the wires through a neat grommet ... then decided I was building a car, not a piece of art. Plus, the body has to come off; this is the only way I could figure to not hand the paint & body guy a pain in the neck. Other ways to solve this I'm sure, but this worked for me.

Untitled by John Ibele, on Flickr
I hemmed and hawed about using the fasteners that Georgie sent me, and finally ponied up for more ARP jewelry ... along with their clearly communicated torque values. I torqued, heat cycled the pipes a few times, and torqued again ... nothing's moved in quite a few drives now. I was able to use the larger diameter fasteners on both sides and still get the alignment with the body I wanted, so good news there.

Untitled by John Ibele, on Flickr
MK4 #7838: IRS 3.55 TrueTrac T5z Dart 347
The drawing is from ~7th grade, mid-1970s
Meandering, leisurely build thread is
here
-
08-06-2023, 03:54 PM
#349
Senior Member
PS was a bit more work, because the side pipes needed a wedge, and also a straight to get them a touch away from the body. I accounted for this when I ordered the ARP fasteners (needed longer length than GasN sent me). But pretty straightforward stuff.
Final task (after a few drives) was to get the hangers in place. My front / back alignment of hanger brackets to side pipe attach point wasn't great, but I found that if I switched sides with the hanger brackets, things lined up well.

Untitled by John Ibele, on Flickr
I have to say, I'm really happy to be done drilling the last few holes in the frame while lying on my creeper looking up. It was at the upper end of my heat tolerance range the morning I mounted the hangers, but it needed to be done. So, rolling sweat, hot metal chips on the arm (too hot for coveralls) ... all the good stuff. Almost took a nap on the creeper a number of times. There may be another build somewhere off in the future, but if so, it certainly won't be without a lift. Must make me a certified old guy now
A few final items before pulling out of the garage. Seat belt grommets on the back of the cockpit, and setting up the belts one last time:
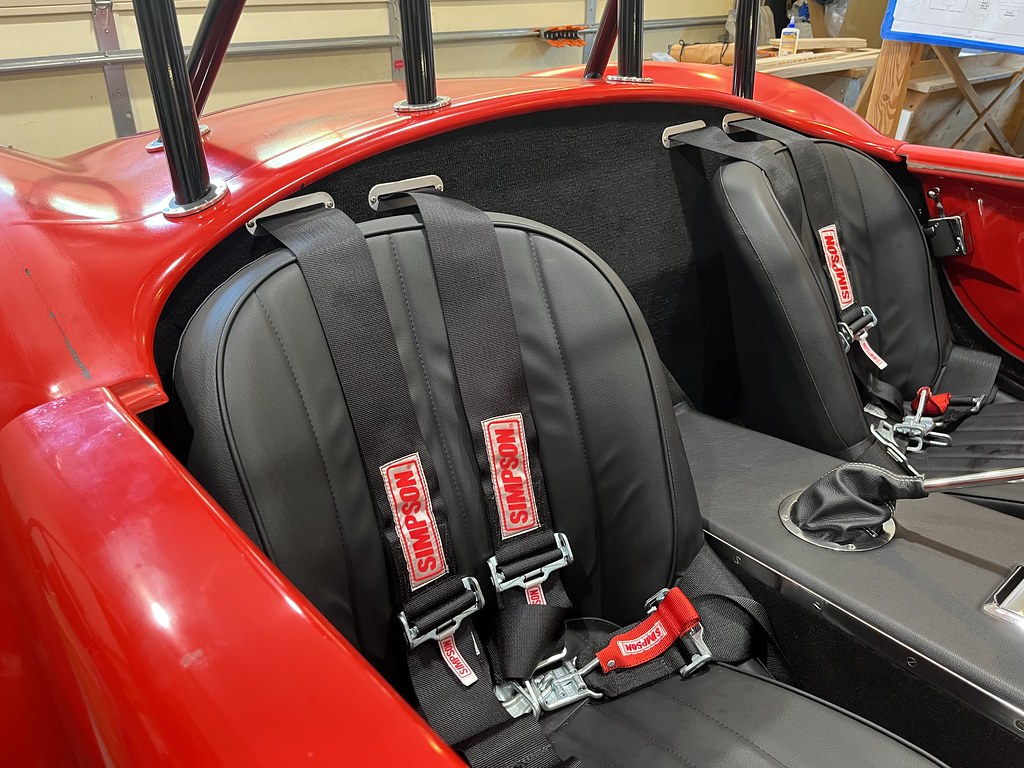
Untitled by John Ibele, on Flickr
And, finally, it sees the light of day in something like final form:
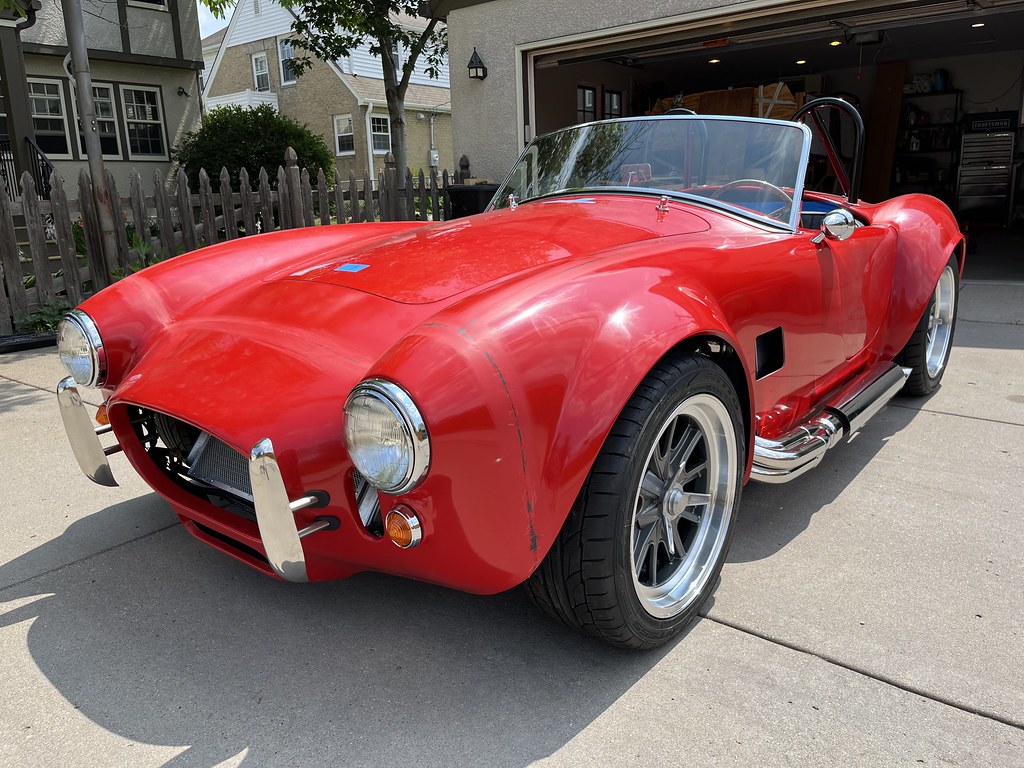
Untitled by John Ibele, on Flickr
The first few drives told me I wasn't going to be driving the rest of the summer and fall without some heat management from the engine bay. I had left the foam off when putting the body on the last time knowing that Jeff could be putting on fresh foam (vs. 10 year old kit-provided foam!) after paint and body work.
However, you can get the same foam from the local big box without the adhesive side, and just jam some lengths of it where the heat is coming through:

Untitled by John Ibele, on Flickr

Untitled by John Ibele, on Flickr
Done. Decent enough heat management for this summer, and no one will be the wiser:

Untitled by John Ibele, on Flickr
And that may be a good spot to wind up the real "build" portion of this build thread. When I have unique details or handy items I'll chime in, but so much has been covered so well in so many threads, I'll not waste my time covering old ground. There is certainly more to do: elephant ears. Front-end-of-the-rear-wheel-well panels so I can stop collecting road debris in my cockpit. Concave bullet mirrors for DS and PS, because I just need more scope in my rear views. The license plate mod ... I have the trunk with the 'period correct' trunk, with inadequate vertical distance to allow for US plates. Yes, I could buy a new trunk for $520 which would avoid having to do the mod. To each his own, I'll save the money and have this be one final quirk of the build. Doesn't bother me, for some reason. Doesn't 'period correct' sound so much more desirable than 'doesn't have enough room for US license plate'?
So ... ANYWAY .... I went driving.
First item, I was not looking forward to tackling the challenge of the Sniper. It had run super-rich in my initial go-kart runs, and in fact wouldn't start the last time I had tried to start it before turning my sights to getting the body on. Being out of gas didn't quite make sense, flooding the engine may have been a possibility (not too jazzed about flooding the car and then letting it sit for a long time ...).
So, made sure I had the USB / CAN cable in hand and laptop software loaded, read the Holley forum material and looked at some You Tube videos from Holley and others to begin wrapping my brain around AFR, stoichiometric reactions, fuel table, ignition table, enrichment ...
But first, figured I'd just see if I could start the car this time around, and drive for a bit. And that worked pretty well. Still super rich at first, but once I got it above 160* and it started learning, things began to get better. I cut down the coolant enrichment from 150% to about 125%, which probably helped with cold starts some (thanks, Papa). But for the most part, I've just been letting it learn, and it's going okay. I still plan to look for a bit better mixture at idle and perhaps some better fuel economy at cruise, but it's well down on the priority list for now.
For actual driving impressions:
- Noise level: I am very happy with the touring pipes ... they are maybe a bit quieter than the kit-provided steel pipes, but not much. But the harsh treble sounds are gone, and that mellower sound that others have mentioned is definitely there.
- Gears: Wow, I like that combination of the 3.55 rear gears, the tall first gear on the T-5z, and the cruising gear I picked for 5th. Combined with my cam choice, I'm not looking for power anywhere ... it behaves well all the way down to 1500 RPM in cruise.
- Cam choice - I could have gone a bit more aggressive with cam choice and lost almost nothing. I would have gotten more lift and HP, and still had plenty of torque down low. Having said that, I'm not at all unhappy with my choice, in fact, I can't think of anything I'd want improved. Nice throaty growl at idle, and it just sounds wonderful when you get into the throttle a bit. "A bit" probably means about 5% at this point! There's a wonderful burble from the exhaust during deceleration after a downshift.
- Brakes: I wondered how much of an adjustment the manual brakes would be. I have the stock GT brakes in front and the 11.5" in back, with pads picked out for each after extensive reading on the forum. I also made a MC adjustment for the rears on my older 2012 kit. I set the balance bar up according to the Wilwood instructions, and they feel completely predictable. I haven't tried any panic stops, but the 60-0 normal stops have been predictable and don't require any heroics or visits to the gym. Very happy.
- Clutch: Cable clutch. Yeah, it's heavy, but not anything I'm going to regret. It does grab pretty quickly, but I'll get used to that fairly soon, I think.
- Engine: So many choices behind me in working with my engine builder, but he steered me right in picking components that were consistent with my desire for a well-behaved, drivable car. I'm not going to piss off my neighbors (much ... any more than I already have ...), and I don't think I'll get sick of the sound of that loping 347 on a long cruise.
- General: Everything just ... works, and works the way it's supposed to.
- I'm glad I spent the time I did on the console cubby, particularly since I don't have door panels yet, and I didn't do a rear cubby. Glasses case, phone, wallet, keys ... it all fits, along with the Holley handheld, and the USB charger hidden on top.
- RT (RIP) turn signals, very worthwhile. Mike's steering wheel bezel gives a professional touch. All gauges working well, I have the old style speedo and did my 2 mile run, nothing unexpected. Set the fuel sender to the right mode, filled up the tank and we're at F, good to go.
- Going over bumps - no drama, no bump steer, and the IRS is surprisingly comfortable considering how close you sit to the ground.
There will be more to come, but for now, kind of basking in the glow of near-completion. One of these days I'll do the 494 / 694 ring around the Twin Cities, and make sure it'll be ready for some longer trips up to 'da nordland' here in Meeeenah-sotahhhh.
Last edited by John Ibele; 08-06-2023 at 08:35 PM.
MK4 #7838: IRS 3.55 TrueTrac T5z Dart 347
The drawing is from ~7th grade, mid-1970s
Meandering, leisurely build thread is
here
-
Post Thanks / Like - 0 Thanks, 2 Likes
-
08-06-2023, 04:44 PM
#350
Senior Member

Originally Posted by
John Ibele
I marked it, removed it and had the O2 bung welded in the narrow portion of the side pipe after the collector. Nice job by the guy, protected the pipe, cleaned up the weld so it looks nice, fair charge. I thought about depinning the O2 connector, feeding the wires through a neat grommet ... then decided I was building a car, not a piece of art. Plus, the body has to come off; this is the only way I could figure to not hand the paint & body guy a pain in the neck. Other ways to solve this I'm sure, but this worked for me.
Untitled by
John Ibele, on Flickr
It's usually recommended to install the O2 sensor at least 10 degrees above horizontal (wire side up, sensor tip down) to prevent moisture from collecting in the sensor.
-
08-06-2023, 05:48 PM
#351
Senior Member

And another fabulous build hits the road. Congratulations and well done.
Nige
Mk.4 FFR supplied Right hand drive
Received 12/2012 completed 12/2019
Gen1 Coyote / TKO600 / IRS
Lots of mods to make compliant for Australian design rules
-
Post Thanks / Like - 1 Thanks, 0 Likes
-
08-06-2023, 05:48 PM
#352
Senior Member
Originally Posted by
Mike.Bray
It's usually recommended to install the O2 sensor at least 10 degrees above horizontal (wire side up, sensor tip down) to prevent moisture from collecting in the sensor.
Yes it is, Mike. The roadster build is full of compromises.
Last edited by John Ibele; 08-06-2023 at 06:21 PM.
MK4 #7838: IRS 3.55 TrueTrac T5z Dart 347
The drawing is from ~7th grade, mid-1970s
Meandering, leisurely build thread is
here
-
08-06-2023, 06:24 PM
#353
Senior Member
Originally Posted by
Nigel Allen
And another fabulous build hits the road. Congratulations and well done.
Nige
Thanks, Nigel. It's great to be on the road. Ultimately a very rewarding endeavor, and it's so nice to have the driving experience meet expectations.
MK4 #7838: IRS 3.55 TrueTrac T5z Dart 347
The drawing is from ~7th grade, mid-1970s
Meandering, leisurely build thread is
here
-
08-06-2023, 09:46 PM
#354
Senior Member
Hi John. So good to read your update, and learn you are on the road now. The first drives are such a rewarding part of the build. Congratulations! You put together a fantastic Roadster. Very happy for you.
Has your other half had a ride yet? I bet she gives it a big thumbs up.
Enjoy the rest of driving season. I'm nearing 600 miles, and might just be enjoying each drive a little more than the last one.
Chris
Coupe complete kit delivered: 4/22/24.
Build Thread. Coyote. T-56. IRS w/3.55. Wilwoods. PS. HVAC. Side windows.
MK4 Complete kit.
Build Thread Index. Delivered: 10/15/2020. Legal: 7/25/23. Coyote Gen3. TKO600 (0.64 OD). IRS w/3.55. PS. Wilwoods. Sway bars. This build is dedicated to my son, Benjamin.
Build Thread.
-
Post Thanks / Like - 1 Thanks, 0 Likes
-
08-07-2023, 07:55 AM
#355
Congrats John on a well-thought-out build
Craig C
P.S: I also really liked your upholstery work and am inspired to make my own "cubbies" now!
-
Post Thanks / Like - 1 Thanks, 0 Likes
-
08-07-2023, 09:41 AM
#356
Senior Member
It's a great build. First class all the way. Congratulations on a tremendous milestone.
I babied mine for almost a year before I got real comfortable with letting it rip. The Sniper "self learn" is a bit oversold. You would see a night and day difference across the board if you hire a tuner. I have 2 seasons now and I love it. Now I am buying a supercharger for Christmas because these cars are never done.
Last edited by Blitzboy54; 08-07-2023 at 11:01 AM.
MK4 #10008 - Ordered 10/06/20, Delivered 03/03/21, First Start 7/22/21, First Go Kart 7/24/21
Paint by Metal Morphous 5/14/22, Legally registered 6/8/22, Graduated 7/20/22
Build Thread
https://thefactoryfiveforum.com/show...been-delivered
Complete Kit, Ford 306, Sniper/Dual Sync, T5, Hydraulic clutch
-
Post Thanks / Like - 1 Thanks, 1 Likes
-
08-07-2023, 11:50 AM
#357
Senior Member
Originally Posted by
460.465USMC
Hi John. So good to read your update, and learn you are on the road now. The first drives are such a rewarding part of the build. Congratulations! You put together a fantastic Roadster. Very happy for you.
Has your other half had a ride yet? I bet she gives it a big thumbs up.
Enjoy the rest of driving season. I'm nearing 600 miles, and might just be enjoying each drive a little more than the last one.
Hey Chris! Thanks! I agree. This weekend, I got to take my older brother on a nice ride along the Minnesota River where it joins the Mississippi, across the High Bridge in St. Paul, and back around to Minneapolis. He had a grin on his face the whole way, and the car performed flawlessly. It was probably my ride to grade school in his red Triumph TR-4 which brought on the itch to build this thing so many years ago.
It was great building along with you, comparing notes along the way, and sharing the joys and challenges of such an engaging project - will need some more photos of that beautiful car of yours as it continues to completion!
Originally Posted by
cc2Arider
Congrats John on a well-thought-out build
Craig C
P.S: I also really liked your upholstery work and am inspired to make my own "cubbies" now!
Hey Craig - thanks and good to hear! That was one thing I felt I could contribute as a first time builder. I think that woodworking experience at least made me somewhat fearless in taking on fabrication in metal, foam and leather. Definitely one of the most satisfying parts of the build for me.
Originally Posted by
Blitzboy54
It's a great build. First class all the way. Congratulations on a tremendous milestone.
I babied mine for almost a year before I got real comfortable with letting it rip. The Sniper "self learn" is a bit oversold. You would see a night and day difference across the board if you hire a tuner. I have 2 seasons now and I love it. Now I am buying a supercharger for Christmas because these cars are never done.
Jesse! Thanks for checking in, your build was always an inspiration for me as I continued plodding along . But, there now, and it is a sweet thing. Definitely understand your comment about the Sniper ... I'll let it do its thing for a while, but at some point it will be time to look at tables and data logs, or just call in a professional. You're not the only one convinced of the value of a professional tune ... and that's true of folks with more refined EFI systems than we have. So, it'll happen at some point. And thank you for the kind comments on the build! As for yours ... still admire both the build quality and the steady progress toward completion, driven with energy, persistence, can-do attitude and optimism. Now to be turned toward a supercharger - 'cause I'm sure you need the added horsepower! Good luck and post pictures & progress!
MK4 #7838: IRS 3.55 TrueTrac T5z Dart 347
The drawing is from ~7th grade, mid-1970s
Meandering, leisurely build thread is
here
-
08-17-2023, 03:01 PM
#358
Senior Member
Well, I've been giving rides and gradually expanding my 'sphere of confidence', but other than the Sniper tuning itself (and it does that, guaranteed, more on that in a minute), there's just been nothing wrong or unreliable about the car. It's been a great experience. That's not to say it's done, because I jumped ahead a bit to the driving phase. It still has the elephant ears to go on in front, and the license plate light to hook up, along with trunk lighting. But the major stuff is done, and the other stuff can happen at night when the driving is done.
Shucks, I forgot to hand my daughter the keys to the cabin when I saw her at lunch today; looks like I'll have to go on a crosstown drive around sunset. Did I mention driving this thing is fun??
One thing that is not optional on these cars is front-of-rear-wheel-well ears. It's the one spot where dirt from the tires gets shot right in between the frame and the body, in the direction of the cockpit ... and what doesn't settle on the body right below the door ends up on your lap. Plan on putting these on, no doubt (they get underbody coating when I do touchup on some bare spots):

Untitled by John Ibele, on Flickr

Untitled by John Ibele, on Flickr
One fun story: I've kept in the habit of checking in regularly with my engine builder, who is local. I've asked him questions about all sorts of stuff, and he's always been happy to offer advice and is one of those folks who never seems in a hurry and never seems stressed. A really nice guy, and a great builder with a great reputation locally. He's near the end of his career and has quite a few roadster engine builds under his belt.
I told him I would stop by 'one of these days', and a few weeks ago, that day rolled around. We talked with a guys in the shop for a few minutes and he came out to see the car, and I asked him after a bit if he wanted to go for a ride. I offered to come back some other day to make good on the offer, because we were encroaching on his lunch break. He thought about it for a second, and after mumbling something about checking with the guys in the shop, he said, "heck, I'm the owner, I think I'll just go for a ride."
I started giving him instructions on how to get in the car, and then apologized for stating the obvious, since presumably he'd ridden in more than one of these cars. That's when he dropped the bomb: with all the roadster engines he's built, not one owner had taken him for a ride. I was the lucky first one.
With that knowledge in hand, I knew I needed to head out on the freeway and at least give him a suggestion of how his engine performed in the car. Keep in mind, I'm a cautious guy who's just learning the car, so that meant something like 15% throttle ... but still, enough to let him know what he'd built, and how it worked.
He finished the ride so happy, and very impressed with the car, which I would say is a great endorsement of FFR's choices, options, and design work. It really does ride nicely for a light car, with seats a few inches off the ground, and a few inches in front of the rear axle.
One photo to commemorate the occasion and show it happened. That's one happy owner, and one happy engine builder. Fun day.

Untitled by John Ibele, on Flickr
Sometime soon I'll do a post on initial Sniper learning. It's a good news story - after initially being disappointed with the Sniper performance, I found some patience and have been rewarded with a car which is indeed dialing itself in. In the meantime, I've been exploring data logging and the laptop software, and improving the tune in some basic ways. I know this isn't blazing any new ground, but those that are completely new to EFI and the Sniper may find it to be of some value.
And a final photo ... that slapdash temporary license plate ... need to erase that memory. Permanent vanity plates came today:

Untitled by John Ibele, on Flickr
There. Much better.
Last edited by John Ibele; 08-17-2023 at 03:06 PM.
MK4 #7838: IRS 3.55 TrueTrac T5z Dart 347
The drawing is from ~7th grade, mid-1970s
Meandering, leisurely build thread is
here
-
Post Thanks / Like - 0 Thanks, 3 Likes
-
08-17-2023, 04:08 PM
#359
Not a waxer
Nice plate John! Keep having fun until the snow flies
Jeff
-
Post Thanks / Like - 0 Thanks, 2 Likes
-
08-17-2023, 08:54 PM
#360
Senior Member
Great idea taking your builder out for a ride. I love the plate.
MK4 #10008 - Ordered 10/06/20, Delivered 03/03/21, First Start 7/22/21, First Go Kart 7/24/21
Paint by Metal Morphous 5/14/22, Legally registered 6/8/22, Graduated 7/20/22
Build Thread
https://thefactoryfiveforum.com/show...been-delivered
Complete Kit, Ford 306, Sniper/Dual Sync, T5, Hydraulic clutch
-
Post Thanks / Like - 0 Thanks, 1 Likes


 Thanks:
  Likes:


 Reply With Quote

