-
Senior Member

Jeff's LS Build - Drive By Wire Pedal
Hello all,
I received a call from Stewart regarding delivery, so it seems like a prime time to start a build thread. First of all I want to say a HUGE thanks to all of you that have done a build thread. I have learned something from EVERY one that I have looked at. This forum is a tremendous resource, and all of you deserve the credit. You have inspired me to start this lifelong dream.
I seriously doubt I will be plowing any new ground with either my build, or the way I document it. I will endeavor to keep this as up to date as time allows. My main target audience will be family and friends that I hope will enjoy following along. I have a son that lives many miles away that I hope will enjoy seeing what his old man is up to.
A brief bio: for most of my career I have been an Industrial Controls Engineer. I design and program the power and control systems that make industrial automation run. I have worked on tiny systems with a couple of relays, up to large systems with thousands of I/O points and huge control networks. I have experience with robots, vision, systems, and advanced motion control systems.
Now for the car. Highlights of my order to Factory Five:
- Complete kit
- IRS
- Powder Coated Frame
- Hydraulic Clutch
- LS mounts and exhaust system
- Power Steering
- 18" Wheels
- Gauge Credit (Will be doing my own thing here)
- Seat Credit (Will be using UltraShield seats)
- Blank Dash
I'm planning on using a variety of items from the good folks at Breeze.
I hope that the hole that the passing of Russ Thompson left will be soon filled, as I would like to use some of the items he manufactured.
I'm planning on a Chevrolet Performance LS3 engine in front of a Tremec TKX. I've had a couple conversations with Mike Forte and will likely be reaching out to him when the time comes for the transmission and associated clutch pieces, plus his hydraulic clutch slave cylinder.
I know the LS is a controversial choice among some. I have several reasons why, not limited to light weight, compact dimensions and good reliability.
So, thanks to all that have read this far. I hope that this will be an entertaining read, if nothing else for all of my mistakes!
----------------------------------------------
Jeff
Roadster delivered 8/27/23
Chevrolet Performance LS3
Build Thread
-
Post Thanks / Like - 0 Thanks, 1 Likes
 Fman
Fman liked this post
-
Senior Member
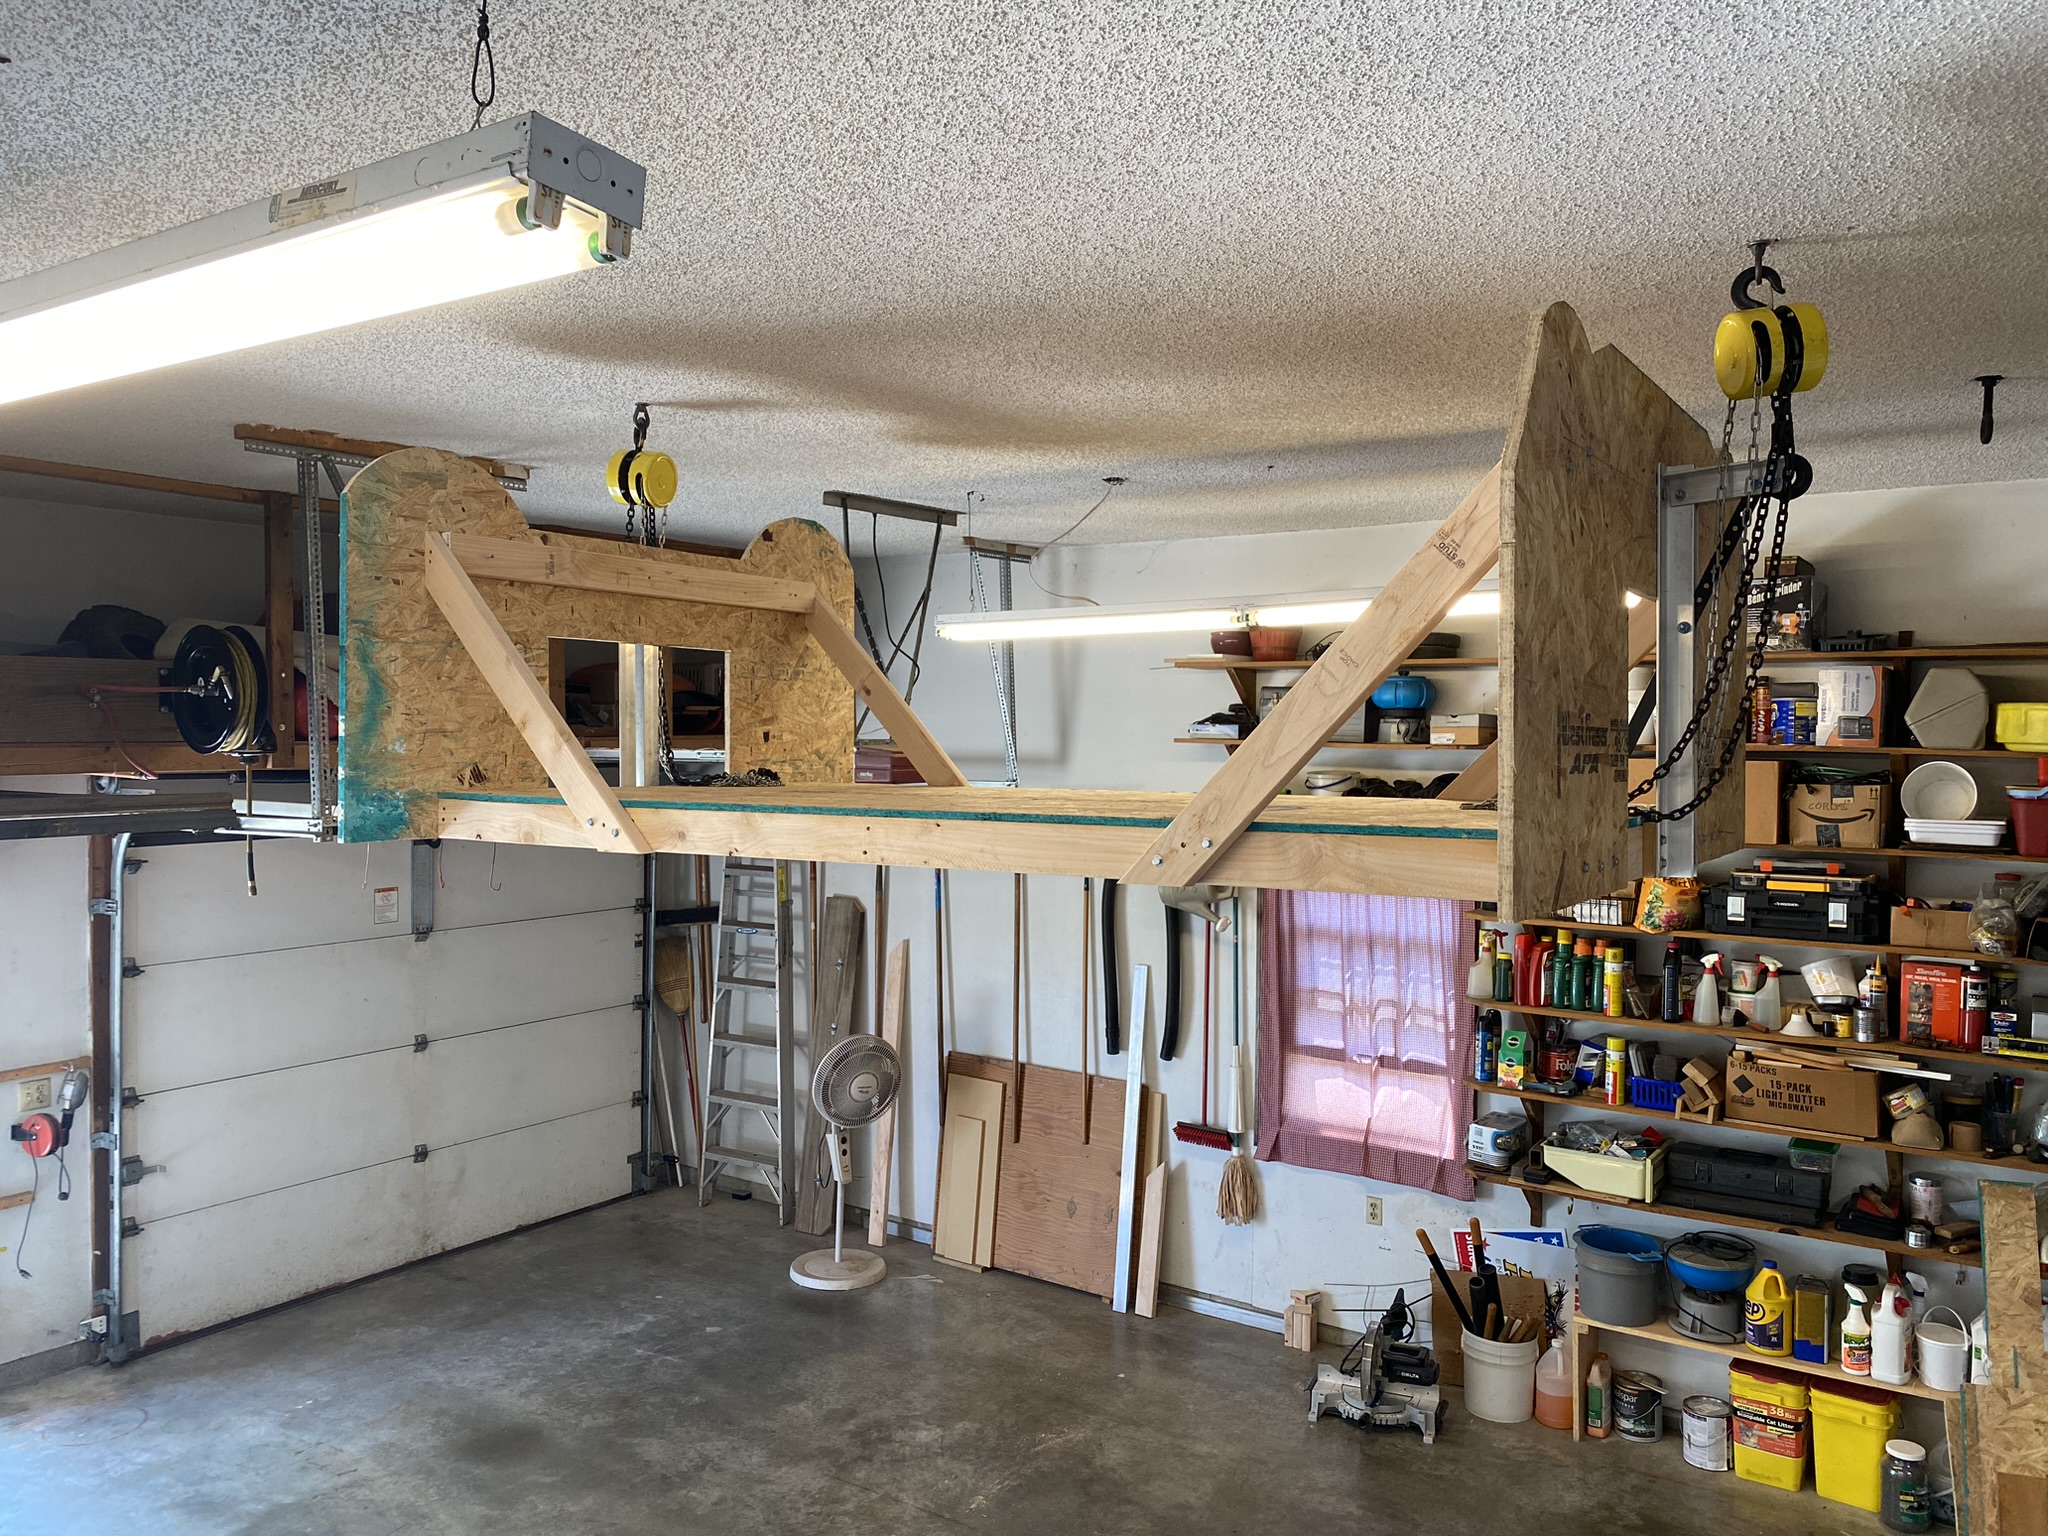
The over-thought, over-engineered, over-built, over-weight body buck and storage shelf:
The more reasonable frame cart:

Last edited by BRRT; 08-20-2023 at 03:23 PM.
----------------------------------------------
Jeff
Roadster delivered 8/27/23
Chevrolet Performance LS3
Build Thread
-
Senior Member

Looks good Jeff, off to a great start! I to did some automation programing, I used to work in facilities and went to a couple training classes and did a lot of Code trouble shooting with our regular staff that did the heavy lifting. Amazing what we could do just sitting at our desk for the facility that spread over a 500 acres with 6 fabs and various labs.
-
Post Thanks / Like - 0 Thanks, 1 Likes
BRRT liked this post
-
Senior Member

Welcome aboard, Jeff! Sounds like your delivery is imminent. Let the fun begin! I think your professional background will serve you well throughout your build. Looking forward to seeing your delivery pictures.
Chris
Coupe complete kit delivered: 4/22/24.
Build Thread. Coyote. T-56. IRS w/3.55. Wilwoods. PS. HVAC. Side windows.
MK4 Complete kit.
Build Thread Index. Delivered: 10/15/2020. Legal: 7/25/23. Coyote Gen3. TKO600 (0.64 OD). IRS w/3.55. PS. Wilwoods. Sway bars. This build is dedicated to my son, Benjamin.
Build Thread.
-
Post Thanks / Like - 0 Thanks, 2 Likes
-
Senior Member
At Factory Five, prepped for shipping. The big truck will be here this afternoon.

----------------------------------------------
Jeff
Roadster delivered 8/27/23
Chevrolet Performance LS3
Build Thread
-
Post Thanks / Like - 0 Thanks, 1 Likes
-
Not a waxer

Congrats man! David and I talked yesterday and this morning he forwarded me the photos and message from Nicole. Exciting time for you guys 
Jeff
-
Post Thanks / Like - 0 Thanks, 1 Likes
BRRT liked this post
-
Senior Member

Welcome Jeff! I'll be a few weeks behind you. Look forward to your build!
-
Senior Member

Originally Posted by
460.465USMC

Welcome aboard, Jeff! Sounds like your delivery is imminent. Let the fun begin! I think your professional background will serve you well throughout your build. Looking forward to seeing your delivery pictures.
Thanks! I have been very blessed to work with some great craftsman. They have set an example for me in running tubing and conduit, and extremely organized and neat wiring. I hope I can do nearly as good a job as I have seen.
----------------------------------------------
Jeff
Roadster delivered 8/27/23
Chevrolet Performance LS3
Build Thread
-
Senior Member
Originally Posted by
Jeff Kleiner
Congrats man! David and I talked yesterday and this morning he forwarded me the photos and message from Nicole. Exciting time for you guys
Jeff
Thanks Jeff!
----------------------------------------------
Jeff
Roadster delivered 8/27/23
Chevrolet Performance LS3
Build Thread
-
Senior Member
Originally Posted by
cv2065
Welcome Jeff! I'll be a few weeks behind you. Look forward to your build!
Thanks! I look forward to seeing your build, the changes you make between #1 and #2. Should be very interesting!
----------------------------------------------
Jeff
Roadster delivered 8/27/23
Chevrolet Performance LS3
Build Thread
-
Senior Member
Sunday was Delivery Day! Mark with Stewart arrived in the afternoon. He did a great job - fast, friendly efficient.

The Stewart trailer is quite a setup

On the hook

In the garage, on the cart. Lots of boxes!

----------------------------------------------
Jeff
Roadster delivered 8/27/23
Chevrolet Performance LS3
Build Thread
-
Post Thanks / Like - 0 Thanks, 1 Likes
-
Senior Member
Completed inventory today (Monday). 7 items on the POL list.
The 7/8 left hand jam nuts for the IRS have the wrong thread pitch - I think they are coarse thread instead of fine.
I will reach out to the FFR folks to get resolution.
----------------------------------------------
Jeff
Roadster delivered 8/27/23
Chevrolet Performance LS3
Build Thread
-
Senior Member
Jeff,
If that IRS jam nut is for the toe link, check the past threads because I believe it should be right hand Jam nut.
Lance
-
Post Thanks / Like - 1 Thanks, 0 Likes
 BRRT
BRRT thanked for this post
-
Senior Member
Straightened out the garage today. Organized boxes in some sense of sequence. Shuffled some to the basement where they will reside until needed.
Removed the front and rear quick jack bolts from the body, plus the 2 little self-tappers from under the sides. Got the hood, trunk lid, and doors off in preparation for body removal tomorrow.
Also went fishing this morning. A beautiful day!
Originally Posted by
F500guy
Jeff,
If that IRS jam nut is for the toe link, check the past threads because I believe it should be right hand Jam nut.
Lance
This is the jam nut for the upper rear control arm. Jams the rod end against the adjuster bung. It's listed as a left hand thread, looks like a coarse thread, but the rod end is fine pitch.
Now you have me wondering.... I will take another look.
----------------------------------------------
Jeff
Roadster delivered 8/27/23
Chevrolet Performance LS3
Build Thread
-
Senior Member
Took another look at those control arm jam nuts. I "cried wolf" prematurely. A little dirt, some burrs, and a very tight fit between the male/female thread made for a tough engagement. I cleaned the threads on the rod end, brushed out the nut and slowly (by hand) worked the nuts onto the rod end. Thanks to Lance for getting me to take another look!
----------------------------------------------
Jeff
Roadster delivered 8/27/23
Chevrolet Performance LS3
Build Thread
-
Senior Member
I started putting together some sub-assemblies, as my body removal assistants were tied up until this evening. The upper control arms seemed like a good starting point. I gathered the upper ball joints and the control arms. I unboxed the ball joints and warily started threading in the first one. It went in about 1/2 turn and came to a hard stop. I backed it out and tried it in the other UCA. Same result. Grabbed the other ball joint and started it in. Got in about 2 plus turns and it started getting tight. Clamped it in the vise, made about a quarter turn and it seized. Started unscrewing it, and it seized again. I applied a little penetrating oil, worked it back and forth, and was luckily able to slowly remove it.I got really lucky. Grabbed the Dremel and abrasive wheels. Removed all of the powder coat on both of the ball joints and from the threads inside the UCA. Was then able to thread the ball joints in by hand, no problem. Started adjusting the arms to the initial alignment spec and ran out of adjustment on the rear side. Disassembled, trimmed the adjusters, trimmed the links, and reassembled. Success! Disassembled again, applied loctite to the ball joints, a little anti-sieze to the threads, and reassembled. Anti-Sieze everywhere. This stuff is evil!
My adjuster trim jig. Crude but effective. Worked good.

Trimmed / Untrimmed

Assembled, ready to install and torque fasteners.

Last edited by BRRT; 08-30-2023 at 05:53 PM.
----------------------------------------------
Jeff
Roadster delivered 8/27/23
Chevrolet Performance LS3
Build Thread
-
Not a waxer
Jeff,
Using the center of the grease zerks as a reference if you set them like this you’ll be real close to about .5 degree negative camber and 7-8 degrees positive caster.
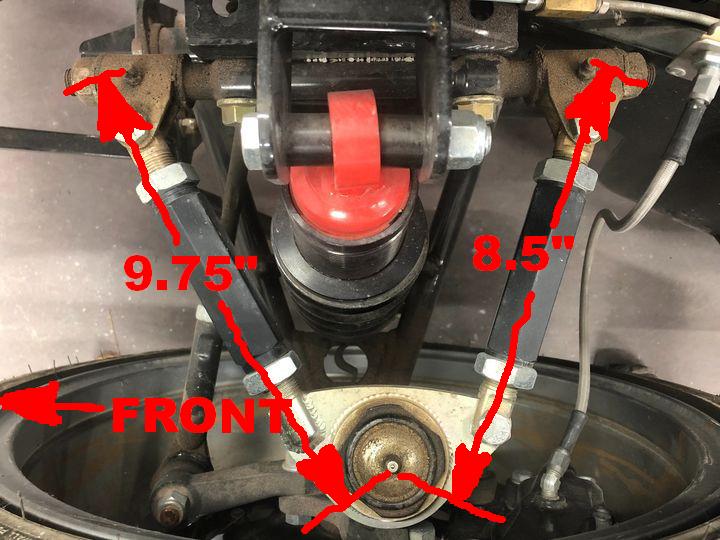
Jeff
-
Post Thanks / Like - 0 Thanks, 1 Likes
-
Senior Member

Originally Posted by
BRRT
I started putting together some sub-assemblies, as my body removal assistants were tied up until this evening. The upper control arms seemed like a good starting point. I gathered the upper ball joints and the control arms. I unboxed the ball joints and warily started threading in the first one. It went in about 1/2 turn and came to a hard stop. I backed it out and tried it in the other UCA. Same result. Grabbed the other ball joint and started it in. Got in about 2 plus turns and it started getting tight. Clamped it in the vise, made about a quarter turn and it seized. Started unscrewing it, and it seized again. I applied a little penetrating oil, worked it back and forth, and was luckily able to slowly remove it.I got really lucky. Grabbed the Dremel and abrasive wheels. Removed all of the powder coat on both of the ball joints and from the threads inside the UCA. Was then able to thread the ball joints in by hand, no problem. Started adjusting the arms to the initial alignment spec and ran out of adjustment on the rear side. Disassembled, trimmed the adjusters, trimmed the links, and reassembled. Success! Disassembled again, applied loctite to the ball joints, a little anti-sieze to the threads, and reassembled. Anti-Sieze everywhere. This stuff is evil!
the UCA ball joints threw me for a loop as well when I was assembling them. just the first of many frustrations during this build, but totally worth it.
-
Post Thanks / Like - 0 Thanks, 1 Likes
BRRT liked this post
-
Senior Member
Originally Posted by
Jeff Kleiner
Jeff,
Using the center of the grease zerks as a reference if you set them like this you’ll be real close to about .5 degree negative camber and 7-8 degrees positive caster.
Jeff
Exactly the picture I was looking for! I set them to the dimensions in the manual, I will double check the setup.
Thanks!
----------------------------------------------
Jeff
Roadster delivered 8/27/23
Chevrolet Performance LS3
Build Thread
-
Senior Member
So the word of the day is CLEAN THE THREADS! Today I decided to assemble the components of the rear suspension. When I removed the lower control arm from the paper a big wad of tapping chips fell out of the threaded end.

This prompted examining the tapped holes in the LCA and the toe link. Very crusty, lotsa chips and powder coat residue.

An ample bath of brake clean, brushing, and "chasing" the threads with the point of a scribe eradicated the debris. Inserted the adjuster bungs with a bit of anti-sieze, added the rod ends, and wrapped them back up in the packing paper until they are needed.
Next up coil-over assemblies. I unboxed all of the parts and went looking for the adjusting screw on the Koni shocks. Looks like it has been deleted. Anyone else seen this? Is it something new?

Got all 4 put together, wrapped them up, and stashed in a box.
The body removal assistants arrived this evening and we got the body off the frame, on the buck, and safely hoisted to it's resting place.
----------------------------------------------
Jeff
Roadster delivered 8/27/23
Chevrolet Performance LS3
Build Thread
-
Not a waxer
Jeff,
These are Koni 30 Series. There is not an adjusting “screw”. The rebound adjustment is made by pushing down firmly on that rounded button and then rotating the shaft clockwise or counterclockwise. You’ll feel it click through the detents as you do so. When you get to the setting position you want release pressure from the button and it’ll pop back up (you may need to twist the shaft back and forth a couple of degrees for it to lock in). With the factory spring rates I set rebound to the softest setting. There is no compression adjustment.
https://www.koni-na.com/en-US/NorthA...t-Guides/mono/
Jeff
Last edited by Jeff Kleiner; 09-01-2023 at 04:12 AM.
-
Post Thanks / Like - 1 Thanks, 1 Likes
BRRT thanked for this post
-
Senior Member
Originally Posted by
Jeff Kleiner
Jeff,
These are Koni 30 Series. There is not an adjusting “screw”. The rebound adjustment is made by pushing down firmly on that rounded button and then rotating the shaft clockwise or counterclockwise. You’ll feel it click through the detents as you do so. When you get to the setting position you want release pressure from the button and it’ll pop back up (you may need to twist the shaft back and forth a couple of degrees for it to lock in). With the factory spring rates I set rebound to the softest setting. There is no compression adjustment.
https://www.koni-na.com/en-US/NorthA...t-Guides/mono/
Jeff
Thanks, the info I needed. 3 were set full soft, 1 was one click off. Adjusted and assembled.
----------------------------------------------
Jeff
Roadster delivered 8/27/23
Chevrolet Performance LS3
Build Thread
-
Senior Member
I had a few snips of time here and there this week, but was able to clear the calendar this afternoon for a bit to get done.
I located and drilled the F panels then washed-degreased-sanded-degreased both sides and applied Upol self-etching primer. The engine side was painted with silver hammertone, the wheel side with Raptor Liner.
I also drilled and inserted 1/4-20 Rivnuts for the elephant ear panels to attach.

This afternoon I had the opportunity to build the front suspension.
Right side:

Left Side:

The suspension went together pretty smoothly, with one minor exception. The area where the UCA rear nuts go was impossible to get a socket on. The area around it was way too tight. I used a die grinder and burr to open up a little clearance.
I used the Energy Suspension grease boots on the upper ball joints. Credit to so many others that have done the same

I still need to torque the spindle nuts and install the dust caps.
When I placed the hubs I found that one hub would fit either spindle, but the other hub was picky, it only would slide on to one of the spindles. Tolerance stackup for sure.
If anyone sees something wrong please comment. Rookie mistakes happen!
Question of the day: where do these pretty M12-1.75 x 35mm 12 point fasteners go? They were in the kit with the UCA stuff, but I didn't spot anywhere mentioned in the assembly manual, nor did I find a place that they really fit.

----------------------------------------------
Jeff
Roadster delivered 8/27/23
Chevrolet Performance LS3
Build Thread
-
Not a waxer
Jeff,
Caliper brackets.
Jeff
-
Post Thanks / Like - 1 Thanks, 0 Likes
BRRT thanked for this post
-
Senior Member
Originally Posted by
Jeff Kleiner
Jeff,
Caliper brackets.
Jeff
Thanks!
----------------------------------------------
Jeff
Roadster delivered 8/27/23
Chevrolet Performance LS3
Build Thread
-
Senior Member
Rack Installed
Had some time this morning to get to the garage. Seemed like a good time to continue to work on the front, so I decided to go ahead and install the rack. In the box with the rack was the bag with the bushings, but no steel sleeves. Hmmm, maybe missing? Took a look at the inventory sheets for that box, not on the list for that box. Checked the forums, found that another builder had made his own when his were missing. Continued on the search, found a builder comment that his were in box 2. Yep, there they are. Makes perfect sense, right? Anyway, used a socket and extension to tap out the pre-installed bushings, tapped in the FFR supplied bushings and sleeves. The tabs on the frame were way too close together to get the rack to fit, so I used the all-thread, nuts and washers technique to open up the gap. The manual mentions installing the drivers side first, then the passengers. I never could get that to work, so went the other way with success. Installed the tie rod ends, centered the rack, made the initial 53 1/16" adjustment, and installed the tie rods into the steering arms.

Got a delivery from FFR today - the first of my POL items. I now have an Assembly Manual, header gaskets, and adapter plates for the LS motor mounts.
Rear suspension comes next. Definitely not looking forward to installing that beast of a differential.
----------------------------------------------
Jeff
Roadster delivered 8/27/23
Chevrolet Performance LS3
Build Thread
-
Looks like I'm right behind you. Congratulations, looking forward to following.
MKIV Roadster - Complete Kit - Delivery 10/12/23
Build Thread
-
Post Thanks / Like - 0 Thanks, 1 Likes
BRRT liked this post
-
Senior Member
Rear Suspension
I got back to the garage today and made some progress on the rear suspension. Like many others, my "IRS Fastener Pack" had an issue. The M16 bolts that secure the front of the differential were way short. The good folks at Ace Hardware had 5/16-18 x 5.50, Grade 8 bolts, washers, and locking nuts that worked well. It does take a lot of prying, rocking, and cussing to get all of the fasteners into the differential.

Once the differential install was complete, I bolted in the driveshaft adapter. The socket head capscrews were a little fat in the head to fit the counterbores, so a quick spin in the drill against a file quickly got them to fit.

I moved on to the suspension assembly. Every one of the frame mounting locations were too close together together for the arms to fit. The all thread-bolts-washers easily spread them apart, making insertion easy. The upper control arms, lower control arms, and toe links all had the same issue, requiring spreading to fit over knuckle. Once adjusted, assembly went well.


All fasteners were torqued, with the exception of the hub nuts. I will get them after I get the brakes on. I still need to fill the differential. None of that sweet-smelling Limited Slip Additive will be required, as this diff has a Torsen differential.
Last edited by BRRT; 09-17-2023 at 07:59 PM.
----------------------------------------------
Jeff
Roadster delivered 8/27/23
Chevrolet Performance LS3
Build Thread
-
Senior Member
My engine arrived!

Sure makes that old engine stand look nice

Chevrolet Performance LS3, 495HP@6200, 473 ft-lbs@5000
Weight is only 415 pounds
I will need to swap out the oil pan prior to installation.
Last edited by BRRT; 09-25-2023 at 12:19 PM.
----------------------------------------------
Jeff
Roadster delivered 8/27/23
Chevrolet Performance LS3
Build Thread
-
Senior Member
I started on the next section in the manual - firewall and footbox front panel, plus pedal box.
I installed the pedal pads full left to get the most room around the throttle pedal and drilled the holes for the brake and clutch switches.

The manual recommends a 3/16" hole, which is body size for a #10-32 screw.
Do yourself a favor and open that up to 7/32" dia. plus open up the hole on the switch bracket to 7/32".
It makes installation easier.

I spent a fair amount of time with a file deburring the front and rear mounting brackets. Some of the burrs on the laser cut stainless
are like razor blades. If I have to work under the dash future me will thank current me.
----------------------------------------------
Jeff
Roadster delivered 8/27/23
Chevrolet Performance LS3
Build Thread
-
Senior Member
A couple small items
Got a couple small items off the list.
I wanted something besides an open hose to vent my differential, and didn't want the big OEM unit, so I came up with this:

Thats a brass 5/16" barb to 1/4 NPT fitting screwed into a stainless 1/4" NPT coupler with a 1/4 NPT sintered brass muffler on the other end.
Simple, effective and cheap. Should do a good job of keeping dirt and critters out.
A 3/4" padded clamp fit pretty decent.
Secured to the frame with a 3/16 rivet. Put a washer under the head because the hole was a bit big:

Then did my "Kleiner Mod". This keeps from having to drop the tank to install or remove the rear bumper.
A 7/16-14 coupler nut secured with 7/16 bolt from the back side, mounted at all 4 locations.
Thanks to Jeff Kleiner for a great idea.

Last edited by BRRT; 09-27-2023 at 07:12 AM.
----------------------------------------------
Jeff
Roadster delivered 8/27/23
Chevrolet Performance LS3
Build Thread
-
Looking good Jeff!
Craig C
-
Senior Member
Originally Posted by
cc2Arider
Looking good Jeff!
Craig C
Thanks Craig!
----------------------------------------------
Jeff
Roadster delivered 8/27/23
Chevrolet Performance LS3
Build Thread
-
Senior Member
It's been a few weeks since I posted an update. I started putting together the passenger side footbox, using the FFR screw holes as guidance. Alignment was terrible, i had nothing but issues. I posted some questions, and the advice I received from the group was on-target. I disassembled the footbox, ignored the screw holes and the footbox went together pretty decent. I still have some gaps that aren't s good as i had wanted, but are acceptable. Several pieces of aluminum took some serious tweaks, like the inside vertical wall. The bent angle was way off, requiring some serious adjustment. It's now all drilled and cleco'd together. I am going to get the drivers side together before I rivet it all.
Last edited by BRRT; 10-16-2023 at 10:07 AM.
----------------------------------------------
Jeff
Roadster delivered 8/27/23
Chevrolet Performance LS3
Build Thread
-
Senior Member
Gas Tank Tweaks
While awaiting arrival of a few parts I pulled out the gas tank. Per instructions, the flange around the outside needs to be straightened where it interfaces with the frame downtubes.
Here is one spot as-shipped:

My precision gas-tank flange adjusting tool:

Post adjustment:

After all four of the bends were straightened, then came a test fit. I balanced it on my floor jack and brought it up. A bit of interference on the passenger side front downtube:

After a few whacks with the deadblow:

Looks great! Gas tank returned back to box to await another day.
The looped ends of the straps are too small for the 3/8 bolts to pass through. I will enlarge them a bit when I get back to this area.
----------------------------------------------
Jeff
Roadster delivered 8/27/23
Chevrolet Performance LS3
Build Thread
-
Originally Posted by
BRRT
It's been a few weeks since I posted an update. I started putting together the passenger side footbox, using the FFR screw holes as guidance. Alignment was terrible, i had nothing but issues. I posted some questions, and the advice I received from the group was on-target. I disassembled the footbox, ignored the screw holes and the footbox went together pretty decent. I still have some gaps that aren't s good as i had wanted, but are acceptable. Several pieces of aluminum took some serious tweaks, like the inside vertical wall. The bent angle was way off, requiring some serious adjustment. It's now all drilled and cleco'd together. I am going to get the drivers side together before I rivet it all.
Hey Jeff,
Good on ya! I'd be interested to hear your comments on the Driver's side footbox fitment, or if I'm a lunatic 
Your progress on the fuel tank fitment makes me realize I can vent my frustrations in a new way!
Craig C
-
Post Thanks / Like - 0 Thanks, 1 Likes
BRRT liked this post
-
Senior Member

Originally Posted by
BRRT
While awaiting arrival of a few parts I pulled out the gas tank. Per instructions, the flange around the outside needs to be straightened where it interfaces with the frame downtubes.
Here is one spot as-shipped:
My precision gas-tank flange adjusting tool:
Post adjustment:
After all four of the bends were straightened, then came a test fit. I balanced it on my floor jack and brought it up. A bit of interference on the passenger side front downtube:
After a few whacks with the deadblow:
Looks great! Gas tank returned back to box to await another day.
The looped ends of the straps are too small for the 3/8 bolts to pass through. I will enlarge them a bit when I get back to this area.
I installed my gas tank this weekend, and I noticed the looped ends of the straps are too small for the bolts, as well. However, if you place the straps in between their mounting tabs, then run the bolt in with an electric ratchet/cordless drill, it'll go right through and clearance itself. Easy peasie.
Built an early MkIII years ago, sold years ago.
Got Corvettes out of my system, and now back after 18 years to build a MkIV.
MkIV Complete Kit Ordered 4/18/23, Delivered 7/11/23, 427 Stroker, Holley Sniper 2, Hyperspark, TKX, IRS, Wilwood Big Brakes
Here to learn, contribute, and have fun!
-
Senior Member

Originally Posted by
BRRT
While awaiting arrival of a few parts I pulled out the gas tank. Per instructions, the flange around the outside needs to be straightened where it interfaces with the frame downtubes.
After all four of the bends were straightened, then came a test fit. I balanced it on my floor jack and brought it up. A bit of interference on the passenger side front downtube:
Looks great! Gas tank returned back to box to await another day.
The looped ends of the straps are too small for the 3/8 bolts to pass through. I will enlarge them a bit when I get back to this area.
Hard to be 100% sure from the pictures. But I can't see the plastic bumpers the kit provides (and the manual shows) that go into the ends of those downtubes. Confirm they're installed before final installation of the tank. You don't want metal-to-metal contact.
Build 1: Mk3 Roadster #5125. Sold 11/08/2014.
Build 2: Mk4 Roadster #7750. Sold 04/10/2017.
Build Thread
Build 3: Mk4 Roadster 20th Anniversary #8674. Sold 09/07/2020.
Build Thread and
Video.
Build 4: Gen 3 Type 65 Coupe #59. Gen 3 Coyote. Legal 03/04/2020.
Build Thread and
Video
Build 5: 35 Hot Rod Truck #138. LS3 and 4L65E auto. Rcvd 01/05/2021. Legal 04/20/2023.
Build Thread. Sold 11/9/2023.
-
Post Thanks / Like - 2 Thanks, 0 Likes
-
Senior Member
Originally Posted by
gbranham
I installed my gas tank this weekend, and I noticed the looped ends of the straps are too small for the bolts, as well. However, if you place the straps in between their mounting tabs, then run the bolt in with an electric ratchet/cordless drill, it'll go right through and clearance itself. Easy peasie.
Good idea! Thanks!
----------------------------------------------
Jeff
Roadster delivered 8/27/23
Chevrolet Performance LS3
Build Thread
-
Senior Member
Originally Posted by
edwardb
Hard to be 100% sure from the pictures. But I can't see the plastic bumpers the kit provides (and the manual shows) that go into the ends of those downtubes. Confirm they're installed before final installation of the tank. You don't want metal-to-metal contact.
Thanks for the heads-up! Any advice is much appreciated!
----------------------------------------------
Jeff
Roadster delivered 8/27/23
Chevrolet Performance LS3
Build Thread


 Thanks:
  Likes:


 Reply With Quote