-
Newbies crazy questions
My first build and Im a Jeep/truck guy and have only really dealt with SBC motors. Instead of making multiple threads, Im hoping to ask all my questions on this one.
Thanks for helping.
Here is the first. Panhard bar on the drivers side. There are two spacers. Does one go on each side of the bar end or both in the back. This changes the horizontal angle of the bar. Does it matter?
-
Senior Member

1 on each side. Bar needs to be as level to the diff as possible
99/2000 NASA PSO Champion-2005 west coast FFR challenge series Champions
Sponsor Tony B's 2007 ST2 National Championship
2009 NASA TTC runner up-2010 NASA TTB runner up
-
Thanks. Thats what I figured. The pic in manual shows them both in the back. Instructions say something like mount it with the spacers provided. It is clearly written for the passenger side,
-
After installing all of the 3-link rear end components, I was left with 2 1" allen head screws and bolts. About 3/8 diameter. Looked through the manual, but don't see where they go. Any ideas?
-
Senior Member
Sounds like the bolt that connects the forward leg of the banana bracket to the diff housing.
99/2000 NASA PSO Champion-2005 west coast FFR challenge series Champions
Sponsor Tony B's 2007 ST2 National Championship
2009 NASA TTC runner up-2010 NASA TTB runner up
-
Post Thanks / Like - 1 Thanks, 0 Likes
-
I believe I had hardware left over after installation of the 3-link, too. Complete kit circa 2016.
Mk4 #8861 Complete kit. Delivered: 27 Apr 2016, currently a roller.
Gen-2 Coyote, clutch, TKO600, midshift, and solid axle from Forte. Many pieces from Breeze and Replicarparts.
-
Thanks. Ill check tonight. My rear came with all of that bolted on already, so that sounds very plausible
-
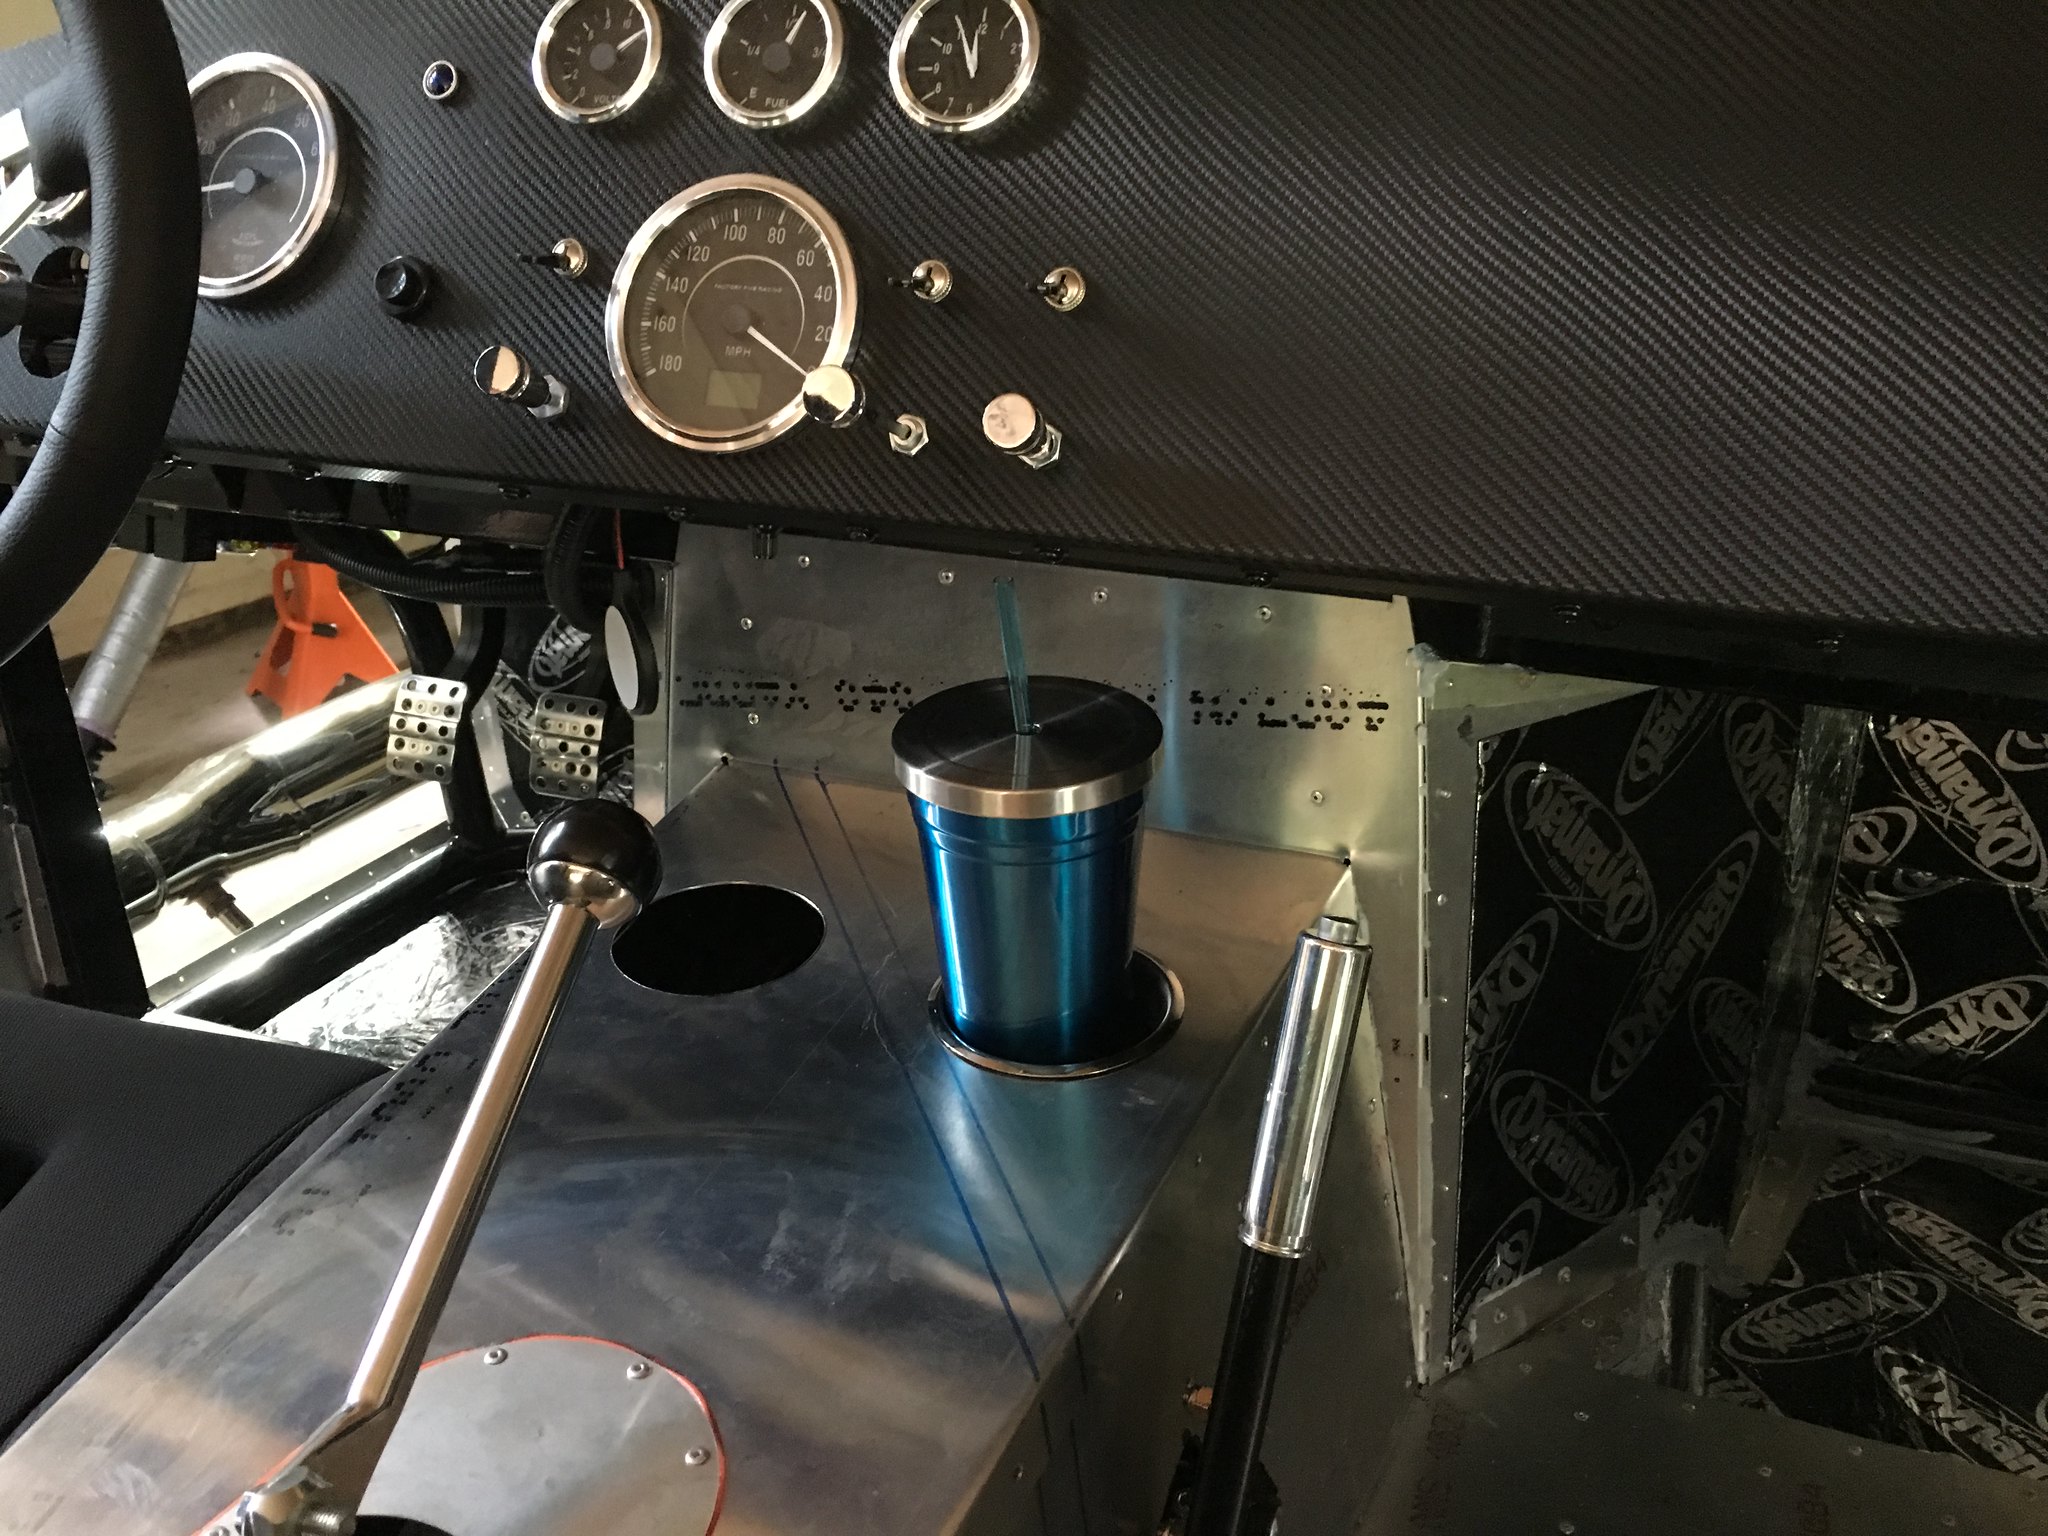
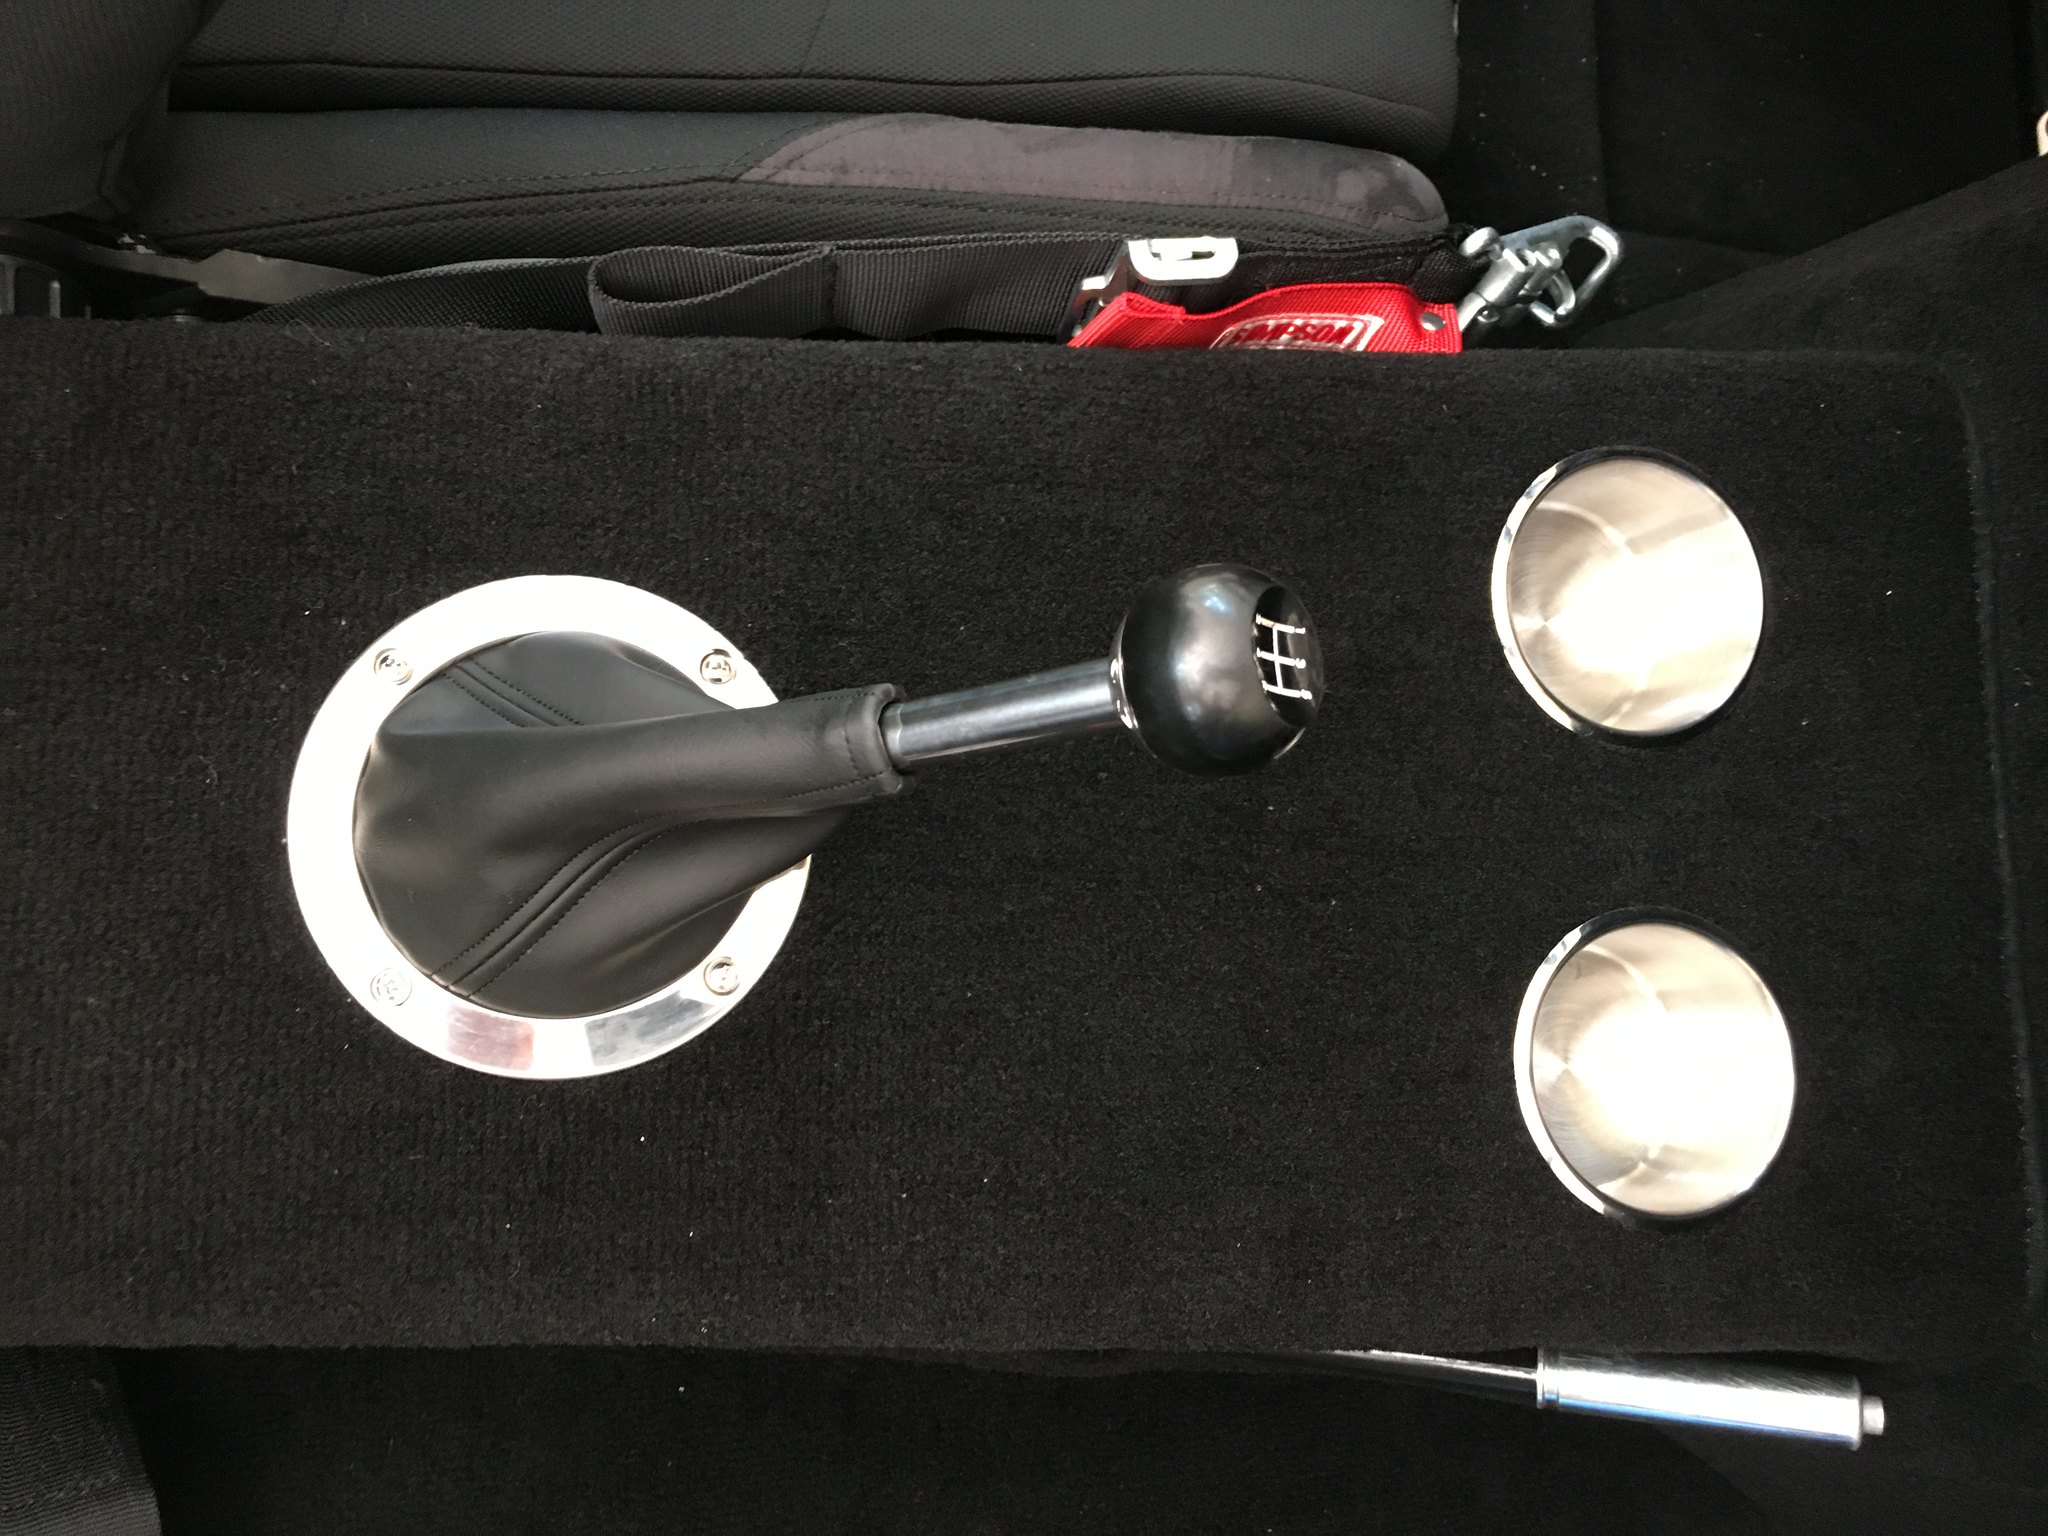
Trying to decide on cup holder placement so I can the trans tunnel wrapped. Dont want it to get in the way of the shifter. Im limited going forward by the center dash support. If I go all the way toward that and to the left will it interfere?
On another note, anyone able to post pics to posts from their phone? I cant figure it out.
-
Senior Member

Clearly what I did won't work with the center dash support, but there are several factors at play in addition to the diagonal bracing at the top of the tunnel.
I found that the trick is to get the right depth cup holders. On my MKIV, I ordered three pair before I found these (https://smile.amazon.com/gp/product/...?ie=UTF8&psc=1). They were the only cup holders I could find that were large enough for my phone case to fit in AND shallow enough to fit at the front of my transmission tunnel. I located them 6” from the forward cockpit wall and 3” to either side of the center line of the transmission tunnel cover. More information is in Post #352 of my build log (https://www.ffcars.com/forums/17-fac...ter-build.html).
John
 IMG_4002 by jhsitton, on Flickr
 IMG_4752 by jhsitton, on Flickr
MK IV Roadster #8631
Ford 302, Holley Terminator EFI, T5z, 3.55 Rear End, IRS, 17 Halibrand Replicas (9 front, 10.5 rear), Nitto 555 G2s (275/40ZR17 front, 315/35ZR17 rear), Fast Freddies Power Steering, F5 Wilwood Brakes, FFMetals Firewall Forward, Fortes Hydraulic Clutch & Throttle Linkage
https://www.ffcars.com/threads/phile.../#post-4776313
-
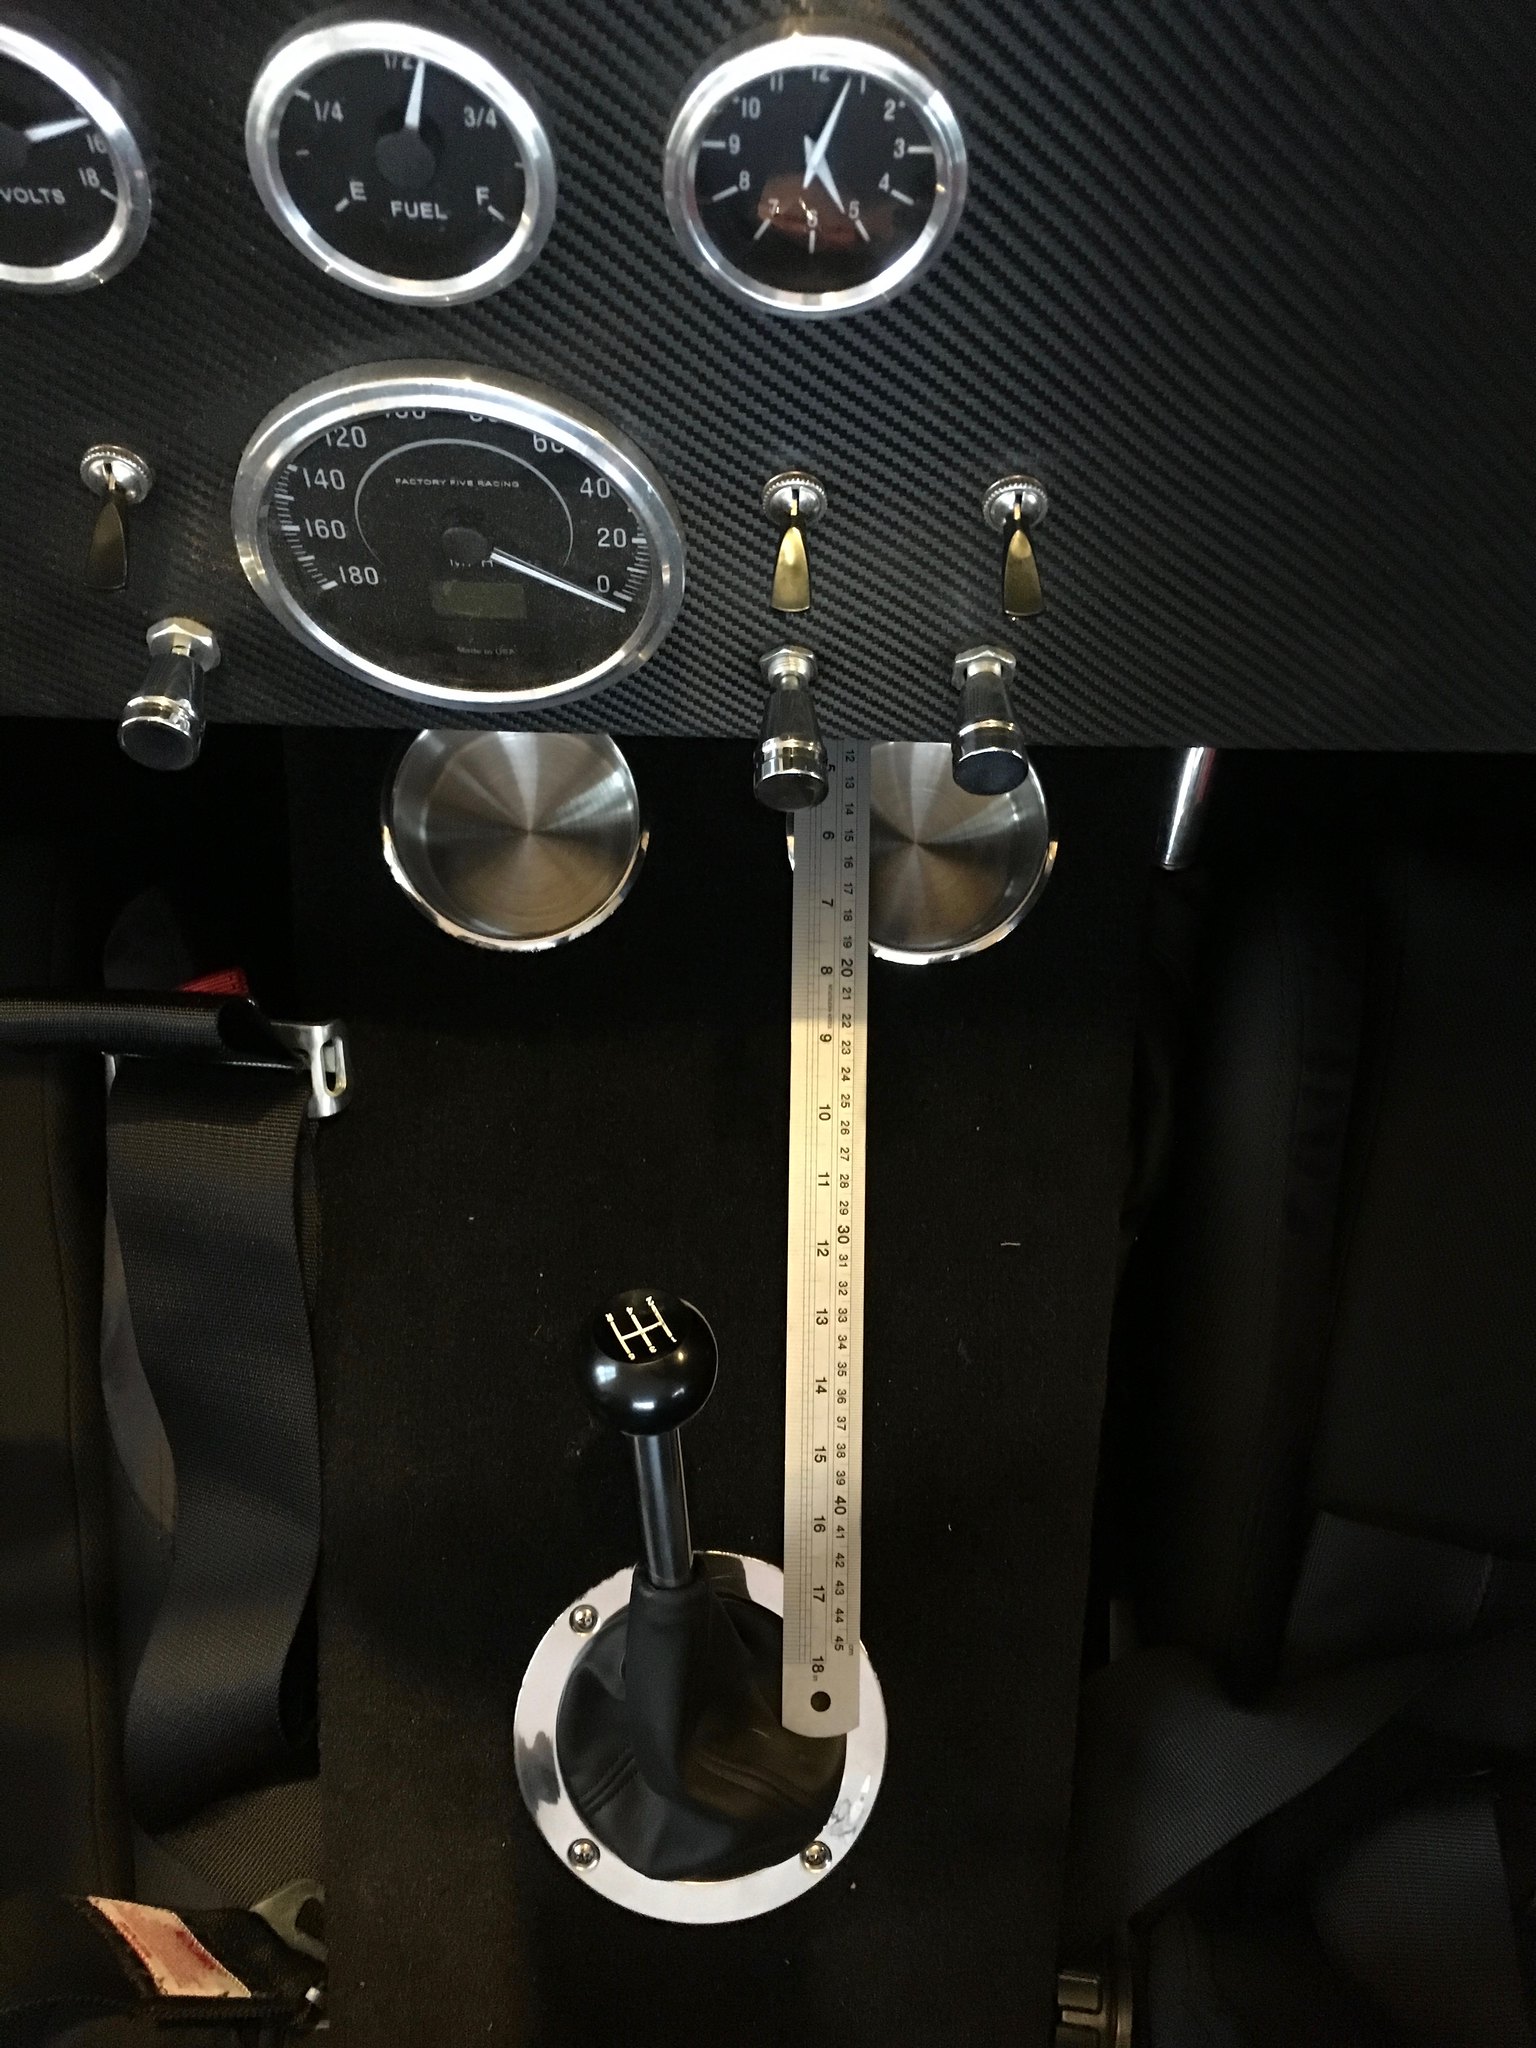
Thanks. The 2nd picture is really helpful. Any way you can throw a tape measure in the same picture? Measuring from the front going back.
-
Senior Member
Sure. The shifter trim ring is 16 5/8" back from the front of the transmission wall. Note that this is for a T5. The gear shifter is in neutral, if that helps.
John
 IMG_5403 by jhsitton, on Flickr
MK IV Roadster #8631
Ford 302, Holley Terminator EFI, T5z, 3.55 Rear End, IRS, 17 Halibrand Replicas (9 front, 10.5 rear), Nitto 555 G2s (275/40ZR17 front, 315/35ZR17 rear), Fast Freddies Power Steering, F5 Wilwood Brakes, FFMetals Firewall Forward, Fortes Hydraulic Clutch & Throttle Linkage
https://www.ffcars.com/threads/phile.../#post-4776313
-
Rivnuts are driving me crazy! I get about 1 good one set for every 3 that end up turning in the hole. I've adjusted the tool down to the point where it doesn't squeeze it enough to hold. Anyone ever try tack welding a steel rivnut in the frame?
-
Senior Member


Originally Posted by
hjoensy

Rivnuts are driving me crazy! I get about 1 good one set for every 3 that end up turning in the hole. I've adjusted the tool down to the point where it doesn't squeeze it enough to hold. Anyone ever try tack welding a steel rivnut in the frame?
Use a drop of red loctite, they won't turn.
-
Post Thanks / Like - 1 Thanks, 1 Likes
-

Steve >> aka: GoDadGo

Heath,
I try to not rock the rivet-nut during the final squeeze of the handle too.
Also, I've got a couple of odd ball drill bits that allow me make the tightest hole possible.
Yes they are a pain in the neck, but once you figure them out you'll be shocked at how often you use them.
Steve
-
Senior Member

As GoDad said, don't drill too big a hole. Sometimes I would do a squeeze, then get a couple more turns on the knob and hit it again. I like the loctite idea.
-
I traded out the aluminum rivnuts for steel. Much much better. I love the loctite idea.
-
I have zero experience with front end alignments and will bring to a shop once running.
For now, I need it to roll out my garage to install the engine. Both front tires are kicked in at the front of the tire. The car looks severely pigeon toed. I read the manual.....but it says bring it to a shop.
Any advice on how to get semi-correct would be appreciated.
-
Steve >> aka: GoDadGo
Heath,
I can probably help you get in the ballpark one night after work or definitely next weekend.
Steve
-
Sounds good. Let me know.
-
Originally Posted by
hjoensy
I have zero experience with front end alignments and will bring to a shop once running.
For now, I need it to roll out my garage to install the engine. Both front tires are kicked in at the front of the tire. The car looks severely pigeon toed. I read the manual.....but it says bring it to a shop.
Any advice on how to get semi-correct would be appreciated.
Take a look at this post, it could be a big help for you to get started... CLICK HERE
-
Post Thanks / Like - 1 Thanks, 1 Likes
-
Awesome thread. I looked, but couldnt find anything this detailed. Thanks.
-
Will installing the radiator before the engine cause engine installation clearance issues? Im running out of things to do before the engine shows up.
-
IMO, wait until the last chance to install the radiator. You will have many things going on in and around the front of the car that you will wish it was not in your way. But, if you do, I would be sure to protect it with a sheet of cardboard or something.
-
Originally Posted by
hjoensy
Will installing the radiator before the engine cause engine installation clearance issues? I’m running out of things to do before the engine shows up.
Hang the radiator, drill and bolt everything in place, pull it and set it aside. You will be glad all the fitting is done.
Last edited by Railroad; 02-04-2019 at 05:56 PM.
20th Anniversary Mk IV, A50XS Coyote, TKO 600, Trunk Drop Box, Trunk Battery Box, Cubby Hole, Seat Heaters, Radiator hanger and shroud.
-
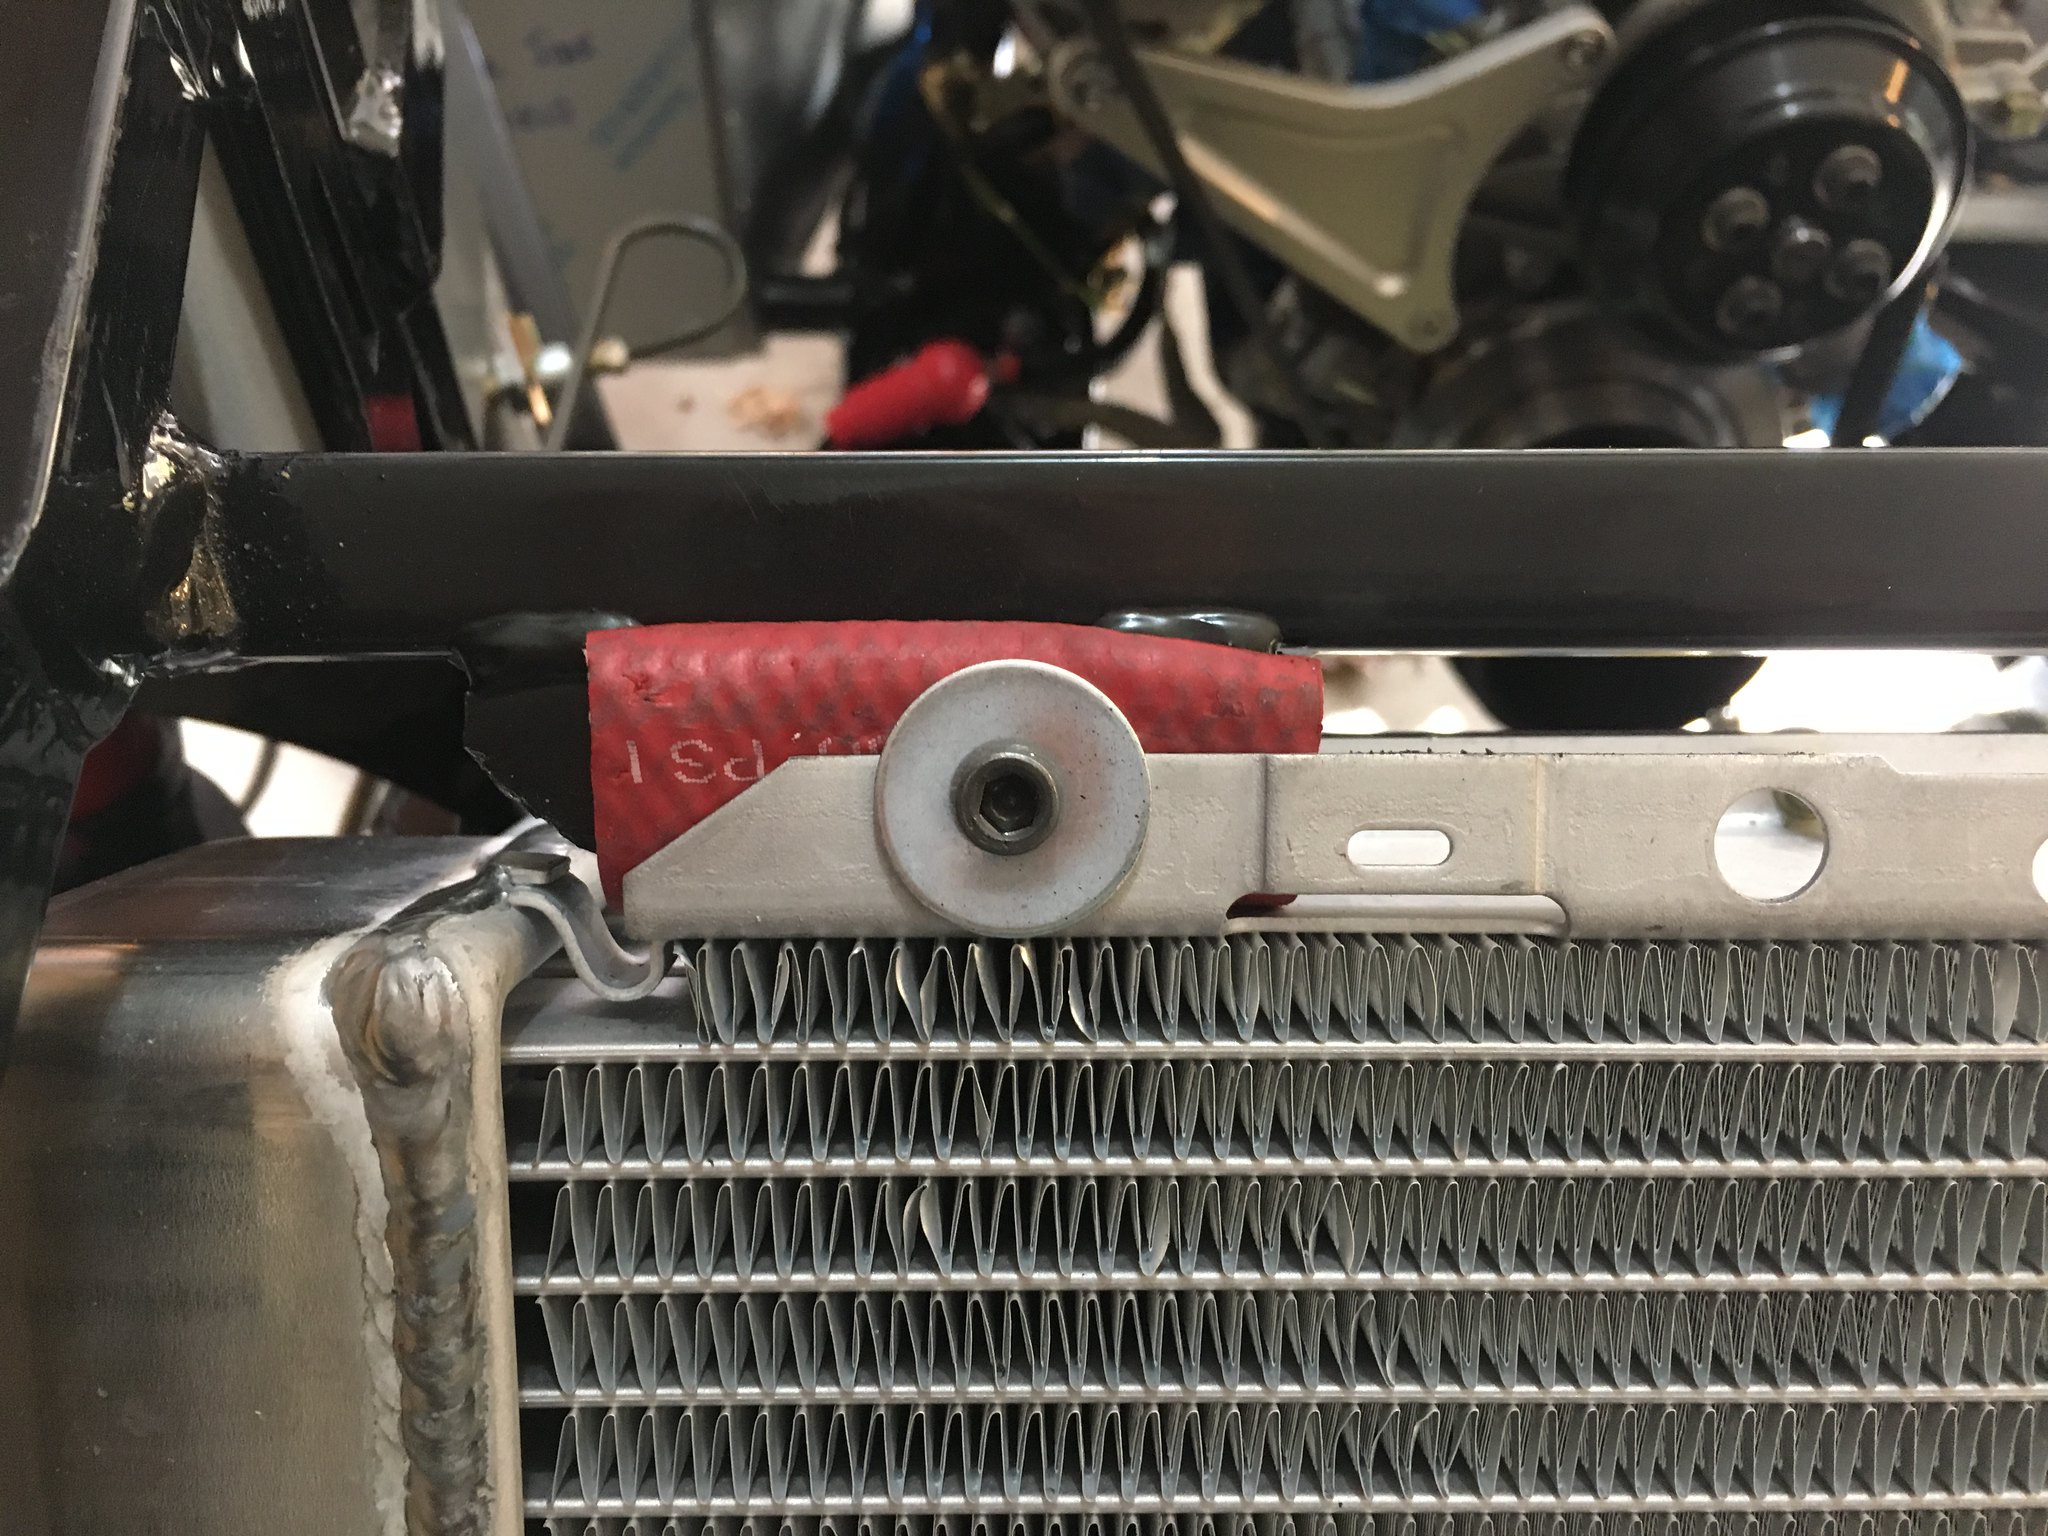
Senior Member
Make sure the right side mount clears the weld on the radiator. Depending on the model, you may have to grind off a bit of the outside corner.
John
 IMG_2750 by jhsitton, on Flickr
MK IV Roadster #8631
Ford 302, Holley Terminator EFI, T5z, 3.55 Rear End, IRS, 17 Halibrand Replicas (9 front, 10.5 rear), Nitto 555 G2s (275/40ZR17 front, 315/35ZR17 rear), Fast Freddies Power Steering, F5 Wilwood Brakes, FFMetals Firewall Forward, Fortes Hydraulic Clutch & Throttle Linkage
https://www.ffcars.com/threads/phile.../#post-4776313
-
Senior Member
Originally Posted by
Railroad
Hang the radiator, drill and bolt everything in place, pull it and set it aside. You will be glad all the fitting it done.
.....and ALWAYS keep cardboard over it while it is sitting in the garage.
-
Steve >> aka: GoDadGo
Originally Posted by
hjoensy
Will installing the radiator before the engine cause engine installation clearance issues? I’m running out of things to do before the engine shows up.
I'd suggest installing the radiator after your driveline goes in to avoid damaging it.
If you need help installing the engine, please know we're willing to lend a hand.
If you want to drag it to The-Dell we can do that too since I've got a trailer.
Installation With No Body:
https://youtu.be/3f1Q4aS5SG4
Removal With Body:
https://youtu.be/Vhbftk4AP4k
Installation With Body:
https://youtu.be/-nVDzIjSjh8
Helping Each Other Is What Factory Five Folks Do!
Last edited by GoDadGo; 02-04-2019 at 05:35 PM.
-
I want to build a cobra. At least I think I do. Can anyone make a short comparison of the factory five and backdraft cobras. Just stick to the important stuff. Chassis, fiberglass body, interior. Whatever you considered when you decided to build your factory five.
Thanks, Dan Raabe
-
Steve >> aka: GoDadGo
Originally Posted by
Dan Raabe
I want to build a cobra. At least I think I do. Can anyone make a short comparison of the factory five and backdraft cobras. Just stick to the important stuff. Chassis, fiberglass body, interior. Whatever you considered when you decided to build your factory five.
Thanks, Dan Raabe
The biggest difference between Factory Five & Backdraft is everything!
Backdraft's Chassis is basically BMW suspension parts on a rectangular tube chassis and the body sits on top like a dune buggy.
Shown below is a link to let you see the B/D chassis:
https://backdraftracing.com/14-rt3-tabs/44-rt3-chassis
The Factory Five Racing Chassis is much like the original being that it is a 4" round tube design for a more period correct look.
Shown below is a link to let you see the F/5 chassis:
https://www.factoryfive.com/gallerie...dster-chassis/
Backdraft is built outside of the country, uses foreign labor and builds "A Nice Looking Car" but it is far from being period correct.
Purchase a driveline and install it or have it installed and you are done.
Factory Five builds their cars in the U.S.A. by American Craftsmen and Craftswomen and the Roadster body is very period correct in shape and style.
Build a Factory Five and your car is truly your car and it will reflect your skills and ability, but more importantly it will include your soul.
Factory Five MK4 Overview By Dave Smith, President & CEO For Factory Five Racing:
https://youtu.be/6ckgfkPU8Ss
How Factory Five Makes Their Cars:
https://youtu.be/wVT6QHyBxDA
https://youtu.be/GvkJ95X7Fio
How Backdraft Builds Their Cars:
https://youtu.be/4Ts87Ta3qik
Where Factory Five Gets It's Inspiration From; Which Is Racing:
Real Cobra
https://youtu.be/KpYxA9QTMxE
Factory Five Roadster
https://youtu.be/X9OSrHFECxc
My Car Then & Now:
https://youtu.be/_wnHDNgnNqs
https://youtu.be/wOID7yvBRPU
Again, The biggest difference between Factory Five & Backdraft is everything!
Do You Want To Build Your Dream Or Simply Purchase It?
The Choice Is Yours!
Good Luck!
Last edited by GoDadGo; 02-05-2019 at 10:58 AM.
-
Post Thanks / Like - 0 Thanks, 1 Likes
-
Senior Member

2nd MK4 #10639 received 3-19-23. Wife's version. Street Snake - IRS, Willwoods, no roll bars, no hood scoop, no stripes, Blue Print EFI 306 with AOD trans, and under car exhaust. Ford Eruption Green with saddle leather interior.
1st build - Mk4 Roadster #9319, received 4-10-18. IL registration 8/6/19. Moser 8.8. 3 Link. Wilwood brakes. Blue Print 427, Holley 750, TKO 600, 0.64 OD. Paint Dec 2020. Ruby Red with Carbon Flash Black metallic stripes.


 Thanks:
  Likes:


 Reply With Quote


