-
11-14-2021, 04:28 PM
#241
Senior Member

Dash sure turned out great! John your getting close to driving on the street soon! and tell your neighbor he can have it for 150k 
-
Post Thanks / Like - 0 Thanks, 1 Likes
-
11-15-2021, 11:33 AM
#242
Senior Member

Looks great John, very classy build.
Nice work
MK4 #10008 - Ordered 10/06/20, Delivered 03/03/21, First Start 7/22/21, First Go Kart 7/24/21
Paint by Metal Morphous 5/14/22, Legally registered 6/8/22, Graduated 7/20/22
Build Thread
https://thefactoryfiveforum.com/show...been-delivered
Complete Kit, Ford 306, Sniper/Dual Sync, T5, Hydraulic clutch
-
Post Thanks / Like - 1 Thanks, 0 Likes
 JohnK
JohnK thanked for this post
-
11-15-2021, 06:08 PM
#243
Senior Member

Yeah, isn't the interior work fun? It's got one of the greatest opportunities for individual expression and also craft. And both your dash and the seats (!!) look fantastic. Nice work.
MK4 #7838: IRS 3.55 TrueTrac T5z Dart 347
The drawing is from ~7th grade, mid-1970s
Meandering, leisurely build thread is
here
-
Post Thanks / Like - 1 Thanks, 0 Likes
JohnK thanked for this post
-
02-13-2022, 06:16 AM
#244
Regarding the brake bias adjuster, did you use the "Tilton Engineering 72-561 - Tilton Brake Balance Bar Coupler Fasteners"? listed on Summit Racing for $93.50? I'm really surprised at how much that thing costs... Just want to make sure we're looking at the same part here.
-
02-13-2022, 10:09 AM
#245
My purchase log shows the Tilton 72-560, which is the version threaded for 3/8-24 (vs 7/16-20 for the 72-561). Interestingly the one I received was also black, not like the one shown in the photo on the Summit site. I don't have an electronic copy of the Wilwood pedal box documentation handy, but confirm which thread pitch of the Wilwood balance bar. One other thing to note, I had to drill out the end that the cable goes into in order for the Wilwood adjuster cable to fit into the Tilton fitting, but not a big deal. Lastly, someone else mentioned taking that 90 degree fitting apart before installation and packing it with a little more grease. When I opened mine up it was pretty dry so I added a little dab of grease and that seemed to help quite a lot.
MkIV Roadster build: Gen 2 Coyote, IRS, TKO600. Ordered 10/24/18. Delivered 1/29/19. Engine installed 8/8/21. First start 9/12/21. First go-kart 9/17/21. Off to paint 4/11/22. Back from paint 12/30/22.
Build thread here.
-
02-13-2022, 01:41 PM
#246
I just received the Tilton 72-560 and its black, this one is for the 3/8" thread. The 72-561is for the 7/16" thread.
-
02-13-2022, 03:00 PM
#247
Thanks for the swift reply John! Did you leave the 90 degree fitting freely rotating about the axis of the balance bar? I guess it can't really rotate THAT much given the small travel distance of master cylinder actuation.
-
02-13-2022, 11:33 PM
#248
Yes, the 90 degree fitting is threaded onto the end of the balance bar and secured with a jam nut and a little blue loctite, and it's free to spin until the cable is installed. Once the cable is installed in the fitting, that will hold it in place. No need to do anything else to secure the 90 degree fitting.
MkIV Roadster build: Gen 2 Coyote, IRS, TKO600. Ordered 10/24/18. Delivered 1/29/19. Engine installed 8/8/21. First start 9/12/21. First go-kart 9/17/21. Off to paint 4/11/22. Back from paint 12/30/22.
Build thread here.
-
02-15-2022, 08:41 PM
#249
Senior Member


Originally Posted by
JohnK

I finally sorted out the issues with my hydraulic clutch (as detailed
here) and was able to get out for a first go-kart this evening. Here's a short video:
It's an unbelievable feeling to be able to take 9509 out for a drive, even a short one to the end of the block and back.
Sorry for the late response but wanted to congratulate you on your go cart!!!! Your build is just beautiful. Almost as beautiful as your Cervelo beside your build.... Hopefully you get out and get some miles on that awesome bike as well 
I have the same bias adjuster on my rig and I read somewhere that the sticker should point towards which side you have the front and rear MC mounted for the adjustment ( ie if the left the MC goes to the front then the bias sticker should show rotating to the left increases the front bias ).
Last edited by nucjd19; 02-15-2022 at 08:45 PM.
FFR MK4 Roadster (9945) complete kit, delivered 12/4/2020, First start and go kart 5/7/2021. Legal 8/14/2021, Paint finished 7/18/2022 (Viking Blue). 347BPE CI, TKO600, Moser 8.8 3link 3.55, Halibrand 17x9 17x10.5, power steering. Carbon Fiber Dash. Carbon Fiber trans tunnel, adjustable Kirkey Lowback Vintage seats, Vintage gauges, RT drop trunk mod, FFmetal drop battery mod and trans tunnel, Forte front sway bar. Forte mechanical throttle linkage, RT gas pedal.
www.covespringsfarm.com
-
02-28-2022, 05:05 PM
#250
Senior Member

Originally Posted by
JohnK
I painted the transmission mount adapter, along with the trans mount spacers, then installed the mount on the trans.

Hi John. Are these the Forte spacers you've mentioned elsewhere? I found the trans mount adapter (as shown above) in my kit supplies, but haven't come across these spacers. If I recall, they were critical to your pinion angle setup?
Chris
Coupe complete kit delivered: 4/22/24.
Build Thread. Coyote. T-56. IRS w/3.55. Wilwoods. PS. HVAC. Side windows.
MK4 Complete kit.
Build Thread Index. Delivered: 10/15/2020. Legal: 7/25/23. Coyote Gen3. TKO600 (0.64 OD). IRS w/3.55. PS. Wilwoods. Sway bars. This build is dedicated to my son, Benjamin.
Build Thread.
-
02-28-2022, 05:33 PM
#251
Hey Chris. Yes, the three pieces on the left in that photo are the Forte's transmission spacers. You can buy them individually, or as a set of three with longer bolts.
MkIV Roadster build: Gen 2 Coyote, IRS, TKO600. Ordered 10/24/18. Delivered 1/29/19. Engine installed 8/8/21. First start 9/12/21. First go-kart 9/17/21. Off to paint 4/11/22. Back from paint 12/30/22.
Build thread here.
-
Post Thanks / Like - 1 Thanks, 0 Likes
-
03-11-2022, 11:20 PM
#252


Greek Guys' Garage Roadster Build #9509 (ready for the final push before paint)
I've been away from the build for a few months. We bought a new house in early December, so between preparing a house to sell, packing, moving, unpacking, getting the new house put together and hosting two large Greek families for the holidays, it was pretty crazy for a bit. We took a little time to take a deep breath after all of that, and now I'm ready to make the final big push and get this build over the finish line. I've had the body in storage since the start of the project as I didn't have space in the old garage to store it, so today was the day to finally get the body out of storage and bring it home.
It's been a bit since it saw the light of day.
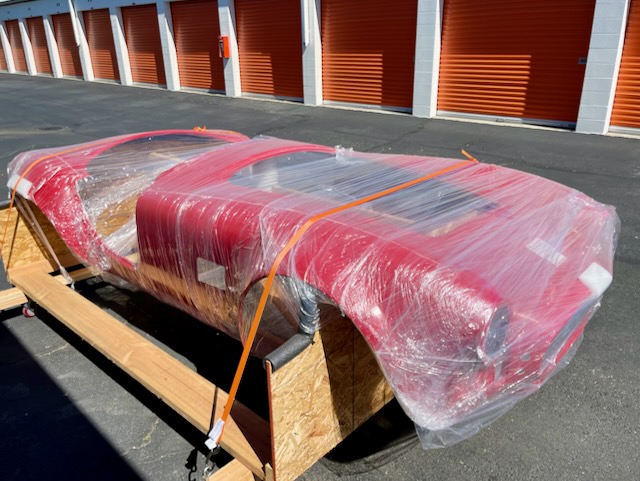
I called up my friend Michael at South Bay Towing. He's helped me several times throughout the build, including the initial delivery from Stewart Transport. He was almost as excited as me to see the body coming back home.

The whole process went very smoothly and quickly, and the body is now in the garage with the car, and ready for initial tweaking and fitting.
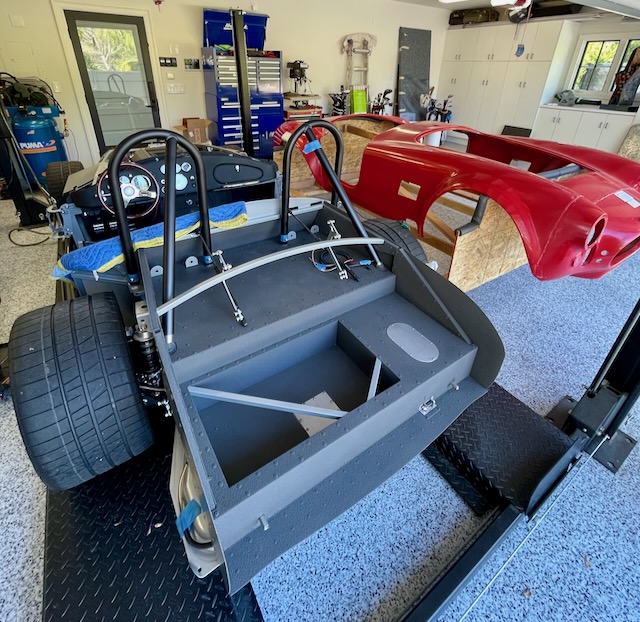
I know that many folks here do some or most of the body prep on their own but I'm not planning to do a lot to the body before sending it off for paint. A guy's got to know his limitations, and bodywork is not an area I have any experience in so I'm opting to leave most of it to the pros. I'll do some preliminary fitting of lights, perhaps side vents, trim the dash and rear wall lips so I can get the body on, and then call it good enough. So this should go pretty quickly and with any luck be off to paint in the next few weeks.
MkIV Roadster build: Gen 2 Coyote, IRS, TKO600. Ordered 10/24/18. Delivered 1/29/19. Engine installed 8/8/21. First start 9/12/21. First go-kart 9/17/21. Off to paint 4/11/22. Back from paint 12/30/22.
Build thread here.
-
Post Thanks / Like - 0 Thanks, 3 Likes
-
03-12-2022, 12:05 AM
#253
-
Post Thanks / Like - 1 Thanks, 0 Likes
JohnK thanked for this post
-
03-12-2022, 08:57 AM
#254
Senior Member
John are you sending it off to Ken or Jeff M.?
-
03-12-2022, 02:51 PM
#255
Senior Member
Good to see you back on the build, John! That's got to be a good feeling to be so close to body/paint!
Chris
Coupe complete kit delivered: 4/22/24.
Build Thread. Coyote. T-56. IRS w/3.55. Wilwoods. PS. HVAC. Side windows.
MK4 Complete kit.
Build Thread Index. Delivered: 10/15/2020. Legal: 7/25/23. Coyote Gen3. TKO600 (0.64 OD). IRS w/3.55. PS. Wilwoods. Sway bars. This build is dedicated to my son, Benjamin.
Build Thread.
-
Post Thanks / Like - 1 Thanks, 0 Likes
JohnK thanked for this post
-
03-22-2022, 09:29 PM
#256
Greek Guys' Garage Roadster Build #9509 (initial body prep)
I've been doing some preliminary work on the body prior to fitting it to the chassis for the first time. I started by trimming the front cowl lip at the dash by 1/4" to provide clearance for the leather dash. It may ultimately need more trimming than that, but this will hopefully allow me to fit the body without damaging the leather dash.
Next, I sanded the entire underside of the body. It will eventually all get coated with some sort of undercoating, so I was mainly trying to get rid of all loose glass fibers and random junk. I did the bulk of the sanding with 80 grit pads on the random orbital sander and followed up with 60 grit paper by hand in all the edges and crevices. A full tyvek suit and respirator on the first day of the year that it's been over 80 degrees was not super-fun, but it's finished.
I'm going to flip it over and put it on the buck again, and fit all the lights before I drop it on the chassis for the first time.

MkIV Roadster build: Gen 2 Coyote, IRS, TKO600. Ordered 10/24/18. Delivered 1/29/19. Engine installed 8/8/21. First start 9/12/21. First go-kart 9/17/21. Off to paint 4/11/22. Back from paint 12/30/22.
Build thread here.
-
Post Thanks / Like - 0 Thanks, 3 Likes
-
03-23-2022, 01:56 AM
#257
-
Post Thanks / Like - 1 Thanks, 0 Likes
JohnK thanked for this post
-
03-24-2022, 11:13 AM
#258
Senior Member

Really glad I found this thread. My "delivery date" is 7/2. Plan on a coyote build, and could only hope for mine to come out half as good as your build is so far.
-
Post Thanks / Like - 1 Thanks, 0 Likes
JohnK thanked for this post
-
03-24-2022, 12:10 PM
#259
Thank you! This forum is such a wealth of knowledge. I couldn't have done this without everyone's help and input. Congratulations on your upcoming delivery.
MkIV Roadster build: Gen 2 Coyote, IRS, TKO600. Ordered 10/24/18. Delivered 1/29/19. Engine installed 8/8/21. First start 9/12/21. First go-kart 9/17/21. Off to paint 4/11/22. Back from paint 12/30/22.
Build thread here.
-
03-25-2022, 02:18 PM
#260
It will be amazing when you are done. Your attention to some of the smaller details may or may not be seen by anyone after it is all together, but you will know.... You will Know....
-
Post Thanks / Like - 0 Thanks, 1 Likes
-
03-26-2022, 01:14 AM
#261
Greek Guys' Garage Roadster Build #9509 (headlight and signal light fitting)
The last couple of days I've been working on fitting headlights and signal lights, plus a few other things. Here are a few quick updates.
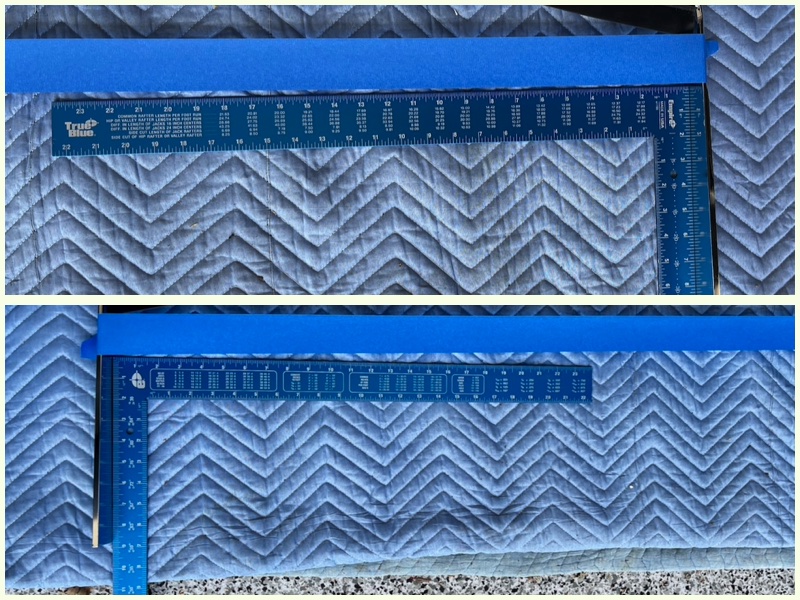
Headlights: I started by cutting out the template for the headlight bucket that is in the back of the manual and comparing that to the holes that are pre-cut on the body. It was pretty close, but needed a little massaging. The holes are purposely cut undersized so they can be tweaked as needed to get the best fit.
Here's how the holes compared to the template:
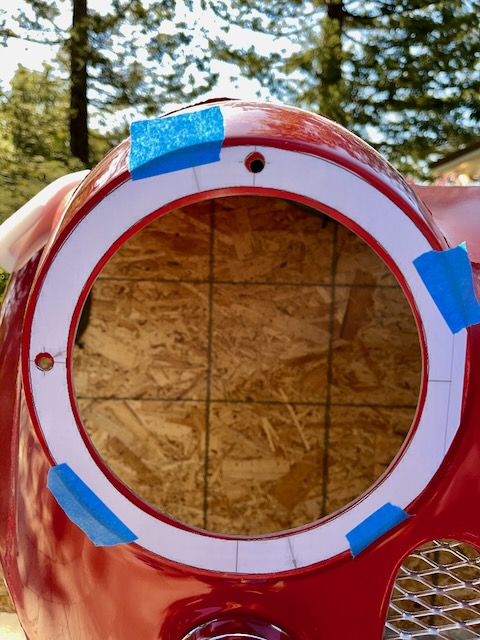
I used a sharpie to highlight the areas I needed to trim away:
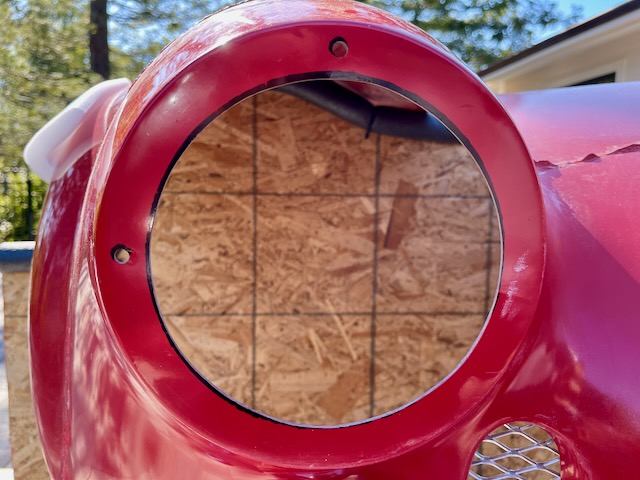
... and with a little work with a drum sanding attachment on the cordless drill and some small files, the headlight buckets were soon in place.
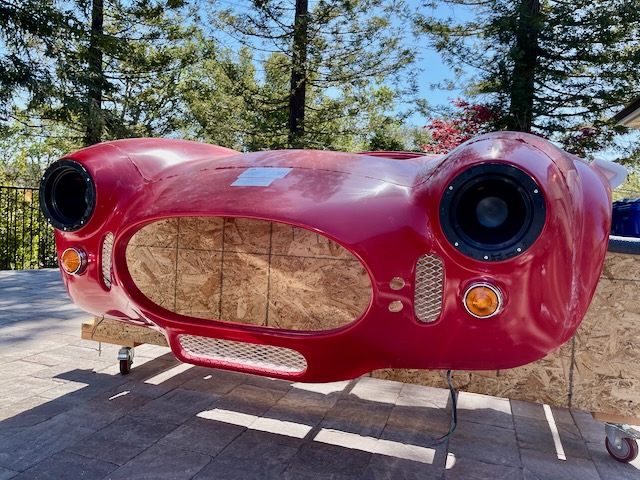
In this photo you can also see the signal lights and wire mesh screens on the oil cooler and brake duct openings. I'm not hugely impressed with the quality of the lenses and rings on the signal lights, so those will be getting replaced shortly. The wire mesh screens are in place temporarily. They'll get powder coated before final installation.
And here's one of the headlights all put together.

From a few feet away, the reproduction Lucas PL700 headlights are a pretty nice touch. Unfortunately, upon closer inspection both headlights had some issues.
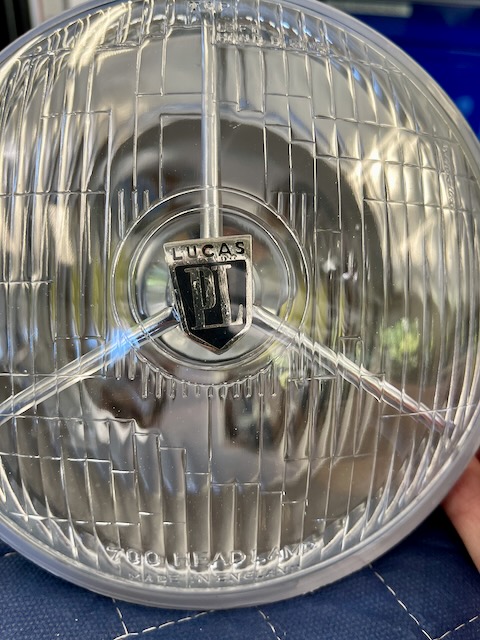
The Lucas emblems on both headlights I received were crooked. (insert Lucas joke here). The shop I bought these from was very apologetic and the replacements have already been shipped to me, so no big deal. Plenty of time to swap these out with (hopefully) better ones.
After the headlights and signal lights, I installed the license plate bracket and light, along with the blank-off panel in the trunk.

I'm on the clock now, as I have an appointment to drop off the car at the shop that will be doing the body/paint in a little over two weeks so I need to keep plugging away at the punch list of items, but good progress so far.
MkIV Roadster build: Gen 2 Coyote, IRS, TKO600. Ordered 10/24/18. Delivered 1/29/19. Engine installed 8/8/21. First start 9/12/21. First go-kart 9/17/21. Off to paint 4/11/22. Back from paint 12/30/22.
Build thread here.
-
Post Thanks / Like - 0 Thanks, 3 Likes
-
03-26-2022, 08:09 AM
#262
Senior Member
Looking great John, smart move doing all fitment prior to paint. Highly recommend upgrading the bulb on the Lucas tri-bar to LED, the halogen bulbs are not super great for light output. I ended up using these 6000 LM which are plug and play and really helped increase light output.
https://www.amazon.com/gp/product/B0...?ie=UTF8&psc=1
-
Post Thanks / Like - 1 Thanks, 0 Likes
JohnK thanked for this post
-
03-26-2022, 09:55 AM
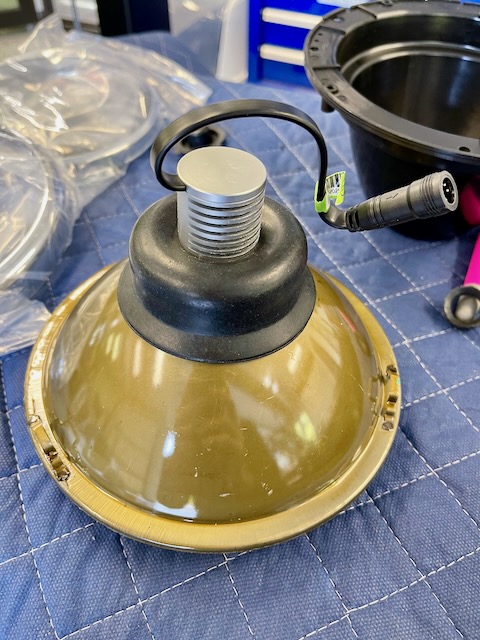
#263
Thanks Travis. I didn't mention it in the previous update, but I have upgraded all the lighting to LED using the Watsons Streetworks kit. Seems like nice stuff. Here are the headlight bulbs they provide. There's a separate driver for each headlight bulb that I still need to mount to the back of the headlight bucket, but I can do that later while the car is off at paint.

MkIV Roadster build: Gen 2 Coyote, IRS, TKO600. Ordered 10/24/18. Delivered 1/29/19. Engine installed 8/8/21. First start 9/12/21. First go-kart 9/17/21. Off to paint 4/11/22. Back from paint 12/30/22.
Build thread here.
-
Post Thanks / Like - 0 Thanks, 1 Likes
 Fman
Fman liked this post
-
03-26-2022, 11:38 AM
#264
Senior Member
Exciting stuff, John, as you get ever closer to body/paint! Good tip on using the headlight template to examine/fix fitment of the buckets.
Couple questions: (1) did you make your own blank-off panel? I've been tossing around which way to go on that one. (2) Would you mind sharing your source for the front turn signal lenses and trim rings? And the mesh? Thanks in advance.
Chris
Coupe complete kit delivered: 4/22/24.
Build Thread. Coyote. T-56. IRS w/3.55. Wilwoods. PS. HVAC. Side windows.
MK4 Complete kit.
Build Thread Index. Delivered: 10/15/2020. Legal: 7/25/23. Coyote Gen3. TKO600 (0.64 OD). IRS w/3.55. PS. Wilwoods. Sway bars. This build is dedicated to my son, Benjamin.
Build Thread.
-
03-26-2022, 01:34 PM
#265
hey Chris. Sure, happy to share:
Lots of folks make their own trunk blank-off. it's a pretty simple piece but Dark Water Customs makes one and it's reasonably priced so I went that route. Here's the link. He doesn't operate like a true store. He'll take names on a waiting list for a particular part and when he gets enough names he'll run a batch. So you may have to wait a bit to get it, depending on whether he has any in stock or not.
For the front turn signal lenses and trim rings, I'm going to go with these from Rogers Motors. I'd been eyeing them for a bit, and in another thread I posted a few others have used them and reported that they're better quality than the FFR pieces. My upgraded LED signal marker bulbs are amber so I can go with the clear lenses on these, but if needed they also carry NOS amber lenses.
The oil cooler mesh and brake duct mesh I bought from Breeze. I had previously bought the brake duct screens from FFR with the kit but FFR doesn't offer a screen for the oil cooler opening (that I'm aware of) and I wanted all three screens to match so I ordered these and will be selling the FFR screens.
I hope that helps.
-John
MkIV Roadster build: Gen 2 Coyote, IRS, TKO600. Ordered 10/24/18. Delivered 1/29/19. Engine installed 8/8/21. First start 9/12/21. First go-kart 9/17/21. Off to paint 4/11/22. Back from paint 12/30/22.
Build thread here.
-
Post Thanks / Like - 2 Thanks, 0 Likes
-
03-27-2022, 10:00 PM
#266
-
Post Thanks / Like - 1 Thanks, 0 Likes
Moniz thanked for this post
-
03-27-2022, 10:19 PM
#267
(continued)
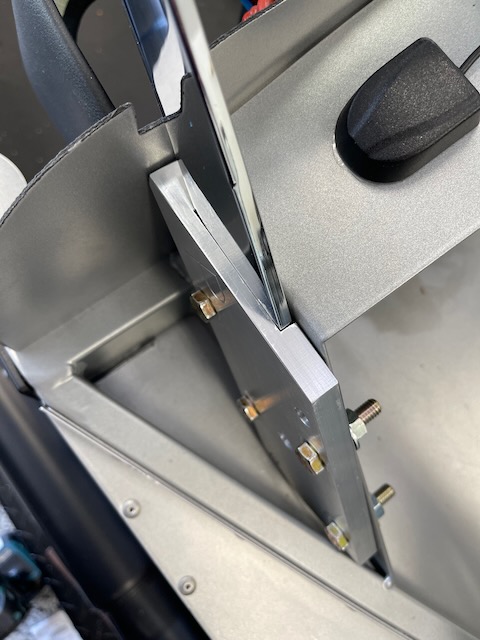
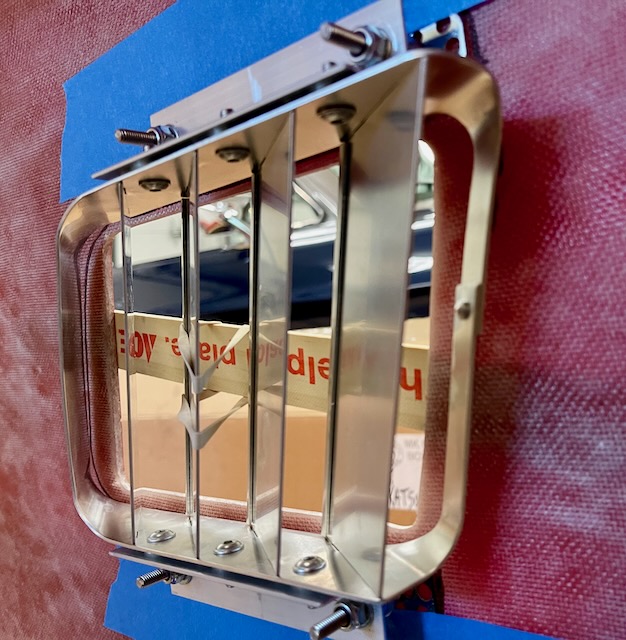
... so next it was time to try fitting the windshield. I started by attaching the windshield side posts to the windshield, attempting to be extremely careful not to strip out the threads in the brass strips. Despite all the warnings and extreme care, I still stripped one hole. Not a big deal, as the Whitby stainless steel strips are on their way and will get swapped out.
After attaching the side posts, I attempted to slide them into the channels in the quick release brackets and it was immediately evident that I would need to shim the brackets out to be wide enough for the windshield posts to slide in. For test-fitting purposes, I added some washers on the PS side bracket (since it's easier to access). I have some hardened washers that happen to be almost exactly 0.10 inch thick. It took two washers to get the brackets spaced far enough apart to be able to finally slide the windshield into place.

However (here's where the questions come) in looking at how the posts fit it appears that they are twisted, with the rearward edge of the post angled inboard from the leading edge.

I've read in other threads that folks have had to bend and twist the windshield posts to get them aligned properly. Does it seem reasonable that I should have to twist them to get them to be straight front-to-back? If so, how best to do this? These seem like pretty stout pieces, and I've also heard that the chrome plating is pretty brittle so I'm not super-excited about attempting to twist (or untwist) them.
The other option that I'm contemplating is to compensate for this twist with the shims I'm going to fabricate. I've ordered some 0.10" thick Delrin sheet that I'm going to use to make the shims, It would be pretty simple to taper the shims to compensate for the front-to-back twist of the posts, thereby avoiding the need to try to bend the posts. Anyone have any thoughts about this approach?
Thanks in advance for any input.
Despite the need for some additional tweaking of the fit, it was pretty cool to see the windshield in place.
Last edited by JohnK; 03-27-2022 at 10:28 PM.
MkIV Roadster build: Gen 2 Coyote, IRS, TKO600. Ordered 10/24/18. Delivered 1/29/19. Engine installed 8/8/21. First start 9/12/21. First go-kart 9/17/21. Off to paint 4/11/22. Back from paint 12/30/22.
Build thread here.
-
Post Thanks / Like - 1 Thanks, 0 Likes
Moniz thanked for this post
-
03-28-2022, 08:11 AM
#268
Not a waxer

Unless I missed something I'm wondering how you determined the windshield placement without having the body on and in it's final position.
Jeff
-
03-28-2022, 08:56 AM
#269
Originally Posted by
Jeff Kleiner
Unless I missed something I'm wondering how you determined the windshield placement without having the body on and in it's final position.
Jeff
Hi Jeff,
Are you referring to front/back, side/side, or just up/down position? The first two I'm basing on the position of the frame brackets and the mounting holes on the frame brackets. I have not yet determined up/down position and haven't drilled the holes in the windshield posts for the quick-release pins, if that's what you're asking. As you said, I will not do that until my body/paint guy has finalized body position.
-John
MkIV Roadster build: Gen 2 Coyote, IRS, TKO600. Ordered 10/24/18. Delivered 1/29/19. Engine installed 8/8/21. First start 9/12/21. First go-kart 9/17/21. Off to paint 4/11/22. Back from paint 12/30/22.
Build thread here.
-
03-28-2022, 10:14 AM
#270
Not a waxer
Originally Posted by
JohnK
Hi Jeff,
Are you referring to front/back, side/side, or just up/down position? The first two I'm basing on the position of the frame brackets and the mounting holes on the frame brackets. I have not yet determined up/down position and haven't drilled the holes in the windshield posts for the quick-release pins, if that's what you're asking. As you said, I will not do that until my body/paint guy has finalized body position.
-John
Up/down and to a lesser extent angle. I thought you had already locked it all down but you clarified that it can still be adjusted vertically so you’ll be good!
Jeff
-
03-28-2022, 10:30 AM
#271
Angle is fixed at this point (matches the holes in the frame) but up/down has not been set yet. Thanks for confirming that I haven't done something dumb.
MkIV Roadster build: Gen 2 Coyote, IRS, TKO600. Ordered 10/24/18. Delivered 1/29/19. Engine installed 8/8/21. First start 9/12/21. First go-kart 9/17/21. Off to paint 4/11/22. Back from paint 12/30/22.
Build thread here.
-
03-29-2022, 02:55 PM
#272
Originally Posted by
JohnK
Angle is fixed at this point (matches the holes in the frame) but up/down has not been set yet. Thanks for confirming that I haven't done something dumb.
Curious as to how the updown adjustment works. Will there be multiple holes for the pin to go through?
-
03-29-2022, 03:08 PM
#273
Originally Posted by
facultyofmusic
Curious as to how the updown adjustment works. Will there be multiple holes for the pin to go through?
No, I will just wait to mark and drill the one hole in each windshield post until after the body is in its final position. For now the windshield slides into the brackets and bottoms out since I haven't trimmed the posts at all.
MkIV Roadster build: Gen 2 Coyote, IRS, TKO600. Ordered 10/24/18. Delivered 1/29/19. Engine installed 8/8/21. First start 9/12/21. First go-kart 9/17/21. Off to paint 4/11/22. Back from paint 12/30/22.
Build thread here.
-
Post Thanks / Like - 1 Thanks, 0 Likes
-
03-30-2022, 11:48 AM
#274
Senior Member
John, did you talk to Ken about all these windshield mods you are adding? He has done over 900 of these cars and knows the tricks to setting the windshield. Just my .02
Last edited by Fman; 03-30-2022 at 11:52 AM.
-
03-31-2022, 04:35 PM
#275
Greek Guys' Garage Roadster Build #9509 (Finalizing windshield install)
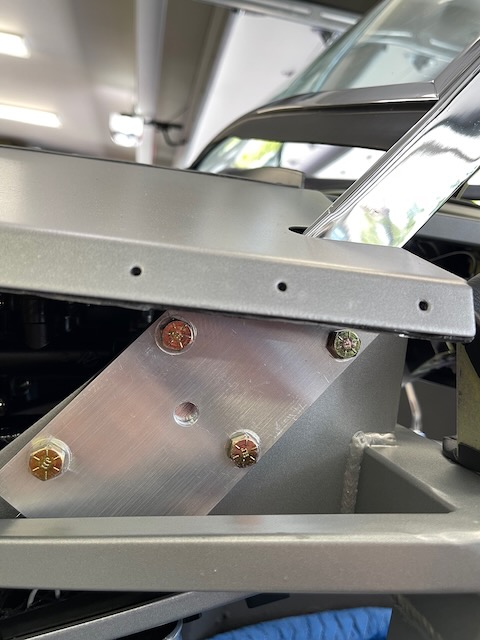
My stainless steel windshield strips finally arrived from Whitby yesterday, so I got back to work finishing up the windshield install. In doing some more research and trading some more messages with SJDave, I realized that it's not uncommon for the windshield posts to be both twisted and out of parallel, and that fixing both of these issues was critical to being able to set the windshield in place with no stress on the glass.
The posts were both twisted and splayed outward.

After several on/off cycles and "massaging" with a big crescent wrench I was able to get both posts to less than 0.5 degree twist and pretty much parallel to each other. The stainless steel strips are definitely more robust than the brass ones but I still wanted to limit the number of times I installed and removed the side posts, so I called this good enough. Prior to correcting the side post alignment I needed about 0.20 inch of shims to be able to insert the windshield into the brackets. After realigning them I was hoping to reduce the amount I needed to shim. It turns out that I didn't need any shims, and the posts slid right in to the brackets. I'm pretty happy about that.
It's a nice snug fit with no slop, but the posts slide in and out very easily. I then trimmed 2.5" off the ends of the posts at a 45 degree angle, as suggested by Mike Everson here.

The only thing remaining to do on the windshield install is to drill the hole for the quick-release pins once the body is in its final position.
All in all, this was quite a bit more work than I anticipated but I'm very happy with how it turned out.
MkIV Roadster build: Gen 2 Coyote, IRS, TKO600. Ordered 10/24/18. Delivered 1/29/19. Engine installed 8/8/21. First start 9/12/21. First go-kart 9/17/21. Off to paint 4/11/22. Back from paint 12/30/22.
Build thread here.
-
Post Thanks / Like - 0 Thanks, 1 Likes
-
04-03-2022, 05:59 PM
#276
Greek Guys' Garage Roadster Build #9509 (Louvers and body fitment - multiple posts)
I'm going to break this update up into a couple of posts.
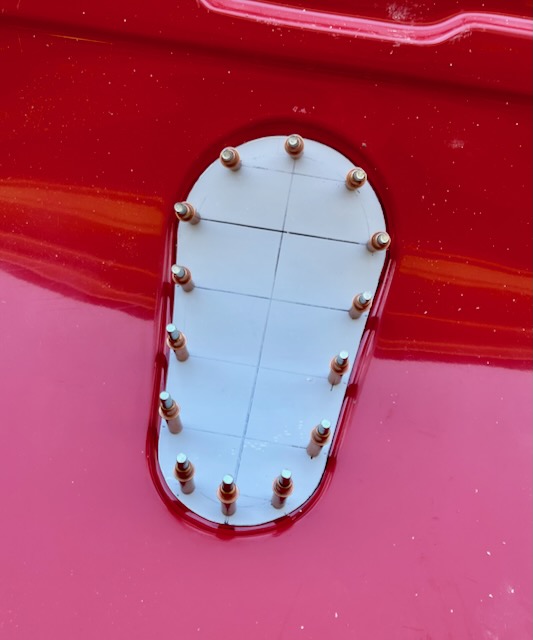
The final thing I wanted to do before fitting the body onto the chassis for the first time was to install the side louvers. I decided to install them as several others have done by bonding studs to the body with HSRF. Nothing ground-breaking here, just following in the footsteps of those that have done this before me. The only small tweak I made was in fabricating some new, more robust brackets for the louvers out of proper aluminum angle rather than the bent sheet metal pieces that come with the FFR louvers. The brackets are attached to the louvers with 10-32 SS screws. I put two washers between the louvers and brackets to keep the brackets off the bent tabs of the louver slats. Here they are ready to be bonded in place.

I made templates of the louvers and taped them in place. The factory-cut holes pretty much dictate where the louvers must go, but they're undersized like all the other holes.
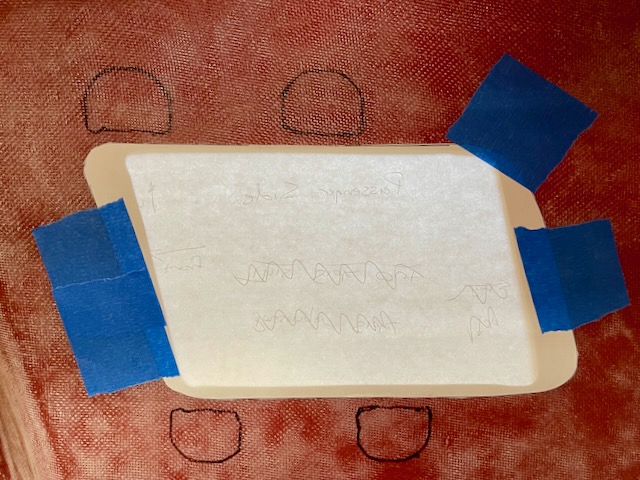
I centered the louvers as best as I could relative to the existing holes, and will leave it to the pro's to massage the holes to their final dimensions.
The studs got bonded with HSRF to the inside of the body, and I made an absolute mess of it so no photos (hey, it's my build thread so I can skip the ugly stuff, right?!  ). Not that it really matters, as it'll get covered with undercoating after paint. HSRF definitely takes some experience to work with.
(continued)
MkIV Roadster build: Gen 2 Coyote, IRS, TKO600. Ordered 10/24/18. Delivered 1/29/19. Engine installed 8/8/21. First start 9/12/21. First go-kart 9/17/21. Off to paint 4/11/22. Back from paint 12/30/22.
Build thread here.
-
Post Thanks / Like - 0 Thanks, 1 Likes
-
04-03-2022, 06:08 PM
#277
(continued)
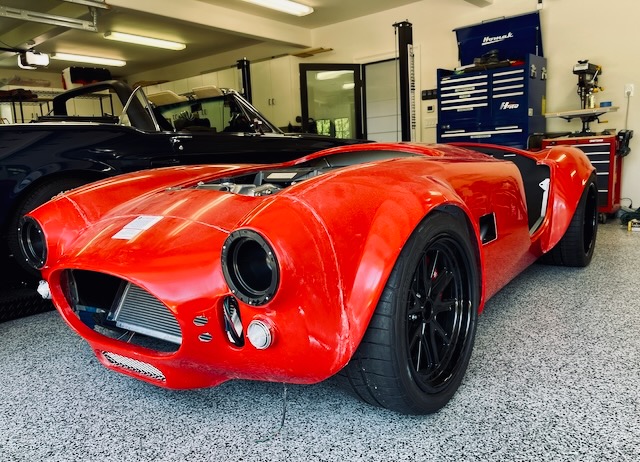
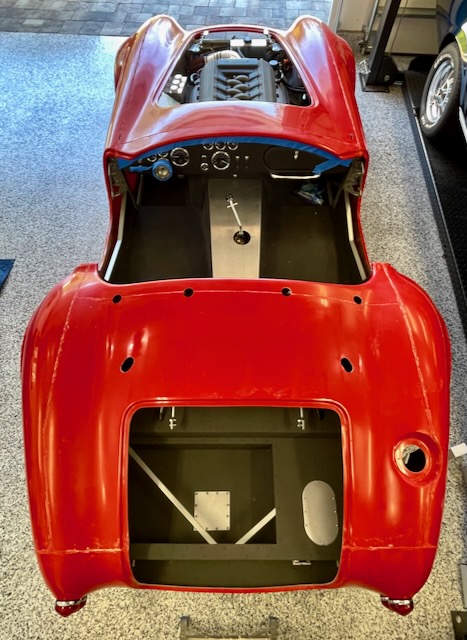
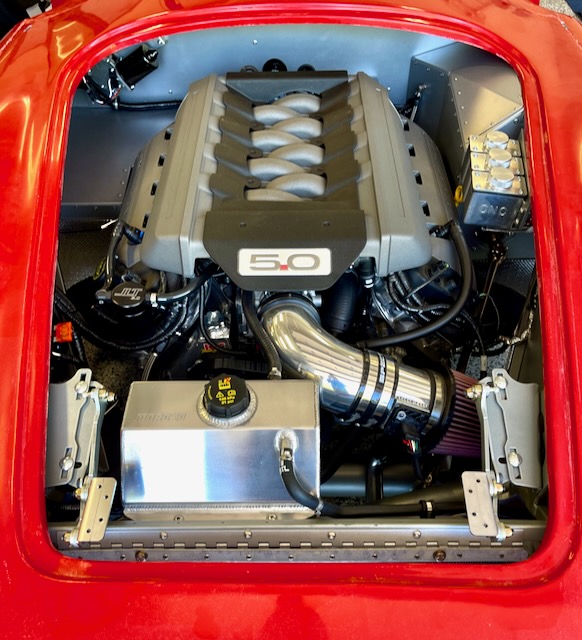
With the louver installation complete, it was FINALLY time to install the body for the first time. I removed side pipes, roll bars, windshield, seats, steering wheel, etc. and taped up the edge of the dash very well. After reviewing the game plan with my wife and kids, it was time to go for it. With four people it's very drama-free. It took us just a couple of minutes to drop the body in place. The fit is absolutely terrible but I didn't expect it to fit well without any bulb seal or weatherstrip in place - I just need to get the body on the chassis. Nonetheless, it's incredible to see the body on after 3+ years.
I have an appointment to take the car up to Ken Pike a week from tomorrow, and will let him take it from here. He'll have the chassis for ~3 weeks to do body fitting and gapping and then I'll go back and retrieve the chassis so I can continue with carpet, seat install and other details while he continues body and paint.
Here are some photos, because... why not.

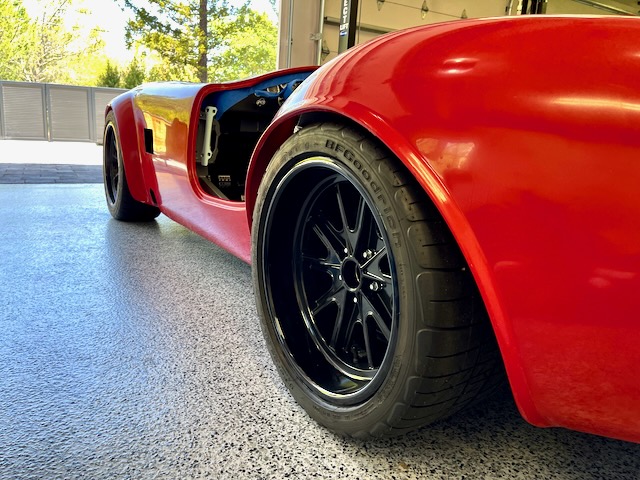
MkIV Roadster build: Gen 2 Coyote, IRS, TKO600. Ordered 10/24/18. Delivered 1/29/19. Engine installed 8/8/21. First start 9/12/21. First go-kart 9/17/21. Off to paint 4/11/22. Back from paint 12/30/22.
Build thread here.
-
Post Thanks / Like - 0 Thanks, 2 Likes
-
04-04-2022, 08:51 AM
#278
Senior Member
Looking great John. This was by far the most fun part for me to date. When it starts looking like a real boy.
Pipes look sharp. Really going to pop against that blue if that is still the plan
MK4 #10008 - Ordered 10/06/20, Delivered 03/03/21, First Start 7/22/21, First Go Kart 7/24/21
Paint by Metal Morphous 5/14/22, Legally registered 6/8/22, Graduated 7/20/22
Build Thread
https://thefactoryfiveforum.com/show...been-delivered
Complete Kit, Ford 306, Sniper/Dual Sync, T5, Hydraulic clutch
-
Post Thanks / Like - 1 Thanks, 0 Likes
JohnK thanked for this post
-
04-04-2022, 09:45 AM
#279
Thanks Jesse. My wife joked yesterday, "Wait... you've been building a car this whole time?!"
The plan is still a bit up in the air but it will definitely be more of a race-inspired theme vs. a "street" scheme.
MkIV Roadster build: Gen 2 Coyote, IRS, TKO600. Ordered 10/24/18. Delivered 1/29/19. Engine installed 8/8/21. First start 9/12/21. First go-kart 9/17/21. Off to paint 4/11/22. Back from paint 12/30/22.
Build thread here.
-
04-06-2022, 06:13 PM
#280
Senior Member

Looks great, John. Nice work!
MKIV Complete Kit #9822 l BluePrint 347 EFI l TKO600 l Power Steering l Heater/Defrost l
Build Thread
-
Post Thanks / Like - 1 Thanks, 0 Likes
JohnK thanked for this post


 Thanks:
  Likes:


 Reply With Quote

