-
12-29-2022, 10:50 AM
#321
Sorry, no "body on" shots yet. Ken was wrapping up another car when I arrived yesterday so I dropped off the chassis and some parts and we chatted for a bit and I took off. It should be ready for me to pick up in a few days.
FFR does provide some foam in the kit and it's mentioned in the manual right before final body mounting, but most accounts I've read say that the foam that's in the kit is just OK. Not really thick enough, and too firm to really compress well and conform to the body properly. Some people put pool noodles in that gap. You want to put something in there, or else you'll have hot engine bay air blowing into the cockpit.
MkIV Roadster build: Gen 2 Coyote, IRS, TKO600. Ordered 10/24/18. Delivered 1/29/19. Engine installed 8/8/21. First start 9/12/21. First go-kart 9/17/21. Off to paint 4/11/22. Back from paint 12/30/22.
Build thread here.
-
12-30-2022, 09:50 PM
#322
Greek Guys' Garage Roadster Build #9509 (back home, safe and sound)
That was a looooong day of towing a trailer in the wind and rain, but we made it up and back to Ken's place today and brought the car home safe and sound. My wife accompanied me for the trip, which was a lot of fun. Here are a couple of quick shots from the shop before we loaded her up. It was very wet and dark when we got home so I'll wait until we have a break in the weather tomorrow to unload her from the trailer.


MkIV Roadster build: Gen 2 Coyote, IRS, TKO600. Ordered 10/24/18. Delivered 1/29/19. Engine installed 8/8/21. First start 9/12/21. First go-kart 9/17/21. Off to paint 4/11/22. Back from paint 12/30/22.
Build thread here.
-
Post Thanks / Like - 0 Thanks, 7 Likes
-
12-30-2022, 10:00 PM
#323
Senior Member

She's looking gooooood, John! Wow. Given the weather conditions, glad you got her home safe and sound.
Chris
Coupe complete kit delivered: 4/22/24.
Build Thread. Coyote. T-56. IRS w/3.55. Wilwoods. PS. HVAC. Side windows.
MK4 Complete kit.
Build Thread Index. Delivered: 10/15/2020. Legal: 7/25/23. Coyote Gen3. TKO600 (0.64 OD). IRS w/3.55. PS. Wilwoods. Sway bars. This build is dedicated to my son, Benjamin.
Build Thread.
-
Post Thanks / Like - 1 Thanks, 0 Likes
 JohnK
JohnK thanked for this post
-
01-03-2023, 11:43 AM
#324
Senior Member

Looking really great! Can't wait to see more pics!
-
Post Thanks / Like - 1 Thanks, 0 Likes
JohnK thanked for this post
-
01-03-2023, 12:29 PM
#325
Love it and love those red accent stripes!!
#10333 Complete Kit, Carbed 427w, TKX, IRS and many other upgrades
- Order Date: September 11, 2021 - 20th Anniversary of 9/11
- Delivery Day: April 1, 2022 - April Fool's Day
- First Start and Go-Kart: January 20th, 2023
- Graduation Date: July 4th, 2023 - Independence Day!!
- Legal Registration Date: October 4, 2023 - My Birthday!!
Visit my MKIV Build Thread (#10333)
-
Post Thanks / Like - 1 Thanks, 0 Likes
JohnK thanked for this post
-
01-04-2023, 02:40 PM
#326
25th Anniversary #9772

-
Post Thanks / Like - 1 Thanks, 0 Likes
JohnK thanked for this post
-
01-05-2023, 08:44 PM
#327
Senior Member

WOW!!! Great color scheme, won't be long now... you are on the final stretch! 
-
Post Thanks / Like - 1 Thanks, 0 Likes
JohnK thanked for this post
-
01-05-2023, 09:33 PM
#328
-
Post Thanks / Like - 0 Thanks, 5 Likes
-
01-06-2023, 01:16 AM
#329
Senior Member
Nice custom touch to have stripes on the underside of your trunk lid! and your Darkwater plate also painted to match... John, really nice attention to detail.
-
Post Thanks / Like - 1 Thanks, 1 Likes
JohnK thanked for this post
-
01-06-2023, 09:37 AM
#330
Not a waxer


Originally Posted by
JohnK

Here's the underside, showing the filler cap grounded to the frame.

Looking good!
I suggest that you move the chassis end of your ground strap---that's right where the flange of the rear splash panel mounts. Drill out one of those rivets that attaches the trunk side panel to the tube that angles downward and put it there.
Cheers,
Jeff
-
Post Thanks / Like - 1 Thanks, 0 Likes
JohnK thanked for this post
-
01-06-2023, 10:03 AM
#331
MkIV Roadster build: Gen 2 Coyote, IRS, TKO600. Ordered 10/24/18. Delivered 1/29/19. Engine installed 8/8/21. First start 9/12/21. First go-kart 9/17/21. Off to paint 4/11/22. Back from paint 12/30/22.
Build thread here.
-
01-06-2023, 10:58 AM
#332
Senior Member

That sir is one sexy son of a ****
Last edited by Blitzboy54; 01-11-2023 at 02:54 PM.
MK4 #10008 - Ordered 10/06/20, Delivered 03/03/21, First Start 7/22/21, First Go Kart 7/24/21
Paint by Metal Morphous 5/14/22, Legally registered 6/8/22, Graduated 7/20/22
Build Thread
https://thefactoryfiveforum.com/show...been-delivered
Complete Kit, Ford 306, Sniper/Dual Sync, T5, Hydraulic clutch
-
Post Thanks / Like - 1 Thanks, 1 Likes
JohnK thanked for this post
-
01-06-2023, 01:08 PM
#333
From one "Greek Guy" to another, I will say "Ti Kaneis" to you and say I loved watching your build! I am pretty close behind you and hope to see your build in the Sacramento area group someday!
Ted
#10333 Complete Kit, Carbed 427w, TKX, IRS and many other upgrades
- Order Date: September 11, 2021 - 20th Anniversary of 9/11
- Delivery Day: April 1, 2022 - April Fool's Day
- First Start and Go-Kart: January 20th, 2023
- Graduation Date: July 4th, 2023 - Independence Day!!
- Legal Registration Date: October 4, 2023 - My Birthday!!
Visit my MKIV Build Thread (#10333)
-
Post Thanks / Like - 1 Thanks, 0 Likes
JohnK thanked for this post
-
01-06-2023, 04:29 PM
#334
Yiassou Ted! Thank you very much. We have family in Rocklin so I'm up that way from time to time. I'd love to meet up with you and some of the other Sacramento-area builders some time.
MkIV Roadster build: Gen 2 Coyote, IRS, TKO600. Ordered 10/24/18. Delivered 1/29/19. Engine installed 8/8/21. First start 9/12/21. First go-kart 9/17/21. Off to paint 4/11/22. Back from paint 12/30/22.
Build thread here.
-
Post Thanks / Like - 0 Thanks, 1 Likes
-
01-12-2023, 06:26 PM
#335
Hey John, I would add some greek myself but all I can remember from college are the cuss words  which is most of what I knew anyway. The paint is looking amazing looking forward to seeing you driving around the local area in her. I did have the awesome chance to see the car while the body was in paint, the work that John has done is amazing and looks so good.
-
Post Thanks / Like - 1 Thanks, 0 Likes
JohnK thanked for this post
-
01-12-2023, 06:28 PM
#336
Thanks so much! Inching closer to completion every day.
MkIV Roadster build: Gen 2 Coyote, IRS, TKO600. Ordered 10/24/18. Delivered 1/29/19. Engine installed 8/8/21. First start 9/12/21. First go-kart 9/17/21. Off to paint 4/11/22. Back from paint 12/30/22.
Build thread here.
-
01-13-2023, 08:30 PM
#337


Greek Guys' Garage Roadster Build #9509 (out with the old... headers, that is)
A few days ago I tried test-fitting the side pipes with less than stellar results, as described in this thread. The long and short of it is that attempting to get the side pipes to fit without major surgery on the painted body will require replacing the current headers with new ones that offer greater adjustability. So the last couple of day's I've been working on the unenviable task of removing the old headers while I wait for the new ones to arrive.
How many different variations of 8mm hex wrenches, extensions and swivels does it take to remove the headers on a coyote? This many:

It was as tight as I expected it would be, but with a little patience and perseverance they both finally came out, and no blood was shed:
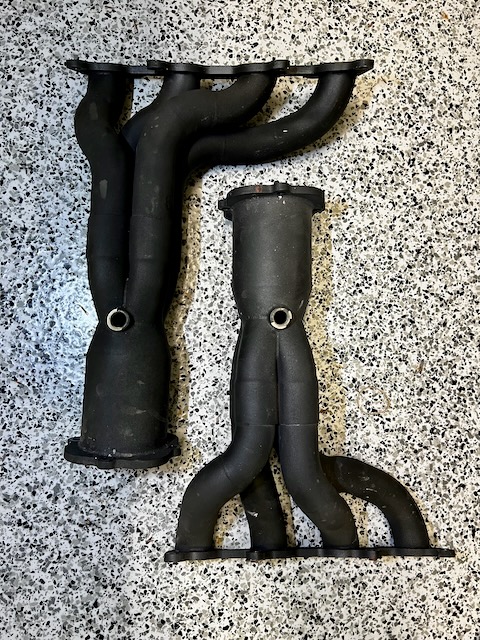
When I installed these headers, I used Remflex gaskets (P/N 3069). I like that the Remflex gaskets are designed to crush down to roughly 50% of their original thickness to conform to any surface irregularities, and have some "springiness" that eliminates the need to retorque header bolts after initial install. In examining the gaskets after removing the headers, I was pretty impressed. They only require 20 ft/lb of torque when installing, and you can see how the gasket crushed and conformed to the header and cylinder head:
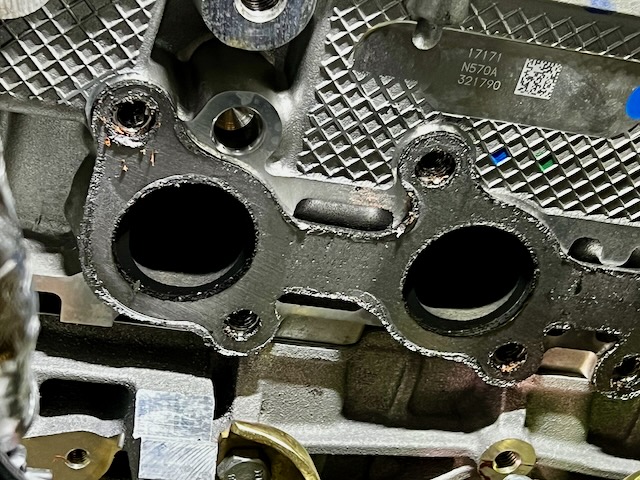
They are a multi-layer construction, so removing them was a bit messy and time-consuming. If you're unlucky when you try to peel them off, you only get about half the gasket:

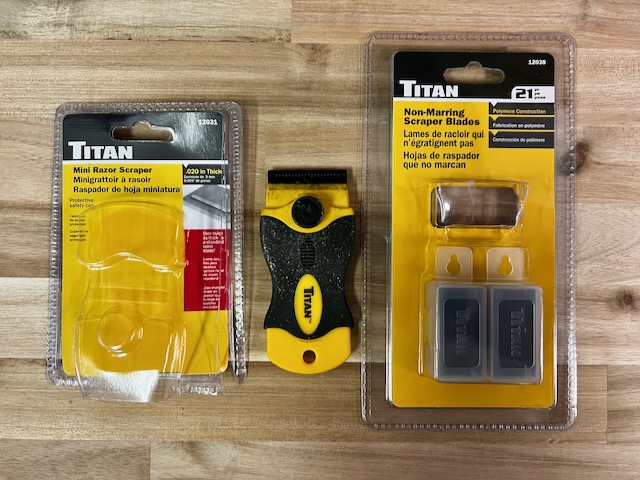
Fortunately, my local auto parts store had this little scraper along with plastic non-marring blades that were perfect for scraping off the gasket without scratching up the cylinder head:
After a whole bunch of scraping I was down to this. Pretty good, but not great:

I went back over everything with some grey ultra-fine Scotch Brite pads and got them looking like this. That's much better. Almost ready for the new headers now:

Last edited by JohnK; 01-13-2023 at 08:47 PM.
MkIV Roadster build: Gen 2 Coyote, IRS, TKO600. Ordered 10/24/18. Delivered 1/29/19. Engine installed 8/8/21. First start 9/12/21. First go-kart 9/17/21. Off to paint 4/11/22. Back from paint 12/30/22.
Build thread here.
-
Post Thanks / Like - 0 Thanks, 3 Likes
-
01-14-2023, 07:02 AM
#338
Nice attention to detail!
Craig C
-
Post Thanks / Like - 1 Thanks, 0 Likes
JohnK thanked for this post
-
01-14-2023, 08:51 PM
#339
Greek Guys' Garage Roadster Build #9509 (MagCode PowerPort for battery charger)
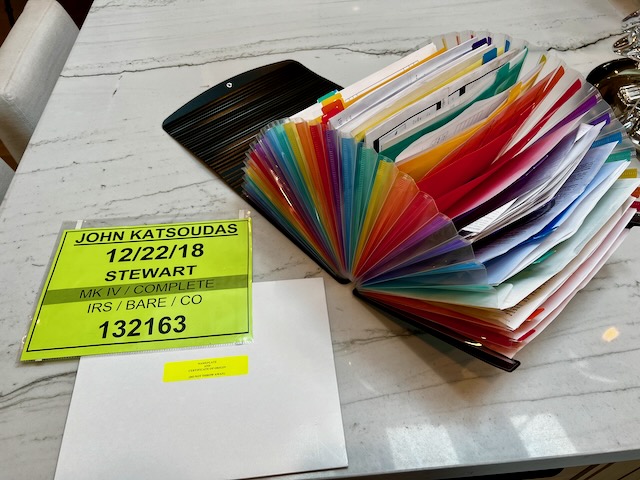
I started off the day doing a little paperwork. I've had a drawer in the toolbox that I've been putting packing slips, invoices, instructions and whatnot for four years now. It was finally time to take that mountain of papers and organize it in preparation for titling the car. Now every invoice for the car is organized alphabetically, and I've pulled together all the receipts and other documents that I need to start the CA SB100 process. I also filled out all the DMV paperwork, so as soon as the car is physically complete enough, I'll be ready to head on down to the DMV to start the process.
With that done, I headed out to the garage. I've been trying to find a more elegant solution to be able to connect a battery charger without having to open the hood and without having a wire pigtail dangling around somewhere. I was surfing the web one night looking for solutions and happened to marvel at the elegant simplicity of the MagSafe charger that was plugged into my MacBook Pro. "there has to be something similar for 12v connections," I thought. Sure enough, there is. It's not particularly cheap, and not readily available in the US, but this little bit of expensive unobtainium just landed on my doorstep today. This is the MagCode PowerPort and PowerClip. These seem to be widely available in Europe but not in the US, but I was able to find an eBay retailer that sells them.

The receptacle and spring-loaded protective cover will get mounted high up on the ReplicaParts radiator surround, where it can only be seen if you stick your head in the snout of the car. The receptacle will get wired directly to the battery. I picked up an SAE cable that I used to make the pigtail connector
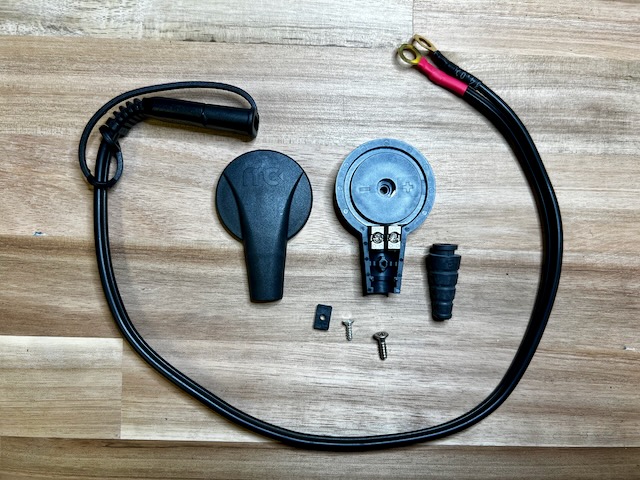
This is what it all looks like when it's connected. The plug end magnetically attaches to the port. The magnets also activate a contact in the receptacle, so it's only "hot" when the port is connected to it. It's a pretty clever little bit of engineering, and it will make plugging the car into the charger a bit cleaner and simpler.

MkIV Roadster build: Gen 2 Coyote, IRS, TKO600. Ordered 10/24/18. Delivered 1/29/19. Engine installed 8/8/21. First start 9/12/21. First go-kart 9/17/21. Off to paint 4/11/22. Back from paint 12/30/22.
Build thread here.
-
Post Thanks / Like - 1 Thanks, 3 Likes
-
01-19-2023, 06:39 PM
#340
Senior Member

That is really a sweet idea. I hadn't even thought about that problem set. I am adding it to my BOM. Great post, thank you!
-
Post Thanks / Like - 1 Thanks, 0 Likes
JohnK thanked for this post
-
01-19-2023, 09:02 PM
#341
We put the charging pigtail in the glovebox for those builds we do with a front mounted battery.

-
Post Thanks / Like - 0 Thanks, 1 Likes
-
02-03-2023, 02:15 PM
#342
Hey John, I have a question about the windshield mounting brackets from Mike Everson. I haven't drilled the pin holes in my windshield arms yet because the body's still at the shop, so right now the posts are just resting inside the brackets. I notice quite a lot of movement back and forth with the windshield and when I go-kart it I can definitely hear the windshield posts rattling inside the brackets. I see you've installed your windshield with the body on. Do you notice a lot of windshield play or rattles? I'm currenting wondering if I should go with the old method of tapping the windshield posts and securing it with the 2 bolts.
-
02-03-2023, 07:37 PM
#343
Hey Daniel. I'm assuming you mean Mike Forte's quick release windshield brackets. No, I don't notice any rattling or any movement at all. Even before the posts were drilled and pins installed after the body was on, the windshield posts were pretty secure in the brackets (other than being able to slide up and down). Now that the pins are in, the windshield feels every bit as solid as if it's bolted in. Do you have any sense for which dimension on the brackets is too large?
MkIV Roadster build: Gen 2 Coyote, IRS, TKO600. Ordered 10/24/18. Delivered 1/29/19. Engine installed 8/8/21. First start 9/12/21. First go-kart 9/17/21. Off to paint 4/11/22. Back from paint 12/30/22.
Build thread here.
-
02-05-2023, 09:08 PM
#344
Yes! I meant Mike Forte (no wonder it felt weird typing that). The play I speak of is front-to-back. For example if I sit in the driver seat and try to move the windshield left and right it would be very solid, but if I push the top of the windshield frame I can push it forward by about an inch. When I let go it would fall back down to its resting position.
-
02-06-2023, 12:25 AM
#345
That's very strange, and not my experience at all. Sounds like the slot in the QR bracket is wider than the posts of your windshield. I guess the good news is that if the windshield is pretty tight side-to-side, then once the pin is drilled and inserted it should resolve the front to back looseness.
MkIV Roadster build: Gen 2 Coyote, IRS, TKO600. Ordered 10/24/18. Delivered 1/29/19. Engine installed 8/8/21. First start 9/12/21. First go-kart 9/17/21. Off to paint 4/11/22. Back from paint 12/30/22.
Build thread here.
-
Post Thanks / Like - 0 Thanks, 1 Likes
-
02-06-2023, 05:40 PM
#346
Thanks John, I'll look into ways to tighten mine down further. Glad you're not having the same issues!
-
02-15-2023, 10:37 PM
#347
Greek Guys' Garage Roadster Build #9509 (final assembly continues)
Progress on final assembly had slowed a bit, as I was waiting on some parts to come back from powder coat, and was also waiting for the new Gas-N headers to arrive. Everything arrived on Monday so I've been able to make some progress over the last few days.
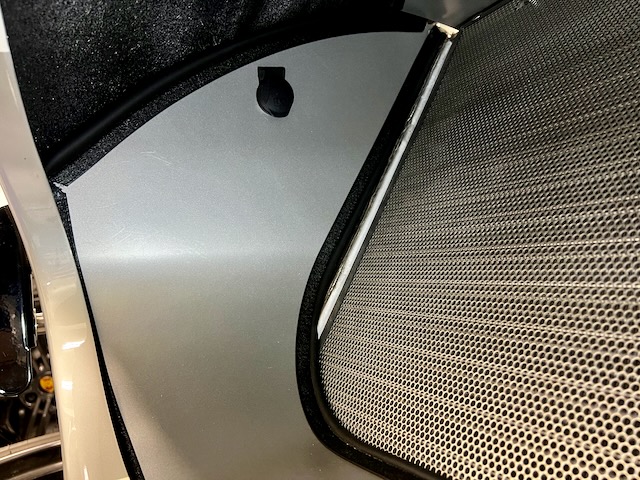
With the Replica Parts radiator surround back from PC, I was able to install it along with the MagCode power port mentioned previously. Here are a couple of photos showing the power port with and without the magnetic charging connector. It's tucked up nice and high so it's not visible unless you stick your head in the snout. Because the charging connector is keyed and magnetic, you don't need to be able to see the port to connect. You just reach in and flip up the spring-loaded cover and the connector snaps into place. Very nice, clean and accessible while staying out of sight.

I was also able to install the upper radiator shroud, which really cleaned up the area around the radiator.

Here's the front end, now nearly complete. Some of the details are: Breeze brake duct and oil cooler opening wire mesh (PC'ed black), replica Lucas Tri-Bar headlights with Watson's Streetworks LED's, and the previously mentioned replacement clear-lens L539 marker lights (with amber LED bulbs). I trimmed the quick jack tubes down to get the QJ's closer to the body and then cleaned up the tubes with some scotchbrite to give them a nice brushed finish, and then installed them with 7/16-20 threaded rod and stainless steel acorn nuts for a nice finished look.

Next up is test-fitting the new Gas-N headers and identifying what I will need in the way of custom collectors to get the pipes to fit properly.
MkIV Roadster build: Gen 2 Coyote, IRS, TKO600. Ordered 10/24/18. Delivered 1/29/19. Engine installed 8/8/21. First start 9/12/21. First go-kart 9/17/21. Off to paint 4/11/22. Back from paint 12/30/22.
Build thread here.
-
Post Thanks / Like - 1 Thanks, 7 Likes
Moniz thanked for this post
-
02-16-2023, 12:52 AM
#348
Senior Member
Dang! Looking really good, John. It's really coming together so well. I appreciate your continued documentation.
Chris
Coupe complete kit delivered: 4/22/24.
Build Thread. Coyote. T-56. IRS w/3.55. Wilwoods. PS. HVAC. Side windows.
MK4 Complete kit.
Build Thread Index. Delivered: 10/15/2020. Legal: 7/25/23. Coyote Gen3. TKO600 (0.64 OD). IRS w/3.55. PS. Wilwoods. Sway bars. This build is dedicated to my son, Benjamin.
Build Thread.
-
Post Thanks / Like - 1 Thanks, 0 Likes
JohnK thanked for this post
-
02-16-2023, 10:24 AM
#349
Senior Member

Wow John, the detail shots of the finishing touches are fantastic. You’ve made a gorgeous machine. And that silver has me revisiting a bunch of colors I thought I’d ruled out. Thanks for that ")
MK4 #7838: IRS 3.55 TrueTrac T5z Dart 347
The drawing is from ~7th grade, mid-1970s
Meandering, leisurely build thread is
here
-
Post Thanks / Like - 1 Thanks, 0 Likes
JohnK thanked for this post
-
02-16-2023, 10:45 AM
#350
Thanks guys. I'm really excited to get it wrapped up and finally be able to enjoy driving it, but if I'm honest I'm really going to miss the build process. I've been trolling BaT for a while now looking for a "next project". 
MkIV Roadster build: Gen 2 Coyote, IRS, TKO600. Ordered 10/24/18. Delivered 1/29/19. Engine installed 8/8/21. First start 9/12/21. First go-kart 9/17/21. Off to paint 4/11/22. Back from paint 12/30/22.
Build thread here.
-
Post Thanks / Like - 0 Thanks, 1 Likes
-
02-16-2023, 04:21 PM
#351
Senior Member
Looking good! I am curious to your feedback on the upper radiator shroud after you drive the car for awhile (hotter summer months), I found it to block a lot of cool air coming into the engine compartment while the car was moving forward so I removed it. Dropped the engine bay temp about 20 degrees after I removed it. Maybe you will have different results.
-
02-16-2023, 08:32 PM
#352
I love the last picture of the front of the car. It's so clean! The clear turn signal lens were definitely a good touch. Just a lovely black, silver, and shades of clear. Question: How did you install the replicaparts radiator aluminum? I don't see any rivets there!
Originally Posted by
JohnK
Thanks guys. I'm really excited to get it wrapped up and finally be able to enjoy driving it, but if I'm honest I'm really going to miss the build process. I've been trolling BaT for a while now looking for a "next project".
Hey you got that mustang 
-
02-16-2023, 11:46 PM
#353
Thanks Travis. Yes, I recall reading about your experience with the upper radiator shroud in your build thread. I installed it anyway, primarily because I'd already drill the 3/4" cross tube for it.  We'll see if it causes any issues. From what I've read here, the coyote runs cooler than your 427 so hopefully under-hood heat won't be an issue, but the shroud is easy enough to remove down the road if necessary.
Hey Daniel - thanks so much. The radiator surround is held on with two rivets at the upper corners and then just wedged between the body and radiator with some bulb seal to hold it in place. It doesn't sound like much but if it's trimmed properly it fits in there pretty snugly and doesn't move around at all. It definitely gives a nice clean finished look to the radiator opening.
The thought of doing a full restomod on the '67 Mustang has crossed my mind more than once. However, every time I watch one of those YT videos where they acid dip a classic car and it comes out looking like a big ball of Swiss cheese gives me pause. I'm not sure I want to sign up for a ton of sheet metal repair, though that could be the catalyst to get me to finally learn to weld like I've always wanted.
This car keeps catching my eye, and it's just up the road in Mountain View. The thought of restoring a Porsche 356A is soooooo tempting, but I think there's more missing than remaining on that car.
MkIV Roadster build: Gen 2 Coyote, IRS, TKO600. Ordered 10/24/18. Delivered 1/29/19. Engine installed 8/8/21. First start 9/12/21. First go-kart 9/17/21. Off to paint 4/11/22. Back from paint 12/30/22.
Build thread here.
-
02-17-2023, 02:21 PM
#354
Originally Posted by
JohnK
The thought of doing a full restomod on the '67 Mustang has crossed my mind more than once. However, every time I watch one of those YT videos where they acid dip a classic car and it comes out looking like a big ball of Swiss cheese gives me pause. I'm not sure I want to sign up for a ton of sheet metal repair, though that could be the catalyst to get me to finally learn to weld like I've always wanted.
This car keeps catching my eye, and it's just up the road in Mountain View. The thought of restoring a Porsche 356A is soooooo tempting, but I think there's more missing than remaining on that car.
If I can weld with a mig welder anyone can. I had not done any welding since secondary school when I was in year 8 or 9 (I don't know the US grade system to ages so I can not relate) so that would be somewhere between 12 to 14 years old, so about 30 years ago (god that makes me feel old). I was able to weld with the oxy actalene touch, but burned a hole with the spot welder, awful with the TIG and the MIG. I simply watched a few videos and listened to other advice. My welding is not pretty but I can grind and it will come out ok. If you want to have a go I can figure something out for you to give it a try.
That Porsche looks like a great project, I would say go for it.
-
02-21-2023, 10:37 PM
#355
Senior Member

Looks AMAZING!!!! What an amazing build! I am so impressed with you r attention to detail.
FFR MK4 Roadster (9945) complete kit, delivered 12/4/2020, First start and go kart 5/7/2021. Legal 8/14/2021, Paint finished 7/18/2022 (Viking Blue). 347BPE CI, TKO600, Moser 8.8 3link 3.55, Halibrand 17x9 17x10.5, power steering. Carbon Fiber Dash. Carbon Fiber trans tunnel, adjustable Kirkey Lowback Vintage seats, Vintage gauges, RT drop trunk mod, FFmetal drop battery mod and trans tunnel, Forte front sway bar. Forte mechanical throttle linkage, RT gas pedal.
www.covespringsfarm.com
-
Post Thanks / Like - 1 Thanks, 0 Likes
JohnK thanked for this post
-
02-22-2023, 12:53 AM
#356
Greek Guys' Garage Roadster Build #9509 (fun with headers!)
The progress on final assembly continues! My punch list of 37 items I needed to complete before being able to begin the titling/registration process is now down to three items: 1) permanently attaching the seats, 2) finishing the installation of the wipers, and 3) getting the header/sidepipe situation sorted out. That last item is far and away the most involved of the three remaining items.
My new Gas-N headers arrived a few days ago, and I got them installed pretty painlessly (or as painless as installing coyote headers can be.). The PS header went in easy-peasy. The DS one not so much, but they're now both in. I installed them with fresh Remflex gaskets and Stage8 locking fasteners.
Before installation, I took a moment to do a quick comparison of the Gas-N headers to the GP Headers units. The DS header dimensions looked pretty similar between the two units but I was pretty surprised (and pleased) to see that the PS Gas-N header was a full inch shorter than the GP Headers unit.

This difference, by itself, was going to solve a lot of problems for me. I decided to tackle the relatively easier PS first. Here's the operating room all prepped and ready to go.

A really nice feature of the Gas-N headers is that all the bolt holes are open-ended so I was able to put the gasket in place and start all the lower bolts, then slip the header in place and then install the upper bolts. This resulted in far less juggling and awkwardness trying to get the gasket and header positioned.

The Stage8 fasteners are a change from the hex socket head bolts I used the first time. Having both an external and internal hex on the bolt heads gave me some added flexibility in torquing all the bolts. I first snugged them all down, and then torqued them in stages starting at 10 ft/lbs, then 15 ft/lbs and finally 20 ft/lbs (then went around once more at 20 ft/lbs.) I'll wait to heat cycle the engine a few times before retorquing the bolts and installing the locking hardware.
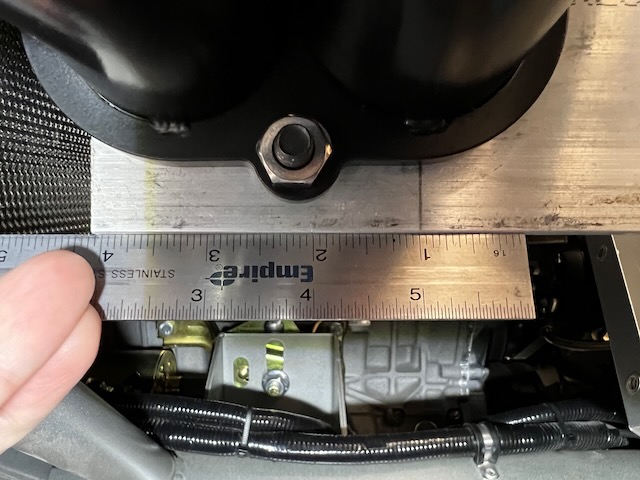
Getting the new headers installed was a big step, but far from the complete solution. In talking with Georgie, he explained that they can make custom offset collectors, and this is likely the route I'd need to go down in order to be able to install the side pipes without cutting into the painted body. I wanted to be able to mock up exactly how much offset I'd need built into each collector more accurately than just holding the side pipe in place and eyeballing some measurements so I decided to take some 6" x 6" x 1/4" aluminum plate and mock up a mount for each side pipe. I started by marking the center line in both directions on the plate, and then drilling and countersinking the two side holes.

I then attached this plate to the collector and, with the help of my son and a friend, got the side pipe positioned exactly where I want it to sit and marked the top and bottom holes on the plate.

I then drilled the top and bottom holes, countersunk on the opposite side, and was able to mount the side pipe in the desired position.

This gave me the flexibility to dial in the vertical and horizontal angle of the side pipe relative to the body using the swiveling ball flange on the header, and also dial in the vertical and horizontal position of the side pipe within the cutout as it exits the body with the offset.
Here you can see that the required offset on the PS is 1-3/16" toward the rear. The DS is much better, only requiring 5/16" offset to get it perfectly positioned.
We'll see what Georgie has to say about all of this tomorrow. If he can build me collectors with this amount of offset, I will be able to get the pipes positioned perfectly without having to touch the painted cutouts, which will be a massive relief.
In the meantime, I'll get back to working on the seats and wipers.
MkIV Roadster build: Gen 2 Coyote, IRS, TKO600. Ordered 10/24/18. Delivered 1/29/19. Engine installed 8/8/21. First start 9/12/21. First go-kart 9/17/21. Off to paint 4/11/22. Back from paint 12/30/22.
Build thread here.
-
Post Thanks / Like - 1 Thanks, 2 Likes
-
02-22-2023, 04:33 PM
#357
Just a quick update: I had short chat with Georgie and explained to him what I needed, and he said, "sure, no problem. We can do that." I'm going to have a more in-depth FaceTime call with him and his head engineer in a few days to go over everything in detail and go from there, but it sounds like we're on the right track here.
Last edited by JohnK; 02-22-2023 at 07:22 PM.
MkIV Roadster build: Gen 2 Coyote, IRS, TKO600. Ordered 10/24/18. Delivered 1/29/19. Engine installed 8/8/21. First start 9/12/21. First go-kart 9/17/21. Off to paint 4/11/22. Back from paint 12/30/22.
Build thread here.
-
02-22-2023, 07:09 PM
#358
I know you said removing and reinstalling the headers wasn't that bad but I can't help but to think you're being modest. Installing them was enough of a pain WITHOUT the body on! You've got the patience of a saint! It's great to see gas'n helping you out. I remember a while ago we talked about having a cat on the header was preferable since it gets rid of some of the smells. Sad to see we you to let that go. 
Keep going man!
-
Post Thanks / Like - 1 Thanks, 0 Likes
JohnK thanked for this post
-
02-22-2023, 07:20 PM
#359
The lift definitely helps. With the car on the lift and front wheels off I was able to get to all 8 bolts on the PS header and 5 of the 8 bolts on the DS standing next to the car. The three rearmost bolts on the DS header (two on the top and one on the bottom) I had to reach from underneath, and those were definitely a bit more tricky. I have a small in/lb torque wrench that I normally use for my carbon fiber bicycles, that goes to 240 in/lb (20 ft/lb). It's much smaller than all my other torque wrenches and was perfect for this job, as the Remflex gaskets specify a 20 ft/lb torque spec. No way I could have gotten a normal torque wrench onto half of the DS bolts. One of the bolts on the DS required a crows foot adapter to get to. All the others just needed some combination of swivels and extensions. All in all, not as bad as I'd feared.
I am a little bummed to have to lose the cats, especially after how much $$ I put into those headers with the Jet-Hot coating, but given the trade-off of keeping the cats or cutting into the painted body, I'll lose the cats.
Are you back home, and more importantly is your painted car back home?
Last edited by JohnK; 02-22-2023 at 07:22 PM.
MkIV Roadster build: Gen 2 Coyote, IRS, TKO600. Ordered 10/24/18. Delivered 1/29/19. Engine installed 8/8/21. First start 9/12/21. First go-kart 9/17/21. Off to paint 4/11/22. Back from paint 12/30/22.
Build thread here.
-
02-22-2023, 07:23 PM
#360
Originally Posted by
JohnK
Thanks Travis. Yes, I recall reading about your experience with the upper radiator shroud in your build thread. I installed it anyway, primarily because I'd already drill the 3/4" cross tube for it.
We'll see if it causes any issues. From what I've read here, the coyote runs cooler than your 427 so hopefully under-hood heat won't be an issue, but the shroud is easy enough to remove down the road if necessary.
Hey Daniel - thanks so much. The radiator surround is held on with two rivets at the upper corners and then just wedged between the body and radiator with some bulb seal to hold it in place. It doesn't sound like much but if it's trimmed properly it fits in there pretty snugly and doesn't move around at all. It definitely gives a nice clean finished look to the radiator opening.
The thought of doing a full restomod on the '67 Mustang has crossed my mind more than once. However, every time I watch one of those YT videos where they acid dip a classic car and it comes out looking like a big ball of Swiss cheese gives me pause. I'm not sure I want to sign up for a ton of sheet metal repair, though that could be the catalyst to get me to finally learn to weld like I've always wanted.
This car keeps catching my eye, and it's just up the road in Mountain View. The thought of restoring a Porsche 356A is soooooo tempting, but I think there's more missing than remaining on that car.
I really like that radiator surround. Did you fabricate it yourself? If so do you have a pattern you can share?
Thanks,
Tom
-
Post Thanks / Like - 1 Thanks, 0 Likes
JohnK thanked for this post


 Thanks:
  Likes:


 Reply With Quote


