-
12-26-2020, 09:45 PM
#441
Senior Member

20200619_153346.jpg
Here's how mine's plumbed. 289 SBF
Heater send coming off intake. Upper nipple on water pump for thermostat bypass. Lower nipple for heater return.
Last edited by egchewy79; 12-26-2020 at 09:50 PM.
-
Post Thanks / Like - 1 Thanks, 0 Likes
-
12-26-2020, 10:17 PM
#442

Originally Posted by
MSumners

About to run the 5/8 heater hoses, it mentions running the send line to the LEFT heater fitting. Does this mean left (driver side) or left as I’m looking at it (passenger side) ?
I have always been told and followed the rule that anytime you are talking about left or right, it is as you are looking at the vehicle from the rear. So in this case, I would say it would be the fitting on the drivers side.
Having said that, as far as the heater core goes, I really do not think it matters the flow direction through it. Hot water goes in, it gets hot, and air blows through it.
And for what it's worth, mine is plumbed exactly the same as egchewy
-
Post Thanks / Like - 1 Thanks, 0 Likes
-
12-26-2020, 10:45 PM
#443
Senior Member

Correct. Left and right is always looking toward the front of the car. This side of the pond, left = driver side, right = passenger side.
Build 1: Mk3 Roadster #5125. Sold 11/08/2014.
Build 2: Mk4 Roadster #7750. Sold 04/10/2017.
Build Thread
Build 3: Mk4 Roadster 20th Anniversary #8674. Sold 09/07/2020.
Build Thread and
Video.
Build 4: Gen 3 Type 65 Coupe #59. Gen 3 Coyote. Legal 03/04/2020.
Build Thread and
Video
Build 5: 35 Hot Rod Truck #138. LS3 and 4L65E auto. Rcvd 01/05/2021. Legal 04/20/2023.
Build Thread. Sold 11/9/2023.
-
Post Thanks / Like - 1 Thanks, 0 Likes
-
12-27-2020, 05:22 PM
#444
Senior Member

Thanks for the input gentlemen, the picture makes it clear. Somehow I was thinking the send line was opposite what it really is.
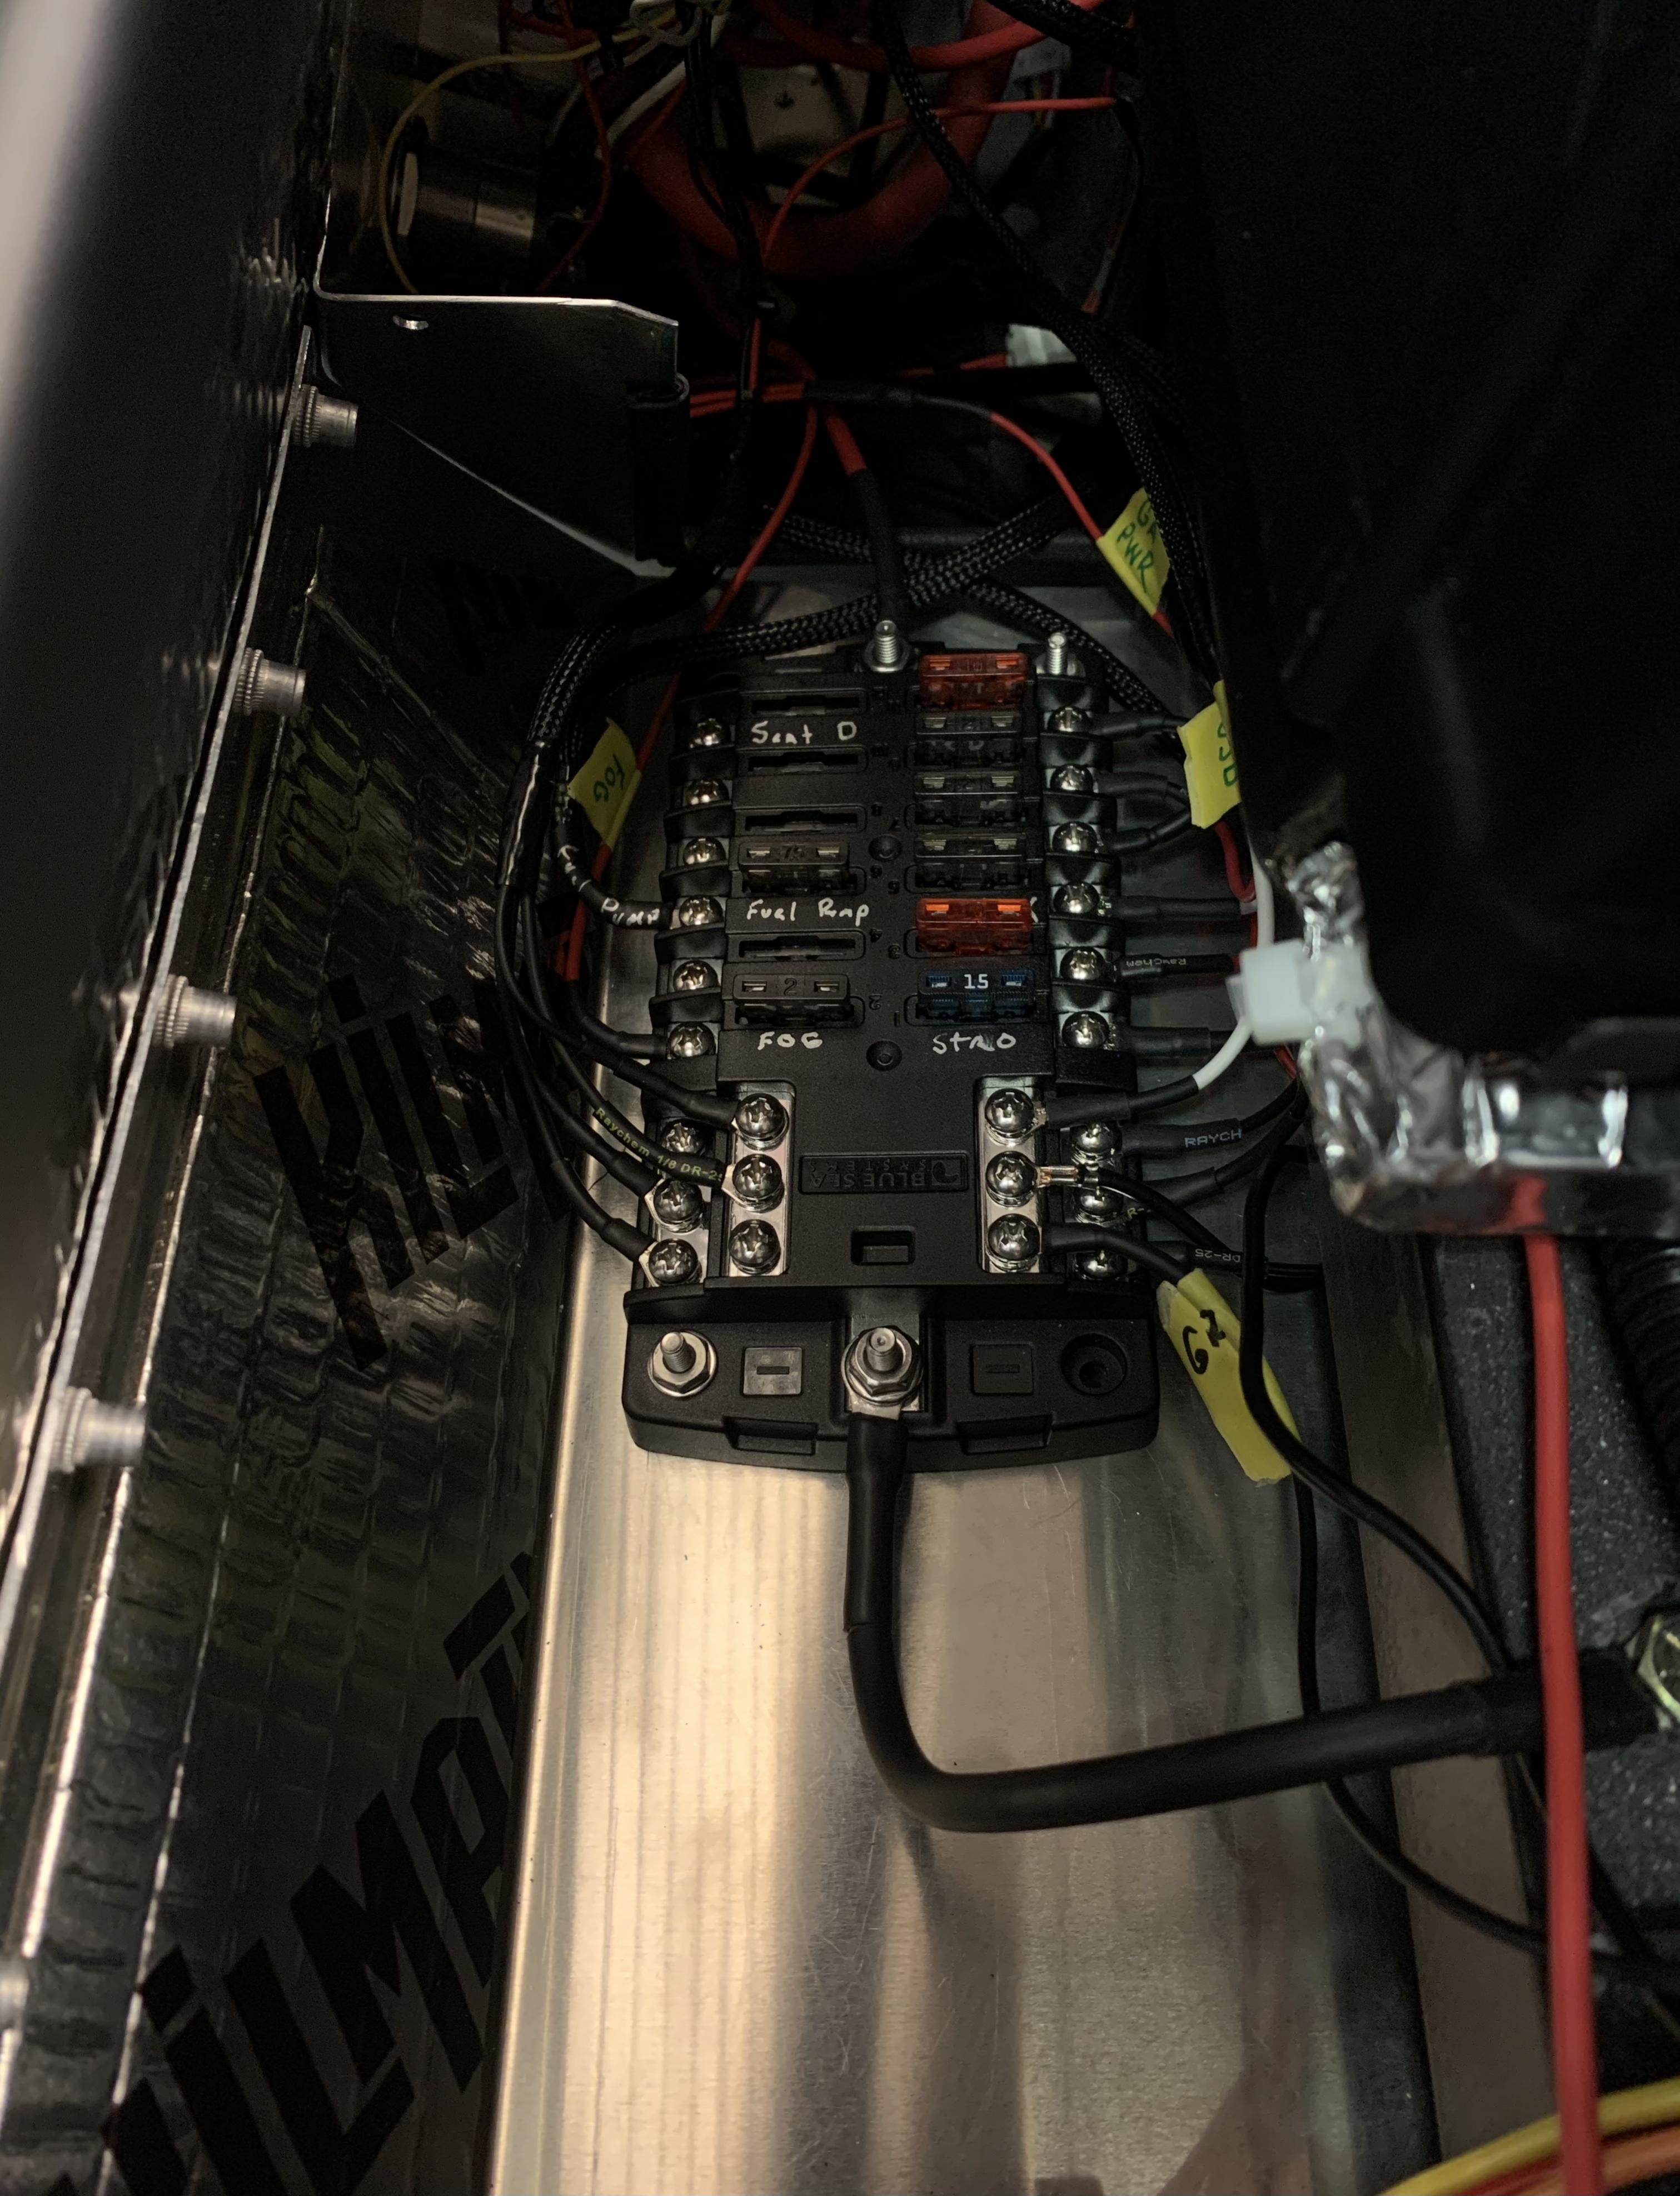
Finished up the wiring to my secondary fuse panel and time to re-test everything.
-
01-08-2021, 05:29 PM
#445
Senior Member
Is factory five releasing a motorcycle?
-
01-09-2021, 05:04 PM
#446
Senior Member
I finally have all the gear I need to finish up the 5/8 send and return heater lines to the engine and thanks again for the images above.
I'm currently draining some coolant from the lower drain port on the radiator. If I drain enough from this position will it still pour out when I take the water neck off?
-
01-09-2021, 07:17 PM
#447
Senior Member
Your thermostat will be closed when the engine is cool, so I suspect you'd still lose coolant despite draining some from the radiator
-
Post Thanks / Like - 1 Thanks, 0 Likes
-
01-10-2021, 08:16 PM
#448
Senior Member
-
01-11-2021, 03:09 PM
#449
Good luck with that flux capacitor. Heard those are hard to tune properly.
-Steve
-
Post Thanks / Like - 0 Thanks, 2 Likes
-
01-11-2021, 04:40 PM
#450
Senior Member

Originally Posted by
Straversi
Good luck with that flux capacitor. Heard those are hard to tune properly.
-Steve
I've seen Mike's car, and am pretty sure he used the gen. 2 flux capacitor which is MUCH easier to tune (pretty much plug-and-play). However, I'm not sure if he installed the recommended 88 mph safety lockout. You can blow a lot of fuses running 1.21 gigawatts through that thing below that speed.
Mike - That dash is looking great! Nice find on the pull/push cable.
Last edited by Traveller; 01-11-2021 at 04:43 PM.
-
Post Thanks / Like - 0 Thanks, 1 Likes
-
01-11-2021, 05:15 PM
#451
Senior Member
If there’s a chance I can go back in time and re-think some of my build decisions it’ll be worth it.
Originally Posted by
Straversi
Good luck with that flux capacitor. Heard those are hard to tune properly.
-Steve
-
Post Thanks / Like - 0 Thanks, 1 Likes
-
01-16-2021, 12:20 AM
#452
Senior Member
-
01-17-2021, 06:23 PM
#453
Senior Member
-
01-17-2021, 07:22 PM
#454
Senior Member
I used black ultra RTV I believe. Where is your fitech temp sensor? In the intake?
-
01-17-2021, 07:35 PM
#455
Senior Member
Yep this is where it came installed.

-
01-18-2021, 08:53 AM
#456
Senior Member
what do you have threaded into the bung on the PS front of the intake? I have my heater coming off my PS front, my Fitech coming off the DS front as you do, and my water temp sender coming off my water neck. it's probably going to work all the same. good luck with the leak. Napa will rent you a coolant system pressure tester to identify leaks.
-
01-18-2021, 09:11 AM
#457
Senior Member
The PS is the temp sender for the gauge. I think I’ll retry with a new felpro gasket and see if I still have trouble.
Originally Posted by
egchewy79
what do you have threaded into the bung on the PS front of the intake? I have my heater coming off my PS front, my Fitech coming off the DS front as you do, and my water temp sender coming off my water neck. it's probably going to work all the same. good luck with the leak. Napa will rent you a coolant system pressure tester to identify leaks.
-
01-18-2021, 11:26 AM
#458
Senior Member

I had problems with my water neck leaking as well. The final fix for me was to order a Ford OEM performance water neck using RTV and good Fel Pro gasket. Let it set up over night before trying to run it. There is also a trick when installing the thermostat using a few small dabs of RTV to hold it in place so it does not move when you place the water neck to the intake manifold. If you do not do this it will move around and cause problems with the sealing.
What water neck are you using?
This neck was what I ended up ordering and it solved all the problems.
https://www.cjponyparts.com/ford-rac...CABEgJt1vD_BwE
Last edited by Fman; 01-18-2021 at 11:30 AM.
-
01-18-2021, 01:43 PM
#459
Senior Member
Thanks for the recs! Yep that’s actually the same water neck I’m using. I just tapped the extra port to 3/8 npt.
-
01-18-2021, 04:59 PM
#460
Senior Member
Originally Posted by
MSumners
Thanks for the recs! Yep that’s actually the same water neck I’m using. I just tapped the extra port to 3/8 npt.
Did you secure the T-stat when installing? RTV on front and back side of gasket and let it sit overnight?
-
Post Thanks / Like - 1 Thanks, 0 Likes
-
01-18-2021, 05:46 PM
#461
Originally Posted by
Fman
Did you secure the T-stat when installing? RTV on front and back side of gasket and let it sit overnight?
I would guess this. I spent sooooo much time on this leak. I was finally able to get sealed up a while ago. When I open the hood, sometimes I still have flashbacks of seeing coolant pooled on top of the water pump on each side 
I did not use RTV on the Fel Pro gasket, but used three dabs to hold the t-stat in place and letting it sit overnight before installing to keep it from slipping out of place.
MK IV Build #9659, 3 link, 17's, Forte 347, Sniper EFI, power steering, built for a freak sized person with 17" Kirkey Vintage seats, RT drop trunk, RT turn signal, lots of stuff from Breeze Automotive, Wilwood brakes, paint by Jeff Miller
-
Post Thanks / Like - 1 Thanks, 1 Likes
 Fman
Fman liked this post
-
01-18-2021, 06:39 PM
#462
Senior Member
I did secure the thermostat and coated both sides of the gasket. However I didn’t let it sit overnight prior to install. I’ll give that a shot on the next round. According to FelPro website using rtv with their gasket can actually make it more difficult to seal so maybe I’ll simply clean it and retry with only a new gasket.
Last edited by MSumners; 01-18-2021 at 06:49 PM.
-
01-21-2021, 05:22 PM
#463
Senior Member
Update on the water neck leak. It was the felpro gasket for the win. Didn’t use any RTV this time just cleaned everything up again and bolted it back in with a new gasket. I was able to heat cycle it a few times and at least to this point no leak at all. Last leak to fix up is at the hydraulic clutch line to the master cylinder connection. It is the smallest of leaks and doesn’t even form a drop over time but I can feel the brake fluid on the exposed threads and have been tracking it for weeks, I have a new brass wilwood adaptor ordered and I’m optimistic that should do it. Everything at this point mechanical and electrical is working as it should.
-
Post Thanks / Like - 0 Thanks, 1 Likes
Fman liked this post
-
01-25-2021, 09:54 PM
#464
Senior Member
I was able to get the clutch connection leak sealed. Ordered the actual wilwood 3/8-24 to -3 fitting and installed then re-bled the line. Not exactly sure why this one works so much better as it looks just like the one I exchanged it for. Nonetheless it’s switched out and not even a trace of fluid after holding the pedal to the stop for over two minutes.

-
01-25-2021, 10:39 PM
#465


One of my brake fittings did the same thing. Just a little bit of a leak. I tightened a little bit, no change. I took it apart, inspected, and reassembled. No change. The hell with it! I replaced the fitting and it has held for 5K miles now. IDK, some parts just don't like to fit together.
I'm glad you fixed the water neck leak. It sucks having to dump coolant out the front of your motor each time you try to fix it. Both you and I are experts in water neck removal! Watch your brass 90 degree fitting and make sure that it does not come loose. I was having problems with mine. After a few hundred miles and lots of heat cycles, mine kept coming loose. Also, because of the 90 degree bend, I would have to remove the upper hose in order the turn it past it. I ended up replacing mine with an aluminum fitting that was straight. That way I could easily turn it if needed to again without removing the upper hose. Of course, the needed a new 90 degree bend heater hose....... It never ends ")
MK IV Build #9659, 3 link, 17's, Forte 347, Sniper EFI, power steering, built for a freak sized person with 17" Kirkey Vintage seats, RT drop trunk, RT turn signal, lots of stuff from Breeze Automotive, Wilwood brakes, paint by Jeff Miller
-
01-25-2021, 10:42 PM
#466
I noticed that you have the vacuum advance port on the distributer capped off. Is that something that is not needed with the FiTech?
MK IV Build #9659, 3 link, 17's, Forte 347, Sniper EFI, power steering, built for a freak sized person with 17" Kirkey Vintage seats, RT drop trunk, RT turn signal, lots of stuff from Breeze Automotive, Wilwood brakes, paint by Jeff Miller
-
01-25-2021, 10:50 PM
#467
Senior Member
When I was first getting the engine going I had messaged Mike Forte about it and he said to get it running and driving first without it. Glad you reminded me actually I need to look into this some more. I can say at least at my go cart speeds (<25mph) everything runs normally. Can’t say I really understand the vacuum advance too well yet specifically with the Fitech and the way it is setup so I have more reading to do.
Originally Posted by
TMartinLVNV
I noticed that you have the vacuum advance port on the distributer capped off. Is that something that is not needed with the FiTech?
-
01-25-2021, 11:58 PM
#468
Originally Posted by
MSumners
When I was first getting the engine going I had messaged Mike Forte about it and he said to get it running and driving first without it. Glad you reminded me actually I need to look into this some more. I can say at least at my go cart speeds (<25mph) everything runs normally. Can’t say I really understand the vacuum advance too well yet specifically with the Fitech and the way it is setup so I have more reading to do.
I'm not an expert and I did not sleep in a Holiday Inn Express last night. There is a lot contradictory information out there. This is a good article:
https://www.hotrod.com/articles/ever...nition-timing/
Go down to the section called "Where Should the Vacuum Canister Be Routed".
Buy about 5 ft of 3/16" vacuum line. This will connect the cone thingy on your distributer to the back of your throttle body. There will be two small ports there. The lower one (probably in the middle) is "manifold vacuum". The slightly higher one (probably on the right side) is "ported vacuum". I have mine connected to the manifold vacuum port. This was suggested to me by Skidd and I did a bit of reading about it afterwards. You can run the line under the throttle body in the valley of the Air Gap intake, and trim to fit. Make sure that the other port is capped off.
Research your FiTech options. I have the Holley Sniper.
MK IV Build #9659, 3 link, 17's, Forte 347, Sniper EFI, power steering, built for a freak sized person with 17" Kirkey Vintage seats, RT drop trunk, RT turn signal, lots of stuff from Breeze Automotive, Wilwood brakes, paint by Jeff Miller
-
Post Thanks / Like - 1 Thanks, 0 Likes
-
02-05-2021, 08:56 PM
#469
Senior Member
Finished fitting the Cipher belts and the attachment points.
Next up is continuing to work on some panels to decrease the amount of sheer metal in the dash area and glare. Using the weldwood solvent adhesive, 1/8”foam and some left over black leather. Not to any versions I would consider ‘keepers’ yet but getting closer and getting the methods down, probably a few more versions as usual until I land on something final.


-
02-06-2021, 11:55 PM
#470
Senior Member
Lots of standing , staring and cutting foam templates.
Not quite yet but getting closer.

-
02-09-2021, 11:35 PM
#471
Senior Member
20-30 minutes of progress daily.
I decided to track down any gaps I missed in sealing the foot boxes. I put my headlamp on flash mode, placed it in the foot boxes and turned the garage lights off. Easily lit up a couple small areas I missed. Now confident they are completely sealed.

-
Post Thanks / Like - 0 Thanks, 1 Likes
-
03-07-2021, 07:31 PM
#472
Senior Member
Great day for some go cart action and to test out the new flow valve on the KRC power steering pump. Night and day difference and feels so much better. I was able to mount a small reservoir and pump for a windshield washer jet and also mount the rear wall speakers. I think this is truly the last wiring to do and should be quick.


-
03-13-2021, 11:42 PM
#473
Senior Member
I’m working on finishing off the trunk area before the body goes back on and started laying out the carpet sections. The placement of most are obvious but there are a few I just can’t seem to get right.
Are all of the walls of the foot boxes supposed to have carpet sections?
Anyone recognize these two?
Anyone have pictures on a finished car of the upper corner near the rear of the door? Trying to envision what this carpet is going to look like and if the overhang from the body covers the edge.

-
03-14-2021, 12:15 AM
#474
Senior Member
Yes, footbox walls are covered. Looks like your PS footbox pieces. That notch is for one of the round tubes. The medial footbox piece isn't in the pic. It has a larger oblong notch for the 4"round frame.
edit: I think the bottom piece looks like the piece for the DS outside footbox kick out area.
Last edited by egchewy79; 03-14-2021 at 09:40 AM.
-
Post Thanks / Like - 1 Thanks, 0 Likes
-
03-22-2021, 12:02 PM
#475
Senior Member
2 years ago today and the most recent progress. Still rolling along 30 minutes here and there.

-
03-23-2021, 09:36 AM
#476
Senior Member
Leather wrapped and test fit the trans tunnel cover and now working on fitting the Lokar boots. Fits like a glove. The landau top and trim adhesive that gets discussed fairly frequently is amazing for this work and would highly recommend it. After cutting the holes for the shifter and Ebrake I used a small syringe and 18ga needle to re-adhere the edges really well.

Last edited by MSumners; 03-23-2021 at 06:09 PM.
-
03-23-2021, 09:38 PM
#477
Senior Member
Last edited by MSumners; 03-23-2021 at 09:42 PM.
-
Post Thanks / Like - 0 Thanks, 1 Likes
-
03-23-2021, 10:05 PM
#478
Senior Member

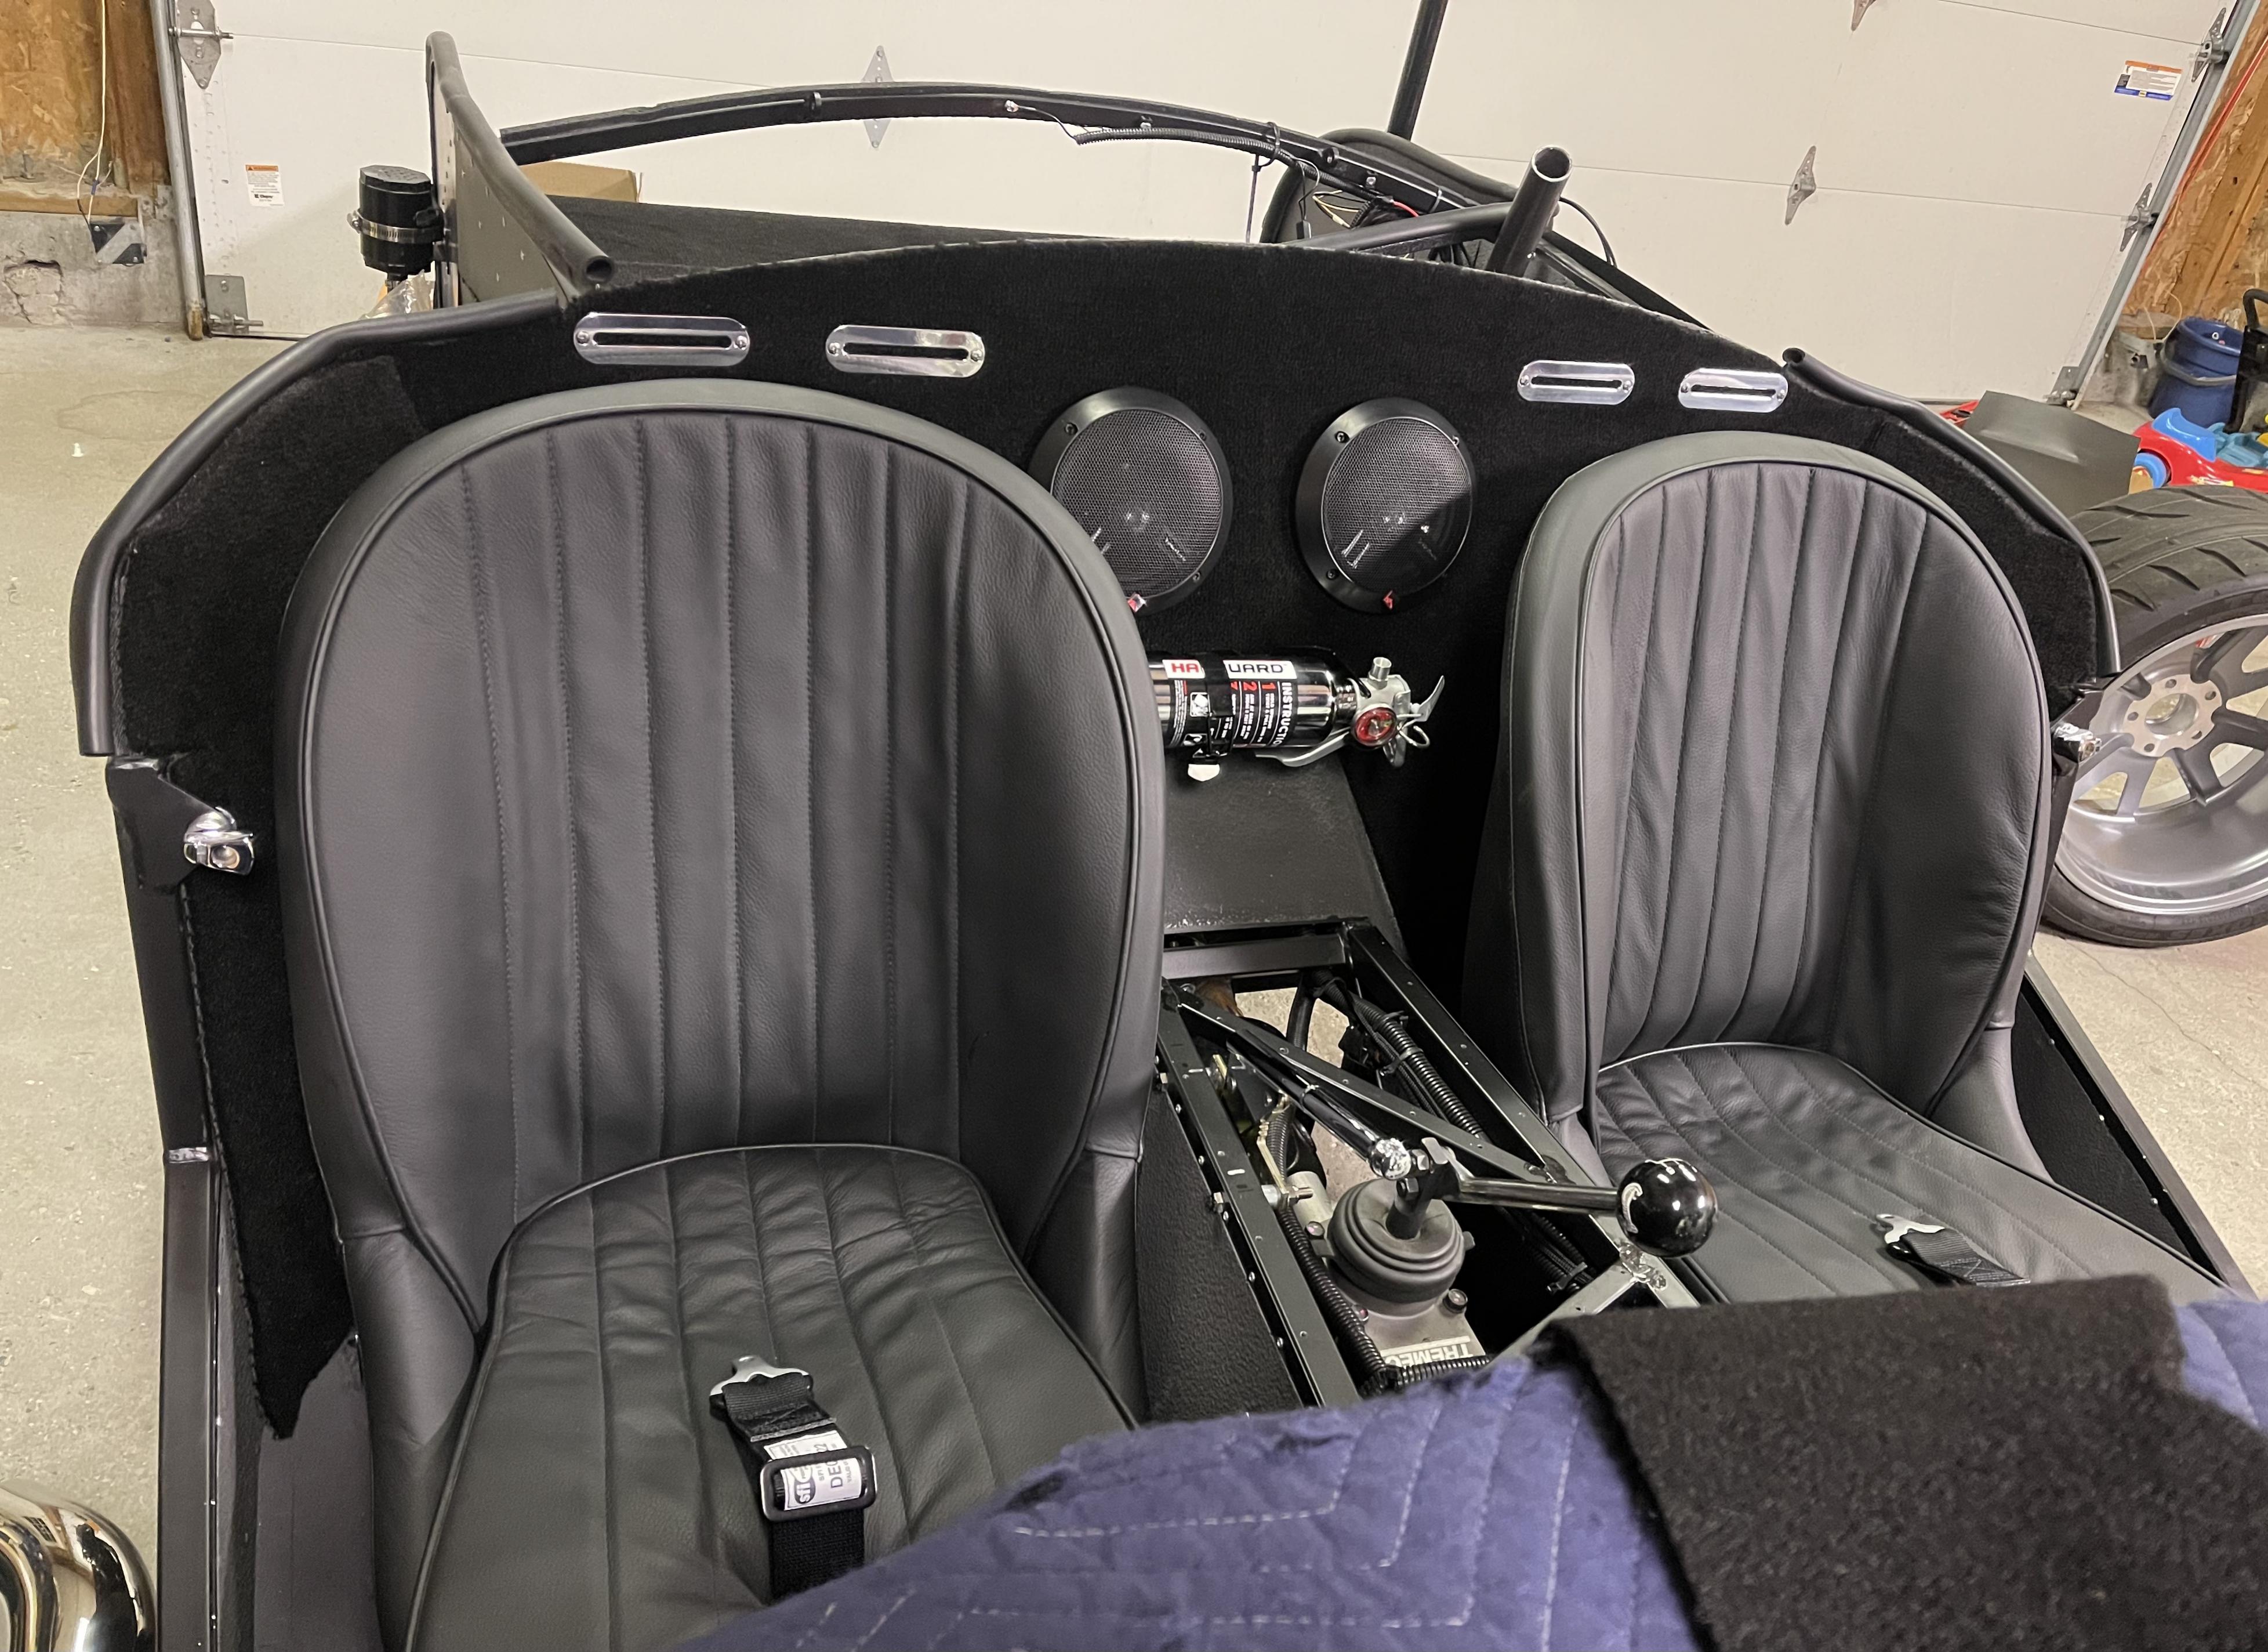
Your cockpit looks like a WWII era fighter. It’s cool as hell.
MK4 #10008 - Ordered 10/06/20, Delivered 03/03/21, First Start 7/22/21, First Go Kart 7/24/21
Paint by Metal Morphous 5/14/22, Legally registered 6/8/22, Graduated 7/20/22
Build Thread
https://thefactoryfiveforum.com/show...been-delivered
Complete Kit, Ford 306, Sniper/Dual Sync, T5, Hydraulic clutch
-
Post Thanks / Like - 1 Thanks, 0 Likes
-
04-13-2021, 09:17 PM
#479
Senior Member
Working on the side louvres and I’m using the HSRF bonded studs for mounting as I saw in Paul’s thread. Works great and as always the forum comes through with an elegant solution. First time using HSRF and I’m glad I really watched where it was going that stuff is hard as rock when it’s cured. Glad I didn’t have to clean much.
4 cycles of ‘fit-mark-remove-trim-clean-check’ and the passenger side is not quite completely done but getting close. The individual fins look like they are 40mm apart and that’s what I used to mark the edges on either end.
(If anyone needs the basic louvres sent with the kit feel free to PM and I’ll send em out)


Last edited by MSumners; 04-13-2021 at 09:21 PM.
-
04-13-2021, 09:41 PM
#480
Senior Member
On your trans tunnel, did you put anything between the leather and the metal or adheres directly to it?
MK4 #10008 - Ordered 10/06/20, Delivered 03/03/21, First Start 7/22/21, First Go Kart 7/24/21
Paint by Metal Morphous 5/14/22, Legally registered 6/8/22, Graduated 7/20/22
Build Thread
https://thefactoryfiveforum.com/show...been-delivered
Complete Kit, Ford 306, Sniper/Dual Sync, T5, Hydraulic clutch


 Thanks:
  Likes:


 Reply With Quote

