-
Senior Member

Just the Basics Build (Brake lines)
Last edited by rthomas98; 04-14-2021 at 12:15 PM.
-
Post Thanks / Like - 0 Thanks, 1 Likes
-
Not a waxer

That's an excellent combination! Use a 3.55 in the rear along with a 2.95 first gear in that T5 and it'll be a hoot 
Jeff
-
Post Thanks / Like - 0 Thanks, 1 Likes
-
Congratulations and welcome! Lots of great folks here to help answer any questions.
Mark IV Complete kit delivered 7/7/20
Blueprint 427 ordered 11/23/20
-
Post Thanks / Like - 0 Thanks, 1 Likes
-
Not a waxer

Originally Posted by
rthomas98

That is the plan. Glad to hear it will still be fun. Was a little worried because I see everyone building these fire breathing monsters.
You want to hear the ugly truth (which will get some panties in a knot)...lots of guys find out that once you get past bragging rights at the cruise in some of those "fire breathers" can be kind of hard to live with and aren't so much fun afterall 
Jeff
-
Post Thanks / Like - 0 Thanks, 2 Likes
-
Senior Member

Originally Posted by
Jeff Kleiner
You want to hear the ugly truth (which will get some panties in a knot)...lots of guys find out that once you get past bragging rights at the cruise in some of those "fire breathers" can be kind of hard to live with and aren't so much fun afterall
Jeff
But, But It goes to 11! Next you'll tell us less cowbells 
Ron
"May you be in heaven a full half hour before the Devil knows you're dead"
-

Steve >> aka: GoDadGo

Originally Posted by
Jeff Kleiner
You want to hear the ugly truth (which will get some panties in a knot)...lots of guys find out that once you get past bragging rights at the cruise in some of those "fire breathers" can be kind of hard to live with and aren't so much fun afterall
Jeff
I don't have a fire-breather, more like a fire-burper (450-Plus HP) so I've got the rev-limiter set at 4,500 which settles the car quickly.
Wheelspin with the rev-limiter at 6,500 occurs in the first four gears so my goal is to learn how to drive the car 300-400 RPMs at a time.
https://youtu.be/9WEe6-wdNtA
Horsepower to weight is what you need to look at so even a 300-HP 302 will equate 7.5 Lbs for every 1.0 HP.
In 1st gear you will be able to smoke the tires while still getting some serious wheel spin in 2nd gear too.
Welcome Aboard!
Last edited by GoDadGo; 08-21-2020 at 01:13 PM.
-
Senior Member

Nice combo. I'm running a hair over 340hp on my little 289, and quite happy with it. Very well behaved around town and goes fast when I want it to.
FFR #8833 289 FIA 3-link
1965 289, TKO600 from Forte's Parts Connection
Body and Paint by Mike's Auto Restoration
Picked up 3/5/2016, First start 4/22/2017, MA legal 7/11/2018
Build Thread
http://thefactoryfiveforum.com/showt...FIA-build-8833
"Insanity is contagious" - Joseph Heller
-
Senior Member

Hello from the Grand Rapids area and congrats on the pending arrival of a new adventure! Where in michigan are you?
-
Senior Member

Sounds like a great plan. I also had the goal of keeping things simple (especially since this is my first build). But I keep adding things along the way . . . Anyway, I look forward to your build.
MKIV Complete Kit #9822 l BluePrint 347 EFI l TKO600 l Power Steering l Heater/Defrost l
Build Thread
-
Senior Member

Hello from Pinckney my completion date is the 23rd so hopefully both cars will be on the same truck.
-
Originally Posted by
rthomas98
One of these works really well for being able to move it around the garage until you are able to install it. The pumpkin fits nicely in the middle and is very stable.
https://www.amazon.com/WEN-721830-10...8163498&sr=1-4
MK IV Build #9659, 3 link, 17's, Forte 347, Sniper EFI, power steering, built for a freak sized person with 17" Kirkey Vintage seats, RT drop trunk, RT turn signal, lots of stuff from Breeze Automotive, Wilwood brakes, paint by Jeff Miller
-
Steve >> aka: GoDadGo
If you want and/or find you need additional pinion adjustment, then this upgrade may be of interest to you.
https://www.spohn.net/shop/Factory-F...ot-Joints.html
These will improve articulation while allowing you to really dial in the rear end location and pinion angle adjustment.
NOTE:... I had the folks at Spohn build me set of shortened fixed units since I didn't want and/or need additional adjustment and am happy with the results.
.............I did this to better center the wheels within the wheel arches and to aid a bit my pinion adjustment.
.............This wasn't a big deal since I was had to get a custom driveshaft made anyway.
Last edited by GoDadGo; 08-23-2020 at 08:33 AM.
-
Originally Posted by
Jeff Kleiner
You want to hear the ugly truth (which will get some panties in a knot)...lots of guys find out that once you get past bragging rights at the cruise in some of those "fire breathers" can be kind of hard to live with and aren't so much fun afterall
Jeff
Exactly correct- I have 42000 miles on my old pushrod 302- t5 with 355s.
Not many of these fire breathers have many miles on them.
Only thing I may suggest if you are
Going with standard size brakes is to go with power brakes.
It will be blast to drive and super civilized.
And yes, I do love Coyotes if the budget allows. But I do not consider it a fire breather😎
-
Originally Posted by
rthomas98
The axle has arrived. Hope I uploaded the image right first time doing this.
Attachment 134041
I'll get it out of the crate and on stands tomorrow.
Hey, that looks just like the first part of my build to arrive a couple of years ago! As Jeff said, you don't need mega horsepower to have fun in these cars, and I have the most fun just cruising and soaking in all the waves, shouts, thumbs-up, and even the dumb questions along the way.
Your pictures will have more impact in your build thread if they are posted following these instructions rather than as an attachment that people have to click on to enlarge:
https://thefactoryfiveforum.com/show...tures-in-posts
Here is your image posted this way:

Dave
-
Post Thanks / Like - 1 Thanks, 0 Likes
-
Senior Member

Welcome to the family. Your build plan sounds perfect. I have to agree with Jeff above in post #5 (that's a no-brainer, we always agree on stuff), most of the "fire breathing monsters" that I've ridden in and/or had the chance to drive aren't that much fun if you have to be throttling back all the time just to drive.
My little 302 powered MK-II Cobra has seen a lot of time on the road and I wouldn't change anything about it manners on the highway or city streets. I built my car with the idea that I was going to be doing a lot of cruising, more than the few miles down to the local car show on the weekends . . . I built it so I could go 500 miles a day and not be beaten to death by the ride - creature comfort was important, reliability was important, being able to stop at ANY auto parts store if something did brake was important. Nothing "exotic" in my engine, standard T5. The car is a dream to drive . . .
Just my 2¢
Doc
FFR3712K (MKII) in Lost Wages Nevada.
5.0 w/tubular GT-40 EFI, E303 cam, Custom 4 into 4 headers, T5, 3-Link 3.73 rear. Full F5 tubular suspension. Drop Butt mod, Dash forward mod, custom foot box air vents, custom turn signal system. 13" PBR brakes, Fiero E-Brake mod, Flaming River 18:1 rack w/ F5 bump steer kit on Breeze bushings. 17" Chrome Cobra "R's" w/ 275 fronts and 315 rears. MKIV seats. FORD Royal Blue w/ Arctic White stripes.
-
Post Thanks / Like - 0 Thanks, 2 Likes
-
Senior Member

Originally Posted by
Jeff Kleiner
You want to hear the ugly truth (which will get some panties in a knot)...lots of guys find out that once you get past bragging rights at the cruise in some of those "fire breathers" can be kind of hard to live with and aren't so much fun afterall
Jeff
This quote can not be any more true! My wife and I import and breed jumper horses from France and Germany, and one of our trainers says " All of the horses you breed can't be fire breathing dragons...... They can be hard to ride and live with"...
And to quote another one of our horse trainers " You want a horse you have to kick to the edge of the cliff, not one that will take you there freely..." I think that quote fits well with these monsters. I think the 347 I am going to be installing will be more than I ever want to handle.
Last edited by nucjd19; 10-19-2020 at 09:00 PM.
-
I'm hoping to start one of these MK4 kits, but my preference is to have a removable hard top. Has anyone gone this route? Any ideas?
-
that sounds close to what I want to build with the exception of a 5.0 engine used. also, IR rear axle etc.
what do you figure your time to complete would be? Curious
-
the luxury of having the time to enjoy the project minus the constraints of time is a blessing. I can afford to do it but since I am now a renter without a garage to build one is rather frustrating.
I saw a post yesterday with photos of a MK4 delivery and the frame seemed to have all the, or most of the sheet metal panels already installed. Wonder if thats common
-
Senior Member
Congrats! You are starting an incredible adventure, and it's great that your daughter gets to participate. I look forward to following your build.
MKIV Complete Kit #9822 l BluePrint 347 EFI l TKO600 l Power Steering l Heater/Defrost l
Build Thread
-
Senior Member

An exciting day, indeed! Glad to see you have a helper to keep you on the right track. 
My complete kit is about three weeks out from delivery...can't wait.
Chris
Chris
Coupe complete kit delivered: 4/22/24.
Build Thread. Coyote. T-56. IRS w/3.55. Wilwoods. PS. HVAC. Side windows.
MK4 Complete kit.
Build Thread Index. Delivered: 10/15/2020. Legal: 7/25/23. Coyote Gen3. TKO600 (0.64 OD). IRS w/3.55. PS. Wilwoods. Sway bars. This build is dedicated to my son, Benjamin.
Build Thread.
-
Senior Member

Originally Posted by
rthomas98
Question for the group though is it better to put the F-panels on now or wait until the front suspension is built up? I see some areas where it looks like it would be easier to install stuff without it, but I also see once that stuff is there might not be the easiest to install it itself. Just looking for some thought.
Hello from Lake Orion. Congrats on your kit order and delivery! You're in for an excellent adventure. For the F-panels, you'll get different opinions on this. Like many choices, "better" is in the eye of the builder. Not absolute. The Factory Five manual shows installing them first, e.g. before the front suspension components. That's what I've typically done. But you can also install them afterwards if that's your choice. Just be very careful about rivet placement. Especially on the lower bar under the UCA mount. Easy to locate them where they're inaccessible with the suspension in place.
Build 1: Mk3 Roadster #5125. Sold 11/08/2014.
Build 2: Mk4 Roadster #7750. Sold 04/10/2017.
Build Thread
Build 3: Mk4 Roadster 20th Anniversary #8674. Sold 09/07/2020.
Build Thread and
Video.
Build 4: Gen 3 Type 65 Coupe #59. Gen 3 Coyote. Legal 03/04/2020.
Build Thread and
Video
Build 5: 35 Hot Rod Truck #138. LS3 and 4L65E auto. Rcvd 01/05/2021. Legal 04/20/2023.
Build Thread. Sold 11/9/2023.
-
Originally Posted by
rthomas98
Hello Paul, Thanks for the feedback. I was leaning towards putting them on after the lower control arms went on. Looks like the only thing that the F panel really gets in the way of when looking at the manual.
Great way to look a couple of steps ahead. Thinking like this will save you a lot of grief as you progress in your build. Now for the part where I try to help you spend your money. Before you get too far into building up the front suspension, consider spending $10 on a set of Energy Suspension ball joint dust boots and toss the upper ball joint boots that came with the kit.
Here are a couple of pictures to help convince you.
Kit supplied upper ball joint boots:
Energy Suspension boots installed:

-
Here is where I got them. You may find them locally as well:
https://www.amazon.com/gp/product/B0...?ie=UTF8&psc=1
Energy Suspension 5.13102G Ball Joint Dust Boot for Chrysler
They come as a set of four (upper and lower), but I only did the uppers (the smaller size in the set).
-
Post Thanks / Like - 0 Thanks, 1 Likes
-
I'd simply persuade (a couple of taps with the BFH) the tab over a bit to close that small gap.
-
Not a waxer
Torque it. And remember that you want to close the frame tabs on the bushing's inner sleeve, not the poly.
Jeff
-
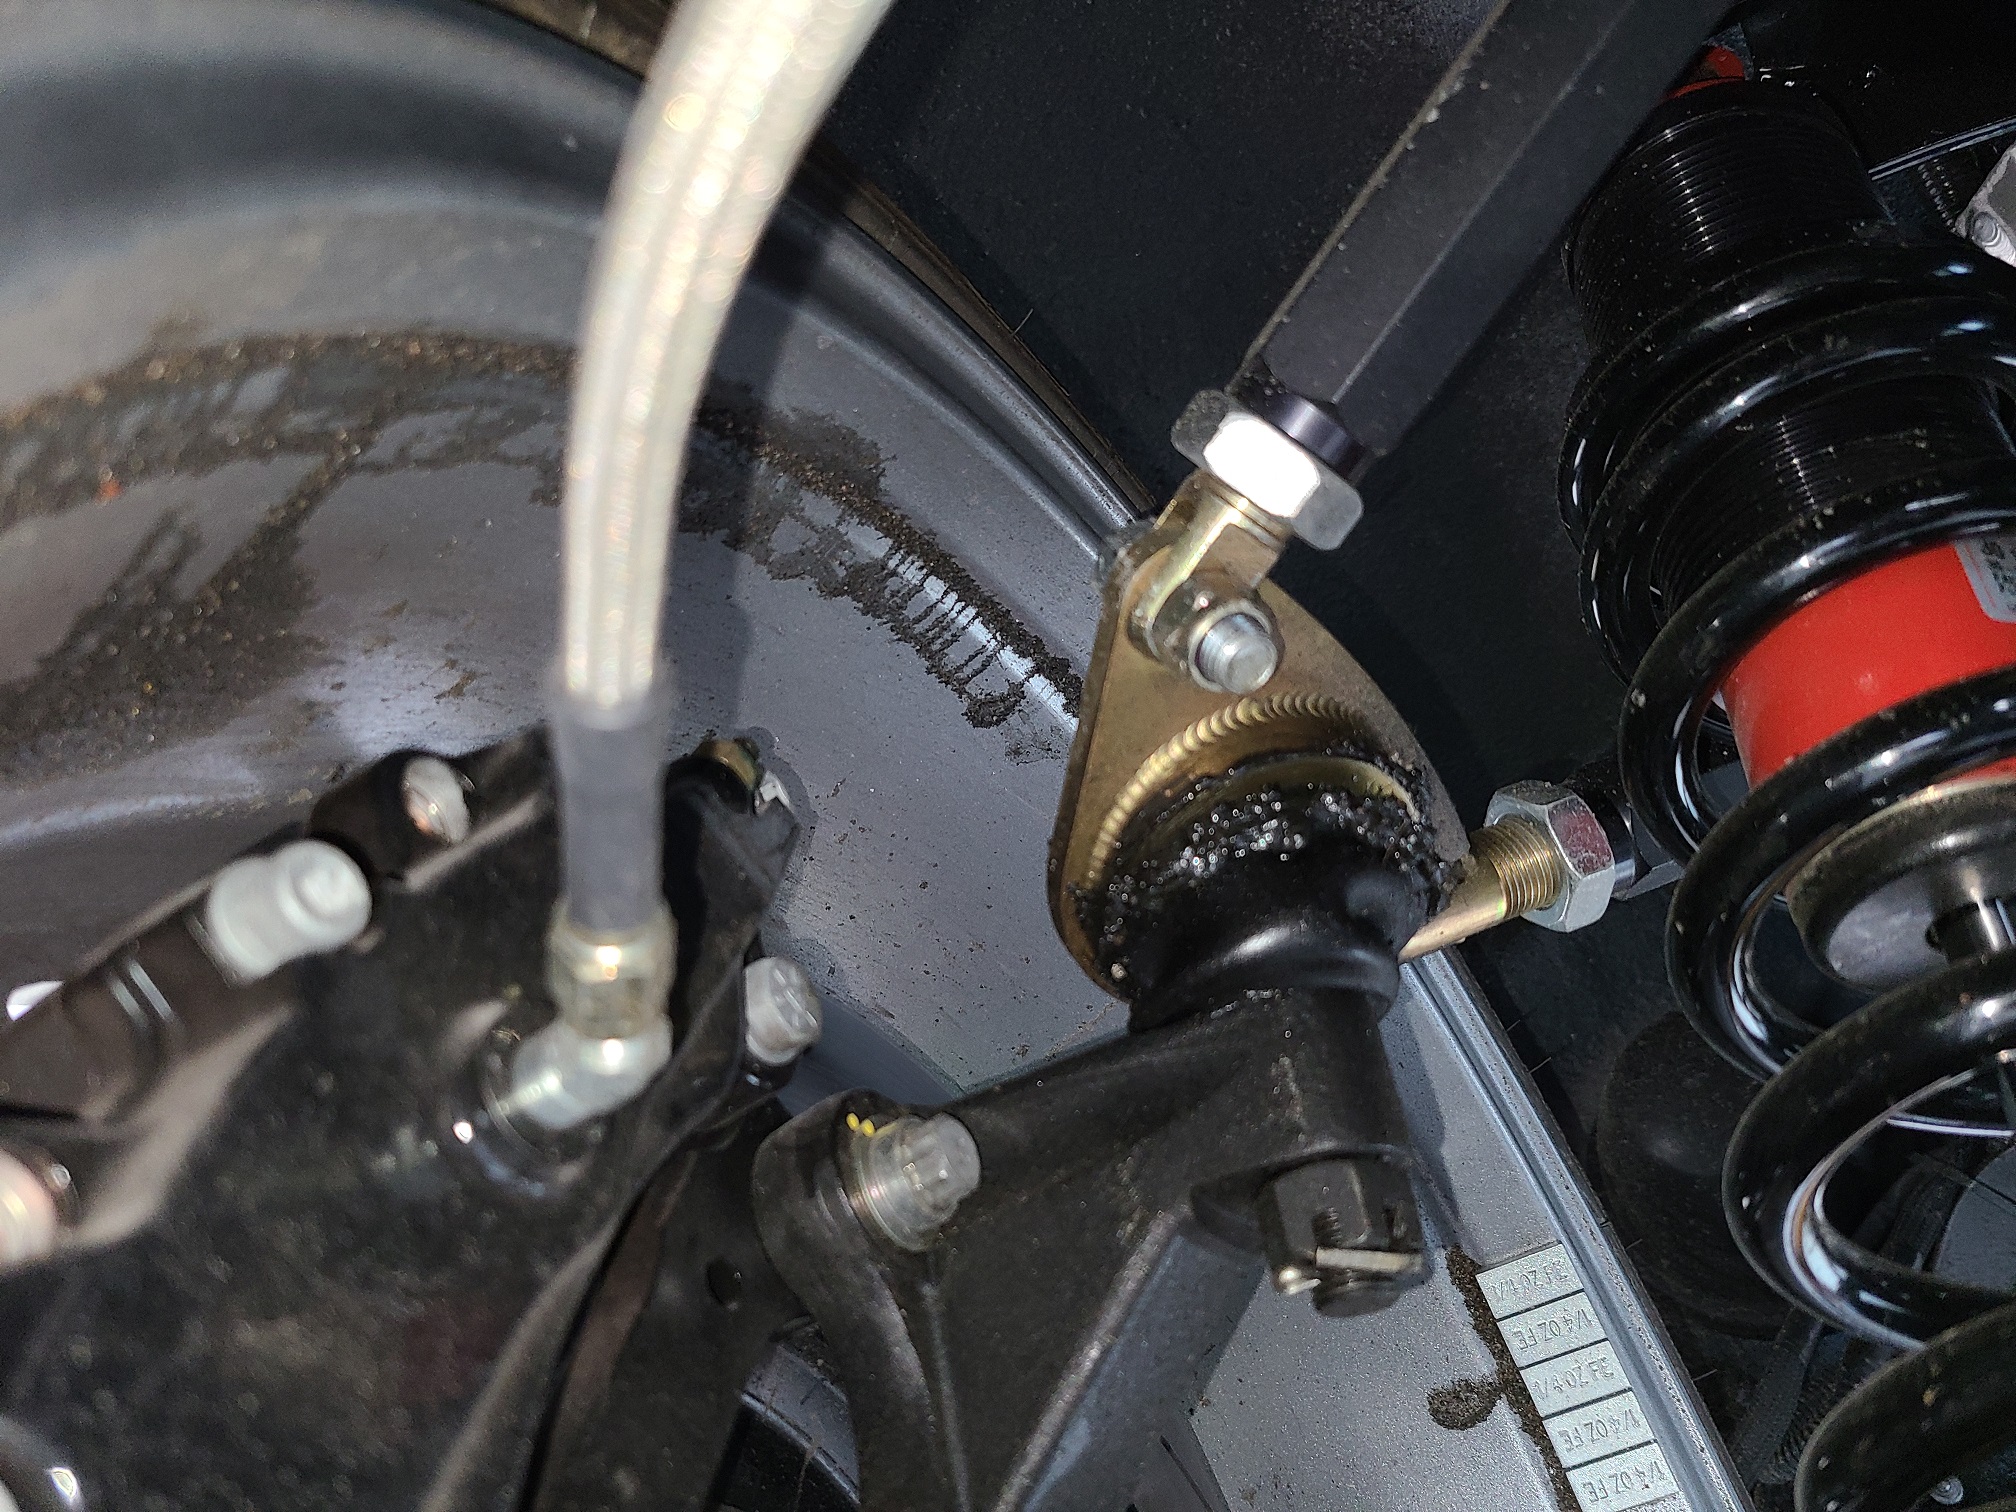
Originally Posted by
rthomas98
So my passenger side suspension is almost complete minus brakes. I am currently stopped on the driver side.
The passenger side. FYI when this pic was taken was before spindle nut was tightened. It is now tightened needed to borrow a torque wrench for it. Mine maxed out at 150 ft/lb
Attachment 136809
Currently stopped and awaiting Factory Five direction. I think I got two passenger side control arms. Unless I was supposed to install one upside down?
Attachment 136810
Are you referring to the upper control arms? You may need to reassemble them in the correct configuration for our cars. I recall mine came assembled incorrectly and I had to flip the rear bar. Also, the ball joint mounts will look opposite on either side of the car. Keep going, this project will cure you of your OCD eventually!
Last edited by Papa; 10-27-2020 at 01:34 PM.
-
Here are a couple of pics from my build. Note that the welded side of the ball joint mount is toward the front on the driver's side and the bolt-on is toward the front on the passenger side.


-
It really doesn't matter where the bolt vs. weld are, but only that the tall side of the angled ball joint mount is properly oriented to cant the ball joint outward vs. inward.
-
Senior Member
I'm just a newbie here, so take my comments at face value. But since you mention that you will be installing power steering, keep in mind that many forum members have recommended trimming the upper control arm sleeves to allow for adequate room to achieve the required high caster for PS. Here is my experience (but full disclosure, I have not yet completed my front-end alignment):
Originally Posted by
JB in NOVA
So I’m continuing to make progress . . . slowly but surely. I spent a few hours today finishing the front suspension. With everything fastened but not torqued to spec, I attempted to adjust the upper control arms to match the rough alignment recommended in the manual for power steering (high caster):

As many others have reported in this forum, I was not able to get the rear arm adjusted down to 7.375 inches, measured from the center of the pivot bolt to the center of the ball joint. On the passenger’s side, I could only get to 7.75 inches (although there was probably still another ¼ inch of thread left to play with if I re-centered the adjustment sleeve). On the driver’s side, I could only get to 7.4375 inches:


Based on the recommendation of others on this forum, I decided to trim the rear adjustment sleeves to allow more leeway for this alignment. I used a hacksaw to trim about 3/8 inches from one end of each sleeve, and a Dremel sanding tool to clean up the cut:


I used a Dremel cutting wheel to cut the bolts the same amount. On the PS, I found I needed to cut both bolts about 3/8 inches. Once I did this, I was able to get both UCAs into the recommended rough alignment for power steering.
After this, there was just one last thing I needed to get everything in the front suspension torqued to spec. Having struck out trying to rent a large torque wrench from Auto Zone, Sun Belt Rentals, etc., I finally gave in and bought a big-azz torque wrench and a 36mm socket for the hub nuts. With these, I was able to get the hub nuts torqued to 225-250 ft-lbs without too much trouble at all:

It’s amazing what a long lever arm can do! I now have a fully assembled and properly torqued front suspension.
MKIV Complete Kit #9822 l BluePrint 347 EFI l TKO600 l Power Steering l Heater/Defrost l
Build Thread
-
I did not cut mine and the alignment is good. I think they were able to get a bit more than 7 degrees of caster. The car centers well and is very stable at all speeds.
-
Not a waxer
For power steering set the forward leg to approximately XX from the center of the ball joint grease fitting to the cross bar pivot grease fitting. Set the rear leg to approximately XX fitting to fitting. I did this to Papa Dave’s car when I had it and I think he’ll confirm that it’ll get you pretty darn close
Jeff
CORRECTION I realized that I transposed my numbers above. The rear leg needs to be approximately 8.5" and the forward leg should be 9.25"
Sorry for the confusion.
Last edited by Jeff Kleiner; 10-30-2020 at 12:00 PM.
-
Post Thanks / Like - 1 Thanks, 1 Likes
-
Originally Posted by
Jeff Kleiner
For power steering set the forward leg to approximately 8.5” from the center of the ball joint grease fitting to the cross bar pivot grease fitting. Set the rear leg to approximately 9.25” fitting to fitting. I did this to Papa Dave’s car when I had it and I think he’ll confirm that it’ll get you pretty darn close
Jeff
Exactly! When I shipped my car to Jeff, it was way off of where it needed to be and after discussing it with Jeff, he agreed to "get it close". When I got my car back and took it to an alignment shop, it was nearly perfect. The shop was surprised that it was that good with no computer alignment. It took just about fifteen minutes on the rack and it was done.
-
Senior Member
Originally Posted by
rthomas98
Is this the part of the initiation "Can we get him to cut something".
I will check I believe I achieved the numbers, but if there is a chance the back will need to be shortened further I will cut it. Thank you for the insight. Do you know if this the same whether it is a FF5 supplied ps rack or is this an issue if you use a mustang one. I know cutting is involved if using the mustang one.
Ha ha! I've had similar thoughts during this process. As FMan says, "Trust but verify." As I noted, I have not yet personally confirmed that cutting the sleeves is necessary. I will report back when I find out for sure.
MKIV Complete Kit #9822 l BluePrint 347 EFI l TKO600 l Power Steering l Heater/Defrost l
Build Thread
-
Not a waxer
Originally Posted by
rthomas98
...Thank you for the insight. Do you know if this the same whether it is a FF5 supplied ps rack or is this an issue if you use a mustang one...
The rack has no bearing on the upper control arms. Only the rear adjuster sleeve is affected; with FFR spindles and control arms with the angled ball joint plate it usually needs to be shortened about 1/4” to achieve 8 degrees positive caster and >.5 degree negative camber. I’ve done “a few”
Jeff
-
Post Thanks / Like - 1 Thanks, 0 Likes
-
Not a waxer
Originally Posted by
rthomas98
Ok Just to make sure I got the measurement correct. The below is the recommended. Want to make sure I am going proper point to point as you described above.
See the correction in post #59 above.
Jeff
Last edited by Jeff Kleiner; 10-31-2020 at 04:51 AM.
-
Post Thanks / Like - 2 Thanks, 1 Likes
-
Not a waxer
Whoa! MY MISTAKE! I transposed the dimensions in post #59 The rear leg is the shorter one and needs to be 8.5" and the forward leg needs to be 9.25"
I have corrected it in the earlier posts. Sorry for the confusion.
Jeff
-
Post Thanks / Like - 0 Thanks, 1 Likes
-
Originally Posted by
rthomas98
quick question for the group. I am installing the power steering rack and there is bushings and sleeves already installed. Do I use these or do I press them out and switch for the sleeve and bushing that came with the kit?
Attachment 137129Attachment 137130
I think the answer is to press them out and switch but just want to make sure.
Yes, you need to swap out the soft rubber ones for the hard bushings that came with the rest of the steering parts.
-
Make sure your steering arms are not upside down! The bore is tapered and should fit the tapered ball stud.
-
Originally Posted by
rthomas98
I assumed the machined side was what went down, powder coated side up. Do I have that backwards?
Check the taper. From the drivers side picture it looks upside down to me.


 Thanks:
  Likes:


 Reply With Quote


