-
FFR Maven

I bought a barely used 20ft car trailer. I lucked out and saved the wait time and got a good deal, since supply is low and prices are high at the trailer dealers. Immediately after getting it home, I chopped the left fender off. Welded up a removable attachment system, so I can now haul low vehicles and still open their doors while parked on the trailer. More trailer mods planned, such as longer ramps, tail jacks, rock guard/tire rack/toolbox combo, extra lighting, etc.

Fabricated custom exhaust. I was basically forced to do something different than the FFR twin-sidepipes that come with the Coupe for two reasons: they're too loud for sound restrictions at certain tracks/events, and they are restrictive on high RPM flow (sucks because I love the look of the twin pipes). My solution was to fabricate a custom elbow with a 4-bolt flange to match the square-ish FFR/GP Headers on one leg, and a 4" V-band on the other leg, in as tight of radius as possible. Then, using multiple interchangeable sidepipes each with their own V-band flange welded on at the inlet, I could quickly swap mufflers of varying loudness onto the elbow which remain bolted to the car. Let me be clear...this is not a simple fabrication job. The amount of angles required to get the alignment just right on the elbow are pretty intense. Also each elbow is custom, they are not mirror images of one another. The elbows are 4" OD 1D bend radius in 304 stainless. The flanges were CNC plasma cut from 3/8" thick 304 stainless, and SS 4” interlocking V-bands. I drew the flange in SolidWorks, and radially slotted the holes a few mm to have some adjustment in the height of the sidepipes, which does work but beware that due to the negative angle at the header outlet this causes the sidepipe to also move in-out relative to the body as it moves up-down. Ultimately I think they're going to work fine, but I may be tweaking them or building a second set once the body is finished and painted. Also, I use stainless wire in a MIG welder, but I REALLY wish I had a TIG for things like this.

My 4” OD side pipes each have 36" stainless augers inside, and sound decent. Quieter than FFR twin-pipes, but still too loud for autocross. I will either make a second set with reverse-flow baffles, or fill the last 12” of my current ones with fiberglass or coarse stainless steel wire to meet the <96dB requirement.
As soon as the new exhaust was finished, we loaded the car on the trailer for the first time for a test haul. Drove it up the 5ft ramps no problem (for now…once the splitter is on I'm going to need reeeeally long ramps), and then figured out straps. For the rear, I put the hooks directly into the holes just above the rear differential. This will be too high and hard to reach once the body is on, so I think I'll put some tie down mounts in my lower airjack brace. For the front I used axle straps around the lowest 1.5" frame tube just behind the swaybar. Again, this will be nearly impossible to reach once the body is on. Maybe I’ll start strapping the tires instead of the chassis. Towed the car about 20 miles to an empty parking lot. Unloaded the car there and drove it around to put some more mileage on the Tilton clutch before dyno day. They wanted 100 street miles on it for optimal break-in, but since I’m not registered yet I did about 35 miles of stop and go over the past few months, which I figure was close enough to 100 miles of city commuting. Loaded up and went home. The trailering process is very easy with the tube chassis.

Three days later I loaded up again and hit the road for Nashville to get it dyno tuned, with two friends and my fiancé. I couldn’t get my ideal choice of shops, but our local autocross site recently opened from being on CV19 lockdown, and I wanted to be ready for the Test-n-Tune on 6/12/21, so a time crunch forced the decision. Local options for tuners who are familiar with the Coyote (especially Gen3), plus tuning on an actual dyno with HP Tuners and not the week-long email back and forth with Lund and their locked devices/files, are few and far between. That’s me on the far right repping the FFR shirt. Everyone loved the car too.

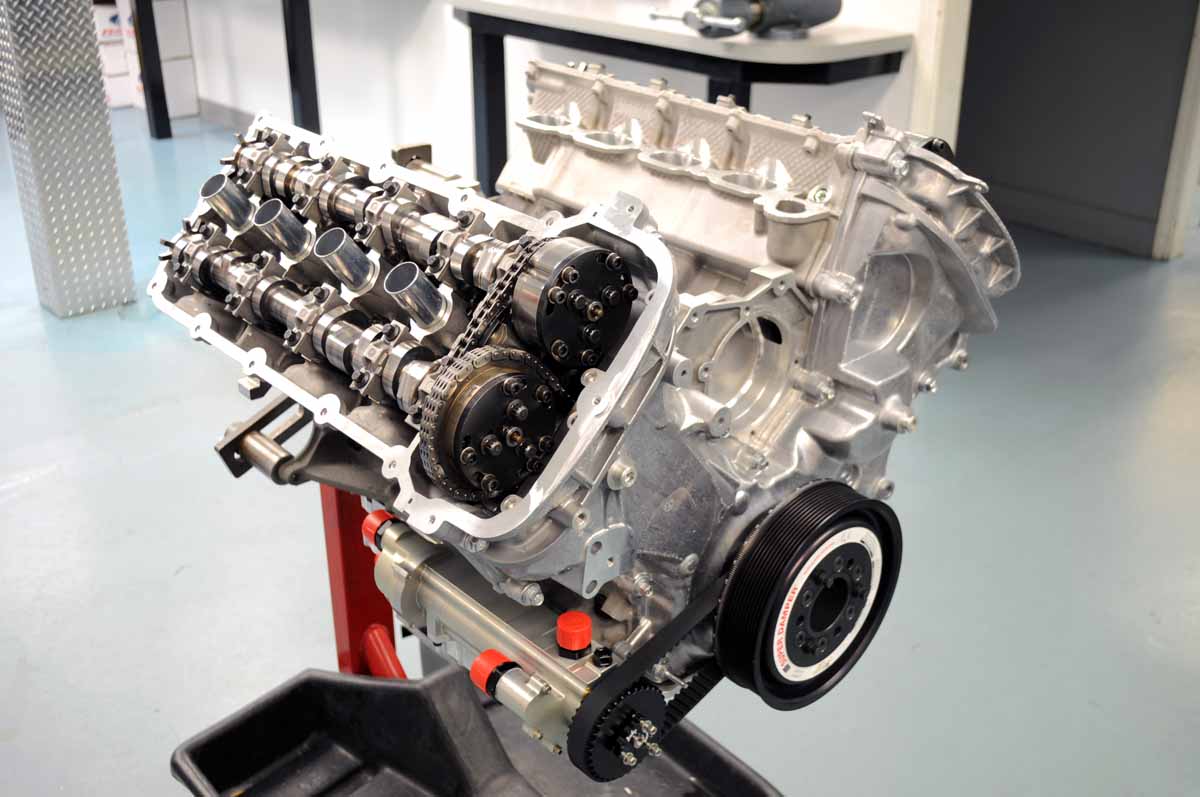
Dyno experience was pretty good. Spent all day there, did idle tuning, part throttle tuning, and of course WOT. I filled the tank with ¾ tank of fresh 93 octane on the way up, and after completing the tune for premium, they poured in about 6 gallons of E85. For best results we should have drained the 93 out before putting ethanol in, but the mixture was enough for them to tune the flex fuel tables anyway. Per the tuner, it was reading about 40% ethanol content (instead of 85). Since I had installed billet steel oil pump gears and crank sprocket, we were able to raise the redline to a stratospheric 8,400rpm. The lack of big power on the top end is due to my MAF tube. I made a big mistake buying a 3.5” ID MAF adapter tube because that’s what fit the FFR provided silicone elbow and pod filter. I should have used the 4.75” ID one which would be a huge improvement in flow. Enlarging the intake and getting a full tank of pure E85 would have resulted in 480+ rwhp. As it stands, 457hp and 421 tq is the result. Dyno sheet got cut off in the printer, but this shows the graph up to about 8k. I think I can make this work for now.

My Ram 1500 4x4 Crew Cab gets about 18mpg empty, and got about 12mpg when towing through the rolling hills of Tennessee at 80mph. On the return trip, it looked like we had about an hour of daylight left so stopped by Erik Treves’ place and let me tell you…he has his hands full! Projects abound. The F9 is coming along nicely, and that V12 is a thundering beast. Shared my progress on the Coupe-R, and finally made it back home just after dark. Weighed the car as it sat and it was 2,496lbs with a full tank of fuel. Rear half of body weighs 75lbs, front half 79lbs. Glass, carpet, Dynamat, lights, wiring harness, aluminum, etc. all still have to go in. Looks like I’m not going to make my goal of sub 2,800lbs… hopefully under 3k at least. A bit disappointed, but attribute a good chunk to the –R frame being ~80lbs heavier than the –S frame, and my airjacks probably added more than I think since the mounts are all 3/16” steel and beefy. Guess I’ll just have to drive faster to make up for it all! Lol

-
Post Thanks / Like - 1 Thanks, 4 Likes
-
Member

-
Great purchase you have here!
I am very excited about the progress of this project. I am no fan of the wheel because it is quite common. The pattern reminds me of the KMC wheels Duece model.
Last edited by Mitchelle; 05-30-2021 at 09:22 PM.
-
FFR Maven
In the autocross world, there are "Test-n-Tune" events, which are small autocross courses combined with skidpads, designed to allow people to test their vehicles (and all the changes they made over the winter) before the season of autocross points events begins.
My first time really driving the car was at the TnT event on 6/12/21. Unlike my puttering-around side street miles to break in the clutch, this was the first time hammering on the car. About 70-80% of normal race pace. Hard acceleration, steering, and braking. With a completely new build, I had no idea what to expect. Initial impressions were understeer. Increased negative camber in front, and drove again. Still understeer, so I disconnected the front swaybar. Next run I thought I fixed the understeer issue, but couldn't be sure because it had just started to rain. Loaded up the trailer and wrote down my minimal findings.
Next event was Autocross Points #1 (of 8 total) on 6/20/21. I had replaced the front 750lb springs with 600lb springs, and verified the alignment. -2 camber all around, -6.5 caster, 0" toe front, 1/16" toe-in rear, thrust angle good. Weather cooperated this time, sunny and 91 degrees. Got a total of 6 runs an a roughly 60 second course. First thing I noticed was lift off oversteer. This unfortunately makes a car very hard to drive quickly. Approaching a corner with steady throttle/speed, as soon as I lift off the throttle and initiate turn-in, the rear end steps out and does not stay behind the car. Occurred whether or not the brakes were used. Several small changes made throughout the day, and each of those changes made a marginal improvement, but ultimately ended the day still experiencing oversteer. Small changes were: decreased tire pressure finally settling on 22psi, move brake bias 6 turns towards the front, increased rear toe to 1/4" toe-in (extreme but was looking for a temporary major change), and lowering front ride height from 5.25" to 4.25". I left the event planning to make more changes before the next one. Jim S. at FFR suggested having about 150lb split between front and rear spring rates. I plan to put the 750lb back in front, and put the 600lb in rear, and also reconnect the front swaybar starting with the softest setting.


LCS 2021: My first time attending the London Cobra Show! Have always watched it from afar, but never went until this year. Did not take my Coupe because it's just a go-kart, but there was a MK4 Roadster there as a rolling chassis not even driveable, so I probably could have taken mine. Oh well, maybe next year I'll be more prepared. Had a blast meeting the people behind the names I've known via the forums for years. Lots of representation by FFR, but also Shell Valley, Hurricane, Superformance, ERA, etc. The charity rides were fun to see, indoor electric go-karting (which may be my newest hobby, super fun!), and the food and speakers at the gala made a great Saturday evening. The raffle car was drawn, went to a Dublin, OH local who was not present at time of drawing. Overall the event raised $130,000+ towards CF, and brings the total nearer to $2M to date... crazy! If you have never been to LCS, put it on your calendar for next year!
-
Post Thanks / Like - 0 Thanks, 1 Likes
-
Administrator

Car is looking great Logan. Good to meet you and Ashley ar the LCS. Hope to see you guys soon!
Henry
-
FFR Maven
I haven't run any events since my last post, unfortunately. However, I have made some changes to the car. More suspension analysis resulted in changing from my previously tested spring rate setup of 600/400 straight to 850/500 (skipping the 750/600 I was planning in my last post). I reconnected the front swaybar, in hole 2 of 4 (4 being firmest). I also finally installed the rear swaybar, and connected it in hole 1, which is the softest (4 being firmest). I need to remove some of the rear toe-in now, because that was a trackside change between runs at the last event to attempt to tame the oversteer (that didn't work, by the way). I should probably also set the ride height and check corner weights if I can before Saturday. I really need my own set of scales... "Dear Santa....
As some of you Gen3 Coupe builders have discovered, the rear tires are prone to rubbing on two short square tubes behind the seats, on the rear of the cockpit. Primarily the angled tube will be touched first, if the tire is large enough or the suspension is compressed enough. Even a smaller tire (275-295) can rub the angled bar if the suspension is compressed enough (easy to do if using the "Race" height option of the chassis). The second bar is horizontal, just above the angled bar, and it too can be hit by the tire if running large tires, low ride height, or enough compression in the suspension happens. Solutions include:
1. Smaller tires
2. Higher ride height
3. Less aggressive driving
Since none of those are options for me, I chose to notch the angled tube. It's the major offender here. I don't know if the upper tube will be an issue, but I'll watch for it. Since the strength of this notched tube is now majorly decreased, I will reinforce this triangulated zone by adding a tube or channel/angle to the cockpit side. Gained at least 0.5" in this area.

I registered for an autocross at Barber Motorsports Park in Leeds, Alabama (Birmingham area) for this coming Saturday 8/14/21. It's not my home region, but it's only 1.5 hour drive, and I want to use it as a personal test and tune event before my next home region event the following weekend (8/21/21 Points Event #3 of 8). Much of the testing I need could be done on a skidpad, basically steady state driving in a 200ft diameter circle accelerating until you lose traction at either end. That would tell me if I'm still oversteering or if I've transitioned to understeer yet. It's funny, but as many big parking lots are out there, very few of them are useful for things like this. Either always busy, have cars/islands/light poles in the way, or are otherwise unusable. So I'll just keep registering for autocross events as I can.
I'm starting to think about the part of this build I've been dreading the most. The body...and bodywork...and paint. I installed the rear body shell, and will be working on fitting it as I have time. I need to get the nose on soon too, because they really need to be fitted with one another. I have painted a vehicle before, a 1989 Ford F250 in Olive Drab Green, and it turned out fine, but it's not my calling. I don't have much equipment or space for doing it, even if I really knew what I was doing. I have considered investing and building a booth and getting a decent gun, but I'd rather not if I can help it. The upside to all this in my particular case is that I do not want a Concours show-quality paint job. I want it to look decent, and be shiny, but I don't mind if it's below the average "Outta this world" level you often see on these FFR cars, with paint so deep you could swim in it.


I've been working on my car trailer as I get time also. Building a large enclosed box on the front to hold a full set of wheels/tires, stack of Milwaukee Packout with tools and parts, fuel jugs, folding canopy, winch, chairs, scooter, tire sprayer, etc. Basically everything I need to take for an autocross or light track day. If I plan to do a weekend or bigger race event, I can add a cooler, grill, tent, bathroom kit, etc. in the pickup. The trailer will stay packed most of the time, so it just becomes as simple as hitch it up, load the car, and hit the road. Still fabricating this thing, but here is a progress shot to give you an idea of the layout.

-
Post Thanks / Like - 0 Thanks, 3 Likes
-
Or you could go full on Mad Max and just skip the body��. Bodywork isn't my thing either. I'll be paying someone to paint mine for me when I get to that point.
-
Worst case, in full racecar fashion, you could wrap the car in something semi gloss, though the body panel size means you'll have a few seams. Easy to replace the wrap once you pass your tolerance for rock chips and melted r-compound rubber bits.
-
FFR Maven

Originally Posted by
Bluemont

Or you could go full on Mad Max and just skip the body��. Bodywork isn't my thing either. I'll be paying someone to paint mine for me when I get to that point.
I've thought about skipping the body, but that would put an end to my 200mph goal pretty quick!
Originally Posted by
bspaulsen
Worst case, in full racecar fashion, you could wrap the car in something semi gloss, though the body panel size means you'll have a few seams. Easy to replace the wrap once you pass your tolerance for rock chips and melted r-compound rubber bits.
I have also considered wrapping. There are some wrapped cars around the Huntsville area that look really good, but the price is like 75% of a real paint job, and at that point I think I'd rather have it painted. Maybe I should race it for a while in gel coat first, because by the time I get some battle scars on it I'll be ready to rattle can the car myself and call it a day. Lol (kidding...mostly)
-


Are you going to dry sump it?
Edit: Disregard, I found your post #21 in Doug's Coupe-R Build Thread. I hope going wet sump works for you.
I think you will regret it though. Yes they are expensive, but not as expensive as a new Coyote will be.
Have you read John George's Thread on installing a dry sump? https://thefactoryfiveforum.com/show...-oiling-system
There are choices out there: Dailey Engineering, Armstrong Race Engineering, and the one you mentioned, Aviaid.
The Armstrong (A.R.E) is not on his website but it's in his physical catalog, part 1316.
I've spent lots of time talking with John@Aviaid, I have two cars with his pumps. And I just ordered a Spintric from Gary@ARE. Both of those guys are happy to spend as much time as needed to figure out a solution that works for you.
The Dailey:
Last edited by Sgt.Gator; 09-04-2021 at 06:31 PM.
"Good Judgement comes from Experience. Experience comes from Bad Judgement"
Owner: Colonel Red Racing
eBAy Store:
http://stores.ebay.com/colonelredracing
818R ICSCC SPM
2005 Subaru STI Race Car ICSCC ST and SPM
Palatov DP4 - ICSCC Sports Racer
-
FFR Maven
Sgt. Gator - Current plan is most likely to add an Accusump. Dry sump would absolutely be better, but not in the cards right now.
I encourage other builders to plan for the dry sump from the get go, it would be much easier to incorporate early on. The Dailey Engineering kit is a work of art. Aviaid looks to be very good too. Hadn't heard of the ARE setup before.
-
FFR Maven
If I'm going to bump some fellow builders' threads asking for updates, I figured I better update my own too!
Regrettably, there has not been much progress in the form of adding parts to my car. Work, home life, building/modifying my trailer, you know how it goes. However, some (limited) progress has been made to the handling dynamics. I have been autocrossing the car for the latter half of this season in go-kart form, first with no body as shown above and recently with the rear body in place. My rule was, if it wasn't raining, I was running the Daytona at every event our local club held. The problem was that it rained for the first half of the events! Regardless, I have tinkered with spring rates, swaybar settings, alignment, brake bias, ride height, tire pressure, gear choice, having and not having passengers, etc.... and learned some things.
1. A car with extreme oversteer equals so much frustration that I didn't even want to drive the car anymore
2. It takes completely removing the rear swaybar, and fully stiffening the front to even begin reducing the oversteer
3. I still have not reached steady-state understeer... I need a stiffer front swaybar!
4. The FFR/Miata swaybars suck to adjust. The endlinks are too short. I'm about to abandon them and go custom
5. I have big Wilwood rotors and calipers, but no stopping power. Fought the bias for a while, with little success
6. The borrowed 300TW summer tires I've been running are holding back my chassis tuning, fresh 200TW rubber coming soon
7. New tires means new wheels. I ordered a set of custom bespoke SDC Forgestar F14s on Cyber Monday:
a. Front 18x11+30 with 12mm spacer (+18 effectively), and 275/35R18 RT660
b. Rear 18x12+6 with 32mm spacer (-26 effectively), and 315/30R18 RT660
At the last autox event, I finally had a setup with decent handling (but still awful brakes). This small win was incredibly motivating and made me want to actually drive the car again. I'm currently using Wilwood BP-10 pads, and I wouldn't even use these as coffee coasters... they're terrible. I'm going to try EBC Blue Stuff next and if they aren't enough, I'll go with Carbotech or similar. I'm just trying to avoid Hawk simply because their brake dust is super corrosive, and I don't need to accelerate the rusting process of my entire suspension, nor do I wish to destroy my wheels or eat through rotors like candy. I hope the Blue Stuff works as well as I've been told by a national champion autocrosser. I wish I knew what the car was SUPPOSED to feel like. I've never driven a properly setup Cobra or Daytona Coupe so I have no reference point or idea of what it should feel like.
Here's a video of the last event if you want to see what a no-grip, no-brakes, slight-oversteer-tendency Daytona looks like on a sealed asphalt autocross course:
The legendary PRI tradeshow is next week at the Indianapolis Convention Center and Lucas Oil Stadium. I'll be there checking out new products and getting ideas on how to further slow my build down for the sake of cool mods I don't really need. Anyone else going to be there?
-
It may not drive the way you want it to but it sure sounds good!
-
Good morning Logan,
I am going to respond to a few of your comments and can hopefully help. Dave Tabor would also be a great resource on the forum as he auto crosses and tracks his coupe a lot.
A car with extreme oversteer equals so much frustration that I didn't even want to drive the car anymore
I had the same feelings after building my roadster, a handful to say the least and not happy at all.
2. It takes completely removing the rear swaybar, and fully stiffening the front to even begin reducing the oversteer
I have had a roadster and a coupe from FF and realized the rear sway bar needs to be removed asap and Dave will agree after his issue with a wall at Laguna Seca after he attached his sway bar.
3. I still have not reached steady-state understeer... I need a stiffer front swaybar!
Remove rear bar and see what happens
4. The FFR/Miata swaybars suck to adjust. The endlinks are too short. I'm about to abandon them and go custom
Agree but I have not done it yet.
5. I have big Wilwood rotors and calipers, but no stopping power. Fought the bias for a while, with little success
I have the 14 inch wilwoods from Levy Racing which I believe you do as well. The pads included with the calipers need some heat. I ride the brakes going to starting line and they work great
6. The borrowed 300TW summer tires I've been running are holding back my chassis tuning, fresh 200TW rubber coming soon
I am running 200 TW Rival S and love the tries, stick like glue.
7. New tires means new wheels. I ordered a set of custom bespoke SDC Forgestar F14s on Cyber Monday:
Also running forgestar F14's with custom backspacing from Levy Racing, no spacers needed.
a. Front 18x11+30 with 12mm spacer (+18 effectively), and 275/35R18 RT660
b. Rear 18x12+6 with 32mm spacer (-26 effectively), and 315/30R18 RT660
Once you get it sorted out you will love the car. My roadster took many auto cross days to get it balanced and driving
the way I wanted. Between removing the rear sway bar and lowering the rear ride height it became a pleasure to drive. I
learned a lot with that car and it has made tuning the chassis on the coupe a quicker process.
I do have an auto cross run on my youtube channel which I think you subscribe to. Car did very well for it's first time out, middle upper of the pack.
-
Logan,
What are your alignment specs by the way? I had to run -2 degrees camber in the front and -.7 in the rear for good balance on the roadster.
Duplicated that on the coupe. Just tossing out ideas as I feel your pain.
-
Logan,
Out of curiosity, what is the piston area on the Wilwood calipers? And running the stock 3/4" MC's? --Thomas
-
FFR Maven
Rsnake,
Thanks for the input. I follow Dave Tabor on Instagram, and here on the forum (and the other forum). You know him better than I, but it appears he focuses more on HPDE/track events with only a few autocross events. It would be nice to compare his car setup to mine, even though ultimately our ideal setups may end up quite different simply due to use case.
3. My rear swarbar is already disconnected. The only way I can further soften the rear at this point is to use lighter springs, which I have on the shelf, but I don't want to change the transient response of the car because the springs seem to be pretty good in transitions (such as slaloms). My rear shocks are also already in the softest rebound setting (FFR single adjustable Koni Reds for now).
5. I have tried dragging the brakes from grid to the start line, and it adds heat, but did nothing to improve the bite whatsoever... from turn 1 all the way to the finish gate, the brakes suck.
7. I sent you a PM asking about your wheel offsets, but maybe you haven't seen that yet. Please share your wheel specs via PM or here. Width and offset. Sounds like you still had rear tire rub with the BFG Rival 335/30R18 even after notching the frame tube like I did. Plans to further increase clearance?
I know there's a crazy fast setup lurking inside my car, and I'm bound and determined to work it out by this time next year. I just went and watched your autox vid in your car. Looks more composed than mine when I first took it out as a go-kart, but I notice lots of body roll in the slalom leading up to the finish. What are your spring rates, and is your front swaybar set to full stiff? (hole 3 out of 4, because the 4th hole is inaccessible due to poor endlink design). My alignment specs are -2° front and -1.5° rear, 7° caster, and 1/8" toe-in front, 3/16" toe-in rear. Might be a bit much for these 300TW tires, but should be a good starting point for next year on fresh RT660s. I plan to have the car laser aligned before next season anyway, for peace of mind and validation.
GT77,
Funny you should mention master cylinder bore to caliper piston area ratios. I built the car initially with the supplied 3/4" masters on both front and rear brake circuits. After 5 autocross events, I changed the front out for a 5/8". This increased the line pressure, at the expense of longer pedal travel. I also tried to reset the balance bar assembly, and make sure I didn't have preload on the MC pushrods. The first event out after the change ended with a locked RF caliper, due to air still being in the crossover line between the front wheels. (school of hard knocks anyone?) After that event, I corrected the crossover line by routing it lower, and re-bleeding the brakes (still one of my least favorite jobs. I am considering buying a pressure-bleed tool). The next event was better. No brake issues, but still poor brake performance. No bite, and no stopping power, despite me standing on the pedal.
Front calipers: Wilwood FNSL6R 4.86 square inches
Rear calipers: Wilwood FNSL66R 4.04 square inches
Front pads: Wilwood BP-10 current, EBC Blue Stuff up next
Rear pads: Wilwood BP-10 current and will remain while testing EBC front pads (have plenty/too much rear brake anyway)
Pedal ratio: 6.25:1
-
Logan,
I am only running 500lb front and 400lb rear springs and I agree that the body roll on the slalom was more then I would like, but I have seen some really fast Cars on the auto cross which rolled a lot. Sway bar set on hole 3. So I don't plan on changing anything until I get more events under my belt. I also have the red Konis but set 1 click from full soft. Gordon at Levy racing said to go full firm but it's too much for street for me. Not sure about your brakes but I used to run hawk hp+ on a mustang and those pads are amazing, I highly recommend them. I think you are running the same calipers as I am and they make hp+ for those. My alignment specs are close but less toe in front and rear. 1/16 front 1/32 rear.
Your car will be crazy fast once you figure it out. Release the beast ��
-
I put my wheel specs on the comments page on my YouTube channel.
-
Senior Member

Originally Posted by
Rsnake
I put my wheel specs on the comments page on my YouTube channel.
Can you post a link to your youtube channel ?
Build 1: Mk4 Complete Kit #9312 Ordered 1/27/18, Delivered 3/24/18, CA SB100 Registered 9/11/19 - Gen 2 Coyote TKO600, IRS, Power Steering, Wilwood Brakes, 17" Halibrand.
Build 2: Gen3 Coupe Complete Kit #309 Ordered 1/25/21, Delivered 6/9/21 - BluePrint GM 427 LS T56, IRS, AC, Power Steering.
Album Here
-
Cobra Daytona build on YouTube.
-
FFR Maven
Originally Posted by
lewma
Can you post a link to your youtube channel ?
His channel is called "Cobra Daytona Build".... here is the link. His wheels are 18x10+0 front and 18x12+6 rear.
-
Senior Member
Originally Posted by
Rsnake
Cobra Daytona build on YouTube.
Thanks for taking the time to produce those videos. I spent a couple hours last night watching them. Great to see how others tackle and solve issues throughout the build.
Keep them coming!
mark
Build 1: Mk4 Complete Kit #9312 Ordered 1/27/18, Delivered 3/24/18, CA SB100 Registered 9/11/19 - Gen 2 Coyote TKO600, IRS, Power Steering, Wilwood Brakes, 17" Halibrand.
Build 2: Gen3 Coupe Complete Kit #309 Ordered 1/25/21, Delivered 6/9/21 - BluePrint GM 427 LS T56, IRS, AC, Power Steering.
Album Here
-
Post Thanks / Like - 0 Thanks, 1 Likes
-
Mark,
It's been fun making the videos and I hoped they help someone in the build process.
Building one of the factory five cars is such a rewarding experience and I hope a lot of people get
the opportunity to build one. Keep pushing forward on yours as its a different beast from the roadster.
-
Logan,
I recently swapped out the red FF supplied konis for some QA1 double adjustable from Levy Racing.
Nice being able to have a decent ride on the street to really firming it up for the track and auto cross. And you can adjust them in minutes.
You could also play with the front shocks being firmer than rear and tune out some of the oversteer, but I haven't gotten that far.
-
Post Thanks / Like - 0 Thanks, 1 Likes
-
Senior Member

Originally Posted by
Rsnake
Logan,
I recently swapped out the red FF supplied konis for some QA1 double adjustable from Levy Racing.
Nice being able to have a decent ride on the street to really firming it up for the track and auto cross. And you can adjust them in minutes.
You could also play with the front shocks being firmer than rear and tune out some of the oversteer, but I haven't gotten that far.
Hijacking but How are the QA1's rsnake? Been slowly going through your videos...loving it, thanks for doing all of that....guess I just want to get to the shocks spoiler early 
Last edited by rhk118; 02-10-2022 at 12:38 PM.
-
Rhk118,
I love them so far. Run them fairly soft for a nice street ride and within about 3 minutes they are as stiff as I want them to be for track and auto cross use. Gordon at Levy racing can set you up and even give you some baseline settings.
I also upgraded the springs as the Factory Five supplied ones are not very good. The supplied Konis single adjustable are nice but changing the settings is a serious pain as you need to take them off the car and pull them apart, not practical. I had the double adjustable on my roadster and they are harder to adjust than the QA1's. Should have went qa1s from the start.
-
FFR Maven
Front Swaybar
Spring 2022 update: I did six autocrosses in 2021, and struggled with chassis balance all year. Mostly a lack of rear grip (oversteer). I approached the problem from multiple angles, one of which was to improve the front swaybar setup. The FFR Miata bar is needlessly hard to adjust trackside, and not stiff enough anyway, so I ordered an array of components to build my own custom swaybar. The center piece is a 1.25” OD, 48-spline hollow bar. They are available in four wall thicknesses (rates). I wanted to install in the stock location, but even the 7/8” Miata bar was rubbing against the rubber coupler of my lower radiator hose, so no room for the larger bar without changing my radiator and hose setup. So I looked at alternatives:
- Through the radiator tunnel. Arms would be too long, with bad angles/geometry.
- Through the square chassis tube above the shock. Would be clever packaging, but too close to axle centerline, arms would be too short. Also weight would be up high.
- On top of the chassis in the engine bay. Weight would be up high, not ideal. Also interferes with my coolant tank, and general access to things below it would be worse. Would allow long endlinks though, and be super easy to adjust by simply opening the hood.
- Behind the front axle, on top of the lower main framerails, between the battery and front of the engine. This is the location I chose. The weight is as low and as far back as possible, closer to COG for less polar moment of inertia. I fabricated mounts in 3/16” steel, and welded them to the chassis. Pillow blocks bolt to these mounts and hold the bar.

The splined arms that attach to the swaybar would be easiest if they could be straight/flat, but to keep endlink angles low that would require the bar to be longer which limits steering angle. Instead, I went with the shortest bar I could for maximum tire clearance, and put offset bends in each arm to keep the endlinks vertical. The arms have 6 holes machined on 1” centers for a large range of adjustability, the hole closest to the bend has been spot faced so the nut and bushing torque flat to the arm and not on a curve.

Speaking of endlinks, I wanted them to be as long as possible to minimize operating angles through suspension travel. The FFR endlinks were literally a male and female heim joint cut down and screwed together, just 2.25” center to center, and they would go to extreme angles or even bind under some circumstances. The endlinks I came up with ended up at 4.25” center to center, not as long as I’d like but much better. The high-angle bushings in the heim joints further increases the angle allowance before bind too. The upper endlink attaches to one of two holes I drilled in the lower control arm, on the inner plate of the lower shock mount. After swaybar mounting was complete, I cut form-fitting holes in the aluminum panels to go around the newly protruding components.


So why did I go through all this effort? According to FFR (and confirmed by my calculations to be within a few %), the Miata bar rates are thus: 180, 210, 250, 300 lbs/in. My new custom swaybar has six rates, approximately thus: 300, 350, 420, 510, 630, and 780 lbs/in. If I need to increase or decrease stiffness beyond my current range, I can simply swap the splined bar for one with a different wall thickness and keep the arms and endlinks the same. Swapping bars takes about 10 minutes. I made a spreadsheet comparing the bar data for those nerdy folks like me.

Was it worth it? Does it work? Yes and yes! I waited until I tested the upgrade before making this post. I took the car to a February Test & Tune event, and with the new front swaybar at full stiff I was able to throw the car into a corner and it understeered. Never been so excited to take out a cone in turn 1…LOL. So now with enough roll stiffness (went from too little to too much, so I have bracketed the target), I started backing off the stiffness incrementally until it was balanced. Don’t misinterpret my goals, I don’t WANT the car to understeer, but nor do I want it to be an oversteering nightmare. Unfortunately it was a chilly day, on ill-suited tires, my brakes still suck, and I don’t have the confidence in the Daytona the way I do in other cars like Mustangs or Corvettes. Still, the new swaybar is a success.
-
Post Thanks / Like - 1 Thanks, 0 Likes
-
FFR Maven
Other Winter Upgrades
I made a few other changes over the off-season in addition to the swaybar. I swapped the Koni Red single-adjustable shocks for QA1 double-adjustables, lowered spring rates again, narrowed the brake and clutch pedals for better ergonomics, and ordered new tires
although I didnt get them mounted in time for the February Test & Tune.
The QA1 shocks were sort of an impulse buy, because I needed something short-term that could be adjusted trackside, but Im not yet ready to spec custom shocks. Since the QA1s are mass produced, I took them to the local racing suspension shop and put them on the shock dyno. Based on the results, we matched them in sets, and put the closest pair in front, and the second closest pair in rear. Even though these are brand new, they can be noticeably different than one another. He recommended baseline settings based on the weight of my car and intended use, which is purely autocross performance. I finished the Test & Tune event within 2 clicks of his recommended settings
which is an impressive testament to his expertise in this realm (he never even looked at my car).

If you havent seen the Daytona Wheel and Tire Repository thread, check it out HERE. I compiled a great deal of research, validated my own measurements, and ordered wheels last fall. I would have preferred Ultra Deep Concave profile for no rear spacer and deeper dish, but UDC is only available in 19. Gearing and tire selection pushed me to 18. I will run spacers in front by choice, and rear by necessity. The specs are in post #52.
Running in CAM-S class, the SCCA rulebook requires 200TW minimum, so I ordered Falken RT660s. The only other tire I considered was the Yokohama A052, but theyre higher cost and half the lifespan, so the decision to go Falken was easy. The RT660 is like the spiritual successor to the Bridgestone RE71R which I loved racing on.


I cut one row of holes off the brake and clutch pedal pads, to provide more room to maneuver and reduce the chance of pressing more than one pedal at a time. Lastly the final change before my next event was installing EBC Bluestuff pads in the front calipers, and bedding them onto freshly sanded rotors...because my brakes still don't have any bite. I used 100-grit sandpaper on a random orbital to remove any transfer layer from the Wilwood pads, then drove the car around back roads to bed the new EBC pads. Initial thoughts is they're better, but it's not the night and day change I was hoping for.. The only thing left to do before the next event is to lower the spring rates further to 550/400 since the FSB is so much stiffer, set ride height, and bolt up the new wheels and tires. For reference, the spring rates used for the TnT were 650/450.


The next event I'll be driving the car at is March 6th. Yes that date has already passed as you read this post, but I'm catching this thread up so bear with me.
Spoiler alert: the 3/6 event was VERY good... actually the best ever. Full review coming soon. 
-
You know, if you ever see a pic of the under side of a superformance Daytona, its front bar looks very similar to what you've built, it's a behind the axle splined bar with adjustable arms.
-
Logan,
Per your comments on the BP-10 pads, yup, pretty much worthless, not sure why they are packaged in the systems. I had them and switched to BP-20s, much better, dirty but not terrible. Never tried the BP-30s.
I like your sway bar solution; I've looked at the same basic concept but don't have your level of knowledge on the engineering and calculations.
Jim
2016 Mk4 Challenge Car, IRS, 3.31 Torsen, RDI Aluminum 427w, AFR 225s, Vic Jr. ProSystems 780 HP, TKO-600 w/Liberty mods. Forward cage. Levy 6/4 piston Wilwoods. Not completed yet, will be a streetable track car.
2004 Superformance MkIII #1855, 2007 Superformance MkIII #2584 purchased in 2012 both sold.
-
FFR Maven
You know, if you ever see a pic of the under side of a superformance Daytona, its front bar looks very similar to what you've built, it's a behind the axle splined bar with adjustable arms.
I have never seen a Superformance Daytona in person, so I had to Google search until I found some images. It looks like they do have a splined bar, albeit with some differences:
1. Rubber bushings instead of pillow blocks
2. Bushings mounted several inches inboard of the ends
3. Significantly longer yet thinner arms
4. One hole per arm, so single rate only (not adjustable)
5. Greater offset in the arms themselves (appears to be 6-8" of offset)
6. Mounted in front of the axle
Gotta say I really like the modularity of the spline bar setup in general. Can swap individual components out as needed, mix and match to get exactly what you're looking for.
Picture of a Superformance Daytona front swaybar:
7530633-1965-shelby-daytona-coupe-superformance-thumb.jpg
Last edited by Logan; 03-10-2022 at 01:09 PM.
Reason: Added pic
-
Originally Posted by
Logan
I have never seen a Superformance Daytona in person, so I had to Google search until I found some images. It looks like they do have a splined bar, albeit with some differences:
1. Rubber bushings instead of pillow blocks
2. Bushings mounted several inches inboard of the ends
3. Significantly longer yet thinner arms
4. One hole per arm, so single rate only (not adjustable)
5. Greater offset in the arms themselves (appears to be 6-8" of offset)
6. Mounted in front of the axle
Gotta say I really like the modularity of the spline bar setup in general. Can swap individual components out as needed, mix and match to get exactly what you're looking for.
Picture of a Superformance Daytona front swaybar:
7530633-1965-shelby-daytona-coupe-superformance-thumb.jpg
Well, the one I was looking at was setup differently than that.
And, superformance early cars are different than the later ones.
And, I only stated it was similar.
-
FFR Maven
Originally Posted by
Ltngdrvr
Well, the one I was looking at was setup differently than that.
And, superformance early cars are different than the later ones.
And, I only stated it was similar.
That they are, good eye!
-
Senior Member

Originally Posted by
lewma
Thanks for taking the time to produce those videos. I spent a couple hours last night watching them. Great to see how others tackle and solve issues throughout the build.
Keep them coming!
mark
Lots of great information on his YouTube Daytona build thread Mark. I keep watching various clips getting prepped for my build! Really keeps me motivated!
Thanks Logan for taking the time to post your chassis tuning frustrations and how you are overcoming them. Very helpful for those of us following after you.
Chris
Last edited by cgundermann; 03-10-2022 at 06:10 PM.
Generation 3 Type 65 Daytona Coupe Complete Kit #151885 received May 6, 2022. Gen 3 Coyote, IRS, Tremec TKX, American Powertrain hydraulic throwout bearing & Wilwood brakes.
MK4 Basic Kit #7404, 347 EFI - Pro M Racing ECM, 30# injectors, 70 mm throttle body, 80 mm MAF, Edelbrock Performer aluminum heads & RPM II intake, all new G-Force T5, 3:55 gears, Pro 5.0 shifter, 3-link, carbon fiber dash/custom Speedhut gauges and paint by Da Bat.
-
FFR Maven
Handling sorted!
A couple weeks after the February Test & Tune I talked about above, but before our local autocross season officially kicks off this coming weekend, I had a chance to run the Daytona as a perk for being an instructor at our Performance Driving School. We had nearly 80 students this year in our annual 3-day PDS event, teaching performance driving in classroom as well as driving drills in the students own cars. This culminates the final day in a mock-autocross, which is timed and operated like normal but without trophies or points to be won. Instructors bring their cars Sunday to give students demonstration rides. I of course took the Daytona and although its only half-bodied, and very raw (no doors, hood, or windshield
stuff rattling, pebbles thrown all over from the tires, etc), I had to laugh because there was a line of students desperate to go for a ride in it.

I took 7 runs, then let a fellow instructor (a friend who has been involved with my build over the past two years) take an additional 5 runs in the car. While those 12 students all had a blast, it was I who left with the biggest grin of the day. Partly because I truly enjoy teaching and watching those lightbulb moments when they apply a new skill, but also because this was the first time I have driven my car on fresh tires and it FINALLY HANDLES LIKE A CAR. Night and day improvement, instantly proving how even reasonably large 285/325 summer tires (300TW) cannot hold a candle to new rubber. My first run I simply scrubbed off the mold release. Runs 2-4 I lowered tire pressures incrementally, finally settling at 25 psi cold. My final 3 runs were spent getting seat time in the car. Not only has the general speed improved (meaning I can drive the course faster), but perhaps more importantly the dynamic handling improved too. Suddenly the chassis is more balanced front to rear, the steering response is much quicker, the brakes work better, oversteer is easier to catch and manage
.
The EBC Bluestuff NDX brake pads, combined with new tires, improved the braking by roughly ~40%. Noticeably better, but still not great. Work continues to solve the brake issue. I need more bite and more modulation. Still looking at stepping up coefficient of friction on the pad scale. Unfortunately I cant just throw the raciest pads available at it because I need cold performance for street and autocross, where I cannot pre-heat the brakes in order for them to work properly. Currently looking at Carbotech AX6 or Wilwood Polymatrix A pads. Dust, noise, and pad/rotor life are all secondary concerns. Performance is first priority.
Lowering the spring rates helped load transfer too. I was on 650/450 at the Test & Tune, and dropped to 550/400 for PDS. Letting the body roll more helps load the tires more gradually instead of shocking them, so it grips instead of sliding upon quick steering inputs. I dont want to go too low however, or Ill be a bobblehead in the cockpit and the transient response will suffer (slower slaloms). The compression setting on the QA1 shocks will play an important role in tuning to the spring rates once I finally decide on them. Speaking of shocks, my codriver added 3 clicks of rebound on the rears and a half step stiffer on the front swaybar to suit the new grip levels. Since he drove the car last, I havent raced on that config yet, so this Saturday Ill be starting from there. Not making any chassis changes before then, except new brake pads if I get them in time.
Heres the video from the PDS (in which I can spot all sorts of mistakes and opportunities to save more time). For reference, we had about 30 instructors who were seasoned drivers, and even though there was no official scoring, my time was good enough for 6th raw and 9th pax. This may not seem like a big deal, but all last year I was a bottom feeder in the results. The car was so frustrating to drive I wanted to give up, but thankfully my stubbornness told me to keep driving anyway. Those efforts to balance the chassis on old tires last year was not in vain, as once the new tires went on it was immediately very close to where it needed to be. To me this was a huge step forward. Now I want to keep building!
-
Post Thanks / Like - 1 Thanks, 0 Likes
-
Congratulations Logan! Sounds like you are on your way to an amazing car.
I just switched brake pads to the Hawk HP+ and they can lock up the tires with much better modulation than the wilwood pads.
Highly recommend them. Great videos by the way.
-
Post Thanks / Like - 0 Thanks, 1 Likes
-
 Administrator

"That's the fastest car I've ever been in!"
Awesome.
FFR 5369 Pin Drive, IRS, Trigos, Torsen, Wilwoods, FMS BOSS 302 "B" cam , Mass-flo. CA SB100 (SPCN) Registered
Delivered 4/23/06. "Finished" 4/2012 (still not done!)
-
Post Thanks / Like - 0 Thanks, 1 Likes
-
just ran my car at Cota last week with the wilwood bp-30 pads, i am running a larger caliper/rotor combo but we had no braking issues or lack thereof.. after first session of monitoring brake pressure through the Racepak IQ3 and Vantage software we were able to consistenly heavy brake with out lock up.
-
Hey Logan, Just spent some very enjoyable time reading your build thread! We need an update of the build and more of the story on how your and Ashley's Autocross and Track day's are progressing! Please don't abandon the build thread it is very good so far! I know you and Ashley have had an eventful year, still though I want to encourage you to continue the blog. Mary and I are still at it, but at a reduced event level. We have only done 1 autox event and 1 track event this year so I know how life can be. Hopefully we'll see more of the Daytona build!


 Thanks:
  Likes:


 Reply With Quote


