-
Senior Member

JB in NOVA's MK4 build : First overnight road trip!
Hello everyone,
I am JB in NOVA. Ive been a big fan of this forum for a couple of years. Thank you everyone for making this such a helpful, non-judgmental, collaborative forum! Ive learned a lot from the build threads, so I figured I would do my part to contribute.
I have almost zero experience building cars. When I was a teenager, I used my lawnmowing money to buy a 1966 Mustang from the original owner with about 100K miles and a lot of rust. I think I paid about $700 for it. My friends called it the Rust-tang. I did some body work and got it looking pretty good, but I would not put this in the category of automotive experience. It was mostly a lot of Bondo and a Maaco paint job at the end. Looking back, Im a little ashamed that I treated a classic car that way . . . but I was a teenager!
I bought a FFR Mk IV kit to atone for my past automotive sins. I want to build it the right way, and I humbly ask the forum to keep me from doing anything stupid. I attended the build school at Mott CC this January (in a blizzard, thank you very much). It was a great experience, and Im really glad I did it. I took notes and lots of pictures, so hopefully that will steer me away from any true disasters in this project. But still, Im worried . . .
Heres my anticipated build:
MK4 Complete kit-powder coated
Moser solid rear axle, 3-Link suspension
Blueprint 347 engine, EFI
Tremac TKO 600
Hydraulic clutch
Halibrand wheels
Dual chrome roll bars
Front battery box (Breeze)
Radiator shroud (Breeze)
Steering-mounted turn signal (Russ Thompson)
Drop trunk (Russ Thompson)
Custom accelerator pedal (Russ Thompson)
Vintage gauges
Glove Box
Wind Visors
Sun Visors
Heated seats
In closing, I will make three predictions:
(1) I will eventually disprove the notion that there are no stupid questions.
(2) I will make every mistake that can possibly be made, and sometimes twice.
(3) I will be very grateful for any advice the forum provides, even if you make fun of me in the process.
Okay, lets build a car!
Last edited by JB in NOVA; 07-01-2022 at 09:12 AM.
-
Post Thanks / Like - 0 Thanks, 3 Likes
-
Senior Member

Welcome JB. I'm South of you a bit in Stafford and been building a Mk4. It was delivered Mar. of 17. I have a 347 from Mike Forte with a Tremec TKO 600. I'm pretty close to being finished. There are 2 other owner builders close to me one a MK3 and the other a Mk4. I know there are several others up your way also and I'm sure some will check-in with you. When this social distancing business is over you are welcome to visit any time just PM me. I'm retired so anytime is fine. Also I have a build thread on the other forum "JRCuz's MK4 build"
JR
Last edited by jrcuz; 04-24-2020 at 07:03 AM.
Mk4 complete kit #9059 ordered 1/19/17 delivered 3/23/17, 2015 IRS, Fortes/DART347,TKO 600, hyd clutch, P/S, 12.88 wilwood brakes front and rear, heater/defrost and vintage gauges
First start and go-cart 4/11/18. Taken To Whitby Motorcars Greensboro, N.C. 2/5/21 for body/paint
-
Post Thanks / Like - 0 Thanks, 2 Likes
-
Senior Member
Thanks jrcuz. I just checked out your build thread, and your MK4 is looking great! I noticed you installed cupholders -- I was thinking about that, too. By the way, do you know if you have to have power windshield wipers to pass inspection in VA?
-
Senior Member
-
Senior Member
With the help of my wife, my daughter, and a friend, we successfully got the body off the frame and onto the body buck:

Next, I removed all the aluminum, taking lots of pictures of how each piece fits together and also the size and shape of each piece. I know that once pieces are powder coated, it can be hard to remember which one is which. So I took “mug shots” of each one like this:

My plan is to powder coat all the panels that are visible (except the wheel wells – I will probably use bedliner or something else on those). I marked and drilled all the panels I wanted to get powder coated so I could get that process started. Here’s the list of panels I decided to powder coat: 2, 3, 4, 5, 6, 7, 8, 9, 10, 11, 14, 15, 16, 17, 18, 19, 20, 23, 24, 25, 26. That’s basically the F-panels, the DS and PS footboxes, the firewall, and the transmission tunnel front vertical wall. I also included the steel trunk hinges and the quick jack brackets.
I’ve resigned myself to the fact that there will have to be a second batch for powder coating. For instance, I also want to powder coat the trunk panels, but I figured I should wait to do that until after I finish the drop trunk modification. So I will keep track of any additional pieces that need powder coating and try to include those in the second batch. Any suggestions?
Regarding powder coating color, I studied lots of build threads and, for me, it came down to either silver or black. In the end, I decided to go with a very lightly textured satin black. I’ll post pictures once I get the panels back from the powder coater.
-
Senior Member
ROOKIE MISTAKE: The day after I dropped off my panels for powder coating, I realized I had made a mistake. The FFR manual lists panel 11 as “LEFT FOOTBOX FRONT – WILWOOD START 1/1/19.” It has part number 16736. A separate panel 49, with part number 10904 is identified as “LEFT FOOTBOX, FRONT – MUSTANG PEDALS.” The panel that came mounted on my chassis (which I dropped off for powder coating) is the one for Mustang pedals, which is the wrong one for my build. The correct panel was in a box. Oops!

Luckily, I figured this out, marked and drilled the correct panel, and drove it out to the powder coater that morning before he had started with my batch. If I had read my inventory sheet more carefully, I would have caught this. Lesson learned!
-
Senior Member
-
Post Thanks / Like - 0 Thanks, 1 Likes
-
Congratulations and welcome. You will be just fine. Enjoy the process, even the mistakes. i look forward to following along with your build.
-Steve
-
Post Thanks / Like - 1 Thanks, 0 Likes
-
Senior Member
After a few days of haggling with UPS, I finally got the Moser rear axle delivered. Hurray! UPS was restricted to “curbside” delivery because of the COVID-19 issue. But luckily the UPS guy (former marine, car buff, and a great guy) let me borrow his hydraulic dolly so I could roll it up to the garage. Otherwise, that would have been a real challenge getting it up my steep driveway.

Got it up on jacks and went to work on the rear brakes and suspension.

-
Senior Member
-
Post Thanks / Like - 1 Thanks, 0 Likes
-
Senior Member
The 2013 instructions that I followed for the 11.65” FFR rear brake assembly did not mention installing anti-chatter clips. But the box with the brake pads included two pairs of clips, which I assume are anti-chatter clips:
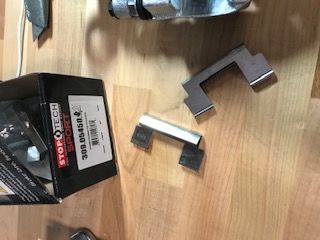
I could not figure out an obvious way that these would fit into the FFR 11.65” rear brake calipers, so I left them out, consistent with the 2013 instructions that I am following. IS THIS OKAY? If anyone thinks these need to be installed and can explain how to do it, I would appreciate your advice. Meanwhile, I assembled the calipers, mounted the rotors, cleaned them with brake cleaner, and installed the rear brakes without tightening them to spec.
Here’s how they look:


The clearance on the inside is tighter than on the outside, although the rotor doesn’t seem to be making contact with the caliper body and it does spin without too much effort. Anyone have thoughts about the clearance in these pictures?

outside clearance, slight gap between pad and rotor, plenty of clearance between caliper body and rotor.

Inside clearance. No gap between pad and rotor (although rotor does turn without too much effort). Very little clearance between rotor and caliper body (maybe a millimeter or less).
It feels like I should try to center the rotor better so that the clearance on both sides is the same. But I’m not sure how to do that. Anyone have any advice? Or does this set up seem okay, considering that the rotor does turn without too much effort?
TWO IMPORTANT EDITS: (1) the rear calipers are installed upside-down in this post. I corrected this error in post #70. (2) The anti-clatter clips should be installed, although it is tricky. I addressed this in post #76.
Last edited by JB in NOVA; 06-09-2020 at 10:31 PM.
-
Hi JB and welcome. I'm over in Alexandria and wrapping up my build.
The below instructions are from 2016 and are on the FF5 racing site under "Parts" and then "Instructions." You'll also find the instructions there for other options like the windshield wipers, front bumper, wind wings, etc.
http://www.factoryfiveparts.com/cont...ions-rev-c.pdf
Last edited by RJD; 04-24-2020 at 04:46 PM.
MKIV complete kit w/powder coating and cut outs, serial #9189 delivered 10/10/17, first start - 10/5/18, legal - 10/08/20. Blueprint 306 w/Holley Sniper EFI, TKO 600, power steering, Breeze fan shroud, trunk cubby, & engine compartment battery kit, CNC brake reservoirs, RT turn signal & gas pedal, mechanical throttle linkage, METCO safety loop, GASN side pipes, drop trunk, dual chrome roll bars, vintage gauges, glove box, custom center console, cup holders, and speakers.
-
Post Thanks / Like - 1 Thanks, 1 Likes
-
Senior Member

Hi JB,
I'm just north of you in the Columbia MD area. Welcome to the build! You're going to have a blast. I received my kit Jan 2 2020 and I'm getting close to go carting. I too have a 347 with EFI, TKO600 from BPE. There is another builder in your area too. Check out VAHokie build thread. One tip I learned on importing pictures was to open them in Paint then do a save. By doing so the picture come out right side up. I'm not sure why it works, but it does.
Cheers!
Mk IV Roadster #9749, Kit received Jan 2, 2020, Blueprint SBF 347 TKO600 Holley Sniper EFI, Dual roll bars, IRS, 17" Halibrand, Nitto 555 G2 245, 315 Road legal Oct 20, 2020
-
Post Thanks / Like - 1 Thanks, 0 Likes
-

Originally Posted by
JB in NOVA

My front lower control arms are on back order, so I started with the upper control arms, and I also assembled the front brake calipers and shocks:


Please let me know if anyone sees anything wrong with my assemblies so far.
Your work is looking great... Welcome to the fun. On your upper control arms (if you are going with power steering) you will want to do a small modification so that you will be able to get the correct alignment caster numbers. CV2065 (Chad) outlined this modification pretty good in his build thread. Here is a LINK to his page and information on this modification.
Again, welcome and enjoy the build...
-
Post Thanks / Like - 1 Thanks, 0 Likes
-
Senior Member
Thanks for the tips everyone. RJD, thanks for the link to the updated rear brake instructions. I don't know why I didn't find that when I was searching. Anyway, I compared the 2016 instructions to the 2013 instructions that I followed, and they are identical. And neither mentions installing anti-chatter clips, so I'm going to assume I'm OK without those.
Caddy Dad, thanks for the tip about pictures. I was a little worried about posting landscape pictures because they sometimes get rendered upside down on some browsers. The Exif file that gets saved with the picture includes orientation info from the phone's accelerometer to indicate which way the camera was oriented when the picture was taken. Most browsers can read this info and correctly orient the picture when it is rendered, but apparently not all. In my browser, all the pictures are correctly oriented, but I know that's not the case for everyone's. I'll try to fix that going forward.
-
Senior Member
Yesterday was a productive day. I filled the axle with gear oil. As others have advised, I did not take off the casing cover to do this (as the manual instructs) but instead used the fill port on the side. It took just shy of 2 quarts of gear oil, plus 4 oz. of additive.
I went ahead and connected the shocks to the mounting brackets on the axle before installing the axle because that’s the way we did it in the build school. One thing I came across is some confusion about the bolts that are used to connect the shocks to the upper and lower mounts. The manual says to “Install the kit ½” x 4” bolts [that] are provided for each lower shock mount.” But on the inventory sheet, the 4” bolts are specified for the upper shock mounts, whereas 3” bolts are included in the part list for the traction lok brackets that go on the axle (i.e., the lower shock mounts).

Hmm . . . should I go with what the manual says, or what the inventory sheet says? My instinct was to go with the manual, but that would mean the 3” bolts (if installed in the upper mount) would have to carry two 1.09” spacers and the shock and still have enough length left over to thread a nut. A quick mock-up told me that this was not feasible.
 (mock-up using 3" bolt)
So I went with the 3” bolts in the lower shock mount, which seemed to work fine, and the 4” bolts in the upper shock mount, which also seemed to work fine.
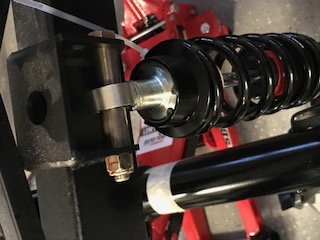 (4" bolt in upper shock mount)
If anyone thinks I got this wrong, please let me know. Otherwise, I’ll assume the manual was incorrect on this point.
-
Senior Member
-
Senior Member
Not much progress yesterday, except for a “learning experience,” which I guess is a form of progress. The problem started when I went to install the forward ½” x 2.5” bolt of the Panhard bar frame into the 3” round car frame tube. I drilled a ½” hole, per the instructions, and began to thread the bolt into a locknut inside the 3” tube. I set my torque wrench for 75 ft-lbs, but when it clicked, the bolt still had some ways to go. I didn’t want to torque any further, so I started to loosen the bolt. And then this happened:

By the grace of God, I was able to extract the threaded portion by wrenching the nut from inside the 3” tube. I suspect the bolt had been threading on some sort of sharp edge left over after my (apparently shoddy) drilling job.
Quick trip to the hardware store for a replacement bolt and locknut, re-inserted the drill bit and rounded out the hole to make sure the bolt slid through easily without snagging any sharp edges, then everything tightened up just fine:

Disaster averted and lesson learned!
-
Senior Member
-
If you haven't already done it, now might be a good time to check the rebound setting of your shocks. One of mine was set differently from the others when I was installing them.
912B0C0E-0302-4B02-9233-906710008F16.png
MKIV complete kit w/powder coating and cut outs, serial #9189 delivered 10/10/17, first start - 10/5/18, legal - 10/08/20. Blueprint 306 w/Holley Sniper EFI, TKO 600, power steering, Breeze fan shroud, trunk cubby, & engine compartment battery kit, CNC brake reservoirs, RT turn signal & gas pedal, mechanical throttle linkage, METCO safety loop, GASN side pipes, drop trunk, dual chrome roll bars, vintage gauges, glove box, custom center console, cup holders, and speakers.
-
Post Thanks / Like - 1 Thanks, 0 Likes
-
Senior Member
I second checking your shock settings, good time to do it if you haven't already. Good progress also.
JR
Last edited by jrcuz; 05-05-2020 at 06:50 AM.
Mk4 complete kit #9059 ordered 1/19/17 delivered 3/23/17, 2015 IRS, Fortes/DART347,TKO 600, hyd clutch, P/S, 12.88 wilwood brakes front and rear, heater/defrost and vintage gauges
First start and go-cart 4/11/18. Taken To Whitby Motorcars Greensboro, N.C. 2/5/21 for body/paint
-
Post Thanks / Like - 1 Thanks, 0 Likes
-
Senior Member
RJD and jrcuz, thanks for the suggestion! I will do that tomorrow morning.
All: I have a question about the brake master cylinders provided with my kit. I was under the impression that the master cylinders would be two different bore sizes, 3/4" for the front brakes and 5/8" for the rear brakes. For instance, see the discussion here: https://thefactoryfiveforum.com/show...der-bore-sizes But in my kit, the master cylinders are both 3/4". They are listed in the inventory as FFR # 16255 "3/4 MASTER CYLINDER KIT" - Qty 2.00. And I verified that they are both stamped with "0.75." Is this how FFR is now doing it? I understand that's how they used to do it several years ago but changed at some point to the 3/4" and 5/8" combination. Have they switched back? Is there any problem using identical sized master cylinders for the front and back?
As always, I would greatly appreciate any advice.
-
Senior Member

Welcome JB and congrats on the build. I'm also in NoVA (Chantilly). Reach out any time.
Tony
MKIV Complete Kit #9494 l Delivered 1/5/19 l First Start
11/28/20 l First Go-kart
4/11/21 l Carb'd 347 l Mid-shift TKO600 l 3.55 IRS l P/S l Forte Mechanical Throttle Linkage l RT Turn Signal, Drop Trunk l Breeze Upper/Lower Radiator Support, Fan Shroud l Boig Upper/Lower Cool Tubes & Quiet Pipes l 18" FFR Gasser Wheels l
Build Thread
-
Post Thanks / Like - 0 Thanks, 1 Likes
-
Senior Member
Originally Posted by
JB in NOVA
All: I have a question about the brake master cylinders provided with my kit. I was under the impression that the master cylinders would be two different bore sizes, 3/4" for the front brakes and 5/8" for the rear brakes. For instance, see the discussion here:
https://thefactoryfiveforum.com/show...der-bore-sizes But in my kit, the master cylinders are both 3/4". They are listed in the inventory as FFR # 16255 "3/4 MASTER CYLINDER KIT" - Qty 2.00. And I verified that they are both stamped with "0.75." Is this how FFR is now doing it? I understand that's how they used to do it several years ago but changed at some point to the 3/4" and 5/8" combination. Have they switched back? Is there any problem using identical sized master cylinders for the front and back?
After a little more forum browsing, I found the answer to this question in Patrick's 427 build thread. https://thefactoryfiveforum.com/show...27-Build/page3 Post #110. FFR has switched to 3/4 inch master cylinders for both front and rear brakes. Thanks Patrick!
-
Senior Member
Some progress to report today. I got the panels back from the powder coater, and I’m very happy with them. A lightly textured satin black. For those in my area, I used NVCoatings in Chantilly,VA, and I was very happy with their service. I decided to use black rivets on the coated panels for a cleaner look. Got the F-panels and the DS footbox front panel installed:


Next, I installed the pedal box assembly. To be honest, I was a bit intimidated by this step because the brake/clutch pedal assembly is so awkward, and even in the build school it was difficult to see exactly how everything fit together. But once I got it mocked up in the foot box and hand-tightened to the front footbox wall, I felt much more comfortable with it. I went ahead and sealed and riveted the footbox front panel and proceeded to the final installation.
Last edited by JB in NOVA; 05-04-2020 at 10:34 PM.
-
Senior Member
The pedal box assembly went fairly well with a few minor hiccups. First, the FFR manual says to “insert three 3/8” x 1” socket head screws from the pedal box hardware assembly and the one included in this pedal assembly through the front of the footbox and through the pedal mount.” But there was no other 3/8 x 1” screw in my pedal assembly hardware, nor was any listed on the inventory. I did notice there are two 3/8 x two-inch socket head screws in the pedal box hardware that are specified for “PEDAL BOX TO FRONT PLATE, LOWER.” But I assume these are for the Mustang pedal box because they don’t seem to match up to my Wilwood set up.
Anyway, long story short, a quick trip to the hardware store for a 3/8” x 1” socket head screw and I was back on track. It was a perfect match for the other three.
I followed the FFR instructions, except I did not trim 5/8” off the master cylinder threaded shafts yet, as many on this forum have advised. I got everything installed and it seemed to work okay except the balance bar and brake push rods were all loose and unstable:

“That can’t be right,” I thought. But when I looked back through the FFR instructions, I didn’t see any step that mentioned tightening them up. On the other hand, the FFR manual has a picture where they are much snugger than what I had:

So I removed the master cylinders and twirled the pushrod mounts on the balance bar as much as I could until they were fairly close to the pedal pivot. While I was at it, I trimmed about 1/4” off the brake master cylinder threaded shafts (which was all I seemed to need), and about 3/8” off the clutch master cylinder.
I reinstalled everything, and this is how it looks now:


The brake pedal moves smoothly with reasonable pressure until it hits the footbox wall:

The clutch pedal moves smoothly with a little less pressure until it hits the ¾” tube on the left-hand side, which stops its travel about 3/4 inch from the footbox wall. IS THAT OK?

Finally, both pedals are adjusted to be at the same resting position:

I would greatly appreciate if someone more knowledgeable than me could check my work here. It “feels” right, but I don’t have enough experience to know if there might be trouble lurking in here somewhere. Also, do I need to be concerned that the clutch pedal doesn’t reach all the way to the footbox wall? If so, what can I do about it? Thanks.
Last edited by JB in NOVA; 04-29-2020 at 01:49 PM.
-
Senior Member
One quick note. I have now studied a bit more about the balance bar. I found this thread particularly helpful: https://thefactoryfiveforum.com/show...-Bar-Questions. It seems the prevailing advice from edwardb, Boss 427 and others is to install per the instructions, centered as shown, and wait for later to adjust it. So that is what I will do.
-
Senior Member
Hi JB, when time comes to bleed your brakes to do it properly with the balance bar I believe you will need to do one side both front and rear calipers at the same time.
JR
Mk4 complete kit #9059 ordered 1/19/17 delivered 3/23/17, 2015 IRS, Fortes/DART347,TKO 600, hyd clutch, P/S, 12.88 wilwood brakes front and rear, heater/defrost and vintage gauges
First start and go-cart 4/11/18. Taken To Whitby Motorcars Greensboro, N.C. 2/5/21 for body/paint
-
Post Thanks / Like - 2 Thanks, 0 Likes
-
Senior Member
I’m making progress inch by inch (and rivet by rivet). This little guy wants me to hurry up and finish so he can go for a ride:

Because I’m still waiting for the front LCAs, I decided to start working on the cockpit aluminum. The first thing I had to decide is how to treat the panels that would not be visible once the build is complete. My first instinct was to leave them bare. My noobie mind was having a hard time figuring out why I would want to spend time prepping and coating “hidden” aluminum panels, as opposed to just letting them be. The aluminum oxide coating that forms on aluminum is an excellent corrosion inhibitor, which is why aluminum has been described as a “miracle metal.” But the more I thought about it, the more I felt like I should paint them black. The amount of work involved is not that much more, and I figured I might regret it later if some bare aluminum peeked through here and there where I didn’t want it. Also, painting the panels certainly wouldn’t hurt, since they will mostly be covered by insulation anyway. Bottom line: Low Risk, Low Reward.
After marking and drilling the panels, I wiped them down with Acetone to remove the ink and grime. Then I sanded with 120 grit sandpaper to rough up the surface for better paint adhesion. I washed with water to remove the sanding residue and let dry. Then, just before painting, I wiped them down again with acetone.
We had beautiful weather this weekend, so I decided to set up my painting operation in my backyard. When my neighbors saw this ticky-tack operation going on, I’m sure they thought, “welp, there goes the neighborhood!”

I put on two coats of self-etching primer and three coats of Dupli-Color Rust Barrier. Although I’m not worried about rust, this product has a slightly rubberized finish (not as much as bedliner) that I thought could provide a tiny bit of extra protection against rattles. I like the finish, although it does scratch easily and has the typical unevenness of “rattle can” application. Should be fine for hidden panels, though.

I assembled the PS footbox and the PS and DS floors. I left the cockpit corners cleco’d for now. No major problems with the panel installation, except I broke a drill bit when I tried to drill too close to a weld (I thought it would clear the weld . . . it didn’t). Also, my arms are really sore now! I found the short rivets worked well in most places, except where the rivet had to go through two aluminum panels and a frame tube. I used the longer rivets for those locations. Here’s the result:


Last edited by JB in NOVA; 05-04-2020 at 12:28 PM.
-
Senior Member
Good going JB. The only fhing I did to my floors was to spray the bottoms with Duplicolor rattle can bedliner.
JR
Mk4 complete kit #9059 ordered 1/19/17 delivered 3/23/17, 2015 IRS, Fortes/DART347,TKO 600, hyd clutch, P/S, 12.88 wilwood brakes front and rear, heater/defrost and vintage gauges
First start and go-cart 4/11/18. Taken To Whitby Motorcars Greensboro, N.C. 2/5/21 for body/paint
-
Post Thanks / Like - 1 Thanks, 0 Likes
-
Senior Member
Nice progress, JB. Like you, I’ve been thinking about how best to coat the panels that weren’t powder coated. Picked up rustoleums professional primer and top coat aerosol specifically for aluminum. Tested it on my dash brace to see how it is and it looks good. Similar to your experience, slightly uneven application and will likely show knicks from road debris kicking up, but I’ll be easy enough to touch up.
MKIV Complete Kit #9494 l Delivered 1/5/19 l First Start
11/28/20 l First Go-kart
4/11/21 l Carb'd 347 l Mid-shift TKO600 l 3.55 IRS l P/S l Forte Mechanical Throttle Linkage l RT Turn Signal, Drop Trunk l Breeze Upper/Lower Radiator Support, Fan Shroud l Boig Upper/Lower Cool Tubes & Quiet Pipes l 18" FFR Gasser Wheels l
Build Thread
-
Post Thanks / Like - 1 Thanks, 0 Likes
-
Senior Member
Originally Posted by
VAHokie
Nice progress, JB. Like you, I’ve been thinking about how best to coat the panels that weren’t powder coated. Picked up rustoleums professional primer and top coat aerosol specifically for aluminum. Tested it on my dash brace to see how it is and it looks good. Similar to your experience, slightly uneven application and will likely show knicks from road debris kicking up, but I’ll be easy enough to touch up.
Tony, thanks for the feedback. I've really learned a lot from your build thread. Your approach is unbelievably methodical -- you definitely must be an engineer. FYI, both of my brothers went to Virginia Tech (both engineers). But I took a different route in life and went to "Canoe U" on the Severn River.
Last edited by JB in NOVA; 05-04-2020 at 10:37 PM.
-
Post Thanks / Like - 1 Thanks, 0 Likes
-
Senior Member
Originally Posted by
jrcuz
Hi JB, when time comes to bleed your brakes to do it properly with the balance bar I believe you will need to do one side both front and rear calipers at the same time.
JR
JR, I may be calling you when that time comes! Bleeding the brakes is high on my "anxiety list."
-
Senior Member
JB, I'll be glad to help. Running brake lines was on my "anxiety list", I put it off for what seemed like forever and when I did it I wondered why I had waited so long. When this social distancing is over let me know and I'll be there.
JR
Mk4 complete kit #9059 ordered 1/19/17 delivered 3/23/17, 2015 IRS, Fortes/DART347,TKO 600, hyd clutch, P/S, 12.88 wilwood brakes front and rear, heater/defrost and vintage gauges
First start and go-cart 4/11/18. Taken To Whitby Motorcars Greensboro, N.C. 2/5/21 for body/paint
-
Post Thanks / Like - 0 Thanks, 1 Likes
-
Senior Member
-
Post Thanks / Like - 0 Thanks, 1 Likes
-
Senior Member
-
Post Thanks / Like - 0 Thanks, 1 Likes
-
Senior Member
I started fitting up some of the trunk aluminum today, including the Russ Thompson drop drunk modification. I found the RT kit to be high quality with clear instructions. Russ did a nice job making this kit “idiot proof,” which I really appreciate because . . . well, you know. He even annotated the panels, so all I had to do is match A with A, B with B, etc.

The box goes together fairly easily. Then it’s necessary to cut four notches in the box to accommodate the frame tubing. As others have mentioned, I found that the left, front notch does not end up “entirely” in the side of the box, as Russ’s instructions state. Instead, it ends up directly on the corner.

This is not a problem, although it did cut away one of my rivets in that corner. So when I was done with the notching, I drilled a new hole and put in a new rivet to maintain the box’s structural integrity.
Once I was done with the left, front corner, I cut the notch on the right side. Then I semi-installed the box from the bottom to check my original markings for the two rear notches. I’m glad I did! They were both about ½” off. I used a makeshift stand to keep the box in place from the bottom while I double-, triple-, and quadruple-checked the position of the rear notches.

This was an awkward process. The position of the frame tubes seemed to end up in slightly different positions each time I marked, until my markings soon looked like indecipherable scribble. I finally decided on the “consensus” markings and made the cuts there. To my surprise, it was a perfect fit:

I’m glad I made this modification. It was relatively easy, and now I’ll have some extra trunk space for . . . whatever.
While I was at it, I also did the "Kleiner" modification to make installing the rear quickjacks easier to install. https://thefactoryfiveforum.com/show...-jack-mounting

-
Post Thanks / Like - 0 Thanks, 1 Likes
-
Senior Member
JB, you're doing things that I now wish I had done to mine like the drop trunk mod. I did do the "Kleiner" mod's, I installed the bumper and overriders.
JR
Mk4 complete kit #9059 ordered 1/19/17 delivered 3/23/17, 2015 IRS, Fortes/DART347,TKO 600, hyd clutch, P/S, 12.88 wilwood brakes front and rear, heater/defrost and vintage gauges
First start and go-cart 4/11/18. Taken To Whitby Motorcars Greensboro, N.C. 2/5/21 for body/paint
-
Senior Member
P
Originally Posted by
JB in NOVA
Tony, thanks for the feedback. I've really learned a lot from your build thread. Your approach is unbelievably methodical -- you definitely must be an engineer. FYI, both of my brothers went to Virginia Tech (both engineers). But I took a different route in life and went to "Canoe U" on the Severn River.
Glad the thread has helped! In addition to being a detailed build log for future reference, I hoped to share what I’ve learned from so many others so that novices like me could learn and benefit from it. My cousin graduated from the Naval Academy, and my go-to build attire is actually a Navy sweatshirt.
MKIV Complete Kit #9494 l Delivered 1/5/19 l First Start
11/28/20 l First Go-kart
4/11/21 l Carb'd 347 l Mid-shift TKO600 l 3.55 IRS l P/S l Forte Mechanical Throttle Linkage l RT Turn Signal, Drop Trunk l Breeze Upper/Lower Radiator Support, Fan Shroud l Boig Upper/Lower Cool Tubes & Quiet Pipes l 18" FFR Gasser Wheels l
Build Thread
-
Post Thanks / Like - 0 Thanks, 1 Likes
-
Senior Member
Today I spent some time thinking about where and how to mount my brake/clutch reservoirs. I bought a triple reservoir from Speedway – a little smaller capacity than I was hoping for, but I think it should work fine. I’ve decided to mount it on the ¾” top frame rail in front of the DS footbox, as most folks on this forum have done. I understand it needs to no farther than 12” forward from the footbox to avoid interference with the hood struts, and that it should be as high as possible without being higher than the frame rail itself. https://thefactoryfiveforum.com/show...voir-placement
With these constraints in mind, I made a few bracket mock-ups with 0.019” aluminum to see how various options would look. I know this topic has been beaten to death on this forum, but I needed to see how each option would look on my build to decide which is best for me.
I first mocked up the simplest option: a flat bracket that attached to the inside of the frame rail:

Two things I noticed about this mock-up. First, because I mounted the triple-reservoirs square with the bracket, which itself was mounted square with the frame rail, the reservoirs ended up at a 5-10 degree longitudinal angle relative to ground:

I have no idea if this could adversely affect brake/clutch operation, but it bugs me from an aesthetic standpoint. I would prefer to have the reservoirs level to ground, rather than to the frame rail. The other thing that concerned me about the flat-bracket approach is that the bracket consumes some space on the inside of the rail. Not a big deal with .019” aluminum, but I’m planning to use thicker aluminum for the bracket, so I’m concerned this might interfere with the fiberglass lip that overhangs this frame rail when the body is installed:

My next mock-up had a ¾-inch 90-degree angle so that it could mount beneath the frame rail, eliminating the interference problem. I also mounted the triple-reservoir so that it was approximately level to ground:

I liked this approach better, but one thing I worry about is whether I would have enough access to the caps once the body was mounted, i.e., whether the whole assembly needed to be pushed a bit further toward the engine. In my third mock-up, I addressed this by adding ¾” to the horizontal lip at the top:

So far, I like this approach best, but with the extra unsupported horizontal extension at the top, I wonder if I’ll need a brace of some sort to prevent excessive vibration. I don’t want my brake and clutch reservoirs bouncing back and forth on an aluminum “spring” while I’m driving. I mocked up a back brace as one possible solution, running from the bottom of the top frame rail to the bottom of the bracket on the back side, basically like a shelf support:

I’m still noodling options, but I’m leaning toward the third option with a back brace. If anyone with more experience than me has any pearls of wisdom on this topic, I would (as always) be very grateful for your input.


 Thanks:
  Likes:


 Reply With Quote


