-
04-05-2023, 03:27 PM
#601
Senior Member

Hood Progress and Prop Rods
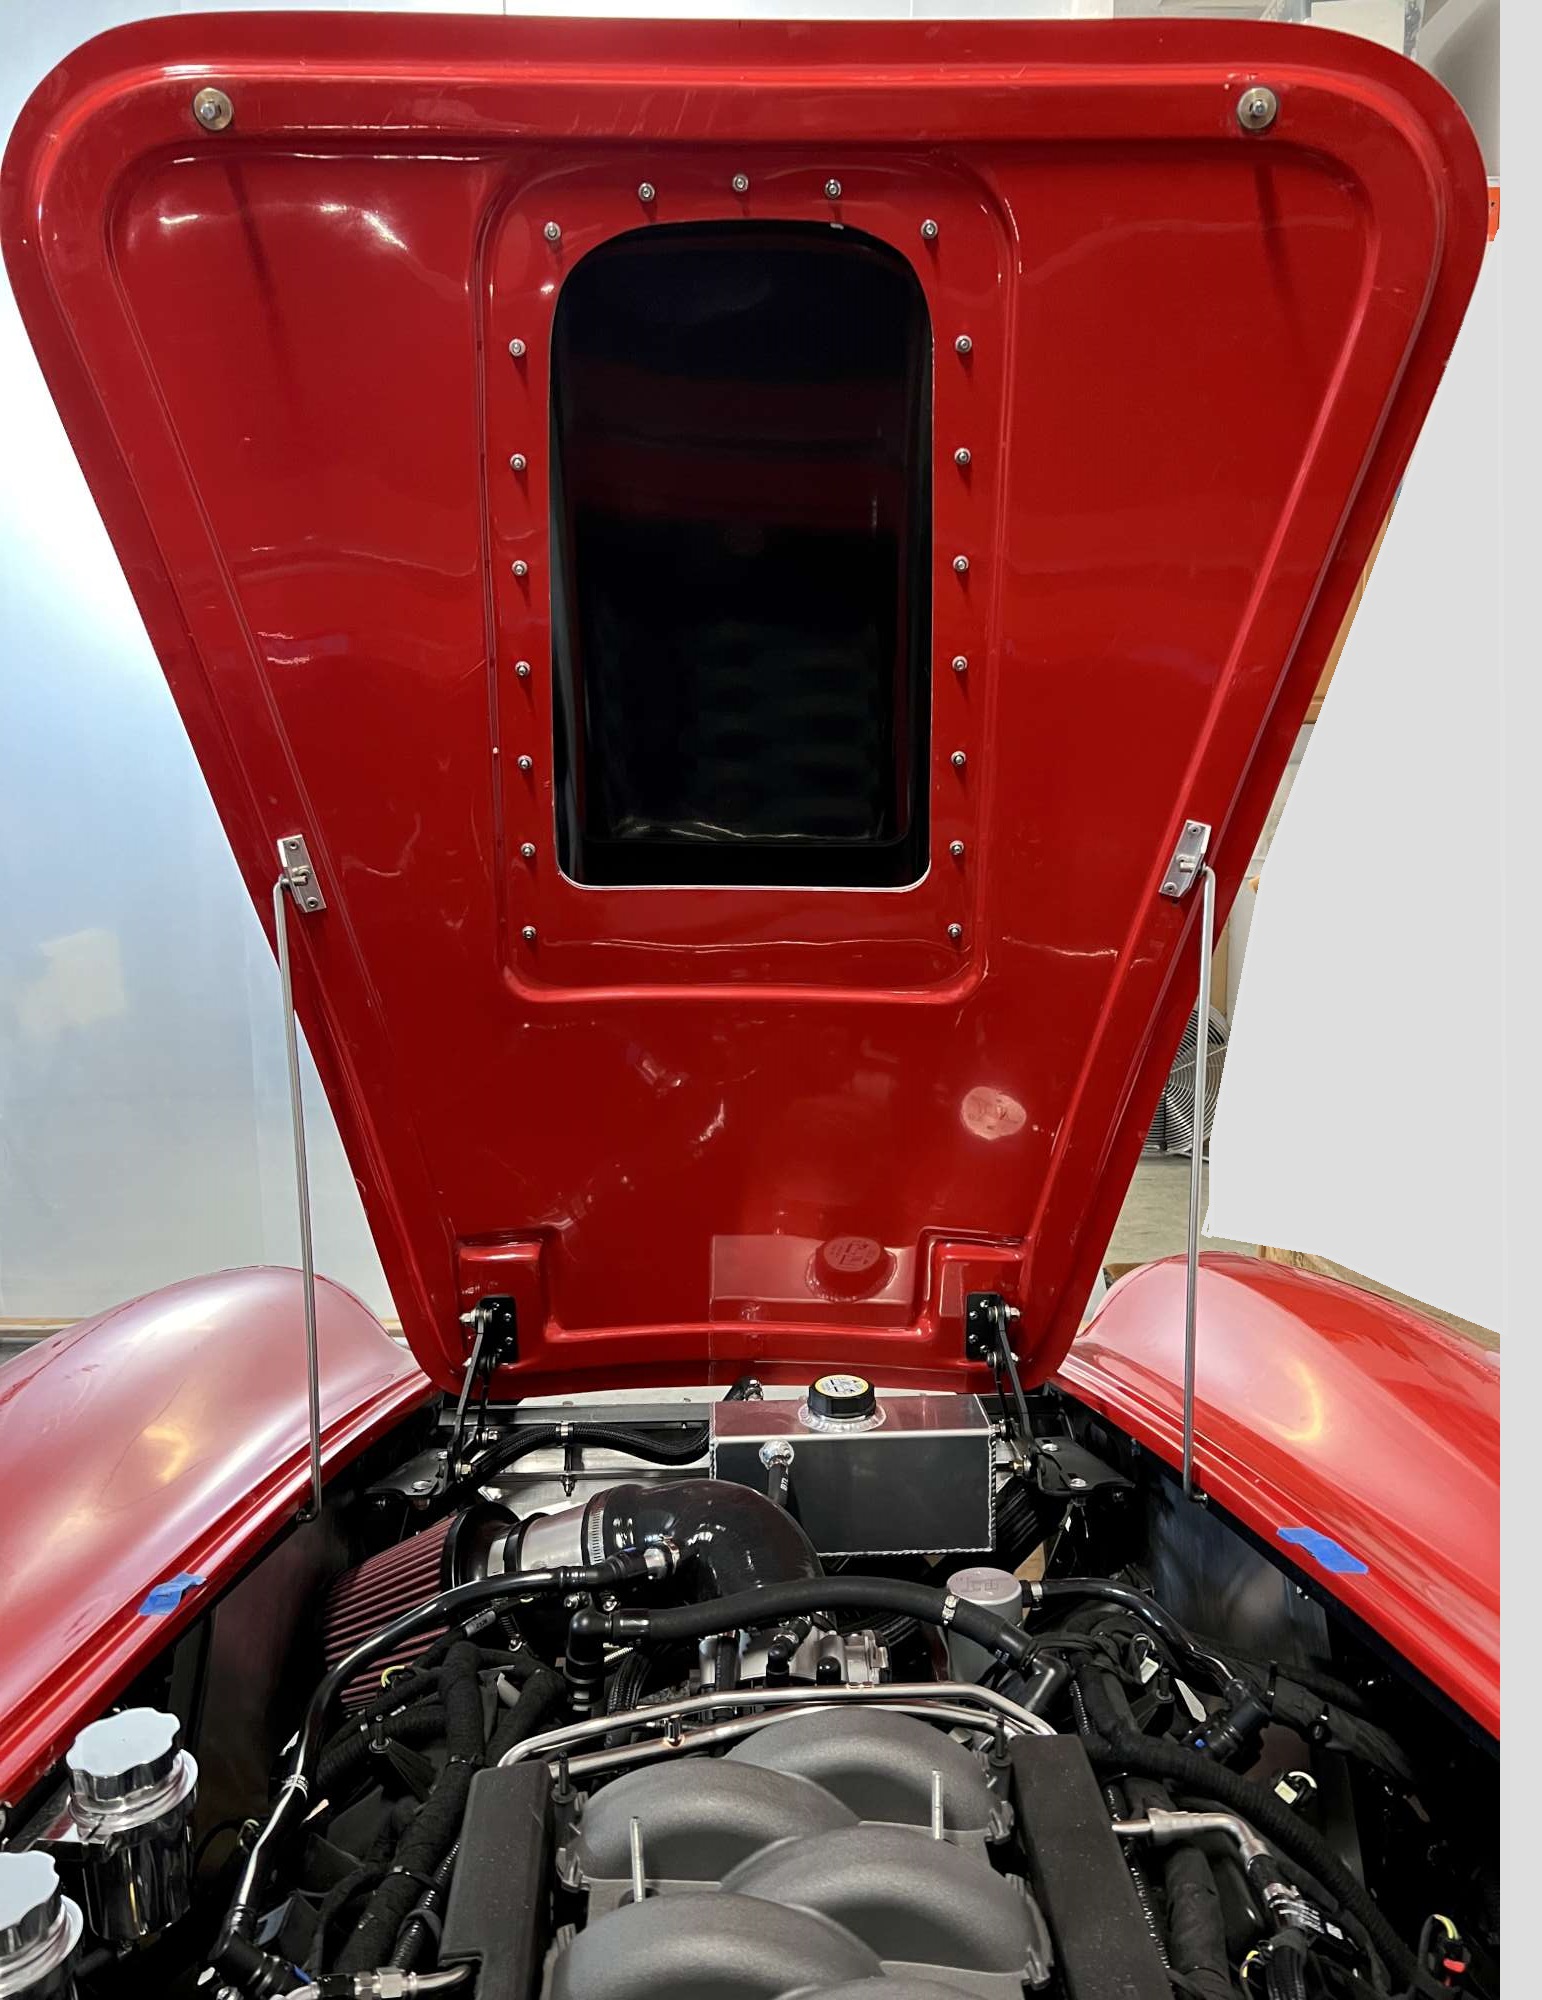
I'm making some slow but sure progress getting the hood installed. My approach is based largely upon forum wisdom:
- Center hood in the hood opening. I used 3M 1/4" vinyl tape on the hood to show me where to remove material for an even gap around the perimeter. I used an orbital and block sander combination until the gap is a solid 3/16". My goal is to make the hood gap functional, not perfect. That will be up to the body Pro later on.
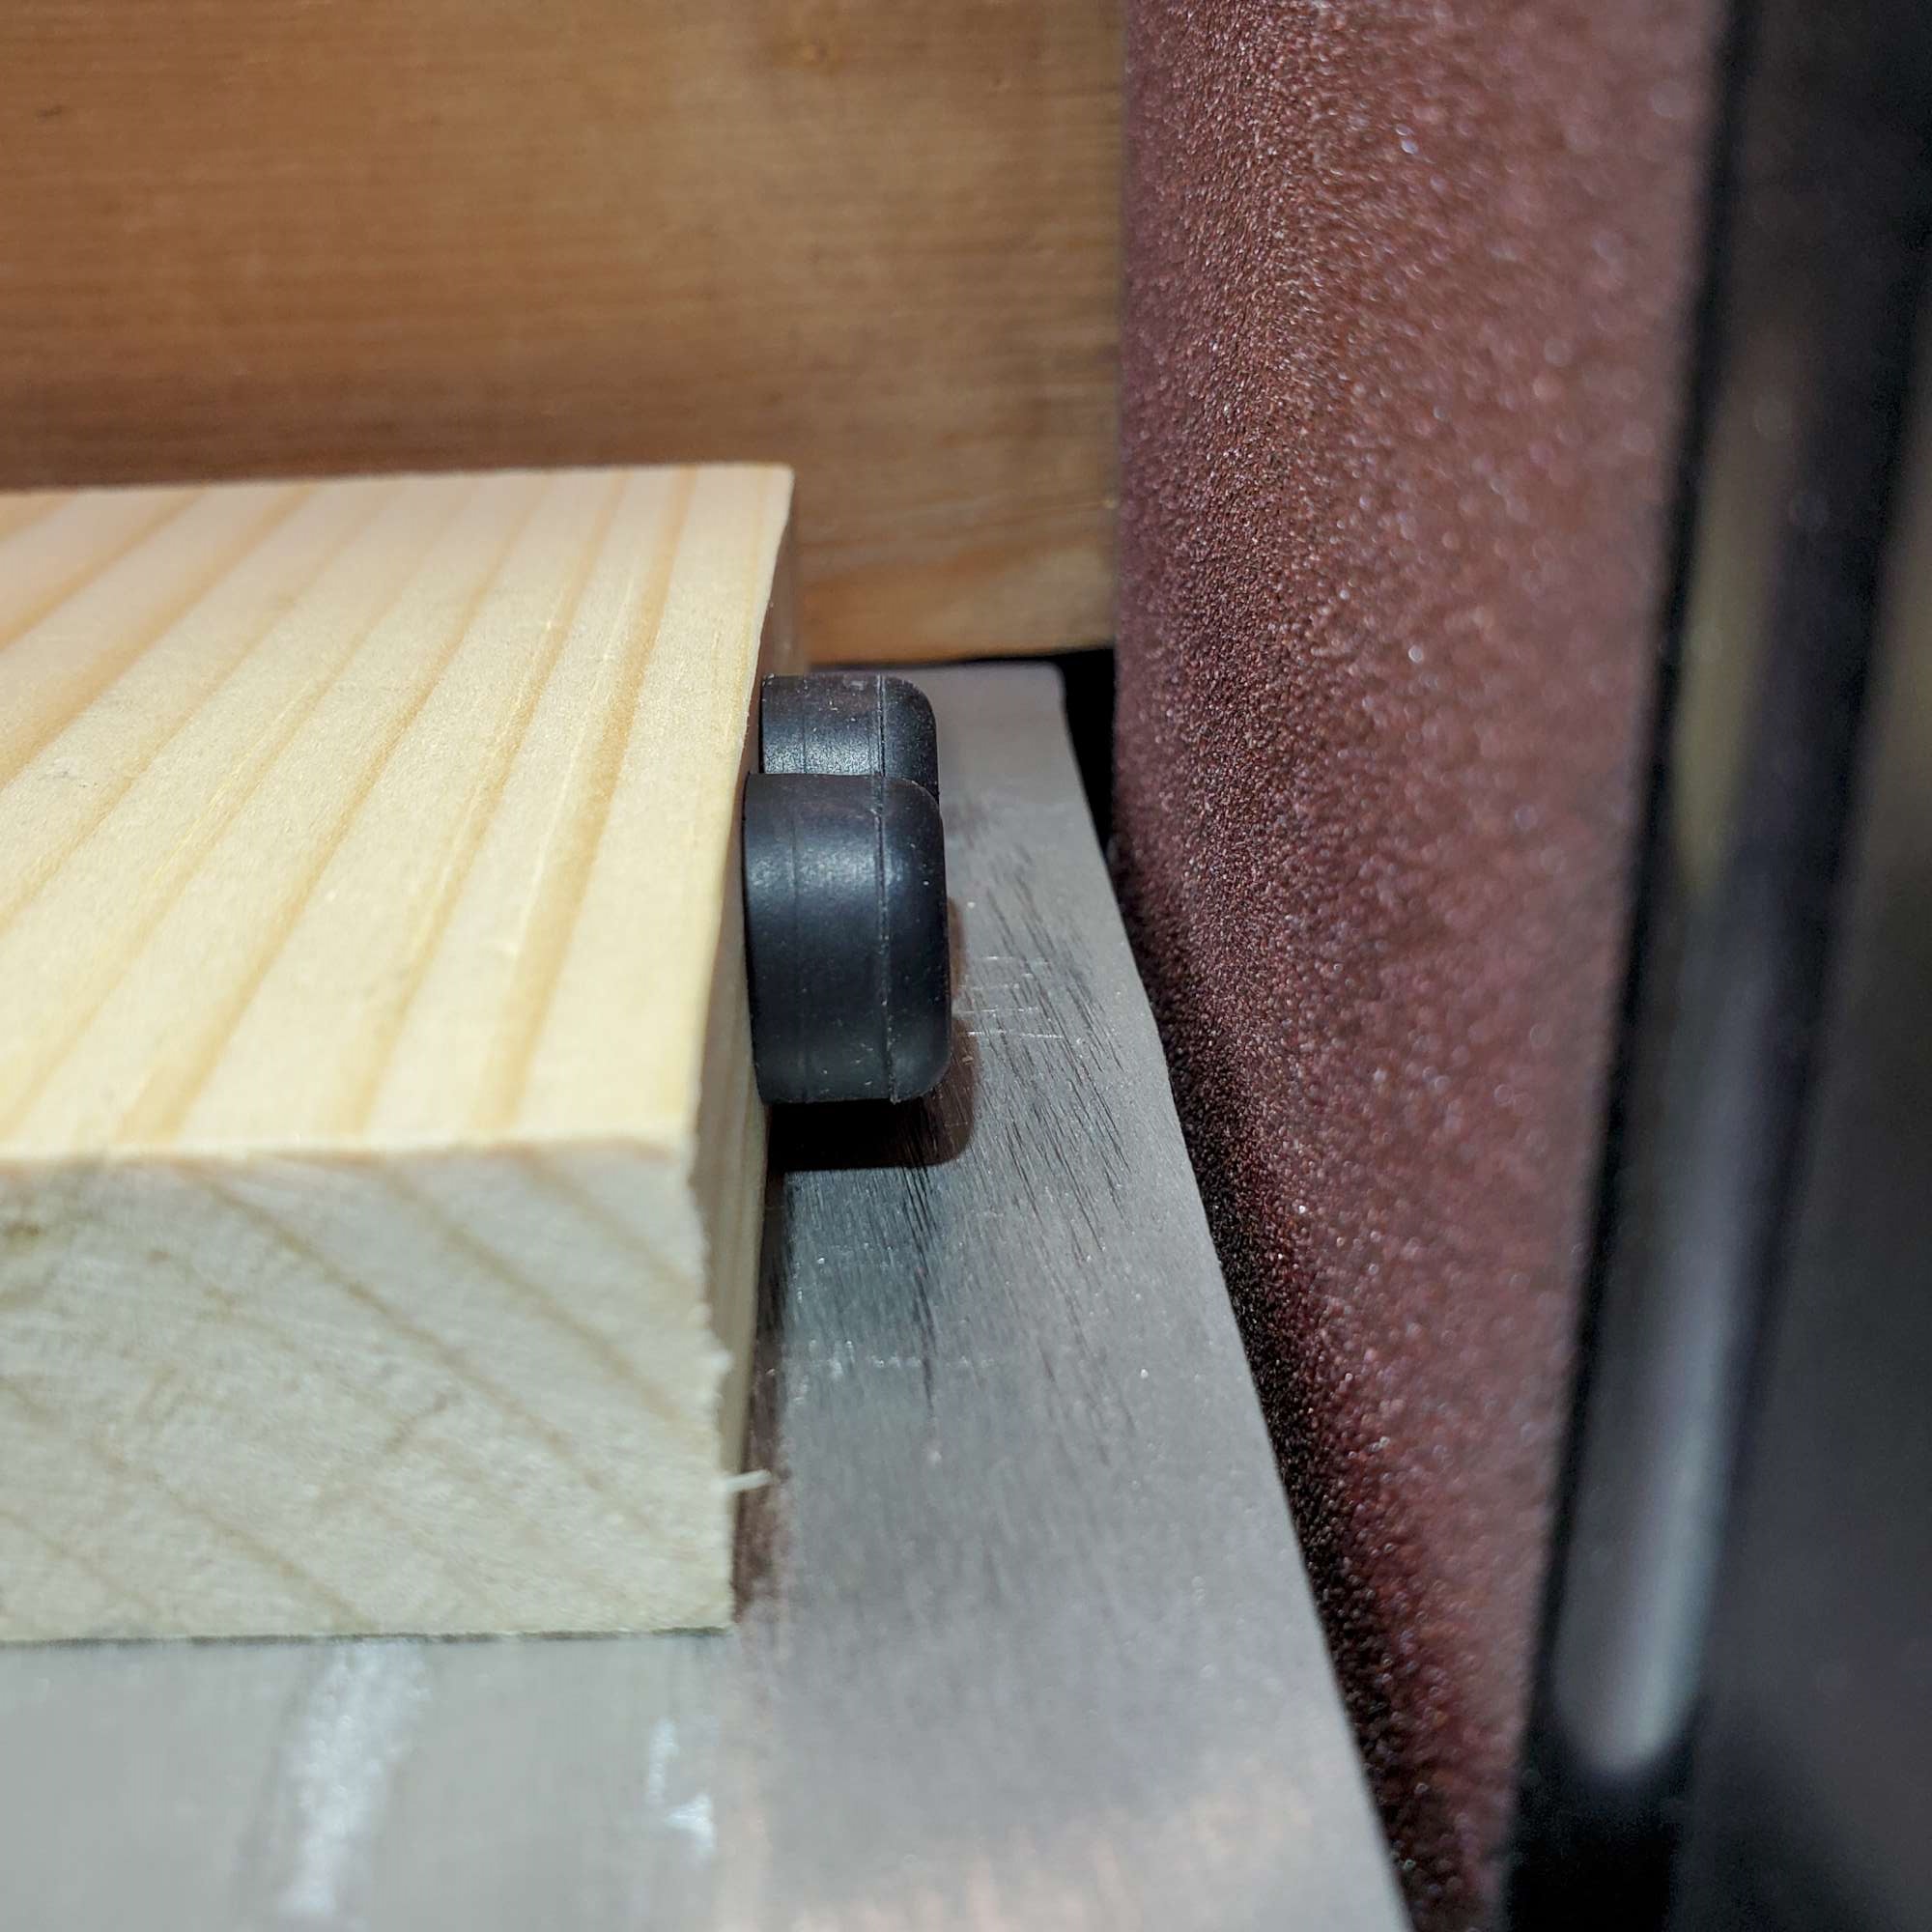
- Bumpers: tape down kit supplied rubber bumpers to get hood at even plane with the body. From a tip from Edwardb, I used my belt sander to shave the bumpers to their respective heights--see picture below. I don't think I'll put any bumpers at the front, as the hinge brackets seem to be providing adequate support. Note: I'm not going to install the bumpers permanently until I'm completely done with the hood. I'm noticing little changes in hood position as I center and adjust front hinges, and rear latches.
- Front hinge brackets: adjusted position of hood (forward/aft, left/right, and up/down) with the front hinge brackets to get the hood centered and in-plane with the hood opening/body.
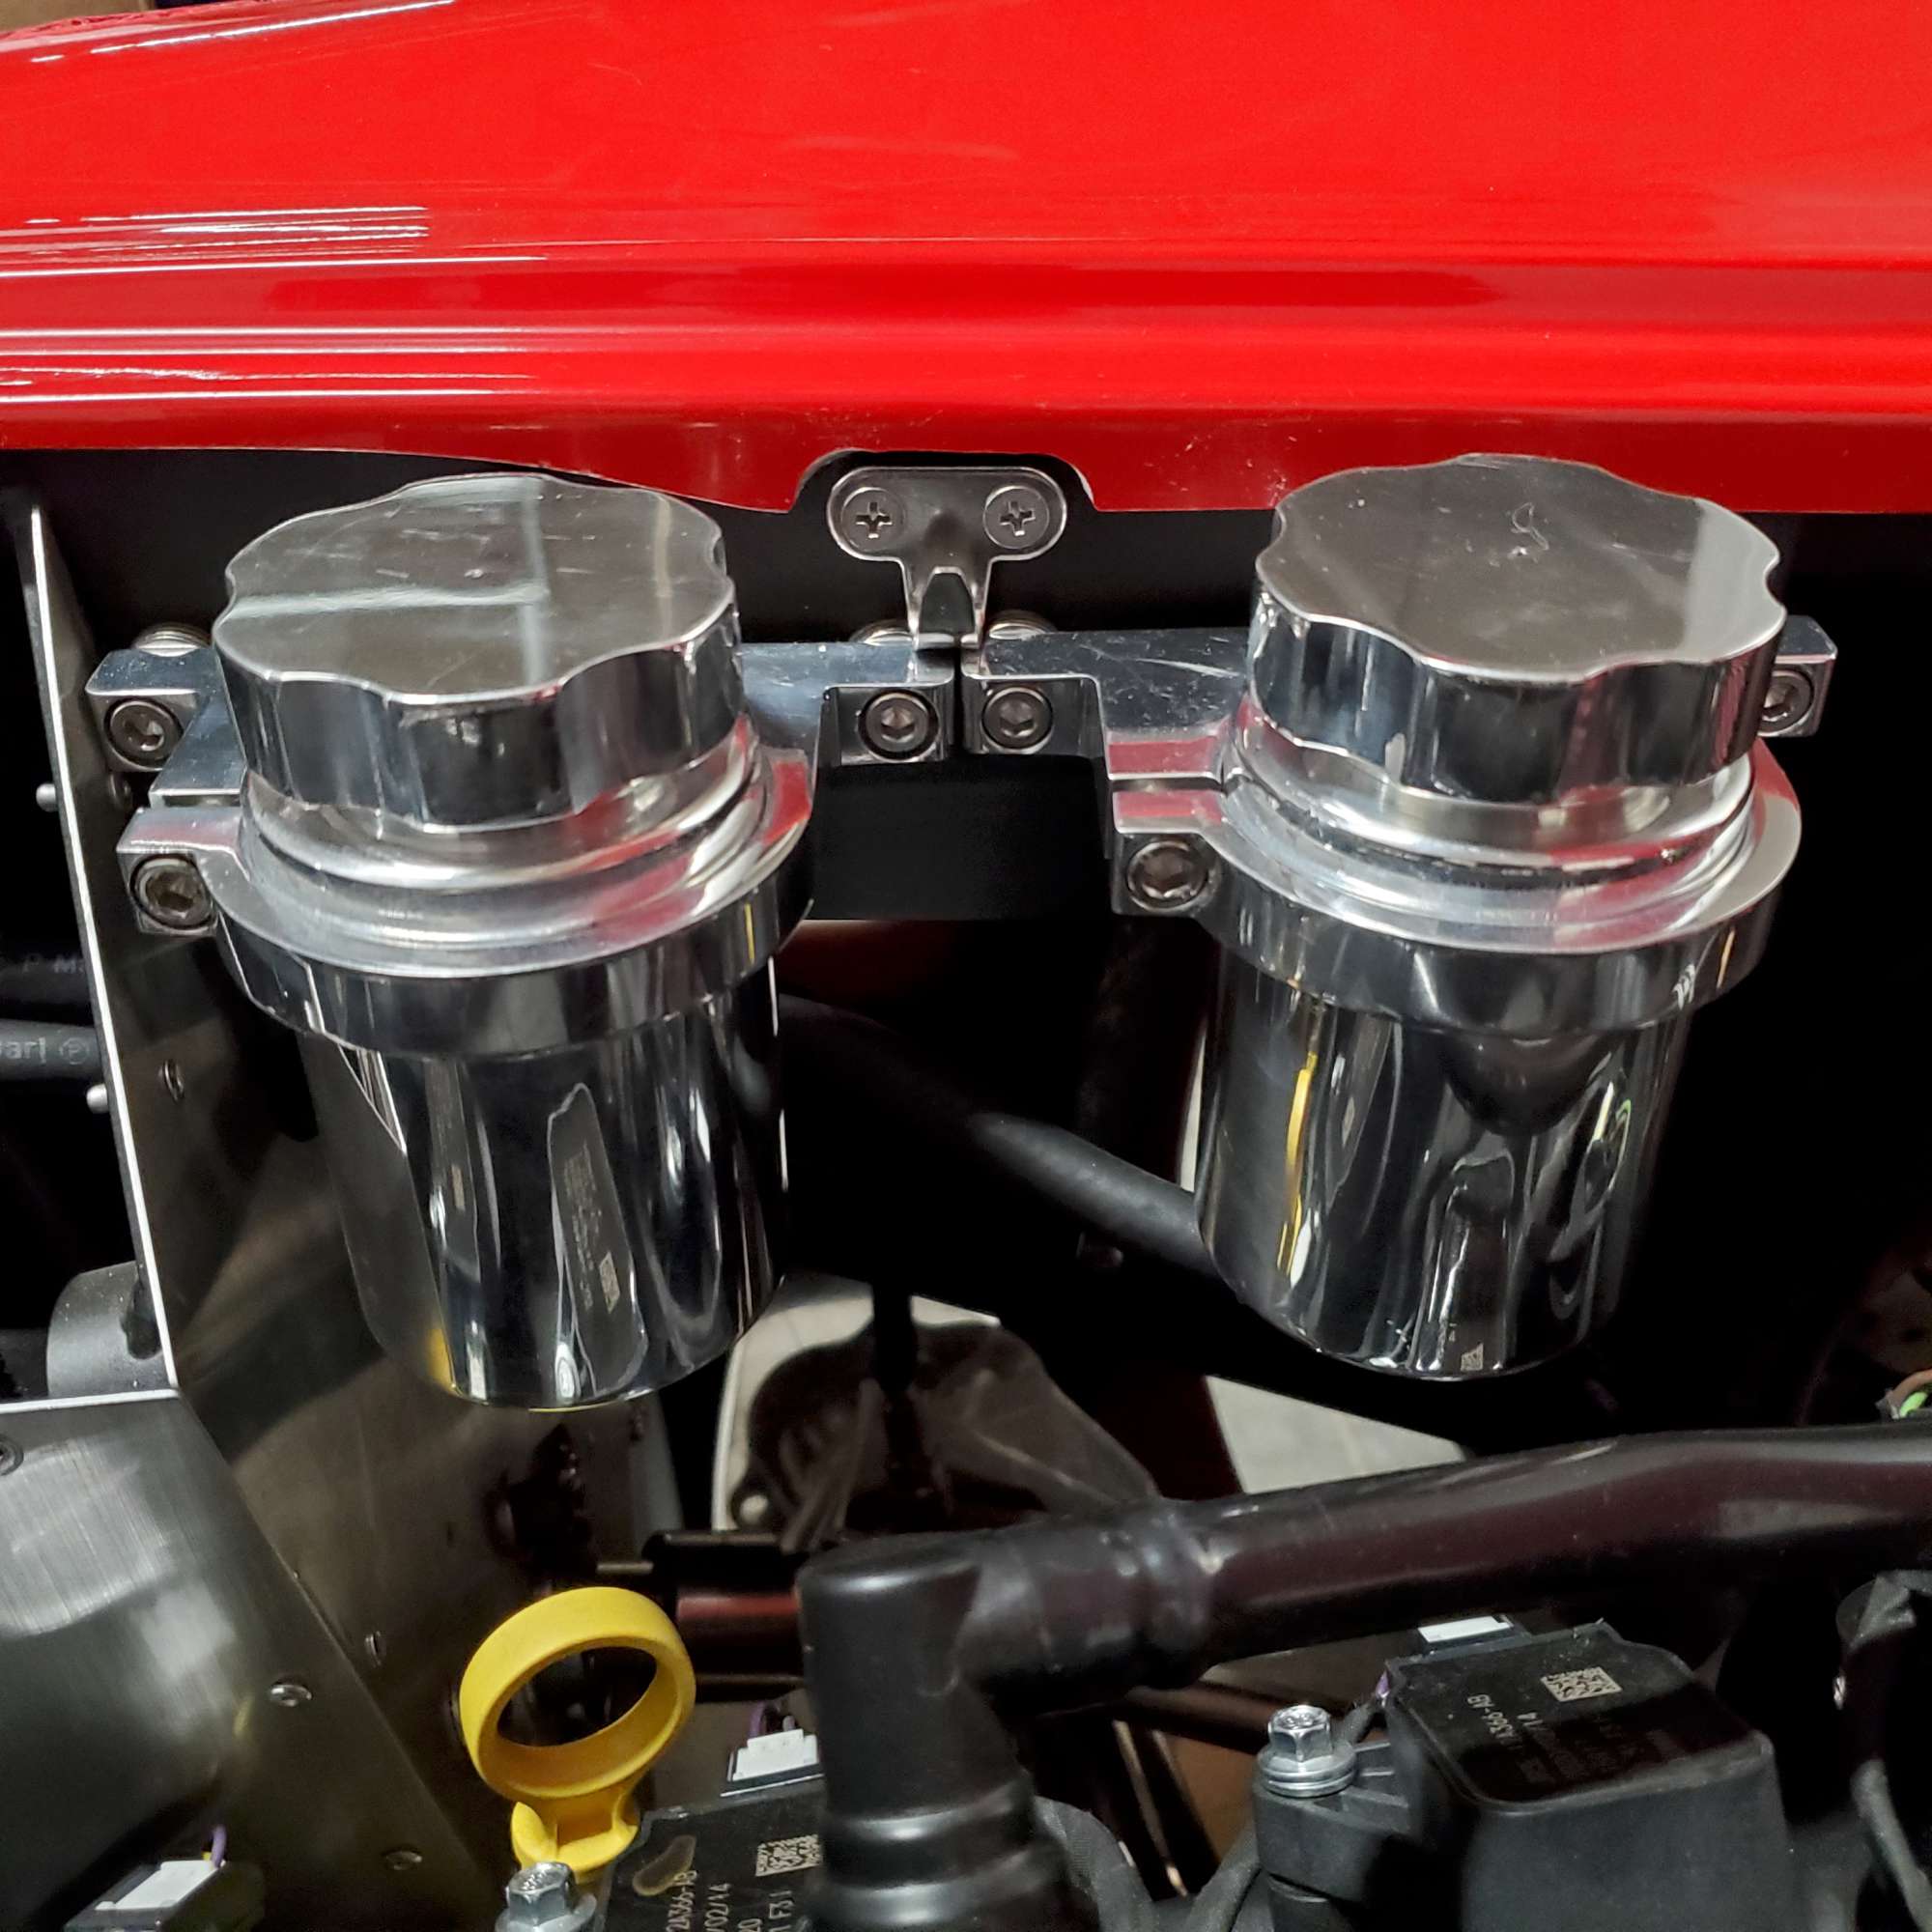
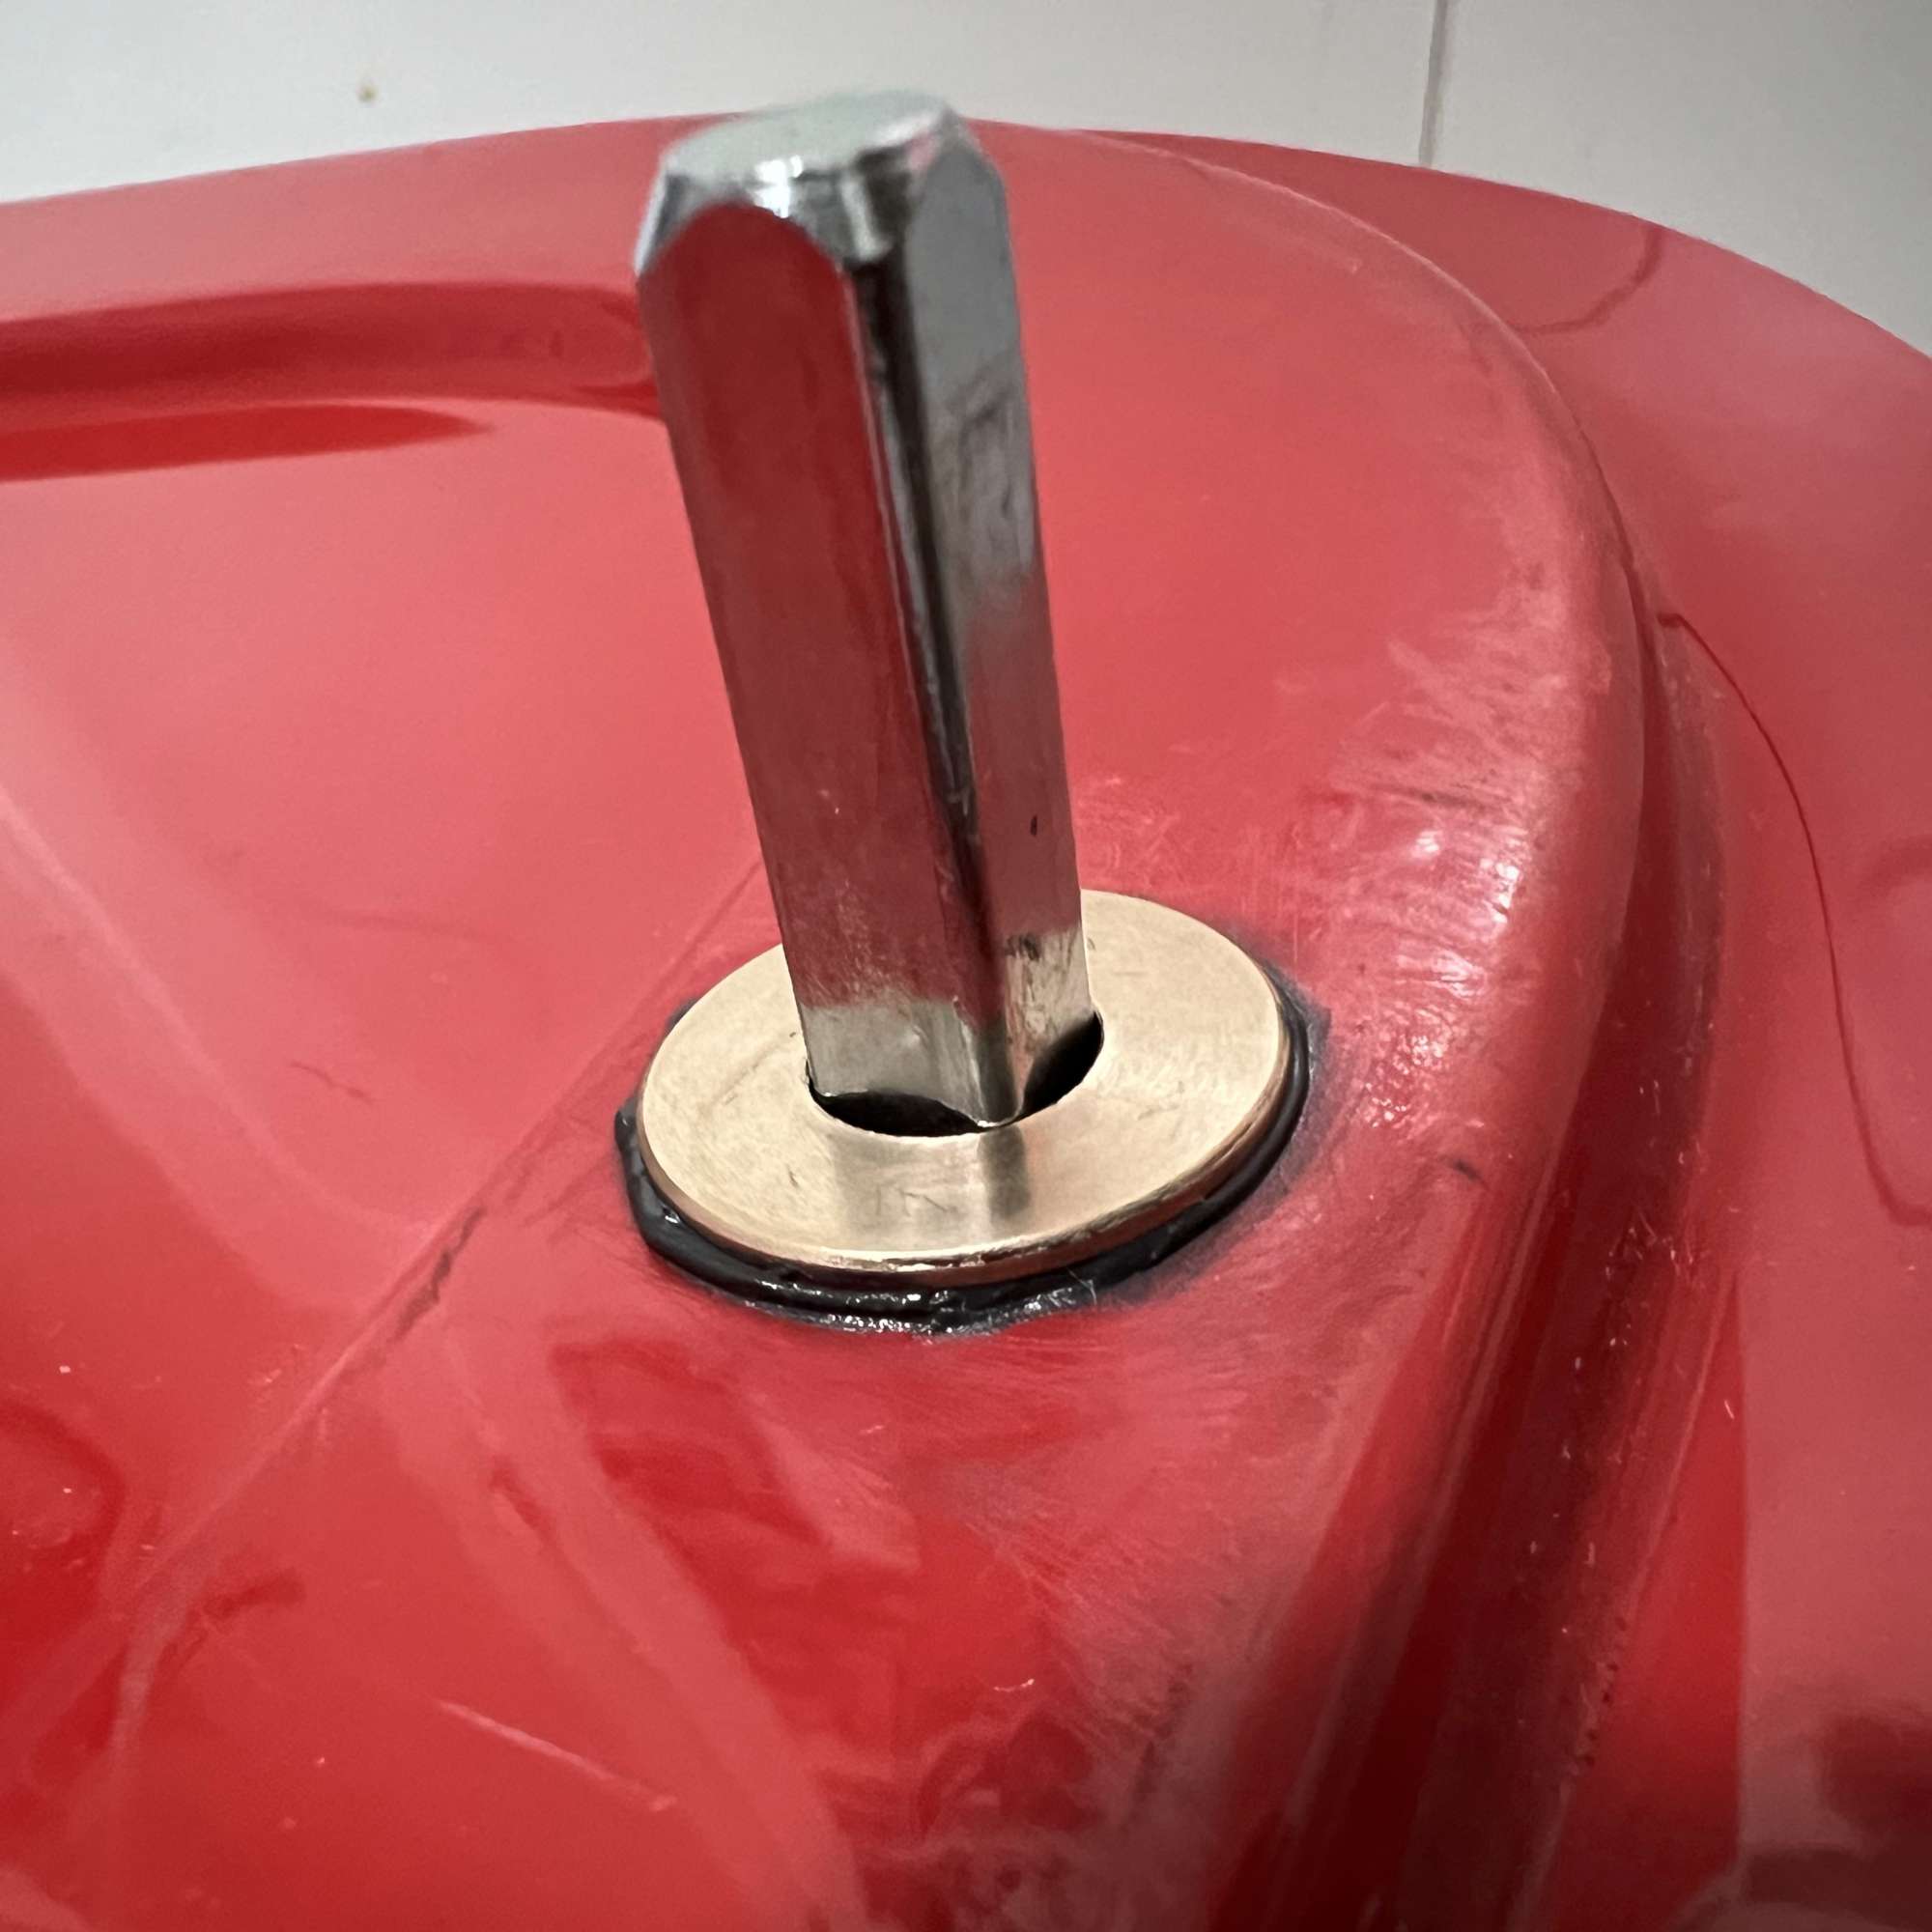
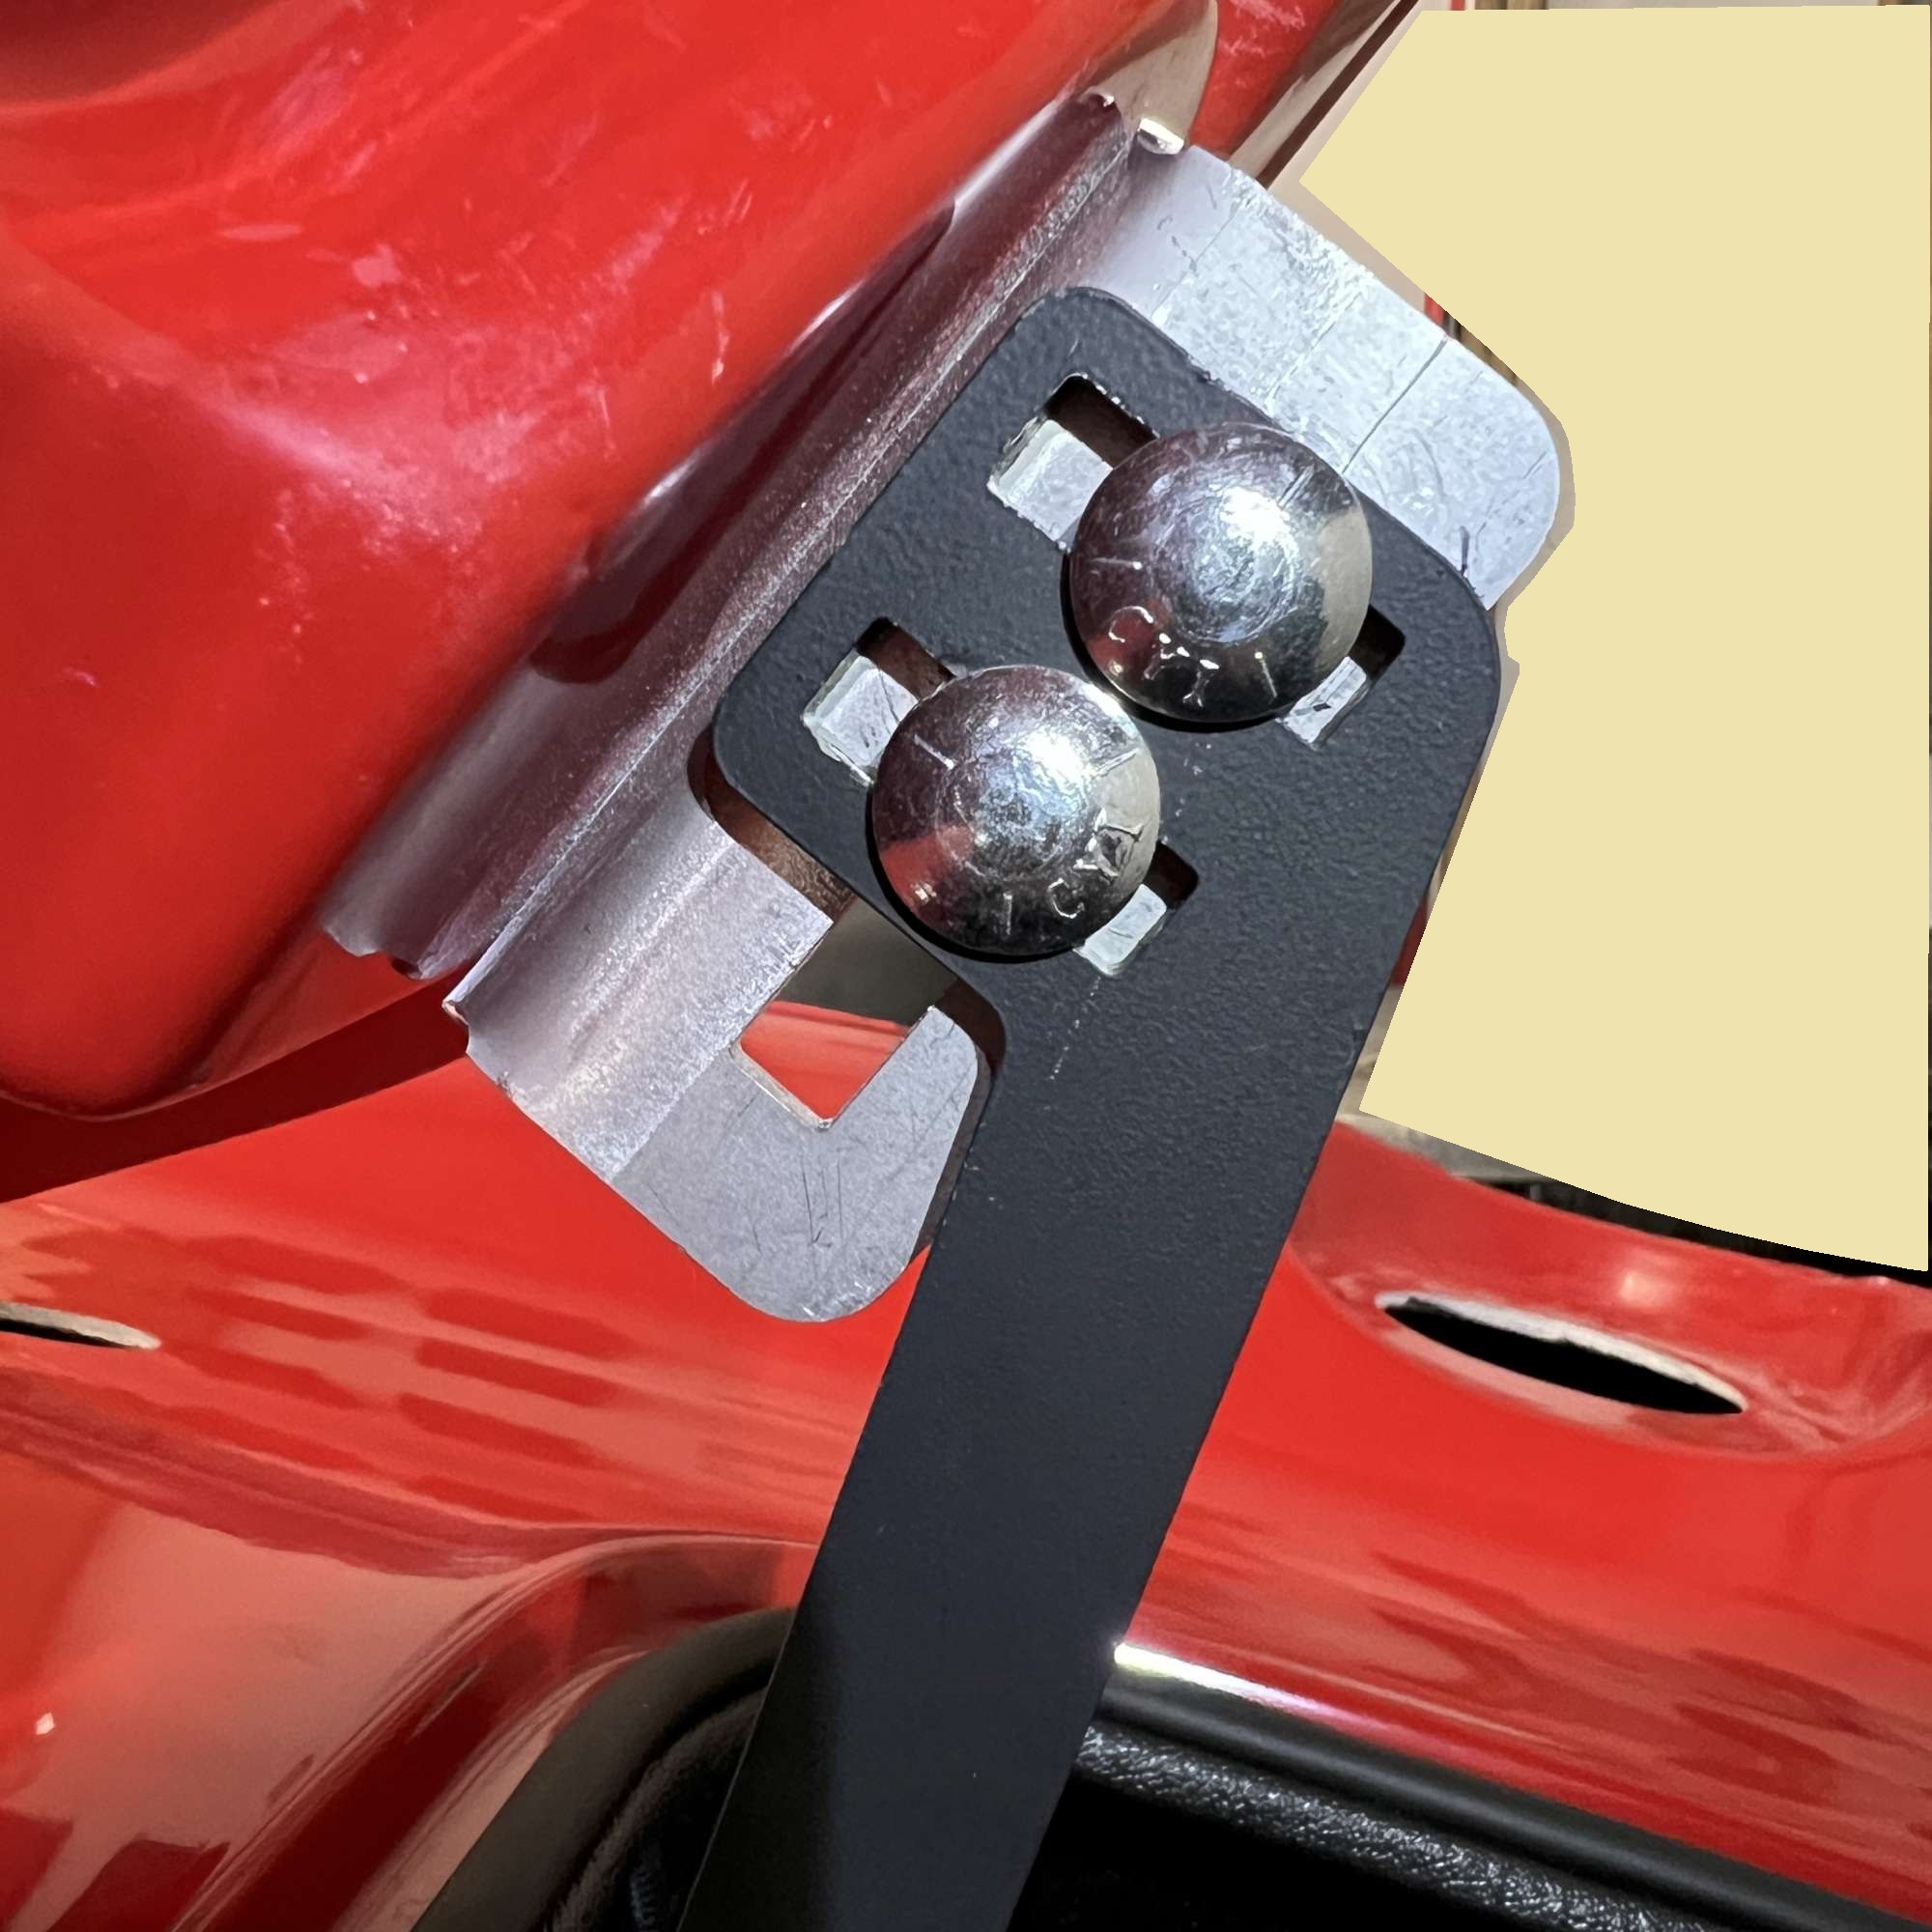
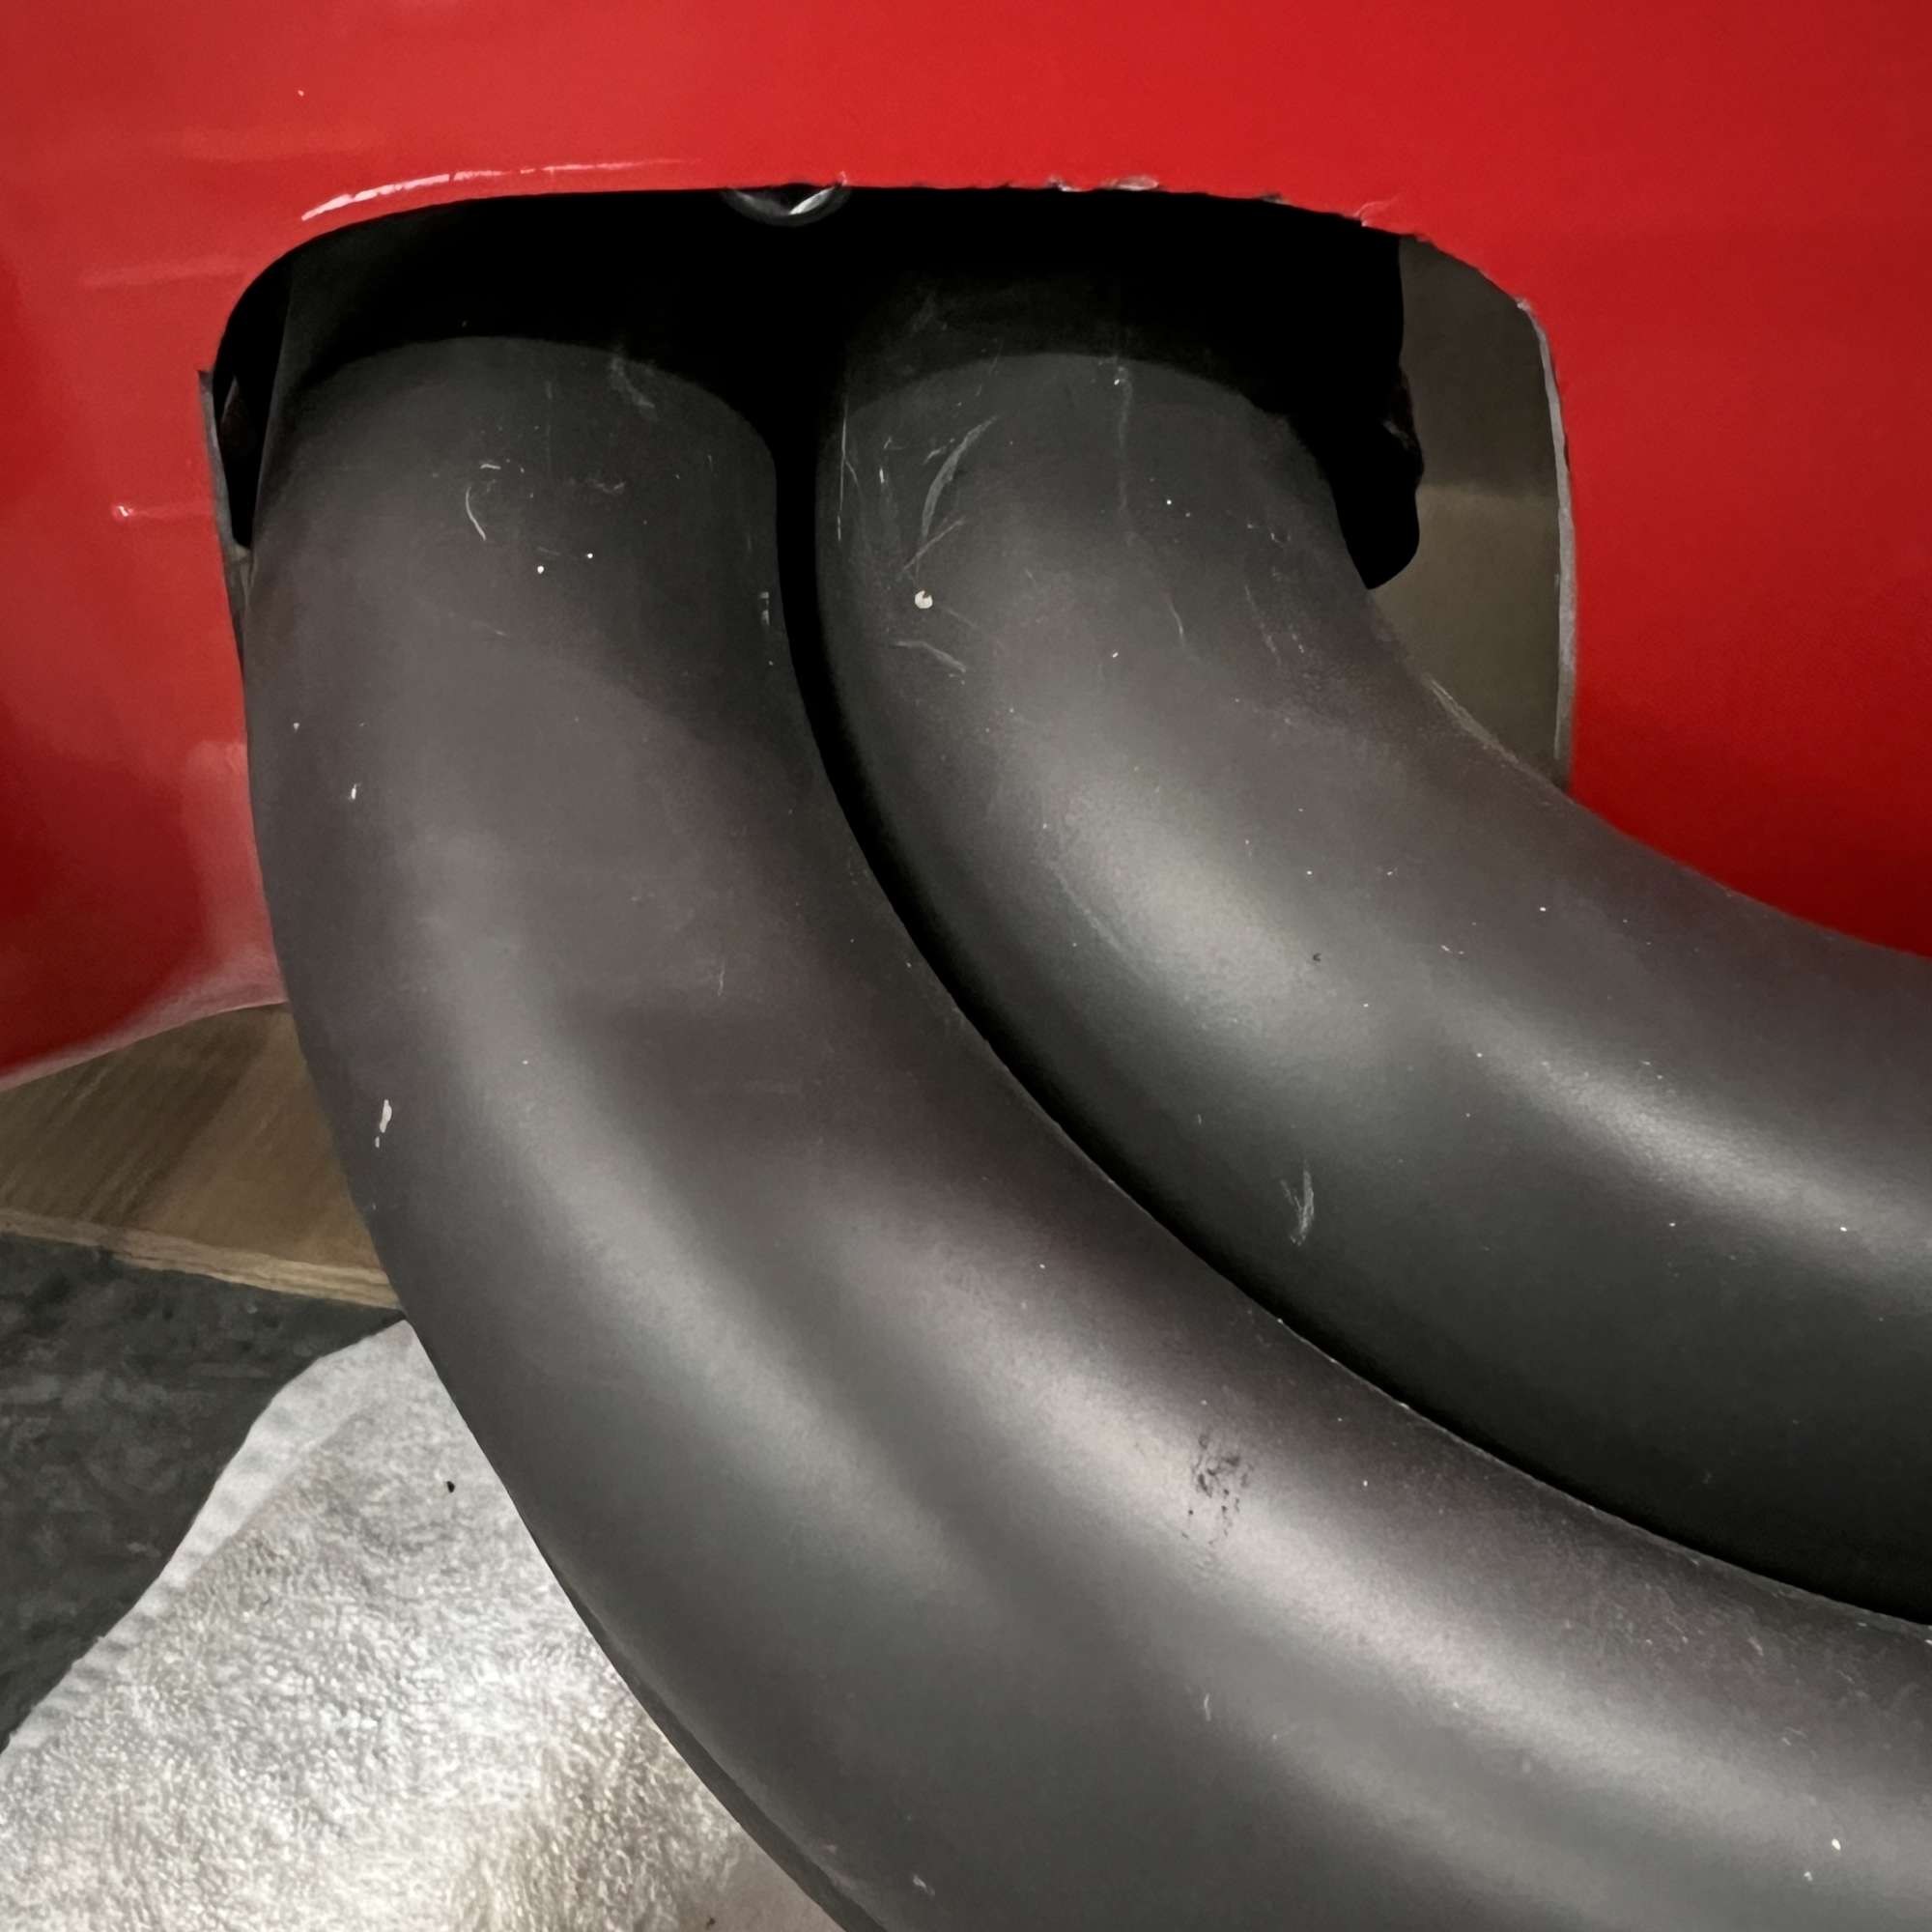
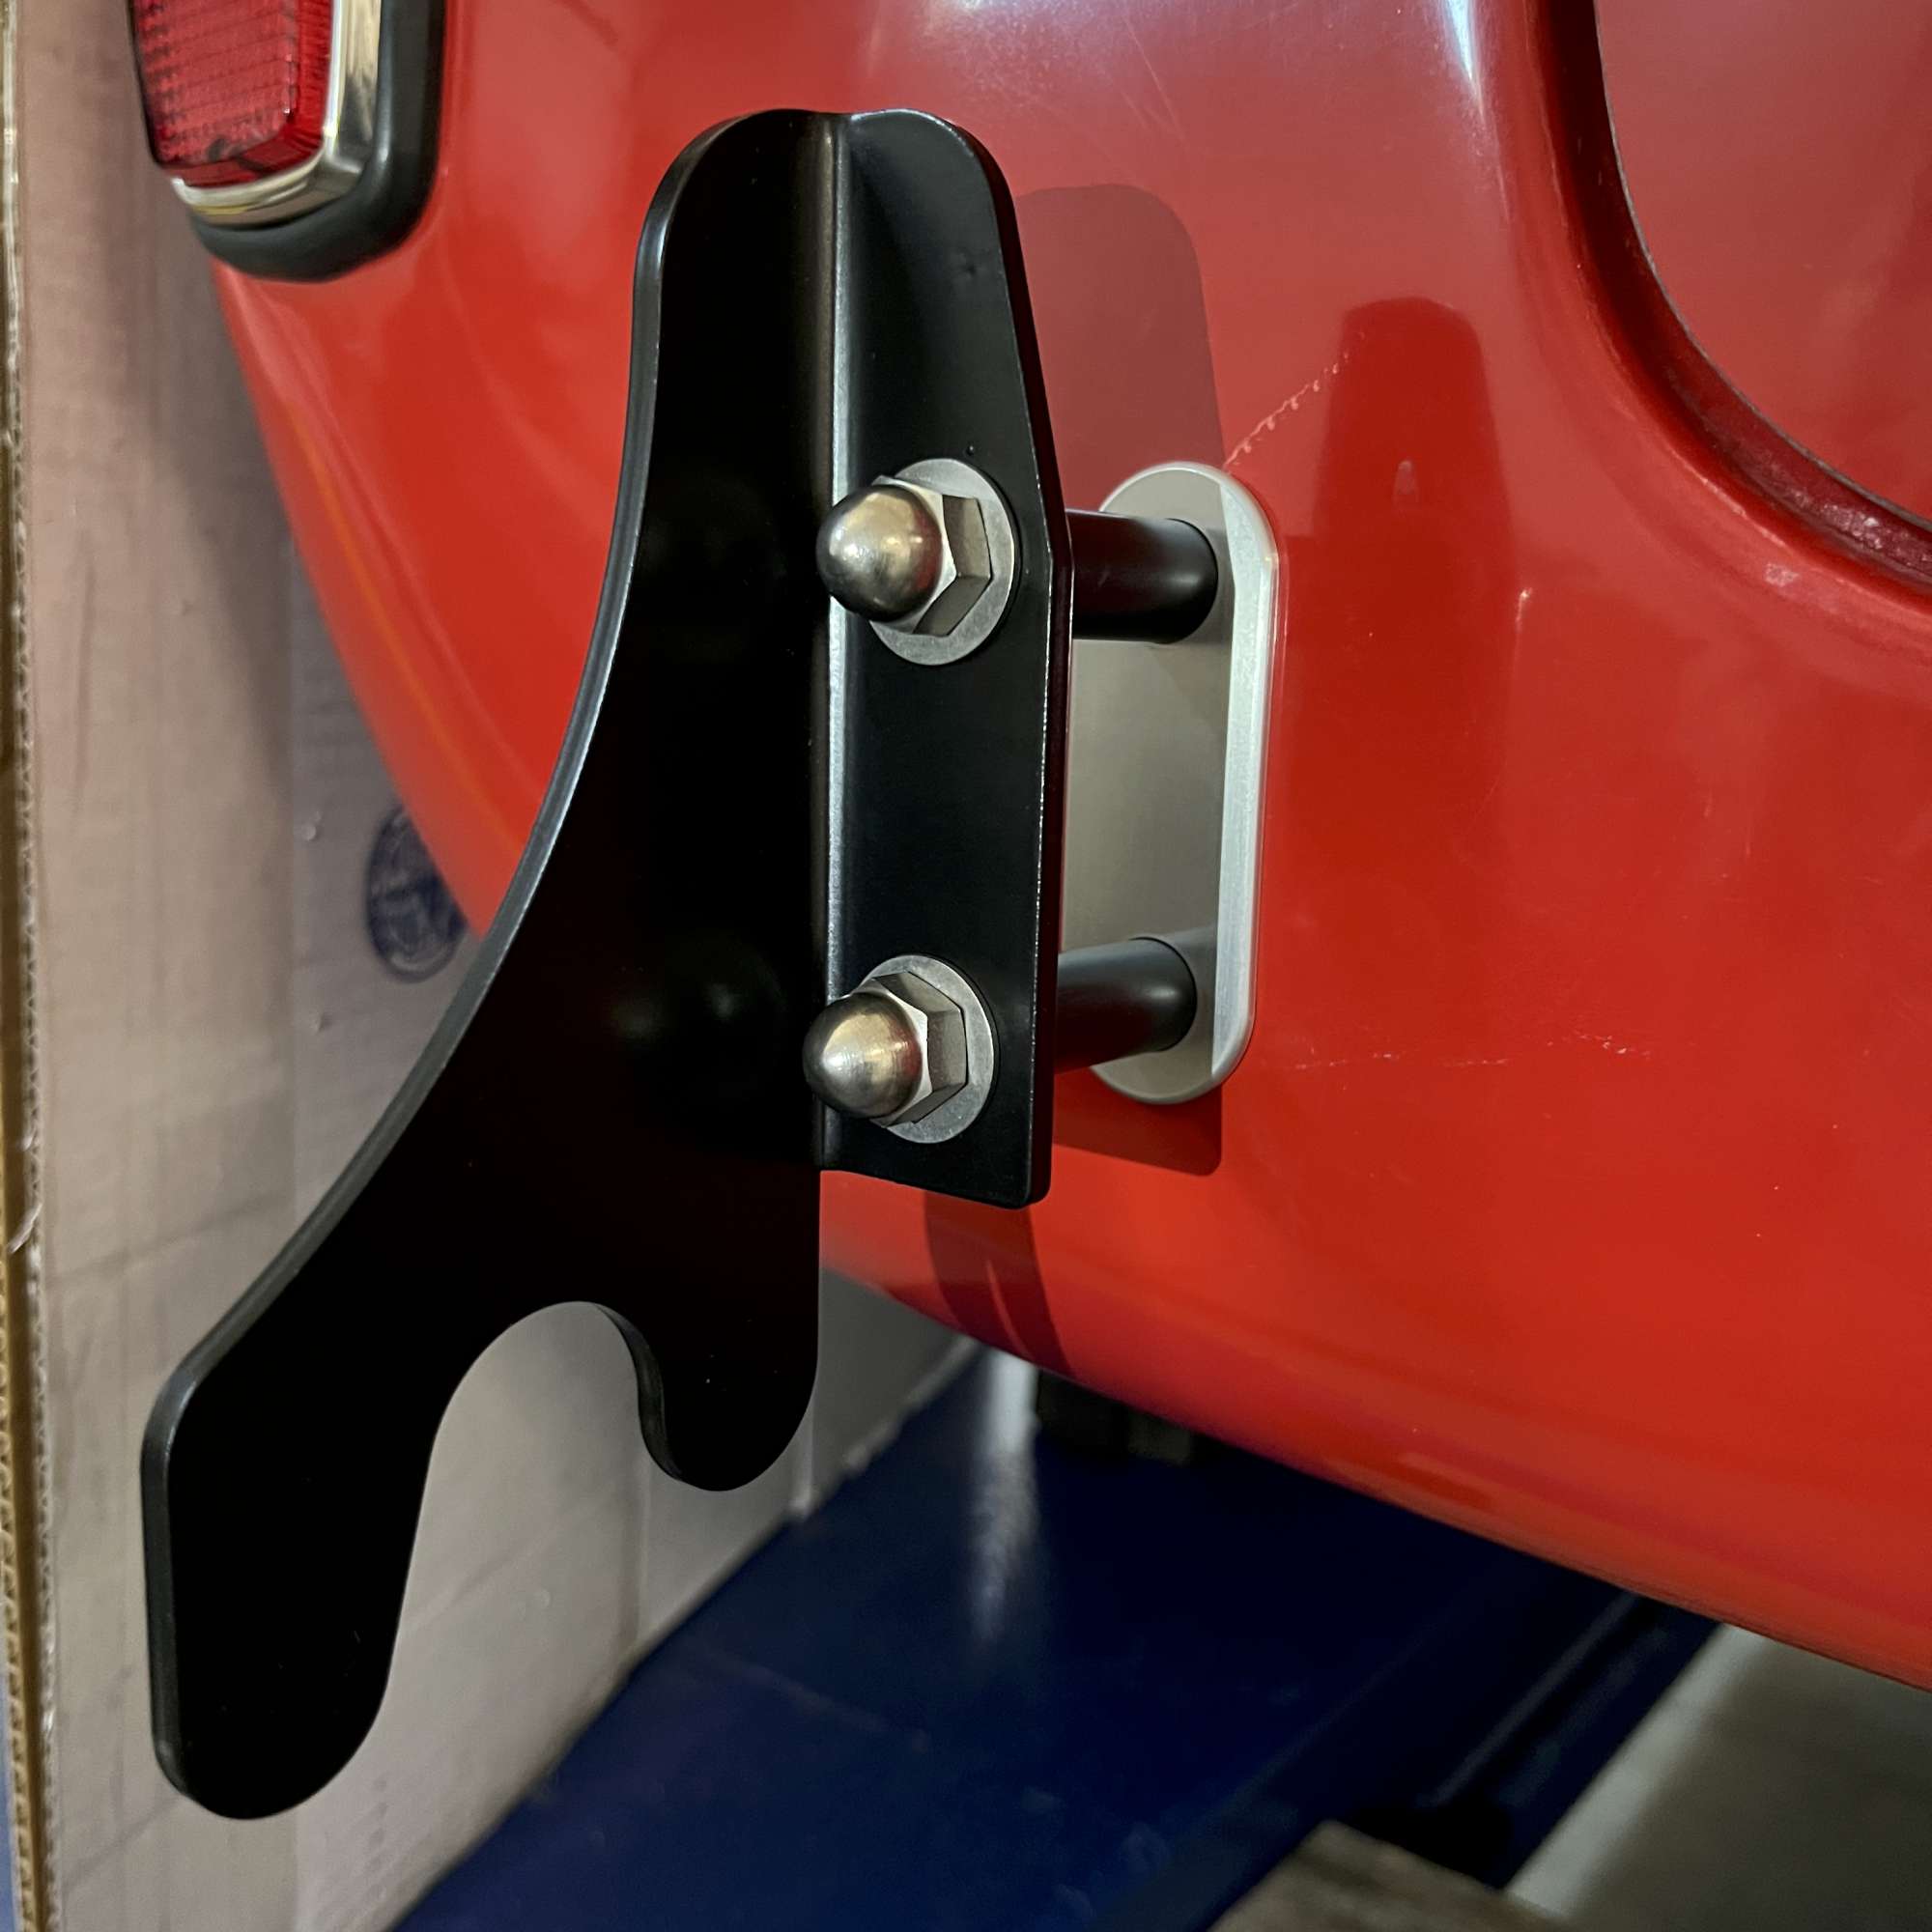
- Prop rods: installed left and right SS prop rods from Breeze. These are 5/16" in diameter. Boy, do they hold the hood solid. I much prefer the look and function of the prop rods to the kit supplied gas struts. However, the DS gave me quite a bit of trouble, because it needs to lay down between the brake reservoirs and 3/4" tube. To make a long story short, I spaced the reservoirs out from the tube, and added a couple spacers to the rod keeper bracket. I also had to grind away a halfmoon shape below the plane of the hood opening. This created a large enough gap for the prop rod to nestle down in between and engage the keeper. See pictures below. Tip: this is probably common sense, but I recommend mocking up the prop rod using the positioning in Mark's instructions to determine best placement for the aluminum brackets on the hood. I didn't, and had to relocate the PS bracket. Now it engages the hood where it naturally wants to be.
Tip from Edwardb to attach bumpers to a block of wood in order to shave them down as needed.
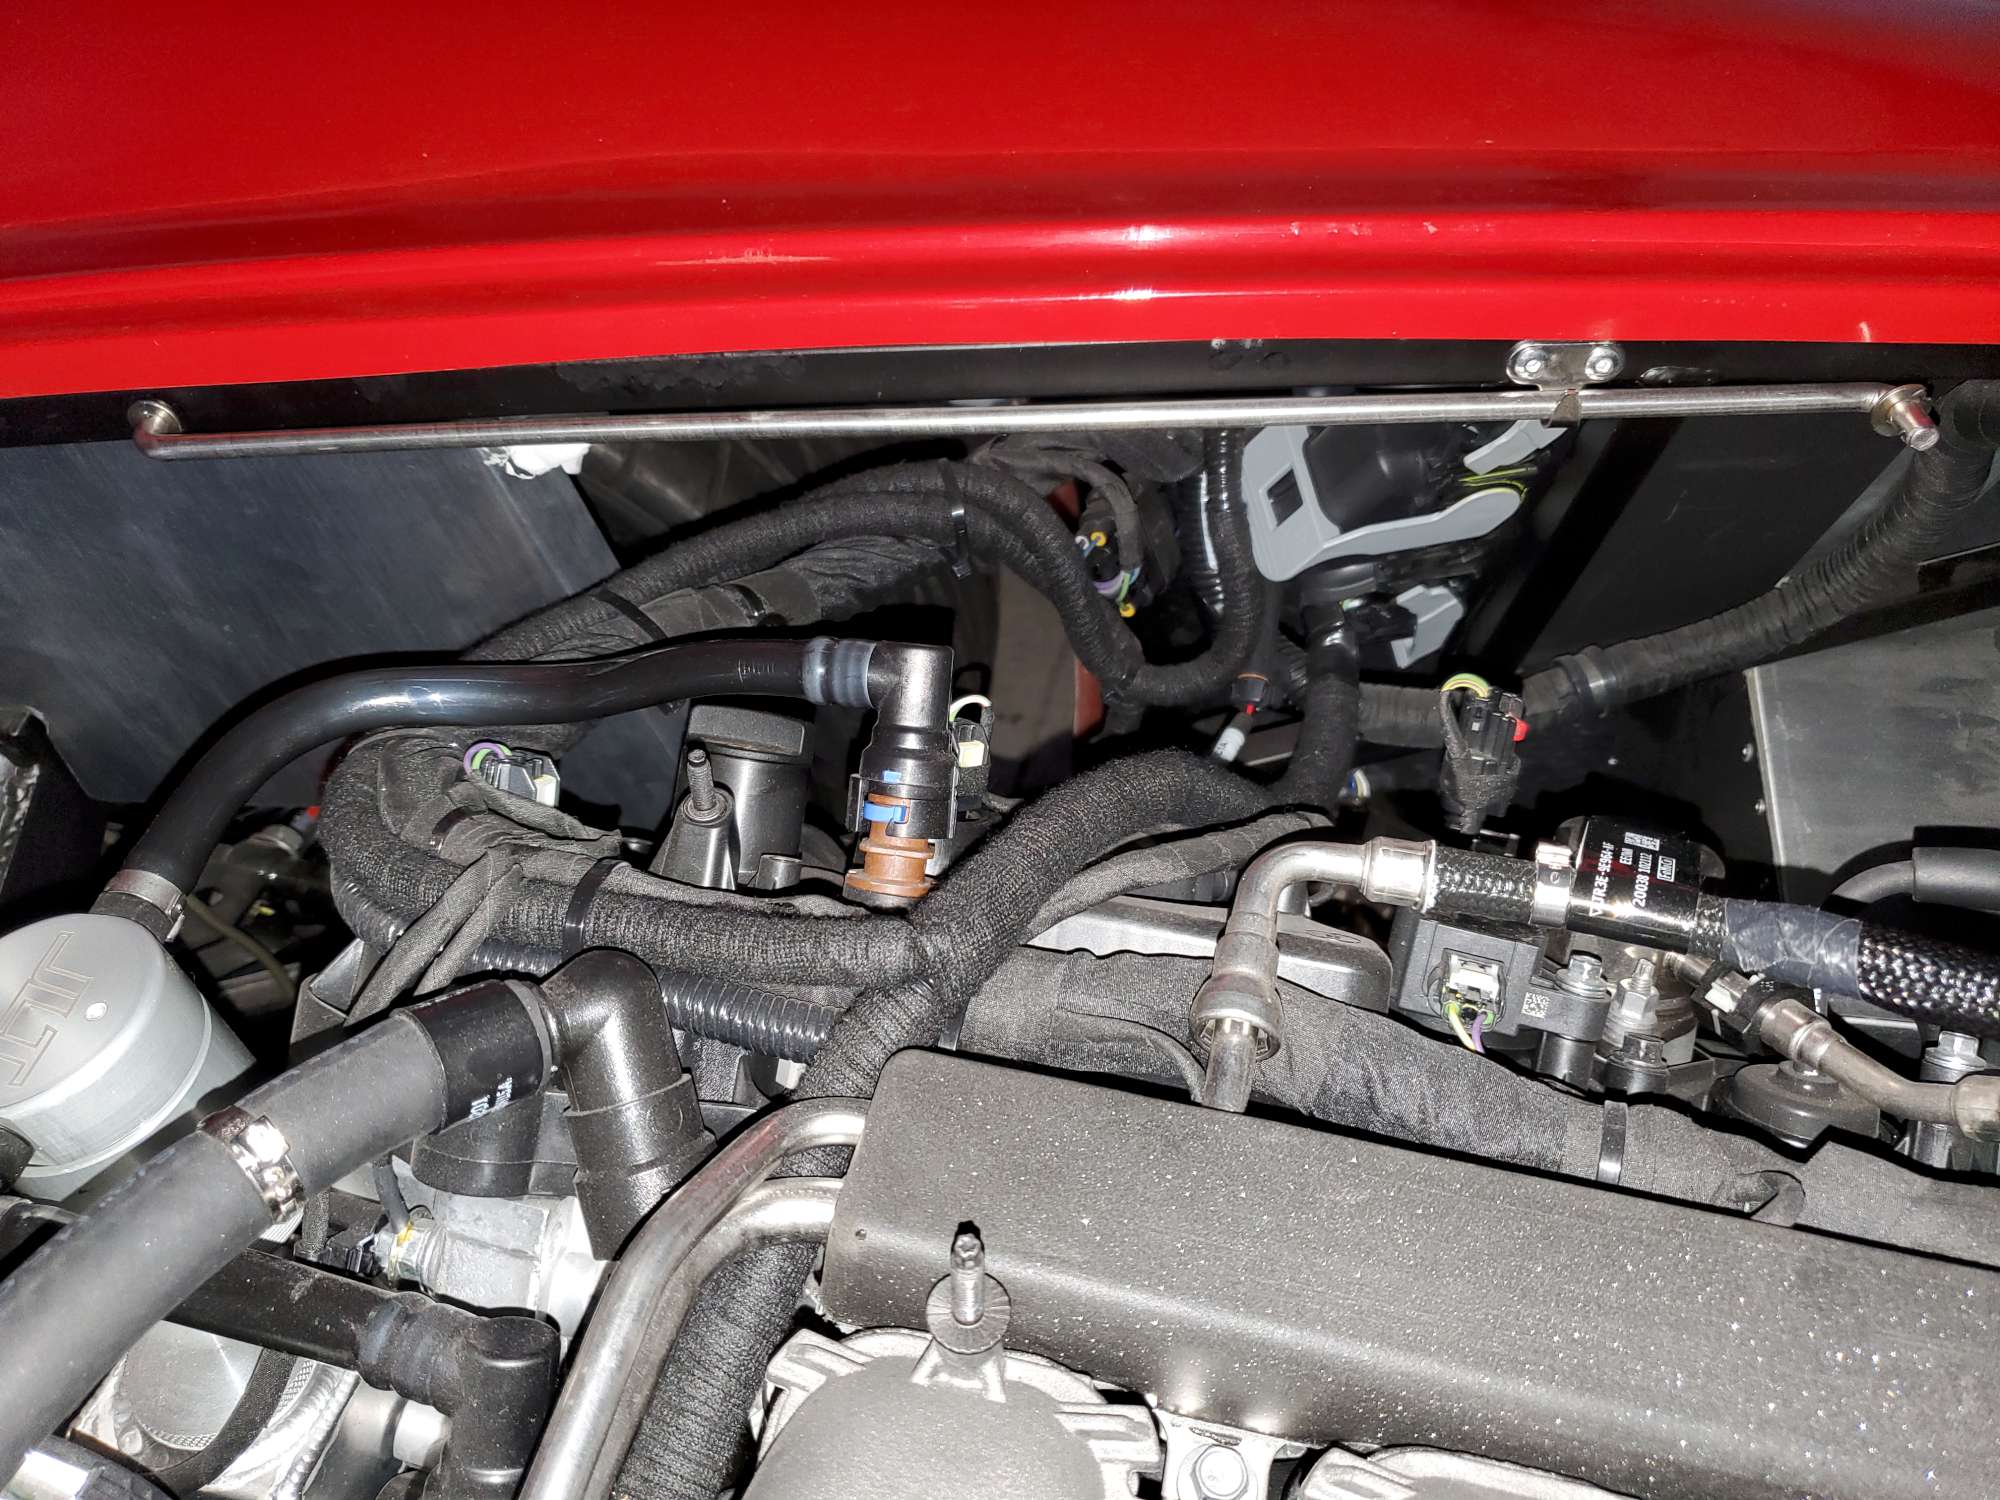
As I described above, I had some work to do to establish a gap between my brake reservoirs and 3/4" tube. Here, the halfmoon shape I ground out is visible just below the plane of the hood opening. It's tight, but fits now without interference.
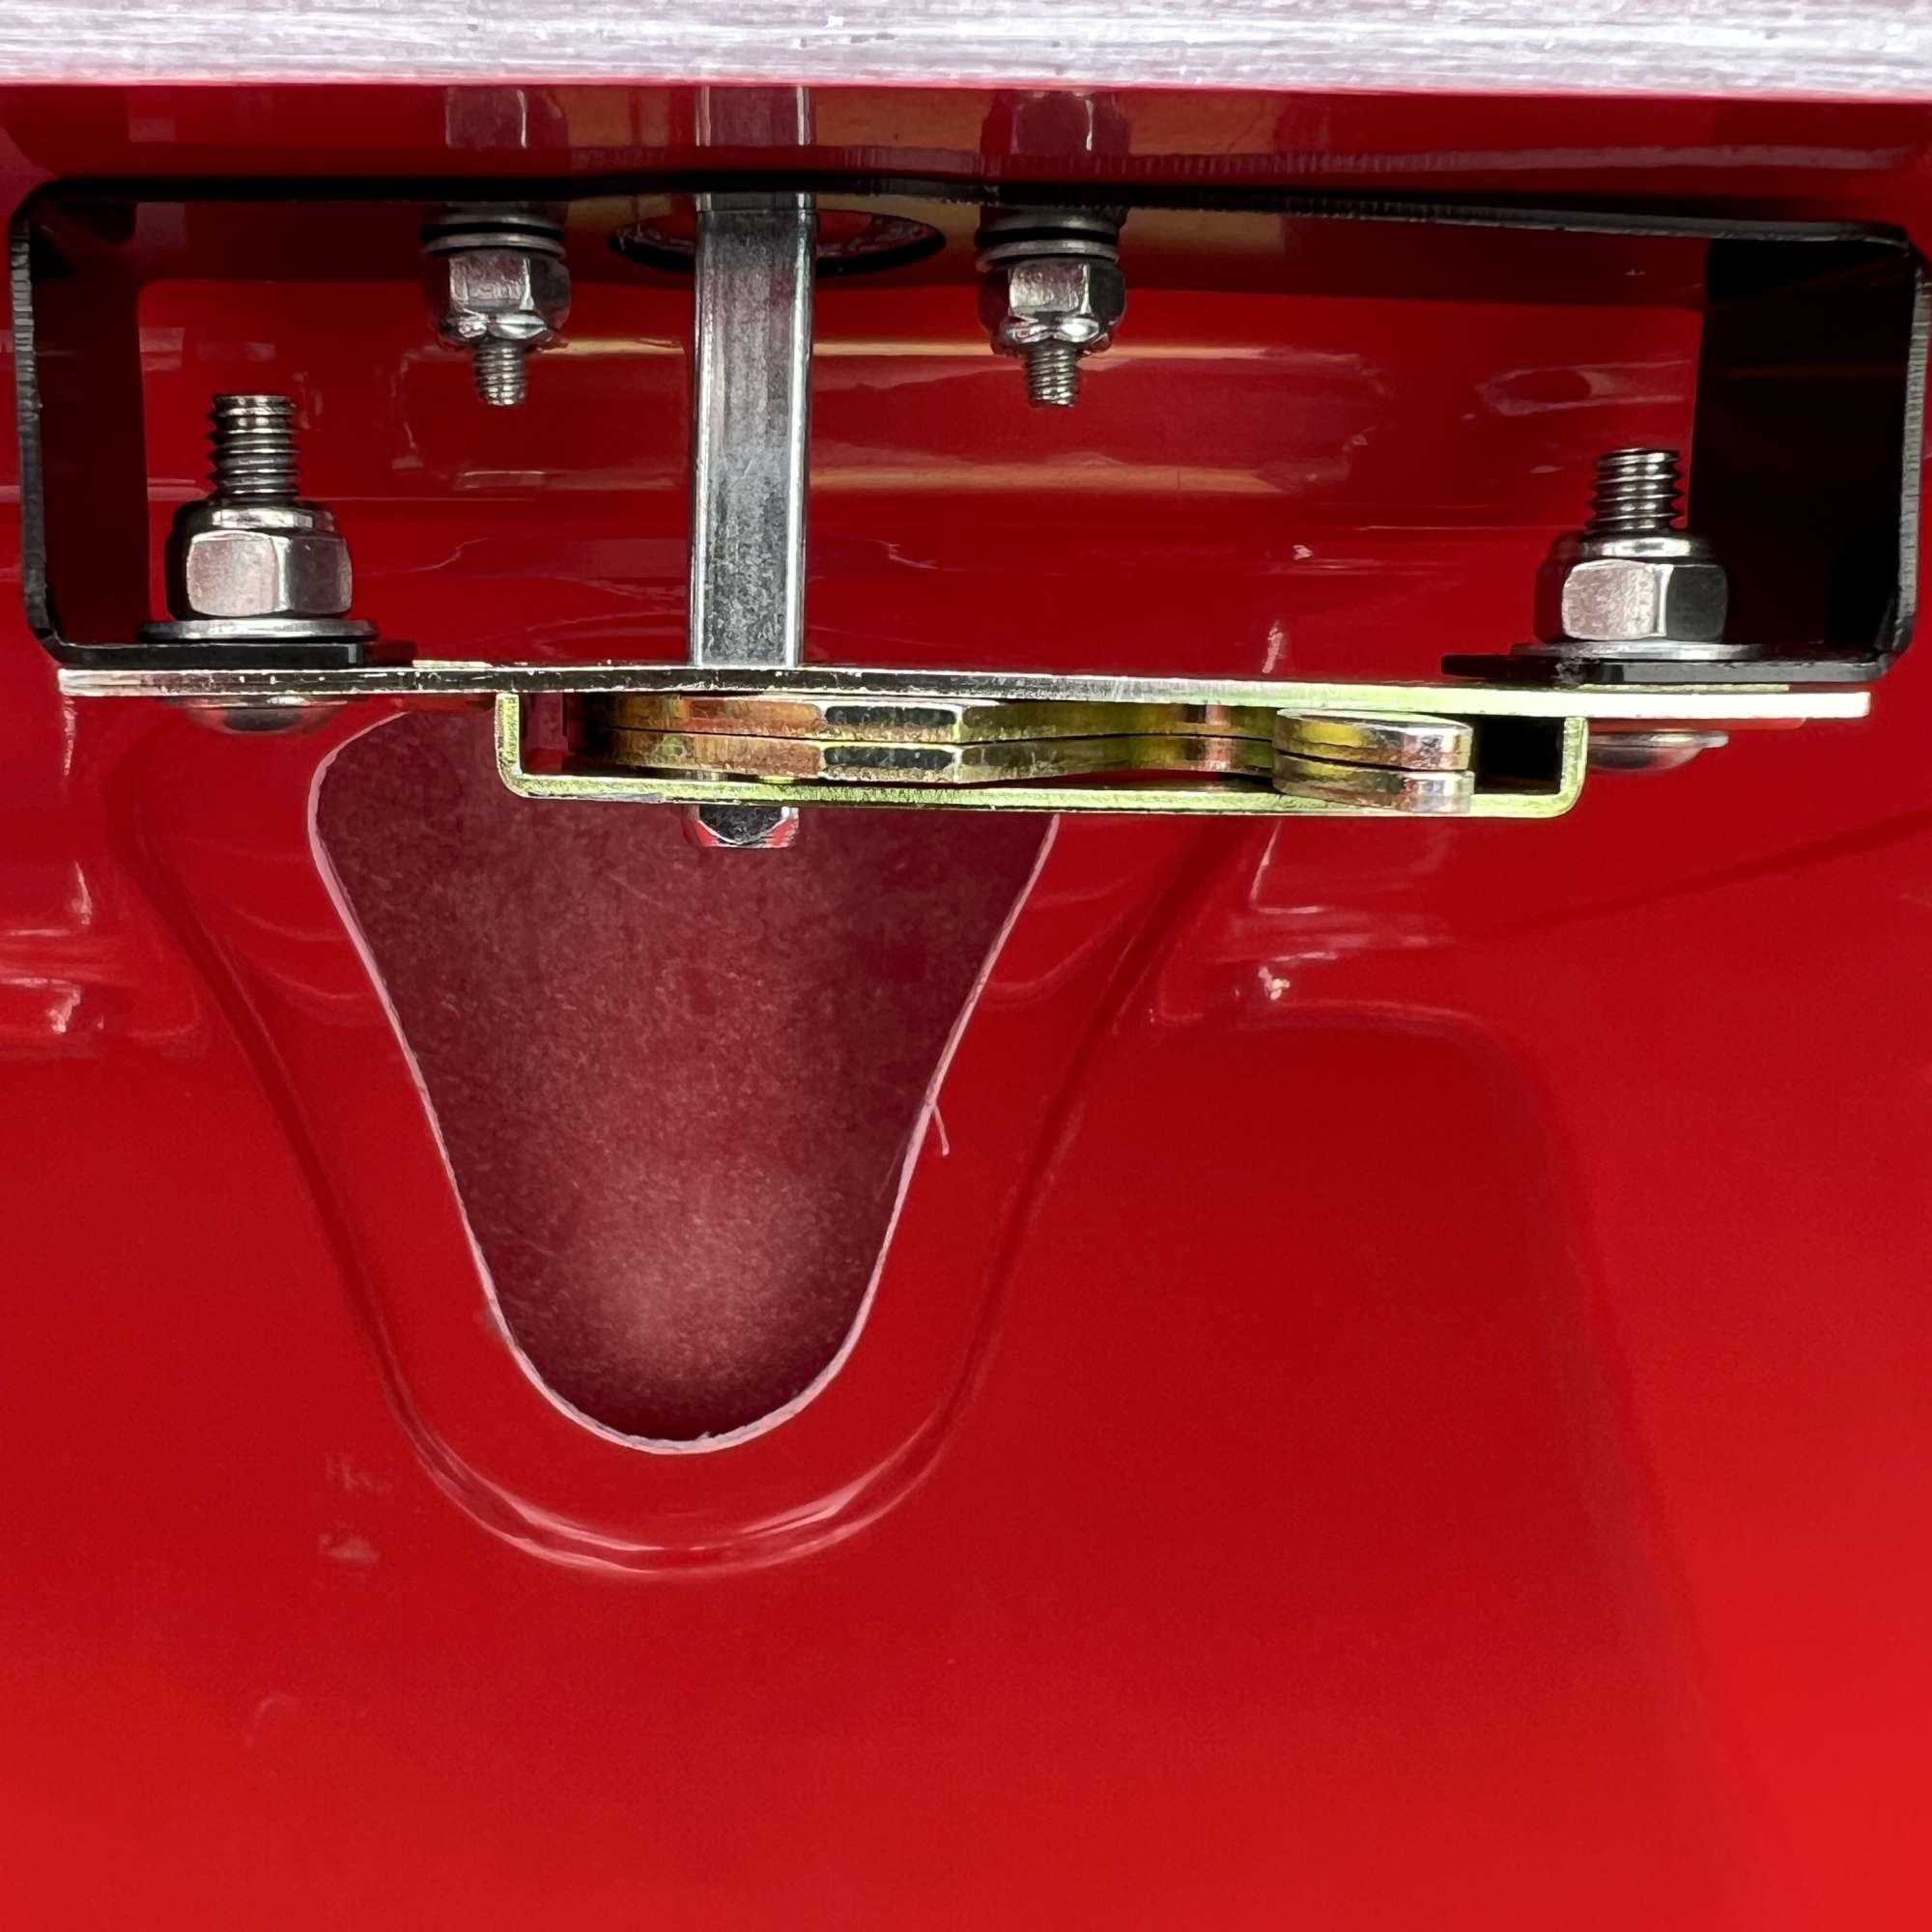
Top view of the same, but with prop rod in place:

View of the PS prop rod.
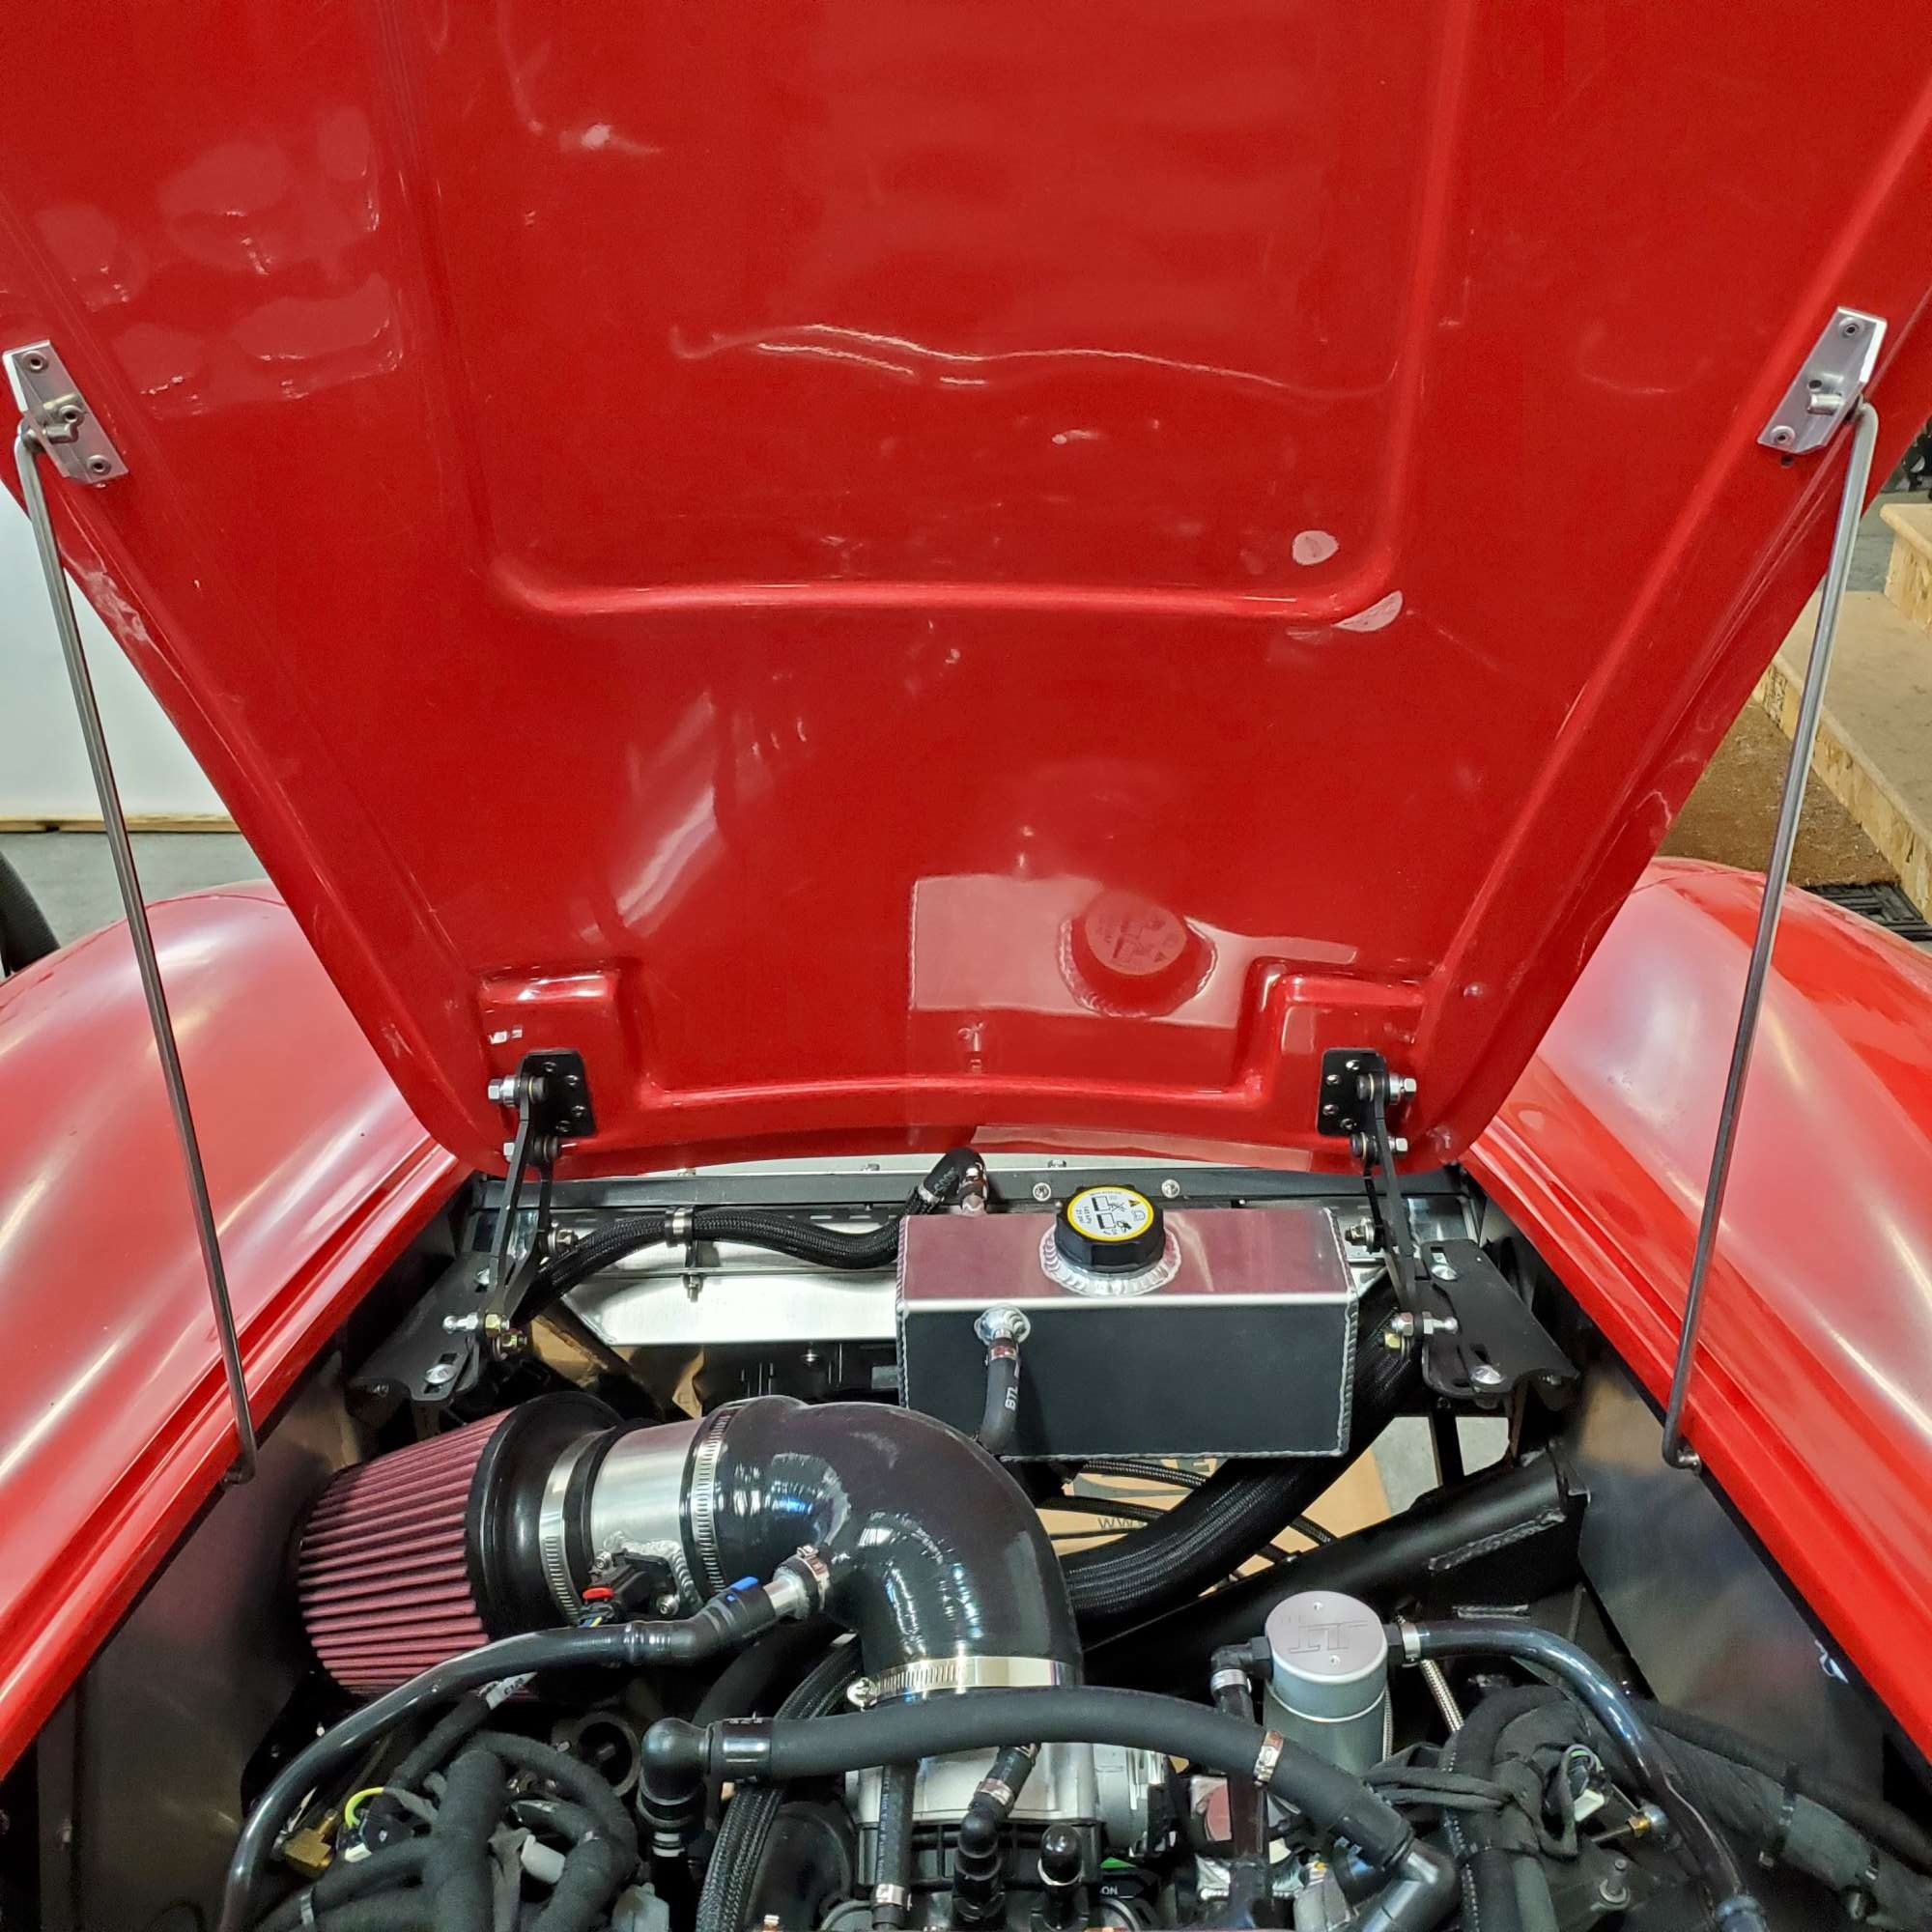
Two functioning hood prop rods. It's a good feeling to be able to open, close, and prop the hood in place. With two prop rods, I can lay down the one on the side I'm working, but still support the hood with the rod on the other side. Should be handy for future maintenance.
I'm pretty far along with installing hood latches and hood scoop. Hope to be able to complete these steps soon and have a finished hood.
Happy building.
Last edited by 460.465USMC; 04-06-2023 at 09:07 AM.
Chris
Coupe complete kit delivered: 4/22/24.
Build Thread. Coyote. T-56. IRS w/3.55. Wilwoods. PS. HVAC. Side windows.
MK4 Complete kit.
Build Thread Index. Delivered: 10/15/2020. Legal: 7/25/23. Coyote Gen3. TKO600 (0.64 OD). IRS w/3.55. PS. Wilwoods. Sway bars. This build is dedicated to my son, Benjamin.
Build Thread.
-
Post Thanks / Like - 0 Thanks, 2 Likes
-
04-05-2023, 04:48 PM
#602
Not a waxer

Hey Chris! Good progress 
Give me a ring before tackling the scoop…there are nuances.
Jeff
-
04-07-2023, 09:03 AM
#603
Senior Member


Originally Posted by
Jeff Kleiner

Hey Chris! Good progress
Give me a ring before tackling the scoop…there are nuances.
Jeff
I’m a pro at those: I’m gonna leave it all to Jeff 
MK4 #7838: IRS 3.55 TrueTrac T5z Dart 347
The drawing is from ~7th grade, mid-1970s
Meandering, leisurely build thread is
here
-
Post Thanks / Like - 0 Thanks, 1 Likes
-
04-08-2023, 08:15 PM
#604
Senior Member
Hood-Scooped Part 1
With the hood centered and height set to match the plane of the hood opening, it was time to move on to the hood latches. I followed Mr. Kleiner's recommend to rotate the latch bases 90 deg.--set left to right instead of front to back as F5 instructions show. The idea is for the screws to catch the flat part of the rib underneath. Although in hind sight, I don't think it matters in my case as my mounting screws do not go through both layers of the hood. More on that in a minute.
Hood latches: I really liked how Edwardb installed his latches, so I set out to do the same. I should know by now when I try to follow some of his mods, it's always more difficult (for me at least) than it looks. There are three improvements to his approach: (1) use 10-32 nut plates to anchor the latches, (2) install a flanged bushing to stiffen the support for the handles, and (3) make a latch catch that matches the profile of the latch arm.
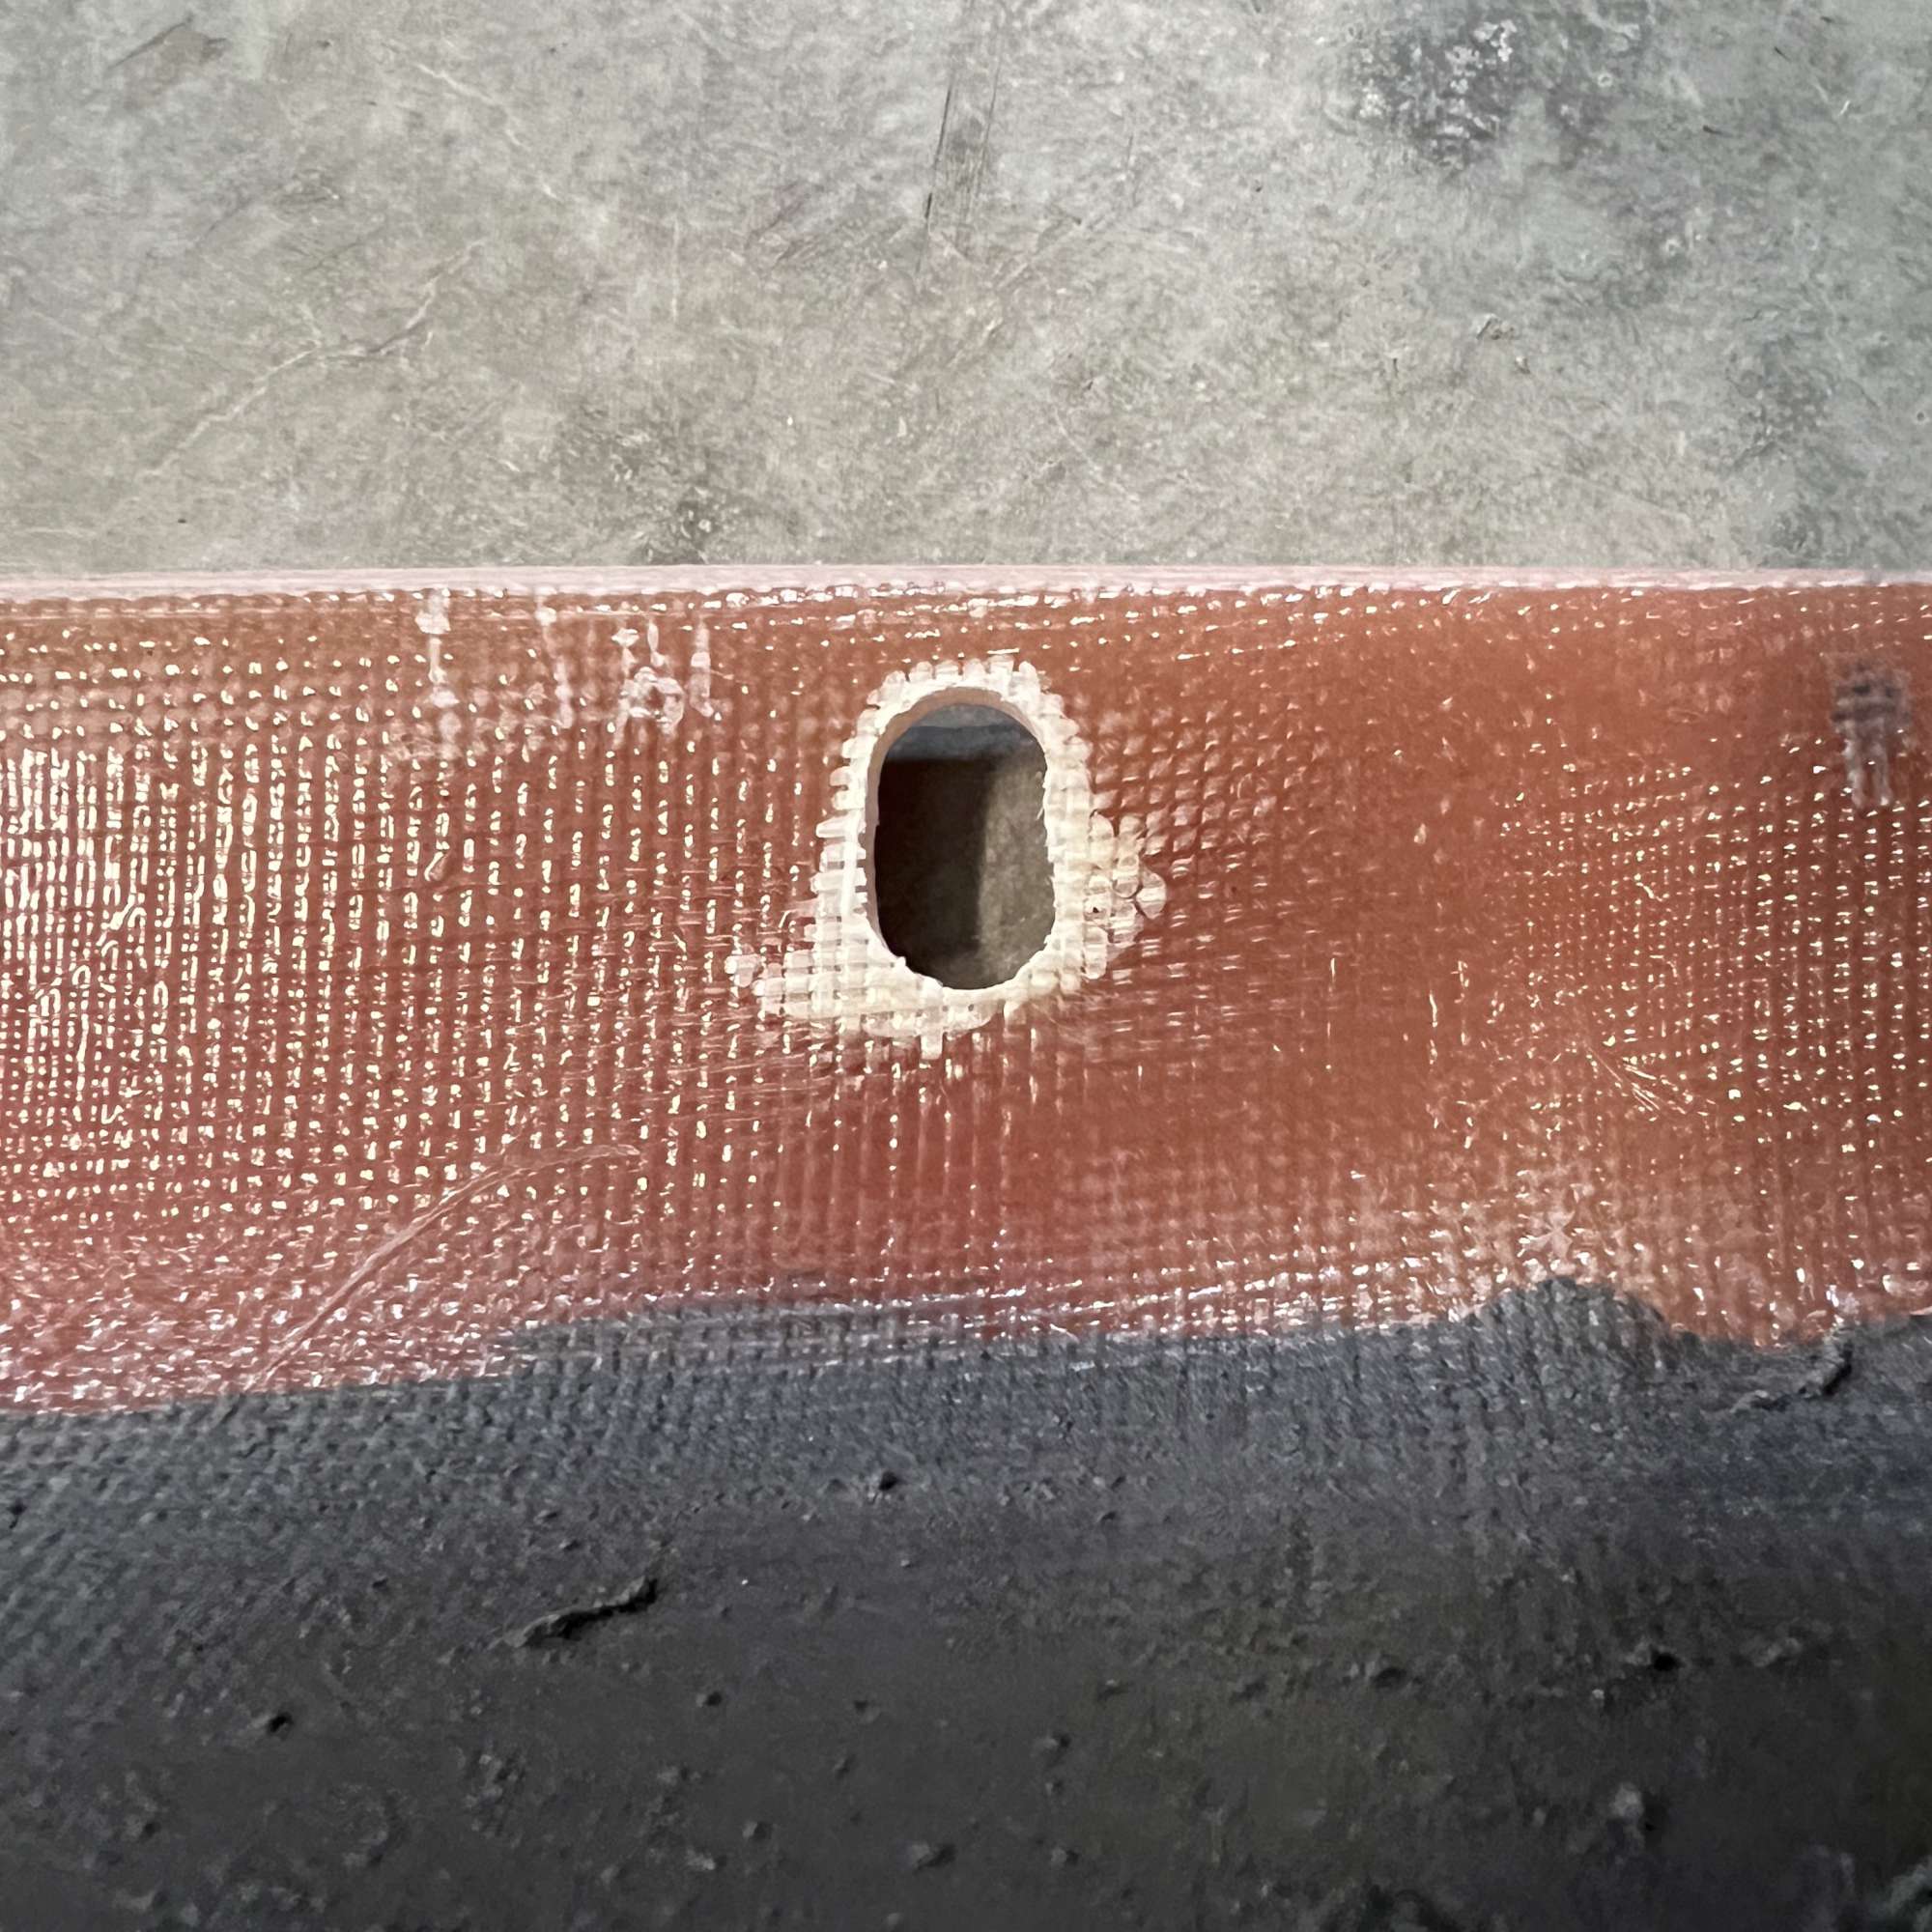
I used a step bit to open the top side of the hole to 7/8", enough room to insert the nut plates. Unfortunately, there was a big glob of resin underneath the top layer of fiberglass. Right where I needed to mount the nut plates. Uff-da! Scratched my head on how to remove enough of the glob to fit the nut plates. Finally, it was Dremel to the rescue.
Please excuse the photo quality, but wanted to show the glob I had to grind away.

Dremel to the rescue. It quickly ate away the glob. So quickly in fact I had to be careful I didn't grind into the top layer of fiberglass.

Next I attached the nut plates (98001A125) with JB Weld. With the latch installed, I slid the flanged bearing (7815K22) over the shaft and used JB Weld to make it permanent. The 3/8" ID of the bearing needs to be opened up slightly so it will fit over the shaft. I used a 25/64" drill bit I had on hand to increase the ID. Just right.
Nut plate and flanged bearing viewed from top side. My attempt is fairly crude. The good news is it's solid, and can't be seen with the latch handles in place.

Bottom side view. The flange is 1/8" wide. Plenty of surface area to get some JB Weld for good adhesion. He was right: it really makes the handle feel more solid. I also added some around the shaft on the other side.
I wasn't quite done copying Edwardb yet. (I should probably drop a check into the mail now for all of his good ideas.  ) He shared a nice idea he picked up from the forum to match the profile of the aluminum latch catches. Not necessary, but a nice touch, as it keeps the latches centered. You can hear them pop into place. The idea is to match (or in my case just try to get close) the top profile of the latch arm. Here's my attempt. I made these out of a leftover piece of 1"x1" angle aluminum. I'll probably powder coat them, or just polish a bit and hit with clear ceramic.

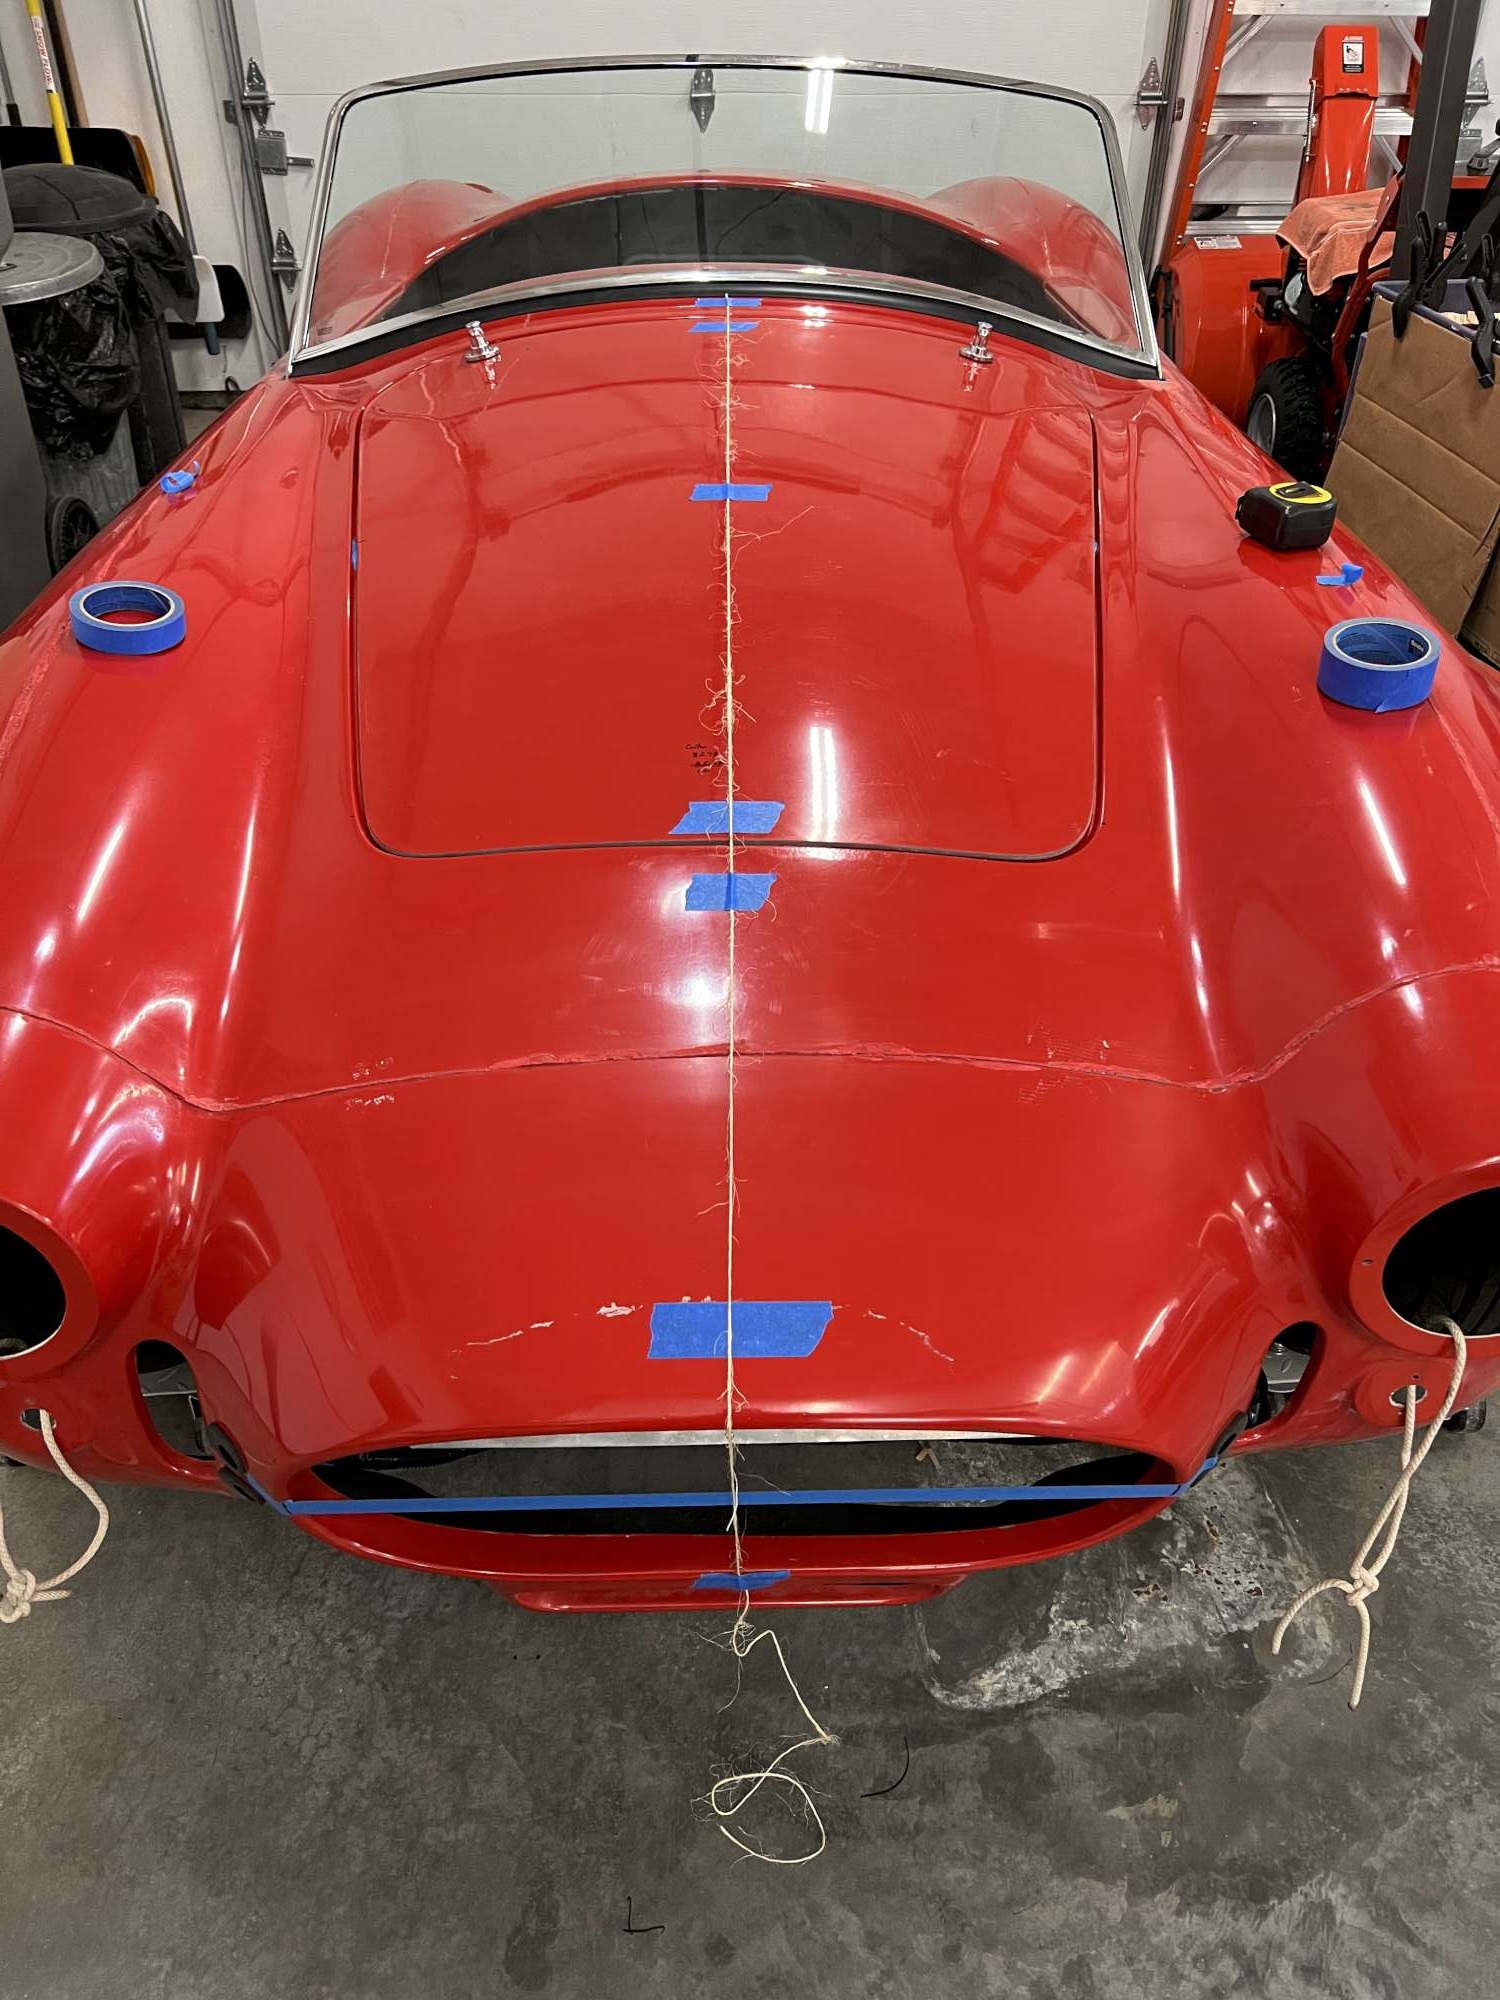
Hood scoop: Okay. So the hood is adjusted and centered. The hood latches are installed. Now the hood scoop. First up is to find the center. I really took my time to carefully measure center. Then placed a string, and used it to mark up the hood and body for the center reference line.
Last edited by 460.465USMC; 04-09-2023 at 11:18 AM.
Chris
Coupe complete kit delivered: 4/22/24.
Build Thread. Coyote. T-56. IRS w/3.55. Wilwoods. PS. HVAC. Side windows.
MK4 Complete kit.
Build Thread Index. Delivered: 10/15/2020. Legal: 7/25/23. Coyote Gen3. TKO600 (0.64 OD). IRS w/3.55. PS. Wilwoods. Sway bars. This build is dedicated to my son, Benjamin.
Build Thread.
-
Post Thanks / Like - 0 Thanks, 1 Likes
-
04-08-2023, 08:16 PM
#605
Senior Member
Hood-Scooped Part 2
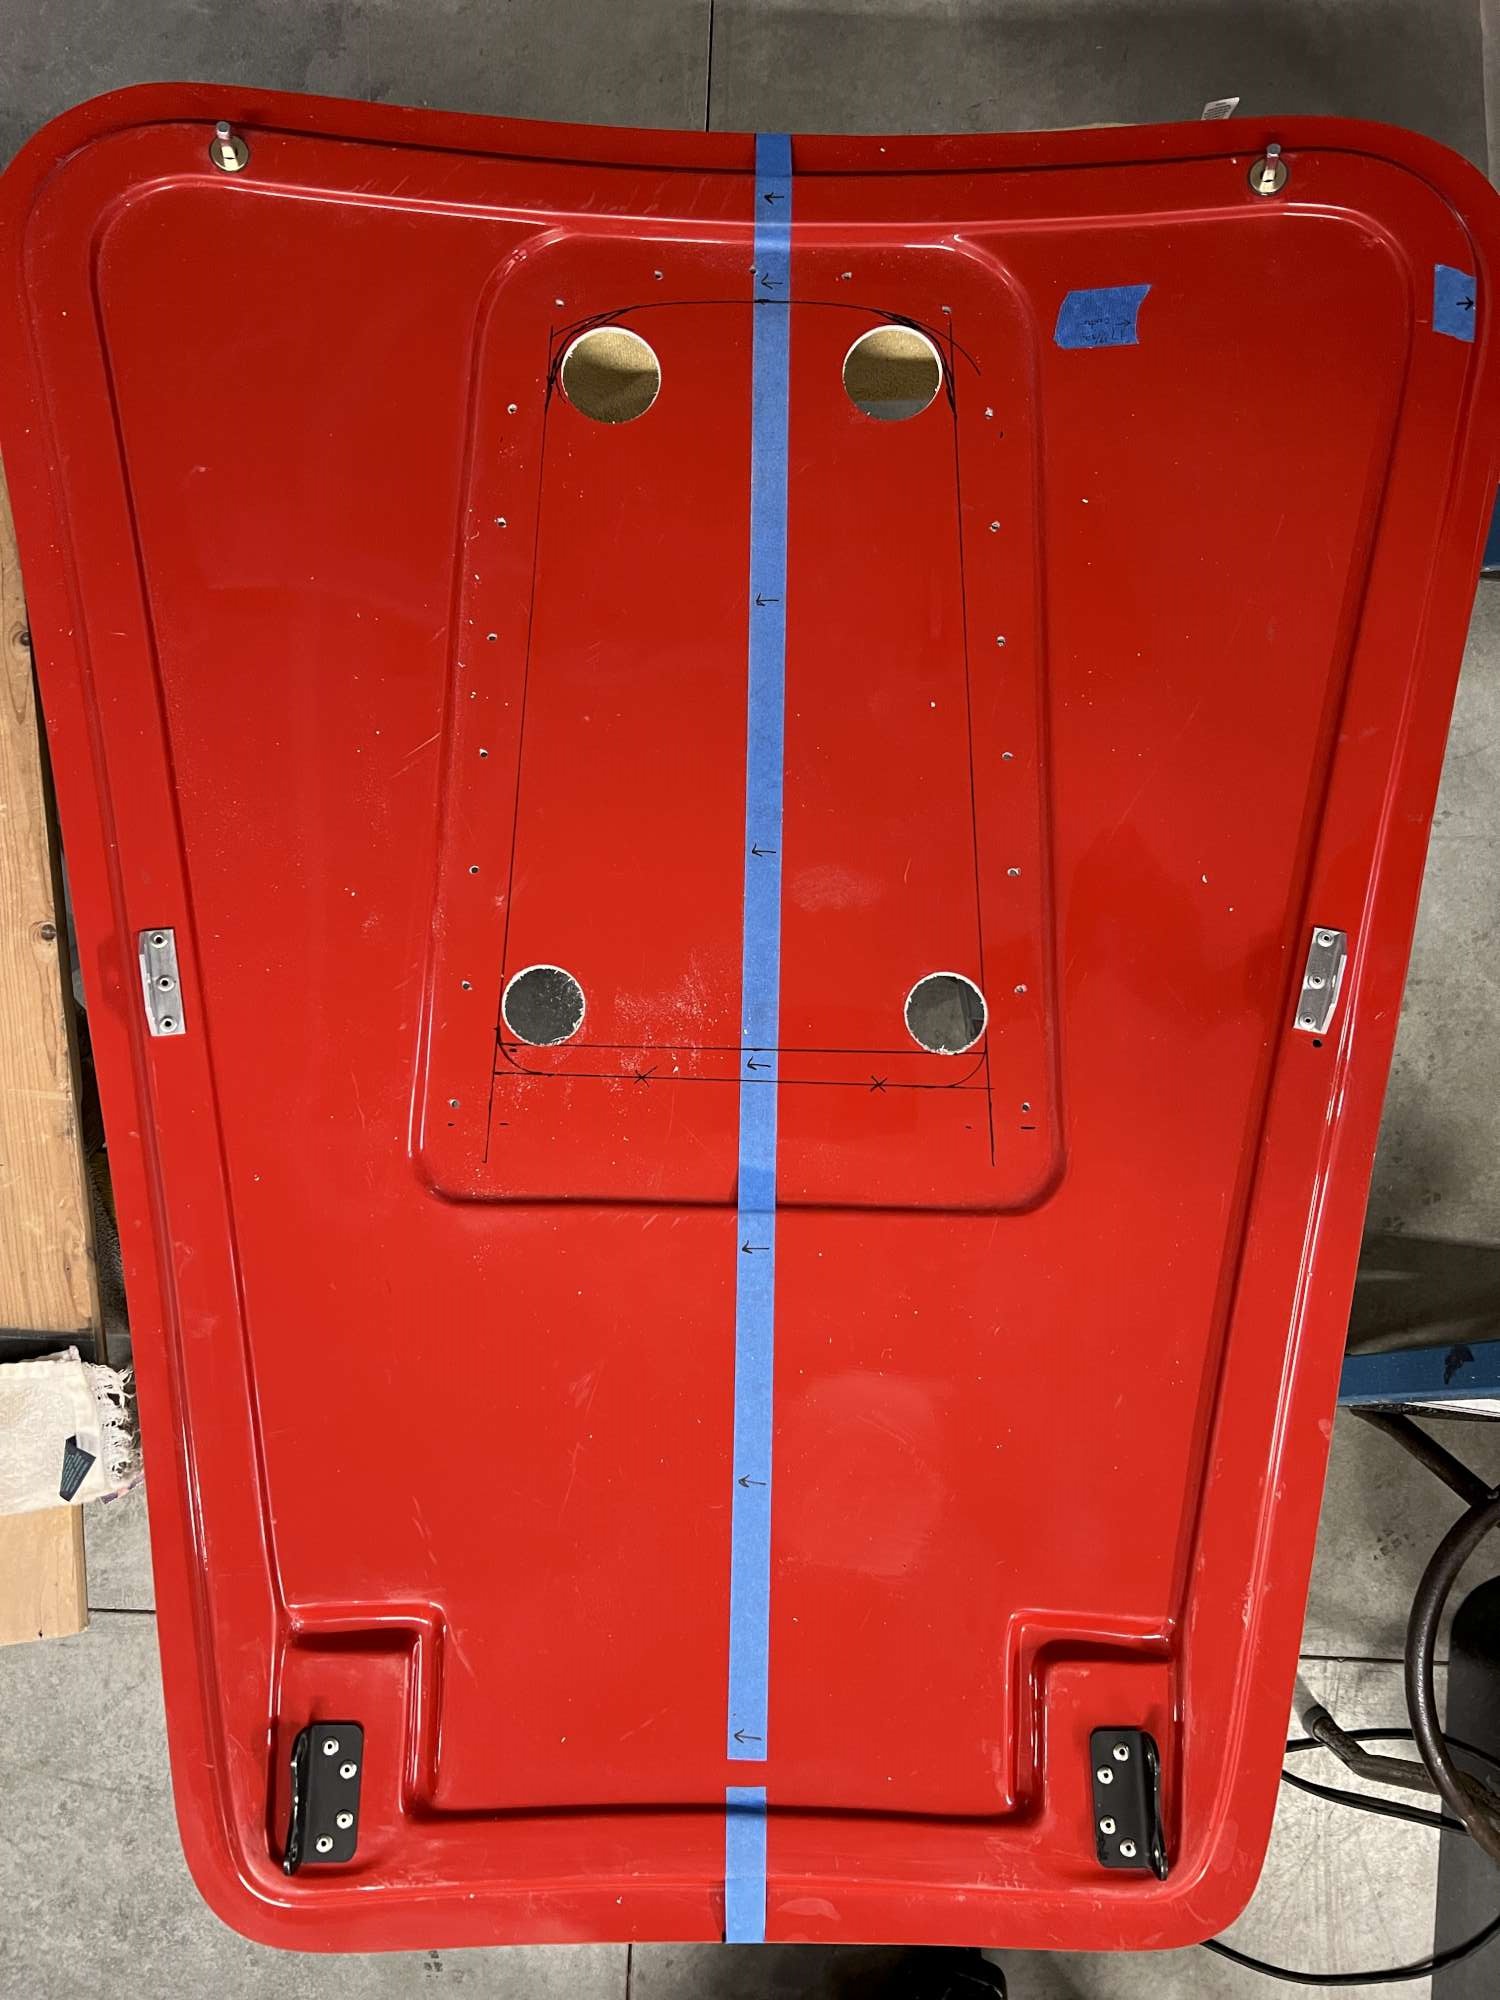
I transferred the hood center to the bottom of the hood. After measuring about ten times and marking the cutout for the scoop, I followed a tip from Mr. Kleiner and used hole saws for the corners. The opening is about 3/4" in from the #10 screw holes on the side, and about two inches rearward from the front of the scoop opening.
No turning back now.
I started with my DIY grade air saw, but the blade wandered, and wasn't cutting well. Maybe it was getting pinched between the two layers of fiberglass. I didn't think Dremel was a good option, but it worked really well. I was able to cut a much straighter line connecting the hole saw holes. I cleaned up the opening using a combination of orbital sander, drum sander on my drill, and a bit of block sanding.
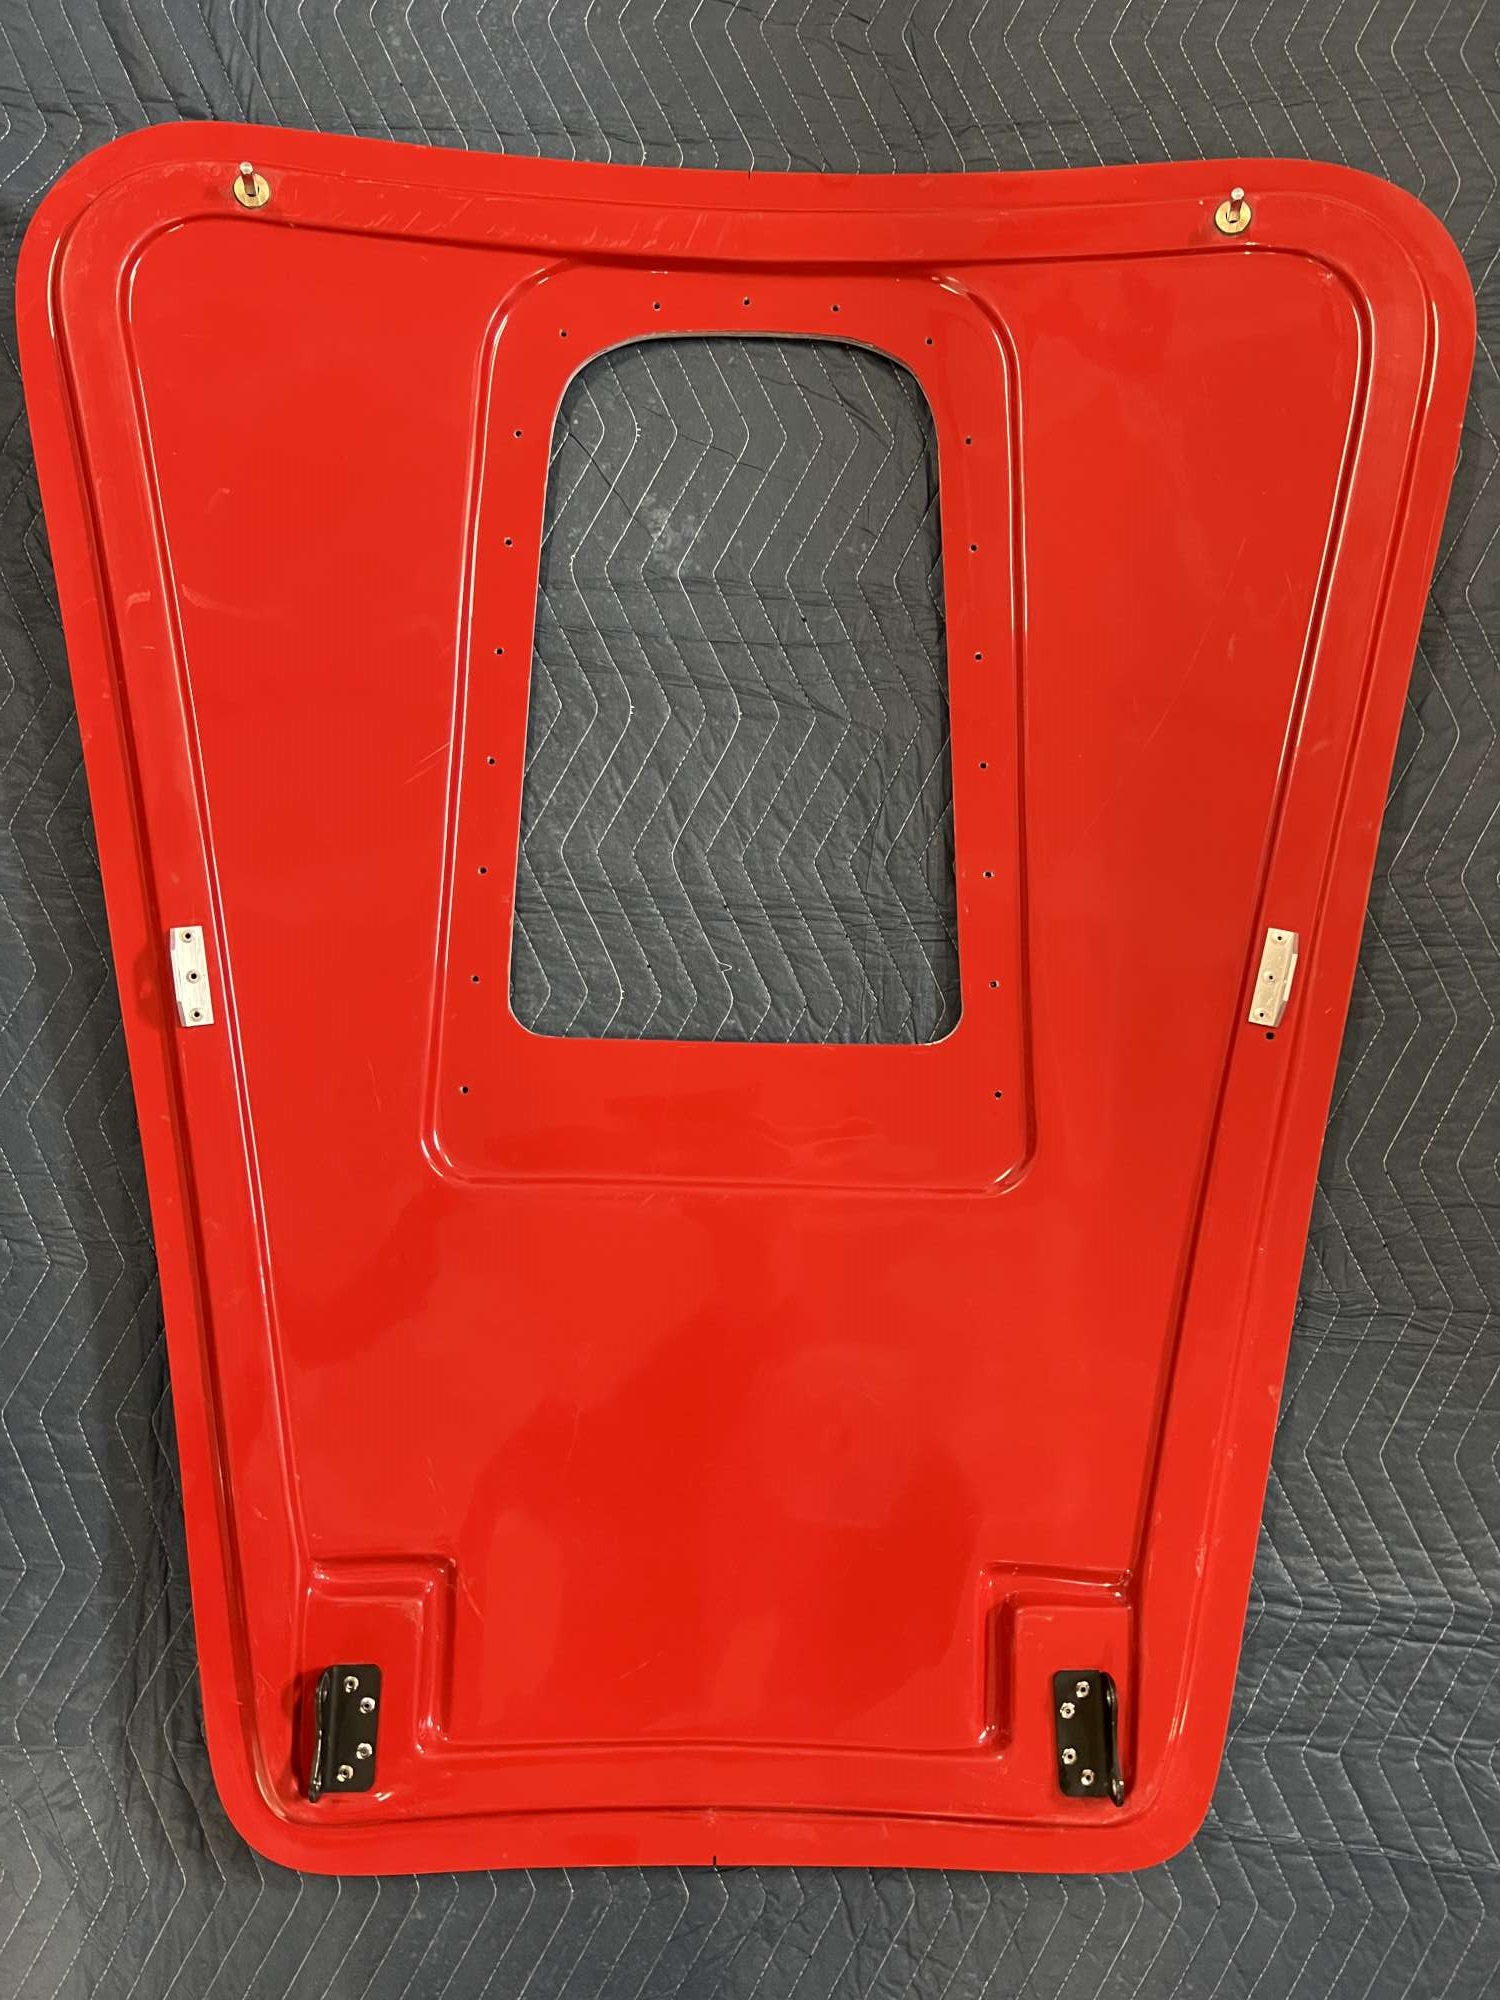
Here it is in place with the hood scoop attached. I'll replace the 10-32 nuts with SS acorn nuts later on.
Top side view. The blue tape seen sticking out into the gap is holding the rubber bumpers in place. Now that I'm done adjusting the hood, I will install the bumpers. The scar on the PS must have occurred during transport between MA and Spokane. I'm not worried about it, as it will be fixed by the body Pro.

The last thing I need to do on the hood (I think) is to fill the ~1/4" gap with 3M HSRF. I ordered a quart, and it should arrive next week ($$$$ - cough, cough). The gap between the hood layers is widest at the front.

A big thanks to Mr. Kleiner and Edwardb for their tips, and patiently answering my questions.
Last edited by 460.465USMC; 04-08-2023 at 08:37 PM.
Chris
Coupe complete kit delivered: 4/22/24.
Build Thread. Coyote. T-56. IRS w/3.55. Wilwoods. PS. HVAC. Side windows.
MK4 Complete kit.
Build Thread Index. Delivered: 10/15/2020. Legal: 7/25/23. Coyote Gen3. TKO600 (0.64 OD). IRS w/3.55. PS. Wilwoods. Sway bars. This build is dedicated to my son, Benjamin.
Build Thread.
-
Post Thanks / Like - 0 Thanks, 1 Likes
-
04-08-2023, 09:46 PM
#606
You're making great progress, Chris. The car is looking really well built.
Dave
-
04-09-2023, 07:11 AM
#607
Senior Member

One thing I learned is I used button head screws (like you) and acorn nuts on the hood scoop. After about 1000 miles I found one missing and several loose. Lots of vibration. When youre done make sure to dab some blue locktite on there. Since then Ive not had any problems.
Car is really coming along. Looks fantastic
MK4 #10008 - Ordered 10/06/20, Delivered 03/03/21, First Start 7/22/21, First Go Kart 7/24/21
Paint by Metal Morphous 5/14/22, Legally registered 6/8/22, Graduated 7/20/22
Build Thread
https://thefactoryfiveforum.com/show...been-delivered
Complete Kit, Ford 306, Sniper/Dual Sync, T5, Hydraulic clutch
-
04-09-2023, 11:29 AM
#608
Senior Member
Originally Posted by
Papa
You're making great progress, Chris. The car is looking really well built.
Dave
Thanks, Dave. I'm having a blast. Hoping to have it licensed and on the road this year...we'll see.
Originally Posted by
Blitzboy54
One thing I learned is I used button head screws (like you) and acorn nuts on the hood scoop. After about 1000 miles I found one missing and several loose. Lots of vibration. When you’re done make sure to dab some blue locktite on there. Since then I’ve not had any problems.
Car is really coming along. Looks fantastic
Good tip, Jesse. I will definitely add some blue to the acorn nuts. Hope your driving season in the NE is getting underway.
Chris
Coupe complete kit delivered: 4/22/24.
Build Thread. Coyote. T-56. IRS w/3.55. Wilwoods. PS. HVAC. Side windows.
MK4 Complete kit.
Build Thread Index. Delivered: 10/15/2020. Legal: 7/25/23. Coyote Gen3. TKO600 (0.64 OD). IRS w/3.55. PS. Wilwoods. Sway bars. This build is dedicated to my son, Benjamin.
Build Thread.
-
04-20-2023, 10:01 PM
#609
Senior Member
Trunk Lid and Trunk Prop Rod
I think there's a light at the end of the body fitting tunnel. Lots of new stuff going on here for me, but I was able to get the trunk lid on and prop rod installed.
Like the F5 instructions say, I started by setting the trunk lid in place to see which edges I needed to sand. Again, used my orbital sander (36 grit) to do the heavy lifting, followed by a block sander (60 or 80 grit). The gap is now ballpark with no interference during opening or closing. Sanded a fairly heavy radius on the inside top edge to give clearance for opening/closing.
With the trunk lid in place (centered), I marked the body and trunk with a Sharpie on the hinge side of trunk lid near center. The marks can be seen in the fourth picture below. Then I transferred the mark to the inside of the lid. Being able to see these marks while my head was underneath--see below--made a big difference in getting the lid set left and right. Then I tightened the screws on the mounting pads.
From there I moved on to the four carriage bolts that attach the hinge arms to the mounting pads. For the next couple of hours there was a whole lot of this:

The white towel is special operations equipment to minimize the number of dents in my Brain Housing Group. It took a lot of little adjustments to slowly creep in on the proper height and even gaps all around. Once I was in the ballpark, I made little adjustments one side at a time to finish dialing it in.
Here's where my hinge adjustment ended. Obviously, this will vary by build.
I followed the instructions to install the latch assembly with one minor exception: I used 1/4-20 SS screws and lock nuts instead of the kit supplied #14 sheet metal screws. I added a dab of anti-seize to prevent galling.
I used a 3/16" x 6" drill bit to drill the hole for the latch pin. Difficult to get the drill close enough with a standard length bit. Here's how it sits in place. I'll leave any gap improvement to the body Pro.
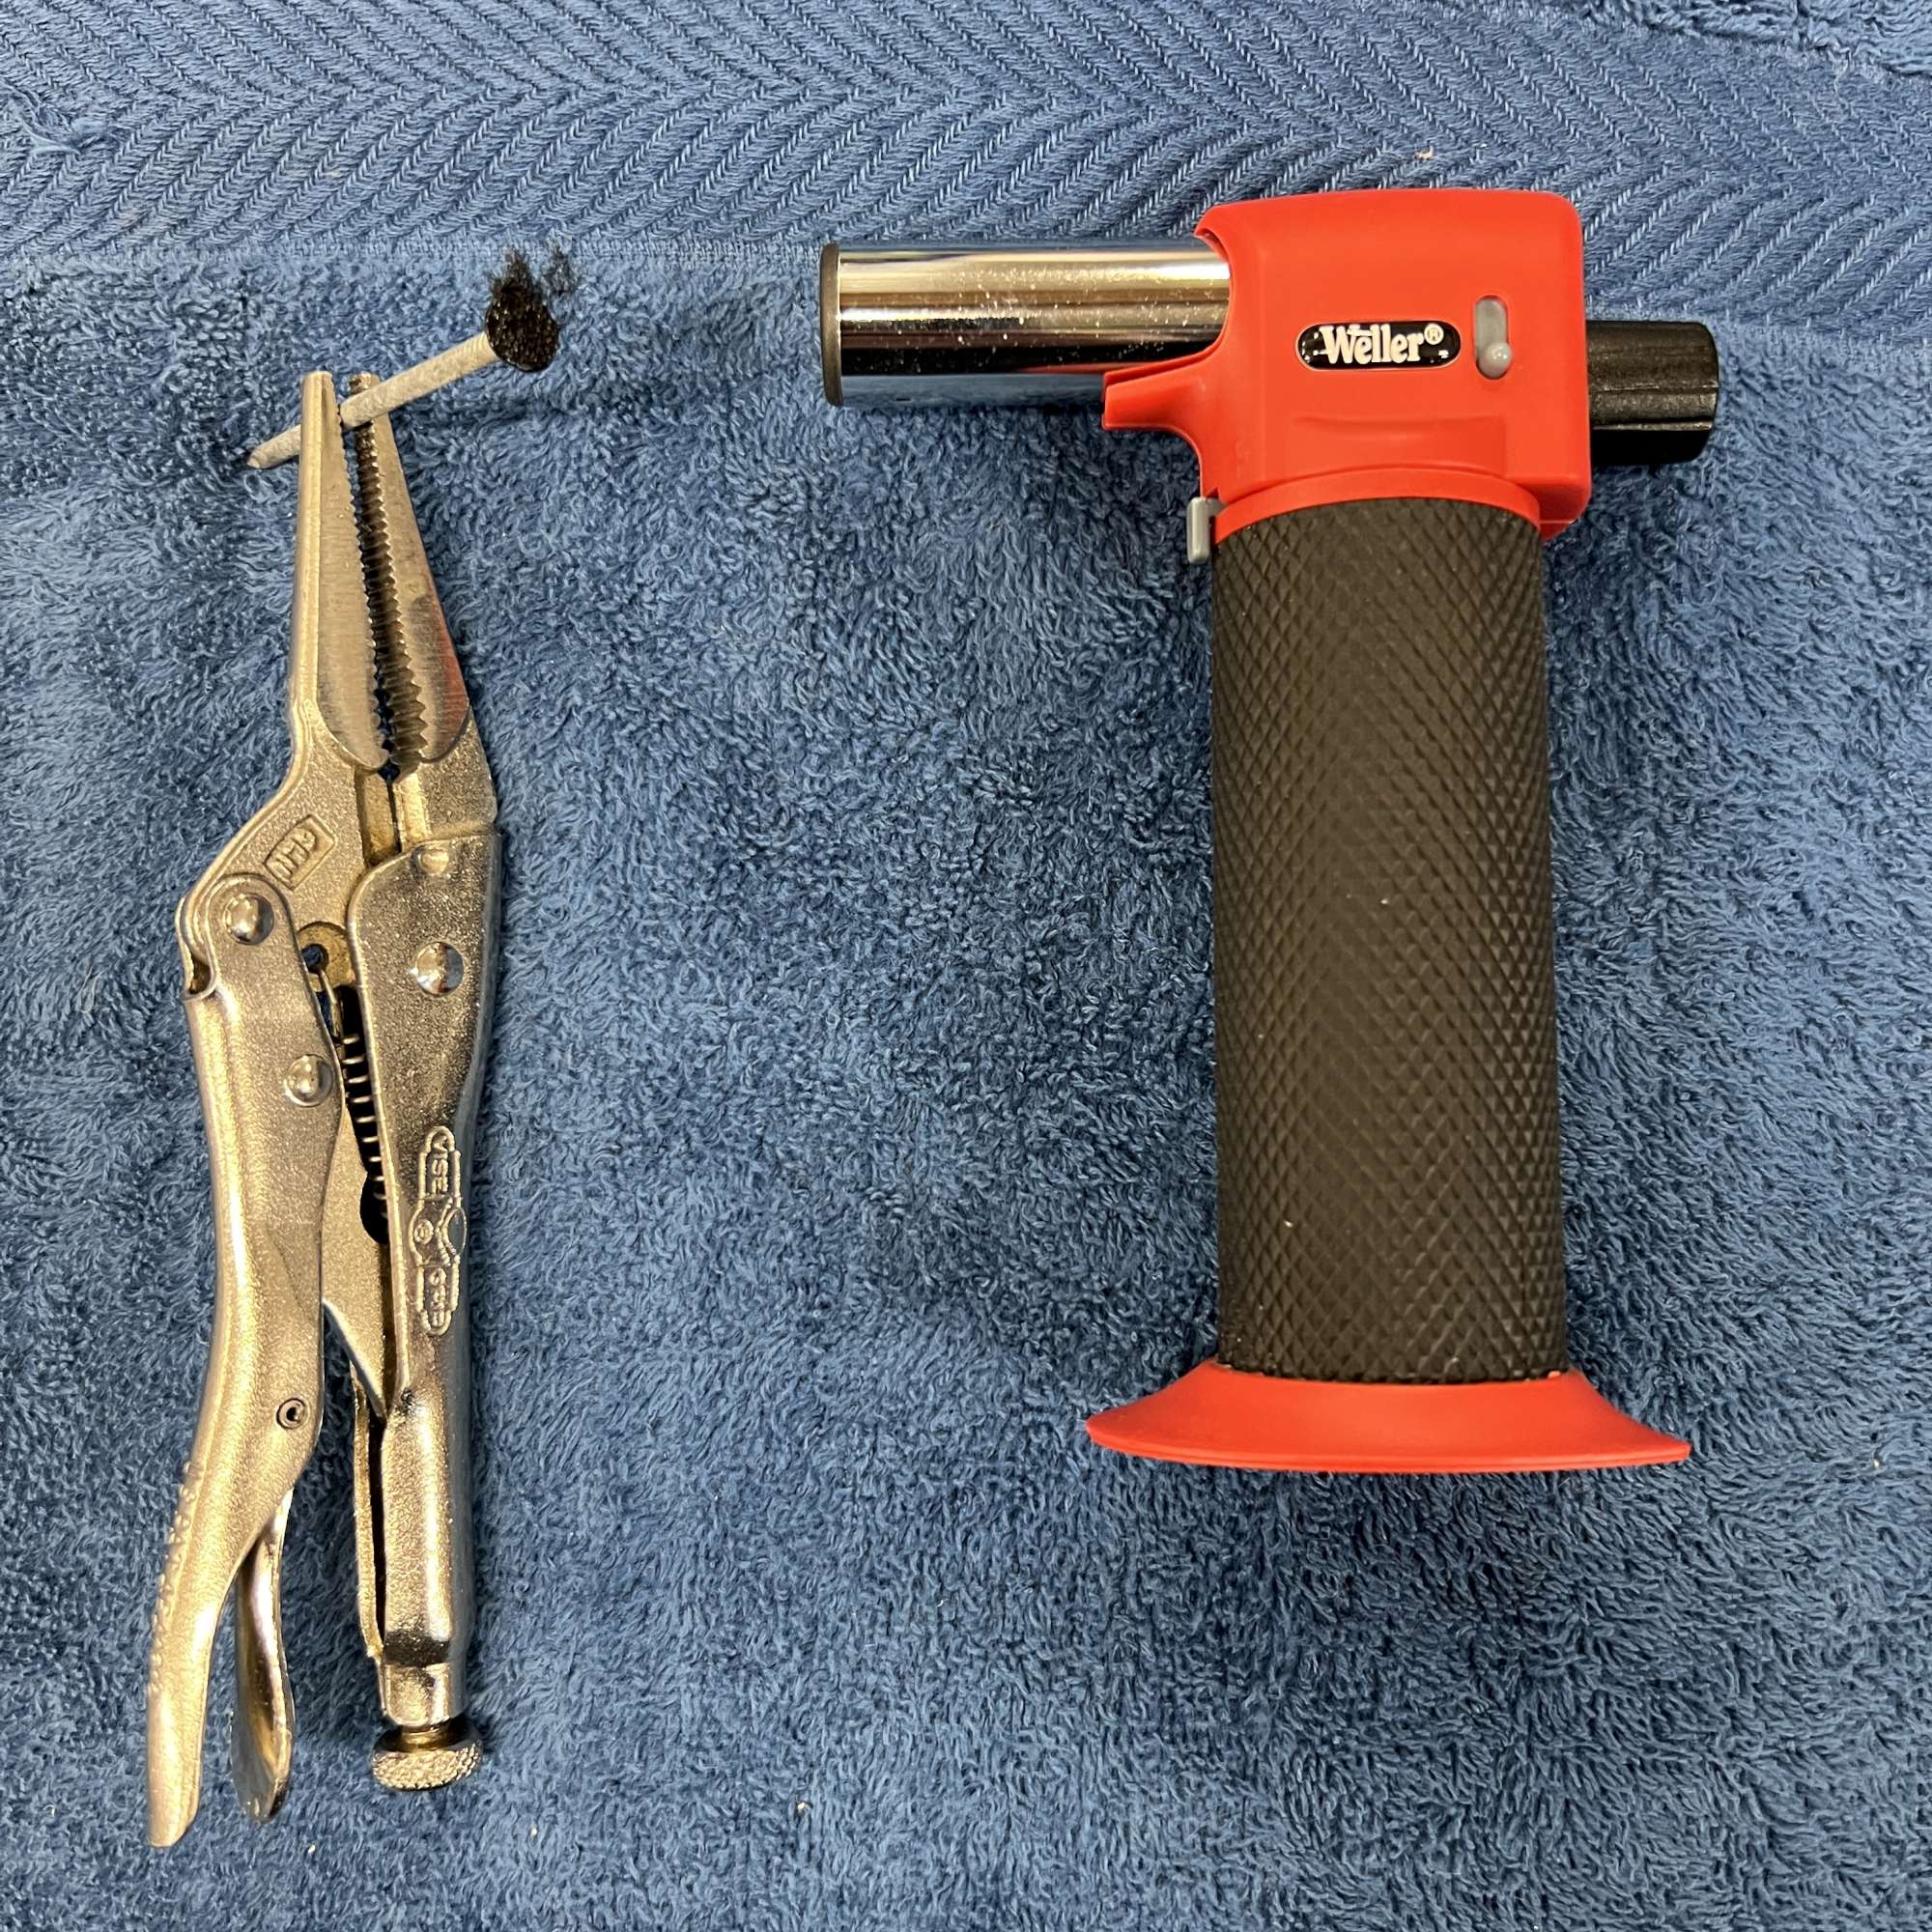
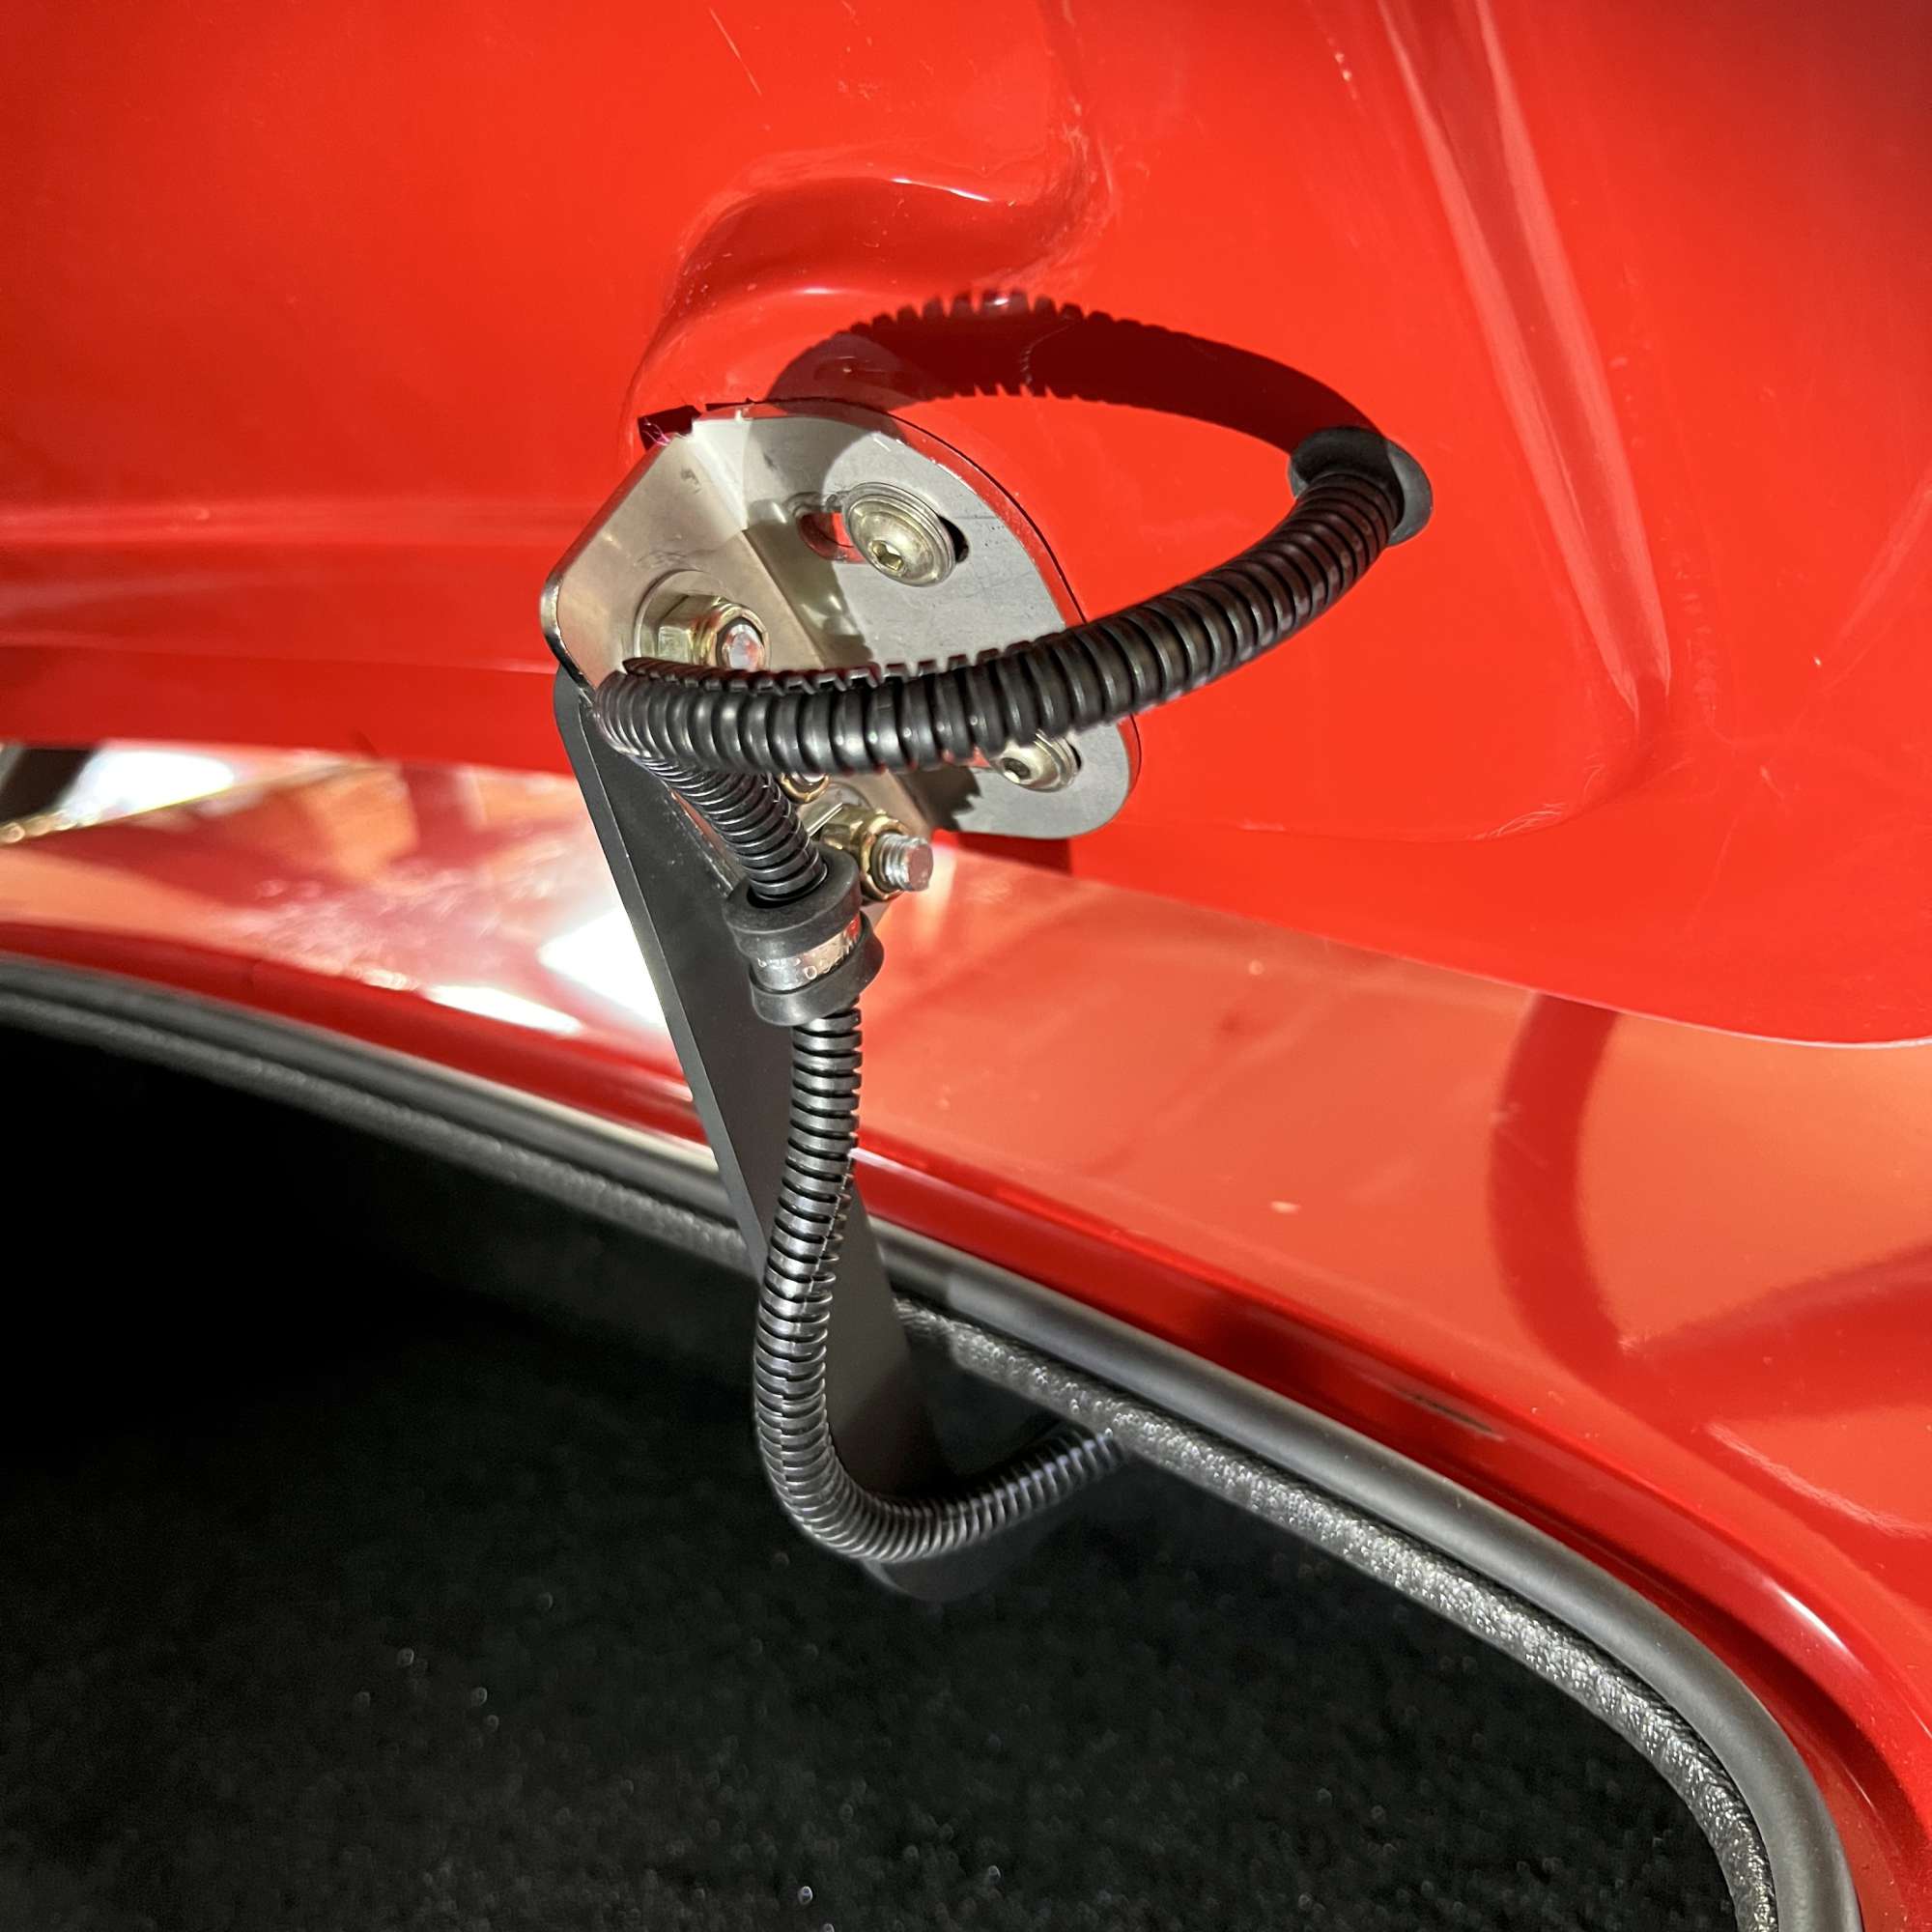
I'm using the Breeze prop rod for the trunk lid as well. I like the simplicity, functionality, and old school vibe. I think these are designed for trunks without carpet, but with a little ingenuity I was able to get it to mount and fit okay despite the ThermoTec and carpet. Installing it with the gas tank and Russ T. drop trunk in place is it's own challenge. I opted for a right side install, so I could fit my hand through the fuel pump access panel to install the washer and cotter pin. Did I mention I'm glad I made the trunk panels removable? I think this is the second or third time I've needed access.
To avoid carpet twirling around the drill bit, I used a nail with a head the right size to melt just enough of the carpet. Used my little torch to heat it. I found it was an effective way to remove the carpet where I needed to drill without damaging the surrounding carpet.
Functioning trunk with prop rod. I trimmed about 1/4" off the latch pin sleeve to get it to fit.
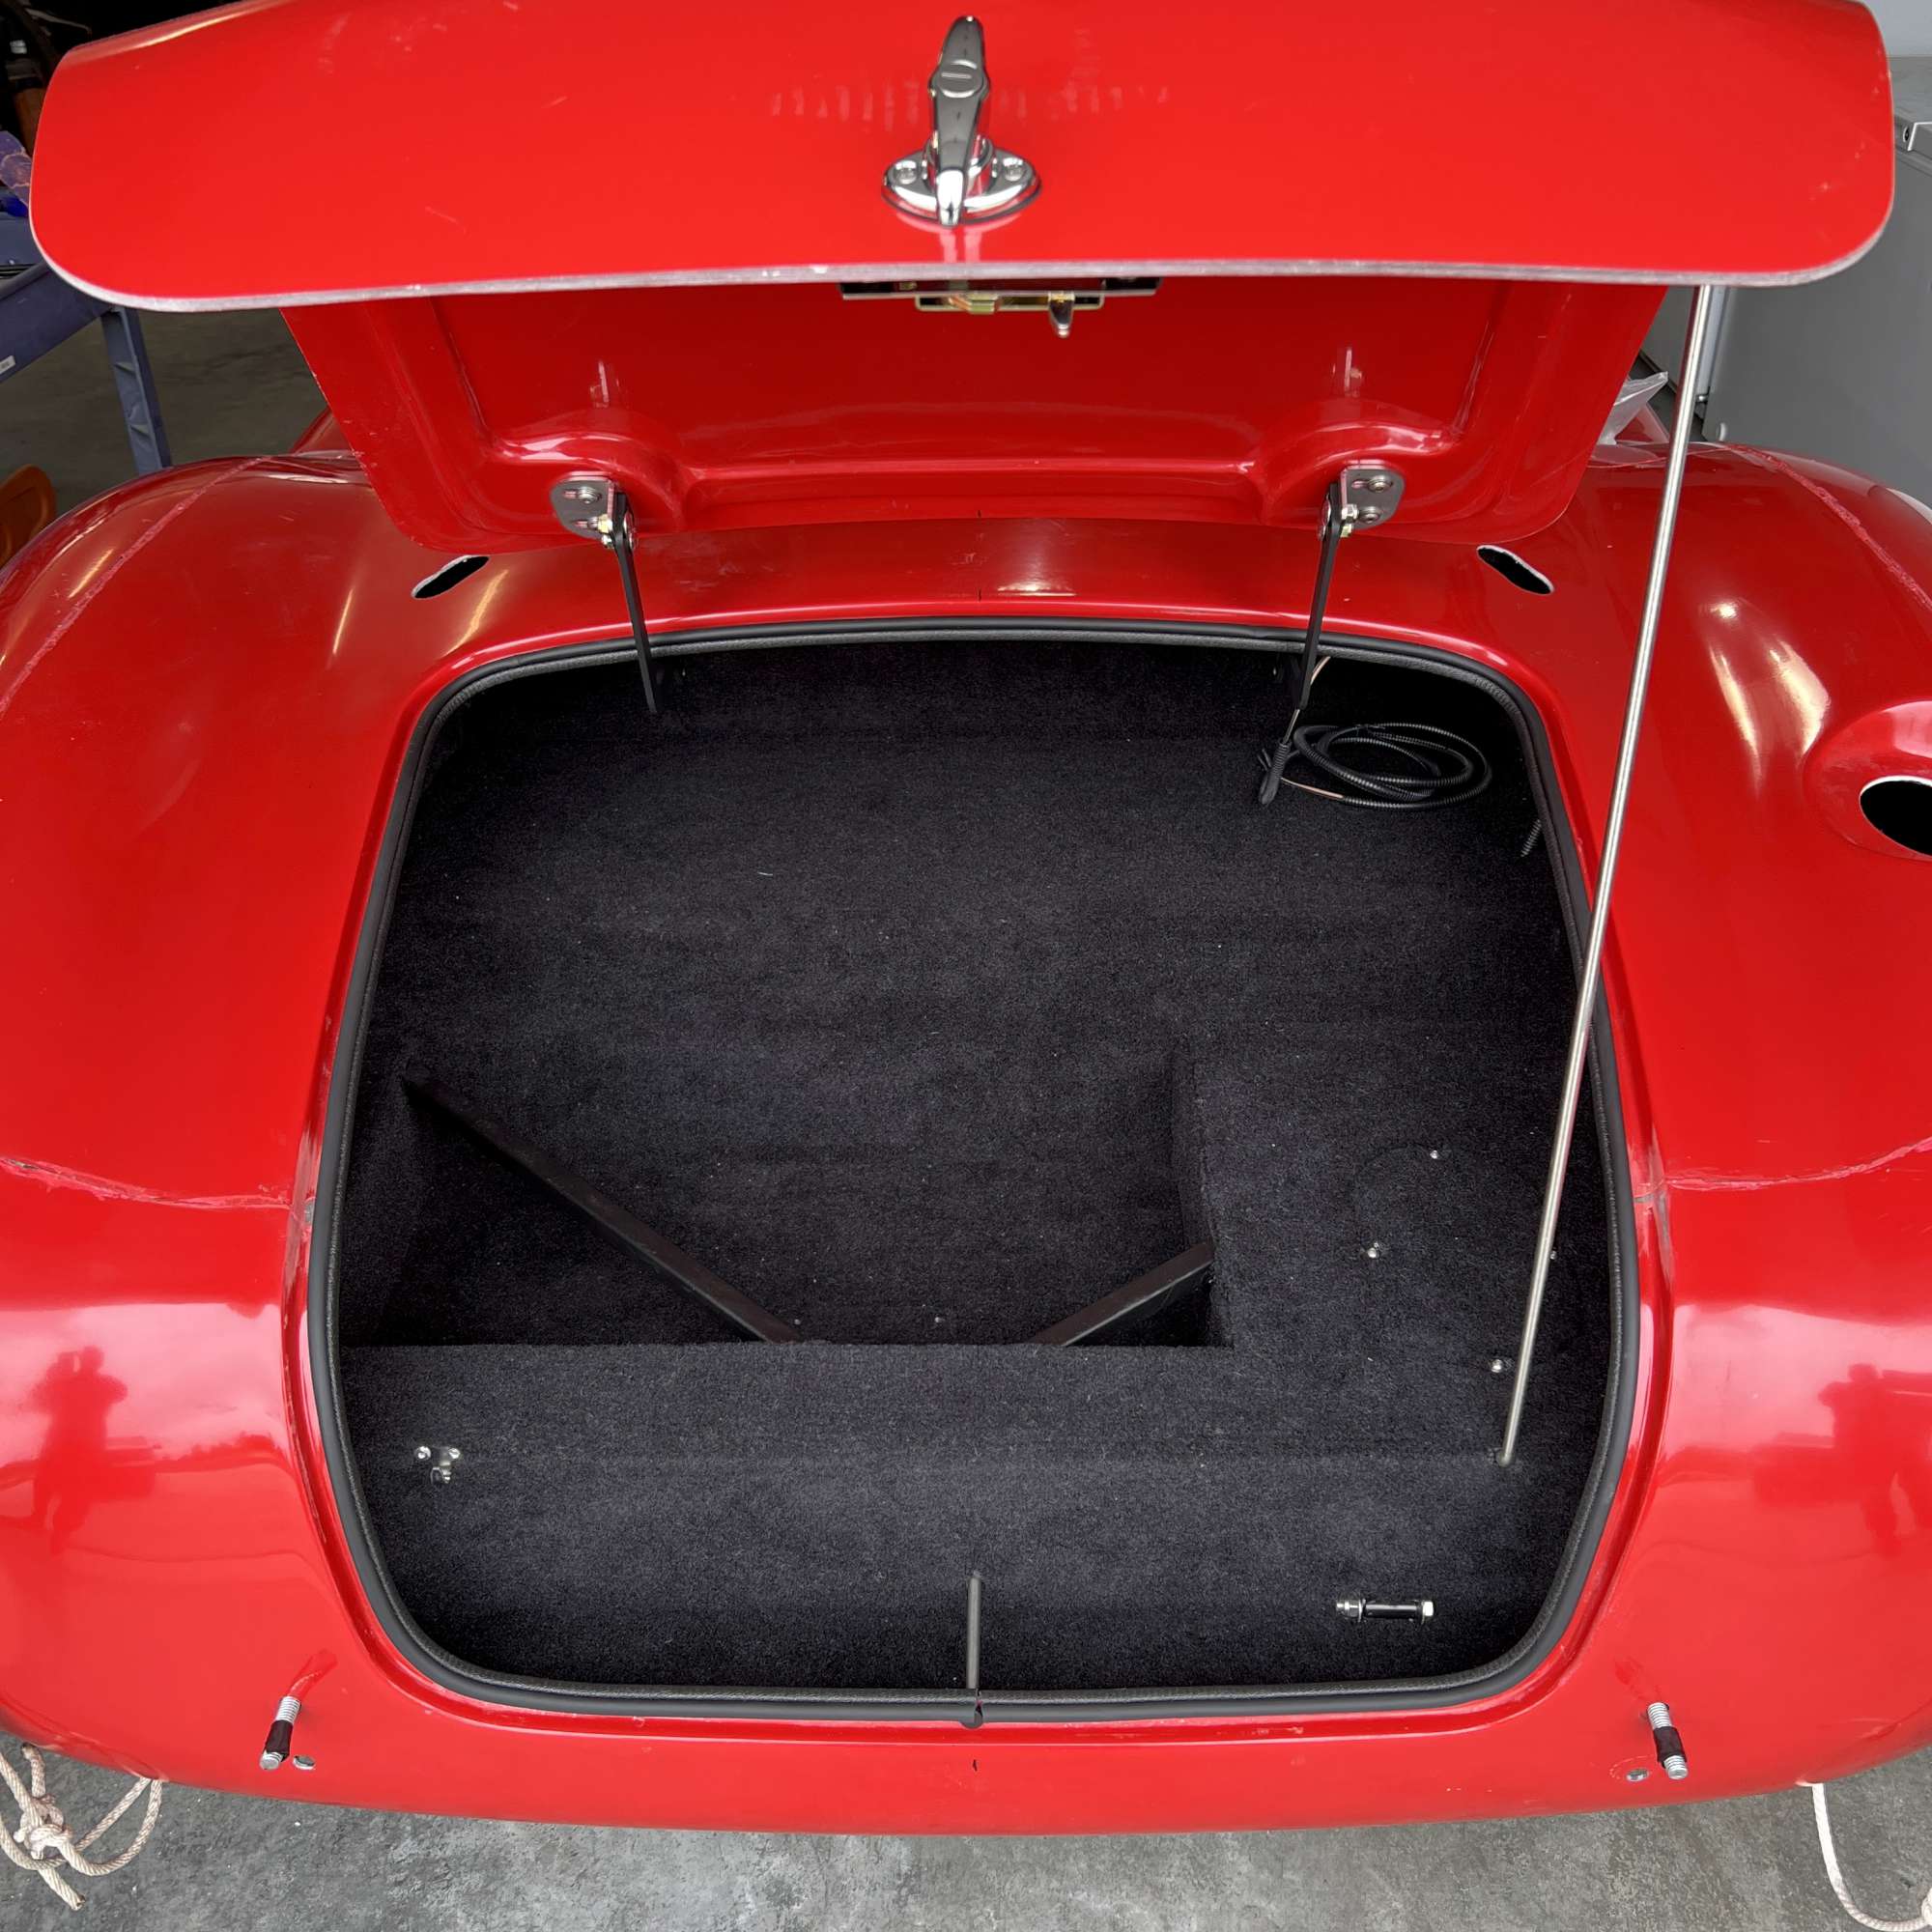
And finally, the not-so-much-anticipated, one-star-rated sequel to "A Door Opens. A Door Closes": "A Trunk Lid Closes.
A Trunk Lid Opens" (16 sec). https://youtube.com/shorts/4bRbvWkw1gg
Last edited by 460.465USMC; 04-21-2023 at 08:48 AM.
Chris
Coupe complete kit delivered: 4/22/24.
Build Thread. Coyote. T-56. IRS w/3.55. Wilwoods. PS. HVAC. Side windows.
MK4 Complete kit.
Build Thread Index. Delivered: 10/15/2020. Legal: 7/25/23. Coyote Gen3. TKO600 (0.64 OD). IRS w/3.55. PS. Wilwoods. Sway bars. This build is dedicated to my son, Benjamin.
Build Thread.
-
Post Thanks / Like - 0 Thanks, 3 Likes
-
04-21-2023, 06:42 AM
#610
Senior Member
Hot nail is genius Chris.
MK4 #10008 - Ordered 10/06/20, Delivered 03/03/21, First Start 7/22/21, First Go Kart 7/24/21
Paint by Metal Morphous 5/14/22, Legally registered 6/8/22, Graduated 7/20/22
Build Thread
https://thefactoryfiveforum.com/show...been-delivered
Complete Kit, Ford 306, Sniper/Dual Sync, T5, Hydraulic clutch
-
Post Thanks / Like - 0 Thanks, 2 Likes
-
04-21-2023, 08:28 AM
#611
Not a waxer
Chris,
I use that exact same tool to hold the trunk open while making hinge adjustments! Only difference is that I'm not smart enough to protect it with a soft fluffy towel 
Jeff
-
Post Thanks / Like - 0 Thanks, 3 Likes
-
04-21-2023, 08:55 AM
#612
Senior Member
Originally Posted by
Blitzboy54
Hot nail is genius Chris.
I thought so too, Jesse. That's why when I saw a guy on YouTube (Dan's Garage) do it, I added it to the list of stolen ideas to implement on my build. I also used it to create a silhouette in the carpet for the prop rod keeper, so it would sit flush.
Originally Posted by
Jeff Kleiner
Chris,
I use that exact same tool to hold the trunk open while making hinge adjustments! Only difference is that I'm not smart enough to protect it with a soft fluffy towel
Jeff
I have precious few brain cells left. Gots to protect 'em!
Last edited by 460.465USMC; 04-21-2023 at 10:42 AM.
Chris
Coupe complete kit delivered: 4/22/24.
Build Thread. Coyote. T-56. IRS w/3.55. Wilwoods. PS. HVAC. Side windows.
MK4 Complete kit.
Build Thread Index. Delivered: 10/15/2020. Legal: 7/25/23. Coyote Gen3. TKO600 (0.64 OD). IRS w/3.55. PS. Wilwoods. Sway bars. This build is dedicated to my son, Benjamin.
Build Thread.
-
04-21-2023, 09:03 AM
#613
Senior Member

Originally Posted by
460.465USMC
I'm using the
Breeze prop rod for the trunk lid as well. I like the simplicity, functionality, and old school vibe. I think these are designed for trunks without carpet, but with a little ingenuity I was able to get it to mount and fit okay despite the ThermoTec and carpet. Installing it with the gas tank and Russ T. drop trunk in place is it's own challenge. I opted for a right side install, so I could fit my hand through the fuel pump access panel to install the washer and cotter pin. Did I mention I'm glad I made the trunk panels removable? I think this is the second or third time I've needed access.
I purchased and installed the Breeze trunk prop rod. Then I saw the gas strut kit from FFR is only $50 so I bought and installed it. I really like the gas struts, open the trunk and it just stays up instead of hitting me in the head. I still have the prop rod installed as a backup, after going through what it takes to install it I have no plans of taking it out lol
-
04-21-2023, 01:19 PM
#614
Senior Member
Last edited by 460.465USMC; 08-30-2023 at 11:55 AM.
Chris
Coupe complete kit delivered: 4/22/24.
Build Thread. Coyote. T-56. IRS w/3.55. Wilwoods. PS. HVAC. Side windows.
MK4 Complete kit.
Build Thread Index. Delivered: 10/15/2020. Legal: 7/25/23. Coyote Gen3. TKO600 (0.64 OD). IRS w/3.55. PS. Wilwoods. Sway bars. This build is dedicated to my son, Benjamin.
Build Thread.
-
Post Thanks / Like - 0 Thanks, 2 Likes
-
04-22-2023, 11:39 AM
#615
Senior Member
Build Thread Index (Continued)
Treadstone Performance Air Straightener and Steering Shaft Finalized
Four Wheel Alignment
Go-kart!
Pinion Angle
Trans Tunnel and Starting Carpet
Trans Tunnel Complete and a Dead Pedal
Underbody Coating
Low Fuel Pressure Resolved
Carpeting
Footwell/Cubby/Trunk Lighting and Headrests
Headrest Extensions and Breeze Seat Bases
E-brake Boot and CobraHeat Heated Seat Inserts(scroll)
MetCo Safety Loop
NRG Steering Wheel Quick Release (scroll)
Body Fitment - Sequence of Steps
Body on for the First Time - Part 1
Body Fitment - Part 2 (scroll)
Body Fitment - Part 3 and Windshield
Door Latch Mod
Door fitting, Louvers, and Check Straps (scroll)
Hood, Prop Rods, Hood Handles, and Hood Scoop (multiple scrolls)
Trunk Lid and Prop Rod
Radiator Swap and Nomex protection
Foam on Footboxes, Louver Final Install, and Fire Extinguisher (scroll)
Windshield, Roll Bar Grommets, Seat Harnesses, Trunk Access Panel, License Plate Light (scroll)
Aston Lemans, Side Exhaust, and Rear QJs
Patriotic Bling
Mirrors, Visors, Splash Guards, Wheel Well Liners
Legal and First Drive
Coyote Engine Cover, Heat Shields for Sidepipes, and Door Panels
Radiator Panels, Grilles, Front Plate, and Wheel Spacers
_________________
Originally Posted by
Mike.Bray
I purchased and installed the Breeze trunk prop rod. Then I saw the gas strut kit from FFR is only $50 so I bought and installed it. I really like the gas struts, open the trunk and it just stays up instead of hitting me in the head. I still have the prop rod installed as a backup, after going through what it takes to install it I have no plans of taking it out lol
The trunk struts are a good option, no doubt. Interestingly, since I didn't use the hood struts, ball pivots, etc. I think I basically have the parts for the trunk strut kit. Will likely list these for sale at half price. In my case I would have had to modify the Breeze cubby wall to accommodate the struts. I thought about installing a flanged sleeve in the rib for the prop rod to slip into, but not sure that's really necessary. Since I'll be driving in gel coat for a while, I'll have plenty of time to get some real-world experience to see whether "improvements" like that (and others) are something I want to do before paint.
Last edited by 460.465USMC; 08-30-2023 at 11:52 AM.
Chris
Coupe complete kit delivered: 4/22/24.
Build Thread. Coyote. T-56. IRS w/3.55. Wilwoods. PS. HVAC. Side windows.
MK4 Complete kit.
Build Thread Index. Delivered: 10/15/2020. Legal: 7/25/23. Coyote Gen3. TKO600 (0.64 OD). IRS w/3.55. PS. Wilwoods. Sway bars. This build is dedicated to my son, Benjamin.
Build Thread.
-
04-22-2023, 01:54 PM
#616
Senior Member
Originally Posted by
460.465USMC
In my case I would have had to modify the Breeze cubby wall to accommodate the struts.
I have the Breeze cubby and had to cut a couple of slots in the bulkhead for the gas cylinders. It wasn't really a big deal at all and I'm very glad I did.
-
04-23-2023, 11:23 AM
#617
Senior Member
Hey Chris, that picture is one for the archives. Actually, it's a much better way to use your head than mine, which seems to involve seating bolt heads under the car when I'm moving around on the creeper.
Your build is looking great and I appreciate the detail you've put into your build thread. I thought about various options for keeping the trunk open, and if I had the newer hinges, I'd go with the FFR struts. However, I do like the old school vibe of the strut and will be going that route, so your thread detail will give me ahead start.
MK4 #7838: IRS 3.55 TrueTrac T5z Dart 347
The drawing is from ~7th grade, mid-1970s
Meandering, leisurely build thread is
here
-
Post Thanks / Like - 1 Thanks, 0 Likes
-
04-24-2023, 07:03 PM
#618
Senior Member
Just For Fun
Last week marked the 2.5 year point in my build. I did not set a goal for my build, as I didn't want to take away any of the fun. Enjoying the build is more important to me. However, once in a while it's okay to have a little fun, right? This is my first "go-kart" with the body on. Seeing the long hood out in front, and closed in with the doors made it a different experience than original go-kart: more fun.
18 second video just for fun (turn up the volume!)
Before I took the drive, I trimmed the side exhaust exits in the body. The left side needed trimming on the forward edge, and the right side on the rear edge. I have the F5 ball headers, which really help with adjustment, both up/down and in/out.
Left side before trimming
Left side after trimming

You may notice some chipping of the black ceramic coating. Georgie with Gasn is shipping me replacement pipes. It was discovered mine were not prepped at all before applying the ceramic coating. Georgie uses another vendor for the ceramic coating, so kudos to him for standing behind his product. I heartily recommend Gasn if you are in the market to replace your F5 side exhaust.
As with the other body fitting, my goal here was to get a reasonable gap so I can drive in gelcoat for some time. The left side trimmed up pretty quickly, with just one pass. The passenger side was a whole other matter. It took 4-5 iterations of trim, bolt exhaust back up and check clearance, remove exhaust, and trim again. Repeat. Repeat. Repeat... These holes will need some TLC from the body Pro when the time comes.
Now that I've had a little fun, it's on to next steps. Which means I get to pull the body off for (hopefully) the last time. I have a number of items that need attention/finalizing, such as swap out radiator (old issue -- slow leak from lower left outlet), DS FB side and top panels install, etc. etc.
Chris
Coupe complete kit delivered: 4/22/24.
Build Thread. Coyote. T-56. IRS w/3.55. Wilwoods. PS. HVAC. Side windows.
MK4 Complete kit.
Build Thread Index. Delivered: 10/15/2020. Legal: 7/25/23. Coyote Gen3. TKO600 (0.64 OD). IRS w/3.55. PS. Wilwoods. Sway bars. This build is dedicated to my son, Benjamin.
Build Thread.
-
Post Thanks / Like - 0 Thanks, 2 Likes
-
04-24-2023, 08:55 PM
#619
Senior Member
MK4 #7838: IRS 3.55 TrueTrac T5z Dart 347
The drawing is from ~7th grade, mid-1970s
Meandering, leisurely build thread is
here
-
Post Thanks / Like - 1 Thanks, 0 Likes
-
04-24-2023, 11:13 PM
#620
Senior Member

I have your video on replay, nothing better than the sound of a Cobra coming down the road!
-
Post Thanks / Like - 0 Thanks, 1 Likes
-
04-25-2023, 07:23 PM
#621
Senior Member
She sounds sexy Chris. The coyote has an underrated exhaust note.
MK4 #10008 - Ordered 10/06/20, Delivered 03/03/21, First Start 7/22/21, First Go Kart 7/24/21
Paint by Metal Morphous 5/14/22, Legally registered 6/8/22, Graduated 7/20/22
Build Thread
https://thefactoryfiveforum.com/show...been-delivered
Complete Kit, Ford 306, Sniper/Dual Sync, T5, Hydraulic clutch
-
Post Thanks / Like - 0 Thanks, 1 Likes
-
04-26-2023, 10:18 AM
#622
Senior Member
Originally Posted by
Blitzboy54
She sounds sexy Chris. The coyote has an underrated exhaust note.
Try as I might, I can't seem to shake this silly perm-a-grin off my mug. Yep, it's definitely different than the old-school lope (which I love), but it's music to my ears nonetheless.
Chris
Coupe complete kit delivered: 4/22/24.
Build Thread. Coyote. T-56. IRS w/3.55. Wilwoods. PS. HVAC. Side windows.
MK4 Complete kit.
Build Thread Index. Delivered: 10/15/2020. Legal: 7/25/23. Coyote Gen3. TKO600 (0.64 OD). IRS w/3.55. PS. Wilwoods. Sway bars. This build is dedicated to my son, Benjamin.
Build Thread.
-
05-10-2023, 03:08 PM
#623
Senior Member
One Step Back to Go Forward (Radiator Swap)
I have to admit pulling off the doors, hood, windshield, trunk lid, and the body was a little deflating. But, a necessary step as I have a laundry list of items that are either impossible, or a lot more difficult to complete with the body on.
Radiator swap: The biggest item on the To Do list is swapping the radiator. After First Start last June, I found a small, slow leak in the neck of the lower two inch tube. I patched it with JB Weld, so I could keep moving on to Go-Kart, etc. Long story short, F5 made good and sent me a replacement, but that one took a pretty good hit during transit. It took some back and forth, but they eventually agreed to send me a second one, and don't want me to return the first replacement.
Swapping it out was pretty straight forward, except for the fact I have a number of mods attached to it: (1) Moroso tank sits on the (2) Breeze shroud, (3) upper and (4) lower Breeze mounts. Plus, it was a perfect time to add (5) radiator protection (more on that in a minute). Suffice it to say, it took a lot of measuring and remeasuring to get the replacement radiator in exactly the same spot so everything would align. Precision is not my especiality. But in the end after throwing enough hours at it, everything came together. After a couple heat cycles, I believe I have a leak free cooling system. Yee-haw!
I'm using Gates PowerGrip hose clamps. These thermoplastic clamps have been recommended on the forum. I paid $5 to $6 each. The down side is they are one time use, and not particularly easy to remove. Sure enough, I needed the
Gates removal tool to cut them off. It slices them lengthwise without damaging the hose.

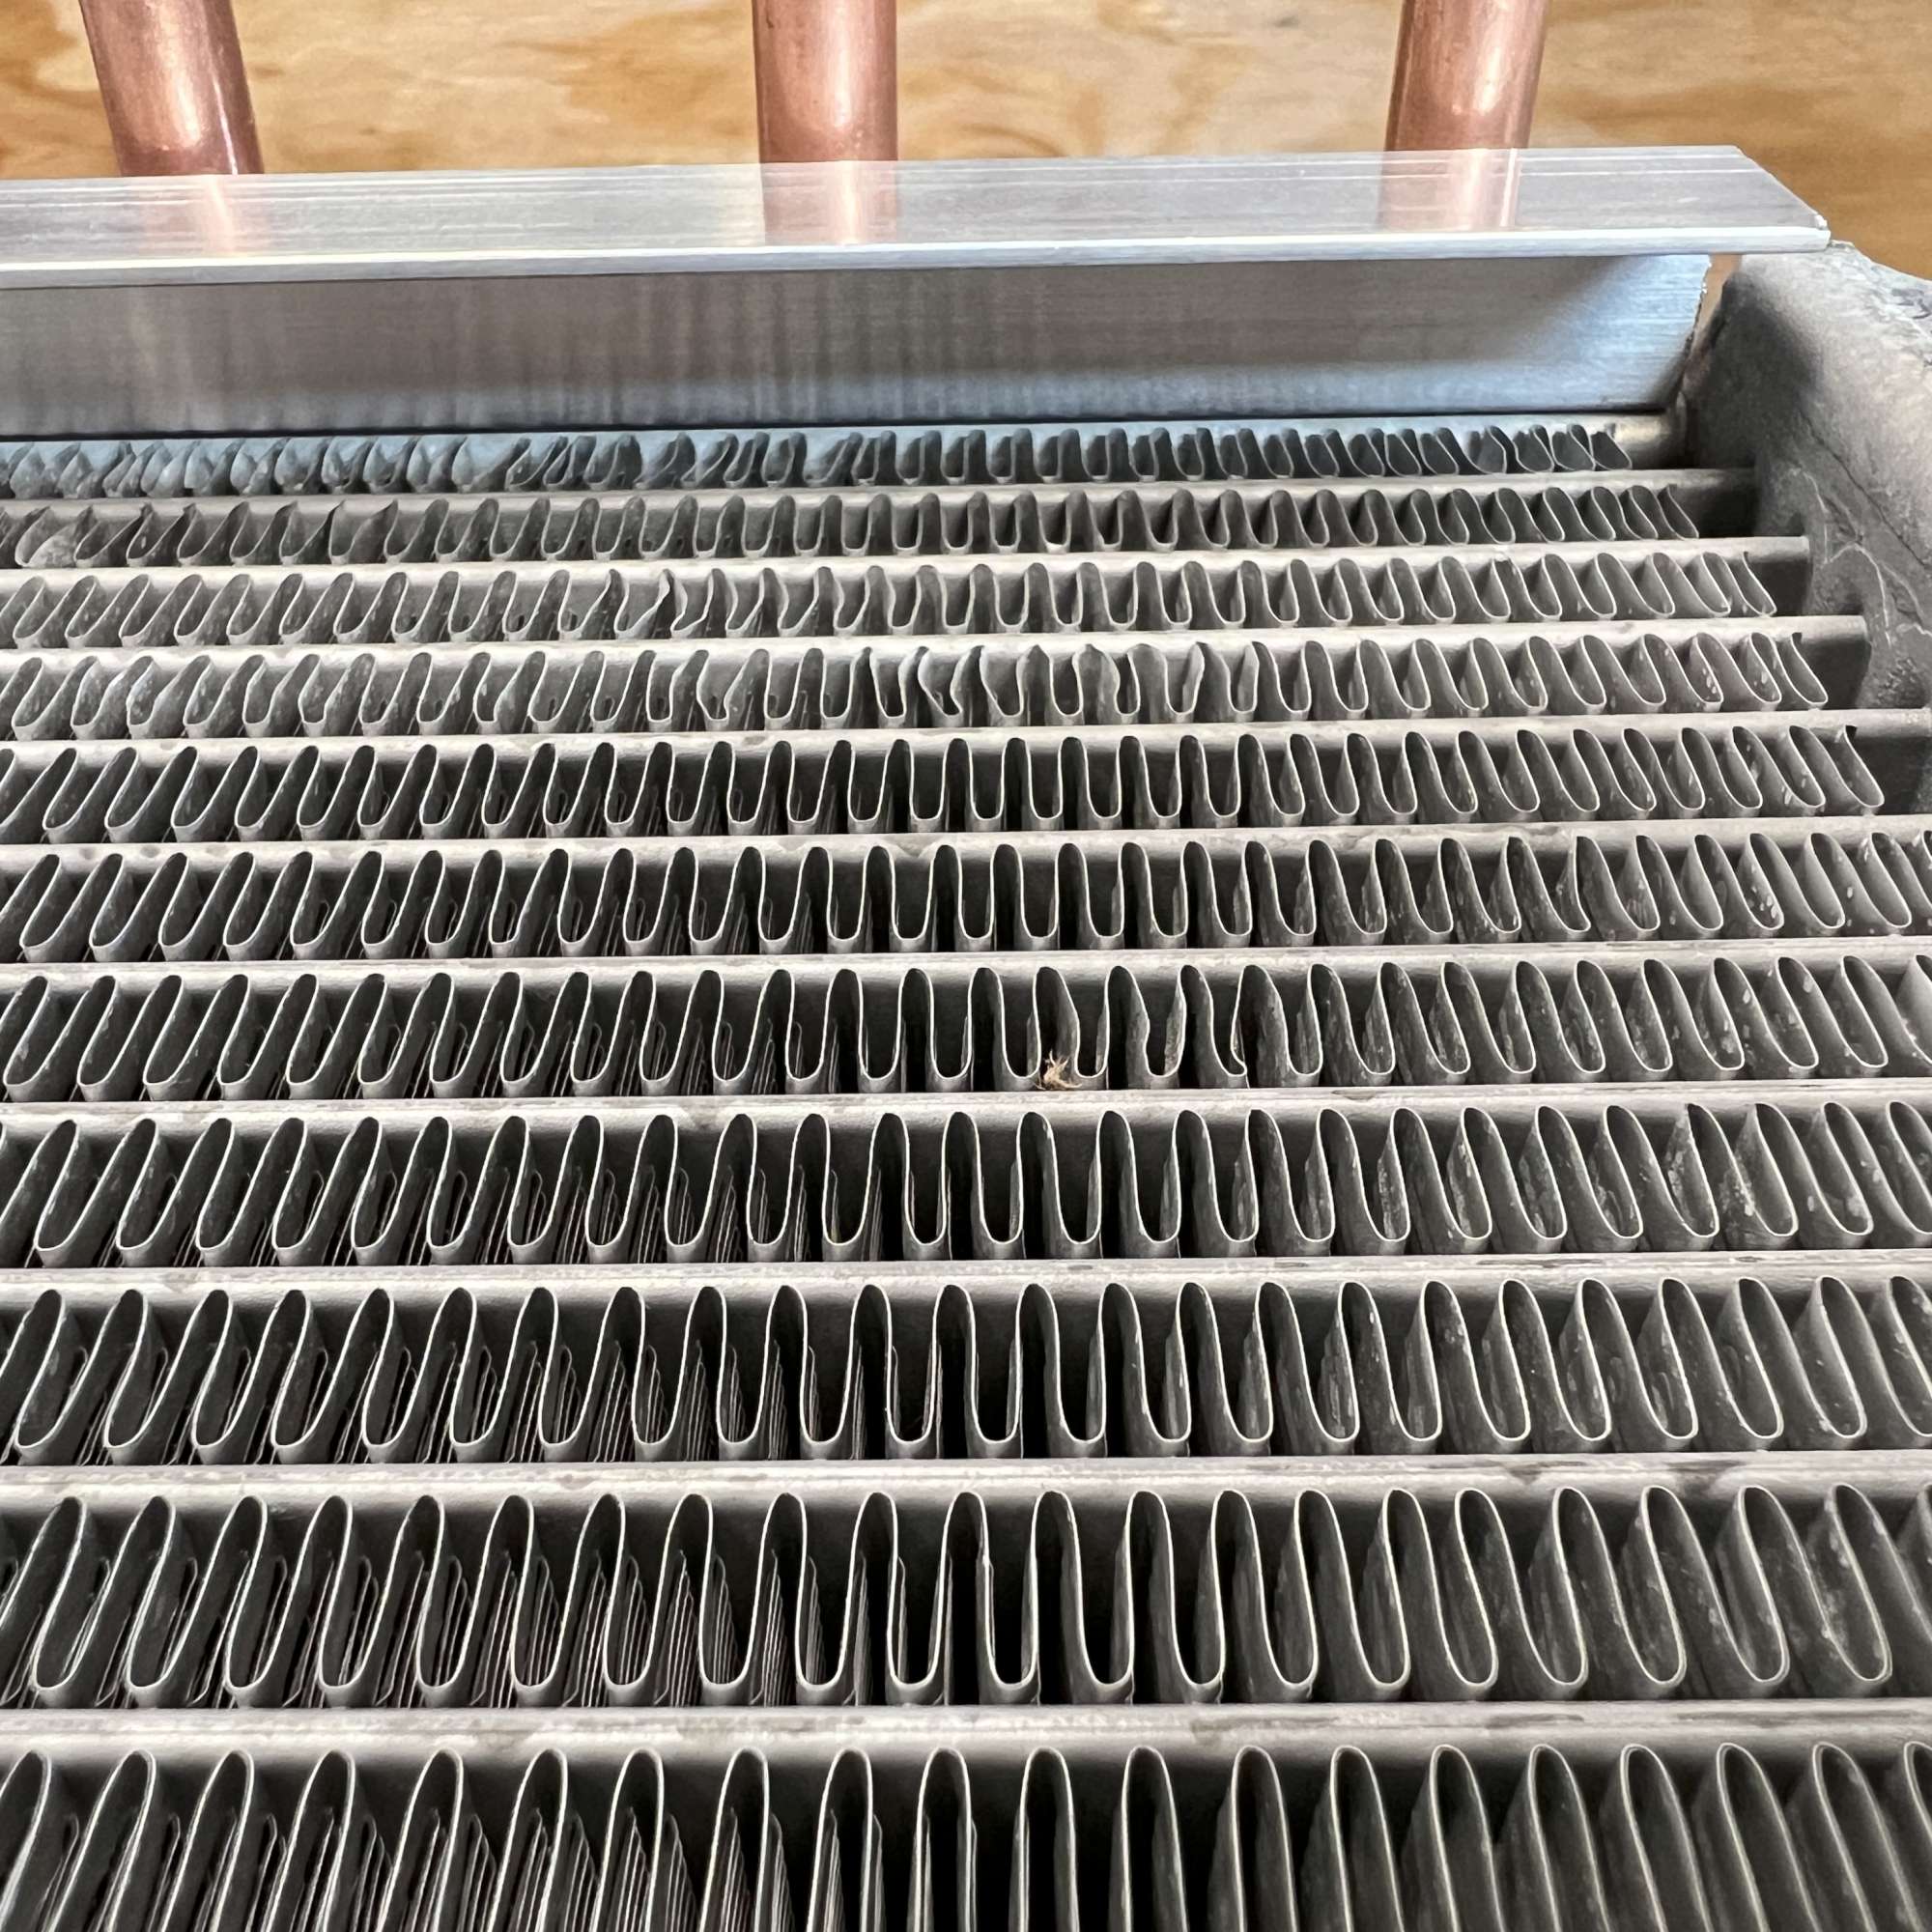
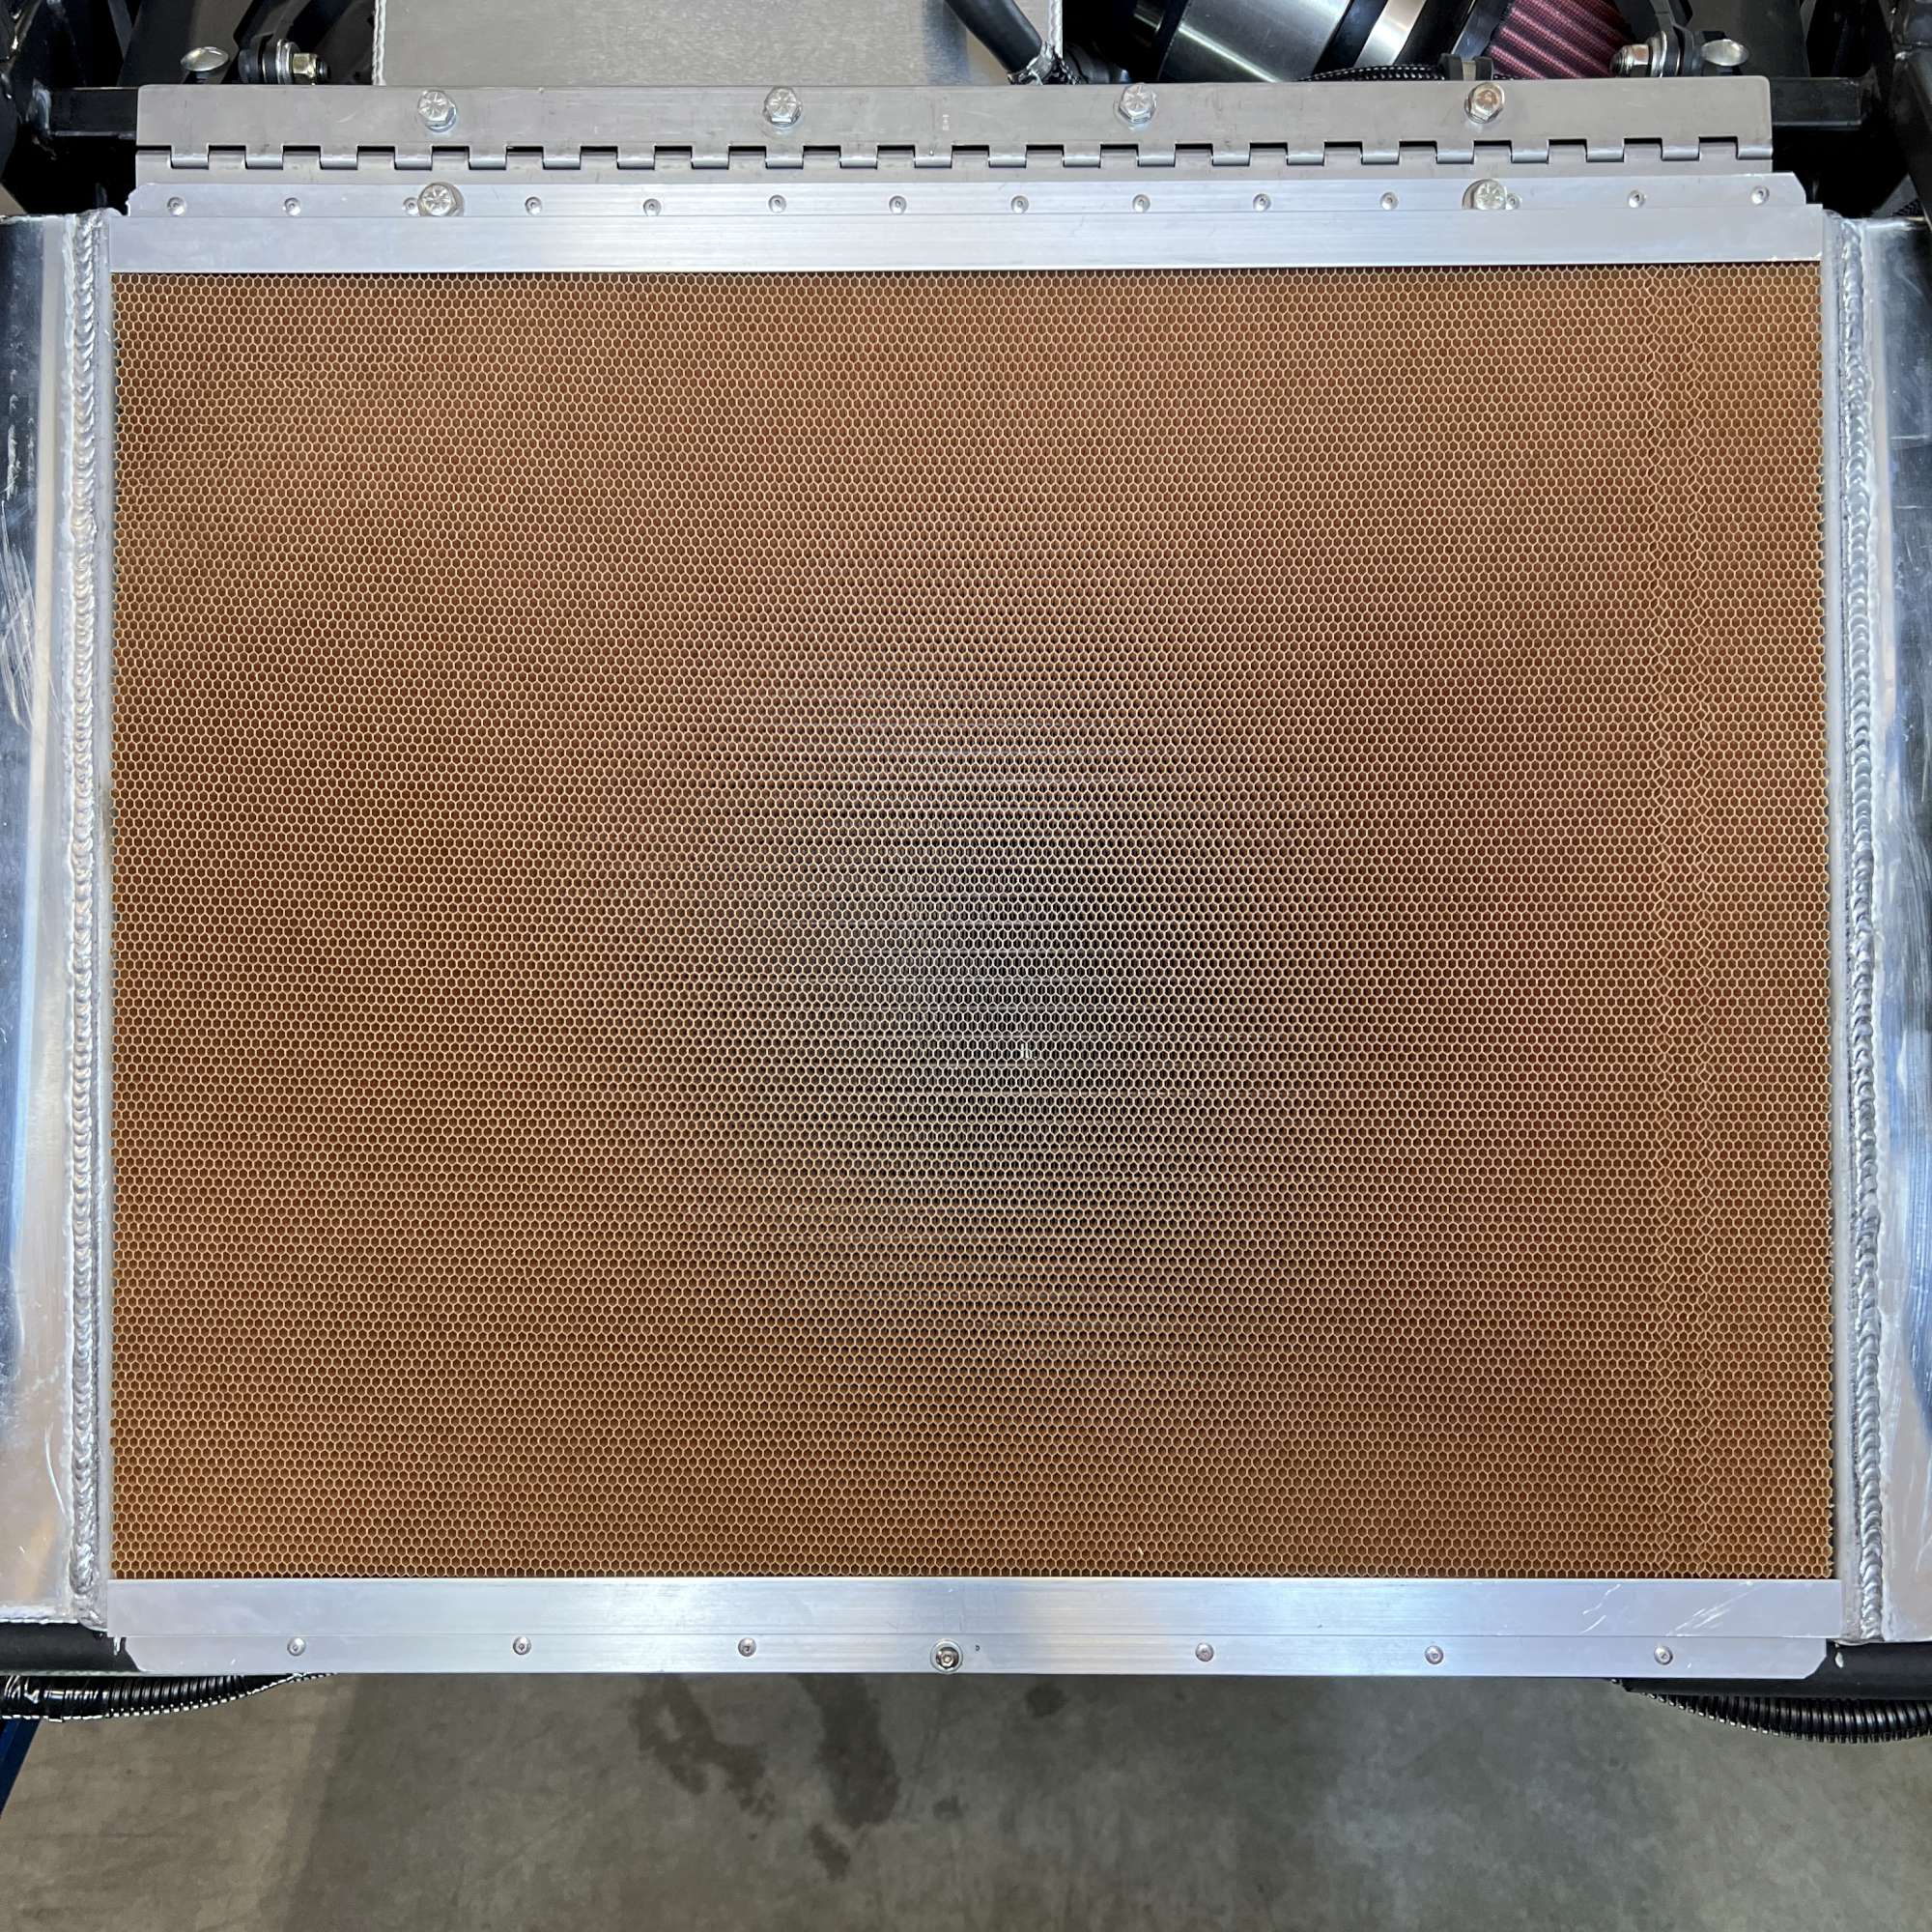
Radiator protection (Nomex): There are several good solutions on the forum. I landed on the Nomex with Z Bar as documented by GTBradley and JB in NOVA. I used the 5/8" Z Bar as recommended by JB. I liked the price, and the functionality that allows for removal of the Nomex for cleaning or replacement without removing any screws/brackets. It just slides right out.
Here's a view looking into the slot of the Z Bar from Orange Aluminum. I ordered through Amazon (saved a few $$ in shipping).
Here's a second view from the opposite angle.

And, here's a view with the Nomex in place. I used a utility knife and straight edge to cut. The Z Bar holds it top and bottom, and the side tanks hold it in place side to side. The camera in my phone "sees" the aluminum fins behind the Nomex in this picture, though my naked eye does not. Hence the silver in the center. It will be painted with high temp. black paint. **EDIT**: it took two cans (12 oz each) to coat one side.
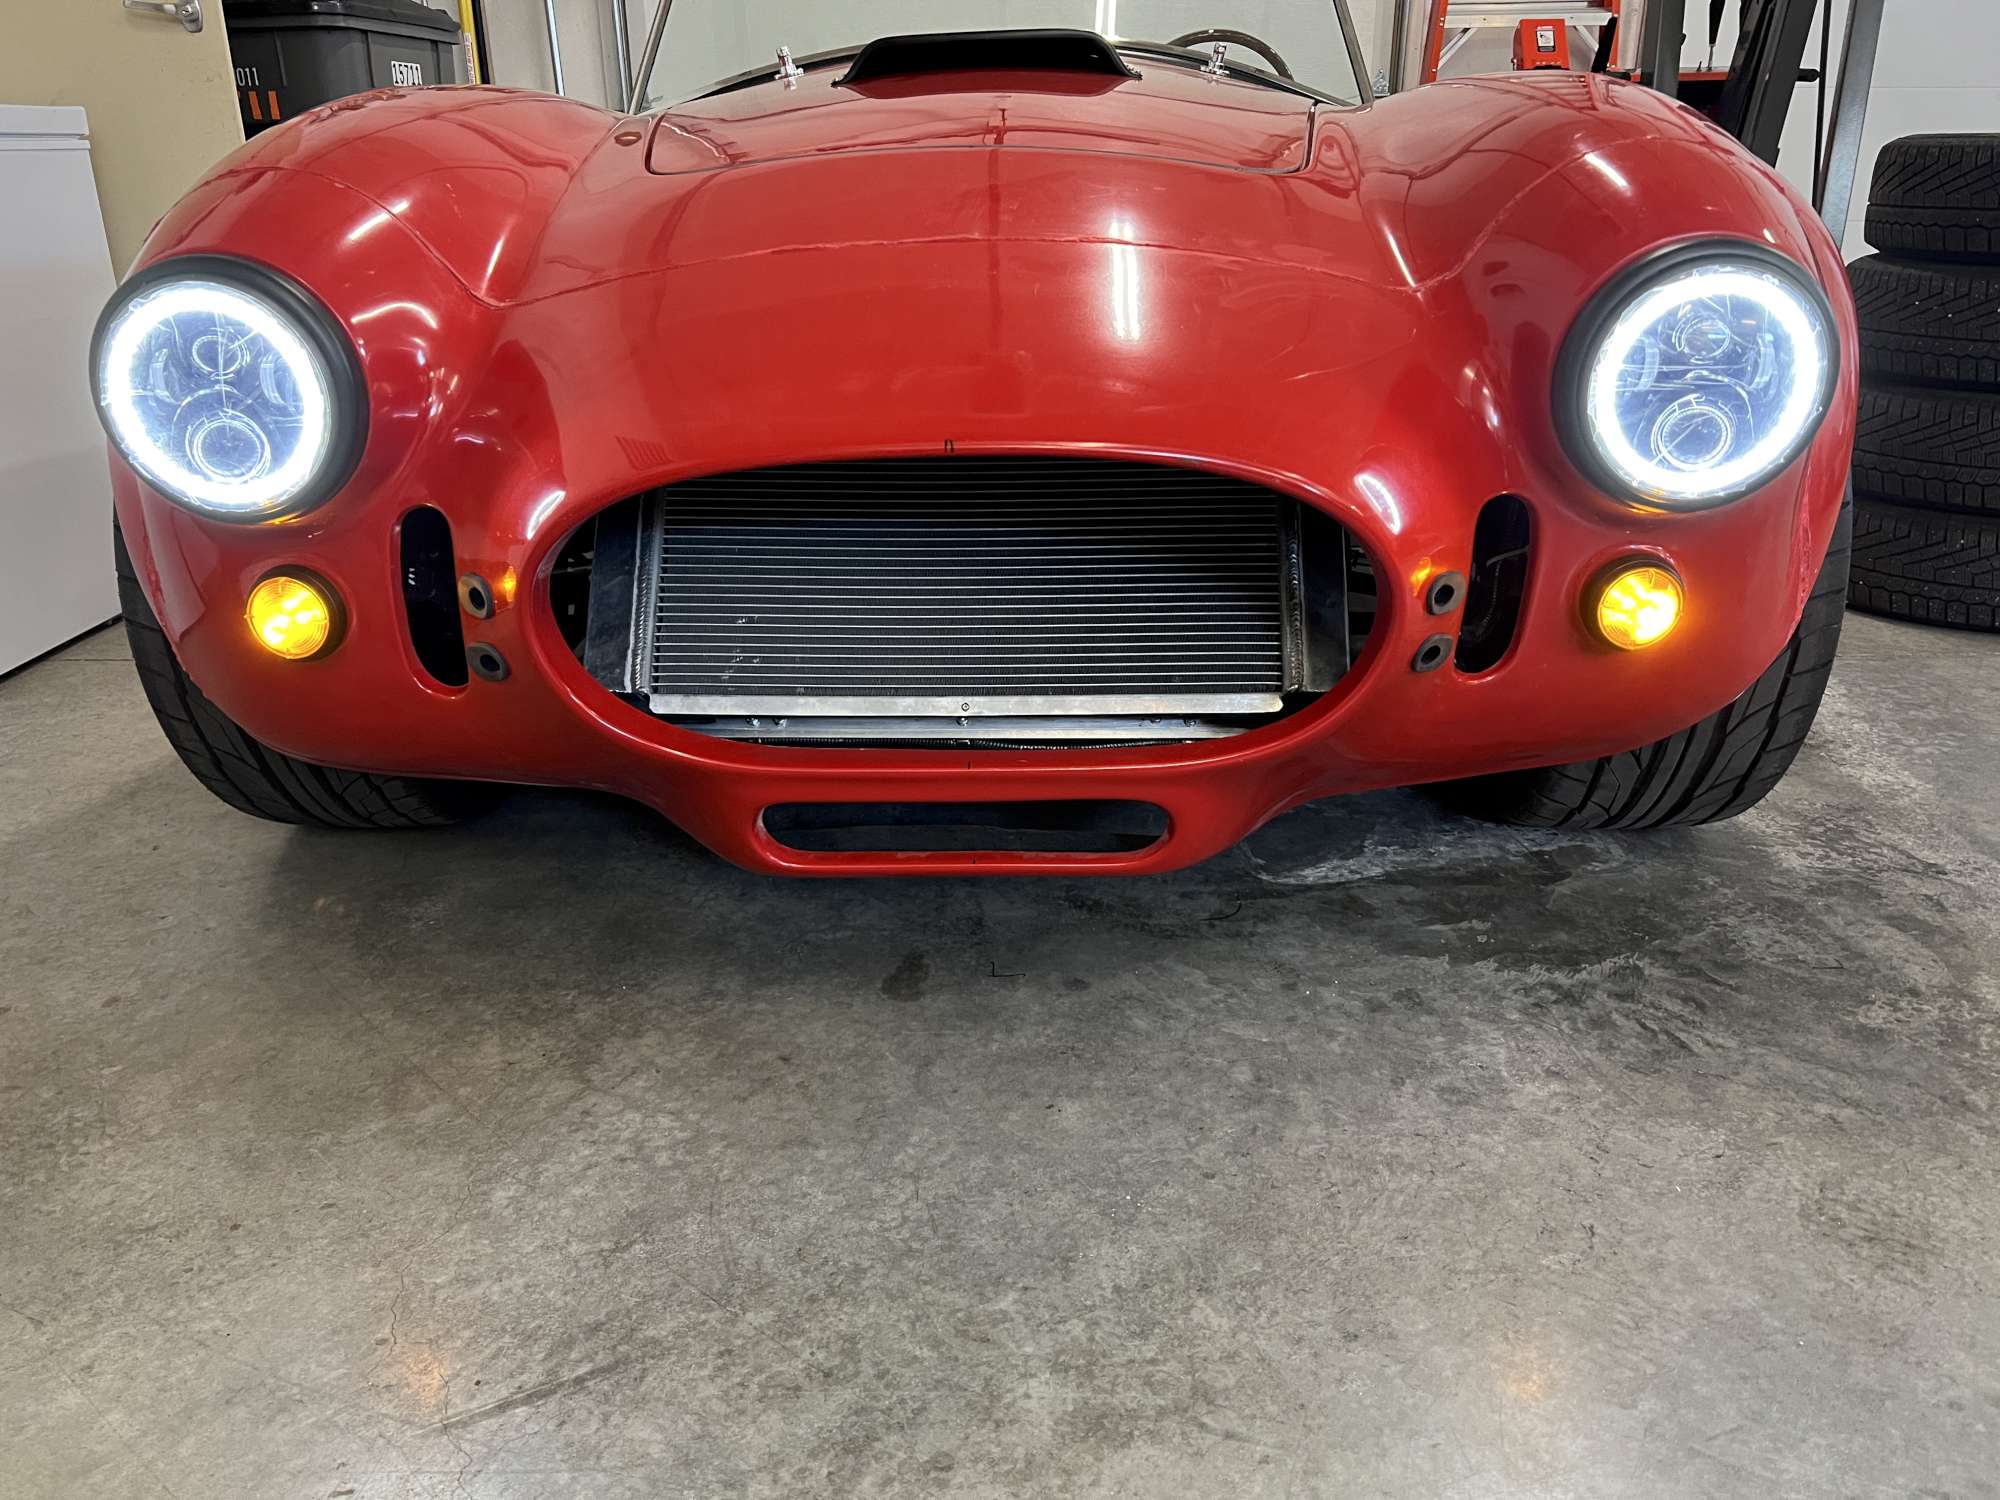
One other notable bit of progress is the headlights and all running lights are installed. I'm leaving the protective film on the headlights as long as possible. The headlights are "Lumen® SB7HLG201D-BLK - 7" Round Black Projector LED Headlights with Switchback Halo". For added daytime driving visibility, I wired the halo to turn on with the ignition. These are as bright as modern daily driver DRLs: just what I wanted. The running lights are LED as well.
I'm back to chipping away at the laundry list. Hope to have the body back on within a couple weeks, so I can move forward with some fun stuff like roll bars, Lemans gas cap, mirrors, etc.
Last edited by 460.465USMC; 05-11-2023 at 04:30 PM.
Chris
Coupe complete kit delivered: 4/22/24.
Build Thread. Coyote. T-56. IRS w/3.55. Wilwoods. PS. HVAC. Side windows.
MK4 Complete kit.
Build Thread Index. Delivered: 10/15/2020. Legal: 7/25/23. Coyote Gen3. TKO600 (0.64 OD). IRS w/3.55. PS. Wilwoods. Sway bars. This build is dedicated to my son, Benjamin.
Build Thread.
-
Post Thanks / Like - 0 Thanks, 2 Likes
-
05-18-2023, 01:16 PM
#624
Senior Member
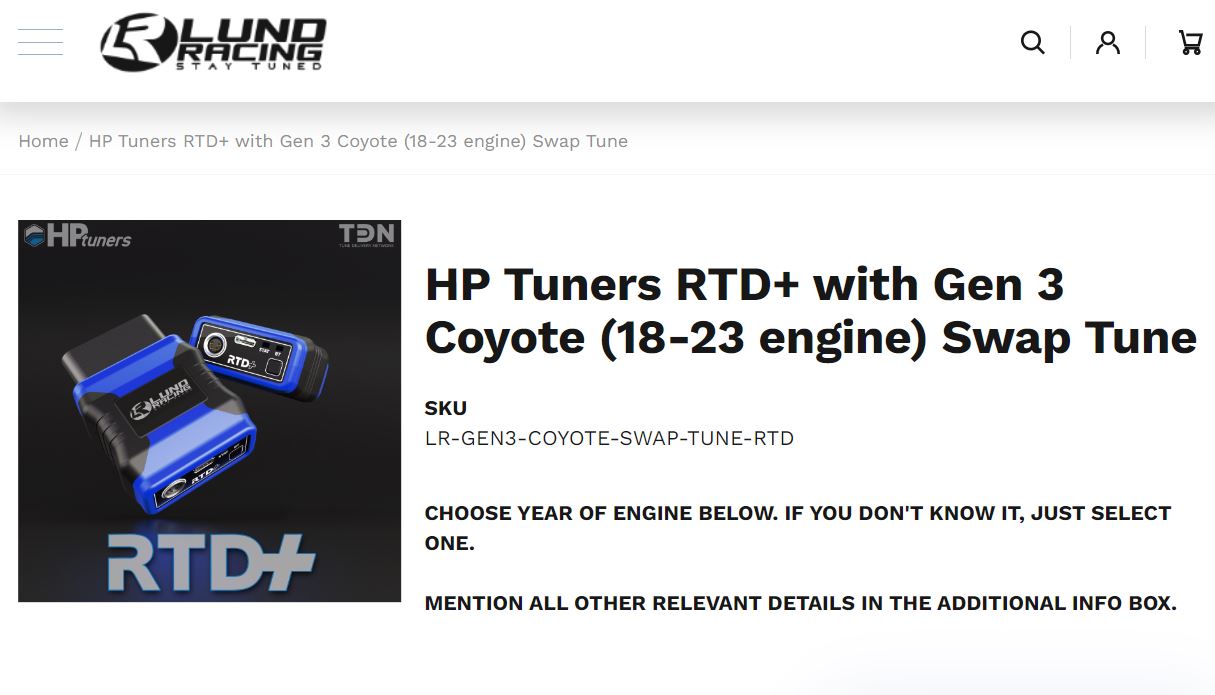
Lund Racing Tune is $1,300?
I contacted Lund Racing about a Coyote Gen 3 tune. Apparently, they only communicate via email. No phone conversations available. Bummer. They're quoting me $800 for the tune, and another $500 for the RTD+ device to load it into the PCM via the ODB II port. I've read some threads on Lund tuning with Gen 3, and previous. Sounds like the ngauge option is no longer available because they're no longer in business. But perhaps a used one could be found.
I'm assuming there are other options, as $500 is a bit much for me to stomach just to collect engine data and load a tune. What device(s) or solutions have others used their Lund tunes, particularly for Gen3 Coyote?
Last edited by 460.465USMC; 05-19-2023 at 09:25 AM.
Chris
Coupe complete kit delivered: 4/22/24.
Build Thread. Coyote. T-56. IRS w/3.55. Wilwoods. PS. HVAC. Side windows.
MK4 Complete kit.
Build Thread Index. Delivered: 10/15/2020. Legal: 7/25/23. Coyote Gen3. TKO600 (0.64 OD). IRS w/3.55. PS. Wilwoods. Sway bars. This build is dedicated to my son, Benjamin.
Build Thread.
-
05-18-2023, 02:32 PM
#625
Yup, that's the going rate with Lund. I paid $1,200 but that was over a year ago. You're correct about the nGauge - no longer an option as they're out of business. I would have preferred that option as well.
Look to see if you have any local dyno tuners in your area that specialize in Mustangs.
Edited to add: also be aware that the RTD software only runs on windows. If you're like me and hate windows and only have Macs at home, you'll need to spring for a cheap windows laptop as well. It's now my beater garage laptop.
Last edited by JohnK; 05-18-2023 at 02:34 PM.
MkIV Roadster build: Gen 2 Coyote, IRS, TKO600. Ordered 10/24/18. Delivered 1/29/19. Engine installed 8/8/21. First start 9/12/21. First go-kart 9/17/21. Off to paint 4/11/22. Back from paint 12/30/22.
Build thread here.
-
Post Thanks / Like - 1 Thanks, 0 Likes
-
05-18-2023, 02:33 PM
#626
Senior Member

Call around to local Ford tuning/performance shops. Google shows a couple in the Spokane area. I looked at lund for my Gen2 tuning couple years ago. They were at $1k then. I went with a local performance shop here in Chicago that specializes in Ford. Was a fraction of the cost and am overall happy with the result. I had to buy the tuner as well (SCT 7015) but was $300. Don't think I paid more than $800 in total and mine included a couple dyno pulls.
MKIV #7275 Acquired June 2019 (2010 partial build), Gen 2 Coyote by Forte w/TK600- PRO 5.0 - McLeod RST twin Clutch-QT Bell, old style IRS, 8.8 3.55 Rear, Gas'n Headers/Pipes, Power Steering, Hydroboost by Forte, Breeze Roll Bar, Heated Seats, 17" halibrand w/ Nitto G2, Maradyne Fan Controller, Paul Proe Vent Kit, Russ Thompson Signal w/ FTP- Received June 2019/First Start April 2020/Go Cart May 2020/Legal September 2020/PAINT BY SPOTLIGHT CUSTOMS JAN 2021
-
Post Thanks / Like - 1 Thanks, 0 Likes
-
05-19-2023, 09:36 AM
#627
Senior Member
Originally Posted by
JohnK
Yup, that's the going rate with Lund. I paid $1,200 but that was over a year ago. You're correct about the nGauge - no longer an option as they're out of business. I would have preferred that option as well.
Look to see if you have any local dyno tuners in your area that specialize in Mustangs.
Edited to add: also be aware that the RTD software only runs on windows. If you're like me and hate windows and only have Macs at home, you'll need to spring for a cheap windows laptop as well. It's now my beater garage laptop.
I knew it was a possibility my current code reader wouldn't work. But wow, I'm struggling to swallow a $500 bill for what will likely amount to be a one time use for me. Going to do some research and visit tuners in my area to see if I can find one I can trust to do the job right. Appreciate your input, John.
Originally Posted by
nuhale
Call around to local Ford tuning/performance shops. Google shows a couple in the Spokane area. I looked at lund for my Gen2 tuning couple years ago. They were at $1k then. I went with a local performance shop here in Chicago that specializes in Ford. Was a fraction of the cost and am overall happy with the result. I had to buy the tuner as well (SCT 7015) but was $300. Don't think I paid more than $800 in total and mine included a couple dyno pulls.
Hello Nuhale. Thanks for the weighing in with your experience. Though Spokane is much smaller than Chicago, I'm hopeful I can find someone who's capable and knows what they're doing. I could easily be fooled by someone due to my ignorance on this topic, so will have to be careful. It would also be great to have it tuned on a dyno, so I can avoid WOT with a vehicle I barely know, not to mention yours truly is head of quality control. Not ready for that until I get the car completely dialed in, with lots of seat time and understanding how it handles and brakes, etc.
Chris
Coupe complete kit delivered: 4/22/24.
Build Thread. Coyote. T-56. IRS w/3.55. Wilwoods. PS. HVAC. Side windows.
MK4 Complete kit.
Build Thread Index. Delivered: 10/15/2020. Legal: 7/25/23. Coyote Gen3. TKO600 (0.64 OD). IRS w/3.55. PS. Wilwoods. Sway bars. This build is dedicated to my son, Benjamin.
Build Thread.
-
05-19-2023, 11:22 AM
#628
Ill able check with Lind to see if they have my tuner locked?
email me at [email protected]
-
05-26-2023, 03:31 PM
#629
Senior Member
DS FB Closed for Good
Tuner update: the first shop I called here in Spokane seems promising. The guy is a ASE certified master mechanic, and taught engine performance/racing class at a local community college for 16 years. He has a dyno, so instant performance feedback to dial in the tune would be a real bonus compared to WOT on the public roadways. The cost would likely be a few hundred dollars less (he charges no more that six hours w/dyno at $150/hr) than Lund's $1,300 (still choking on that one). We'll see what happens when I get to that point.
Build update: continuing to chip away at the build. Here are a few of the items I have checked off the list before final body on:
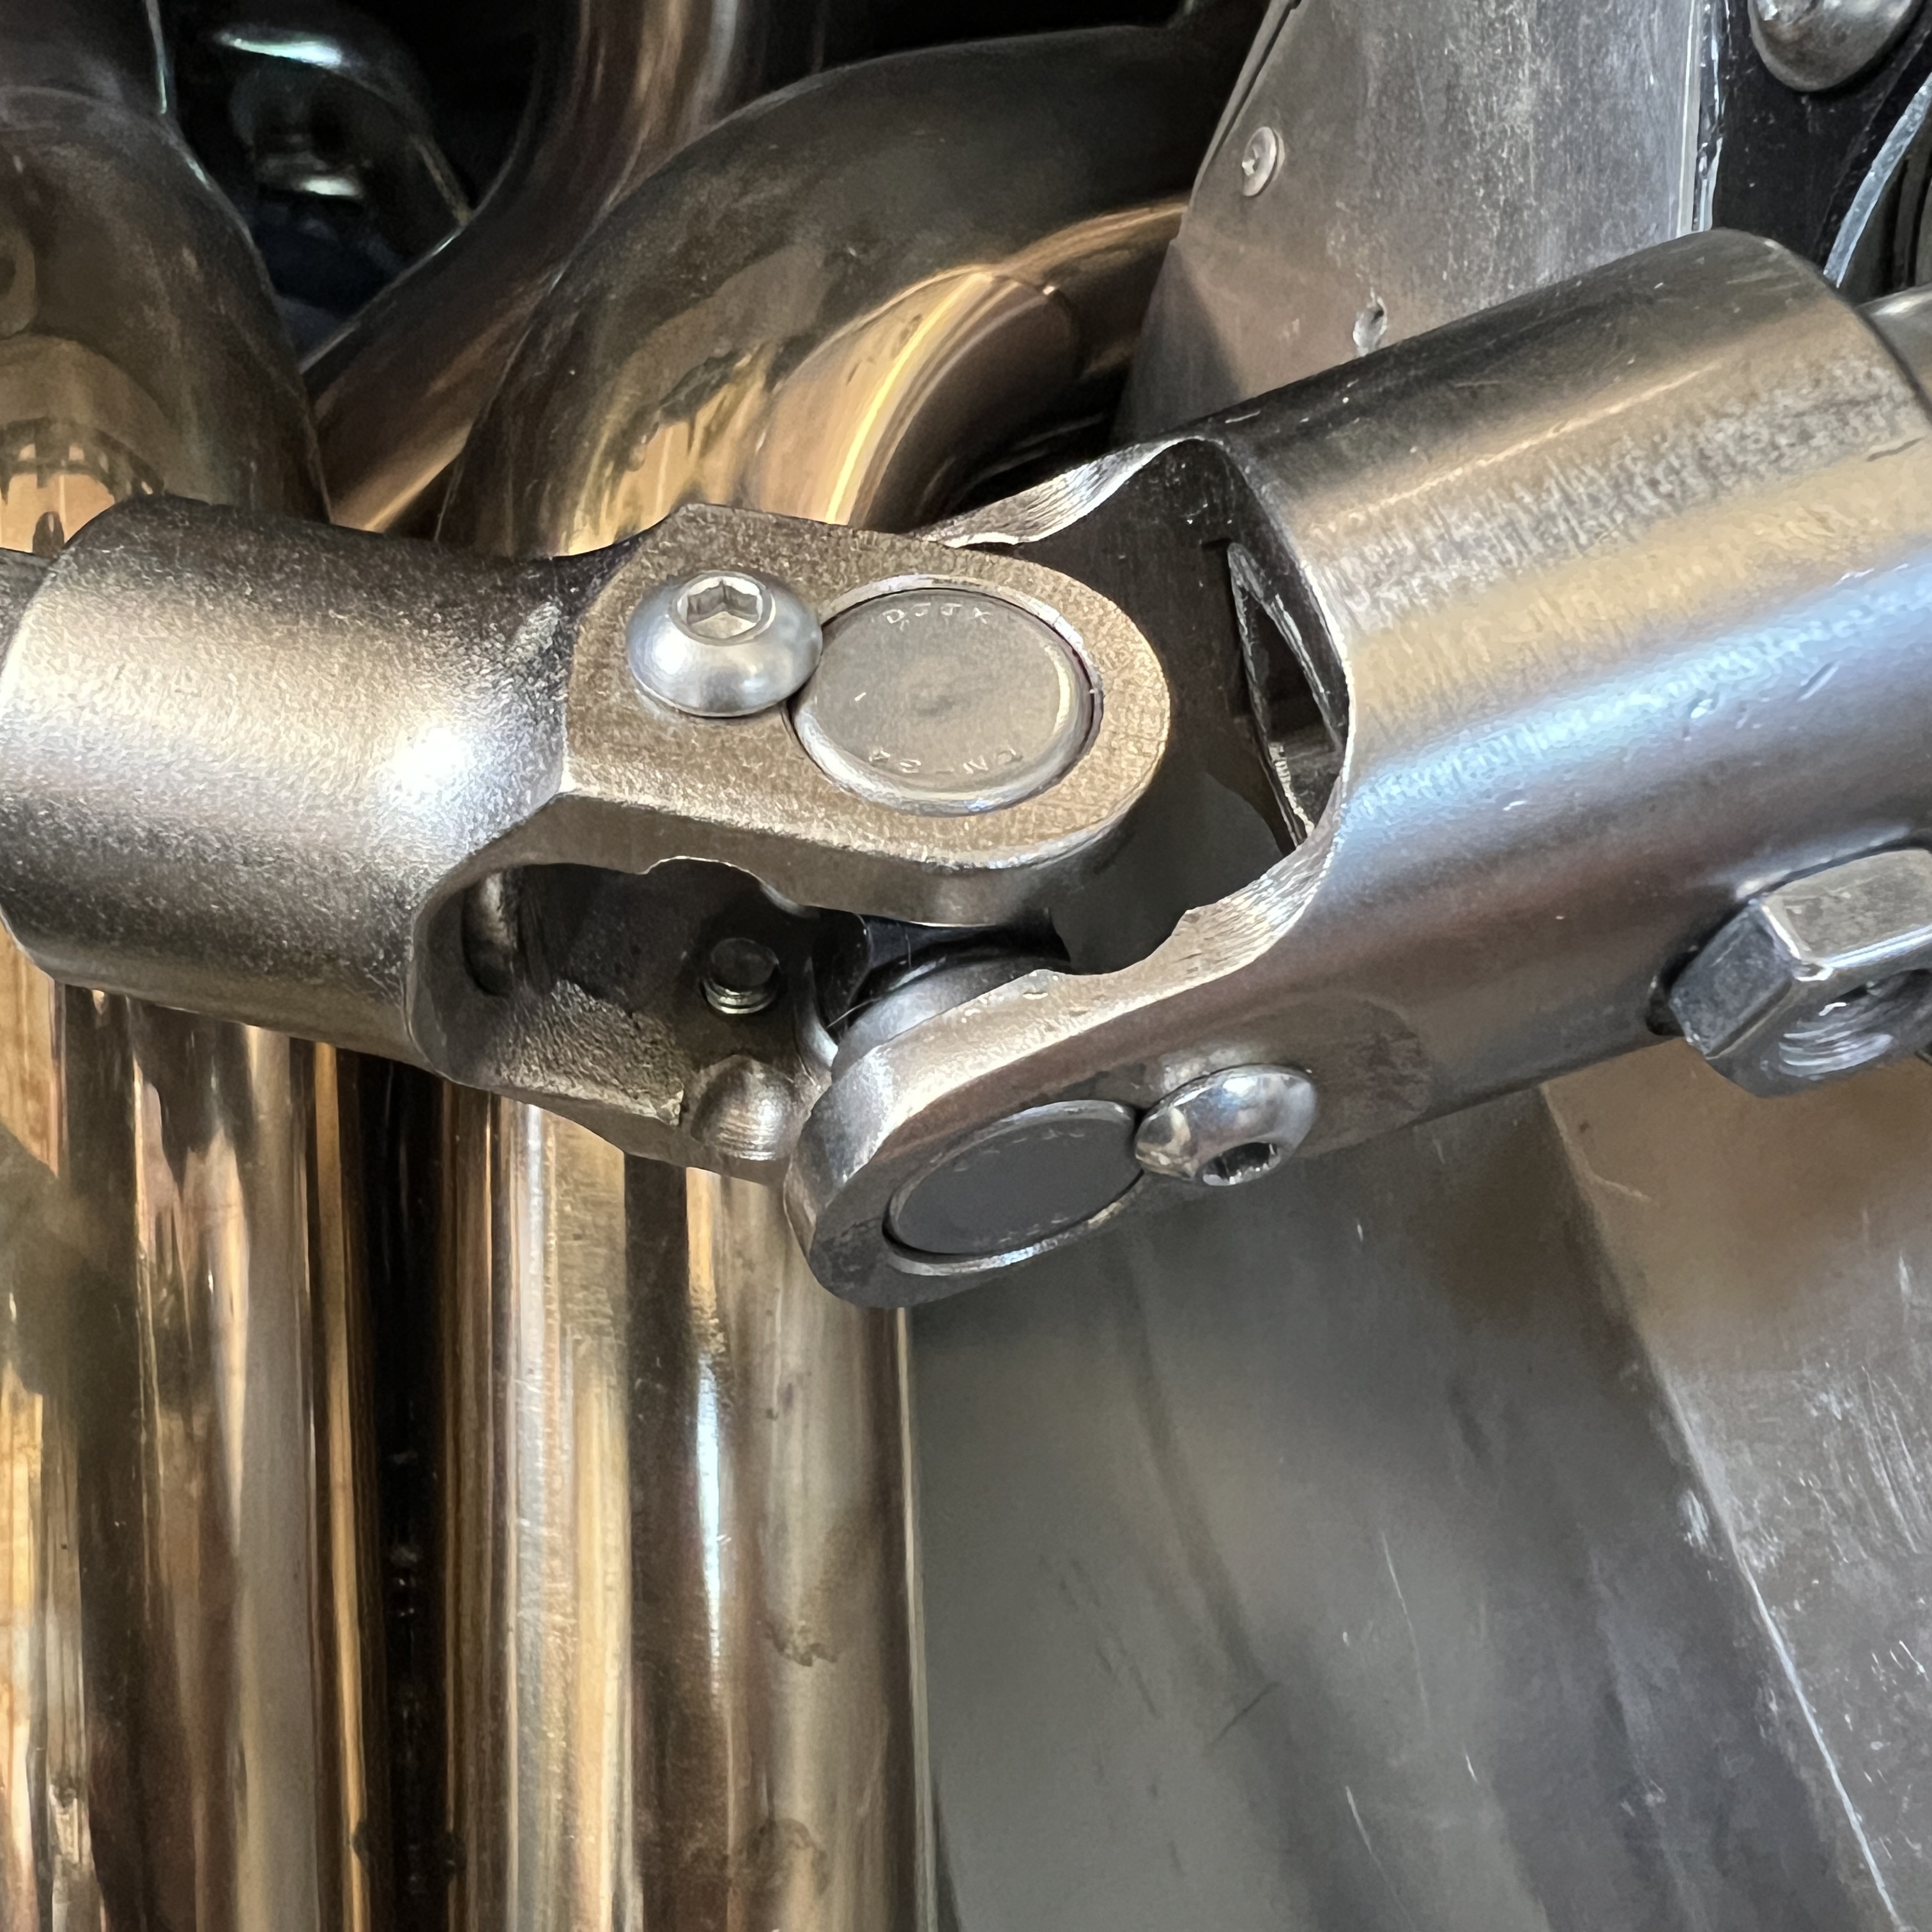
- Steering shaft finalized: rotated steering shaft one spline to center the steering wheel. I also applied blue Loctite to the M5-0.8 metric screws (8 ea) that secure the u-joints. Replaced the 5/16"-18 set screw with a longer one (3/4"). The kit supplied 1/2" wasn't long enough for the nut to grab enough threads. This is the set screw that fits into the dimple we drill into the middle section of the steering shaft, just before it enters the footbox.
- Rocker panels: installed 5/16"-18 rivnuts on the 2" chassis tube to secure the rocker panels. Wow, the bit is huge (17/32") for the rivnuts. Of course, I didn't have one on hand. (Same story for all of the odd sized drill bits needed for the various rivnuts (#8, #10, 1/4", and now 5/16") I've installed. Slotted the four holes in the rocker panel, and and slightly oversized them for the 5/16" SS button head screws.
- Closed up DS FB. Phew. Can't say I wasn't a little apprehensive about sealing it. Did my best to check or orient everything I could think of that will be difficult to access afterward.
* I used 10-32 rivnuts (7 ea) for the DS FB access cover--they will be accessible with the body on. When I was drilling and fitting the FBs about 1.5 years ago, I got a little over zealous with the holes in the access cover. I think some or all of the extra ones will be hidden once the body is back on (hoping). I can always make a replacement cover from scrap 0.040 aluminum if they're visible.
- Foam insulation on outside of FBs: Per recommend from Mr. Kleiner, I installed HVAC cushion seal (2.25"x2.25") around outside of both footboxes. 3M Super77 to glue them. Spent quite a bit of time taping off and putting down towels to protect from overspray on the PS. Then I wondered why I didn't apply the Super77 on the ground with a cardboard backer. Avoid the prep time and no chance of overspray on car? I'm in. I did. It worked. That foam seal is definitely on there. First time using 3M Super77. Handy product.
- Tightened header bolts: found a few that needed a little tightening. I hadn't touched them since initial installation. They've now been through quite a few heat cycles.
- Sealed chassis ground connections at four corners: applied black silicone RTV on the ground connections at all four corners (a precaution I got from Edwardb).
- Grounds for Lemans cap and fuel tank: I took advantage of the wide open access and installed the Lemans Cap ground connection to the chassis. While I was at it I also installed a ground for the gas tank. Crimped and soldered the ring terminals, and added a dab of dielectric grease before sealing up with the RTV.
Here a couple of the M5-0.8 metric screws are visible that received a dab of Loctite (blue). You can see why I swapped out the 5/16'-18 set screw for a longer one. Original 1/2" length set screw shown did not provide enough thread engagement for the nut.
Slotted hole in rocker panel to provide a little in/out adjustment to get good door alignment.
Driver's side FB closed up. HVAC foam seal installed with 3M Super77.
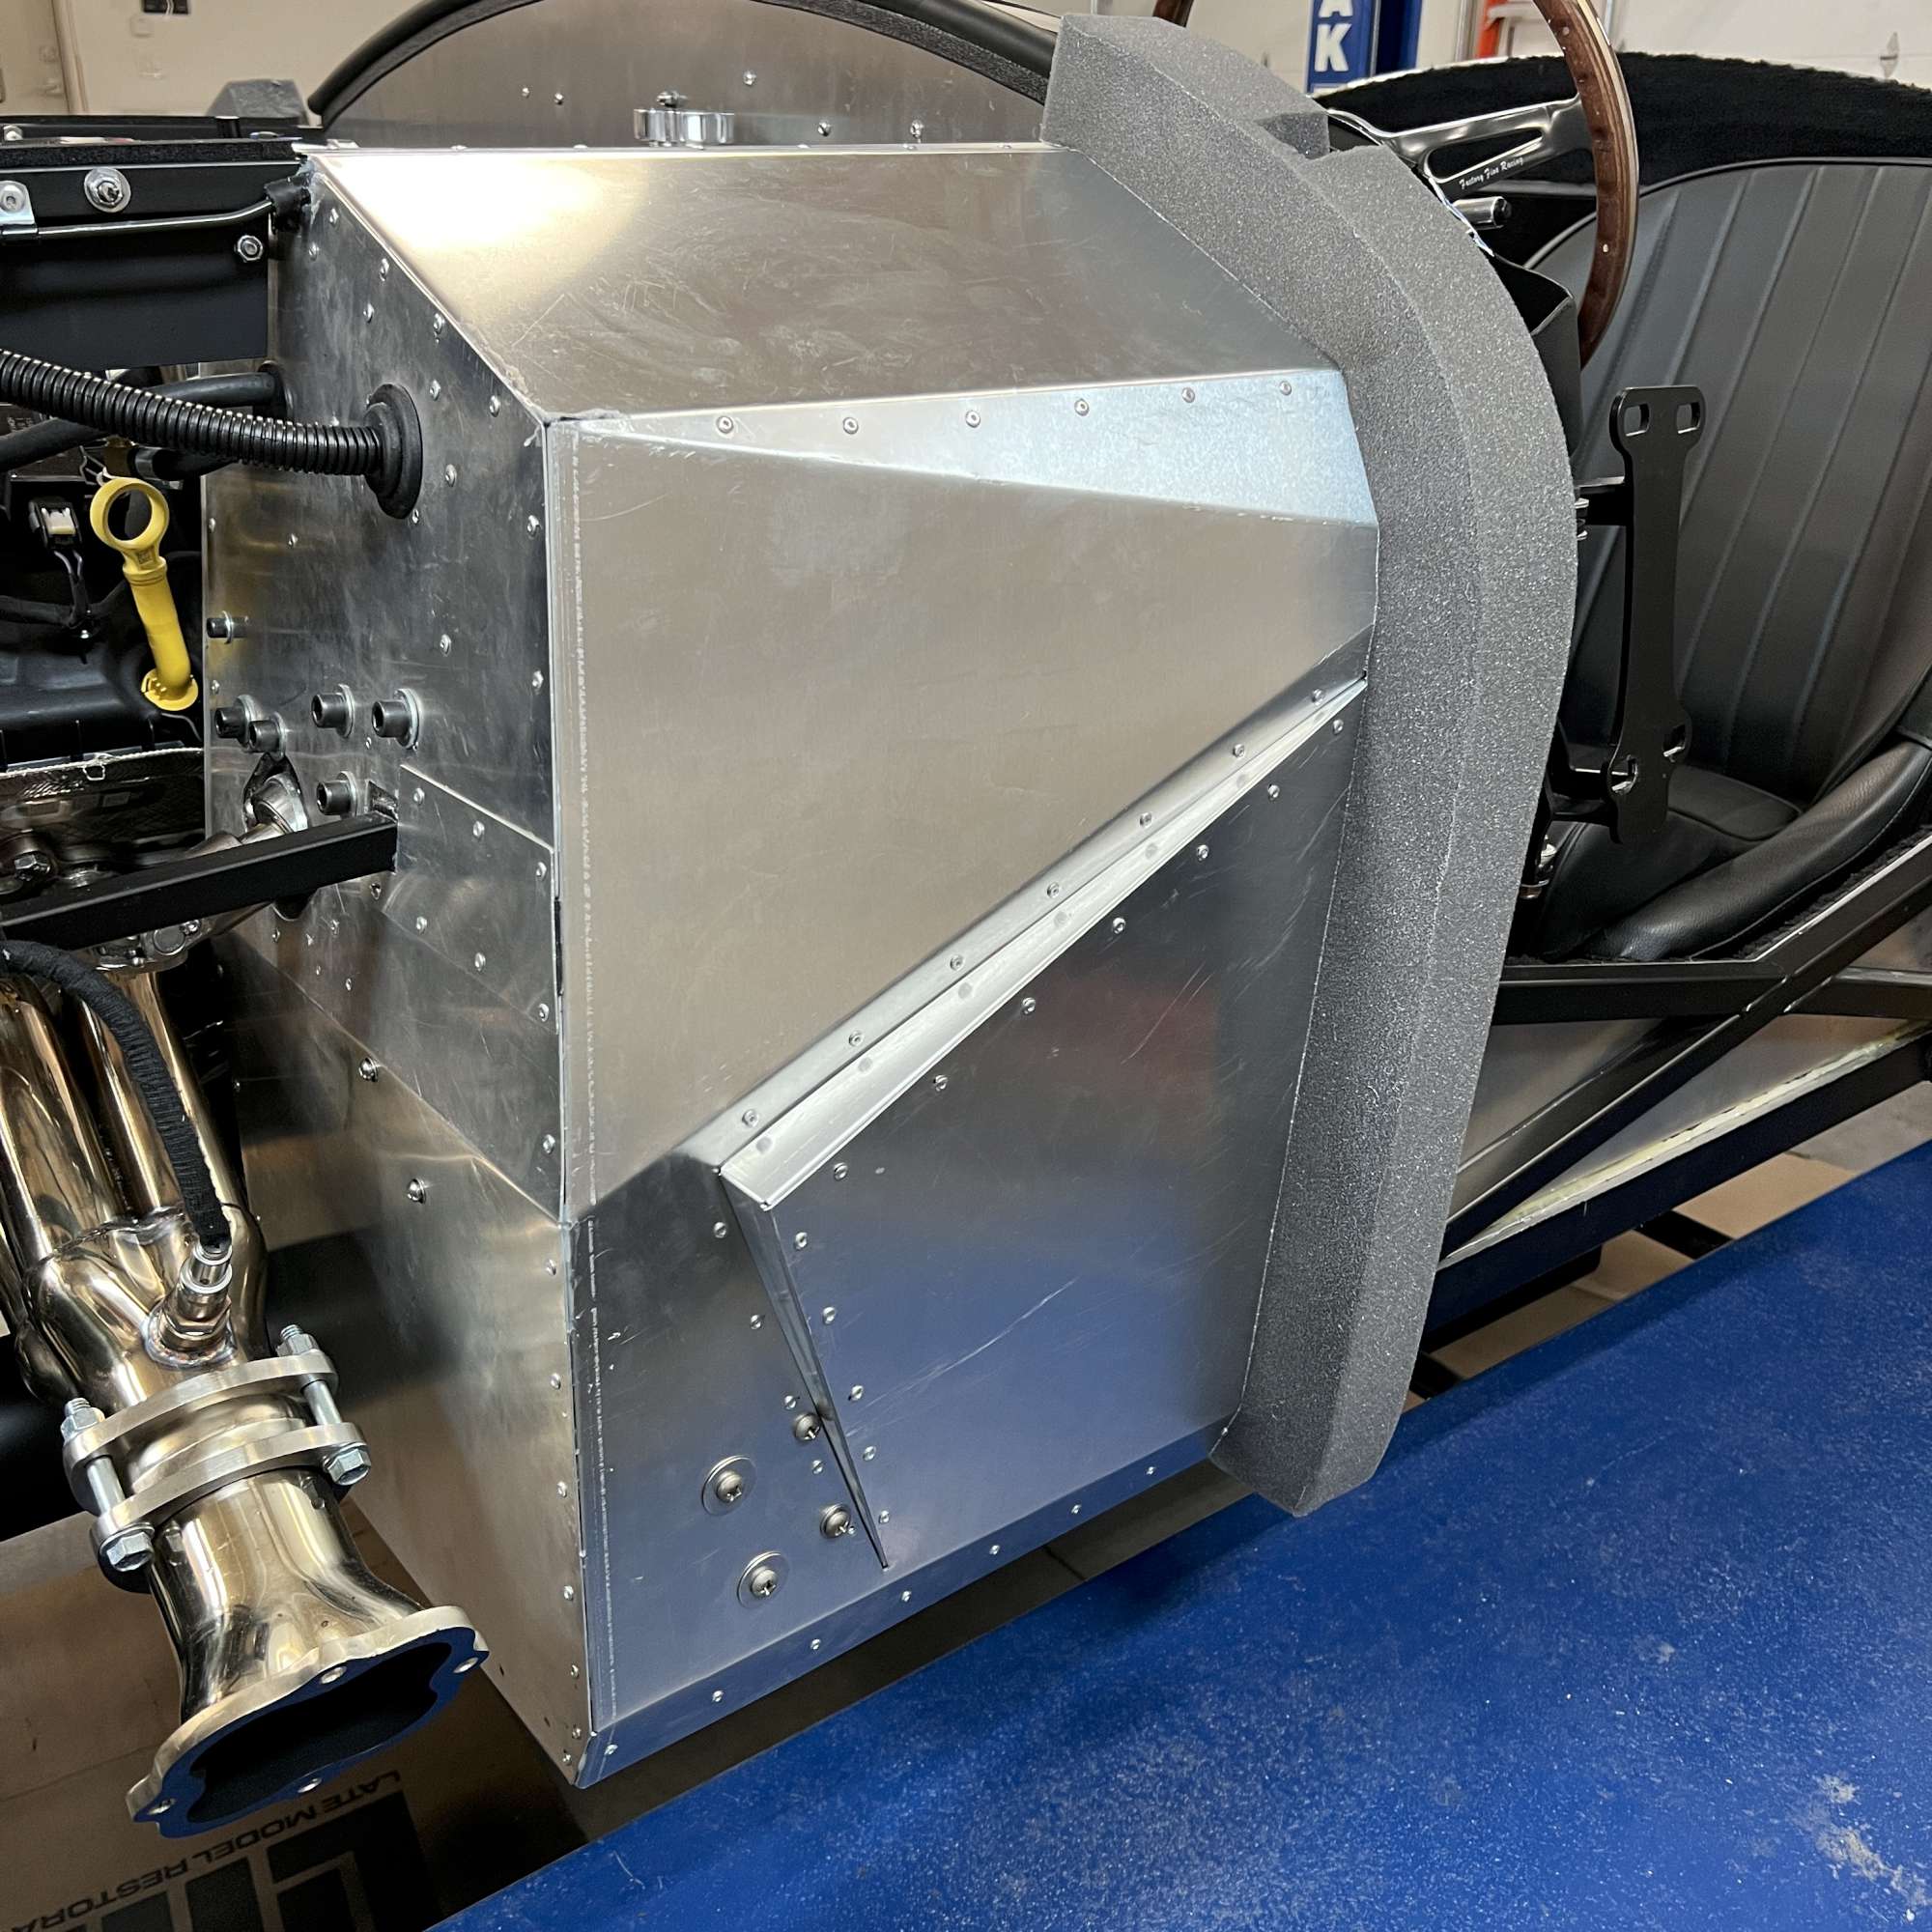
View of PS FB with foam seal.
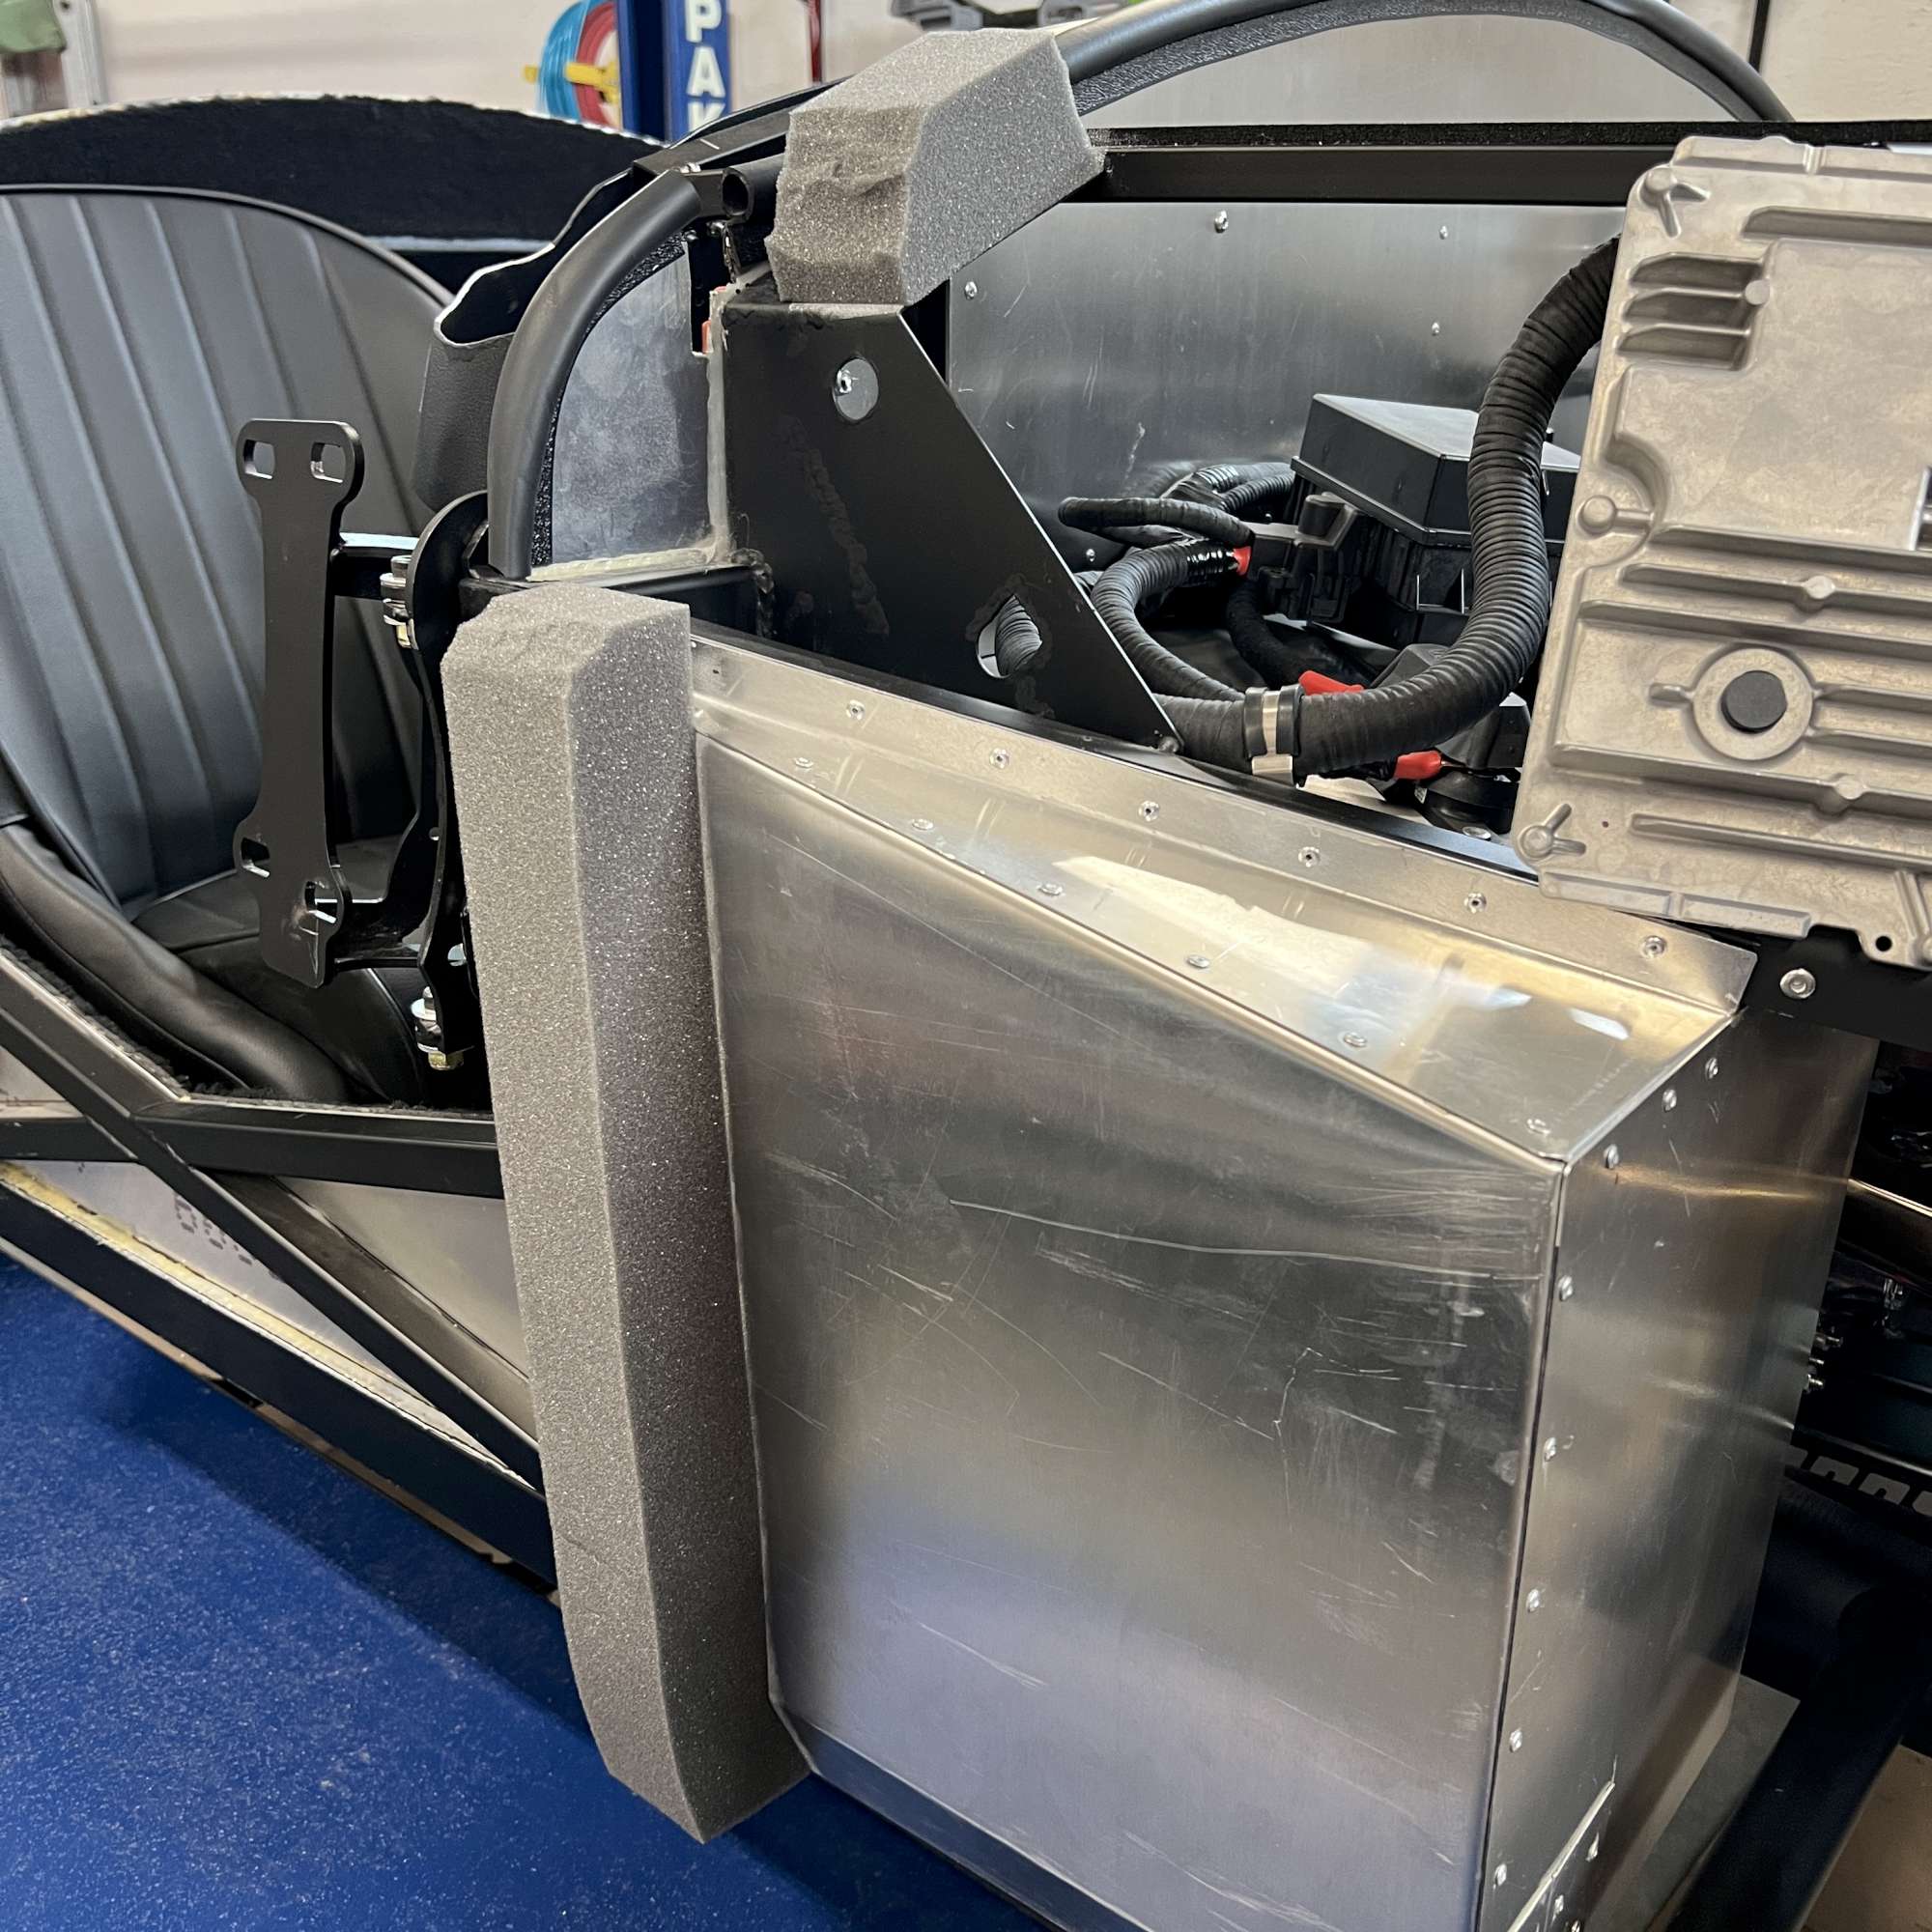
View of DS FB access cover with 10-32 SS button heads. Whoops! Too many holes drilled in the cover.

Ground connections sealed with black silicone RTV.

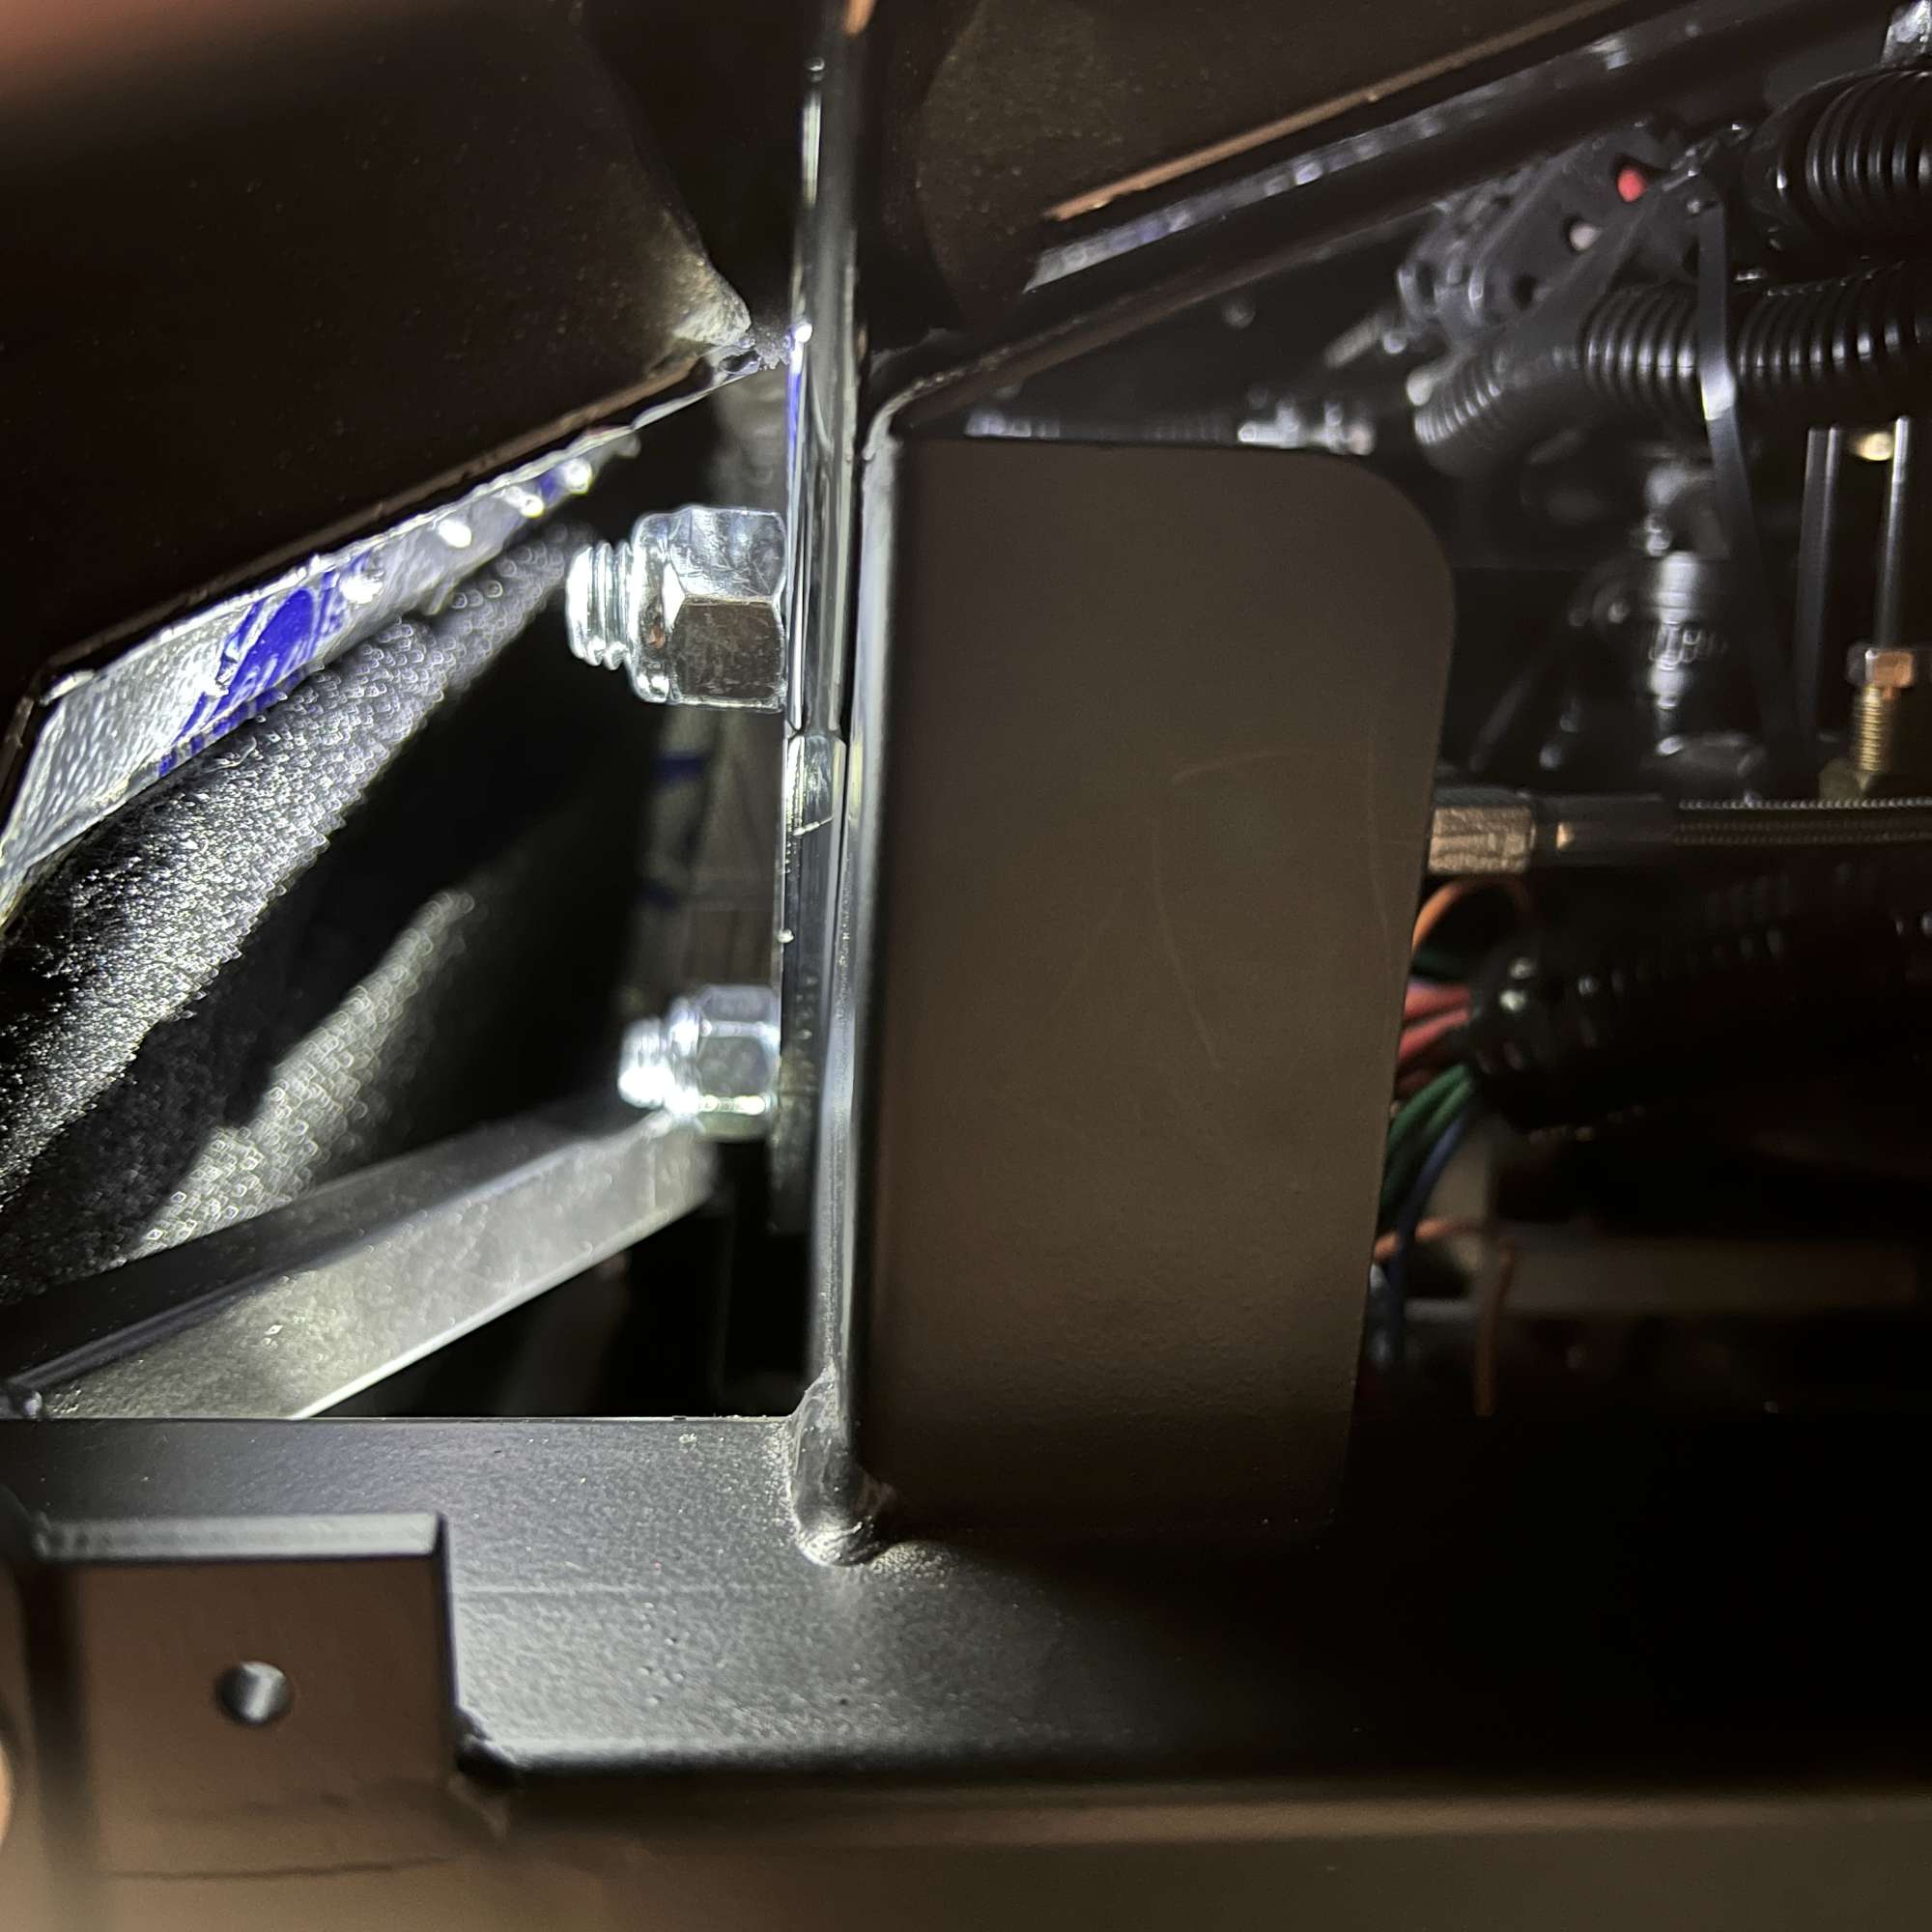
New location for the vapor canister. It's rearward from the original location to give clearance for the splash guards. Thanks to Mr. Kleiner for the location help. Also, the Lemans cap and fuel tank ground connections.

Still feels like I'm running in place with these small tasks. But the list is getting shorter.
Happy building.
Last edited by 460.465USMC; 05-29-2023 at 11:07 PM.
Chris
Coupe complete kit delivered: 4/22/24.
Build Thread. Coyote. T-56. IRS w/3.55. Wilwoods. PS. HVAC. Side windows.
MK4 Complete kit.
Build Thread Index. Delivered: 10/15/2020. Legal: 7/25/23. Coyote Gen3. TKO600 (0.64 OD). IRS w/3.55. PS. Wilwoods. Sway bars. This build is dedicated to my son, Benjamin.
Build Thread.
-
Post Thanks / Like - 0 Thanks, 2 Likes
-
06-12-2023, 04:56 PM
#630
Senior Member
Louvers, Fire Extinguisher, etc.
It's been a couple weeks, but I'm making steady progress (at a Chris rate). Quite a few things checked off my list. Many are quite small, but here are a few I could photograph.
- Doors: Sanded down horizontal lip that runs along the top inside of the doors. I also sanded a generous radius on the inside of the doors to help with clearance when opening/closing.
- Hood scoop: I managed to incorrectly order two different lengths of SS button head 10-32 screws from McMaster to secure the scoop to the hood. No one's fault but mine. The 3/4" screws were too long; the 1/2" were too short. The 5/8" version would have been perfect. So, nothing to do but cut down 19 of the 3/4" screws to the correct length. Added a dab of Loctite blue to the acorn nuts.
- Rear cockpit carpet fix. Cut back a one inch strip of carpet along the top right of the rear cockpit wall to solve this unsightly gap. (For some reason my body doesn't come over the top of the cockpit wall far enough, and stopped my carpet just shy (3/8") of the top of the wall). Glued in a replacement strip that extends above the cockpit wall. This closed the gap, but now there's a noticeable line where the new strip meets the old. Ugh: fixed the head of that issue, but then the tail fell off.
- Leveled headers: my PS header was almost 1.5" higher than DS header. I loosened the motor mount nuts and lifted on DS header by hand. The motor rotated toward the PS surprisingly easily. Unfortunately, the motor mount pin bottomed out on the PS. The DS needs to rotate up another 5/16" for both sides to be level. I should get some additional help from the adjustable ball flange, but my guess is it won't be perfect. We'll see how close when I remount the side exhaust in the near future. Note to self: level the headers during drivetrain install. Wish I would have thought about that at the time.
- Louvers: installed the louvers with 10-32 perforated studs and HSRF. First time using that product. I like it because it dries fast (sandable in 30 min), but still has a reasonable amount of working time (10 min). Ventilation is important given the fumes. Painted over HSRF with flat black to match the Dupli-color underbody coating reasonably close.
- Fire extinguisher: I like Fman's setup. Tapped 1/4"-20 holes into the 2"x3" chassis behind the cockpit wall, and secured with flat head screws. It came with stainless hose clamps, but I'm trying the black cable ties for now. These come in Red, Black, Chrome, or Platinum colors, and prices differ based upon the finish (chrome=$$$$).
Sanded down seam where fiberglass sections come together. This way I won't lose as much bark from the side of my side arm while driving in gel coat.

The best way I've found so far to cut down screws is to find a piece of scrap metal, and drill a hole the same diameter of the screw. Then thread a nut to hold it securely while cutting. This particular piece of scrap also has a 1/4" hole that's beveled to cut down button head or flat head 1/4" screws. The angle grinder makes quick work of the removal. Then I file the end square with a flat file, and remove any burs. Then hit it briefly with a tap to true-up the threads. If I had a dollar for every fastener I've cut to size on this build...

I followed the perforated stud approach to mount the louvers. Note to self: save yourself some time and redo by installing these before applying body undercoating.

Here's a view of the PS louver installed looking from inside the body.
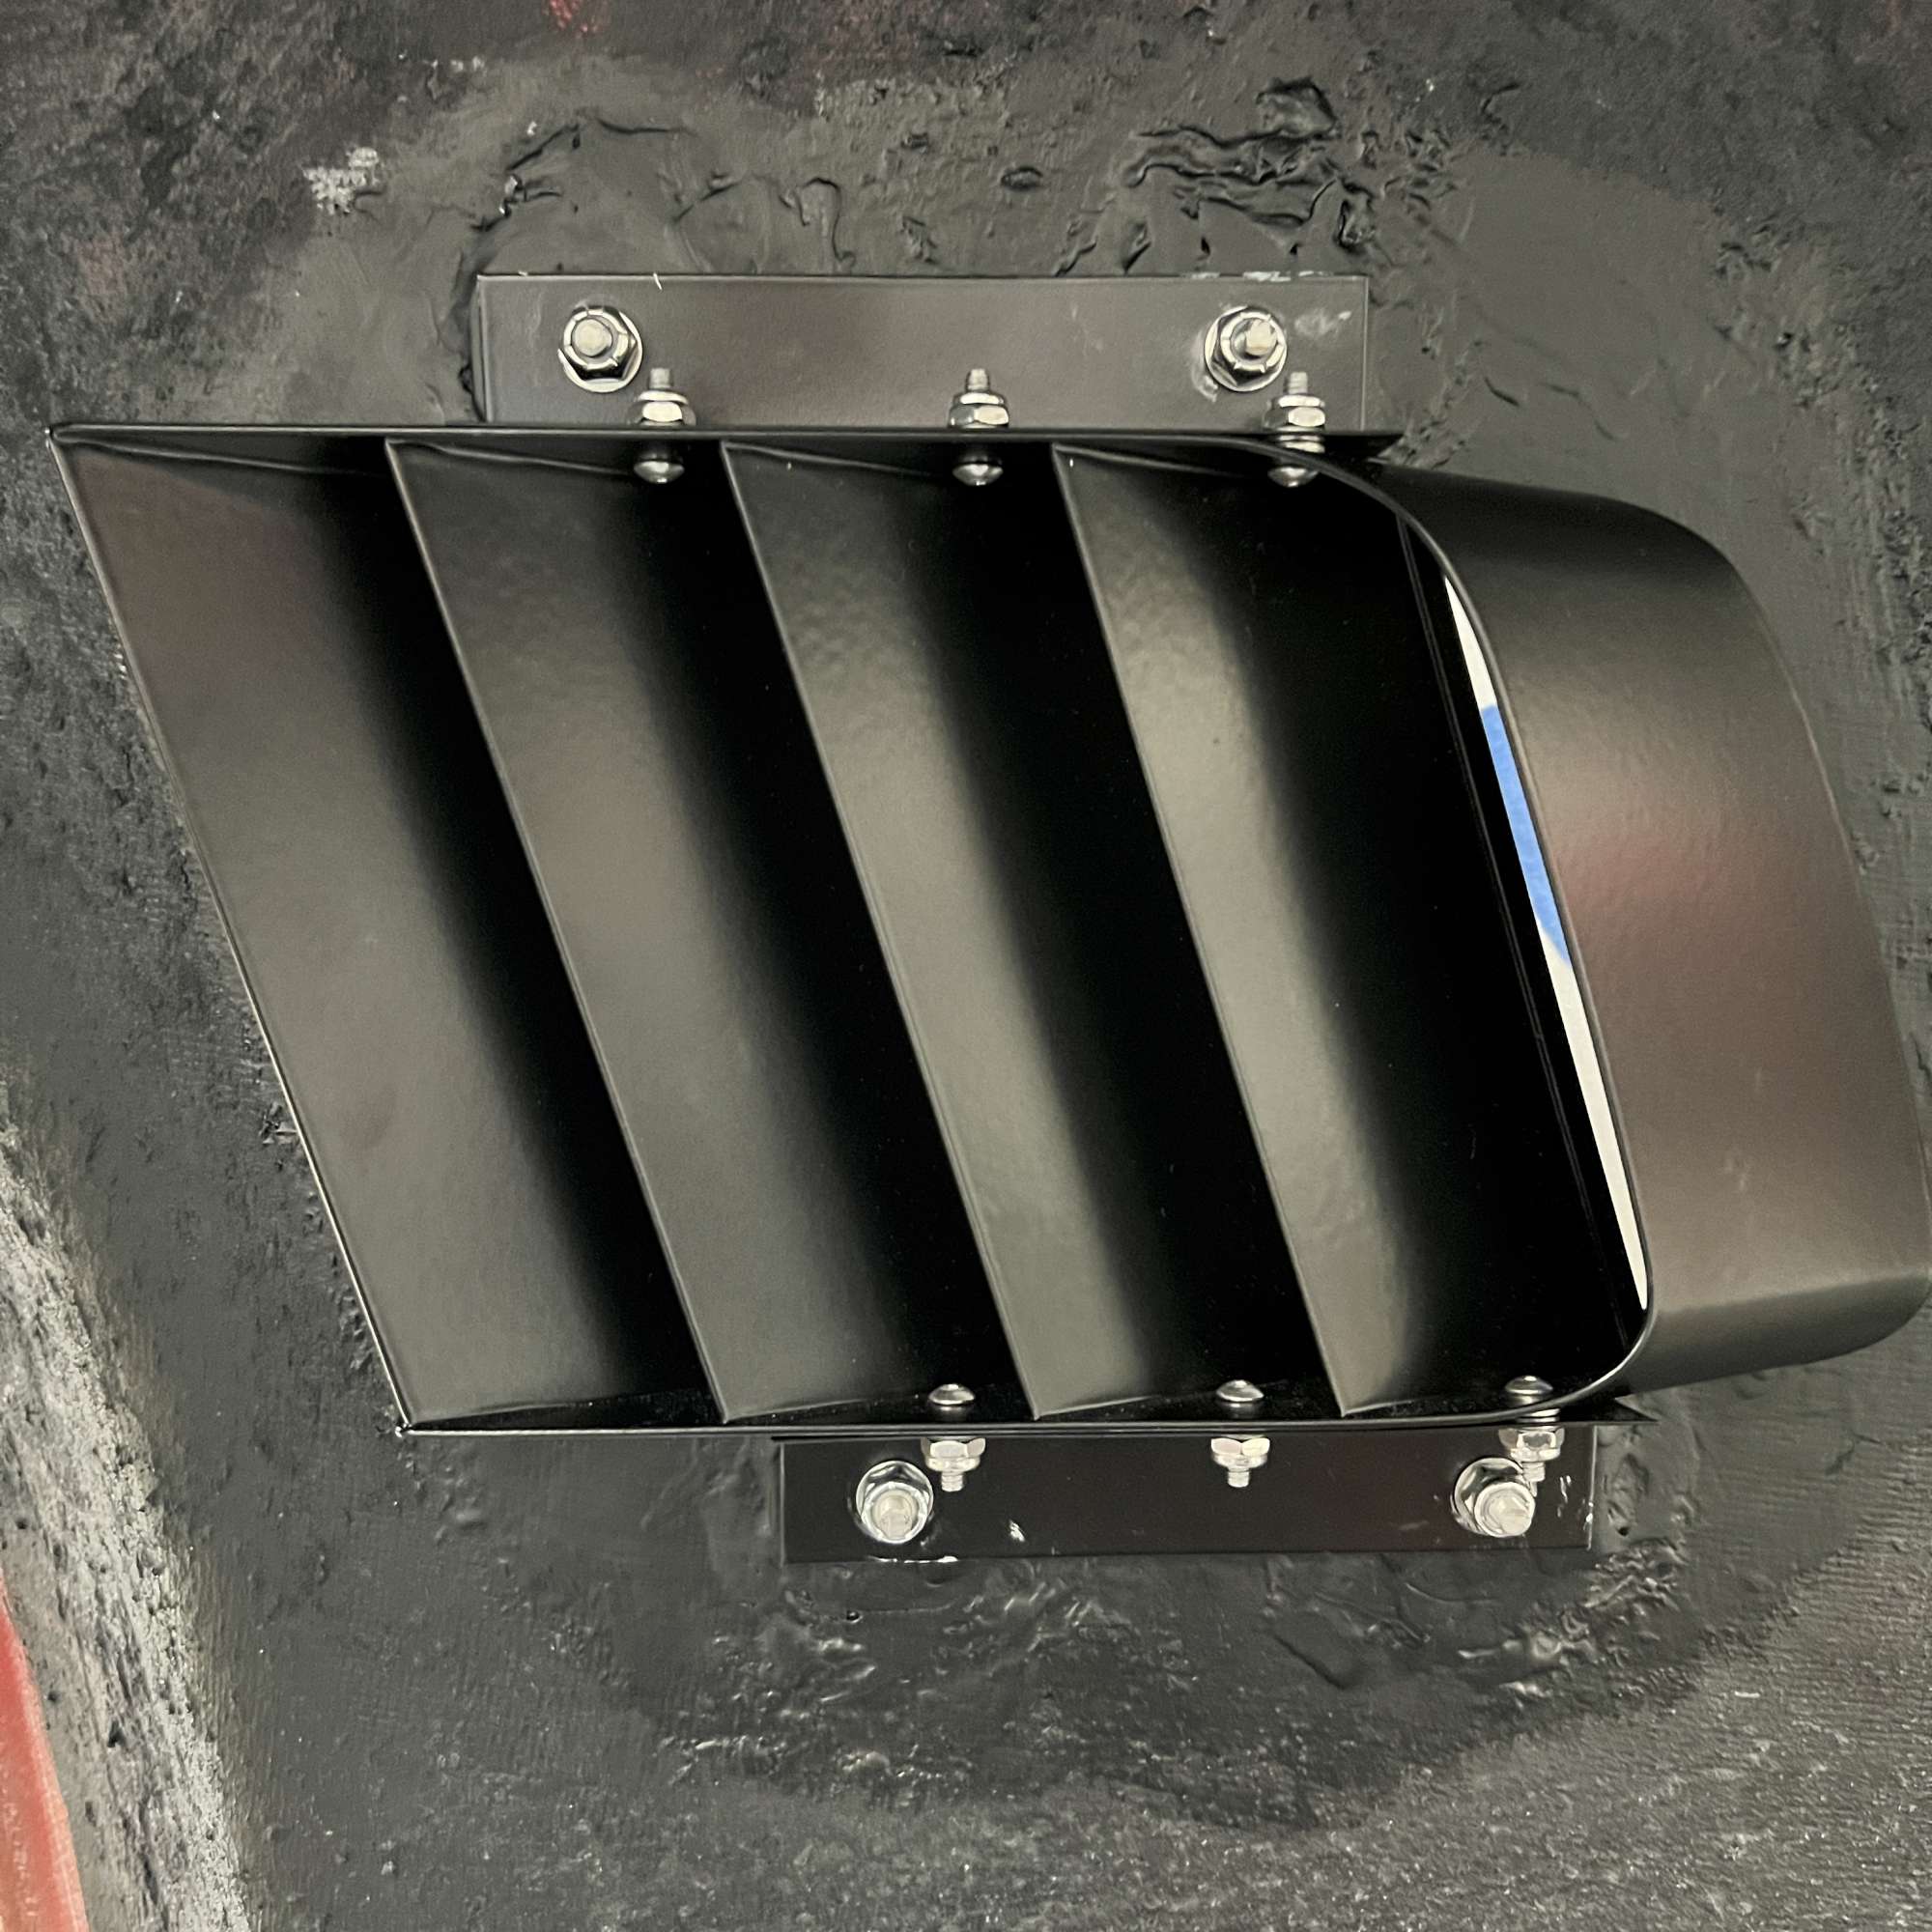
View of the DS louver installed. These are the assembled version available from F5. The openings F5 cut needed massaging to get them equal distance from the outer edges to the fins on the sides, and to get the top and side angles parallel to each other.

Fire extinguisher installed between the seats.
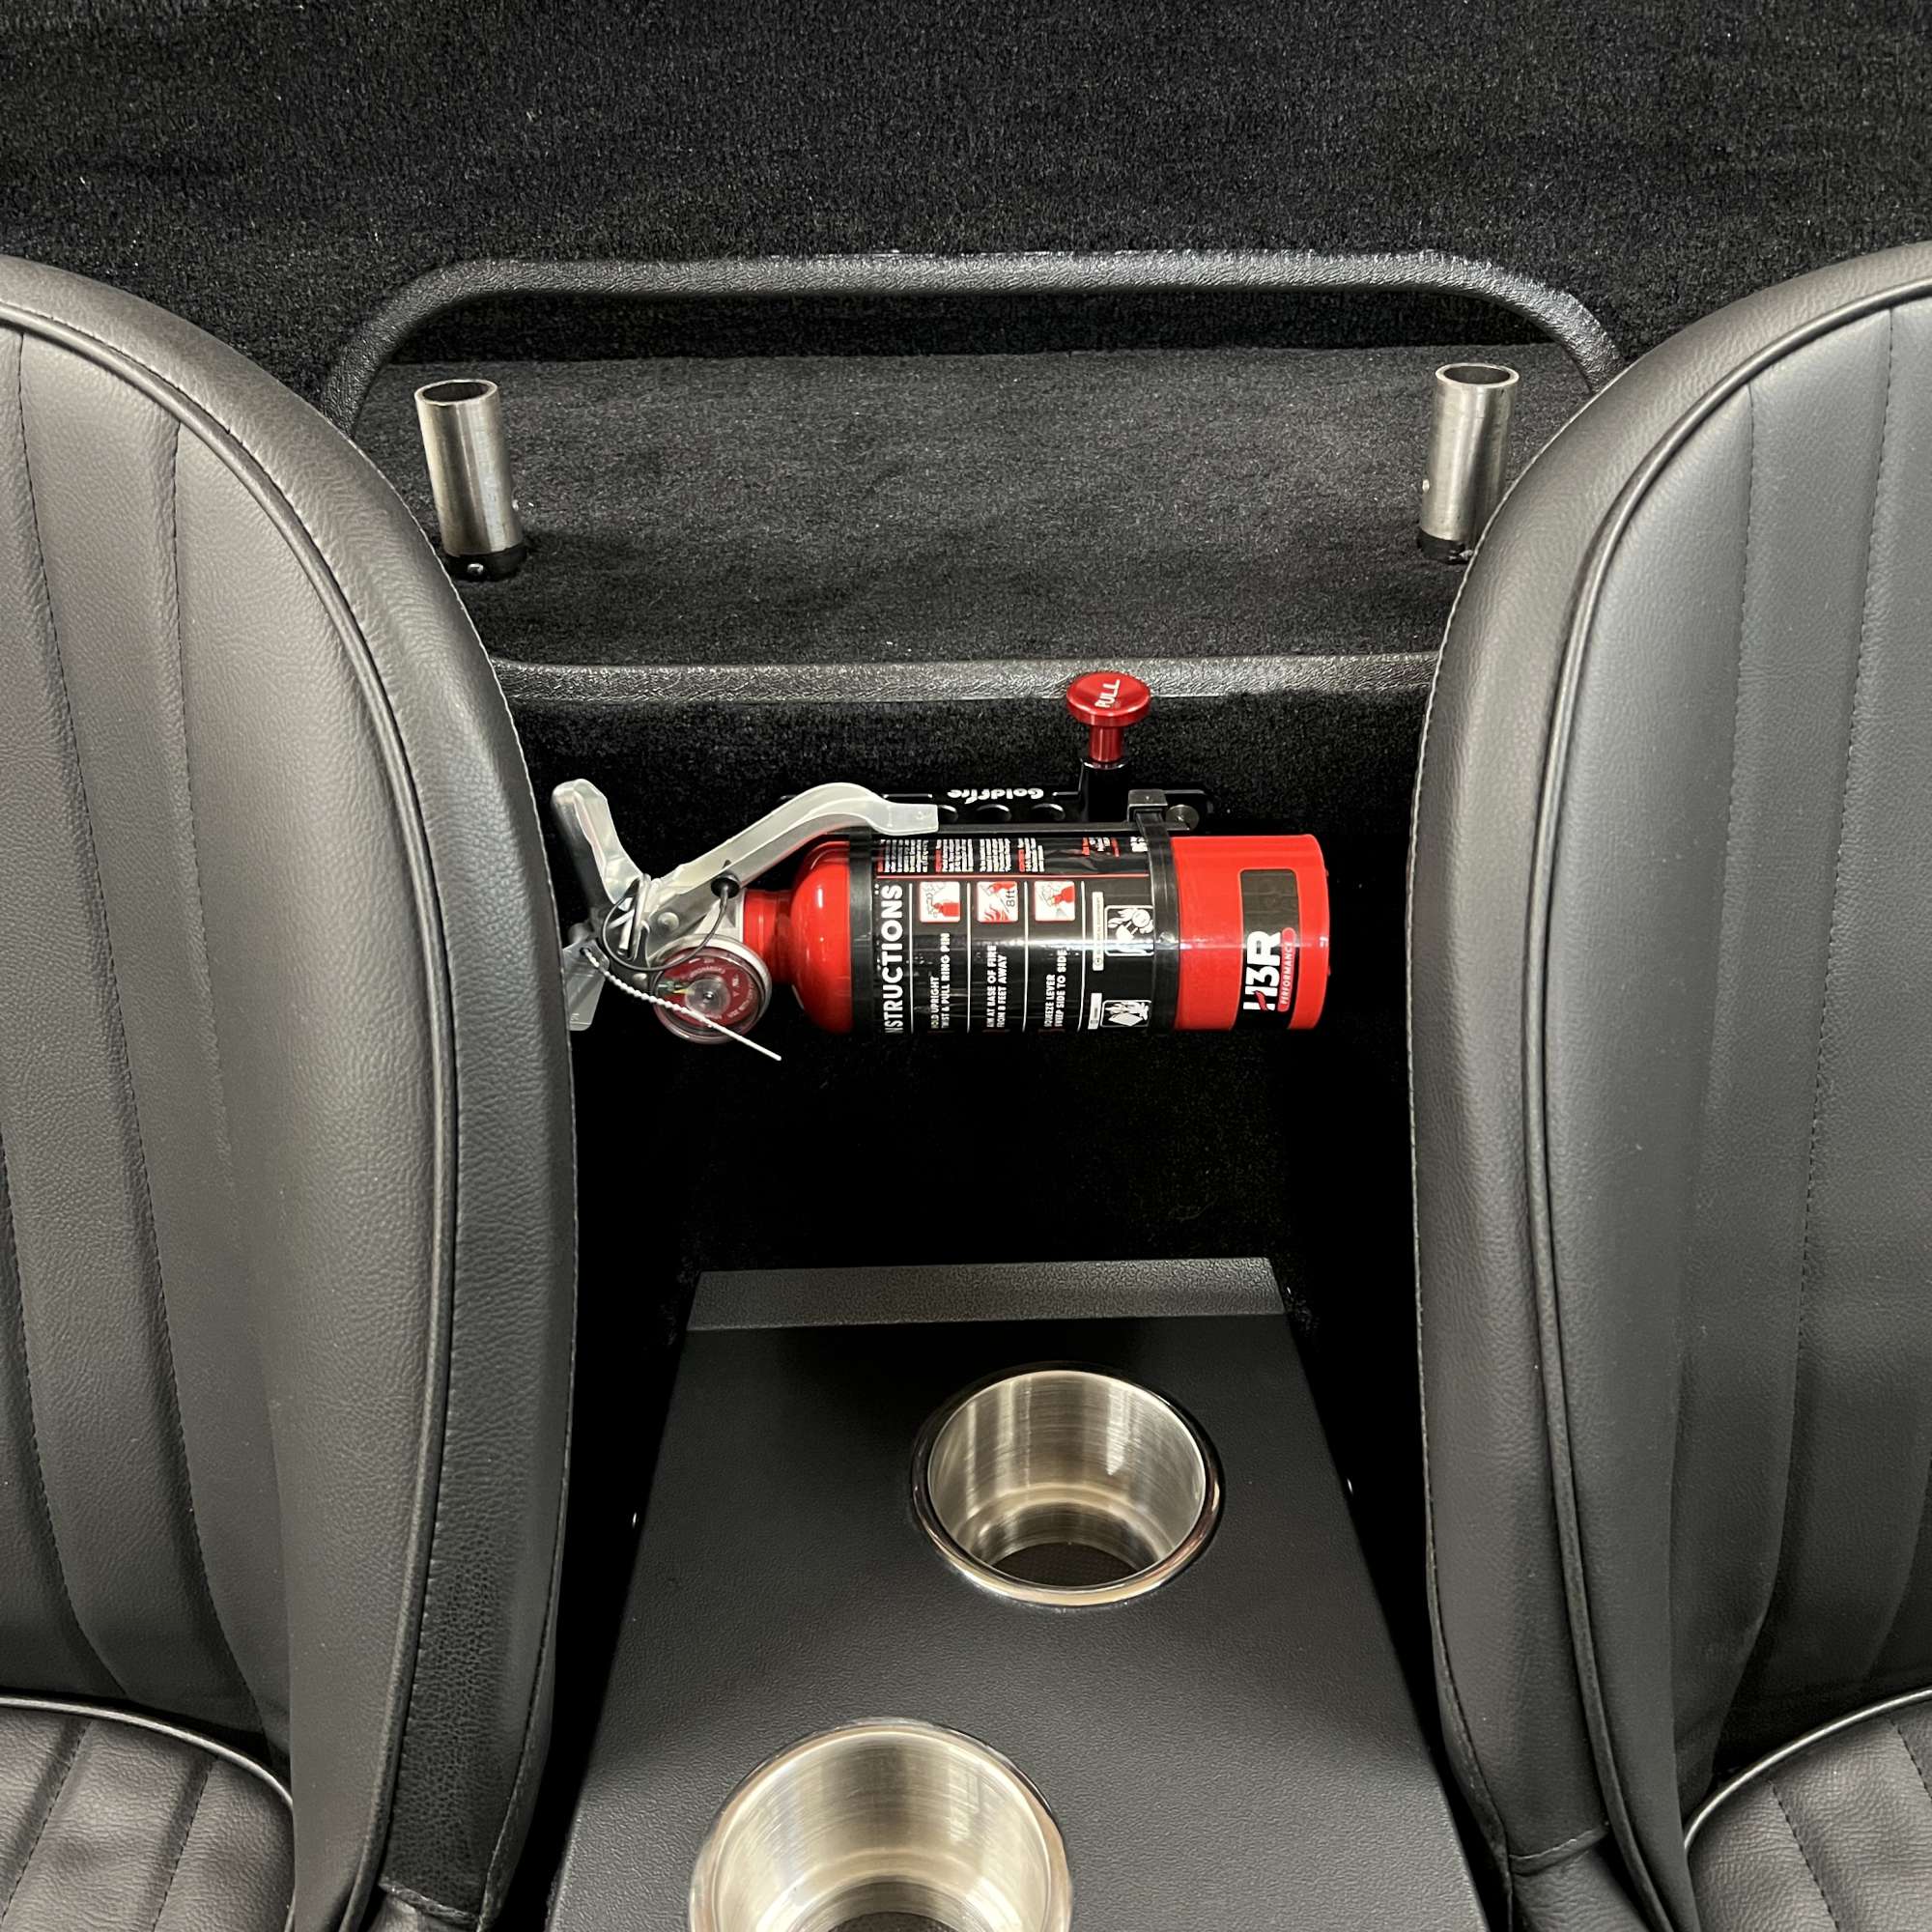
View of the mounting bracket from the top. I have since removed the plastic cable tie.

I have several items in flight. Hope to wrap up a number of these items soon, including Vinegaroon of leather door check straps and lap belts, finalize seat harness install, etc. I just got the body back on yesterday for the final time (hopefully!). That feels good.
Happy building!
Last edited by 460.465USMC; 06-13-2023 at 09:10 AM.
Chris
Coupe complete kit delivered: 4/22/24.
Build Thread. Coyote. T-56. IRS w/3.55. Wilwoods. PS. HVAC. Side windows.
MK4 Complete kit.
Build Thread Index. Delivered: 10/15/2020. Legal: 7/25/23. Coyote Gen3. TKO600 (0.64 OD). IRS w/3.55. PS. Wilwoods. Sway bars. This build is dedicated to my son, Benjamin.
Build Thread.
-
Post Thanks / Like - 1 Thanks, 2 Likes
 Moniz
Moniz thanked for this post
-
06-12-2023, 06:48 PM
#631
Good update on the latest details
I suppose I could look on the FFR website, but it surprised me that you wrote they offer a different set of louvers(the assembled version). I had heard of other vendors that offered them.
It might be something I consider since the kit-supplied louvers seem flimsy...was that the reason you went with a different set?
Craig C
-
Post Thanks / Like - 1 Thanks, 0 Likes
-
06-13-2023, 09:03 AM
#632
Senior Member
Hi Craig. Yes, that's correct. I also think the kit supplied louvers are a bit flimsy, and did not have confidence my hand-bending of the fins would come out reasonably well. They sell the set for $85 (plus shipping). Check out the link here: https://www.factoryfiveparts.com/156...de-louver-set/. I don't know how these compare to other vendors' louvers, but I'm pretty happy with the quality from F5.
Chris
Coupe complete kit delivered: 4/22/24.
Build Thread. Coyote. T-56. IRS w/3.55. Wilwoods. PS. HVAC. Side windows.
MK4 Complete kit.
Build Thread Index. Delivered: 10/15/2020. Legal: 7/25/23. Coyote Gen3. TKO600 (0.64 OD). IRS w/3.55. PS. Wilwoods. Sway bars. This build is dedicated to my son, Benjamin.
Build Thread.
-
Post Thanks / Like - 1 Thanks, 0 Likes
-
06-26-2023, 02:24 PM
#633
Senior Member
Windshield, Roll Bars, Seats/Harnesses, Trunk Lid - Part 1
Last time, I mentioned the body was back on for good (hopefully). It's a great site to see. From there I moved on to the following:
- Windshield
- Vinegaroon: I went with this option because I like the contrast of the white stitching against the black. I'm not sure if I didn't have the vinegar to steel wool proportions correct, but my size 00 steel wool didn't breakdown very well in the white vinegar. Even after a couple weeks. It looks okay, I guess, but not sure I would do this again. Here's a link I found on the forum quite a while back that describes vinegaroon.
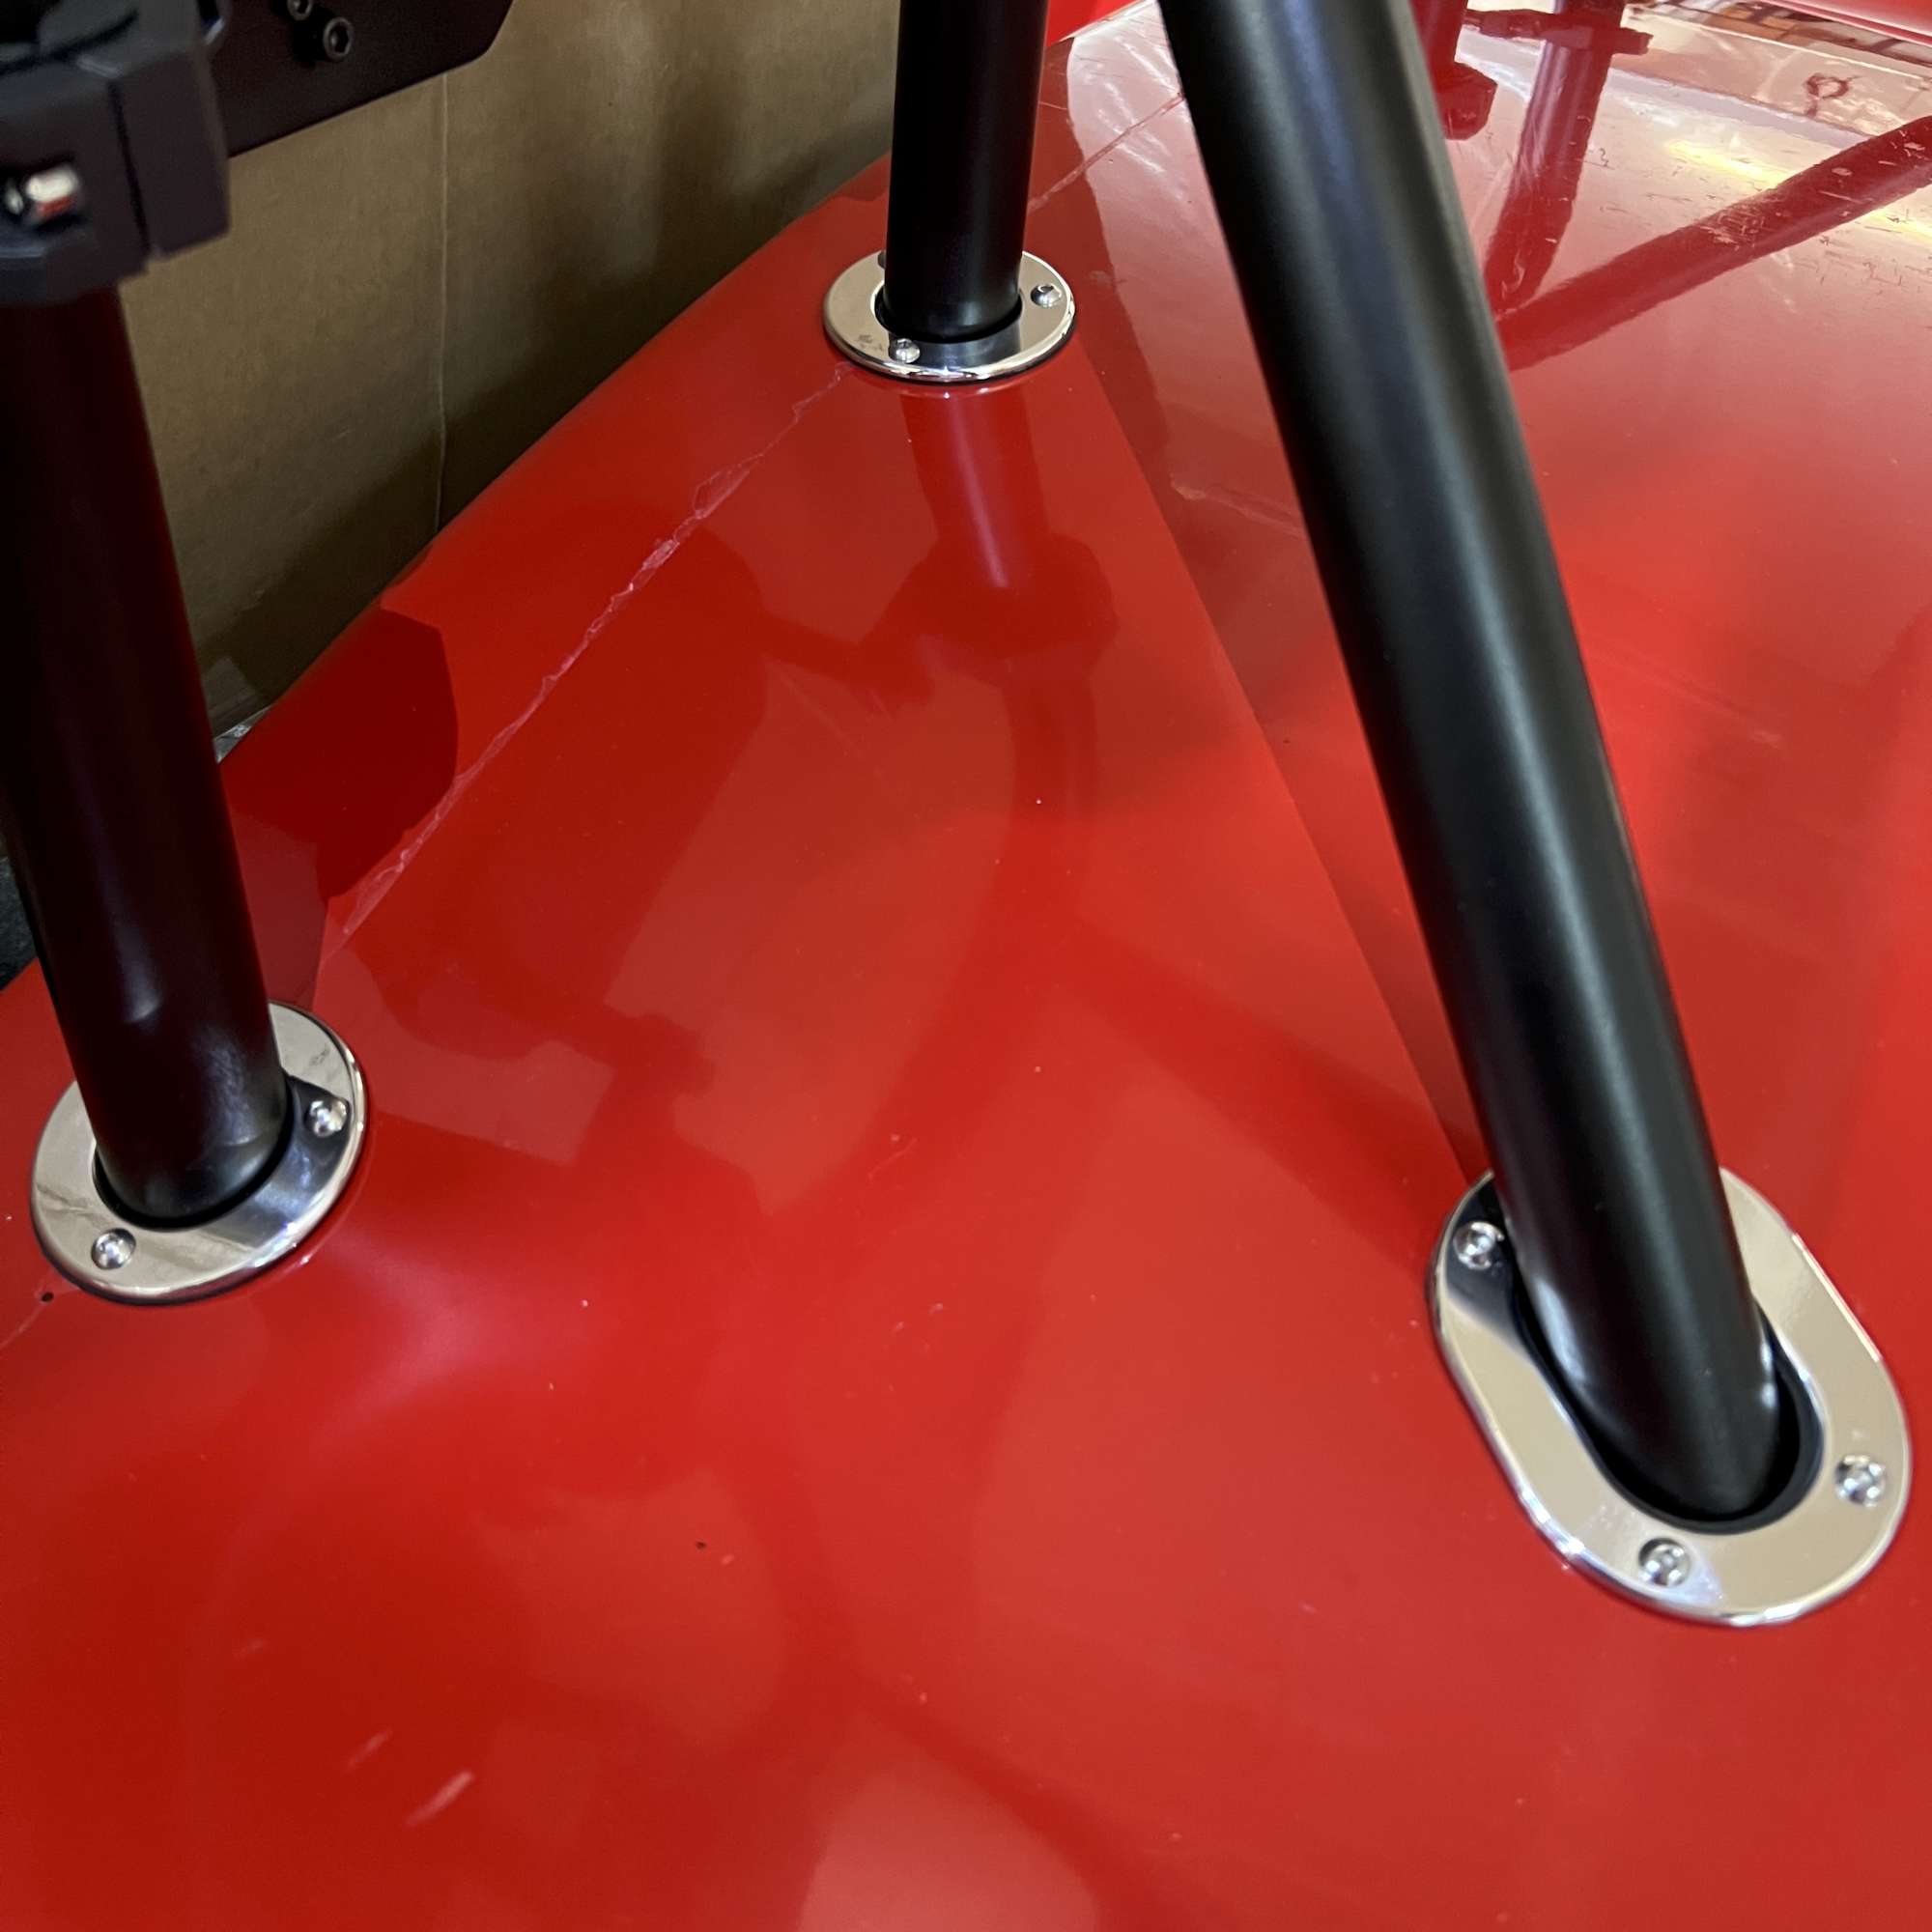
- Roll bars: I previously drilled the roll bars, so the challenge at this point was more the trim rings. I bought all my trim rings (and harness trim plates) from Replicaparts (Mike Everson). (Compared to the F5 trim rings, I noticed they show much less rubber between the roll bar and the metal ring). I opted to use some 3/4" 10-32 SS button heads and locknuts I had on hand instead of the supplied SS taper head screws. I can confirm marking, drilling, and installing the rings is tedious work. Glad I went slow and took my time. As other builders have noted, there are a couple locations that are particularly difficult to get the nut on.
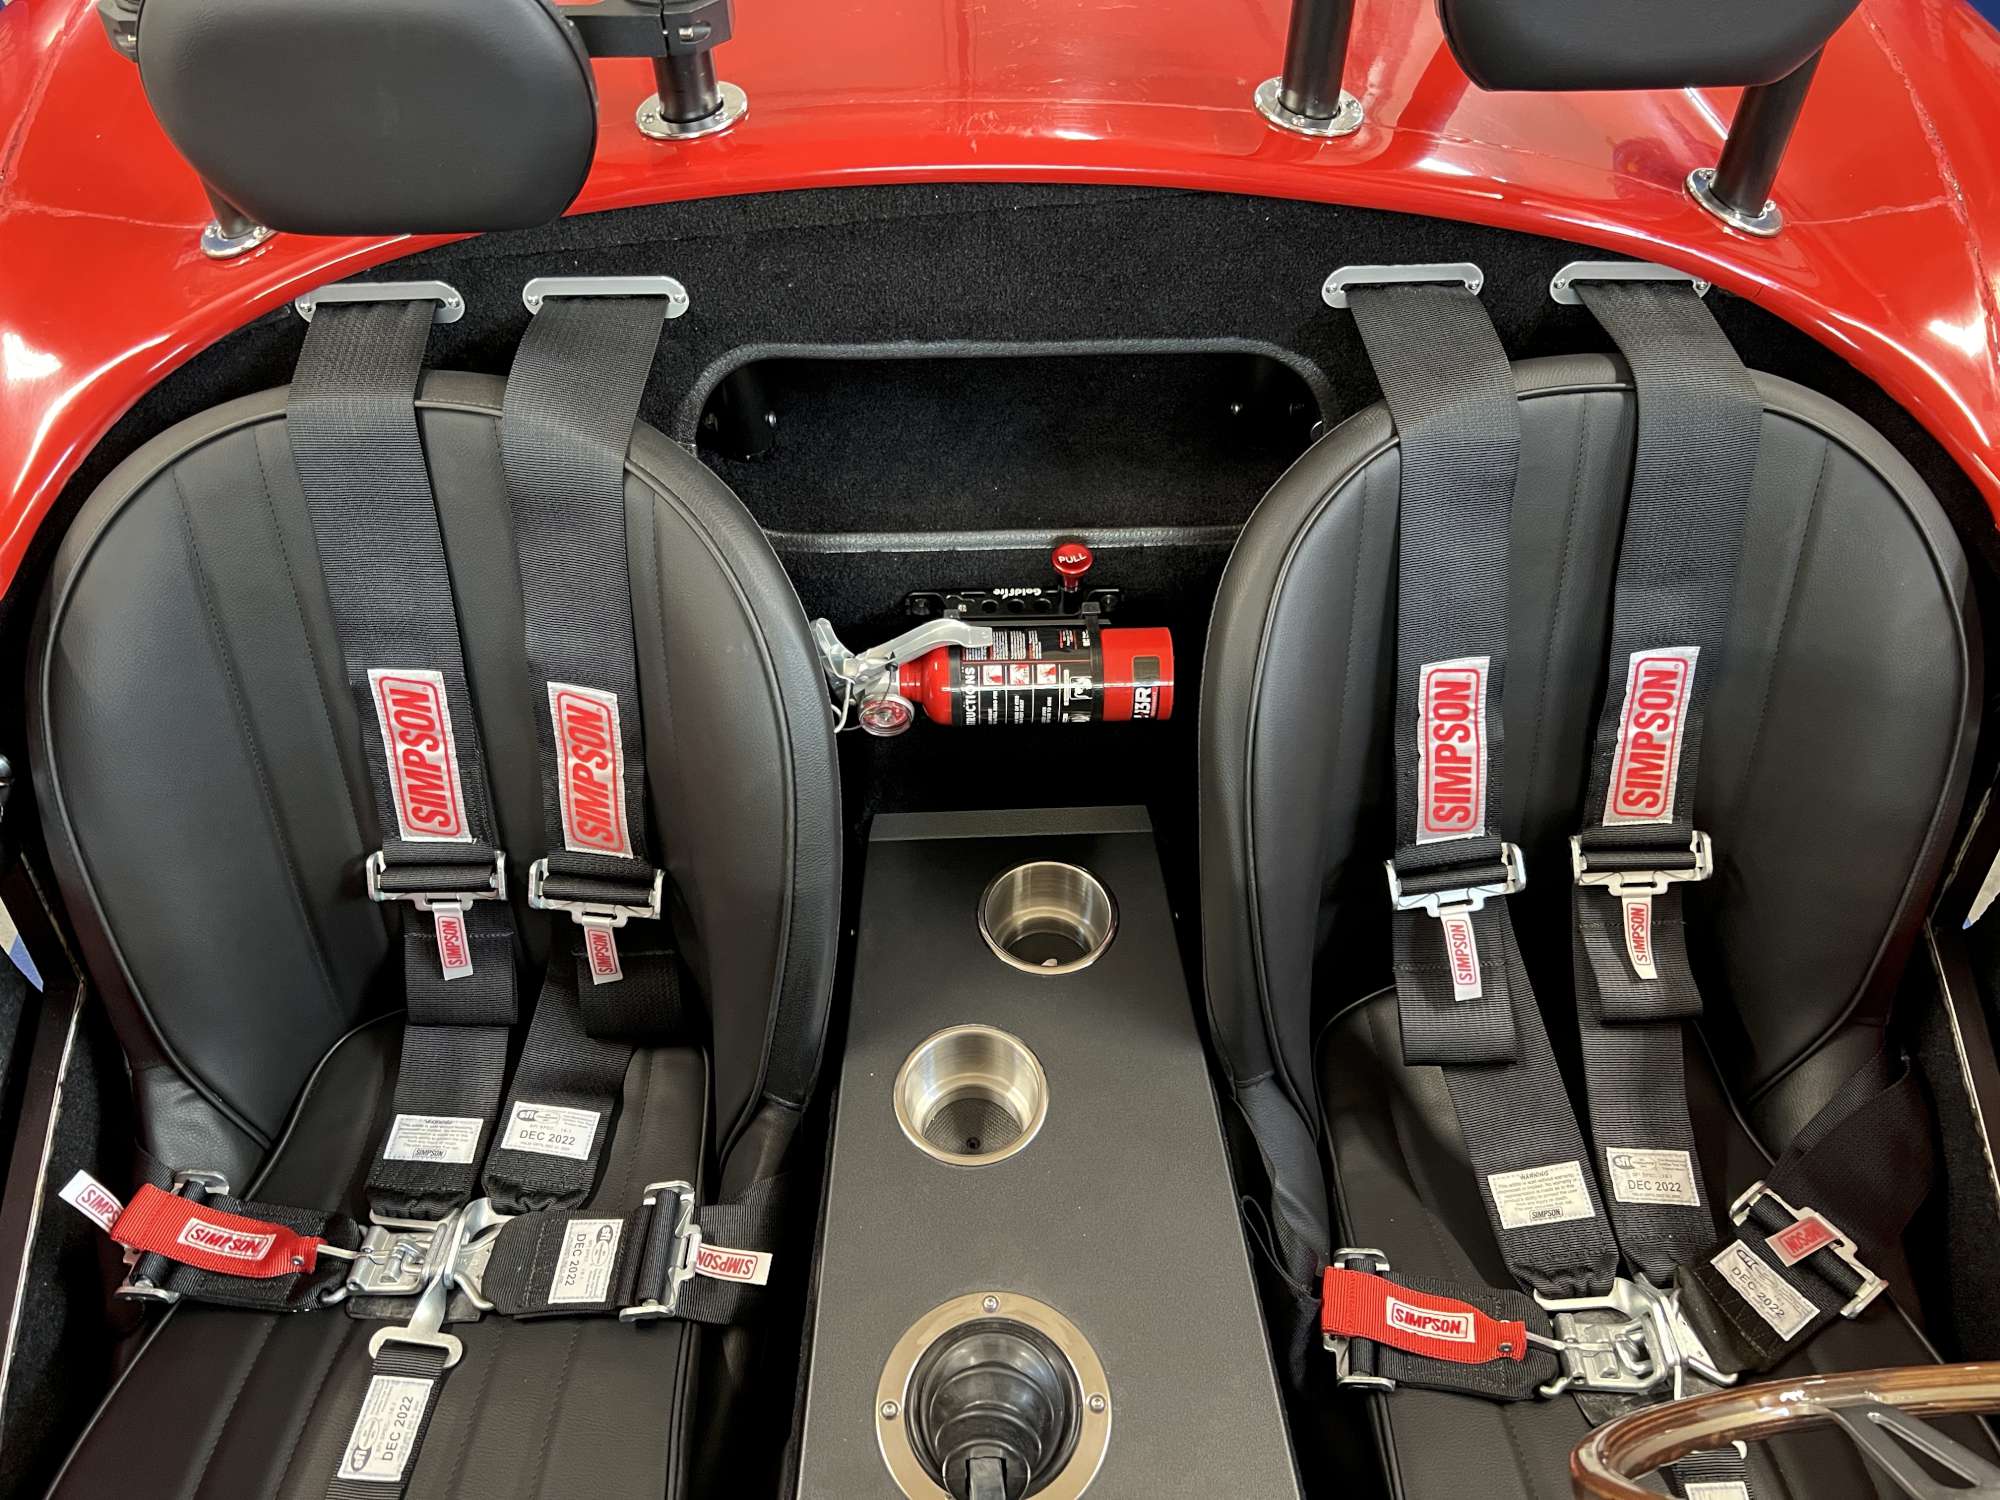
- Seat Harnesses. I anchored the sub belt through the Breeze steel seat base, and down through the steel floor pan. Used 8-32 SS button heads with nylon lock nuts to secure the trim plates.
- Seats: With the Breeze seat bases previously installed, the seats went in without fanfare. Just had to clip the seat cushion down onto the bar on the bottom side of the frame, and route the seat heater wire through a hole I cut in the ABS plastic. In a previous post, I showed how I swapped the Breeze supplied hardboard for ABS plastic based upon advice from the forum (water could be an issue with the hardboard).
- Trunk lid access panel: used a 5 gallon bucket to bend the panel around to get it close to the same curve as the trunk lid.
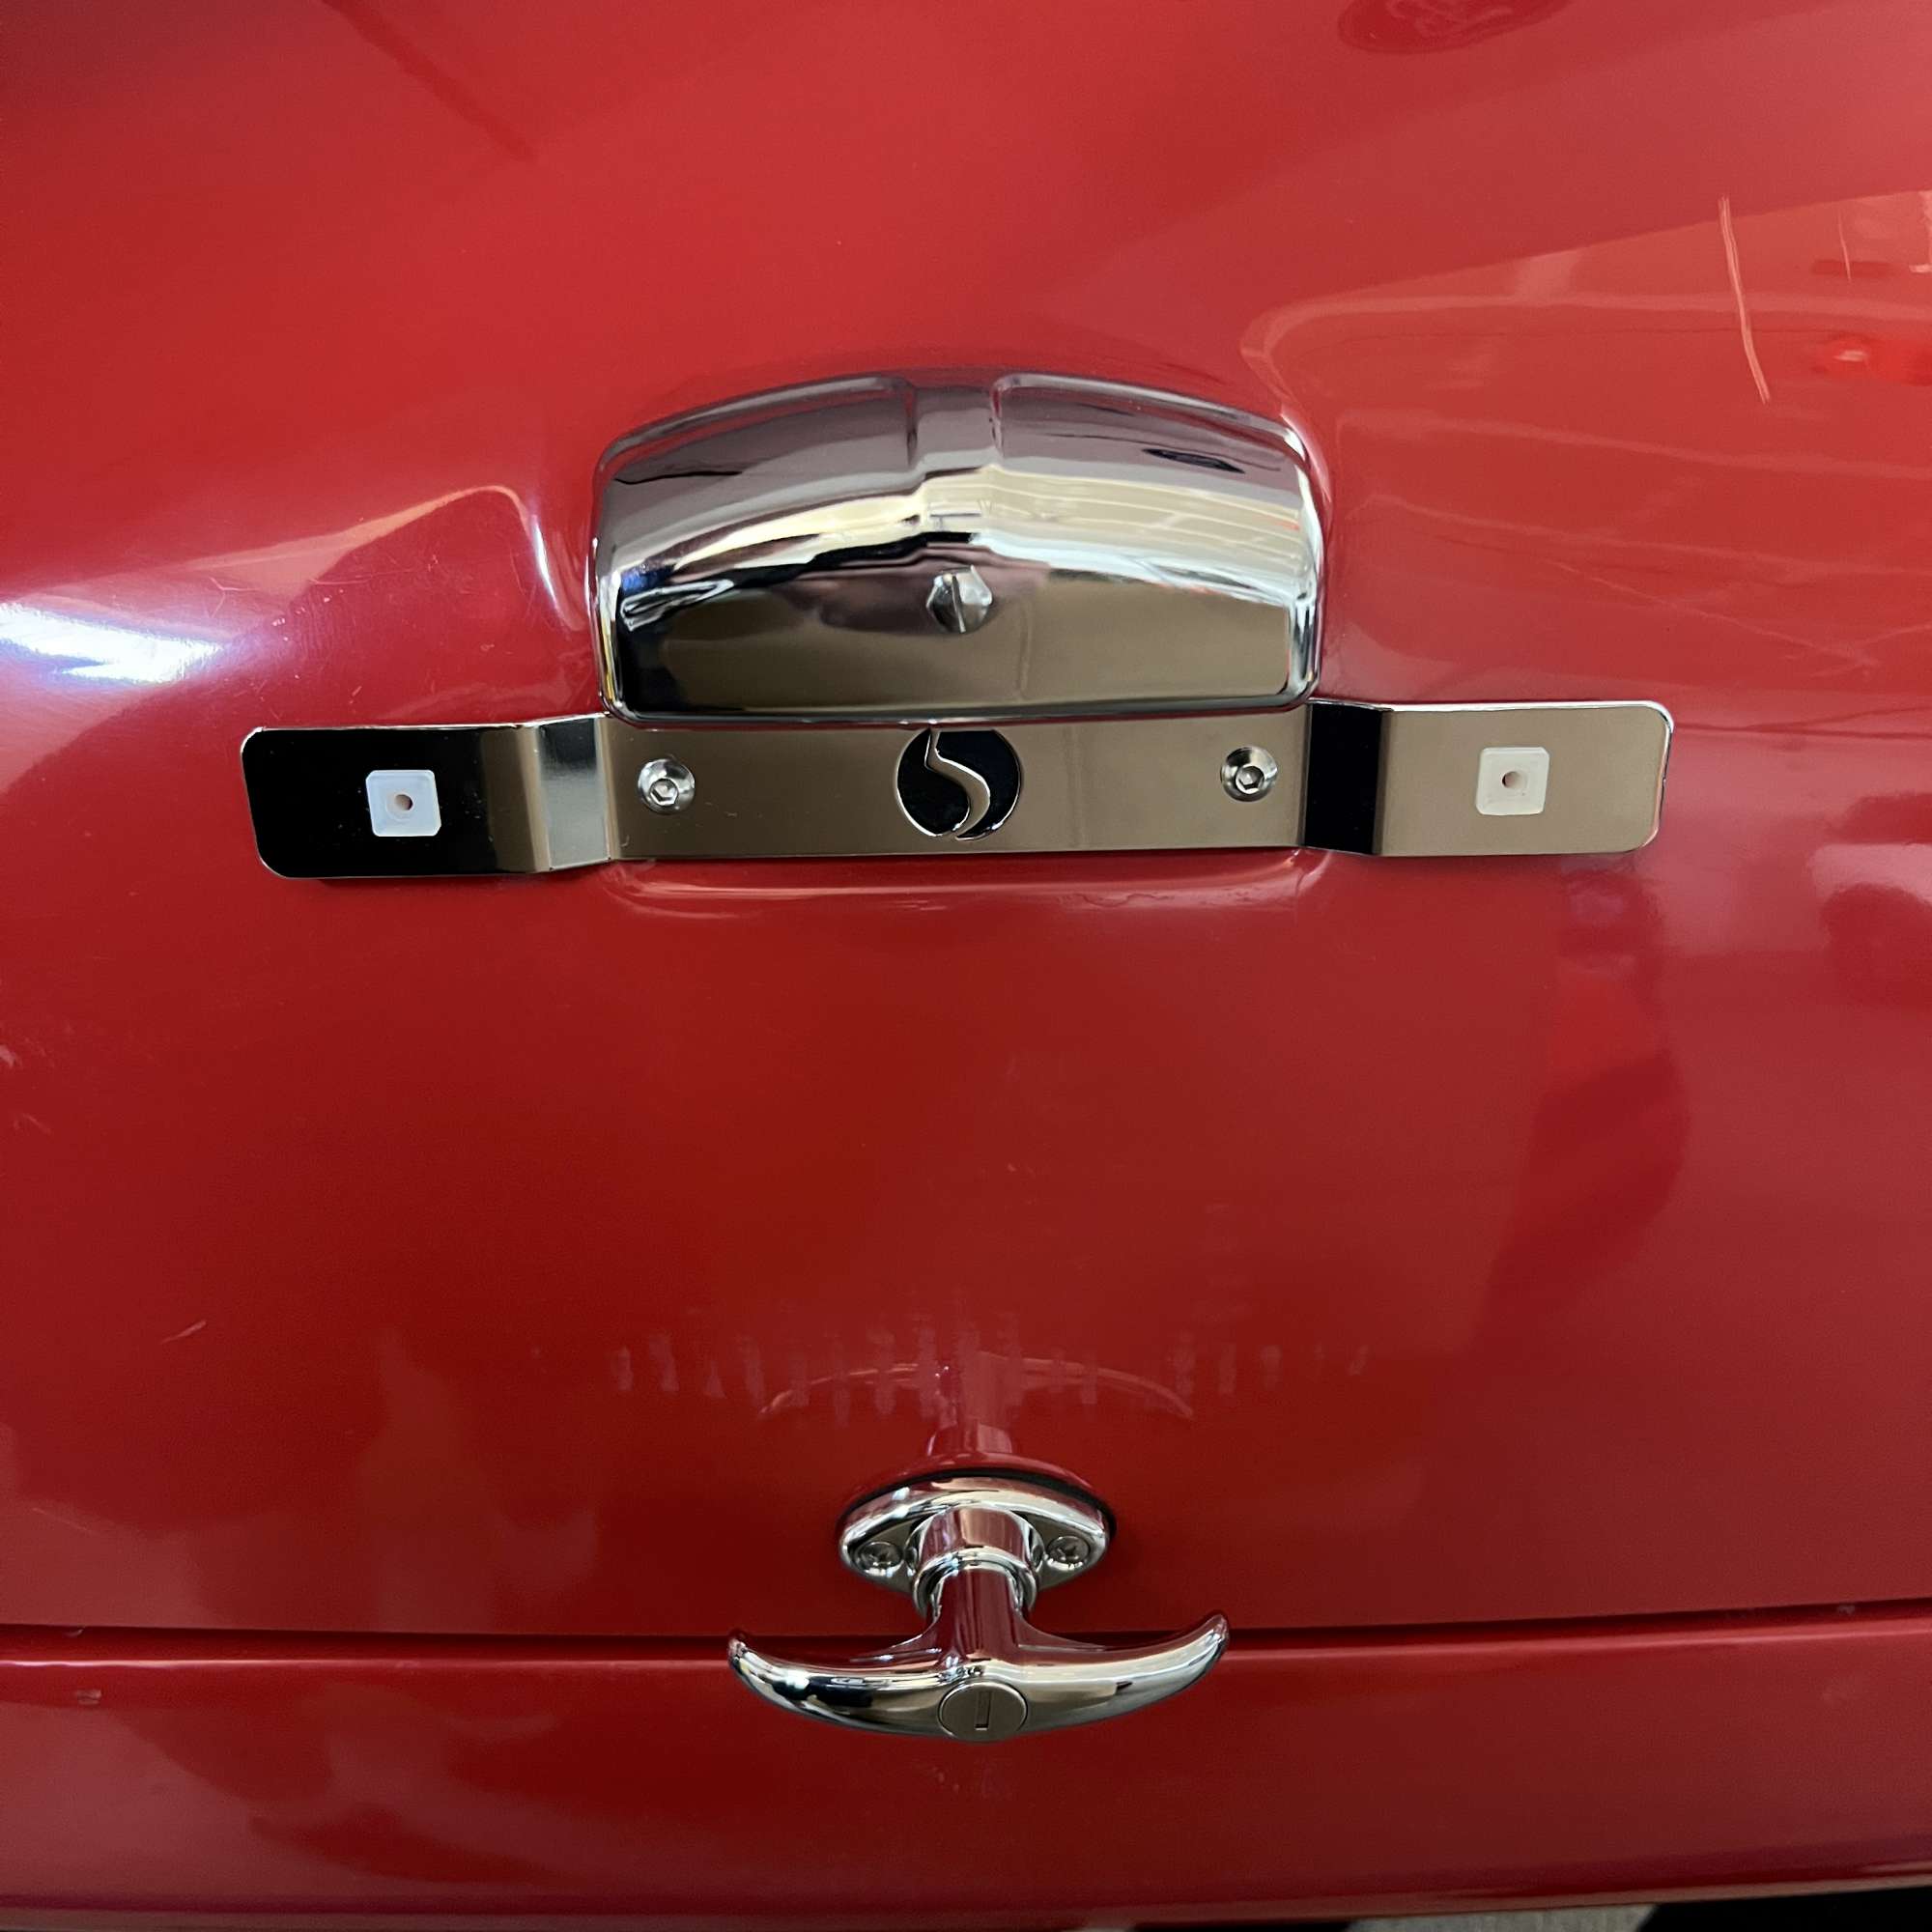
- License plate bracket: glad I double checked dimension between the #10 screws, as the template in the manual was more than 1/16" narrow.
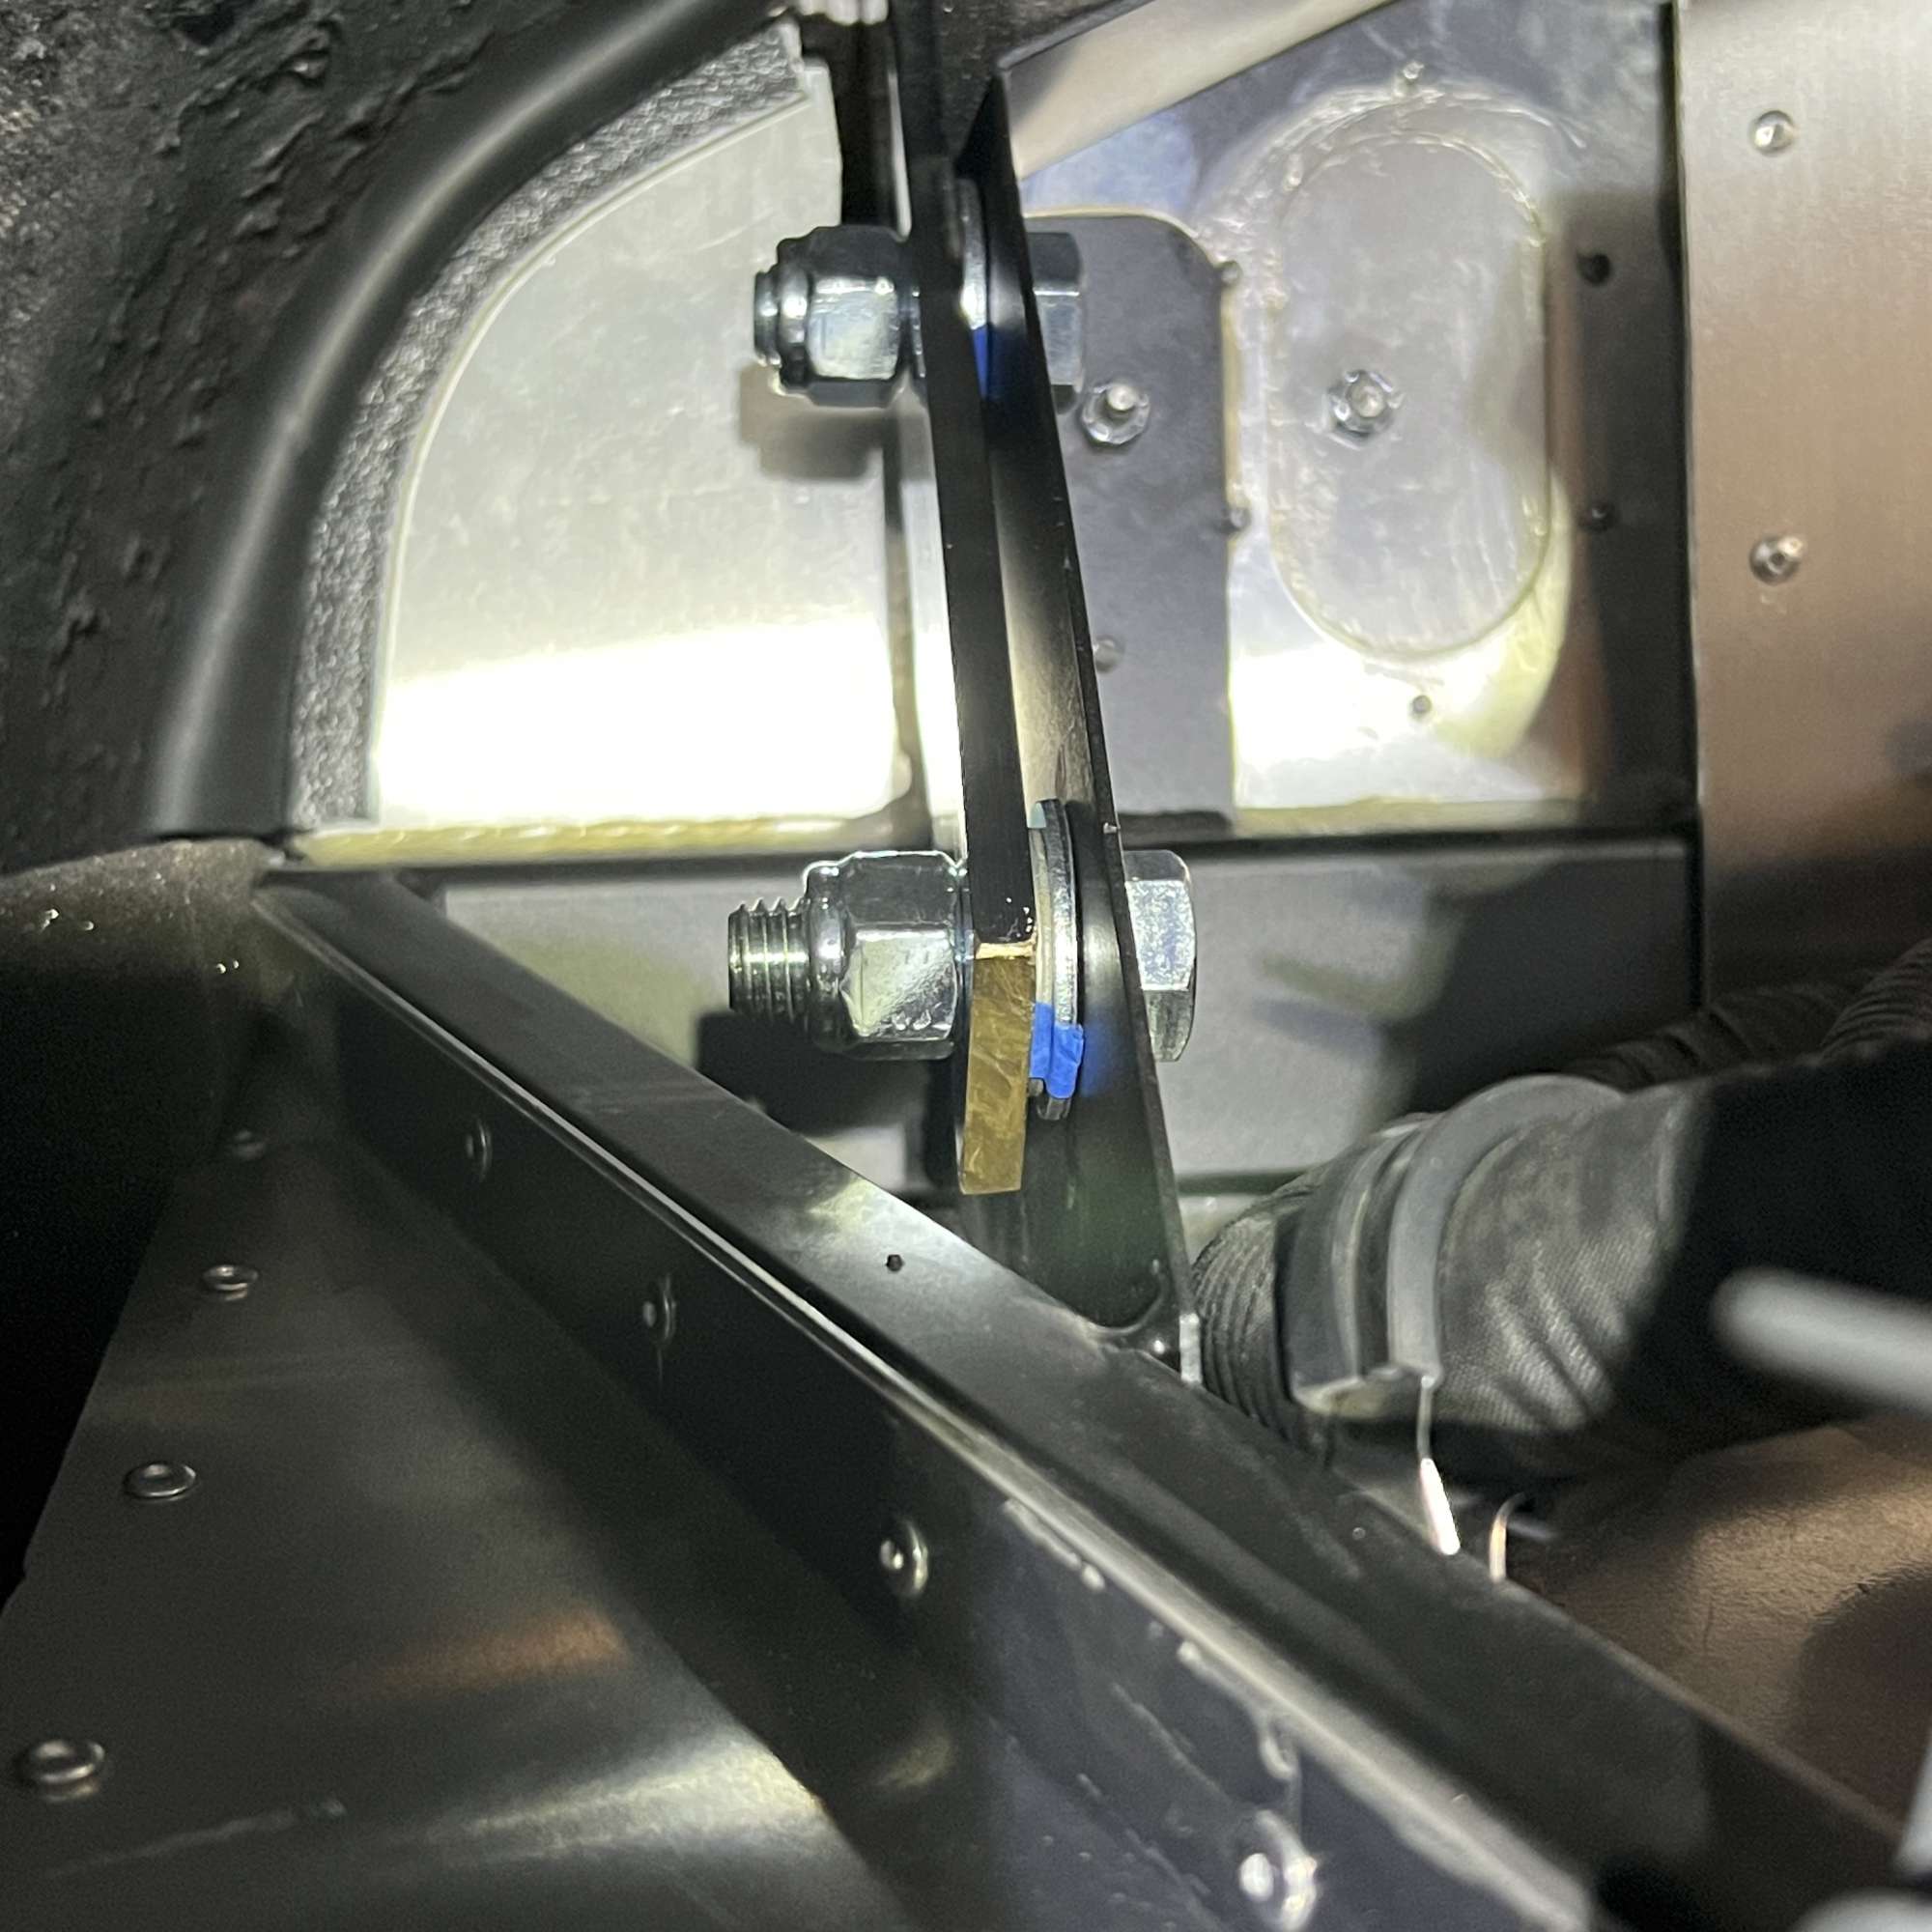
Is it belt and suspenders to tap the posts and install lock nuts? Maybe, but I like it. Here's the PS side. It took a couple washers on the bottom and one on the top to fill the space so as to minimize tension on the brackets (and hopefully avoid a broken windshield later on). I used a longer 1/2" bolt on the bottom to accommodate the two washers.
DS: no washers, as it's easier to add them to the PS.
Check straps and lap belts after Vinegaroon treatment.

Here's a look at the Replicaparts roll bar trim rings.
I liked John Ibele's set screw idea better than the button heads I used during initial roll bar fitment. These 5/16"x24x1.25" sit flush and are pretty invisible. Great idea, John.
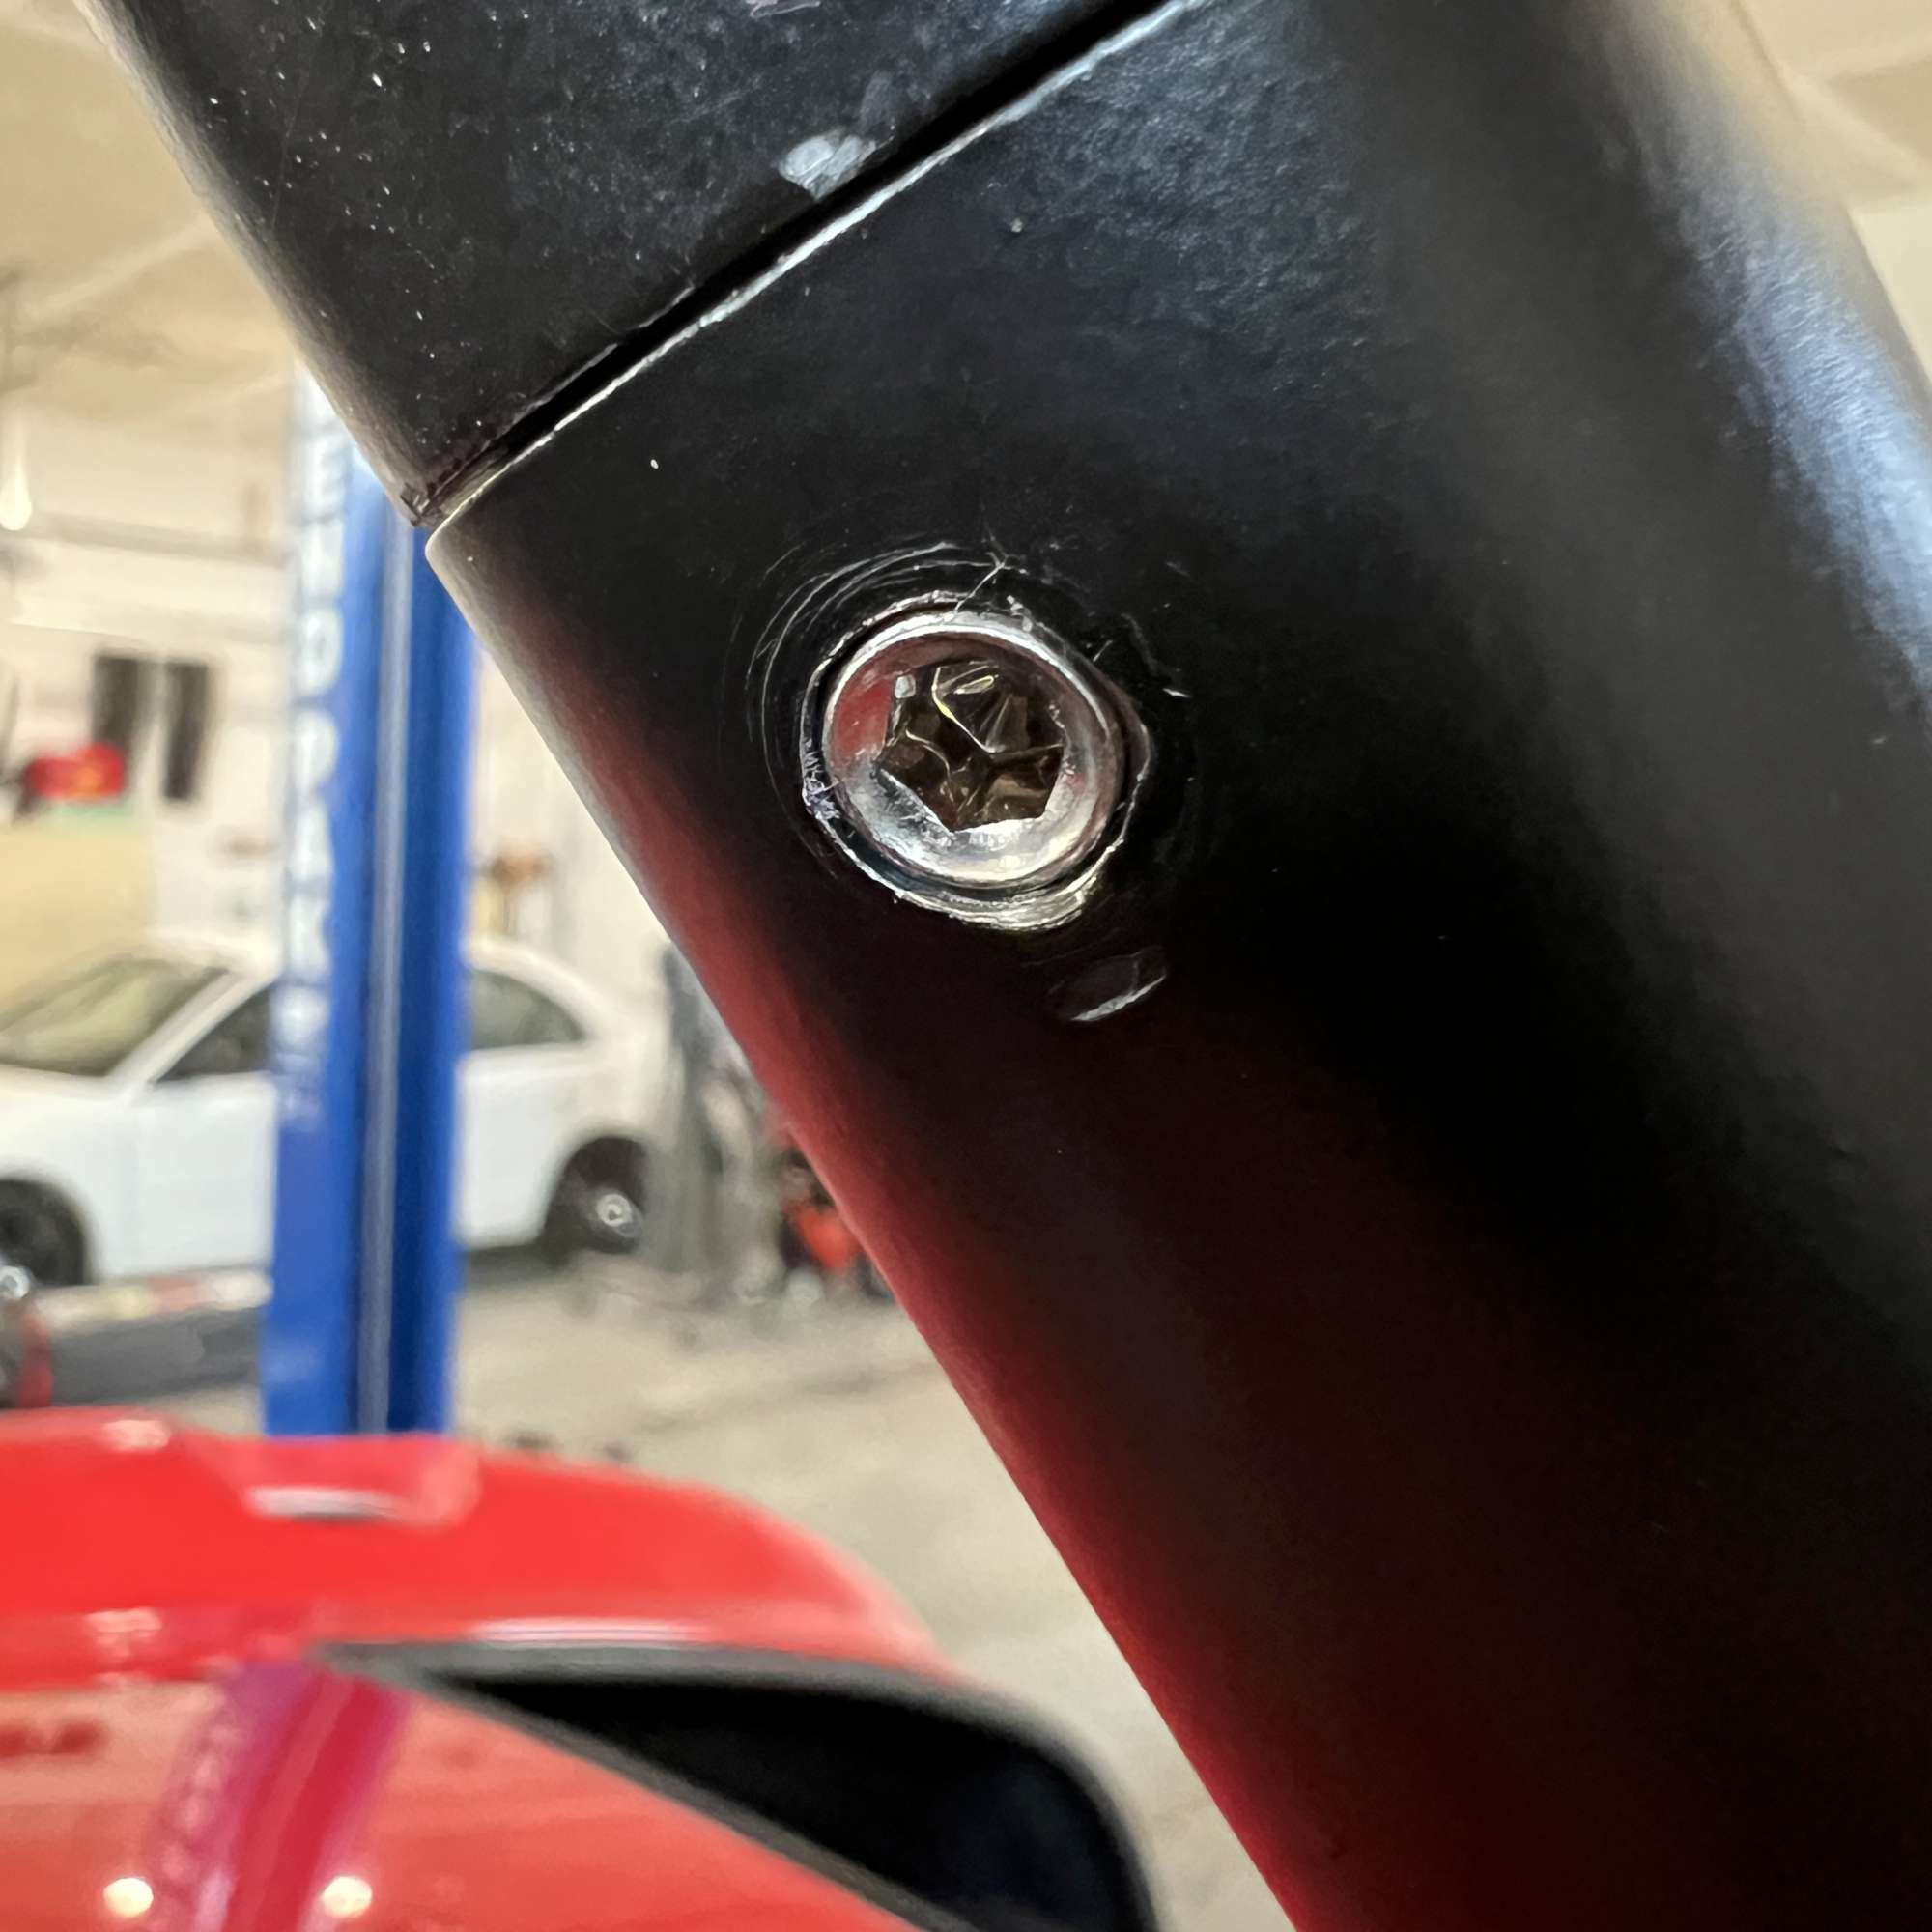
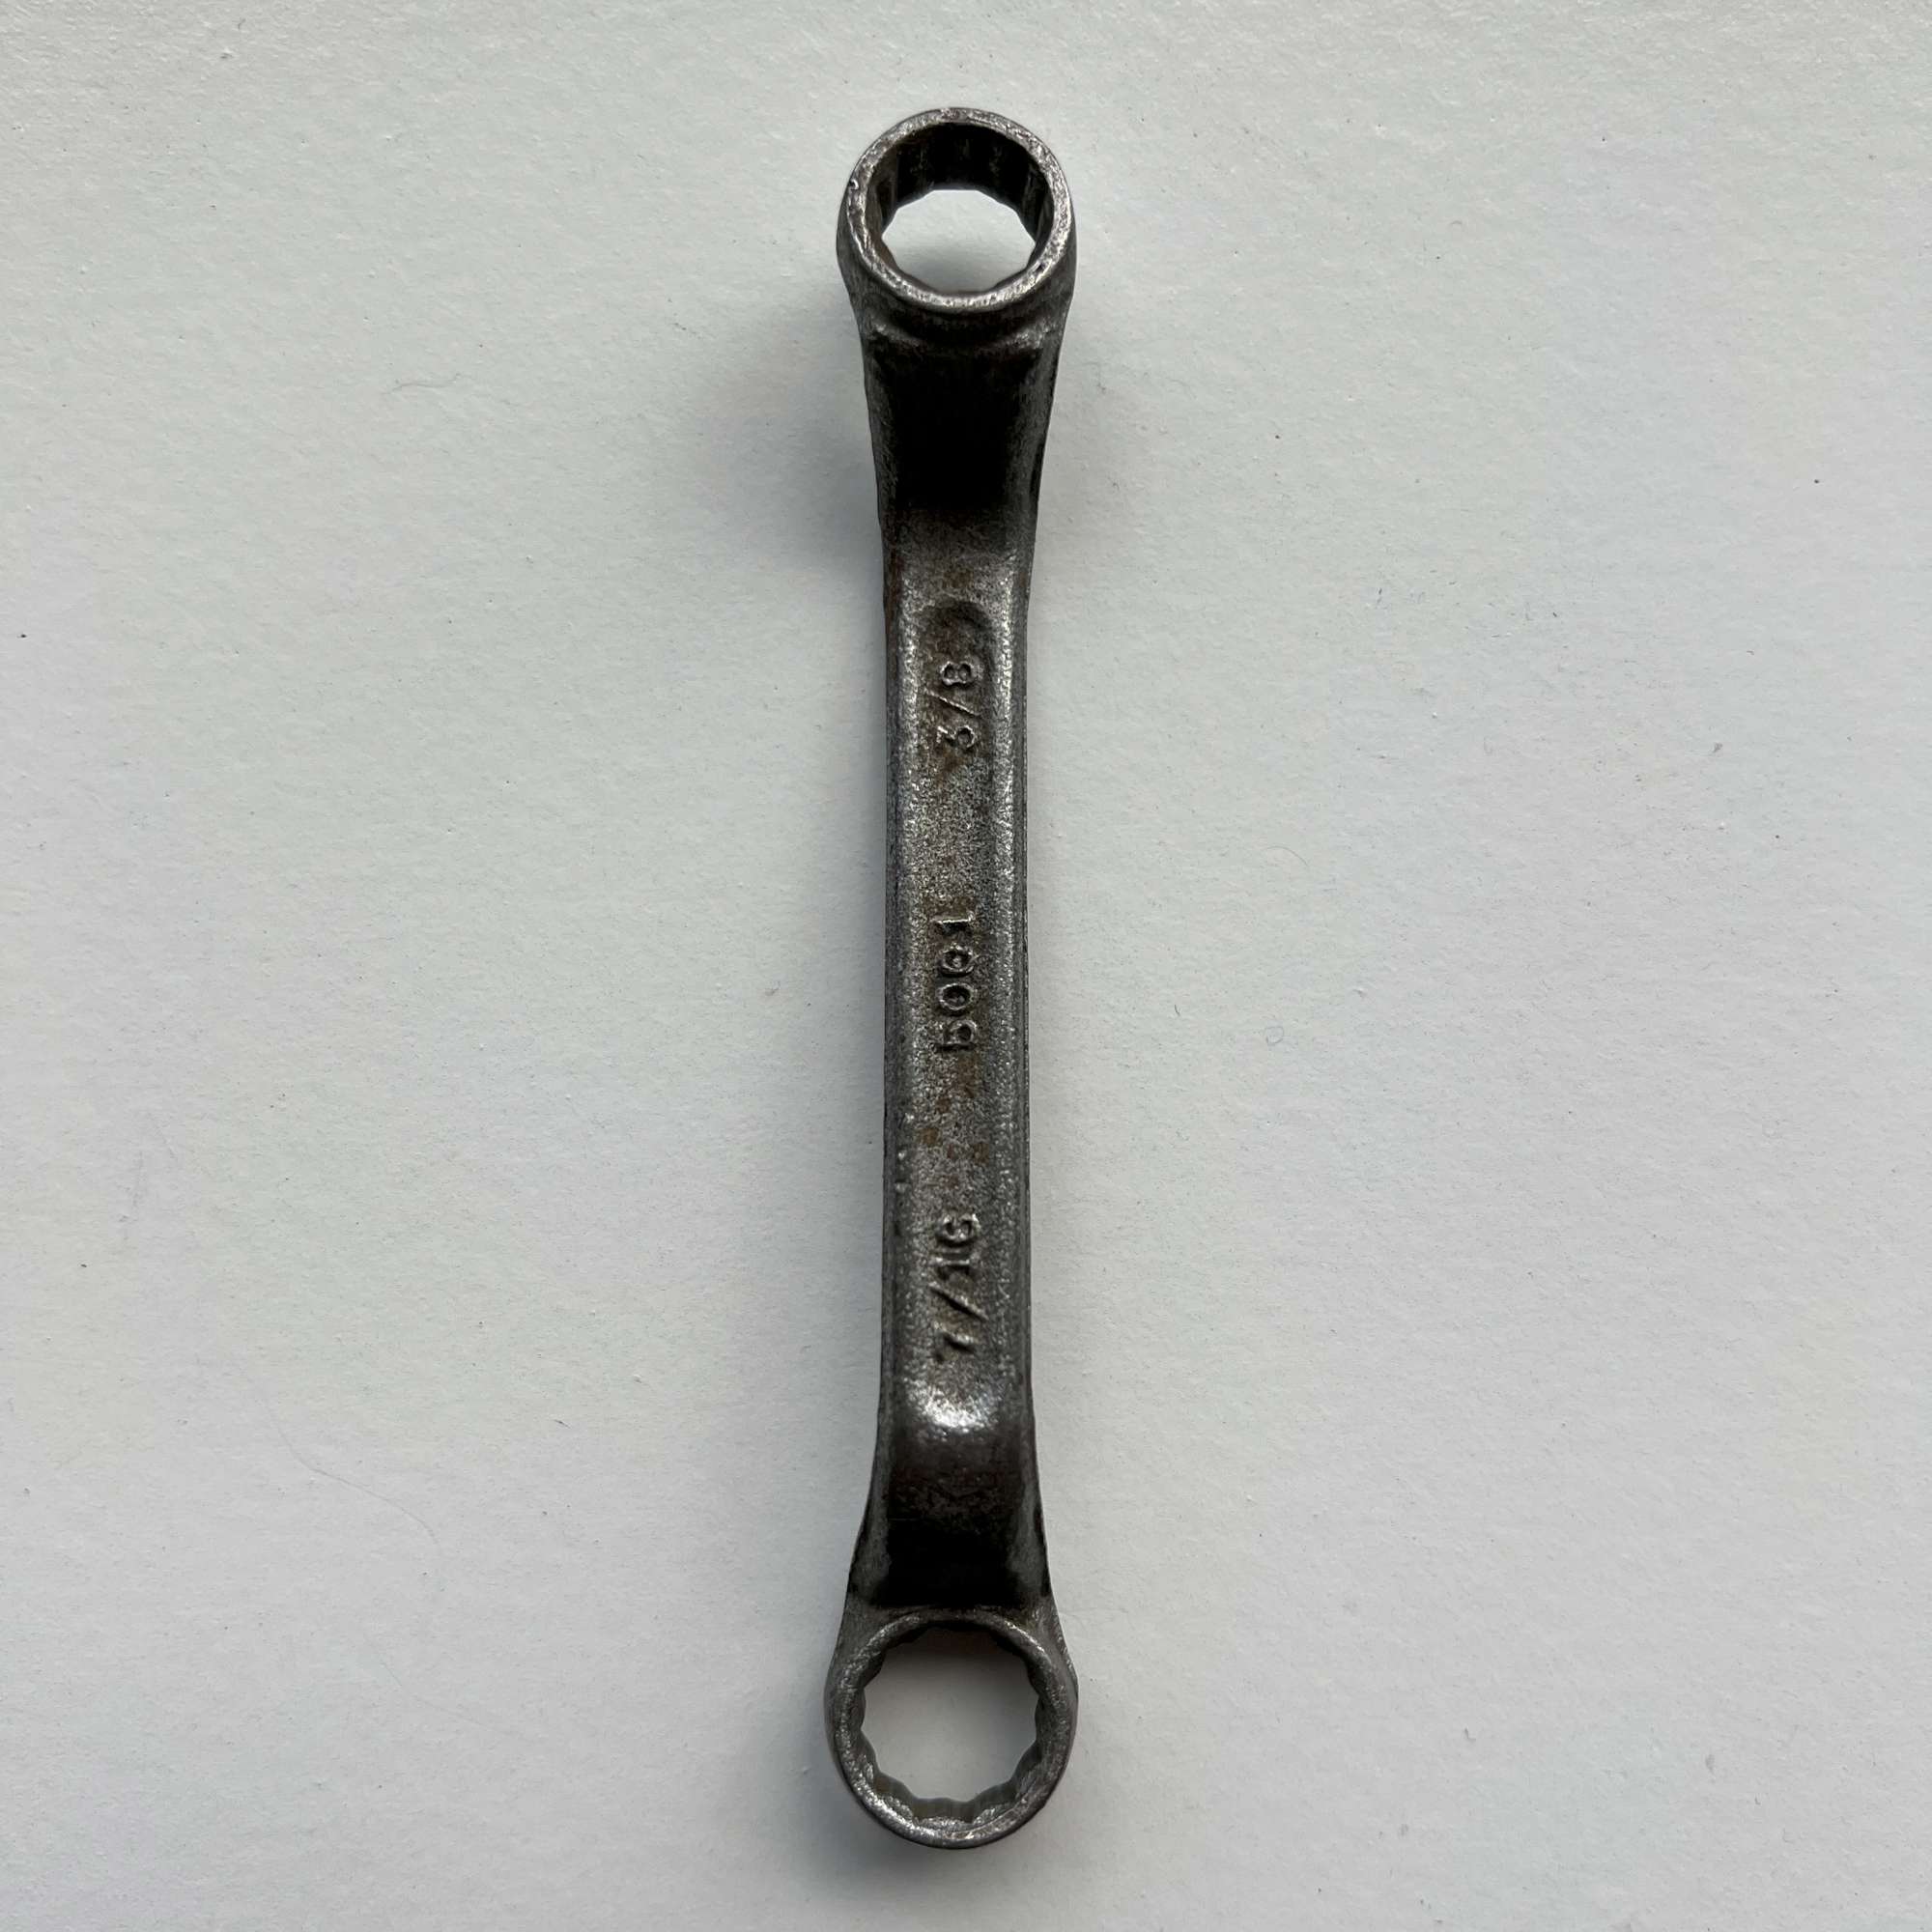
Grandpa's 3/8" offset wrench was just the ticket to reach the elusive 10-32 nut on the back of the trunk lid catch pin. Not much room in there to reach it.
Seat harnesses in, and seats installed. Makes me want to drive it.
Last edited by 460.465USMC; 06-26-2023 at 02:54 PM.
Chris
Coupe complete kit delivered: 4/22/24.
Build Thread. Coyote. T-56. IRS w/3.55. Wilwoods. PS. HVAC. Side windows.
MK4 Complete kit.
Build Thread Index. Delivered: 10/15/2020. Legal: 7/25/23. Coyote Gen3. TKO600 (0.64 OD). IRS w/3.55. PS. Wilwoods. Sway bars. This build is dedicated to my son, Benjamin.
Build Thread.
-
Post Thanks / Like - 0 Thanks, 3 Likes
-
06-26-2023, 02:25 PM
#634
Senior Member
Windshield, Roll Bars, Seats/Harnesses, Trunk Lid - Part 2
License plate bracket installed.
Like others have done, I routed the license plate light wires inside the trunk lid. Drilled a 1/2" opening near the right hinge bracket, and a 3/8" ID grommet. Also, installed a cushion clamp on the hinge bracket to keep the wiring in place. I put a flashlight behind the trunk lid so I knew where to reach in with a flexible grabber claw tool to grab it.
I installed Dark Water Customs access panel cover for a more finished look (will be painted to match the body). A five gallon bucket worked pretty well to form it to the curve in the trunk lid. Thanks to JohnK for the soft material rivet idea.

Of course I had to test the license plate light.

Last edited by 460.465USMC; 06-26-2023 at 02:46 PM.
Chris
Coupe complete kit delivered: 4/22/24.
Build Thread. Coyote. T-56. IRS w/3.55. Wilwoods. PS. HVAC. Side windows.
MK4 Complete kit.
Build Thread Index. Delivered: 10/15/2020. Legal: 7/25/23. Coyote Gen3. TKO600 (0.64 OD). IRS w/3.55. PS. Wilwoods. Sway bars. This build is dedicated to my son, Benjamin.
Build Thread.
-
Post Thanks / Like - 0 Thanks, 5 Likes
-
06-28-2023, 12:42 PM
#635
#10333 Complete Kit, Carbed 427w, TKX, IRS and many other upgrades
- Order Date: September 11, 2021 - 20th Anniversary of 9/11
- Delivery Day: April 1, 2022 - April Fool's Day
- First Start and Go-Kart: January 20th, 2023
- Graduation Date: July 4th, 2023 - Independence Day!!
- Legal Registration Date: October 4, 2023 - My Birthday!!
Visit my MKIV Build Thread (#10333)
-
Post Thanks / Like - 1 Thanks, 0 Likes
-
07-06-2023, 11:36 AM
#636
Senior Member
Aston Lemans, Side Exhaust, and Rear QJs
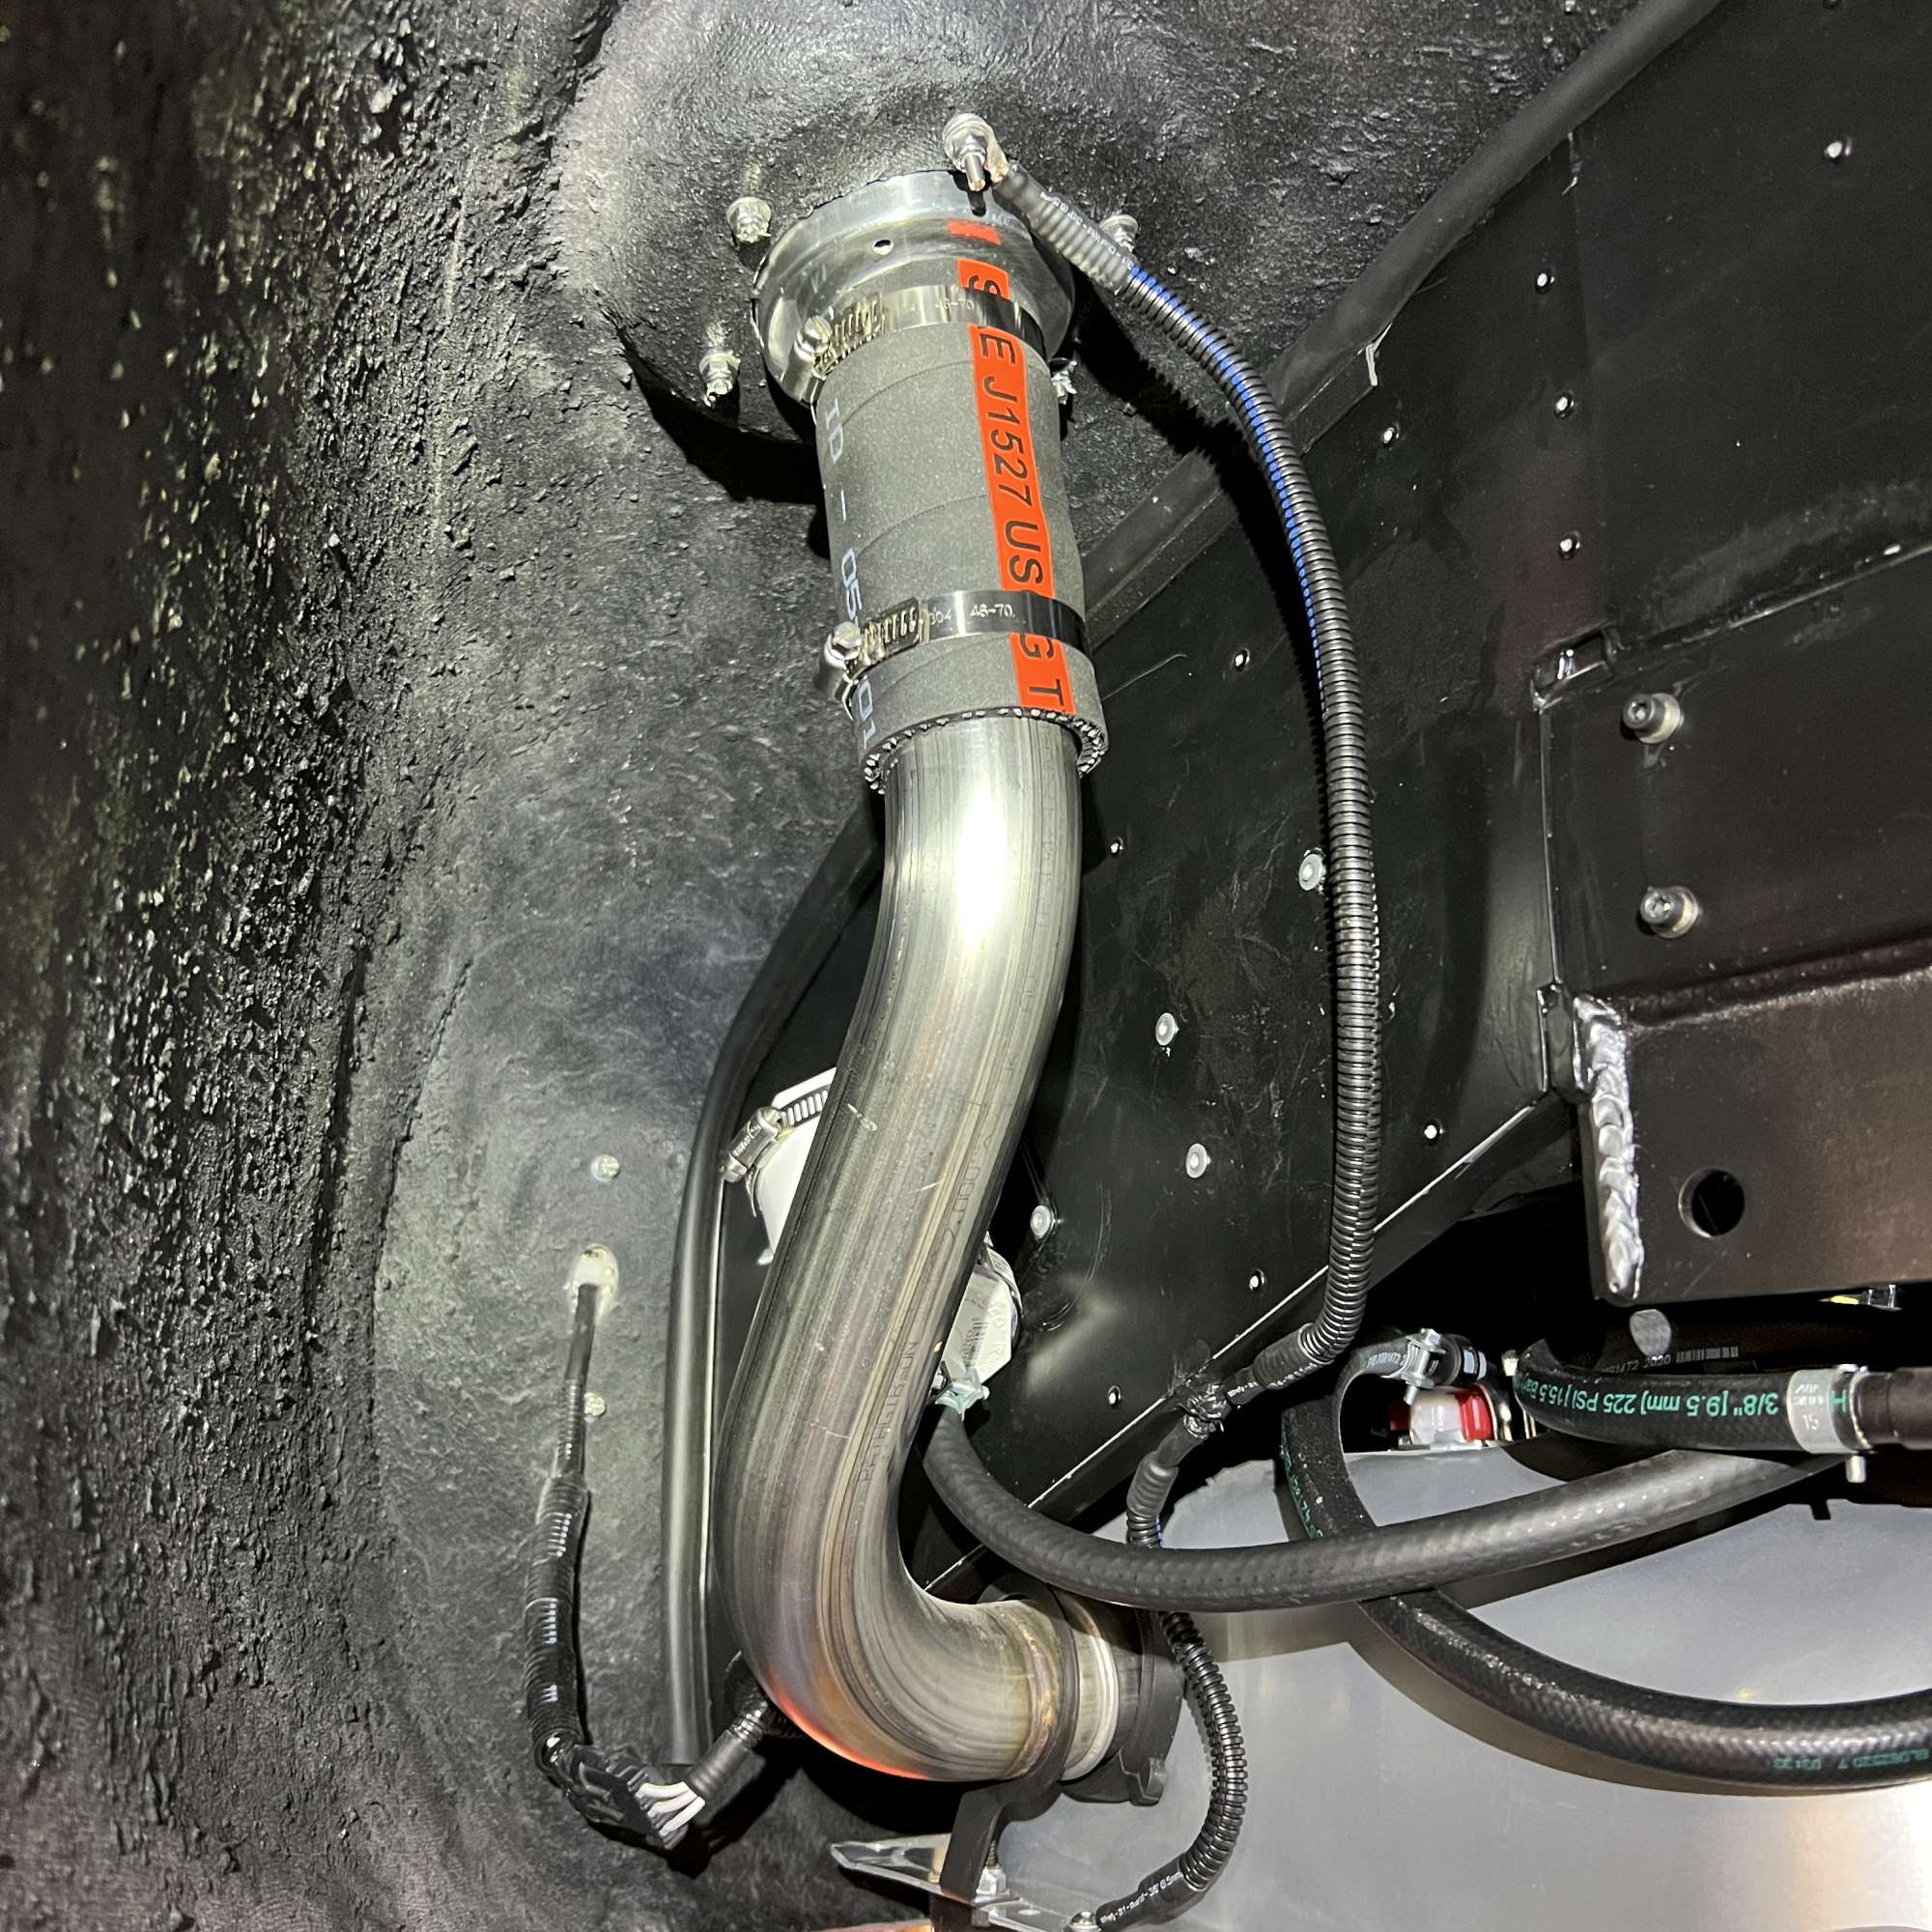
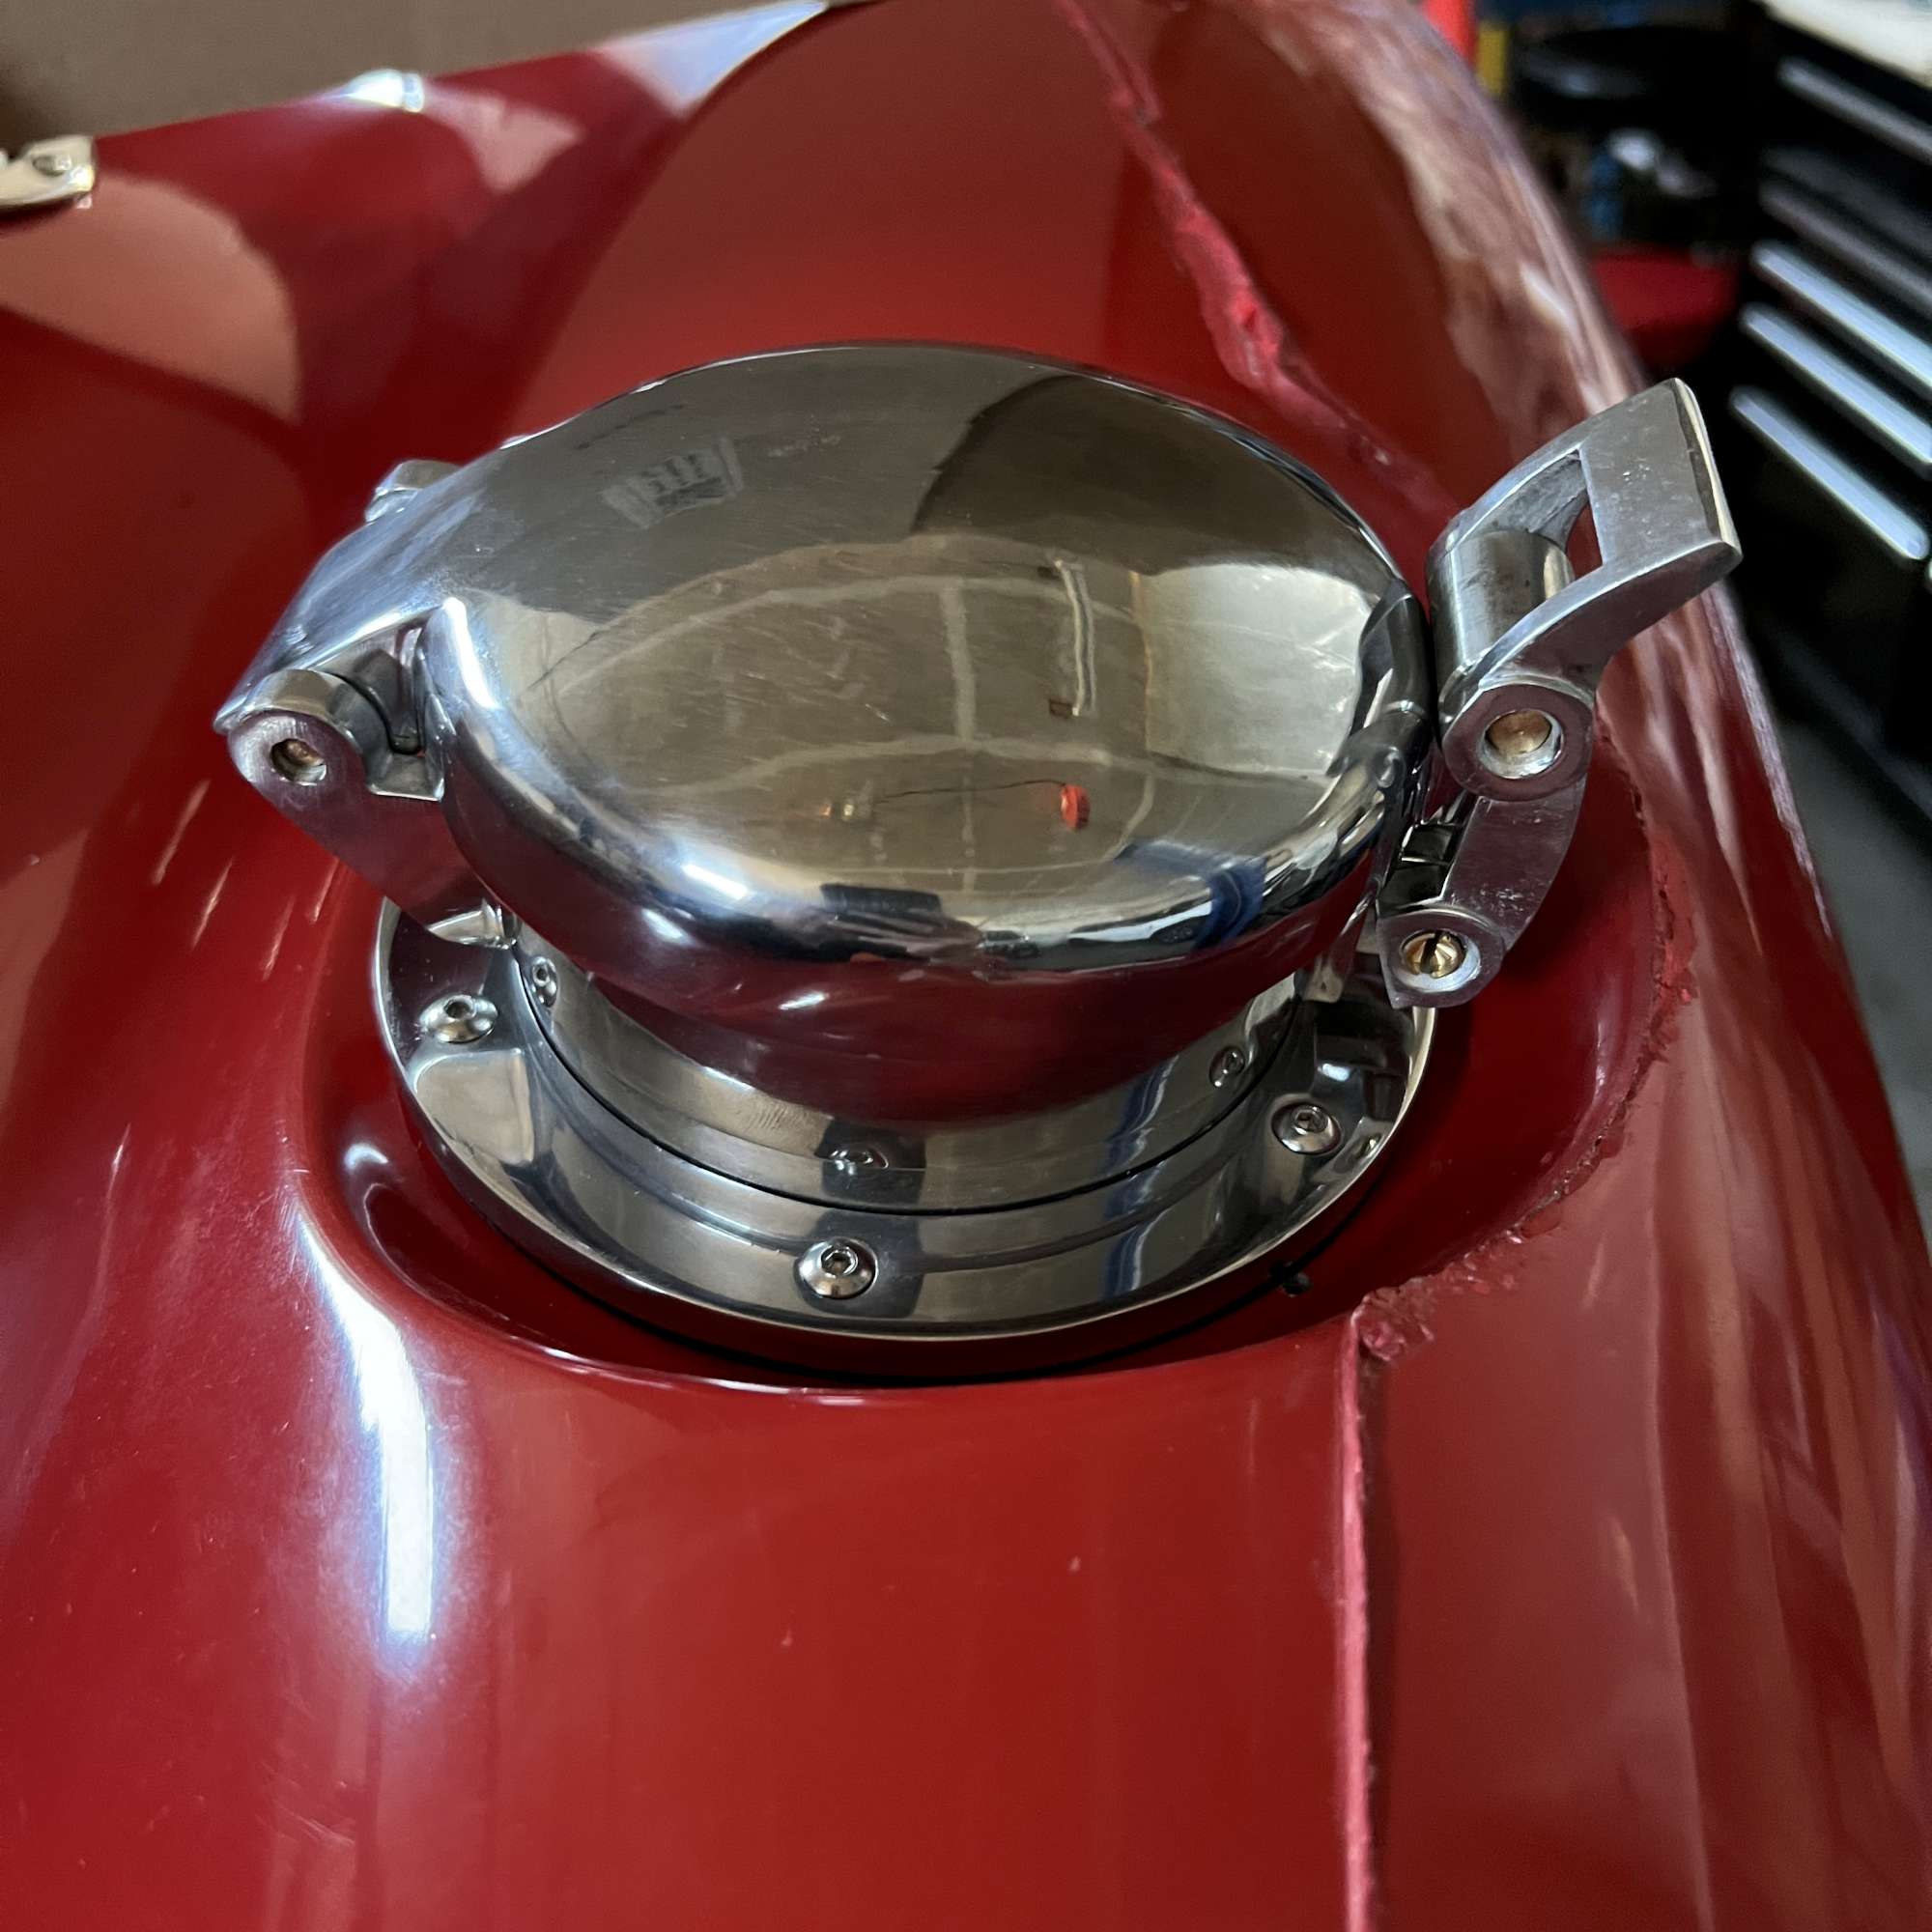
Next up was installing the Aston Lemans cap. This provided me yet another opportunity to relocate my homemade fuel vapor canister. Third time's the charm? Ugh. This time it was to avoid any interference with the fuel filler tube. I used 8-32 SS button heads and lock nuts instead of the supplied taper head course screws. It's just good to know there are nuts and washers on the other side. I drilled a small hole next in the recessed area (al la John Ibele) to provide a drainage path in case of spilled fuel (or rainwater!).
I will say getting the stiff rubber hose connected to the Aston Lemans cap and filler tube was a bear. Wow. Even with a little bit of soapy water it was all I could do to get it on. Once on it really stiffens up the metal fill tube nicely. Solid.
And here's the Aston Lemans cap. Of course, I had to add a gallon of fuel through the completed filler tube just to savor this milestone...and to confirm no leaks. All set.
Side exhaust with CobraStuff heat shields: I reworked the DS exhaust opening in the body to better match the PS contour. The good news is the ball flange allowed me to get the pipes the same height off the ground on both sides, and parallel to the body/ground. This was a relief since my headers are not quite equal distance off the ground as noted previously.
DS exhaust with CobraStuff heat shields installed. I bought these in raw stainless, so had them powder coated so they blend in better with the Gas-N pipes (Touring model).

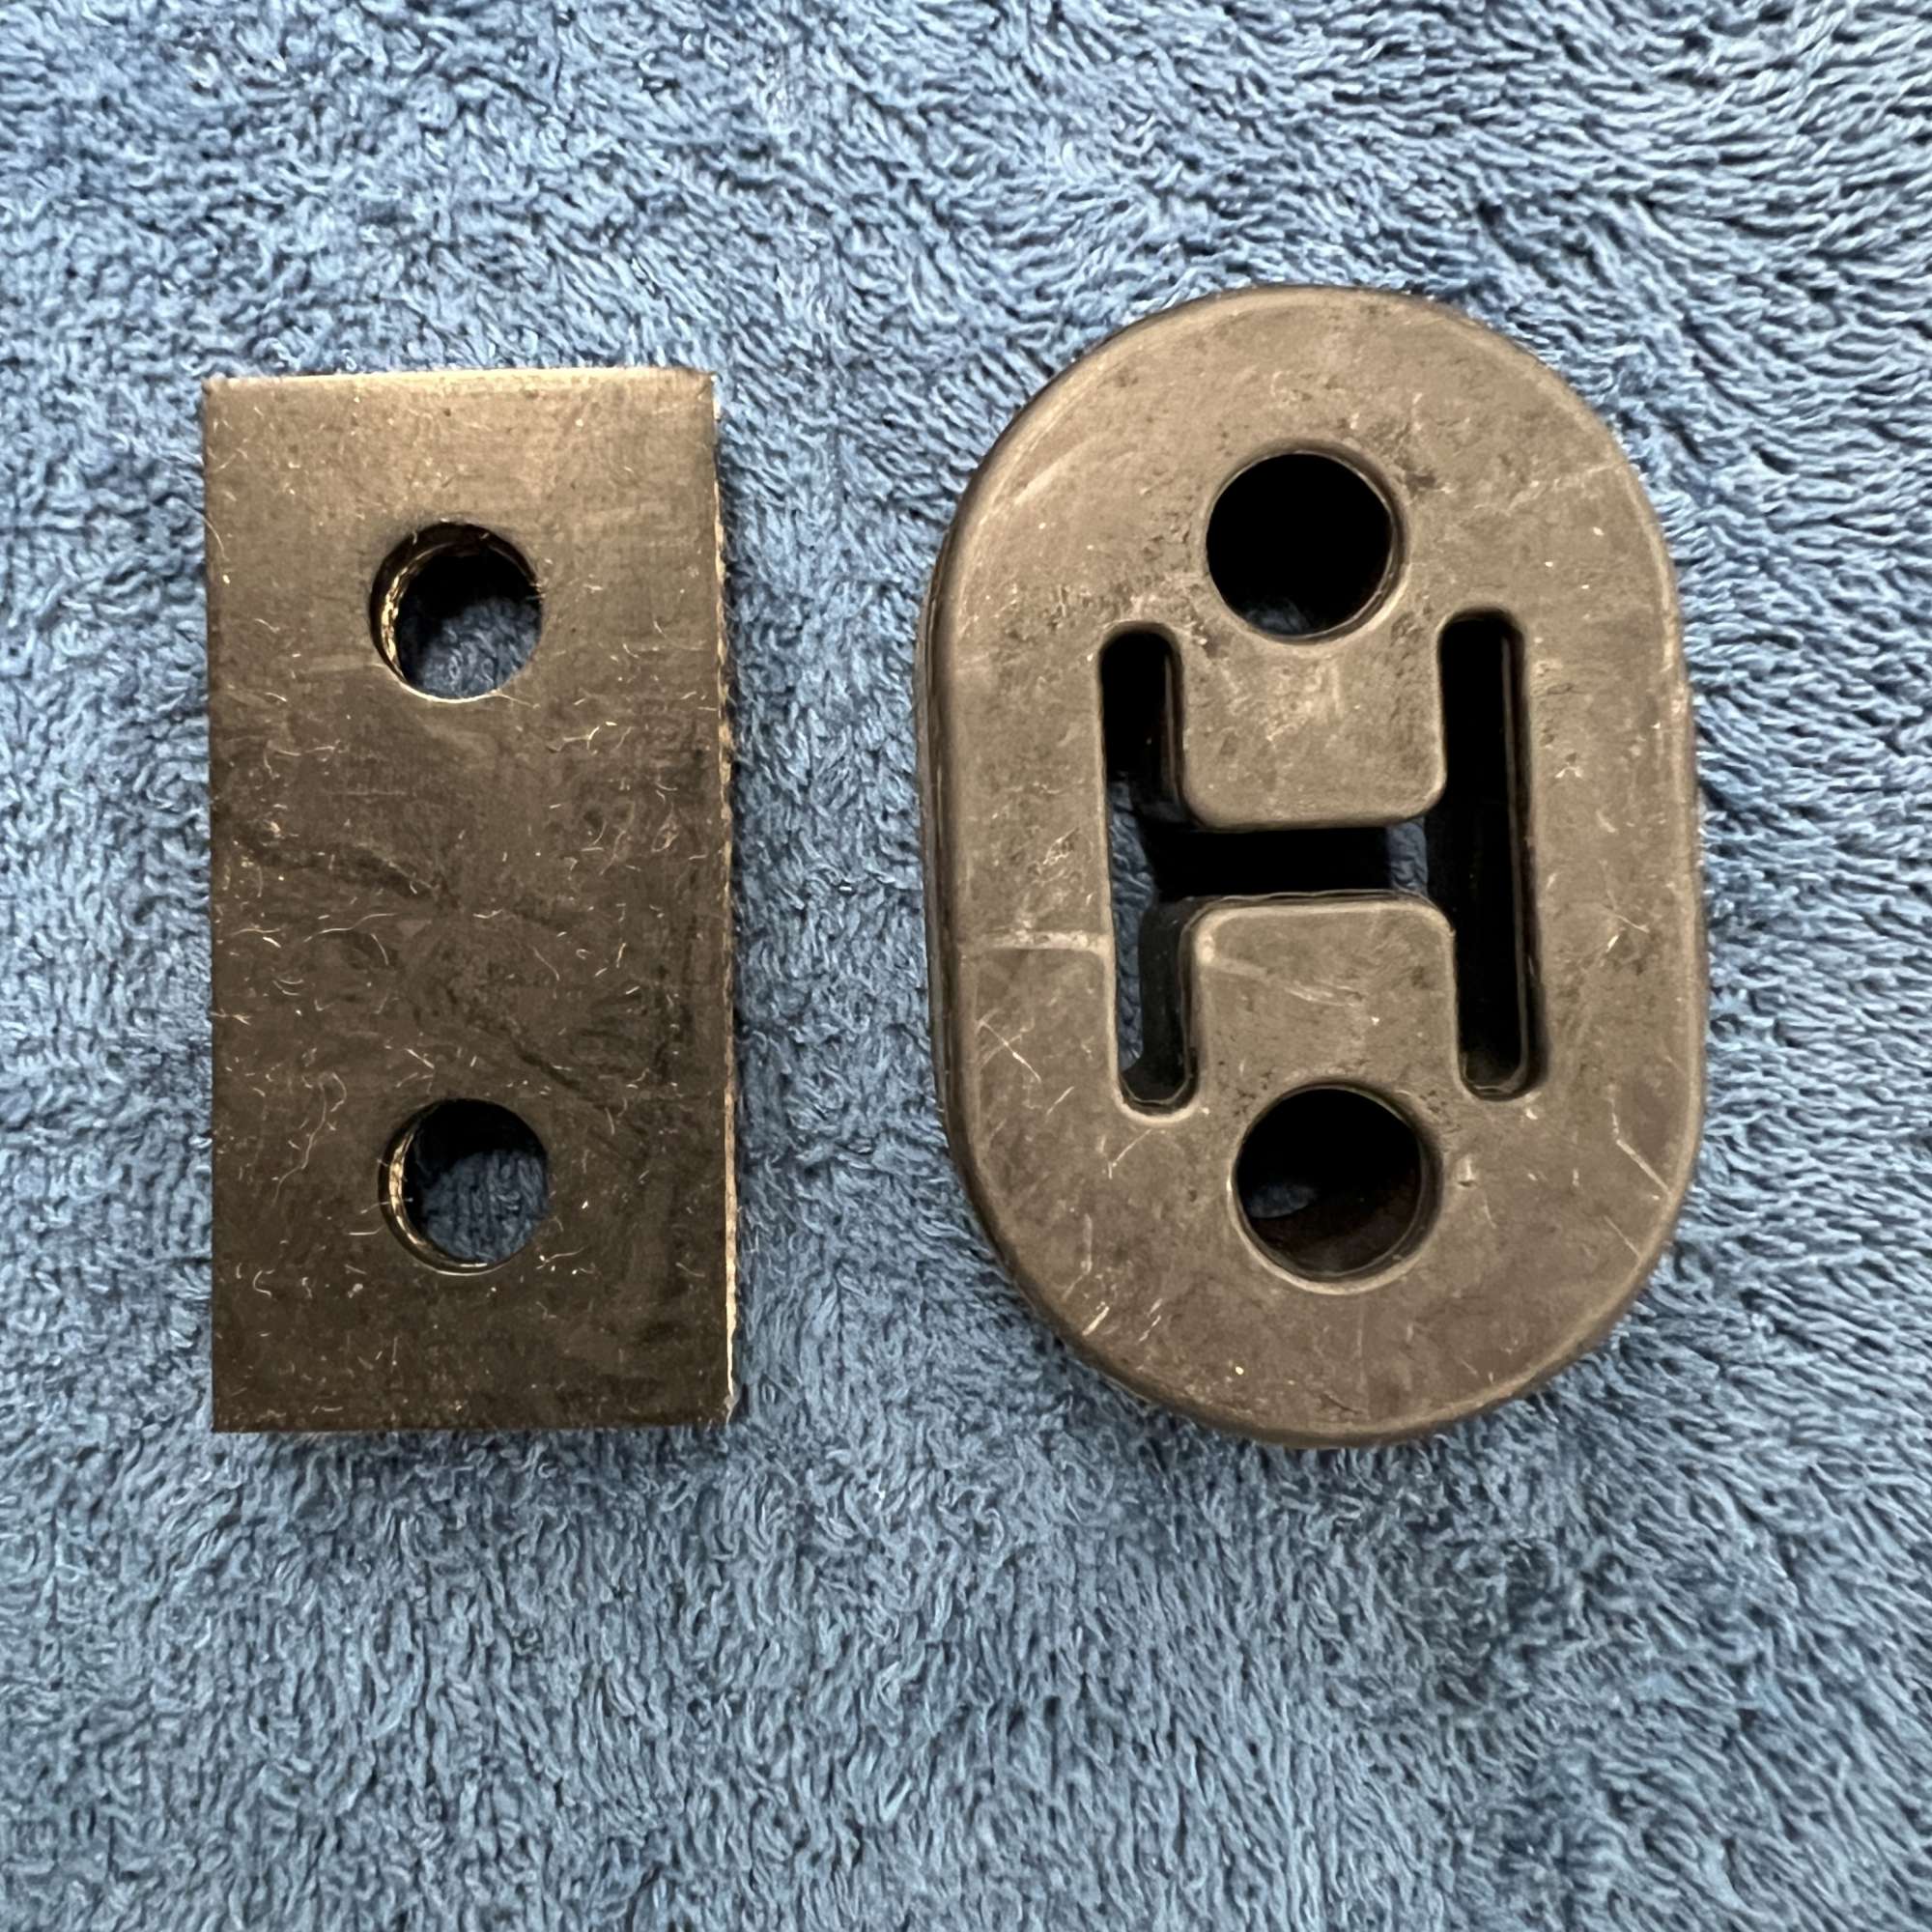
Drooping side pipe fix (my attempt): Given the feedback on the forum about this issue, I ditched the supplied rubber exhaust hangers and installed these from Moss Motors (1 3/8" x 2 7/8" x7/16"--the hole spacing exactly matches the supplied rubber exhaust hangers--bonus!). This is the same idea Fman documented (thanks Travis!), but just a different strap. I doubled them up for strength, and to fill the gap between the 2"x2" chassis tube and the bracket arm. I hope this does the trick.
I hung the side brackets with 5/16"-18 riv nuts (a la Edwardb) instead of drilling through the 2"x2" chassis tubes and into the FBs.

Rear QJs: I'm using the Kleiner rear QJ mod. I bought a section of 7/16"-14 threaded rod to thread into the coupler nuts. The kit supplied tubes worked fine (now powder coated), but I had to trim the longer ones (inside trunk) in order to fit the nut and washer that's used to adjust the rear valance to match the trunk lid.
Here's a view of the DS. The bottom one looks the same.

And the QJ all put together. These are the QJ plates from Replicaparts ($30). The fronts QJs are installed as well.
Build on!
Last edited by 460.465USMC; 07-06-2023 at 11:41 AM.
Chris
Coupe complete kit delivered: 4/22/24.
Build Thread. Coyote. T-56. IRS w/3.55. Wilwoods. PS. HVAC. Side windows.
MK4 Complete kit.
Build Thread Index. Delivered: 10/15/2020. Legal: 7/25/23. Coyote Gen3. TKO600 (0.64 OD). IRS w/3.55. PS. Wilwoods. Sway bars. This build is dedicated to my son, Benjamin.
Build Thread.
-
Post Thanks / Like - 0 Thanks, 2 Likes
-
07-06-2023, 05:19 PM
#637
Nice work Chris! I like the helpful tips throughout
Craig C
-
Post Thanks / Like - 1 Thanks, 0 Likes
-
07-06-2023, 05:51 PM
#638
I noticed you have 2 bolts in your side pipe bracket. Years ago, it seemed to be determined this increased the potential for the exhaust tube to fracture around the bracket. The deemed solution was to use 1 bolt, allowing more of a pivot point.
Very neat work, with some great ideas, solutions, in your build.
I am sure some of the more experienced builders can confirm or correct the number of bolts issue.
Last edited by Railroad; 07-07-2023 at 09:50 AM.
20th Anniversary Mk IV, A50XS Coyote, TKO 600, Trunk Drop Box, Trunk Battery Box, Cubby Hole, Seat Heaters, Radiator hanger and shroud.
-
Post Thanks / Like - 1 Thanks, 0 Likes
-
07-07-2023, 08:48 AM
#639
Senior Member
Originally Posted by
cc2Arider
Nice work Chris! I like the helpful tips throughout
Craig C
Thanks, Craig. I've received so much help from the forum, I just hope I can be of some help and give back a little.
Originally Posted by
Railroad
I noticed you have 2 bolts in your side pipe bracket. Years ago, it seemed to be determined this increased the potential for the exhaust tube to fracture around the bracket. The deemed solution was to use 1 bolt, allowing move of a pivot point.
Very neat work, with some great ideas, solutions, in your build.
I am sure some of the more experienced builders can confirm or correct the number of bolts issue.
Hi Railroad. I appreciate your keen eye. It's very helpful. Yes, I've read about the cracked mount and the two bolts issue. However, I assumed this was limited to the F5 pipes? I emailed Georgie yesterday, and he said in his 17 years of building his Gas-N pipes he's never had this issue. I welcome additional feedback from other builders with Gas-N pipes, if theirs cracked with two bolts.
Chris
Coupe complete kit delivered: 4/22/24.
Build Thread. Coyote. T-56. IRS w/3.55. Wilwoods. PS. HVAC. Side windows.
MK4 Complete kit.
Build Thread Index. Delivered: 10/15/2020. Legal: 7/25/23. Coyote Gen3. TKO600 (0.64 OD). IRS w/3.55. PS. Wilwoods. Sway bars. This build is dedicated to my son, Benjamin.
Build Thread.
-
07-07-2023, 01:38 PM
#640
Originally Posted by
460.465USMC
I COMPLETELY forgot I bought those too! Nice progress Chris, and thanks for the reminder! Now I gotta go dig it out...
-
Post Thanks / Like - 0 Thanks, 1 Likes


 Thanks:
  Likes:


 Reply With Quote


