-
05-08-2022, 10:01 PM
#361
Senior Member

Coyote/TKO600 Installed! (Part 1)
Almost 18 months after getting the Gen 3 Coyote/TKO600 in my garage, they are now in my Roadster! It's easily been several hundreds of hours of build up to this point, and feels really good to see it nestled (ever so tightly!) in the chassis.
My wife gifted me the Harbor Freight two-ton engine crane and leveler for Christmas. I'm not sure if it was a Christmas Eve sale, but there was a $70 savings, and they threw in a year's membership. They still come with the red plastic handle many forum members have had issues with. I did too. I wasn't happy with the engine hoist attachments (I bought from Forte). No concerns with the quality, but they only attach to a single M10 header bolt on either side. I'm sure Forte wouldn't sell them if there was a strength issue. However, I found a set off of eBay for $40 shipped, and made in the USA! These attach to the bosses on the motor: two bolts secure each bracket to the motor--left side front, and on the rear-right. This approach inspired much more confidence when the drivetrain is suspended 4+ feet off the floor. Glad I tested the crane and hoist setup ahead of time to work out a few Gotchas!
Dry run the night before. Plenty of clearance above upper 3/4" tube, and a couple inches to spare between the crane legs and the 4" chassis. Bonus question: what additional items in this picture will become obstacles during the actual attempt?
Let the games begin! My daughter, Grace, keeps a close eye on the operations, perched high above for maximum optics.
Progress! Plenty of maneuvering left to go. Any rational person would be saying at this point, "It ain't gonna fit"! Thankfully, I have my German engineering consultant and fellow local builder, Jim, here for precision guidance! Jim is on the left, while I adjust the leveler for a change in roll?? of the engine (side-to-side).
Installation of the DS header underway. We're about 1 hour 45 minutes in at this point. The beast has been slain, so we transition to mop-up work like threading a bolt in to keep the driveshaft in place, install the transmission A-frame mount, etc. At this point Jim came up with the clever idea to raise the DS side of the motor up a little to give us a bit more finger space to thread in the DS header bolts. Thanks to a tip from JohnK I used a dab of Ultra Copper RTV on each header bolt.

Afterward it was time to celebrate our victory with a burger at Five Guys!
I can't thank Jim enough for his expertise and help. He was instrumental, and I couldn't have done it without him! Also, I really appreciate all the tips from the forum, and in particular from Coyote builders JohnK and Edwardb. Also, to Papa for the tip to remove the radiator. More on that in a minute.
Last edited by 460.465USMC; 05-08-2022 at 10:06 PM.
Chris
Coupe complete kit delivered: 4/22/24.
Build Thread. Coyote. T-56. IRS w/3.55. Wilwoods. PS. HVAC. Side windows.
MK4 Complete kit.
Build Thread Index. Delivered: 10/15/2020. Legal: 7/25/23. Coyote Gen3. TKO600 (0.64 OD). IRS w/3.55. PS. Wilwoods. Sway bars. This build is dedicated to my son, Benjamin.
Build Thread.
-
Post Thanks / Like - 0 Thanks, 1 Likes
-
05-08-2022, 10:05 PM
#362
Senior Member
Coyote/TKO600 Installed! (Part 2)
Some time ago I posted a picture of a header dent, right on the lip of the four-into-one collector. Since it's just a hair below where it seals, I decided to attempt to restore it as close as possible to its original shape myself with an adjustable wrench--another tip from the forum (Railroad). Here's how it turned out. The header on the right had the dent.
Here are some of the key tips I followed that made a big difference in the drivetrain install:
- Wheel dollies for ground clearance for the engine crane legs. (Had these already on-hand).
- Swing break reservoirs out of the way. Mine mount to DS upper 3/4" tube.
- Remove steering shaft.
- Remove the 1/2" NPT on PS, and 16 MM plug on DS from Moroso oil pan
Here are a few lessons learned (and answers to obstacles question above):
- In addition to removing radiator, remove the lower Breeze rad mount and swing wiring harness out of the way--see picture below.
- Swing Coyote PDB fuse box away. Mine mounts to top of PS footbox.
- Remove gauge from Aeromotive fuel pressure regulator.
- Remove hood hinges.
The HF crane needed to move forward to the front sway bar (red arrow pointing down). You can see how far forward it needed to go before I realized the lower Breeze radiator mount and wire loom were in the way. D' oh!

I really enjoyed this challenge, though it had a harrowing moment. I'm kind of giddy whenever I go out to the garage and see the drivetrain in place!
Last edited by 460.465USMC; 05-09-2022 at 07:59 AM.
Reason: front sway bar....not stabilizer bar.
Chris
Coupe complete kit delivered: 4/22/24.
Build Thread. Coyote. T-56. IRS w/3.55. Wilwoods. PS. HVAC. Side windows.
MK4 Complete kit.
Build Thread Index. Delivered: 10/15/2020. Legal: 7/25/23. Coyote Gen3. TKO600 (0.64 OD). IRS w/3.55. PS. Wilwoods. Sway bars. This build is dedicated to my son, Benjamin.
Build Thread.
-
Post Thanks / Like - 0 Thanks, 3 Likes
-
05-08-2022, 10:40 PM
#363
Senior Member

Big win my friend!!
Great job
MK4 #10008 - Ordered 10/06/20, Delivered 03/03/21, First Start 7/22/21, First Go Kart 7/24/21
Paint by Metal Morphous 5/14/22, Legally registered 6/8/22, Graduated 7/20/22
Build Thread
https://thefactoryfiveforum.com/show...been-delivered
Complete Kit, Ford 306, Sniper/Dual Sync, T5, Hydraulic clutch
-
Post Thanks / Like - 1 Thanks, 0 Likes
-
05-08-2022, 10:58 PM
#364
Awesome work Chris! That's a big milestone. Seeing that engine finally in place must put a huge smile on your face. First start can't be far off now. 
MkIV Roadster build: Gen 2 Coyote, IRS, TKO600. Ordered 10/24/18. Delivered 1/29/19. Engine installed 8/8/21. First start 9/12/21. First go-kart 9/17/21. Off to paint 4/11/22. Back from paint 12/30/22.
Build thread here.
-
Post Thanks / Like - 1 Thanks, 1 Likes
-
05-09-2022, 05:58 AM
#365
Ahh, I remember that day all too well. I had planned on dropping mine in for 'mock ups' and once it was in, I quickly decided it wasn't coming back out. Congrats, looks great!
MK4 Complete Kit #10315 / Coyote G3 / TKX / 427 HardTop
Build Thread Production Date: 2/26/22, Registered 5/19/22, Graduated 3/1/2023
-
Post Thanks / Like - 1 Thanks, 0 Likes
-
05-09-2022, 02:37 PM
#366
Senior Member

Originally Posted by
Blitzboy54

Big win my friend!!
Great job
Thanks, Jesse! For this first-timer it feels like a big deal, indeed!
Originally Posted by
JohnK
Awesome work Chris! That's a big milestone. Seeing that engine finally in place must put a huge smile on your face. First start can't be far off now.
Yes, pretty sure I'm still smiling two days later. I'm excited to keep moving forward toward first start. Thanks again for all the tips and info.
Originally Posted by
JeffP
Ahh, I remember that day all too well. I had planned on dropping mine in for 'mock ups' and once it was in, I quickly decided it wasn't coming back out. Congrats, looks great!
I hear you! There's no doubt in my mind I don't want to reverse this! Man, it looks good in there. Thanks, Jeff!
Chris
Coupe complete kit delivered: 4/22/24.
Build Thread. Coyote. T-56. IRS w/3.55. Wilwoods. PS. HVAC. Side windows.
MK4 Complete kit.
Build Thread Index. Delivered: 10/15/2020. Legal: 7/25/23. Coyote Gen3. TKO600 (0.64 OD). IRS w/3.55. PS. Wilwoods. Sway bars. This build is dedicated to my son, Benjamin.
Build Thread.
-
05-09-2022, 02:58 PM
#367
Looking great Chris!
(EDIT: I asked about hood hinges. I should have read your posts more carefully. Sorry about that.)
Last edited by facultyofmusic; 05-09-2022 at 03:00 PM.
-
Post Thanks / Like - 1 Thanks, 1 Likes
-
05-09-2022, 05:23 PM
#368
Senior Member

I still can’t believe it fits! It was my pleasure to give you a hand. The real star of the show was Grace as she watched over us while the two knuckleheads installed a motor that’s too big into a space that’s too small.
The smile on your face and the look of weight lifting off your shoulders after it was in was priceless.
On to the next step!
Last edited by Jim Frahm; 01-05-2023 at 09:42 PM.
-
Post Thanks / Like - 0 Thanks, 1 Likes
-
05-17-2022, 12:01 PM
#369
Senior Member

Hey, isn't that a kick? So great to see the engine resting in its final 'home'. Well done, good tips Chris ... you had a lot more space considerations that I did with my tiny SBF  . Onward!
... and to answer your implied question ... nope, couldn't spot the dent! Finally, great shot of the safety / fire marshall perched on top of the fridge. Can never have too much moral support!
Last edited by John Ibele; 05-17-2022 at 12:03 PM.
MK4 #7838: IRS 3.55 TrueTrac T5z Dart 347
The drawing is from ~7th grade, mid-1970s
Meandering, leisurely build thread is
here
-
Post Thanks / Like - 1 Thanks, 1 Likes
-
05-17-2022, 02:21 PM
#370
Senior Member
Thanks, John! So many fun parts of the build available to me now that the drivetrain is in. Looking forward to next steps.
My fire marshall has good reason to keep a watchful eye...no doubt she'll be the first to raise her hand for a ride.
Chris
Coupe complete kit delivered: 4/22/24.
Build Thread. Coyote. T-56. IRS w/3.55. Wilwoods. PS. HVAC. Side windows.
MK4 Complete kit.
Build Thread Index. Delivered: 10/15/2020. Legal: 7/25/23. Coyote Gen3. TKO600 (0.64 OD). IRS w/3.55. PS. Wilwoods. Sway bars. This build is dedicated to my son, Benjamin.
Build Thread.
-
05-18-2022, 08:47 AM
#371
Chris,
Congratulations on a BIG milestone in the build. It really starts to feel a lot more like a car once the engine is in place. Can't wait for the first start video.
Dave
-
Post Thanks / Like - 1 Thanks, 0 Likes
-
05-18-2022, 01:59 PM
#372
Senior Member
Thanks, Dave! I still feel like I'm walking on-air some two weeks later. I'm truly indebted to you and so many other good builders for the many great tips and knowledge sharing here on the forum. I can't stand in the engine bay any more: I'm good with that. 
Chris
Coupe complete kit delivered: 4/22/24.
Build Thread. Coyote. T-56. IRS w/3.55. Wilwoods. PS. HVAC. Side windows.
MK4 Complete kit.
Build Thread Index. Delivered: 10/15/2020. Legal: 7/25/23. Coyote Gen3. TKO600 (0.64 OD). IRS w/3.55. PS. Wilwoods. Sway bars. This build is dedicated to my son, Benjamin.
Build Thread.
-
05-22-2022, 10:02 PM
#373
Senior Member
Poor Man's Mid-Shift | Engine Grounds and Misc.
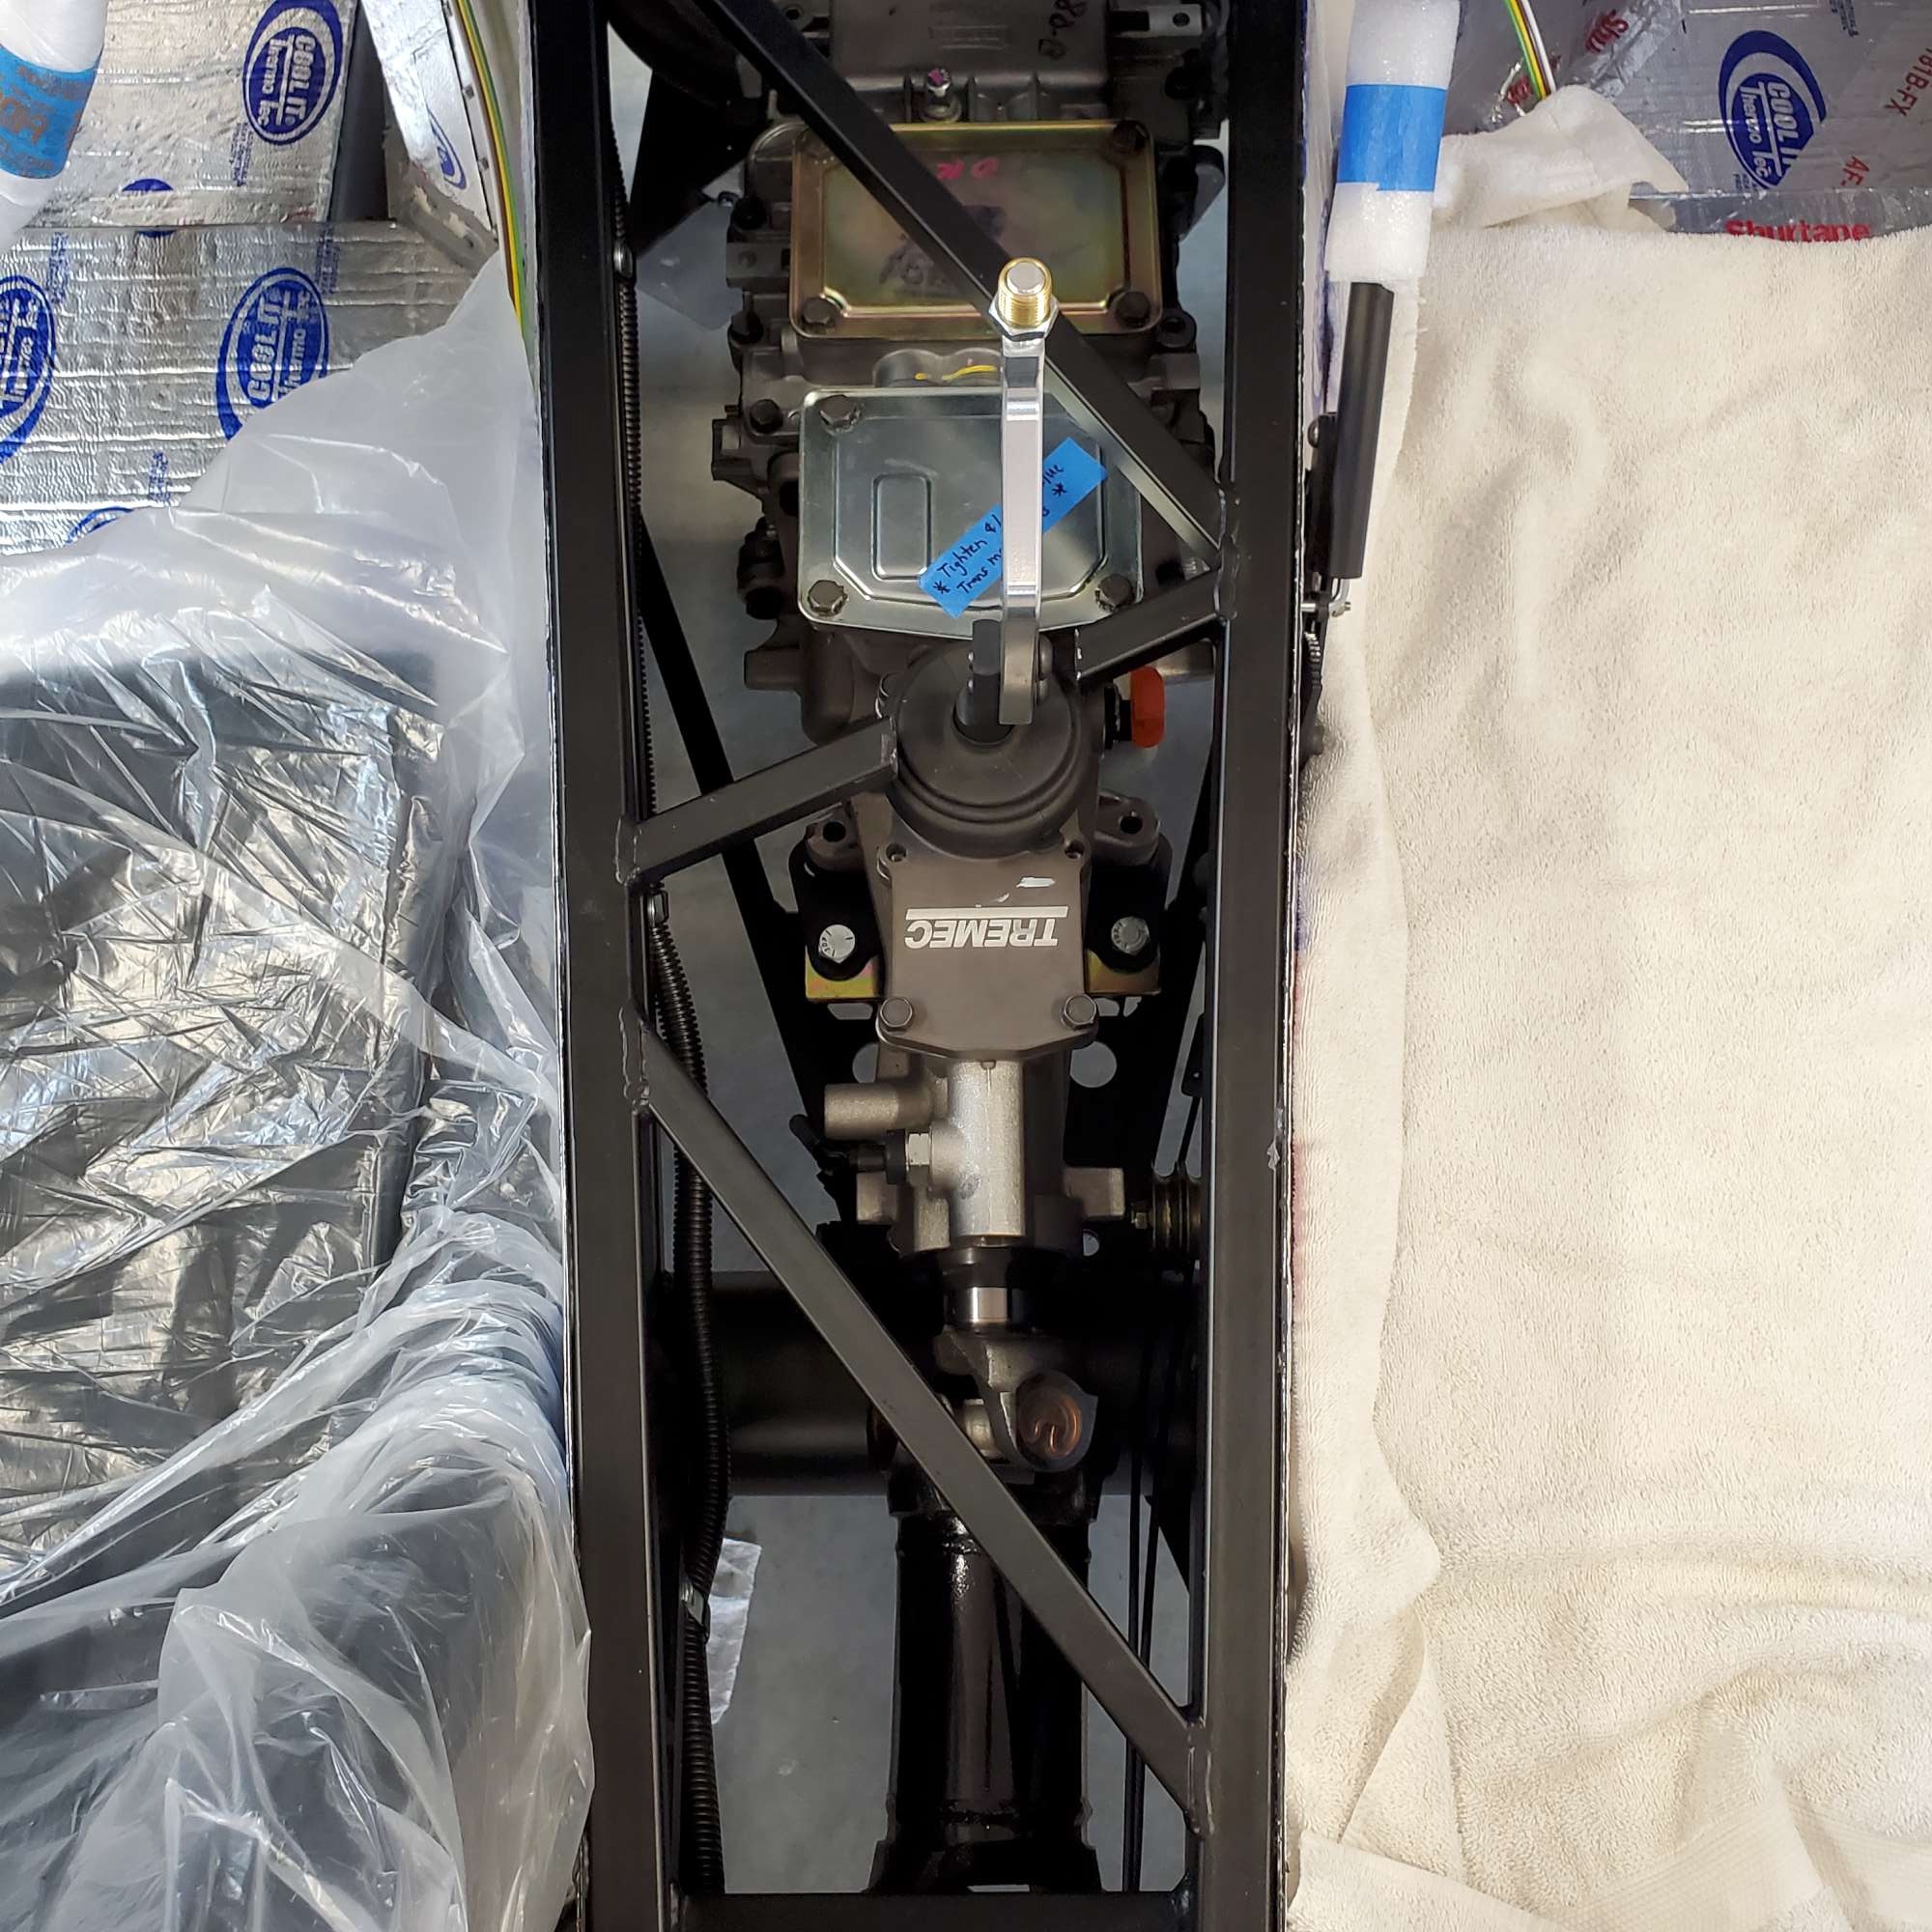
I'm starting to chip away at my To Do list, which I hope will eventually get me to First Start. Right now the list is growing, as I keep thinking of more items to complete, faster than I'm getting others done. Once I pushed the rolling chassis back up on the lift (heavier now with the drivetrain installed!), I refilled the TKO with the AC Delco 75W-80 Synchromesh fluid I had carefully removed and stored.
I added a 45 degree 1/8-27 NPT to angle my fuel press gauge upward which makes it easier to read. This was a tip I read on the forum.
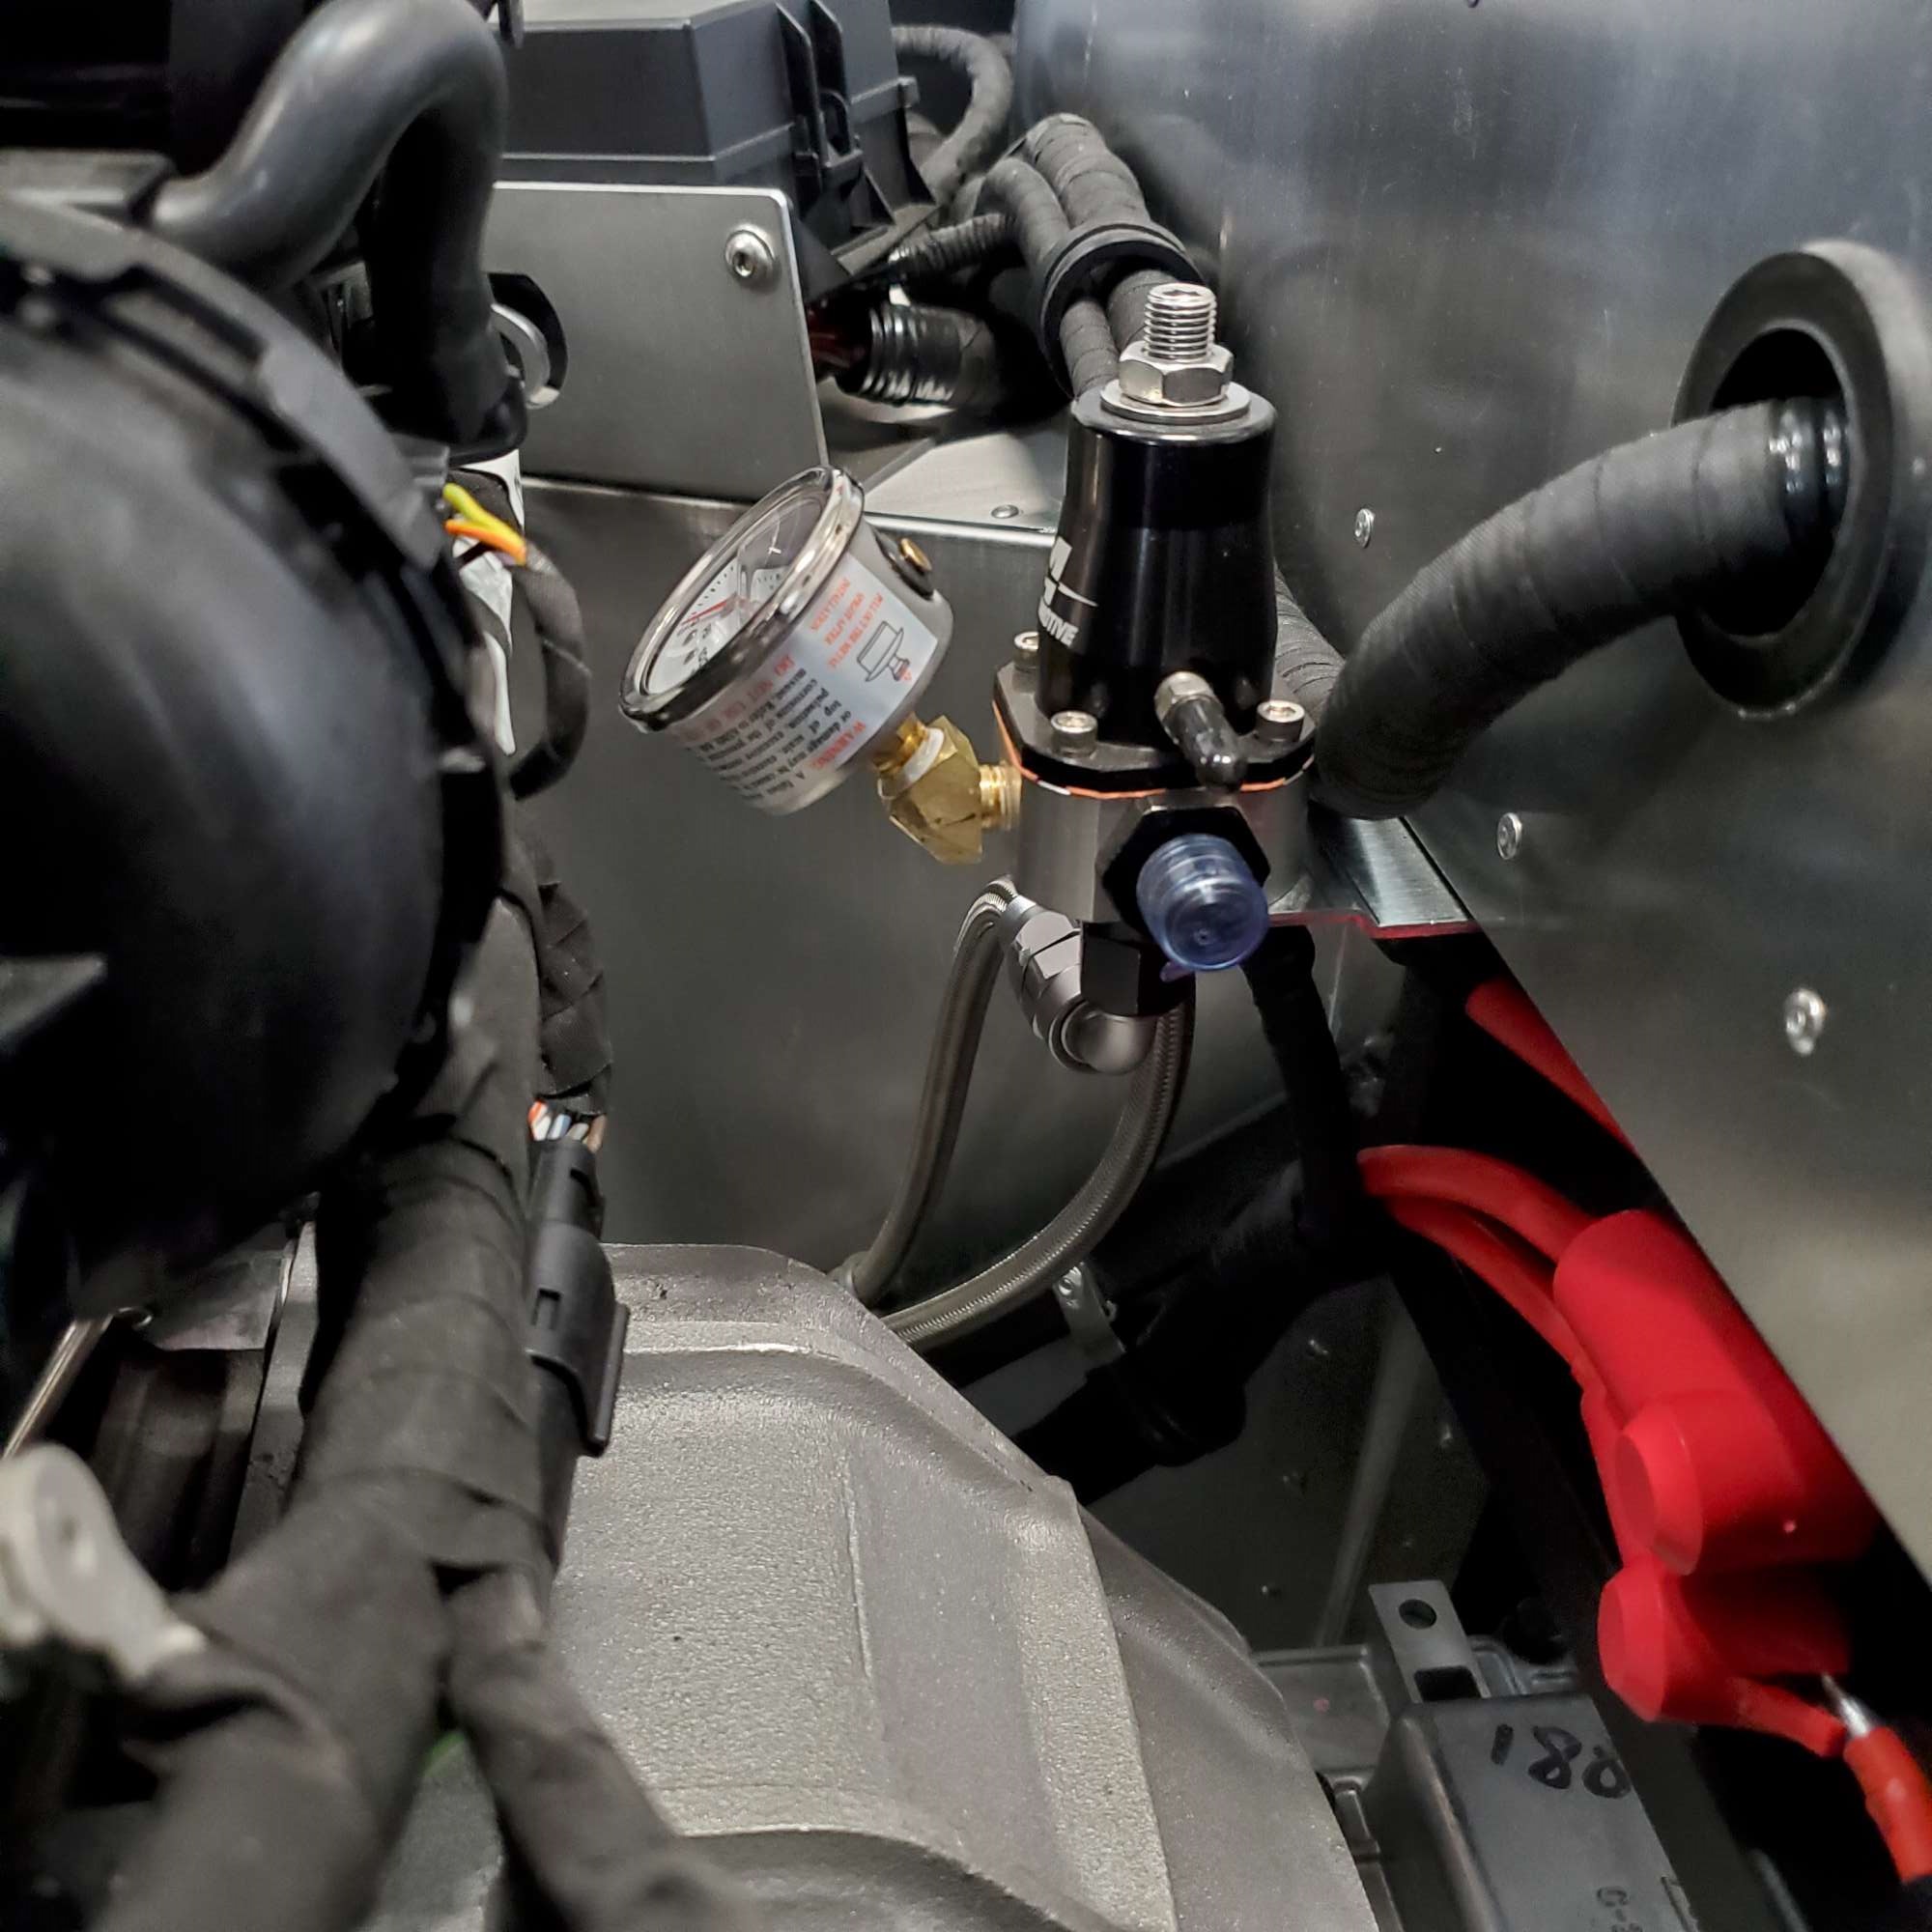
I made up my last section of fuel line and installed. I'm using a 3/8" tube swage to 6 AN on the fuel rail side that came with my Breeze stainless braided fuel line kit. It passed the leak test (ends submerged in water--no bubbles)! I also connected the kit supplied vacuum line to the fuel pressure regulator.

Next, I removed the unused tab in the trunk with my angle grinder. There's just something satisfying about using that tool! I fine tuned it a bit with a hand file, then applied a couple coats of black paint after this picture was taken.
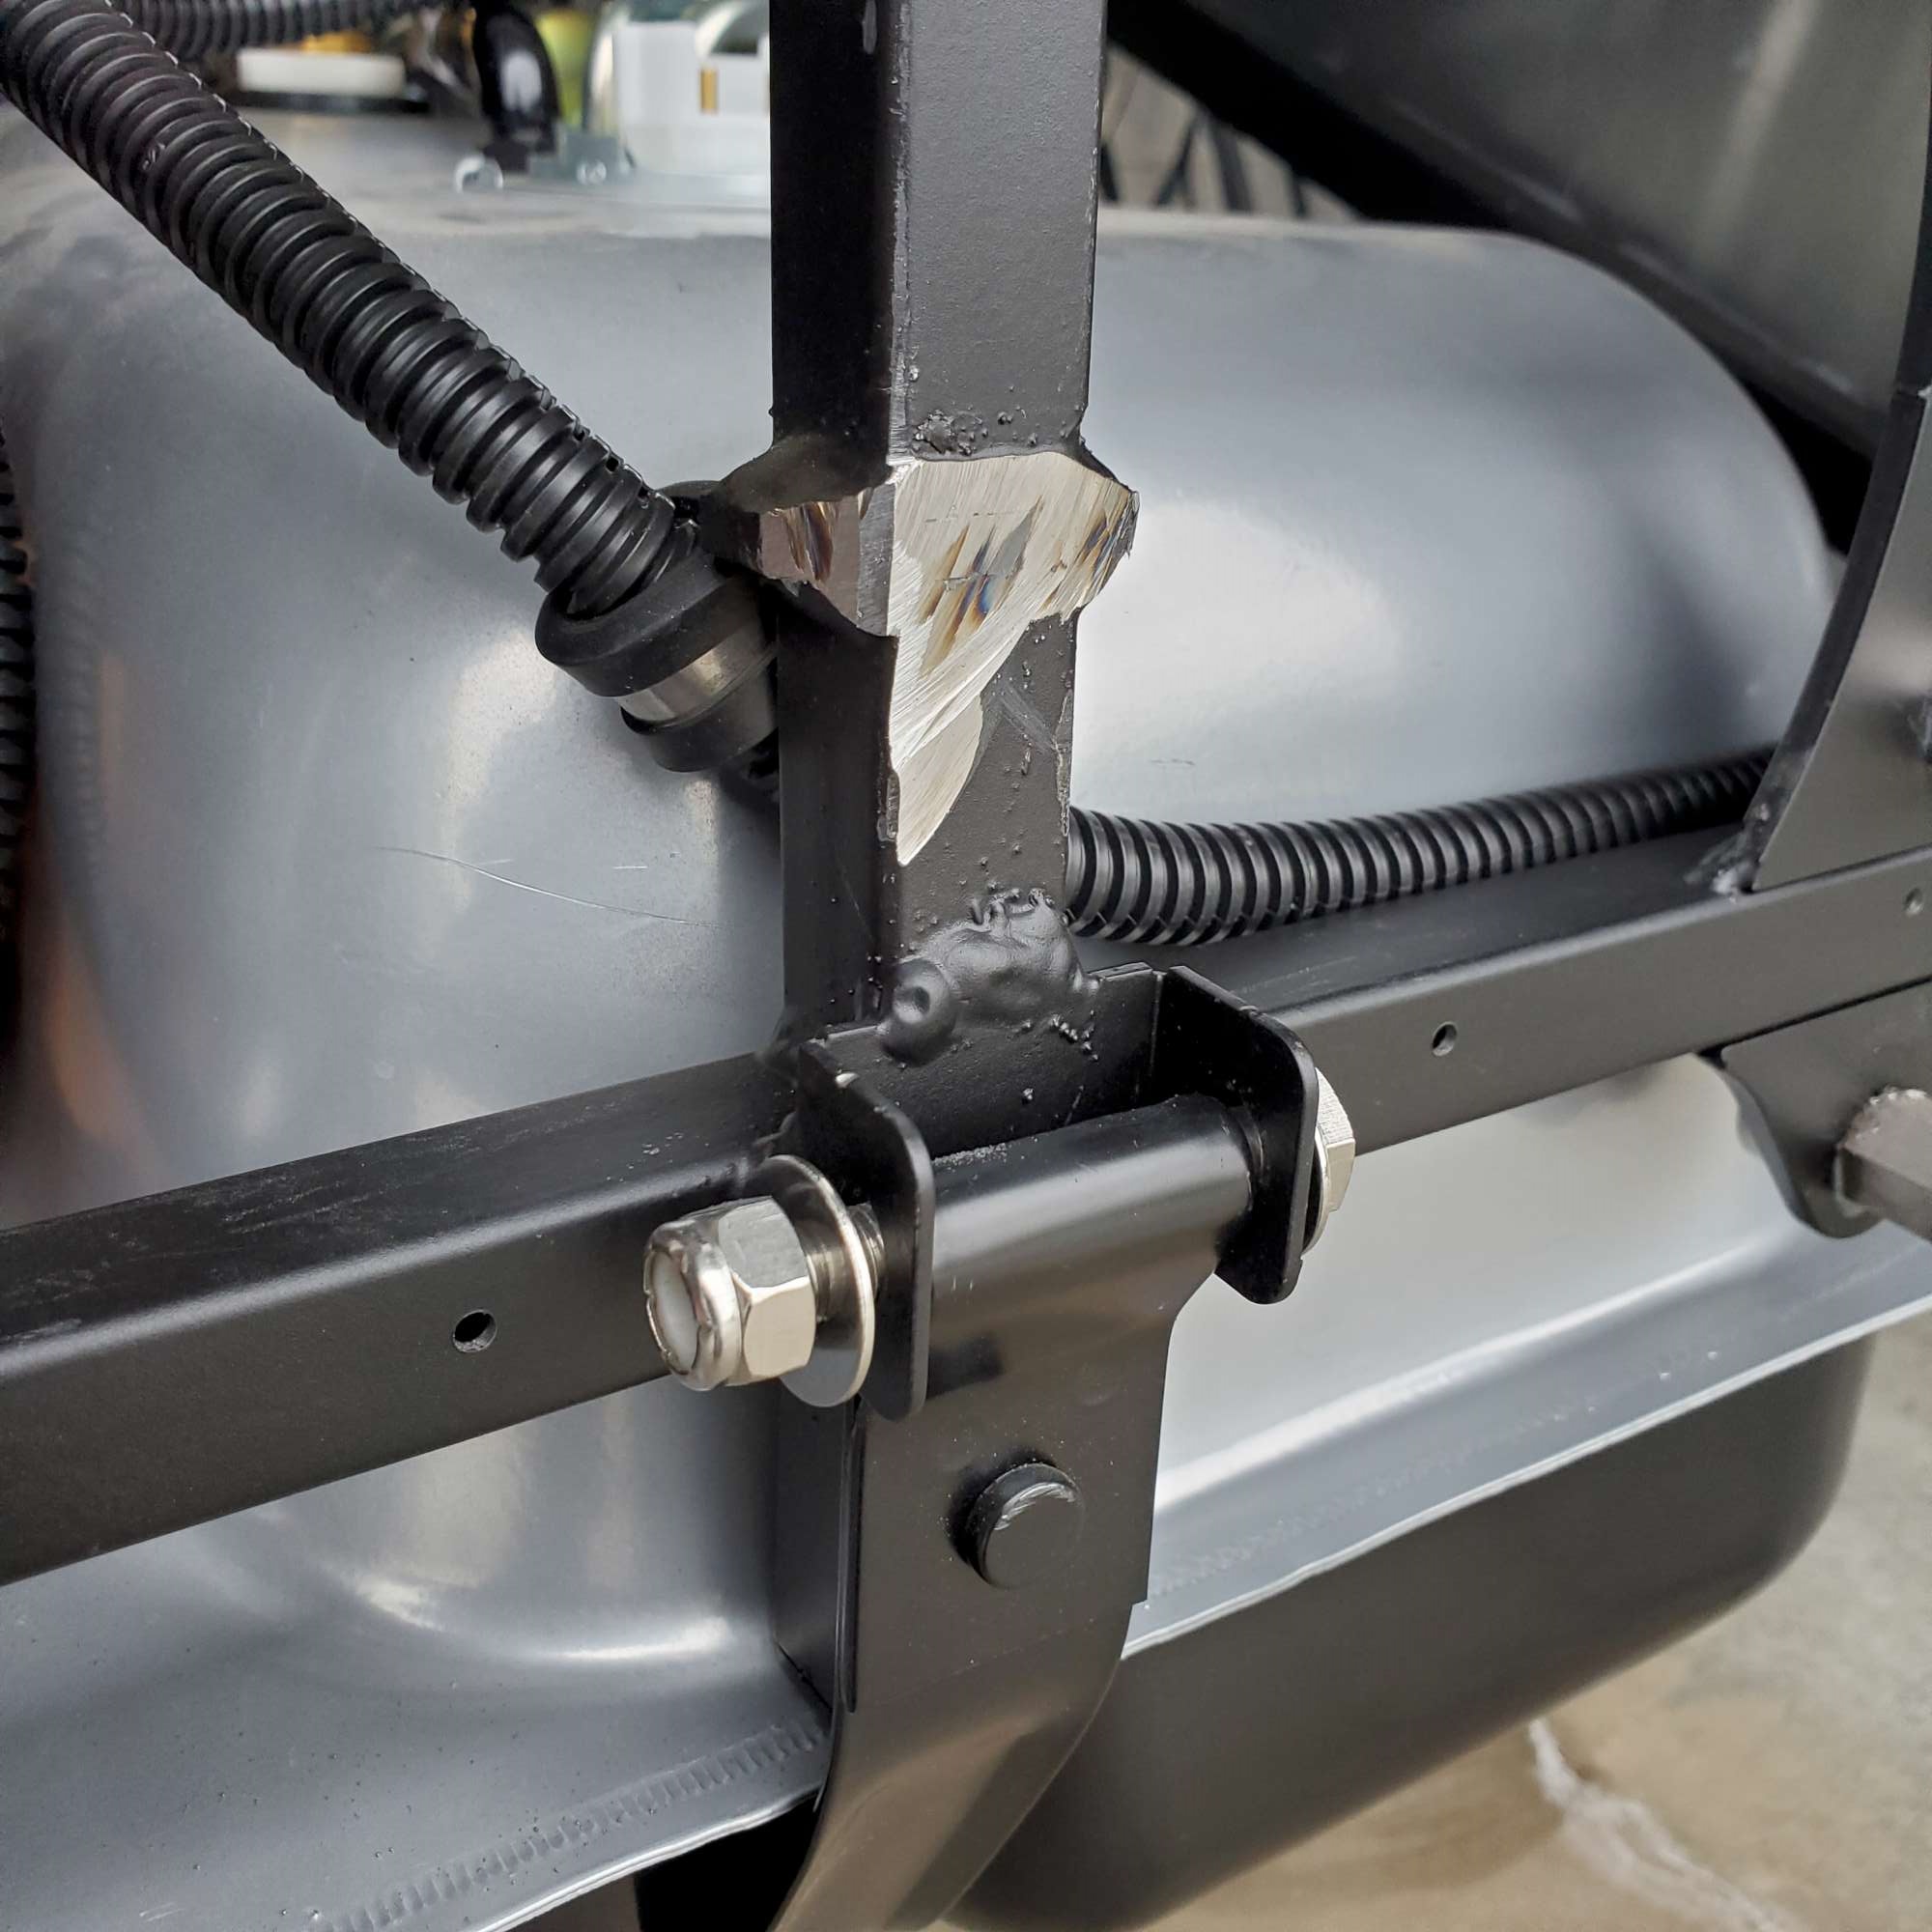
Something I haven't been looking forward to was cutting the 3/4" tube that interferes with the mid-shift position. I knew I wanted the shifter forward of the stock location, so I threw caution to the wind and cut the diagonal. I don't have welding or any real metal fabrication skills, so I wish there was an off-the-shelf bracket of sorts I could bolt on to reinforce it. Anyway, it's done now.
I also made an extension bracket from a piece of quarter inch thick by 2.25" steel I had in my bucket of scrap goodies. This moves the shifter forward an additional 2 1/8". I haven't installed the Breeze seat bases I'll be using, so my exact seating position is not yet known. So, I made a second set of 3/8" holes in the middle in case the 2+ inches is too far forward. Then I hit it with some Eastwood chassis black as you see here. It's temp. in place here with misc. hardware until the dome head SS 3/8-24 bolts arrive from McMaster.
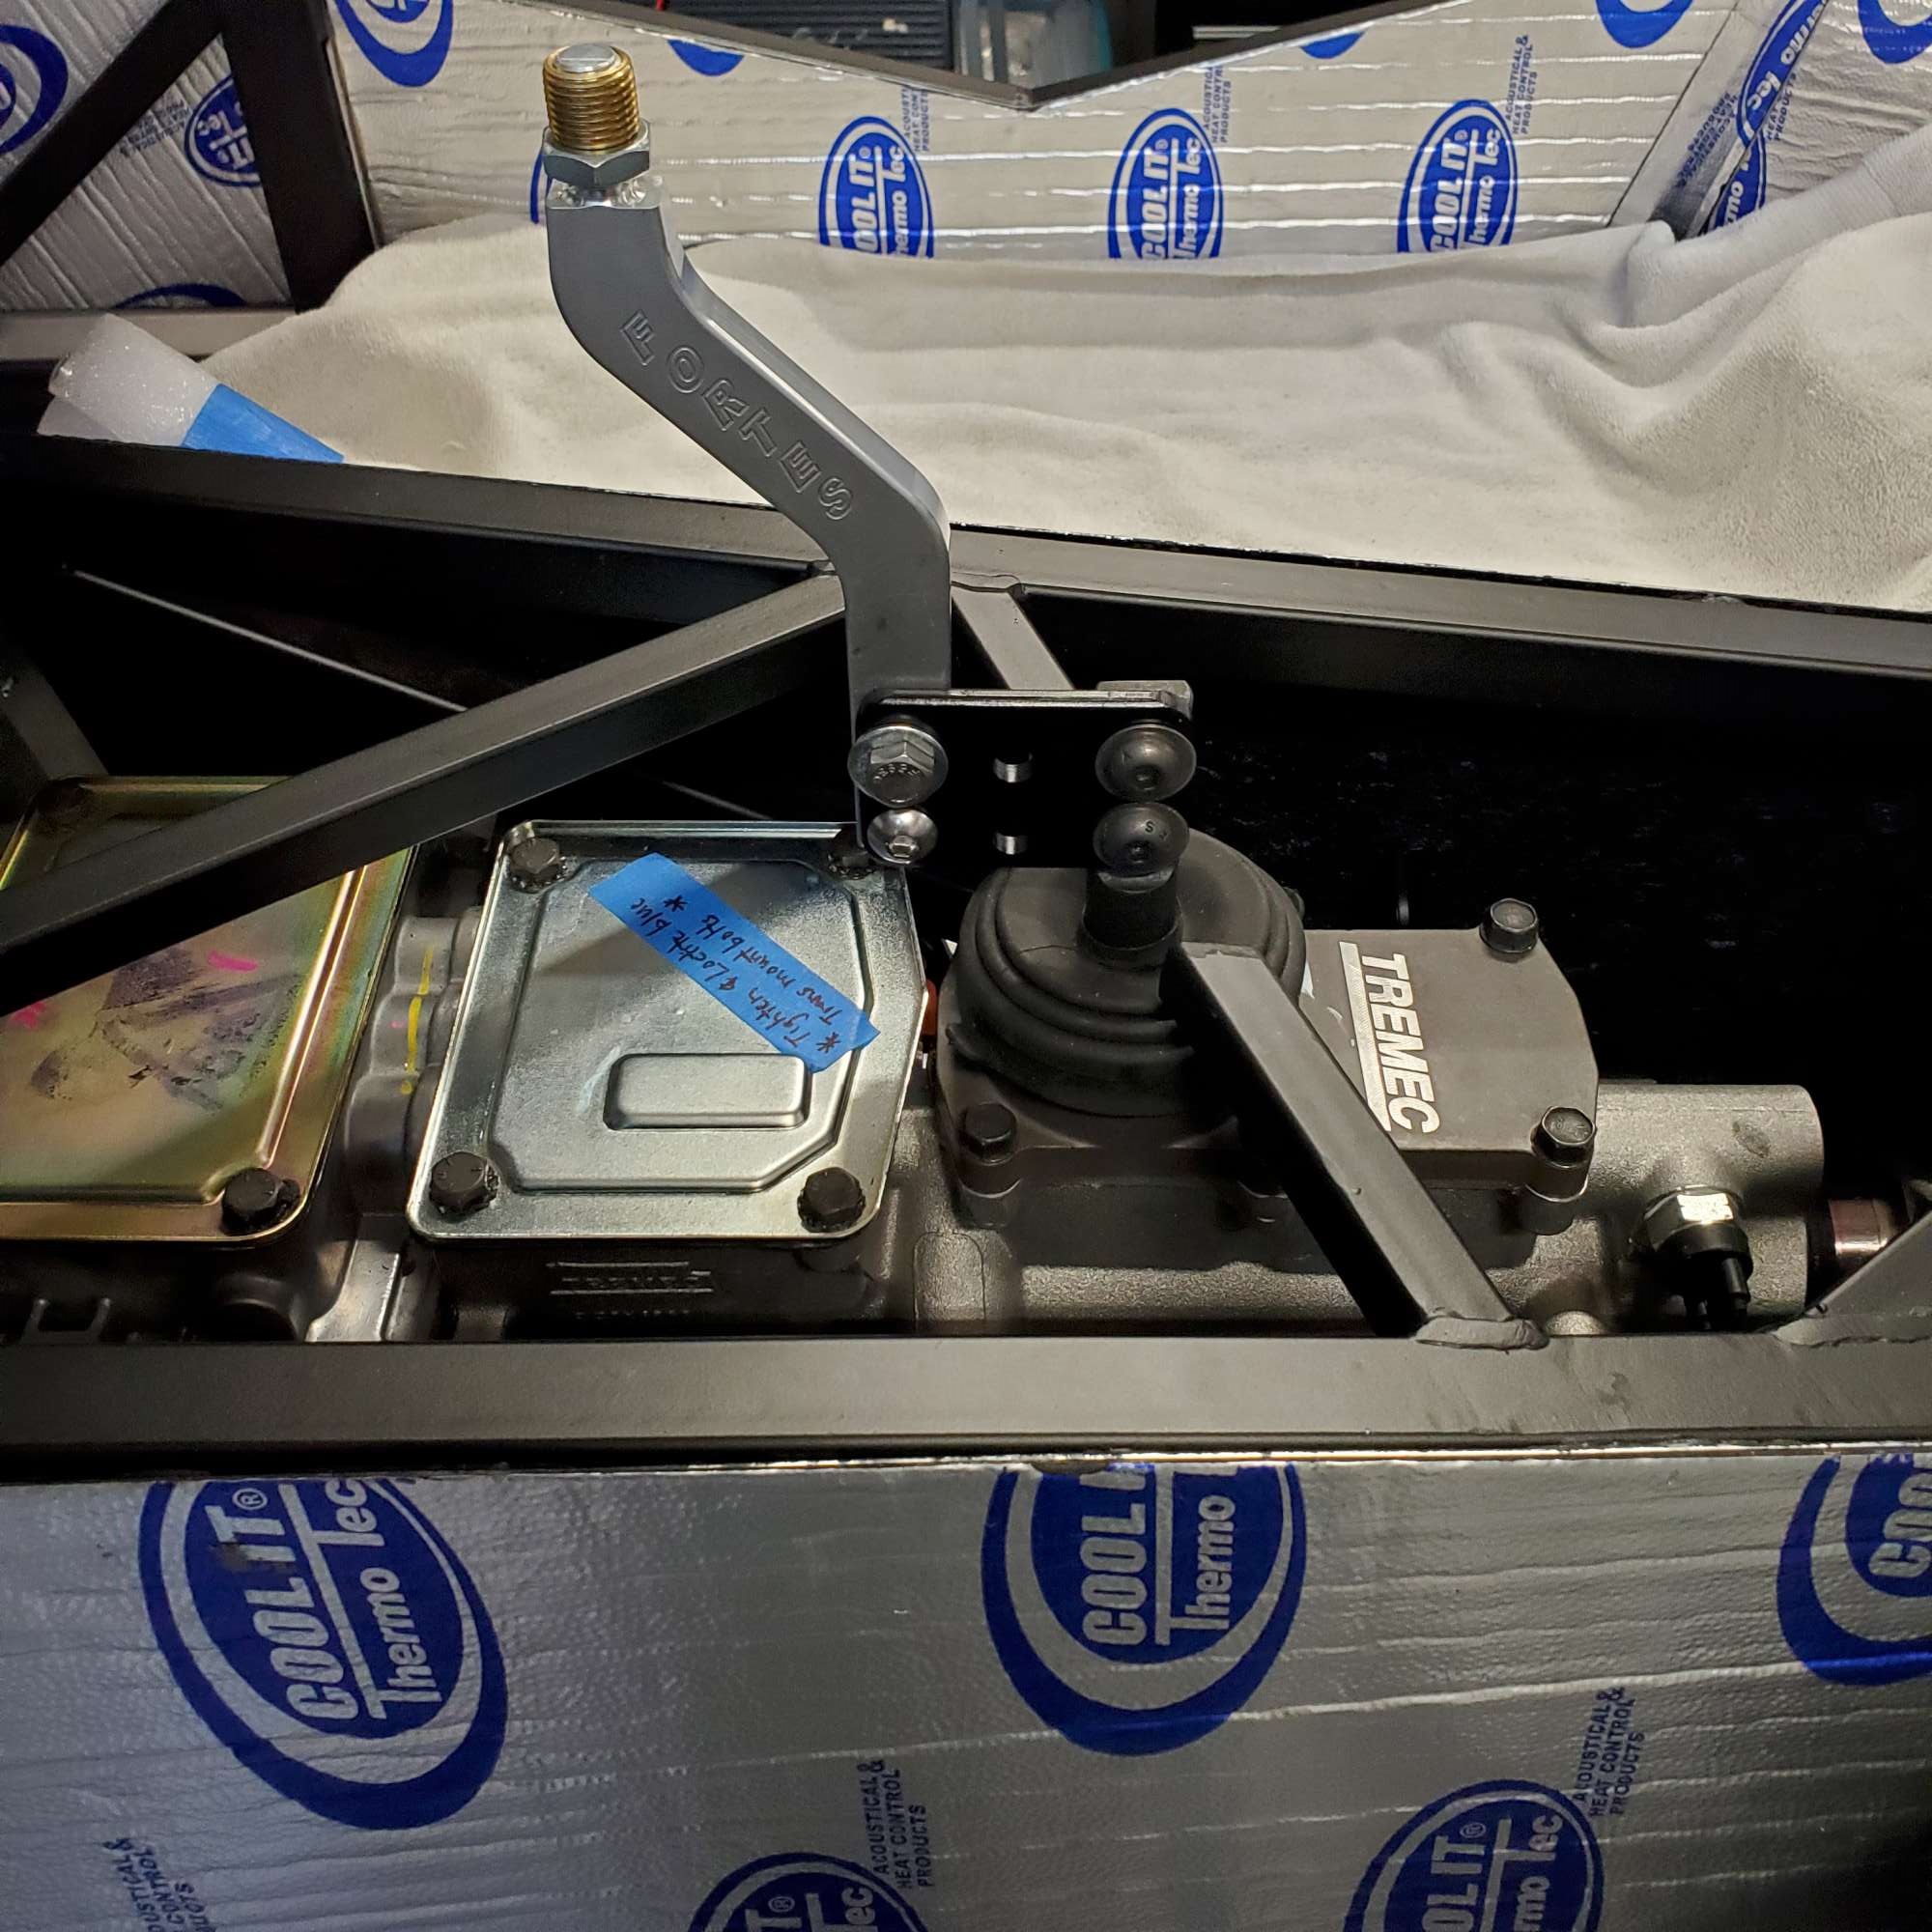
Next, I grounded the engine on the DS using the 12 inch black jumper (4 AWG) that I believe came with the Breeze forward battery mount kit. I used a M8-1.25 boss on the block just below the power steering pump lower mount.
Driver side ground
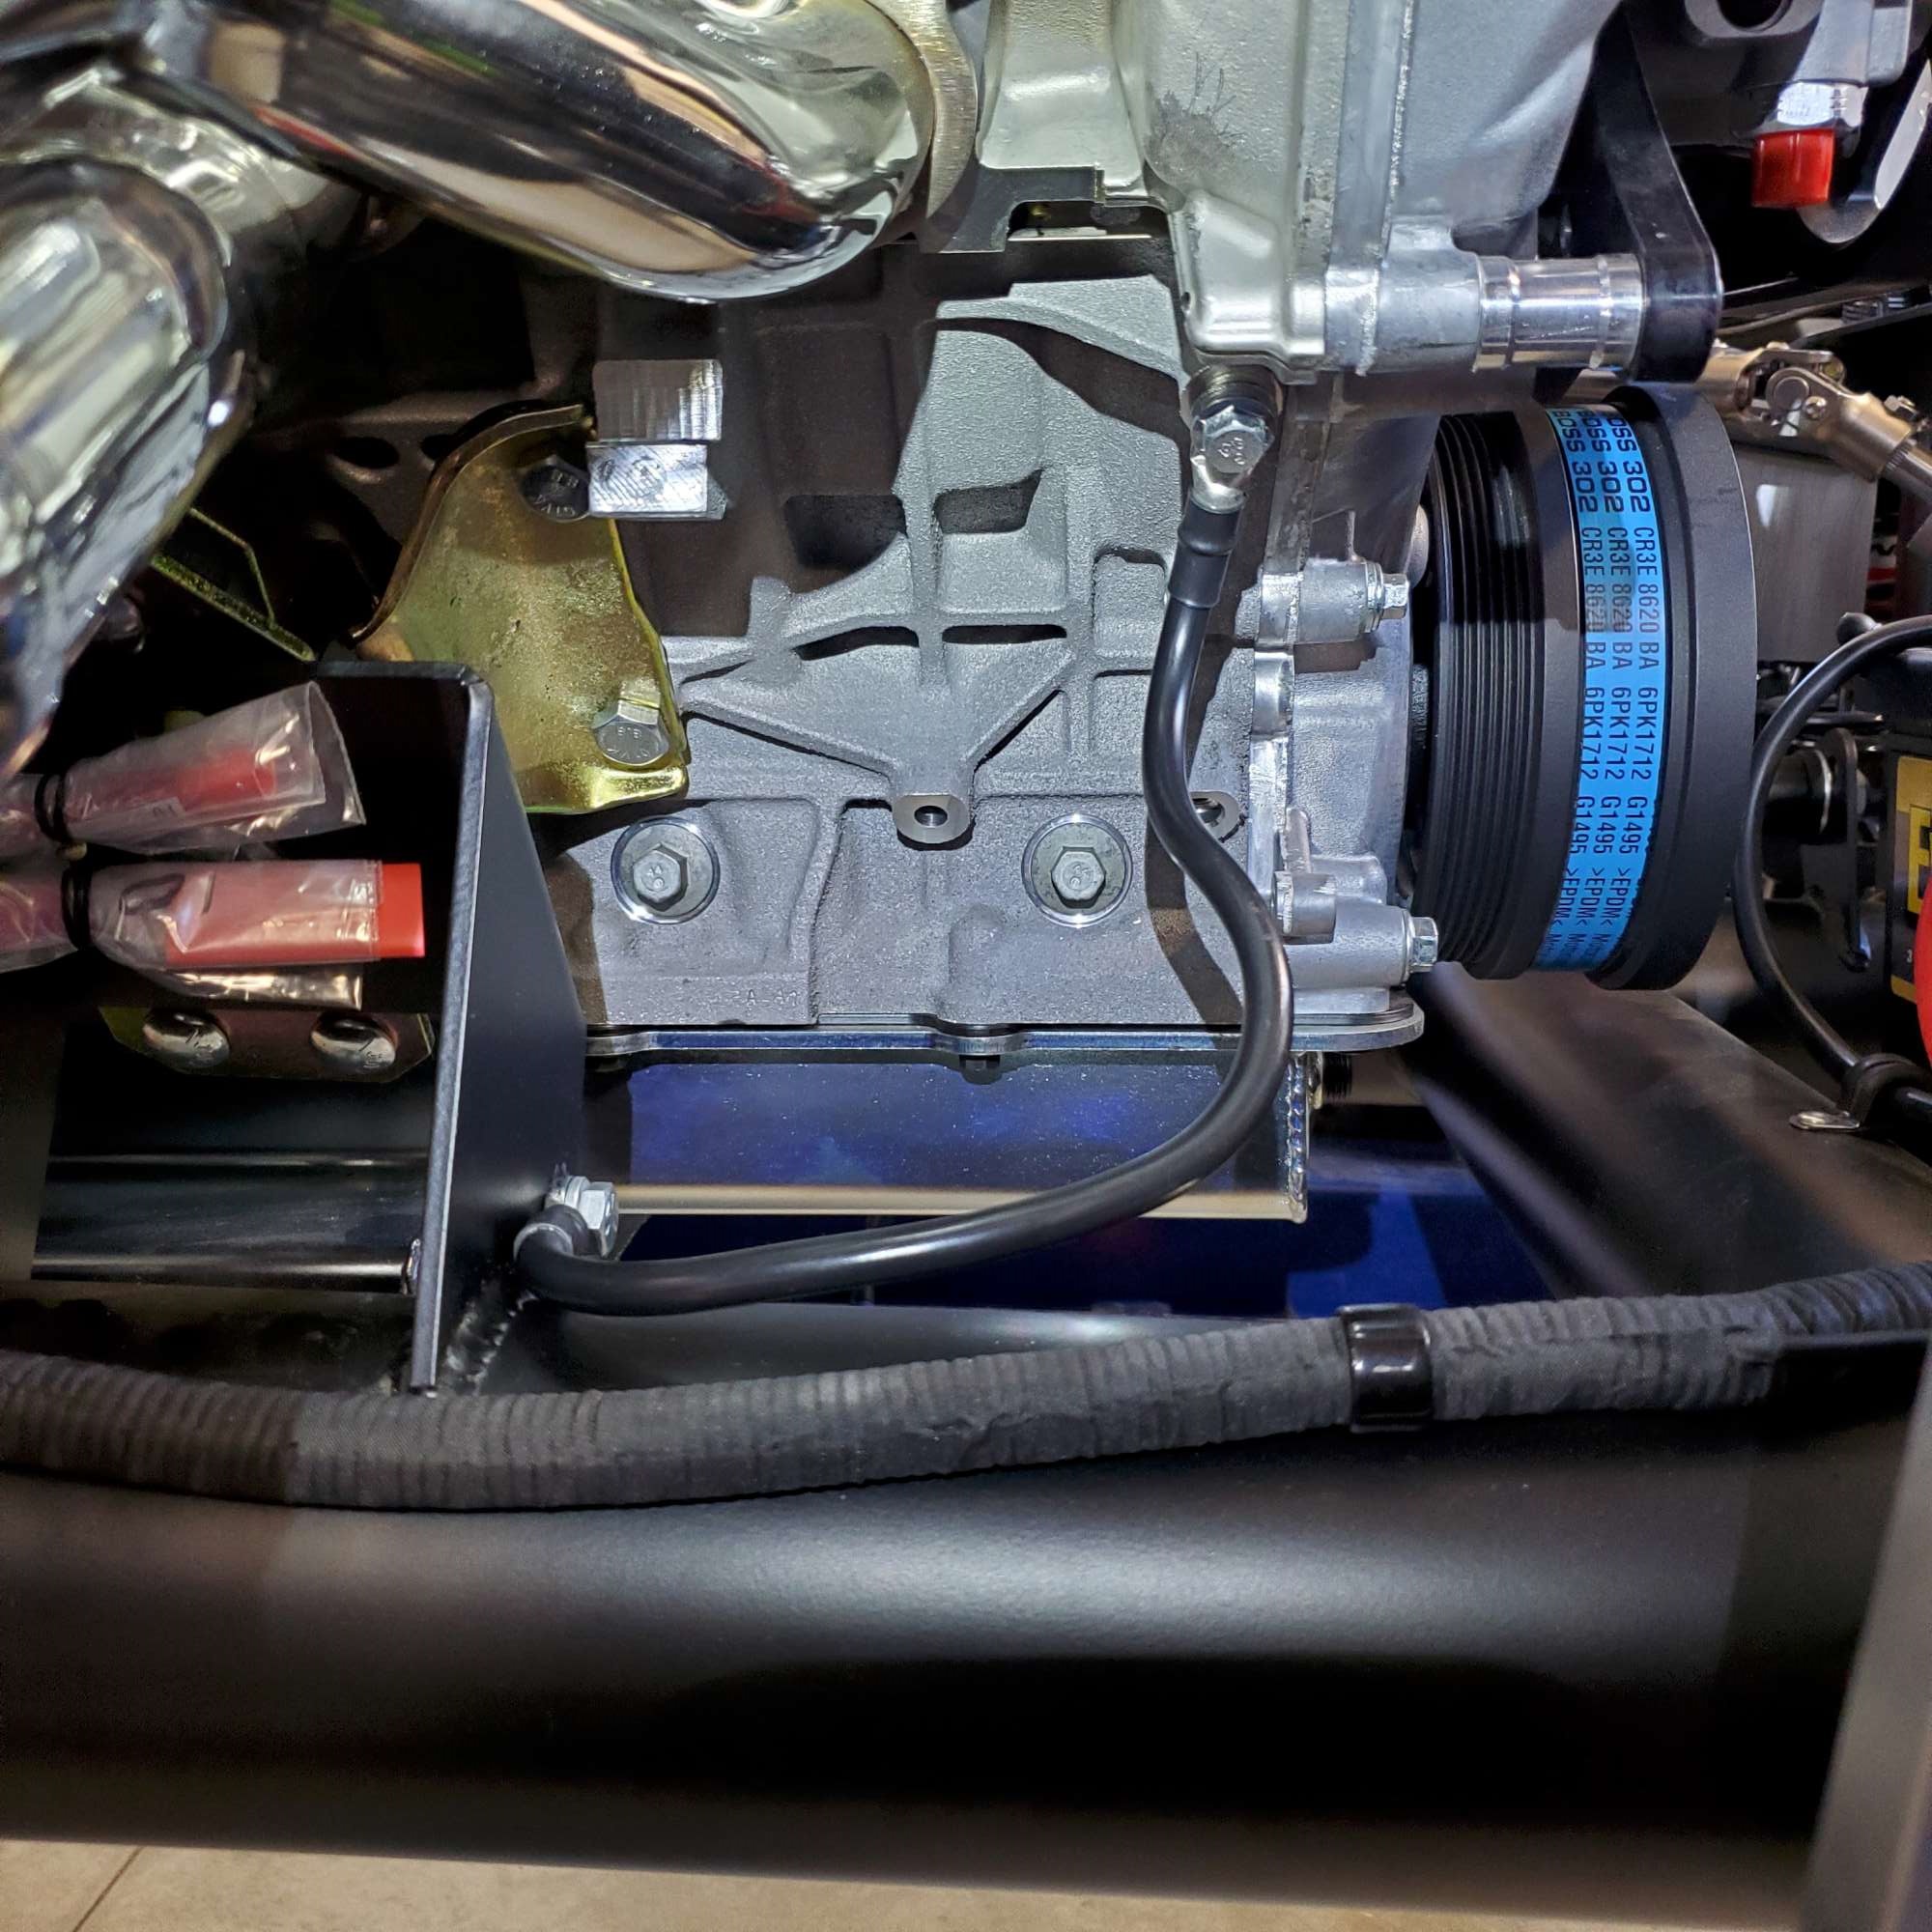
I also grounded the PS of the motor. For that I used the flat braided grounding strap that comes with the kit. I drilled a 5/16" hole in the motor mount and connected the other end to the block in a M10-1.5 mounting boss--just to the rear of the motor mount. Not visible in this picture, but I removed the powder coat on the inside of the motor mount with the wire brush attachment on my Dremel, and applied a bit of dielectric grease. The most resistance I could find between the battery negative post and various points on the engine block was 0.2 Ohms. I'm good with that. Perhaps unnecessary to ground both sides of the block, but I had all the pieces on-hand, so why not?
Passenger side ground

In a post quite few months back I described how I was stumped as to why my PS front wheel had a lot of toe-in. So much so I couldn't push it on and off the lift. Well, when local builder, Jim, was over to help with the drivetrain install, I asked what he thought. He discovered I had reversed the length adjustment between front and rear UCA arms on the DS. So, it was the DS out of whack, not the PS! After correcting to the F5 recommended measurements, the PS and DS are now pretty much symmetrical. Mystery solved. Thanks, Jim!
P.S. I'm off the fence on the Moroso recovery tank option: going for it! Ordered the parts this weekend ($$ ouch!) from Summit Racing. A big thanks to Edwardb for thoroughly documenting the parts list!
Last edited by 460.465USMC; 05-22-2022 at 10:06 PM.
Chris
Coupe complete kit delivered: 4/22/24.
Build Thread. Coyote. T-56. IRS w/3.55. Wilwoods. PS. HVAC. Side windows.
MK4 Complete kit.
Build Thread Index. Delivered: 10/15/2020. Legal: 7/25/23. Coyote Gen3. TKO600 (0.64 OD). IRS w/3.55. PS. Wilwoods. Sway bars. This build is dedicated to my son, Benjamin.
Build Thread.
-
Post Thanks / Like - 0 Thanks, 2 Likes
-
05-23-2022, 12:28 AM
#374
Senior Member
You are moving right along. I can almost hear that thing running. The more I look at your progress the more I realize I have a lot more to do before my first start….
Jim
-
Post Thanks / Like - 0 Thanks, 1 Likes
-
05-23-2022, 10:42 AM
#375
25th Anniversary #9772

-
Post Thanks / Like - 1 Thanks, 0 Likes
-
05-23-2022, 11:07 AM
#376
Senior Member
Love the shifter Chris. Might need to play with your opening/boot to accommodate the adaptor you made. I would offset the hole forward, maybe get a test piece and play with it when it's time.
MK4 #10008 - Ordered 10/06/20, Delivered 03/03/21, First Start 7/22/21, First Go Kart 7/24/21
Paint by Metal Morphous 5/14/22, Legally registered 6/8/22, Graduated 7/20/22
Build Thread
https://thefactoryfiveforum.com/show...been-delivered
Complete Kit, Ford 306, Sniper/Dual Sync, T5, Hydraulic clutch
-
Post Thanks / Like - 0 Thanks, 1 Likes
-
05-23-2022, 01:27 PM
#377
Senior Member
Originally Posted by
Blitzboy54
Love the shifter Chris. Might need to play with your opening/boot to accommodate the adaptor you made. I would offset the hole forward, maybe get a test piece and play with it when it's time.
Hi Jesse. Yeah, I was thinking about the transmission tunnel cover hole and boot as well. Like you suggest, I will probably use the kit supplied trans tunnel cover to mock up the hole diameter/centering. Then, order a trans tunnel cover from one of the forum vendors (my little brake is only 30", so can't do the bend myself).
Chris
Coupe complete kit delivered: 4/22/24.
Build Thread. Coyote. T-56. IRS w/3.55. Wilwoods. PS. HVAC. Side windows.
MK4 Complete kit.
Build Thread Index. Delivered: 10/15/2020. Legal: 7/25/23. Coyote Gen3. TKO600 (0.64 OD). IRS w/3.55. PS. Wilwoods. Sway bars. This build is dedicated to my son, Benjamin.
Build Thread.
-
05-24-2022, 09:37 AM
#378
Senior Member
Originally Posted by
460.465USMC
Something I haven't been looking forward to was cutting the 3/4" tube that interferes with the mid-shift position. I knew I wanted the shifter forward of the stock location, so I threw caution to the wind and cut the diagonal. I don't have welding or any real metal fabrication skills, so I wish there was an off-the-shelf bracket of sorts I could bolt on to reinforce it. Anyway, it's done now.
I had to do something similar with the 3/4" tube that interfered with the clutch on the early MK4 frames. I drilled and tapped some inserts which I JB Welded in the ends of the cut frame, then attached a solid piece of steel connecting bar to the two inserts, which looks okay:

Pedal box by John Ibele, on Flickr
One other thought, you could get some steel channel of the same dimensions, and cut of 3 of the 4 walls on the ends, so that you have a 'tab' you can bend on each end. With that, you could replace the whole bar with one just behind it that you bolt into the frame, drilling and bolting through the tabs. The way I figure it neither solution is going to behave the same way when crumpled, so it's all what works for the builder's peace of mind. Way to keep moving through the list, Chris, we're kinda at the same stage now.
MK4 #7838: IRS 3.55 TrueTrac T5z Dart 347
The drawing is from ~7th grade, mid-1970s
Meandering, leisurely build thread is
here
-
Post Thanks / Like - 1 Thanks, 1 Likes
-
05-24-2022, 12:34 PM
#379
Senior Member
Hi John. I don't think the first option will work, as the shifter travel might touch the support tube. I think the second option you suggested would work. Thanks for the idea! Good food for thought.
Chris
Coupe complete kit delivered: 4/22/24.
Build Thread. Coyote. T-56. IRS w/3.55. Wilwoods. PS. HVAC. Side windows.
MK4 Complete kit.
Build Thread Index. Delivered: 10/15/2020. Legal: 7/25/23. Coyote Gen3. TKO600 (0.64 OD). IRS w/3.55. PS. Wilwoods. Sway bars. This build is dedicated to my son, Benjamin.
Build Thread.
-
05-28-2022, 10:12 PM
#380
Senior Member
Forte Hyd Clutch | Oil/H2O Conn | F5 Open House
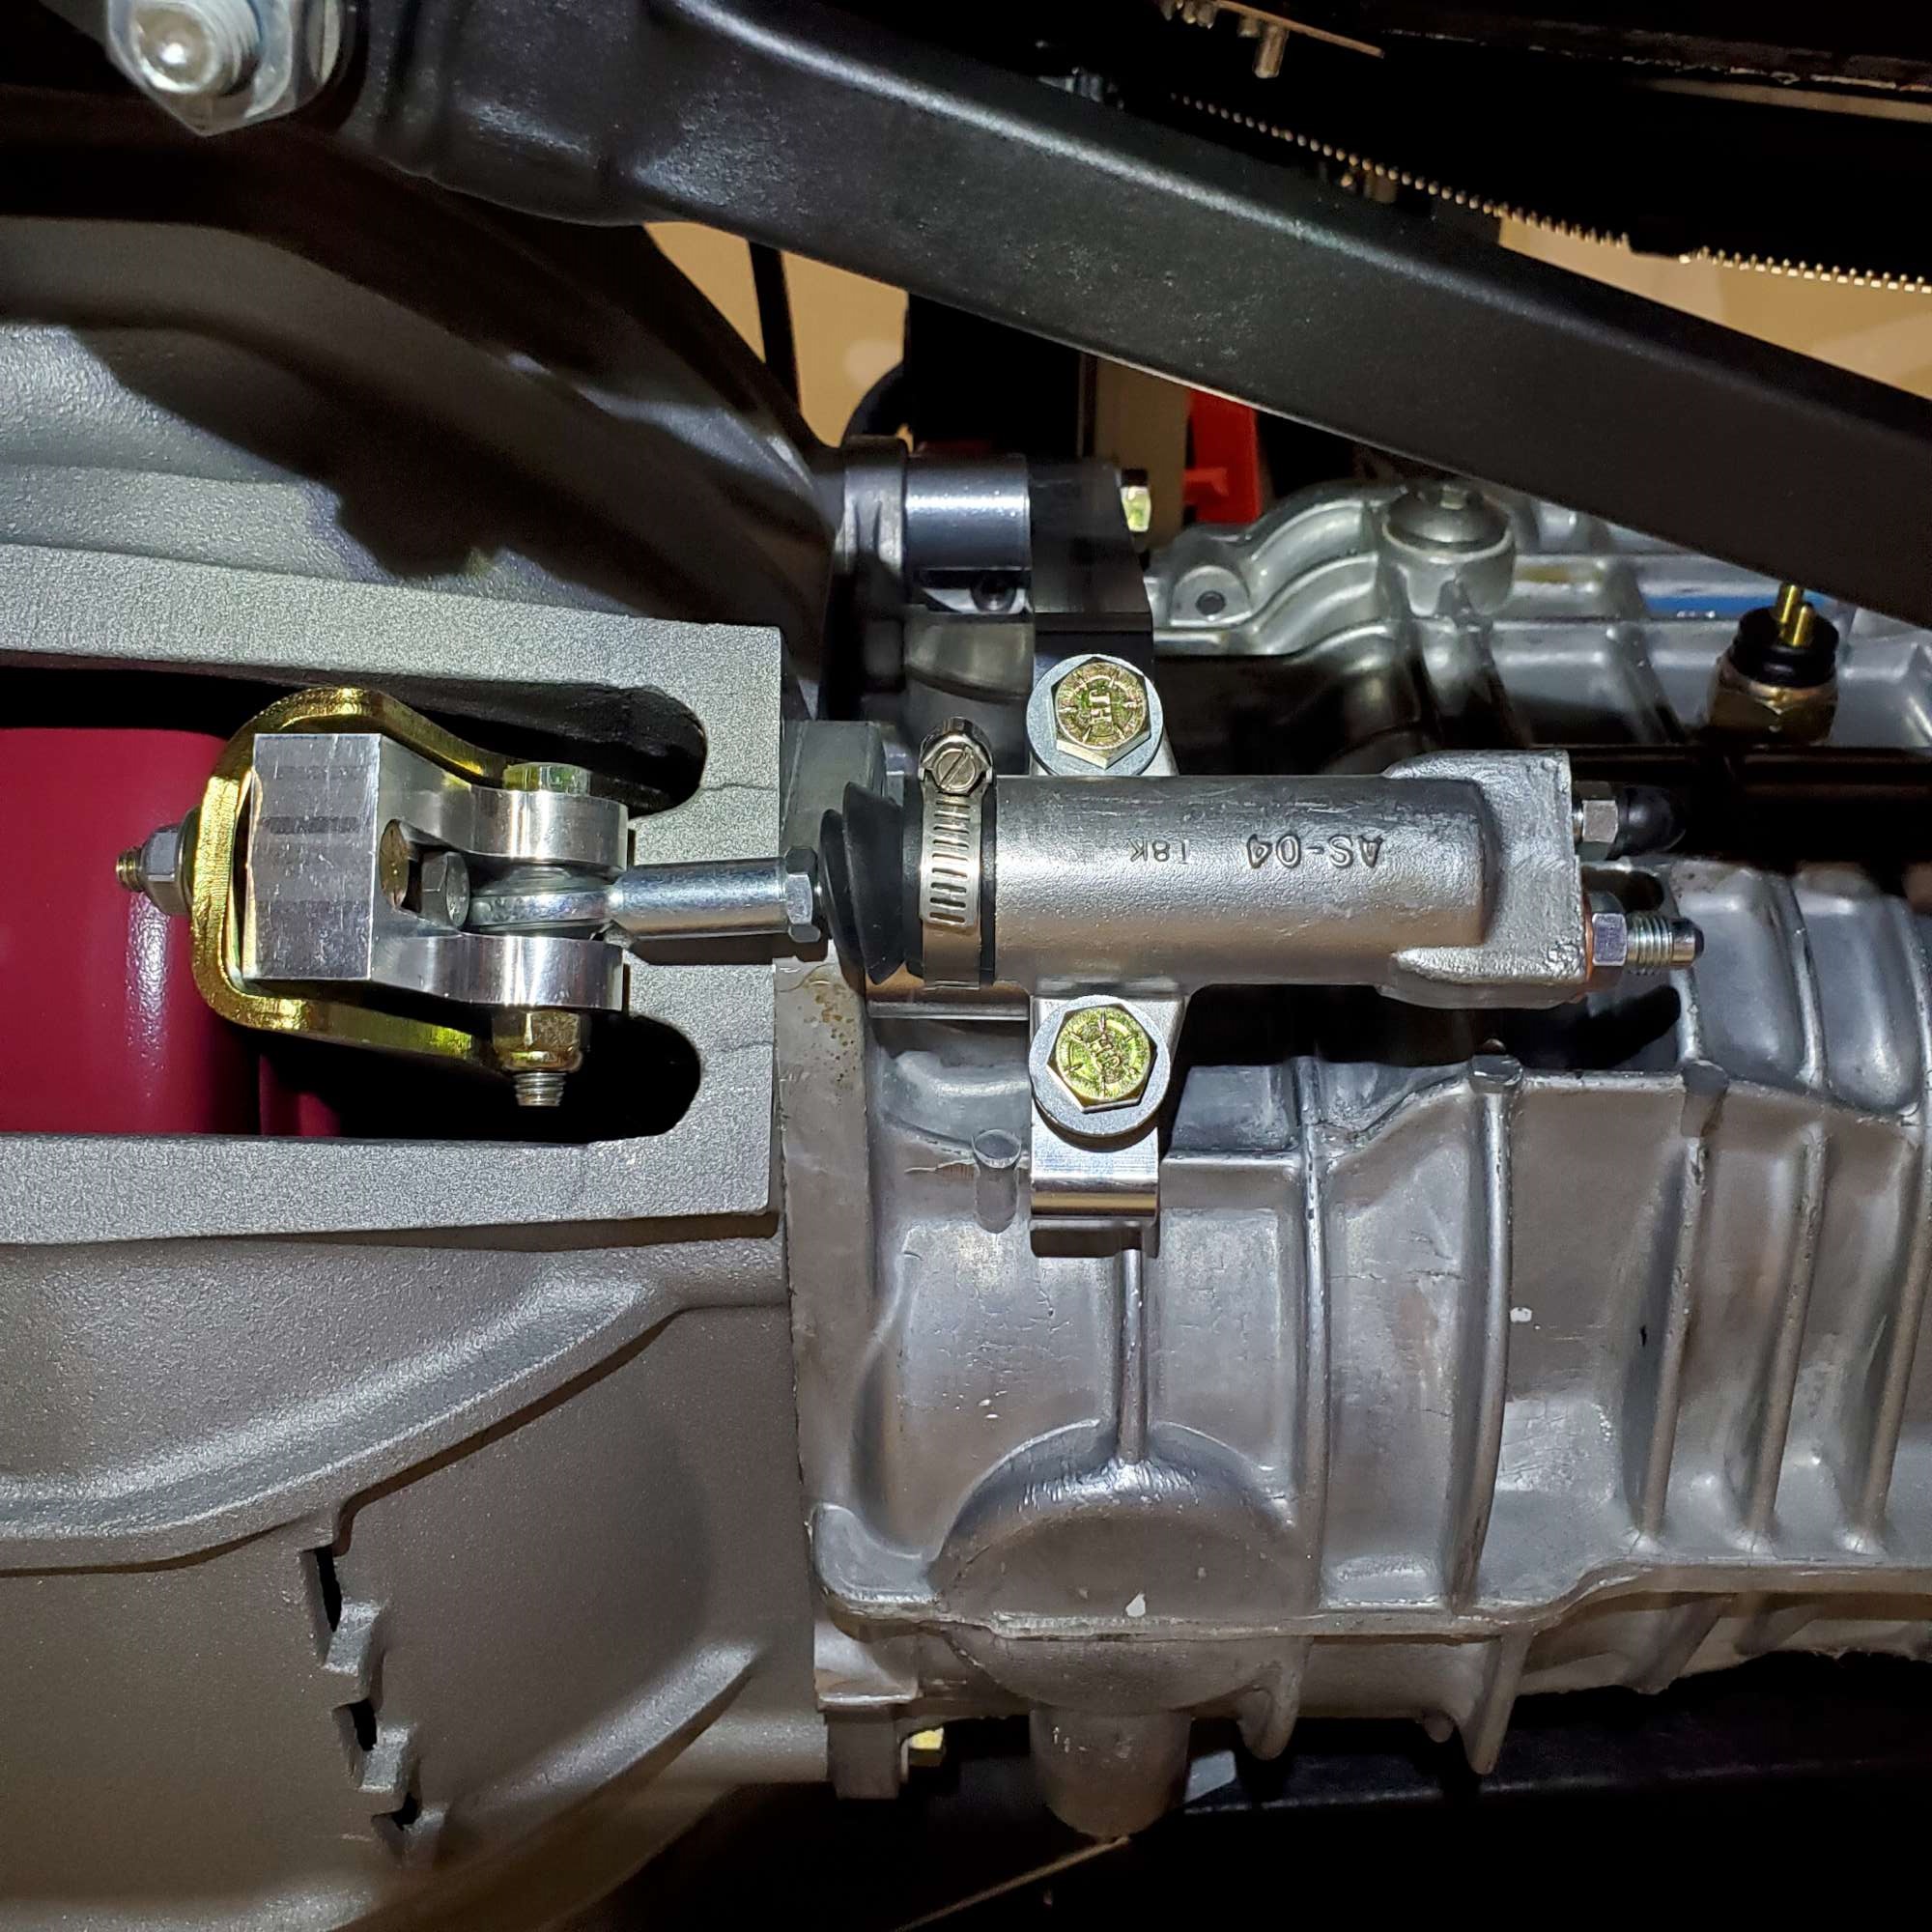
The next item I tackled this week was the Forte hydraulic clutch slave cylinder install. Here are the instructions from Mike's website:
TO ADJUST THE CLUTCH:
– YOU MUST PUSH THE SLAVE PISTON REARWARD TO BOTTOM OF THE CYLINDER SO THE PISTON
RETURNS TO THE BASE OF STROKE
- YOU WILL NEED TO CUT TO FIT PUSHROD
- ONCE CUT USE THREADED ADJUSTER TO SET 3/16″ (.187) CLEARANCE SPACING
Looking for some more context as to what is meant by "clearance spacing" (yes, I'm a noobie!) I did some research on the forum. That helped fill in some of the gap, but ultimately I had to reach out to a couple guys (local builder Jim and Edwardb) to really understand how this works. With their help, here's how I installed the slave cylinder and set the spacing:
- Move clutch fork forward so the throw-out bearing is making contact with the clutch fingers.
- Thread the rod into the threaded adjuster about half way. The rod is just a 5/16-24 bolt with the head cut off. If you cut it too short, no biggie. Pick up a replacement at the hardware store.
- Put the metal bushing on the other end of the rod, and push it into the cup of the piston.
- Slide the piston all the way in (fully retracted).
- Cut off enough of the rod to allow for 3/16" of play, or "clearance" (i.e. the fork moves off of the clutch fingers and toward the slave ~3/16").
- Tighten the jam nut.
I installed a hose clamp over the rubber boot, so it won't push off during clutch engagement. Like some others I added a second 1/4-20 bolt at the clutch fork attachment point just for good measure. Here's how it turned out:
The Coyote/TKO setup I ordered from Forte came with a cover over the clutch fork. At first, I thought it was just for protection during transport. But as I looked at it more closely, it became obvious someone put some thought into it. It attaches with two 10-24 screws into the bellhousing, and even has foam strips along its edges that make contact with the bellhousing. Seems like a good piece to keep in place for protection against road debris and whatnot. I had to open up the U-shaped hole to allow ample clearance for the slave piston/boot to travel forward during the clutch engagement stroke. Added a piece of edge trim, cleaned up the surfaces, lightly sanded, and then hit it with a coat of Dupli-Color clear ceramic. It hangs down 5/8" below the 4" chassis tubes, which is 1/8" below the bottom of the bellhousing.
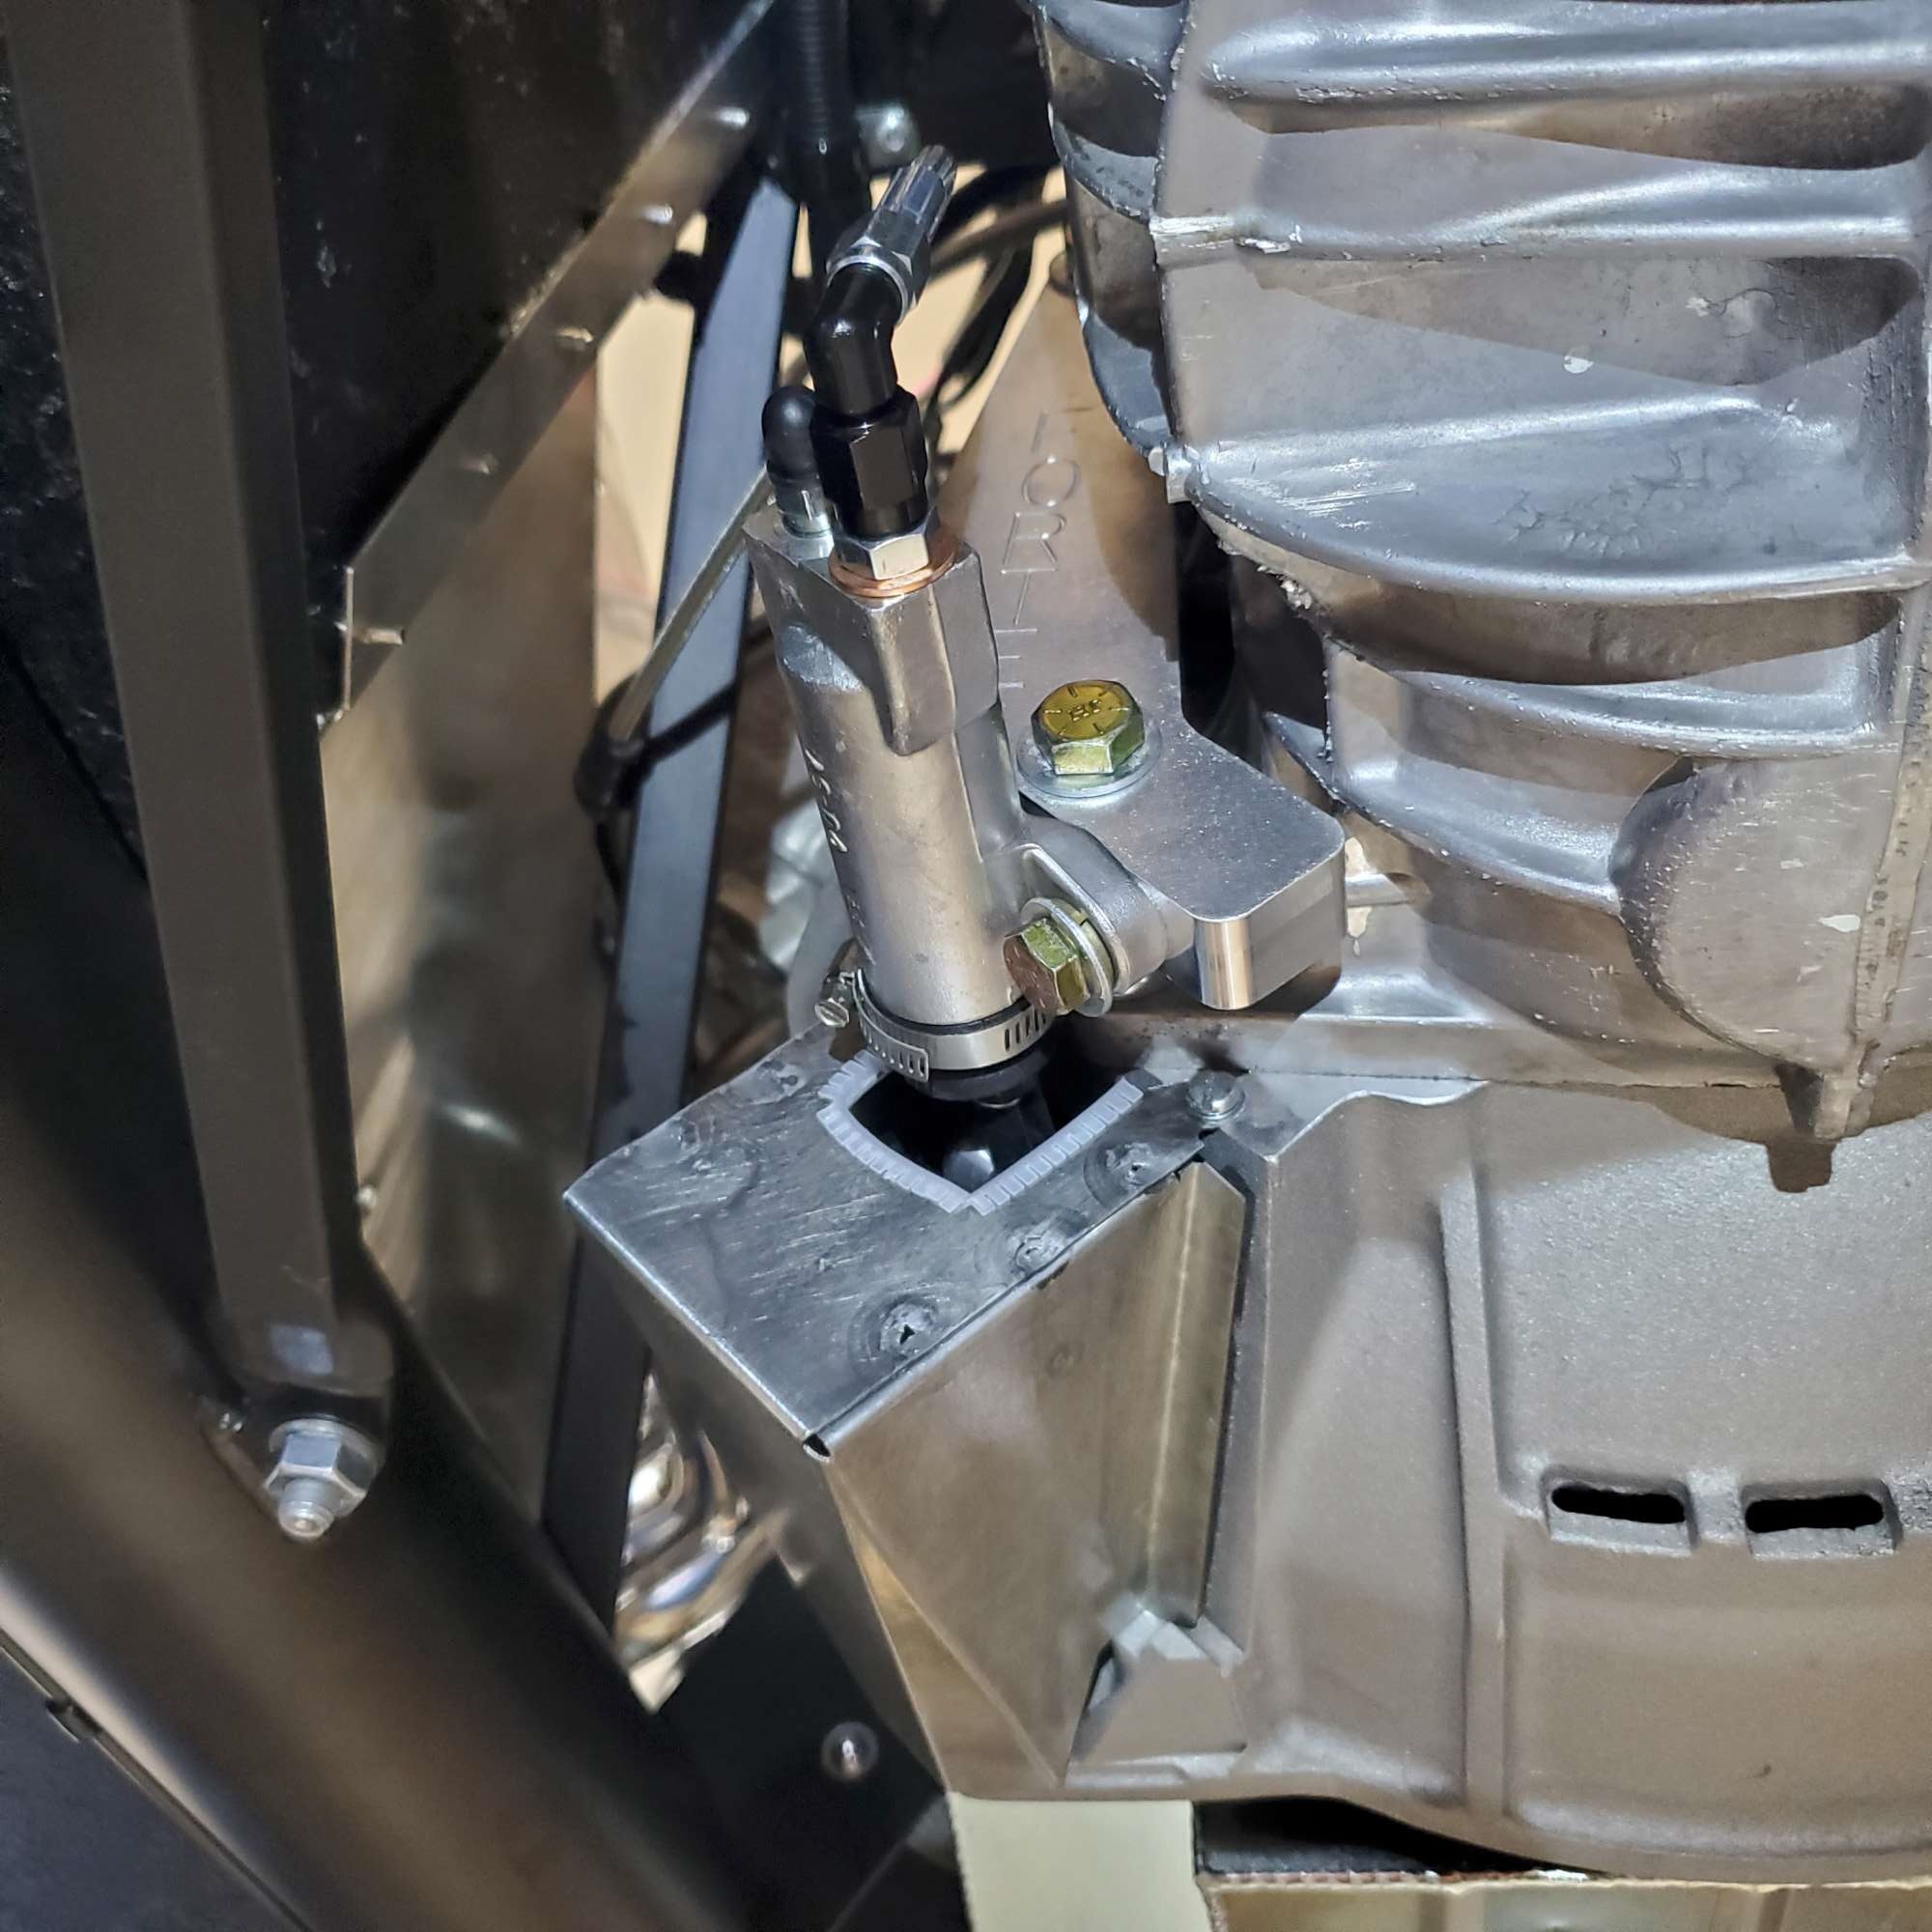
To install the SS braided hose with -3AN connectors that Forte supplies with the kit, I drilled a 1/2" hole through the top of the DS FB inner wall, near the firewall. I ran the braided host through this hole, passing through a high temp. grommet. I sleeved the braided line with a short piece of 1/4" rubber fuel hose, so it won't rub on the 1" diagonal brace (a bit hard to see in the pic, but visible if you follow the braided hose down toward the slave). Then, secured it with a cable tie through a 1/4" cushion clamp on the same 1" tube.

Next up was running the oil pressure and H2O temp. harnesses from the firewall exit. I ran them along the top of the left side of the motor below the fuel rail, and then secured them around the front of the head and down to their respective plugs (I'll add additional routing pics on next update). I'm using the Speedhut wiring harnesses/connectors. I protected the harnesses with high temp. wire loom, and then wrapped with high temp. cloth. I've been wrapping all of the wiring I've installed in the engine bay with this cloth. Perhaps some additional temp. protection, and I think it gives a more finished look than exposed wire loom. I'm securing these wires with cable ties, so they are as far away as possible from the headers. The cable ties I'm using are from McMaster-Carr and rated to 230 deg.

This past week I was chatting with my wife about the F5 open house coming up in a couple weeks. To my surprise, she encouraged me to go. Seriously. It's a long haul from Spokane, and not cheap. But it will be a once in a lifetime opportunity for me. So, with her encouragement I booked the tickets. It should be a lot of fun. I hope to meet a number of other builders there, tour the factory, and enjoy the car show. I welcome anyone else to let me know if you're planning to go. While there, I'm also going to visit a couple of the forum vendors. I think it's going to be a blast!
Last edited by 460.465USMC; 05-29-2022 at 10:45 AM.
Chris
Coupe complete kit delivered: 4/22/24.
Build Thread. Coyote. T-56. IRS w/3.55. Wilwoods. PS. HVAC. Side windows.
MK4 Complete kit.
Build Thread Index. Delivered: 10/15/2020. Legal: 7/25/23. Coyote Gen3. TKO600 (0.64 OD). IRS w/3.55. PS. Wilwoods. Sway bars. This build is dedicated to my son, Benjamin.
Build Thread.
-
Post Thanks / Like - 0 Thanks, 4 Likes
-
05-29-2022, 04:06 AM
#381
Nicely done Chris! The water and oil sensors look clean! Also nice to see you've already finished wiring your dash... I'm just getting started on that after dropping the engine and will be taking inspirations from your posts. :P
-
Post Thanks / Like - 1 Thanks, 0 Likes
-
05-29-2022, 10:40 AM
#382
Senior Member
Thanks, Dan! I'm really enjoying this phase of the build. In retrospect, I may have been better served to do the bulk of the dash wiring after the motor was installed. I think this would have helped me to minimize some of the guess work in determining the wiring lengths.
Chris
Coupe complete kit delivered: 4/22/24.
Build Thread. Coyote. T-56. IRS w/3.55. Wilwoods. PS. HVAC. Side windows.
MK4 Complete kit.
Build Thread Index. Delivered: 10/15/2020. Legal: 7/25/23. Coyote Gen3. TKO600 (0.64 OD). IRS w/3.55. PS. Wilwoods. Sway bars. This build is dedicated to my son, Benjamin.
Build Thread.
-
06-03-2022, 12:37 PM
#383
Senior Member
Which Way Does the Coyote Rotate?
Okay, time to put my ignorance on display (again!). I'm going to add power steering fluid to the KRC power steering pump tank. Then, I want to spin the KRC pulley with my drill to "bleed" the system and check for leaks. I'll have someone turning the steering wheel back-and-forth at the same time.
Here's my question: which way does the Coyote motor rotate as viewed from the front? I've been searching and what I've found is many (most?) motors rotate clockwise as viewed from the front. I want to be certain before I spin the pulley. Not sure if it would screw up anything in the pump if rotated backwards, but I don't want to find out. Please advise.
Chris
Coupe complete kit delivered: 4/22/24.
Build Thread. Coyote. T-56. IRS w/3.55. Wilwoods. PS. HVAC. Side windows.
MK4 Complete kit.
Build Thread Index. Delivered: 10/15/2020. Legal: 7/25/23. Coyote Gen3. TKO600 (0.64 OD). IRS w/3.55. PS. Wilwoods. Sway bars. This build is dedicated to my son, Benjamin.
Build Thread.
-
06-03-2022, 12:41 PM
#384
Originally Posted by
460.465USMC
Okay, time to put my ignorance on display (again!). I'm going to add power steering fluid to the KRC power steering pump tank. Then, I want to spin the KRC pulley with my drill to "bleed" the system and check for leaks. I'll have someone turning the steering wheel back-and-forth at the same time.
Here's my question: which way does the Coyote motor rotate as viewed from the front? I've been searching and what I've found is many (most?) motors rotate clockwise as viewed from the front. I want to be certain before I spin the pulley. Not sure if it would screw up anything in the pump if rotated backwards, but I don't want to find out. Please advise.
I'm at the exact same step so I'm curious: Will spinning the pulley with a drill generate enough pressure to detect leaks?
-
06-03-2022, 03:30 PM
#385
Last edited by Papa; 06-03-2022 at 03:35 PM.
-
Post Thanks / Like - 1 Thanks, 0 Likes
-
06-04-2022, 01:55 PM
#386
Senior Member
Coyote Harness & Power Steering Done
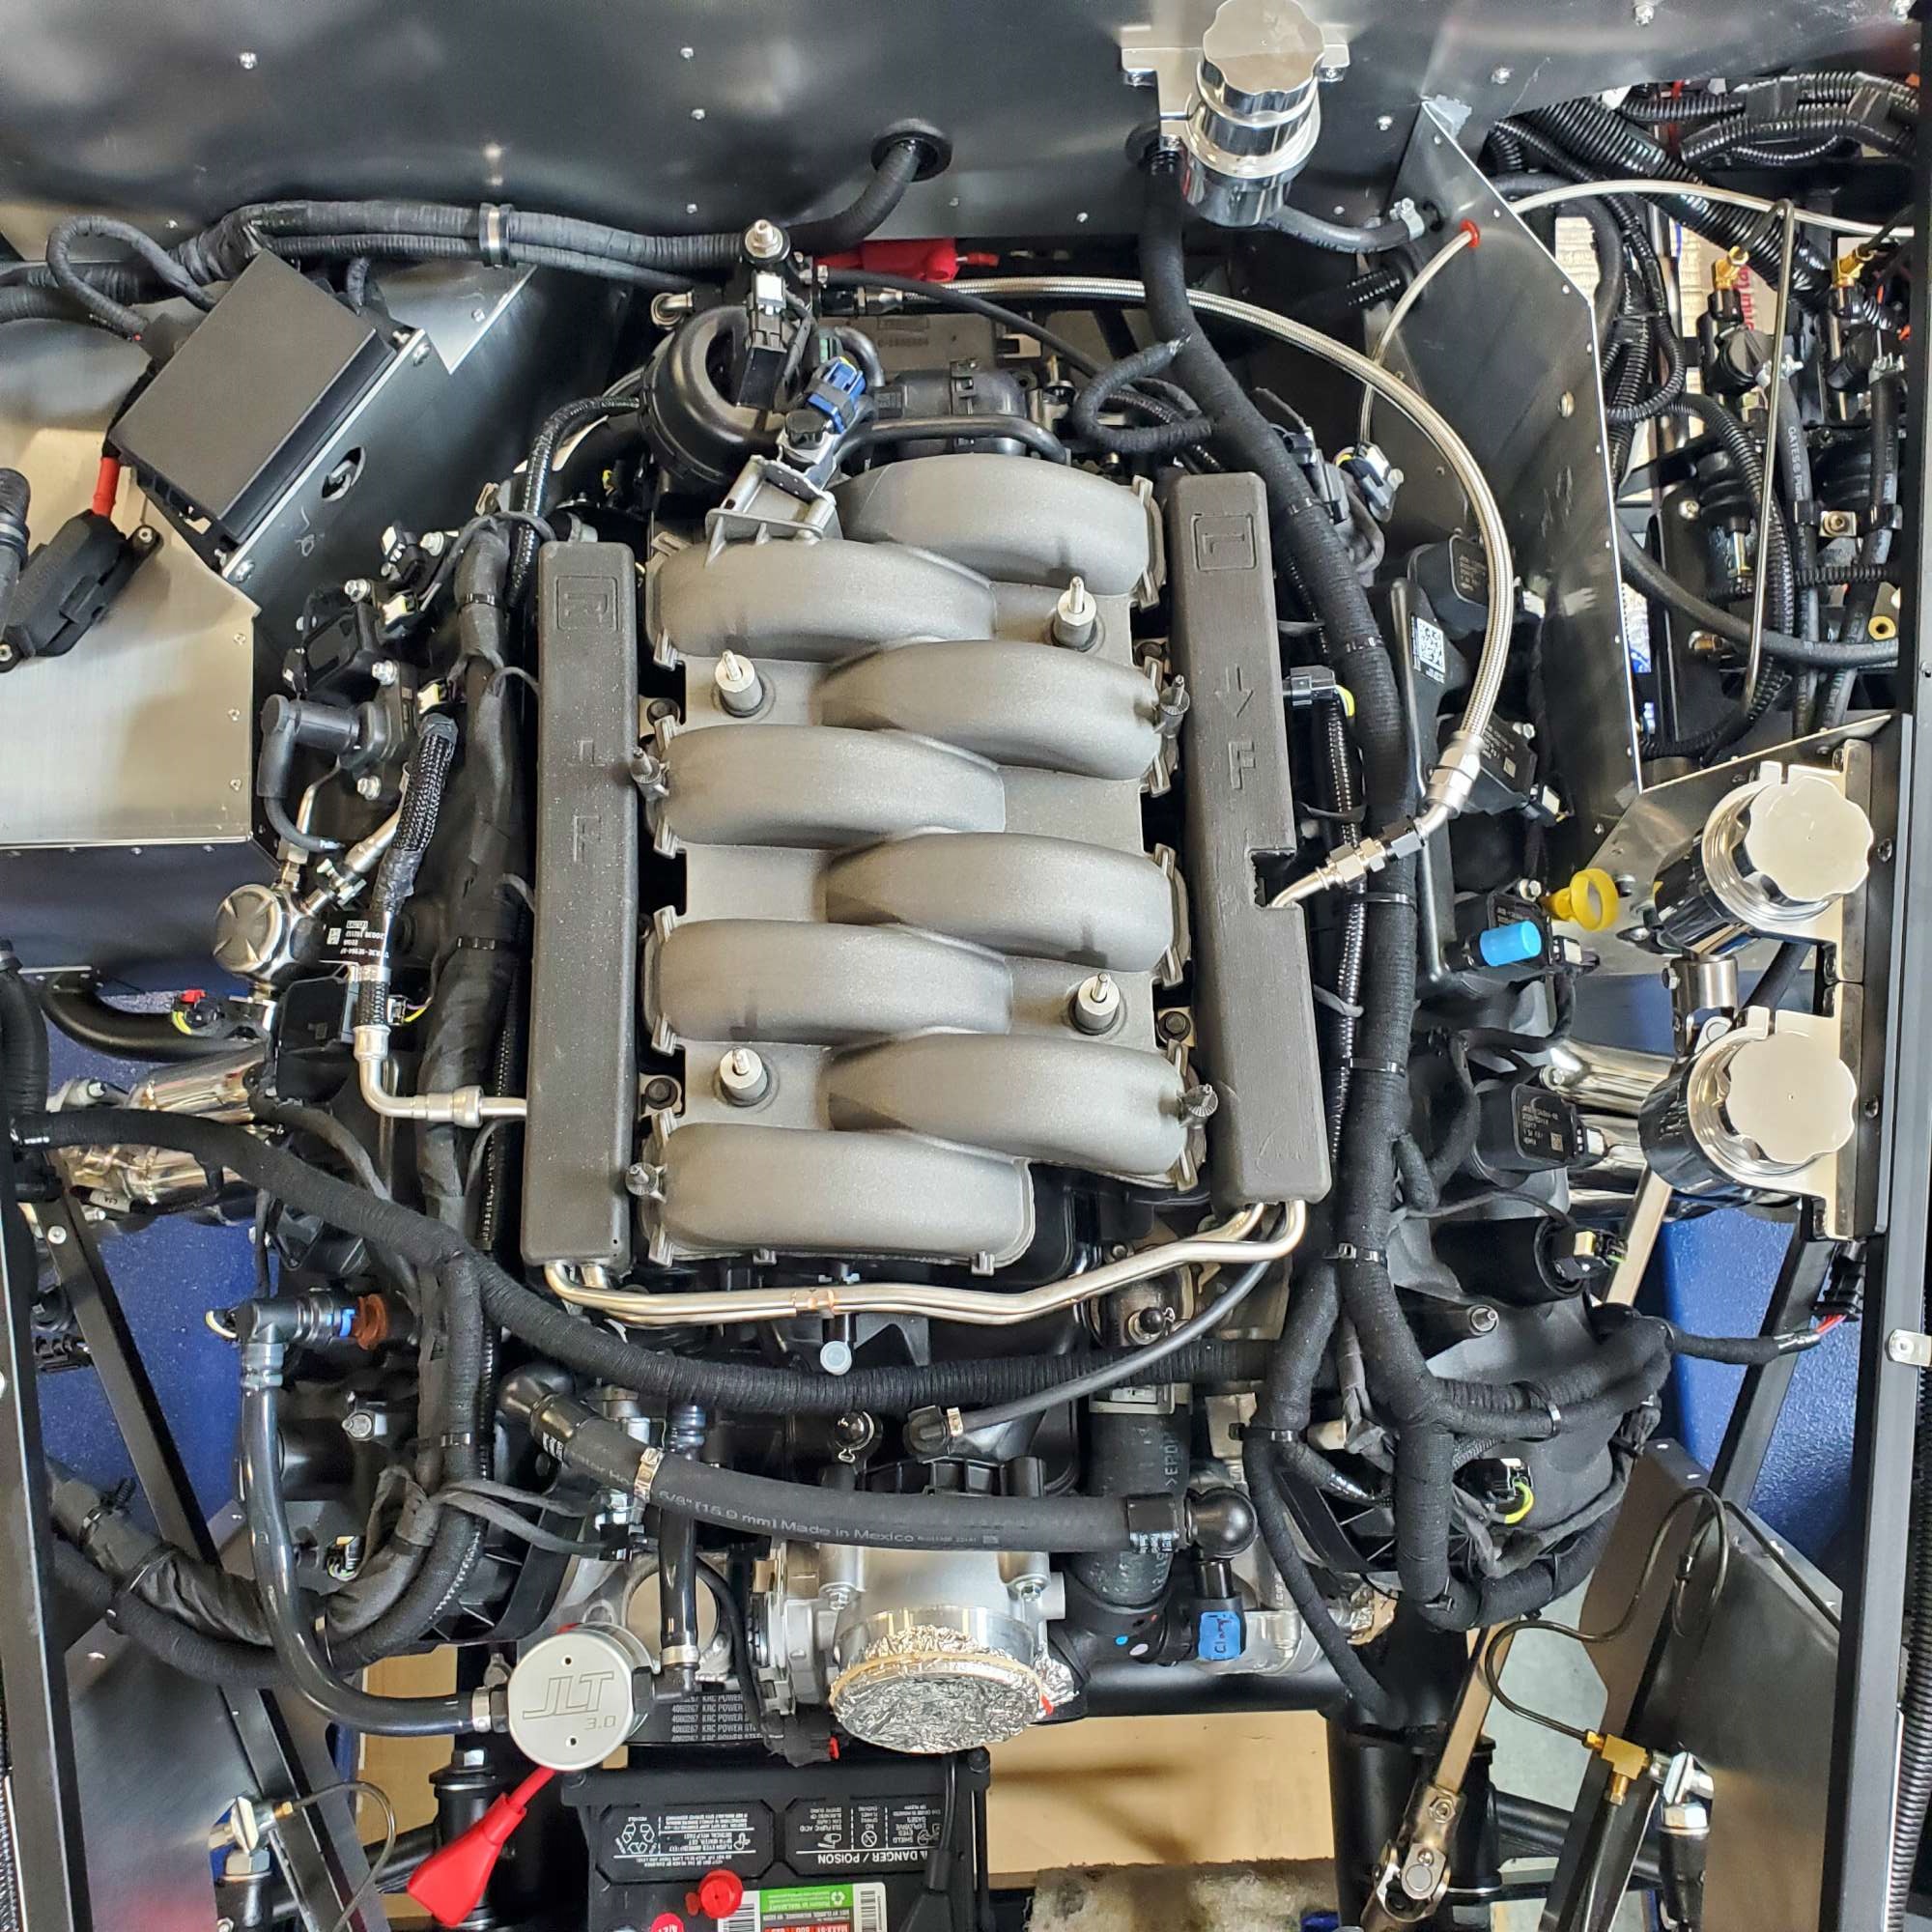
It was time to wrap up the engine bay wiring. At this point it was primarily routing the Coyote harnesses and various legs to their destination. Again, I applied the cloth vinyl wrap to most of the harness legs.
I couldn't find a home for the C132 Ambient Air Temp Sensor (AAT). It's part of the harness that splits into three legs on the DS and also includes the MAF and Alternator connections. To my relief I found it's not used as asked/answered here: Is the C132 Ambient Air Temp Sensor used. The MAF leg is hanging loose until I install the air intake components.
I ran the DS O2 sensor across the front of the motor as seen below. The other harness legs start at the PCM, follow rearward under the PS fuel rail, wrap around the rear and follow under the DS fuel rail. Also routed and combined into one loom under the DS fuel rail are the main +12V 8 AWG to the alternator, tach wire to #6 coil, and oil and H2O sensor wiring. As others have observed it's a tight fit, but all of it will route and tuck away.
Put the cover on to ensure it still fit. As I've noted before, this is a Gen 1 cover modified to fit the Gen 3.

The DS gets pretty busy with the alternator connections, O2 sensor, oil pressure, and H2O temp. sensor harnesses. I secured the O2 with a cushion clamp to the 3/4" tube as shown here, and in similar fashion on the PS as well.

Next up was to finalize the starter connections. The legs I ran much earlier were a little long, so I cut off and re-terminated with my hydraulic crimp tool. I seem to like to put a dab of dielectric grease on the larger electrical connections, so did the same here.

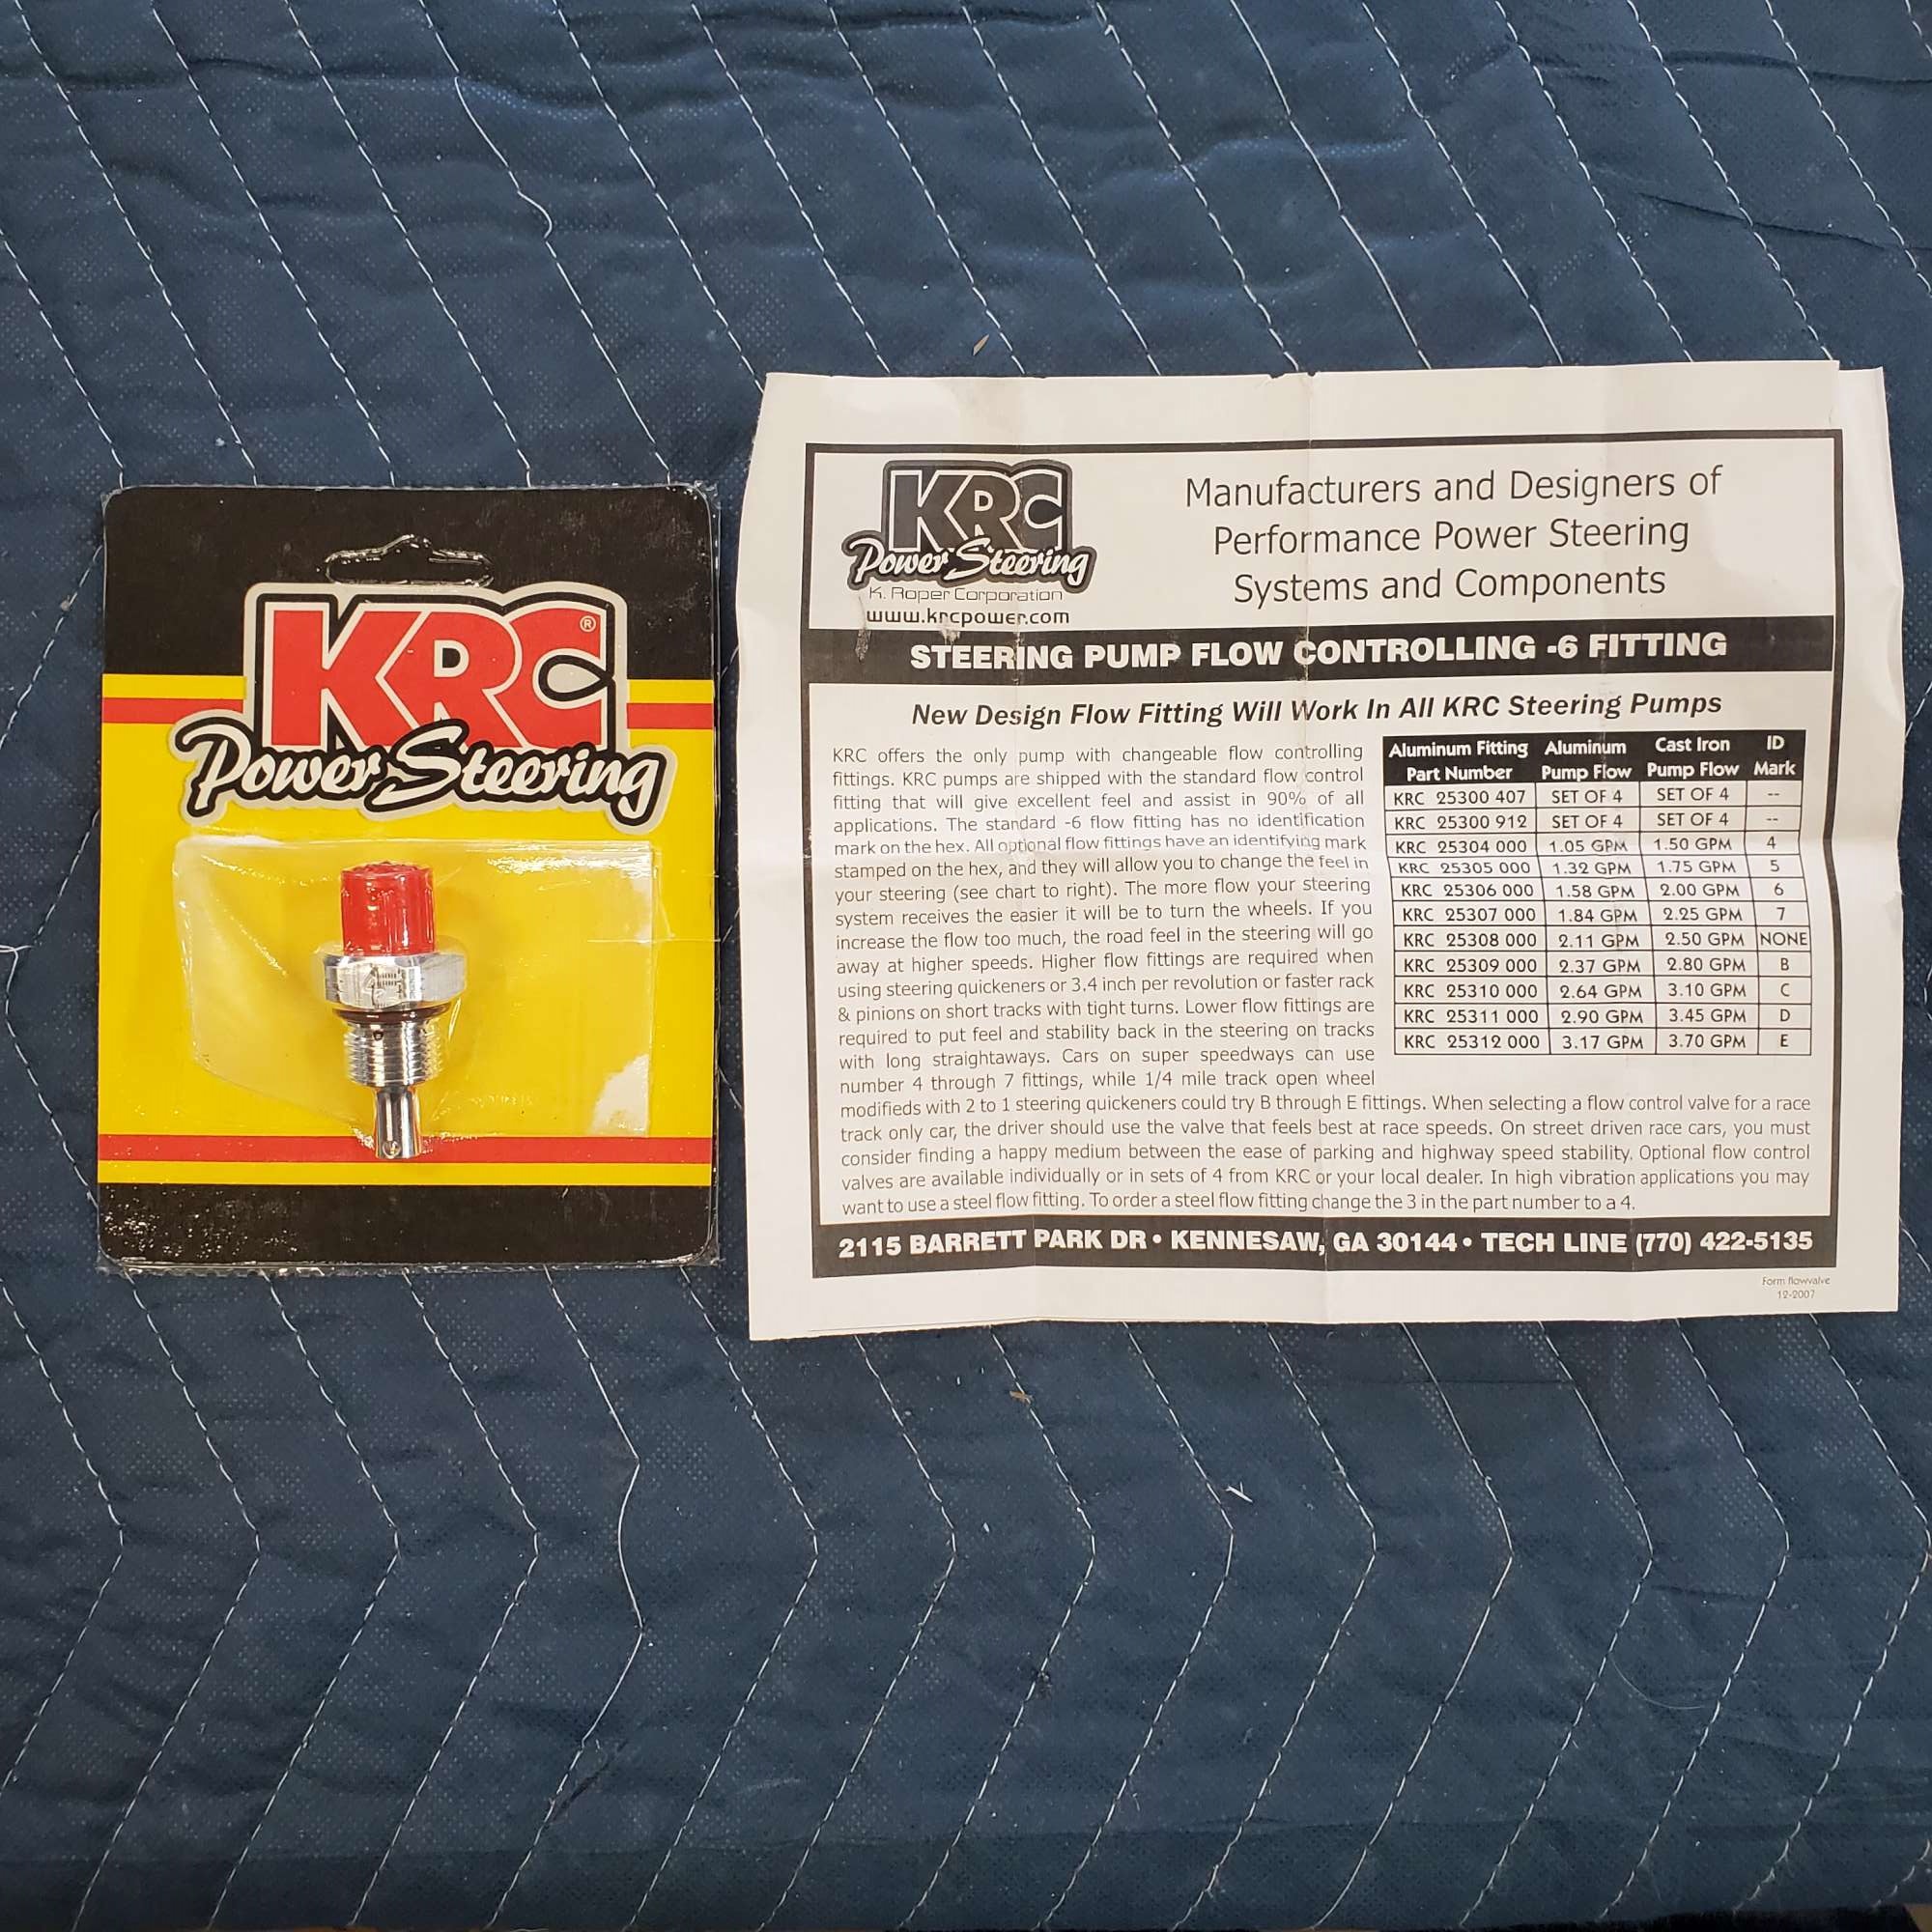
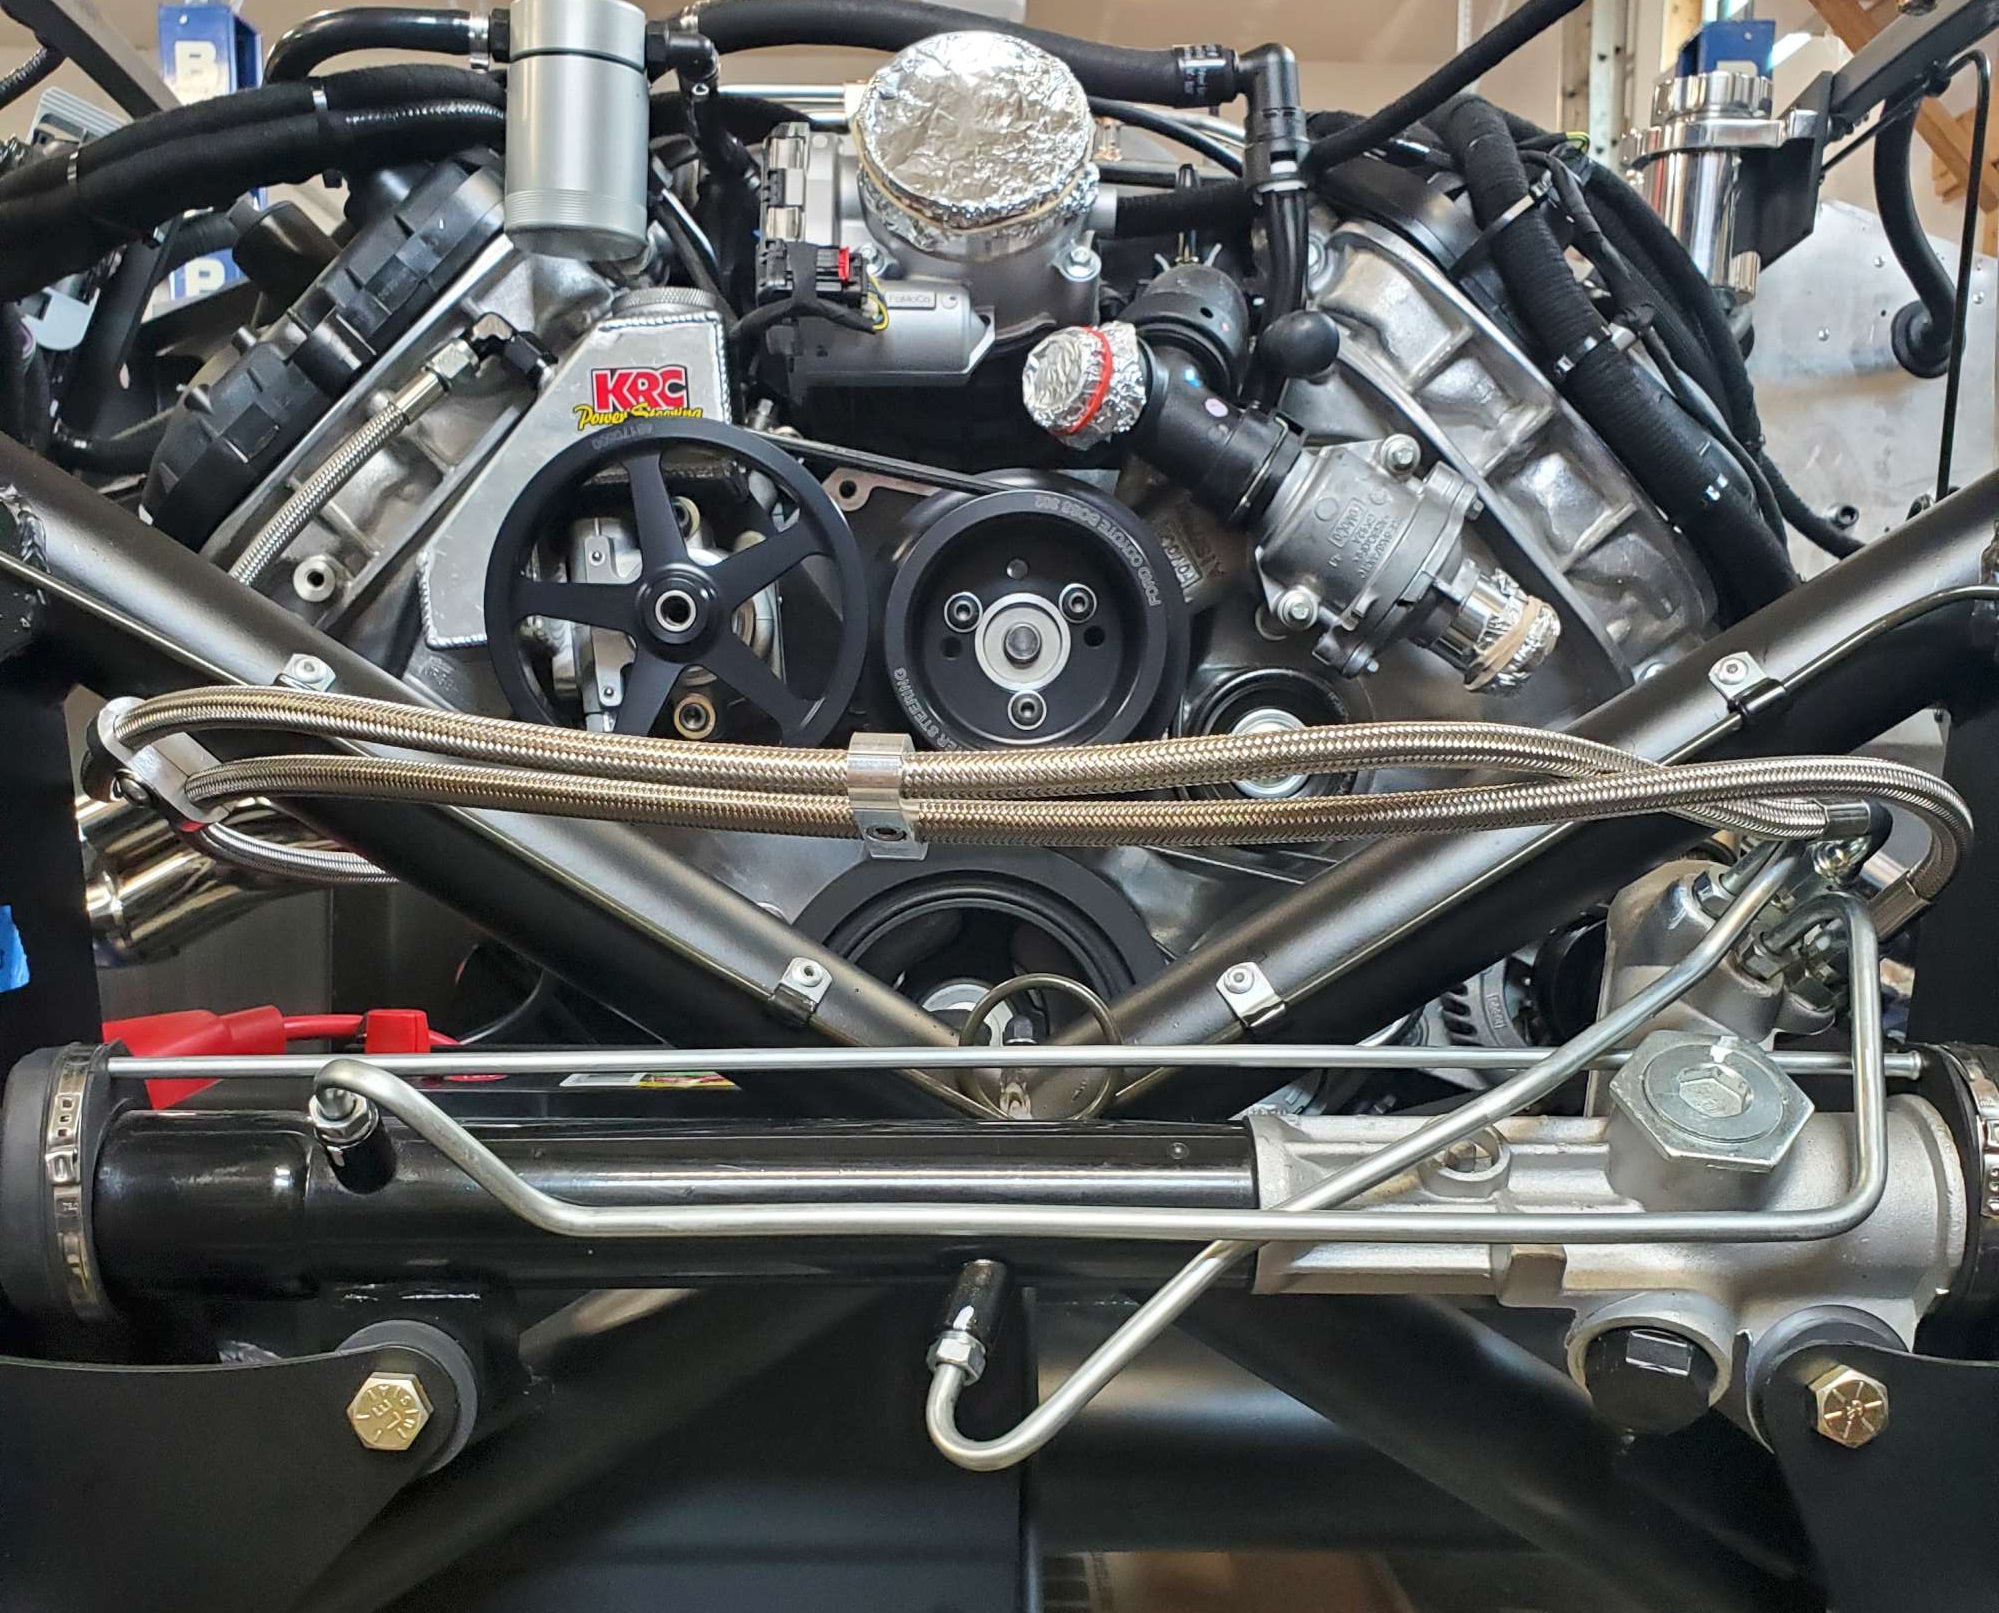
Since I hadn't put the radiator back in yet, I took advantage of the wide open access from the front and installed the power steering lines. These are the kit supplied lines. Given the numerous comments here on the forum about too much assist with the stock valve that comes with the KRC pump, I swapped it out (2.5 GPM) to the lower volume flow #4 valve (1.05 GPM). I bought it from Amazon for $33. Probably easier and less messy to do before the system is fully charged with fluid.
I think the power steering kit came with a Earl's 90 deg. -6AN (I don't recall buying it separately), so I put it to use on the return line (top port of KRC tank). Kept the hoses somewhat parallel with a couple Earls hose clamps (EAR-167207ERL) from Summit Racing. I drilled and tapped a 1/4"-20 hole and secured one of the clamps to keep the hoses well above the battery's positive post. Added ~20 oz of KRC power steering fluid (KRS-10032001; $13/qt from Summit). Inserted a 3/8"-16 socket head bolt (kit comes with lots of them) and a 5/16" hex drive to spin the pump clockwise while my lovely wife turned the steering wheel slowly lock-to-lock. No leaks detected so far.
Still having a blast!
Chris
Coupe complete kit delivered: 4/22/24.
Build Thread. Coyote. T-56. IRS w/3.55. Wilwoods. PS. HVAC. Side windows.
MK4 Complete kit.
Build Thread Index. Delivered: 10/15/2020. Legal: 7/25/23. Coyote Gen3. TKO600 (0.64 OD). IRS w/3.55. PS. Wilwoods. Sway bars. This build is dedicated to my son, Benjamin.
Build Thread.
-
Post Thanks / Like - 0 Thanks, 3 Likes
-
06-06-2022, 10:39 AM
#387
Senior Member
Very professional looking. Looks great
MK4 #10008 - Ordered 10/06/20, Delivered 03/03/21, First Start 7/22/21, First Go Kart 7/24/21
Paint by Metal Morphous 5/14/22, Legally registered 6/8/22, Graduated 7/20/22
Build Thread
https://thefactoryfiveforum.com/show...been-delivered
Complete Kit, Ford 306, Sniper/Dual Sync, T5, Hydraulic clutch
-
Post Thanks / Like - 1 Thanks, 0 Likes
-
06-06-2022, 07:47 PM
#388
Senior Member

That is a clean looking engine compartment! Nice job.
MKIV Complete Kit #9822 l BluePrint 347 EFI l TKO600 l Power Steering l Heater/Defrost l
Build Thread
-
Post Thanks / Like - 1 Thanks, 0 Likes
-
06-07-2022, 02:43 PM
#389
Senior Member
Moroso Coolant Tank "Mod" - Part 1
I recently decided to go with the Moroso coolant expansion tank. As Edwardb points out, this is the Ford design. Not saying the F5 setup doesn't work just fine, but I like the idea of leveraging the design by the army of engineers at Ford--also a primary reason I chose the Coyote. Skilled builders ahead of me warned there's a lot going on in making the brackets: I can 100% confirm that is an accurate statement. This was a big challenge for me, but I prevailed in the end. To see this "mod" executed by skilled Coyote builders, check out JohnK's or Edwardb's 20th anniversary. Here's my humble approach:
First up was to make the upper bracket to match the lip on the Moroso tank with the 5/16" holes. I made a template using a cereal box, and used my jigsaw to cut it out of a piece of 0.090" aluminum left over from my dash. My metal brake won't bend metal this thick, so back to my DIY "metal brake" to bend the 6061 aluminum.
I installed 1/4"-20 rivnuts to mount the tank to this upper bracket. First time installing those. Now I know first hand why some builders use them. To make the "block" portion of the lower bracket setup, I cut a piece of 3/8" x 2" aluminum bar stock I had on hand. Fastening two of them together with JB Weld made them 3/4", just the right dimension to fit inside the U-shaped pocket on the bottom of the tank. Then drilled and tapped for 6/32" screws. Here are the brackets ready to install:
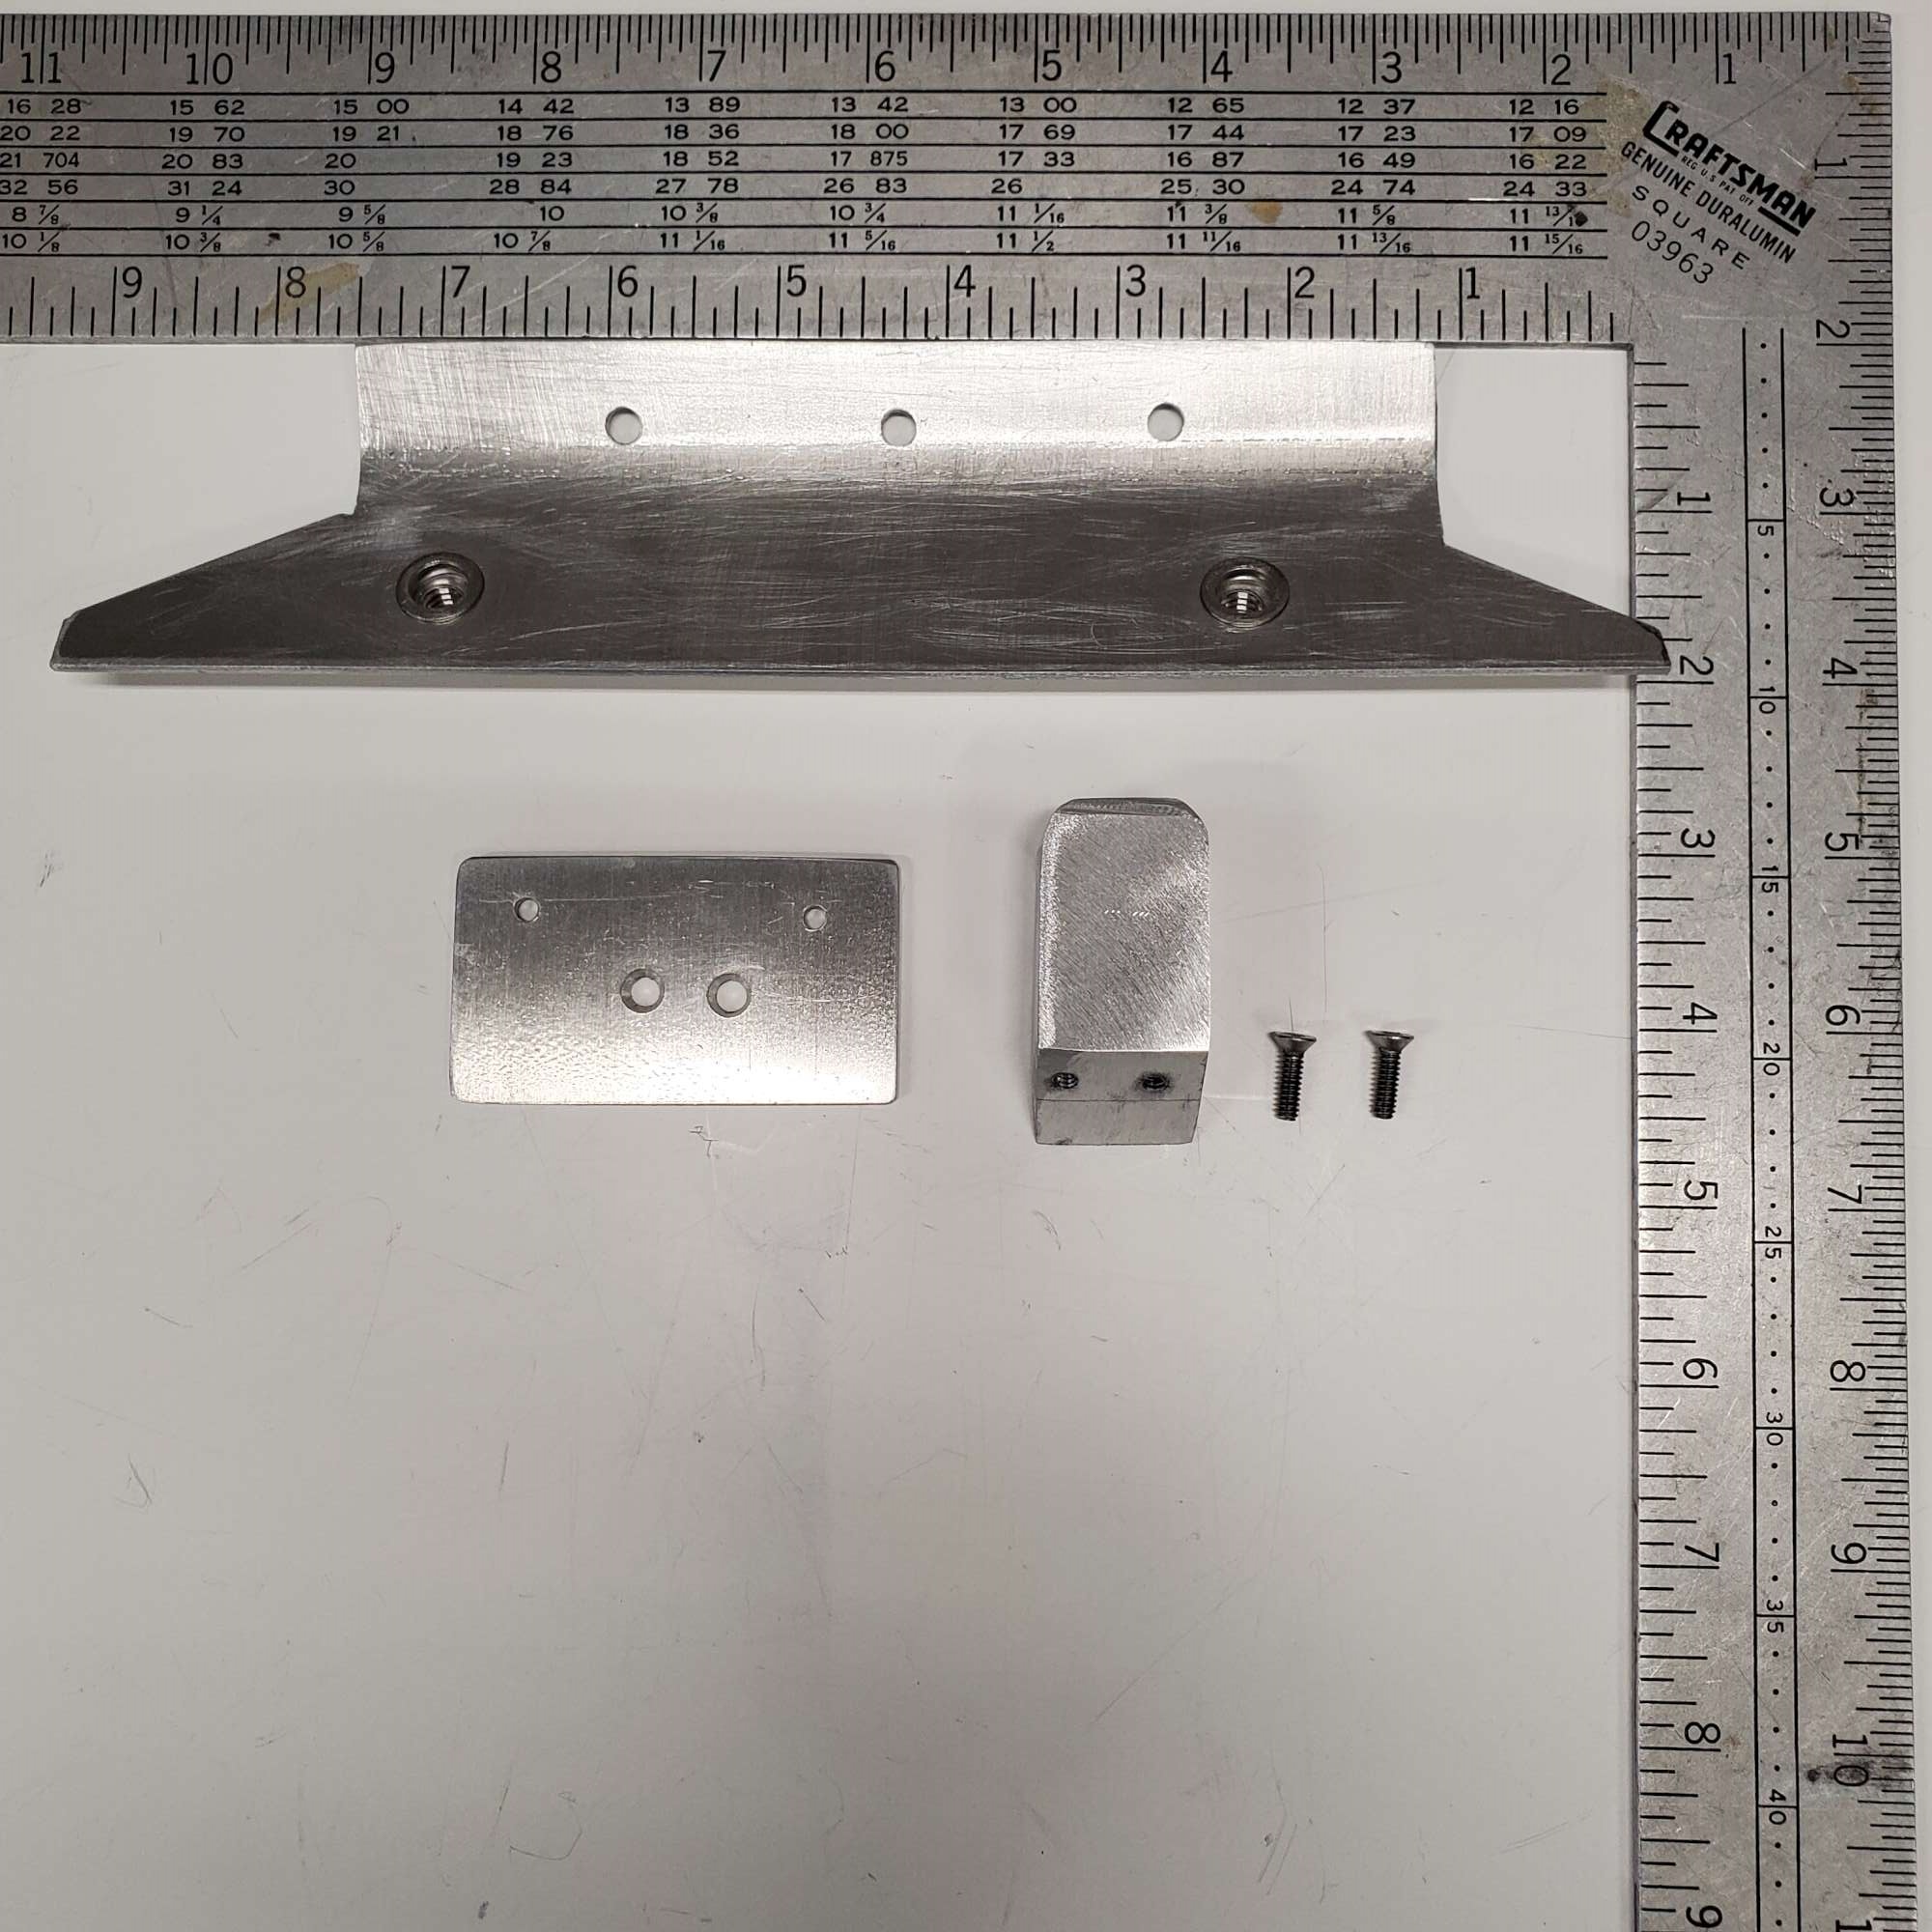
Seeing that my first attempt on the lower bracket setup wasn't going to work, I replaced it with a misc. steel bracket (~1/8" thick) I found in my bucket of odds and ends. The bonus is it's stronger than the 0.090" aluminum, and it gave me the additional length I needed in order for it to mount to the Breeze radiator shroud.
Finding the exact location for the lower brackets was a real bugger. With the tank secured by the 1/4"-20 rivnuts, I held the lower brackets in position with one hand, and then applied Gorilla tape with my other hand. The tape was strong enough to hold the bracket in position so I could drill the holes in the Breeze shroud. I installed 10-32 rivnuts in these holes, and secured with a couple 10-32 dome head SS screws.

JohnK sent me several very helpful photos (similar to the one below) showing the placement for his tank relative to the PS upper 3/4" tube. The tank needs to clear the fresh air intake, upper radiator hose, etc. Thanks, JohnK!
Last edited by 460.465USMC; 06-07-2022 at 02:55 PM.
Chris
Coupe complete kit delivered: 4/22/24.
Build Thread. Coyote. T-56. IRS w/3.55. Wilwoods. PS. HVAC. Side windows.
MK4 Complete kit.
Build Thread Index. Delivered: 10/15/2020. Legal: 7/25/23. Coyote Gen3. TKO600 (0.64 OD). IRS w/3.55. PS. Wilwoods. Sway bars. This build is dedicated to my son, Benjamin.
Build Thread.
-
06-07-2022, 02:47 PM
#390
Senior Member
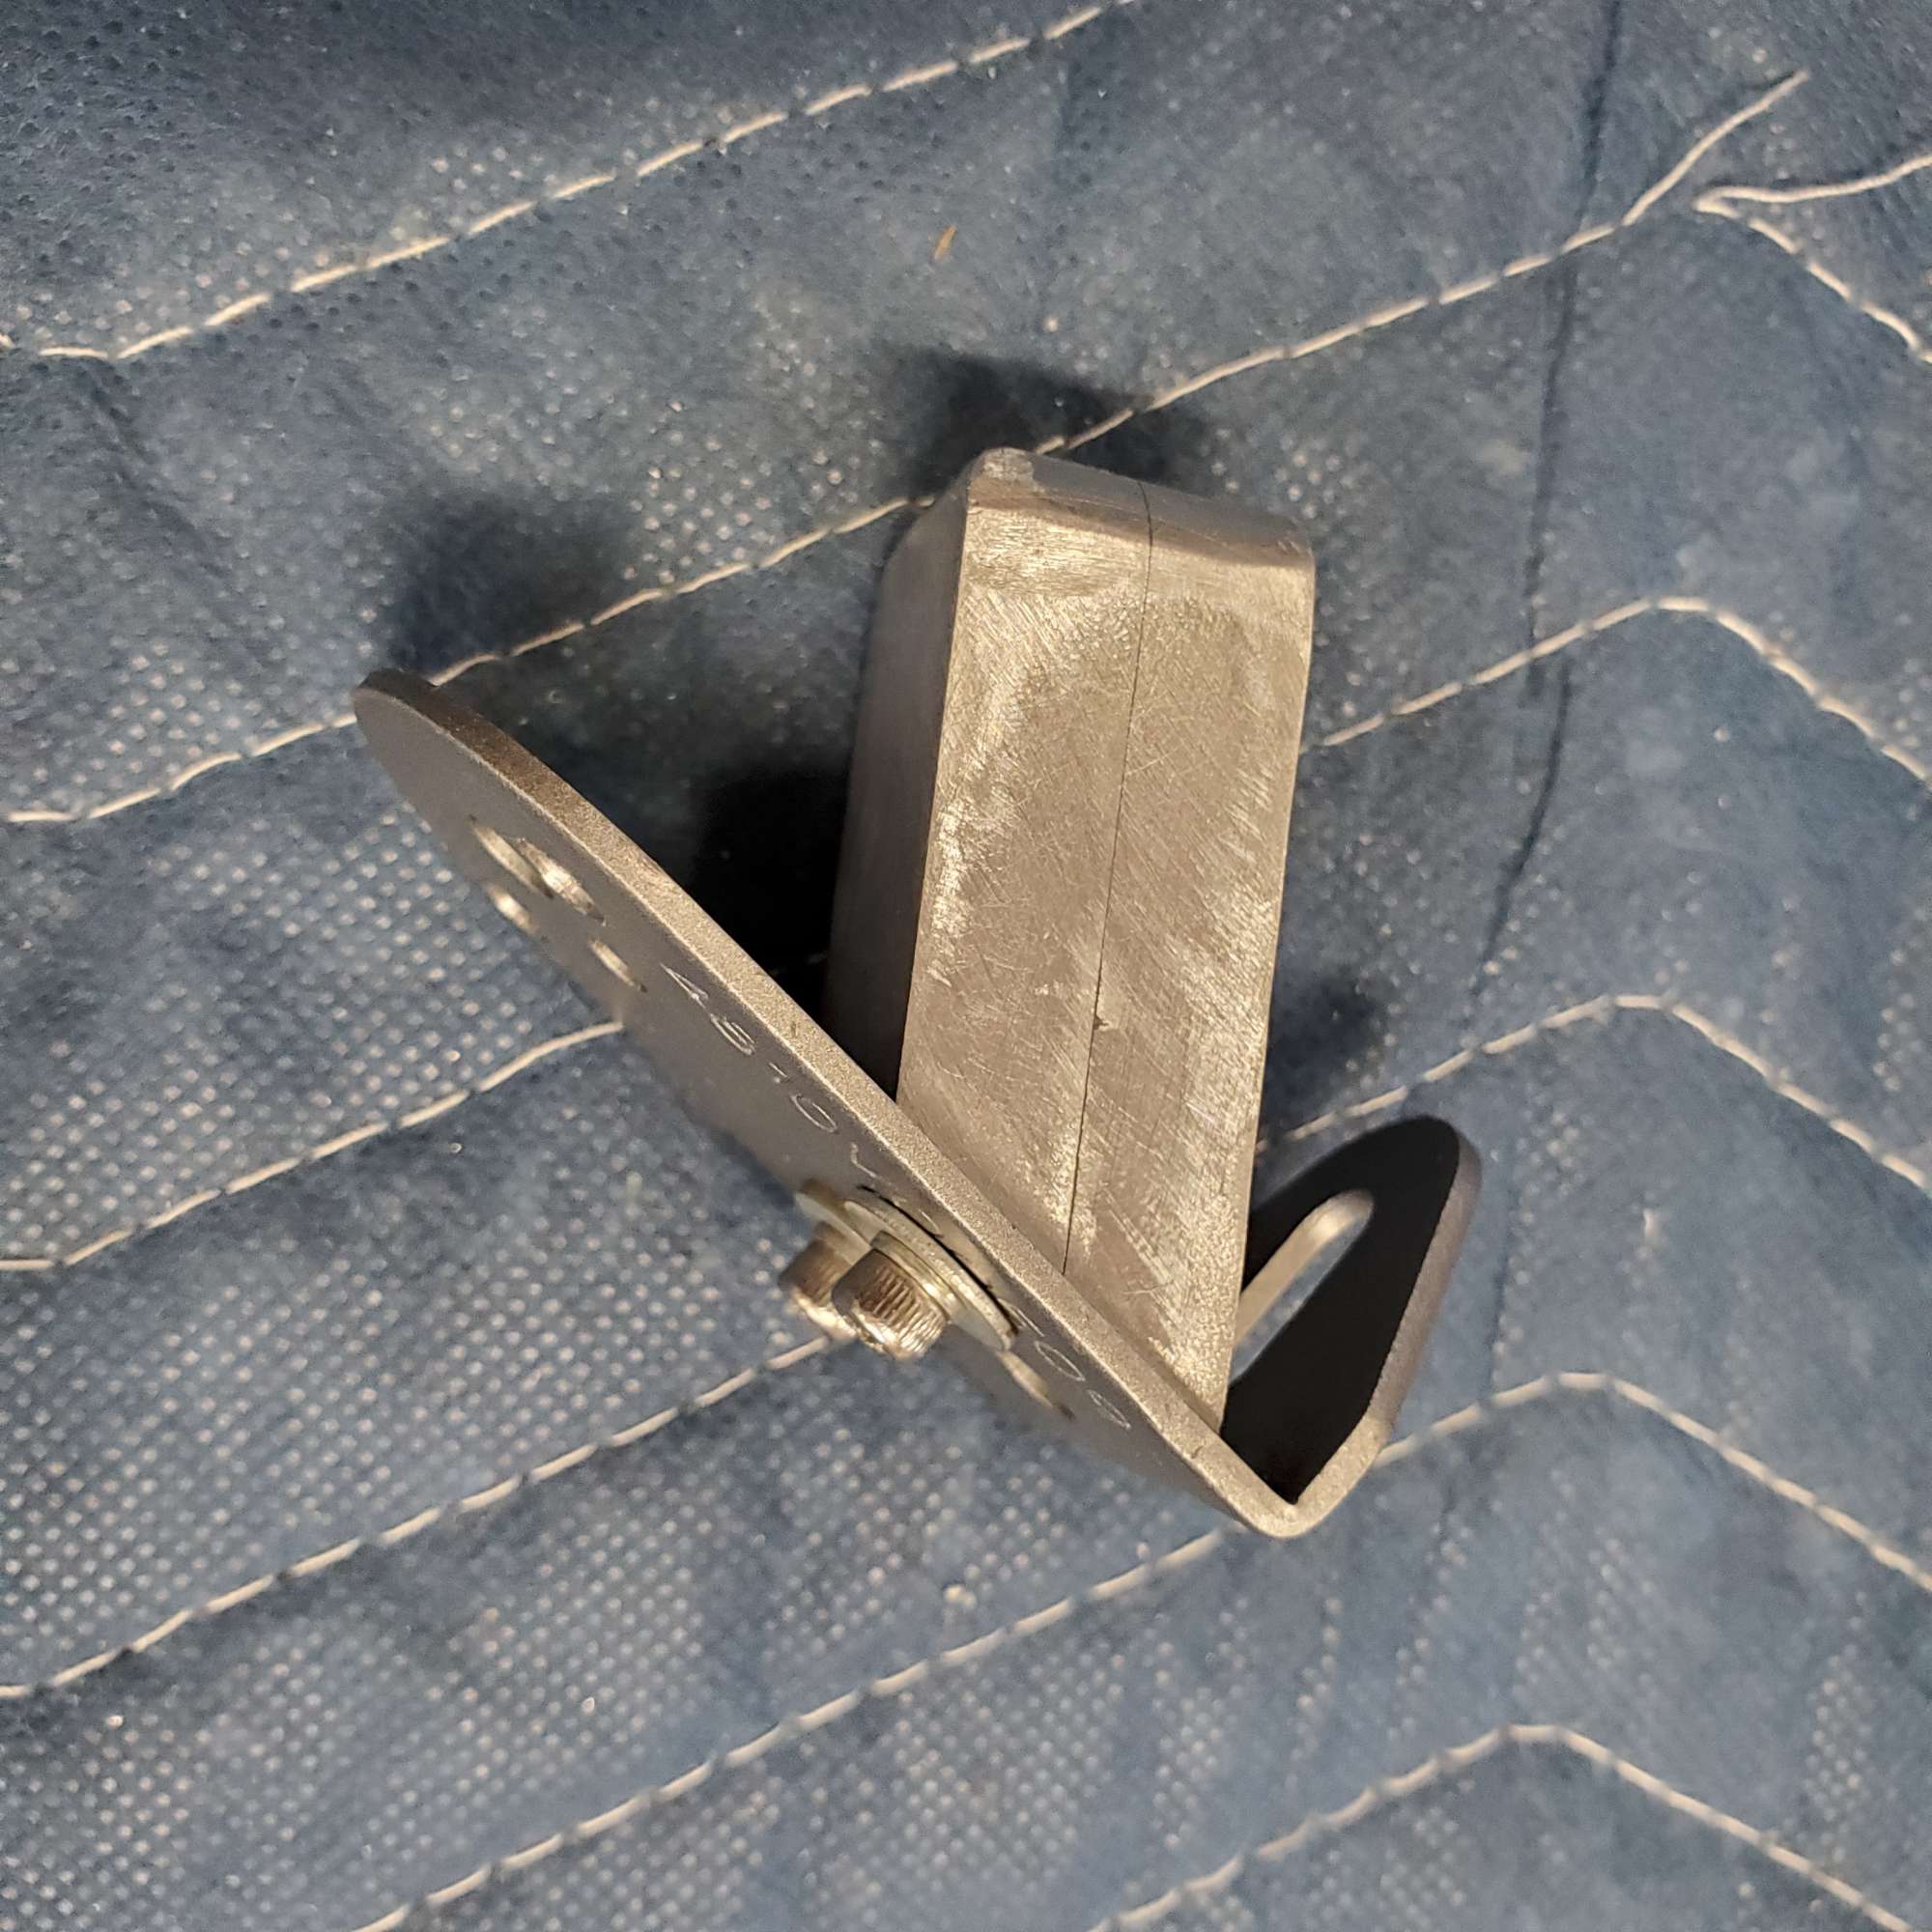
Moroso Coolant Tank "Mod" - Part 2
And, here it is in final position. I guess Moroso isn't as proud of this tank anymore, as no laser etched branding on the tank--though they did include a Moroso sticker in the box from Summit Racing. Not a concern for me, but thought it odd.

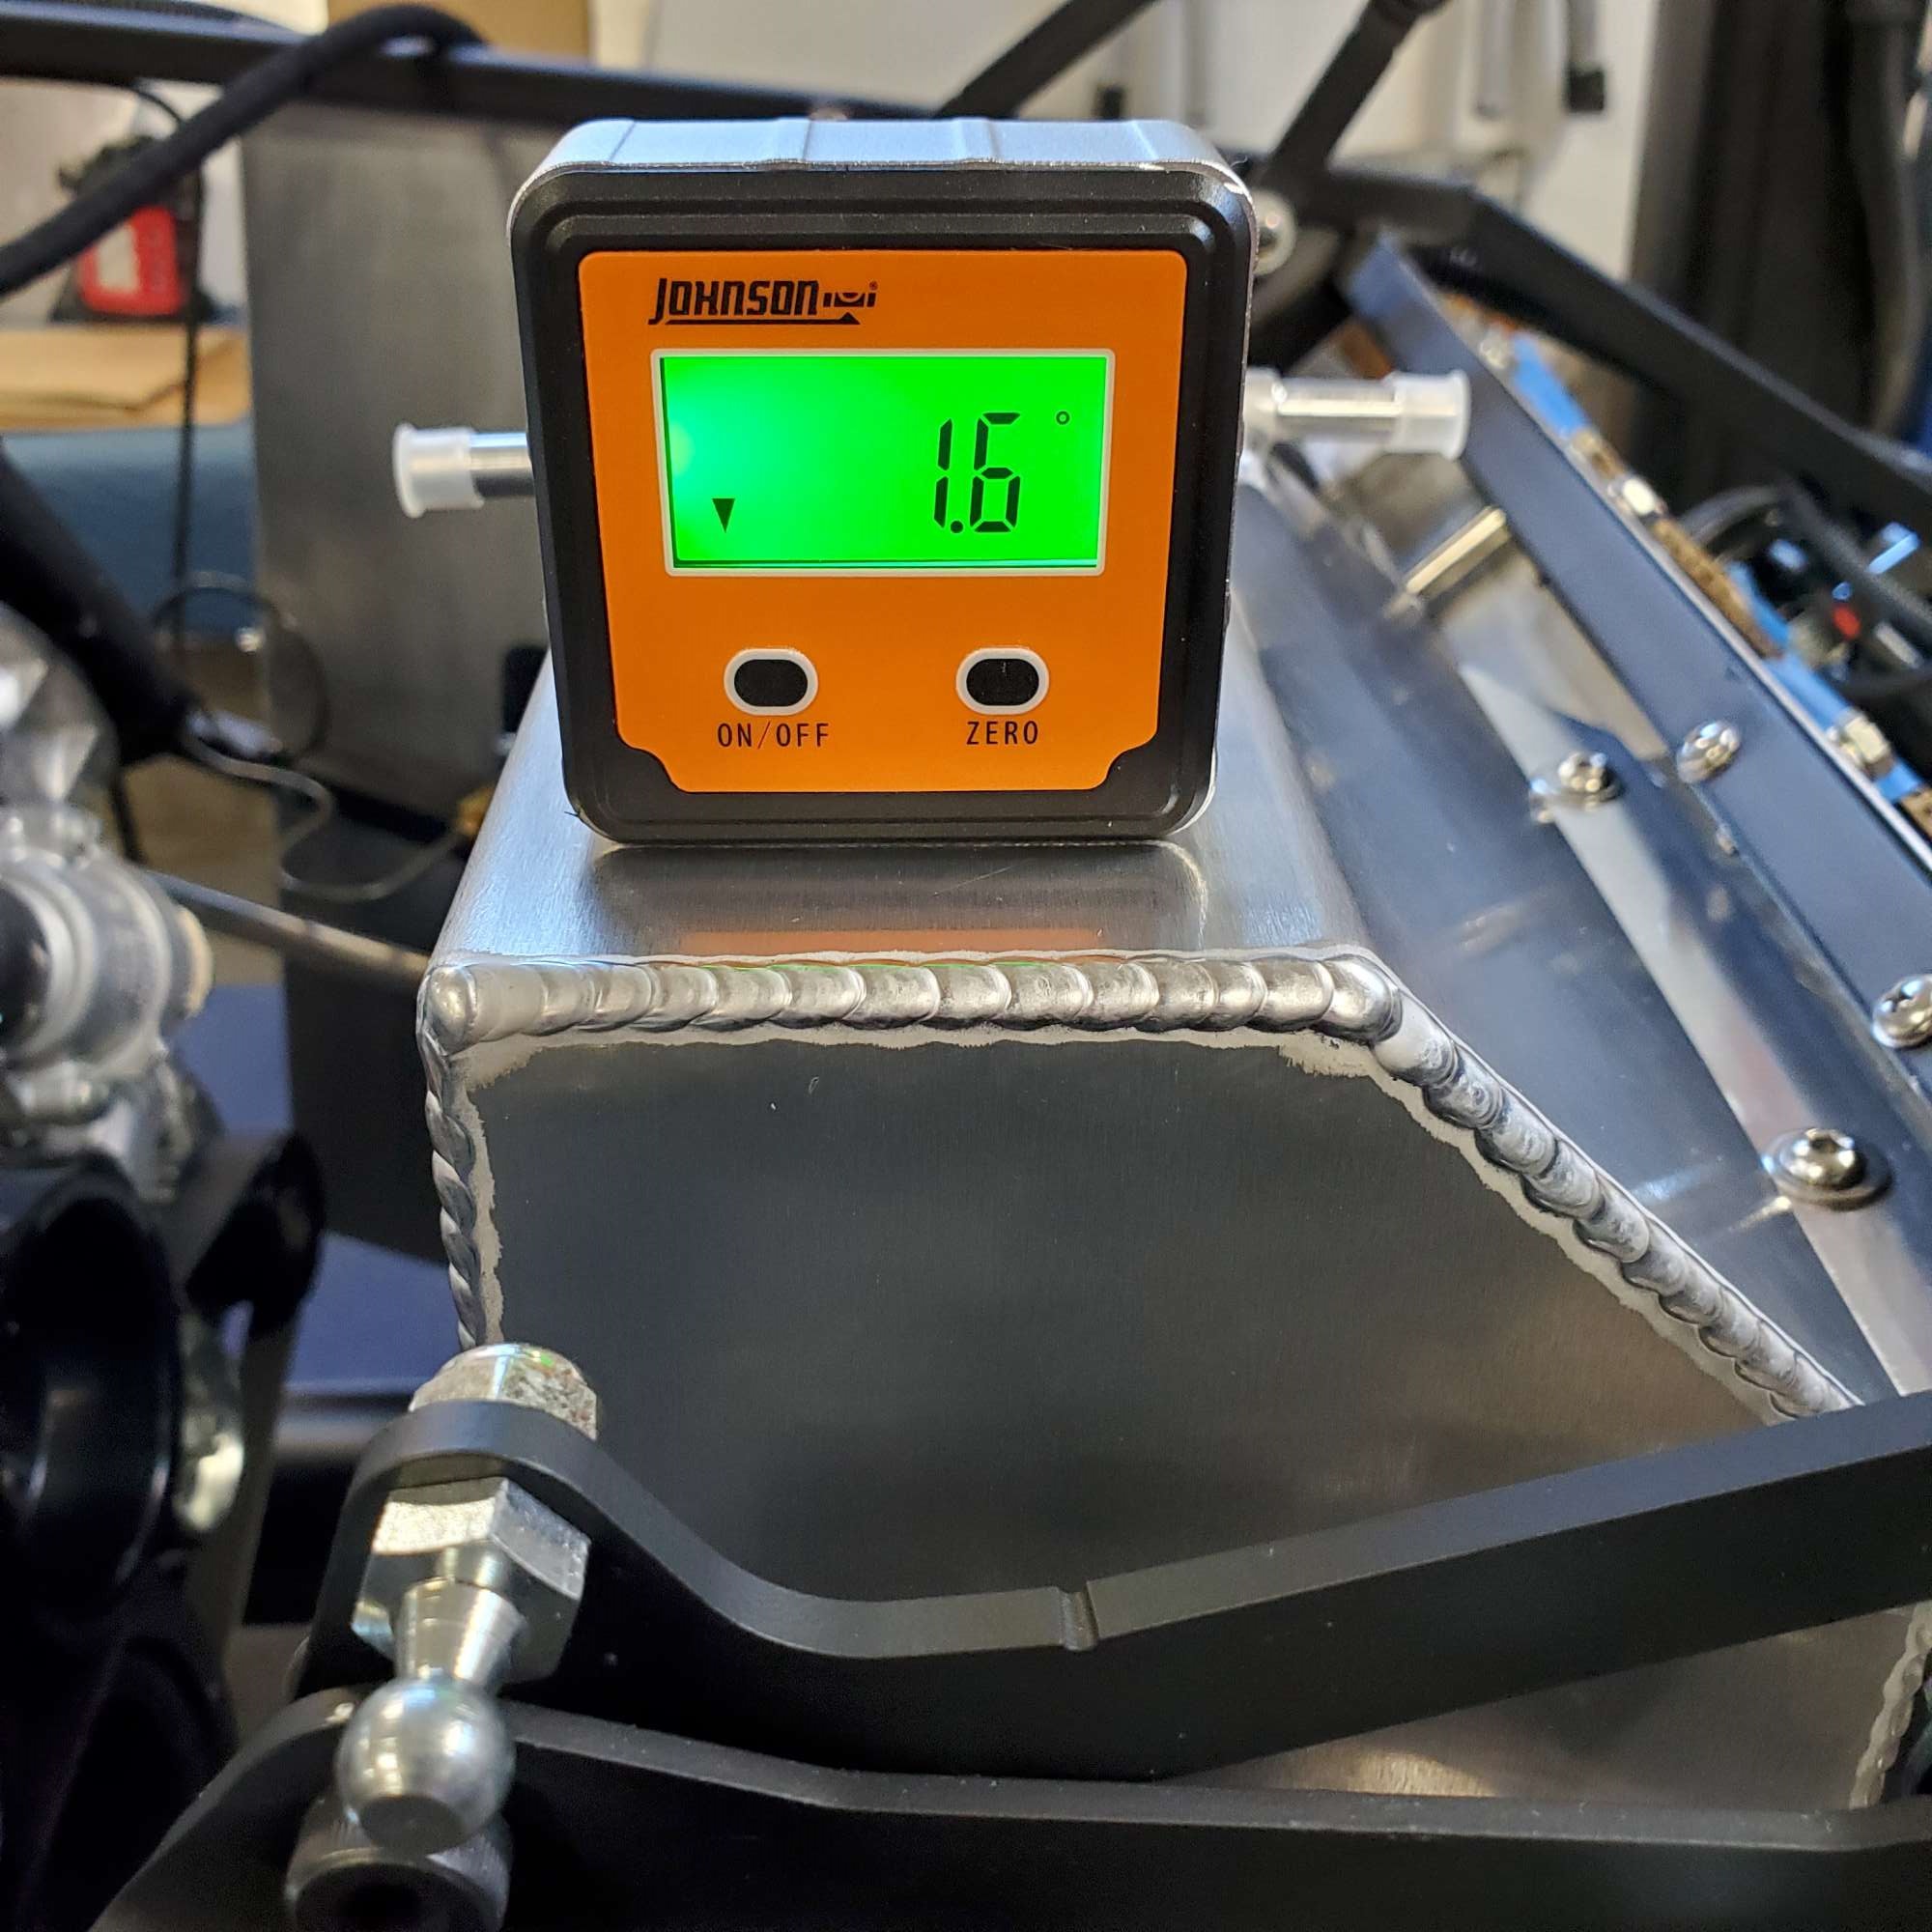
I tried to get the tank level, but missed the mark by this much.
I'm hoping first start is somewhere on the near horizon, so picked up this 1.5" rubber pipe cap (ID is 2") for $5 from Home Depot to keep the fumes down in the garage. Good idea from Fman. Should get me through first start and go-kart stage.

Last edited by 460.465USMC; 06-07-2022 at 02:56 PM.
Chris
Coupe complete kit delivered: 4/22/24.
Build Thread. Coyote. T-56. IRS w/3.55. Wilwoods. PS. HVAC. Side windows.
MK4 Complete kit.
Build Thread Index. Delivered: 10/15/2020. Legal: 7/25/23. Coyote Gen3. TKO600 (0.64 OD). IRS w/3.55. PS. Wilwoods. Sway bars. This build is dedicated to my son, Benjamin.
Build Thread.
-
Post Thanks / Like - 0 Thanks, 1 Likes
 Papa
Papa liked this post
-
06-07-2022, 03:11 PM
#391
Senior Member
FYI on the rubber cap. I did the same thing but the fuel fumes broke down the cap a little and started leaking a gooey oil down the shaft (and I would assume in the tank) on really hot days. Luckily I caught it early. If your garage is climate controlled probably doesn't matter. Mine is not. I ended up putting a piece of aluminum foil over the hole then the cap over that.
Maybe I just had a cheap rubber cap or something but wanted to pass that along.
Expansion tank looks incredible. You go out of your way to be humble on the forum but your work is exceptionally clean. Can't wait to see her done.
MK4 #10008 - Ordered 10/06/20, Delivered 03/03/21, First Start 7/22/21, First Go Kart 7/24/21
Paint by Metal Morphous 5/14/22, Legally registered 6/8/22, Graduated 7/20/22
Build Thread
https://thefactoryfiveforum.com/show...been-delivered
Complete Kit, Ford 306, Sniper/Dual Sync, T5, Hydraulic clutch
-
Post Thanks / Like - 1 Thanks, 2 Likes
-
06-07-2022, 07:00 PM
#392
Originally Posted by
Blitzboy54
FYI on the rubber cap. I did the same thing but the fuel fumes broke down the cap a little and started leaking a gooey oil down the shaft (and I would assume in the tank) on really hot days. Luckily I caught it early. If your garage is climate controlled probably doesn't matter. Mine is not. I ended up putting a piece of aluminum foil over the hole then the cap over that.
Maybe I just had a cheap rubber cap or something but wanted to pass that along.
Expansion tank looks incredible. You go out of your way to be humble on the forum but your work is exceptionally clean. Can't wait to see her done.
+1 on the rubber cap. I did something similar and the thin rubber couldn't hold in the petroleum + ethanol.
-
Post Thanks / Like - 1 Thanks, 0 Likes
-
06-07-2022, 07:13 PM
#393
Senior Member
Originally Posted by
Blitzboy54
FYI on the rubber cap. I did the same thing but the fuel fumes broke down the cap a little and started leaking a gooey oil down the shaft (and I would assume in the tank) on really hot days. Luckily I caught it early. If your garage is climate controlled probably doesn't matter. Mine is not. I ended up putting a piece of aluminum foil over the hole then the cap over that.
Maybe I just had a cheap rubber cap or something but wanted to pass that along.
Expansion tank looks incredible. You go out of your way to be humble on the forum but your work is exceptionally clean. Can't wait to see her done.
Wow! It didn't even cross my mind the vapor would cause that issue. Appreciate the tip!
Thanks for the kind words. There's so much quality and craftsmanship on the forum, my build feels like the C-squad basketball player watching the varsity team win the state championship. Thanks for keeping an eye on my build. I very much welcome your input.
Originally Posted by
facultyofmusic
+1 on the rubber cap. I did something similar and the thin rubber couldn't hold in the petroleum + ethanol.
Appreciate the X2 heads-up, Dan! For several reasons I was planning to wait until the very last minute to add fuel to the tank. Now I have one more reason!
Chris
Coupe complete kit delivered: 4/22/24.
Build Thread. Coyote. T-56. IRS w/3.55. Wilwoods. PS. HVAC. Side windows.
MK4 Complete kit.
Build Thread Index. Delivered: 10/15/2020. Legal: 7/25/23. Coyote Gen3. TKO600 (0.64 OD). IRS w/3.55. PS. Wilwoods. Sway bars. This build is dedicated to my son, Benjamin.
Build Thread.
-
06-08-2022, 04:38 PM
#394
Senior Member
Super job fabbing the metal brackets, Chris. That looks sharp.
MK4 #7838: IRS 3.55 TrueTrac T5z Dart 347
The drawing is from ~7th grade, mid-1970s
Meandering, leisurely build thread is
here
-
Post Thanks / Like - 1 Thanks, 0 Likes
-
06-08-2022, 08:21 PM
#395
Senior Member
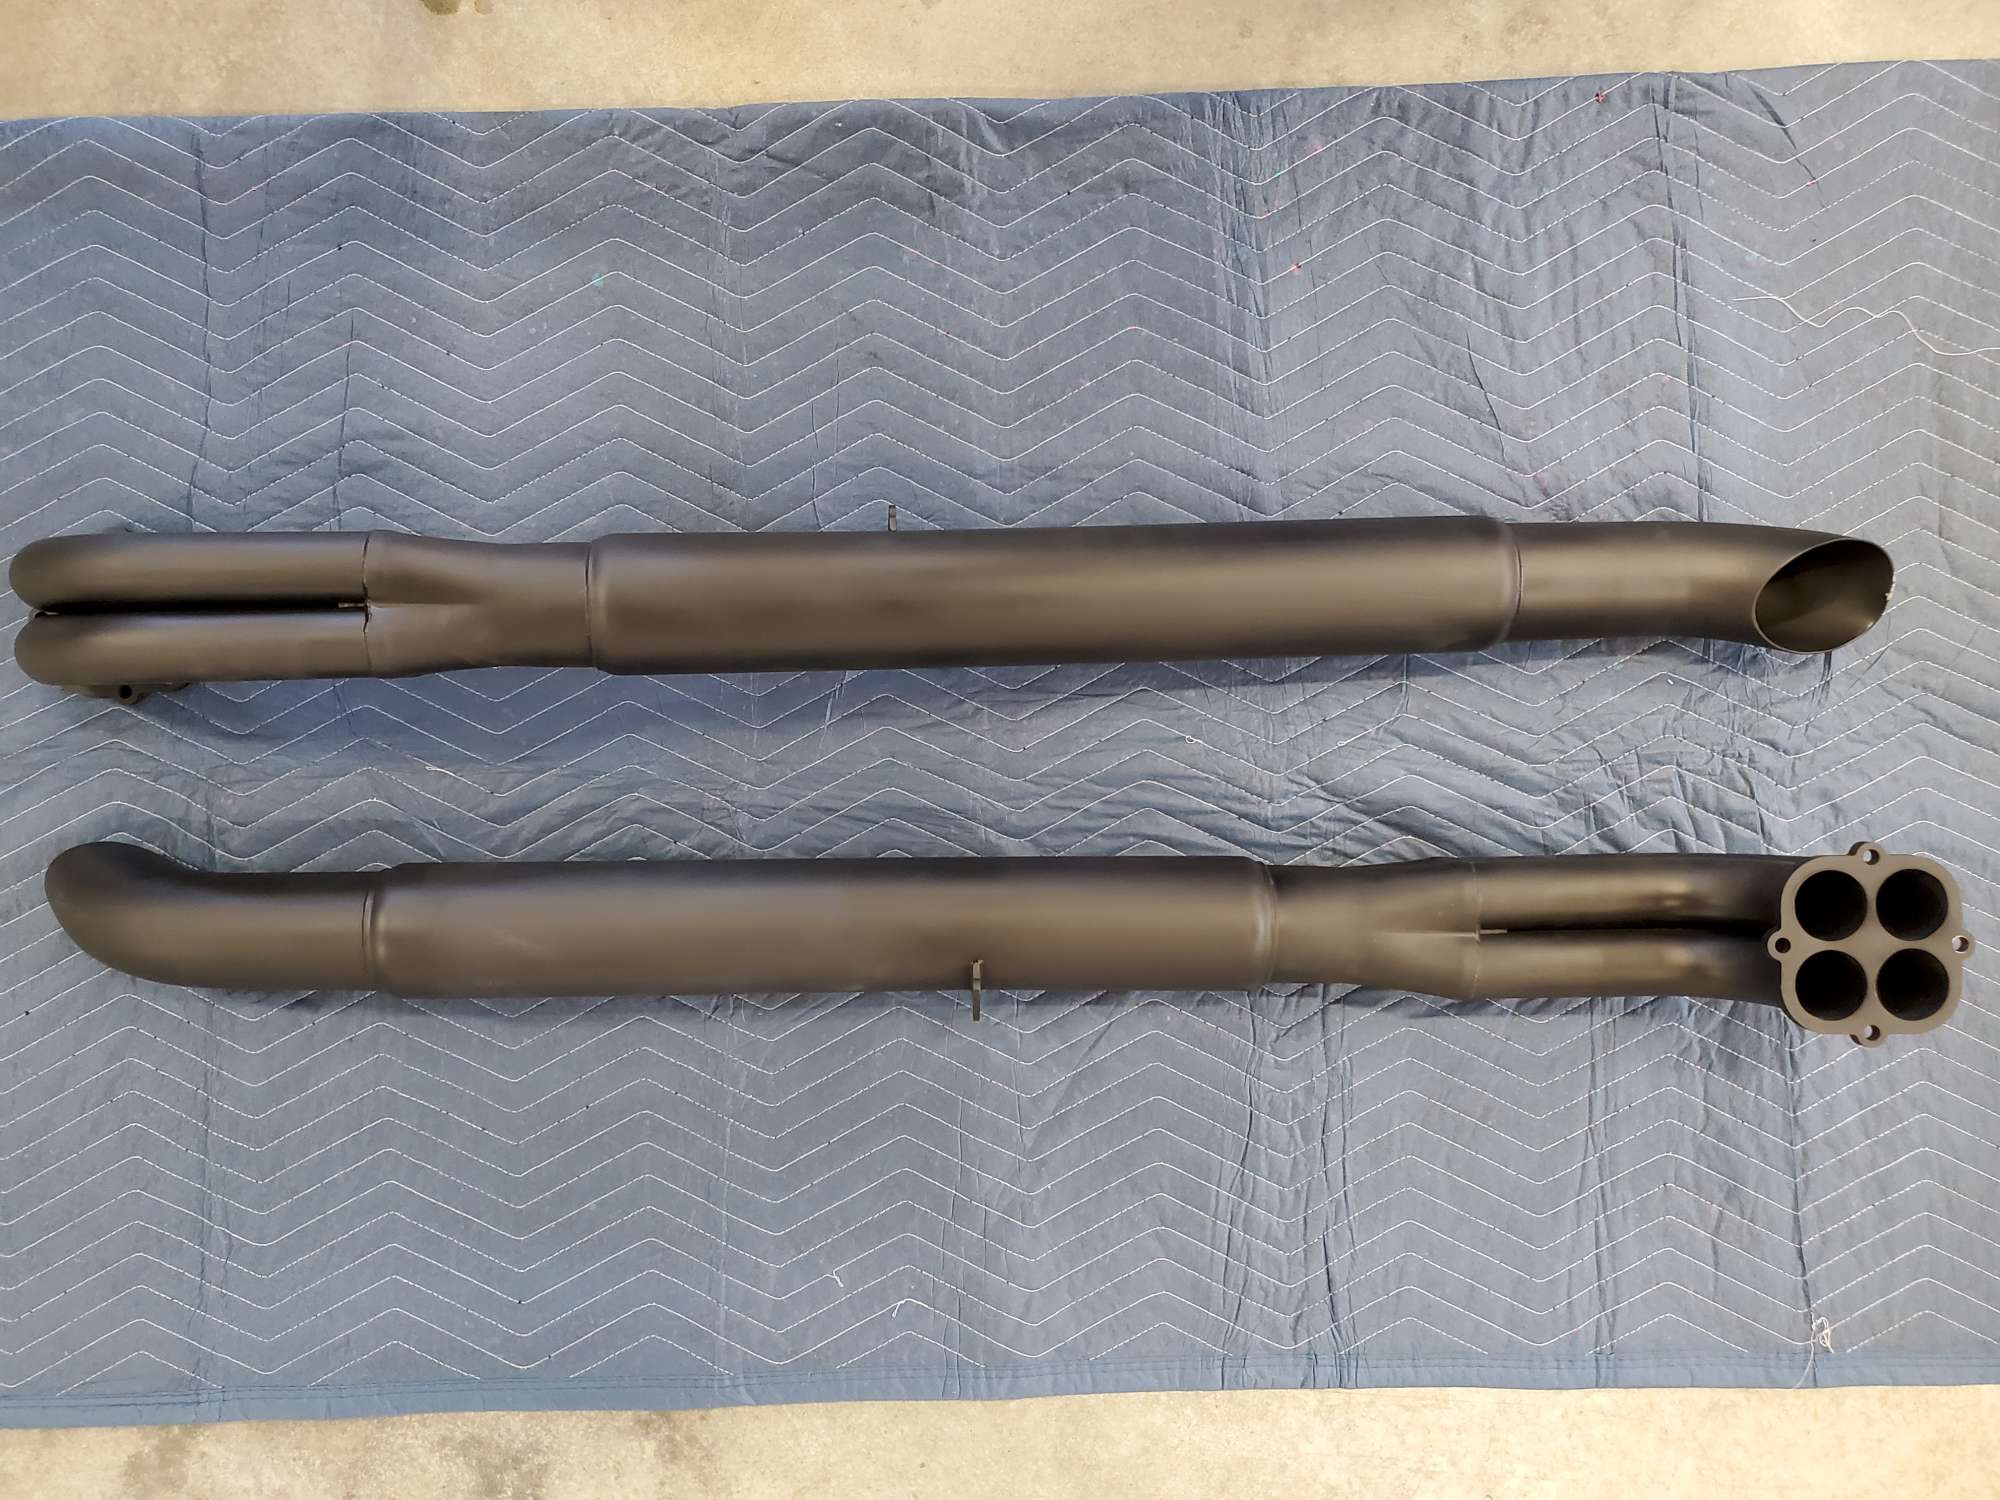
Wilwood Brake & Forte Hyd Clutch Bleeding Party
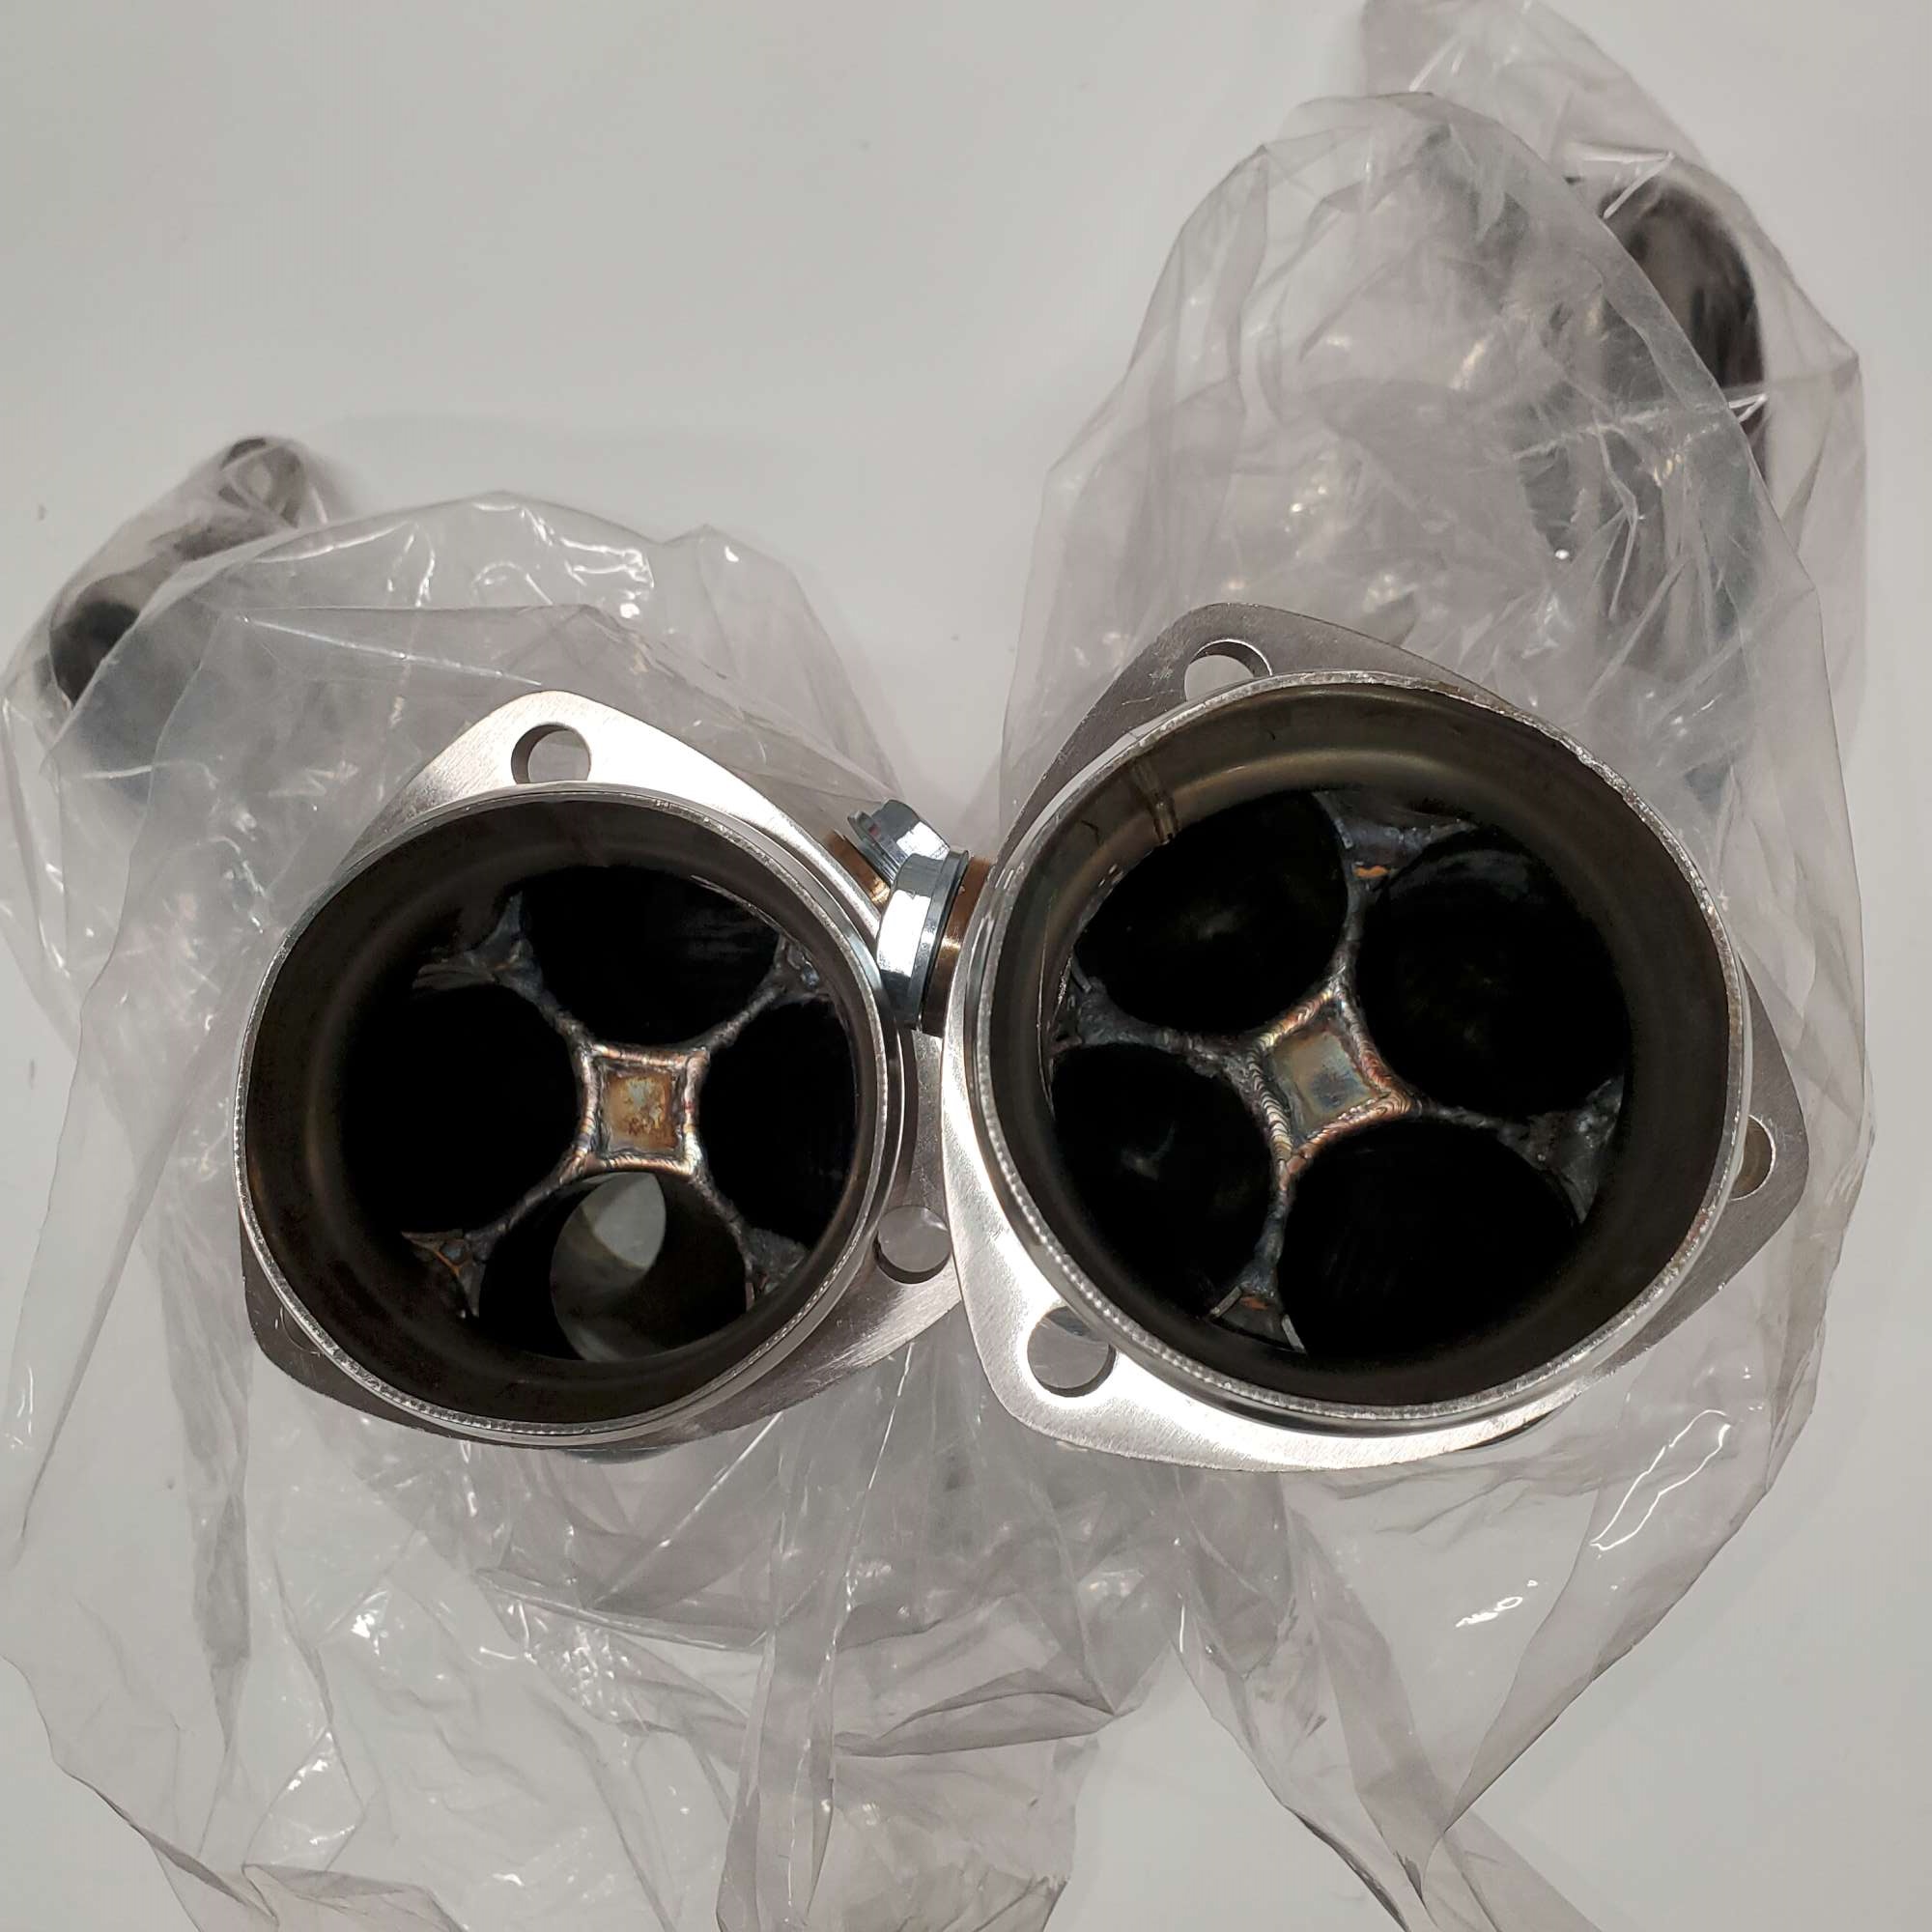
Look what the brown box truck delivered yesterday. I ordered these (Touring model with ceramic coating) from Gas-N in Dec., so it was ~six month turn around. Really glad they showed up when they did, or I was looking at a First Start with open headers!
Unfortunately, the box was dropped somewhere along the way, and the PS exhaust tip curled in a bit. It's not a big bend (top exhaust pipe in the picture), but I was disappointed to see them arrive with damage. Not at all Georgie's fault, as he packaged them quite well. There's only some much you can do to prepare against rough handling. I can't wait to hear what these sound like!
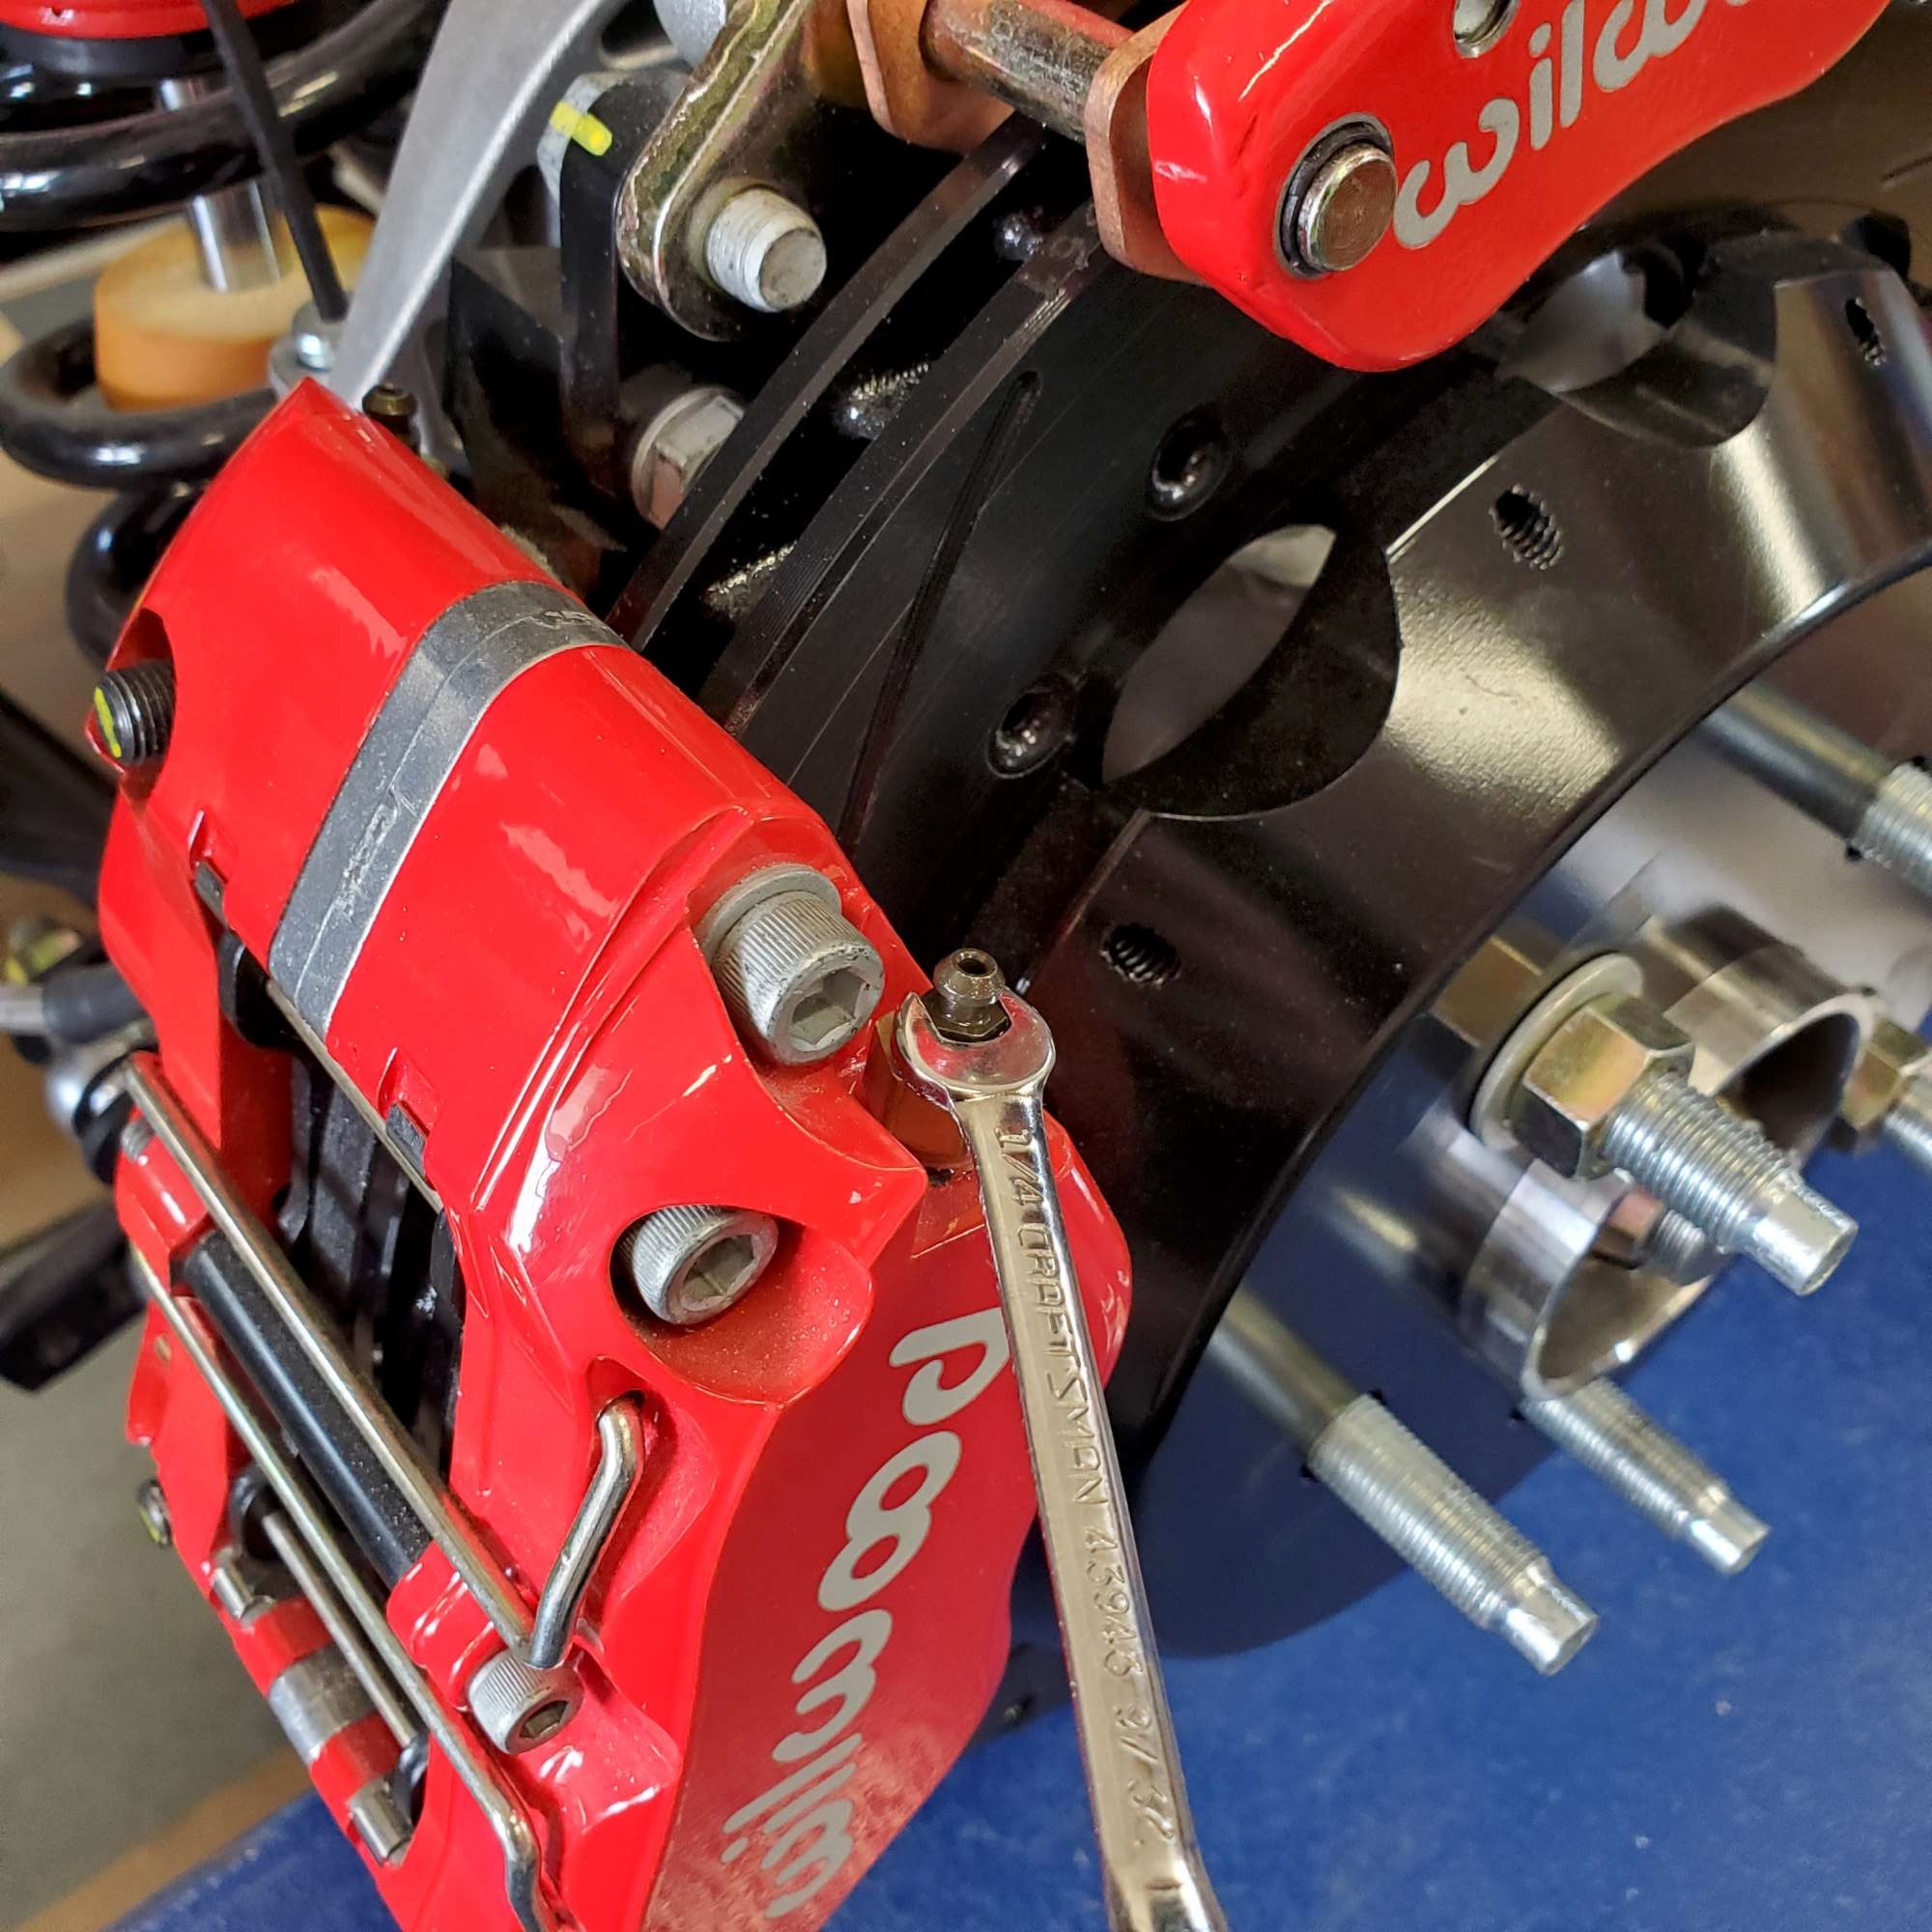
I had the day off, and local builder Jim graciously offered to help me bleed my Wilwood brakes, as well as the Forte hydraulic clutch. So, it was a brake and clutch bleeding party. I was prepared for my usual trial-and-error approach, but Jim has experience, and this really cool pressure bleeding setup:

Both procedures went really well. I'd been somewhat putting off the brake bleeding for a while, keeping plenty busy with other tasks. But now that I had the hydraulic clutch installed, no more procrastination. The amazing part is no leaks! This being my first brake line installation, I wasn't sure how much torque to apply to the fittings. Definitely didn't want to over-torque, but also didn't want the fittings to leak. Apparently, I found the right amount. The pedal is quite firm. I pushed down on it hard and held for a few minutes: no movement. I'll take it! Of course, we had to reward the firm pedal and no leaks with a Five Guys burger.
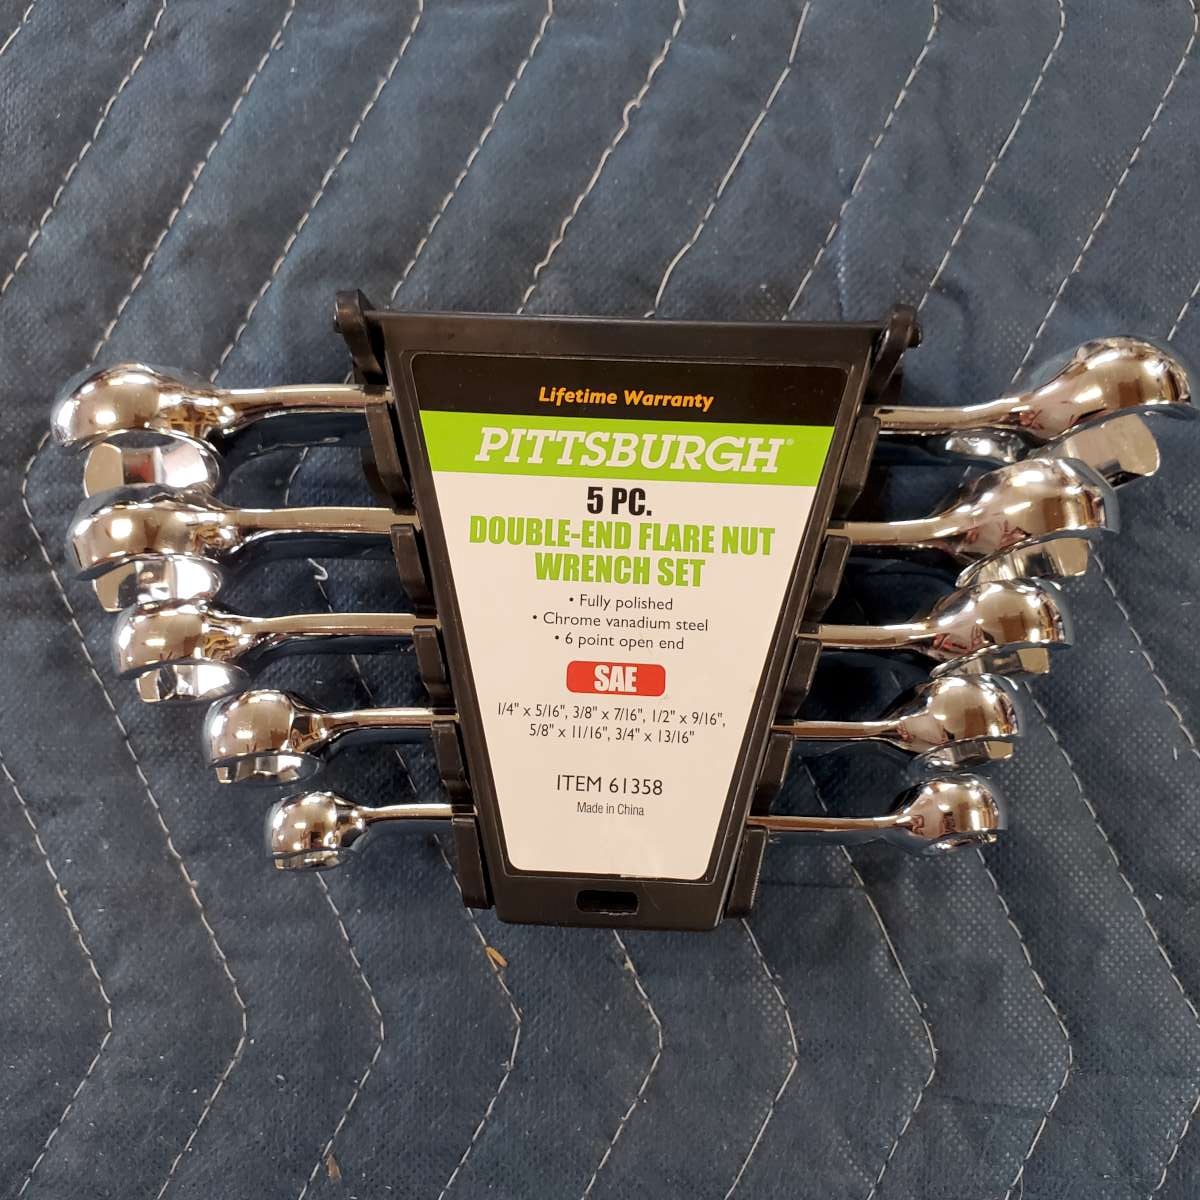
On advice from the forum, this is the flare nut wrench set I bought from Harbor Freight to tighten the hardline fittings.
It was a day of success, and I learned a lot from Jim. Here are a few things that stick out in my mind for bleeding my Wilwood brakes:
- I couldn't get a socket or wrench to seat on the brass fitting seen in the picture below--look closely underneath the wrench and you'll see it. Well, that's because you're supposed to just open the small black nipple that threads into the brass fitting with a 1/4" wrench. Duh! Good thing Jim was here, or who knows how long I would have tried to get a socket or wrench on that brass fitting.
- The rears calipers have two nipples on the top and two on the bottom. Per Wilwood instructions, ignore the bottom nipples/valves. Start with the outer valve first on the top, then move on to the inner.
- The front six piston calipers have just one nipple on the top, and one on the bottom. Again, ignore the bottom.
- Isopropyl alcohol (AKA rubbing alcohol) works well to clean up any spills.
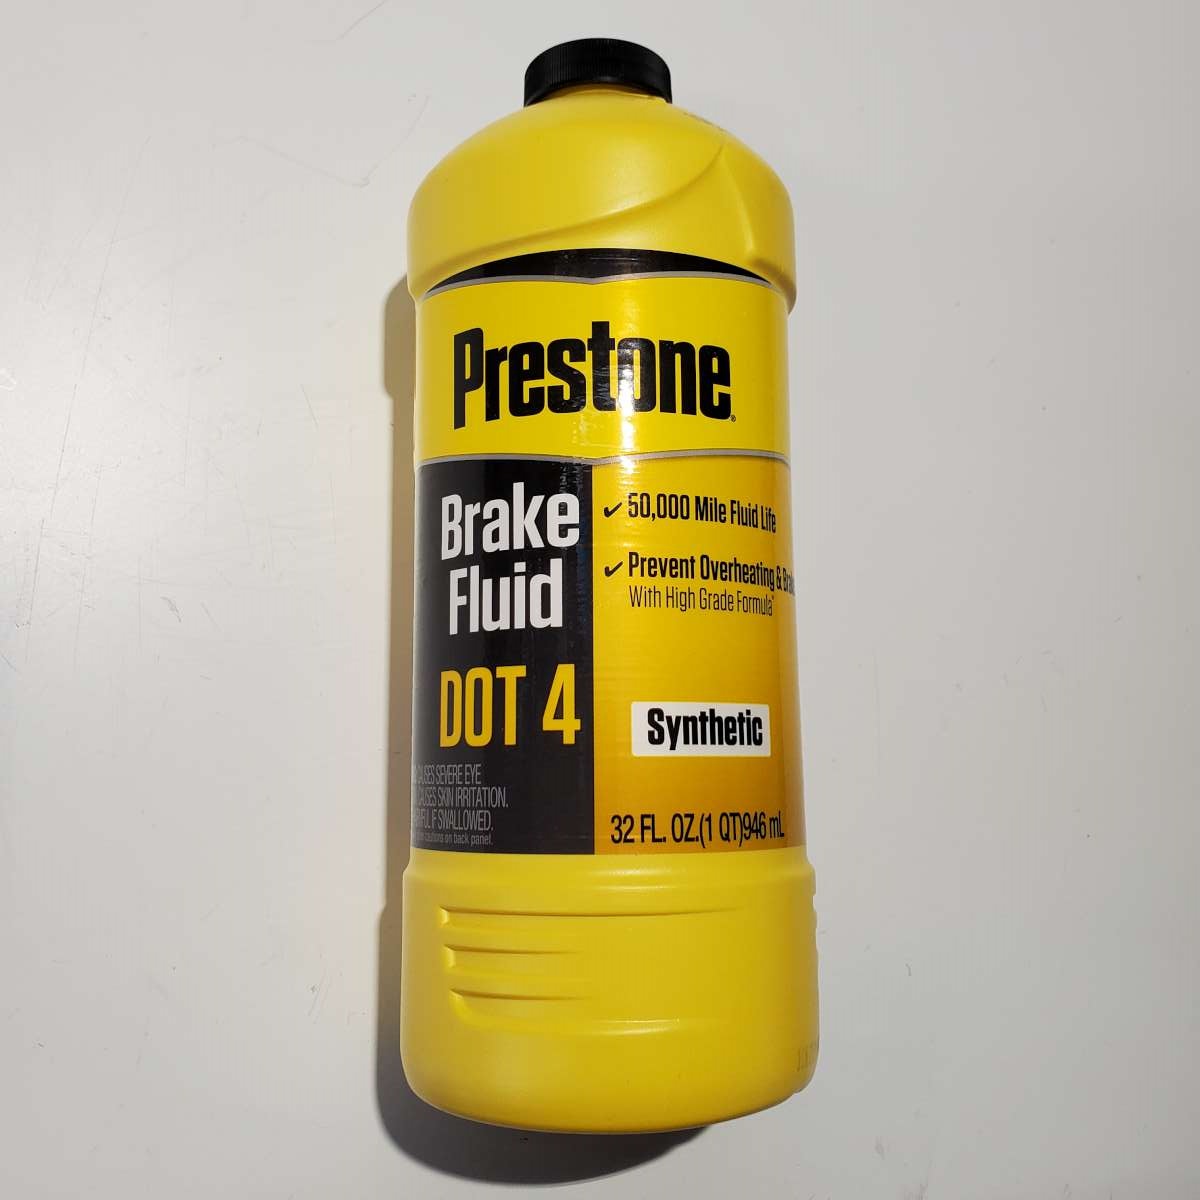
I used Prestone DOT 4 synthetic fluid for the brakes and the hydraulic clutch. I bought two of these 32 oz containers. Maybe could have squeaked by with just one, but good to have plenty on-hand when in the middle of the process just in case.
My various coolant hoses for the Moroso setup also arrived yesterday, so I'll start tackling those connections when I return from the F5 open house. Hope to see some of you there.
Last edited by 460.465USMC; 06-10-2022 at 09:11 AM.
Chris
Coupe complete kit delivered: 4/22/24.
Build Thread. Coyote. T-56. IRS w/3.55. Wilwoods. PS. HVAC. Side windows.
MK4 Complete kit.
Build Thread Index. Delivered: 10/15/2020. Legal: 7/25/23. Coyote Gen3. TKO600 (0.64 OD). IRS w/3.55. PS. Wilwoods. Sway bars. This build is dedicated to my son, Benjamin.
Build Thread.
-
06-10-2022, 09:31 AM
#396
Senior Member
I used the exact same setup. I had to do each twice to get all the air out. I recommend jiggling the pedals a bit to get anything trapped in there. I had air build up in my front calipers and the clutch. Since my second bleed they have both remained very tight.
MK4 #10008 - Ordered 10/06/20, Delivered 03/03/21, First Start 7/22/21, First Go Kart 7/24/21
Paint by Metal Morphous 5/14/22, Legally registered 6/8/22, Graduated 7/20/22
Build Thread
https://thefactoryfiveforum.com/show...been-delivered
Complete Kit, Ford 306, Sniper/Dual Sync, T5, Hydraulic clutch
-
06-10-2022, 04:45 PM
#397
Senior Member
Jim had us go around the front and rear brakes 2-3 times each. A couple pedal presses along the way as well. Similar with the hydraulic clutch. That system works really nice. If I need to bleed in the future, I'm going to get something similar.
Chris
Coupe complete kit delivered: 4/22/24.
Build Thread. Coyote. T-56. IRS w/3.55. Wilwoods. PS. HVAC. Side windows.
MK4 Complete kit.
Build Thread Index. Delivered: 10/15/2020. Legal: 7/25/23. Coyote Gen3. TKO600 (0.64 OD). IRS w/3.55. PS. Wilwoods. Sway bars. This build is dedicated to my son, Benjamin.
Build Thread.
-
06-10-2022, 09:57 PM
#398
Sorry to hear about the damaged side pipes man... especially after ceramic coating and all that. I'd be heartbroken.
With regards to bleeding, what you have there is really neat! I remember using my friend's power bleeder before and it was just a mess. Perhaps I did it wrong? This time I just had a friend pump the brakes over and over again :P
-
06-11-2022, 07:08 PM
#399
Senior Member
F5 Open House - Worth It!
Today, I had the fantastic opportunity to attend the F5 open house. It's been a couple years or so since they've been able to host one due to COVID. This is my first time at F5. I'm killing time here in my hotel room this evening, so thought I'd go off topic for a minute and share a few pictures of today's events:
Lots of really well done F5 Roadsters in attendance. This view only shows ~50% of the Roadsters:

I was able to meet a few vendors while I was here, including Mark Reynolds (Breeze), Mike Forte, Mike Everson (Replica Parts), and Jeff Kleiner. While I was at it, I picked up a couple small items that can fit into my suitcase from Mark at Breeze. It was fun to buy in-person, and he gave me a nice tour of his MKIII, and his shop. Plus, it saved me a few shekels in shipping (for once!). I was also able to meet and chat with Edwardb and his wife for a bit. This is his incredibly well-built Coupe: it doesn't disappoint.
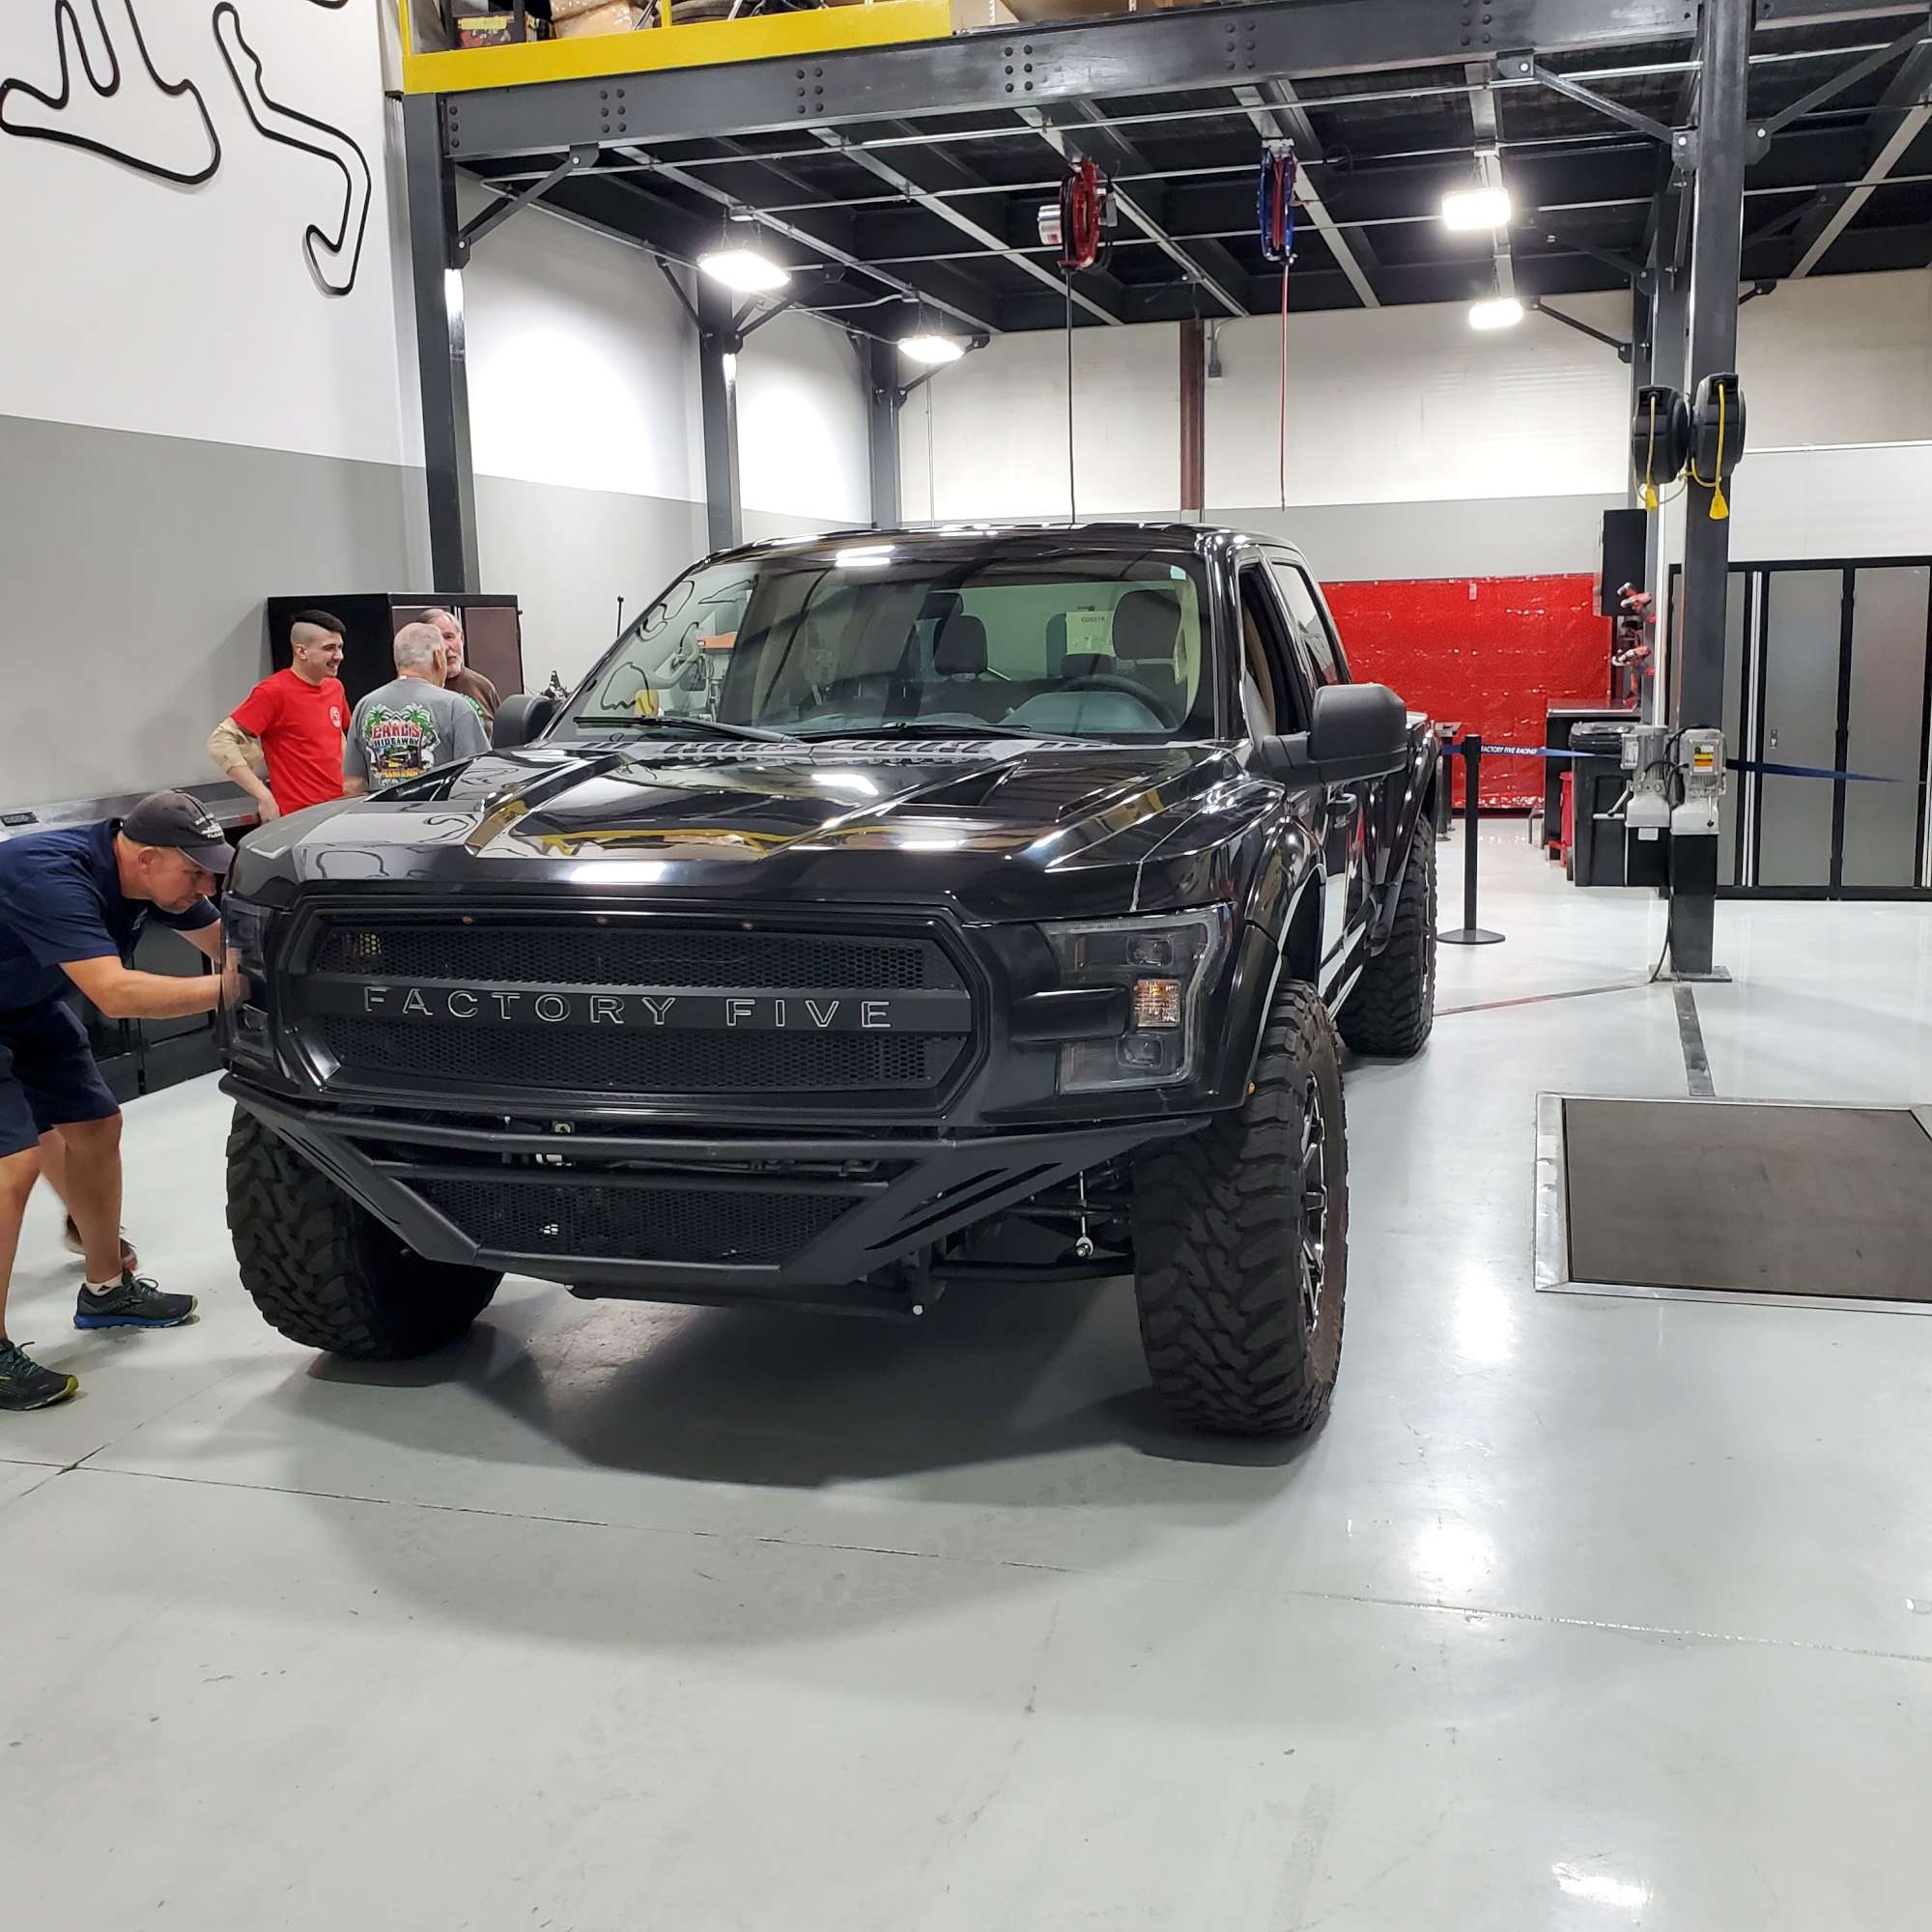
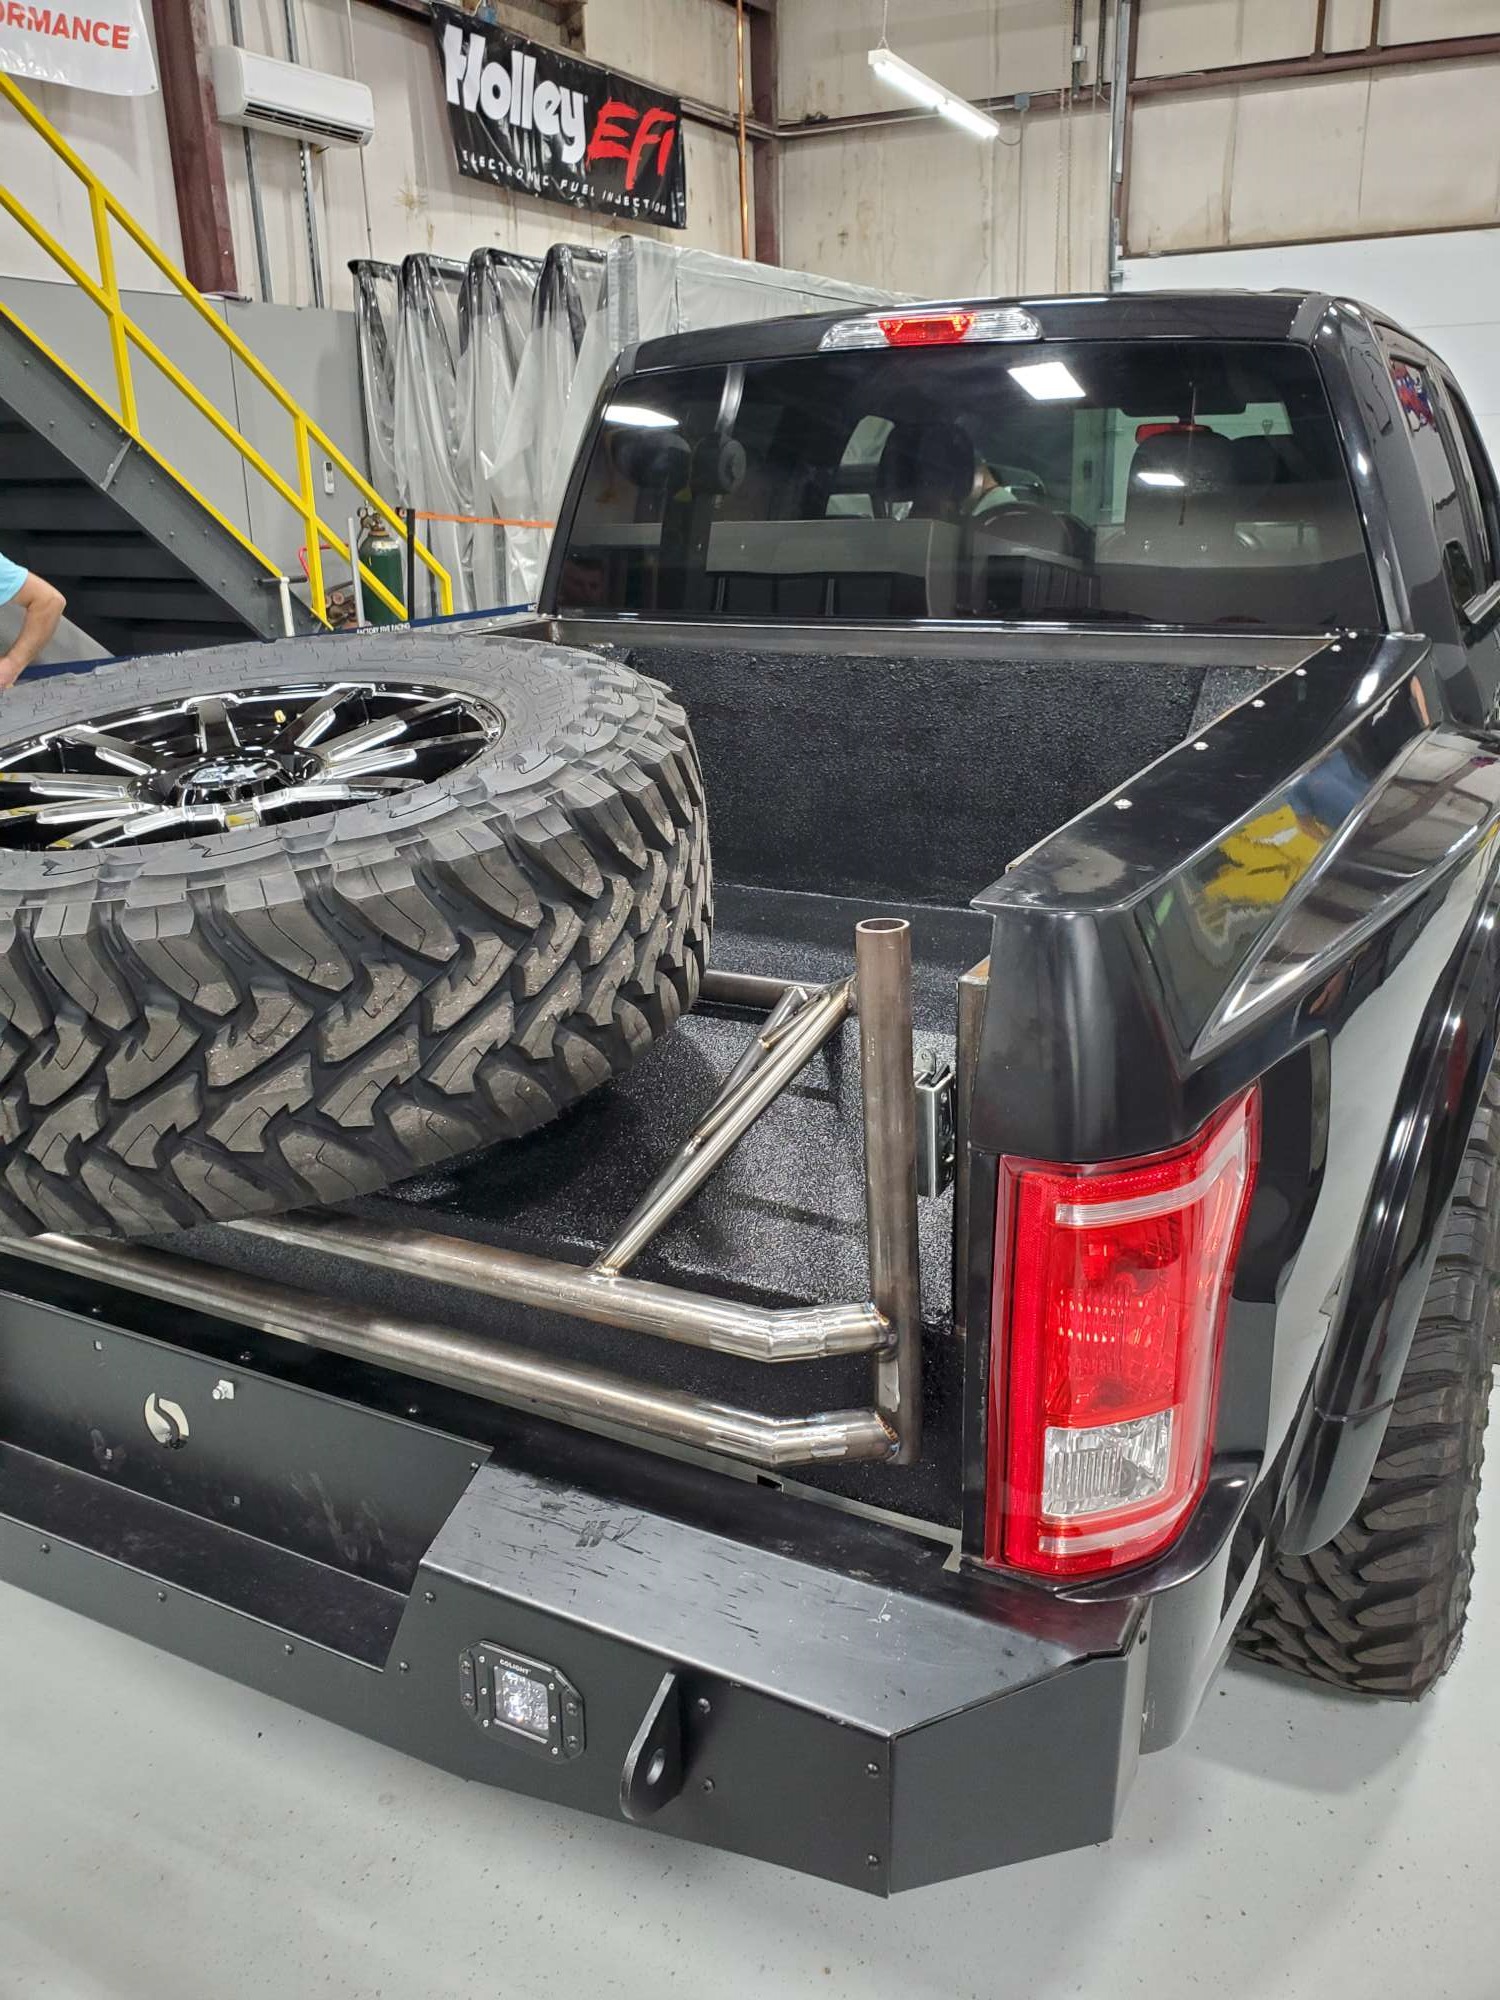
In case anyone's interested, this is the pre-runner truck F5 is developing. According to Dave S., any 2015-2020 F-150 will mate up to their chassis. Looks like this thing will be pretty incredible off-road!
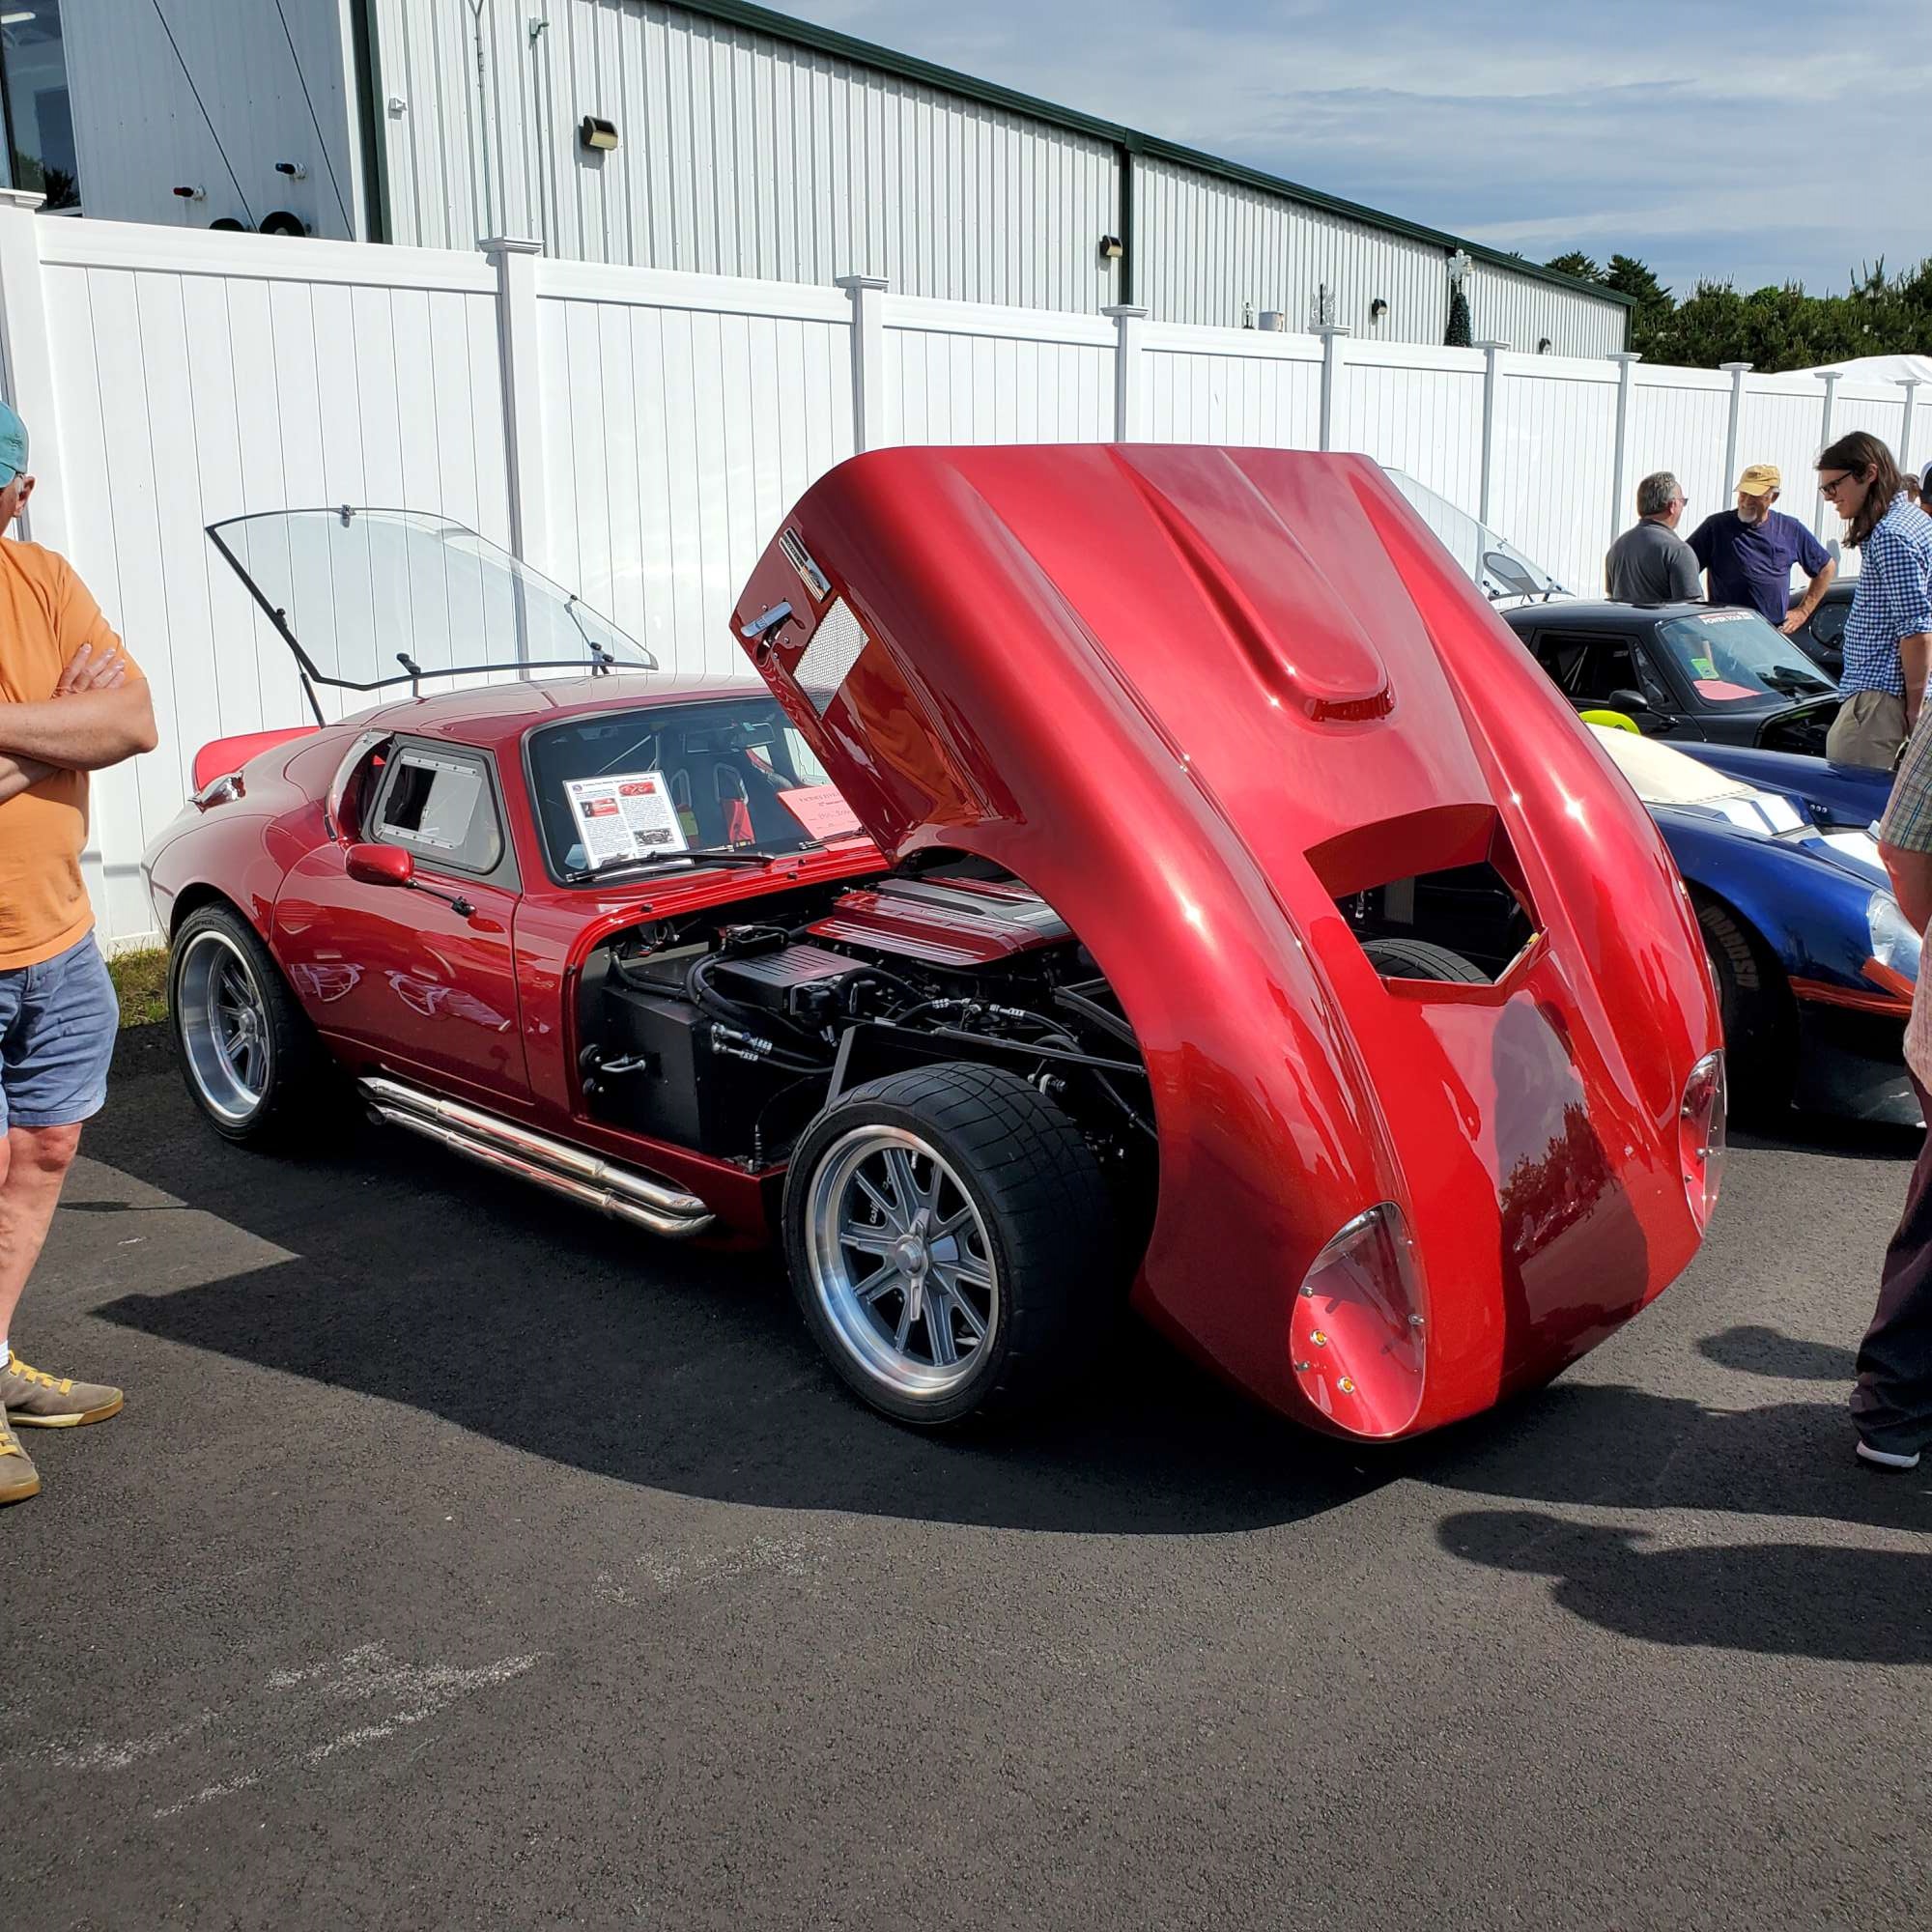
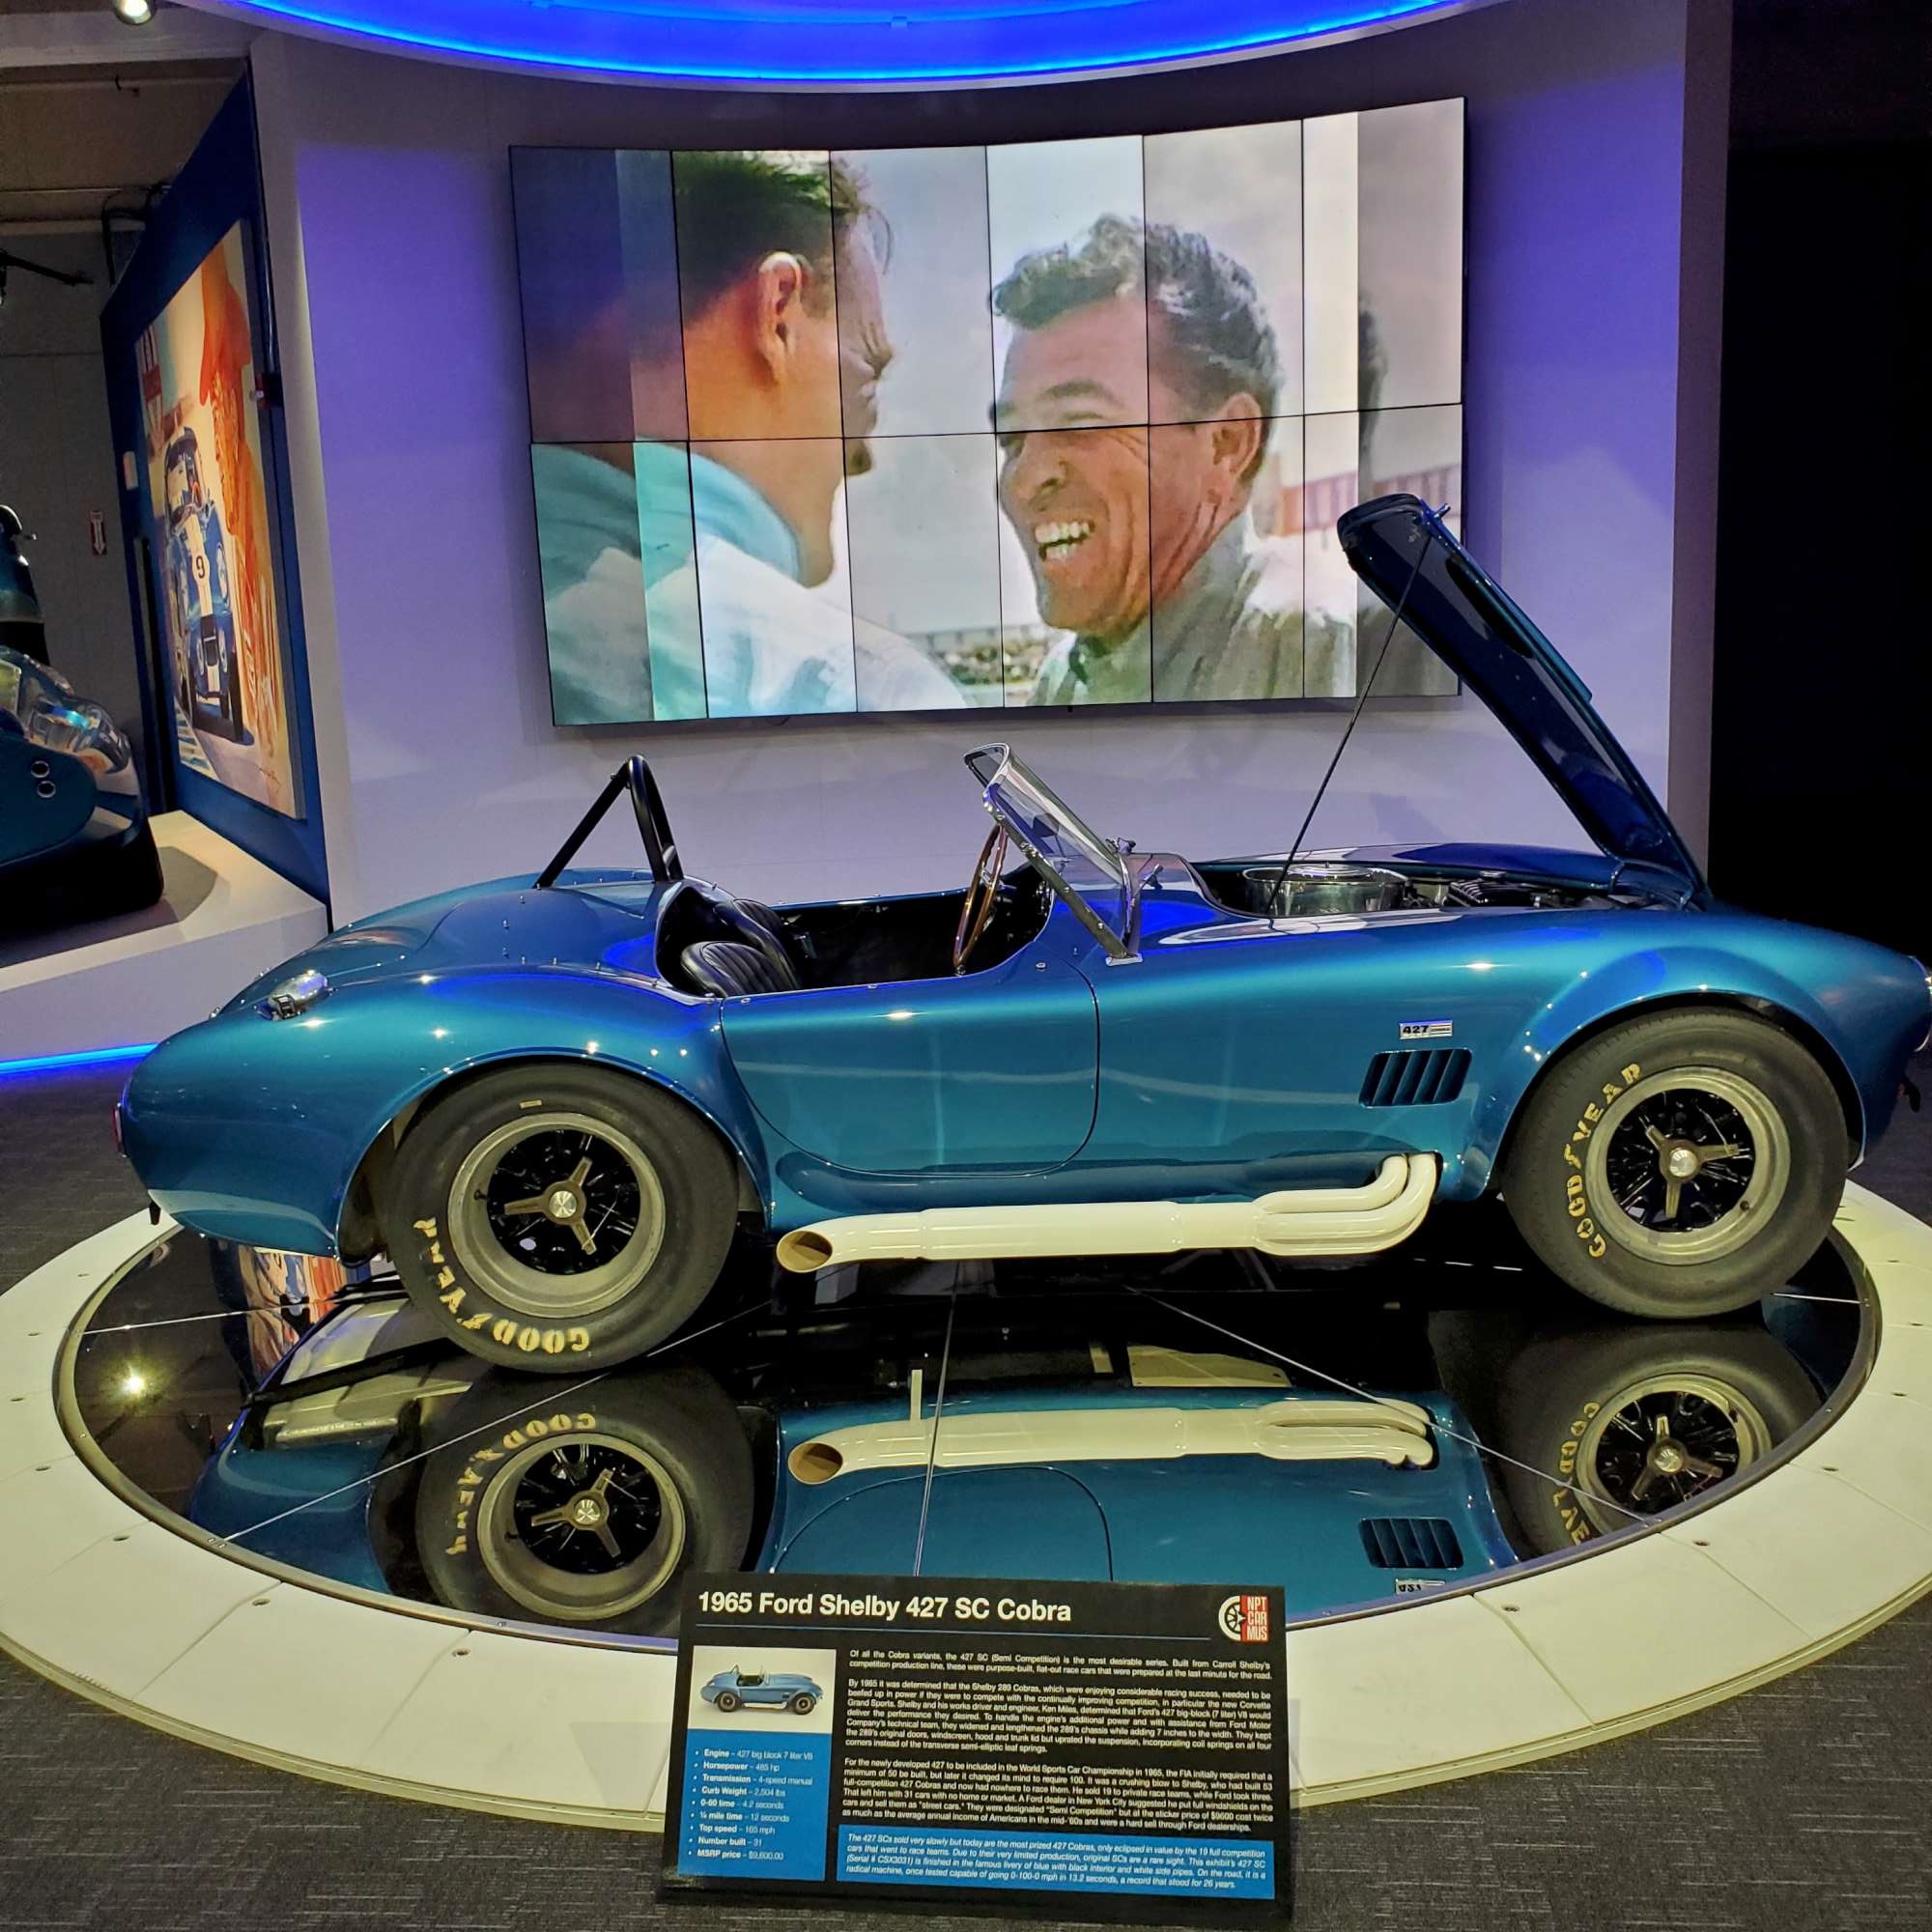
After the tour, car show, and awards 30-40 of us drove down to the Newport Car Museum, about a 45 minute drive from F5. Dave Smith lead the way in his F5 Coupe. Lots of current and historic performance cars, including a huge display of Shelby and/or Ford gems like the 427 SC Cobra, GT40, vintage/current GT500, etc.
And this offering from the General...and, Orange to boot! Not sure how this picture got in here.

It was a very enjoyable day all the way around. A nice tour of their new facility hosted by Dave S. And, lots of sunshine for the car show (I have the sunburn to prove it!).
Last edited by 460.465USMC; 06-11-2022 at 07:11 PM.
Chris
Coupe complete kit delivered: 4/22/24.
Build Thread. Coyote. T-56. IRS w/3.55. Wilwoods. PS. HVAC. Side windows.
MK4 Complete kit.
Build Thread Index. Delivered: 10/15/2020. Legal: 7/25/23. Coyote Gen3. TKO600 (0.64 OD). IRS w/3.55. PS. Wilwoods. Sway bars. This build is dedicated to my son, Benjamin.
Build Thread.
-
Post Thanks / Like - 2 Thanks, 7 Likes
-
06-18-2022, 10:08 PM
#400
Senior Member
Cooling System and Vacuum Connections Complete
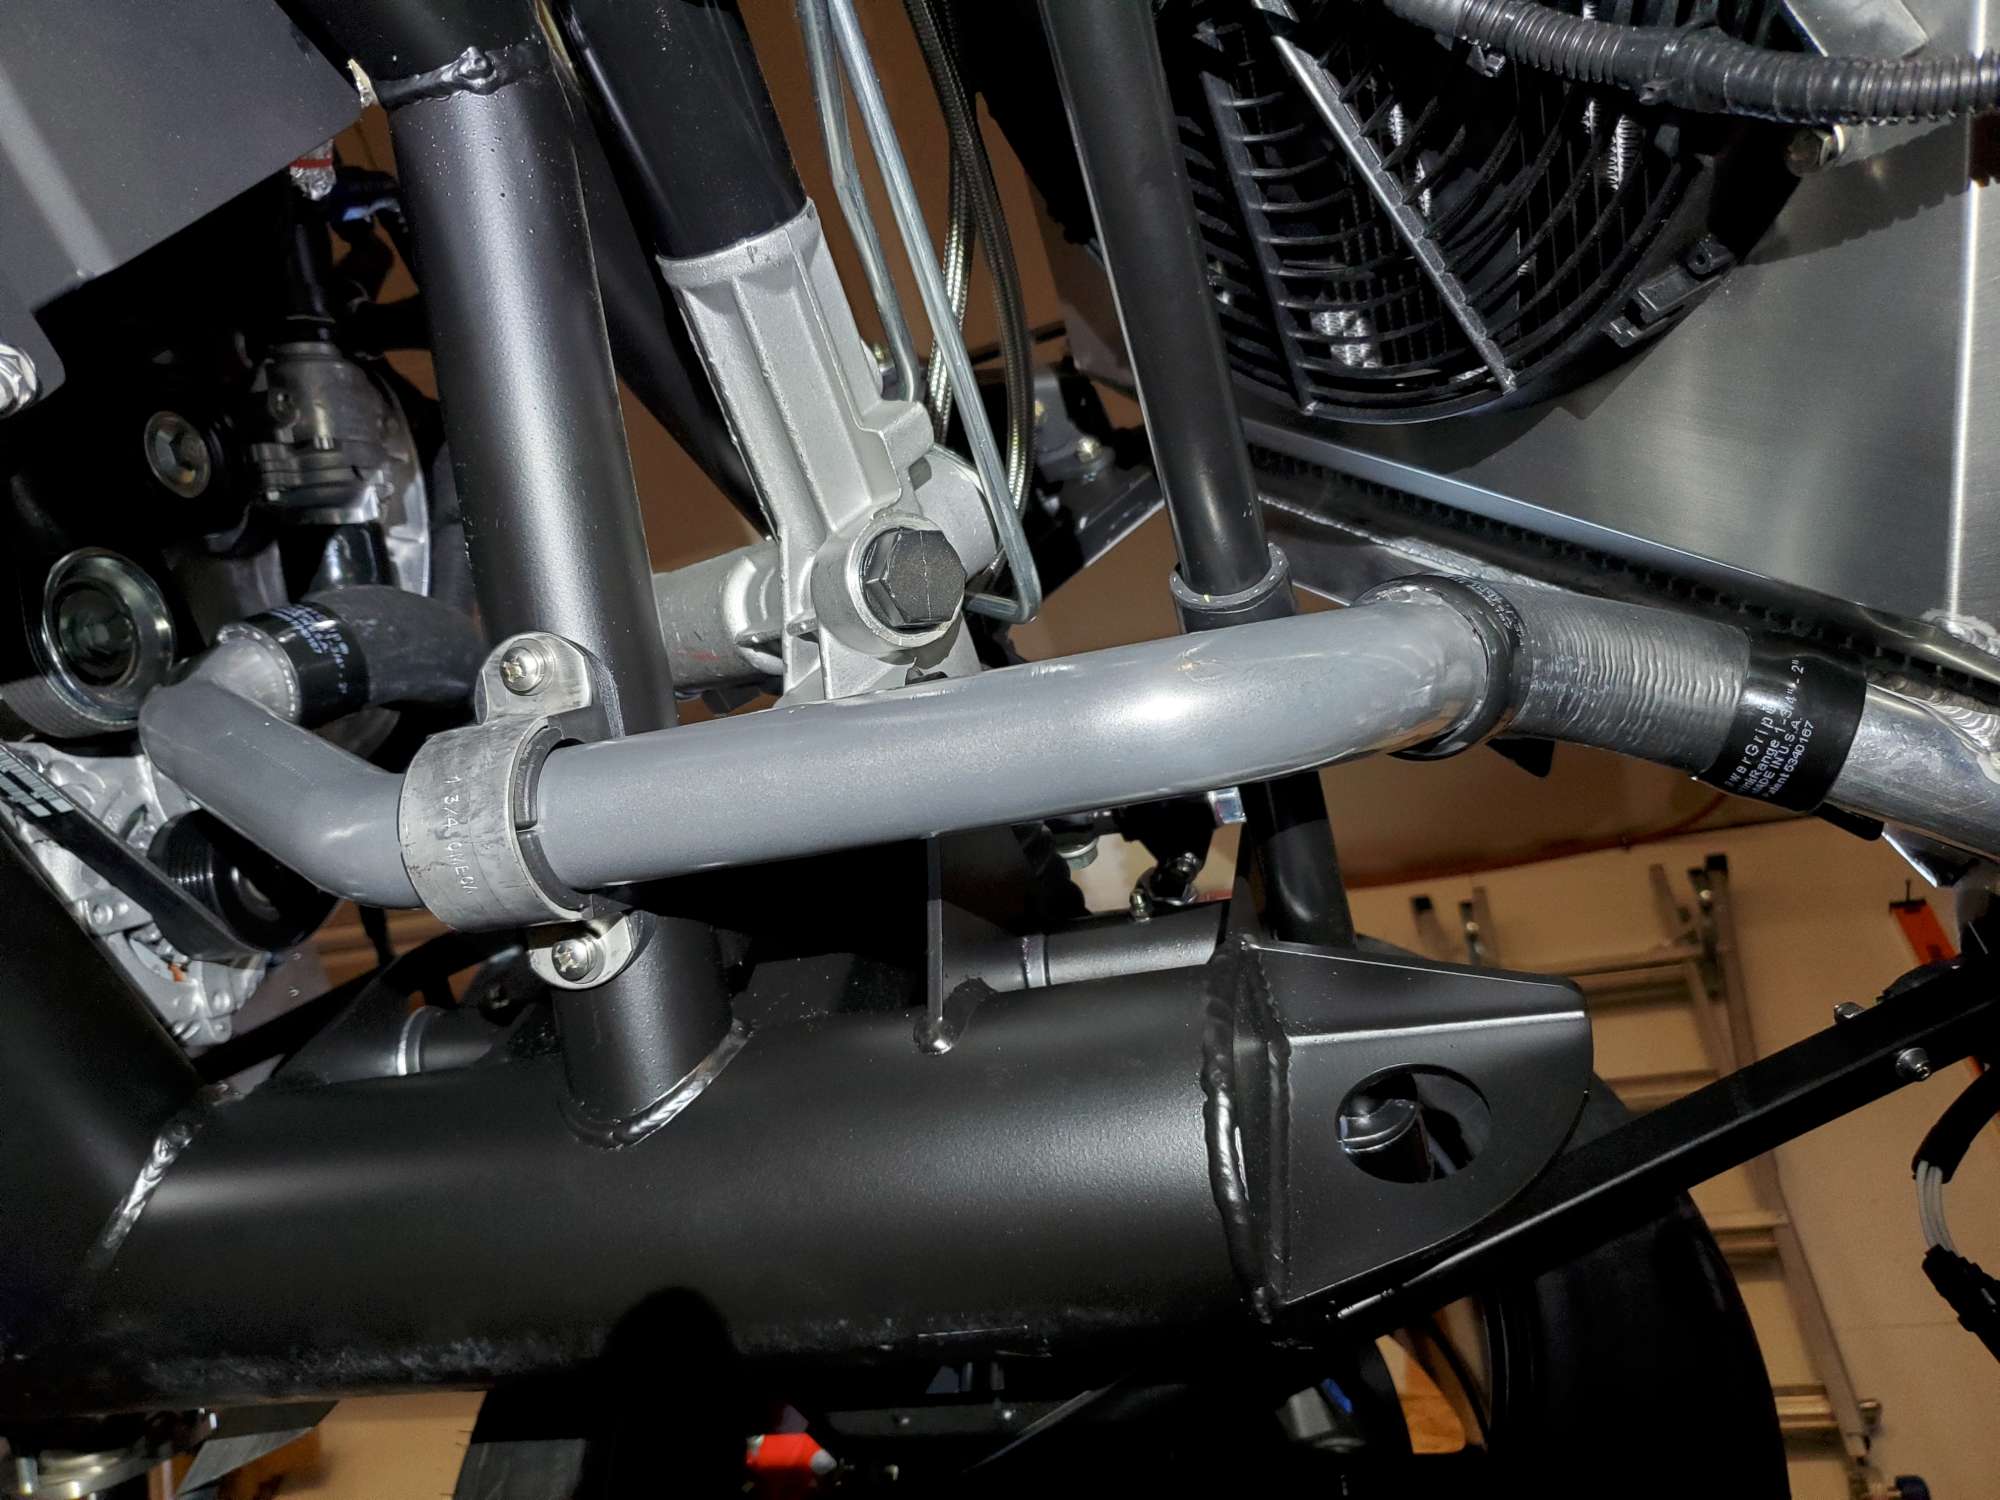
After getting the Moroso tank installed, I continued working on the cooling system connections. I started with the lower rad hose. Last year, I bought the lower hose kit from Boig (BMS-104). After a few iterations of careful trimming on both ends, I got the needed clearance from the steering shaft. There is just a whisker of a gap between the mandrel bent pipe and the front sway arm. With the motor running and car in motion no doubt there will be some contact. So, I wrapped the sway arm with a piece of heater hose for a little cushion. I picked up the lower radiator hose bracket kit from Breeze (70785) while I was at the F5 open house. Tapped the 1/4"-20 holes, and secured the hose. It's a solid setup.
Here's the Boig lower hose with Breeze bracket kit trimmed and ready for install.
Here's what the routing looks like from underneath. You can see the short piece of heater hose in place to protect from metal-on-metal rubbing.
The FR3Z-8C289-B lower Moroso tank hose that arrived from OEMPartsSource.com wasn't right. Not sure where the breakdown occurred. So, returned it and picked up a couple feet of 3/4" heater hose from my local auto parts store, and installed pinch clamps at both ends. The arc is gentle enough I think it will be a workable substitute--and cheaper.
Next up was the upper rad hose. Thanks to JohnK's very helpful documentation--see his post #207--I was tipped off to the great idea of making a second notch in the 5 o'clock position. This rotates the hose connection on the motor side counterclockwise, away from the power steering pump pulley/belt. Just for fun I reused the mesh hose wrap from the 2" hose in my Coyote fitment kit from F5. Trimmed the radiator side of the hose, slid on the Gates Powergrip hose clamps, and applied heat. Done.
After all was said and done I spent about $425 (not including tax) to put together the Moroso setup. This does not include the Boig lower radiator hose I mentioned above. The Boig hose is not related to or required for the Moroso, so I didn't include it in my total. Just a heads-up in case someone is interested in this option, and curious about its cost.
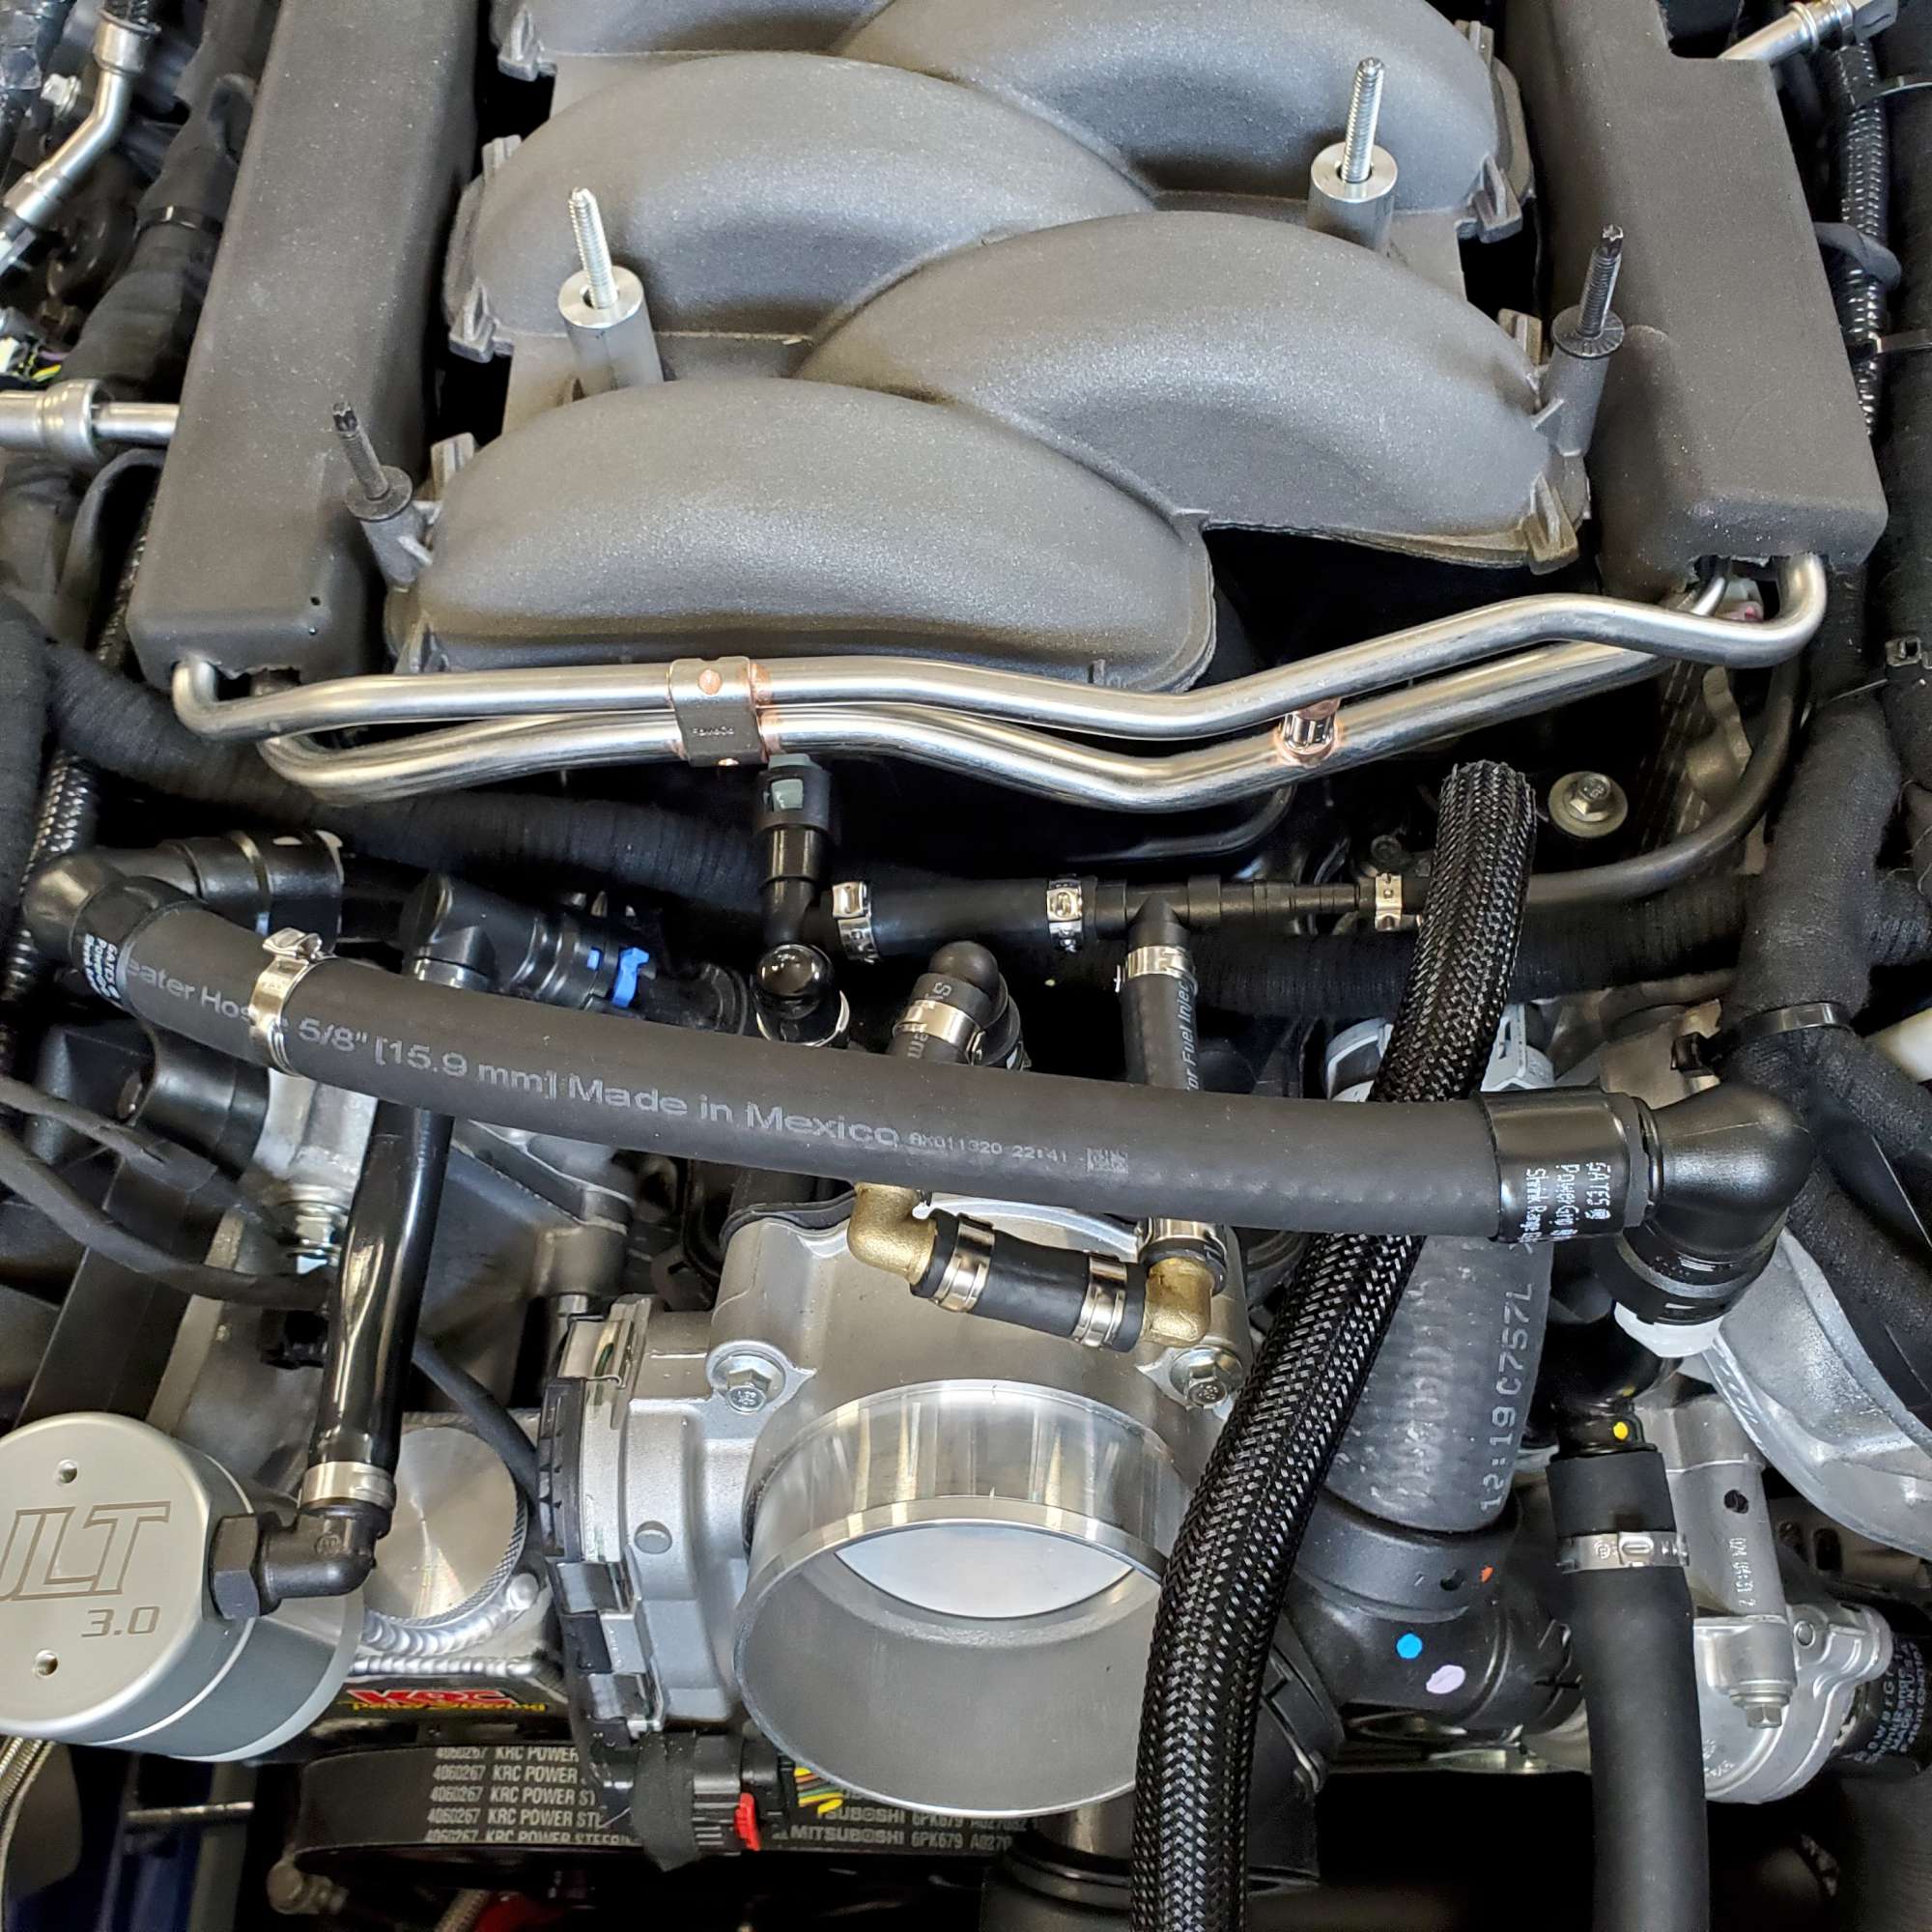
I connected the vacuum connections per Edwarb's Gen 3 Coupe set up--see post #488 of his Coupe build. This meant I needed to come up with a custom hose arrangement to tie together the two vacuum ports (ports F and I in his picture) with a 1/8" port splitting off to my Aeromotive fuel pressure regulator. As he educated me, this will avoid the PCM throwing CMCV related error codes.
Here's the hose setup I put together:
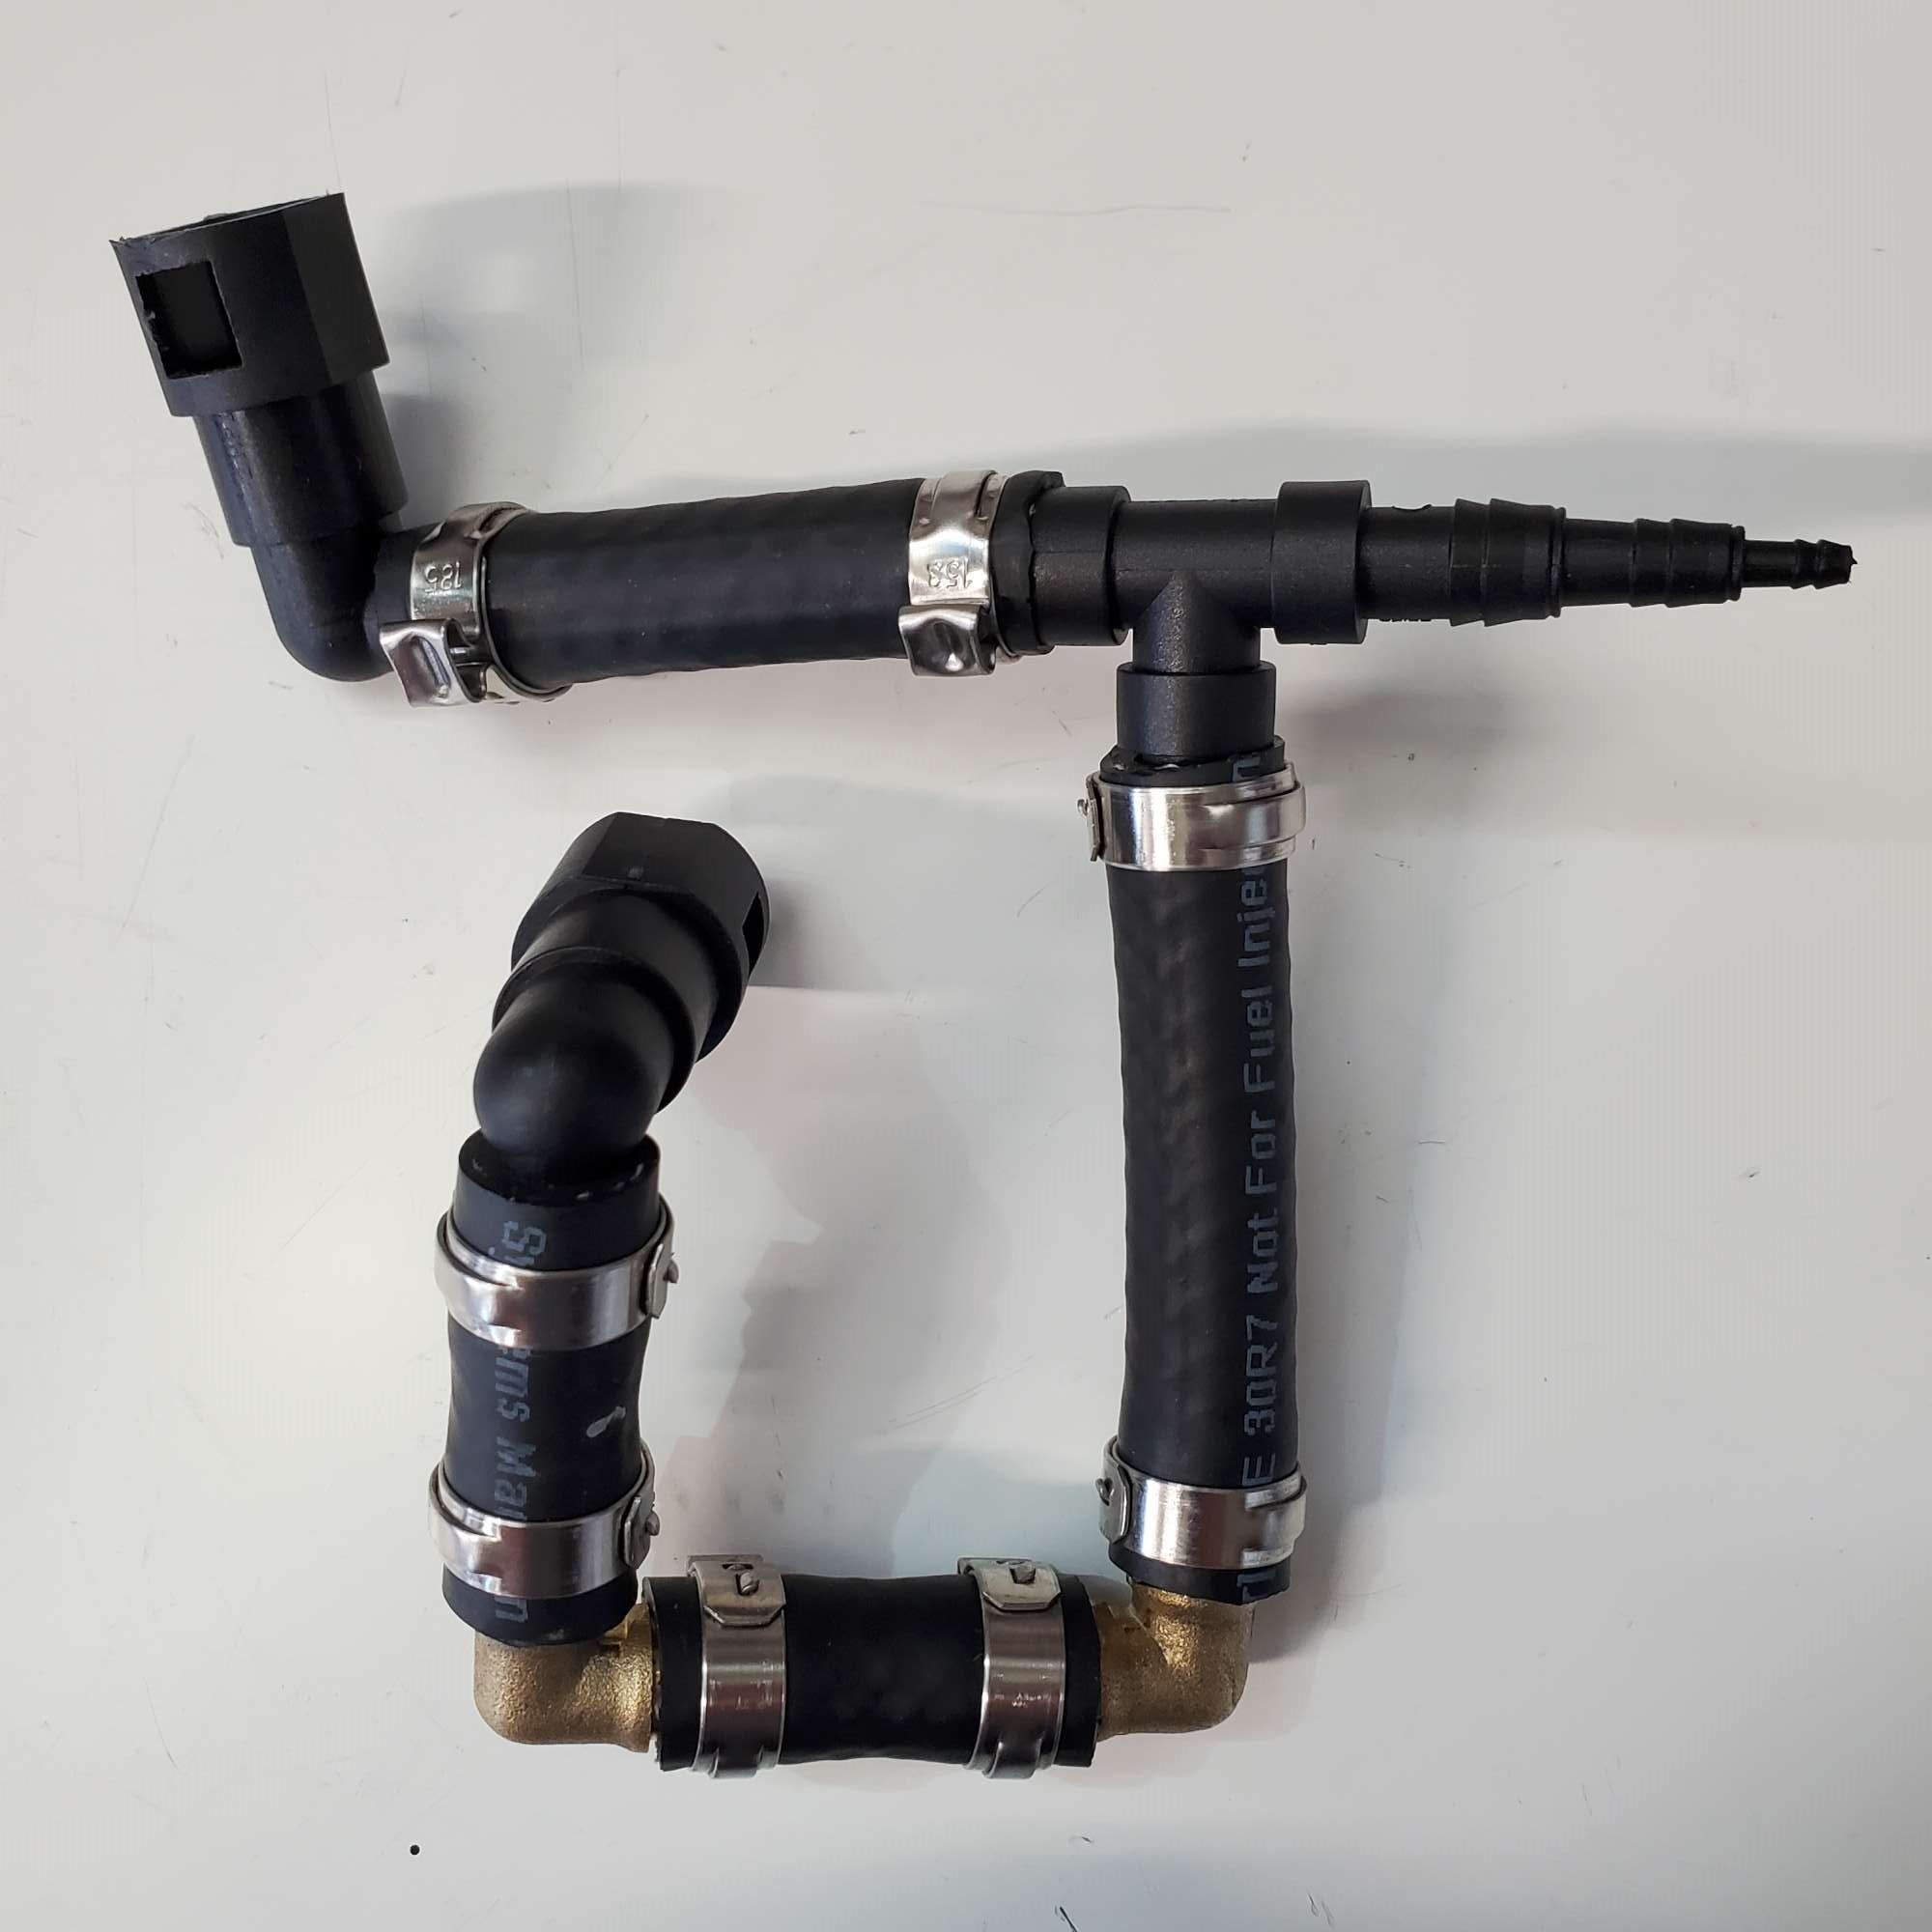
And, here it is installed:
At long last it was time to put in the antifreeze. I used the Napa Dex-Cool compatible coolant (made by Valvoline). This is the concentrate, which I mixed 50/50 with distilled water. I was able to add it directly to the Moroso tank fill opening, as it sits high enough for the liquid to drain into the system. It took about 14.75 quarts. The Moroso tank is about 3/4 full. I'll check it again after first start, as I'm expecting it to take 15+ quarts. Feels good to reach this milestone.

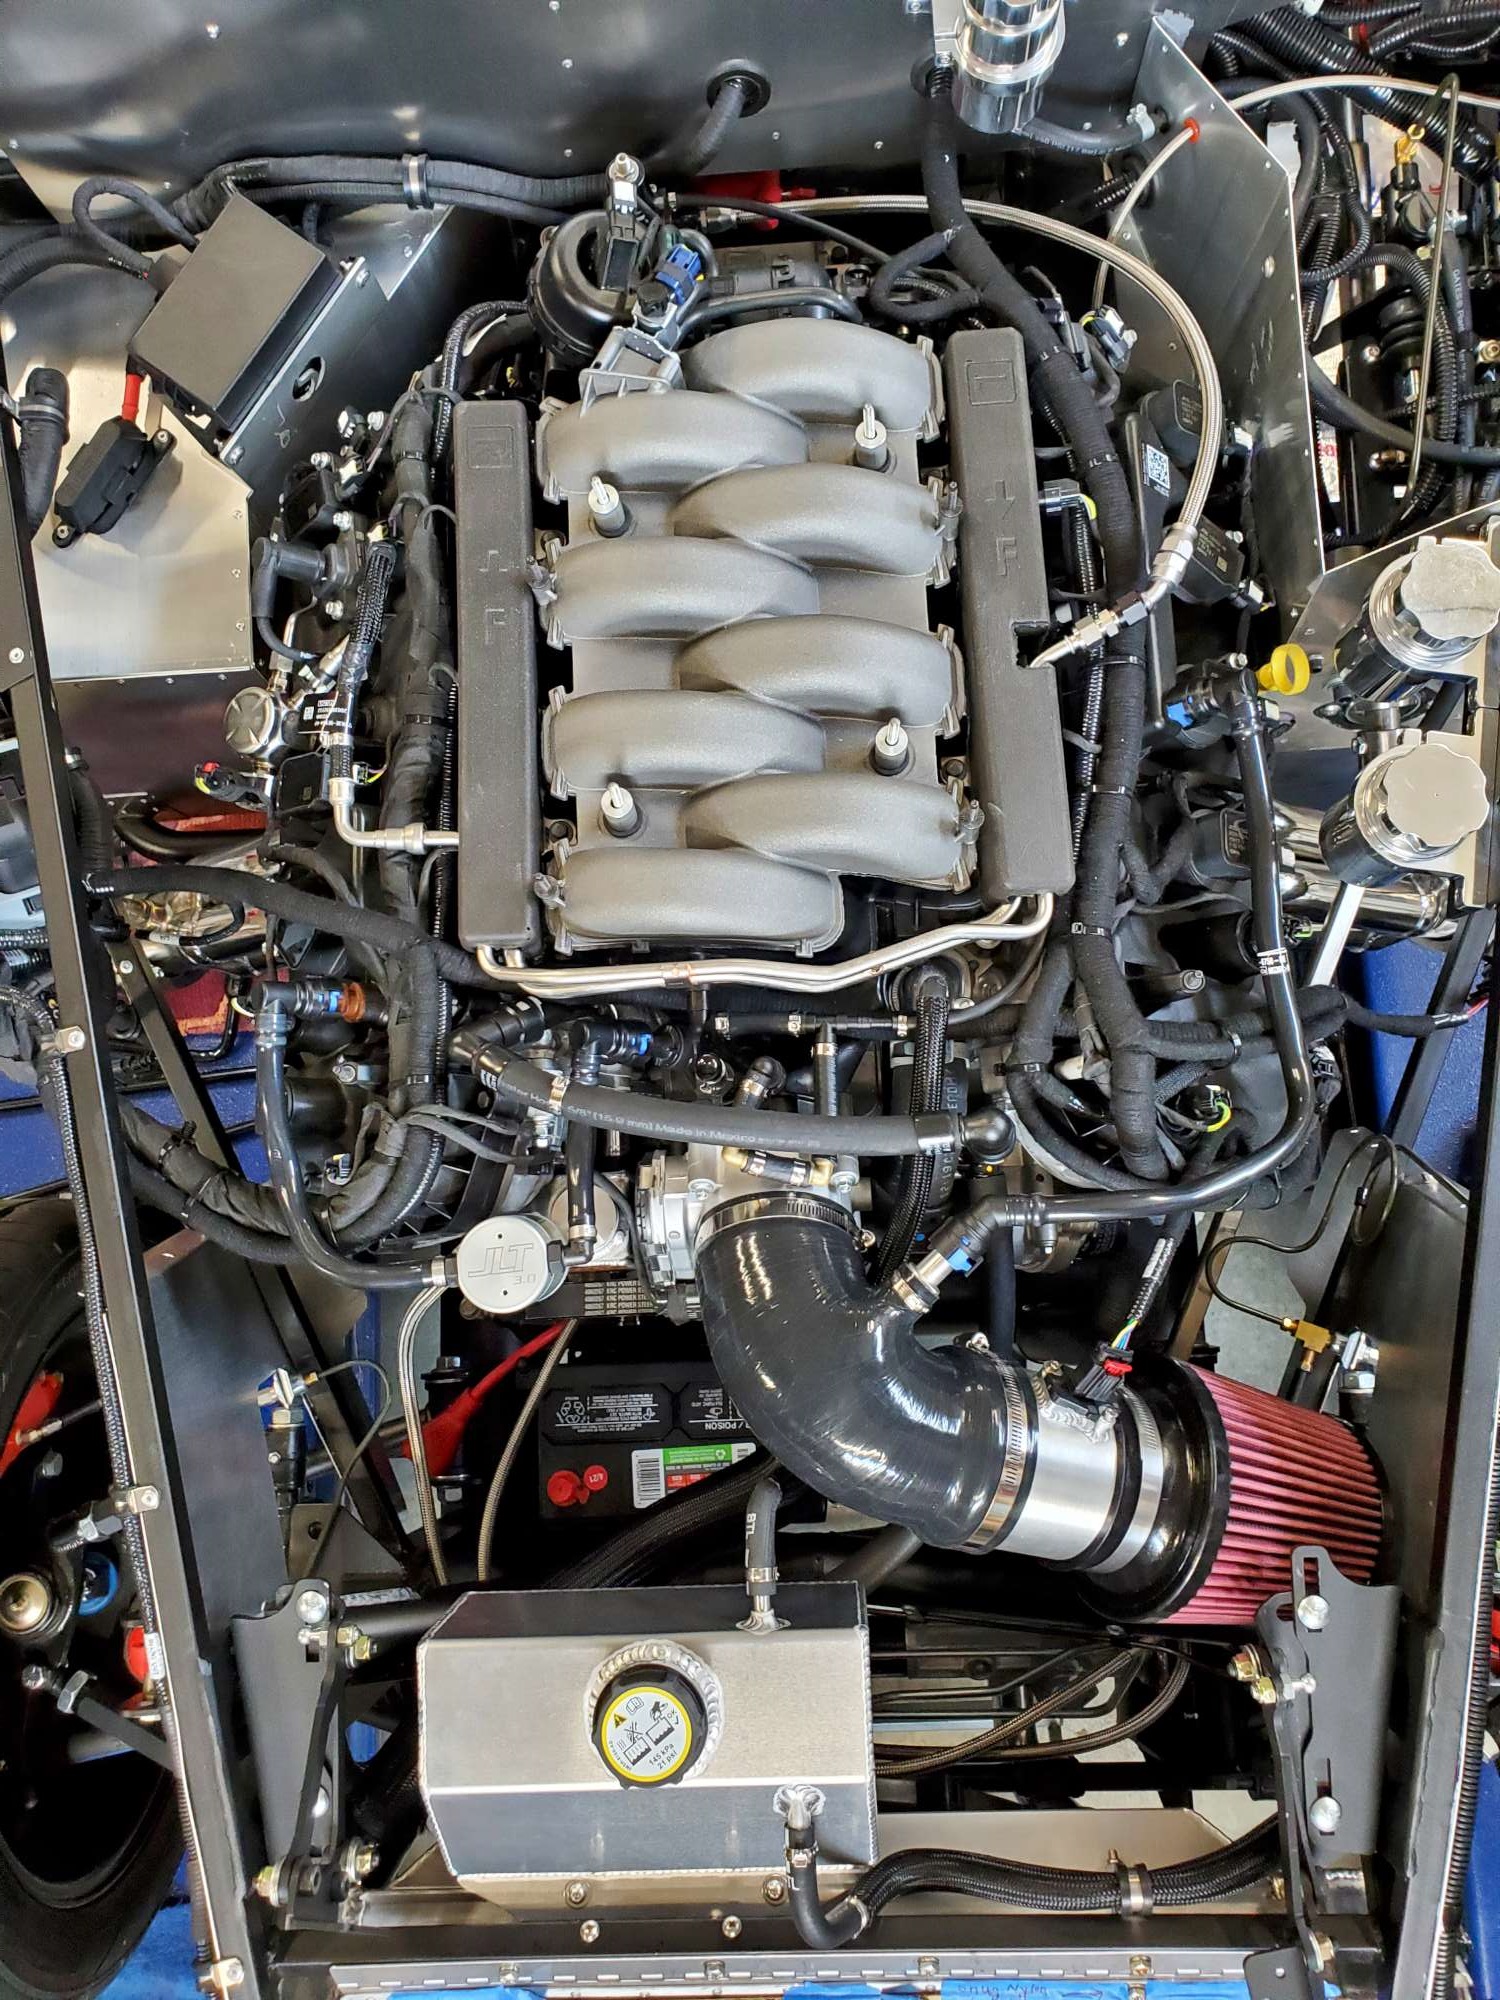
Next, it was on to installing the air intake components. These are the components I received from F5, as part of the "Coyote fitment kit". The installation instructions are confusing because one of the pictures shows the wrong MAF tube being installed. In the picture below, the tube between the air filter and the silicone elbow is not the correct one for the Gen 3 Coyote. Nor are the black plastic sleeves used. The tube below it is correct. Thanks again to Edwardb for helping me sort through this confusion.

And, here's everything in place. I have the Treadstone honeycomb air straightener on order. Hey, what's a few more bucks to gain (hopefully!) more reliable PCM air readings, right???? This engine bay is getting to be a pretty busy place.
Last edited by 460.465USMC; 06-21-2022 at 09:33 PM.
Reason: Added Moroso tank setup cost
Chris
Coupe complete kit delivered: 4/22/24.
Build Thread. Coyote. T-56. IRS w/3.55. Wilwoods. PS. HVAC. Side windows.
MK4 Complete kit.
Build Thread Index. Delivered: 10/15/2020. Legal: 7/25/23. Coyote Gen3. TKO600 (0.64 OD). IRS w/3.55. PS. Wilwoods. Sway bars. This build is dedicated to my son, Benjamin.
Build Thread.
-
Post Thanks / Like - 0 Thanks, 2 Likes


 Thanks:
  Likes:


 Reply With Quote


