-
12-23-2022, 04:36 PM
#441
Looks great Paul!! I'm sure there are a lot of miles to be enjoyed in this one..
All the best to you and the Family over the holidays.
Jeff_J
-
Post Thanks / Like - 1 Thanks, 0 Likes
-
12-23-2022, 08:13 PM
#442
Hi Paul
I wanted to make sure the heat was vented so I added these slots that are parallel to the back hood edge. They have woven metal attached to the backside and will have black trim rings bonded (3M Tape) to the hood when complete. Also, I have a bracket to stabilize the sides and fender to the frame tubes. Too my flex for my taste.
Sept2022HotRod12232022.jpg
- Peterh226 #1134
'33 Hot Rod 2nd Gen. Blueprint 383 Sniper TKO Delivered 4/14/2019
Full Fenders, Top, 3-Link, Wilwoods
YOKOHAMA ADVAN NEOVA AD08 R | Fr 245/45 R17 | Rr 295/30 R18
AR605 Torq-Thrust M Chrome | Fr 17x8 | Rr 18x10
-
Post Thanks / Like - 1 Thanks, 0 Likes
-
12-23-2022, 08:40 PM
#443

Steve >> aka: GoDadGo


Originally Posted by
edwardb

........................All I can say is I just love, love, love that color!
-
Post Thanks / Like - 1 Thanks, 0 Likes
-
12-26-2022, 06:10 PM
#444
Senior Member

Looking great Paul. Hope you had a great Xmas.
MK4 #8900 - complete kit - Coyote, TKO600, IRS - Delivered 6/28/16 First Start 10/6/16 Go cart - 10/16/16 Build completed - 4/26/17 - 302 days to build my 302 CI Coyote Cobra - Registered and street legal 5/17/17
Build Thread
http://thefactoryfiveforum.com/showt...e-build-thread
PHIL 4:13 INSTAGRAM - @scottsrides
-
Post Thanks / Like - 1 Thanks, 0 Likes
-
01-16-2023, 06:28 AM
#445
Progress is great Paul well done on another stunner
-
Post Thanks / Like - 0 Thanks, 1 Likes
-
01-21-2023, 07:31 AM
#446
Senior Member

Finished Instrument Panel
Haven't posted an update for awhile. Busy with lots of things other than the build. But slowly making progress as parts are completed from paint. Yesterday I put all the parts and wiring back into the painted and polished instrument panel. Very happy with it. It's sitting safely in a corner of my basement that isn't well lit, so not the best picture. But you get the idea. I had taken a lot of pictures and carefully marked everything before taking out for paint. So went back together pretty quickly. The empty holes are the ignition and headlight switches that go in when the dash is installed. They're still attached to the chassis harness in the cab. Sure is red! Several have asked about the color. I picked the color out of a color book. Something body shops have that contains multiple shades of every color under the sun. They typically cross-reference to OE colors, but I haven't dug into that with the color I picked. It's described as "408E5" and consists of nearly all red toner with a tiny amount of black and white. It's the bright pure red non-metallic I was looking for. I won't put the dash back into the truck until the doors are hung and adjusted since it blocks the top hinges. But working on that now.
I've also finished all the carpet in the cab (finally...) and working on how I want to treat the door sills. Didn't use the FF pieces. Wanted something a little more finished and better looking. I also made a few changes to the rear inside corner pieces. The instructions say to rivet them in. But then the door latch bolts wouldn't be accessible which didn't seem to me a good idea. So I made them removeable and also carpeted them a little differently so they look more finished. I'll post some pictures when everything is done. We're deep into winter here in Michigan. I don't see any issues with this build being done before spring. Plus the first shipment of my next project should be arriving soon.

Build 1: Mk3 Roadster #5125. Sold 11/08/2014.
Build 2: Mk4 Roadster #7750. Sold 04/10/2017.
Build Thread
Build 3: Mk4 Roadster 20th Anniversary #8674. Sold 09/07/2020.
Build Thread and
Video.
Build 4: Gen 3 Type 65 Coupe #59. Gen 3 Coyote. Legal 03/04/2020.
Build Thread and
Video
Build 5: 35 Hot Rod Truck #138. LS3 and 4L65E auto. Rcvd 01/05/2021. Legal 04/20/2023.
Build Thread. Sold 11/9/2023.
-
Post Thanks / Like - 0 Thanks, 2 Likes
-
01-21-2023, 08:41 AM
#447
Not a waxer

Originally Posted by
edwardb
...Several have asked about the color. I picked the color out of a color book. Something body shops have that contains multiple shades of every color under the sun. They typically cross-reference to OE colors, but I haven't dug into that with the color I picked. It's described as "408E5" and consists of nearly all red toner with a tiny amount of black and white...
Hmmmm? E5 is a Chrysler code from the 1970s for "Rallye Red" if used on a Chrysler or Plymouth and "Bright Red" when used on a Dodge (same color and code just a different name). It's a very bright non-metallic red...might be it.
Still looking forward to seeing it all together! 
Jeff
-
01-24-2023, 08:35 AM
#448
Senior Member
looking good Paul.
Any build thread location determined for the next project?
MK4 #8900 - complete kit - Coyote, TKO600, IRS - Delivered 6/28/16 First Start 10/6/16 Go cart - 10/16/16 Build completed - 4/26/17 - 302 days to build my 302 CI Coyote Cobra - Registered and street legal 5/17/17
Build Thread
http://thefactoryfiveforum.com/showt...e-build-thread
PHIL 4:13 INSTAGRAM - @scottsrides
-
01-24-2023, 09:08 AM
#449
Senior Member
Originally Posted by
wareaglescott
looking good Paul.
Any build thread location determined for the next project?
Not yet. I have a draft started and a plan for how I'm going to document. But waiting for physical parts to arrive. Stay tuned. Shouldn't be much longer. At least I hope not.
Build 1: Mk3 Roadster #5125. Sold 11/08/2014.
Build 2: Mk4 Roadster #7750. Sold 04/10/2017.
Build Thread
Build 3: Mk4 Roadster 20th Anniversary #8674. Sold 09/07/2020.
Build Thread and
Video.
Build 4: Gen 3 Type 65 Coupe #59. Gen 3 Coyote. Legal 03/04/2020.
Build Thread and
Video
Build 5: 35 Hot Rod Truck #138. LS3 and 4L65E auto. Rcvd 01/05/2021. Legal 04/20/2023.
Build Thread. Sold 11/9/2023.
-
01-31-2023, 07:08 AM
#450
Senior Member
Final Assembly Underway, Doors and Dash, Autorama
Some good work days wrapping up final assembly on several items. Looking back at the build, the doors are probably where I’ve spent the most time on any one single aspect. Other builds have made similar comments. With the doors painted, first order of business was to hang them back into the openings and make final adjustments. Never to come off again! At least that's the goal. Driver’s side took only a minor tweak and all good. Passenger side was more challenging. I found I didn’t do a good enough job prior to paint because I left little/no clearance between the top hinge on the door and the door jam. With the added thickness of filler, paint, etc. the hinge contacted the door jam at about six inches short of closing. Given the angles, doesn't take much. Tried a number of things, but after walking away and sleeping on it, saw no option except to reduce the thickness of the top hinge where it was interfering. Any other attempts to resolve messed up the gaps and overall fit. Sanded a shallow angle onto the face of the hinge using my disk sander and also increased the countersink of the mounting screws until it cleared adequately. Cleaned it up with fine sandpaper and not obvious based on the location. Set the strikers and with final adjustment very happy with how the doors turned out. The pie cuts described earlier on both doors resulted in a good fit at the bottoms.
Next up put in the power window mechanisms. That was easy enough since I had spent the time to fully mock them up previously. Then the final installation of the inner and outer gaskets around the window openings and the glass. This took some time as I had to do some additional clearancing at the lower corners to reduce drag as the windows went up and down. But done and the windows work OK. I’m not a huge fan of the inner gasket setup. The transitions in the lower inside corners from one type of gasket to another are hard to make look decent. Plus there's a gap between the gasket and the glass along the inside bottom edge. Discussed previously and others have also mentioned this. But did the best I could and that’s it. The outer gasket is one piece all around and looks OK. Only thing left now is to do the final power hookup to the power windows and install the door cards and check straps. Will do that once the interior is 100% done. Easier now to have the doors swing wide open. Here are pictures of a completed door. Other side is the same.


Another small detail I completed was the door sills. Didn't like the utilitarian and plain looking aluminum sills that came with the kit. Considered several options, but came up with this pretty simple approach using some polished stainless sheet from McMaster. Held in place with countersunk 10-32 SS screws tapped into the frame. The carpet pieces were just large enough to wrap over the sill and the edges are covered. I wanted to make them slightly longer. But the fiberglass curves up at the ends and I didn't trust myself to bend curves into the SS sheet to match. But looks OK and yet more shiny parts.

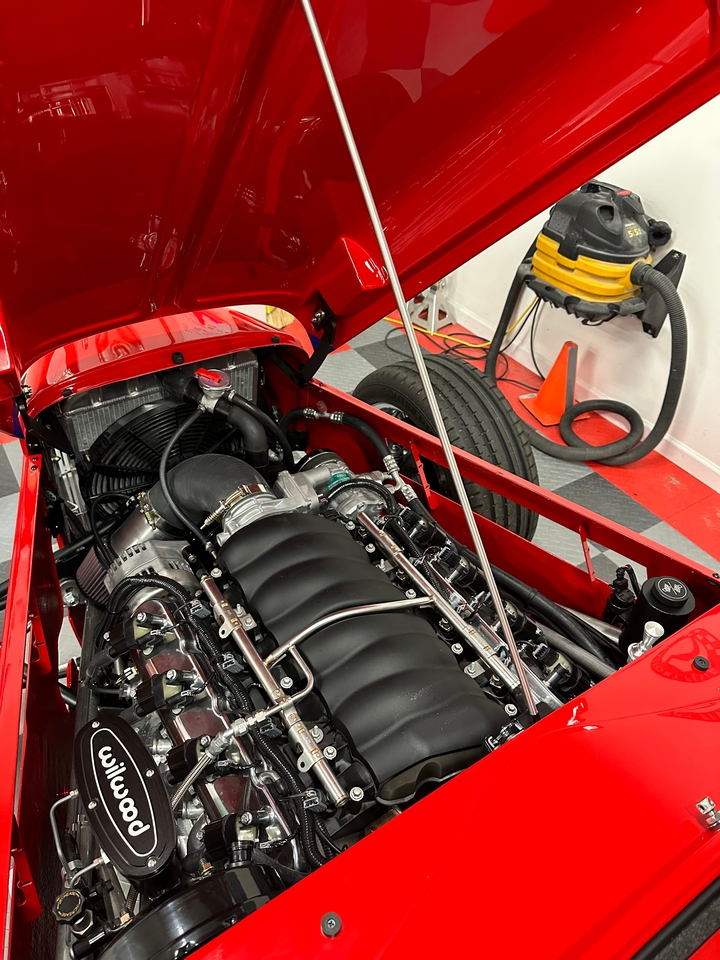
With a huge feeling of relief that the doors are done and turned out OK, installed the instrument panel. This went smoothly as I had made a list of all the connections plus had mocked everything up previously. All went together with no drama, and everything works. No smoke. It sure is red. Like everything else. Happy with the look though. My painter thinks the shiny top of the dash might be a reflection issue. The windshield isn't a sharp angle back, so maybe won’t reflect the top back to the occupants? We’ll see. Radiator cowl, hood, and engine sides are next. Side note: For my last several builds I've wired one aux outlet to be a direct battery connection with adequate wire size and breaker to plug in my CTEK battery charger. During the winter, like to hit the batteries about once a month to top off plus it does diagnostic tests. It was time for this one. You can see the cable in these pics. I wouldn't do a jump start through there. But works great for this purpose. There's another port on the driver's side with two USB connections.


I did have one pretty major glitch along the way last week. I took the truck off the lift and repositioned it since the doors hit the lift arms when partially opened. Not easy to work that way plus not interested in banging up newly painted parts. Tried to start it (easier than pushing…) and nothing in park. Full battery but no start, clicks, whatever. Moved the shift lever to neutral, and no start there either. But something wasn’t right with the shifter. Felt loose and wasn’t indexing like before. With a little jiggling, the engine did start but lurched a little (good thing my foot was on the brake) because it started in reverse. Clearly something was going on and the starter safety switch wasn’t hitting in the right places. Sent a description of the issue to Lokar along with some pictures. I received a call the next day and was very patiently taken through several diagnostic steps. Conclusion was something either broke or slipped out of alignment inside the mechanism and nothing I should try to fix. Only choice was to remove and send back for repair. It wasn’t too bad to get out. Good thing I made the top of the center console removeable. I’ve always felt that the indexing between gears was a bit sketchy. Maybe it hasn’t been quite right all along? We’ll see. Good thing it’s not driving season. But they said they’d turn it around pretty quickly. It’s not an inexpensive part (Lokar ES4L60EFMP Electronic Sport Shifter) and I’ve had good luck with their parts in the past. Has a lifetime warranty. I’m expecting to report a good result but a little disappointed about the early failure.
Final slightly off topic subject. The Detroit Autorama is coming up on Feb 24 – 26 at the downtown convention center. Used to be Cobo Hall. Then TCF Center. Now Huntington Place. All the same. I’ve had every one of my builds in the event over the years and while an exhausting weekend, something I enjoy doing. Was kind of hoping to take the truck this year, but the deadline for applications was several days ago and just wasn’t going to submit one with pictures of an incomplete build plus take a chance it doesn't get done in time. So, I’ve decided to take the Coupe again. I took it three years ago right after it was completed with zero miles. Now has some time and miles on it. Gives me something more to talk about.  I sent my application a couple weeks ago and just received word it was accepted. So looking forward to that. Like I said, something I really enjoy doing. If you’re in the SE Michigan area (or interested in travelling here) it’s a great show and would love to see you there. https://autorama.com/attend/detroit/.
Last edited by edwardb; 01-31-2023 at 05:52 PM.
Build 1: Mk3 Roadster #5125. Sold 11/08/2014.
Build 2: Mk4 Roadster #7750. Sold 04/10/2017.
Build Thread
Build 3: Mk4 Roadster 20th Anniversary #8674. Sold 09/07/2020.
Build Thread and
Video.
Build 4: Gen 3 Type 65 Coupe #59. Gen 3 Coyote. Legal 03/04/2020.
Build Thread and
Video
Build 5: 35 Hot Rod Truck #138. LS3 and 4L65E auto. Rcvd 01/05/2021. Legal 04/20/2023.
Build Thread. Sold 11/9/2023.
-
Post Thanks / Like - 1 Thanks, 9 Likes
-
01-31-2023, 11:29 AM
#451
Outstanding work as always! 
Craig C
-
Post Thanks / Like - 1 Thanks, 0 Likes
-
01-31-2023, 01:33 PM
#452
Is that red?
Cause it looks red from here!!!
Nice job!!!
-
Post Thanks / Like - 1 Thanks, 0 Likes
-
01-31-2023, 01:37 PM
#453
PLATNUM Supporting Member


Super job!!
16+ FFR kits and counting!
-
Post Thanks / Like - 1 Thanks, 0 Likes
-
01-31-2023, 05:46 PM
#454
Senior Member
Originally Posted by
RuffShod
Is that red?
Cause it looks red from here!!!
Nice job!!!
That's what the label on the can says.
Build 1: Mk3 Roadster #5125. Sold 11/08/2014.
Build 2: Mk4 Roadster #7750. Sold 04/10/2017.
Build Thread
Build 3: Mk4 Roadster 20th Anniversary #8674. Sold 09/07/2020.
Build Thread and
Video.
Build 4: Gen 3 Type 65 Coupe #59. Gen 3 Coyote. Legal 03/04/2020.
Build Thread and
Video
Build 5: 35 Hot Rod Truck #138. LS3 and 4L65E auto. Rcvd 01/05/2021. Legal 04/20/2023.
Build Thread. Sold 11/9/2023.
-
Post Thanks / Like - 0 Thanks, 3 Likes
-
02-05-2023, 09:52 PM
#455
Senior Member

Looking great Paul. I was planning on going to autorama this year so I will have to swing by and say hi.
On the dash glare if it ends up being an issue, you could always look into a dash mat for the upper part for when you are driving. There are a couple of places that will do custom ones so it doesn't look like Wal-Mart automotive aisle tackiness.
-
Post Thanks / Like - 1 Thanks, 0 Likes
-
02-06-2023, 12:01 PM
#456
Senior Member

Always a pleasure checking in with your builds. Just incredible.
Question. Relative to the coupe I would assume the truck is much easier to get in and out of? I'm guessing having never been in one that you can probably hop in and out. Would like to hear your experience.
Last edited by Blitzboy54; 02-06-2023 at 12:23 PM.
MK4 #10008 - Ordered 10/06/20, Delivered 03/03/21, First Start 7/22/21, First Go Kart 7/24/21
Paint by Metal Morphous 5/14/22, Legally registered 6/8/22, Graduated 7/20/22
Build Thread
https://thefactoryfiveforum.com/show...been-delivered
Complete Kit, Ford 306, Sniper/Dual Sync, T5, Hydraulic clutch
-
Post Thanks / Like - 1 Thanks, 0 Likes
-
02-06-2023, 02:36 PM
#457
Senior Member

Looking amazing like always. What a fun truck that is going to be and you won't see many of those around at a C&C or car show. I think your next build should be a GT40
-
Post Thanks / Like - 1 Thanks, 0 Likes
-
02-06-2023, 02:49 PM
#458
Senior Member
Originally Posted by
Blitzboy54
Always a pleasure checking in with your builds. Just incredible.
Question. Relative to the coupe I would assume the truck is much easier to get in and out of? I'm guessing having never been in one that you can probably hop in and out. Would like to hear your experience.
Thanks for following the build. The end is approaching. For your question, I'll give the truck a qualified yes. Easier to get in/out than the coupe. I say qualified because it's well known that this version of the truck is tight on the interior. The seats I chose (for the reasons listed earlier in the build thread) make it just a touch tighter. I need the tilt wheel all the way to up when climbing in and out to help clear my knees. I'm 5'9" and even with different seats would be tight if taller. For the passenger side, much easier for my wife to get in/out compared to the coupe. The rest of the story is the new longer cab version, which I understand is the only thing available now for future deliveries, solves all this and then it's an unqualified yes the truck is easier. But I will add the Coupe has more space in the footboxes. So there's that. I do have an automatic. With a manual shift I guess it's possible to narrow the transmission cover and make a little more room. But then you have the clutch on the other side which I don't have.
Last edited by edwardb; 02-06-2023 at 02:52 PM.
Build 1: Mk3 Roadster #5125. Sold 11/08/2014.
Build 2: Mk4 Roadster #7750. Sold 04/10/2017.
Build Thread
Build 3: Mk4 Roadster 20th Anniversary #8674. Sold 09/07/2020.
Build Thread and
Video.
Build 4: Gen 3 Type 65 Coupe #59. Gen 3 Coyote. Legal 03/04/2020.
Build Thread and
Video
Build 5: 35 Hot Rod Truck #138. LS3 and 4L65E auto. Rcvd 01/05/2021. Legal 04/20/2023.
Build Thread. Sold 11/9/2023.
-
02-10-2023, 10:52 PM
#459
Senior Member
More Painted Pieces Added
Added more finished pieces. I know, slow going. But progress. Pictures here without a lot of my usual verbiage.
Hood set in place (carefully
) and starting to hook up front hinges. Best done without the engine covers and reaching underneath. Alignment not quite set yet. Gap in front has to be wide in order for the hood to swing up and over the radiator surround. Thats the geometry of the hinges. But not quite that wide.

With the gaps set, very happy with how my adjustment on the rear edge came out. Recall this is where I added 1/8+ to clean this up. Dash looks darker because its in the shadow of the roof. The colors match fine.

Hood final alignment plus engine side covers. Happy with how the radiator surround top flows into the top line of the hood. This was another adjustment I made and discussed previously.

One of things I asked my painter to do was to spray primer, base and clear with minimal other work on the inside of the engine covers and radiator surround. Its just raw fiberglass so obviously not a fancy finish. But will be easy to keep clean plus keeps the red theme intact.

Build 1: Mk3 Roadster #5125. Sold 11/08/2014.
Build 2: Mk4 Roadster #7750. Sold 04/10/2017.
Build Thread
Build 3: Mk4 Roadster 20th Anniversary #8674. Sold 09/07/2020.
Build Thread and
Video.
Build 4: Gen 3 Type 65 Coupe #59. Gen 3 Coyote. Legal 03/04/2020.
Build Thread and
Video
Build 5: 35 Hot Rod Truck #138. LS3 and 4L65E auto. Rcvd 01/05/2021. Legal 04/20/2023.
Build Thread. Sold 11/9/2023.
-
Post Thanks / Like - 0 Thanks, 2 Likes
-
02-10-2023, 10:54 PM
#460
-
Post Thanks / Like - 1 Thanks, 0 Likes
-
02-11-2023, 08:22 AM
#461
All I can say is wow. While I will never be at this level with my build you are keeping me motivated to do the best of my capabilities.
-
Post Thanks / Like - 1 Thanks, 0 Likes
-
03-09-2023, 05:53 PM
#462
Senior Member
Getting Close. Interior and Truck Bed
While waiting for further progress with the paint, finalized all remaining details with the interior. I received the sport shifter back from Lokar. They repaired mine although did offer if they couldn’t repair, they would send a new replacement. Their parts have a lifetime guarantee. Would be nice to not have a defect on a new part. But they stood behind it 100%. It’s still a mystery exactly what happened. But best I can tell it was defective out of the box and eventually failed. It now clicks through the gears smoothly and with much less effort. As expected, it was challenging to install back into the hole in the center console. But it’s done and buttoned up. In keeping with what other build threads have done, I made a video of the completed interior. Not edited (obviously with gaffes and not knowing the difference between right and left…) but gives a look at the final outcome.
https://youtu.be/Y2nu78nLaSk
With more painted parts completed I was able to assemble the truck bed. This was a big step forward. Everything had been together previously, so relatively straightforward to assemble for the last time. Our oldest grandson spent his spring break at our place. So he was a big help to hang the parts without scratching up my shiny new paint. Yesterday I finished the wood (aka vinyl over aluminum) bed, tailgate, and even installed the rear lights. Again, straightforward enough and really digging the final appearance. I had one panic putting in the wood bed. The chrome strips are held by 1/4-20 SS button head screws into SS T-nuts in the mounting channels. Literally the very last one I put in started grabbing and (you guessed it) did the SS galling routine. I was able to get it loose and chase the threads. So, no major surgery. But did go back and put antiseize on every one of the screws. Which I should have done in the first place and always recommend  . The only thing left are the fenders and running boards. They’re not quite done and my painter had the nerve to go on vacation. Didn’t even ask for permission! He’ll be back and I know he wants to get this wrapped up. Probably by month end I should have a completed truck.


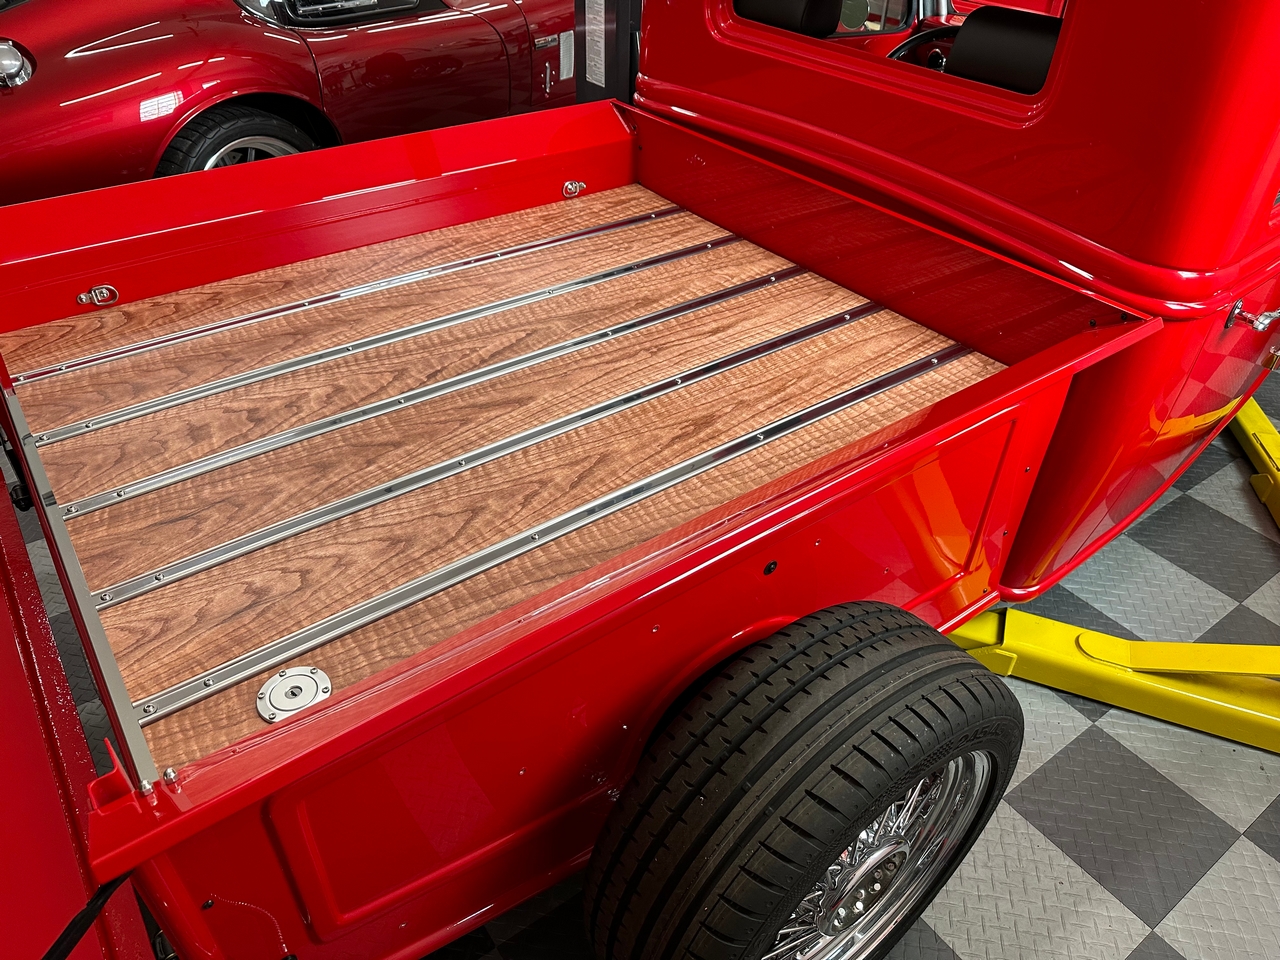

The last two pictures were taken with the garage door open and the sun shining in. (Yes, we do occasionally see the sun in Michigan during the winter.) The red does pop. Question for the group. Pretty sure I would like to put something on the tailgate. Right now, considering this Ford script piece. I know, LS engine up front. Oh well. Obviously, it would be better centered and levelled. What do the masses think?

Last edited by edwardb; 03-10-2023 at 12:53 AM.
Build 1: Mk3 Roadster #5125. Sold 11/08/2014.
Build 2: Mk4 Roadster #7750. Sold 04/10/2017.
Build Thread
Build 3: Mk4 Roadster 20th Anniversary #8674. Sold 09/07/2020.
Build Thread and
Video.
Build 4: Gen 3 Type 65 Coupe #59. Gen 3 Coyote. Legal 03/04/2020.
Build Thread and
Video
Build 5: 35 Hot Rod Truck #138. LS3 and 4L65E auto. Rcvd 01/05/2021. Legal 04/20/2023.
Build Thread. Sold 11/9/2023.
-
Post Thanks / Like - 0 Thanks, 8 Likes
-
03-09-2023, 06:08 PM
#463
So close now! Looks spectacular. (wouldn't expect anything less from you  ). I like the chrome Ford script. One other option if you want something "period correct" is to paint the Ford script on like the originals.
16402282-1934-ford-pickup-thumb.jpg
MkIV Roadster build: Gen 2 Coyote, IRS, TKO600. Ordered 10/24/18. Delivered 1/29/19. Engine installed 8/8/21. First start 9/12/21. First go-kart 9/17/21. Off to paint 4/11/22. Back from paint 12/30/22.
Build thread here.
-
Post Thanks / Like - 1 Thanks, 0 Likes
-
03-09-2023, 06:19 PM
#464
Not a waxer
“Five” in the same script then see how many notice and make the connection
Looks really nice Paul!
Jeff
-
Post Thanks / Like - 1 Thanks, 0 Likes
-
03-09-2023, 08:11 PM
#465
Looks great! I like the chrome script.
-
Post Thanks / Like - 1 Thanks, 0 Likes
-
03-09-2023, 09:08 PM
#466
Paul,
She's going to be a real head turner in "arrest me" red!
Dave
-
Post Thanks / Like - 1 Thanks, 2 Likes
-
03-10-2023, 11:04 AM
#467
Senior Member

-
Post Thanks / Like - 1 Thanks, 0 Likes
-
03-10-2023, 11:45 AM
#468
I was just looking at a news brief on the Reno Air Races. This will be the last year as it has been encroached by development. Looking at the legendary unlimited class names gave me a thought of your truck name. May be something like one of these but your own. Streaga, Voodoo, Dreadnought, Rare Bear, Dago Red?
20th Anniversary MK4 Roadster, #8752, 18 of 20, Delivered 12/03/15, 1st Start 01/28/2017, off to paint 4/13/2017, Forte 351w/ Holley EFI, Forte throttle linkage, TKO 600/Forte Hyd. Clutch, UniSteer Electra Steering, RT's turn Signals, many Breeze parts, Paint by the Jeff Miller. Finished on 10/08/2017. 500 mile inspection on 10/21/2017, 3000 mile inspection on 1/14/19.
-
Post Thanks / Like - 1 Thanks, 0 Likes
-
03-10-2023, 05:53 PM
#469
Senior Member
Originally Posted by
RR20AC
I was just looking at a news brief on the Reno Air Races. This will be the last year as it has been encroached by development. Looking at the legendary unlimited class names gave me a thought of your truck name. May be something like one of these but your own. Streaga, Voodoo, Dreadnought, Rare Bear, Dago Red?
I just heard about that too. Sounds like they're looking for a new location. Those names are cool and I can picture every one. But I'm not into naming my builds or stealing anything from those. Some of my growing up years we lived down the street from the Van Nuys airport in SoCal. There were several race P-51's based there, plus a race Bearcat. Saw them in person lots of times including close up. Always a distinctive sound to say the least. Not to take away from the time we lived in Virginia near Dulles many years later and saw (and heard) the Concorde arrive and depart every day. Another amazing memory.
Boy, talk about getting off track...
Build 1: Mk3 Roadster #5125. Sold 11/08/2014.
Build 2: Mk4 Roadster #7750. Sold 04/10/2017.
Build Thread
Build 3: Mk4 Roadster 20th Anniversary #8674. Sold 09/07/2020.
Build Thread and
Video.
Build 4: Gen 3 Type 65 Coupe #59. Gen 3 Coyote. Legal 03/04/2020.
Build Thread and
Video
Build 5: 35 Hot Rod Truck #138. LS3 and 4L65E auto. Rcvd 01/05/2021. Legal 04/20/2023.
Build Thread. Sold 11/9/2023.
-
Post Thanks / Like - 0 Thanks, 1 Likes
-
03-18-2023, 05:42 PM
#470
Senior Member
Windows and Wipers
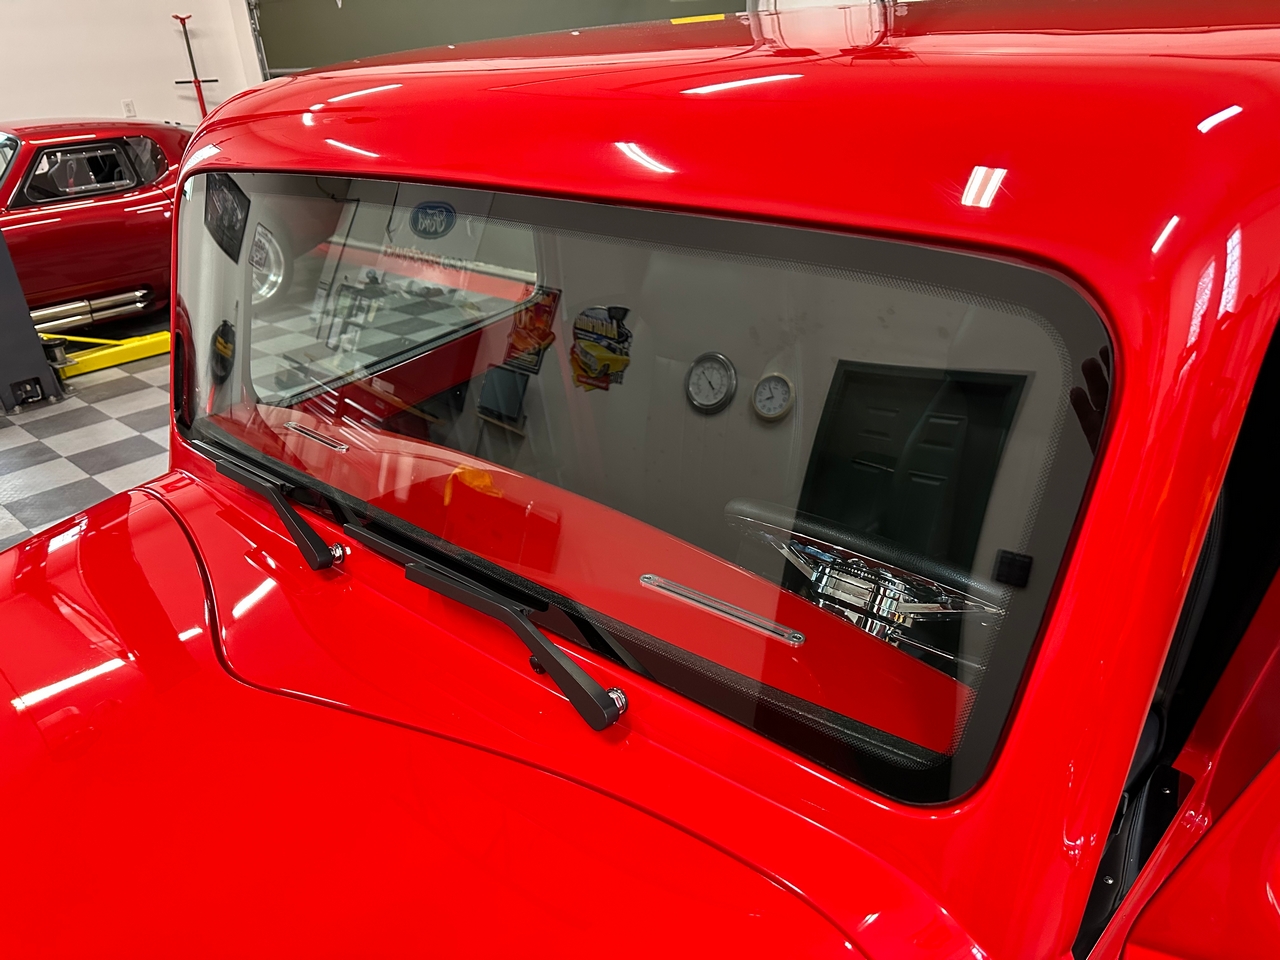
Not a huge update, but this close to the finish line feels like a good step forward. Plus two more empty boxes to put in the recycle bin. Yesterday we installed the front and back windows. Today I installed the wiper arms for the first time. All good.
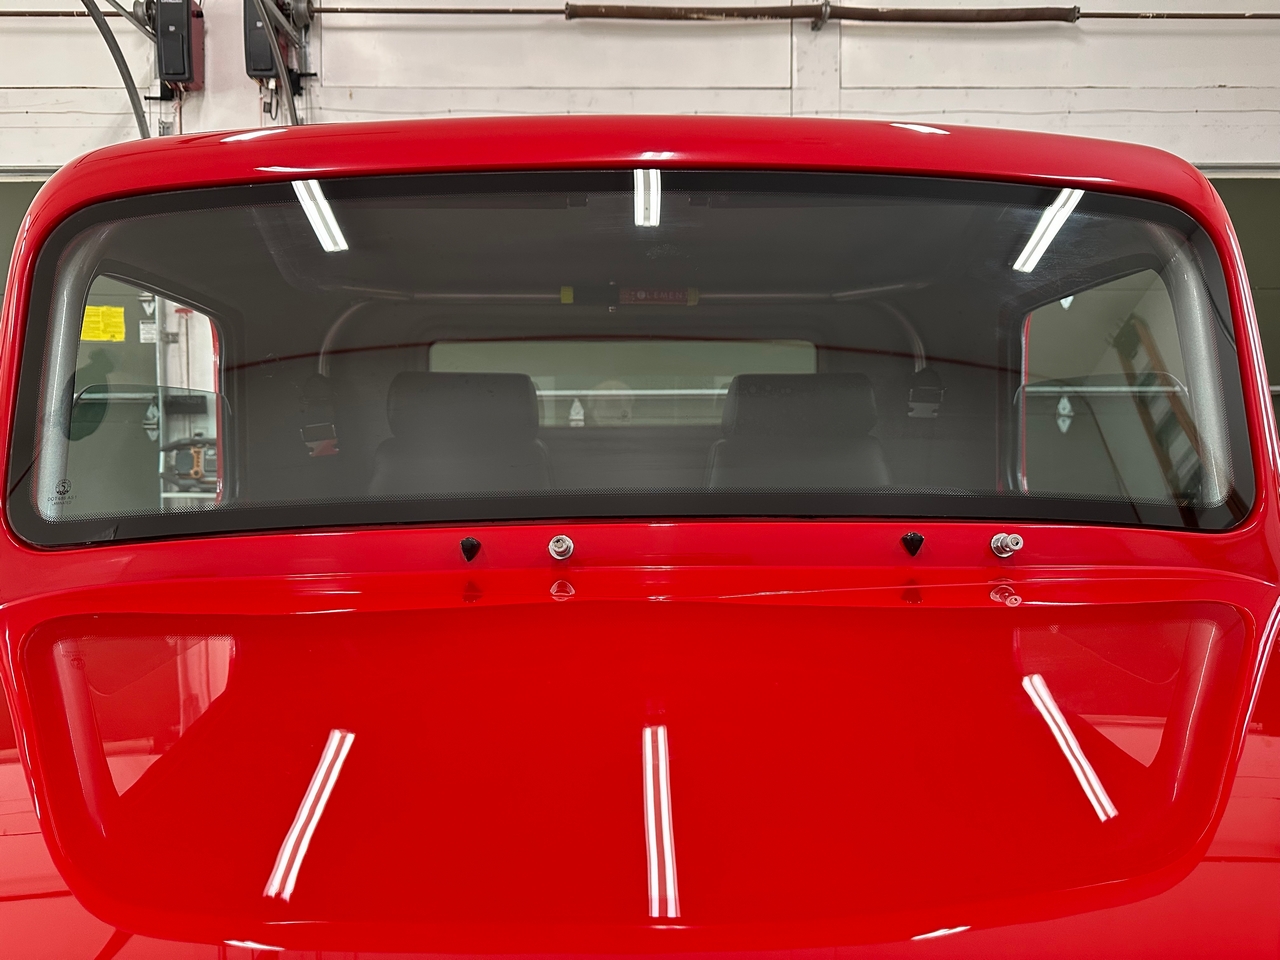
For the windows, the truck has a glued in windshield just like the Coupe, several other FF models, and untold millions of DD's. Plus a smaller window on the back of the cab. As opposed to the bolt-on windshield with the Roadster. Which, for the work required, seems a bit of a chore. But, trust me, easier than the glue-in process. The truck is a bit easier than the Coupe though as the glass comes with the frit (black border) already in place. So, no tedious masking and painting the frit with black primer. Didn’t miss that step at all. Also, again as compared to the Coupe, the supplied glass from FF fits the truck openings perfectly without any bending or trimming. I used rubber trim around the windshield on the Coupe. But didn’t use any for the truck. Also made it simpler. As with previous installations, I have a local buddy who’s in the business working for one of the major OE suppliers, lives close by, and is happy to stop and help whenever I ask. Good thing because none of the regular glass shops I’ve talked to are interested in doing this kind of custom work and I still haven't developed the nerve to try it myself.
There’s really not a lot to say about the process. It’s pretty straightforward. My buddy ask me to abrade the pinch weld contact area with 120 grit sandpaper. Then we very carefully cleaned (no touching!) and did apply primer even though the adhesive we used was technically primerless. Which is pretty common now. With that, and the perimeter of the glass also carefully cleaned, gunned in the urethane adhesive (I watched…) using a power caulking gun with a special tip that makes a “V” bead. Then pressed the glass into place, made sure it was properly centered, and added a few pieces of wide masking tape. We did the small rear window first, then the larger windshield. There’s not really much to add. It’s a straightforward and very standard process. The main tip I would mention is the pinch weld and frit are relatively narrow. So the right size bead (on the small side) properly placed is critical. You obviously need enough for a strong water-tight seal. But not so much that it’s squeezing out excessively around the edges. Both the inside and outside edges are pretty exposed. I didn’t have to do anything to the rear glass. For the windshield, I did a little clean-up and trimming in a few places after the adhesive had set for a couple of hours. All turned out fine and really happy to see the glass in place.

Today I installed the wiper arms and confirmed the angles and directions I set on the Specialty Power Windows WWK2 wiper drive kit back when it was installed. Good thing because it’s a little bit of a pain to disassemble and adjust. Mostly just messy with all the packed grease. I used Specialty Power Windows WAB-01BR Billet Aluminum Wiper Arms, RH Bend that I had previously sprayed with satin black Steel-It Polyurethane Spray. I'm Ok with how it all turned out. These wiper arms I would rate as a little fiddly to set up. They have very small screws and they’re not knurled like the 1/2" drums on the wheelboxes. I made sure to use blue Loctite on everything and get the set screws plenty tight. I’m sure they’ll be fine for the (hopefully) very limited use on the truck. But I wouldn’t put them up there with OE style wipers, like the Anco ones on the Coupe. Also tested and confirmed my washers work. Nothing exiting but will pass the safety inspection.

Couple more last minute details. I was going to glue the mount for the kit supplied center rear view mirror on the windshield and get that done. But unfortunately the mirror is wider than the opening between the sun visors I installed. I have 6” between and the supplied mirror is almost 8". Ends up a little clunky with things running into each other. Going to look for a different mirror and maybe mount it to the body rather than the windshield. TBD.
While moving the truck around in preparation for installing the glass, the MIL lit and it threw a P2138 “Throttle/Pedal Position Sensor/Switch “D”/”E” Voltage Correlation" code. First time my LS3 has thrown a code. With the MIL on, the accelerator pedal was inoperative, which agrees with various write-ups about this code, putting the engine into a low power or no-drive condition since it’s a potential safety issue. Basically, for redundancy there are two voltage paths between the accelerator and the throttle body. If they are different by a certain amount, the system throws this code. I cleared the code with my scanner and it hasn’t come back (yet…). So maybe it’s a one-time random event. But after doing some research, found that connectors could be the issue. So unplugged each (one at the throttle body, two at the accelerator pedal DBW module), cleaned with contact cleaner, allowed them to dry, and put a very small amount of dielectric grease on the pins. Again, as recommend on multiple sites. All is working OK so far with limited testing. But obviously will be monitoring closely. All new components, so wouldn’t expect anything to be bad. But anything’s possible. The one wildcard IMO is the Dakota Digital cruise control setup I’m using has a jumper cable between the LS3 harness and the DBW module. Maybe that’s disturbing something? Next troubleshoot if the code reappears will be to take that jumper out of the circuit and see if anything changes.
Finally, I’ve decided to change the rear springs. Way back in the build thread I noted how the driveshaft contacted the chassis with the rear suspension in full droop. From another builder, received a recommendation to move the rear coilover upper mounts to the top holes (described in the manual as “for the Hot Rod or low ride height”) as opposed to the lower holes which are for the truck. This limited the suspension droop and eliminated the chassis interference. But as is often the case, changes can have unintended consequences. In this case, the coilover adjustment collars required additional adjustment to make up for the higher mounting. Plus I found in order to keep the rear tires off the fenders, I needed the ride height to be more than the recommended amount. Both of these factors put the coilover adjustments near the end of their upper range and I’m really compressing the kit supplied 8" springs. Now that it’s been on the ground more, the ride height has settled slightly (normal) and ideally I should adjust it some more. But instead, I’m going to swap out the 8” springs for 10” ones. That will get me back to where it should be plus give a little wiggle room for some front-to-back rake which I don’t currently have. I ordered Eibach 1000.250.0250 springs (2.500” ID, 10” length, 250 lbs./in. spring rate) which are the same ID and spring rate as the stock springs. Plus Eibach’s are supposedly an upgrade. They’ll be here next week and shouldn’t be a difficult swap.
The Ford script is now attached with 3M molding tape to the center of the tailgate. Thanks for those that responded to my question and confirmed that location. Seeing a picture of an original 1935 sealed the deal. An easy Google search I could have done but didn't.
That’s enough. My painter is due back from vacation tomorrow so hoping to get the last few pieces finished and installed soon. Unless something else breaks or I decide to change something else, really getting close to done.
Last edited by edwardb; 03-19-2023 at 05:13 AM.
Build 1: Mk3 Roadster #5125. Sold 11/08/2014.
Build 2: Mk4 Roadster #7750. Sold 04/10/2017.
Build Thread
Build 3: Mk4 Roadster 20th Anniversary #8674. Sold 09/07/2020.
Build Thread and
Video.
Build 4: Gen 3 Type 65 Coupe #59. Gen 3 Coyote. Legal 03/04/2020.
Build Thread and
Video
Build 5: 35 Hot Rod Truck #138. LS3 and 4L65E auto. Rcvd 01/05/2021. Legal 04/20/2023.
Build Thread. Sold 11/9/2023.
-
Post Thanks / Like - 0 Thanks, 5 Likes
-
03-19-2023, 04:28 AM
#471
Senior Member

Looks great as always Paul!!
MK4 #11012 picked up 04/16/24
351W, 3 link, single roll bar
MK4 #10616 picked up 4/10/23
302w, 4 link, 17's, dual roll bar SOLD
MK4 #9759 picked up on 4/3/19
351C, 3 link, 17's, dual roll bars SOLD
-
Post Thanks / Like - 1 Thanks, 0 Likes
-
03-20-2023, 12:52 PM
#472
Senior Member
This is looking awesome Paul. Seeing the Coupe sitting there in one of the pics sure has me hoping you have some plan for an outdoor photo shoot with both cars together!
MK4 #8900 - complete kit - Coyote, TKO600, IRS - Delivered 6/28/16 First Start 10/6/16 Go cart - 10/16/16 Build completed - 4/26/17 - 302 days to build my 302 CI Coyote Cobra - Registered and street legal 5/17/17
Build Thread
http://thefactoryfiveforum.com/showt...e-build-thread
PHIL 4:13 INSTAGRAM - @scottsrides
-
Post Thanks / Like - 1 Thanks, 0 Likes
-
03-20-2023, 09:27 PM
#473
Senior Member
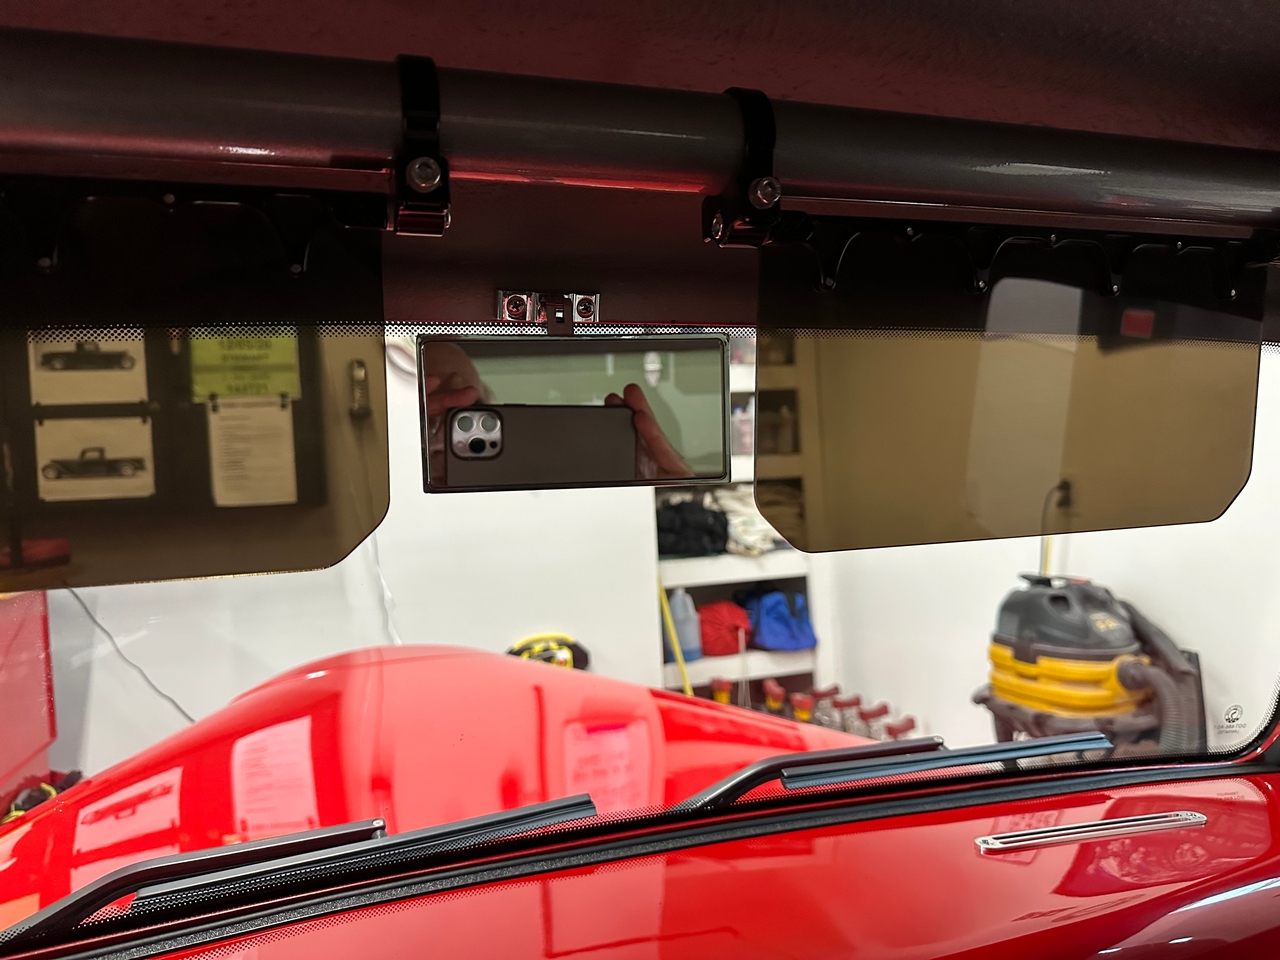
Interior Rear View Mirror
In my last update, I mentioned the kit supplied interior center rear view mirror didn’t fit between the sun visors I previously installed. My bad and my issue to resolve. Posting my solution. With a little research, found a United Pacific 70803 rear view mirror, at 2-1/2” tall and 5-1/8” wide, fit between my visors plus uses a screw-on mount vs. the windshield mount. I liked the idea of not messing with gluing to the windshield so ordered it. Amazon had it on my porch the next day. Passing this on because others may found this mirror to be a nice option as well. Chrome plated aluminum and very robust. The quality is impressive. It doesn’t have the “day/night” function, but not a big deal in my experience.
Mounted it today and it’s perfect. I VERY CAREFULLY drilled two #29 holes (size for an 8-32 tap) slightly over 1/8” deep. Just deep enough to not break into the windshield pinch weld area. I used the 8-32 mounting screws to cut threads into the fiberglass which worked quite well. A bottoming tap would probably be better, but don't have one on hand. Roughed up the back of the mount and the spot on the cab with 40 grit paper for HSRF. The combination of screws and HSRF is very strong and likely much stronger than the usual button glued to the windshield. It would be safer (and less stressful) to mount before installing the windshield. As usual, hindsight is always 20/20.


Last edited by edwardb; 03-21-2023 at 02:34 PM.
Build 1: Mk3 Roadster #5125. Sold 11/08/2014.
Build 2: Mk4 Roadster #7750. Sold 04/10/2017.
Build Thread
Build 3: Mk4 Roadster 20th Anniversary #8674. Sold 09/07/2020.
Build Thread and
Video.
Build 4: Gen 3 Type 65 Coupe #59. Gen 3 Coyote. Legal 03/04/2020.
Build Thread and
Video
Build 5: 35 Hot Rod Truck #138. LS3 and 4L65E auto. Rcvd 01/05/2021. Legal 04/20/2023.
Build Thread. Sold 11/9/2023.
-
Post Thanks / Like - 0 Thanks, 2 Likes
-
03-21-2023, 11:49 AM
#474
Paul your attention to detail is beyond reproach, you're like the Yoda of FF builds. I don't envy the task of choosing which of the two to drive...
-
Post Thanks / Like - 1 Thanks, 1 Likes
-
04-03-2023, 05:54 PM
#475
Senior Member
Teaser Pics Getting Very Close
Today I mounted the painted front fenders, headlights, finished the headlight wiring, and put the front wheels back on for (hopefully) the last time. The truck looks so much different with fenders. I really like it. The running boards are painted but just sitting in place right now. The rear fenders should be back from the painter later this week and that’s it for paint. All the parts accounted for. I’ll be happy and so will my painter. With the rear fenders and running boards bolted in place, I’ll be ready for inspection and get the title/registration process underway. I have all the paperwork ready. And my bank account hopefully ready for the tax man. Just these two pictures today:


The single remaining open item is how I’m going to treat the running boards. The truck door opening is so low I don’t think they’ll be much use to step on getting in and out. But I want to protect the paint somehow. Looking at several options. But won’t hold up getting it legal.
Timing couldn’t be better. Expecting the first delivery of my next project within the next day or two. I’ll post more about that in the near future. Had the Coupe out Saturday for the second time. Love that thing. (Have I said that before?) Running flawlessly even with months-old gas. Looking forward to a great cruising season.
Last edited by edwardb; 04-04-2023 at 04:55 AM.
Build 1: Mk3 Roadster #5125. Sold 11/08/2014.
Build 2: Mk4 Roadster #7750. Sold 04/10/2017.
Build Thread
Build 3: Mk4 Roadster 20th Anniversary #8674. Sold 09/07/2020.
Build Thread and
Video.
Build 4: Gen 3 Type 65 Coupe #59. Gen 3 Coyote. Legal 03/04/2020.
Build Thread and
Video
Build 5: 35 Hot Rod Truck #138. LS3 and 4L65E auto. Rcvd 01/05/2021. Legal 04/20/2023.
Build Thread. Sold 11/9/2023.
-
Post Thanks / Like - 0 Thanks, 5 Likes
-
04-03-2023, 06:42 PM
#476
That 1st picture lookin' a little "ZZ Top!"
Craig C
-
Post Thanks / Like - 1 Thanks, 0 Likes
-
04-03-2023, 09:25 PM
#477
Beautiful, over the top build as always!!
-
Post Thanks / Like - 1 Thanks, 0 Likes
-
04-03-2023, 09:59 PM
#478
Paul,
One idea for protection of the running boards is a product I see used a lot in the high-end car arena called Xpel. Some guys wrap their entire car with this stuff.
https://www.xpel.com/products/paint-protection-film
Dave
-
Post Thanks / Like - 1 Thanks, 0 Likes
-
04-03-2023, 10:47 PM
#479
Senior Member
Originally Posted by
Papa
Yup, Xpel is one of the options I'm considering. I've used it in the past including behind the wheels on my Coupe and behind the rear wheels on my Roadsters. It's a nice product. If I use it here, could be the entire running boards or just patches by the doors. Also considering some half-round polished SS strips.
Thanks for your suggestion.
Last edited by edwardb; 04-04-2023 at 04:58 AM.
Build 1: Mk3 Roadster #5125. Sold 11/08/2014.
Build 2: Mk4 Roadster #7750. Sold 04/10/2017.
Build Thread
Build 3: Mk4 Roadster 20th Anniversary #8674. Sold 09/07/2020.
Build Thread and
Video.
Build 4: Gen 3 Type 65 Coupe #59. Gen 3 Coyote. Legal 03/04/2020.
Build Thread and
Video
Build 5: 35 Hot Rod Truck #138. LS3 and 4L65E auto. Rcvd 01/05/2021. Legal 04/20/2023.
Build Thread. Sold 11/9/2023.
-
04-04-2023, 07:44 AM
#480
I think a polished SS scuff plate would look great, maybe with Ford script on it? It looks great just like all your builds
David W
Mkll 4874 built in 2004
Gen 3 coupe #16 registered 2018 painted 2019
-
Post Thanks / Like - 1 Thanks, 0 Likes


 Thanks:
  Likes:


 Reply With Quote


