-
Member

-
Post Thanks / Like - 0 Thanks, 2 Likes
-
Senior Member

MKIV Complete Kit #9822 l BluePrint 347 EFI l TKO600 l Power Steering l Heater/Defrost l
Build Thread
-
Member
So. Been quite for a while but things are moving along. As everyone else, I started with the "F" plate and front suspension, Installed as well averything I have from the rear suspension, but FFR is really behind with a bunch of parts and that will stall my build very shortly.94DB1F61-BEFE-443C-8694-57C13C35EDAD.JPGIMG_5133.jpgIMG_5135.jpg
-
Post Thanks / Like - 0 Thanks, 1 Likes
-
Member
Next step now is to replace the seals of the differential and plug the oil cooling section (honestly do not believe I`ll need a cooled rear diff.)
IMG_5151.jpg
In case someone wonders the side (for the CV Shaft) seal part number is: AL3Z-4B416-A and the plug is 5R3Z-7860108-AA
-
Member
Post COVID era is hard... I do stumble into missing parts every 5 minutes, FFR does not even answer my emails, I`m missing bolts, nuts, a.o. that`s really annoying it almost takes the fun out of it!
Does anyone knows what is the part number of the steering bearing flange?? I`m about to purchase it in the market instead of waiting forever from FFR...
-
Senior Member

Well, can't guarantee it, but "10577 pillow block, 3/4" id" brings up this from Grainger, which does look familiar. Good luck with the POL, that makes a complex puzzle even tougher!
MK4 #7838: IRS 3.55 TrueTrac T5z Dart 347
The drawing is from ~7th grade, mid-1970s
Meandering, leisurely build thread is
here
-
Member
I found one on Ebay (for fast delivery) and it fits perfectly, the part number is: NTN AS205-100, PFL205
-
Member
Aluminum Panels (passenger foot side)
Since I stalled a bit in the suspension part, I`m trying not to stop completely, so I moved into the passenger side panels. lot`s of fun drilling. To be honest I believed it would take me more time.
IMG_5186.jpg
Someone said here that you cannot have too many Cleco`s, and he is right, never used almost all 200 I have at one time!!!
IMG_5188.jpg
I painted them last night but the cold weather does not help much in drying, so I probably will re install the panels tonight...
-
Post Thanks / Like - 0 Thanks, 1 Likes
-
Senior Member

ADI, I was reading through your build and it's looking really good so far. You did a great job on "the skins" and it's all coming together nicely! As for the POL's, I hope that works it self out as soon as it can for you and everyone else too. Keep plugging away with what and where you can. And all the best to on your journey and I'll be following along... Nice work!
Dj or Doug or TheLateDude
----- #19 of 25th Anniversary MKIV 9769 -----
Build Link:
https://thefactoryfiveforum.com/show...-Slow-Progress
Ordered: Oct 07, 2019 / Production: Dec 28th, 2019 / Shipped: Jan 19th, 2019 First Start: In the future... / Graduation: Even further in the future...
-
Member
Thanks Doug.
Some more progress last night, I installed and riveted all the passenger side panels, left the inner side not painted so the auto adhesive from the heatshield (I ended purchasing it from Breeze) will better adhere to it.
IMG_5193.jpgIMG_5194.jpg
Does anyone knows why I can`t edit anything on my profile, nor create albums in order to embed the pictures on the thread???
-
Senior Member
Good tip on the inner skins! I'll make sure to do the same with mine too. I wasn't sure if sharkhide would hinder adhesion, but makes sense to just skip it on the inner side.
As for full access it'a 20 post minimum, but since you're clearly building, contact David Hodgkins with a PM or email message and he can elevate your privileges.
Dj or Doug or TheLateDude
----- #19 of 25th Anniversary MKIV 9769 -----
Build Link:
https://thefactoryfiveforum.com/show...-Slow-Progress
Ordered: Oct 07, 2019 / Production: Dec 28th, 2019 / Shipped: Jan 19th, 2019 First Start: In the future... / Graduation: Even further in the future...
-
Member
Thanks Doug, I`ll talk to David!
-
Member
-
Member
Some updates since last time.
Finished up the drop trunk and all the panels. received a box from FFR with shocks and driveshafts !!! could finish some of my open topics.


-
Post Thanks / Like - 0 Thanks, 1 Likes
-
Member
I`m painting the aluminum panels with Bed Liner and in my first panel I did not like the paint adhesion so much, so I`m sanding it down before painting and it did improve a lot the adhesion, I`m using a grade 50 sand paper on a sander.
You can see the difference (the right one was sanded)

-
Member
-
Post Thanks / Like - 0 Thanks, 3 Likes
-
Senior Member

Those gauges are sick.
Well done!
MK4 #10008 - Ordered 10/06/20, Delivered 03/03/21, First Start 7/22/21, First Go Kart 7/24/21
Paint by Metal Morphous 5/14/22, Legally registered 6/8/22, Graduated 7/20/22
Build Thread
https://thefactoryfiveforum.com/show...been-delivered
Complete Kit, Ford 306, Sniper/Dual Sync, T5, Hydraulic clutch
-
#10333 Complete Kit, Carbed 427w, TKX, IRS and many other upgrades
- Order Date: September 11, 2021 - 20th Anniversary of 9/11
- Delivery Day: April 1, 2022 - April Fool's Day
- First Start and Go-Kart: January 20th, 2023
- Graduation Date: July 4th, 2023 - Independence Day!!
- Legal Registration Date: October 4, 2023 - My Birthday!!
Visit my MKIV Build Thread (#10333)
-
-
I'd love to see a close up of your mounting bolts. I too have a CF dash coming and have been wondering how to make it removable and look finished. I like the riv-nut idea and the under braces too. What screws did you use? Looks like black anodized capscrews.
thanks in advance,
Ted
#10333 Complete Kit, Carbed 427w, TKX, IRS and many other upgrades
- Order Date: September 11, 2021 - 20th Anniversary of 9/11
- Delivery Day: April 1, 2022 - April Fool's Day
- First Start and Go-Kart: January 20th, 2023
- Graduation Date: July 4th, 2023 - Independence Day!!
- Legal Registration Date: October 4, 2023 - My Birthday!!
Visit my MKIV Build Thread (#10333)
-
Member

Originally Posted by
Ted G

I'd love to see a close up of your mounting bolts. I too have a CF dash coming and have been wondering how to make it removable and look finished. I like the riv-nut idea and the under braces too. What screws did you use? Looks like black anodized capscrews.
thanks in advance,
Ted
Ted, I used M5 x 15 - 6 on top and 4 on the bottom - Allen cap screws (black anodized) Not sure how long they will last, but it`s a $2.00 fix and 5 min...
-
Post Thanks / Like - 0 Thanks, 1 Likes
-
Member
-
Wow, tell us more about that engine, she sure looks pretty darned new!
What are your plans? Just a freshening up?
Love your dash by the way; gauges look terrific! Thanks for letting us follow along.
Regards,
Steve
-
Member
Got something done this past weekend.
Finished the rear end installation, I`ll use Mustang rotors and calipers
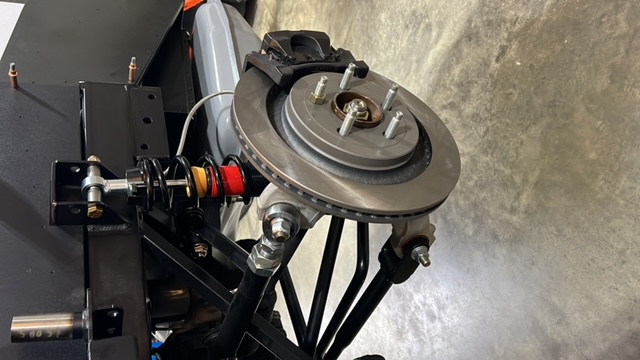
Getting close to see it sitting on its own .... exciting
-
Member
-
Member
Originally Posted by
WIS89
Wow, tell us more about that engine, she sure looks pretty darned new!
What are your plans? Just a freshening up?
Love your dash by the way; gauges look terrific! Thanks for letting us follow along.
Regards,
Steve
Tks Steve.
Bought from the parts farm in GA, it belongs to a 2020 Mustang with very low mileage it is really looking good... I`ll just change oil pan and should go right into the the car as is.
-
Post Thanks / Like - 0 Thanks, 1 Likes
-
Member
-
Post Thanks / Like - 0 Thanks, 2 Likes
-
Member

The dash and gauges look fantastic.
Where did you get the buttons?
Scott
Type 65 Daytona Coupe Complete Kit ordered 11/2021, delivered 7/25/2022....the fun has begun!
Build Thread
-
Same question...Where'd you find those buttons?
-
Member
Originally Posted by
Qballz
Same question...Where'd you find those buttons?
Funny answer.. I was looking around and definitively not liking the "out of the box" options,
Then I found these guys here:
https://billetautomotivebuttons.com/
Liked the variety of designs and a fare price. After I completed my purchase I found out that the store is in Australia!
I wrote an e-mail on Saturday night about the missing high beam light and Nelson wrote me back on Sunday with a tracking number and a lot of apologies..
If you can zoom into the horn button... 
-
Post Thanks / Like - 1 Thanks, 1 Likes
-
What's the size of those buttons?
Thanks
Scott
-
Member
Originally Posted by
Sharris2
What's the size of those buttons?
Thanks
Scott
These specific ones are 22mm
-
thanks look good
-
Nice build and as others have said, those gauges are sweet!
-
Member
-
Post Thanks / Like - 0 Thanks, 2 Likes
-
Member
Engine Wiring / ECM
Decided to skip the Ford Performance pack for the Coyote Gen 3 and went back to my roots.
Just ordered a Fueltech FT550
https://www.fueltech.net/products/ft550-efi-system
Slightly cheaper than the Ford Pack and with the huge advantage of endless programing options...
Will start wiring it next weekend.
-
My son and I were looking at the Fueltech for the Gen3 Coyote engine. Do you think it will work with the injection system of the Gen3?
-
Member
Originally Posted by
Glen Davis
My son and I were looking at the Fueltech for the Gen3 Coyote engine. Do you think it will work with the injection system of the Gen3?
I`ve build many rally race cars using FT since they began back in Brazil, I`m confident it will work and I`ll post my progress here.
The reason I went with the FT550 is because it handles the gas pedal by wire.
-
Member
-
Post Thanks / Like - 0 Thanks, 1 Likes
-
Senior Member

Originally Posted by
ADI
Those look like 94-95 SN95 spindles. Do you have the pin drive front suspension? Wondering as that's what I have ordered.


 Thanks:
  Likes:

)


 Reply With Quote


