Very Cool Parts

Visit our community sponsor

Thanks Thanks:  4
Likes Likes:  26
Page 1 of 2 12 LastLast
Results 1 to 40 of 63

Thread: ADI`s Build Thread

  1. #1
    Member ADI's Avatar
    Join Date
    Mar 2021
    Posts
    73
    Post Thanks / Like

    ADI`s Build Thread

    Hello all,

    As I mentioned some weeks ago during my introduction I just started my build and will share the progress here as much as I can. I ordered a basic kit because I wanted to get my place in line (back in February) and because I was not sure what exactly how I planned to build it. In a nutshell it will be a more "modern" build with a Coyote Gen 3, manual, dark blue with matte black finish. I`m a horsepower fan (used to build rally cars in the past) so the HP will be there, but by the end it still going to be a weekend ride. I`m using this forum a lot to understand the process and steps and it is fun to see that are 3000 ways to build this car!!!

    I received my kit in the end of August and had to finish some home improvements before I could start the build. It officially started this past weekend.

    Hope you guys enjoy!

    Let`s start with the famous delivery pic!:

    IMG_4824.jpg

    I did build the frame dolly as most of us. (forgot who placed all dimensions and step by step build, but thanks!!! )

    Removed the body from the frame (had to rent a trailer to take the body to the storage)

    And I`m ready to start the build.

    IMG_5101.jpg
    IMG_5106.jpg

    More to come...
    Attached Images Attached Images

  2. Likes Tooth, JohnK liked this post
  3. #2
    Senior Member JB in NOVA's Avatar
    Join Date
    Apr 2020
    Location
    Virginia
    Posts
    388
    Post Thanks / Like
    Now the real fun begins!
    MKIV Complete Kit #9822 l BluePrint 347 EFI l TKO600 l Power Steering l Heater/Defrost l Build Thread

  4. #3
    Member ADI's Avatar
    Join Date
    Mar 2021
    Posts
    73
    Post Thanks / Like
    So. Been quite for a while but things are moving along. As everyone else, I started with the "F" plate and front suspension, Installed as well averything I have from the rear suspension, but FFR is really behind with a bunch of parts and that will stall my build very shortly.94DB1F61-BEFE-443C-8694-57C13C35EDAD.JPGIMG_5133.jpgIMG_5135.jpg

  5. Likes onemoretry liked this post
  6. #4
    Member ADI's Avatar
    Join Date
    Mar 2021
    Posts
    73
    Post Thanks / Like
    Next step now is to replace the seals of the differential and plug the oil cooling section (honestly do not believe I`ll need a cooled rear diff.)
    IMG_5151.jpg
    In case someone wonders the side (for the CV Shaft) seal part number is: AL3Z-4B416-A and the plug is 5R3Z-7860108-AA

  7. #5
    Member ADI's Avatar
    Join Date
    Mar 2021
    Posts
    73
    Post Thanks / Like
    Post COVID era is hard... I do stumble into missing parts every 5 minutes, FFR does not even answer my emails, I`m missing bolts, nuts, a.o. that`s really annoying it almost takes the fun out of it!
    Does anyone knows what is the part number of the steering bearing flange?? I`m about to purchase it in the market instead of waiting forever from FFR...

  8. #6
    Senior Member John Ibele's Avatar
    Join Date
    Sep 2011
    Location
    Minneapolis, MN
    Posts
    719
    Post Thanks / Like
    Well, can't guarantee it, but "10577 pillow block, 3/4" id" brings up this from Grainger, which does look familiar. Good luck with the POL, that makes a complex puzzle even tougher!
    MK4 #7838: IRS 3.55 TrueTrac T5z Dart 347
    The drawing is from ~7th grade, mid-1970s
    Meandering, leisurely build thread is here

  9. #7
    Member ADI's Avatar
    Join Date
    Mar 2021
    Posts
    73
    Post Thanks / Like
    I found one on Ebay (for fast delivery) and it fits perfectly, the part number is: NTN AS205-100, PFL205

  10. #8
    Member ADI's Avatar
    Join Date
    Mar 2021
    Posts
    73
    Post Thanks / Like

    Aluminum Panels (passenger foot side)

    Since I stalled a bit in the suspension part, I`m trying not to stop completely, so I moved into the passenger side panels. lot`s of fun drilling. To be honest I believed it would take me more time.
    IMG_5186.jpg
    Someone said here that you cannot have too many Cleco`s, and he is right, never used almost all 200 I have at one time!!!
    IMG_5188.jpg

    I painted them last night but the cold weather does not help much in drying, so I probably will re install the panels tonight...

  11. Likes ydousurf liked this post
  12. #9
    Senior Member ydousurf's Avatar
    Join Date
    Feb 2019
    Location
    Greality, Colorado
    Posts
    365
    Post Thanks / Like
    ADI, I was reading through your build and it's looking really good so far. You did a great job on "the skins" and it's all coming together nicely! As for the POL's, I hope that works it self out as soon as it can for you and everyone else too. Keep plugging away with what and where you can. And all the best to on your journey and I'll be following along... Nice work!
    Dj or Doug or TheLateDude
    ----- #19 of 25th Anniversary MKIV 9769 -----
    Build Link: https://thefactoryfiveforum.com/show...-Slow-Progress
    Ordered: Oct 07, 2019 / Production: Dec 28th, 2019 / Shipped: Jan 19th, 2019 First Start: In the future... / Graduation: Even further in the future...

  13. #10
    Member ADI's Avatar
    Join Date
    Mar 2021
    Posts
    73
    Post Thanks / Like
    Thanks Doug.

    Some more progress last night, I installed and riveted all the passenger side panels, left the inner side not painted so the auto adhesive from the heatshield (I ended purchasing it from Breeze) will better adhere to it.

    IMG_5193.jpgIMG_5194.jpg

    Does anyone knows why I can`t edit anything on my profile, nor create albums in order to embed the pictures on the thread???

  14. #11
    Senior Member ydousurf's Avatar
    Join Date
    Feb 2019
    Location
    Greality, Colorado
    Posts
    365
    Post Thanks / Like
    Good tip on the inner skins! I'll make sure to do the same with mine too. I wasn't sure if sharkhide would hinder adhesion, but makes sense to just skip it on the inner side.

    As for full access it'a 20 post minimum, but since you're clearly building, contact David Hodgkins with a PM or email message and he can elevate your privileges.
    Dj or Doug or TheLateDude
    ----- #19 of 25th Anniversary MKIV 9769 -----
    Build Link: https://thefactoryfiveforum.com/show...-Slow-Progress
    Ordered: Oct 07, 2019 / Production: Dec 28th, 2019 / Shipped: Jan 19th, 2019 First Start: In the future... / Graduation: Even further in the future...

  15. #12
    Member ADI's Avatar
    Join Date
    Mar 2021
    Posts
    73
    Post Thanks / Like
    Thanks Doug, I`ll talk to David!

  16. #13
    Member ADI's Avatar
    Join Date
    Mar 2021
    Posts
    73
    Post Thanks / Like

    More panels!

    So,, since I do not have enough parts to keep working on, I continue to drill and prep the aluminum panels.

    I decided to install a cubby from Breeze (tks btw! super fast shipment!!!)

    Pretty standard install. In detail the tool to deburr the panel after cutting / drilling. I recommend this for anyone dealing with metal works (like everyone here!!)


    the tool is this one: https://www.amazon.com/gp/product/B0...?ie=UTF8&psc=1

    and this time yes.. I used ALL my Cleco`s!


    And here is Pippa making me some company checking the neighborhood!


  17. #14
    Member ADI's Avatar
    Join Date
    Mar 2021
    Posts
    73
    Post Thanks / Like
    Some updates since last time.

    Finished up the drop trunk and all the panels. received a box from FFR with shocks and driveshafts !!! could finish some of my open topics.


  18. Likes speedfreak1211 liked this post
  19. #15
    Member ADI's Avatar
    Join Date
    Mar 2021
    Posts
    73
    Post Thanks / Like
    I`m painting the aluminum panels with Bed Liner and in my first panel I did not like the paint adhesion so much, so I`m sanding it down before painting and it did improve a lot the adhesion, I`m using a grade 50 sand paper on a sander.
    You can see the difference (the right one was sanded)

  20. #16
    Member ADI's Avatar
    Join Date
    Mar 2021
    Posts
    73
    Post Thanks / Like
    Been quite for a while. Happens when you live in NC and have an assignment in CA!
    Last weekend I got some work done and was able to start my Carbon Fiber dash. Bought it from FFR with gauges from Speedhut (red on red).
    First step was to cover it with painters tape to avoid any scratches and start with the placement. Dis not wanted to blindly trust FFR aluminum template for my steering wheel shaft, so I used an M8 bolt that fit quite snuggle into the thread in the shaft and using my bench drill and a floppy disk grinder created a center punch.
    Worked well:


    After that I CLECO it in place but did not like how the bottom part seemed flimsy and wobbly to me, so I added 4 holding brackets using some scrap aluminum:

    And finally drilled the holes for the gauges: (used regular hole saw from Diablo, with hand drill and high speed)

    Now I`m waiting on the buttons and warning lights to finalize the project.

  21. Likes CaptB, Ted G, Springsyeti liked this post
  22. #17
    Senior Member Blitzboy54's Avatar
    Join Date
    Oct 2020
    Location
    Albany, NY
    Posts
    1,178
    Post Thanks / Like
    Those gauges are sick.


    Well done!
    MK4 #10008 - Ordered 10/06/20, Delivered 03/03/21, First Start 7/22/21, First Go Kart 7/24/21
    Paint by Metal Morphous 5/14/22, Legally registered 6/8/22, Graduated 7/20/22
    Build Thread https://thefactoryfiveforum.com/show...been-delivered
    Complete Kit, Ford 306, Sniper/Dual Sync, T5, Hydraulic clutch

  23. #18
    Ted G's Avatar
    Join Date
    Aug 2021
    Location
    El Dorado Hills, CA
    Posts
    762
    Post Thanks / Like
    Looks great!
    #10333 Complete Kit, Carbed 427w, TKX, IRS and many other upgrades

    • Order Date: September 11, 2021 - 20th Anniversary of 9/11
    • Delivery Day: April 1, 2022 - April Fool's Day
    • First Start and Go-Kart: January 20th, 2023
    • Graduation Date: July 4th, 2023 - Independence Day!!
    • Legal Registration Date: October 4, 2023 - My Birthday!!


    Visit my MKIV Build Thread (#10333)

  24. #19
    Senior Member
    Join Date
    Feb 2020
    Location
    Chicago
    Posts
    215
    Post Thanks / Like
    Looking good!

  25. #20
    Ted G's Avatar
    Join Date
    Aug 2021
    Location
    El Dorado Hills, CA
    Posts
    762
    Post Thanks / Like
    I'd love to see a close up of your mounting bolts. I too have a CF dash coming and have been wondering how to make it removable and look finished. I like the riv-nut idea and the under braces too. What screws did you use? Looks like black anodized capscrews.

    thanks in advance,

    Ted
    #10333 Complete Kit, Carbed 427w, TKX, IRS and many other upgrades

    • Order Date: September 11, 2021 - 20th Anniversary of 9/11
    • Delivery Day: April 1, 2022 - April Fool's Day
    • First Start and Go-Kart: January 20th, 2023
    • Graduation Date: July 4th, 2023 - Independence Day!!
    • Legal Registration Date: October 4, 2023 - My Birthday!!


    Visit my MKIV Build Thread (#10333)

  26. #21
    Member ADI's Avatar
    Join Date
    Mar 2021
    Posts
    73
    Post Thanks / Like
    Quote Originally Posted by Ted G View Post
    I'd love to see a close up of your mounting bolts. I too have a CF dash coming and have been wondering how to make it removable and look finished. I like the riv-nut idea and the under braces too. What screws did you use? Looks like black anodized capscrews.

    thanks in advance,

    Ted
    Ted, I used M5 x 15 - 6 on top and 4 on the bottom - Allen cap screws (black anodized) Not sure how long they will last, but it`s a $2.00 fix and 5 min...

  27. Likes Ted G liked this post
  28. #22
    Member ADI's Avatar
    Join Date
    Mar 2021
    Posts
    73
    Post Thanks / Like

    Engine Arrived!

    Some news.... I FINNALY received my engine! That`s a big milestone for the build, I literally waited in line to get it out of the donor car for months!


    After some dismantling I should be able to start rebuilding shortly.


  29. #23
    Senior Member
    Join Date
    Feb 2011
    Location
    Myrtle Beach, SC
    Posts
    2,108
    Post Thanks / Like
    Wow, tell us more about that engine, she sure looks pretty darned new!

    What are your plans? Just a freshening up?

    Love your dash by the way; gauges look terrific! Thanks for letting us follow along.

    Regards,

    Steve

  30. #24
    Member ADI's Avatar
    Join Date
    Mar 2021
    Posts
    73
    Post Thanks / Like
    Got something done this past weekend.

    Finished the rear end installation, I`ll use Mustang rotors and calipers
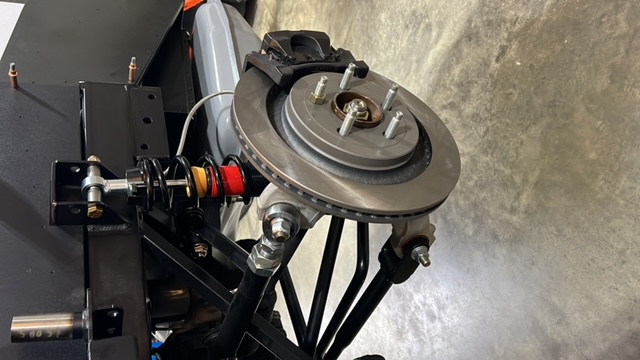


    Getting close to see it sitting on its own .... exciting
    Mk4 IRS Coyote Gen3 6 speed, FuelTech control,
    Build progress:https://thefactoryfiveforum.com/show...s-Build-Thread

  31. #25
    Member ADI's Avatar
    Join Date
    Mar 2021
    Posts
    73
    Post Thanks / Like
    Next I started the accelerator pedal work. For whatever reason my pedal is different from the old ones, so I could not flip the pedal and do all that trimming as other posts showed.

    My driving style also calls for a lower location and I started by modifying the FF5 bracket (cut the 90 bend) and used the chassis bracket holes as guide. Also thinking on the future, I do not like the idea of reaching a nut behind the bracket if the pedal ever needs to be replaced This is what I came with:


    Added 2 threads on the side, one is a "stopper" for the plastic housing and the other is for a 1/4"-20 x 2 1/2" screw that have a modified washer to clamp the pedal against the stopper and avoid it to flex (because now it is only supported by the 2 left side screws.

    Also added a limiter when pressing the pedal fully to avoid any breakage using the original hole and angle of the FF5 bracket
    Mk4 IRS Coyote Gen3 6 speed, FuelTech control,
    Build progress:https://thefactoryfiveforum.com/show...s-Build-Thread

  32. #26
    Member ADI's Avatar
    Join Date
    Mar 2021
    Posts
    73
    Post Thanks / Like
    Quote Originally Posted by WIS89 View Post
    Wow, tell us more about that engine, she sure looks pretty darned new!

    What are your plans? Just a freshening up?

    Love your dash by the way; gauges look terrific! Thanks for letting us follow along.

    Regards,

    Steve
    Tks Steve.

    Bought from the parts farm in GA, it belongs to a 2020 Mustang with very low mileage it is really looking good... I`ll just change oil pan and should go right into the the car as is.
    Mk4 IRS Coyote Gen3 6 speed, FuelTech control,
    Build progress:https://thefactoryfiveforum.com/show...s-Build-Thread

  33. Likes WIS89 liked this post
  34. #27
    Member ADI's Avatar
    Join Date
    Mar 2021
    Posts
    73
    Post Thanks / Like

    Dash - added some buttons

    This weekend I got some traction on my dashboard, my buttons and warning lights arrived and I started testing the drilling holes for quality and size. decided to use the leftovers from the speedometer to do some testing with the wood flat drills. worked nicely and super clean!
    These buttons are have led backlight and are made out of aluminum, nice quality overall!


    checking how it will look like:


    It`s always a tense moment drilling into a carbon fiber dash...

    Then measuring and drilling in real life.


    Installing the buttons:


    Overall really happy with the end result. these

    and the final result: (the high beam warning light was missing, but the supplier just shipped..

    Mk4 IRS Coyote Gen3 6 speed, FuelTech control,
    Build progress:https://thefactoryfiveforum.com/show...s-Build-Thread

  35. Likes Railroad, WIS89 liked this post
  36. #28
    Member slarson's Avatar
    Join Date
    Apr 2021
    Location
    Indian Harbour Beach, FL
    Posts
    73
    Post Thanks / Like
    The dash and gauges look fantastic.
    Where did you get the buttons?

    Scott
    Type 65 Daytona Coupe Complete Kit ordered 11/2021, delivered 7/25/2022....the fun has begun! Build Thread

  37. #29
    Member
    Join Date
    Dec 2021
    Posts
    43
    Post Thanks / Like
    Same question...Where'd you find those buttons?

  38. #30
    Member ADI's Avatar
    Join Date
    Mar 2021
    Posts
    73
    Post Thanks / Like
    Quote Originally Posted by Qballz View Post
    Same question...Where'd you find those buttons?
    Funny answer.. I was looking around and definitively not liking the "out of the box" options,

    Then I found these guys here:

    https://billetautomotivebuttons.com/

    Liked the variety of designs and a fare price. After I completed my purchase I found out that the store is in Australia!

    I wrote an e-mail on Saturday night about the missing high beam light and Nelson wrote me back on Sunday with a tracking number and a lot of apologies..

    If you can zoom into the horn button...
    Mk4 IRS Coyote Gen3 6 speed, FuelTech control,
    Build progress:https://thefactoryfiveforum.com/show...s-Build-Thread

  39. Thanks jeskam thanked for this post
    Likes jeskam liked this post
  40. #31
    Member
    Join Date
    Nov 2021
    Posts
    30
    Post Thanks / Like
    What's the size of those buttons?
    Thanks
    Scott

  41. #32
    Member ADI's Avatar
    Join Date
    Mar 2021
    Posts
    73
    Post Thanks / Like
    Quote Originally Posted by Sharris2 View Post
    What's the size of those buttons?
    Thanks
    Scott
    These specific ones are 22mm
    Mk4 IRS Coyote Gen3 6 speed, FuelTech control,
    Build progress:https://thefactoryfiveforum.com/show...s-Build-Thread

  42. #33
    Member
    Join Date
    Nov 2021
    Posts
    30
    Post Thanks / Like
    thanks look good

  43. #34
    Member
    Join Date
    Aug 2021
    Posts
    50
    Post Thanks / Like
    Nice build and as others have said, those gauges are sweet!

  44. #35
    Member ADI's Avatar
    Join Date
    Mar 2021
    Posts
    73
    Post Thanks / Like

    Engine, transmission...

    Started my weekend installing the shifter on my transmission, since I`m going with the Mustang original 6 speed I needed to reposition the shifter. Purchased the shifter from FormaCars and it is well done and really P&P...


    Then installing the power steering pump:


    And after all check and balances, put the engine in... YES, you "should" have more people helping you, but since I`m a stubborn guy and no one was available at the moment, I did it alone... it demanded quite some creativity, but it`s done!!!


    Now let`s play with wires....
    Mk4 IRS Coyote Gen3 6 speed, FuelTech control,
    Build progress:https://thefactoryfiveforum.com/show...s-Build-Thread

  45. Likes JB in NOVA, WIS89 liked this post
  46. #36
    Member ADI's Avatar
    Join Date
    Mar 2021
    Posts
    73
    Post Thanks / Like

    Engine Wiring / ECM

    Decided to skip the Ford Performance pack for the Coyote Gen 3 and went back to my roots.

    Just ordered a Fueltech FT550

    https://www.fueltech.net/products/ft550-efi-system


    Slightly cheaper than the Ford Pack and with the huge advantage of endless programing options...

    Will start wiring it next weekend.
    Mk4 IRS Coyote Gen3 6 speed, FuelTech control,
    Build progress:https://thefactoryfiveforum.com/show...s-Build-Thread

  47. #37
    Member
    Join Date
    May 2019
    Location
    Hayward, CA
    Posts
    86
    Post Thanks / Like
    My son and I were looking at the Fueltech for the Gen3 Coyote engine. Do you think it will work with the injection system of the Gen3?

  48. #38
    Member ADI's Avatar
    Join Date
    Mar 2021
    Posts
    73
    Post Thanks / Like
    Quote Originally Posted by Glen Davis View Post
    My son and I were looking at the Fueltech for the Gen3 Coyote engine. Do you think it will work with the injection system of the Gen3?
    I`ve build many rally race cars using FT since they began back in Brazil, I`m confident it will work and I`ll post my progress here.
    The reason I went with the FT550 is because it handles the gas pedal by wire.
    Mk4 IRS Coyote Gen3 6 speed, FuelTech control,
    Build progress:https://thefactoryfiveforum.com/show...s-Build-Thread

  49. #39
    Member ADI's Avatar
    Join Date
    Mar 2021
    Posts
    73
    Post Thanks / Like
    Got some time to work this weekend,

    Arrived home from CA and was like X-mas.


    Summit Racing, Breeze and Fueltech arrived.

    Received my Fueltech FT550 and compared with the models I started back in Brazil years ago, the quality and presentation are now just impeccable!


    Installed Breeze`s battery tray and fuel regulator, still waiting on the fuel pump but all connections are ready for it.


    Next after asking for some ideas on a below dash I built a mockup and have pretty much decided on the final design that plan to build this coming weekend.


    More to come on that.

    Now, back in CA I`m studying the engine wiring and what to do with the Coyote Gen 3 secondary fuel injection system (delete/bypass/use)

    More to come! Fun times!
    Mk4 IRS Coyote Gen3 6 speed, FuelTech control,
    Build progress:https://thefactoryfiveforum.com/show...s-Build-Thread

  50. Likes WIS89 liked this post
  51. #40
    Senior Member Mike.Bray's Avatar
    Join Date
    Dec 2021
    Location
    Flower Mound TX
    Posts
    834
    Post Thanks / Like
    Quote Originally Posted by ADI View Post

    [/ATTACH]IMG_5135.jpg
    Those look like 94-95 SN95 spindles. Do you have the pin drive front suspension? Wondering as that's what I have ordered.
    My build thread https://thefactoryfiveforum.com/show...Roadster-Build

    Thread on Stainless Steel AN brake lines.

    Thread on fasteners and torque wrenches.

Page 1 of 2 12 LastLast

Posting Permissions

  • You may not post new threads
  • You may not post replies
  • You may not post attachments
  • You may not edit your posts
  •  

Martin's Dent and Collision Shop

Visit our community sponsor