-
Fuel lines mostly in
Another thing accomplished was getting most of the fuel lines set in their final places. I tested them with a AN/schrader fitting set I got off amazon.
https://www.amazon.com/gp/product/B0...?ie=UTF8&psc=1
I went PTFE steel braided lines from the tank to a bulkhead setup just behind the passenger cockpit.

Mounted the bulkheads on a simple bracket I made (don't mind the mismatched hardware). Then 3/8" hard steel lines along the traditional route into the engine bay. Added a rivnut to the passenger footbox to secure my mounting hardware. I also coated the steel lines with rattle can rubberized flat black paint to match it to the frame. I got the hard line brackets from a vendor that is somewhat local to me http://www.lsbilletworks.com/.

I like the way it turned out.
Last edited by topherchrisb; 10-07-2022 at 04:22 PM.
MK4 #10255 project: "Mako"
Coyote Gen 3, TKX, IRS, Wilwood brakes, power steering
Order date: 6/24/21, Received date: 1/12/22, First Gocart date: TBD, Registration date: TBD
Build thread
-
Post Thanks / Like - 0 Thanks, 1 Likes
-
Senior Member

Congrats on getting your fuel lines completed. I like how you coated them to match your frame. Nice detail!
Chris
Coupe complete kit delivered: 4/22/24.
Build Thread. Coyote. T-56. IRS w/3.55. Wilwoods. PS. HVAC. Side windows.
MK4 Complete kit.
Build Thread Index. Delivered: 10/15/2020. Legal: 7/25/23. Coyote Gen3. TKO600 (0.64 OD). IRS w/3.55. PS. Wilwoods. Sway bars. This build is dedicated to my son, Benjamin.
Build Thread.
-
Final pedal placement
Long time no talk. I've got the same excuse as everyone... just busy with life, so not much progress is being made. My youngest gets to start school in Jan so I'm hoping that'll afford me some more time in the shop. Counting the days!
One of the things I spent some time on was making sure my adjustments for the coyote pedal translated to something I can operate with my feet. I have ordered a dead pedal from breeze but not really to the point I can try to test that. Hoping I can get to that before the end of the T-day weekend here. I also have not got any driving shoes yet and was testing with a pair of shop slippers. I am pretty anal about keeping the floor clean out there so I switch to some slip ons when trekking through the weathered yard. That allows me to test worst case scenario for the spacing though. I'm pretty happy with the spacing and alignment. Happenstance the amount I shifted the coyote pedal mounting hardware sets up the alignment across the bottom of the pedals dead even.

MK4 #10255 project: "Mako"
Coyote Gen 3, TKX, IRS, Wilwood brakes, power steering
Order date: 6/24/21, Received date: 1/12/22, First Gocart date: TBD, Registration date: TBD
Build thread
-
RT Drop trunk
I thought I was going to work on the brake lines next. I stared for a while and thought I came up with a good route/plan and started drilling a hole in the bottom of the floor pan, inserted a rubber grommet, and realized I won't be able to just take things apart easily when the brake lines are in place. After more staring I decided that I couldn't really plumb the brake lines till I got some final fitment and some finishing (powder coat) of the driver's foot box. Then that led to me wanting to have as much as I can available to take to the powder coating shop. Ugh... got to work on as many of the panels as I can now.
Going back and forth in my head about which panels need coating and which are just going to be lizard skinned was taking time. Still not convinced I'm to my final decision on all that, but I needed to get things fitted regardless of direction. So I started working on the drop trunk and breeze cubby.
So I thought I was being smart diverging from the instructions by putting the lip of the drop on top of the trunk metal but if I were to do it again I would probably stick to the direction Russ provides. My thinking about the lip on top was easier assembly(didn't have to drop the tank) and the trunk being tucked under the lip providing more structural support weight wise. I centered the sending unit under the hole in the bottom panel so my placement is a little more driver's side and forward. I can still put the lip under the trunk piece during final riveting and I may do that, but it'll make sloppier edges due to making the hole larger to allow for the walls to come up through easily. It also forces you to make the cutouts for the cross braces a little larger since you have to traverse horizontally for placement instead of just vertically from the bottom. A bit sloppy but this is getting lizard skin and carpet so likely not going to be able to tell once it's all finished.

Over all progress photos as of now. You'll see the wire harness for the wilwood electronic ebrake sitting there. You'll also see the FF metal forward firewall. Have a couple emails out to vendors for AC/heater unit planning before I get too far on that piece. I've thought about starting the wiring routing and dash planning next, but we'll see what my next revelation is during a staring contest with the car.


Sorry the compression on the uploads is still getting me. Have to go back and read the recommendations for photo upload to see what I'm doing wrong there.
MK4 #10255 project: "Mako"
Coyote Gen 3, TKX, IRS, Wilwood brakes, power steering
Order date: 6/24/21, Received date: 1/12/22, First Gocart date: TBD, Registration date: TBD
Build thread
-
Roll bar bummer
Well I was able to spend a bunch of time getting panels fitted like I had hoped over the holiday weekend. I got up to where I was sizing up the hole for the Breeze cubby and decided I should probably fit the roll bars and figure out what kind of access I needed to get those lower bolts in. Glad I did... cause this happened. I started off being confused about what I did wrong for about five long seconds or so then started laughing. It won't hold up progress right now as I'm just trying to figure out how I'll get them on later. Hopefully it doesn't take too long. I started thinking I was going to mock up dash components then realized I completely forgot I'm still waiting for gauges to show up. I wrote over to FFR to see how we can proceed about the roll bar and follow up with my gauges. I still have plenty to help me forget about those gauges again. Just need to decide if I should work on the smaller panel fitments, radiator fitment, wiring, or seat fitments now.

MK4 #10255 project: "Mako"
Coyote Gen 3, TKX, IRS, Wilwood brakes, power steering
Order date: 6/24/21, Received date: 1/12/22, First Gocart date: TBD, Registration date: TBD
Build thread
-
Senior Member
Too funny. Some additional good news is from the picture/angle it looks like the rear diagonal leg (DS) fits well to the hoop. I had trouble with the gap on the PS.
Chris
Coupe complete kit delivered: 4/22/24.
Build Thread. Coyote. T-56. IRS w/3.55. Wilwoods. PS. HVAC. Side windows.
MK4 Complete kit.
Build Thread Index. Delivered: 10/15/2020. Legal: 7/25/23. Coyote Gen3. TKO600 (0.64 OD). IRS w/3.55. PS. Wilwoods. Sway bars. This build is dedicated to my son, Benjamin.
Build Thread.
-

Originally Posted by
460.465USMC

Too funny. Some additional good news is from the picture/angle it looks like the rear diagonal leg (DS) fits well to the hoop. I had trouble with the gap on the PS.
Yeah they went in fairly easily... just flap disced the powder coat off the inside of the female ends and they slid right on. The stubs on the frame gave me plenty of room to shift them into place.
I heard back from FFR on both the hoop and the gauge pack. For the hoop they are starting a replacement and return operations to get me straight there. The gauges are a little more complicated... apparently Autometer sent a whole batch of 7 gauge packs to FFR with only 6 gauges in them. So they are working on resolving that before they can send out a gauge pack for me.
MK4 #10255 project: "Mako"
Coyote Gen 3, TKX, IRS, Wilwood brakes, power steering
Order date: 6/24/21, Received date: 1/12/22, First Gocart date: TBD, Registration date: TBD
Build thread
-
Senior Member

Staring contest with the car
I like that one, weve had many of those in my garage.
Brake lines - for the brake line to the rear, I put my hole in the bottom DS footbox panel at the very front, where the bent tab of the front panel overlaps the bottom. In other words, where you silicone the two panels together. I made a groove in the front of the bottom panel and a matching groove in the tab. When assembled, the two grooves formed a hole through the overlapped panels. Makes getting things aligned much easier. You can slide a grommet on the brake line early, or just use gasket maker at the end to seal it up and protect the brake line.
I wouldnt stress much about the drop trunk, particularly if youre going to cover it. I used OEM trunk liner, which was easy to use and turned out great.
Also FWIW, I was pleasantly surprised at how the footbox width felt the first time I go karted. I have the DS box without either of the bump outs theyve added over the past few years. I just wore the used up trail running shoes I had on, and didnt feel any risk of getting my feet snagged anywhere, or hitting two pedals at once. I was concerned the go pedal might seem too far to the outside of my right foot, but that felt solid as well. Unless you have pretty wide feet I think you wont feel cramped.
Last edited by John Ibele; 12-03-2022 at 12:04 PM.
MK4 #7838: IRS 3.55 TrueTrac T5z Dart 347
The drawing is from ~7th grade, mid-1970s
Meandering, leisurely build thread is
here
-
Senior Member

Originally Posted by
John Ibele
You can slide a grommet on the brake line early, or just use gasket maker at the end to seal it up and protect the brake line.
You can also use bulkhead fittings.
-
Trunk Struts and Rear Speakers
The marathon continues... but a couple decent updates. I know installing speakers are hit and miss in terms of worth the money, but I love listening to music and I have it available every where I go. It seems like the people whom think the speakers are worth it mention needing a lot of power. I didn't want to go all the way into getting a dedicated sub but went with some 6x9s to hopefully get a lot of potential punch in an open air environment. I bought a 4 channel amp to run these and potentially two smaller speakers some where up front. I also coincidentally need speakers in the land cruiser so if I can't make them worthwhile here I can use them there.
I re-enforced the breeze cubby wall with some 1/2" MDF and angle the speakers a little to make room for the trunk struts. This current positioning was a second attempt after realizing my first position had a bit of interference with where the struts would have passed through. Part of this position is moving the frame side strut mounts to in between the seat belt pass through slots. It does put the struts resting placement at a bit of an angle... but I think they'll be fine. I also ordered a set of 20lb struts to test in place of the 28lbs that come with the kit. The 28lbs seem like overkill at the moment. I put the speakers in rubber baffles hopefully helping with the sound a bit.

From top of cubby:

From rear:

MK4 #10255 project: "Mako"
Coyote Gen 3, TKX, IRS, Wilwood brakes, power steering
Order date: 6/24/21, Received date: 1/12/22, First Gocart date: TBD, Registration date: TBD
Build thread
-
Radiator Mock Up
I also spent a bit of time with some of the Breeze components dealing with the radiator mounting. This at the moment involves the fan shroud, upper and lower mounts, as well as the upper cowl from Breeze. No need to go into how great these parts are... if you've been on the forum for any length of time you've seen references to these multiple times likely.

You'll also see the radiator shroud from replica parts. I order a bunch of parts from him as well recently... seat belt, roll bar, windshield and RT turn signal trim pieces. I did order the under dash support piece as well but I didn't receive it. I haven't heard back from my inquiry about it missing but haven't been too worried as it's holiday season.

Now if I could just pick a color scheme for the powder coating I could get some of these pieces mounted permanently. I'm still bouncing around between matching the frame, doing a dark gray to provide a bit of contrast against the frame, and a lighter gray for something that matches more with the intended body color(or a combo of the three).
As for next... I did get out the rear wire harness for a possibility of running that. I still haven't got any indication on when the FFR gauge kit will be ready for shipment. I think I may just start ordering some gauges from another vendor. Then I can start staring at the dash forever trying to design that layout.
I love the multi color setup as well as the trim pieces with the button head screws on this:
https://thefactoryfiveforum.com/show...l=1#post504159
There is one layout I absolutely love with a yellow/black gauge combo and these thick black screwed in bezels but I can't find it anymore. I think the general gist I'll go for is dual colors for the gauges, modern buttons/indicators, and some sort of trim pieces that break up all the carbon fiber.
MK4 #10255 project: "Mako"
Coyote Gen 3, TKX, IRS, Wilwood brakes, power steering
Order date: 6/24/21, Received date: 1/12/22, First Gocart date: TBD, Registration date: TBD
Build thread
-
Dash mock up
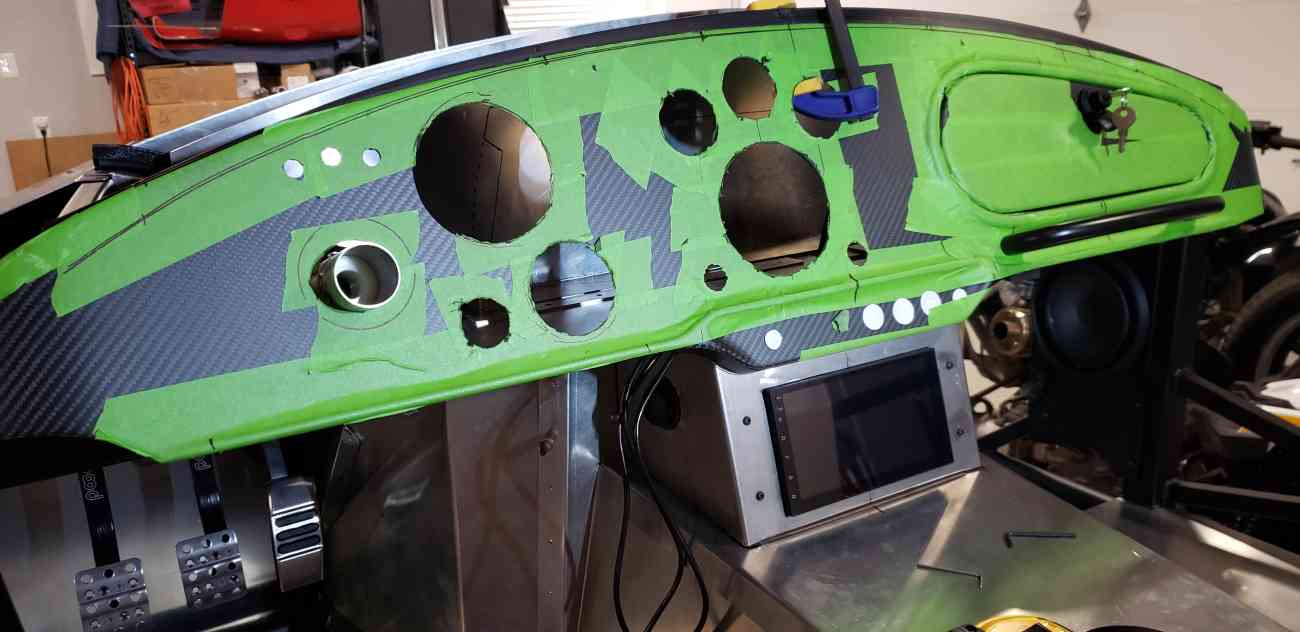
Looking at the date from the last post... has it been two months already!? That's a little embarrassing but starting to get into things that are a little more detail oriented. I started playing with ideas on dash layout. Below are two pictures of what I'm thinking. I've been wanting a more modern look and function. So at the moment my mock includes white background main gauges with gray supplemental gauges. I ordered them as they are mocked from speedhut. I like the look from the driver's point of view with the gauges a little off center to the left. It's hard to understand how weird it'll look in combination with the stripes. I'm planning on an under dash center console for a navigation unit. I still can't figure out a good image format for the compression when uploading photos. So a bit of detail is lost. To the left of the fuel gauges is the push button ignition, right of the fuel is the horn button and center main dash is the hazards button. Above the steering wheel are all the pilot lights left to right top to bottom is left turn, high beam, right turn, oil pressure, engine mil, emergency brake. I ordered an IDIDIT high/low beam relay set for the RT turn signal button and the goofy unit left of the steering wheel is a modern ford headlight switch from a focus. I'm still working on reverse engineering that switch and will add a dedicated thread in the roadster forum asking for help/guidance on how to do that. The drop down portion of the carbon fiber dash will be driver's seat heater, wilwood electric parking brake switch, heater/ac controls (still planning on soft top with ac), and passenger seat heater.


The headlight switch I'm attempting to reverse engineer...
https://partshawk.com/ford-focus-hea...-hls-1582.html
MK4 #10255 project: "Mako"
Coyote Gen 3, TKX, IRS, Wilwood brakes, power steering
Order date: 6/24/21, Received date: 1/12/22, First Gocart date: TBD, Registration date: TBD
Build thread
-
Post Thanks / Like - 0 Thanks, 1 Likes
-
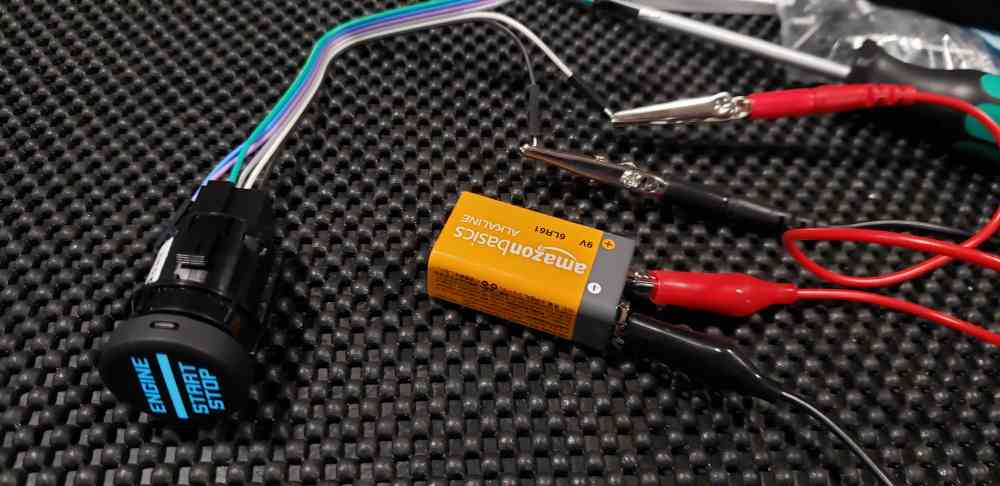
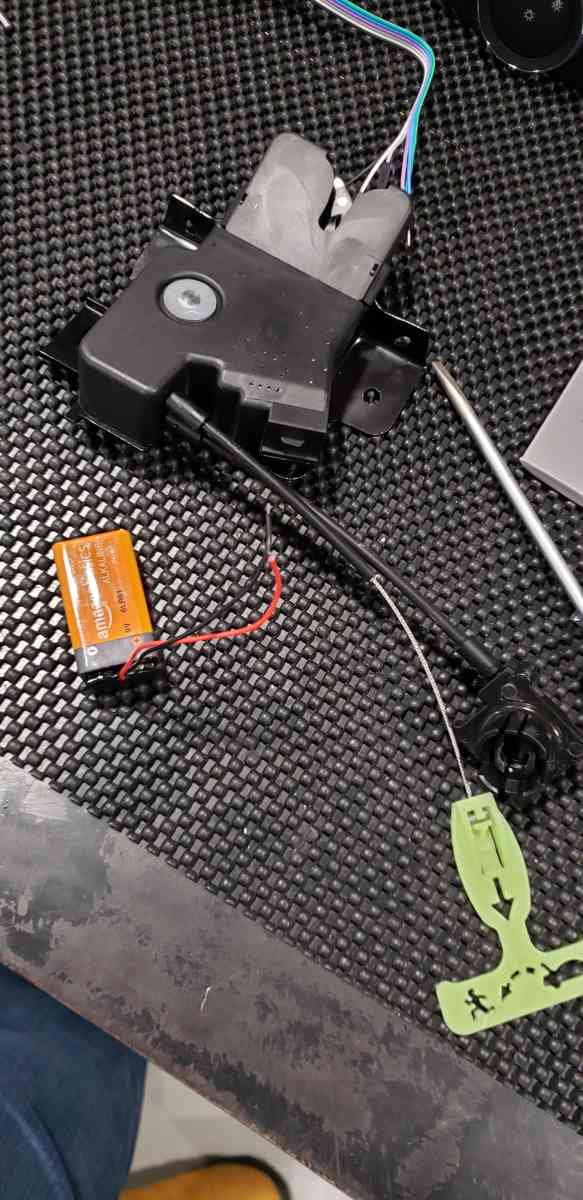
Ignition testing
With the dash layout coming together I also have started planning/testing some electrical. I'm going with a Digital Dawg PBS1 unit for the ignition. The first unit I got I could not get the keys to work. The unit worked fine with the push button over ride and was I unable to repair the keys while in maintenance mode. Brian over there called me after submitting a support request and he talked me through all the reprogramming steps just to be confident I was doing it properly. We still couldn't get the keys to pair so he hooked me up with an RMA for the device. They were very timely in getting the unit back to me and it worked as intended after. I wrote Brian to ask him what was wrong and he said they had to put a new receiver in the unit. Great product, great support and great experience. Highly recommend using their unit if you want to do push button start. I am trying to do a more factory looking theme so I switched out the button with a modern bronco button. All that's needed for the unit to function is a normally open momentary switch. The bronco button has 6 pins on it but only need 4 of them to work with the ignition... the 2 for the LED to light up and 2 that have continuity when pressing the button.

Recommendation for cheap items that have made this type of electrical testing much simpler. Alligator clips and a 9v battery clip connector. I'm not an electrical guru by any means. I know connecting things that were meant for a 12v dc circuit to the car battery wouldn't blow things up, but it still make me nervous sometimes. Previously in the thread you'll see I tested some pilot lights I ordered with a 9v battery. That was sort a "let's just try it" moment. I was pleasantly surprised when it worked! Since then I've used these little clips often for this type of testing.
Using the 9v clip connector to test the electric trunk latch. I did find a normally open set of terminals on the trunk latch that closes when the trunk is not latched. I think I can use that for the courtesy lights and possibly a trunk open warning light on the dash if I decide to go that direction. I may just run the wire for the dash light but not use it for now. I'd like not having to have one but if I find myself using the trunk more than I think I'll like having the option to easily add later.
I've found the pigtail for the headlight module but haven't really looked for the one that the ignition button or the trunk latch use yet but I came across this PDF doc that is useful when looking for pigtails when dealing with ford electrical devices.
https://www.fordservicecontent.com/p...torcatalog.pdf
MK4 #10255 project: "Mako"
Coyote Gen 3, TKX, IRS, Wilwood brakes, power steering
Order date: 6/24/21, Received date: 1/12/22, First Gocart date: TBD, Registration date: TBD
Build thread
-
First body fit test
Well it's been longer than a month since the last update. The cadence for updates is getting wider as the kids start soccer/tennis and the yard work is ramping up. Slow and steady is still the case for me.
After rearranging some things I got the quick jacks positioned under where I've had the body hanging from the ceiling for about a year now. It was easier to get back on then what I remember when taking it off initially. Just a little at a time and guiding each side a bit as things go.
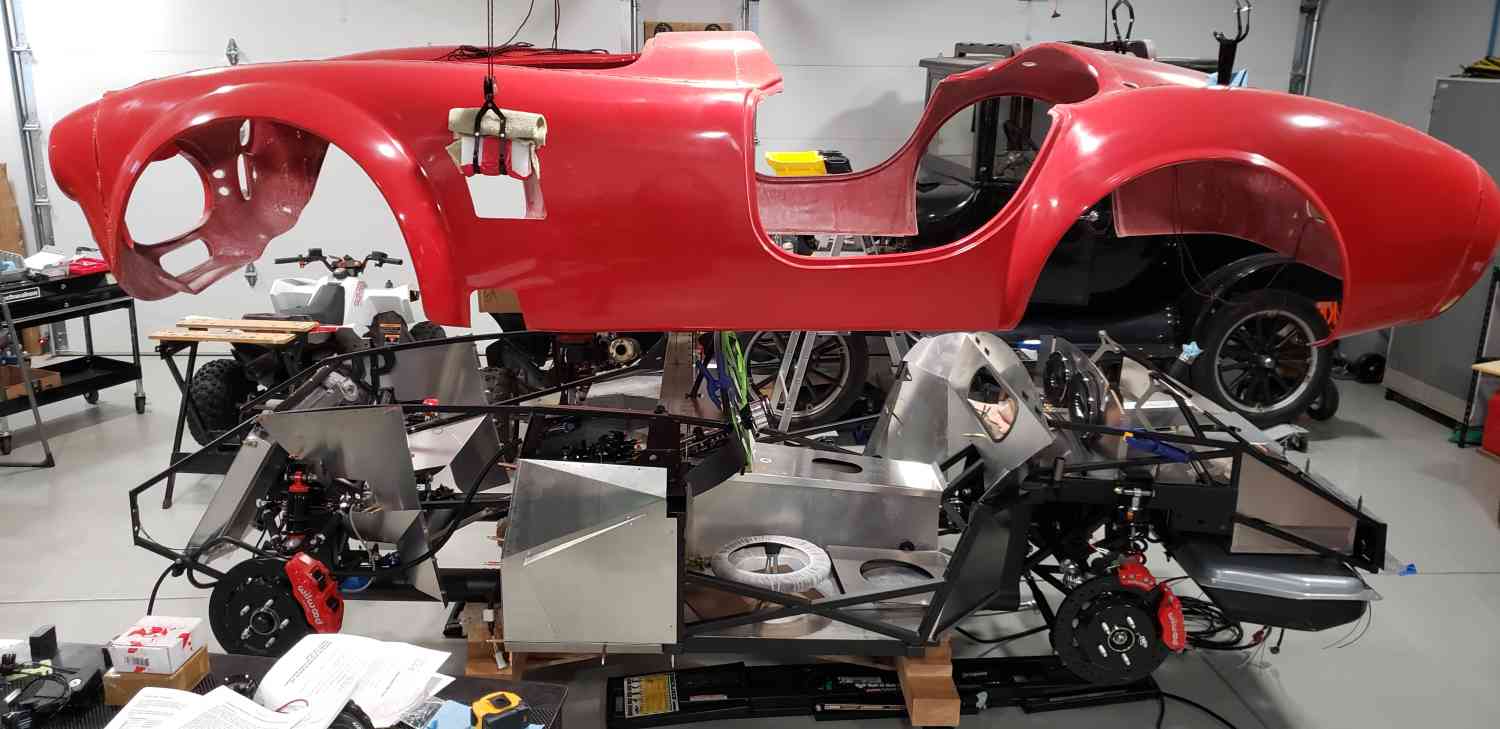

Drop the nose over the "outriggers" (I think that's what they are referred to) up front initially, spread the sides as the center comes down and get that trunk over the rear aluminum panels. After testing a large number of positional differences I ended up putting the dash in a temporary position to check gaps and compare the witness marks I made before putting the body on.

First time I used the glove box. I do have the replica parts under dash support holding that drill up in there.

A few areas that stuck out as needing strong persuasion for fitting... the left outrigger was wider than the right one, the lower trunk floor preventing body forward movement, and right side cockpit clearance(dash and striker bracket). I've read somewhere about people "adjusting" the outrigger positions with the BFH move and I'll likely attempt to get that left one about a half inch towards center doing that. I think that'll allow me to move the body to the right side a little to help fix the cockpit issue as well. The rear trunk floor I'm pretty confident I can take a half inch off. That's about the same distance difference between the lower body and bottom trunk lip when just temporarily held in place. Real scientific stuff here.
MK4 #10255 project: "Mako"
Coyote Gen 3, TKX, IRS, Wilwood brakes, power steering
Order date: 6/24/21, Received date: 1/12/22, First Gocart date: TBD, Registration date: TBD
Build thread
-
Post Thanks / Like - 0 Thanks, 1 Likes
-
Gauges in place
I had got my new gauges from speedhut a big ago but hadn't done anything with them till I had the body at least temporarily in place to verify spacing and such. I went with white backed main gauges and gray colored supplementals. I got the stealth black trim pieces as they said they were the most "matte" finish they had... but wish it was a bit more matte. The glare shines off the edges pretty good still. I'm hoping outside where there aren't so many light sources causing glare it'll be better. A few people have already asked me about the 120mph gauge. I felt I would hardly ever be going over that speed and I preferred the 60 at the 12 o'clock position in my peripheral.

A couple of new hole saws and some tense sessions with the drill press and we were there!

And with it put in place and from this angle you can pretty much get the driver's view.

Still some things to figure out... am I doing AC... will I put the controls on the dash... the headlight switch... the trunk release button... the parking brake switch... the seat heater switches... do i need more pilot lights... but I am happy with it so far.
MK4 #10255 project: "Mako"
Coyote Gen 3, TKX, IRS, Wilwood brakes, power steering
Order date: 6/24/21, Received date: 1/12/22, First Gocart date: TBD, Registration date: TBD
Build thread
-
Post Thanks / Like - 0 Thanks, 1 Likes
-
Senior Member

Looks good, I was also thinking of a modified 427 S/C layout, but I will be adding oil temp and ditching the clock, so will have 5 small and the 2 large.
-
Senior Member

Originally Posted by
topherchrisb
I had got my new gauges from speedhut a big ago but hadn't done anything with them till I had the body at least temporarily in place to verify spacing and such. I went with white backed main gauges and gray colored supplementals. I got the stealth black trim pieces as they said they were the most "matte" finish they had... but wish it was a bit more matte. The glare shines off the edges pretty good still. I'm hoping outside where there aren't so many light sources causing glare it'll be better. A few people have already asked me about the 120mph gauge. I felt I would hardly ever be going over that speed and I preferred the 60 at the 12 o'clock position in my peripheral.
A couple of new hole saws and some tense sessions with the drill press and we were there!
And with it put in place and from this angle you can pretty much get the driver's view.
Still some things to figure out... am I doing AC... will I put the controls on the dash... the headlight switch... the trunk release button... the parking brake switch... the seat heater switches... do i need more pilot lights... but I am happy with it so far.
This is pretty sweet in terms of layout. I really like the look. I assume you are going to put a head unit for music in the square about the transmission tunnel? Can't wait to see it on the road. There are actually about 10 of us or so in a 50 mile radius that are building or have built this beast.
Really admire your build so far.
-
Originally Posted by
danmas
This is pretty sweet in terms of layout. I really like the look. I assume you are going to put a head unit for music in the square about the transmission tunnel? Can't wait to see it on the road. There are actually about 10 of us or so in a 50 mile radius that are building or have built this beast.
Really admire your build so far.
It turned out better than I expected. Yeah I have a buddy from high school that has a fab shop in firestone. That was the template I gave him to fab me up a little thicker piece of metal than I could handle comfortably. I've been studying Andriod head units to put in there. I got a teyes cc2 plus already, but I may try to sell it and go with an atoto s8 ultra instead. They are much more capable than the big name brands... the only downfall so far is no HD radio I've been finding. Sounds like the licensing for that is a little complicated. Most units come with the ability to put a sim card directly in the unit. So they can reside on your cell service independently which is pretty neat. It'll mostly be used for navigation and a TPMS system outside of music. It'll give me some cool features in the future though if I get bored. Easy USB expand-ability and the Andriod app store allow you to do OBD2 apps and such.
I should have some free time this week to go pick it up the console from my buddy's shop. He's going to let me rummage through some scrap for some future mods. One of them being putting in some framing to hold 6.5" speakers high up in the foot wells. I think the amp I got will push 100w to each corner so hopefully that'll overcome the noise at speed but at minimum I'll have some low speed tunes. I have been watching your build thread as well. I'll reply in yours to keep the conversation targeted.
MK4 #10255 project: "Mako"
Coyote Gen 3, TKX, IRS, Wilwood brakes, power steering
Order date: 6/24/21, Received date: 1/12/22, First Gocart date: TBD, Registration date: TBD
Build thread
-
Build is looking great! Enjoy the process! I am in Firestone if you ever need an extra set of hands my MK4 is in go cart stage about to install the body.
John
-
Senior Member

Just noticed your build thread, and that I'm doing allot of the same crazy stuff you are. So, dumb question, but when wiring the digital ignition did you use both brown wires to the same acc lead? I'm at the overthinking all the electronics stage.
Thank you
-
Originally Posted by
JV1953
Build is looking great! Enjoy the process! I am in Firestone if you ever need an extra set of hands my MK4 is in go cart stage about to install the body.
John
I would love to see what you're doing some time. You could also come over and see how I slip the body on and off as I'm doing it about once a week right now in order to make adjustments. I'll send you a PM.
Originally Posted by
Tooth
Just noticed your build thread, and that I'm doing allot of the same crazy stuff you are. So, dumb question, but when wiring the digital ignition did you use both brown wires to the same acc lead? I'm at the overthinking all the electronics stage.
Thank you
I'm not sure it is a dumb question as I haven't done anything with the RF harness at all yet. I was barely even planning on where to place the ignition control box this morning even. I looked at the manual for the harness just briefly and I'm assuming you're talking about the two in the book marked brn-gauge feed/brn-radio power and brn-heater? I'm assuming I will hook both those up to the ACC 2 wire on the digital dawg controller at the moment. If I remember correctly that is the wire that is dead when the starter crank mode is on. But I'm shooting from the hip there a little. I bought a secondary mini fuse panel that's half always hot half ignition triggered for the trunk where I'm going to power my wilwood electric parking brake controller, trunk latch, trunk lights, and a phone charging station. I also have the IDIDIT dimmer relay set for the RT turn signal setup. I imagine I'll be breaking away from the book in a number of areas with all that stuff in use.
MK4 #10255 project: "Mako"
Coyote Gen 3, TKX, IRS, Wilwood brakes, power steering
Order date: 6/24/21, Received date: 1/12/22, First Gocart date: TBD, Registration date: TBD
Build thread
-
[QUOTE=topherchrisb;523876]I would love to see what you're doing some time. You could also come over and see how I slip the body on and off as I'm doing it about once a week right now in order to make adjustments. I'll send you a PM.
Great! Always good to bounce ideas! Cant wait to share mine build and see yours.
-
Senior Member
Originally Posted by
Tooth
Just noticed your build thread, and that I'm doing allot of the same crazy stuff you are. So, dumb question, but when wiring the digital ignition did you use both brown wires to the same acc lead? I'm at the overthinking all the electronics stage.
Thank you
Hi Tooth and Topher, I connected the BRN-ACC Feed wire (Brown) from the RF harness wire to the Accessory 2 wire (also brown) on the DGD. I used the ACCY 1 (Pink/Black wire) to run daytime running lights (LEDs).
Chris
Coupe complete kit delivered: 4/22/24.
Build Thread. Coyote. T-56. IRS w/3.55. Wilwoods. PS. HVAC. Side windows.
MK4 Complete kit.
Build Thread Index. Delivered: 10/15/2020. Legal: 7/25/23. Coyote Gen3. TKO600 (0.64 OD). IRS w/3.55. PS. Wilwoods. Sway bars. This build is dedicated to my son, Benjamin.
Build Thread.
-
Minor summer progress
Well... it's been a while. Summer was a pretty busy period for me this year. I haven't got to work on the car much at all. I'm hoping shorter days and no yard work after the raking leaves season is over will allow me more time in the shop. Let's get to it before I have to figure out the next thing the kids destroyed during their after dinner routine.
I did start stubbing out runs of electrical. Just temporarily putting in place the front and rear harness to get ideas of routing so I can thinking about adding additional wires into the existing looms or making new runs. Probably the most interesting thing I decided so far is to run a secondary bus bar and fuse block in the trunk. I'll be able to run a number of things off of this... seat heaters, electronic trunk latch, in trunk lighting, speaker amp, electric parking brake controller, usb ports, etc.

The next thing I did was getting the front speakers situated. I made some simple square brackets out of square tubing...
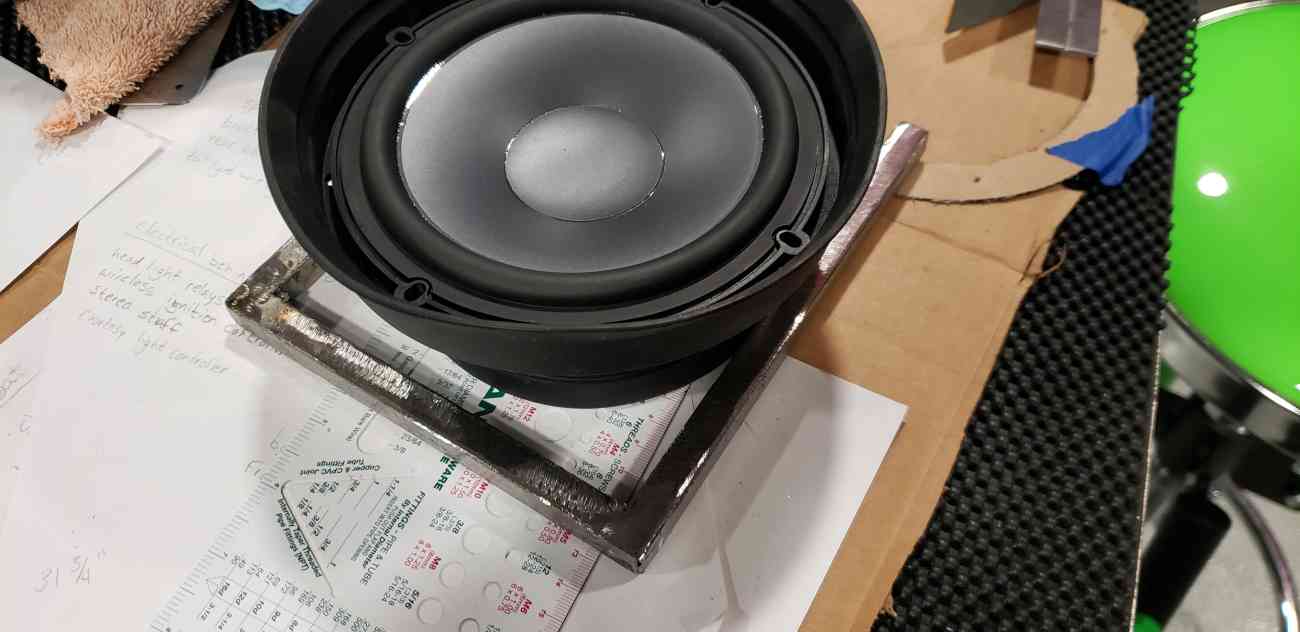
Welded the brackets onto the frame of the car. Made some ABS panels for a more finished look and added some rubber baffles. One in the top of the drivers foot box... (sorry this picture got a weird aspect ratio)

And this one in the passenger kick panel. You can also see in this picture I got the grab handle and the glove box installed... (Hard to see over on the right with the black on black on black)
In this picture you can see what I did with the tweeter portions of the front components there in the under dash console. You can also see grab handle bracing. Those are just magnets holding it in place. The way I cut holes in the under dash panel I need to have it in place permanently before I set it as I want to weld it in place instead of bolting it in there. I did make sure I made those cut outs in a way I could easily unscrew the grab handle when I do need to get the dash off.

Right now I'm tackling the front brake hard lines. Hopefully I'll have an update on those sooner than six months from now.
MK4 #10255 project: "Mako"
Coyote Gen 3, TKX, IRS, Wilwood brakes, power steering
Order date: 6/24/21, Received date: 1/12/22, First Gocart date: TBD, Registration date: TBD
Build thread
-
Post Thanks / Like - 0 Thanks, 2 Likes
-
25th Anniversary #9772

pretty innovative setup you've got going there!!
-
Originally Posted by
toadster
pretty innovative setup you've got going there!!
Thanks. I get inspiration from so many sources on this forum. Your site is definitely one of them. I've read and re-read your sections on AC a number of times lately. I have reduced the number of complications on my build due to how little time I've had to work on the car... but a soft top and AC is still on the list! Just haven't felt great about any designs I've come up with for evaporator and controls yet. That's why you see the place holder button templates on the bottom lip of the dash still there.
MK4 #10255 project: "Mako"
Coyote Gen 3, TKX, IRS, Wilwood brakes, power steering
Order date: 6/24/21, Received date: 1/12/22, First Gocart date: TBD, Registration date: TBD
Build thread
-
Gauge fun!
I was testing some electrical stuff to verify function and ideas. I got distracted for a bit and decided to test the lighting on one of the gauges. I don't know why I hadn't done that yet after having them for quite some time. Pictures are that awkward shape again.
Testing the easiest first... volts man!

Let's see the speedo at work! I plugged in the GPS antenna just to get rid of the "acquiring" text for the photo.

All together now!
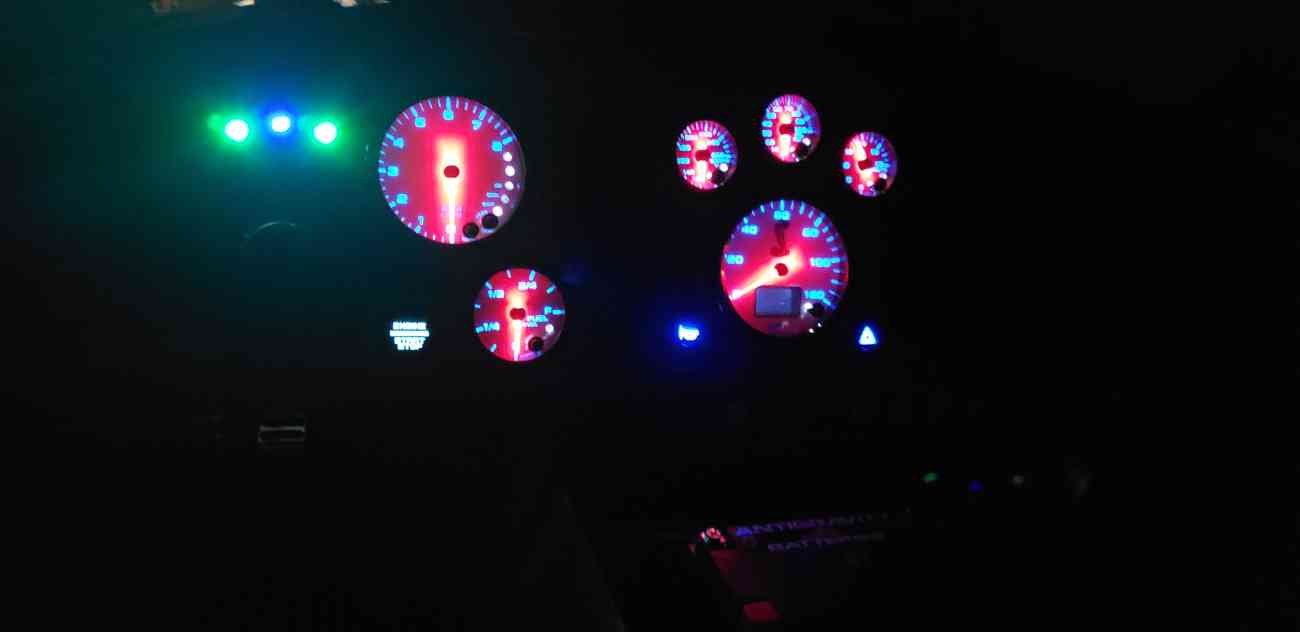
Things I learned from the test. The needles and the pilot lights are bright!!! I got on speedhut's site after the test to order the dimmer for their LED gauges to see if I can take some of that intensity out of it. I thought maybe I could take the needles off and put a little black paint on the back to reduce the bleeding glow effect. But after getting the gauge apart I didn't feel comfortable trying to pry the needle off. Hindsight I'd probably order needles in the darker red and without the tails on them. I like the way the brighter red looks during the day more though... and would bet I'll be driving during the day more anyway. I might buy some small resistors to see about dimming down the pilot lights as well.
While I had them in there I calibrated the fuel gauge to the sending unit as well.
MK4 #10255 project: "Mako"
Coyote Gen 3, TKX, IRS, Wilwood brakes, power steering
Order date: 6/24/21, Received date: 1/12/22, First Gocart date: TBD, Registration date: TBD
Build thread
-
Battery bracket
This one took me a bit to be happy with. I ended up using the breeze front battery shelf but knew I wanted to use a more modern smaller lithium battery. I went with an Antigravity ATX-20-HD with 900ca. It was popular on the mustang forum I'd frequent when I was shopping for one of the new GT350s before I ordered the cobra. That left a lot of room to take up in the battery box. I tried making my own hardware and adapting existing sets to form but wasn't really happy with anything I came up with. So I broke down and bought one for the specific application. It was a LOT more than I thought it would be but I am very happy with the result. It's the MMR S550 billet tray. Very nice piece. I just drilled a few holes in the bottom of the breeze tray and attached this one using some tapered screws for countersinking under the battery. And you get a little peak to some of my brake hard line in the picture too.

MK4 #10255 project: "Mako"
Coyote Gen 3, TKX, IRS, Wilwood brakes, power steering
Order date: 6/24/21, Received date: 1/12/22, First Gocart date: TBD, Registration date: TBD
Build thread
-
Behind the Dash
Well clearly I've had more time to work on the car in the last week in a long time. It feels good!
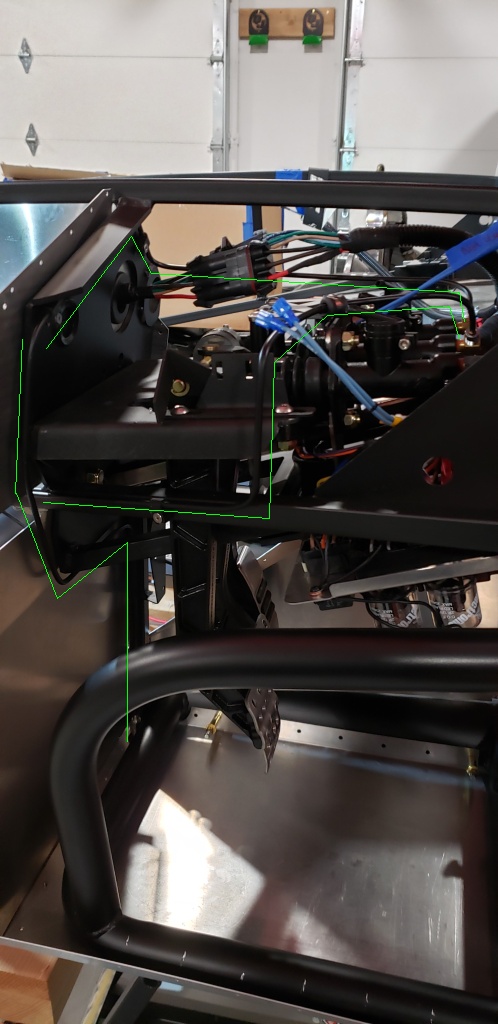
This is something I've thought about doing for a while. I have to admit it's another thing I evolved from someone else's idea. A while back I went over to a fellow builders house to help him drop his body on for the first time. When looking behind his dash I saw he had built some hardware standing off from the firewall for mounting components behind the dash without having rivnuts sticking out in the engine bay. I knew immediately that would be handy for what I'm doing. Instead of making custom bracketry though... I used a whole firewall! I am using the FFMetal forward firewall piece. That afforded me the whole firewall that came in the kit as a false back behind the dash. A couple tweaks and now I have a whole wall to mount all my controllers I need to put in for the electronics. So far it's the ididit headlight relays, a button controller, the trailer brake adapter and the wireless ignition. There is about a half inch gap on the back between the two firewalls to run wires too but I don't have any decent shots of that yet. One example being I put a grommet in by the ignition controller and ran the wire harness for the ignition in the gap coming out down by the steering column to plug straight into the button.
Controllers... they're everywhere.

The mess is just for testing... it'll get cleaned up as I finalize locations.

MK4 #10255 project: "Mako"
Coyote Gen 3, TKX, IRS, Wilwood brakes, power steering
Order date: 6/24/21, Received date: 1/12/22, First Gocart date: TBD, Registration date: TBD
Build thread
-
25th Anniversary #9772
the false wall is a great idea to mount your electronics behind the dash - did the same in my car, removes the extra rivets, screws, etc from coming out on the firewall
build is looking great!!!
-
Wheel Saga
Well I have made some good progress on the electrical stuff... but still do have a lot to do, so I'm going to have to give an update on that later. This update will be about the brake lines and how I've run them. I have a bit of ADD when it comes to this project and I'll just randomly start working on some other portion of it with the realization I forgot what was was trying to accomplish with my previous task. Not as efficient but the tasks end up having more thought and perspective into them when I get back to them. Hopefully allowing something to be more robust or serviceable when I change my mind or do something a second/third time.
Oh speaking of ADD let's do a quick update on wheels before we get to the brakes. I had been trying to get a hold of Forgestar for a while to order some F14s... and when I say a while I mean a LONG while. I think my first attempt at contact was in April and I tried a few more times after that both using their support forms and just email. I usually try to do that type of stuff when I'm on a meeting for work and don't end up calling. That was my down fall. I was originally going to order the satin black but really like the way Junbug's looked in satin bronze when he posted. I wasn't hearing back from my inquiries so I DM'd Junbug to get hopefully get a contact he had worked with to get his order placed. He was awesome and responded quickly and now I had a Forgestar employees direct contact info. Well after emailing that contact I didn't get a reply neither. After about another month went by I finally decided to call and got Tim on the phone. I explained to him I had been writing emails and not getting any replies and he was perplexed as well. He ended up checking his spam mail and coincidentally he found my messages in his spam box. After he did a bit of research he determined since I was attaching the link to the FFR 18" wheel sales page (to show target sizes) it was being flagged as spam. Darn it... just need to pick up the phone sometimes.
Tim has been a pleasure to deal with. Keyword HAS and not WAS. I'm still going through this saga a bit as you can see what happened with my first order in the picture below. Two different finishes! After some back and forth I decided to order a second set at a discount so I could have one set for strict summer tires and a second all weather set for the sunny CO days in spring/fall(maybe even winter) to get more driving days in. I haven't thanked Junbug yet for trying to help me out as I wanted to get through the whole ordeal so I could give him the whole story at once, but if you're reading this thanks man.

Fitment pictures:


Last edited by topherchrisb; 01-26-2024 at 12:53 PM.
MK4 #10255 project: "Mako"
Coyote Gen 3, TKX, IRS, Wilwood brakes, power steering
Order date: 6/24/21, Received date: 1/12/22, First Gocart date: TBD, Registration date: TBD
Build thread
-
Post Thanks / Like - 1 Thanks, 1 Likes
-
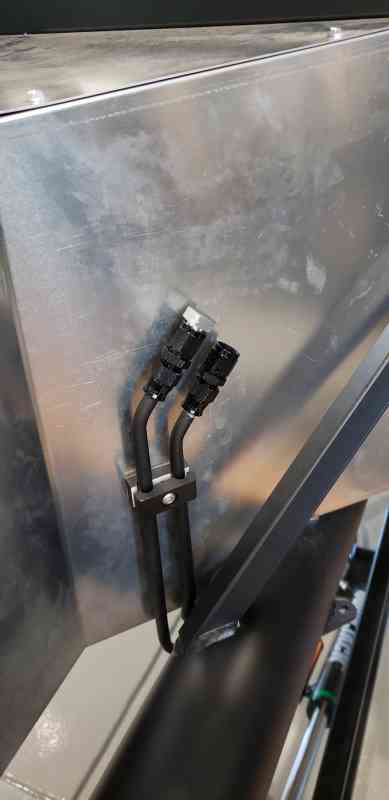
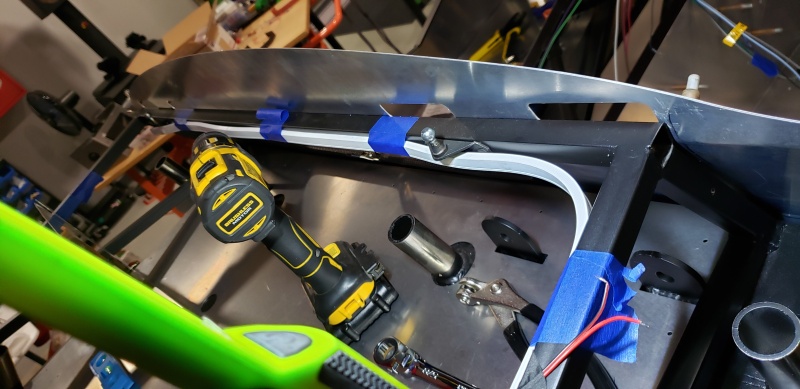
Brake Lines
OK so now we're getting to what I intended to write about in the last post. BRAKE LINES!
There is nothing earth shattering here. For the front traversal between the two calipers I went with the route Frank (I think that's his name) from the ie427 you tube channel recommends. I watch all his videos about the cobra builds he does and you can pick up a lot of good info from them. Especially for me lately cause his last couple have been coyote builds. I try to watch all the people documenting builds on you tube. Tons of things to pick up in them. Maybe I'll start a thread on the main forum to aggregate all the channels out there. I'm sure I'm missing a bunch but some of the others I check out are Dan's Garage, Amateur Hour Garage, Random Werks, and Cars are People Too just off the top of my head. That dang ADD thing again... back to the topic on hand. I coated everything in a black rubberized paint so it's hard to see the routes as they are blending into the frame in the pictures. I followed them with some green digital lines so they are easier to pickup on visually.
Front Traversal:

On the split for the driver's side caliper I wanted to keep everything as tucked to the side as possible. So probably a little different than most but it seams to fit pretty well. I use some simple aluminum 3/16 clamps I got off amazon to hold everything down. Also painted them black so they are hard to see as well.

Foot box entry:

Foot box routes:
For the run under the driver's floor pan I did add some of the spring wrap guard just for the heck of it. It's tucked up there tight enough I'm not sure it'd help anything but it's cheap insurance.

Last edited by topherchrisb; 01-26-2024 at 06:23 PM.
MK4 #10255 project: "Mako"
Coyote Gen 3, TKX, IRS, Wilwood brakes, power steering
Order date: 6/24/21, Received date: 1/12/22, First Gocart date: TBD, Registration date: TBD
Build thread
-
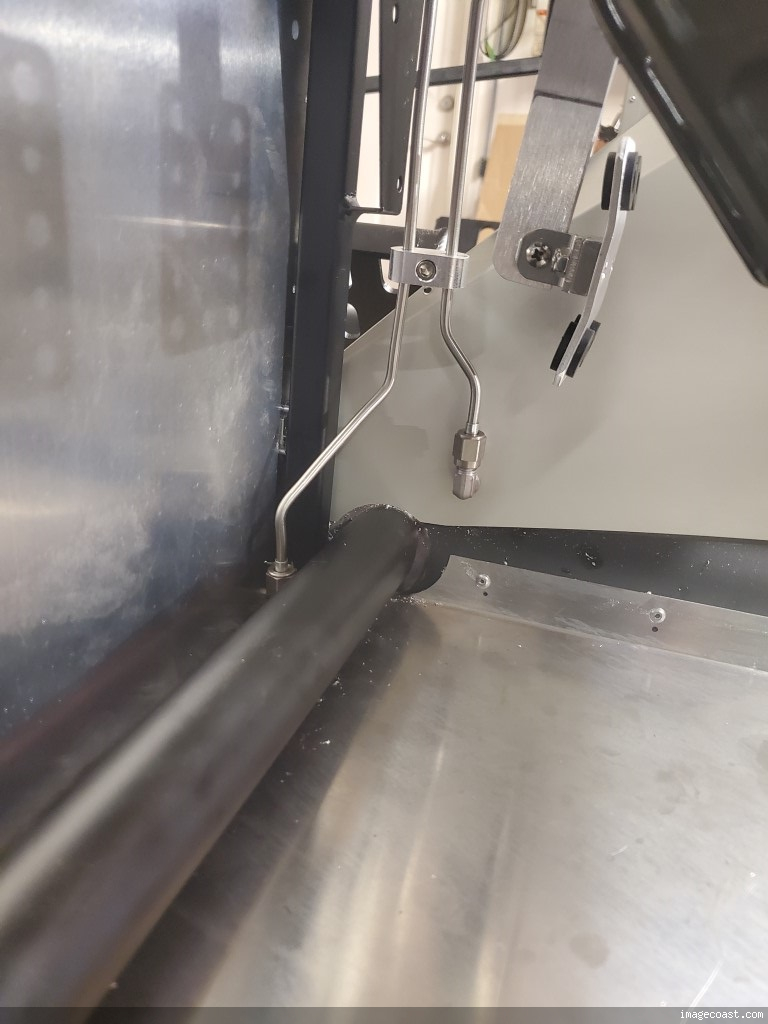
Brake Lines again
There is a max picture count per post so had to split it up...
Up the rear of the cockpit:

Rear split:

On the rear brackets I did something a little different than most probably. I used the brackets we get in the kit but adding 90 degree bulkheads to allow the line a more natural position/flex. The bulkheads are much smaller than the standard couplers but I added rubber grommets for them to pinch on instead. Not sure it it helps with anything vibration wise but it worked and they'll be easy enough to replace if I see them wearing funny over time.

Pass soft line:

MK4 #10255 project: "Mako"
Coyote Gen 3, TKX, IRS, Wilwood brakes, power steering
Order date: 6/24/21, Received date: 1/12/22, First Gocart date: TBD, Registration date: TBD
Build thread
-
Senior Member
You've got a great build going. You went for a totally different look than I did, and you're carrying it out really well. Part of the fun of reading build threads is seeing how many different kinds of delicious are out there, and watching the builder's vision take shape. Along those lines - dash is going to look great. Thanks for sharing.
MK4 #7838: IRS 3.55 TrueTrac T5z Dart 347
The drawing is from ~7th grade, mid-1970s
Meandering, leisurely build thread is
here
-
Senior Member

***Nevermind***...I see you did get Mark's return kit, and have the hanger return blocked off.
Great looking build! I have a question for you...your fuel pump hanger...is that the kit-supplied piece, or the Pro-M Race hanger? If it's the kit-supplied, that return line inlet is 1/4", and will cause cavitation. And if both your feed and return lines are 3/8", it's a choke point. Can't tell from the pics.
Last edited by gbranham; 01-26-2024 at 01:56 PM.
Built an early MkIII years ago, sold years ago.
Got Corvettes out of my system, and now back after 18 years to build a MkIV.
MkIV Complete Kit Ordered 4/18/23, Delivered 7/11/23, 427 Stroker, Holley Sniper 2, Hyperspark, TKX, IRS, Wilwood Big Brakes
Here to learn, contribute, and have fun!
-
Originally Posted by
gbranham
***Nevermind***...I see you did get Mark's return kit, and have the hanger return blocked off.
Great looking build! I have a question for you...your fuel pump hanger...is that the kit-supplied piece, or the Pro-M Race hanger? If it's the kit-supplied, that return line inlet is 1/4", and will cause cavitation. And if both your feed and return lines are 3/8", it's a choke point. Can't tell from the pics.
You are correct that I have the breeze fuel pump kit and return. I just scrolled up to look... and at the angle I took the picture it's hard to tell the return line is separate from the hanger and directly behind the return line visually.
I don't know why I never posted this picture but I already had it uploaded to my album...

MK4 #10255 project: "Mako"
Coyote Gen 3, TKX, IRS, Wilwood brakes, power steering
Order date: 6/24/21, Received date: 1/12/22, First Gocart date: TBD, Registration date: TBD
Build thread
-
Senior Member
Originally Posted by
topherchrisb
On the rear brackets I did something a little different than most probably. I used the brackets we get in the kit but adding 90 degree bulkheads to allow the line a more natural position/flex. The bulkheads are much smaller than the standard couplers but I added rubber grommets for them to pinch on instead. Not sure it it helps with anything vibration wise but it worked and they'll be easy enough to replace if I see them wearing funny over time.
Pass soft line:
Installing bulkhead fittings in rubber grommets for the transition from hard lines to flex lines makes me all kinds of nervous. The flex line is in constant motion when driving and when the grommet fails the stress from flexing will be transferred directly to the hard line. In time the hard line will probably see a fatigue failure. If I was a safety inspector I would fail the car based on those connections.
Get some aluminum angle and make a bracket to fit the bulkhead fitting proper so you have a good ridgid connection.
Mike
-
Post Thanks / Like - 0 Thanks, 1 Likes
 BRRT
BRRT liked this post
-
3rd Brake light testing
I was going to hold off on updating till I had more of the wiring complete... but I realized it'll take me a bit to have that check box marked. So I'm going to do some incremental updates here before the picture is complete.
One thing I wanted to do is add a 3rd brake light/reverse light combo. I want to do as little work as possible with this so I looked for something that exists for more modern cars already with the plan to adapt it. The light pictured below has the perfect functionality/brightness and ease of use combination... but it's LARGE. It's an over cab light for a GM pickup if I remember correctly. The bed light works just fine for a reverse light... and the brake light has a switch to enable the racing brake like blinking functionality. Just not sure it'll look decent at all. Going with a blacked out theme it'll stand out less... and tucking it up under the curve of the trunk makes it less visible from up close but this will continue to be a work in progress. I might be able to take the electronics out of it and adapt them to another light that is more aesthetically pleasing if I find something.
It's BIG:

Reverse:

Brake:

MK4 #10255 project: "Mako"
Coyote Gen 3, TKX, IRS, Wilwood brakes, power steering
Order date: 6/24/21, Received date: 1/12/22, First Gocart date: TBD, Registration date: TBD
Build thread
-
Dash wiring start
I did also start to clean up the dash wiring. I did put in the ebrake switch and the seat heater switches since the last update but you can only see them from the back here in the dropped down part of the dash. Right now I'm trying to finish more of the logistics on the wiring going to the controllers mounted to the firewall before finalizing the guage dimmer and feeds and looming everything else.

I did a number of tests with the lights, switches, and gauge functionality before putting the terminators and wraps in. Try to minimize the rework as much as possible. Bench testing brakes, blinkers, hazards as well as getting familiar with the wiper motor wiring.

Last edited by topherchrisb; 02-11-2024 at 12:54 PM.
MK4 #10255 project: "Mako"
Coyote Gen 3, TKX, IRS, Wilwood brakes, power steering
Order date: 6/24/21, Received date: 1/12/22, First Gocart date: TBD, Registration date: TBD
Build thread
-
More light testing
This was a bit rewarding but still not a finalized situation... testing the front lights I picked out to replace the ones that come in the kit. For a more modern look I decided to try some halo themed lights up front. I happened to also find some halo style blinker lights I'm pretty sure I can adapt into the stock trim rings. There are a number of ways to set them up as both headlights and blinkers have halos, running light and blinker functionality. One weird thing I haven't had time to do research on yet is having both blinkers on the same circuit does not yield the same blinking rhythm. There must be some type of smarts in the headlights allowing for it's own control of the blinker timing. So I'll likely not use the blinkers in the headlights if I can't figure that out. Lights are attached to my temporary wooden bumper. I know the headlight is upside down but it was easier to temp attach to the bumper in this orientation for now.
Both running lights on:
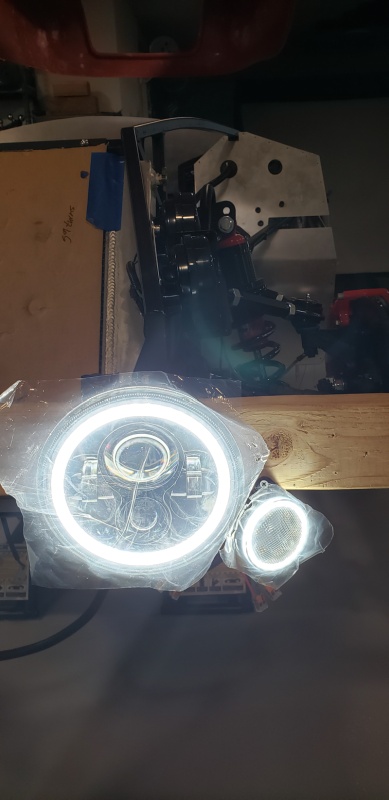
Both blinkers on:

Headlight on:

Also starting to play with some courtesy light options. Think I'm going with a blue color for sure but trying to figure out how much to use at the moment. Here is my test of the cubby lit up. I'm using those flexible LED strips with the soft silicone diffuser used to make fancy curved patterns on walls.
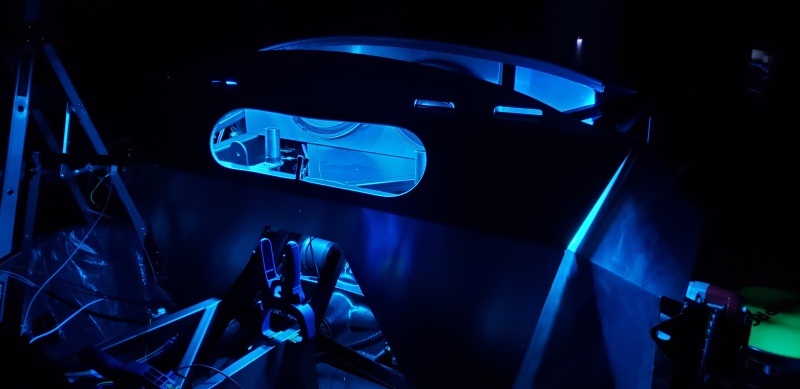
Lights with temp tape mounting:
Last edited by topherchrisb; 02-12-2024 at 10:12 AM.
MK4 #10255 project: "Mako"
Coyote Gen 3, TKX, IRS, Wilwood brakes, power steering
Order date: 6/24/21, Received date: 1/12/22, First Gocart date: TBD, Registration date: TBD
Build thread


 Thanks:
  Likes:


 Reply With Quote