Ok gents, kit's ordered, completion date in September.
Full kit.
Sourced a Gen III Coyote from Mike Forte (what a character and he deserves all the accolades I see on here), fully trimmed with the TKX transmission.
Went with the power steering, Mike setting up the pump for me, FF kit for the rest.
Also opted for IRS, gist from the folks here is it's a little more money, not much more difficulty in setting up, and it's one of those things that you'll wish you did if you didn't.
Everything else basically sourced from FF: wheels, tires (went with the 17), in tank fuel etc.
My personal flourish (I hope) is to finish the dash and maybe some of the interior with wood veneer, kind of give it a nautical look, or a classic looking British roaster. Any advice folks have on using wood, I'll take it.
I'm in PA and looking at the vehicle inspection requirements, I believe I'll need windshield wipers (which I got from FF) and side pipe heat shields (I found some on Finish Line accessories). From the inspection guide, it looks like I don't need self-cancelling turn signals, but I feel like I saw someone saying you did in PA.
I found In Tune Autoworks in Harrisburg that seems to work with Mustangs (they look like they are next door to CJ's Pony Parts, who also sells aftermarket Mustang parts), I haven't called to find out, but I'm hoping they can tune my Coyote for me.
Also, my garage is small, it barely fits two cars. I've got the body buck built and on stilts to put stuff underneath so I think I'll make it. But any advice folks have on working on one of these in tight spaces, I'll take it.
Any case, I'm looking forward to posting on here and I'll be in touch
Last edited by nashuanuke; 07-03-2023 at 01:28 PM.
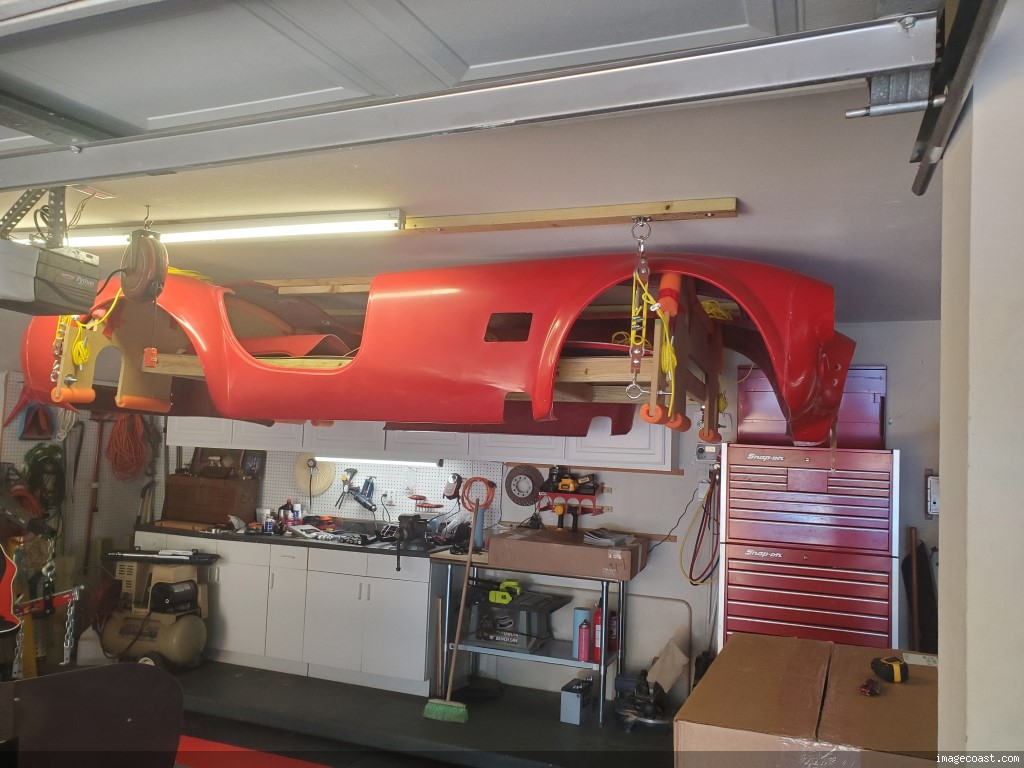
Congrats on the kit order! Welcome to the madness. Just a suggestions for the body - if you don't plan to need it frequently during the build (and you likely won't until you are ready to start doing body fitment), the thought of having to roll the body buck out of the way every time I wanted to quickly work on the car didn't appeal to me. I saw some folks hoisted the body to the garage ceiling to get it out of the way. So I did the same. For less than $20 you can get some cheap bicycle hoists on Amazon and just lift the body up. Then lower it when you are ready for it. Of course this assumes your ceiling is tall enough to put the body above 6.5 ft or so. I'm working in a 2.5 car garage, and my wife parks her car on one side, so I have 1.5 car width for my build/tools. I did add the plywood cutouts for the front & rear (not shown in the pics) because I was worried about warping the body, so now it is fully supported but still hanging from the ceiling. Here are some pics:
Darryl [dbo_texas]
MKIV #9644 (build thread) (Index)
MK4 Complete Kit | Gen2 crate Coyote | Tremec T56, 3.55 IRS | power steering | hydroboost | dual roll bars | FFR carbon fiber dash | 18" Halibrands + Wilwoods | RT drop trunk kit & turn signal | front battery mount | saddle leather Intatrim Stoneleigh seats + interior accents
Congrats on the kit order! Welcome to the madness. Just a suggestions for the body - if you don't plan to need it frequently during the build (and you likely won't until you are ready to start doing body fitment), the thought of having to roll the body buck out of the way every time I wanted to quickly work on the car didn't appeal to me. I saw some folks hoisted the body to the garage ceiling to get it out of the way. So I did the same. For less than $20 you can get some cheap bicycle hoists on Amazon and just lift the body up. Then lower it when you are ready for it. Of course this assumes your ceiling is tall enough to put the body above 6.5 ft or so. I'm working in a 2.5 car garage, and my wife parks her car on one side, so I have 1.5 car width for my build/tools. I did add the plywood cutouts for the front & rear (not shown in the pics) because I was worried about warping the body, so now it is fully supported but still hanging from the ceiling. Here are some pics:
Thanks Darryl, I've seen that and will keep it in my back pocket.
I hoisted mine up to the ceiling and could walk under it. If I did it again I probably wouldn't do a full on buck, it weighed more than the body. I would just use my 4 hoists and hook them to the wheel openings.
Welcome aboard! I think you're in for a great adventure and a lot of fun. I also have a Gen 3 Coyote and TKO from Forte.
Times 3 on the ceiling storage. I know it's not for everyone, as each situation is unique. But it worked great for me. I did not build or use a body buck, and had it suspended ~15 months. It also allows me to put the body on/off by myself.
September will be here before you know it.
Chris Coupe complete kit delivered: 4/22/24. Build Thread. Coyote. T-56. IRS w/3.55. Wilwoods. PS. HVAC. Side windows. MK4 Complete kit. Build Thread Index. Delivered: 10/15/2020. Legal: 7/25/23. Coyote Gen3. TKO600 (0.64 OD). IRS w/3.55. PS. Wilwoods. Sway bars. This build is dedicated to my son, Benjamin. Build Thread.
Update: Coyote is here. Mike Forte was great at getting the thing all the way to a shipping terminal just a couple of miles away. I've planned a lot of aspects of this build to the minute detail but hadn't quite figured out how to get the engine from the warehouse to my garage. I rented a trailer, the warehouse loaded it. Then it sat in my driveway while I realized I had no way to get it off the trailer. Finally got an engine hoist, broke down the crate in the trailer, lifted it out, and got it into the garage. So for other folks in the future, there's your plan, trailer and hoist, oh, and each was like $25 to rent for the day, so not too bad.
Last note, I made through the whole ordeal without hurting myself until I was breaking down the hoist to return it and dropped one of its legs on my toe. I recommend safety toes if you're doing anything that involves heavy stuff.
Congrats! Consider buying a cherry picker; you'll need it again. And they don't take up too much room when broken down. Savor your build!
Built an early MkIII years ago, sold years ago.
Got Corvettes out of my system, and now back after 18 years to build a MkIV.
MkIV Complete Kit Ordered 4/18/23, Delivered 7/11/23, 427 Stroker, Holley Sniper 2, Hyperspark, TKX, IRS, Wilwood Big Brakes
Here to learn, contribute, and have fun!
Update: Coyote is here. Mike Forte was great at getting the thing all the way to a shipping terminal just a couple of miles away. I've planned a lot of aspects of this build to the minute detail but hadn't quite figured out how to get the engine from the warehouse to my garage. I rented a trailer, the warehouse loaded it. Then it sat in my driveway while I realized I had no way to get it off the trailer. Finally got an engine hoist, broke down the crate in the trailer, lifted it out, and got it into the garage. So for other folks in the future, there's your plan, trailer and hoist, oh, and each was like $25 to rent for the day, so not too bad.
Last note, I made through the whole ordeal without hurting myself until I was breaking down the hoist to return it and dropped one of its legs on my toe. I recommend safety toes if you're doing anything that involves heavy stuff.
Ha, reminds me of this one time I bought a grill from Lowes and couldn't fit it in my 2d accord that I drove there in. Ended up unboxing the grill outside the store and putting the large shell of the grill in the front w/ the seat reclined all the way back.
Originally Posted by gbranham
Congrats! Consider buying a cherry picker; you'll need it again. And they don't take up too much room when broken down. Savor your build!
Get a 2T harbor freight hoist. 1T doesn't have enough reach to easily get the motor in from the front. ask me know I know.
My neighborhood is too tight to fit the Stewart 18 wheeler, so I'm meeting them close by with a trailer. I'm renting the trailer and am planning to drop the frame directly onto it for the short trip home. I built a wooden dolly with some hefty wheels to get it from the trailer into the garage. Does anyone have any other advice? How hard will it be to get the frame lifted onto the dolly without the Stewart winch? Can i do it with just a jack and some jack stands?
you'd be surprised at how relatively light the frame is without all the stuff attached yet. I bet you can just lift it from 4 corners w/ the help of 3 others.
you'd be surprised at how relatively light the frame is without all the stuff attached yet. I bet you can just lift it from 4 corners w/ the help of 3 others.
This is what I was thinking, but thought I'd ask. Thanks!
Build school out of the way. Great experience. If anything, it made me realize I've prepared well for this. My trick that I think will work well: I have Microsoft OneNote on my phone. Anytime they gave a trick or tip not in the instruction manual, I snapped a photo and put it with tip into OneNote. Once I got home, it was all waiting for me on my laptop.
Stewart called, car shows up Thursday or Friday. My neighborhood streets are too narrow, so I'm meeting the truck nearby. I'm renting a trailer and built a dolly with some pretty hefty casters. I'm hoping to drop the car right on the dolly and secure it to the trailer for the mile drive to my garage. Depending on the size of the trailer, I'm fairly certain I'll have to make two trips to get all the boxes back.
Alright, car's finally here. I do not suggest using a john boat trailer if you're driving more than a half a mile, but for me, it worked out perfectly. Got the body on the buck, I stuck to the plans FF provides to a certain degree, but made a couple of audibles based on scrap wood I had around and wanting to prop it up higher. The one thing I didn't anticipate is that the supports on the side need to be in deeper so they don't interfere with the side of the body. Some quick carpentry and I solved that issue. Now on to removing the panels and getting it onto the dolly to start work. cobra trailer.jpg
Last edited by nashuanuke; 10-12-2023 at 07:59 PM.
I did the exact same thing with the side supports. Hah! Had to make some quick adjustments.
Built an early MkIII years ago, sold years ago.
Got Corvettes out of my system, and now back after 18 years to build a MkIV.
MkIV Complete Kit Ordered 4/18/23, Delivered 7/11/23, 427 Stroker, Holley Sniper 2, Hyperspark, TKX, IRS, Wilwood Big Brakes
Here to learn, contribute, and have fun!
one funny anecdote, I have already experienced the pointing and staring, just driving the kit through my neighborhood guys were stopping what they were doing to watch me pull it by on a trailer.
ok, question, what do I do with these nuts? Couldn't find anything in the manual and I don't feel right just torquing them to the spec in the back. Right now I've just got them snug.
ok, question, what do I do with these nuts? Couldn't find anything in the manual and I don't feel right just torquing them to the spec in the back. Right now I've just got them snug.
yup. tight enough for the arm to move but not fall on it's own. too tight and you'll crush the nylon washers and the grooves in them that help disperse grease.
1. needed a bigger torque wrench (150 ft-lbs), also, Harbor Freight's torque wrench doesn't seem to work at all.
2. the hub nuts call for 250 ft-lbs, recommendation from the build school is torque them as high as you can go, then just ask the shop to do it for you when you take it in for alignment. I loosely attached the dust covers for now.
3. needed a 12-point socket for the brake cylinder bolts
4. I spent a lot of time making sure the upper control arms were properly aligned on the bench, only to have to loosen everything to get the spindle attached.
5. I think the steering arms are on right, I guess I'll find out shortly. IMG_1262.jpg IMG_1263.jpg
edit: not sure why the pics keep uploading rotated, I'll work on that
Last edited by nashuanuke; 10-23-2023 at 06:58 AM.
I'm sinking those rear wheel studs now using an impact driver and a lug nut and washer per the instructions. It's working...but I'm destroying the washer in the process, replacing the washer isn't hard, I'm just concerned about damaging something else. And it's slow going. I get one or two done and the battery on the impact driver is dead.
I'm finding it interesting that the instructions tell me to torque the bolts to 100 ft lbs, as if I'm using everything I've got just to get them into the hub
edit: and I cross threaded one, figures
Last edited by nashuanuke; 10-24-2023 at 12:18 PM.
1. needed a bigger torque wrench (150 ft-lbs), also, Harbor Freight's torque wrench doesn't seem to work at all.
2. the hub nuts call for 250 ft-lbs, recommendation from the build school is torque them as high as you can go, then just ask the shop to do it for you when you take it in for alignment. I loosely attached the dust covers for now.
3. needed a 12-point socket for the brake cylinder bolts
4. I spent a lot of time making sure the upper control arms were properly aligned on the bench, only to have to loosen everything to get the spindle attached.
5. I think the steering arms are on right, I guess I'll find out shortly. IMG_1262.jpg IMG_1263.jpg
edit: not sure why the pics keep uploading rotated, I'll work on that
Many builders have the upper ball joint grease boots split. The easy fix is the Energy Suspension boots. Replace the uppers, usually the lowers are fine.
Many builders have the upper ball joint grease boots split. The easy fix is the Energy Suspension boots. Replace the uppers, usually the lowers are fine.
Alright, I got replacement studs since I stripped one of the ones that came with the kit. These seemed to match the measurements. And I have to say, it went in much easier than the kit ones. Doesn't seem to want to come out. Anyone know if these are good? studs.jpg
Edit: Well in any case, all are installed, two of them are from this batch, the rest from the replacements FFR supplied. Hopefully my rear wheel doesn't fly off.
Last edited by nashuanuke; 10-27-2023 at 02:23 PM.
delayed getting the rear in, was missing the two long bolts for attaching the rear differential. But the folks at FFR are very reasonable when it comes to little things, in the mail now.
started on footbox, I'm finding the dispersion of fasteners a little annoying, some are with the components in their box, others are with the other fasteners. For example, one of the 1/4 bolts for the lower mount was in the box, the other I had to get from the fasteners, along with the washers and nuts. In any case, got it all in then moved on to the brake cylinders. Lesson learned, don't torque these 90 degree connections too hard, and Summit has spares they'll sell you for about $5. IMG_1290 (002).jpg
delayed getting the rear in, was missing the two long bolts for attaching the rear differential. But the folks at FFR are very reasonable when it comes to little things, in the mail now.
bolts came, thanks the folks at FFR. And rear dfferential's in, along with the upper and lower control arms (those are big, and have a tight clearance, I ended up having to file one of the bushings down just to get it in). rear diff.jpg
I am now youtube educated on brake pad installation and learned that if you can't get the damn brake pads into the calipers, you not only can, but should grind the mounts down a little bit so they slide smoothly. If you have to force the pad in, then they most likely won't engage smoothly when braking and you'll get uneven wear and even potentially issues with them working correctly.
Been a while since an update. Rear wheels finally done. Willwood pedal assembly done. Passenger footbox as well. I hope to finish the drive side footbox and get started on the fuel system and brake lines. Based on the recommendation from the build school. I got an extra brake reservoir as a part of the FFR black Friday sale. IMG_1305.jpgIMG_1306.jpgIMG_1307.jpgrear diff.jpg
started on the fuel tank. I went for the FFR in tank pump. For instructions, it's split between the manual, an electronic link for the EFI fuel system and a piece of paper that comes with the pump that was made in Taiwan and looks like something you'd order off of Ali Baba. From what I can tell, FFR modifies the pump and adds some parts, with no change to the instructions, so you just kind of have to figure things out. Oh, and good god, I started to attach the hose from the pump discharge to connection on the diaphragm and noticed something wedged in it. Buried, almost out of sight, was one of the electrical connections. I'm just imagining getting that tank buttoned up and engine installed and somewhere down the line having issues with fuel flow and being baffled and having to take it all apart.
I posted this in the main room, but I've finished the pedals. The coyote accelerator is about as tight a clearance as physically possible. And that's with trimming the plastic on the pedal mount down to the edge of the metal mount and widening the upper metal mounting hole to get everything to fit. The steering column is in there, but man is it tight. IMG_1315.jpgIMG_1316.jpgIMG_1317.jpgIMG_1318.jpg
started on the fuel tank. I went for the FFR in tank pump.
So I chucked the FFR in tank pump after reviewing the forum. Went with the Pro-M hanger and a pump from Summit. Better fit, AN fittings feel better. Cost more...
It might be the light, but it don't look like you flattened out the tank flange where it interfaces with the frame. Don't forget the little plastic inserts that go in the down tubes.
----------------------------------------------
Jeff
Roadster delivered 8/27/23
Chevrolet Performance LS3 Build Thread
they came pre bent interestingly enough. I guess I should say all but the driver's side rear was, and that's the one you're probably seeing. It didn't interfere, so I didn't worry about it. And yeah, those inserts are in, thanks.
One question, the banjo fittings for the front brakes have these crush washers to put in, but they also had some brass or copper washers already on the brake cylinders. I'm thinking I keep the the two washers on the cylinder, plus the crush washers. Anyone know? Crush washers.jpg


 Thanks:
  Likes:


 Reply With Quote


")


