-
12-11-2023, 09:21 AM
#161
Senior Member


Originally Posted by
egchewy79

I definitely needed spacers to raise my driveshaft loop. SBF, poly motor mounts, 3 Forte shims under trans.
Thanks for telling me that. It really helps to know that I'm not the Lone Stranger in dealing with these types of issues, and it's especially good to hear it from someone who's had his Cobra on the road for a while!
-
01-16-2024, 12:29 PM
#162
Senior Member
Odds & Ends, and Getting Close to First Start
December was a very busy month for me, but it was a “do-nothing” month as far as the Cobra was concerned. Likewise, the first week in January. However, I think I’m back on it now and have made a little progress.
The dash is in, and everything works, including the replacement FFR light switch. An unexpected bonus of the light switch issue is that I was able to replace the heater’s knob with the one from the faulty switch, so that both knobs now match. I don’t have any pictures, but will edit this post later to add one or two.
I had chosen a poor location to mount my headlight dimming relays, because you could see everything hanging out below the dash. So, I drilled out the rivets and relocated the assembly on the chassis tube right above the chassis number.
I ordered a stick-on LED lighting strip from Amazon (there wasn’t enough in the kit) and used it for the driver and passenger foot wells, the cubby, and the trunk, with all four areas controlled by the same switch. Wiring to the cubby and the trunk was a bit of a challenge, because all the metal is permanently in place there, and it was hard to find an opening to run the wiring through. I ended up running it through the rear harness conduit and then through a tiny gap adjacent to the seat belt anchor. From there it runs in the corners up to the LED strips and will be covered by carpet.
It’s been almost a year since I put in the engine, so I removed the spark plugs and squirted oil into each of the cylinders. I waited a day, hoping that the oil would make its way to the cylinder walls, and then turned the engine over in a series of 10 second bursts with the fuel pump disconnected. I’ll do this again before attempting my first start.
I finished the weekend’s work by temporarily mounting the Gas-N Touring sidepipes—they’ll look great after I’ve removed the cling wrap. Except for several very minor tasks (such as removing the cling wrap), I’m ready to attempt my first start this coming weekend. I had plenty of time to start it this past weekend, but it was too doggone cold (any temp less than 40 qualifies as “too doggone cold” in south central Texas). Besides, I think Terry (from Las Vegas) might stop by this Friday and he can help/advise/sympathize/laugh, as appropriate.
It's good to feel like I'm finally making a little progress.
Last edited by buttsjim; 01-17-2024 at 09:20 AM.
-
01-17-2024, 09:58 PM
#163
Senior Member

Originally Posted by
buttsjim
I had such a disorganized mass of wiring behind my dash, that I just couldn’t stand it any longer. I disconnected everything, removed the dash from the car, and started trimming, re-routing, and organizing the wiring to try and get some semblance of order and neatness. I ran out of time and had to quit before finishing, but I think it’s already looking better. The downside is that my first start gets pushed back yet again. And, I have to figure out how to hook everything up all over again.
I’m starting to wonder if I’ll finish the car in this lifetime.
Yep, I remember that. Including removing the dash, doing an additional round of dieting and cleanup including completely unwrapping and rewrapping the dash harness, before being satisfied. You'll get beyond it, and yes, you'll finish the car, and it'll all have been worth it 
MK4 #7838: IRS 3.55 TrueTrac T5z Dart 347
The drawing is from ~7th grade, mid-1970s
Meandering, leisurely build thread is
here
-
Post Thanks / Like - 1 Thanks, 0 Likes
-
01-19-2024, 11:06 PM
#164
I stopped by Jim's house today. He has made a lot of progress. His BP 347 lives! We got it going after a little bit of troubleshooting. It was great to see him look as excited as a 9 year old in a toy store ��.
Last edited by TMartinLVNV; 01-20-2024 at 10:06 AM.
MK IV Build #9659, 3 link, 17's, Forte 347, Sniper EFI, power steering, built for a freak sized person with 17" Kirkey Vintage seats, RT drop trunk, RT turn signal, lots of stuff from Breeze Automotive, Wilwood brakes, paint by Jeff Miller
-
Post Thanks / Like - 0 Thanks, 3 Likes
-
01-22-2024, 09:21 AM
#165
Senior Member
Originally Posted by
TMartinLVNV
I stopped by Jim's house today. He has made a lot of progress. His BP 347 lives! We got it going after a little bit of troubleshooting. It was great to see him look as excited as a 9 year old in a toy store ��.
Terry, I'm so very glad that you came by--what a huge help you were!
To the forum: First of all, my throttle linkage had originally been perfectly adjusted (see post 94), but I hadn't pinned the levers, and they'd somehow slipped so that both of them were in a horizontal position. I hadn't noticed, but Terry caught the problem, which could have been a show stopper. I think he might of thought that I was pretty stupid at that point, but we pressed on. Then, I either didn't know, or had forgotten, that the Sniper needed some minor pre-programming in order for the car to start. The car would never have started without his advising me on that.
When we were finally ready to start it, the motor would catch and start right away, and then die just as quickly. We decided that I had a fuel delivery issue, so we got the Sniper tech involved. After narrowing things down to the yellow wire from the coil negative terminal (which I had changed to green (I can explain that...somewhat)), Terry discovered that the pin for that wire was bent inside the seven pin connector, and not making contact. He straightened the pin, and it was ecstasy every after. And yes, I was very excited! I put a couple of vids on YouTube (I'm even worse at YouTubing than I am at photography). Debra (my wife) videoed and narrated (a little bit), and it was a fun time for all of us.
Thanks again for all your help, Terry!
https://www.youtube.com/watch?v=4azzzeZbTSU*
https://www.youtube.com/@jb19511/playlists
-
Post Thanks / Like - 0 Thanks, 4 Likes
-
01-22-2024, 12:05 PM
#166
Senior Member

Wahoo! Congrats, Jim. Such an exciting (and rewarding) milestone. You did it. Well done. So cool to have another builder there for First Start.
Chris
Coupe complete kit delivered: 4/22/24.
Build Thread. Coyote. T-56. IRS w/3.55. Wilwoods. PS. HVAC. Side windows.
MK4 Complete kit.
Build Thread Index. Delivered: 10/15/2020. Legal: 7/25/23. Coyote Gen3. TKO600 (0.64 OD). IRS w/3.55. PS. Wilwoods. Sway bars. This build is dedicated to my son, Benjamin.
Build Thread.
-
Post Thanks / Like - 0 Thanks, 1 Likes
 BRRT
BRRT liked this post
-
01-22-2024, 12:07 PM
#167
Senior Member

Congratulations Jim, that's great!!
I think Debra was scared of a little oil smoke :-)
----------------------------------------------
Jeff
Roadster delivered 8/27/23
Chevrolet Performance LS3
Build Thread
-
Post Thanks / Like - 0 Thanks, 1 Likes
-
01-22-2024, 12:08 PM
#168
I'm happy to help out Jim. I had a lot of people help me during my build. I know that it would have taken a lot longer and with much more frustration without the help of others.
MK IV Build #9659, 3 link, 17's, Forte 347, Sniper EFI, power steering, built for a freak sized person with 17" Kirkey Vintage seats, RT drop trunk, RT turn signal, lots of stuff from Breeze Automotive, Wilwood brakes, paint by Jeff Miller
-
Post Thanks / Like - 0 Thanks, 2 Likes
-
01-22-2024, 01:55 PM
#169
Senior Member
Well, that's just cool. Those vids are the best. You've reached a huge milestone that can help carry you through whatever future challenges you have with the build. But for me, once I had the wiring done the worst was behind me. Having a builder who's been through the challenges to help you work through the bugs is huge. Congratulations!
MK4 #7838: IRS 3.55 TrueTrac T5z Dart 347
The drawing is from ~7th grade, mid-1970s
Meandering, leisurely build thread is
here
-
01-23-2024, 08:06 AM
#170
Senior Member
Originally Posted by
John Ibele
You've reached a huge milestone that can help carry you through whatever future challenges you have with the build. But for me, once I had the wiring done the worst was behind me. Having a builder who's been through the challenges to help you work through the bugs is huge. Congratulations!
Thanks, John (and Chris!). I was really looking forward to my first start but got totally hung up with completing the wiring. Which, I made much worse by quitting for several months and forgetting what I had in mind to do (I took some notes, but where the heck did I put them?). I'll spare you the details, but one of those changes caused a lot of confusion when Terry and I were troubleshooting my first start failure. Terry was incredibly helpful throughout the first start process, in addition to being very patient and a great guy to work with.
I feel like I've crested a mountain now that the motor is running. A lot of the hidden, detailed work is done, and it's on to big things that show obvious progress: sealing gaps, sound barrier, carpeting, seats, etc. I get the feeling that I'll approach all these tasks with a lot more enthusiasm, and that things will start to go quickly once again.
By the way, I added another short to the YouTube playlist linked above. It shows the very first attempt, where the engine started and immediately quit. Quite a lot of smoke!
Last edited by buttsjim; 01-23-2024 at 08:21 AM.
-
02-05-2024, 10:03 PM
#171
Senior Member
A couple of weekends have passed since my first start, and I’ve settled back into my routine of not getting much done. Including posting any progress.
Two weekends ago, I spent about 3 hours on the Cobra, tackling odds and ends related to my first start. Per Terry Martin’s suggestion, I added a secondary spring assembly to the Forte throttle linkage. The spring set came with the throttle linkage, and installing it was an easy job that took only a few minutes. I still need to install roll pins to keep the levers from slipping—2 pins came with the linkage, but their diameter is about half the diameter of the pivot shaft, which seems larger than necessary. I ordered smaller roll pins and will install them next weekend.
I spent the remainder of my time checking the fluid levels, nuts, bolts, and hose clamps, looking for leaks, etc. On my first start we noted that the engine fan was working intermittently; I traced that to an improperly crimped wire in the Weatherpack, and the problem was easily fixed. The only other issue I found was a lackadaisical tachometer needle that operates completely independent of engine RPMs. I sent an email to Speedhut, who are very responsive and helpful, and they’re working on it. I posted a couple of videos on Youtube to help them troubleshoot—they think I’m getting interference with my signal from the coil and are sending me a filter to correct that. I hope it works!
After my first start, my driveway had traces of green liquid that indicated a coolant leak, so I tightened all the hose clamps and double checked everything. Again. This past weekend I pressure tested the system at 16 psi and left the tester in place overnight. Fourteen hours later, I still had exactly 16 psi, so I considered the coolant leak fixed, and moved on to front-end alignment.
The alignment went well. I started by centering the power steering rack. The wheels were hitting the “F” panels at full lock, so I first added two steering limiters to each side of the rack to eliminate that happening. The limiters reduced the steering from 2-1/2 turns to 2 turns lock-to-lock, so I centered the steering shaft so that one turn in either direction brought me to full lock. I next loosened the rack and rotated the Breeze offset bushings to center it, measuring per Karlos’ instructions from this forum. Finally, I used the string method to adjust the wheels to be perfectly straight ahead. I thought with this all done, I should have an approximately equal number of threads showing on each inner tie rod, but the left side had about a ¼” more threads exposed. So, I shifted the rack 1/8” back to the left to make everything even. This means that the steering rack is probably off-center (relative to the chassis) by about an 1/8”, but my steering is centered with the wheels pointing straight ahead, and needing one turn to full lock in each direction. I still need to pull the shaft and rotate it a couple of splines to properly orient the steering wheel, but I think I’m otherwise properly centered.
I set my ride height to 4-1/4” all around using blocks of wood for a gauge. I had to adjust each end and each side of the car a couple of times before I got a consistent measurement at all four corners.
I then used the Longacre Caster Camber Gauge (https://www.summitracing.com/parts/LNG-78260) to set my caster and camber and, boy, do I ever love it. Using it is a quick, foolproof process, making it my favorite type of tool. The gauge came with an attached magnet to hold it on the hub, but the magnet isn’t compatible with the Cobra’s hub (nor my daily drivers), and I found that it wasn’t even necessary. It was easy to just hold the tool against the hub, and keep it flat and level. For caster, instead of trying to judge when my wheels were at a 20* angle, I just always turned the steering wheel to full lock and then back a quarter of a turn to ensure consistency. It took two adjustment iterations—caster, camber, caster, camber—on each side to have everything right on the money, with consistently repeatable measurements.
I had also purchased the Tenhulzen toe plates (https://www.summitracing.com/parts/TNH-2200) to set my toe-in, but ran out of time before I could do that. That will be a quick job for next weekend, and then I’ll clock the steering wheel to finish up the front. By the way, it was easy to justify purchasing those tools, because they work on all my cars and will pay for themselves within a year or two.
I had thought my “coolant leak” was fixed, but after starting the car and maneuvering it around the driveway, I still found numerous spots of green fluid on the pavement. This was a perplexing problem, and I couldn't understand how I could be completely leak free with a cold engine, but dripping lots of fluid with it hot. I looked everywhere and spent a lot of time with a shop towel wiping every joint in the system, with no sign of fluid. It was dripping from somewhere onto the 4” chassis crossmember, and then to the pavement, but where the heck from? Finally, I saw a couple of green drops at the fitting for the transfer tube that attaches to the top of the right side of the steering rack. I checked my container of unused power steering fluid and, sure enough, it was bright green—my “coolant leak” was actually power steering fluid! I should probably feel pretty stupid about that, but I don't. Anyway, the leaking fitting was already very tight, but I further tightened it as much as I dared, and the dripping stopped. I’m hoping it holds, but there may be a problem with the fitting that requires further correction.
Next weekend after finishing the front-end alignment, I’ll start on the rear (I think the IRS might be a bit harder to align), and maybe see how it drives.
Thanks for reading.
Last edited by buttsjim; 02-06-2024 at 09:13 AM.
-
Post Thanks / Like - 0 Thanks, 1 Likes
-
02-06-2024, 09:02 AM
#172
Senior Member

Originally Posted by
buttsjim
The alignment went well. I started by centering the power steering rack. The wheels were hitting the F panels at full lock, so I first added two steering limiters to each side of the rack to eliminate that happening. The limiters reduced the steering from 2-1/2 turns to 2 turns lock-to-lock, so I centered the steering shaft so that one turn in either direction brought me to full lock. I next loosened the rack and rotated the Breeze offset bushings to center it, measuring per Karlos instructions from this forum. Finally, I used the string method to adjust the wheels to be perfectly straight ahead. I thought with this all done, I should have an approximately equal number of threads showing on each inner tie rod, but the left side had about a ¼ more threads exposed. So, I shifted the rack 1/8 back to the left to make everything even. This means that the steering rack is probably off-center (relative to the chassis) by about an 1/8, but my steering is centered with the wheels pointing straight ahead, and needing one turn to full lock in each direction. I still need to pull the shaft and rotate it a couple of splines to properly orient the steering wheel, but I think Im otherwise properly centered.
When centering the rack make sure the pivots are inline with the upper & lower A-arm pivots. Here's a good post showing it. https://thefactoryfiveforum.com/show...415#post547415
-
Post Thanks / Like - 1 Thanks, 0 Likes
-
02-06-2024, 07:20 PM
#173
Senior Member
Originally Posted by
Mike.Bray
Thanks Mike--that makes perfect sense. I never even looked at that relationship when I centered the rack, but I'm eager to check it out this weekend! I'm not sure what I'll need to do if things don't line up, but it'll be an interesting problem to figure out.
-
02-16-2024, 02:45 PM
#174
Senior Member
Originally Posted by
Mike.Bray
Hi Mike, I think I need some advice. The pivot on my inner tie rods is about 1/4" short of the point you describe on both sides. I can screw them each out 1/4" and use a lock nut (if I can find one) or roll pin to hold them, but that leaves about half their threads showing, and I'm not comfortable with that. I was looking for some type of extended inner tie rod but couldn't find one (maybe I haven't looked hard enough). It seems to me that if this situation is true for me, it should be true for everyone with the FFR steering rack, so I'm wondering if 1/4" is close enough? I really don't want any bump steer with this car's power to weight ratio--I'm easily overwhelmed! Please tell me what you think.
Thanks--I always appreciate your advice.
Jim B
-
02-16-2024, 03:42 PM
#175
Senior Member
Originally Posted by
buttsjim
Hi Mike, I think I need some advice. The pivot on my inner tie rods is about 1/4" short of the point you describe on both sides. I can screw them each out 1/4" and use a lock nut (if I can find one) or roll pin to hold them, but that leaves about half their threads showing, and I'm not comfortable with that. I was looking for some type of extended inner tie rod but couldn't find one (maybe I haven't looked hard enough). It seems to me that if this situation is true for me, it should be true for everyone with the FFR steering rack, so I'm wondering if 1/4" is close enough? I really don't want any bump steer with this car's power to weight ratio--I'm easily overwhelmed! Please tell me what you think.
Thanks--I always appreciate your advice.
Jim B
Hey Jim,
I don't think you want to be backing the tie rods off. What I would do is, with the car on jackstands, remove the shocks so you can move the suspension up and down by hand. Then take a couple of pieces of 1 1/2 x 1 1/2 angle about 24" long and attach them to the brake rotors so that they are horizontal. Now you can measure the bumpsteer while moving the suspension through it's cycle. I suspect you're fine.
Hope this makes sense.
-
Post Thanks / Like - 1 Thanks, 0 Likes
-
02-16-2024, 10:12 PM
#176
Senior Member
Originally Posted by
Mike.Bray
Hey Jim,
I don't think you want to be backing the tie rods off. What I would do is, with the car on jackstands, remove the shocks so you can move the suspension up and down by hand. Then take a couple of pieces of 1 1/2 x 1 1/2 angle about 24" long and attach them to the brake rotors so that they are horizontal. Now you can measure the bumpsteer while moving the suspension through it's cycle. I suspect you're fine.
Hope this makes sense.
Thanks Mike! It makes perfect sense, and I think I'll try that. Although it would be more of an interesting experiment, as I wouldn't be able to change the result.
By the way, I definitely wasn't going to back the tie rods off, after seeing how much thread I had to work with. I actually had an inner and outer tie rod come apart on a military cargo truck I was driving many years ago, and the result was interesting enough that I still remember it.
Last edited by buttsjim; 02-16-2024 at 10:18 PM.
-
03-12-2024, 07:00 PM
#177
Senior Member
A Laundry List
Time flies… but I crawl. I am only home on weekends, and I’ve recently had too many commitments to find much time to work on the Cobra. And, for a while there, all my progress seemed to be in the wrong direction. But I did move forward enough this past weekend to provide the following laundry list of updates. The post is too long, so I put the key point for each task in bold font so that you can just read the portions you're interested in.
I noted in post 171 that the fitting for the ¼” transfer tube on my power steering rack leaked. Tightening it as much as I dared didn’t help, so I removed the fitting and used Permatex on the threads. This remedy stopped the leak; however, I’m concerned—Permatex should be an insurance against leaks, rather than a first line of defense, so, this is another wait and see situation. I’ve had several issues with this (FFR supplied) rack, and I’m not entirely happy with it. However, it works well, and I like the amount of steering assist.
I also had some issues with two of my gauges—the tach needle was everywhere but the right spot, and the voltmeter was consistently inaccurate. For these, Ayden at Speedhut provided outstanding tech support, responding to my emails promptly, with advice that was always right on target. I would post videos on YouTube of what was happening and send Ayden the link; he’d watch the videos, and then tell me the remedy. Very efficient. The tach needed a filter (which Speedhut speedily mailed) due to a dirty signal from the coil, and both gauges needed their needles turned a rotation counter-clockwise to reset them to zero. These were all simple fixes, and everything now works perfectly.
I had never torqued my rear axle nuts, so I did this before setting the rear alignment. I have a seldom-used, 0 to 600 ftlb, dial torque wrench, so I did a little experiment just for kicks. I first torqued the nuts to 95 ftlb using my regular torque wrench and then used the big one with a cheater bar to turn the nut an additional 45 degrees. Doing so resulted in a reading of 340 ftlb when I reached the 45 degree mark. I've seen some questions regarding that torque on this forum, so there's the answer. The torque wrench has a sticker stating it was last calibrated in 1971, but my back was telling me that that number was pretty close.
I put the car back on the wheel dollies so that the wheels could move easily, and then used the Longacre Camber Gauge and Tenhulzen Toe Plates to set my rear alignment. That task was a little frustrating due to tool issues. First, the toe plates need to stay firm against the wheel, but they kept shifting. After I put some weight on each one, they were rock solid, and that issue was fixed. Second, I didn’t have big enough open end wrenches to turn the hardware for the camber adjustment. I do have some large Crows Foot wrenches that I was able to use, but that’s where I encountered the frustration—those wrenches (Sunnex) must be cheaply made because they wouldn’t stay on the breaker bars that I was using them with (one was a Snap On, and the other was a Craftsman, so probably not their fault). I’d turn the nut a quarter turn, and then have to crawl under the car to retrieve the wrench that had just fallen off. At least a hundred times… maybe a thousand. I forget which, but one of Newton’s laws of motion states that when an object is dropped from above a car, it remains in motion until it arrives at the most inaccessible spot under the car. It’s really irritating. Nevertheless, I finished the job, and the car drives perfectly. I’ll eventually get it professionally aligned, but I’m satisfied that, right now, it’s as good as I can make it.
After the alignment (and a little test drive), the Cobra went back onto its jackstands.
My fuel line had developed a big leak at the filter outlet, and I thought the fittings just needed re-tightening. Nope—they were very tight, so last week I polished up the mating surfaces and used Permatex (although I don’t think you’re supposed to use sealant on AN fittings). This failed also, so I just went ahead and ordered a new fuel filter, and two new AN hose fittings. The new parts are working fine with no trace of leakage. Good.
I secured my Forte throttle linkage with 1/8” roll pins. I wasn't looking forward to that task, but it turned out to be a very easy one. I marked the linkage and removed it, so that I could do the work on my bench instead of on the car. Then I drilled successively larger holes in the mating pieces using lots of cutting oil. I inserted one of the roll pins on the bench, then reassembled everything in the car, and inserted the second roll pin when all was in place. I need to add a stop behind the throttle pedal, but otherwise I’m quite happy with the linkage and the throttle feel.
I repaired my emergency brake. I had originally tightened the cable clamp’s set screws on the cable sheathing, rather than directly on the cable. This didn’t work—the screws cut through the sheathing, allowing the cables to slip back out. So, I removed that portion of the sheathing and properly clamped the cable. That’s another what-not-to-do lesson for those who haven’t reached that point in their build.
Finally, I increased my spacers under the transmission from 1-1/2” to 1-3/4” by replacing my two pieces of ¾” aluminum bar stock with two ½” pieces and one ¾” piece. This gets the pinion angle down to .7 degrees, and that’s as close as I’m going to make it. I now need to raise my safety hoop a bit more to provide adequate clearance for the driveshaft, but that’s going to have to wait until next weekend.
By the way, I had wanted to check my bump steer using the method suggested by Mike Bray. However, there’s nothing I can do to change it (checking would just have been a matter of curiosity), so I decided to skip that and use the time toward making forward progress.
Like I said earlier, this update is a laundry list—not very exciting to read, but it’s progress!
Last edited by buttsjim; 03-14-2024 at 10:38 AM.
-
03-29-2024, 08:57 AM
#178
Senior Member
I'm installing my ThermoTec heat insulation, and am uncertain about what to do with the seams between the pieces. I was planning to use aluminum tape to join them, but I'm not sure what impact that might have with my carpet installation--the tape will add another layer of adhesive and another chance for something to come unglued. I'm very confident with the ThermoTec's bond to the sheet metal, and I'm assuming that the carpet adhesive will bond well to the ThermoTec. But, I'm wondering about the longevity of the aluminum tape's bond to the ThermoTec, and am concerned that it might eventually pull loose.
I'd be using the tape in the corners, which is the very area in which the carpet needs a tight bond in order to have nice, crisp seams. If the tape comes loose there, then the carpet won't have that crisp look, and may also start to pull loose from the surrounding ThermoTec. So far, I'm getting very tight seams between the individual ThermoTec pieces, and am therefore wondering if there's any added advantage to using the tape.
Any opinions/ideas/suggestions?
Thanks for considering, and any replies.
-
03-29-2024, 09:26 AM
#179
Senior Member
-
Post Thanks / Like - 2 Thanks, 0 Likes
-
03-29-2024, 09:57 AM
#180
Senior Member
Originally Posted by
Mike.Bray
Thanks Mike!
From its description, that product seems like the perfect match for the ThermoTec, and it has the strong bond I want. But, whooo-boy, it sure is expensive. I ordered, but it will be over a week before I receive it, so I need to find something else to work on.
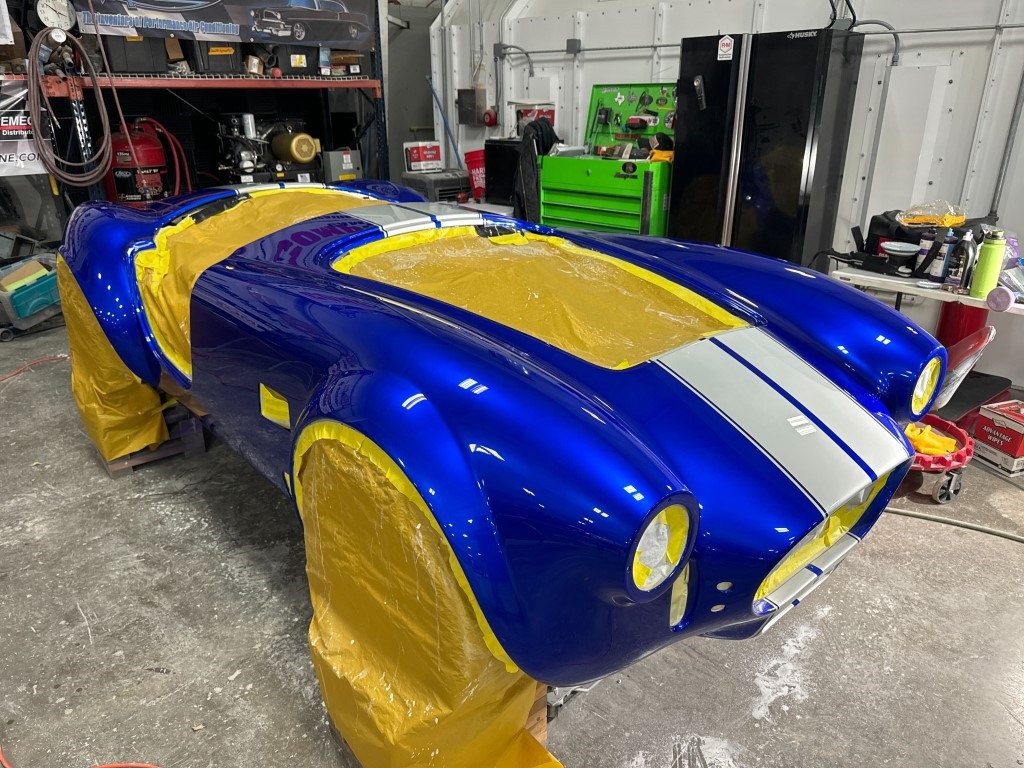
By the way, I'm looking forward to seeing some pics of an electrifyingly blue Cobra, hopefully this week!
Last edited by buttsjim; 03-29-2024 at 10:06 AM.
-
03-29-2024, 10:38 AM
#181
Senior Member
Originally Posted by
buttsjim
Thanks Mike!
From its description, that product seems like the perfect match for the ThermoTec, and it has the strong bond I want. But, whooo-boy, it sure is expensive. I ordered, but it will be over a week before I receive it, so I need to find something else to work on.
By the way, I'm looking forward to seeing some pics of an electrifyingly blue Cobra, hopefully this week!
Strong bond is an understatement! It is seriously good stuff.
Here's my car the other day right after buffing.
-
Post Thanks / Like - 0 Thanks, 3 Likes
-
03-29-2024, 11:29 AM
#182
Senior Member

many of us will spray paint the areas under the carpet seams black, to avoid any shiny bits of aluminum/tape/sound material visible at the junctions.
just food for thought.
-
Post Thanks / Like - 1 Thanks, 0 Likes
-
03-29-2024, 04:10 PM
#183
Senior Member

Nashua also do a Matt Black 'gaffer' tape. Just as sticky, and negates the need to spray any joins black.
Use a slow tacking gel adhesive so you can maneuver sections of carpet.
Cut your carpet 2mm oversize. It will make for tight, seamless joins.
Use a soldering iron to make holes.
Have some mineral turps handy to remove any adhesive that gets wiped when installing pieces.
Have plenty of forced ventilation. Especially for footboxes.
Mk.4 FFR supplied Right hand drive
Received 12/2012 completed 12/2019
Gen1 Coyote / TKO600 / IRS
Lots of mods to make compliant for Australian design rules
-
Post Thanks / Like - 1 Thanks, 1 Likes
-
03-30-2024, 11:21 AM
#184
Senior Member
Originally Posted by
Mike.Bray
Here's my car the other day right after buffing.
Wow! I think that just might be worth the wait...it's beautiful!
-
Post Thanks / Like - 0 Thanks, 1 Likes
-
03-30-2024, 11:26 AM
#185
Senior Member
Egchewy79:
many of us will spray paint the areas under the carpet seams black, to avoid any shiny bits of aluminum/tape/sound material visible at the junctions.
just food for thought.
Nigel Allen:
Nashua also do a Matt Black 'gaffer' tape. Just as sticky, and negates the need to spray any joins black.
Use a slow tacking gel adhesive so you can maneuver sections of carpet.
Cut your carpet 2mm oversize. It will make for tight, seamless joins.
Use a soldering iron to make holes.
Have some mineral turps handy to remove any adhesive that gets wiped when installing pieces.
Have plenty of forced ventilation. Especially for footboxes.
Thank you both! All good suggestions, and I will implement all. Thanks again!
Last edited by buttsjim; 03-30-2024 at 11:32 AM.
-
04-07-2024, 08:35 PM
#186
Senior Member
I’ve been working on the Cobra’s interior the last two weekends, but don’t think I’ve made a lot of progress. The work’s not difficult or unpleasant—I just didn’t seem to apply myself to getting it done. I think for every five minutes I spent working, I spent about ten resting, or thinking, or chasing after distractions, or catching my breath, or whatever. It’s weird, because I’m at a very exciting part of the build and eager to move forward, yet I lollygag. It’s hard to understand.
Well anyway, I finished sealing all the gaps in the cockpit; some by applying sheet metal patches, others using sealant and some with both.
After patching, I moved on to installing the ThermoTec and am almost finished with that. I still need to do part of the left side footbox, and I’m having a bit of trouble in this area trying to get the ThermoTec in behind the 2” tube at its front. I think I will put in small scraps in front of the tubing to fill that area, and then slide a small piece under the tube without taking the backing paper off. It won’t achieve its full effect that way, but it’s better than nothing. Otherwise, the fit’s too tight to squeeze the material under the tube without the mastic taking hold and stopping it.
Other than that, the ThermoTec installation went quite well. I used poster board to make the templates. To make them, I first tried to measure all the dimensions of an area, but this was a very tedious (and hopeless for me) process since every cockpit shape is irregular. I switched to a lazy approach and started cutting one large piece of poster board to line up with an area’s longest dimension and putting it into position. Then I would cut and Scotch tape scraps to that piece to flush up to all the other borders. This made for a quick process with only one measurement required for each area, but it also made for some very ugly templates. However, it was easy to get each template perfectly sized, and I have very good seams in the ThermoTec as a result. To seal those seams, I ordered the Nashua Mastic Butyl Rubber Sealant recommended by Mike Bray, but it hasn’t arrived yet. Next week will finish the ThermoTec.


You might notice in the second picture that I had to relocate the shifter hole in my tunnel cover. I’ve had second, and third, thoughts about this, as I think it indicates a problem with my engine installation. I double checked my motor and transmission mounts and both sides are even, and everything is seemingly centered. Yet, something seems wrong. I’ve already had to raise my transmission more than most to get a reasonable pinion angle in the vertical plane; now I suspect that I’m also way off in the horizontal plane. Something ain't right. Next weekend, I’ll loosen every mounting bolt and give the engine a mighty shake at the tailshaft, and hope that it somehow settles in with better alignment. If not, I’ll press forward with what I have, but I’m concerned by it.
One of the distractions I referred to earlier was a productive one. I took a break from ThermoTec'ing to temporarily mount my seats with the Breeze mounting plates, and then painted the brackets, so that everything's ready to bolt in after the carpet installation. Because the seats are going in on top of the carpeting, I’m using 5/16 – 18 – 1 button head bolts instead of the supplied rivets for the mounting plates. I’ll use a hot soldering iron to punch up through the holes I’ve already drilled in the chassis to make the bolt holes in the carpet, and I think it'll be a quick process to get them in.
Although it's strongly recommended to locate the seats with the body on, I took a chance and chose mounting locations based on others' videos and pictures and, crossing my fingers, I think I’ll be okay (I’m 5’11”, and don’t need the seat all the way back against the rear cockpit wall). With the mounting plates, the driving position is absolutely perfect for me with the seat in its rearmost position; unfortunately, I won’t be able to move it far enough forward for Debra to be able to drive the car. Funny—the CCR song “Bad Moon Rising” popped into my head as I typed that last sentence. Uh-oh.
Last edited by buttsjim; 04-08-2024 at 08:32 AM.
-
Post Thanks / Like - 0 Thanks, 1 Likes
-
04-08-2024, 10:42 PM
#187
Senior Member
Jim, nice progress on the insulation and carpet prep. FWIW, I used regular HVAC foil on my seams, and haven't had any issues with separation so far through numerous heat cycles. Hopefully, that remains true. In hindsight, I wouldn't have bothered with the seam tape, and don't plan to on the Thermotec in my Coupe build. I don't think the juice is worth the squeeze. However, it gave me warm fuzzies at the time when I applied it. So, maybe that counts for something? 
I agree with Nigel's comments above about cutting your carpet. I, too, was worried about the Thermotec flash-through at my carpet seams. I got some good advice at the time like Nigel's, and it turned out to be a non-issue. Just food for thought.
Keep up the good work.
Chris
Coupe complete kit delivered: 4/22/24.
Build Thread. Coyote. T-56. IRS w/3.55. Wilwoods. PS. HVAC. Side windows.
MK4 Complete kit.
Build Thread Index. Delivered: 10/15/2020. Legal: 7/25/23. Coyote Gen3. TKO600 (0.64 OD). IRS w/3.55. PS. Wilwoods. Sway bars. This build is dedicated to my son, Benjamin.
Build Thread.
-
Post Thanks / Like - 1 Thanks, 0 Likes
-
04-24-2024, 08:17 AM
#188
Senior Member
I’ve finally finished the ThermoTec insulation, including taping it, and painting the seams black. It should have been a one weekend job, but it took three weekends, due to schedule and laziness factors.
I used 4 rolls of ThermoTec and have about 4 square feet left over. I did all the cockpit (including the underside of the tunnel cover), and inside the cubby, so the cockpit is completely isolated from road noise. It might help a little to also do the trunk to reduce road noise coming from the rear tires, but I’ve had to draw the line on spending, and I think what I’ve done will be adequate—I don’t think I’ll be hearing a lot of road noise over the exhaust anyway. I’m not quite as well insulated from heat, as I couldn’t cover all of the top of the driver’s footbox; however, the header wrap, and the reflective insulation that I added to the outside walls of the footboxes will help in that regard.
I used the Nashua 367-17 butyl rubber tape recommended by Mike Bray to cover all the ThermoTec seams—it’s a great product, but I’m not sure that it adds any value. After ordering it, I learned too late from Nigel Allen that the same tape was available in black—that would have been a better choice and eliminated the need to paint the seams. Painting these with a brush only took a few minutes, but it concerns me that I now have four layers of adhesive between the carpet and the cockpit metal: the carpet glue, the ThermoTec glue, the tape glue, and the paint. I hope it all sticks!
I used the pictured rollers to get the tightest bond that I could achieve. The three wooden-handled rollers ( https://www.amazon.com/dp/B07TV19PQF...roduct_details ) seemed to work best as they really concentrated the pressure, and the serrated rollers helped to push the materials into all the crevices. The trim tool was a big help in the corners.

I’m looking forward to starting the carpet this weekend, and hope to make better progress with that.
Last edited by buttsjim; 04-24-2024 at 10:30 AM.
-
Post Thanks / Like - 0 Thanks, 1 Likes


 Thanks:
  Likes:


 Reply With Quote
