-
Terry's LS MK4 Build
Wow, it seems way longer than the 14 months it's been since I placed my order (yes I pushed the date so I could finish other projects). During this time I've spent countless hours reading build threads, asking questions, asking more questions, making plans, changing plans, and watching about every FFR youtube video I could find.
Stewart arrives tomorrow, so a good time to start my build thread.

My roadster experience is of a somewhat different, lower-powered type... a failed restoration of an Alfa Spider when I was young and stupid (and no money). Then didn't learn (of course), bought a '74 Spider, and rebuilt it into a super fun roadster with great Italian sound and quirky mechanical fuel injection. Four kids arrived (not all at once), so went on a car hiatus until I bought a 2009 Miata and built it for SCCA STR autocross (what a blast, even though the car was way faster than the driver). And my last one, which I sold a couple years ago, was a pristine 2003 Miata that I supercharged with a Eaton TVS900. During this entire time however, the Cobra has always been the pinnacle of roadsters to me. So it's time, and the garage is ready:


* Special shout-out to Mike in TX for the body buck and dolly, but most of all for great advice and continuous attempts to spend my money. 
My vision is a clean looking street Cobra without stripes, hood scoop, or side pipes. I'd really prefer no roll bar, but I negotiated with my wife on that decision so the car will have two. In terms of engine, I'm planning to go with some variant of the LS3 crate engine. Strangely enough, this choice goes back to my Miata days... I've always been mesmerized by this engine in a small roadster since Flyin' Miata started transforming these little cars with them. Interesting side note, I believe FM supplies FFR with sway bars (I think).
Build Details
Complete Kit
IRS / 3.55 Torsen
Bare Chassis
No body cut-outs
Manual brakes (2015+ rears and Cobra fronts)
Hydraulic clutch
Power steering
Leather steering wheel
Breeze roll bars, front battery, cubby etc.
E-Stopp parking brake
18" Halibrands
LS mounts
LS headers (ordered these in case my under-car exhaust plans change; at the very least I can use them during go-kart)
Thanks to so many on this forum for inspiration and awesome build threads.
Last edited by OB6; 04-18-2023 at 06:19 PM.
-
Post Thanks / Like - 0 Thanks, 4 Likes
-
Senior Member

A warm welcome, Terry! And an early congrats on tomorrow's delivery. I'm a bowtie guy at heart, so you have kindred spirits here on the forum. A local builder here in Spokane area, Jim Frahm, is well into his LS Roadster build.
Enjoy the big day tomorrow, and don't forget to take and post some pictures.
Chris
Coupe complete kit delivered: 4/22/24.
Build Thread. Coyote. T-56. IRS w/3.55. Wilwoods. PS. HVAC. Side windows.
MK4 Complete kit.
Build Thread Index. Delivered: 10/15/2020. Legal: 7/25/23. Coyote Gen3. TKO600 (0.64 OD). IRS w/3.55. PS. Wilwoods. Sway bars. This build is dedicated to my son, Benjamin.
Build Thread.
-
Thanks Chris. Yes, I have followed Jim's build closely, he's doing a nice job.
-
-
Post Thanks / Like - 0 Thanks, 1 Likes
-
-
Post Thanks / Like - 0 Thanks, 2 Likes
-
Senior Member

I love seeing delivery pics on build threads. It's the best day, like Christmas morning when you're 8 years old. Congratulations on starting your journey. I'll be following for sure.
MK4 #10008 - Ordered 10/06/20, Delivered 03/03/21, First Start 7/22/21, First Go Kart 7/24/21
Paint by Metal Morphous 5/14/22, Legally registered 6/8/22, Graduated 7/20/22
Build Thread
https://thefactoryfiveforum.com/show...been-delivered
Complete Kit, Ford 306, Sniper/Dual Sync, T5, Hydraulic clutch
-
Post Thanks / Like - 1 Thanks, 0 Likes
 OB6
OB6 thanked for this post
-
-
Subscribing! I just started building my complete kit two weeks ago and I am also using an LS3 crate engine. I opted for the 430hp variant to maximize my reliability for long road trips, but they all seem great. I was also influenced by growing up wanting an LS swapped import, but instead of the Miata it was the RX-7 for me. The FF will be better than either of those though!
Great to see a fellow LS'er.
-
Post Thanks / Like - 1 Thanks, 0 Likes
OB6 thanked for this post
-
-
Post Thanks / Like - 0 Thanks, 1 Likes
-
Senior Member

Originally Posted by
OB6

And she's loaded up for the drive to the powder coater tomorrow. Still not 100% sure about color... hoping to get inspired when I get there and make a final decision. Silver, gray metallic, or good old chassis black. Or just clear... kidding.
The patina look became quite popular on hot rods. Maybe you could start a new trend on chassis patina. 
Those extra ground points will be handy. Nice! (Wish I knew how to weld too).
Chris
Coupe complete kit delivered: 4/22/24.
Build Thread. Coyote. T-56. IRS w/3.55. Wilwoods. PS. HVAC. Side windows.
MK4 Complete kit.
Build Thread Index. Delivered: 10/15/2020. Legal: 7/25/23. Coyote Gen3. TKO600 (0.64 OD). IRS w/3.55. PS. Wilwoods. Sway bars. This build is dedicated to my son, Benjamin.
Build Thread.
-
-
Post Thanks / Like - 0 Thanks, 1 Likes
-
Panel Fitting
I've started to fit the panels, and intend to bring ALL of them to the PC shop as a full set. Not sure about color yet (big surprise), but thinking silver, black, or the same as the chassis. It really only matters for the engine bay, but it's kind of a permanent decision. Open to opinions although I realize it's a super subjective thing.
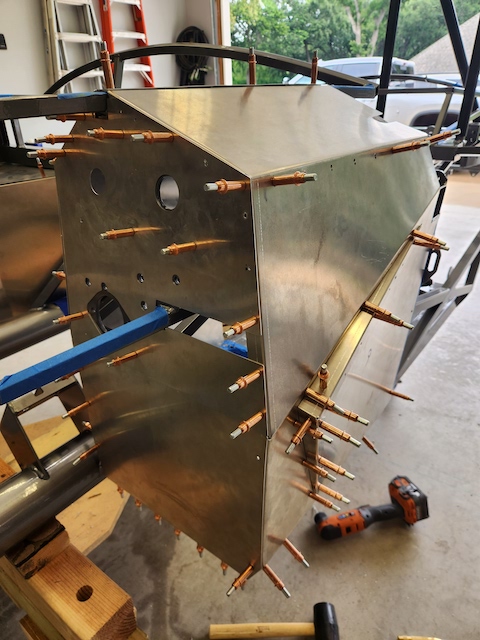
My original plan was to drill and fit all panels prior to PC, and I did this for the driver foot box. However now I'm thinking I'll just check fitment (without drilling) to confirm there are no major issues like I encountered with the right panel of the driver foot box as it meets the "A" piece. What a pain, but it turned out fine:
The other panels seem to fit really well, especially those aft of the foot boxes, so I'm not concerned moving forward.
Last edited by OB6; 05-30-2023 at 02:39 PM.
-
Post Thanks / Like - 0 Thanks, 1 Likes
-
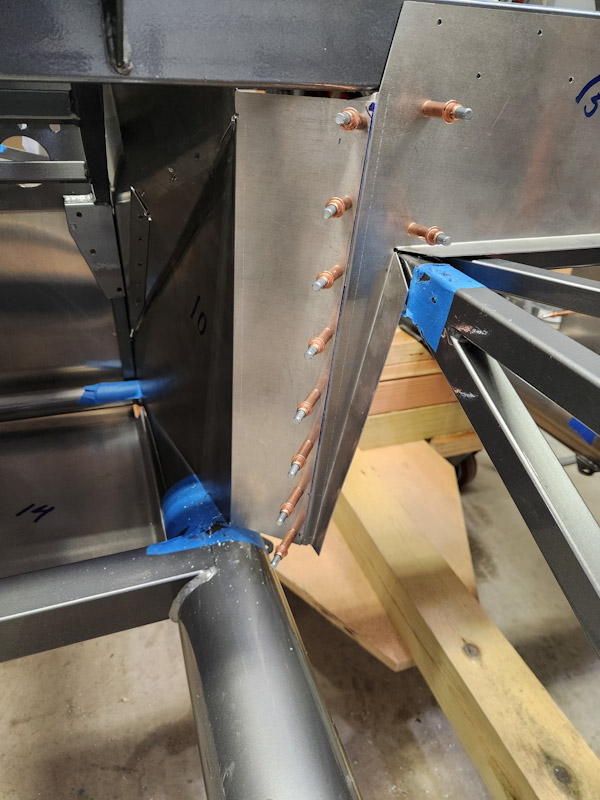
Mike made a good point about making some adjustments to the receiver for the door latch if FFR hadn't done so already to accommodate the new latch design. Ted G did a nice job with this, as you can see here. Fortunately (according to my eyeball calipers) it appears FFR actually did make changes to the frame. I'll check with FFR unless someone reading this can confirm.
It looks like they did do the adjustment to those tabs.... Lucky you!!
#10333 Complete Kit, Carbed 427w, TKX, IRS and many other upgrades
- Order Date: September 11, 2021 - 20th Anniversary of 9/11
- Delivery Day: April 1, 2022 - April Fool's Day
- First Start and Go-Kart: January 20th, 2023
- Graduation Date: July 4th, 2023 - Independence Day!!
- Legal Registration Date: October 4, 2023 - My Birthday!!
Visit my MKIV Build Thread (#10333)
-
-
Post Thanks / Like - 0 Thanks, 1 Likes
-
-
Post Thanks / Like - 0 Thanks, 1 Likes
-
Your steering arms (that bolt onto the spindles) appear to be backwards.
They should be pointing slightly outward instead of slightly inward.
-
Love the powder coating, did they sand or bead blast before painting?
-
Originally Posted by
Windsor
Your steering arms (that bolt onto the spindles) appear to be backwards.
They should be pointing slightly outward instead of slightly inward.
Good catch, you're probably right. I literally threw those on loosely before ending for the [extremely hot] day. Appreciate the heads-up.
-
Originally Posted by
mosh1999
Love the powder coating, did they sand or bead blast before painting?
Thanks, yes they blasted before powder coating.
-
Originally Posted by
OB6
I literally threw those on loosely before ending for the [extremely hot] day. Appreciate the heads-up.
Roger that "hot day" business. I'm about 40mi NE of you as the crow flies.
-
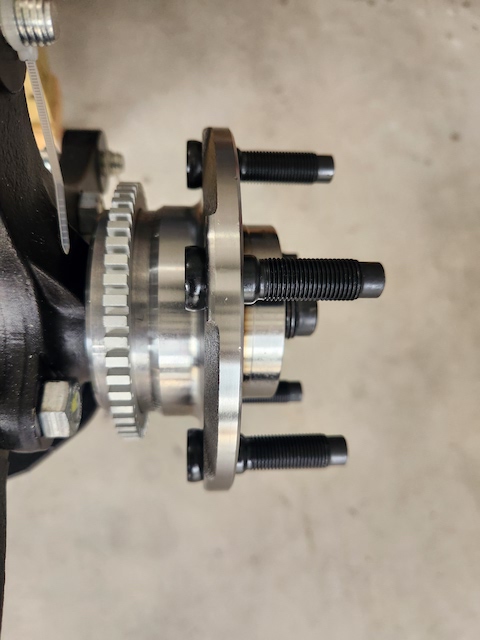
Hubs installed
I installed the hubs this weekend, but ran into a snag (pun intended) with the FFR-supplied Mevotech units. As others have noted, these often don't just slide on like they should (do not force them!). During my initial fitting, I hit resistance at about an 1/8" of engagement on the spindle. I gently removed the hub and part of it decided to stay. I ended up with this:

I never really liked the quality of the Mevotechs based on what I saw and felt, but I know they've worked well for many. Despite that, I pulled the emory cloth from my plumbing tool box and polished the spindle. The second hub went on further, but again I gently pulled it when I hit the least amount of resistance. Same result as above. Ugh. Now I know these are largely held together by the preload of the axle nut and maybe I could have just popped them back together, but this did not give me confidence. Screw it, gonna buy new ones. The local NAPA store was having their monthly 30%-off sale, so I picked up a set of their premium hubs manufactured by SKF (good!). Still made in China, but what isn't these days.

These units are clearly much higher quality... tighter, no grease oozing out the seals, etc. I'm not sure if the studs are black for cosmetic reasons or if they're a higher grade steel. Doesn't really matter, as I was happy with the purchase. I will say though, regardless of the hubs you use, be sure to clearance the spindles with emory cloth or equivalent. It doesn't take much, but it makes a huge difference.

I realized I didn't removed the ABS tone rings until after I torqued the axle nut (of course), so a few quick passes of the dremel and they popped right off.
-
Post Thanks / Like - 0 Thanks, 1 Likes
-
Steering Rack
I got the P/S rack installed. The [URL="https://breezeautomotive.com/shop/offset-rack-mounting-kit-for-ffr-roadster-and-coupe/"]Breeze mounting kit/URL] is awesome and makes centering the rack a simple process. There's not much to installing the rack other than figuring out how to fit it in. I also used Moog tie-rod ends.

-
Front brakes
Clearly I need to get better at posting along the way instead of in batches. ")
Anyway, front brakes installed. I went with the 13" Cobra brakes (these are from RockAuto), as I omitted the FFR brakes from my initial order. I suppose I should have known they're aluminum -- much lighter than I expected. Should be plenty of stopping power. The calipers could use some cosmetic attention, but that's easy to do later. Nobody will really see them anyway.

-
-
Post Thanks / Like - 0 Thanks, 1 Likes
-
-
-
Gas pedal mockup
I decided to get the gas pedal installed before I close up the inside of the DS foot box, and I knew it would take some thinking and some light fabrication since it's not a standard FFR part. I bought GM p/n 10379038, which is the same pedal that comes in the LS3 controller kit. There are other aftermarket units available, but I chose to stick with OEM because I know compatibility will be good (even with EFI systems like Holley Terminator X if I go that route).
The design of the pedal is good in that it's not a big chunk of plastic like the Coyote pedal, so there is is some built-in flexibility for mounting options and the pedal itself. There are three main pieces... the bracket, the actual mechanism, and the pedal.

Now I needed to figure out how to get it installed, and I have a few objectives 1) correct placement, 2) don't make it look like a hack-job, and 3) access/serviceability. I spent some time clamping it in different positions and came up with ideas for a couple of brackets. Mike Bray came over the next day to give me another set of eyes. Glad he did because he looked at it differently and offered a great idea loosely based on the Breeze pedal solution that hangs off the 3/4" tube. It basically involves removing the steel bracket from the GM pedal, fabricating and attaching it to a 1/4" aluminum plate, and then securing two 3/4" pieces of aluminum stock to the plate -- these clamp the chassis tube using set screws in the lower piece.
My first mockup using MDF, 1x3, a few screws, and super-glue (think I could just leave it like that? )


And how it fits on the 3/4" tube:

The idea is that I can slide the assembly up or down the 3/4" tube for some adjustment flexibility, and lock in place with set screws from the bottom. Not a ton, but enough to make a difference. And to make more room l'll likely remove the standard welded mounting plate. The most notable obstacle is the sensor connector, so I'll need to make sure that's still accessible. Worst case I can connect it and then mount the assembly.
Here's the initial pedal placement.

Not bad for a quick mockup that took 15 minutes to put together. It still needs to move forward so the pedal sits somewhat behind the brake pedal. GM recommends 2", but that seems like a lot... especially in such a small space. The good thing is that I don't need to worry too much about where the plastic pedal lands because I can modify it or replace it with something custom/aftermarket. But I think it might just work out the way it is.
Didn't intend to get so lengthy here. Ideas, observations, etc. welcome as always.
-
Post Thanks / Like - 0 Thanks, 2 Likes
-
-
Post Thanks / Like - 0 Thanks, 1 Likes
-
Not a ton of progress due to other commitments.... and this:

However, I've managed to get a few things done. First, the brake master cylinders are installed. I was going to swap the Wilwoods for Tiltons, but decided that I'll have a ton of time to figure out if these leak. Plus I'm installing the fuse panel in the trunk, which will make replacement that much easier if it ever comes to that. Odds are I'll be fine. The clutch MC will be a Tilton.

Also, continuing with the brake system are the hard lines themselves. I've decided to go stainless with AN fittings throughout and run bulkhead fittings out of the footbox. I've done a ton of brake work in the past, but not stainless lines, and certainly not 37 degree AN flares. Not worried because I've got my stainless line maestro friend down the street. I don't really have room to run the rear line inside the footbox because the gas pedal assembly is in the way. That's ok -- I'll just run the line towards the front and then down and back along the 4" tube. Easy.

(that's just dust on the aluminum, not a rash in the powder coat)
All four brackets are done with fittings installed. I've said it before... I'm not a fabricator, but I play one on the forum.

And the final update... this just arrived today. I originally planned to use the RF harness and install the fuse box under the PS dash. After thinking about it more I decided to install it in the trunk, likely on the rear of the Breeze cubby divider. The RF harness won't work for that, so I ordered one from Rebel Wire and sold the RF to another builder. Rebel makes them to order, and this particular 16 circuit harness is designed for trunk install. I also had them install LED flashers instead of the normal units. It's heavy duty SXL wire, which is great but maybe not as ideal in tight places. I think it will be fine.

-
Post Thanks / Like - 0 Thanks, 1 Likes
-
Senior Member

Hello Terry, I just came across your thread. Great work! My Roadster will also have a LS. It seems as though it is becoming a little more common.
I look forward to following your progress.
----------------------------------------------
Jeff
Roadster delivered 8/27/23
Chevrolet Performance LS3
Build Thread
-
Originally Posted by
BRRT
Hello Terry, I just came across your thread. Great work! My Roadster will also have a LS. It seems as though it is becoming a little more common.
I look forward to following your progress.
Thanks Jeff, yes I agree the LS seems to be a more common (and dare I say accepted) option. Great fit, awesome power, and a ton of flexibility.
-
Post Thanks / Like - 0 Thanks, 1 Likes
 BRRT
BRRT liked this post
-
-
Post Thanks / Like - 0 Thanks, 2 Likes
-
Senior Member
Brake lines look great, Terry. Nice work. What bender did you use on those hair pin 180 deg bends?
Chris
Coupe complete kit delivered: 4/22/24.
Build Thread. Coyote. T-56. IRS w/3.55. Wilwoods. PS. HVAC. Side windows.
MK4 Complete kit.
Build Thread Index. Delivered: 10/15/2020. Legal: 7/25/23. Coyote Gen3. TKO600 (0.64 OD). IRS w/3.55. PS. Wilwoods. Sway bars. This build is dedicated to my son, Benjamin.
Build Thread.
-
Thanks Chris. I bought a new (but 25 year old) Ridgid bender off eBay. It's super precise and easy to use. This is the 3/16 unit, and I bought a 3/8 too.
20230916_163101_copy_600x800.jpg
-
Post Thanks / Like - 0 Thanks, 1 Likes
-
Senior Member

Originally Posted by
OB6
Thanks Chris. I bought a new (but 25 year old) Ridgid bender off eBay. It's super precise and easy to use. This is the 3/16 unit, and I bought a 3/8 too.
20230916_163101_copy_600x800.jpg
Unfortunately Ridgid doesn't make these great lever benders anymore which is very sad. If you can't find one on eBay Fragola make similar ones.
If you're going to do AN hard lines this thread might be of interest to you Chris.
-
Post Thanks / Like - 1 Thanks, 1 Likes
-
Hi Terry,
I agree...nice work on your brake lines! For what it's worth, I just bought a Ridgid 3/16" tube bender, since I've been inspired by work such as yours, Mike's, Paul's, etc -- very clean-looking!
Hi Mike,
I'm hoping that the Ridgid bender I got works just as well as the one you've mentioned. It is made in China...soooo We'll see...
Craig C
-
Post Thanks / Like - 0 Thanks, 1 Likes
-
-
Post Thanks / Like - 0 Thanks, 1 Likes
-
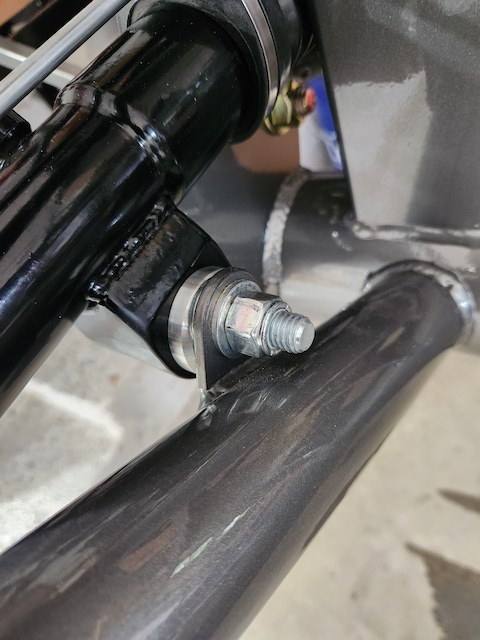
I got some lightweight stuff done today, like finalizing the reservoir install and addressing the unsealed Tilton reservoir caps.


The long screws through the 3/4 tube are by design. Since the body will be sitting on top of the screw heads, I won't be able to hold the screw from the top. This way I'll be able to hold it by double-nutting the bottom end of the screw. I'm probably over thinking it.
-
Post Thanks / Like - 0 Thanks, 1 Likes
-
This arrived today... made by Ron Davis for MK4 LS application. Hadn't planned on buying and likely overkill, but I got a deal from a would-be builder that I couldn't pass up. I like that the inlet and outlet are on the correct side for the LS, and there's a steam port.
20230925_193931_copy_600x800.jpg
20230925_194005_copy_600x800.jpg
-
Post Thanks / Like - 0 Thanks, 2 Likes
-
The hard lines are done. Just need to get flex lines and bleed the master cylinders. I'm not sure if I'll run a hard line to a bulkhead fitting for the clutch, or just run a flex line the entire way.
20230929_161901_copy_600x800.jpg
20230929_161927_copy_600x800.jpg
20230929_161937_copy_600x800.jpg
20231001_123118_copy_450x600.jpg
20231001_133138_copy_800x600.jpg
-
Post Thanks / Like - 0 Thanks, 3 Likes


 Thanks:
  Likes:


 Reply With Quote
 ). With some help I was able to get the body off the frame and up to the ceiling. It was an easy process, but I imagine it's pretty stressful to maneuver one that's been finished/painted.
 :
: 
 Rotors are new, obviously.
  ).
).