-
Senior Member

We Finished Body Work and Paint Ourselves -- My Thoughts
I know some of you followed my body work and paint thread over the past 6 months. It was a rollercoaster of excitement, disappointment, frustration, and pride. I am writing this thread to give my thoughts on the process and to help other people decide if they want to tackle this portion of the build themselves.
I suspect this post will be long, and it will likely be the most helpful to those who are considering doing their own body work. I hope to share all of the good, the bad, and the ugly. I am going to be as honest as I can about the process to help people know what they are getting into. This threat might feel like a bunch of rambling (because it is), but hopefully it is helpful.
To start off, this was a huge undertaking. I truly feel like this was as big of a project as the mechanical build. We finished the car and drove it one season in gel coat. We put 5,000 miles on the car before starting body work. I have no regrets driving it in gel coat. In fact, I highly recommend it if you are going to do your own body work. It was an amazing year putting 5,000 miles on the car before we started working on it again.
Time
We did about 280 man hours of work. I kept track of how many hours I worked, how many my brother put in, and how many my nephew did. Sometimes having 2-3 of us didn't speed things up much, so somebody doing this by themselves may do it in less time.
Sanding
The amount of sanding is unreal. We ended up doing several rounds of Rage Gold on the parting seams on the body. When we thought we were done, we ended up doing a few more rounds until it looked and felt perfect to us. Then we had to do it again with glazing putty to get rid of all the pin holes in the body filler. We spent about 45-50 hours on the parting lines, getting the doors to line up, trimming the holes, etc. Most of that time was sanding by hand. I'm sure it would go faster using a DA sander, but we were worried about sanding too fast so we did it by hand.
Once we had all the parting lines sanded, we then had to sand the entire car by hand. We block sanded everything to get it ready for Slick Sand. Every square inch of the car was sanded thoroughly to prep for Slick Sand.
After spraying the slick sand, we block sanded the entire car again.
After spraying the sealer we lightly sanded the entire car.
We didn't sand the base color coat because that will mess up the metal flake.
We sanded the clear coat. We sanded it several times. We sanded it by hand with 1000 grit, 1500 grit, 2000 grit, and then 3000 grit. We did all of this by hand because we didn't want to go too fast with power tools. This did add time to the sanding, but I think it was time well spent.
Painting
This was stressful, but definitely doable. Luckily, you learn how to spray the car with the slick sand, primer, and sealer before you start doing color. By that time you have it at least partly figured out. If you have a friend who can help you set up the spray gun, that would be a big help as well. It was a huge help to have a second person while painting. The second person can help with moving the air hose around, making sure the air hose doesn't hit the wet paint, and they can mix paint so you can just keep spraying.
The clear coat is stressful because every piece of dust and insects can get into the clear coat and cause issues. You can sand a lot of these out, luckily. However, we got some dust in the clear coat on the hood scoop and it will forever bother me, but it wasn't bad enough for us to respray.
Buffing
This was painful for me. Everything went well, but the final result wasn't what I wanted. It was also hard to get a perfect finish. I still need to buff our car some more, but it is more than acceptable at this point.
Equipment
Expect to buy a lot of equipment. The equipment isn't cheap, either. We probably spent about $7,000 in paint and supplies. Pain is expensive. We didn't even buy expensive paint and we spent about $3,000 for color, clear, primer, sealer, and Slick Sand. We spent a few hundred dollars on Rage Gold. We bought a lot of sand paper, and I don't even know how much I spent on that, but I'd guess a few hundred dollars. Buying enough plastic and red rosin paper to protect my garage from the paint cost a few hundred dollars. I spent $500 to get high volume explosion proof fans (many use cheap box fans but I personally didn't want to risk it). We also spent about $200 in wood and supplies to build the jigs for the doors, trunk, and hood.
I already owned an air compressor, but I have a 33 gallon compressor. This was a limiting factor in my paint job. Ideally I would have had at least a 60 gallon compressor that could do at least 12 CFM. My compressor could do 6 CFM. I did spend several hundred dollars on HVLP spray guns, and I chose guns that didn't require more than 6 CFM. I suspect I would have had a better spray pattern with higher volume spray guns. I ended up buying a gun for the slick sand, a gun I used for both primer and color, and a gun for the clear coat. Each gun was about $150-200 each. I didn't buy cheap guns, but I also didn't buy super nice and expensive guns.
I also had to buy a rotary buffer and pads. I had to buy buffing compound. I had to buy Tyvec suits. I bought an extra light that attaches to the spray gun. I bought extra LED lights for the garage. All of this added up.
Even with all of that equipment, it was still cheaper than having somebody else do it.
Errors
This is the real point of this thread. If you decide to do paint, just know you will have errors. We have multiple errors and I can point them all out. I will give a few examples of my errors. We still have a small amount of orange peel in our clear coat. We didn't have enough light in the garage to adequately know we got rid of it. The orange peel is minimal and it is definitely less than what you see on a paint job from the dealer. We still have a few buffer trails in the clear coat that annoy me, but they are minimal and I am one of the only few people who will notice them. I had a fiber from a rip in my Tyvec suit go into the clear coat and I had to sand and respray the color and clear on half of the hood. We had some dust blow into the clear coat on the hood scoop, and it is on the white stripe. It is noticeable and that is the error that bothers me the most. However, we decided that most people would never see it and it wasn't worth respraying the entire hood scoop. When moving the hood I accidentally hit the edge on something and put a chip in the paint. I ended up just doing a touch up on the edge and it isn't that noticeable. I have some TINY pin holes in the clear coat, likely due to my spraying technique (or lack thereof). There are a few spots on our stripes where the edge isn't as crisp as I would like. The list goes on. We have a few runs that we didn't fix. One of the runs is LOW on the nose and was in the base coat. It is not noticeable since it is so low on the car, so we decided to leave it. There is a run on the inside of the door, but we are going to put a panel over it so it wasn't worth fixing. We had a drop of paint fall from the cap of the gun to the fender, and if you look hard you can still see it is slightly raised even after sanding it down.
Like I said, just know that you will have errors. We could have spent another 100 hours to get rid of many of the errors, but we didn't think it was worth it. Our goal was NOT a show quality finish. Our goal was a good paint job that we would be proud to show other people. Our goal for the build was to make a car that we would drive into the ground. We know we will get rock chips, scratches, etc. Whenever we found an error, we evaluated the error to determine if it was something that was acceptable considering our goal of driving the car into the ground. We fixed the errors that weren't acceptable or that were too noticeable.
Even though we have all of those errors, I cannot stress how good the car looks. No paint job is perfect. But only you can decide which errors need to be fixed and which ones don't.
-
Post Thanks / Like - 7 Thanks, 16 Likes
 FF33rod
,
cc2Arider,
bobm488,
kabacj,
Andrew Davis,
mach'er,
Just 1 More,
mikeinatlanta,
JimStone,
phileas_fogg,
RR20AC,
Windsor,
zarnold,
M. Townsend,
JV1953,
WIS89 liked this post
-
Senior Member
Time
As I said above, we put about 280 man hours into the body work and paint. Another thing to realize is that once you spray the sealer you have to get everything sprayed to clear within several days. To get proper chemical bonds, you have to get the next coats on within certain time limits. For example, our base coat said you need to have a clear coat on NO MORE than 24 hours after spraying the base, but preferably within several hours of spraying the base. I had 8 days off in a row to do the paint. We painted the bed liner on the underside of the body, built jigs, etc. in those 8 days as well. I highly recommend that you have at least 4-5 days off in a row to go from primer to clear.
Final Thoughts
This was a huge project. After having finished the car, I can truly say I am glad we did the paint job ourselves. I have no regrets about doing our own body work and paint. I learned a lot. I gained new skills. I am proud of my work. The best part for me is I can say we built the car and painted it ourselves. The car is ours, flaws and all. I am proud of the car and love showing it to other people.
Do I think other people should do their own body work and paint? This is a loaded question, and I think it is something you have to decide yourself. Body work and paint is a test of patience. This is something you can't rush. You also have to be willing to accept errors in your paint job, especially if this is your first time. The good news is if you decide to do it, it is a rewarding experience. There are plenty of folks on the forum who are willing to help you get through the process.
In closing, I am glad we did it ourselves. I know I have said that several times, but I am proud of our work and glad we did it. Would I do it again on our next build? I'm not sure, but I will seriously consider it. Part of me thinks it would be nice to just pay somebody else to do it, but then part of me is proud that we did it all ourselves.
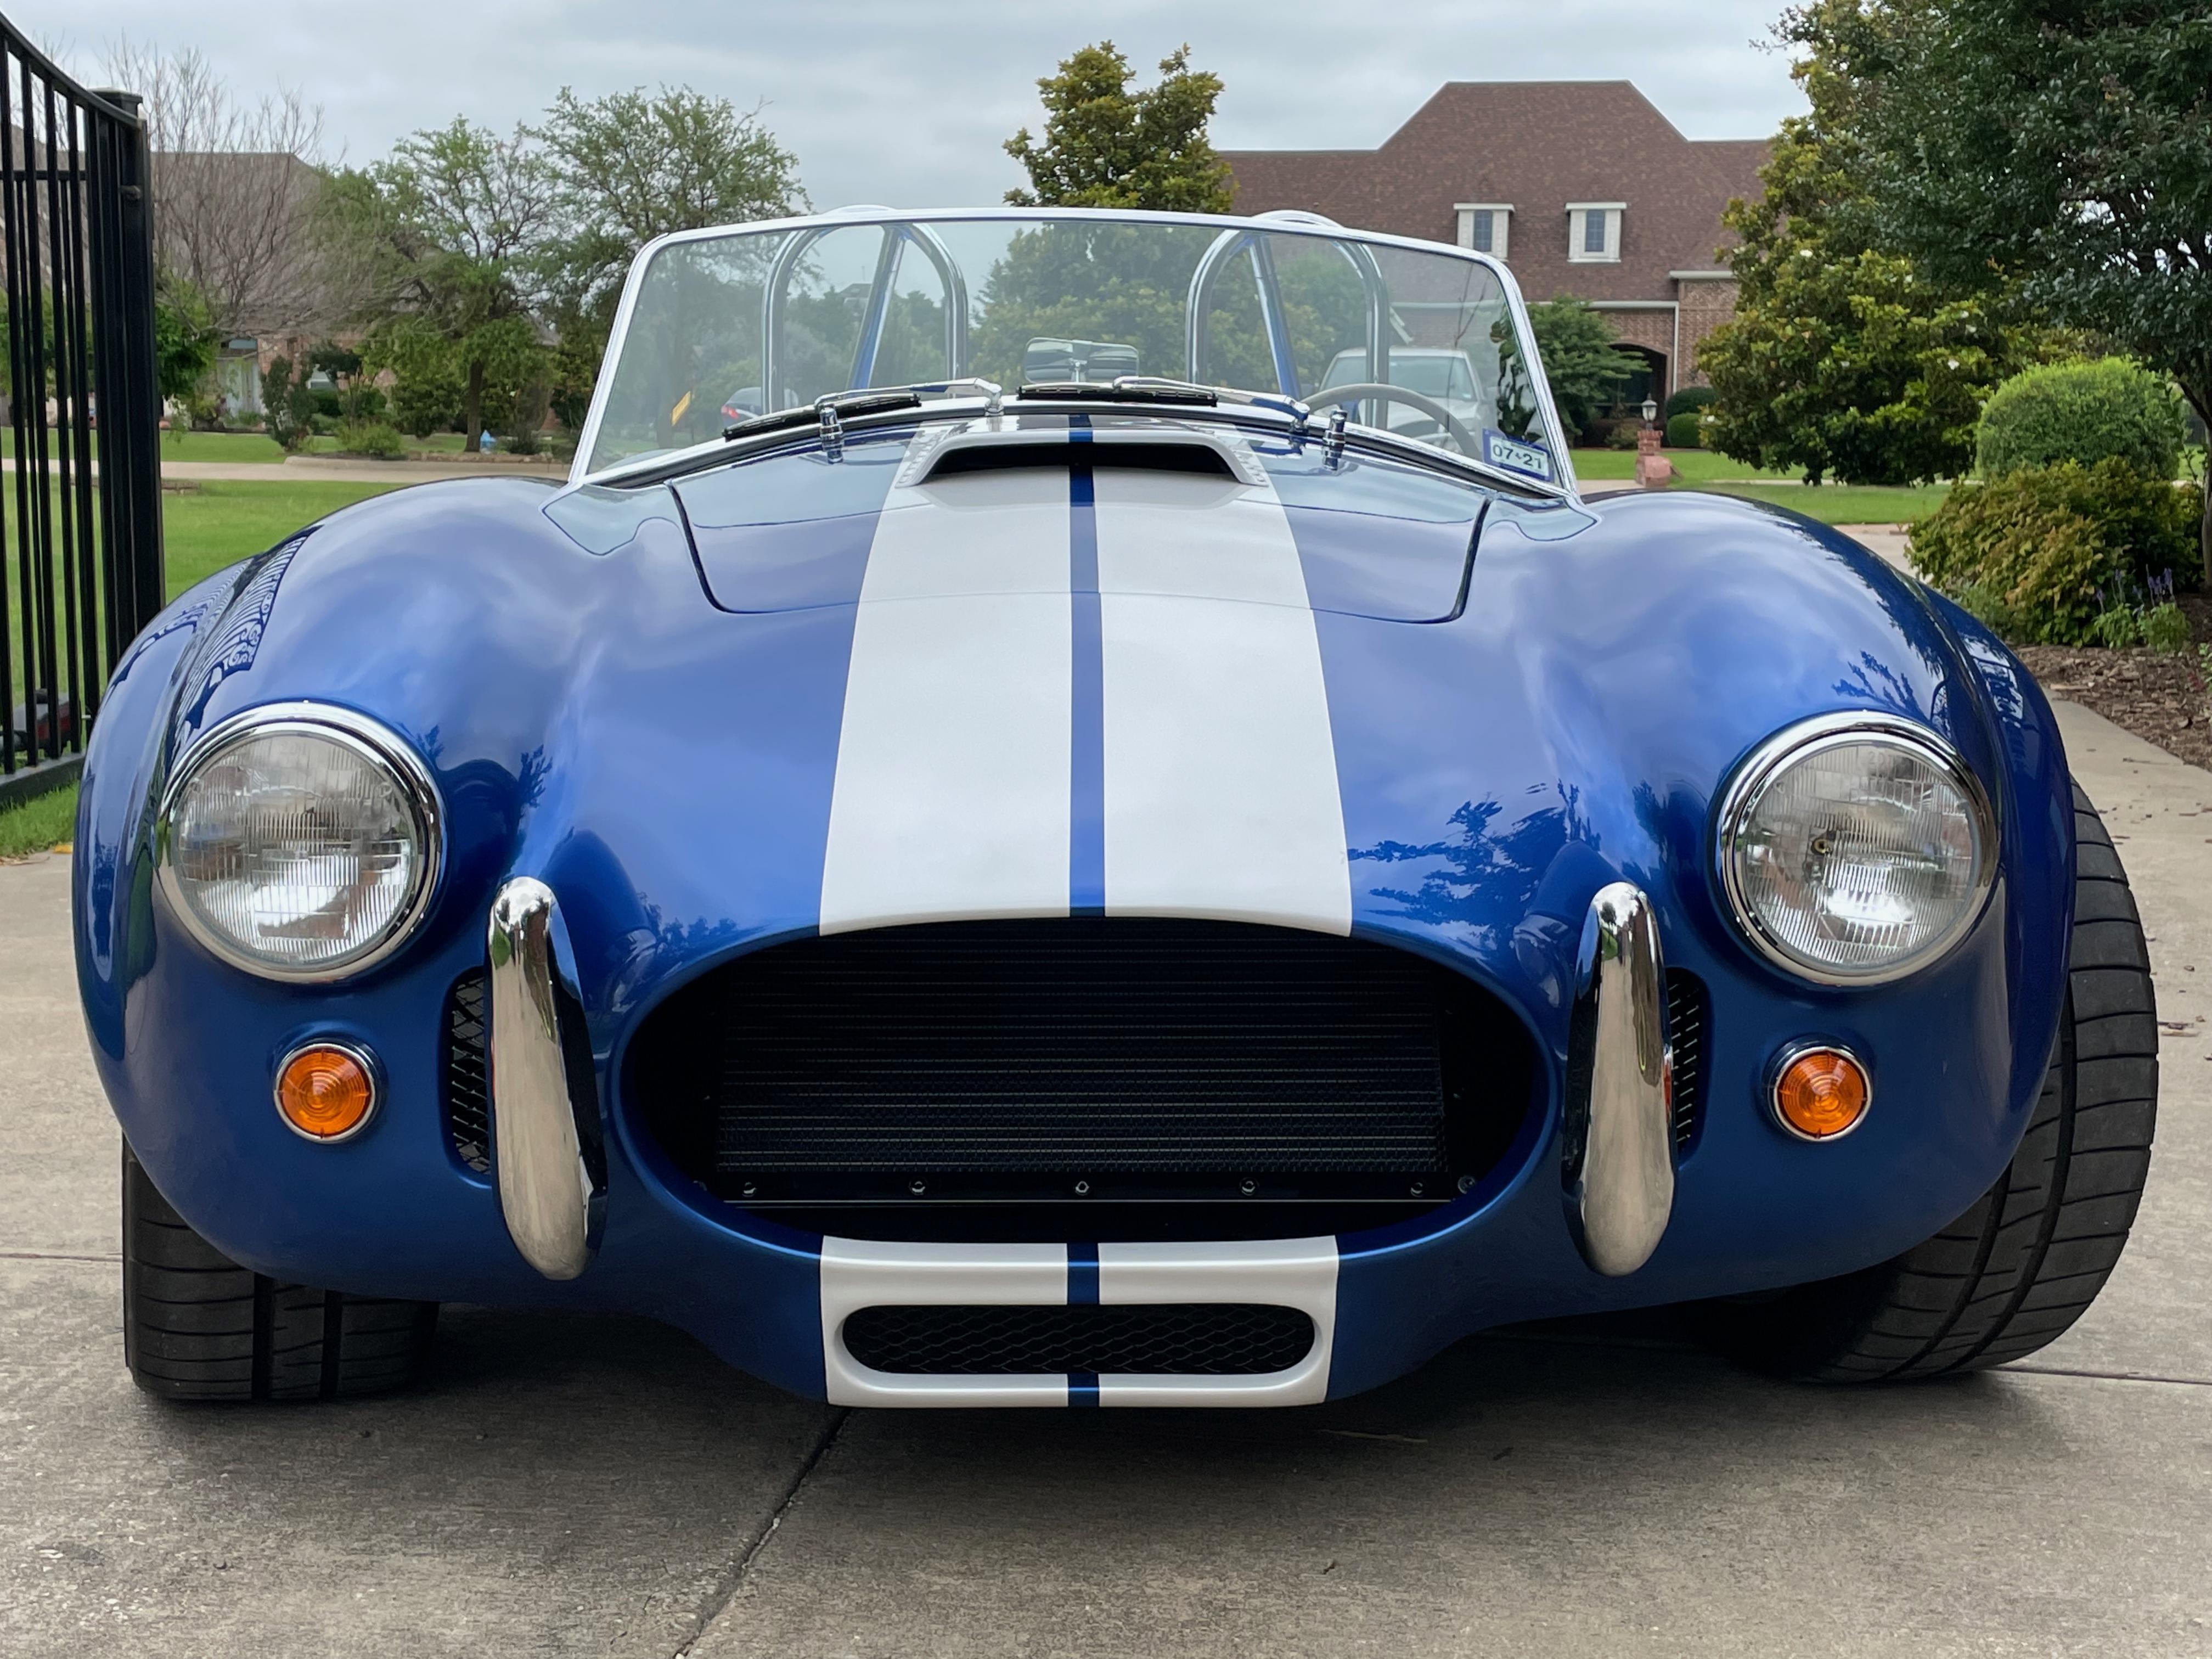
The car is truly stunning. Here are some pictures. It looks even better now because I did another round of buffing after taking these pictures.
20230623_120952.jpg20230623_120838.jpg20230623_120848.jpg20230623_120859.jpg20230623_120916.jpg
-
Post Thanks / Like - 5 Thanks, 13 Likes
JohnnyB,
k-roy,
cc2Arider,
Salty Chief 35,
bobm488,
Andrew Davis,
mach'er,
Just 1 More,
mikeinatlanta,
JimStone,
Windsor,
JV1953,
WIS89 liked this post
-
Looks great. Congrats!
Jim
2016 Mk4 Challenge Car, IRS, 3.31 Torsen, RDI Aluminum 427w, AFR 225s, Vic Jr. ProSystems 780 HP, TKO-600 w/Liberty mods. Forward cage. Levy 6/4 piston Wilwoods. Not completed yet, will be a streetable track car.
2004 Superformance MkIII #1855, 2007 Superformance MkIII #2584 purchased in 2012 both sold.
-
Senior Member

I think it came out great!
FFR #7388 - Mk 4 Complete Kit w/ IRS, Ordered 10/21/10, Delivered 12/8/10. 302 with FiTech and Under Car Exhaust, Heat & A/C, Rod Top. Hard top and shop built side curtains added 2023.
-
Senior Member

That's definitely something to be proud of! Quite a beautiful car.
----------------------------------------------
Jeff
Roadster delivered 8/27/23
Chevrolet Performance LS3
Build Thread
-
Senior Member

Very nicely done! Looks great!
FFR 5385 MKIII. 302, 3-Link. All legal in MA 1/7/2012.
-
Ken
MK4 #10476, complete kit, Gen 3 Coyote, TKX with 0.68 overdrive, PS with cooler, IRS, 18" rims, dual rollbar, Carbon fiber dash,
Ordered 12/18/2021, Deliverd 9/24/2022, First Start 6/24/2023
-
As I start the process of building my kit I followed your other thread closely. Thank you for taking time to document this and for this final write up. You guys did an amazing job and I would be proud to have a car that looks that nice.
-
Senior Member

Wonderful results and write up. You’ve reinforced my decision to leave this process up to the pros!!
-
Senior Member
Thanks for all the kind words! We did the body work and paint in 6 months, which I feel is impressive since it wasn't our day job.
Every time I walk into the garage I have to give myself a few extra minutes to look at the car and think, "I built and painted it."
The UPS guy has been following the paint job. Yesterday he stopped and talked to me for 15 minutes about it and admired our work. He was amazed I learned from YouTube and this forum. Thank you everyone for the help!
-
Senior Member

That looks fantastic, damn rights you should be proud!!!
Steve
Gen 1 '33 Hot Rod #1104
347 with Holley Sniper & Hyperspark, TKO600, IRS, 245/40R18 & 315/30R18, DRL, Digital Guard Dog keyless Ignition
-
Senior Member

Great job! I would be proud of that.
MK2 Roadster - 347 - Boss 302 Crate 4x2 Weber 44 IDFs
-

Originally Posted by
hineas

Buffing
This was painful for me. Everything went well, but the final result wasn't what I wanted. It was also hard to get a perfect finish. I still need to buff our car some more, but it is more than acceptable at this point.
I painted my car too (my first paint job).
My favorite learning was 3M Trizact Sandpaper.
I did not do any machine buffing or machine polishing.
I used the traditional sanding for the initial passes but used the 3M Trizact 3000, 5000 and 8000 instead of buffing.
I used the 3M Perfect-it steps 2 and 3 by hand after the 8000 and it turned out great.
-
Post Thanks / Like - 1 Thanks, 0 Likes
 WIS89
WIS89 thanked for this post
-
What an achievement! Looks great, and thank you for sharing your journey with us 
Craig C
-
Senior Member
Great to know! I might look into that
-
Senior Member

Good for you guys! Others have said it as well, but it can’t be overstated. The bodywork is daunting for us novice types, but you proved it’s possible and knocked it out of the park. Congrats!
-
Husband/father/son

You could have saved time by only sanding to 1500, then buffing, the 2000 and 3000 steps are a waste of time unless you are attempting a World of Wheels show paint job, and even then, those guys do not sand to 3000, but buff with varying materials designed for cutting and buffing to a final finish.
Modern base coats do not get sanded before clearing over, so in this case, you did exactly what you were supposed to do.
Getting a large compressor, with a water/oil separator is a must, as you clearly found out, even with a modern day HVLP gun.
I think you should be very proud of your finished product, it looks great in the pictures, and after you drive the car, and get a few paint chips, you'll forget about that grain or two of dust caught in the clear you could not denib and buff out.
Bill S.
-
Senior Member
We did have a water/oil separator. There is no way I would paint without one. I was actually quite impressed with my 33 gallon compressor. Sure, it wasn't ideal, but honestly the finish was pretty good considering what we had. To me, it wasn't worth getting a 60+ gallon compressor for the cost and so we decided to just "deal" with the smaller compressor. However, there is NO way we could have painted with anything less. I would recommend to others that the 60 gallon is definitely better, but we "got by" with what we had. My compressor kept-up with the gun settings. On the primer gun it ran continuously (not ideal). The finishing gun I used for the clear used less air, so that gun was perfect for my compressor. The compressor would cycle on and off with that gun.
Even though my compressor ran continuously while spraying the primer gun, I never had decreased pressure at the gun. I set my gun at 40 psi going into the gun (recommendation by the gun and the pain), and my compressor maintained 40 psi the entire time. Running my compressor continuously isn't good for the compressor though...
I had read the same thing about the sanding to 1500 being sufficient. I wasn't sure which way to go. With two of us wet sanding, it didn't take long to do the 2000 and 3000 so no harm done. Good tip for the future, though.
Your last sentence exactly reflects our thoughts and why we didn't fix some of the errors. It is good to know we aren't alone on thinking like that. We had 2-3 runs in the clear that weren't acceptable, but those was easily sanded out. The large fiber that blew into our clear coat also wasn't acceptable (it looked horrid), so we fixed that. But the dust in the clear (a little more than a few grains) on the hood scoop is annoying, but it isn't visible when standing next to the car unless you know it is there.
-
Member

Looks like a professional job. I went to school for collision repair and fiberglass refinishing is a pain sometimes, especially when you're doing parting lines. Even if their are small imperfections, if you learned a thing or two along the way, the journey was worth it. I'd be proud of the job you did if that was my car. Congrats!
-
Just another plug for the Trizact sandpaper instead of buffing.
All the curves on the front end would have been impossible for me to successfully buff out with a wheel but they came out great with the Trizact sandpaper followed by a hand polish.
-
Post Thanks / Like - 1 Thanks, 1 Likes
-
-
Thank you for sharing your experience. That's a heck of a lot of work but the finished product looks fantastic! And not many guys can say they did their entire body and paint work. Really cool
-
Senior Member

What was the final cost when you include all painting supplies, sprayer and booth materials that you didn't already own?
MK4 #10008 - Ordered 10/06/20, Delivered 03/03/21, First Start 7/22/21, First Go Kart 7/24/21
Paint by Metal Morphous 5/14/22, Legally registered 6/8/22, Graduated 7/20/22
Build Thread
https://thefactoryfiveforum.com/show...been-delivered
Complete Kit, Ford 306, Sniper/Dual Sync, T5, Hydraulic clutch
-
Senior Member
I don't have all of my receipts so I don't have an exact amount.
But we spent roughly $3,000 on paint. $200 on body filler. $200 on sand paper and sanding supplies. $500 on exhaust fans. $400 on plastic, paper, tape, etc. to make the booth in my garage. $200 on PPE for 3 people. $300 for buffing. $250 for extra lights in the garage. $50 for a gun light. $500 on spray guns. $100 for a dryer and oil separator system for the air compressor. $150 for tack cloth, wax and grease remover, cleaning supplies, etc. $200 for building jigs to hold the doors, trunk, and hood.
I'm sure I missed a few things. But $6,000 or so is a rough estimate.
-
PLATNUM Supporting Member


Super Job!
16+ FFR kits and counting!
-
Senior Member

Your car looks fantastic. Your costs sure make pro paint job estimates look more reasonable. But then you wouldn't have the pride in job that you now have.
FFR MkII, 408W, Tremec TKO 500, 2015 IRS, DA QA1s, Forte front bar, APE hardtop.
-
Not a waxer

Originally Posted by
CraigS
Your costs sure make pro paint job estimates look more reasonable.
Materials have skyrocketed since 2020 (gee, imagine that!). Currently material costs for a roadster are right around $3k for something like Guardsman Blue which is not an expensive color and go up from there for some of the modern colors that are loaded with metallics and pearls. I did one recently for which a gallon of the main color alone was well over $3,000!
Jeff
-
My hat is off to anyone who will venture into the body and paint world and paint their own car. I found that part of the build to be way harder than the chassis, which I found enjoyable, but the body probably took as much time or more than the chassis. I did mine in Ford Ruby Red which has a pearl middle coat which I was terrified to shoot because if it's not right the splotchiness stands out like a sore thumb. I did the base and clear coat but had my friend who lent me the spray booth did the pearl coat. The cost for materials is ridiculous, but the end result I am proud of being able to say I did my whole car. cobra3.jpgcobra (9).jpg
FFR 9883 MKIV ,427 Windsor engine
TKX 5 speed, Three Link 3.55 gears
Power Steering, Leather Seats
18" Wheels and Tires, Drop Trunk
Fun Package
-
Sorry for the sideways pics. Sometimes I get them right but most times I don't.
FFR 9883 MKIV ,427 Windsor engine
TKX 5 speed, Three Link 3.55 gears
Power Steering, Leather Seats
18" Wheels and Tires, Drop Trunk
Fun Package
-
Senior Member
We seriously considered the ruby red, but didn't want to deal with the tricoat paint. Yours looks amazing!
-
Senior Member
Originally Posted by
Jeff Kleiner
Materials have skyrocketed since 2020 (gee, imagine that!). Currently material costs for a roadster are right around $3k for something like Guardsman Blue which is not an expensive color and go up from there for some of the modern colors that are loaded with metallics and pearls. I did one recently for which a gallon of the main color alone was well over $3,000!
Jeff
That is right on for us too. Materials alone were about $3,200. The rest of the cost was equipment and setup that a paint shop wouldn't need to do because they already have it.
-
Senior Member
Originally Posted by
ggunter
My hat is off to anyone who will venture into the body and paint world and paint their own car. I found that part of the build to be way harder than the chassis, which I found enjoyable, but the body probably took as much time or more than the chassis. I did mine in Ford Ruby Red which has a pearl middle coat which I was terrified to shoot because if it's not right the splotchiness stands out like a sore thumb. I did the base and clear coat but had my friend who lent me the spray booth did the pearl coat. The cost for materials is ridiculous, but the end result I am proud of being able to say I did my whole car.
I definitely agree that the body work and paint is at least as big of a project as the mechanical build. Speaking strictly hours, we did the build in a similar time as the body and paint (I estimate roughly 300 hours for our bills with minimal modifications). However, the body work and paint was more challenging for me.
-
Your car turned out amazingly well. What color is it? It almost looks like Ruby Red.
FFR 9883 MKIV ,427 Windsor engine
TKX 5 speed, Three Link 3.55 gears
Power Steering, Leather Seats
18" Wheels and Tires, Drop Trunk
Fun Package
-
Senior Member
It is the Mazda Soul Red Crystal. This is supposed to be a tri-coat like the Ford Ruby Red. However, PPG has one that is just a base coat and clear. This doesn't have quite as much "pop" as the tricoat coat you see on Mazdas, but the color is identical. I was worried about it not being a tri-coat, but it turned out to be a phenomenal color.
The lady who mixed the paint said it had several different colors of aluminum flake, including orange. It also had a pearl added into the base coat.
For being a base coat with clear, it has a lot of depth. In the direct sun it is bright red, but when the sun is hitting it at an angle it has varying shades of deep red. I'm pleased with the color.
-
Post Thanks / Like - 0 Thanks, 1 Likes
-
Member

This is such a helpful thread for inexperienced folks like me, as it provided so much information. Thanks for posting!
And, as others have said, your car looks amazing!
-
Senior Member

Good for you! Your car looks amazing. You should be proud of what you've accomplished.
I'm in a black hole right now with tackling bodywork on my coupe build. Definitely learning a lot, sweeping up a lot of dust and trying the patience of my wife too with all the mess
The plan is to get it painted by someone that knows what they're doing but the longer I work on this the more I'm tempted to try the paint myself too.
Build 1: Mk4 Complete Kit #9312 Ordered 1/27/18, Delivered 3/24/18, CA SB100 Registered 9/11/19 - Gen 2 Coyote TKO600, IRS, Power Steering, Wilwood Brakes, 17" Halibrand.
Build 2: Gen3 Coupe Complete Kit #309 Ordered 1/25/21, Delivered 6/9/21 - BluePrint GM 427 LS T56, IRS, AC, Power Steering.
Album Here
-
Senior Member

hineas it is absolutely gorgeous!!!!! You guys should be proud. I did not have the stones to walk the path you did with body and paint. Congrats! I am currently tearing down my 1978 fj40 landcruiser with a full restore going on. My brother and I are planning on shooting paint on it. My bro builds and paints high end guitars so he has an idea about paint but not on the large scale. A lot less riding on this paint job than my cobra ( flat surfaces and shooting an original color which has NO metallic flakes).
FFR MK4 Roadster (9945) complete kit, delivered 12/4/2020, First start and go kart 5/7/2021. Legal 8/14/2021, Paint finished 7/18/2022 (Viking Blue). 347BPE CI, TKO600, Moser 8.8 3link 3.55, Halibrand 17x9 17x10.5, power steering. Carbon Fiber Dash. Carbon Fiber trans tunnel, adjustable Kirkey Lowback Vintage seats, Vintage gauges, RT drop trunk mod, FFmetal drop battery mod and trans tunnel, Forte front sway bar. Forte mechanical throttle linkage, RT gas pedal.
www.covespringsfarm.com
-
Such a good thread! Just ordered my kit and am researching forum to learn from those that have gone before me. I definitely plan on painting mine. And interestingly, am seriously considering Mazda Soul Red. It’s such a pretty color.
Having built a plane with a fiberglass cabin, I’m all too familiar with the body work that’ll be required. (I affectionately call it fiberglass hell). But, I can only hope to end up with a finished product as good as yours! You have a lot to be proud of! It turned out AWESOME!
-
I loved your description! As someone who just painted their first car (finished mine last month) I can say you are spot on in your account of the process. I didn't have quite as many hours as you did (about 150 hours), I suspect that's because I used a DA buffer to wetsand the clear to get rid of the orange peel (my car looked like a giant brown orange)-- so I guess that's where the time savings happened.
And yes, it was very stressful indeed. Looking back, I love the fact that I painted it myself. My goal was to build this car solo-- soup to nuts, and that included the paint. While its not perfect, I have yet to have any one point to any flaws, which of course I see easily.
For those considering doing your own paint all I can say is this. If you're willing to put in the time and realize that it will take longer than you think, AND, be a bit stressful; I say go for it. I used a $300 HF 21 gallon compressor, the famous HF purple spray guns, and set up a $89 back yard wedding tent (from Amazon) inside my garage to use as a spray booth. A couple of box fans were cut into the walls of the tent to control ventilation (this is important to control overspray). And one month later, I had a painted car.
If I can do it, anyone can-- seriously!
Thanks for your post!
Picked up kit 9/6/22. Complete Roadster Kit, IRS, 18" wheels, Forte 302, T5. First build. No auto mechanical experience and beyond excited to learn. Loaded with "Empty Nester" time and energy. Link to my build videos:
https://www.youtube.com/channel/UCgX...uCWGcelzGecm1Q
-
Post Thanks / Like - 0 Thanks, 1 Likes
-
Senior Member
Originally Posted by
nucjd19
hineas it is absolutely gorgeous!!!!! You guys should be proud. I did not have the stones to walk the path you did with body and paint. Congrats! I am currently tearing down my 1978 fj40 landcruiser with a full restore going on. My brother and I are planning on shooting paint on it. My bro builds and paints high end guitars so he has an idea about paint but not on the large scale. A lot less riding on this paint job than my cobra ( flat surfaces and shooting an original color which has NO metallic flakes).
The FJ40 will be amazing! Painting a solid color with no flake is definitely easier. Plus, if I understand correctly, you can also sand the base coat if there are errors.
I love those FJ40's. I am definitely jealous!


 Thanks:
  Likes:


 Reply With Quote