-
Senior Member

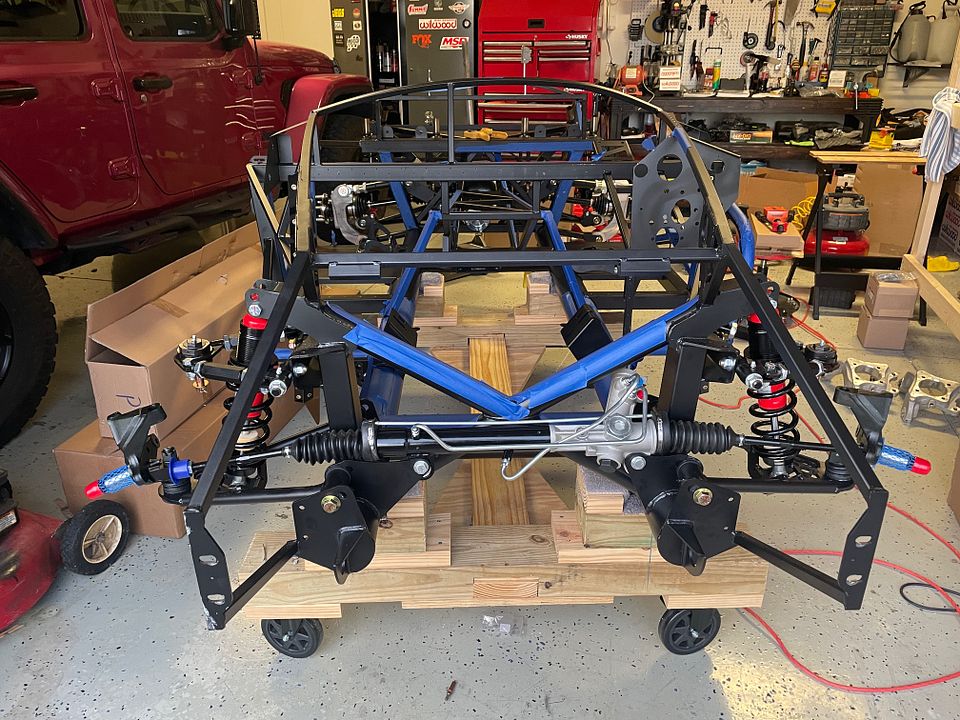
CV2065 MKIV Roadster Build Thread #2
I've had my kit for almost 2 weeks now and was debating about a build thread and was going to take to Instagram instead, but as much as I've dug into other build threads over the years for ideas and help, thought I'd give some more back as well, so here we go again!
I did sell my last Roadster in May. Hated to see it go, but the money was right and the gentleman I sold it to was so happy to have it, and that made it really satisfying. Also, with the funds I can do a few things with this build that I wasn't able to do last time around due to a few financial restraints, even though everything has gotten so much more expensive!
So...ordered the complete kit again with all of the bells and whistles and there will be many custom items on this build. Here's a few of them:
- Wilwood Brakes - Front and Rear (Yay!)
- Intatrim Diamond Stitch Custom Upholstery
- Custom Speedhut Gauges w/Roush Theme
- 2" Rollbar
- Gas N Pipes/Headers (Big and Loud version)
- Carbon Fiber Dash
- BC Forged KL17 Wheels
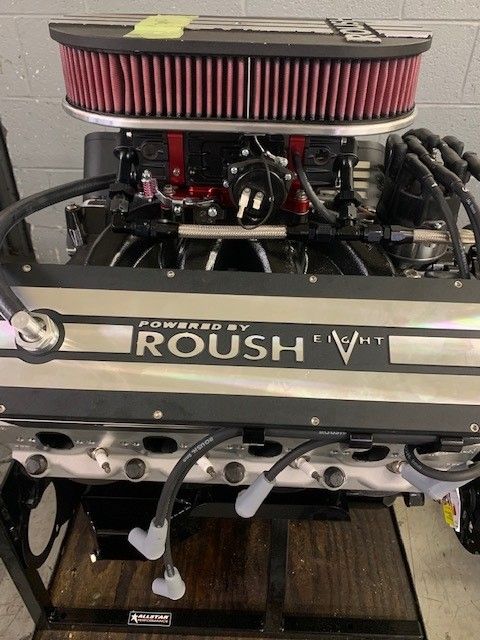
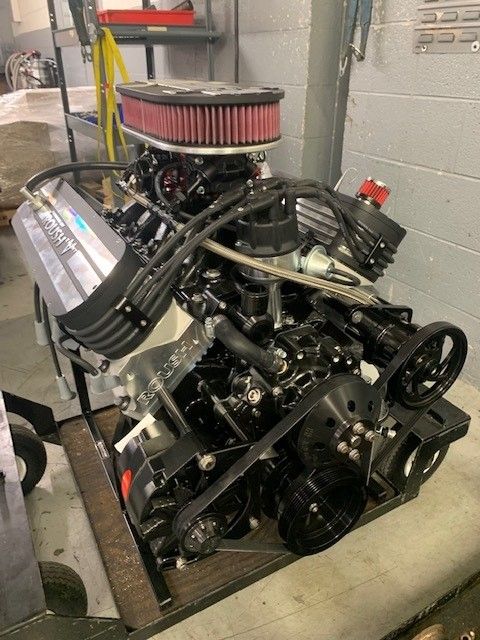
Top it off with a Roush 427R (nice big cam), TKX 5 speed, IRS and as with my last build, the car will be all blacked out. Haven't decided on the color yet. All of the trimmings from Breeze, hydraulic and mechanicals from Mr. Forte, exterior additions from Mike Everson and turn signal/pedal and drop trunk mods.
Thought I'd move a little faster on this one since I've been down the road before, but it's amazing how much one forgets, so we'll see. Looking forward to the build!
-
Post Thanks / Like - 0 Thanks, 5 Likes
-
Senior Member

This will be good--I'm looking forward to following your thread!
-
Post Thanks / Like - 0 Thanks, 1 Likes
-
Senior Member

Followed your thread the first time around researching my roadster, great to see you doing another one
-
Post Thanks / Like - 0 Thanks, 1 Likes
-
Senior Member

Right on, I look forward to following along again. I learned a lot from the first one and would love another bite at the apple. Lots of things I would do differently the second time.
2" roll bars are good start
Last edited by Blitzboy54; 11-21-2023 at 12:37 PM.
MK4 #10008 - Ordered 10/06/20, Delivered 03/03/21, First Start 7/22/21, First Go Kart 7/24/21
Paint by Metal Morphous 5/14/22, Legally registered 6/8/22, Graduated 7/20/22
Build Thread
https://thefactoryfiveforum.com/show...been-delivered
Complete Kit, Ford 306, Sniper/Dual Sync, T5, Hydraulic clutch
-
Post Thanks / Like - 0 Thanks, 1 Likes
-
-
Post Thanks / Like - 0 Thanks, 1 Likes
-
Way to go Chad.... Can't wait to see what you come up with this time... I've seen the new gauges and wheels,,,, this is going to be an awesome beast...
-
Post Thanks / Like - 0 Thanks, 1 Likes
-
Subed! Looking forward to the build!!
-
Post Thanks / Like - 0 Thanks, 1 Likes
-
Senior Member

Congrats, Chad. I totally understand the fun and satisfaction from the build experience, and the desire to do it again. Glad you get the opportunity for Part Deux. Did you consider any other F5 kits for your second build (i.e. Coupe, truck, etc.)?
Chris
Coupe complete kit delivered: 4/22/24.
Build Thread. Coyote. T-56. IRS w/3.55. Wilwoods. PS. HVAC. Side windows.
MK4 Complete kit.
Build Thread Index. Delivered: 10/15/2020. Legal: 7/25/23. Coyote Gen3. TKO600 (0.64 OD). IRS w/3.55. PS. Wilwoods. Sway bars. This build is dedicated to my son, Benjamin.
Build Thread.
-
Post Thanks / Like - 0 Thanks, 1 Likes
-
Senior Member

Originally Posted by
460.465USMC

Congrats, Chad. I totally understand the fun and satisfaction from the build experience, and the desire to do it again. Glad you get the opportunity for Part Deux. Did you consider any other F5 kits for your second build (i.e. Coupe, truck, etc.)?
Hey Chris. I did take a look at a lot of other kits, including some from Superlite, Ultima, and the FFR 65 Coupe. I came back to the Roadster as there was some unfinished business I wanted to do with the car that I didn't do the first time around.
-
Post Thanks / Like - 0 Thanks, 1 Likes
-
Senior Member
Let's Go!
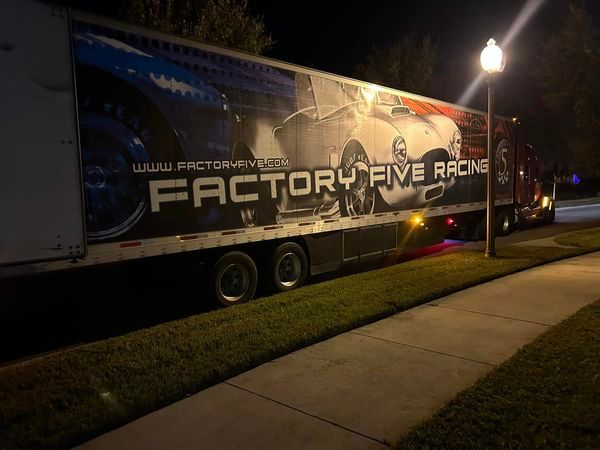
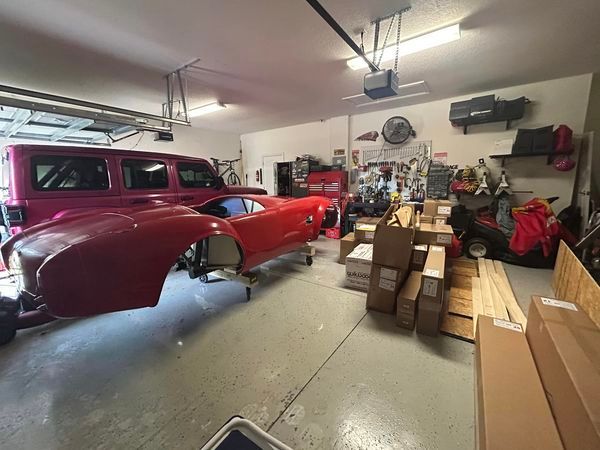
I've been making progress on the build, although not as quickly as I would have liked, but progress none the less. Starting at the beginning with the delivery using Stewart. My kit was completed on 9/30, but not picked up until about 5 weeks later and delivered on 11/6. Not terrible, but I think I missed the first run down to Florida. Delivery was at night and spot on as usual. My driver was great and managed to get through my neighborhood with ease, which is no easy task. The neighbors remembered the giant Stewart truck coming in the first time about 5 years ago and knew where he was going. I'm always amazed at how much larger that Stewart FFR truck is to a 'typical' 18 wheeler.
Loaded up on my dolly and got everything stuffed into the garage. Body buck was almost built and began the inventory. Amazingly enough, I only had about 10 items on the POL list. Two of which were my wiper system and radiator, which came only 2 days after the kit arrived. The only other major item was the wiring harness. Apparently, Russ Francis is having issues with labor, so they are limited on the harnesses they can produce. I waited about 4 weeks to get one sent out but had to keep calling until I was able to secure one from a recent delivery. Squeaky wheel!! I'm still waiting on my Certificate of Origin. Apparently, it can't be sent until all POL items have been shipped and I have one more item to get, which are the assembled louvers. I don't remember that to be the case from the first build?
Last edited by cv2065; 12-19-2023 at 12:42 AM.
-
Post Thanks / Like - 0 Thanks, 1 Likes
-
Senior Member
-
Post Thanks / Like - 1 Thanks, 0 Likes
-
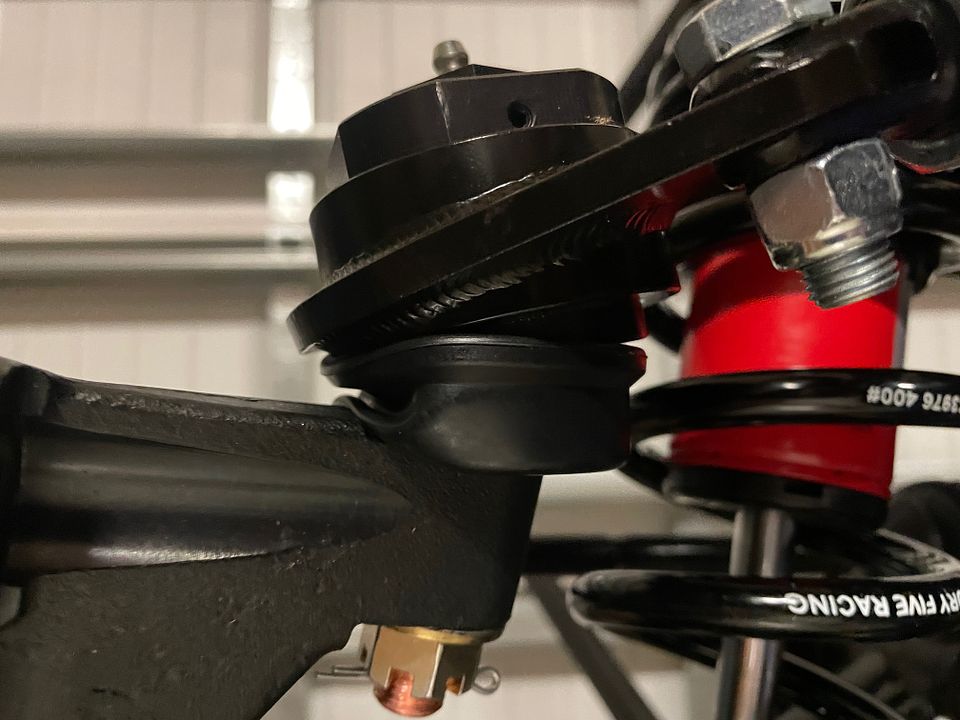
Senior Member
The IRS
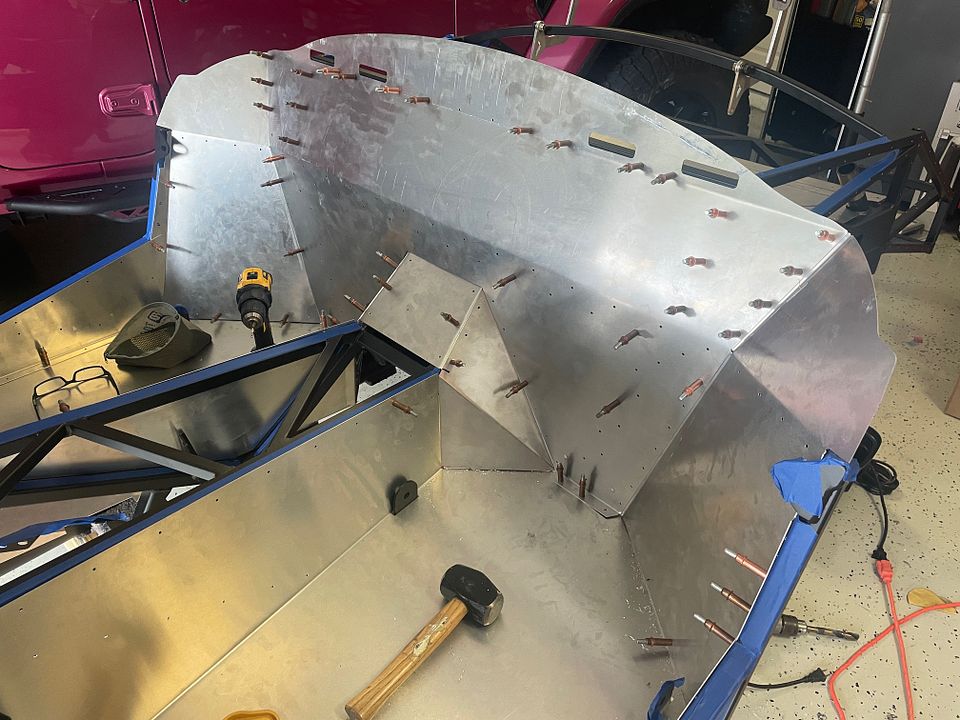
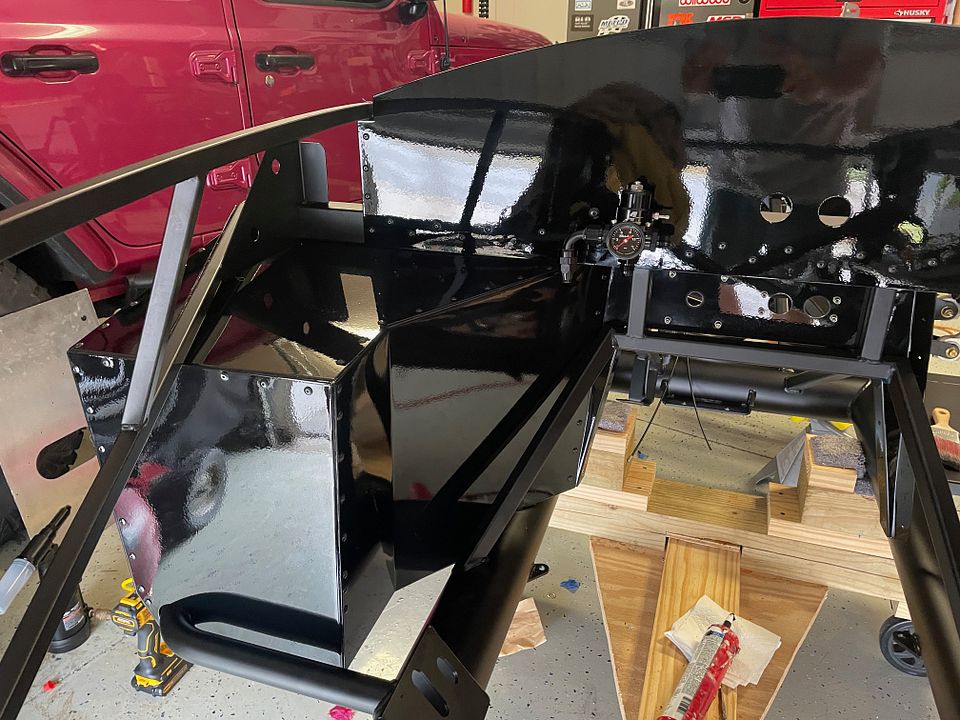
I removed all of the panels after fitment and drilling, and they are now all at the powder coaters. We're going a gloss black this time and some have already come back. I should have all of them before Christmas, but the guy I used last time is out of business, so I'm pretty sure that I won't be getting the all in, $500 'friends and family' discount.
The IRS was next and I propped it up on my wife's school dolly, degreased, taped up and painted with a Rustoleum Oil based high gloss. The unit is new from FFR, so didn't take much to prepare. Although I did paint the coupler with POR15. Don't forget to protect your threaded holes! I also drilled out the front mounting holes with a 5/8" bit. I bought a brand new bit for this as well as cutting oil. My cordless drill couldn't handle the torque so switch to my corded one. Very slow and back and forth as I had flashes of my wrist getting ripped off the last time because I just wanted to get it done. VERY easy to do if you take it slow and have the right tools, once you get past the first indented area of the ear.
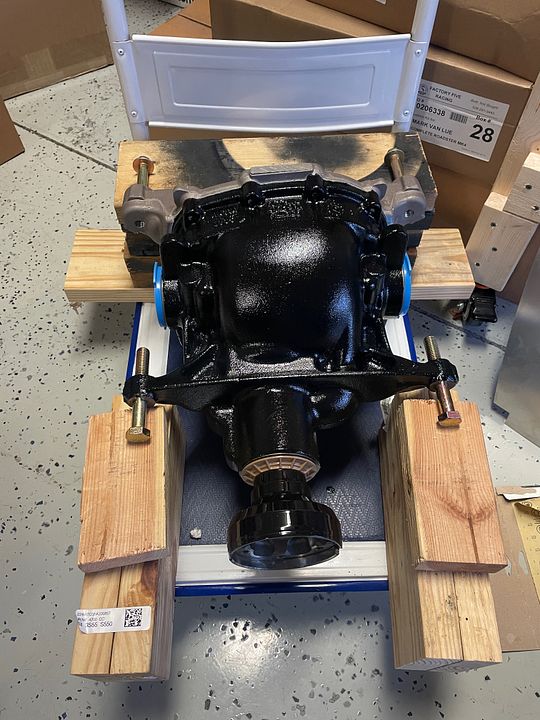
Time for installation! My son was back from school, so now I have 3 helpers. I think things went worse than when I was alone like last time, which was literally a 25-minute process. I duplicated as before by using my trans jack to get the pumpkin up and over the frame support, then I planned to switch over to my floor jack. My son was guiding and somehow got the IRS wedged in the frame. ") . I still don't know how that happened but took some time to get it worked out. The wife, aka 'The Foreman' was shouting out commands and reminding me that she was running out of time and needed to go exercise. if I end up doing another one down the road, I'll fly solo again. In the end, all looks great and snugged down to 100 ft/lbs on all 4 corners.
. I still don't know how that happened but took some time to get it worked out. The wife, aka 'The Foreman' was shouting out commands and reminding me that she was running out of time and needed to go exercise. if I end up doing another one down the road, I'll fly solo again. In the end, all looks great and snugged down to 100 ft/lbs on all 4 corners.
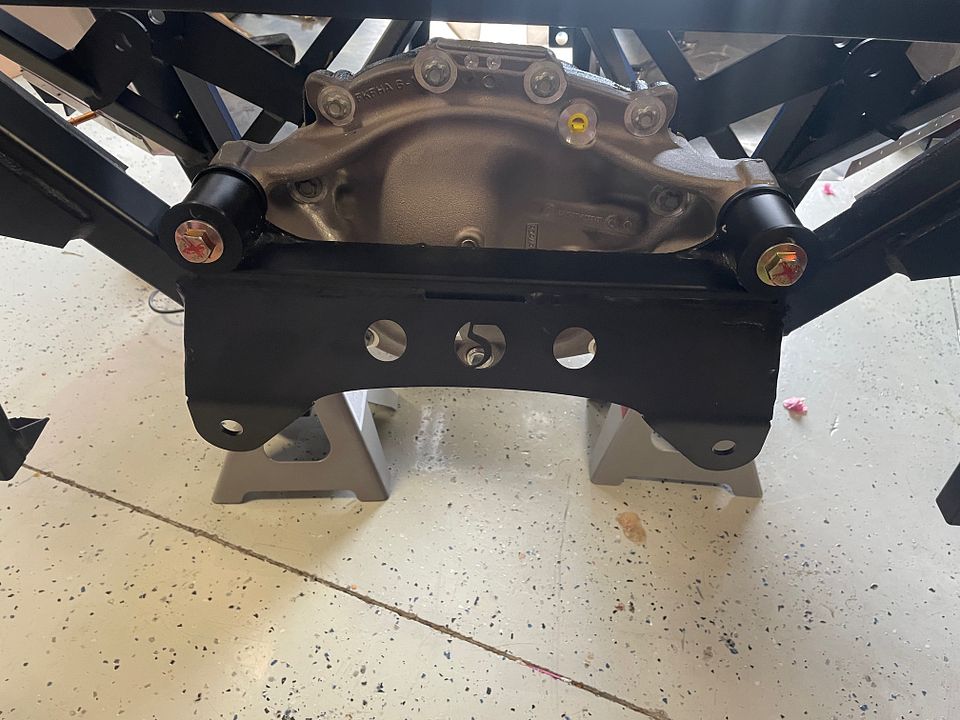
There is some confusion in the manual in regard to torque values where it states 100 ft/lbs in one area and 129 ft/lbs on another table. Confirming with FFR, they recommend 100 ft/lbs (dry - no lube) on all 4 corners. The M14-2.0 bolts on the rear are going into aluminum, so I feel more comfortable with the 100 ft/lbs as well. I also have seen on other posts that some, including myself, experience a 1/32" gap on the right side rear mount. I also inquired with FFR, and they said "That is considered normal for our install, and nothing needs to be done regarding it. You can proceed with the build." Micheal Everson said the same in another thread. I don't recall this on my last build but maybe I wasn't looking close enough. I went as is per recommendation. Here's a pic:
Once satisfied with witness marks on all bolts, I added the vent tube. I used the original Ford part versus the provided tube. I just had to cut it down a bit. As an FYI, the aluminum nipple does not come with the FFR supplied IRS, so you'll have to order one. These two parts are Ford IRS Vent Hose Assembly (FR3Z-4A058-A and 2L1Z4022BA).

Last edited by cv2065; 12-19-2023 at 07:29 PM.
-
Senior Member
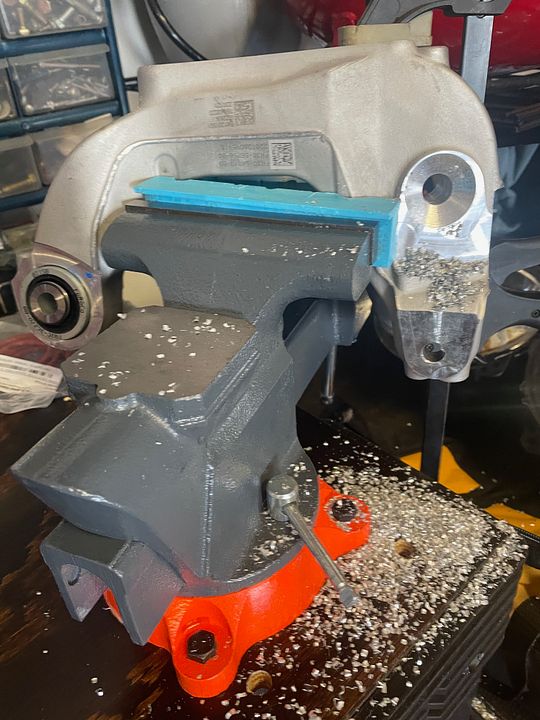
Spindles and Knuckles Oh My!
It was time for the really fun part of drilling out large holes and cutting off the ears of a perfectly good knuckle! I prepped by painting the back of each spindle with my Rustoleum high gloss. Again, turned out great. I put paper towels in the mounting holes to avoid getting paint on the threads. I was going to paint the knuckles, but they were brand new and looked fine, so skipped that.
Started with the two knuckles. Wedged them in my vice and again, took the hole slow and easy with the new 5/8" bit and cutting oil. Soft vice guards really help out here. The hole cut surprisingly easy and if you get off the mark a little and the hole isn't completely centered, no worries as the connecting hardware takes up for any slop. One tip. When you are cutting this hole or lopping off the knuckle ears, tape up your other knuckle mounts so metal does not get into the gasket areas. If it does, you can use a q-tip and water to clean out, but it will save some time.
Lopped off the ears with my Sawzall from Harbor Freight. This would be its last job as the plastic keeper for the blade removal broke off. Luckily, it had finished its tour of duty. The manual doesn't recommend a 14tpi blade, but I found that size to be perfect. I did this on my portable workbench to keep the vibration down.
Regarding the spindles, once again I used my local machine shop to knock out the old studs and press in the new ones. I'd rather do that than use the hammer and drill, yada yada. Last time he charged me $20 and had them done in a half hour. This time I was charged double and it took 4 days. Times have changed!!!
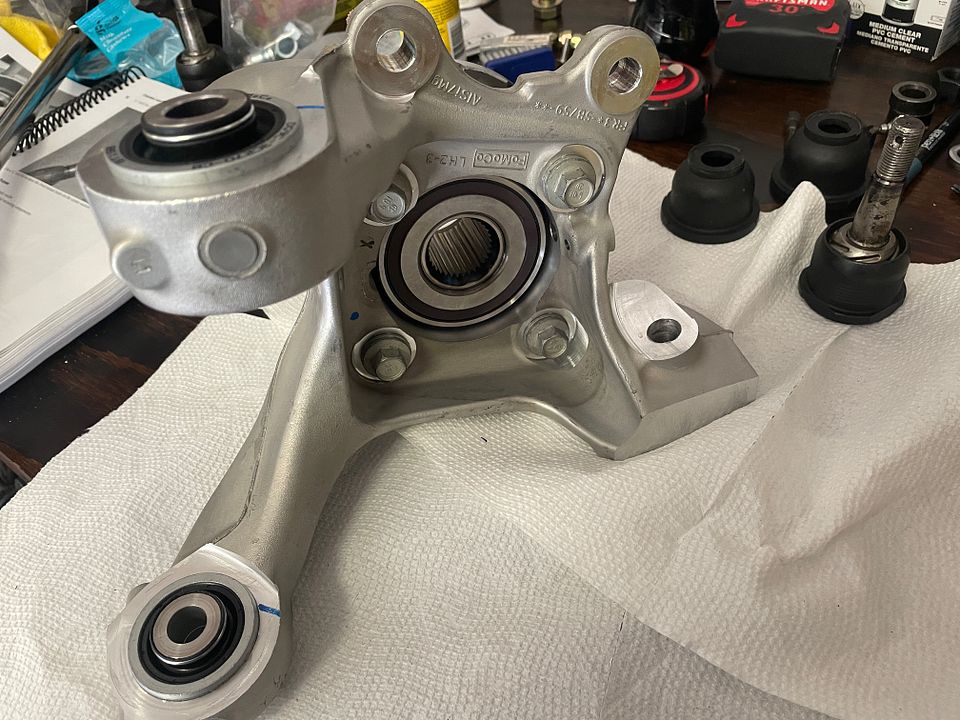
Installed on the knuckle and cranked down to 98 ft/lbs. I couldn't get that entire thing into my vice, so that was one of those foot on the floor, torque wrench scenarios. The new spindles came with OEM bolts from Ford with the dry red locktite already on the bolts. I did not add any additional. I read that the dry locktite is actually two materials, then when compressed by installation, they react together and form the bond. Pretty cool.
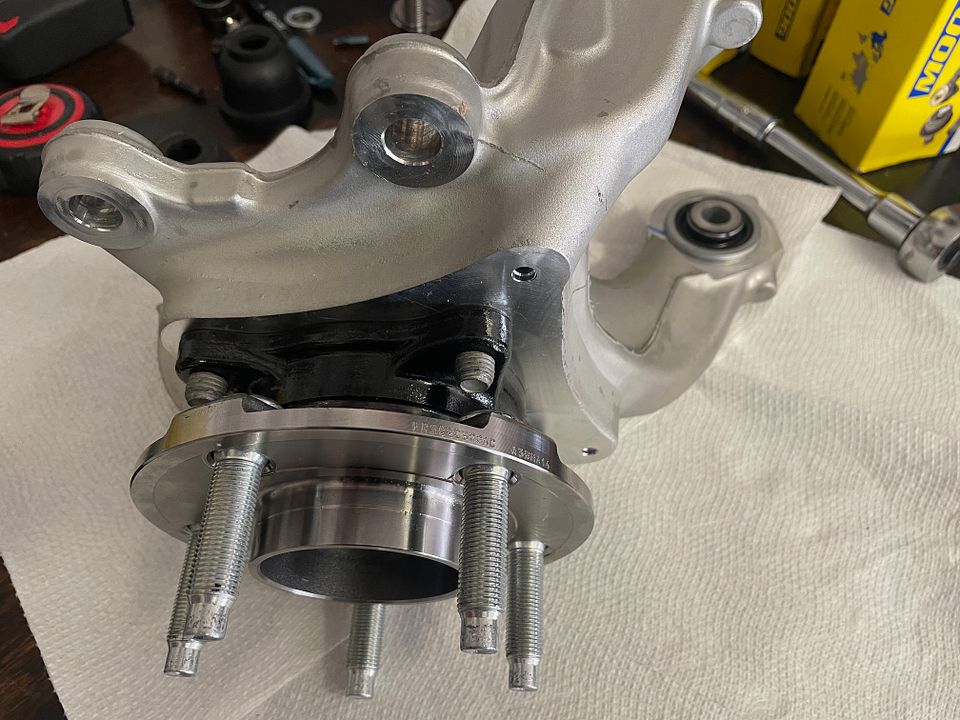
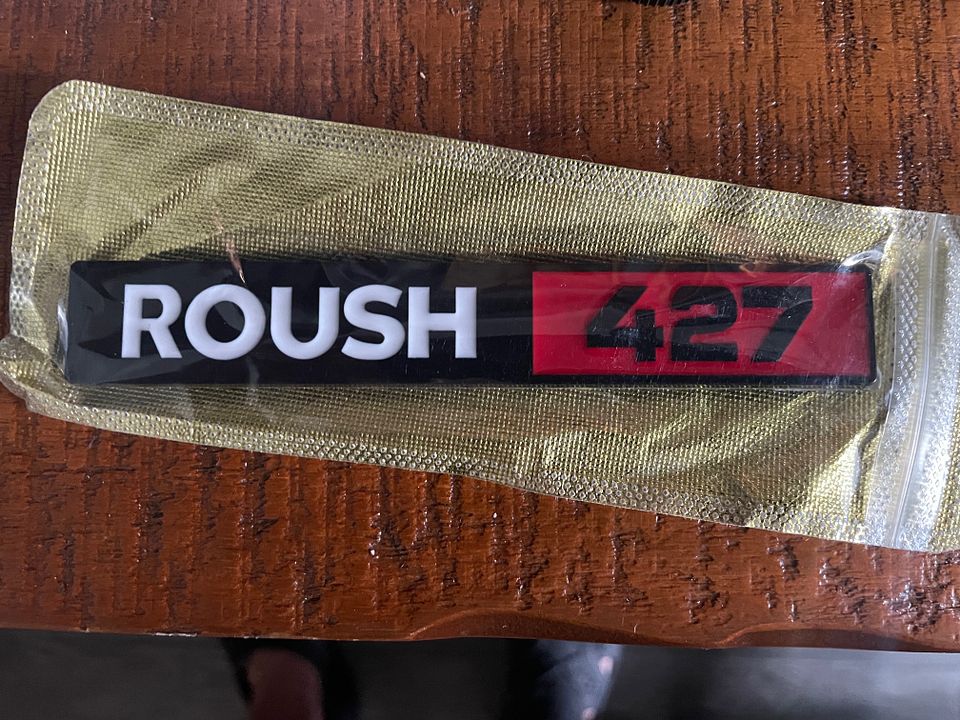
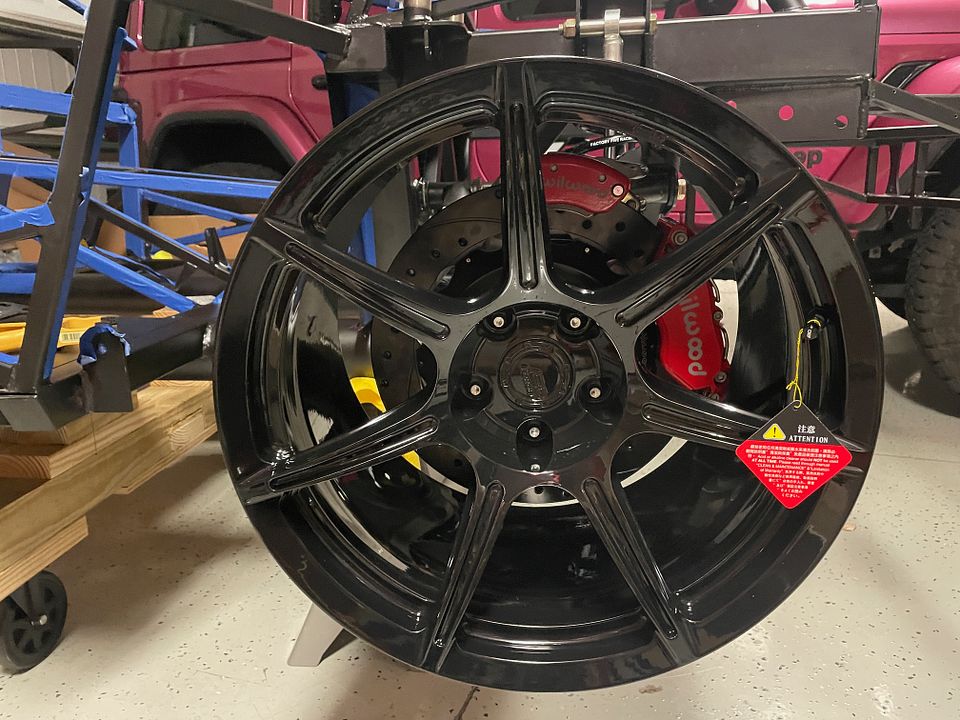
While I was working on this, look what arrived. My new wheels and custom fender badges. The car is going to have a Roush 427 'theme' so thought these would be cool. They are about 3/4" in height and 5.5" in length, which mimic the dimensions and color combination of the 5.0/Coyote badge. Wheels are BC Forged KL17s that are the exact same dimensions as the FFR Halibrands and clearanced for the Wilwood brakes.

Last edited by cv2065; 12-19-2023 at 01:47 AM.
-
Post Thanks / Like - 0 Thanks, 2 Likes
-
Senior Member
You're off and running, Chad. Real progress. It must be satisfying to apply the lessons learned from your first build. Nice.
Question: from which vendor did you order your fender badge?
Chris
Coupe complete kit delivered: 4/22/24.
Build Thread. Coyote. T-56. IRS w/3.55. Wilwoods. PS. HVAC. Side windows.
MK4 Complete kit.
Build Thread Index. Delivered: 10/15/2020. Legal: 7/25/23. Coyote Gen3. TKO600 (0.64 OD). IRS w/3.55. PS. Wilwoods. Sway bars. This build is dedicated to my son, Benjamin.
Build Thread.
-
Senior Member
Originally Posted by
460.465USMC
You're off and running, Chad. Real progress. It must be satisfying to apply the lessons learned from your first build. Nice.
Question: from which vendor did you order your fender badge?
Thanks Chris. It's amazing how much I forgot from the first time. The badge vendor is Badgeslide.com. They can do most anything and its out of metal, not acrylic or plastic.
-
Nice touch with the badge and the wheels. Where did you to for the 2" hoops? I'm not a fan of the tall 1.5" FFR bars.
Justin
-
Senior Member
Originally Posted by
Justin
Nice touch with the badge and the wheels. Where did you to for the 2" hoops? I'm not a fan of the tall 1.5" FFR bars.
Justin
You mean the paperclips? LOL. Michael Craven (aka Hacksaw), pointed that out to me on my last build at a car show. He said that once you see it, you can't unsee it....and he was right, so I switched. FFR still makes the 2” roll bars. They are made to order. Speak to Madison and she’ll hook you up as some that work there don’t know they are still available. I'll be cutting about 2" off of it at some point.
Last edited by cv2065; 12-19-2023 at 11:24 PM.
-
Post Thanks / Like - 0 Thanks, 1 Likes
-
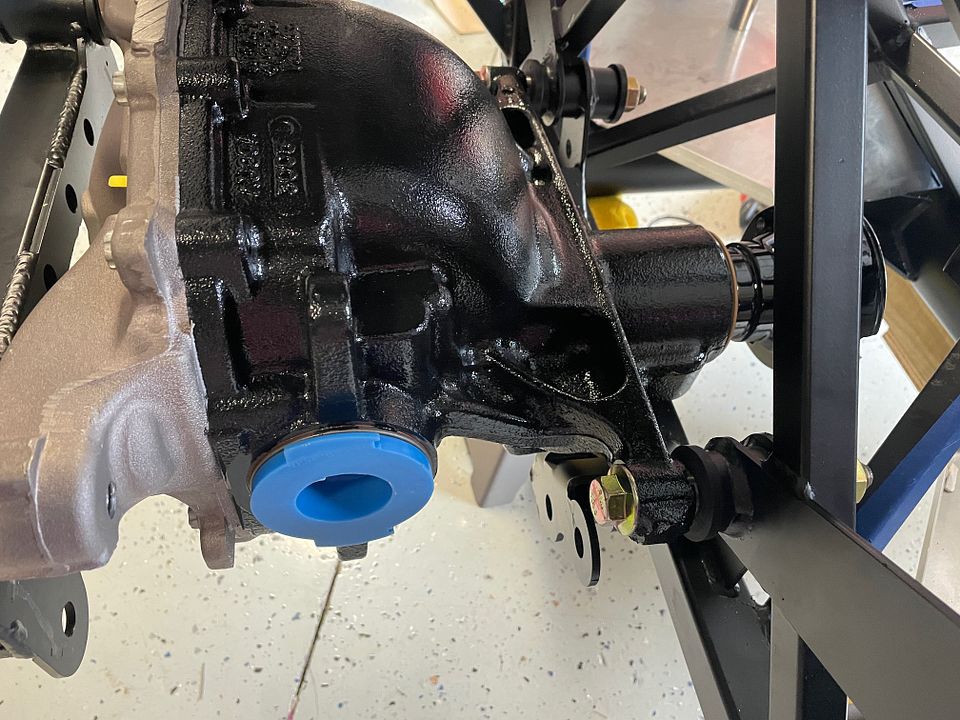
Senior Member
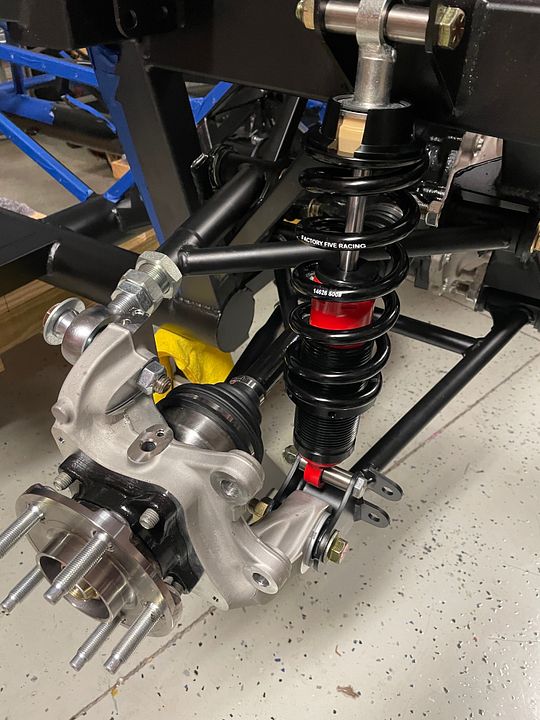
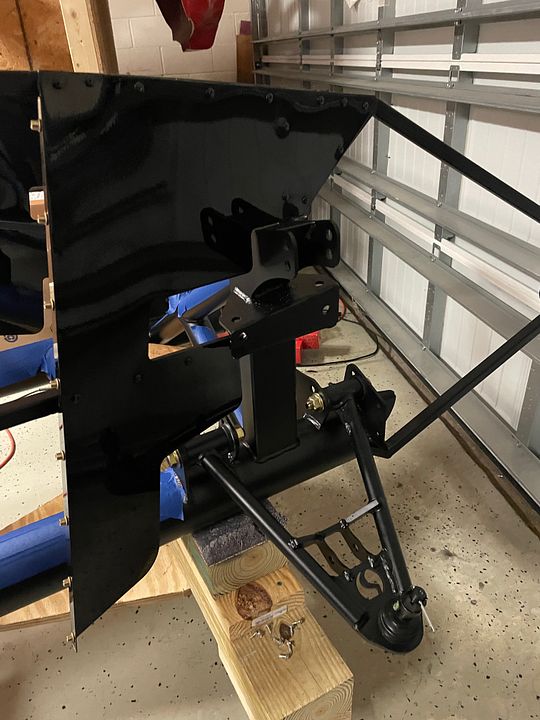
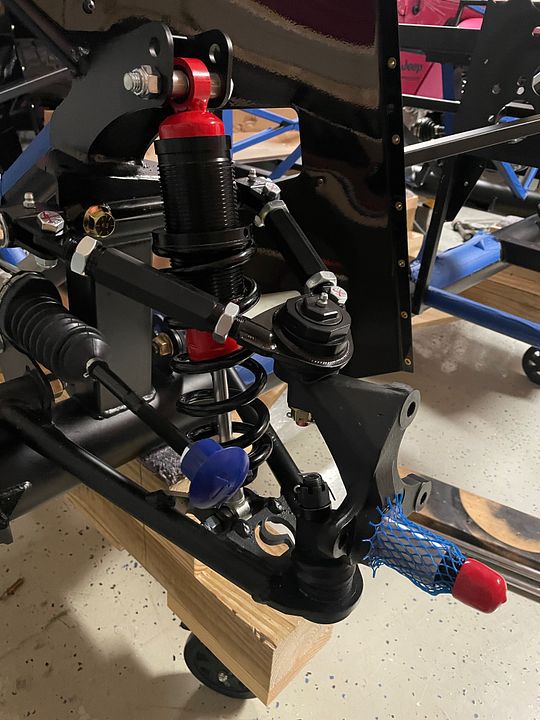
Rear Suspension Assembly
The IRS mid-shafts went in without issue. I painted the shaft and CV housing with POR15. These areas will rust if you look at them wrong. Then I put a little gear lube on the c clip that goes into the housing. A couple firm taps with the soft blow hammer and they both easily installed. The first time around, I never heard a click to verify full insertion on either side. This was no different, but I know by two things. One, they bottom out by the sound of the hammer. And two, I measure the gap between shaft and housing, which is supposed to be ~1/8" according to the manual. Mine is identical on both sides. And as the instructions state, give them a pull to ensure they don't release and all is good!
A couple of things I noted from the last build for the install:
- Longer mid-shaft goes on the driver side, shorter one on the passenger side. Don't get them mixed up!
- Grease the arms per the instructions BEFORE you install. Otherwise the bushings will bulge out as the grease will have nowhere to go when under compression.
- If you use anti-seize, it will amplify torque values. You'll still be within the limits of the fastener, but I started to but decided not to. Just don't go hog wild on the mechanical lock nuts and you shouldn't have to worry about heat and galling.
- Every attachment point will most likely need to be widened. Have your threaded bar, nuts and washers handy.
- I left the arms with roughly 1/2" of threads showing on both sides of the lock nuts for adjustment later. Another Paul lesson from the past!
- I'll be filling the smaller top holes of the knuckle with silicone to keep dirt and debris out.
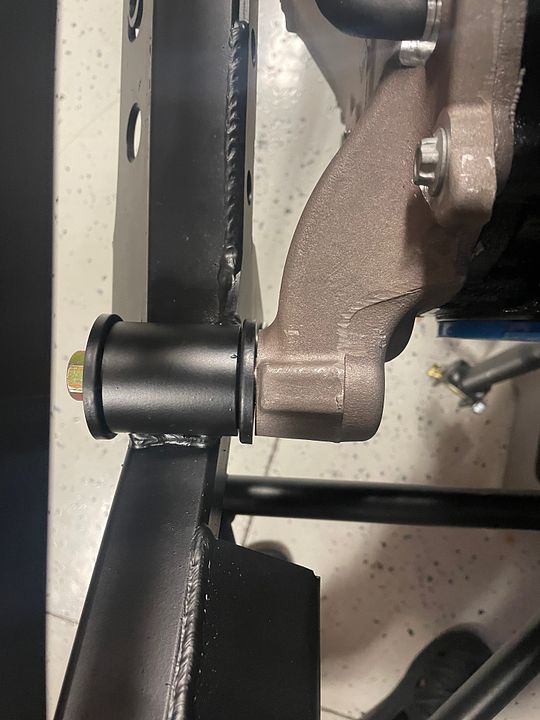
Torqued all arms to 100 ft/lbs, witness marks on all bolt heads and moved on. I did get forum advice around the UCA, as the rod end seemed a little close to the arm but was guided to proper positioning and all is well. This is the basis of my earlier comment around drilling the knuckle hole. It doesn't have to be picture perfect precise and FFR planned for that. As usual, the forum is awesome!!
Shocks went together without issue, although I had a leaky one and FFR sent out a replacement that I'll get in a few days. I did note that many of the mounting eyelets on the shocks were not flush, which made getting a bolt through a little rough in some instances. And of course, if everything is not perfectly parallel, I don't know what I'd do with myself! 5 second fix and I took a C-Clamp and flattened them flush as I wasn't able to move them by hand. And to satisfy the OCD folks out there, the Factory Five logo is right side up on the springs (PAPA!) . All in all, both sides came out great and move up and down like butter!
I did want to make mention of the grease and quick release coupler that I used. Grab yourself a Lock N Lube zerk coupler and gone are the days of hanging from your grease gun trying to get it to release. I also used my favorite grease....GREEN Grease. Synthetic polymer grease that is super tacky, waterproof and is compatible with most other greases. Easy to see as well. I got my fitting from Amazon and Green grease is available at your local Autozone or Advanced Auto.

Last edited by cv2065; 12-19-2023 at 08:41 PM.
-
Post Thanks / Like - 0 Thanks, 1 Likes
-
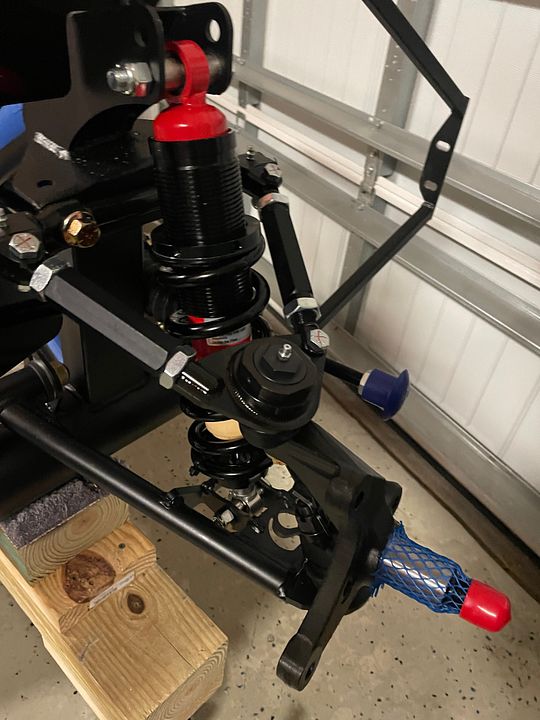
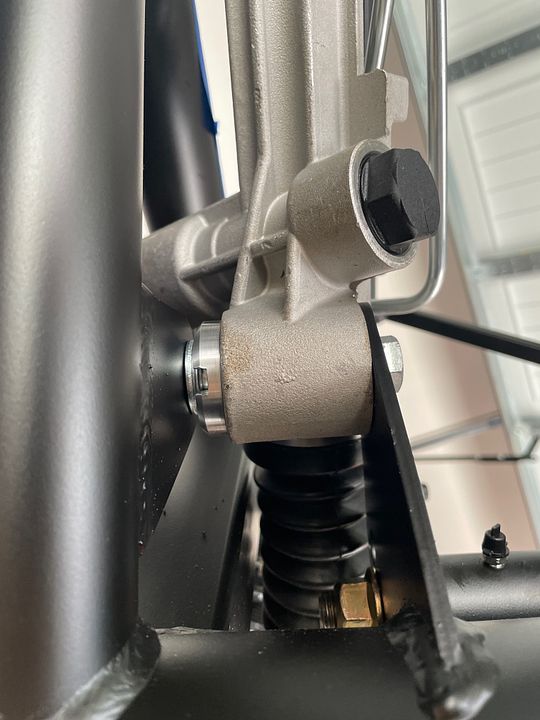
Senior Member
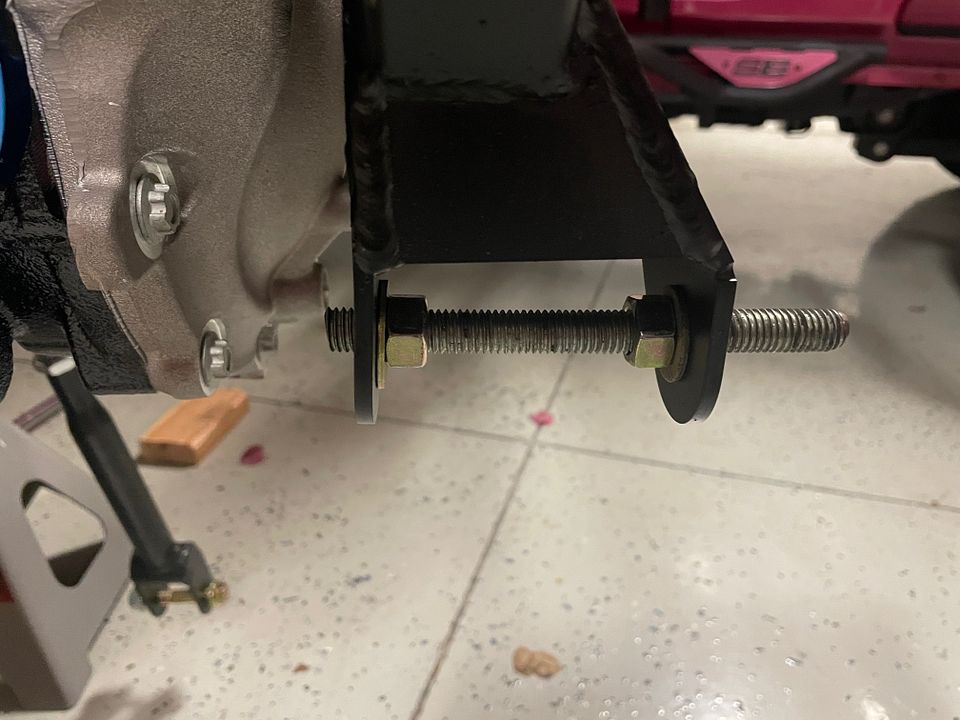
Front Suspension
FFR has made some subtle improvements to the front suspension area since my last build. One is that the upper control arms did not need to be disassembled and reassembled properly. Yay! These things are a source of confusion for many, including myself, so unless this is a one off for my kit, I'm sure that this will help everyone! Welded joint at the top of the driver's side with ball joint fitting pointing out? Check! Welded joint at the bottom of the passenger side with ball joint fitting pointed out? Check!
First order of business since I have power steering is to trim the rear sleeves of the control arms up to the beveled area on each side (1/8" or so). I didn't do this last build and had to disassemble everything to go back and do it. PITA so no ground hog day for this kid! I also cut the same off of the end of each mounting bolt as well. I used my vice and hack saw with 18tpi blade. I was tempted to use my cut off wheel but wanted more precision and finesse as that tool just wants to get down to business! Took about 20 minutes to cut all of it and then cleaned up with flap disk. Don't forget to leave the lock nut on before cutting so you can straighten the threads when all done. Put it all back together to ensure that each side screwed down flush and good to go! And I didn't forget to add a "slathering" as FixIt would say, of anti-seize inside each tube so that the adjustments are buttery. But this stuff is so ridiculously messy....

Starting with the Mevotech ball joints, I had trouble with the kit ball joints last time, and again this time. I hit them with a wire brush, added a lot of patience, and zippo....still wouldn't screw in past a couple of threads and I'm not about to force anything. Moved on to the Moog K772, which worked great for me last time, but this time, same thing. Talk about aggravation! I know that I fiddled with them last time and they would just 'drop' in, but not this time. Went back to edwardb's 20th anniversary thread (the gift that keeps on giving) to see which Howe ball joints he used. Those would be the Howe Racing 22320S ball joints. Dropped an order into Summit and had them in 3 days. Holy mackerel are they expensive but OH BOY these are the big daddy of all ball joints!! The movement of the ball is like butter and...wait, this is a family friendly forum!! Anyhow, they dropped right in. A few drops of blue loctite and manhandled them in the vice until they would turn no further, and all good to go! I did think about having them tack welded, but I never had an issue before, so I'll just mark and keep track.
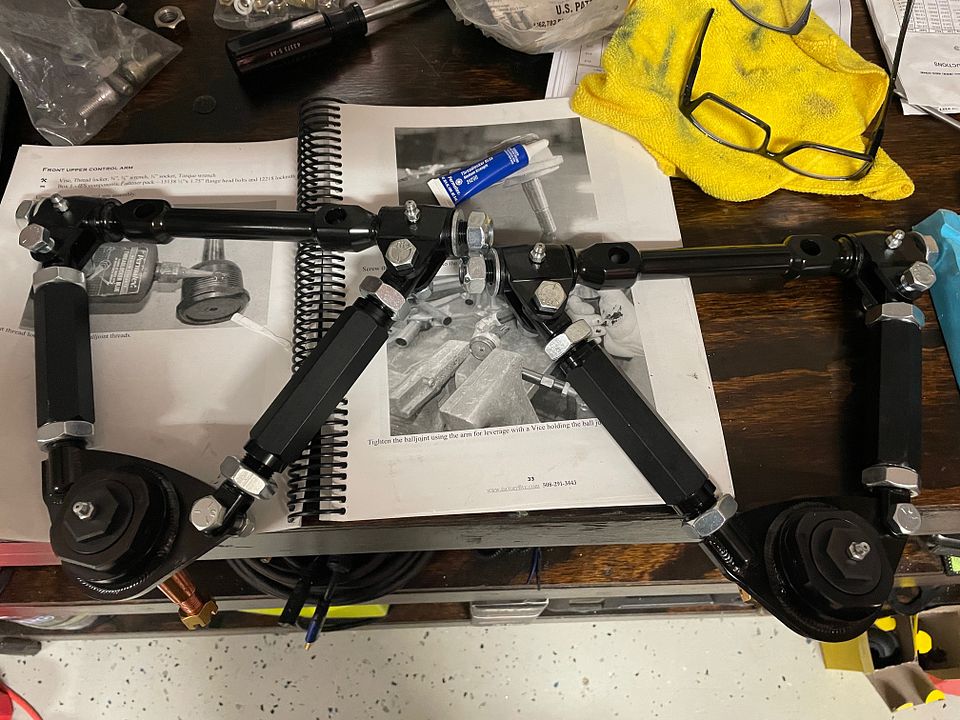
I'll install these tomorrow but had to get the lower control arms on first. Uneventful and tightened up to 100 ft/lbs. Threaded rod was needed again to spread the ears a bit. I needed a shim on the driver's right side and one for the passenger left side. Loosely fit the castle nut and pin with spacer. Spacer is beveled side down.
First shot of the glossy F panels and also the second change that FFR made. The F Panels now have edwardb's notch on the top left already built in to make way for the harness. How cool is that!!

Last edited by cv2065; 12-20-2023 at 10:04 PM.
-
Originally Posted by
cv2065
You mean the paperclips? LOL. Michael Craven (aka Hacksaw), pointed that out to me on my last build at a car show. He said that once you see it, you can't unsee it. LOL...and he was right, so I switched. FFR still makes the 2” roll bars. They are made to order. Speak to Madison and she’ll hook you up as some that work there don’t know they are still available. I'll be cutting about 2" off of it at some point.
So will they make the two inch bars in the same jig as the current 1.5” so the angles are correct?
MkIV Complete - Dart 427/TKX/Sniper II/IRS from Forte
-
Senior Member
Originally Posted by
jeskam
So will they make the two inch bars in the same jig as the current 1.5” so the angles are correct?
Not sure, but Micheal's sure looked good. Maybe someone else can chime in on that.
-
Senior Member
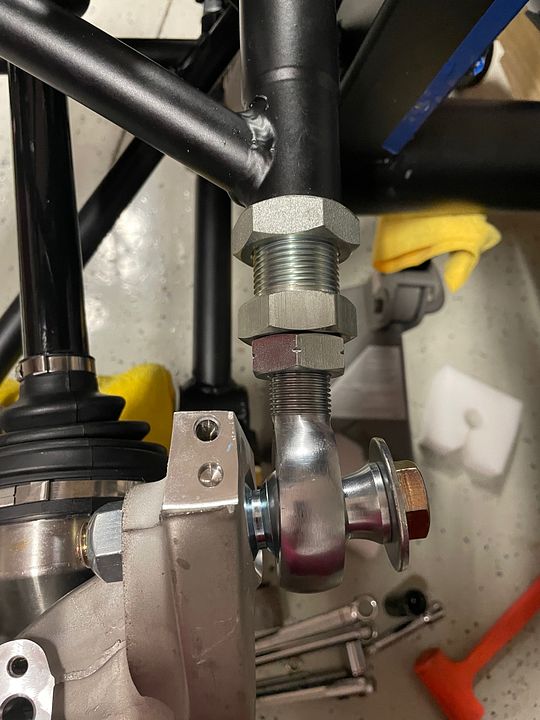
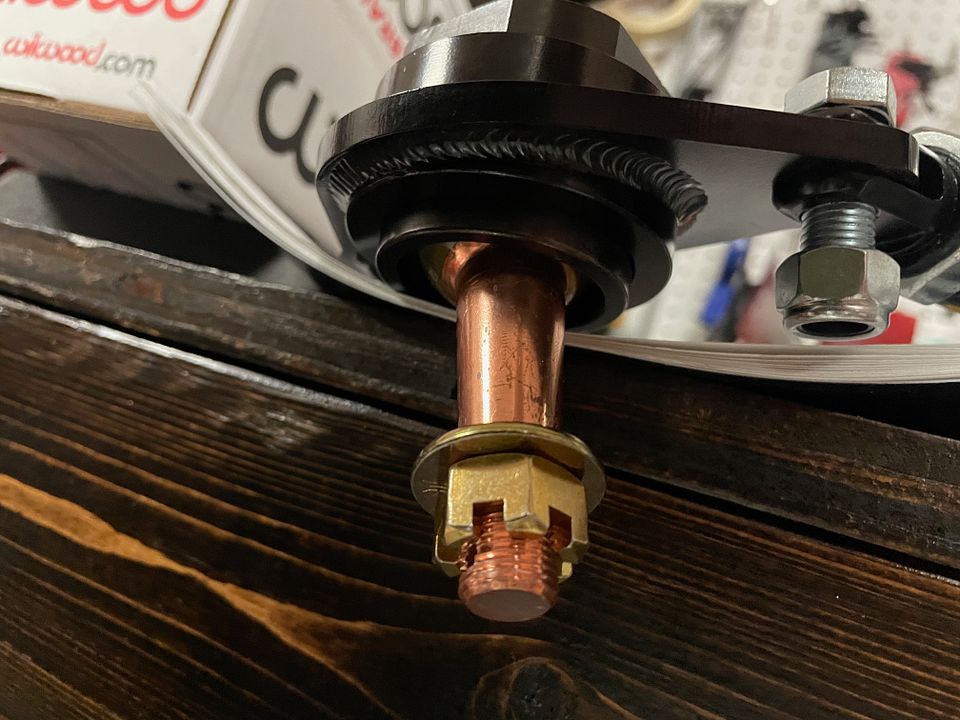
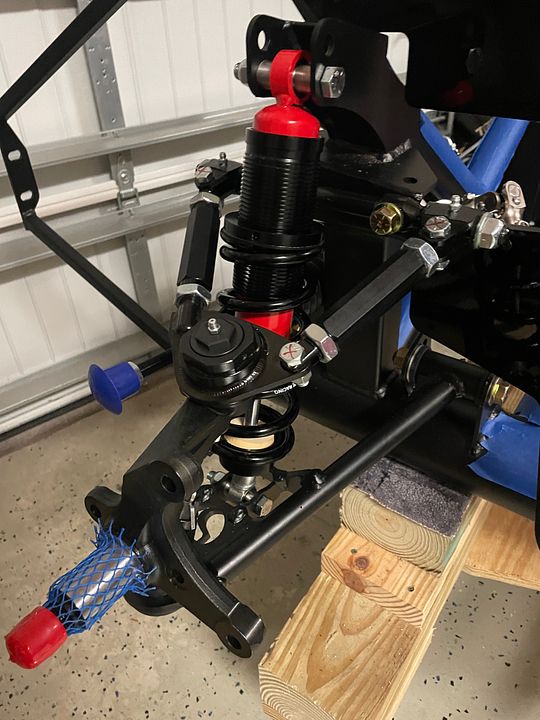
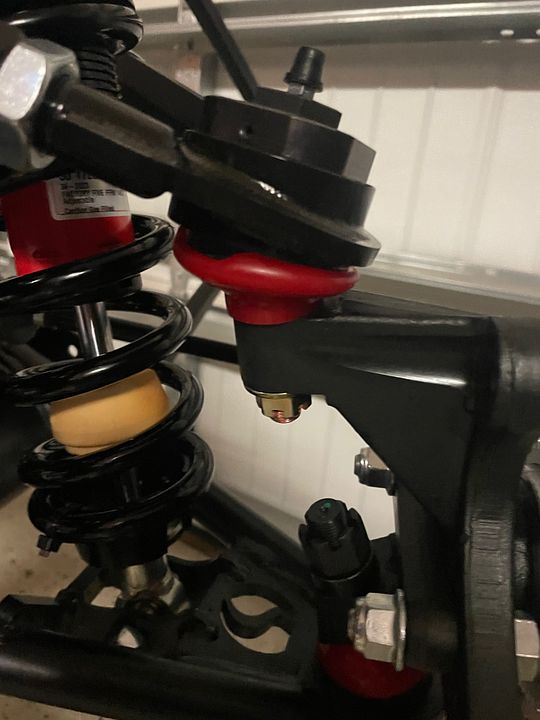
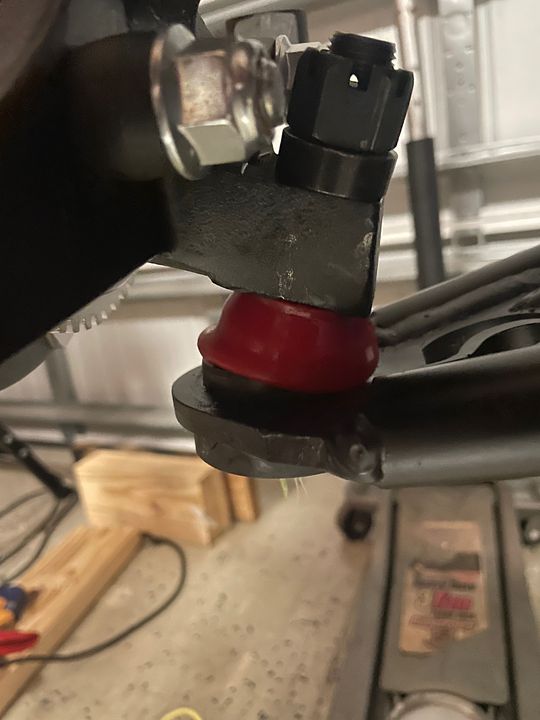
Front Suspension Continued
Stil working on the front suspension and had a little delay as I ordered the Howe Suspension dust boots for my upper ball joints. I tried the Energy ones but they didn't seem to fit properly despite reading edwardb's build thread. Even though they are the same model number, my Howe ball joints look a little different than Paul's, so maybe something changed? Either way, thought I'd try these and had to wait for these to arrive from Summit so I could continue. They are the Howe Precision Ball Joint Boots (22399V).
So got everything together, with just the rotor and brakes left to install. A couple of learnings from the front suspension install:
- In order to tighten the LCA spindle, I connected the upper ball joint and then used a piece of 2x4 to steady it all. The spindle has a multi-directional movement so isolating without connecting the UCA is really tough.
- The LCA spindle castle nut is a 15/16" socket size. Once isolated, I used a 15/16" crows foot to tighten to 80 ft/lbs, as connecting the UCA does not allow the room to put a torque wrench with socket. Putting the crows foot on at a 90 degree angle does not alter the torque values.
- Harbor Freight was the only local place I found (not Lowes or Home Depot) that had a 15/16" crows foot.
- The driver's size castle nut did not align to install the cotter pin at the correct torque value. I swapped out with the other side and still no joy. I removed the castle nut, VERY slightly ground some of the flat side off on my workbench grinder, which did the trick. I did not want to use a washer.
- Because the Howe Ball Joint uses a smaller castle nut (19mm), I was able to get a torque wrench on to it, stabilize with a 2x4 and get to the recommended torque value of 55 ft/lbs. Howe states that one can go as high as 70 ft/lbs in order to get the hole and cotter pin to align, but that wasn't needed. On both sides, it was dead on 55 ft/lbs with alignment. Not sure if that is coincidence or these things are just dead on accurate. I probably could get to the next hole and 70 ft/lbs if I wanted, as these torque so easily, but not sure that is necessary?
- The LCA grease boot on the driver's side was a little 'rotund'. I put too much grease in there and squeezed out what I could out of the overflow channel before installing the spindle, but it was still a little 'puffy'. I think this will work itself out when the assembly is under load and flattens out a bit. I think you just need a couple of squirts of grease. At least this is what Howe recommends for their joints.
_IMG_8906.png?width=960&height=720&fit=bounds)
Here's how the Howe dust boots align. One side is not completely aligned with the top. I hope to not have a repeat of the Moog boots on the last build, but I think they will align once there is weight and the arms move up a bit. They fit perfectly before I hooked up the arms. Cotter pin is not secured yet on the nut.
URL=https://hosting.photobucket.com/images/c310/cv2065/IMG_8909.jpg?width=960&height=720&fit=bounds]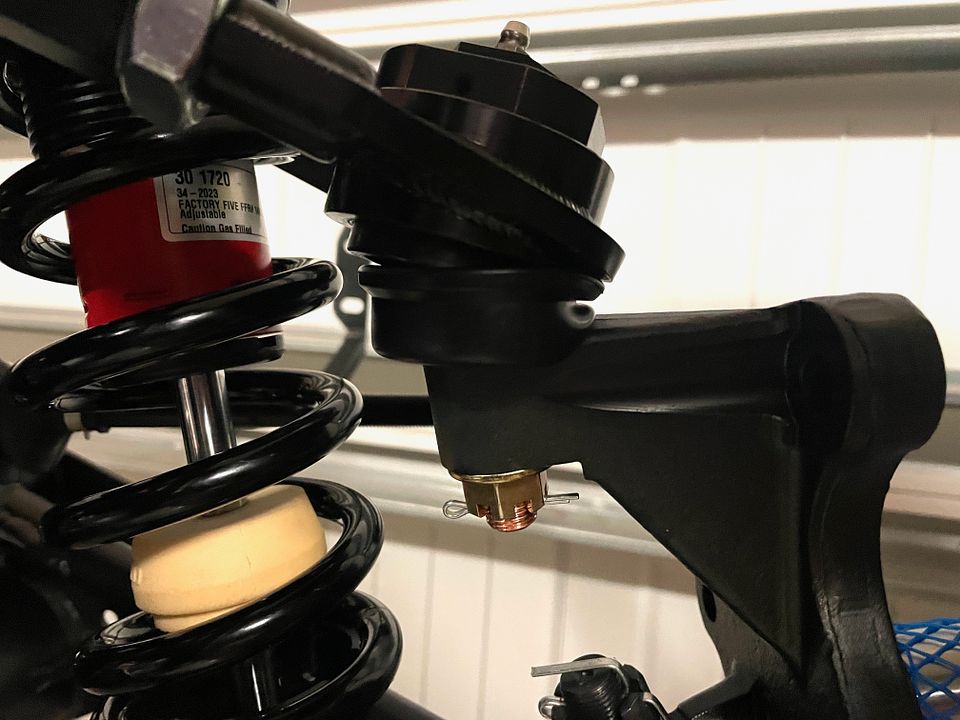 [/URL]
Last edited by cv2065; 12-24-2023 at 01:32 AM.
-
Senior Member
Power Steering
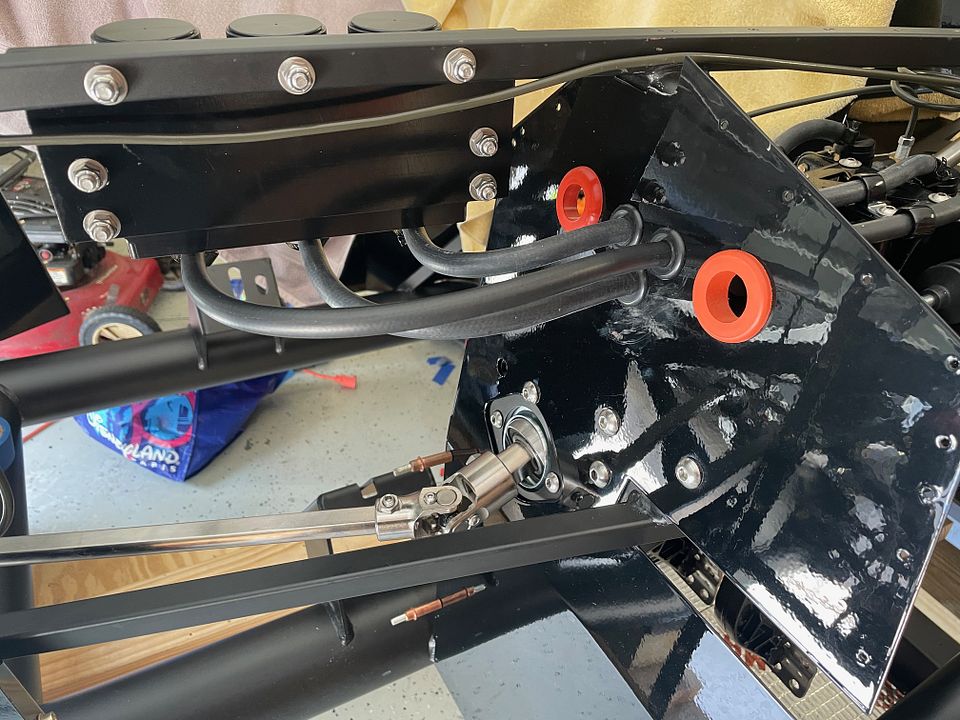
I found out yesterday that my powder coated panels will not be ready until after Christmas. Not real happy about this as I stressed the importance of a few panels only, and they could take their time with the rest. This will impact my electrical and brake install, but it is what it is. I went ahead and jumped forward to the Power Steering rack. I used the Breeze Solid Offset Rack Mounting Kit. All I can say is that this is probably one of the best upgrades that I've made to the kit. Makes centering the steering rack "a Breeze".  You can find it here:
https://breezeautomotive.com/shop/of...ter-and-coupe/
So a couple of learnings from the install:
- You have to remove the existing rack bushings and sleeves to replace with the FFR provided ones. No need for any hammers or banging. I was able to grab a hold of the lipped side of the sleeves with a pair of pilers and wiggle them out from each side.
- If you are using the Breeze Offset Kit, don't put the FFR bushings and sleeves back in, as Breeze provides their version. It's a pain to do it twice, as I did not read ahead.
- Breeze provides stainless steel bushings that perfectly fit into each joint from behind and the stock bolt feeds in from the front.
On my last build, it took me a bit to get the explanation of centering the PS rack. With the Breeze kit, even a caveman can do it. There was no fighting with bolts on fitment with driver's side first, angling it just right, rubber bushings catching the mount or not fitting, yada yada. With the Breeze mount you just put it right up to the mounts and push the bolts in. No hassles and the SS bushings are almost satisfying to install. Perfect fitment! I had the rack installed in 2 minutes. Then the best part is the adjustment. Manually lock the rack to the right, take a measurement. Do the same for the left and divide the difference. Put two 1/4" flat head screwdrivers into the channels of the Breeze mounts, turn at the same time the amount of distance you need, and viola, you have a centered rack in about 5 minutes then torqued everything down to 50 ft/lbs. Do yourself a favor and grab this upgrade.
Mounts and adjustors from the underside. See the screwdriver adjustment channels?
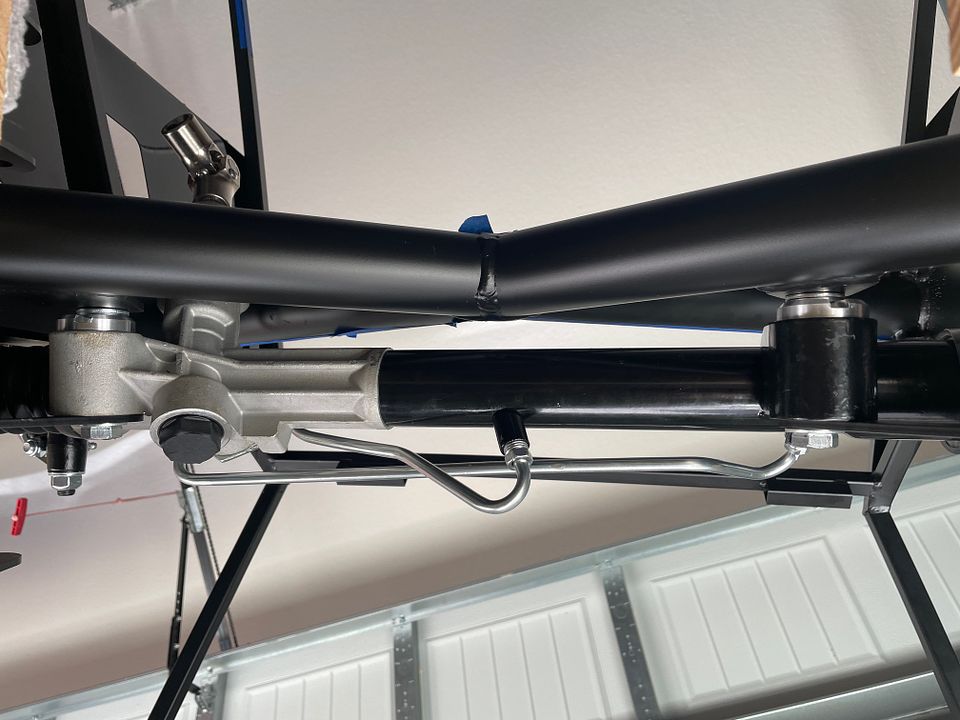
I'll be hooking these up to the spindles tomorrow.
Last edited by cv2065; 12-24-2023 at 01:22 AM.
-
Senior Member
-
Post Thanks / Like - 0 Thanks, 4 Likes
-
Senior Member

MK4 #11012 picked up 04/16/24
351W, 3 link, single roll bar
MK4 #10616 picked up 4/10/23
302w, 4 link, 17's, dual roll bar SOLD
MK4 #9759 picked up on 4/3/19
351C, 3 link, 17's, dual roll bars SOLD
-
Post Thanks / Like - 0 Thanks, 1 Likes
-
Senior Member
Just noticed that the 427 has a mechanical fuel pump...Hmmm. Haven't run one of those in a long time as I couldn't run one on the last Blueprint Dart block with the power steering pump interference. Guess Roush has worked that all out. Electric or Mechanical? I do like the simplicity of the mechanical I will admit.
-
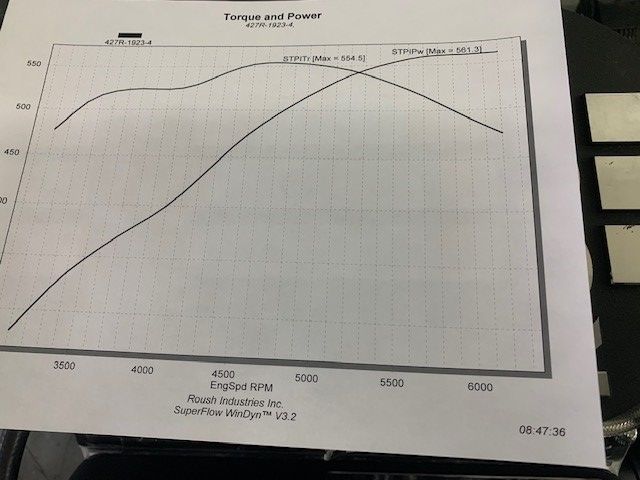
Power numbers look amazing...if not a little scary.
For me personally I don't think you can go wrong with either style of pump but I tend to like simple things and would probably keep the mechanical pump if it fits.
-
Post Thanks / Like - 0 Thanks, 1 Likes
-
Senior Member
What are you doing?! Taking a break...
MK4 #11012 picked up 04/16/24
351W, 3 link, single roll bar
MK4 #10616 picked up 4/10/23
302w, 4 link, 17's, dual roll bar SOLD
MK4 #9759 picked up on 4/3/19
351C, 3 link, 17's, dual roll bars SOLD
-
Senior Member

That engine is sweet! Roush engines are legit and built well. Also thumbs up on the two piece valve covers!
-
Post Thanks / Like - 0 Thanks, 1 Likes
-
Senior Member
Front Suspension Completion
Been a while since I've posted, but that hasn't stopped the progress!! Trying to get as much done as I can before the really hot weather comes. We're already getting 80 degree days. So where did I leave off?
Oh yeah, I was just about to get the hubs and Wilwood brakes installed. So first off, the Howe dust boots for the front suspension suck. Don't get those. I had an OCD moment where I needed everything to match with the Howe ball joints and just came back to the good old Energy Suspension boots 5.13102Gs. I installed them and noticed that I had a tear on one of the bottom boots...Ugh. So I decided to take care of business there instead of waiting down the road. So again, I used the same Energy boots, just the ones for the bottom. They fit as well as the tops but are a little lopsided right now with the hanging suspension.
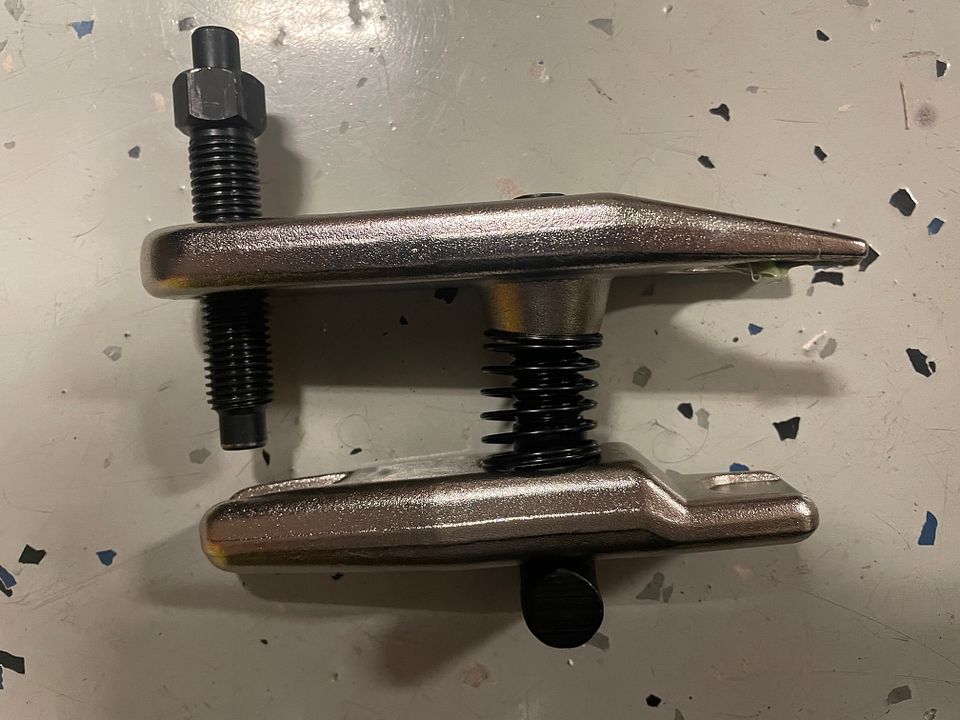
I rented the tool at Autozone to pop the lower ball joint, and it was really horrible. I checked online and found this gem. Doesn't look like much but it did the job with ease. $40 and you can get it here: https://www.amazon.com/gp/product/B0...e?ie=UTF8&th=1
All squared up with the boots and finally was able to get my hubs on and torqued the front hub to 250 ft./lbs. I already had a torque wrench for this and worked like a champ.
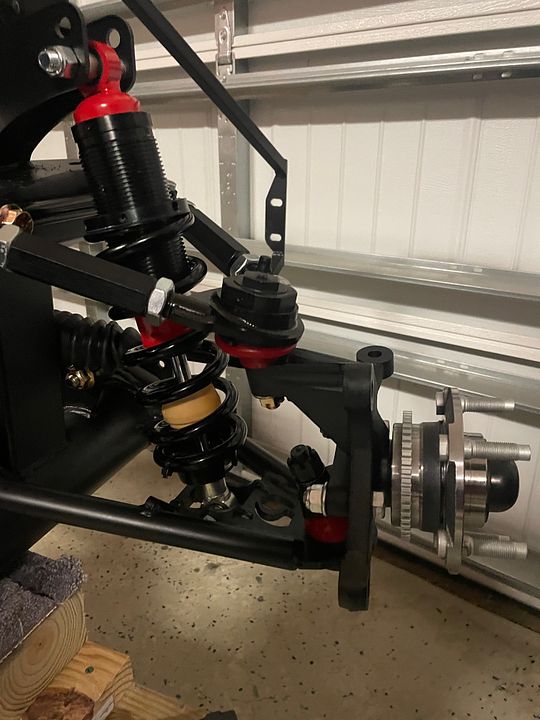
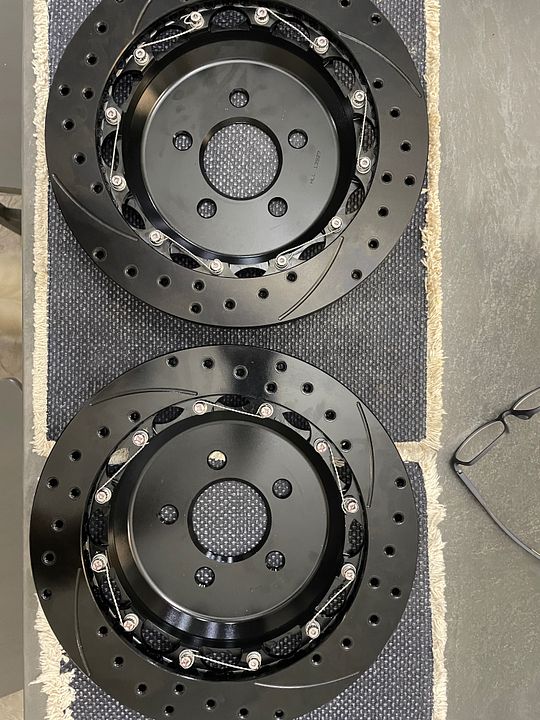
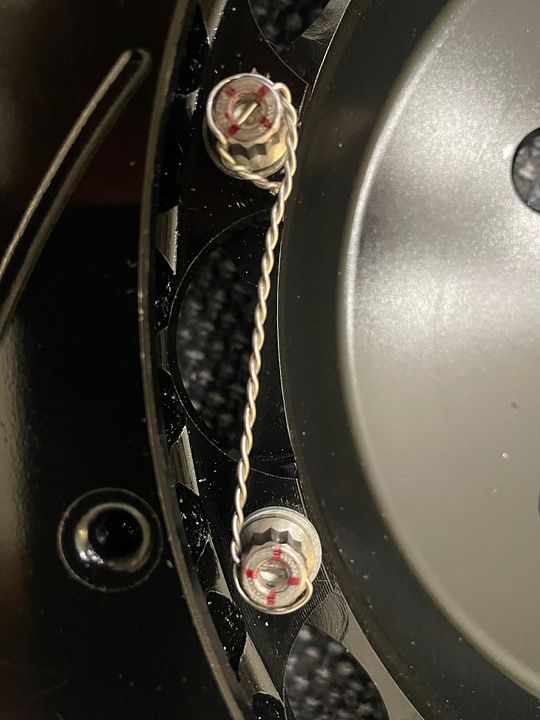
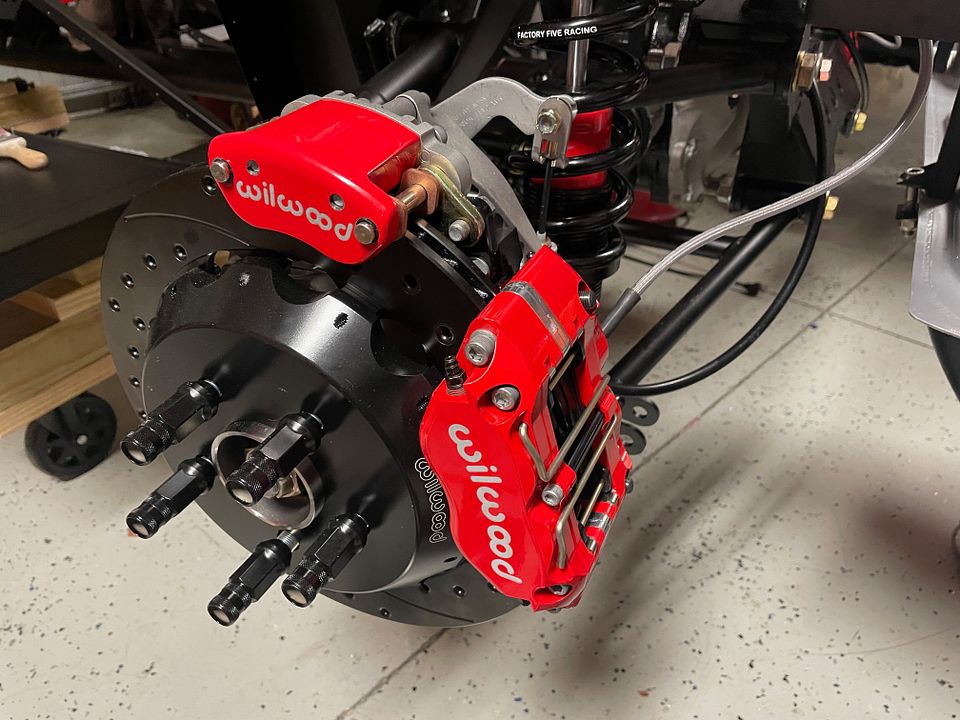
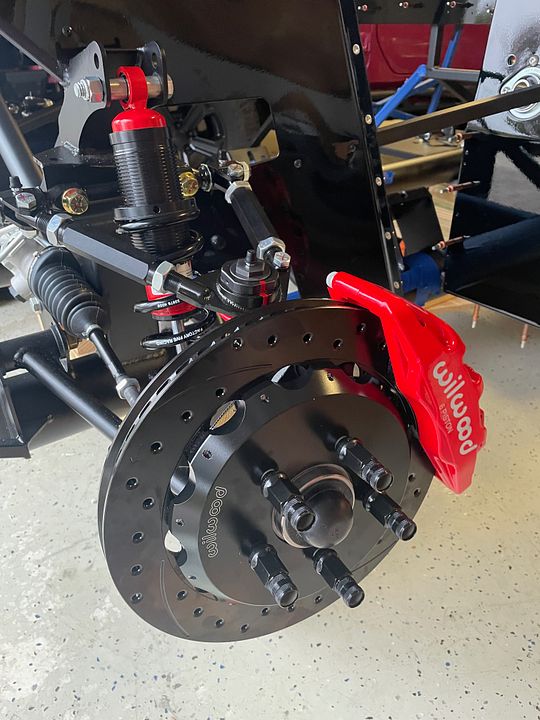
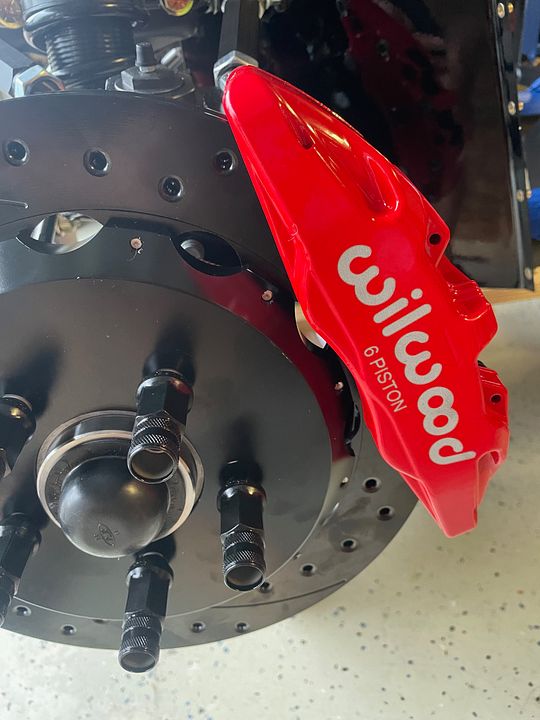
Wilwoods were next and again, no issues here. The Wilwood instructions are so easy to follow and had much less headache than with the banjo fittings of the Mustang brakes from last build. They are expensive, so that was the expectation. First step was to wire the rotors. Now, I've never done this and was very frustrating at first, as my fingers are not skinny and was cutting myself while trying not to damage the finish but finally got the hang of it. I bought the correct tool from Amazon and Mr. Gasket .032" Safety Lock Wire that I found at O'Reillys, model number 8022G. It was $31, which is on par with what I found online. $20 6" Safety wire pliars and I was in business.
I'm a weirdo when it comes to torque specs, so followed the Wilwood directions to the letter. I marked the head of each one so I wouldn't forget which ones were already torqued with red loctite. Came out pretty good, but don't look too close. 
-
Post Thanks / Like - 0 Thanks, 2 Likes
-
Senior Member
Rear Brakes and Wheels
Once the rotors were wired, on with the installation. Again, love the Wilwood program, just make sure that you have the correct installation instructions as there seem to be a few versions out there and can be confusing. Since I hve the IRS setup, I used the .PDF for part number 140-12048 for the fronts and part number 140-15138 for the rears. If you are getting custom wheels and need them cut to the Halibrand specs, the wheel manufacturer will ask you for the correct .PDF for wheel clearance stats with the Wilwood brakes.

Spacing for the pads is obviously important, so get your glasses and ensure the calipers are evenly spaced on the rotor. I'm using the Gorilla extended knurled lug nuts. I think they are about 2.5" in length and fit perfectly with my wheels. One thing about the Dorman studs. I had the local machine shop press these in, but the threads were very sticky compared to the Ford studs on the front. Almost to the point where I thought they would get damaged with too much use. So I picked up this Lang Tools 7 piece wheel stud thread restorer kit on Amazon. These don't cut, they just clean, and man did they do a great job. These studs are like brand new! You can get it here: https://www.amazon.com/dp/B000XJ5KZS...roduct_details
Moved to the front and all is well here. Don't forget to ensure that the arrows on the caliper AND rotor are going in the right direction!
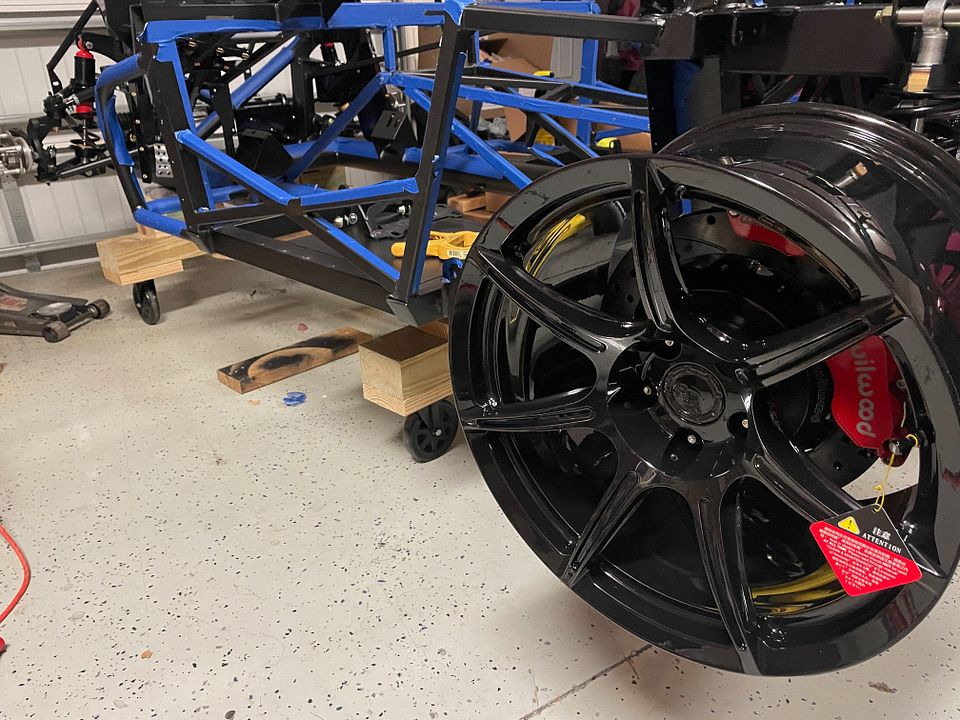
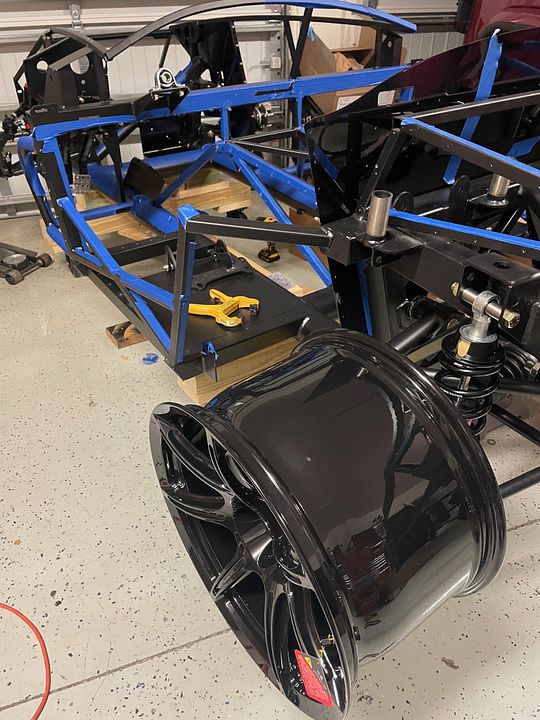
Last thing I have to with the suspension is to hook up the toe arms, which I'll do in the coming week. Looks like I'll be able to use my Moog's after all! And I did get my wheels and was able to fit them and ensure that they are backspaced correctly. They look sweet! These are the BC Forged KL17s.
-
Senior Member
-
Senior Member
-
Senior Member
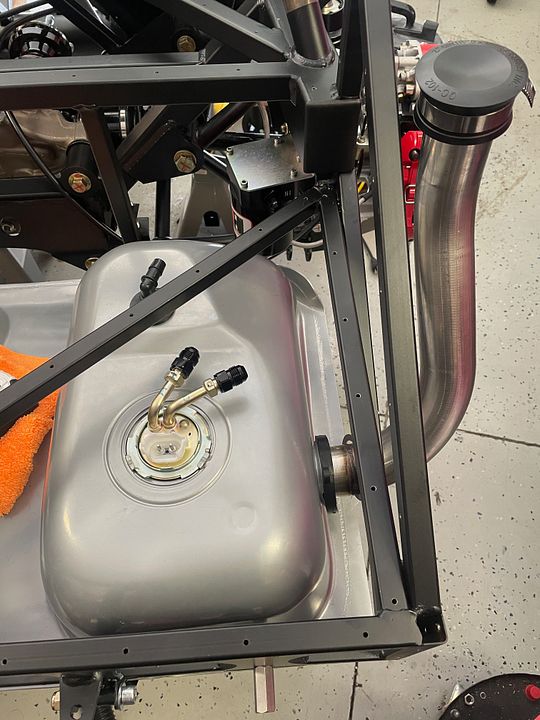
Fuel Tank
Tank installation went very easy. Floor jack underneath. I did note that it was a different color this time. It's silver versus the black one before. I also bought a longer bolt for the passenger side as many do. I started out with the Aeromotive fuel hangar and 340 pump. All very nice pieces but the only thing I wasn't a fan of was the straight up ORB fittings. Putting a 90 degree elbow or swivel is doable, as many have, but raises the height of the fittings to the top of the 3/4" tubing and might be for some, but just wasn't a fan. So I went back to the old faithful that everyone uses, the Pro M racing hangar, but kept the Aeromotive 340 pump, as it served me well before. I am running 8AN fuel lines, so I did need a 6AN to 8AN fitting on each end of the feed and return. Aeromotive recommends this same setup for carb'd engine. By the way, the Evil Energy fittings are really nice, especially compared to the Fragola stuff. Every Fragola fitting I ordered always looked banged up on the end. Maybe it was just my luck but never with the EE fittings.
I did take a look at the Quantum hangar offering as I would have preferred an 8AN fitting already on the feed, but when comparing the two, the housings were almost identical. The biggest difference was the gauge of wire used to the pump. Pro M used what looked like 10GA, and the Quantum used 12GA. I read that without the proper wiring size, it could cause a fire and that settled that in favor of the Pro M. I will say that the Quantum Customer Service was impeccable as well as very fast shipping. Also, if you buy the Quantum 340 pump with hangar, it comes all pre-wired, so no cutting or butt connectors needed, so may work fine with a smaller pump. Speaking of butt connectors, I used the same that Paul had recommended last time, the step down, solvent resistant variety from Del City, Molex 19164-0077 Perma Seal butt connector.
Cutting the hole was the first step, which is not my favorite thing to do. One screw up or leave something in the tank and it can cost you some $$$. I used my shop vac taped around the hole with a Dremel and grinding stone. Worked great, but even with all of that suction I still needed to give the inside of the tank a once over wipe. When installing into the hole, even with the cut, the hanger will seem like its just too big. You really need to squeeze the return tube just right to get it through at the right angle. And of course, be careful with the wires. the sides of the tank hole are like razors. I used tape last time to dull it out, but didn't want anything to fall into the tank during install so winged it.
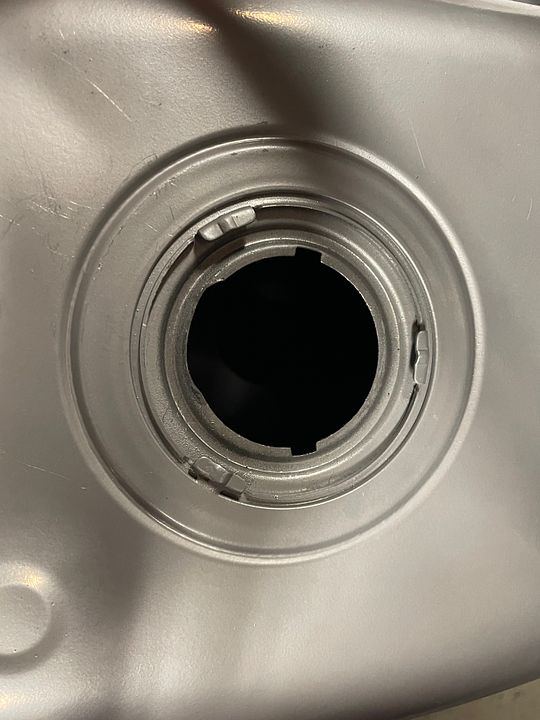

I upgraded to the Ford Filler neck seal part #F4ZZ9072DA. Big difference in quality versus the FFR provided part. I also used the Breeze Big Bore Vent Check Valve, part #70648. Once the filler neck was installed (lightly lubed with oil of course), I capped it off at the top with a Fernco 2" Pipe Cap (part #PQC-102) from Amazon to keep things out of the tube. The last build, I was on my maiden voyage and the tube fell to the ground and I'm sure ate some gravel.
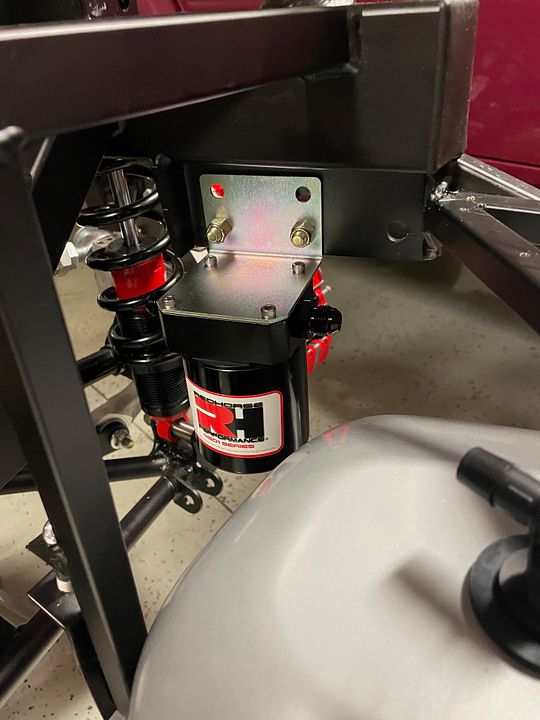
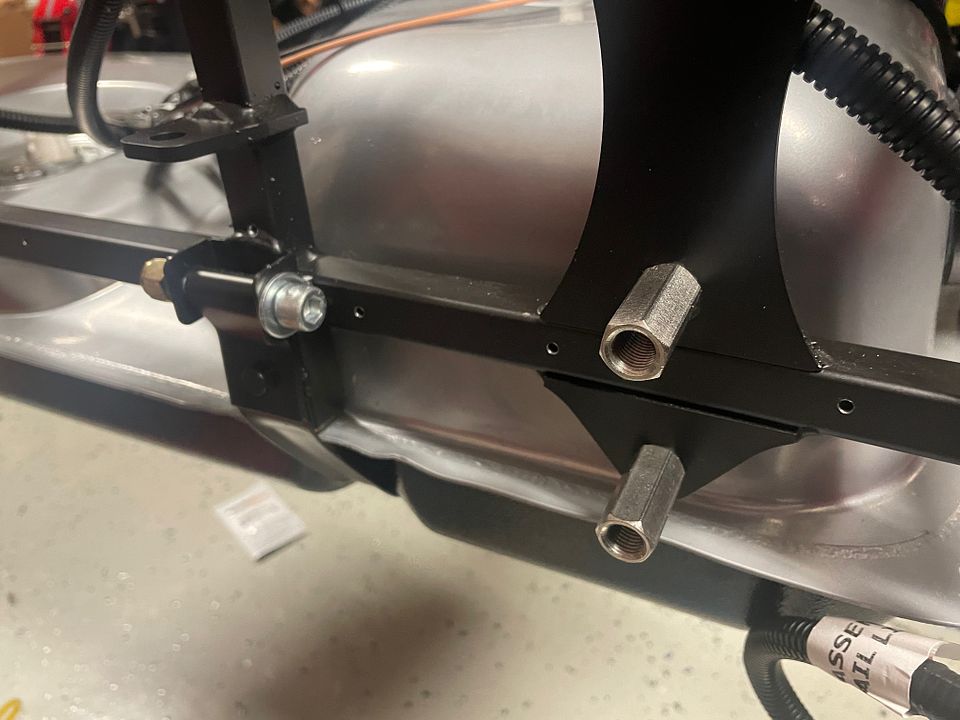
Last build I used the Trick Flow cannister filter that Paul had used. Loved it and very high-quality part. This time I was looking for a cannister with an 8AN sized inlet/outlet already built in. Enter the Red Horse 4501-08-2 10 8AN ORB 10 Micron fuel filter. What a beauty. Never heard of Red Horse before, but stuff seems nicely built. Adding a couple of Evil Energy fittings and ready to rock. The mounting plate is reversible for multiple ways to attach. I wanted to use the holes that were already in the frame, but they were either too big or not aligned right. I used one and had to drill another. It looks close to the tank in the picture but plenty of clearance.
And before I forget, I DID NOT forget the Kleiner mod!
Last edited by cv2065; 03-14-2024 at 12:06 AM.
-
Post Thanks / Like - 0 Thanks, 1 Likes
-
Senior Member
You know, if you update your thread more often...you wouldn't have to stay up till 1AM writing a book!! Build looks like it is coming along! Love the wheels, i am sensing another black out theme. Bradenton looked like a great time as well!!
MK4 #11012 picked up 04/16/24
351W, 3 link, single roll bar
MK4 #10616 picked up 4/10/23
302w, 4 link, 17's, dual roll bar SOLD
MK4 #9759 picked up on 4/3/19
351C, 3 link, 17's, dual roll bars SOLD
-
Post Thanks / Like - 0 Thanks, 1 Likes
-
Senior Member
Whats up Higgy! Im on vacation this week so am keeping some late hours. . I got through about half of my update. More to come. And yeah, blacked out is the only way to go for me.
-
Senior Member
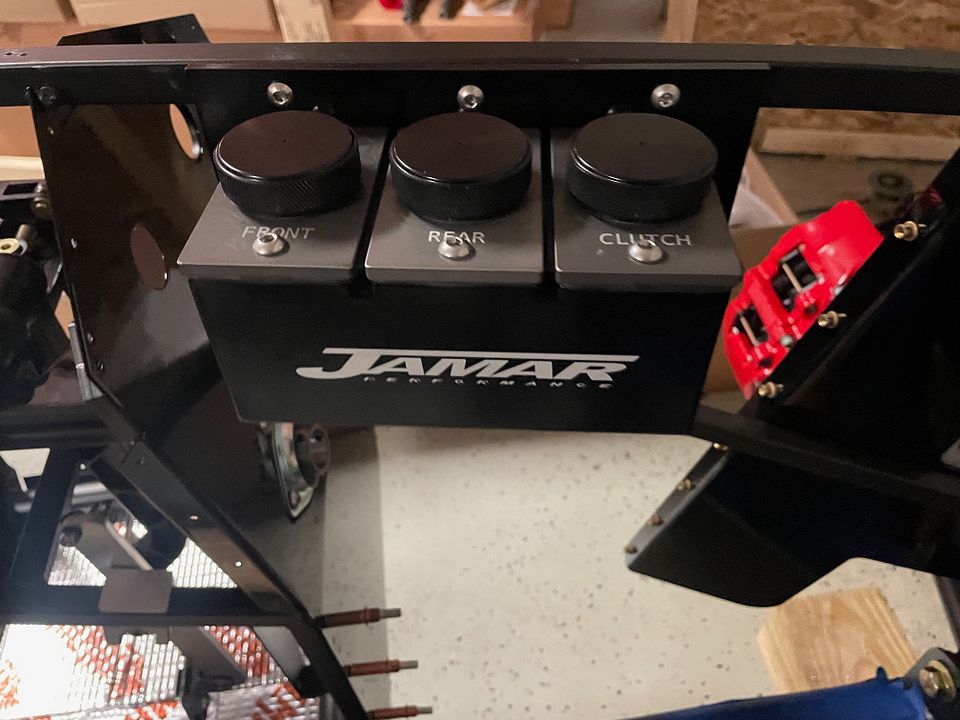
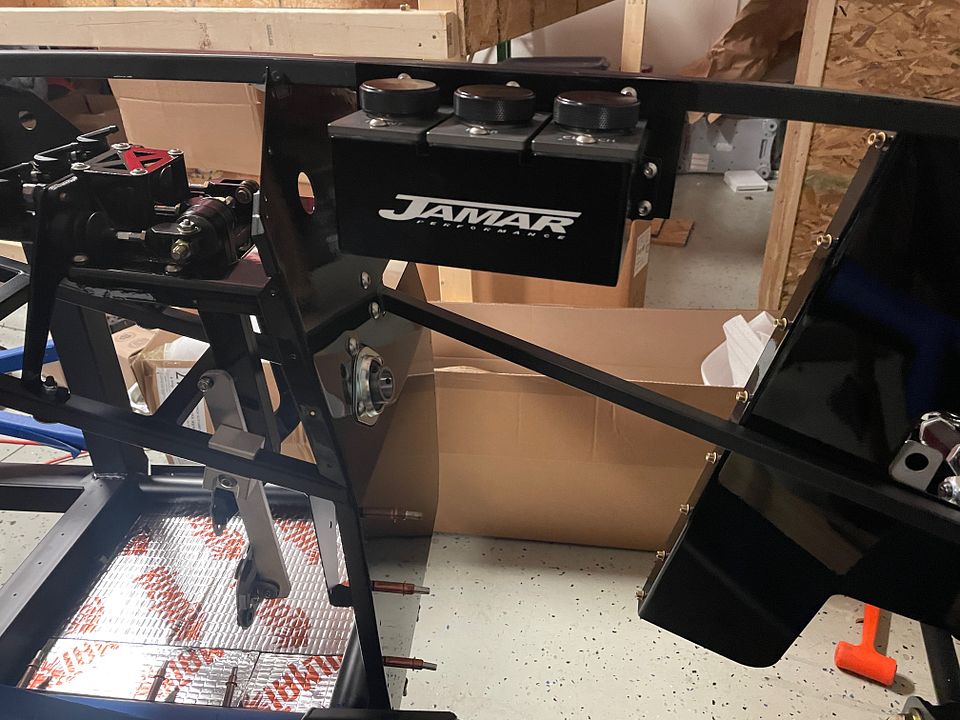
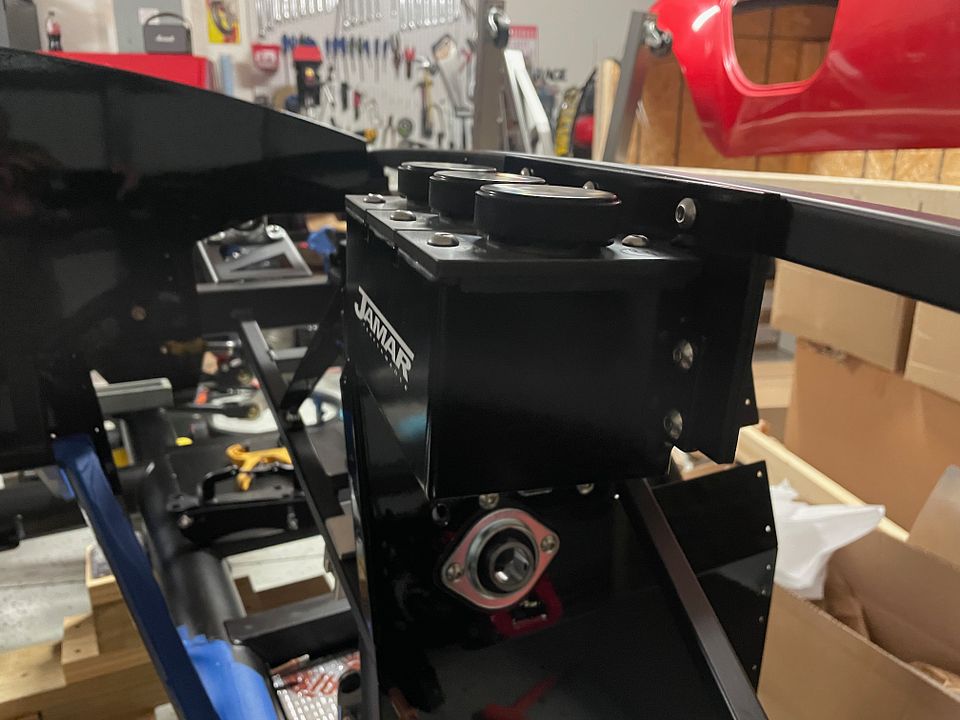
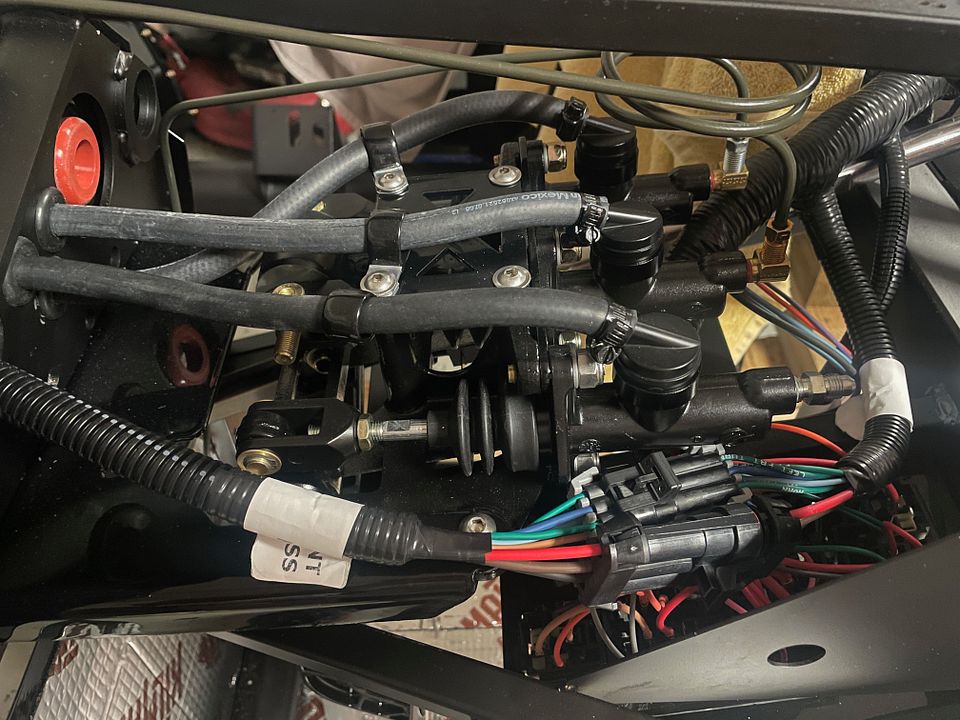
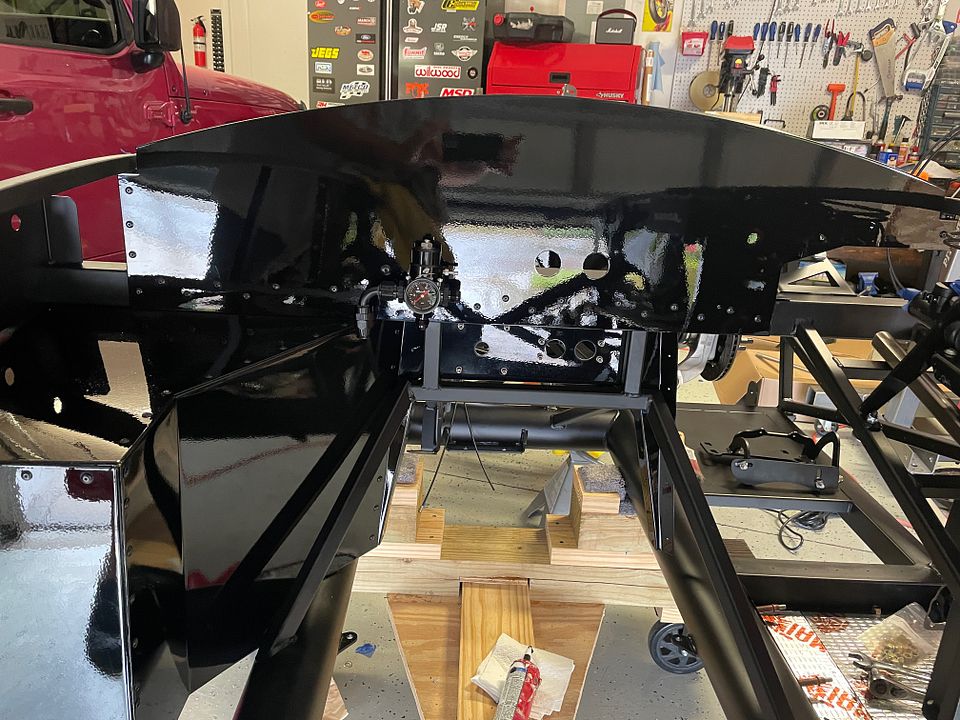
Pedal Box and MCs
Completed the pedal box with no issues. I was going to use straight fittings instead of the 90 degree elbows with the MCs, but as I bent the brake lines, they seem to extend a bit far to the rear of the box and wasn't sure if I was going to have any clearance issues with the harness, as I like to run up the left side of the box instead of the right, so I went back to the 90 degree ones. The concern was rotating those around to the right position without overtightening. I think I'm good to go.
I cut 5/8" off of the MC rods and they fit perfectly. I also cut 3 separate holes for into the front of the box for the hoses. Drilling through that plate is NOT a great time. I also scored some grommets from McMaster car that were suited for 1/4" material thickness. Trying to get the grommet between the plate and sheet metal is difficult when all buttoned up. These fit perfectly. I used part #9307K63. The larger orange grommets are the only ones I could find that were high temp. Seemed like the Mac Truck grommet I found last time has a temperature issue, as it was always gooey during the build after a run. I had to take one of these out as the harness has its own grommet.
When I partially assembled the driver's foot box, I put the sound deadener in before hand. Last time I cut the patterns and put in after the fact, but its a small space, so makes it easier this way. I might have to go back and seal up a couple of spots when I do the 'light' test for heat leaks. I used the 80 mil Kil Mat this time around instead of the ThermoTec. It's a bit cheaper and also comes in smaller sheets so its easier to use for smaller panels and I don't seem to have as much waste. Function and material seems to be the same.
I received my Russ Thompson pedal from TJ at Mountain Metalworks. He's done a great job carrying on Russ' legacy with these pieces. They are identical to his design and function. That will be hooked up to Forte's throttle assembly once installed. Can't recall why I have those big washers under the cap screws that hold the pedal box, but I'll be replacing that hardware.
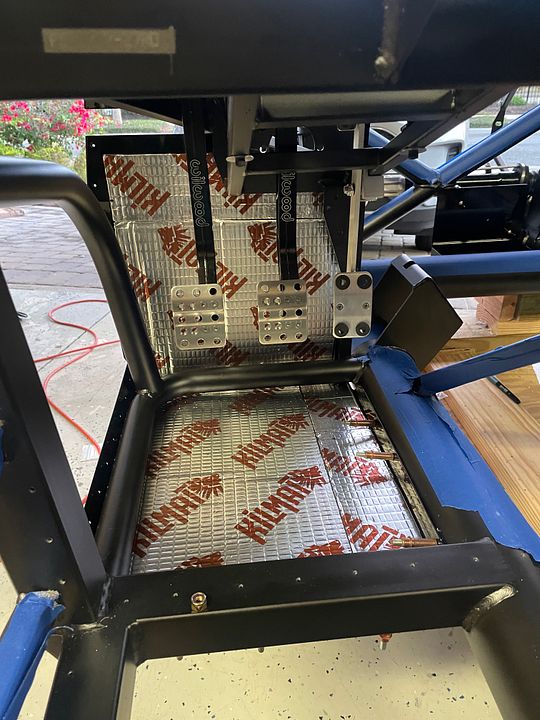
While I was at it, I also completed the passenger side footbox. I buttoned this up with black oversized headed rivets and more Kil Mat. I tucked all of my joining tabs inside the box for a smooth look top to bottom. Came out really nice.
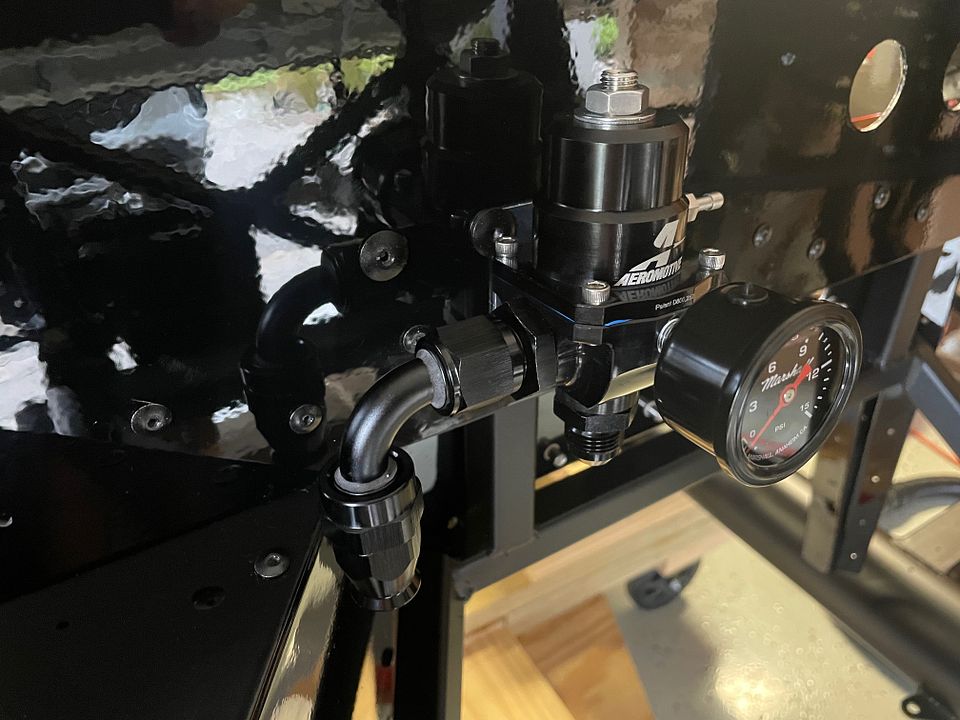
You'll also notice the Aeromotive X1 Series fuel regulator (13304) that I installed for my carb'd setup. Very versatile if I want to swap out to FI later. What a top-quality piece! I also added the Marshal Instruments Fuel Pressure Gauge as it was the only one I could find in black. You can find that here:
https://www.amazon.com/gp/product/B0...?ie=UTF8&psc=1
URL=https://hosting.photobucket.com/images/c310/cv2065/IMG_9106.JPG?width=960&height=720&fit=bounds]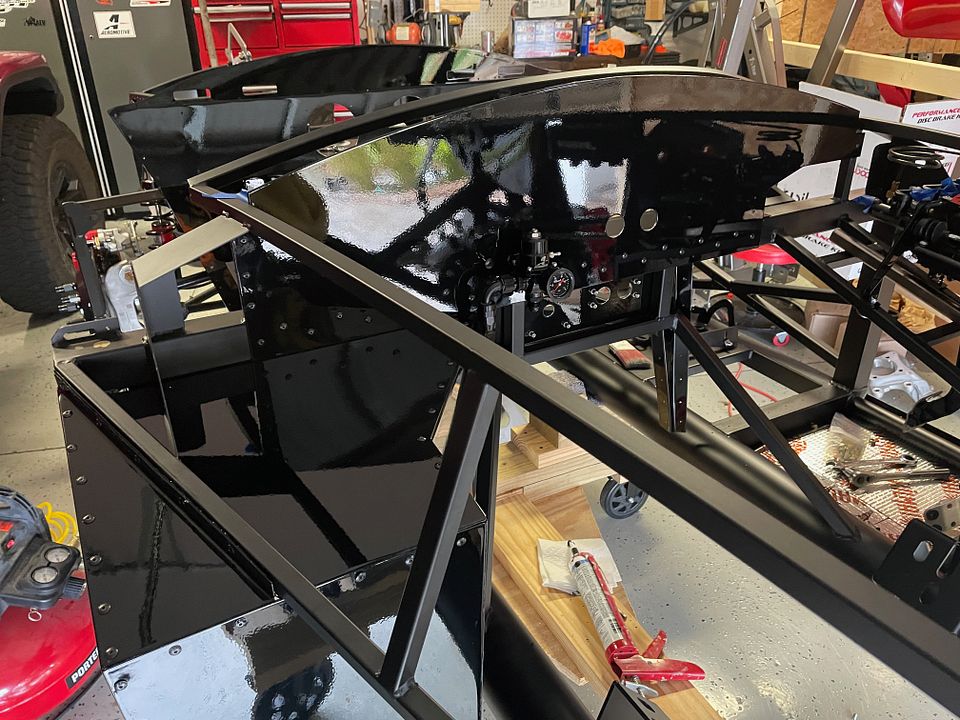 [/URL]
Last edited by cv2065; 03-14-2024 at 08:31 AM.
-
Senior Member
E-Brake
I decided that I wanted the e-brake on the top of the tunnel this time around as I'm going to be using the mid-shift kit from Forte. Thanks to Mike Craven and his outstanding build for the visual. Lots of different ways to do this on the forum, so I started down the road of making this much more complicated than it needed to be. At the recommendation from Wallace18, I bought the blacked out Lokar Kit (Model XEHB-700F) from Speedway Motors. This came with the handle assembly, clevis, boot and also the trim ring, which is a nice bonus, as they are hard to find.
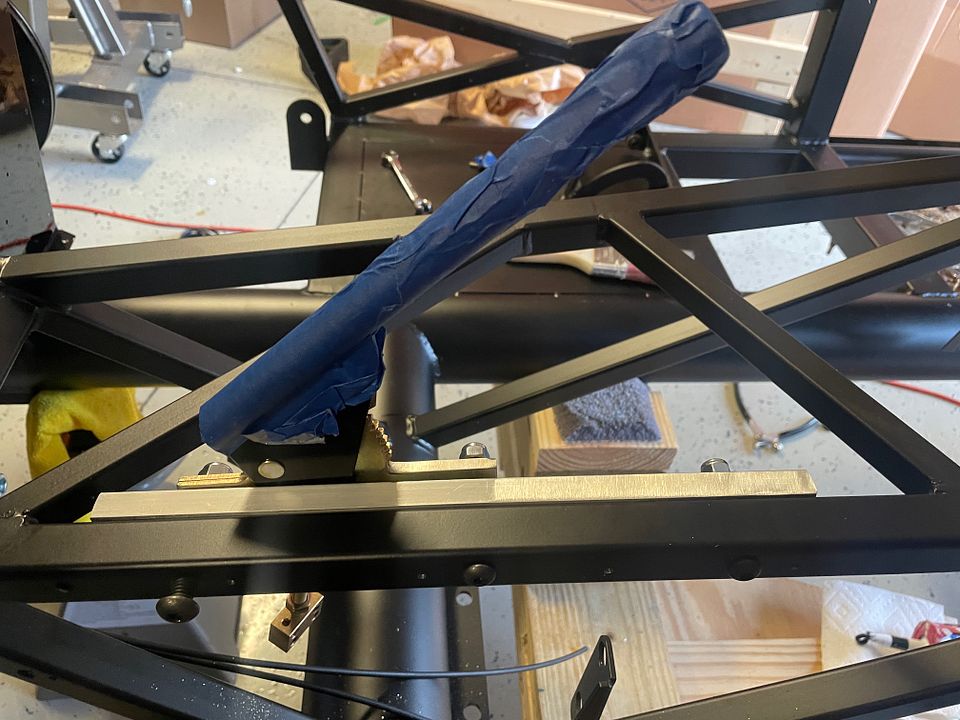
I wanted to put the handle as far back on the tunnel as possible on the passenger side, but there's not much room as the supports come together at the corner. The handle was to be mounted through the 1" tubing and needed to be spaced out, so I bought a 12" x 1", 1/4" thick plate of aluminum to serve as the spacer and help support the tubing. The tunnel tubing is not that thick so I thought bolstering it up a bit and spreading the load over a foot would help with the stress of pulling up on the handle.
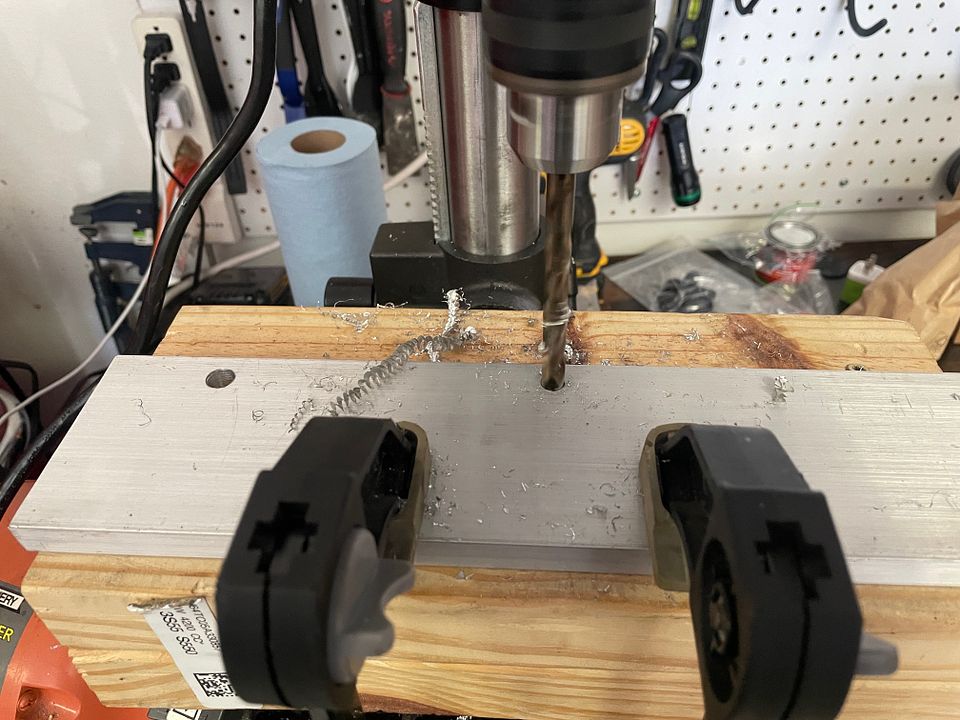
I then drilled 5/16" holes through the tubing, spacer and secured with a bolt through the lokar handle mounting holes. I now have a drill press, and man did that make things easy!

I used the FFR supplied cables that i ran over the IRS and connected right into the frame bracket and will be secured into the clevis. Not much slack between the bracket and clevis and the angle seems doable. MSummers has a similar setup that works fine.
Then they run to the Wilwood calipers. Again, this setup is SO much better than the Mustang calipers that I had before. Getting the ebrake to work with a custom spring, etc., was a bit tedious. The Wilwoods come with a connecting bracket and the e brake cable fit right up into the channel and I secured with an E clip.
Final testing still needed, but I like how its routed and hopefully will get much better engagement that what I had before. I will be cutting off the FFR e brake bracket from the frame so that I can create a flush patch panel.
Last edited by cv2065; 03-14-2024 at 10:01 PM.
-
Post Thanks / Like - 0 Thanks, 2 Likes
-
Senior Member
Steering Column
On the last build, I had the steering shaft collar and footbox bearing on the outside of the footbox as per the instructions. But I had a heck of a time getting it inserted into the lower joint, and always wondered that if I needed to pull it out later, it would most like mean that the body was going to have to come off. So this time, I took the advice of several forum members and put it on the inside of the box which is much better. Grind a little off at the top of the clam shell to clear the nut and all is good.
I also saw a post about recesses in the steering shaft to accommodate the set screws. The instructions have you put in one recess, but not another at the other end of the shaft. Odd? I reached out to FFR just to be sure I wasn't missing anything and asked about putting in the other recess, and they had no issue, but to just be sure to measure properly. And that's what I did. Drill press again made things very easy. All came out great, but if you do goof it up, you can just turn the shaft over and have another go. Along with the recesses, I also upgraded the set screws as they were a little too short for my liking. I replaced with Corrosion Resistant 5/8" SS 5/16-18 set screws (McMaster Carr #92313A580). These have a cup point tip that really dig into the shaft and used a little blue loctite. I never had any issues before with no recesses on the shaft, but certainly can't hurt.
I did have to give the shaft a little deburring with a flat file as it would not slide easily through the upper bearing. I'm reminded that this needs to be collapsable in case of an accident, and mine now slides easily in or out. I'm using the RT Turn Signal mod from Mountain Metalworks, so I haven't put the spring washers in yet or mounted the upper bearing. The footbox bearing is also still lose at this point.

Brake lines are done and I'll post more there once secured.
Last edited by cv2065; 03-14-2024 at 10:01 PM.
-
Senior Member
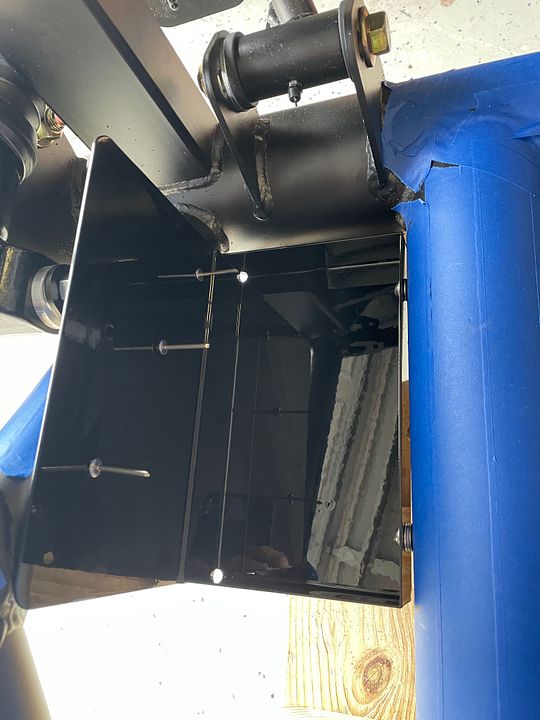
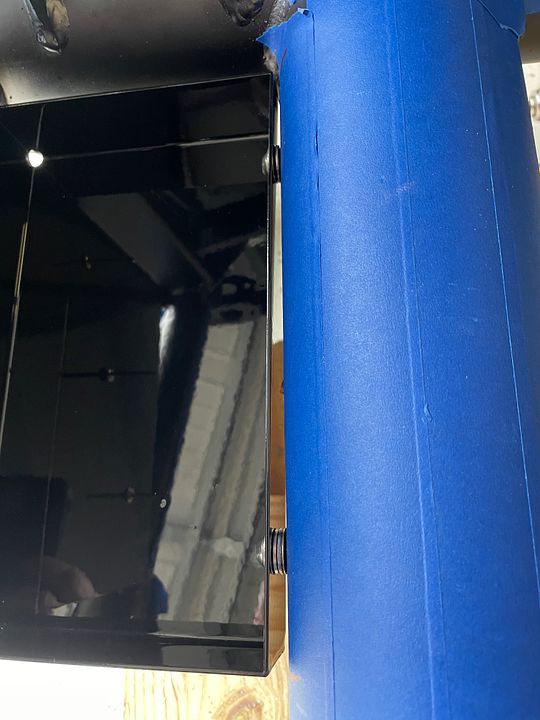
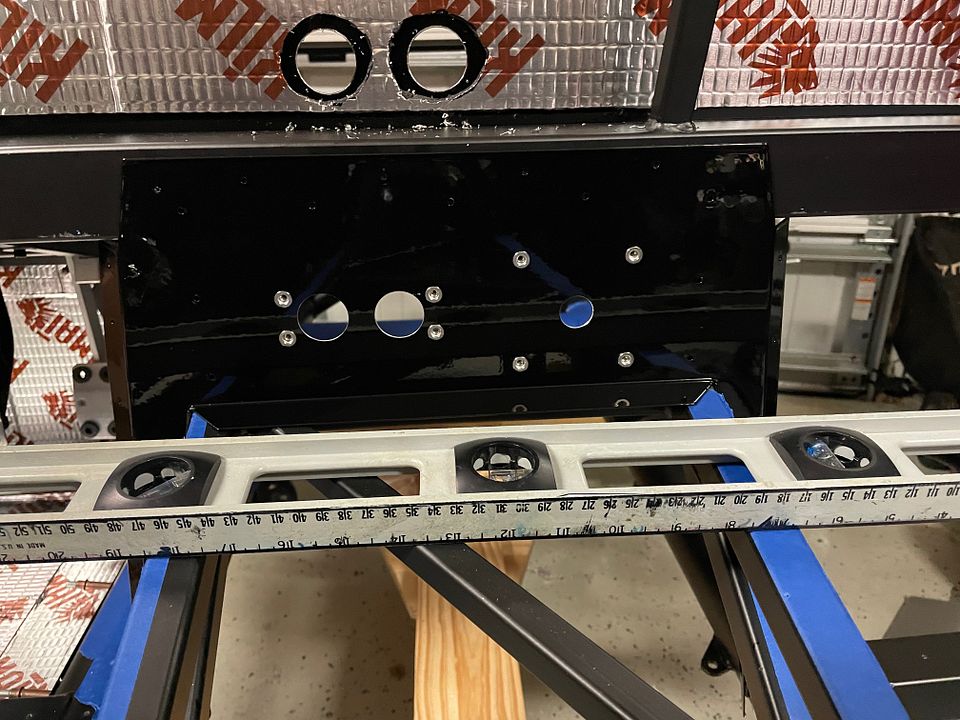
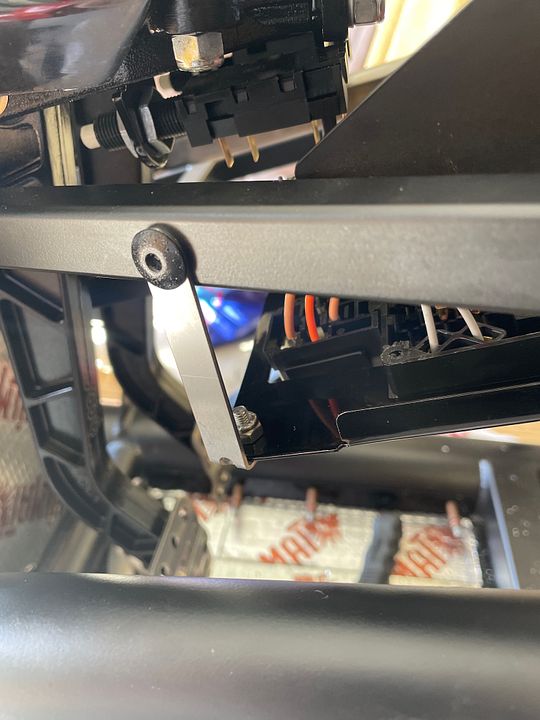
Fuse Panel and Wiring Start
I managed to get the fuse panel installed and ran the front and rear harnesses. For the fuse panel I used 10-32 Rivnuts instead of rivets in case it needed to be dropped down the road. Looks like I'm missing a screw in the picture. I could have probably tapped it just as easily. I also took a page out of Paul's playbook and added an extra support on the upper left side so it's not just hanging there in space and is now rock solid. I used one of the four support straps that FFR gives you for the fan and just bent it to size.
Thinking about an angled cover that I can put over the top of the panel in the event of moisture getting in or the MCs leaking so that it drains away but haven't fabricated anything yet.
URL=https://hosting.photobucket.com/images/c310/cv2065/IMG_9159.JPG?width=960&height=720&fit=bounds] [/URL]


 Thanks:
  Likes:


 Reply With Quote