Forte's

Visit our community sponsor

Thanks Thanks:  0
Likes Likes:  4
Page 2 of 3 FirstFirst 123 LastLast
Results 41 to 80 of 116

Thread: Kai-Rod's #236 Build Page

  1. #41
    Senior Member Kai-Rod's Avatar
    Join Date
    Feb 2011
    Location
    Hanau, Germany
    Posts
    109
    Post Thanks / Like
    I also worked a bit more on the wiring and tried all lights. Having the turn signals in the head lights is kinda nice, but not legal in Germany. I will have to change to different lights and will use small motor cycle style mini blinkers in the front.


    I taped the water fall in place to see where the seats will go. I am using the seat tracks on the driver side as my wife also wants to drive and she is not that tall at all. The tracks will also raise the seat by more than an inch and I also raised the passenger side seat by that much.


    Here is a mock up of my 3 point automatic belts I plan to use. I will have to use the roll bar for the upper mounting. Safety first.


    I made a mini dash board for the switches to mount below the fiberglas dash which I will only have my three Classic Instruments gauges mounted in. This one here is just a first preliminary version. I will make another one later when I have my final switches selected.


    ... more to come.
    Kai
    Hanau/Germany
    Rides & Projects: 54 F100 347SBF/Auto; 65 Galaxie FB 446FE/5-Speed; 67 Mustang Convertible 306SBF/Auto; 07 Mustang GT Convertible 4.6 3V/Auto; #236 FFR Hot Rod 4.6 2V/5-Speed

  2. #42
    33 Hot Rod Builder geoffav's Avatar
    Join Date
    Feb 2011
    Location
    Enterprise, AL
    Posts
    458
    Post Thanks / Like
    Do you plan to have the switches hidden? I like the idea of not seeing the light, wiper, and key switches. Kyle has a neat panel below his seat that's cool too.

  3. #43
    Senior Member Kai-Rod's Avatar
    Join Date
    Feb 2011
    Location
    Hanau, Germany
    Posts
    109
    Post Thanks / Like
    Not sure how I will have the final version, but for now I at least do not have to drill more holes into my fiberglass. With the driver seat on tracks it is not easy to have a panel there unless you want it to move with the seat back and forth.
    Kai
    Hanau/Germany
    Rides & Projects: 54 F100 347SBF/Auto; 65 Galaxie FB 446FE/5-Speed; 67 Mustang Convertible 306SBF/Auto; 07 Mustang GT Convertible 4.6 3V/Auto; #236 FFR Hot Rod 4.6 2V/5-Speed

  4. #44
    Senior Member Kai-Rod's Avatar
    Join Date
    Feb 2011
    Location
    Hanau, Germany
    Posts
    109
    Post Thanks / Like
    Here you can see my small panel under the dash and a paper version of the gauge size I am using. I tried various positions and decided to center it from all side (left/right and top/bottom). Holes are in, but the gauges are still in the box.


    ... more to come.
    Kai
    Hanau/Germany
    Rides & Projects: 54 F100 347SBF/Auto; 65 Galaxie FB 446FE/5-Speed; 67 Mustang Convertible 306SBF/Auto; 07 Mustang GT Convertible 4.6 3V/Auto; #236 FFR Hot Rod 4.6 2V/5-Speed

  5. #45
    President, Factory Five Racing Dave Smith's Avatar
    Join Date
    Feb 2011
    Location
    Barrington, RI
    Posts
    1,811
    Post Thanks / Like
    Blog Entries
    2
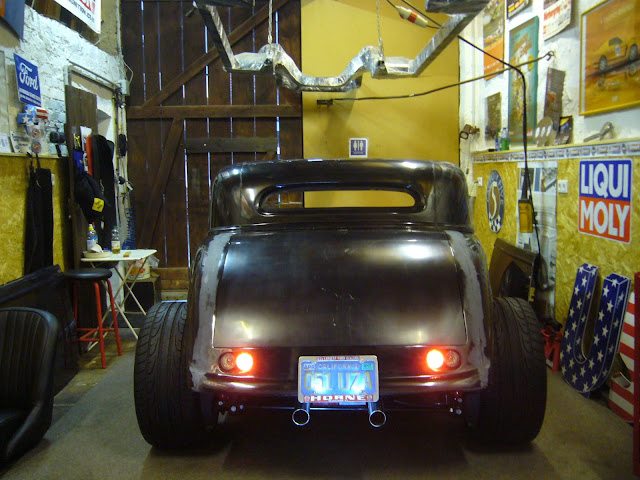
    I dont get to vote for HR Pic of the Month, but if I did, THAT photo of the rod in the garage with the lights on would be my pick. I have to go back and read the entire post here, but AWESOME job!
    Dave Smith, FFR 001
    President
    Factory Five Racing

  6. Likes theidlemind liked this post
  7. #46
    Out Drivin' Gumball's Avatar
    Join Date
    Feb 2011
    Location
    Blackberry Township, IL
    Posts
    2,653
    Post Thanks / Like
    What a cool post - I love the attention to detail and the fact that this Hot Rod, as well as the pick-up and the convertible Mustang, are prowling the roads in Deutschland. Viel Gluck!
    Later,
    Chris

    "There are no more monsters to fear, and so, we have to build our own."
    Mk3.1 #7074

  8. #47
    Senior Member Kai-Rod's Avatar
    Join Date
    Feb 2011
    Location
    Hanau, Germany
    Posts
    109
    Post Thanks / Like
    Thanx Dave and Chris. Appreciate your comments. This project is great fun !
    Kai
    Hanau/Germany
    Rides & Projects: 54 F100 347SBF/Auto; 65 Galaxie FB 446FE/5-Speed; 67 Mustang Convertible 306SBF/Auto; 07 Mustang GT Convertible 4.6 3V/Auto; #236 FFR Hot Rod 4.6 2V/5-Speed

  9. #48
    Senior Member Kai-Rod's Avatar
    Join Date
    Feb 2011
    Location
    Hanau, Germany
    Posts
    109
    Post Thanks / Like
    ... and finally I was able to go cart a little bit last Saturday. My drive way is short and I cannot drive "out of the door" as I live right on our main street and driving like this is a total NO GO !

    I needed a little time to get used to the clutch before I finally left the garage for my first little brake test. Then I did 3 trips to the gate a back. Wish I had more room to shift into 2nd.

    Hope the link works OK for you. If not, then let me know.

    http://www.youtube.com/watch?v=XrVFY...yer_detailpage
    Kai
    Hanau/Germany
    Rides & Projects: 54 F100 347SBF/Auto; 65 Galaxie FB 446FE/5-Speed; 67 Mustang Convertible 306SBF/Auto; 07 Mustang GT Convertible 4.6 3V/Auto; #236 FFR Hot Rod 4.6 2V/5-Speed

  10. #49
    Administrator David Hodgkins's Avatar
    Join Date
    Feb 2011
    Location
    Corona del Mar, CA
    Posts
    6,071
    Post Thanks / Like
    Blog Entries
    7
    I especially like the parts at :55 and 1:20.

    Looking - and sounding - REALLY good!


    FFR 5369 Pin Drive, IRS, Trigos, Torsen, Wilwoods, FMS BOSS 302 "B" cam , Mass-flo. CA SB100 (SPCN) Registered
    Delivered 4/23/06. "Finished" 4/2012 (still not done!)


  11. #50
    Senior Member Kai-Rod's Avatar
    Join Date
    Feb 2011
    Location
    Hanau, Germany
    Posts
    109
    Post Thanks / Like
    Another week went by and more progress. Let's start with a shot of the car after the go cart ride Saturday a week ago.


    On Sunday I tried to figure out how to attach my 2003 Mustang E-brake cables to the E-Brake lever. I just saw no way and started to make my own bracket.


    Here you see the still raw piece mounted to the frame. It works perfect. In the mean time it is painted black to match the chassis. Done. It did cost me a day and made me lay flat on the floor under the car at least 20 times.


    Next I modified the pedal box bracket to allow mounting the Wilwood brake bias adjuster. Just need to find a place to mount the knob and then cut the cable.


    ... more to come.
    Kai
    Hanau/Germany
    Rides & Projects: 54 F100 347SBF/Auto; 65 Galaxie FB 446FE/5-Speed; 67 Mustang Convertible 306SBF/Auto; 07 Mustang GT Convertible 4.6 3V/Auto; #236 FFR Hot Rod 4.6 2V/5-Speed

  12. #51
    Senior Member Kai-Rod's Avatar
    Join Date
    Feb 2011
    Location
    Hanau, Germany
    Posts
    109
    Post Thanks / Like
    Next was to get the trans cover done so that I have all holes closed. I bought me a started kit from an online store with various resins, hardener, gel coat, color, etc etc. I also bought a book, but it arrived when I was done with this little job here which is hidden anyway. Guess I will have to do more fibre glass work later and can use the technics from the book.


    I had a hole saw which had the perfect diameter for the shifter. See yourself. I did cover it with one more layer colored resin and now it is almost completely black. Does not matter in the end as it will be covered with heat insulation and carpet.


    First car wash, but with body off. I did sand the joints in the body. Now it is ready for a first coat of epoxy primer which I will spray before I start the bondo and sanding work.


    ... later.
    Kai
    Hanau/Germany
    Rides & Projects: 54 F100 347SBF/Auto; 65 Galaxie FB 446FE/5-Speed; 67 Mustang Convertible 306SBF/Auto; 07 Mustang GT Convertible 4.6 3V/Auto; #236 FFR Hot Rod 4.6 2V/5-Speed

  13. #52
    Senior Member Kai-Rod's Avatar
    Join Date
    Feb 2011
    Location
    Hanau, Germany
    Posts
    109
    Post Thanks / Like
    Body is now on again and I bolted it up except for the fire wall. Not sure what I do here, but for sure no rivets.

    Played around with a set of steelies from my Galaxie. Might get me a set of 16s or 17s with modern rubber so that I can swap between the modern 20s and the old school look.

    The ones I used here did not clear the front original FFR brakes. Guess later year 15s will, but these here were made for drum brakes and barely clear the Stainless Brakes I have for the Galaxie.


    OK. Now I will go to the garage and see what is next ...
    Kai
    Hanau/Germany
    Rides & Projects: 54 F100 347SBF/Auto; 65 Galaxie FB 446FE/5-Speed; 67 Mustang Convertible 306SBF/Auto; 07 Mustang GT Convertible 4.6 3V/Auto; #236 FFR Hot Rod 4.6 2V/5-Speed

  14. #53
    Z Nut
    Join Date
    Feb 2011
    Location
    Vacaville, CA
    Posts
    212
    Post Thanks / Like
    Those steelies look great!

    Keep up the excellent work. Oh, and I really love the seat warmers. I was very glad reading through all this to see that you ceramic coated everything to fight out the heat. My gut tells me that long hauls might still get a little toasty.

  15. #54
    certified gear head 5speed's Avatar
    Join Date
    May 2011
    Location
    Atlantic Canada
    Posts
    24
    Post Thanks / Like
    Fantastic thread Kai. Your attention to detail and fabrication skills are amazing.

  16. #55
    Senior Member Kai-Rod's Avatar
    Join Date
    Feb 2011
    Location
    Hanau, Germany
    Posts
    109
    Post Thanks / Like
    .... have not posted for a couple of weeks, but did make some progress.

    At first one frustrating issue. I have found out that I have two same passenger side inner door frames, but no driver side. It is always a good idea to make a full inventory when receiving the kit, but I guess you just won't find all issues. Especially because you don't know what some parts are looking like.


    Here you see what I did with the trunk side panels. In order to get the body off easily I cut them in two pieces. The lower section needs to be removable.

    Passenger side before I bolted the lower section in. I had to make this piece out of a new sheet of aluminum as mine was a bit short.


    Driver side with the original cut off piece bolted in:


    Now it was time to fit the rear wall of my self made box housing the engine electronics. I wanted it to fit perfectly between the trunk side panels. That's why I waited until they were done.


    The lid is attached with just two small screws in the middle. I still need to find and fit a gasket.


    ... more to come.
    Kai
    Hanau/Germany
    Rides & Projects: 54 F100 347SBF/Auto; 65 Galaxie FB 446FE/5-Speed; 67 Mustang Convertible 306SBF/Auto; 07 Mustang GT Convertible 4.6 3V/Auto; #236 FFR Hot Rod 4.6 2V/5-Speed

  17. #56
    Senior Member Kai-Rod's Avatar
    Join Date
    Feb 2011
    Location
    Hanau, Germany
    Posts
    109
    Post Thanks / Like
    Next was fitting the waterfall. I fixed it with seven (7) rivet nuts around the top. I have not yet fitted the sides or the lower corners. I will wait with that until I can do my doors.


    I have also fitted the tranny cover. For now I have two bolts each side to the floor and one to the firewall. I have used some of the half moon gaskets. Not sure if this is water tight yet.

    Kai
    Hanau/Germany
    Rides & Projects: 54 F100 347SBF/Auto; 65 Galaxie FB 446FE/5-Speed; 67 Mustang Convertible 306SBF/Auto; 07 Mustang GT Convertible 4.6 3V/Auto; #236 FFR Hot Rod 4.6 2V/5-Speed

  18. #57
    Senior Member Kai-Rod's Avatar
    Join Date
    Feb 2011
    Location
    Hanau, Germany
    Posts
    109
    Post Thanks / Like
    What is a build without a party every once in a while. Had my 2011 party just a week ago. Many good friends showed up. One photo shows Roger's V12 powered coupe.


    Thought this is a good shot, too. In the fore ground my LED lighted weissbeer glass (pretty cool, eeh ?) and in the back my 33.


    ... more to come.
    Kai
    Hanau/Germany
    Rides & Projects: 54 F100 347SBF/Auto; 65 Galaxie FB 446FE/5-Speed; 67 Mustang Convertible 306SBF/Auto; 07 Mustang GT Convertible 4.6 3V/Auto; #236 FFR Hot Rod 4.6 2V/5-Speed

  19. #58
    Senior Member Kai-Rod's Avatar
    Join Date
    Feb 2011
    Location
    Hanau, Germany
    Posts
    109
    Post Thanks / Like
    Here I have fitted the 3-link cover. For some reason it did not fit the way it came and I had to had some material to fill the gaps. The angles were just not right.


    Next is the roll bar ...
    Kai
    Hanau/Germany
    Rides & Projects: 54 F100 347SBF/Auto; 65 Galaxie FB 446FE/5-Speed; 67 Mustang Convertible 306SBF/Auto; 07 Mustang GT Convertible 4.6 3V/Auto; #236 FFR Hot Rod 4.6 2V/5-Speed

  20. #59
    Senior Member Kai-Rod's Avatar
    Join Date
    Feb 2011
    Location
    Hanau, Germany
    Posts
    109
    Post Thanks / Like
    Here is how I did the roll bar. I have seen this "card board process" on another build page.

    First I cut two pieces of card board and added holes the size of the roll bar diameter. I fitted them together with the roll bar and taped the card board to the body.


    With card board in place I removed the roll bar and marked the water fall thru the holes in the card board.


    I then cut the holes.


    Pretty good result I think. Just a little trimming needed.


    And this is what it looks like with the roll bar in place.


    Next is trial fit 3-point automatic seat belts.
    Kai
    Hanau/Germany
    Rides & Projects: 54 F100 347SBF/Auto; 65 Galaxie FB 446FE/5-Speed; 67 Mustang Convertible 306SBF/Auto; 07 Mustang GT Convertible 4.6 3V/Auto; #236 FFR Hot Rod 4.6 2V/5-Speed

  21. #60
    Junior Member
    Join Date
    Jul 2011
    Posts
    13
    Post Thanks / Like
    Great build page...looks like a nice ride...good job, especially from across the pond!

  22. #61
    Senior Member Kai-Rod's Avatar
    Join Date
    Feb 2011
    Location
    Hanau, Germany
    Posts
    109
    Post Thanks / Like
    Have not added any photos and news since quite some time. On one hand I was handicapped because I was waiting for the doorframe and it took a couple of month to get the parts needed to work with the later model frame. And on the other hand I got a bit lazy and I was also traveling a bit. Anyway, I spend this past Saturday in the garage and will now add a couple of photos.
    Kai
    Hanau/Germany
    Rides & Projects: 54 F100 347SBF/Auto; 65 Galaxie FB 446FE/5-Speed; 67 Mustang Convertible 306SBF/Auto; 07 Mustang GT Convertible 4.6 3V/Auto; #236 FFR Hot Rod 4.6 2V/5-Speed

  23. #62
    Senior Member Kai-Rod's Avatar
    Join Date
    Feb 2011
    Location
    Hanau, Germany
    Posts
    109
    Post Thanks / Like
    OK. Let's get started with what happened the past couple of month.

    Here I did a mock-up of the upper seat belt mount. I have to have belts and I cannot use the one in the kit as they are not legal here. My wife also hates the static belts which will not allow any movement. So the plan called for 3-way automatic belts which I just bought and installed in my 54 F100. I now got me a similar set for the 33.


    The lower point with the reel uses the original mounting tab. Same for the side with the lock.


    The belts I used for the mock-up were those I got for the truck. Now that I knew how this would work I worked my truck and ordered two belts for the 33.

    Next was making a bracket for my rear fog light and my back up light. Both are needed in Germany. I made me a bracket which would then also hold the license plate.


    This is how it looks mounted to the car. Since the lights are very close to the trunk floor and moved a bit back, they are almost invisible when you walk around the car. Just like I wanted it.

    Kai
    Hanau/Germany
    Rides & Projects: 54 F100 347SBF/Auto; 65 Galaxie FB 446FE/5-Speed; 67 Mustang Convertible 306SBF/Auto; 07 Mustang GT Convertible 4.6 3V/Auto; #236 FFR Hot Rod 4.6 2V/5-Speed

  24. #63
    Senior Member Kai-Rod's Avatar
    Join Date
    Feb 2011
    Location
    Hanau, Germany
    Posts
    109
    Post Thanks / Like
    Next I try fitted the hardtop. Looks good, doesn't it ?


    Trying to square it is close to impossible. You need to accept a compromise.


    The cowl on my body is not square either as you can see from these photos.


    More to come ...
    Kai
    Hanau/Germany
    Rides & Projects: 54 F100 347SBF/Auto; 65 Galaxie FB 446FE/5-Speed; 67 Mustang Convertible 306SBF/Auto; 07 Mustang GT Convertible 4.6 3V/Auto; #236 FFR Hot Rod 4.6 2V/5-Speed

  25. #64
    Senior Member Kai-Rod's Avatar
    Join Date
    Feb 2011
    Location
    Hanau, Germany
    Posts
    109
    Post Thanks / Like
    Don't worry. I did not die. I was just a bit slow on the build and the last couple of month I just did not find the time to post the news here. I will try to catch up to where I am now.

    Next its time to drill the access holes for the top mounting.


    Be careful when choosing the right size drill. If your hoe is too small or too big then the covers won't fit.


    Finding the center line is tough. Either you will have to accept a compromise or you will have to square your car very early in the build (which I did not). I have read now a lot about what other builders did. Too late for me.


    I am using lots of masking tape to mark and write my measurements on.


    Installing the rivet nuts for the top mounts.


    ...
    Kai
    Hanau/Germany
    Rides & Projects: 54 F100 347SBF/Auto; 65 Galaxie FB 446FE/5-Speed; 67 Mustang Convertible 306SBF/Auto; 07 Mustang GT Convertible 4.6 3V/Auto; #236 FFR Hot Rod 4.6 2V/5-Speed

  26. #65
    Senior Member Kai-Rod's Avatar
    Join Date
    Feb 2011
    Location
    Hanau, Germany
    Posts
    109
    Post Thanks / Like
    Next was the fitting of the roadster windshield. I realized that it does not use the exact same holes I drilled for the hardtop in order to look right on my 33. I guess the reason is that I did not square mine. So, another compromise here, but it sure looks OK.


    Another view from distance. You would need a measuring tape to find out that it does not sit in the centre (if you find a centre)


    Added two more cables to the batterie for remote charging as the batterie will be hard to reach later.


    Running the cables to the side of the trunk


    Here you see the terminals that I got from Summit.


    ...
    Kai
    Hanau/Germany
    Rides & Projects: 54 F100 347SBF/Auto; 65 Galaxie FB 446FE/5-Speed; 67 Mustang Convertible 306SBF/Auto; 07 Mustang GT Convertible 4.6 3V/Auto; #236 FFR Hot Rod 4.6 2V/5-Speed

  27. #66
    Senior Member Kai-Rod's Avatar
    Join Date
    Feb 2011
    Location
    Hanau, Germany
    Posts
    109
    Post Thanks / Like
    A few more photos with the car outside the garage. You can already see how the Classic Instruments make for a clean look. No switches, no ignition key on the dash board (all mounted on a small panel below.


    ... more to come the next few days ...
    Kai
    Hanau/Germany
    Rides & Projects: 54 F100 347SBF/Auto; 65 Galaxie FB 446FE/5-Speed; 67 Mustang Convertible 306SBF/Auto; 07 Mustang GT Convertible 4.6 3V/Auto; #236 FFR Hot Rod 4.6 2V/5-Speed

  28. #67
    Senior Member Kai-Rod's Avatar
    Join Date
    Feb 2011
    Location
    Hanau, Germany
    Posts
    109
    Post Thanks / Like
    As some know the early versions of the 33 had this "grill issue". Some just left it and worked the hood to fit the grill, some used Dr. Ruth Grill Service (I would have done the same if there wasn't that much water between us) and then there are the fearless (like me) who tried their own luck.

    I had the hood many times on the car and just could not accept to leave the grill as it was. Probably hard to see in this photo.


    ... and here's my grill after I took half of the bars out (using a Dremel) and after I cut about 1cm to of the frame. Since this is a casted part it was very hard to make the two ends meet again.


    It takes a good welder to ensure a good connection. You got to find one and it will cost you. Took about an hour of welding while I was cutting the bars to the correct length.


    Done with the welding. Now it is grinding and sanding to make it look like there was no cut. Some areas are hard to reach. Means you can see the weld when you look closely.


    After I was done I can only say: DON'T DO THIS. Have it done by Dr. Ruth !!!

    ... and now a funny photo. Since I am working in an unheated garage running quickly will warm you up.

    Kai
    Hanau/Germany
    Rides & Projects: 54 F100 347SBF/Auto; 65 Galaxie FB 446FE/5-Speed; 67 Mustang Convertible 306SBF/Auto; 07 Mustang GT Convertible 4.6 3V/Auto; #236 FFR Hot Rod 4.6 2V/5-Speed

  29. #68
    Senior Member Kai-Rod's Avatar
    Join Date
    Feb 2011
    Location
    Hanau, Germany
    Posts
    109
    Post Thanks / Like
    Now that the grill was straight it was time to do the body work. I am definitely not good in this, but no reason for me not to do it anyway. It is just great fun to do the whole thing yourself. Trust me.

    After sanding the seams I first used some fibre glass bondo and then some regular bondo to get a smooth finish.


    I used the flexible sanders from AFS. Pretty cool tools. I guess anyone can do a great job using these.


    Done with the sanding ...


    ... and then a little car wash ...


    This is my (not yet completed) paint booth.


    And here my 20 year old SATA GRZ. Even so SATA is one of the best brands out there, this model is way out dated. I still gave it a try ...

    Kai
    Hanau/Germany
    Rides & Projects: 54 F100 347SBF/Auto; 65 Galaxie FB 446FE/5-Speed; 67 Mustang Convertible 306SBF/Auto; 07 Mustang GT Convertible 4.6 3V/Auto; #236 FFR Hot Rod 4.6 2V/5-Speed

  30. #69
    Senior Member Kai-Rod's Avatar
    Join Date
    Feb 2011
    Location
    Hanau, Germany
    Posts
    109
    Post Thanks / Like
    Next was a trip to my local DuPont dealer. Returned home with more than $600 worth of primer, filler and paint.

    Ready for the first layer of primer.


    And here is a shot of the fresh primered body ...


    ... and some other pieces.


    ... then more sanding sanding sanding ...


    ... and then a layer of filler in a color to fit the color I wanted to paint the 33.

    Kai
    Hanau/Germany
    Rides & Projects: 54 F100 347SBF/Auto; 65 Galaxie FB 446FE/5-Speed; 67 Mustang Convertible 306SBF/Auto; 07 Mustang GT Convertible 4.6 3V/Auto; #236 FFR Hot Rod 4.6 2V/5-Speed

  31. #70
    Senior Member Kai-Rod's Avatar
    Join Date
    Feb 2011
    Location
    Hanau, Germany
    Posts
    109
    Post Thanks / Like
    ... and finally a layer of paint. The color is a grey tone used on the Fiat 500 (at least over here in Europe).


    ... the doors ...


    ... done ...


    ... ready for mounting he body (hopefully the last time) ...

    Kai
    Hanau/Germany
    Rides & Projects: 54 F100 347SBF/Auto; 65 Galaxie FB 446FE/5-Speed; 67 Mustang Convertible 306SBF/Auto; 07 Mustang GT Convertible 4.6 3V/Auto; #236 FFR Hot Rod 4.6 2V/5-Speed

  32. #71
    Senior Member
    Join Date
    Feb 2011
    Location
    Myrtle Beach, SC
    Posts
    2,108
    Post Thanks / Like
    Kai-

    You have done a spectacular job on your build, as well as keepingg us so well informed of your progress! Your attention to detail and meticulous hard work are an inspiration! I can't wait to see her finished. Fantastic job Sir!!

    Regards,

    Steve

  33. #72
    Senior Member Kai-Rod's Avatar
    Join Date
    Feb 2011
    Location
    Hanau, Germany
    Posts
    109
    Post Thanks / Like
    Thank you Steve. But don't believe my 33 is perfect. It is not. Especially on the body I did not do any of the stuff some others did to get it straight. I have no patience for this kinda work. ... :-)
    Kai
    Hanau/Germany
    Rides & Projects: 54 F100 347SBF/Auto; 65 Galaxie FB 446FE/5-Speed; 67 Mustang Convertible 306SBF/Auto; 07 Mustang GT Convertible 4.6 3V/Auto; #236 FFR Hot Rod 4.6 2V/5-Speed

  34. #73
    Senior Member Kai-Rod's Avatar
    Join Date
    Feb 2011
    Location
    Hanau, Germany
    Posts
    109
    Post Thanks / Like
    Since I had the body on and of about six to seven times, putting it on one more time was easy. No scratching of the paint. Here are now a few shots.


    Kai
    Hanau/Germany
    Rides & Projects: 54 F100 347SBF/Auto; 65 Galaxie FB 446FE/5-Speed; 67 Mustang Convertible 306SBF/Auto; 07 Mustang GT Convertible 4.6 3V/Auto; #236 FFR Hot Rod 4.6 2V/5-Speed

  35. #74
    Factory Five Distributor Hammink Performance's Avatar
    Join Date
    Oct 2011
    Location
    Ommen, The Netherlands
    Posts
    210
    Post Thanks / Like
    Hi Kai,

    Very cool that you even do the painting your self!

    But I also agree with steve, your attention to detail is huge!

    regs Freek
    Distributor of Factory Five for Europe
    www.hamminkperformance.com

  36. #75
    Senior Member Tom Veale's Avatar
    Join Date
    Mar 2011
    Location
    Wisconsin
    Posts
    449
    Post Thanks / Like
    Thanks Kai for updating the build thread and adding the photo series. (I think my spray gun is even older than yours! However, I let the pros paint my car!)

    My car ended up two tone for a bunch of reasons. My wife said we already had too many gray cars! I had looked at cherry/gray two tone first.

    Best regards,

  37. #76
    Senior Member Kai-Rod's Avatar
    Join Date
    Feb 2011
    Location
    Hanau, Germany
    Posts
    109
    Post Thanks / Like
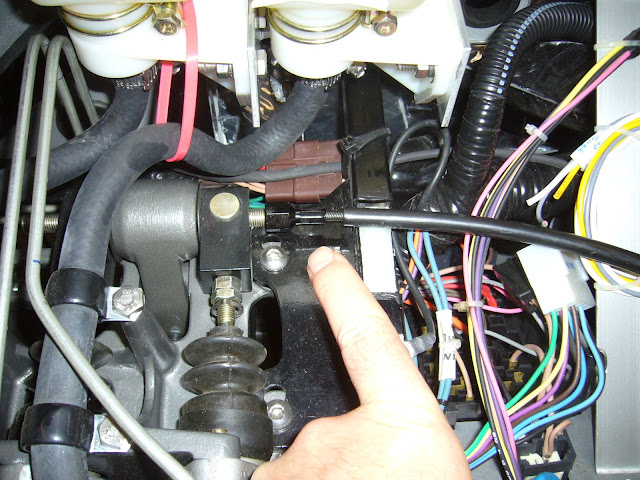
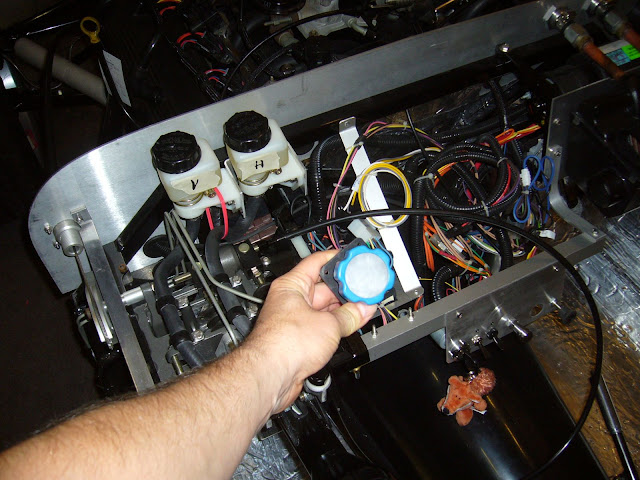
    Thanx for the kind words. In some areas I am really very much into the details and want things to look good (even so under the car or areas which cannot be seen later) and function well.

    Getting the car ready for the first trip. Working under the dash is not one of my favorites.

    Kai
    Hanau/Germany
    Rides & Projects: 54 F100 347SBF/Auto; 65 Galaxie FB 446FE/5-Speed; 67 Mustang Convertible 306SBF/Auto; 07 Mustang GT Convertible 4.6 3V/Auto; #236 FFR Hot Rod 4.6 2V/5-Speed

  38. #77
    Senior Member Kai-Rod's Avatar
    Join Date
    Feb 2011
    Location
    Hanau, Germany
    Posts
    109
    Post Thanks / Like
    Mid August 2012. All ready for the first road trip thru town. I invited a couple of friends and had a count down on Facebook with new Photos every day for the exact date and time. And i rolled out the drive way exactly that day and that time. What a great pleasure. Except for the brakes all went like planned. The brakes are really an issue.

    By the way , my chase plane was a 32 Dearborn Deuce which was built all new in 2011.


    Kai
    Hanau/Germany
    Rides & Projects: 54 F100 347SBF/Auto; 65 Galaxie FB 446FE/5-Speed; 67 Mustang Convertible 306SBF/Auto; 07 Mustang GT Convertible 4.6 3V/Auto; #236 FFR Hot Rod 4.6 2V/5-Speed

  39. #78
    Senior Member riptide motorsport's Avatar
    Join Date
    Feb 2011
    Location
    Fort Lauderdale Fl.
    Posts
    3,296
    Post Thanks / Like
    Too cool!! Great work.
    FFR Daytona Type 65 Coupe
    67 427 Cobra
    57' Belair
    72 Pinto Wagon ,306" 1/4 miler
    34 5 window coupe Ford
    2003 Mustang GT
    99' ZX9
    85 Goldwing

    All toys still in the Scuderia!


    Every Saint has a past..................every sinner a future

    Don't take yourself so seriously........no one else does.

    You never see a motorcycle parked outside a Psychiatrists office.

  40. #79
    Senior Member Kai-Rod's Avatar
    Join Date
    Feb 2011
    Location
    Hanau, Germany
    Posts
    109
    Post Thanks / Like
    Since no fenders are a clear NO No in Germany I then started to fit the bike fenders. What really disturbed is the red color. Makes it look silly no matter what you do (unless you have a red car).

    The rears are mounted but definitely need to be cut. The front don't fit until I have my new wheels (8x18 with 235/40s instead of the 9x20 with 255/35s).


    First cut marked on the pax side. We wanted it to follow the body lines.


    This is how much I cut it.


    Then some sanding ...


    Both sides cut, sanded and mounted. Red still looks silly. Rattle can paint is what is needed now.

    Kai
    Hanau/Germany
    Rides & Projects: 54 F100 347SBF/Auto; 65 Galaxie FB 446FE/5-Speed; 67 Mustang Convertible 306SBF/Auto; 07 Mustang GT Convertible 4.6 3V/Auto; #236 FFR Hot Rod 4.6 2V/5-Speed

  41. #80
    Senior Member Kai-Rod's Avatar
    Join Date
    Feb 2011
    Location
    Hanau, Germany
    Posts
    109
    Post Thanks / Like
    Last weekend I had temp tags which is good for five days and requires no inspection. However, you have to sign that the vehicle is safe. Oh well.

    I took the rod to a local cruise night and on the way back we got soaked by heavy rain. The Rod did not care. But now I know why they call the fibre glass part behind the seat water fall. The rain first hits your face, then the water fall where it then runs down (like a water fall) into the car. :-)

    I did mount the hood and tried another way to mount the cold air intake. Did not work like you see it here and then went with another routing thru the pax side opening under the hood.


    I also sanded the hood inside and out before finally adjusting it. This took many hours. May be I am slow.


    Here you can see the current routing of the cold air intake. Ultimately I need to have it all inside the engine compartment.


    SOAKED !!! We took a small break under the roof of a gas station before we hit the road again back home.

    Kai
    Hanau/Germany
    Rides & Projects: 54 F100 347SBF/Auto; 65 Galaxie FB 446FE/5-Speed; 67 Mustang Convertible 306SBF/Auto; 07 Mustang GT Convertible 4.6 3V/Auto; #236 FFR Hot Rod 4.6 2V/5-Speed

Page 2 of 3 FirstFirst 123 LastLast

Posting Permissions

  • You may not post new threads
  • You may not post replies
  • You may not post attachments
  • You may not edit your posts
  •  

Brown County Customs

Visit our community sponsor