-
Senior Member

Chris's Chassis Dolly Build Plans
I hope this serves many builders for years to come.
Source (my Build site): Chris's Cobra Build Site - Chassis Dolly
Click here to download the PDF.
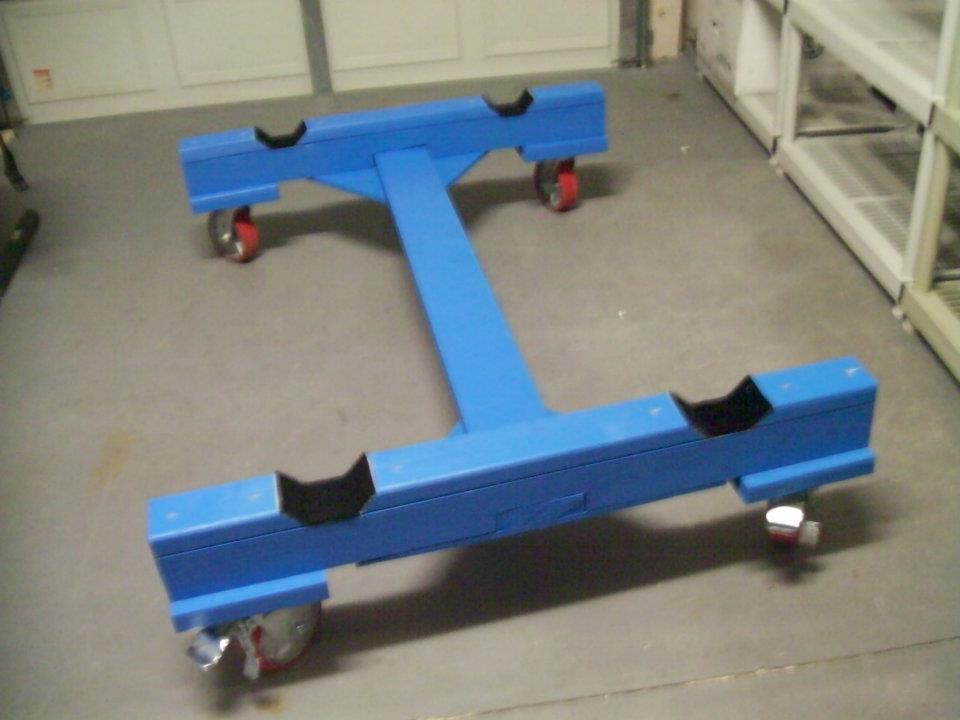
The finished product.

Tools
- Drill / Screw Gun
- Circular Saw
- 1/2″ Wrench or ratchet
- Measuring Tape
- Chisel
- Rasp or Sander
Materials
- (1) 2′ x 4′ x 1/2″ Plywood Sheet
- (1) 2″ x 4″ (nominal) dimensional lumber, 8′ long
- (1) 4″ x 4″ (nominal) dimensional lumber, 8′ long lumber
- (1) 2″ x 6″ (nominal) dimensional lumber, 8′ long lumber
- (16) 3/8″ x 3″ Lag Bolts
- (16) 3/8″ Washers
- (52) 2-1/2″ Coarse Drywall Screws
- Heavy-duty casters (rated to 800 lbs. each; 2,400 lbs total capacity)
- Low pile carpet, enough to yield (4) 3-1/2″ x 12″ strips
- Paint (optional)
Steps
Squarely cut your 4″ x 4″ lumber into (2) 44″ lengths.
Squarely cut your 2″ x 4″ lumber into (2) 21″ length pieces.
Cut each 21″ piece with a 45° angle inward at both ends of each piece, so that their final length is 21″ at the longest point.
Cut your remaining 2″ x 4″ lumber into (4) 9″ lengths with a 45° angle at one end of each piece.
Squarely cut your 2″ x 6″ lumber into (1) 60″ length, and (4) 9″ lengths.
On each of your 4″ x 4″ x 44″ lumber, place marks 19-1/2″ from each end so that they are 5-1/2″ apart at the center.
Set a depth of 1-1/2″ on your circular saw, and cut grooves across the face of your 4×4 within the 5-1/2″ wide area at the center.

Chisel out the grooves and sand down the rough pieces to smooth out the opening flat as needed.
If you are going to paint your dolly, now is the time to do it while you have everything apart. Once dry, you can assemble it.
Using (4) 2-1/2″ drywall screws, join a 2″ x 4″ x 9″ piece flush to one end of your 4″ x 4″ x 44″ piece on the top, so that the 45° cut is angled inward.
Repeat joining another 2″ x 4″ x 9″ piece flush to the other end of your 4″ x 4″ x 44″ piece on the top so that the 45° cut is angled inward.
Using (4) 2-1/2″ drywall screws, join a 2″ x 6″ x 9″ piece flush to one end of your 4″ x 4″ x 44″ piece on the bottom.

Repeat joining another 2″ x 6″ x 9″ piece flush to the other end of your 4″ x 4″ x 44″ piece on the bottom. You now have the front and rear bases complete.

Flip the front and rear bases upside-down to expose the slot in the bottom.
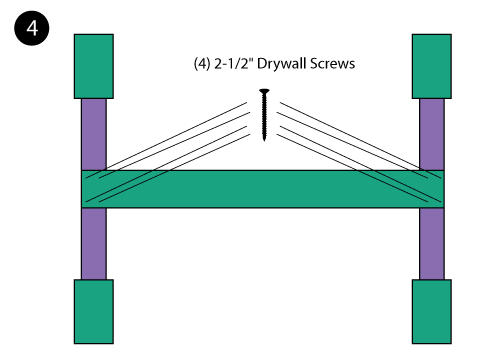
Slide the 2″ x 6″ x 60″ cross brace into the slots, to join the front and rear platforms and screw them together using (2) 2-1/2″ Drywall screws at each end.
Cut (2) triangular pieces of plywood such that two legs are approximately 24″ long and the other is 18 long.

Join a triangular piece of plywood to each end of your dolly, such that the short end follows the long, outside edge of the base. Screw down each piece of plywood using (5) 2-1/2″ drywall screws. Make sure to put (3) into the base and (2) into the 2″ x 6″ x 60″ cross brace. This will help to keep the dolly from torquing when rolling your chassis around the shop.
Using your lag bolts, fasten your casters to each corner of your dolly.
Flip it over.
In the recesses where the chassis will sit, apply some liquid nails and tack your carpet strips in place. This is to protect the bottom of the chassis from getting scratched. Let dry completely per the directions on the Liquid Nails.
Here is a picture from the PDF if you want to just print this out for a one-page plan:

Enjoy!
History
Years ago when I first ordered my roadster, I built a chassis dolly in support of building my Roadster. Like everything I do, I researched the heck out of it before engineering it as best I could and within reason. It needed to:
- be able to support the weight of a finished vehicle
- be easy to build
- be easy to roll around my garage
- be able to be locked in place
- allow room to work underneath comfortably
- have very little restrictions on my ability to run brakes, fuel, and electric
My car has been on this chassis since December of 2011 and I have been very happy with the dolly for 6 years. Life took me in many different directions since receiving my car that put the project on hold for years but I am finally getting back to it.
There have been several on here that have used the photos of my completed dolly for their own but I never took the time to publish any documentation on mine. Well, sorry it took so long.
*Note: These plan are provided as general guidelines to help you build a chassis dolly to support the building of a Factory Five Racing Mark IV Roadster. No warranty is provided, and you assume all risks.
Chris
Mark IV Roadster #7679
Coyote 5.0, T56, Hydraulic Clutch, IRS, Torsen Diff, Wilwoods, Hydraboost, ABS Power Brakes, Power Steering, & tons more extras.
-
Post Thanks / Like - 2 Thanks, 6 Likes
-
-
THANK YOU! I think I asked on Facebook as well. I really appreciate this.
"Doddmoore," Mitchell Moore on facebook, Follow Tonks347Cobra on Instagram
MK IV Complete kit, SB Ford 347, Holley Sniper EFI, TKO 500, Moser 8.8 Solid axle, Wilwoods, Power Steering
My Build Thread:
Tonks347, The Baker's Build
Slow and steady wins the race.
-
Senior Member

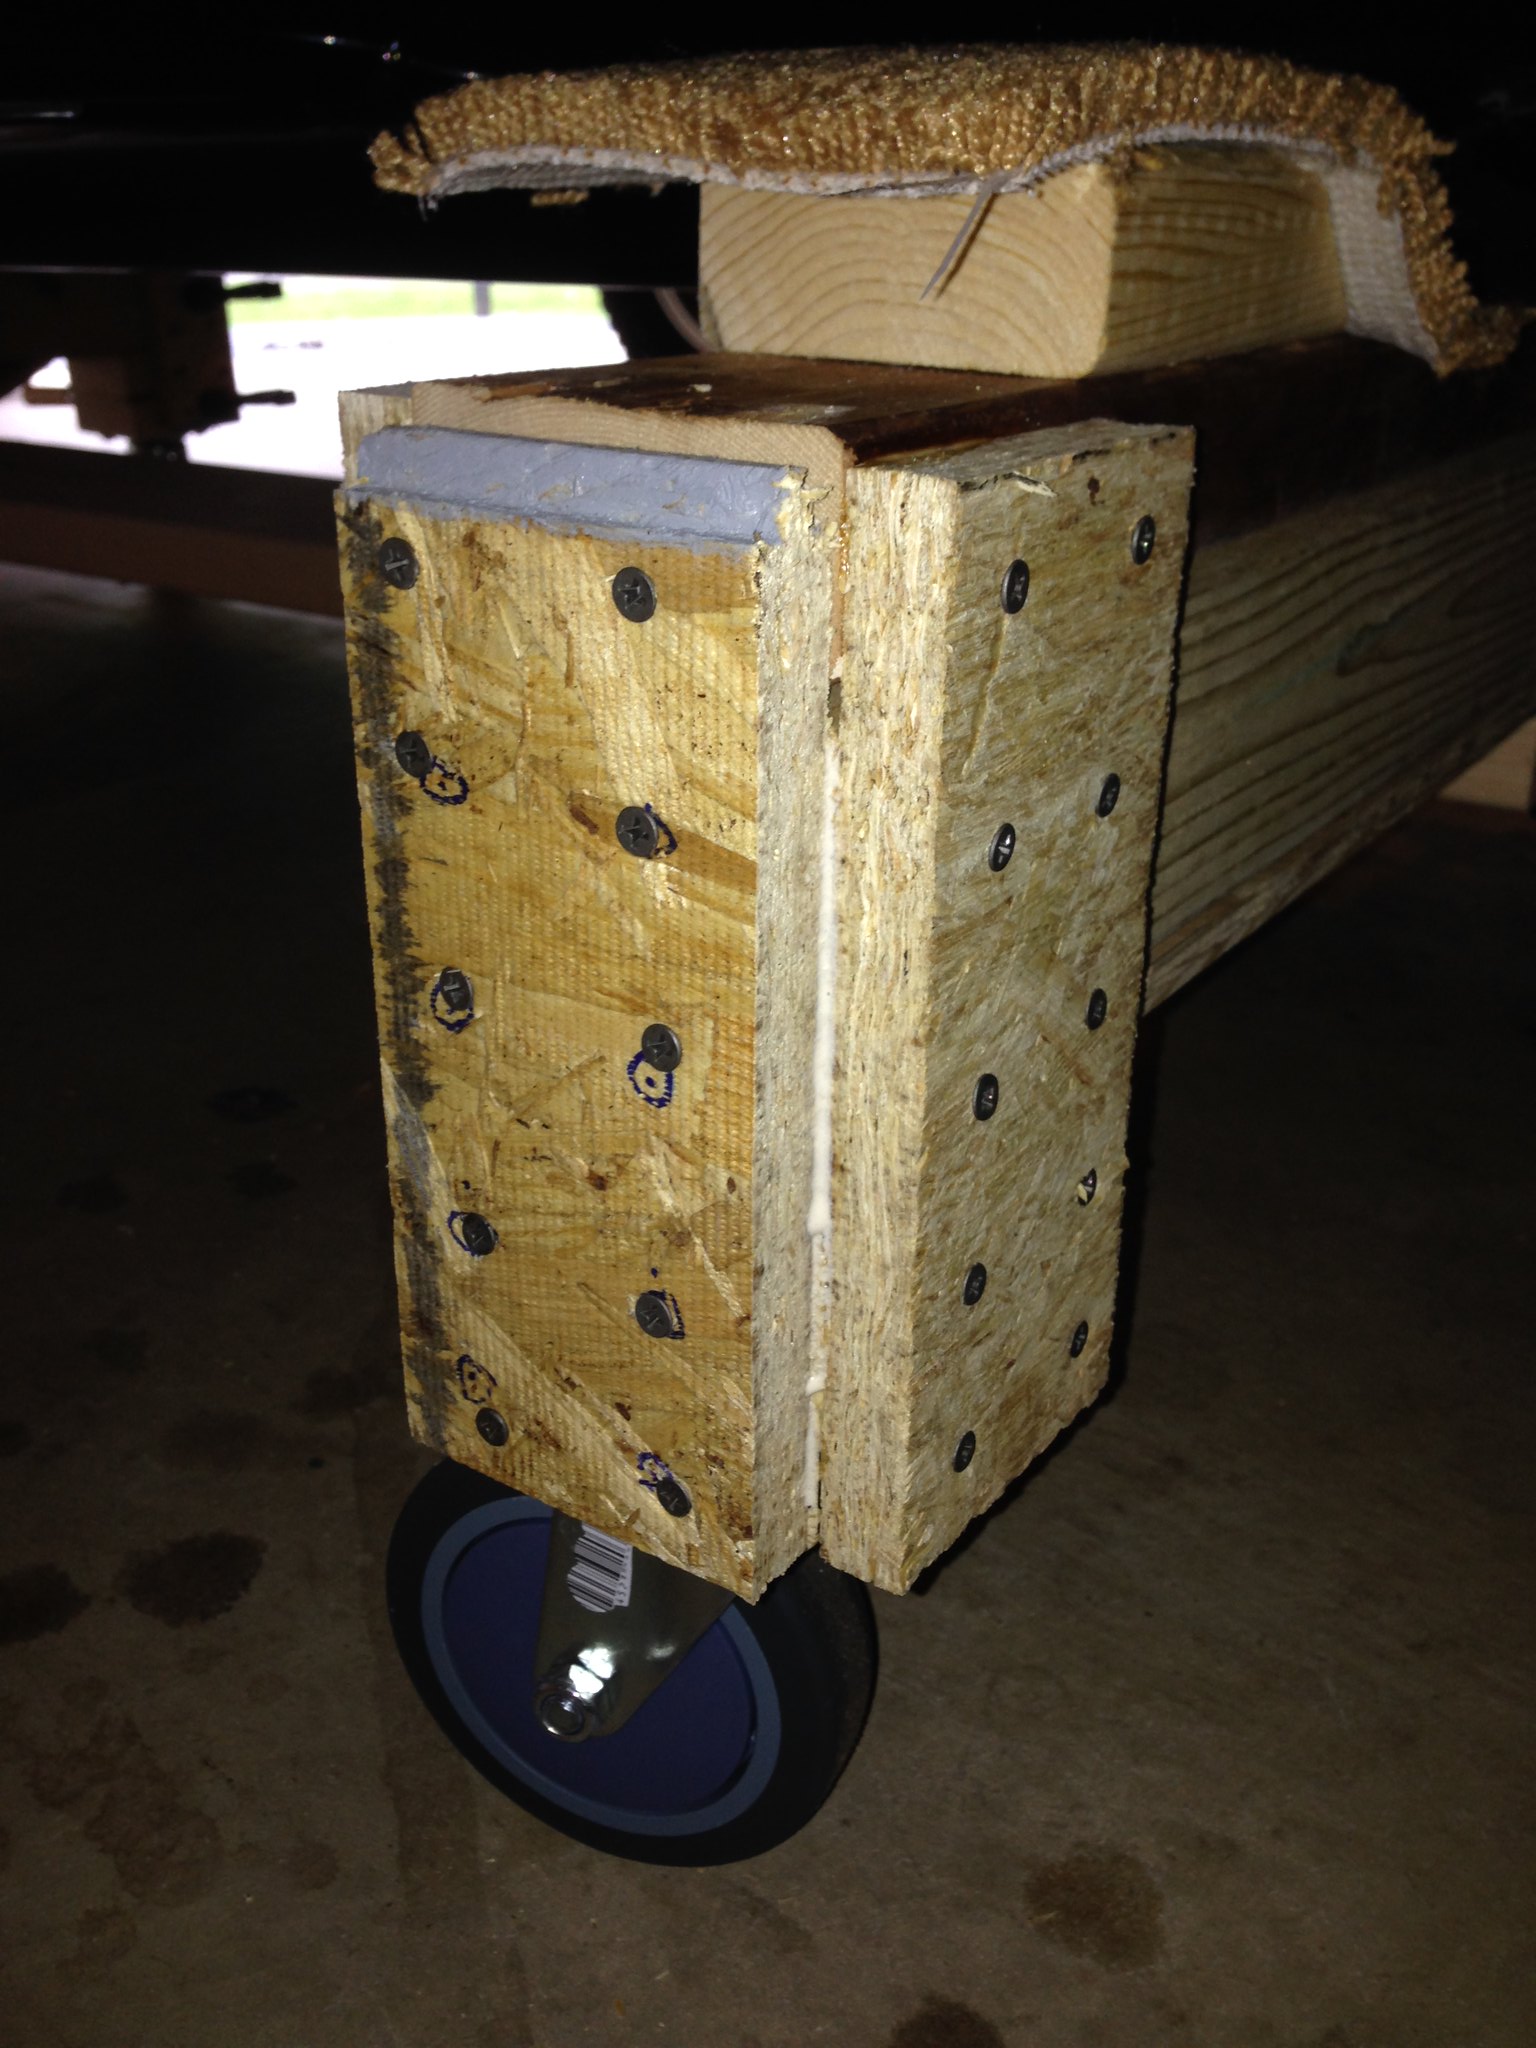
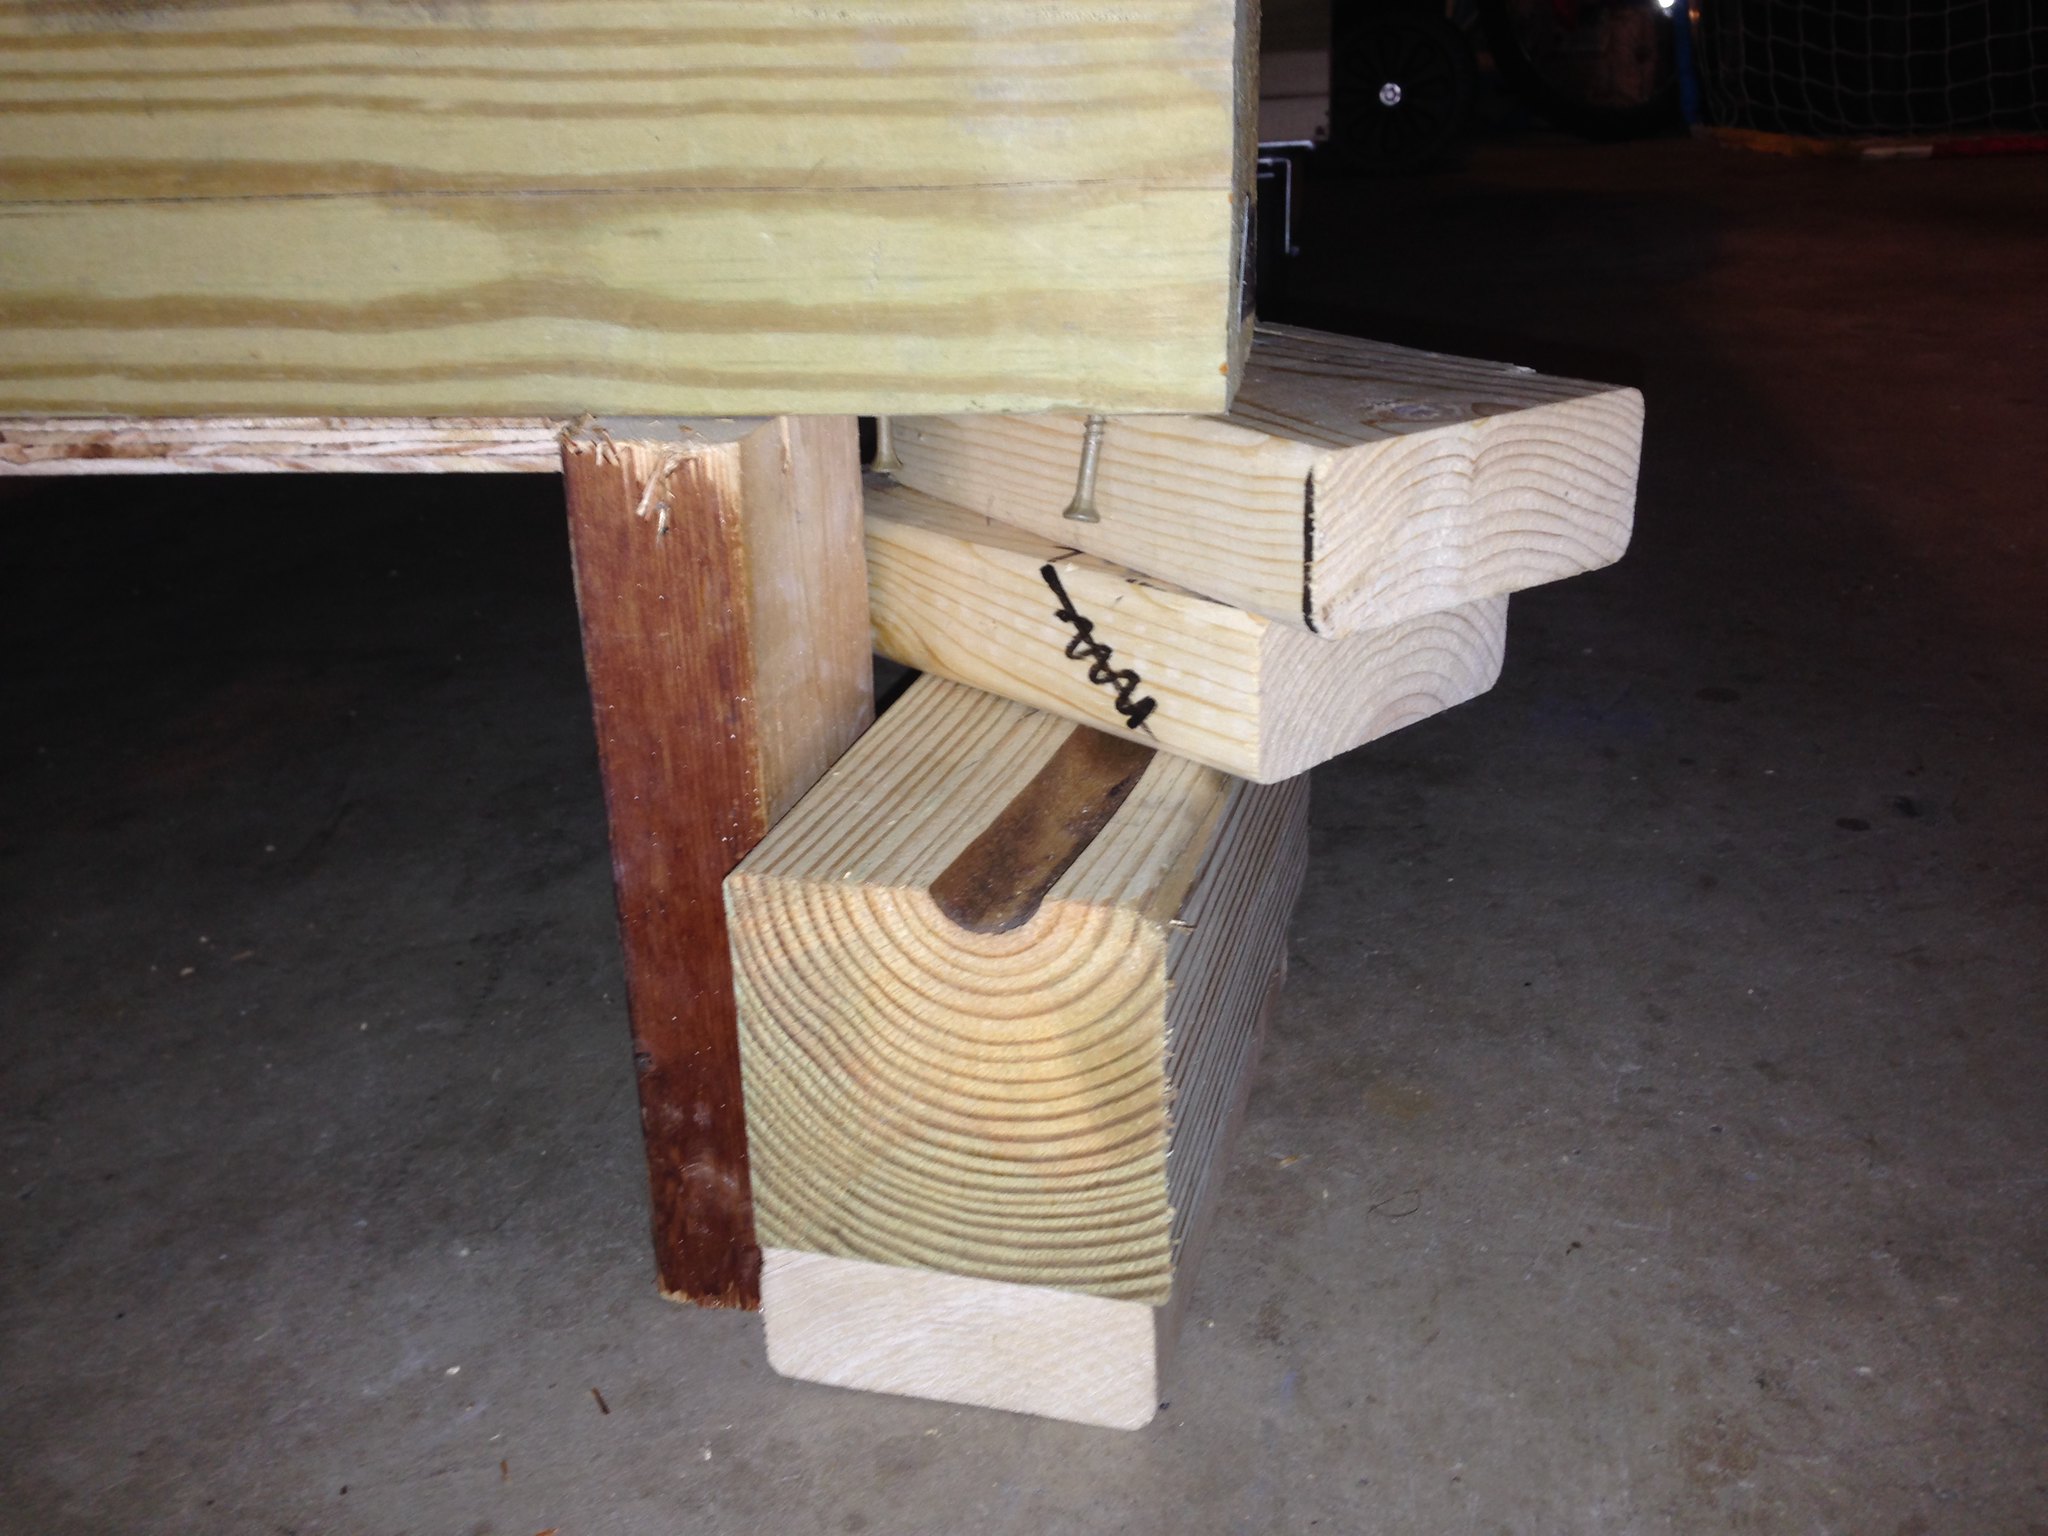
I copied Chris's design 2 years ago (thanks Chris!), but added some height under the wheels. When rolling over the lip of my garage, one of the "stilts" snapped off the dolly. So if you choose to add some height, do this:
 IMG_0874 by jhsitton, on Flickr
Do NOT do this:
 IMG_0871 by jhsitton, on Flickr
Or you'll end up with this:
 IMG_0872_2 by jhsitton, on Flickr
John
MK IV Roadster #8631
Ford 302, Holley Terminator EFI, T5z, 3.55 Rear End, IRS, 17” Halibrand Replicas (9” front, 10.5” rear), Nitto 555 G2’s (275/40ZR17 front, 315/35ZR17 rear), Fast Freddie’s Power Steering, F5 Wilwood Brakes, FFMetal’s Firewall Forward, Forte’s Hydraulic Clutch & Throttle Linkage
https://www.ffcars.com/threads/phile.../#post-4776313
-
25th Anniversary #9772

love this writeup!
has anyone done a body dolly with an open middle? i.e. you can drop in the engine/trans without hitting a center piece?
sorry for my poor artwork, but seems that if you have 2 supports - 1 under each rail, you'd free up the center...
dual-dolly.jpg
-
Senior Member

Two thoughts. First, I'd be concerned about the dolly holding the total weight of the car. Do some math, check the specs on your casters, & you'll figure out if it'll work or not. Second, I suspect the two longitudinal pieces would hinder access to the underside of the car.
But since I haven't done it, I truthfully say one way or another. 
John
MK IV Roadster #8631
Ford 302, Holley Terminator EFI, T5z, 3.55 Rear End, IRS, 17” Halibrand Replicas (9” front, 10.5” rear), Nitto 555 G2’s (275/40ZR17 front, 315/35ZR17 rear), Fast Freddie’s Power Steering, F5 Wilwood Brakes, FFMetal’s Firewall Forward, Forte’s Hydraulic Clutch & Throttle Linkage
https://www.ffcars.com/threads/phile.../#post-4776313
-
Post Thanks / Like - 0 Thanks, 1 Likes
-
Senior Member

Thanks for the kudos toadster.
I'm not an engineer but I believe the horizontal sheer tolerance of a single 4x4 is well above the 800-lb rated casters I used, so in theory this dolly should be able to support the combined tolerance of the casters: 3,200-lbs. Plenty of head-room for the weight of a roadster. The bigger question is how in the world you'd get a fully built roadster off the dolly at that point. 
Chris
Mark IV Roadster #7679
Coyote 5.0, T56, Hydraulic Clutch, IRS, Torsen Diff, Wilwoods, Hydraboost, ABS Power Brakes, Power Steering, & tons more extras.
-
Post Thanks / Like - 0 Thanks, 1 Likes
-
25th Anniversary #9772


Originally Posted by
chrisarella

Thanks for the kudos toadster.
I'm not an engineer but I believe the horizontal sheer tolerance of a single 4x4 is well above the 800-lb rated casters I used, so in theory this dolly should be able to support the combined tolerance of the casters: 3,200-lbs. Plenty of head-room for the weight of a roadster. The bigger question is how in the world you'd get a fully built roadster off the dolly at that point.

Id assume a floor jack would work - right? 
-
Senior Member


Originally Posted by
toadster

Id assume a floor jack would work - right?

would probably need one on each side to get it up evenly so you could slide it out from under the chassis.
Chris
Mark IV Roadster #7679
Coyote 5.0, T56, Hydraulic Clutch, IRS, Torsen Diff, Wilwoods, Hydraboost, ABS Power Brakes, Power Steering, & tons more extras.
-
Senior Member

I built one with just a 2x12 going down the center. To put the engine in, I put it on jack stands to move the dolly out of the way. I put the front jackstands as high as they’d go and the rear ones low.
After the engine I put it back on the dolly, haven’t had any problems with it supporting the weight. Kept jack stands under the frame for a bit just in case.
Pretty easy with a jack to get it on and off the dolly, as long as you have jack stands.
25th Anniversary Roadster #12 of 25
Gen 3 Coyote
TKO 600 mid-shift
Car
-
Post Thanks / Like - 1 Thanks, 2 Likes
-
Senior Member

Yep. Lift either front or rear onto jack stands, then the other end. Nerve wracking, but you get used to the idea once you realize you have no choice.
Good call on having the chassis on stands for the engine install. As it is, I had to jockey the front stands around a bit to figure out where to place them so I could move the legs of the engine hoist where they needed to be. I don't believe I could have gotten the hoist in place if the chassis was on the dolly.
John
MK IV Roadster #8631
Ford 302, Holley Terminator EFI, T5z, 3.55 Rear End, IRS, 17” Halibrand Replicas (9” front, 10.5” rear), Nitto 555 G2’s (275/40ZR17 front, 315/35ZR17 rear), Fast Freddie’s Power Steering, F5 Wilwood Brakes, FFMetal’s Firewall Forward, Forte’s Hydraulic Clutch & Throttle Linkage
https://www.ffcars.com/threads/phile.../#post-4776313
-
Thanks Chris. I modified the plans to fit a Gen 3 Coupe. 20.5" center to center on the frame rails and 65" total length 5" longer than the Roadster dolly
-
Post Thanks / Like - 1 Thanks, 1 Likes
-
Senior Member

I used your plans 5 years ago Chris and it worked out perfect. I passed my dolly to another builder at least 2 years ago and he liked it too.
JR
Mk4 complete kit #9059 ordered 1/19/17 delivered 3/23/17, 2015 IRS, Fortes/DART347,TKO 600, hyd clutch, P/S, 12.88 wilwood brakes front and rear, heater/defrost and vintage gauges
First start and go-cart 4/11/18. Taken To Whitby Motorcars Greensboro, N.C. 2/5/21 for body/paint
-
Post Thanks / Like - 1 Thanks, 1 Likes
-
I'm unclear why a dolly is needed. In the build school I attended we used jack stands start to finish. Is it to move the car during the build if its in the way of other activity?
-
Senior Member

No, a dolly is not needed
Mrk III, 331 stroker, Borla stack injection, T5, 3:55 IRS, Power steering and brakes. Kleiner body & paint
-
Senior Member

Rich is correct, a dolly is not necessary. I built one, and my frame is currently setting on it. It has been very handy to move the frame around in my limited space. It is nice to be able to move the frame and clean under it.
A lot of drill chips are created during the build.
So, not necessary, but for me it has been pretty handy.
----------------------------------------------
Jeff
Roadster delivered 8/27/23
Chevrolet Performance LS3
Build Thread
-
Senior Member

If I build another roadster I will build another dolly, it was really convenient being able to move it around. I would not build another body buck, I would just use four hooks under the wheelwell openings. I didn't see any value in the buck at all.
-
Thanks to all for feedback on my question. I'm going to build one. Murphy's law says if I place it on jack stands, the next day I'm going to need to move it to free up the space to work on something else that breaks down!
-
Senior Member


Originally Posted by
PMD24

Thanks to all for feedback on my question. I'm going to build one. Murphy's law says if I place it on jack stands, the next day I'm going to need to move it to free up the space to work on something else that breaks down!
Good move
----------------------------------------------
Jeff
Roadster delivered 8/27/23
Chevrolet Performance LS3
Build Thread
-
Member

There are also builders that give dollys away after they are done using them. I have one in AZ.


 Thanks:
  Likes:


 Reply With Quote


