-
01-22-2023, 05:07 PM
#121
The rad aluminum is very visible with the hood both open and closed, I had all of mine powder coated along with the foot boxes, fire wall and splash shields.
David W
Mkll 4874 built in 2004
Gen 3 coupe #16 registered 2018 painted 2019
-
Post Thanks / Like - 1 Thanks, 0 Likes
-
01-22-2023, 05:18 PM
#122
Senior Member

Battery Mount and Reservoir:
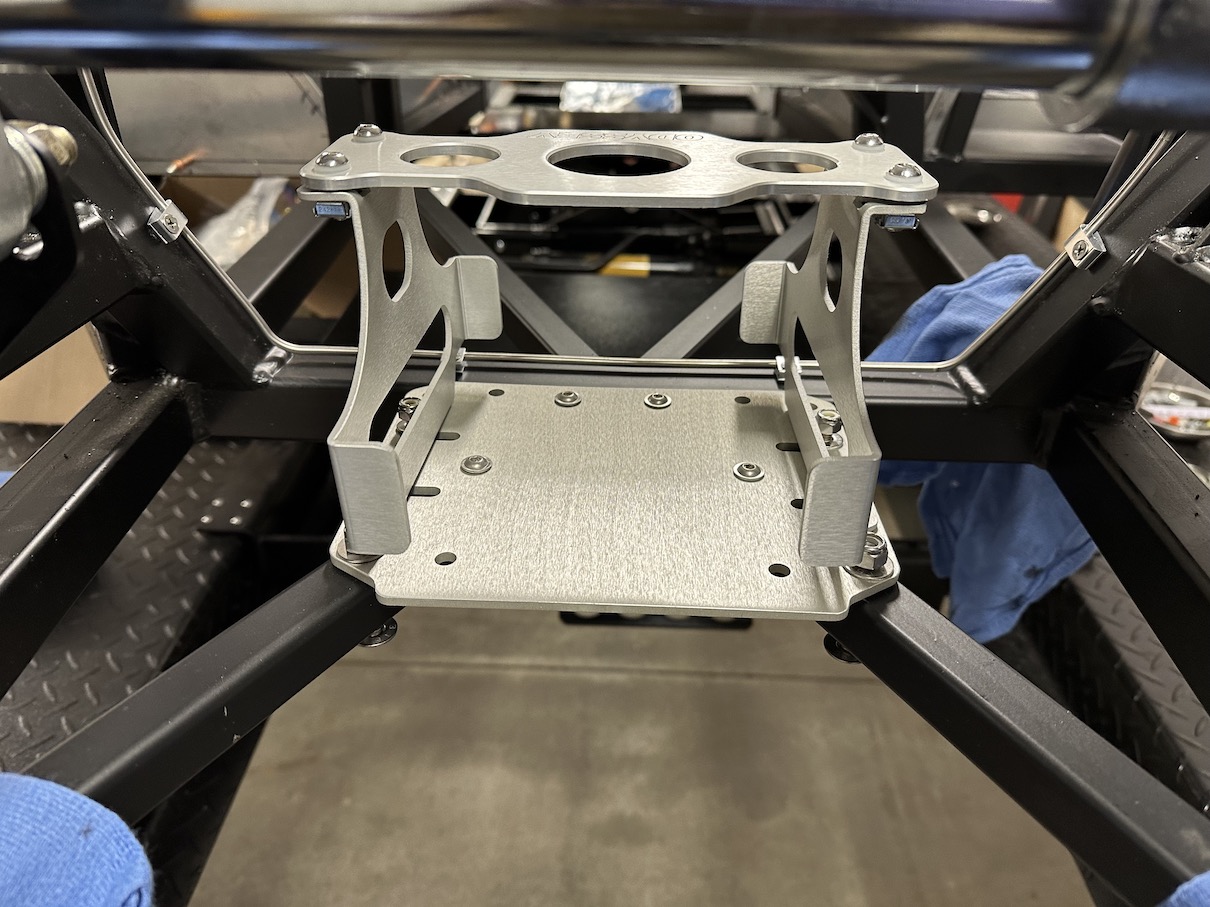
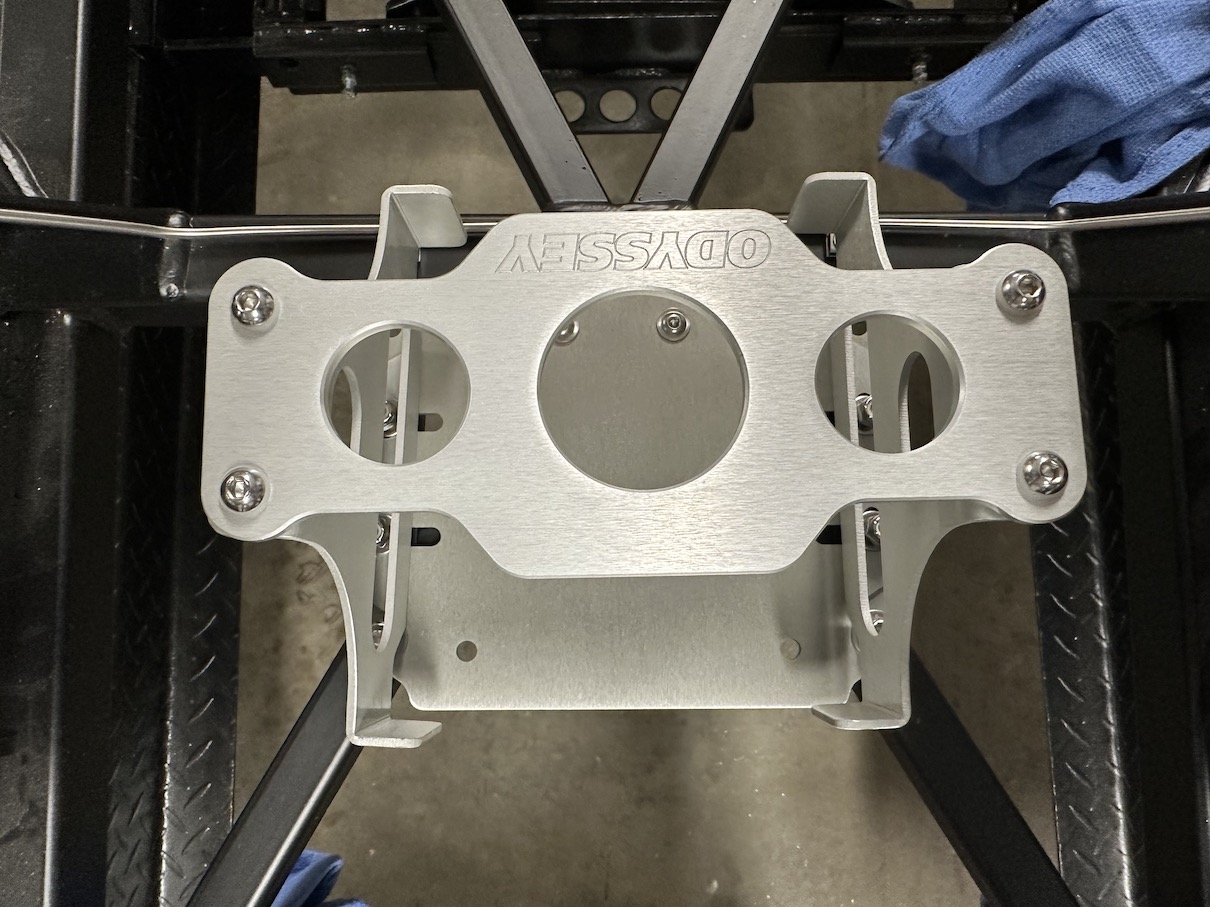
Ordered an Odyssey AGM-28 battery that many have used and it came as a kit with an odyssey mount at a 50% discount so figured why not. It is very similar to the one Paul and others have used, problem is it is specific to this battery only which may be an issue someday in the future, but for now looks very clean. Rather than powder coating this I Ieft it bare aluminum and sprayed with Shark Hide. It has a couple of plates on the bottom that are bare steel so had those powder coated, and with them back, loosely mounted this thing to the front frame rails. Used 4 nutserts but also 2 through and through bolts just to play it safe as it is a 27# battery! Had to cut down the bottom plate so it sits flush, and will need some 1/8 inch rubber or similar so the battery not sitting on machine screw heads:
Views from the front through the radiator tunnel:

----------
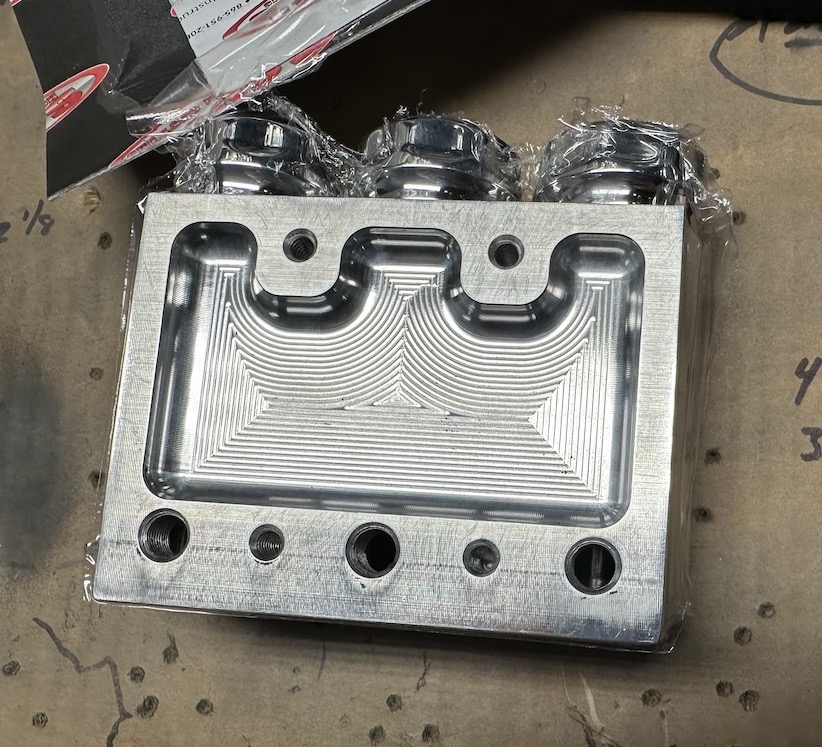
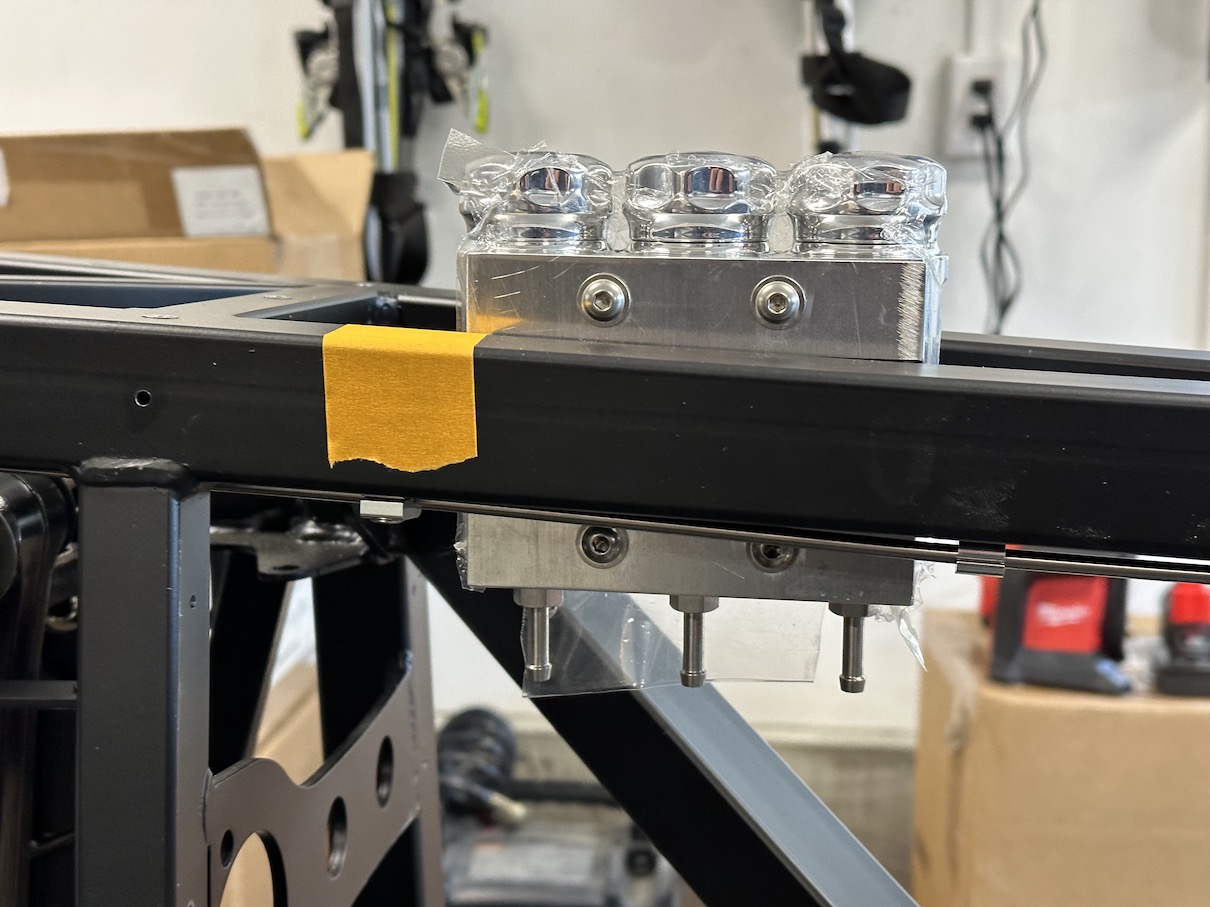
Scott’s Hotrods Triple Reservoir: I like the look of the Scott’s Hotrods reservoirs. They come in different sizes, and I settled on the largest just for piece of mind that there is more than 1 ounce of extra fluid in there. I know that the 1.1 oz reservoirs are likely fine, but also like the look of these a little better, and can get the fluid level a little higher than the smaller reservoirs (these are 3 oz per chamber, the smaller ones are 1.1 oz per chamber I believe). They come in polished or matte black. I had to fashion a mounting plate from 1/8” thick aluminum that is mounted to the frame with a couple of nutserts. The back of the reservoir has an indent so those screw heads holding the mounting plate do not interfere with the reservoir. You can run the line out the bottom (as I did) or out the back, but you need to order 3 set screw plugs for the holes that aren’t being used.
Here is the back of it – you can see how it is hollowed out to accommodate the mounting plate screws and have it be flush to the mounting site. There are 3 openings for the reservoirs which I plugged. There are 4 mounting screws:

-
01-22-2023, 05:43 PM
#123
Senior Member

-
Post Thanks / Like - 0 Thanks, 1 Likes
-
01-26-2023, 08:12 PM
#124
Great looking wheels. I bought two FFR Halibrand 17x9s from Fred down in Houston - he had them sitting around gathering dust! I then ordered two 17x10.5 from FFR that will be shipped with my kit. I fully expect the color will not match exactly but Fred gave me a deal I could not refuse. The wheels are now sitting in a prominent spot in my garage making me all the more eager to get my kit. Those look like a good tire - I think they are the same as on my C8 which is part of the Z51 package. I went to the Ron Fellows Driving school again a couple of weeks ago and they have Michelin's on their C8s. I pushed the car a lot harder this time and the tires make quite a lot of noise but they work well - had a blast learning to throttle steer around long corners with the tires squealing the whole way. They also worked really well on the watered down ski pad.
I thought you were on the injured reserve list? Looks like you are still spending money and making progress!
-
Post Thanks / Like - 1 Thanks, 1 Likes
-
01-26-2023, 08:21 PM
#125
Great pics - thanks for posting them. I was just looking at all the parts that I got from Gordon and wondering exactly where do they go - so you're pictures are very helpful.
-
Post Thanks / Like - 1 Thanks, 1 Likes
-
01-27-2023, 07:15 PM
#126
Senior Member


Originally Posted by
jgray

I thought you were on the injured reserve list? Looks like you are still spending money and making progress!
Yes still injured reserve, trying to setup another neck steroid injection as it was improving then took another turn last weekend.
As for getting "caught" working while injured  ...All those things I posed above are delayed in that I did all the work already - Battery tray was all drilled and fitted in late October, just needed some powder coated brackets that sit under it - so literally 14 bolts to thread to loosely put it in and none are tightened down. The brake line brackets were pre-fitted and drilled back in November so only 8 rivets to place along with 4 fittings, nothing stressful. As for money spend I have a lot of parts sitting here already (tires were budgeted, powder coating rims was not but I love the blue or red cars with white faced rims)....engine is paid off but still getting built....I am going to build the serp setup on the front myself so will need all those parts....as we all say budget? nah...hobby...Last big ticket items for me will be side windows, push-button starter and possibly double door poppers (those setups seem pretty slick to me), sound proofing, PAINT, PAINT, and PAINT...then at some point race rims and tires. I'm sure I'm forgetting about another 5K in miscellaneous parts in there...
...But I've significantly slowed down my build timeframe in my head which to be honest is less stressful. As others have said the build can be a lot of fun and it is a blast which I highly recommend but there's a lot of modification that needs to happen to things, and if you get frustrated just drop it (looking at you tunnel aluminum  ) and work on something else that appeals to you, but this injury forcing me to slow down has taken a lot of pressure away that I had on myself to get as much done as fast as possible (and you look through these build threads and they seem quick, but a lot of us have a month or 2 between posts)...I would love to have this finished by next summer, but it's just not going to happen, and I'm cool with it! Plus to me the coupe is a very special car and I love everything about its history and what it represents...and for better or worse I'm building it (as they say "nailed it!"), for those reasons will keep it forever, and if I do ever get rid of it my middle daughter has already called "dibs" on it haha....
On the Michelin's they got great reviews....similar to PS4S in feel and stability in a straight line, not as stable in turns because of deeper tread, slightly different compound. Like you mention John Corvettes come with them, reviews from those guys are they are great but will only last about half of their 40K treadlife then start to "chunk" (I believe is the term) if really burning them up. I like that they have a snow rating and can drive down to just about any temp here I throw at them and for the build and early driving experience with the car they'll be great. Toyos or Nittos will be more fun, in the summer!
Last edited by rhk118; 01-27-2023 at 07:32 PM.
-
08-05-2023, 10:56 AM
#127
Senior Member

Back at it…pun intended...
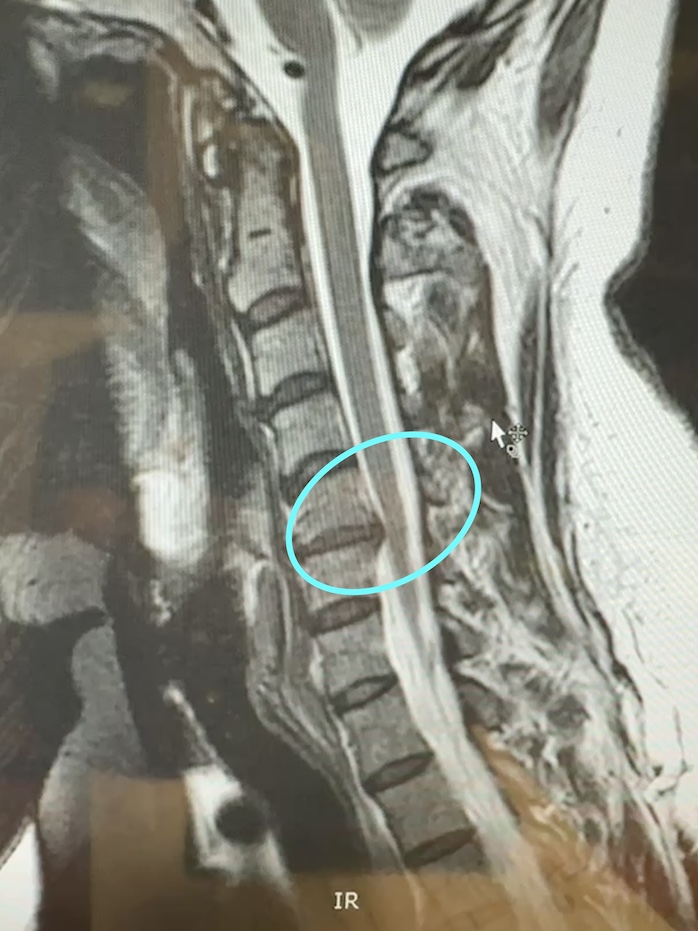
OUCH! This happened last Thanksgiving and 100% would not recommend a herniated disk with pinched nerves (not even 1 star out of 5 on yelp). It’s been 8 months and I’m starting to have more good days to the point that I feel safe working on the car again despite my body’s “new feature”. All I have to say about that is don't drink water too hard (haha). Or sneeze with your head in the wrong direction.
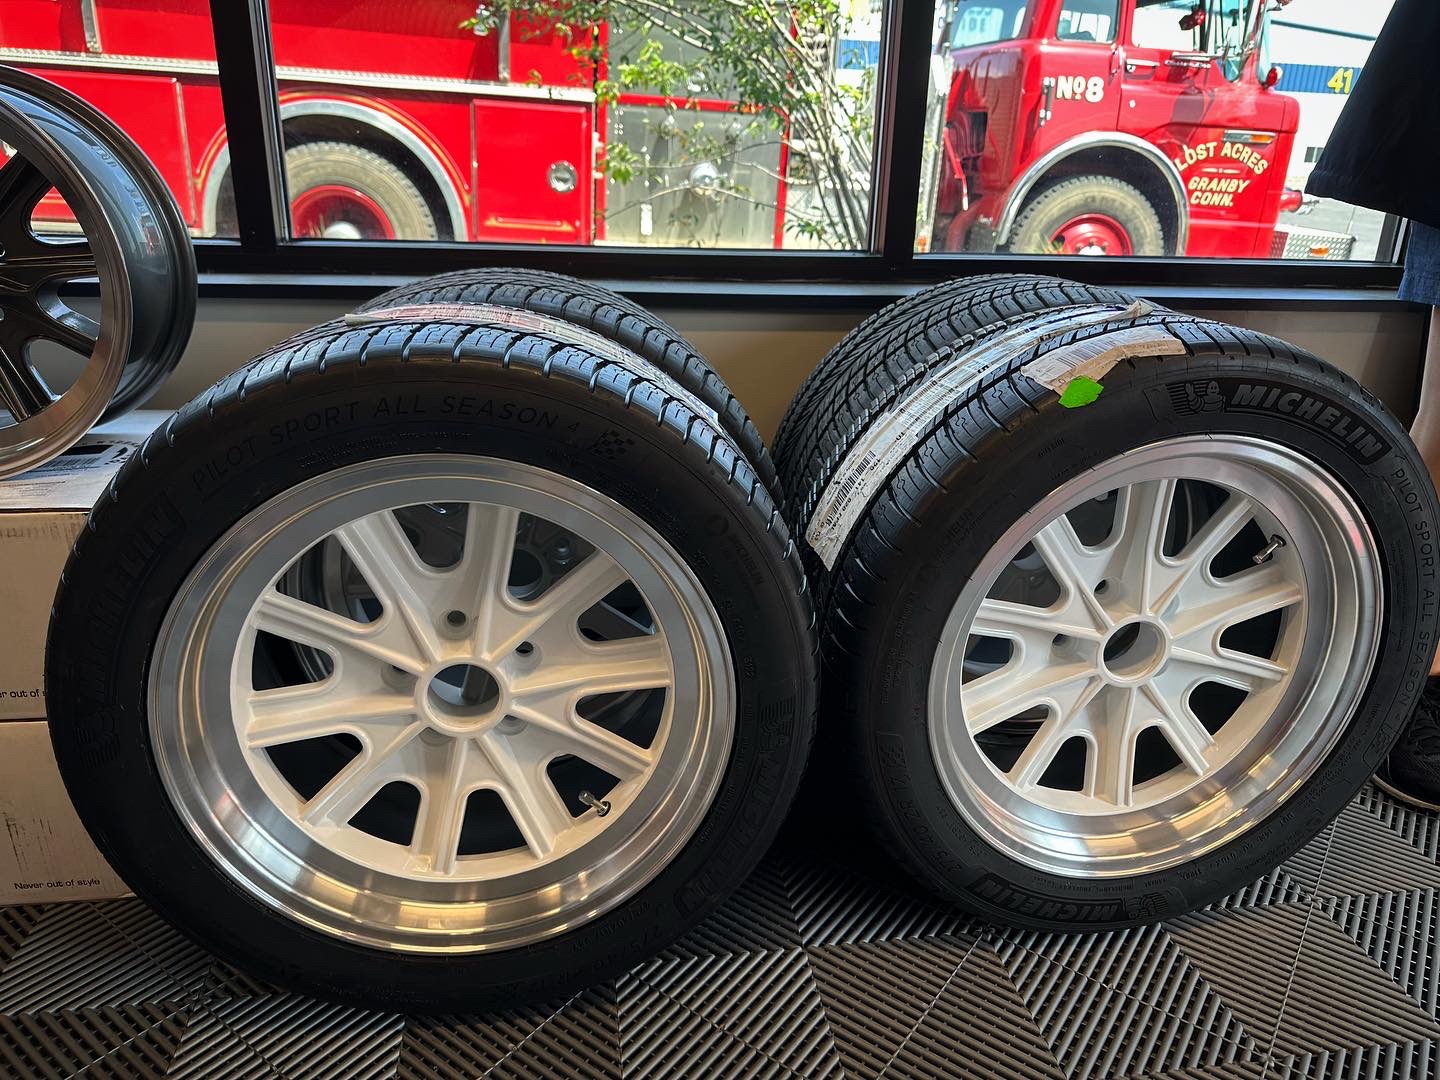
Not much has happened in the past 8 months. Tires got mounted. My kids pointed out that they look exactly like wheels on any Lego car….I can’t say they’re wrong but it made me laugh as I didn’t make that connection and maybe just living out a childhood dream…Tires are Michelin Pilot Sport all season 4. Live in New England and these will see time in winter during the build and likely during some shake down runs. I don't want to have to worry about using a summer tire in 20-30 degree weather and wondering if any skittishness is the suspension setup, swaybars contacting in a corner, or just cold summer tires that have turned to plastic under 40 degrees. I'm sure these won't last long and are great for the roller and "honeymoon" phase...
Not much else has happened over 8 months. Got some panels powder-coated. Still don’t have an engine (been almost a year at the builder now) and it seems that will be another 6 months at least as I’m completely on other people’s timeframes with that. The engine needs to get dyno’ed, tuned, and painted, then I need to build a custom front end on it. Then need to mate the T-56 and test fit to see if I need to modify the transmission mount or cut the crossbar as other’s have had to do and see if I have the correct driveshaft length. Also waiting on some welding that I’m going to have a shop do as I don’t weld. Also on other people’s timeframes. Was going to be March, then May, then June, and supposed to get in early July. I am hoping for before next year at this point.
In the meantime, I did get the fuel filler neck into the gas tank and here is my iteration of that. I was able to use the FFR supplied bracket and used a nut-sert on the frame with a bolt going through the holes on the tank and the bracket:
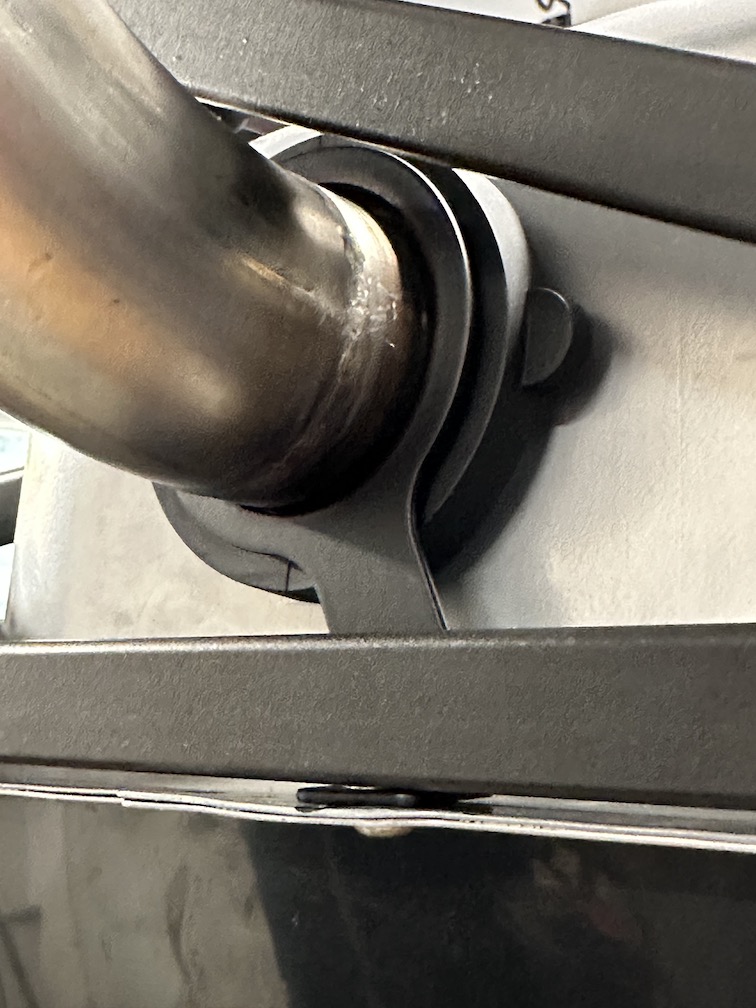
Disadvantage of this vs making my own Paul-style “U” shaped bracket is I need to drop the tank to change that if anything leaks or needs replacing and it can’t easily be taken off.
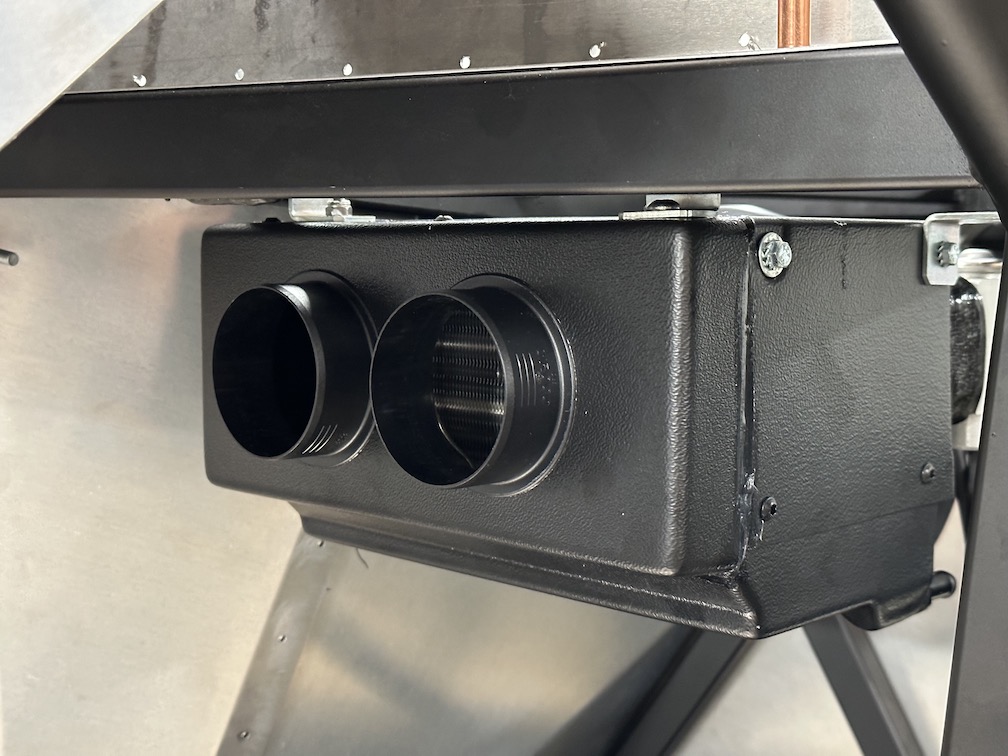
Also got the evaporator installed in what seems like the same orientation as the manual. This was much more straightforward than I thought, or maybe sometimes its better to be lucky than good. Seems all the rear end hookups are far enough from the frame that there won’t be interference. Ask me later when that all needs to be hooked up.
Yesterday I installed the Tolton 90 degree adapter for the Wilwood brake bias adjuster.
Last edited by rhk118; 08-08-2023 at 03:29 PM.
-
08-05-2023, 11:54 AM
#128
Senior Member

-
08-05-2023, 12:13 PM
#129
Senior Member

Wilwood Brake Balance Adjuster with 90-degree Tilton Adaper (Tilton Part # 72-560)
I mounted the Wilwood brake bias adjustment knob far to the left on the serial number frame rail where it will be relatively hidden, yet easy to get to. I won’t be making on-track adjustments to this thing. This location also allows a very straight shot of the cable to the 90-degree adapter with no interference from anything (yet, wiring still to be installed)

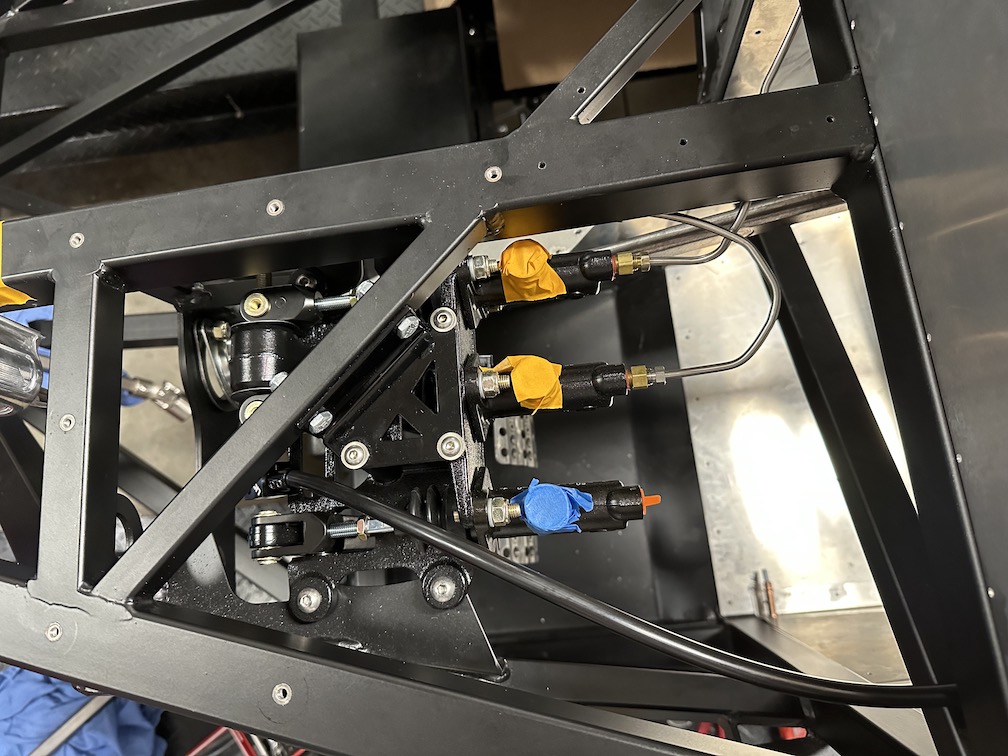
Of note, the Wilwood adjustment cable is slightly wider than the Tilton adapter sleeve that accepts the cable and I had to bore that half of the cable sleeve of the Tilton to allow the wildwood cable to fit. I will red-loc-tite everything once things are more put together.
-
08-05-2023, 04:15 PM
#130
Nice post Hank. Your implementation is very similar to mine, and you seem to have edited the same bits in similar ways to make it fit.
If one is building a pure track car, bias adjustment range may be more of a concern than I have had. And poking a hole in the tranny tunnel may be indicated. My assumption has always been that a brake system is pretty well tuned for the car, and a bias adjustment is compensating for relatively small errors in that tuning or part wear. That said, there are many experts in this space - I am just a novice. I know it is quite complex trying to tune one's brakes to perform well under both hard braking and trail braking, in the face of centers of moment and on wear / conditions, different track event format, , ..., etc.
"tuned for the car" begs a bit of definition I suppose, but is perhaps simplified to using master cylinders that are appropriate for the front and rear calipers, staying within bounds in terms of tire size offset and spring rates, and setting up M/C push rods consistent with guidance from Wilwood or others as a starting point.
I am still breaking in the Coupe, so am not driving to its [braking] limits, nor spending time on the track yet - Next weekend my intent is to attend a NASA event at High Plains Raceway. Yes, I know what a dangerous decision that may be :-)
I enjoy watching your build!!
-
Post Thanks / Like - 0 Thanks, 1 Likes
-
08-14-2023, 01:10 PM
#131
Senior Member

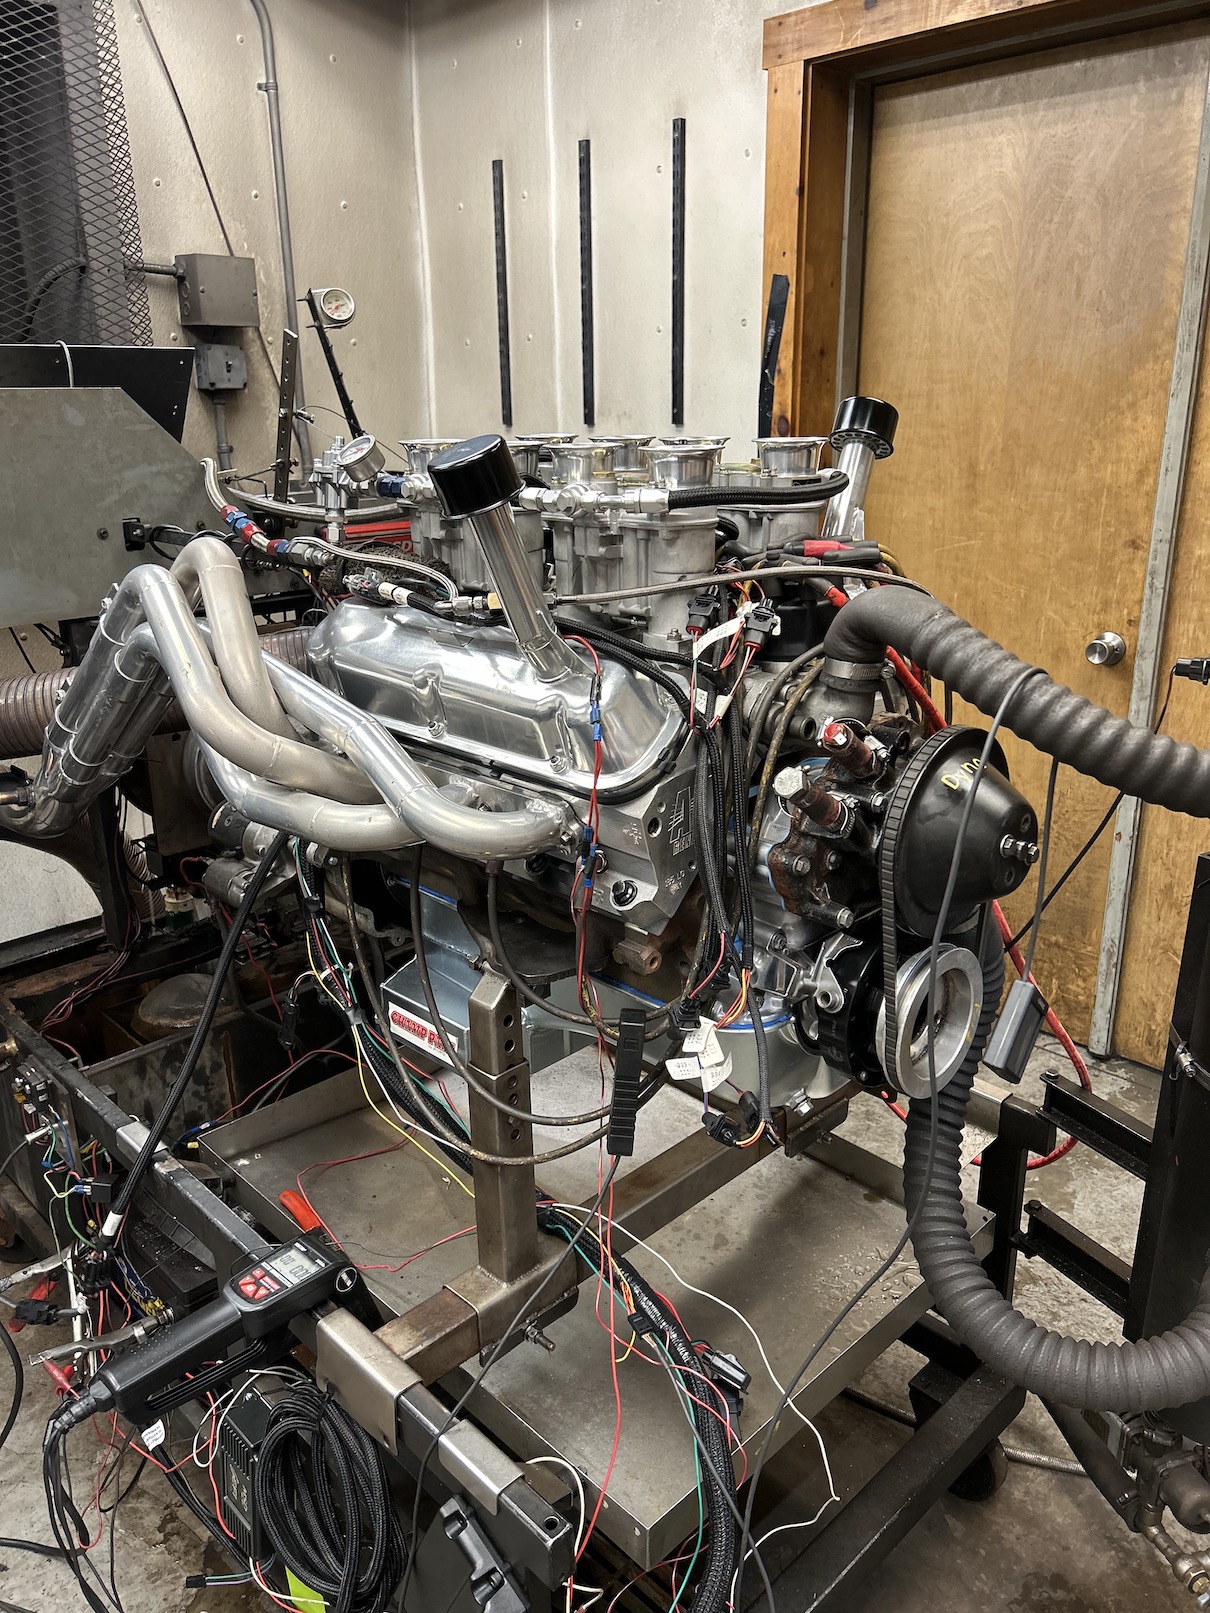
Engine has made it to tuning! Got this photo from the builder. 347 SBF, AFR heads and cam, Shelby American valve covers, Jim Inglese EFI. Once tuned will go for paint.
-
Post Thanks / Like - 0 Thanks, 2 Likes
-
08-16-2023, 12:01 PM
#132
Hank,
Good to see you are back at it. That engine looks awesome! I really like the 8 stack look. Its interesting how similar our builds are. I just installed my engine trans a few months back and noted my issues here, https://thefactoryfiveforum.com/show...-a-Gen-3-coupe. It definitely took some fabrication and a lot of patience but, in my opinion defiantly worth it to get the T56 in there. Looking forward to watching your progress.
Shakey
-
Post Thanks / Like - 1 Thanks, 0 Likes
-
08-16-2023, 07:39 PM
#133

Originally Posted by
rhk118

Powder coated Halibrands!
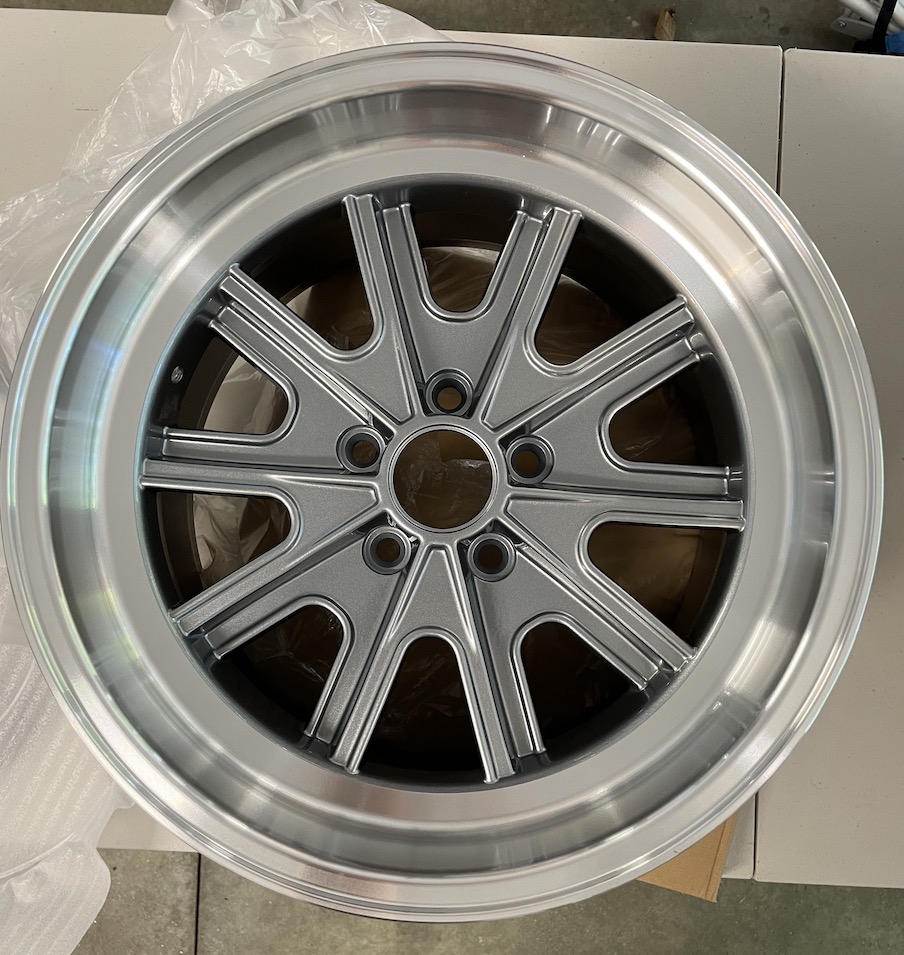
Got the FFR Halibrands (17”) back from powder coating and very happy with how they turned out (for reference $600 for prep and powder coating all 4). My plan is for 2 sets of wheels/tires – these will be the “dress” / daily driving set. Decided to just go with Michelin All Season 4’s as the first set of tires as will be driving this car in cold temps, and these will help me get to know how it handles a little better as they won’t have the traction of Toyo or Nittos so can break it free at lower speeds, presumably. I like the 275 front/ 315 rear stagger as well. For now this will get me to roller phase and progress with the build.
The plan is that I will eventually have a dedicated set of summer/track rims and tires. Hoping to come up with similar sizes and offsets so I don’t need to be changing spacers with the wheel changes. But also considering a square setup for the track set…lots of time to think about this.
Before:
 After
After:
 Fronts
:
 Rears
Rears:
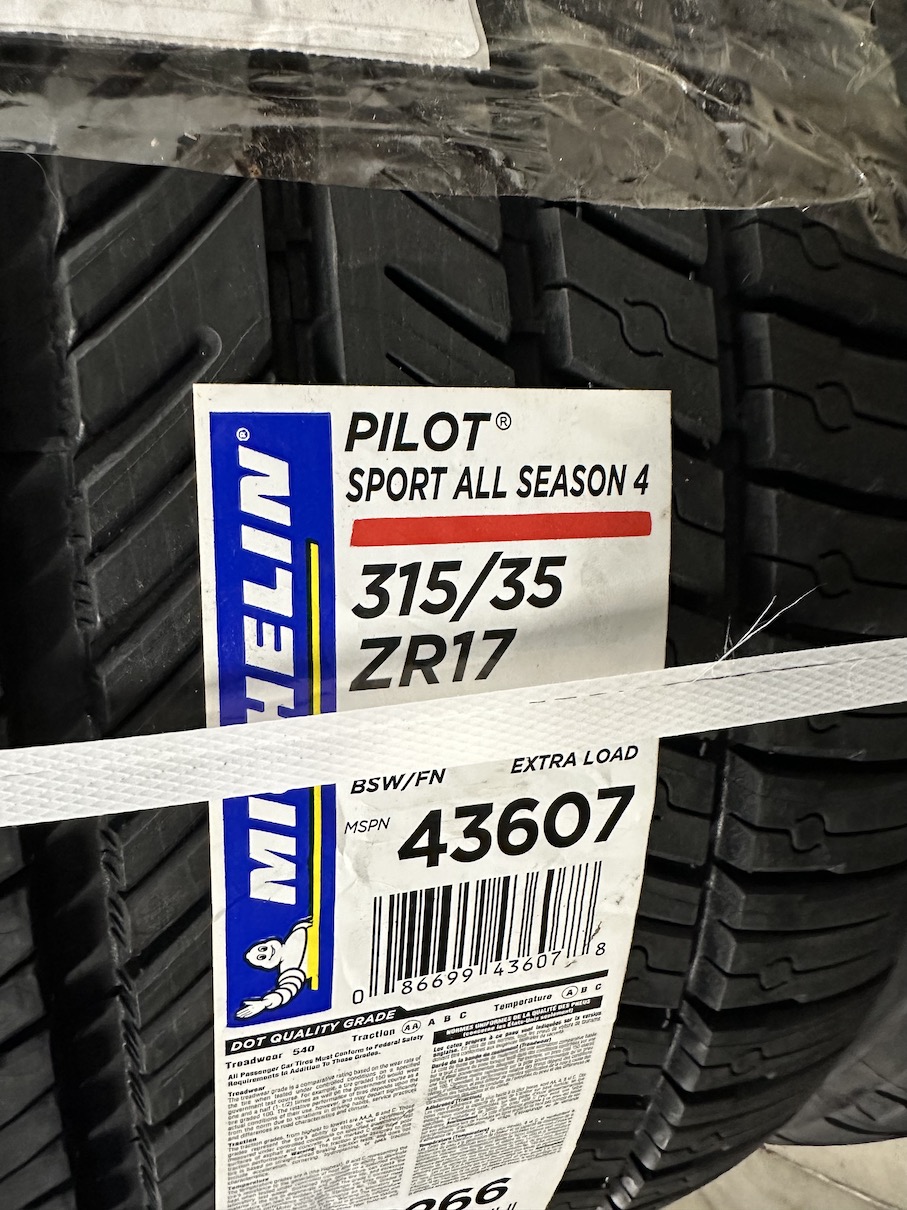
Remind me of your body color Hank, will you? The wheels look great, and the Pilot Sports are a great tire!!
-
Post Thanks / Like - 0 Thanks, 1 Likes
-
08-16-2023, 07:54 PM
#134
Senior Member

Thanks Bob. Color-wise it's going to be a blue. Initially was looking at Viking, then saw the Guardsman Metallic on the coupes at the M1 Concourse last year and like the little bit of teal metallic it has in it giving what I consider a really different and era-appropriate shade (well both those colors were on the cars in '64 and '65 so era appropriate is an understatement). Then you look at the pictures of klawrence's car in the what I believe to be GT40 Midnight Blue metallic and that looks quite alright (amazing) as well. I'm going white painted stripes, gumballs, and all, hence the white wheels. I always found white wheels to be out of the ordinary (especially by today's black on black on black rims with black emblems standard) and will make things stand out - on my Expedition they would look out of place, but are right at home on the Daytona! I looked into whiting the pipes as well but any ceramic coating will yellow, so either polished pipes as is or VHT white and touch it up from time to time.
I just have to post this here...one of my favorite pictures of the Coupe I've ever seen (Guardsman Blue), what an absolutely stunning design. I'm going to add a front intake air splitter as well like the originals, just have to see the clearance first with the hood going up:

Last edited by rhk118; 08-16-2023 at 08:14 PM.
-
08-16-2023, 08:22 PM
#135
Senior Member

Thanks Shakey. Been following your build, those wheels are sweet. And the engine is  . Like the shiny front end. Also appreciate the heads up on the transmission mounts, I'm anticipating the need to customize things a bit for the mount and hoping the driveshaft length is correct. If not, will make it work!
-
08-16-2023, 08:29 PM
#136

Originally Posted by
rhk118

Thanks Bob. Color-wise it's going to be a blue. Initially was looking at Viking, then saw the Guardsman Metallic on the coupes at the M1 Concourse last year and like the little bit of teal metallic it has in it giving what I consider a really different and era-appropriate shade (well both those colors were on the cars in '64 and '65 so era appropriate is an understatement). Then you look at the pictures of klawrence's car in the what I believe to be GT40 Midnight Blue metallic and that looks quite alright (amazing) as well. I'm going white painted stripes, gumballs, and all, hence the white wheels. I always found white wheels to be out of the ordinary (especially by today's black on black on black rims with black emblems standard) and will make things stand out. I looked into the pipes as well but any ceramic coating will yellow, so either polished pipes as is or VHT white and touch it up from time to time.
I just have to post this here...one of my favorite pictures of the Coupe I've ever seen (Guardsman Blue), what an absolutely stunning design. I'm going to add a front intake air splitter as well like the originals, just have to see the clearance first with the hood going up:

I thought so :-) As you know, I went the Viking Blue route with my coupe, which is also Ford paint code Q (Brittany Blue), which has a long heritage and several revisions over the years, first on the '64 Thunderbird if I recall, and then on the Mustangs. Of course the paint itself has changed with new technology (e.g.: base / clear coat), but the Blue is great and I catch smiles all the time :-) I see what you are angling for with the light-colored powder coat on the wheels - that will look great IMO :-)
I am starting to run the car pretty hard in the canyons here in CO. Having way too much fun. Need to clean it up a bit before the Shelby American Collection Annual show / picnic. Very much looking forward to talking with Peter Brock at that event.
p.s. Still holding off on stripes and roundels / numbers.
Speedy recovery wishes to you!!
-
Post Thanks / Like - 0 Thanks, 1 Likes
-
08-16-2023, 08:35 PM
#137
I was out at High Plains Raceway this past weekend. I had done open track days on my Ducati there a couple of years ago and really like the track. I did not take the Coupe there this time. You walk around the paddock and almost all the cars show the bump and grind of track days. I will at some point get this car on the track, but for now, with almost 2K miles on the odometer, am still breaking in my build :-) It is as fast as snakes tho ... ;-)
-
Post Thanks / Like - 0 Thanks, 1 Likes
-
08-25-2023, 02:41 PM
#138
Senior Member

-
08-25-2023, 02:42 PM
#139
Senior Member

-
08-25-2023, 06:45 PM
#140
Nicely done!
Remember that you may get some windshield and PS side-window glare off things mounted in this location. This may color your visor design &/or how you may wish to cant "faces" to the driver.
I placed a visor over my gauge panel, but hadn't thought enough about items I placed to the right of the gauge panel, or on the tranny tunnel (like for example a TermX interface or the Alpine deck in the face above the tranny tunnel, which gives me a rear view mirror for that Big-A$$ blind spot on the right rear quarter :-).
It is hard to visualize this on a naked chassis IMO. The roof will provide some shading.
FWIW ...
-
Post Thanks / Like - 1 Thanks, 0 Likes
-
08-26-2023, 10:44 AM
#141
Hank, It all looks great. From an aesthetics standpoint the “lines” of the piece you’ve added are pleasing to the eye! And from an engineering standpoint it looks “tight”. I like that you are using 0.063; I expect it will really help. Have you figured out the fasteners or however you are putting this together? The use of CAD and plasma cutting is cool. I have Turbo CAD but am not very skilled with it. If I went that path it would add 12 months to my build! Great work!
-
Post Thanks / Like - 1 Thanks, 0 Likes
-
08-27-2023, 07:12 AM
#142
Senior Member


Originally Posted by
LateApex

Nicely done!
Remember that you may get some windshield and PS side-window glare off things mounted in this location. This may color your visor design &/or how you may wish to cant "faces" to the driver.
I placed a visor over my gauge panel, but hadn't thought enough about items I placed to the right of the gauge panel, or on the tranny tunnel (like for example a TermX interface or the Alpine deck in the face above the tranny tunnel, which gives me a rear view mirror for that Big-A$$ blind spot on the right rear quarter :-).
It is hard to visualize this on a naked chassis IMO. The roof will provide some shading.
FWIW ...
Bob, this is excellent info that I had not considered, so thank you. Not sure I’ve seen a picture of how your terminatorX is mounted but if you have one somewhere would love to see it. Does the screen need to remain connected at all times or is it removable like the Sniper setup? Was hoping I could tinker and dial in the engine ECU as needed then disconnect it.
I’ve been looking for camera systems that have rear view and blind spot cameras. I found 1 mirror that will show 3 camera views but it was discontinued a couple years ago with no like replacement and afraid to buy something discontinued like that. Hoping the rear view cameras with 180 degree view will at least cover my blind spots to some extent.

Originally Posted by
jgray

Hank, It all looks great. From an aesthetics standpoint the “lines” of the piece you’ve added are pleasing to the eye! And from an engineering standpoint it looks “tight”. I like that you are using 0.063; I expect it will really help. Have you figured out the fasteners or however you are putting this together? The use of CAD and plasma cutting is cool. I have Turbo CAD but am not very skilled with it. If I went that path it would add 12 months to my build! Great work!
I only did this because felt like mocking it up and my nephew was here over the summer for vacation. We discussed the car a lot and I just asked if he knew how to do CAD, it took him and me about 6 minutes to get that converted to a CAD file and maybe 10 to measure and input the transmission tunnel piece. The shop that cut them only uses 0.063 aluminum which was really tough for me to bend but will give really good support of the dash in the central “floppy” area there.
The overlaps of aluminum edge between the transmission tunnel and my piece are very busy. As you know I’m black powder coating my dash and tunnel for the retro look but will use the carpet kit for the sides, might need dome kind of trim to cover that area, or might redesign that piece with longer sides (if I decide to use it in the end, it really doesn’t add much space at all over the “traditional” triangular piece a lot of builds add to that area). Not sure how I will connect it yet but don’t think it will be that tough - nutserts.
Last edited by rhk118; 09-02-2023 at 08:35 AM.
-
09-01-2023, 09:04 AM
#143
Senior Member

Just a little PSA that gave me a chuckle. Hope you all have a good weekend!

-
09-01-2023, 02:50 PM
#144
Couple of things going on here:
I've canted the TermX mounting bracket with some high density foam. The effect of this is that all reflections (as viewed from my eyes) are directed to the roof and not the windows. The TermX interface can always be removed, but the mounting bracket works pretty well, and is pretty fixed once you drill through carpet, ..., etc., to moun t on the tranny tunnel. I looked for other places to mount this, but to be honest, did not think this through as much as I should have
This is admittedly a hack, but it works. I'll play with this a bit this Winter. The other bit to note is the reflection coming off the Alpine head unit. I had designed a visor like the one over my dash panel, but didn't like the overall geometry. So that is yet another tweak planned for this Winter
TermX.jpg
The "Ball' that you see is a Steelie. I mount a cell phone on this and have this product in 4 different cars.
The Alpine touch screen needs a little cleaning - Hah!
-
Post Thanks / Like - 0 Thanks, 1 Likes
-
09-02-2023, 02:27 AM
#145

Originally Posted by
rhk118

Just a little PSA that gave me a chuckle. Hope you all have a good weekend!

Thanks Hank! Given that you are and MD I take this quite seriously. I have a lot of Aluminum shavings in my garage right now, and have many double IPAs in the fridge encased in aluminum cans - but being British I do prefer to pour my beer in a glass. God save the Queen, I think I will survive!
-
Post Thanks / Like - 0 Thanks, 1 Likes
-
09-02-2023, 08:29 AM
#146
Senior Member


Originally Posted by
LateApex

Couple of things going on here:
I've canted the TermX mounting bracket with some high density foam. The effect of this is that all reflections (as viewed from my eyes) are directed to the roof and not the windows. The TermX interface can always be removed, but the mounting bracket works pretty well, and is pretty fixed once you drill through carpet, ..., etc., to moun t on the tranny tunnel. I looked for other places to mount this, but to be honest, did not think this through as much as I should have
This is admittedly a hack, but it works. I'll play with this a bit this Winter. The other bit to note is the reflection coming off the Alpine head unit. I had designed a visor like the one over my dash panel, but didn't like the overall geometry. So that is yet another tweak planned for this Winter
The "Ball' that you see is a Steelie. I mount a cell phone on this and have this product in 4 different cars.
The Alpine touch screen needs a little cleaning - Hah!
Thanks for the picture Bob, very helpful. All my engine parts went straight to the builder so I haven't seen that screen yet for the TermX. Seems like something I can hide behind the dash if connected and pull it out to tinker. Ideally I can build a glove box like Paul did for his and put it in there, just know my metalworking and riveting skills pale in comparison to his and others on here. I think I just need to bite the bullet and do it, and perhaps the oval access panels that fit over the gas tank in the trunk area are the perfect size and shape for a glovebox door.
Never seen a Steelie mount before, nice subtle mount that isn't a big plastic bracket. I love the Alpine in yours but want the retro look. Would like some of the tech though and currently researching a new line of rearview mirrors that have the backup cam mirror AND Apple CarPlay built in. I don't need the music, but some driving directions on the mirror might help.

Originally Posted by
jgray

Thanks Hank! Given that you are and MD I take this quite seriously. I have a lot of Aluminum shavings in my garage right now, and have many double IPAs in the fridge encased in aluminum cans - but being British I do prefer to pour my beer in a glass. God save the Queen, I think I will survive!
Haha, I'm sure I've had my fair share of Al-you-min-EEE-um (have to acknowledge the proper pronunciation there  ) with a sandwich and beer on the bench while die-grinding away at aluminum panels...everything in moderation as they say! I try to stay on top of it all vacuuming after every build session, but its still everywhere...
Cheers fellas, have a good weekend!
Last edited by rhk118; 09-02-2023 at 08:33 AM.
-
09-02-2023, 08:42 PM
#147
If I may, there is a lot of info that the TermX interface provides, at a glance. Maybe during your break in period, you figure out how to use that info, or whenever you modify any of the settings. And then you retire that interface (or hide it in a glove box). After 2K miles I am still using and still tweaking the ECU, trying to get the fuel mix right mostly
A funny anecdote: I am having the VIN plate affixed in the last of my state patrol office visits, and the Master Sergeant of the State Patrol is looking over the car. He spots the "TerminatorX" interface, and asks "What is that?" One could imagine a number of things that were going through his mind at that point :-)
-
Post Thanks / Like - 1 Thanks, 0 Likes
-
09-03-2023, 08:38 AM
#148
Senior Member


Originally Posted by
LateApex

If I may, there is a lot of info that the TermX interface provides, at a glance. Maybe during your break in period, you figure out how to use that info, or whenever you modify any of the settings. And then you retire that interface (or hide it in a glove box). After 2K miles I am still using and still tweaking the ECU, trying to get the fuel mix right mostly
A funny anecdote: I am having the VIN plate affixed in the last of my state patrol office visits, and the Master Sergeant of the State Patrol is looking over the car. He spots the "TerminatorX" interface, and asks "What is that?" One could imagine a number of things that were going through his mind at that point :-)
Once again very useful info. You had mentioned to me you were still tweaking settings, but seems I will need it available for a while in a visible area. So will come up with some way of mounting it where I can see it, but be able to hide it. Maybe a steel plate behind one of the dash panels and will put some magnets on the screen panel...hmmm...
Did you answer:
A) Fuzz Buster
B) Flux Capacitor
C) Coal blower settings???
D) 
Last edited by rhk118; 09-03-2023 at 08:41 AM.
-
09-03-2023, 10:11 PM
#149
Senior Member

Hello Hank. Just finished reading your build thread start to present. Thanks for documenting with pictures, and explaining the "why" behind your decisions. Very helpful. I noted some good tips. If you hadn't admitted to being a first timer, I would be none the wiser.
One dumb question I have is how did you get your chassis up onto your four-post lift? I've read they weigh ~650 lbs. Did you have some muscle on standby, or use a more more crafty idea? I ordered some bridge jacks for my four-post (Bendpak); looks like yours have been working well since Day 1 of your build, and I would like to do the same.
P.S. What a great name you have! As a kid, our family adopted an older gentleman (born in 1900) as our grandfather, he was also named Hank. Such a zest for life: up early most summer mornings hooking up his 12 foot aluminum boat to his Datsun pickup to go fishing. He was in his 80s at the time! I didn't even entertain the thought of beating him at cribbage. He was sharp as a tack well into his 90s, and he made it past the century mark. It's not a name I hear often. Brings back great memories.
Chris
Coupe complete kit delivered: 4/22/24.
Build Thread. Coyote. T-56. IRS w/3.55. Wilwoods. PS. HVAC. Side windows.
MK4 Complete kit.
Build Thread Index. Delivered: 10/15/2020. Legal: 7/25/23. Coyote Gen3. TKO600 (0.64 OD). IRS w/3.55. PS. Wilwoods. Sway bars. This build is dedicated to my son, Benjamin.
Build Thread.
-
Post Thanks / Like - 0 Thanks, 1 Likes
-
09-04-2023, 07:55 AM
#150
Senior Member


Originally Posted by
460.465USMC

Hello Hank. Just finished reading your build thread start to present. Thanks for documenting with pictures, and explaining the "why" behind your decisions. Very helpful. I noted some good tips. If you hadn't admitted to being a first timer, I would be none the wiser.
One dumb question I have is how did you get your chassis up onto your four-post lift? I've read they weigh ~650 lbs. Did you have some muscle on standby, or use a more more crafty idea? I ordered some bridge jacks for my four-post (Bendpak); looks like yours have been working well since Day 1 of your build, and I would like to do the same.
P.S. What a great name you have! As a kid, our family adopted an older gentleman (born in 1900) as our grandfather, he was also named Hank. Such a zest for life: up early most summer mornings hooking up his 12 foot aluminum boat to his Datsun pickup to go fishing. He was in his 80s at the time! I didn't even entertain the thought of beating him at cribbage. He was sharp as a tack well into his 90s, and he made it past the century mark. It's not a name I hear often. Brings back great memories.
Thanks for the kind words. Other than installing some crazy car stereos in my youth I’ve never worked on cars in any mechanical sense. I have learned a lot and it's certainly easier to learn how to do this putting new parts together than trying to restore an older car. It's great, absolutely love it and even though every step of the build has some caveats and something needs to be tweaked, adjusted, fit differently I'm thankful for Factory Five for making this all possible. My main concern is I don't know what I don't know and that makes the process very slow. My neck issue actually made me take a step back and relax about it. Only work on it when I have time and feel like it, not going to force anything, it's not a race.
I have had a lot of help from a lot of great people on here and around me. I find this build attracts a lot of interest among car people who’ve come over to see it (JohnG came from California to the East Coast and made a trip out of his way here to see it as well, and we are now building in parallel), invariably someone will tell me about someone they know that does X, Y or Z. I need some welding done and already have 3 offers for help with that just through folks asking me how its going. When Factory Five talks about the community around the build it is absolutely real. Then as I was building found a Cobra build and a Coupe build both happening within 5 miles of my house. Lots of looking, studying photos, checking out the cars at shows, a few visits to Factory Five, and just talking. Seeing Paul (edwardb) and Scott's (namrups) builds more recently has helped me a lot. I love this community. After going to Factory Five’s open house now have the itch for a 289 Cobra kit. But need to finish this one first, SO much to do.
Answer to your question: Muscle is the answer for me here. Hood easily comes off, set that aside. Then 4 guys, a 4x6 through the back wheel well and a 2x4 under the front frame, 1 guy on each corner like carrying Cleopatra and set it down directly on the lift (no didn't ask my wife to get in first  ). You can see the 2x6 in the back in the pictures. I then jacked up the front then back using a floor jack between the rails and got the bridge jacks under on my own.
Short of 4 guys the cart that Stewart Transport has would roll up onto my lift on the ramps….then jack it up front and back and remove the cart I think would work. Looking at threads on here it seems Stewart has fit these things into some very tight spaces!
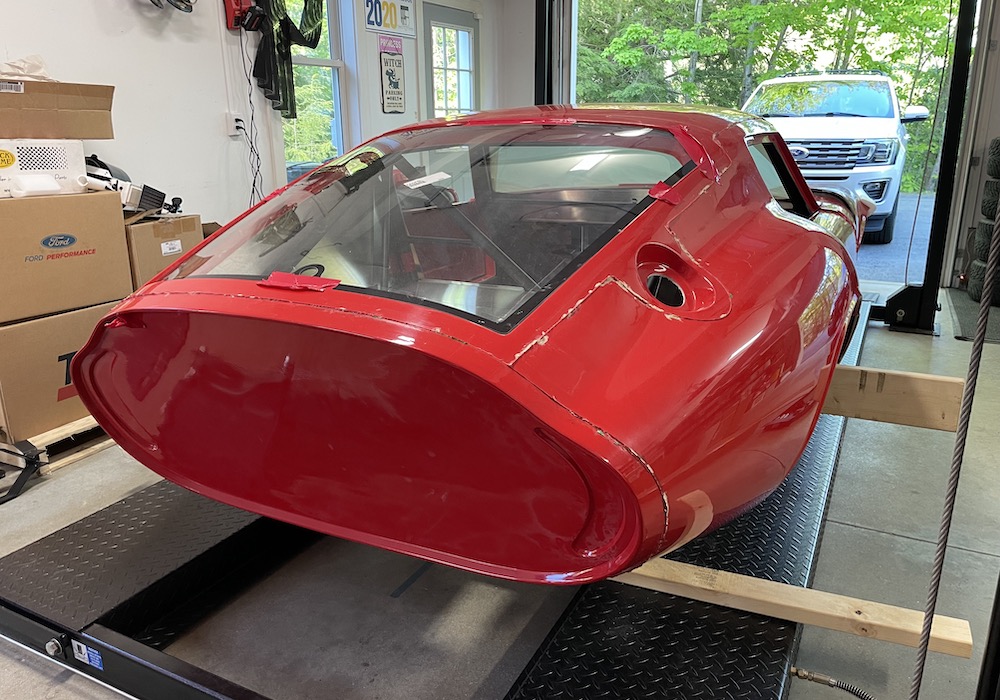


Using the lift has worked really well for me. The car is now up on the 5” Jack extensions which gives some extra room to work. And when I’m not working on it, up in the air it goes and instant storage. Once the engine is in I will need to strap it to the lift front and back so it doesn't get tippy, but up to this point with the diff and suspension all in it is very stable.
I live in New England, and as you can probably see the snow shoes in the background in some of my pictures the lift was originally purchased for car storage, not to build the FFR (but works great on that). For reference the lift is a Forward Lift EFP8 and got that because there is a local garage supply company that sells and will service them and the price was the same as a year of car storage around here. Bendpack lifts are definitely better having seen some but this absolutely does the job (and the local guy won’t service Bendpack, decision made). The bridge jacks for these lifts can be very expensive ($1200+ each), but found home depot randomly had bridge jacks with a different company name but the same part number as Forward Lift’s part number for $600. Thought it too good to be true so ordered one just to see what arrived and it was the exact part I needed. Quickly ordered the second. Needless to say Home Depot quickly removed them from their website...I suspect someone had the price wrong there. I bought the bridge jacks when I bought the kit. They are very helpful to take summer tires off for winters on my other cars.
I appreciate your Hank story. It’s a great name because there aren’t many of us around, so I know when someone is addressing me and I’ve never met another (many Henrys though). I’ve found it also lends itself to some great nicknames: Hammerin’ Hank, Hank Williams, Hank the Tank, Hanky Panky, Mr. Hankey for you Southpark fans….all good in my book! I have 3 daughters, so no Hanks (not sure my wife would have appreciated me pulling a George Foreman and naming them all George  )
)
Once again, too long of a reply to a simple question!
Last edited by rhk118; 09-04-2023 at 08:34 AM.
-
09-04-2023, 08:18 AM
#151
Thanks for the call out Hank! Glad my build was an inspiration. Road trip out to see you with the coupe next year may be in the works!
-
Post Thanks / Like - 1 Thanks, 1 Likes
-
09-04-2023, 08:27 AM
#152
Senior Member


Originally Posted by
Namrups

Thanks for the call out Hank! Glad my build was an inspiration. Road trip out to see you with the coupe next year may be in the works!
100% Scott! Not sure when we're heading back to the Albany area but will let you know when we do - I trimmed my radiator tunnel aluminum back to against those brackets this weekend so won't have the hinge issue...thanks for the tip!
-
Post Thanks / Like - 0 Thanks, 1 Likes
-
09-04-2023, 03:07 PM
#153
Senior Member

Thanks for the pictures, Hank. Very helpful. So cool you have a couple builds going on nearby.
That would be great if it could be rolled onto the lift using the Stewart cart. Worse case, I'll find some muscle--beer in exchange for a few minutes of lifting might be just the trick. 
(We have four sons and a daughter. Unfortunately, Hank never made it to the top of my wife's list).
Chris
Coupe complete kit delivered: 4/22/24.
Build Thread. Coyote. T-56. IRS w/3.55. Wilwoods. PS. HVAC. Side windows.
MK4 Complete kit.
Build Thread Index. Delivered: 10/15/2020. Legal: 7/25/23. Coyote Gen3. TKO600 (0.64 OD). IRS w/3.55. PS. Wilwoods. Sway bars. This build is dedicated to my son, Benjamin.
Build Thread.
-
Post Thanks / Like - 0 Thanks, 1 Likes
-
09-09-2023, 06:36 AM
#154
Senior Member

Do the perfect seats exist? (basically me just talking out loud, not much useful here)
Hoping for input here guys...
I want to make sure that the ergonomics of my seating position are comfortable to me before getting the interior buttoned up only to find that I don’t like the pedal or seat position. I’m 5’11” and currently 240# and my entire life have been called husky (who doesn’t like a charismatic dog with blue eyes?!). When I ordered my kit there was a backorder on Corbeau seats for >6 months so I ordered the fixed back Evolution X seats from Corbeau and it took 6 months for them to arrive. As I will be tracking this car from time to time I want a sport seat that has full back support and head protection in the back, so low-backs are out. The Corbeaus are quite nice, in my view match the car, and I fit in them well...but do not think they will work for me.
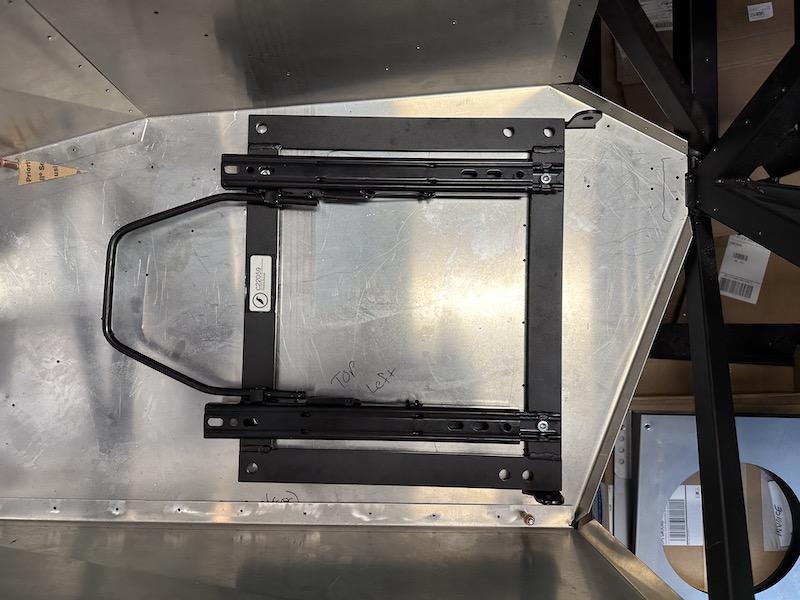
My issue, as others have pointed out is you are limited by how far back they will sit on the floor by the seatbelt tabs. The tabs are 17” apart. When I put them in the car as far back as they will go the seating position is OK with legs relative to pedals (still would like the pedals further away, but pedal position isn’t set yet – going to set them out as far as possible to engage clutch and brakes without hitting the firewall). However the steering wheel is quite literally in my lap. I can’t turn the thing freely because my arms are too close. I have the Russ Thompson turn signal and the NRG quick release making the wheel a bit closer. I was able to shorten the RT signal adapter by ½ inch without interfering with the 2-bolt mounting on the tube.
If I lean back and angle the Corbeau seat back hinging off the floor (like I used to get yelled at for doing in elementary school) so the back is against the back of the cockpit, it is perfect distance arms to steering wheel, but now the seat base is too angled. The fixed-back Corbeau just won’t get into that orientation enough for me (needs to tip back at 25-30 degrees by my estimation). I’m afraid for me they are the wrong seats.
The low back vinyl kit seats fit PERFECTLY. They fit between the tabs and slide all the way back to the back of the cockpit, are angled well, and the seating position to me is great for legs and arms. My issue again is they are lowbacks and I just worry about whiplash and hitting head on something behind me, even if I install some type of headrest on the rollbars behind. Maybe I wear a HANS device when racing. At the Factory Five open house I sat in the blue coupe with the Kirkey lowbacks. I fit pretty well in them and they are also perfectly situated for arm and leg length. The high-back Kirkeys in the R-coupe they have there I do not fit in the seat, super uncomfortable, non-starter. I also got to sit in Scotts car and he is using the Corbeau Evolution X’s with the Breeze angled floor bracket – better but felt not quite far enough for my arms to the steering wheel.
So I’ve been fiddling around – I have the 1” Corbeau Mounts. Noticed the 2” Corbeau mounts are a lot narrower and slightly slanted so ordered a set to try. They fit between the tabs nicely and can get the seat back a little farther, but the extra height has the seat bolsters and headrest interfering with the roll cage preventing them basically from fitting any further back. I also bought the Breeze angled seat mounts for the roadster like Scott (namrups) used and these may be OK.
In the meantime I’ve been looking at a lot of seats. Corbeau A4s are reclining, narrow, and I suspect will angle back enough to get them to the back of the cockpit. Sparco R100s are similar. There are some places that make low back roadster seats with a headrest. Then found some GT40 seats that are very narrow, by measurement will fit between the tabs, have a 120 degree angle so will definitely sit at the back of the cockpit, but after mocking them up in cardboard, the front of the seat is too wide….
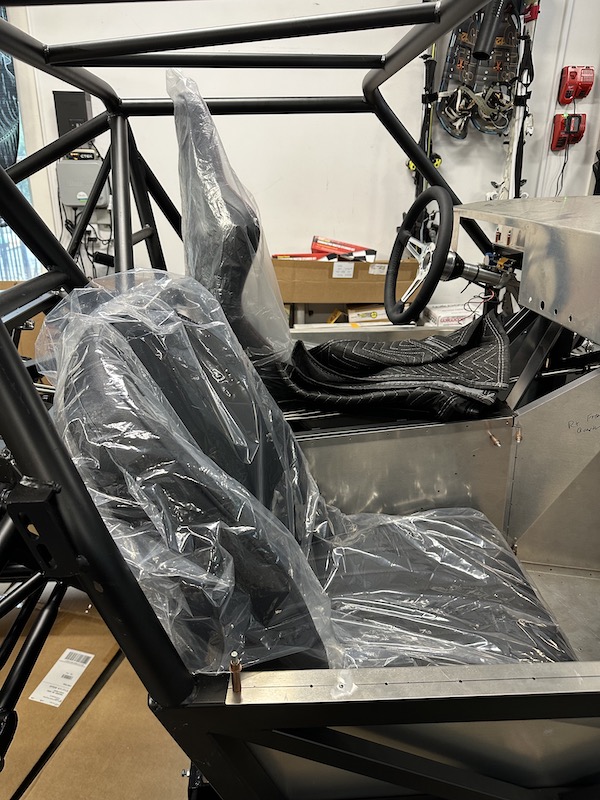
Corbeau Evolution X vs Kit low back – Low back fit is perfect. See how far the Corbeau back is from the rear of the cabin, it needs to tilt back or recline for me. Where its sitting in this picture isn’t as far back as it goes, but hopefully you get the idea.
Corbeau 1” Seat mount relative to the tabs:
Corbeau 2” Seat mounts – these are very narrow, slightly slanted back. With the Evolution X it doesn’t really get the seat farther back:
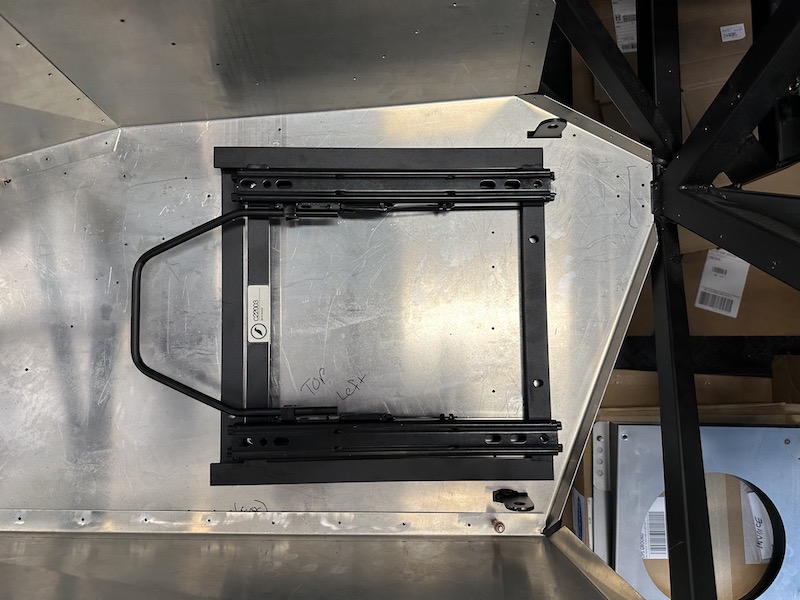
Breeze Angled seat mounts. Will need to mount the Corbeau seat mount on top of this. They seem to help, but not quite enough for me:
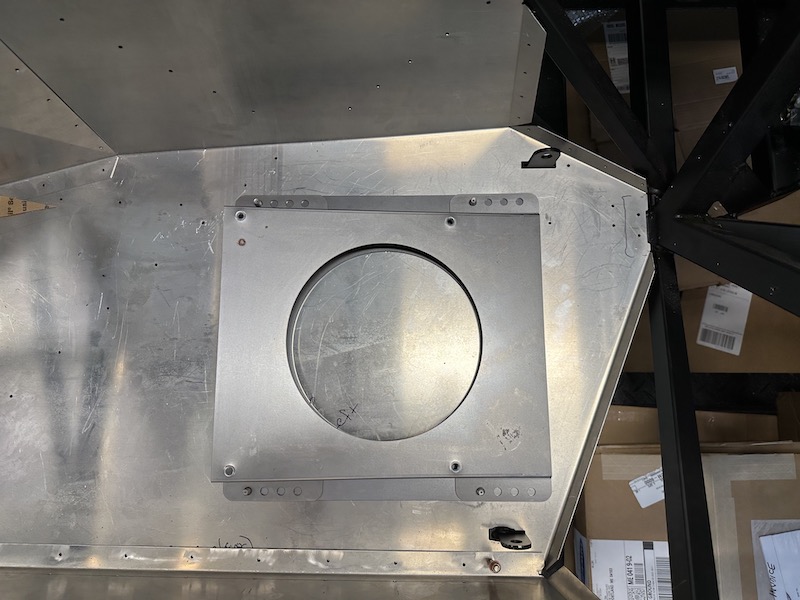
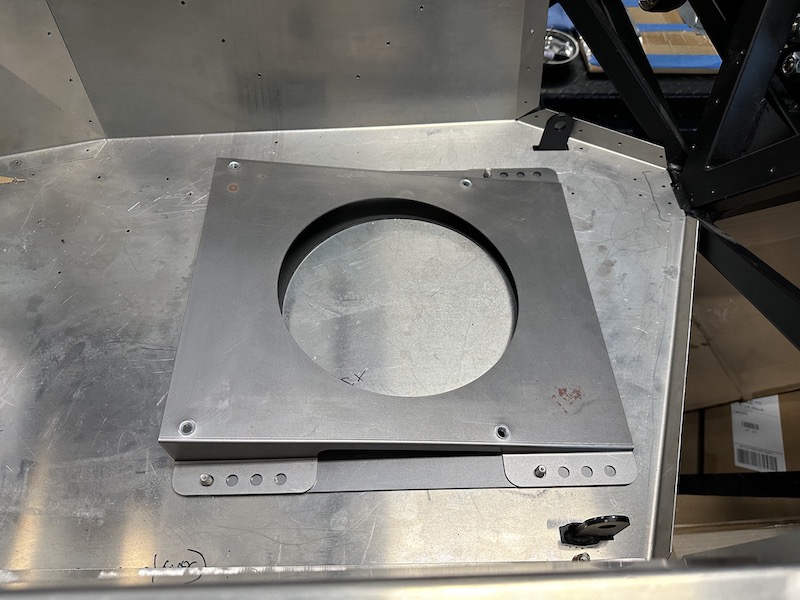
GT40 seat mockup. The angle and footprint dimensions are accurate. Hope you like my fancy plaid seat pattern  . Ultimately the front of the base will be too wide for the coupe.

In any event I am open to any and all suggestions for high-back seats (or modified / “high back” roadster-style seats) that will fit all the way back in the cockpit.
To Be Continued….
Last edited by rhk118; 09-09-2023 at 06:43 AM.
-
09-09-2023, 05:31 PM
#155
Have you thought about moving the seatbelt tabs? I thought about that but I had already installed the aluminum panels and didn't want to rip it all out again.
-
09-10-2023, 06:15 AM
#156
Senior Member


Originally Posted by
Namrups

Have you thought about moving the seatbelt tabs? I thought about that but I had already installed the aluminum panels and didn't want to rip it all out again.
Yes I have Scott. They are the culprits in all of this for sure! I should have put your seat back a bit when sitting in yours, but didn't want to mess up your seating position. I honestly think that I will go the same way you did with the Breeze angle mounts.
Last edited by rhk118; 09-10-2023 at 06:18 AM.
-
09-10-2023, 08:38 AM
#157
We all know that these cars are not your standard vehicles that are designed for creature comfort. They are street legal race cars. The cabins are tight, you sit at an angle and there is very little arm and leg room. During your build when your sitting there you can see and feel all of these quarks. They seem like major issues. On the plus side, that all goes away when you get to drive it down the road.
-
Post Thanks / Like - 0 Thanks, 1 Likes
-
09-10-2023, 11:47 AM
#158
One other option may be the Sparco Grid Q's. I am 6' 195 lbs and have ample room in mine. I did modify the fiberglass body in order to get them to slide all the way back and have the base tilted up at an angle and the seat sits pretty square to the dash.
20230910_123741.jpg
20230910_123747.jpg
20230910_123758.jpg
20230910_123819.jpg
20230910_123842.jpg
-
Post Thanks / Like - 0 Thanks, 1 Likes
-
09-10-2023, 08:11 PM
#159
I am not piping in at the right time or spot I suspect - but it is a good time to think about head protection in general. We have this great chassis around us, but that roll bar (or space frame) around us is a real hazard to think about in the event we we are may be involved in some sort of collision. Without a helmet, a minor accident may be more than minor The high-back seats are great, but at a basic level, what are we doing doing to protect ourselves from the simplest of accidents?
FWIW
-
09-11-2023, 08:35 PM
#160
Senior Member

It is the side bar up top that really worries me. Will definitely add padding to that like others have. High back seat should get the rest. Or just helmet everywhere (I kid, I kid)...
Last edited by rhk118; 09-11-2023 at 08:42 PM.


 Thanks:
  Likes:

 Reply With Quote


 ...All those things I posed above are delayed in that I did all the work already - Battery tray was all drilled and fitted in late October, just needed some powder coated brackets that sit under it - so literally 14 bolts to thread to loosely put it in and none are tightened down. The brake line brackets were pre-fitted and drilled back in November so only 8 rivets to place along with 4 fittings, nothing stressful. As for money spend I have a lot of parts sitting here already (tires were budgeted, powder coating rims was not but I love the blue or red cars with white faced rims)....engine is paid off but still getting built....I am going to build the serp setup on the front myself so will need all those parts....as we all say budget? nah...hobby...Last big ticket items for me will be side windows, push-button starter and possibly double door poppers (those setups seem pretty slick to me), sound proofing, PAINT, PAINT, and PAINT...then at some point race rims and tires. I'm sure I'm forgetting about another 5K in miscellaneous parts in there...
 ) and work on something else that appeals to you, but this injury forcing me to slow down has taken a lot of pressure away that I had on myself to get as much done as fast as possible (and you look through these build threads and they seem quick, but a lot of us have a month or 2 between posts)...I would love to have this finished by next summer, but it's just not going to happen, and I'm cool with it! Plus to me the coupe is a very special car and I love everything about its history and what it represents...and for better or worse I'm building it (as they say "nailed it!"), for those reasons will keep it forever, and if I do ever get rid of it my middle daughter has already called "dibs" on it haha....
 . Like the shiny front end. Also appreciate the heads up on the transmission mounts, I'm anticipating the need to customize things a bit for the mount and hoping the driveshaft length is correct. If not, will make it work!
 ) to hide behind my dash, and as a result more switches, plus will lose some space behind the driver’s side dash for the electric steering motor.
  ) with a sandwich and beer on the bench while die-grinding away at aluminum panels...everything in moderation as they say! I try to stay on top of it all vacuuming after every build session, but its still everywhere...


