Very Cool Parts

Visit our community sponsor

Thanks Thanks:  0
Likes Likes:  0
Results 1 to 39 of 39

Thread: New 4-Post Lift Arrives - almost done building, need air

  1. #1
    Administrator David Hodgkins's Avatar
    Join Date
    Feb 2011
    Location
    Corona del Mar, CA
    Posts
    6,129
    Post Thanks / Like
    Blog Entries
    7

    New 4-Post Lift Arrives - almost done building, need air

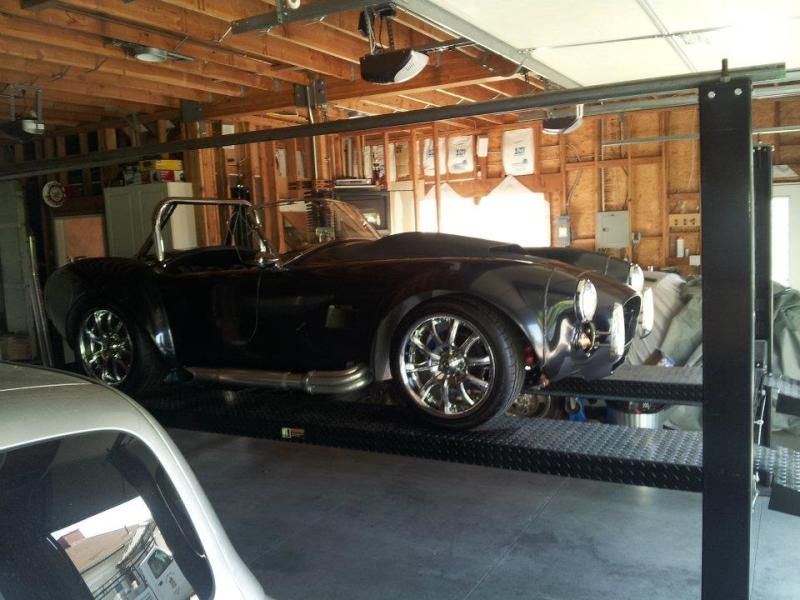
    My brother and I continue to build up our little shop with the arrival of a HD9-XL BendPak lift today! I can't wait; I've wanted one of these for a while now. We splurged on the larger lift in case we ever want to work on the 'ol support vehicles:


    Accessories include the long aluminum approach ramps and a center scissor jack. I think we might need a trans stand too but didn't pull the trigger on it just yet. I hooked up 20 amps of 240 last week. Hope it's enough...

    This is going to be awesome.


    PS Pics as soon as it arrives. How the heck will I move the ramps around?? I heard those suckers are HEAVY!

    FFR 5369 Pin Drive, IRS, Trigos, Torsen, Wilwoods, FMS BOSS 302 "B" cam , Mass-flo. CA SB100 (SPCN) Registered
    Delivered 4/23/06. "Finished" 4/2012 (still not done!)


  2. #2
    Senior Member FFRSpec72's Avatar
    Join Date
    Feb 2011
    Location
    Kirkland, WA
    Posts
    2,256
    Post Thanks / Like
    Enjoy, remember to remove the lower car before lowering the lift !
    Tony Nadalin
    2022 SOVREN Championship
    2018 SOVREN Big Bore Champion
    2015 SCCA Oregon Region VP3 Champion
    2012 ICSCC ITE Class Champion
    FFR MkII Challenge Car, Spec Racer, Street Legal, SCCA, ICSCC and NASA Racing

  3. #3
    Senior Member RM1SepEx's Avatar
    Join Date
    Jul 2011
    Location
    Freeport, ME
    Posts
    3,801
    Post Thanks / Like
    I have the std width bendpak and the aluminum load ramps that are stand alone. The aluminum ramps are not that heavy, the stock steel ones are tho! I use my aluminum ones to load cars in my 8.5 w x 16 long aluminum V nose Thule trailer... makes entry and exit to the trailer easier and does double duty for the ramps. Right now the Bendpak is a parking lift and the trailer is a portable garage... they account for 3 Miata all winter!
    Dan

    818S #17 Picked up 8/1/13 First start 11/1/13 Go Kart 3/28/14

  4. #4
    Administrator David Hodgkins's Avatar
    Join Date
    Feb 2011
    Location
    Corona del Mar, CA
    Posts
    6,129
    Post Thanks / Like
    Blog Entries
    7
    Quote Originally Posted by FFRSpec72 View Post
    Enjoy, remember to remove the lower car before lowering the lift !
    Please tell me that's not personal experience talkin'...


    FFR 5369 Pin Drive, IRS, Trigos, Torsen, Wilwoods, FMS BOSS 302 "B" cam , Mass-flo. CA SB100 (SPCN) Registered
    Delivered 4/23/06. "Finished" 4/2012 (still not done!)


  5. #5
    Senior Member 68GT500MAN's Avatar
    Join Date
    Feb 2011
    Location
    Fresno, CA
    Posts
    1,808
    Post Thanks / Like
    Do the vehicles in the photo come with the lift? If so, I will take the Porsche to make room for your roadster!
    Doug

  6. #6
    Senior Member
    Join Date
    Apr 2011
    Location
    Shawnee KS< KC Burb
    Posts
    844
    Post Thanks / Like

    eye level

    Quote Originally Posted by David Hodgkins View Post
    My brother and I continue to build up our little shop with the arrival of a HD9-XL BendPak lift today!
    Accessories include the long aluminum approach ramps and a center scissor jack.
    PS Pics as soon as it arrives. How the heck will I move the ramps around?? I heard those suckers are HEAVY!
    I had longer steel ramps made for my Worth and I just leave them on the lift. BUT, I push a short block under the ramp and on top of the tab they droop against when the lift is up.
    That block keeps the ramps tipped up as high as possible so I can walk under them with no cranial damage. Not sure if a Wookie can walk under yours that way or not but it
    works for a 5'6" < normal size guy just fine. Before lowering I just pull those blocks so the ramps droop free, tip the safety arm and drop it down as usual.

    You will find the 4 post is also handy for cleaning rocker panels/side pipes etc. I just keep an office chair handy run the car part way up then roll back and forth and save the back trouble.
    Dale
    Hemi33

  7. #7
    Administrator David Hodgkins's Avatar
    Join Date
    Feb 2011
    Location
    Corona del Mar, CA
    Posts
    6,129
    Post Thanks / Like
    Blog Entries
    7
    Quote Originally Posted by myjones View Post
    ../You will find the 4 post is also handy for cleaning rocker panels/side pipes etc. I just keep an office chair handy run the car part way up then roll back and forth and save the back trouble.
    Dale
    Hemi33
    Truth is that's as high as I think we'll be able to raise a chassis in this little shop. Some will think the lift is overkill for the space but getting away from crawling under a car on jack stands is the goal. Jack stands freak me out a little and I don't enjoy being under a car like that.


    FFR 5369 Pin Drive, IRS, Trigos, Torsen, Wilwoods, FMS BOSS 302 "B" cam , Mass-flo. CA SB100 (SPCN) Registered
    Delivered 4/23/06. "Finished" 4/2012 (still not done!)


  8. #8
    cobra Handler skullandbones's Avatar
    Join Date
    Jul 2011
    Location
    Superstition Mtn foothills 5 miles west of Gold Canyon AZ
    Posts
    2,686
    Post Thanks / Like
    Blog Entries
    19
    David,

    I don't know if you have delivery into the garage area but if you don't have it so you can disassemble the container and move components conveniently. Your's may be a little heavier than the 4 poster we installed (a friend's). 4 old guys were able to move the pieces around but the ramps were pretty heavy. Use some furniture dollies and save your back. I guess you and one more wookie friend should have no problems!!! Good luck, WEK.
    FFR MkIII 302 (ATK), EFI 75mm TB with custom box plenum chamber, 24# injectors, 4 tube BBK ceramic, cold air sys, alum flywheel, crane roller rockers, T5, Wilwood pedals, custom five link with Watt's link, 4 rotors, coil overs, power steering with Heidt valve, alum FFR rad, driver's crash bar mod, mini dead pedal mod, quick release steering wheel hub #6046

  9. #9
    Tool Baron frankeeski's Avatar
    Join Date
    Feb 2011
    Location
    "The I.E." SoCal
    Posts
    1,358
    Post Thanks / Like
    Sure does make cleaning the wheels a lot easier.
    Frank
    __________________________
    Factory Five Racing MKIII Super Snake Replica. Cannonball Cobra Drop Trunk Box, Horn Button and other machined Do Dads.
    i.e.427 Chromed Full Width Roll Bar with integrated LED Third Brake Light.
    I will never forget My Buddy Paul.

  10. #10
    Out Drivin' Gumball's Avatar
    Join Date
    Feb 2011
    Location
    Blackberry Township, IL
    Posts
    2,653
    Post Thanks / Like
    I love my Bendpak - truly makes things so much easier you'll find yourself doing much more work under the car just because of the convenience.

    Later,
    Chris

    "There are no more monsters to fear, and so, we have to build our own."
    Mk3.1 #7074

  11. #11
    Senior Member luvaz's Avatar
    Join Date
    Feb 2011
    Location
    Scottsdale, AZ
    Posts
    157
    Post Thanks / Like
    Quote Originally Posted by David Hodgkins View Post
    My brother and I continue to build up our little shop with the arrival of a HD9-XL BendPak lift today! I can't wait; I've wanted one of these for a while now. We splurged on the larger lift in case we ever want to work on the 'ol support vehicles:


    Accessories include the long aluminum approach ramps and a center scissor jack. I think we might need a trans stand too but didn't pull the trigger on it just yet. I hooked up 20 amps of 240 last week. Hope it's enough...

    This is going to be awesome.


    PS Pics as soon as it arrives. How the heck will I move the ramps around?? I heard those suckers are HEAVY!

    Dave, When I installed my 4 post lift, a buddy and a cherry picker did the trick! Get a sling/strap around the middle of the ramp (balanced like a see-saw), and you should be fine.

    I've moved on to a different house since buying & installing the 4 post, two actually. The last one only had garage ceiling height for a mid-rise scissor lift. My current house has plenty of height and a 2 post is my current set up! It is my favorite of the 3 lifts.

    Enjoy!

    Will

    Cobra lift lights.jpgcoBRA 002.jpgCobraTop 005.jpg
    FFR MK III picked up 9/24/05 Roller 9/28/05 First start & go-cart 11/28/05 red w/white stripes, PC Chassis, heat/defrost, FFR 15's, pwr footbox vents, radio delete, dual quad 427W, 4 link w/3.27's, Koni's all around, Gen 1 rag top, snapless tonneau, Herb's door panels, NRC rear discs, Breeze head rest, ********** emblems, Paint by Gino's in Rowley, MA
    2011 ffcars.com calendar Cover Car Yes, that's me in the avatar with Dave Smith in front of my roadster at the '06 FFR Open House!

  12. #12
    Senior Member riptide motorsport's Avatar
    Join Date
    Feb 2011
    Location
    Fort Lauderdale Fl.
    Posts
    3,296
    Post Thanks / Like
    I'm so envious!
    FFR Daytona Type 65 Coupe
    67 427 Cobra
    57' Belair
    72 Pinto Wagon ,306" 1/4 miler
    34 5 window coupe Ford
    2003 Mustang GT
    99' ZX9
    85 Goldwing

    All toys still in the Scuderia!


    Every Saint has a past..................every sinner a future

    Don't take yourself so seriously........no one else does.

    You never see a motorcycle parked outside a Psychiatrists office.

  13. #13

    Join Date
    Feb 2011
    Location
    Norton, MA USA earth
    Posts
    3,457
    Post Thanks / Like
    Dave. I have 3 of them. It was cheaper to build a tall 2 car garage with two lifts than a 4 car garage. I have another one in my main garage that I use to work on cars. Has the rolling jack as well. I will never lay on my back again.
    mike

  14. #14
    Senior Member
    Join Date
    Jun 2011
    Location
    Litchfield,NH
    Posts
    503
    Post Thanks / Like
    Very nice David!

  15. #15
    Administrator David Hodgkins's Avatar
    Join Date
    Feb 2011
    Location
    Corona del Mar, CA
    Posts
    6,129
    Post Thanks / Like
    Blog Entries
    7
    Well, I spent the entire weekend building this thing and it's still not done. I learned a lot though and am now very happy with the decision to go with BendPak.

    The lift arrived on Friday afternoon and required the use of a neighbors forklift to get of the truck. The runners were stuffed with various components including the cross members and uprights. All together I received 3 packages totaling over 2100 lbs.


    It took some manuvering to got the runners into the shop:


    I didn't know enough to know if the runners were going into the shop in the correct orientation but at that point I didn't know there was a difference between runners and that they even had an orientation. Here they are after being loaded into the shop:


    ... this 300 lb scissor jack. Heavy, man:


    Cont...

    FFR 5369 Pin Drive, IRS, Trigos, Torsen, Wilwoods, FMS BOSS 302 "B" cam , Mass-flo. CA SB100 (SPCN) Registered
    Delivered 4/23/06. "Finished" 4/2012 (still not done!)


  16. #16
    cobra Handler skullandbones's Avatar
    Join Date
    Jul 2011
    Location
    Superstition Mtn foothills 5 miles west of Gold Canyon AZ
    Posts
    2,686
    Post Thanks / Like
    Blog Entries
    19
    David,

    Your experience sounds like mine where the whole thing was bolted together. I think mine was around 2K lbs. Myself, the truck driver and a neighbor wrestled the thing out of the back of a big trailer. Must be nice to have a neighbor with a fork lift!!!!

    Good luck with the rest of it.

    WEK.
    FFR MkIII 302 (ATK), EFI 75mm TB with custom box plenum chamber, 24# injectors, 4 tube BBK ceramic, cold air sys, alum flywheel, crane roller rockers, T5, Wilwood pedals, custom five link with Watt's link, 4 rotors, coil overs, power steering with Heidt valve, alum FFR rad, driver's crash bar mod, mini dead pedal mod, quick release steering wheel hub #6046

  17. #17
    Administrator David Hodgkins's Avatar
    Join Date
    Feb 2011
    Location
    Corona del Mar, CA
    Posts
    6,129
    Post Thanks / Like
    Blog Entries
    7
    Thanks WEK!

    First order of business was to unpack so I broke out the 'ol utility knife and started cutting the wrapping. After quite some time, and at least one nice jab of the knife into my thumb I started to hit paydirt:


    As I unwrapped i discovered that one of the runners had a big piston in it, which I found out is the "Power" ramp. All cabling is done through this ramp and the other one is just along for the ride. I lucked out on this one; it was loaded in the right orientation. I just had to flip it over.

    I wasn't so lucky with the other one. It had to be rotated 180 degrees and flipped over. To accomplish this feat I first flipped it over and the stuck the floorjack beneath it in the center. Then I raised the jack as high as it would go and SOMEHOW managed to swing the ramp 180 degrees. I made it side-to-side be ~1.5 inches!:


    Then it was time to mount the crossbars in the legs. I had NO CLUE what I was doing and ended up putting them in without their spacers. NOTE; when putting the crossbars in, don't slide them in looking like this:


    They MUST have spacers, like this:


    ..Or you'll end up breaking things like this grease fitting (NOT GOOD):


    Cont...

    FFR 5369 Pin Drive, IRS, Trigos, Torsen, Wilwoods, FMS BOSS 302 "B" cam , Mass-flo. CA SB100 (SPCN) Registered
    Delivered 4/23/06. "Finished" 4/2012 (still not done!)


  18. #18
    Administrator David Hodgkins's Avatar
    Join Date
    Feb 2011
    Location
    Corona del Mar, CA
    Posts
    6,129
    Post Thanks / Like
    Blog Entries
    7
    After properly getting the crossbars in, I installed the ladders. These are what the crossbar latches on to and they can be fine tuned to level, which is nice:


    Then I put the caps on the legs. NOTE: they were packed with the runner stops and impossible to find until I unpacked ALL the components:


    Then it was time to manhandle the runners onto the crossmembers. First you flip the runner over, lift from the bottom with a floor jack, and then take off the temporary shipping steel "legs" and then grab a friend and lift the bar over the cross member. Then do the same for the other side:


    Getting the second runner over the crossbars is "fun". For this one I had to put the runner on top of the crossmember on one side and then lift the other sid up and over with an engine hoist, all the while holding the ramp in place by hand because it WANTS to slide off the cross member as it's lifted! This was the sketchiest maneuver and I didn't stop for pictures. Once the 2 runners were in place I torqued them down and started hooking up the cables.

    The cables took some time as I found out you have to route the cable BEFORE installing the pulleys. Then All the hydraulic lines were hooked up, followed by the air lines, which are used to release the safety catches. THis part went very quickly due to all the guide tubes and push-in fittings. Then I mounted the power unit and filled it with 3 gallons of ATF. That stuff stinks man.


    Then I hooked up the electrical. Or at least TRIED:


    The wall outlet is 30A 125V and the plug I got was 30A 250V. Oops. I guess I'll replace the outlet with a 30A 250 and i should be good to go? I took readings and get two 120 readings in the outlet for a total of 240V. Can I just change out the 125V outlet for a 250V?

    As I stands now I need to resolve the electrical and run air to the lift to operate the safety catches. Then I should have a working lift:


    After that, or prior, possibly; I have to install the scissor lift into the center of the runners and hook up an accessory power/air station. All-in-all I should be done in a few days. It was a LONG weekend but it's gonna pay off soon I think.


    FFR 5369 Pin Drive, IRS, Trigos, Torsen, Wilwoods, FMS BOSS 302 "B" cam , Mass-flo. CA SB100 (SPCN) Registered
    Delivered 4/23/06. "Finished" 4/2012 (still not done!)


  19. #19
    Senior Member
    Join Date
    Apr 2011
    Location
    Shawnee KS< KC Burb
    Posts
    844
    Post Thanks / Like
    David
    Don't forget to borrow a neighbors car for the first couple lifts just to be sure it all works right.
    Just tell them you need a car that's heavy enough to push out all the air bubbles
    Dale

  20. #20
    Senior Member RM1SepEx's Avatar
    Join Date
    Jul 2011
    Location
    Freeport, ME
    Posts
    3,801
    Post Thanks / Like
    Dave, what do you think of the aluminum ramps? You were worried about the weight
    Dan

    818S #17 Picked up 8/1/13 First start 11/1/13 Go Kart 3/28/14

  21. #21
    cobra Handler skullandbones's Avatar
    Join Date
    Jul 2011
    Location
    Superstition Mtn foothills 5 miles west of Gold Canyon AZ
    Posts
    2,686
    Post Thanks / Like
    Blog Entries
    19
    Quote Originally Posted by David Hodgkins View Post

    The wall outlet is 30A 125V and the plug I got was 30A 250V. Oops. I guess I'll replace the outlet with a 30A 250 and i should be good to go? I took readings and get two 120 readings in the outlet for a total of 240V. Can I just change out the 125V outlet for a 250V?

    As I stands now I need to resolve the electrical and run air to the lift to operate the safety catches. Then I should have a working lift:


    After that, or prior, possibly; I have to install the scissor lift into the center of the runners and hook up an accessory power/air station. All-in-all I should be done in a few days. It was a LONG weekend but it's gonna pay off soon I think.

    David,

    If I understand you correctly, that won't work. You need two 120 lines that would suffice for the two hots or a dedicated 8/3 or 10/3 line (code) to that outlet. Of course the latter is better. I've heard of a short cut to get it done but not something I would feel safe doing that way. I would definitely want to have heavy enough wiring in place to make sure you don't burn up your motor/pump prematurely. The hidden cost of adding cool machinery to your garage is a *****!!!

    WEK.
    FFR MkIII 302 (ATK), EFI 75mm TB with custom box plenum chamber, 24# injectors, 4 tube BBK ceramic, cold air sys, alum flywheel, crane roller rockers, T5, Wilwood pedals, custom five link with Watt's link, 4 rotors, coil overs, power steering with Heidt valve, alum FFR rad, driver's crash bar mod, mini dead pedal mod, quick release steering wheel hub #6046

  22. #22
    Administrator David Hodgkins's Avatar
    Join Date
    Feb 2011
    Location
    Corona del Mar, CA
    Posts
    6,129
    Post Thanks / Like
    Blog Entries
    7
    Quote Originally Posted by skullandbones View Post
    David,

    If I understand you correctly, that won't work. You need two 120 lines that would suffice for the two hots or a dedicated 8/3 or 10/3 line (code) to that outlet. Of course the latter is better. I've heard of a short cut to get it done but not something I would feel safe doing that way. I would definitely want to have heavy enough wiring in place to make sure you don't burn up your motor/pump prematurely. The hidden cost of adding cool machinery to your garage is a *****!!!

    WEK.
    The wall socket appears to have two hot 120 leads and a ground. The part I don't get is the voltage. I'll post more pics this afternoon showing the pin-outs.

    Thanks for commenting; I need help on this.


    FFR 5369 Pin Drive, IRS, Trigos, Torsen, Wilwoods, FMS BOSS 302 "B" cam , Mass-flo. CA SB100 (SPCN) Registered
    Delivered 4/23/06. "Finished" 4/2012 (still not done!)


  23. #23
    cobra Handler skullandbones's Avatar
    Join Date
    Jul 2011
    Location
    Superstition Mtn foothills 5 miles west of Gold Canyon AZ
    Posts
    2,686
    Post Thanks / Like
    Blog Entries
    19
    You will need to check the box to see but I doubt that you have 2 120 circuits (wires running into the box). A 2 gang box only has one circuit. Unless the electrician was kind and put in two lines which would most probably be organized in a "4 gang box" ( four plug ins sometimes done to allow more high amp devices to be run on the same box), then they almost always only have one circuit running in. It will appear that there are two but usually that is the outlet connected in a series. The one farthest from the breaker will only have one wire coming in. So you might have 4 or 5 120 outlets running on a single circuit. If you don't have a 240 line then you will have to run one from your breaker box to the area of the motor/pump in metal conduit. Some people have them run up into the ceiling and then down to the motor/pump out of the ceiling to keep it neat. Good luck,

    WEK.
    FFR MkIII 302 (ATK), EFI 75mm TB with custom box plenum chamber, 24# injectors, 4 tube BBK ceramic, cold air sys, alum flywheel, crane roller rockers, T5, Wilwood pedals, custom five link with Watt's link, 4 rotors, coil overs, power steering with Heidt valve, alum FFR rad, driver's crash bar mod, mini dead pedal mod, quick release steering wheel hub #6046

  24. #24
    Administrator David Hodgkins's Avatar
    Join Date
    Feb 2011
    Location
    Corona del Mar, CA
    Posts
    6,129
    Post Thanks / Like
    Blog Entries
    7
    Turns out the plug was wired wrong and it was wired for 220. I replaced the socket and my lift LIFTS!

    Now I have to finalize the air so I can get it back down...


    FFR 5369 Pin Drive, IRS, Trigos, Torsen, Wilwoods, FMS BOSS 302 "B" cam , Mass-flo. CA SB100 (SPCN) Registered
    Delivered 4/23/06. "Finished" 4/2012 (still not done!)


  25. #25
    Tool Baron frankeeski's Avatar
    Join Date
    Feb 2011
    Location
    "The I.E." SoCal
    Posts
    1,358
    Post Thanks / Like
    Air? Why wouldn't you just get manual release for the safety locks?
    Frank
    __________________________
    Factory Five Racing MKIII Super Snake Replica. Cannonball Cobra Drop Trunk Box, Horn Button and other machined Do Dads.
    i.e.427 Chromed Full Width Roll Bar with integrated LED Third Brake Light.
    I will never forget My Buddy Paul.

  26. #26
    Senior Member RM1SepEx's Avatar
    Join Date
    Jul 2011
    Location
    Freeport, ME
    Posts
    3,801
    Post Thanks / Like
    It's a manual release but the locks are spring loaded, the air holds them out, you can lift w/o air but the air is needed to lower it. I just use my air line with a quick connect. Dave make sure that you use a regulator to tone down the pressure as you could pop a line off the safety cylinders... ask me how I know!
    Dan

    818S #17 Picked up 8/1/13 First start 11/1/13 Go Kart 3/28/14

  27. #27
    Administrator David Hodgkins's Avatar
    Join Date
    Feb 2011
    Location
    Corona del Mar, CA
    Posts
    6,129
    Post Thanks / Like
    Blog Entries
    7
    Dan is correct.

    Dan, I was wondering about that when I saw the fittings. I have a few questions about setting that up. Here's the Electric Work Station:


    ...and here's the Electric Work Station on the post feeding the lift:


    It has a filter/regulator and an oiler. The middle air outlet is dry for blowing off stuff or filling a tire and the 2 air outlets to the left provide lubricant with the air for air tools. It shows the top one feeding the lift.

    So my questions are:
    Is it correct to feed lubricated air to the lift?
    Do I dial down pressure when lowering the lift and raise it when working with tools?
    What do you think about the soft line feeding the unit. Wouldn't this always be pressurized?
    Should I then add a cutoff and quick connect to the end of a hard line and go with this model? (I was thinking hard line to the workstation but am now thinking maybe that's not correct)
    Can I mount this on the opposite side of the pole instead of at 90* as shown?

    As an aside the Doc cut my back again yesterday to remove some more skin cancer (basal cell, not melanoma) and gave me specific instructions to not twist, bend or lift heavy objects for two friggin' weeks. I didn't tell him I built this thing with stitches in me from my visit 2 weeks ago. This time since it's right over my spine I'm going to try to force myself to wait at least 9 or 10 days before running the air. Then again, those pipes aren't really very heavy...

    FFR 5369 Pin Drive, IRS, Trigos, Torsen, Wilwoods, FMS BOSS 302 "B" cam , Mass-flo. CA SB100 (SPCN) Registered
    Delivered 4/23/06. "Finished" 4/2012 (still not done!)


  28. #28
    Junior Member pavieSD's Avatar
    Join Date
    Feb 2011
    Posts
    27
    Post Thanks / Like
    Dave if you need help getting things lifted/finished up, I can drive up this weekend and do the manual labor for you. I would hate to see you bust a stitch so close to Huntington beach and be out of commission! I have a free weekend anyways, and have been looking for an excuse to take the cobra for a spin. I'm happy to drive up, just let me know. Cheers.

    Mark

  29. #29
    Administrator David Hodgkins's Avatar
    Join Date
    Feb 2011
    Location
    Corona del Mar, CA
    Posts
    6,129
    Post Thanks / Like
    Blog Entries
    7
    Mark,

    Man, that's nice of you! Where would you be driving from? I'd have to make sure we were ready to go with hard and soft lines, etc. Forecast is for 90*(!) this Saturday. I wouldn't want you to drive that far in heat like that...


    FFR 5369 Pin Drive, IRS, Trigos, Torsen, Wilwoods, FMS BOSS 302 "B" cam , Mass-flo. CA SB100 (SPCN) Registered
    Delivered 4/23/06. "Finished" 4/2012 (still not done!)


  30. #30
    Junior Member pavieSD's Avatar
    Join Date
    Feb 2011
    Posts
    27
    Post Thanks / Like
    I'd be driving up from San Diego, but I have a place to crash in San Clemente, so no big deal on the distance. 45-60 mins on Saturday morning is no big deal to get to San Clemente, and then from there to your shop shouldn't be a problem. Assuming your shop is near San Clemente, I can get to your shop whenever you guys are ready to go on Saturday and my schedule is open for the entire day so no worries. You really helped me out when you let me sit in your roadster back in the day so I'm happy to help get things lifted and in place. Let me know if you want me to bring anything (that will fit in the roadster!) and I can clear my schedule on Saturday. Shoot me a PM if you'd rather coordinate via e-mail/cell.

    Mark

  31. #31
    Senior Member RM1SepEx's Avatar
    Join Date
    Jul 2011
    Location
    Freeport, ME
    Posts
    3,801
    Post Thanks / Like
    1 Since the air to the lift mechanism is to work small cylinders lubrication is good and 50 PSI is all that you need

    2 I assume you have a regulator back at the compressor, so I would take air at the line pressure for tools, tires and blow off before the regulator and drop the pressure at the regulator to operate the lift cylinders, that's how mine is setup. I have a drop with a reel on the ceiling between the bays. It's at line pressure, regulated at the compressor. My compressor is 5 HP and still can be wheeled, I connect with rather short hose to the overhead hose in the corner of the garage. Sometimes it is nice to drag the compressor out to a flat tire in the driveway etc... With a quick connect I can use the hose to work the lift or run an air tool, just not both at the same time. I did buy a triple female adapter, just not installed yet. I also have a 25 foot extension coiled up, just in case
    3 are you happy with the aluminum ramps?

    I'm too cheap to buy the bridge lift and I'm making up a simple one using a scissors jack. I can spin it up and down with a socket on my DeWalt portable drill
    Dan

    818S #17 Picked up 8/1/13 First start 11/1/13 Go Kart 3/28/14

  32. #32
    Administrator David Hodgkins's Avatar
    Join Date
    Feb 2011
    Location
    Corona del Mar, CA
    Posts
    6,129
    Post Thanks / Like
    Blog Entries
    7
    Dan, you have a good idea about the bridge lift.

    I'll also take your advice about splitting off before the regulator to run blow off.

    The aluminum ramps are very nice and make rolling the chassis on an off easy. They are pretty light too considering their size.

    I put some pressure in my air line and stuck my blow off nozzle in the air feed to the safety catches and they released so I was able to lower the lift:


    Mark, Let's meet up in San Clemente for breakfast and we can cruise up the coast to the shop after if ya want. I'll send you a PM with my cell.


    FFR 5369 Pin Drive, IRS, Trigos, Torsen, Wilwoods, FMS BOSS 302 "B" cam , Mass-flo. CA SB100 (SPCN) Registered
    Delivered 4/23/06. "Finished" 4/2012 (still not done!)


  33. #33
    Junior Member pavieSD's Avatar
    Join Date
    Feb 2011
    Posts
    27
    Post Thanks / Like
    Sounds good Dave. Want to meet at Pipes in San Clemente?

    2017 S El Camino Real
    San Clemente, CA 92672

    Let me know the time, and I'll plan accordingly. I'll PM you my cell. If the lift is done, that I'm happy to help out with the car if there are things that need to be done there.

    Mark

  34. #34
    Junior Member pavieSD's Avatar
    Join Date
    Feb 2011
    Posts
    27
    Post Thanks / Like
    Dave. Glad I could help and looking forward to seeing it fully operational! I was thinking about your air line under the one long rail. To keep it off the ground and away from the braided metal cables you could use these organizer cables to keep it up high and away from everything.

    http://www.amazon.com/Black-Adhesive.../dp/B005MN2QHK

    Mark

  35. #35
    Senior Member RM1SepEx's Avatar
    Join Date
    Jul 2011
    Location
    Freeport, ME
    Posts
    3,801
    Post Thanks / Like
    I love your ramps, they're longer than mine but I got my lift used, my friend sold the std width lift to me to get the wider one like you have to feed his http://dynocom.net/catalog/detail.asp?iPro=106&iType=29

    he has the eddy brake for it too... many of the parts are from a locomotive!
    Dan

    818S #17 Picked up 8/1/13 First start 11/1/13 Go Kart 3/28/14

  36. #36
    Administrator David Hodgkins's Avatar
    Join Date
    Feb 2011
    Location
    Corona del Mar, CA
    Posts
    6,129
    Post Thanks / Like
    Blog Entries
    7
    Mark thanks for dropping by yesterday! Hope the drive home wasn't too hot. I'm running the last air hard line today so I can try out the scissor lift.

    Thanks again man, you were a great help.


    FFR 5369 Pin Drive, IRS, Trigos, Torsen, Wilwoods, FMS BOSS 302 "B" cam , Mass-flo. CA SB100 (SPCN) Registered
    Delivered 4/23/06. "Finished" 4/2012 (still not done!)


  37. #37
    Junior Member pavieSD's Avatar
    Join Date
    Feb 2011
    Posts
    27
    Post Thanks / Like
    Quote Originally Posted by David Hodgkins View Post
    Mark thanks for dropping by yesterday! Hope the drive home wasn't too hot. I'm running the last air hard line today so I can try out the scissor lift.

    Thanks again man, you were a great help.

    David, Happy to help and I look forward to Huntington Beach. You have a great setup in the garage and I can already see how it's going to save you a ton of time with that awesome lift. I'm going to reach out to Kenny about the side pipes and let you know when I can figure out a window to pick them up. Once I get a plan worked out, I'll let you know and we can figure something out for getting them thrown on my FFR. Cheers!

    Mark

  38. #38
    Administrator David Hodgkins's Avatar
    Join Date
    Feb 2011
    Location
    Corona del Mar, CA
    Posts
    6,129
    Post Thanks / Like
    Blog Entries
    7
    Sounds good Mark, keep me in the loop.

    I went down to the local hoser place yesterday (how many times do I get to use "hoser" in a sentence?!?). They are making some custom hoses so I can finish off the install and have a working lift.

    It's stil not leveled or anchored yet but with the new engine arriving TOMORROW I have to gitter' dun'!


    FFR 5369 Pin Drive, IRS, Trigos, Torsen, Wilwoods, FMS BOSS 302 "B" cam , Mass-flo. CA SB100 (SPCN) Registered
    Delivered 4/23/06. "Finished" 4/2012 (still not done!)


  39. #39
    Junior Member pavieSD's Avatar
    Join Date
    Feb 2011
    Posts
    27
    Post Thanks / Like
    Already heard back from Ken, he's going to bring the pipes to Huntington Beach. I'll most likely need to bring them back down to San Diego, since I'll need to get an O2 bung welded into them (I don't think they come stock with the o2 bung and I need it for my EFI setup). I"ll also look into getting them coated black. Once I have them setup the way I want them, I'll shoot you a PM and we can work something out. If I can mount the pipes, quick jacks, and we can do a basic nut a bolt test of the suspension, that would be awesome. We can talk more at Huntington beach.

Posting Permissions

  • You may not post new threads
  • You may not post replies
  • You may not post attachments
  • You may not edit your posts
  •  

FFMetal

Visit our community sponsor