-
Not a waxer

-
Post Thanks / Like - 2 Thanks, 2 Likes
-
That's pretty slick! Nice work!
-
Hey Jeff-
I like the mod; very simple, elegant, and a nice finished look when completed.
I believe that I will be plagiarizing your idea. Thanks for posting!
Regards,
Steve
-
Me too, too good not to use.
Excellent idea

Originally Posted by
WIS89

Hey Jeff-
I like the mod; very simple, elegant, and a nice finished look when completed.
I believe that I will be plagiarizing your idea. Thanks for posting!
Regards,
Steve
-
Senior Member

I can't work out what has been resolved here. I guess once I receive my Mk4 and start working on it will become apparent!
-
Senior Member

Nicely done and nice write-up w/ pictures. This was one thing I kicked myself for not doing when I built my Mk3.
CTB - the issue being solved, to oversimplify is this: once the car is completed, body on, quick jacks installed (or overriders, if you go that route) you can no longer remove the body without first dropping (or at least loosening and precariously balancing) the fuel tank. This is because the quick jacks need to be removed to remove the body, and in order to remove the bolts to the quick jacks, you must remove the fuel tank to get clearance.
As you say, once you have the frame in front of you and see where the bolts/fuel tank line up, the problem becomes apparent.
-
Kleiner! You are as bad as me for giving out secrets! Just remember there are 91 we agreed we would not give out .....ooops! that was the proof of the rum I'm swiggin.....N>E>V>E>R>M>I>N>D>...da Bat
-
Hi Jeff: I love your mod. Makes much sense. I am just installing the trunk latch on my MK IV and it occurs to me I need to also do something similar with the bolt that the latch latches onto. True? It is a very tight fit to get the nut on that bolt.
-
Slord, I'm about to drill and install a rivnut for my trunk latch. Size is 10-24.
Kyle
-
The nut for the latch bolt can be put on through the inspection cover in the center of the trunk .
-
Originally Posted by
j.miller
The nut for the latch bolt can be put on through the inspection cover in the center of the trunk .
Yeah unless one has already riveted that panel in ... oops. And does not make it removable for future body removal via that bolt
-
Originally Posted by
kgkeys
Slord, I'm about to drill and install a rivnut for my trunk latch. Size is 10-24.
Kyle
OK that might work. Thanks.
I also found another thread where guys are replacing that bolt altogether with a U bolt or cleat. That attaches through the panel below.
-
Originally Posted by
j.miller
The nut for the latch bolt can be put on through the inspection cover in the center of the trunk .
I installed that cover with rivnuts, as well, but I dropped my trunk floor on the left side, so this won't work in my case, either... 
Kyle
-
Originally Posted by
Slord
OK that might work. Thanks.
I also found another thread where guys are replacing that bolt altogether with a U bolt or cleat. That attaches through the panel below.
That's not a bad idea. Are they reinforcing the panel with a backer or anything? Seems kinda flimsy.
-Kyle
EDIT: I found the thread Slord was talking about on the other site. They did reinforce with a steel back plate that attaches to the 3/4" tubing.
Last edited by kgkeys; 11-04-2016 at 09:26 AM.
-
Originally Posted by
kgkeys
Slord, I'm about to drill and install a rivnut for my trunk latch. Size is 10-24.
Kyle
Hi Kyle: Did that work out well for you?
I have been sourcing rivnuts here in small town Ontario and there are only 2 places that seem to stock them and, of course, they are only open Mon-Fri business hours. Guess I will have to use a lunch hour and hope I don't have to buy a 100 pack for one.
-
Mine are still in the mail. Ordered mine from some place on Amazon. I did end up getting a bag of 100 for about $10. I have the body off of mine right now, buttoning up some wiring and the driver footbox. I think you'd be hard pressed to drill and install the rivnut with the body on.
Last edited by kgkeys; 11-06-2016 at 10:02 PM.
Reason: typos
-
cobra Handler

I don't understand why FFR hasn't picked up on your mod to make it a kit standard. It is like you say easy and cheap. It would not involve a great change in the hardware kit. After doing the install the first time the old way, I felt beat up with scraps and a couple of little cuts and a sore back. So I plan to do this before removing body for paint again.
Thanks a lot, Jeff!
WEK.
FFR MkIII 302 (ATK), EFI 75mm TB with custom box plenum chamber, 24# injectors, 4 tube BBK ceramic, cold air sys, alum flywheel, crane roller rockers, T5, Wilwood pedals, custom five link with Watt's link, 4 rotors, coil overs, power steering with Heidt valve, alum FFR rad, driver's crash bar mod, mini dead pedal mod, quick release steering wheel hub #6046
-
Got my rivnuts, yesterday and installed one for the striker. Easy-peasy.
-Kyle
20161105_211853_resized_1.jpg
-
Senior Member

What size coupler nuts, rods and bolts are you using. I'm having a really hard time finding 7/16-20 for all of the pieces as others have used. My hope is to use stainless but not finding too many places that carry them - not even amazon or Grainger has them.
Chris
Mark IV Roadster #7679
Coyote 5.0, T56, Hydraulic Clutch, IRS, Torsen Diff, Wilwoods, Hydraboost, ABS Power Brakes, Power Steering, & tons more extras.
-
Here you go. If they don't have it, it doesn't exist.
https://www.mcmaster.com/98804a116
-
ACE hardware sells the stainless 7/16-20 hardware you need for this... at least they do here in SC.
-
Not a waxer
Originally Posted by
chrisarella
What size coupler nuts, rods and bolts are you using. I'm having a really hard time finding 7/16-20 for all of the pieces as others have used. My hope is to use stainless but not finding too many places that carry them - not even amazon or Grainger has them.
Make it easy on yourself (and cheap)---pick up 7/16-14 cad plated hardware at your local Lowes, Home Depot or hardware store. I can see no need for either fine thread or stainless.
Jeff
-
Senior Member

I used 1/2"-13, because that's the size coupler nuts I could find locally. I had to enlarge the rear body holes slightly to accommodate the larger diameter.
John
MK IV Roadster #8631
Ford 302, Holley Terminator EFI, T5z, 3.55 Rear End, IRS, 17 Halibrand Replicas (9 front, 10.5 rear), Nitto 555 G2s (275/40ZR17 front, 315/35ZR17 rear), Fast Freddies Power Steering, F5 Wilwood Brakes, FFMetals Firewall Forward, Fortes Hydraulic Clutch & Throttle Linkage
https://www.ffcars.com/threads/phile.../#post-4776313
-
Senior Member
Great suggestions guys. I wanted stainless because I'm in Florida where it extremely humid and I'd lose my mind if I looked in the trunk and saw rust in a few years. Looking at my options for 7/16-14 and 1/2"-13 now. Thank you.
Chris
Mark IV Roadster #7679
Coyote 5.0, T56, Hydraulic Clutch, IRS, Torsen Diff, Wilwoods, Hydraboost, ABS Power Brakes, Power Steering, & tons more extras.
-
A slightly different approach. I had the guys that modified the frame weld nuts to the tank side of the QJ flanges on the frame. From there I'll use bolts or threaded rod and then sleeves to support QJs or some other form of bumper. I think the nuts were 1/2-13. I usually build with stainless 'cause I like it.
Jim
-
Senior Member

Originally Posted by
chrisarella
I wanted stainless because I'm in Florida where it extremely humid and I'd lose my mind if I looked in the trunk and saw rust in a few years. Looking at my options for 7/16-14 and 1/2"-13 now. Thank you.
Stainless fasteners are very prone to galling. You are doing this mod to make it easy to remove the body. It would be a real pain getting in there and cutting those apart.
If you must have stainless - Mcamaster Carr has them. Don't forget a great big tube of anti seize.
Last edited by Avalanche325; 02-16-2019 at 10:29 PM.
-
Post Thanks / Like - 0 Thanks, 1 Likes
-
Senior Member
Chris
Mark IV Roadster #7679
Coyote 5.0, T56, Hydraulic Clutch, IRS, Torsen Diff, Wilwoods, Hydraboost, ABS Power Brakes, Power Steering, & tons more extras.
-


? Overiders
Originally Posted by
Jeff Kleiner
I just had a PM from someone asking about my optional method for mounting the rear quick jacks given the tight space to do so with the tank installed. I looked and it appears that I have never posted it on this site so here it is imported from the other forum. I've used this method on a dozen or so cars now (even a Mk3 because it makes things sooooo much easier). Hope this option helps future builders.
************************************************** ***
The RH side of a Mk3 is a pain however with the lowered structure for the non-perky butt on the Mk4 it's all but impossible to access the bolts once the tank is installed and the trunk floor is completed.
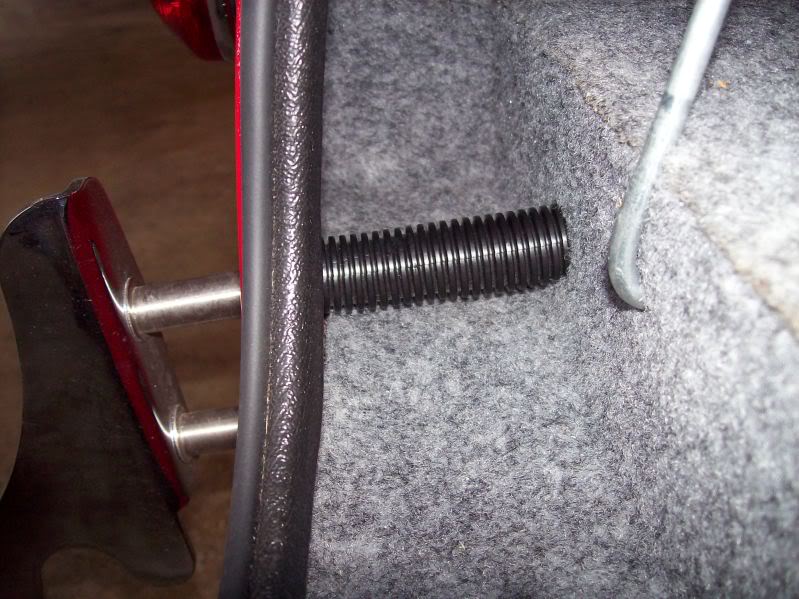
My solution is to use a 1/2" long bolts from the tank side threaded into coupler nuts:

There are no sleeves on the inside; instead I use all thread. After putting it thru the body but before threading it into the coupler I put a fender washer then a nut on it---the washer winds up against the inside of the body and the nut is between it and the coupler. After the all thread was snugged into the coupler the "floating" nuts and washers were used in conjunction with the sleeves and jack bolts on the outside to adjust the rear valance in or out as needed to meet the lower edge of the trunk lid. Afterwards with it positioned and locked down I cut off the excess all thread and installed the quick jacks with chrome acorn nuts & chrome washers. Although you really have to stick your head inside to see it the coupler nut plus a couple of inches of all thread remain visible:

I simply cover the whole works with a piece of wire harness split loom:
Nothing fancy, just hardware store all thread, couplers, nuts & washers. Simple---cheap---easy :001_smile:
Cheers,
Jeff
coupler1.jpgcoupler2.jpgcoupler3.jpg
I have done this mod, and am at the point of installing the bumper with overriders...a bit confused on the threaded over rider? Do I just install from the outside first and adjust the inside by threading the all thread into the nut extender? And then turn the bolt near the tank to take up the runout on the nut extender? Was that ? Confusing enough?
MK IV complete Kit - 1st time builder started Sept 2016
Levy 306
T5
2015 Mustang IRS
Power steering - Levy setup, Breeze roll bars, Thompson trunk box
fuel injection, powder coating, sway bars, heater, wipers, 17 in wheels
-
If the overriders are threaded, just drill out the threads to allow the all-thread to pass through and attach with washers and nuts.
-
Originally Posted by
Papa
If the overriders are threaded, just drill out the threads to allow the all-thread to pass through and attach with washers and nuts.
Thanks, that was going to be how I originally was gonna do it, but started talking myself out of it...probably over thinking?
MK IV complete Kit - 1st time builder started Sept 2016
Levy 306
T5
2015 Mustang IRS
Power steering - Levy setup, Breeze roll bars, Thompson trunk box
fuel injection, powder coating, sway bars, heater, wipers, 17 in wheels
-
Not a waxer
Originally Posted by
Jacob
I have done this mod, and am at the point of installing the bumper with overriders...a bit confused on the threaded over rider? Do I just install from the outside first and adjust the inside by threading the all thread into the nut extender? And then turn the bolt near the tank to take up the runout on the nut extender? Was that ? Confusing enough?
Here is another old post explaining how I install bumpers & overriders:
https://thefactoryfiveforum.com/show...hlight=coupler
Hope that helps!
Jeff
-
Senior Member

Originally Posted by
Papa
If the overriders are threaded, just drill out the threads to allow the all-thread to pass through and attach with washers and nuts.
My overriders are from ********** and are threaded into molded portions inside them, cannot be drilled out to use washers and nuts.
JR
Mk4 complete kit #9059 ordered 1/19/17 delivered 3/23/17, 2015 IRS, Fortes/DART347,TKO 600, hyd clutch, P/S, 12.88 wilwood brakes front and rear, heater/defrost and vintage gauges
First start and go-cart 4/11/18. Taken To Whitby Motorcars Greensboro, N.C. 2/5/21 for body/paint
-
Senior Member

Overriders just by themselves pose a little different problem, but Kliner's technique for overriders and bumpers provides the basics.
There was a previous thread on this by Shark (12/3/18) with a good discussion.
This additional information may be helpful.
For Just Overriders: From previous thread
I struggled with a solution for this a few months ago. I was determined to stay with the rear body mount fix, as first described by Kliner, to avoid having to drop the gas tank.
The main problem is that the OVERRIDERS are threaded. They do not slip over the threaded rod like QUICK JACKS, as mentioned.
Also, be sure to note that the OVERRIDERS are front and rear specific. Don't ask me why I say this. The front OVERRIDERS can be threaded as intended because the front jack bolt heads can be reached and screwed into the OVERRIDER. Easy!
For the rear, in theory the threaded rod could be screwed back into the threads on the OVERRIDER, but I found it impossible to get tight and flush with the stainless spacers. Particularly, since there are 2 rods to thread.
Here is what I did and it worked:
1) Rear OVERRIDER - I drilled out the threads. Now I used 1/2 inch stainless threaded rod but works with 7/16 as well. The OVERRIDERS are polished stainless. Drilling stainless is tough. Have a good cobolt drill bit and use cutting oil. Painter tape the OVER RIDER and secure in a vice with plastic vice jaw inserts.
2) Then I put a nut behind the OVER RIDER plate, first by hand, then used a FLEX Head wrench to tighten it. It takes some patients and fiddling but it is doable. Everything tightens up nicely.
In addition, you may have to adjust the threaded rod lengths. They have to be long enough to get a lock washer and nut behind the OVER RIDER plate, but be short enough to get the nut on.
I also provided a pic of the SS washers I used from McMaster. They have rubber on the one side that goes against the body.
Note the double nut (one as a lock nut) technique which is helpful in threading on or off the rod. And the Flex Wrenches used.
Remember, it all has to be convenient to take off as well!
SpacerWasher.jpegThreading.jpegORdrilled.jpegORnut.jpegWasher.jpegFlexWrench.jpeg
Last edited by Scott Zackowski; 02-18-2019 at 05:39 PM.
-
However, like jrcuz, the ********** overriders are different. They have what is basically a threaded socket welded into the deepest part of the bumper. You cannot drill it out or you're drilling through the over rider. This means you have 2 threaded, bottomed holes that you need to screw into simultaneously... need something like a turnbuckle. Still need to work this out on mine.
-
Senior Member
Originally Posted by
Boydster
However, like jrcuz, the ********** overriders are different. They have what is basically a threaded socket welded into the deepest part of the bumper. You cannot drill it out or you're drilling through the over rider. This means you have 2 threaded, bottomed holes that you need to screw into simultaneously... need something like a turnbuckle. Still need to work this out on mine.
True
The fix I was detailing is for those with FFR Overriders, as general information.
Unfortunately, I am not familiar with the ********** Overriders.
Last edited by Scott Zackowski; 02-18-2019 at 05:28 PM.
-
Originally Posted by
Scott Zackowski
True
The fix I was detailing is for those with FFR Overriders, as general information.
Unfortunately, I am not familiar with the ********** Overriders.
Thats cool. Not making trouble, just a new twist on the same topic, wondering what anyone else has done.
As you stated in your very good writeup, the fronts are a non-issue, as you can just tighten the rod into the overrider, then use nuts & washers on the inside.
But the rears... I may even return my **********s and buy FFR's.
-
Senior Member
Originally Posted by
Boydster
Thats cool. Not making trouble, just a new twist on the same topic, wondering what anyone else has done.
As you stated in your very good writeup, the fronts are a non-issue, as you can just tighten the rod into the overrider, then use nuts & washers on the inside.
But the rears... I may even return my **********s and buy FFR's.
No offense ever taken.
-
Post Thanks / Like - 0 Thanks, 1 Likes
-
Took a slightly different approach, since my tapping was a bit screwy I had trouble getting my threads started, so I threaded a short piece of all thread into the over rider, then capped it with a chrome acorn nut, much easier and looks ok
EC296372-244F-41DB-972E-F143999407F9.jpeg
MK IV complete Kit - 1st time builder started Sept 2016
Levy 306
T5
2015 Mustang IRS
Power steering - Levy setup, Breeze roll bars, Thompson trunk box
fuel injection, powder coating, sway bars, heater, wipers, 17 in wheels
-
Post Thanks / Like - 1 Thanks, 1 Likes


 Thanks:
  Likes:


 Reply With Quote


