Midwest Classic Insurance

Visit our community sponsor

Thanks Thanks:  19
Likes Likes:  111
Page 5 of 12 FirstFirst ... 34567 ... LastLast
Results 161 to 200 of 447

Thread: CV2065 MKIV Build Thread - Graduated!

  1. #161
    cv2065's Avatar
    Join Date
    Dec 2017
    Location
    Orlando, FL
    Posts
    2,044
    Post Thanks / Like
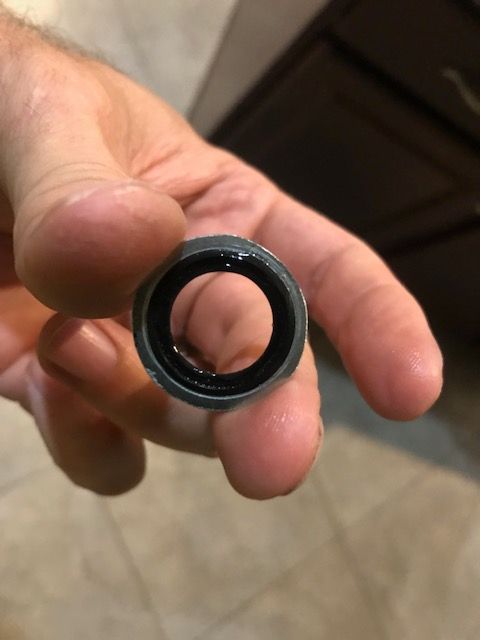
    Well, things have been a little trying lately, as I'm getting defective or wrong parts that I have to wait on. First off, I pulled the 'donut' out of the TKO600. Pretty easy to do, but you have to be careful not to grab on to the actual seal. I took some channel locks, locked on to the donut and it came right out. Needle nose pliers weren't cutting it. Looks something like this:
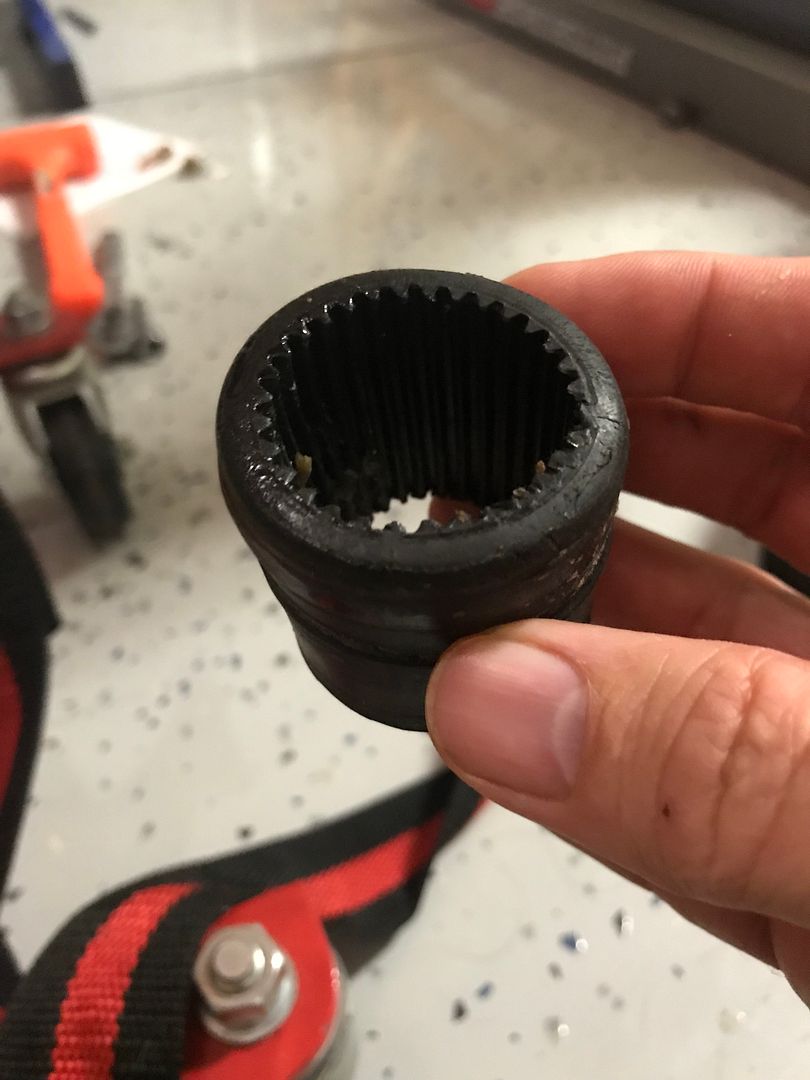


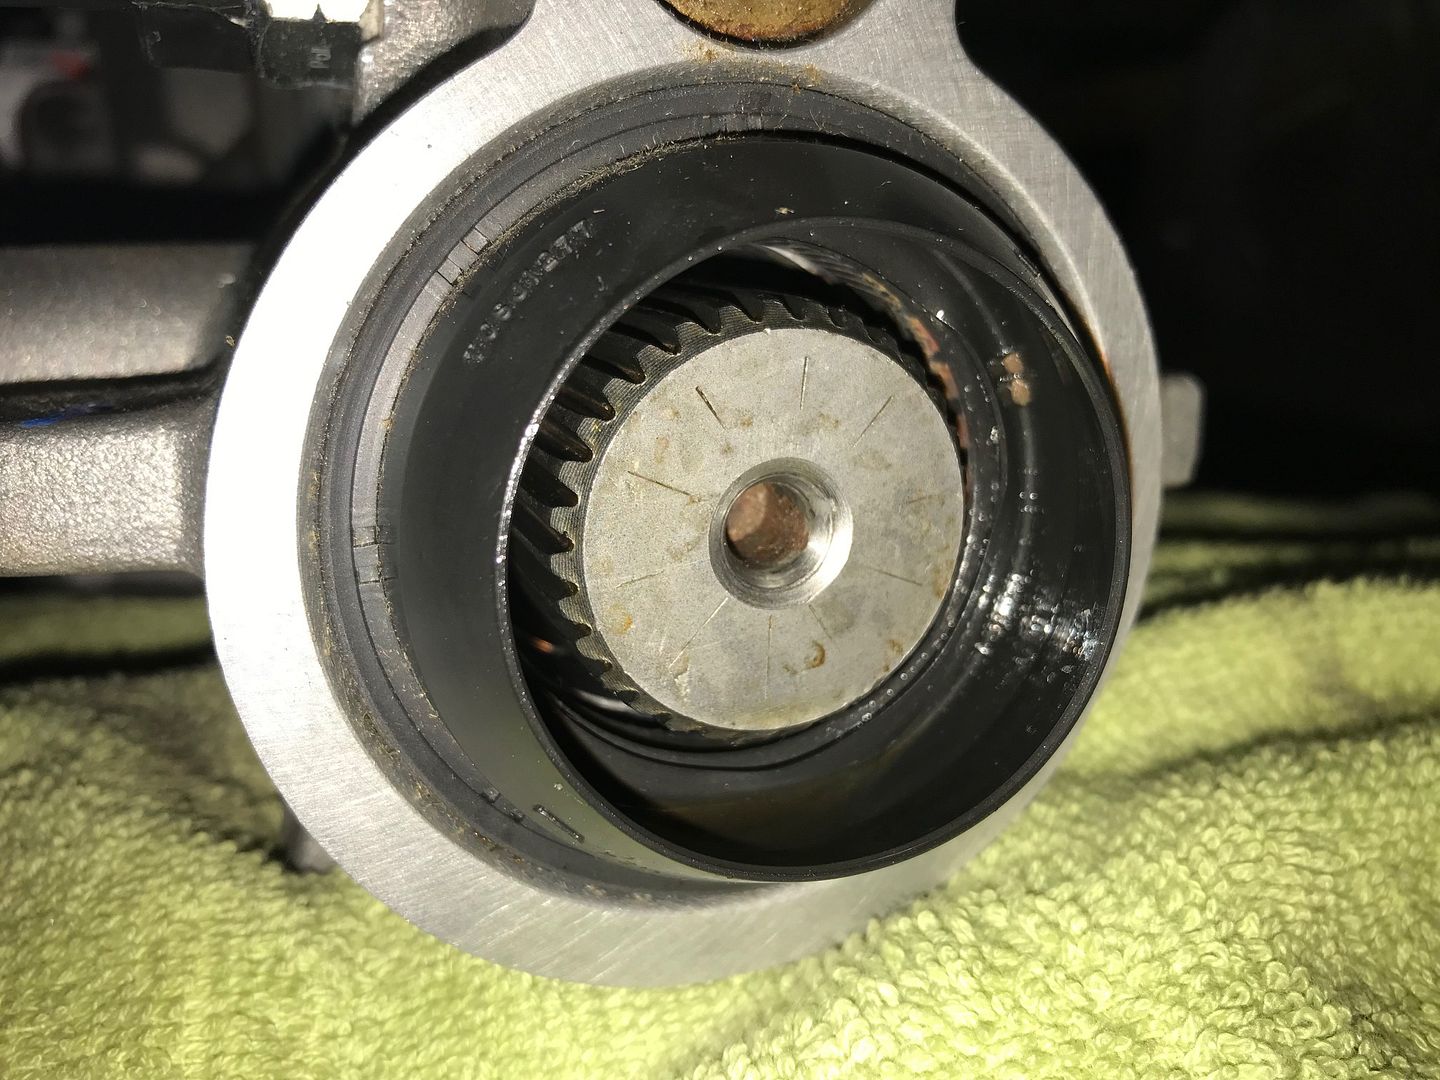
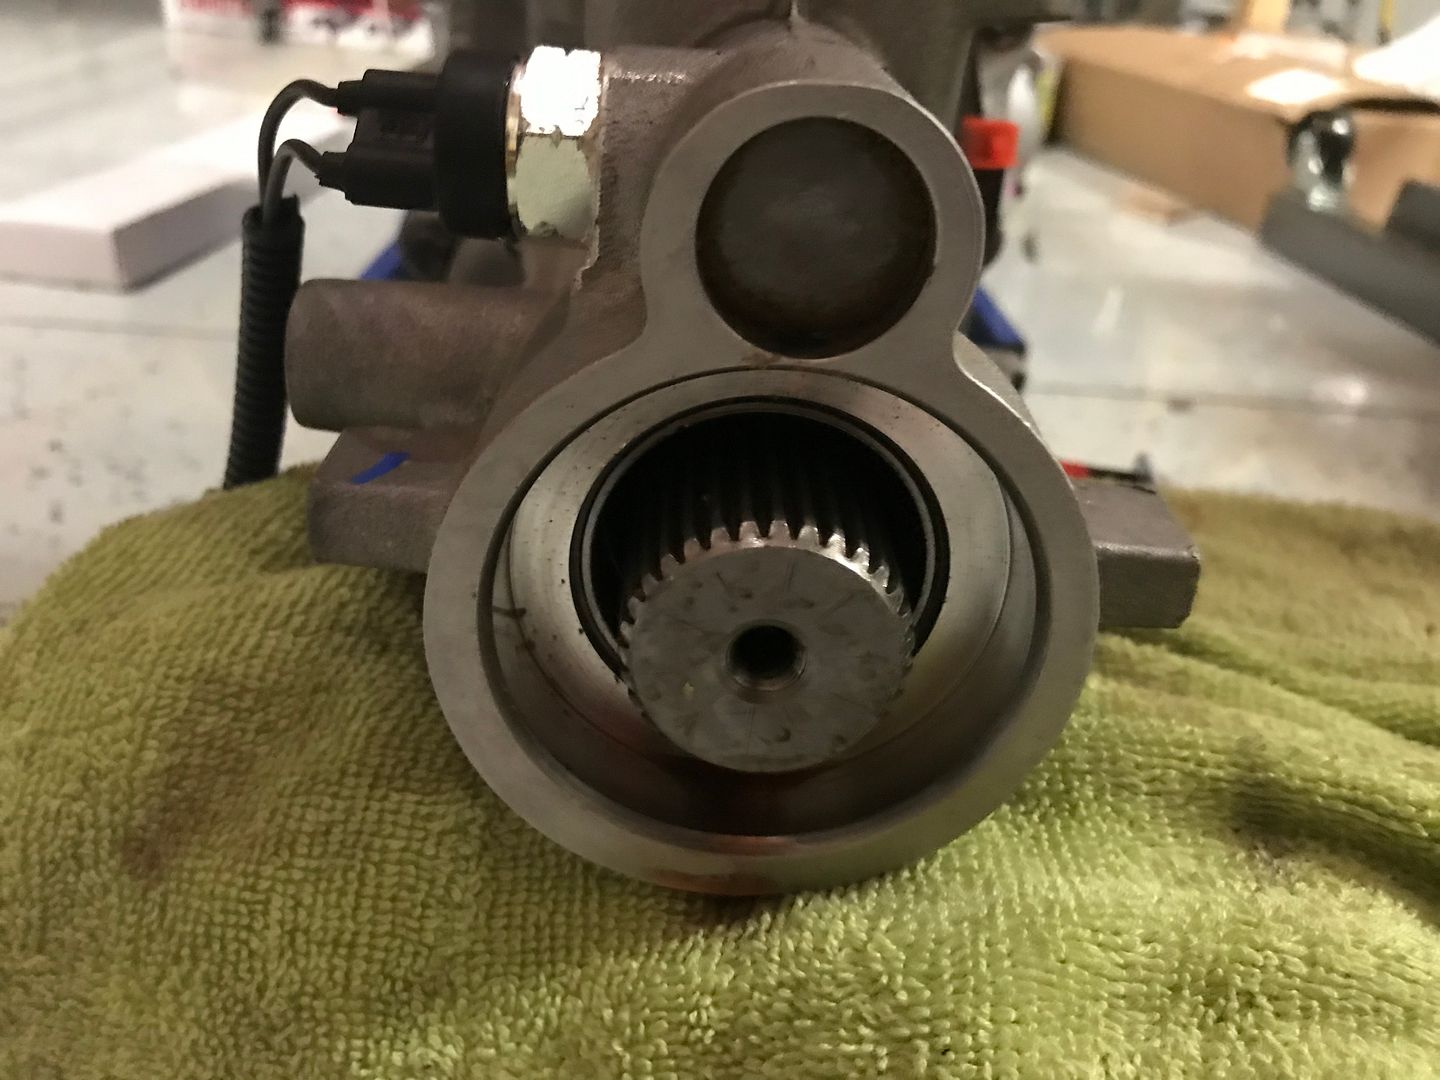
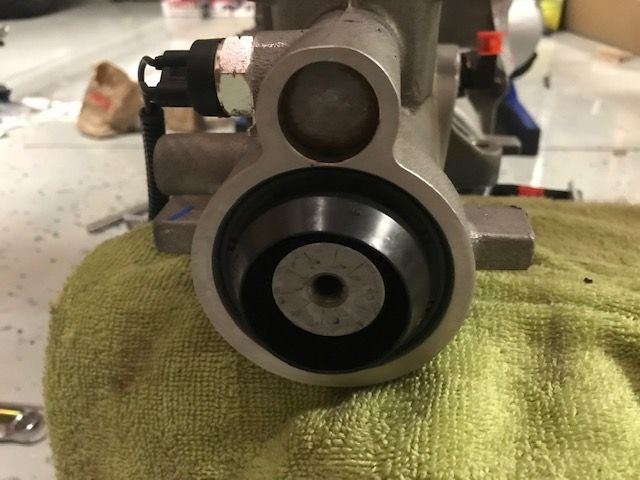
    Once out, I inspected the seal, and you guessed it, was defective. The lip was rolled on one side and thanks to the forum advice, I swapped it out. The replacement for the TKO600 is Tremec #TCSJ1277. Funny thing was when I contacted Tremec, they were recommending a National part, and not a Tremec part. I read off the number from the old seal and they said "Oh yeah"...and sent me one almost next day, so good customer service on Tremec's part.

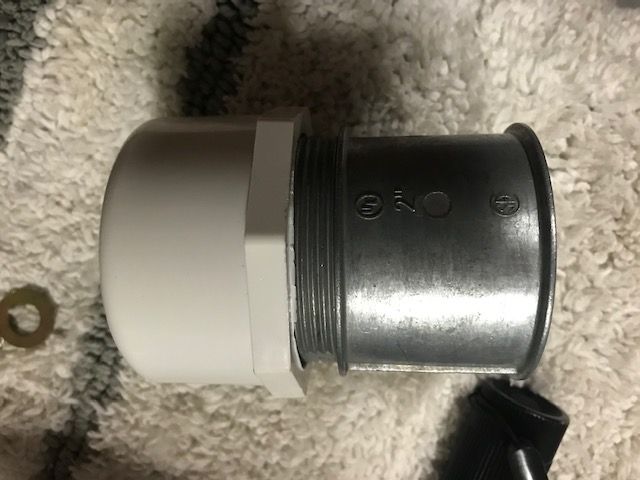
    Very easy to swap out. I grabbed on the seal with a seal puller and popped out immediately. Pressed the new one back in flush with the housing by hand and then tapped it the rest of the way in with an electrical pipe fitting that I found at Home Depot and put a plastic 2" cap on the top. No sealer on the sides of the seal. As you can see in the pictures, the seal rests on a backstop inside the housing, so no guessing how far to drive in. When it stops, you're good.

    Bad Seal

    No Seal

    New Seal

    Seal Tapper (Home Depot #12320 - Halex 2" Electrical Tube)
    Last edited by cv2065; 02-10-2019 at 10:32 PM.
    MKIV Roadster - #9380 - Complete Kit - Delivered 7/17/18 - SOLD 5/2023
    Build Thread #1: https://thefactoryfiveforum.com/show...V-Build-Thread
    MKIV Roadster - #TBD - Complete Kit - Delivered 11/6/23 - In Progress
    Build Thread #2: https://thefactoryfiveforum.com/show...Build-Thread-2

  2. Likes BadAsp427 liked this post
  3. #162
    cv2065's Avatar
    Join Date
    Dec 2017
    Location
    Orlando, FL
    Posts
    2,044
    Post Thanks / Like
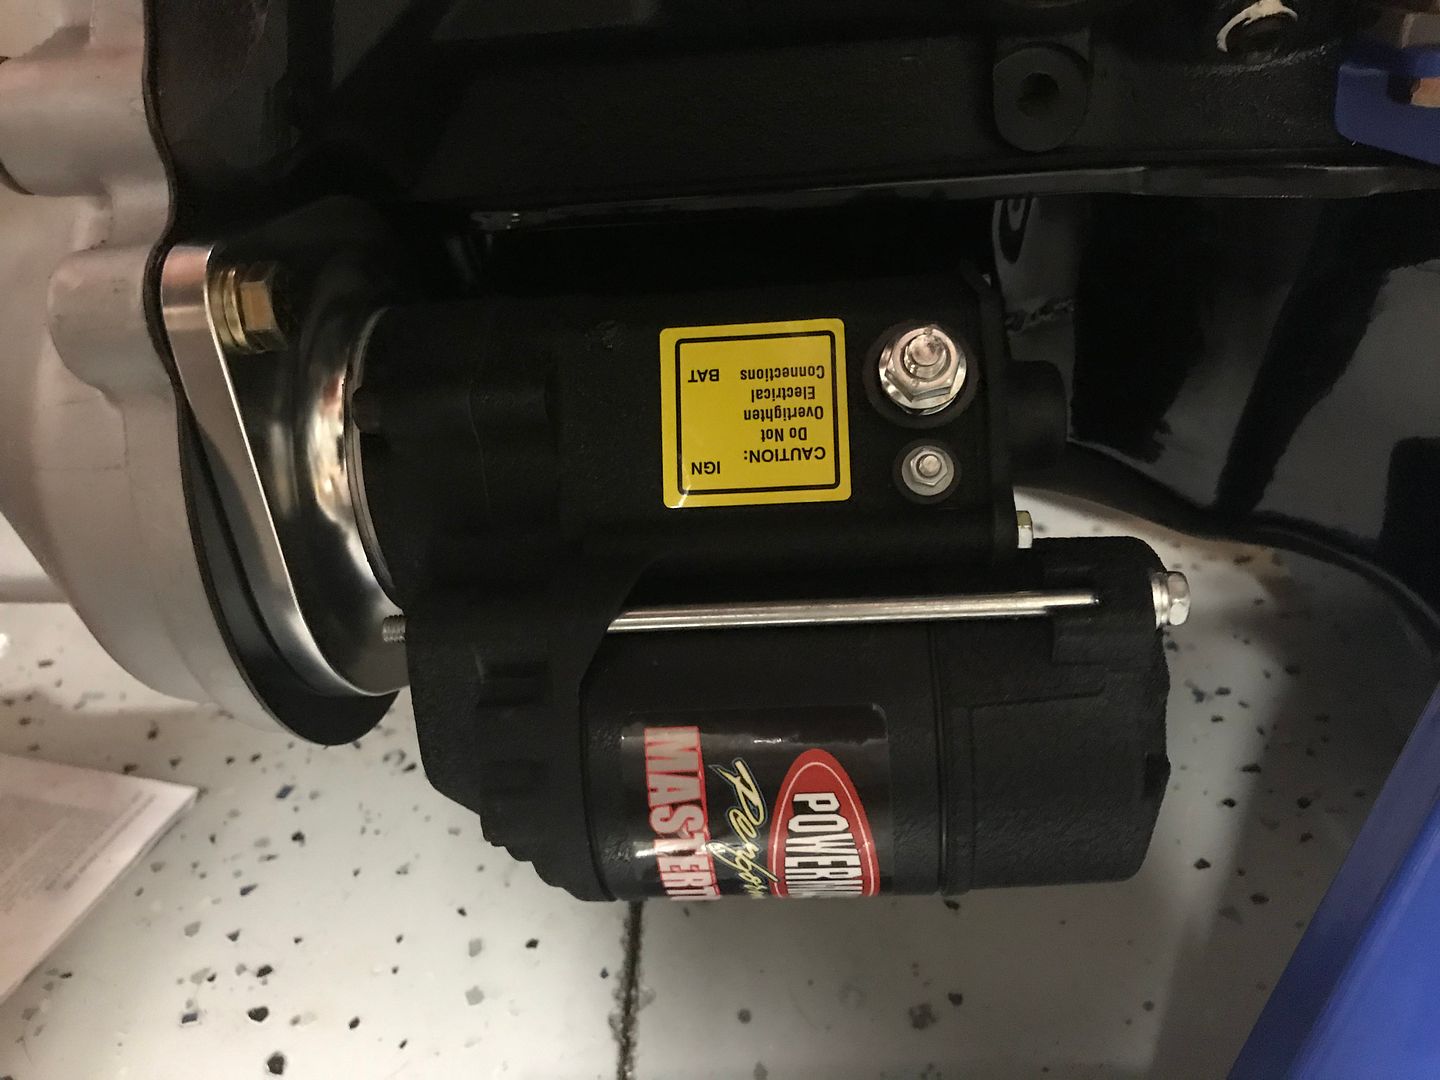
    Afterwards I installed my Powermaster Starter. Measured the distance between backplate and ring gear. Needed 3/4" according to Powermaster, and came up about 1/16" short, so used the shim in the starter and it was perfect. I used 3/8" Grade 8 bolts at 1.25" torqued to 35 ft-lbs.


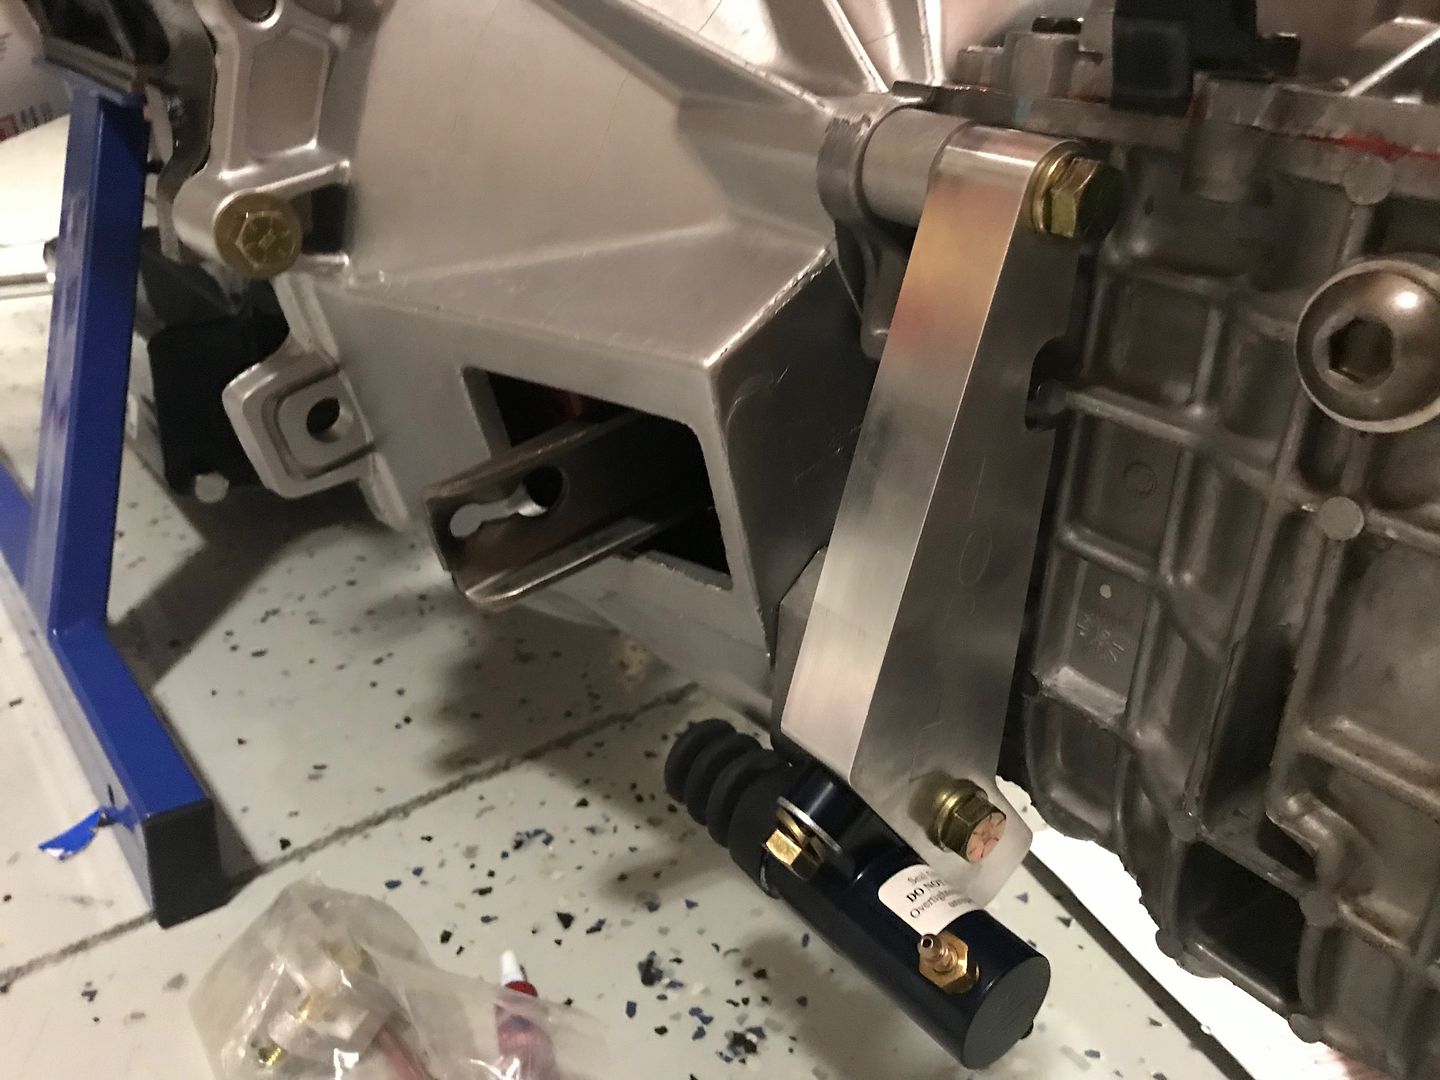
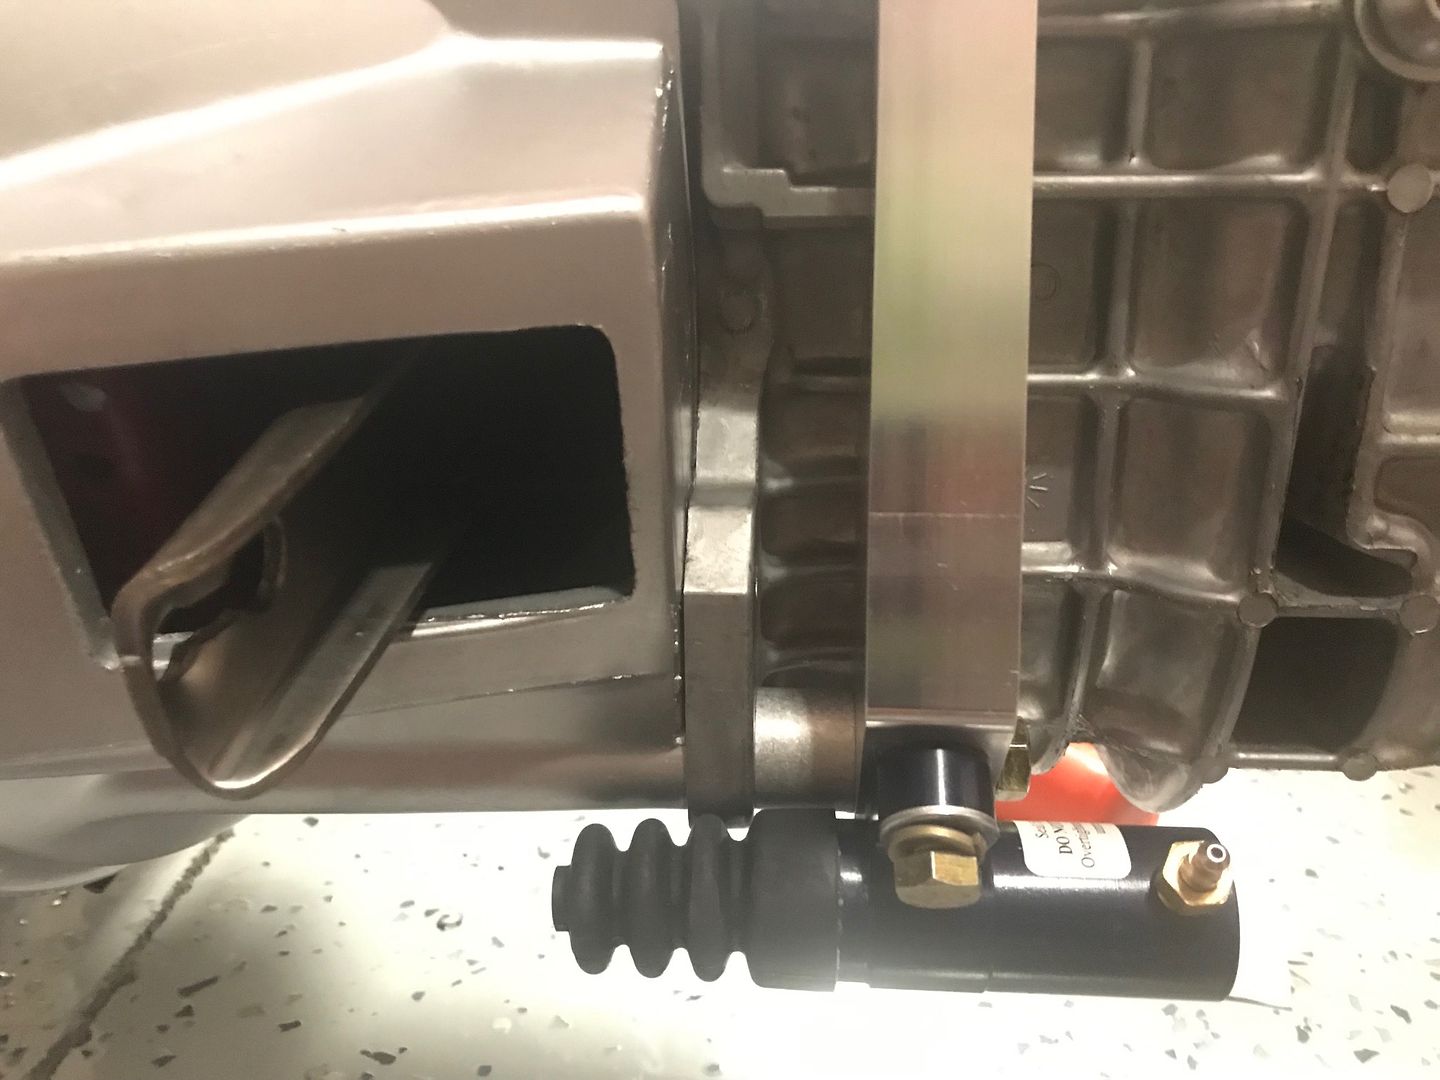
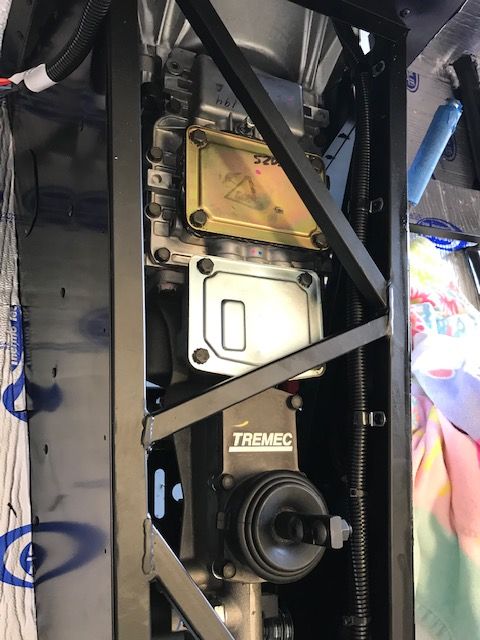
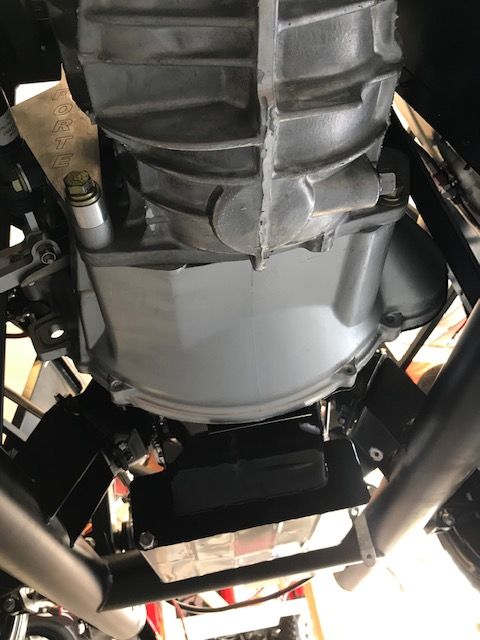
    Went on to install my Forte Hydraulic clutch and noticed that I had been sent the wrong bracket as its not aligning with the clutch fork. As Paul pointed out, there is one for the stock Ford bellhousing and one for the Quicktime housing. I wasn't aware that there was a difference, but now I know. Sent a note to Forte and I'm sure he'll take care of it. He's been great with questions thus far.


    I want to have this buttoned up before installing the engine, so I guess I'll be working on some wiring tomorrow and Monday. Might even drop the body on and see how my dash is lining up so I can get that secured.
    MKIV Roadster - #9380 - Complete Kit - Delivered 7/17/18 - SOLD 5/2023
    Build Thread #1: https://thefactoryfiveforum.com/show...V-Build-Thread
    MKIV Roadster - #TBD - Complete Kit - Delivered 11/6/23 - In Progress
    Build Thread #2: https://thefactoryfiveforum.com/show...Build-Thread-2

  4. #163
    cv2065's Avatar
    Join Date
    Dec 2017
    Location
    Orlando, FL
    Posts
    2,044
    Post Thanks / Like
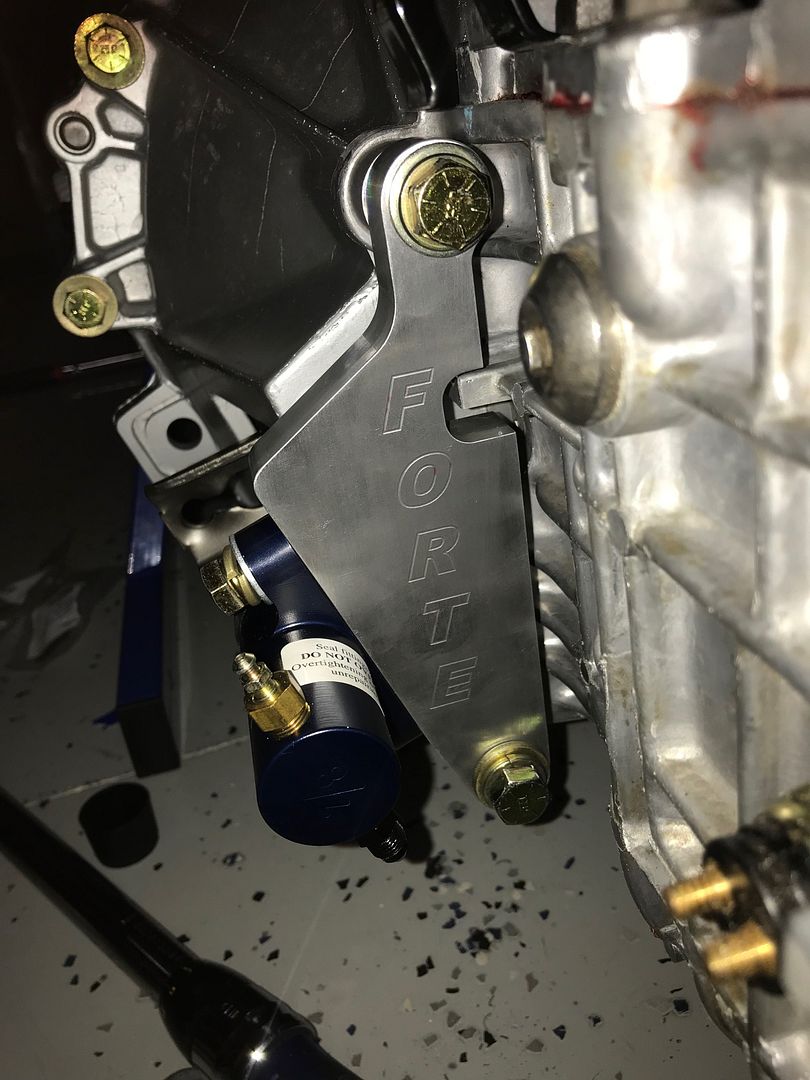
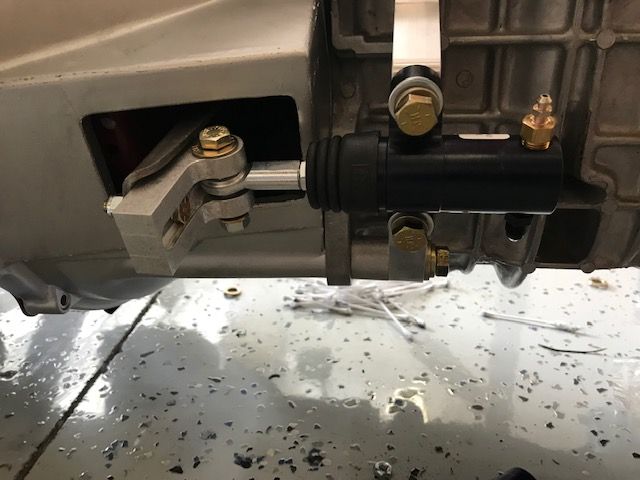
    So, Mike Forte sent me a replacement bracket in record time. Thanks Mike! I'll get this other bracket sent back to you asap. Beautiful piece of aluminum billet and with the help of the forum, got this thing dialed in perfectly. I cut roughly 1-1/8" off of the slave cylinder push rod and have about 1/8" play from the TOB against the clutch fingers to bottoming out the slave. Bolts are tightened down to 30 ft/lbs.

    I would have liked to have put another bolt into the fork bracket, but just not enough room. I'm sure it will hold just fine as designed. I will probably be proactive and just go ahead and add the 1" MC as so many have done.

    Last edited by cv2065; 02-17-2019 at 12:00 AM.
    MKIV Roadster - #9380 - Complete Kit - Delivered 7/17/18 - SOLD 5/2023
    Build Thread #1: https://thefactoryfiveforum.com/show...V-Build-Thread
    MKIV Roadster - #TBD - Complete Kit - Delivered 11/6/23 - In Progress
    Build Thread #2: https://thefactoryfiveforum.com/show...Build-Thread-2

  5. #164
    cv2065's Avatar
    Join Date
    Dec 2017
    Location
    Orlando, FL
    Posts
    2,044
    Post Thanks / Like

    We've Got Engine!

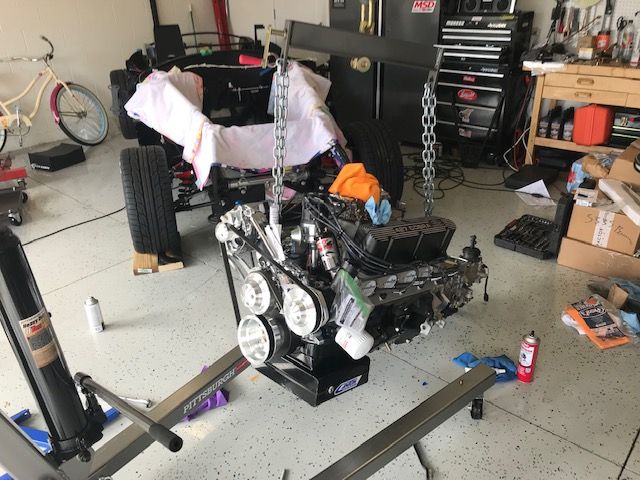
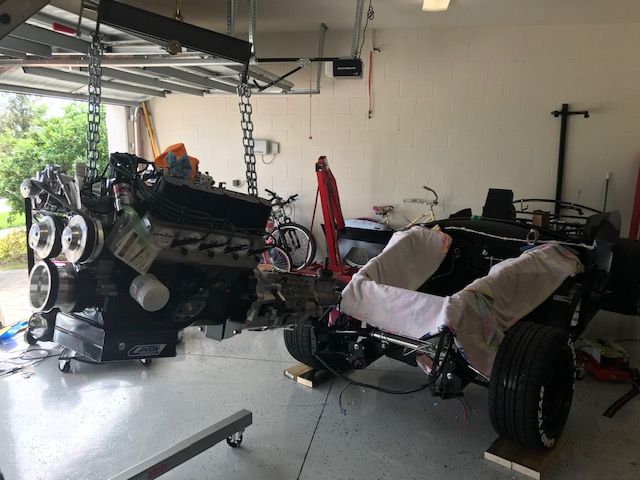
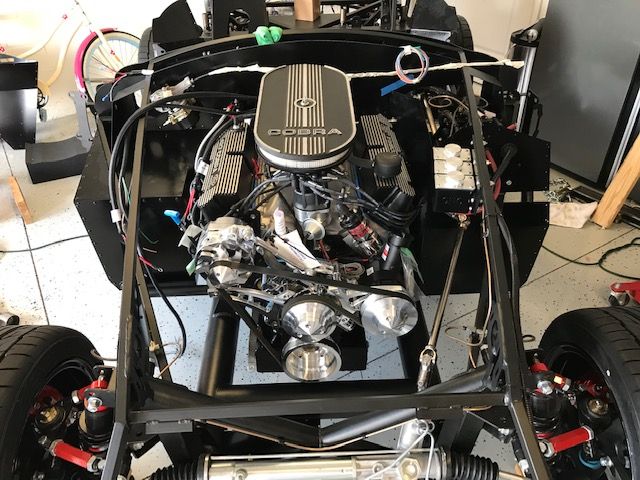
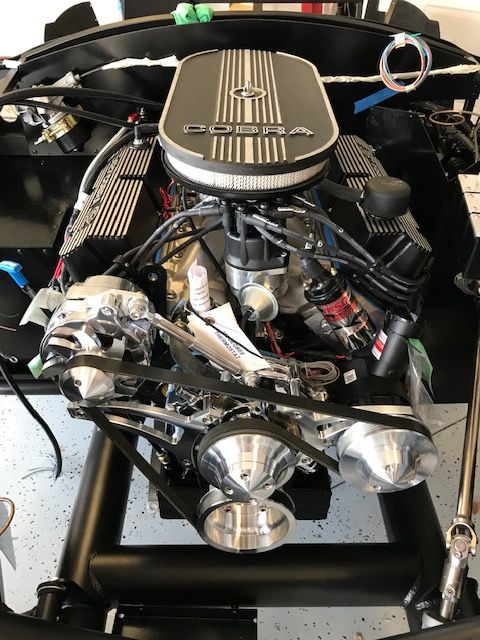
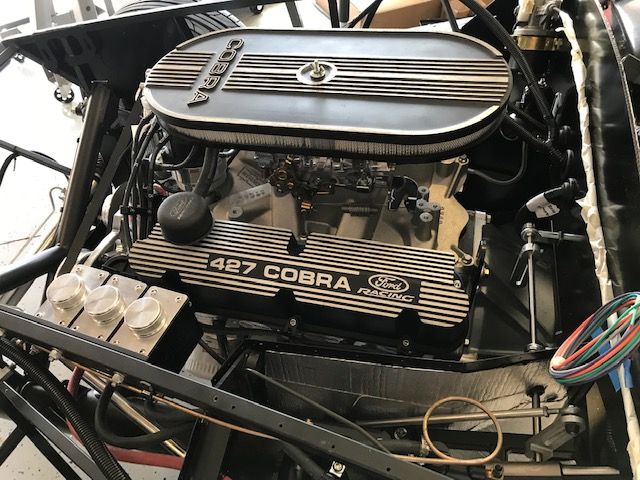
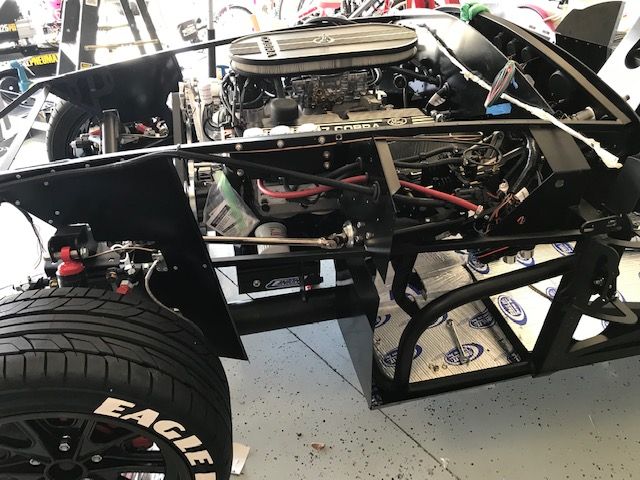
    The Blueprint 427 is finally installed! WooHoo!! Man is she a beauty!

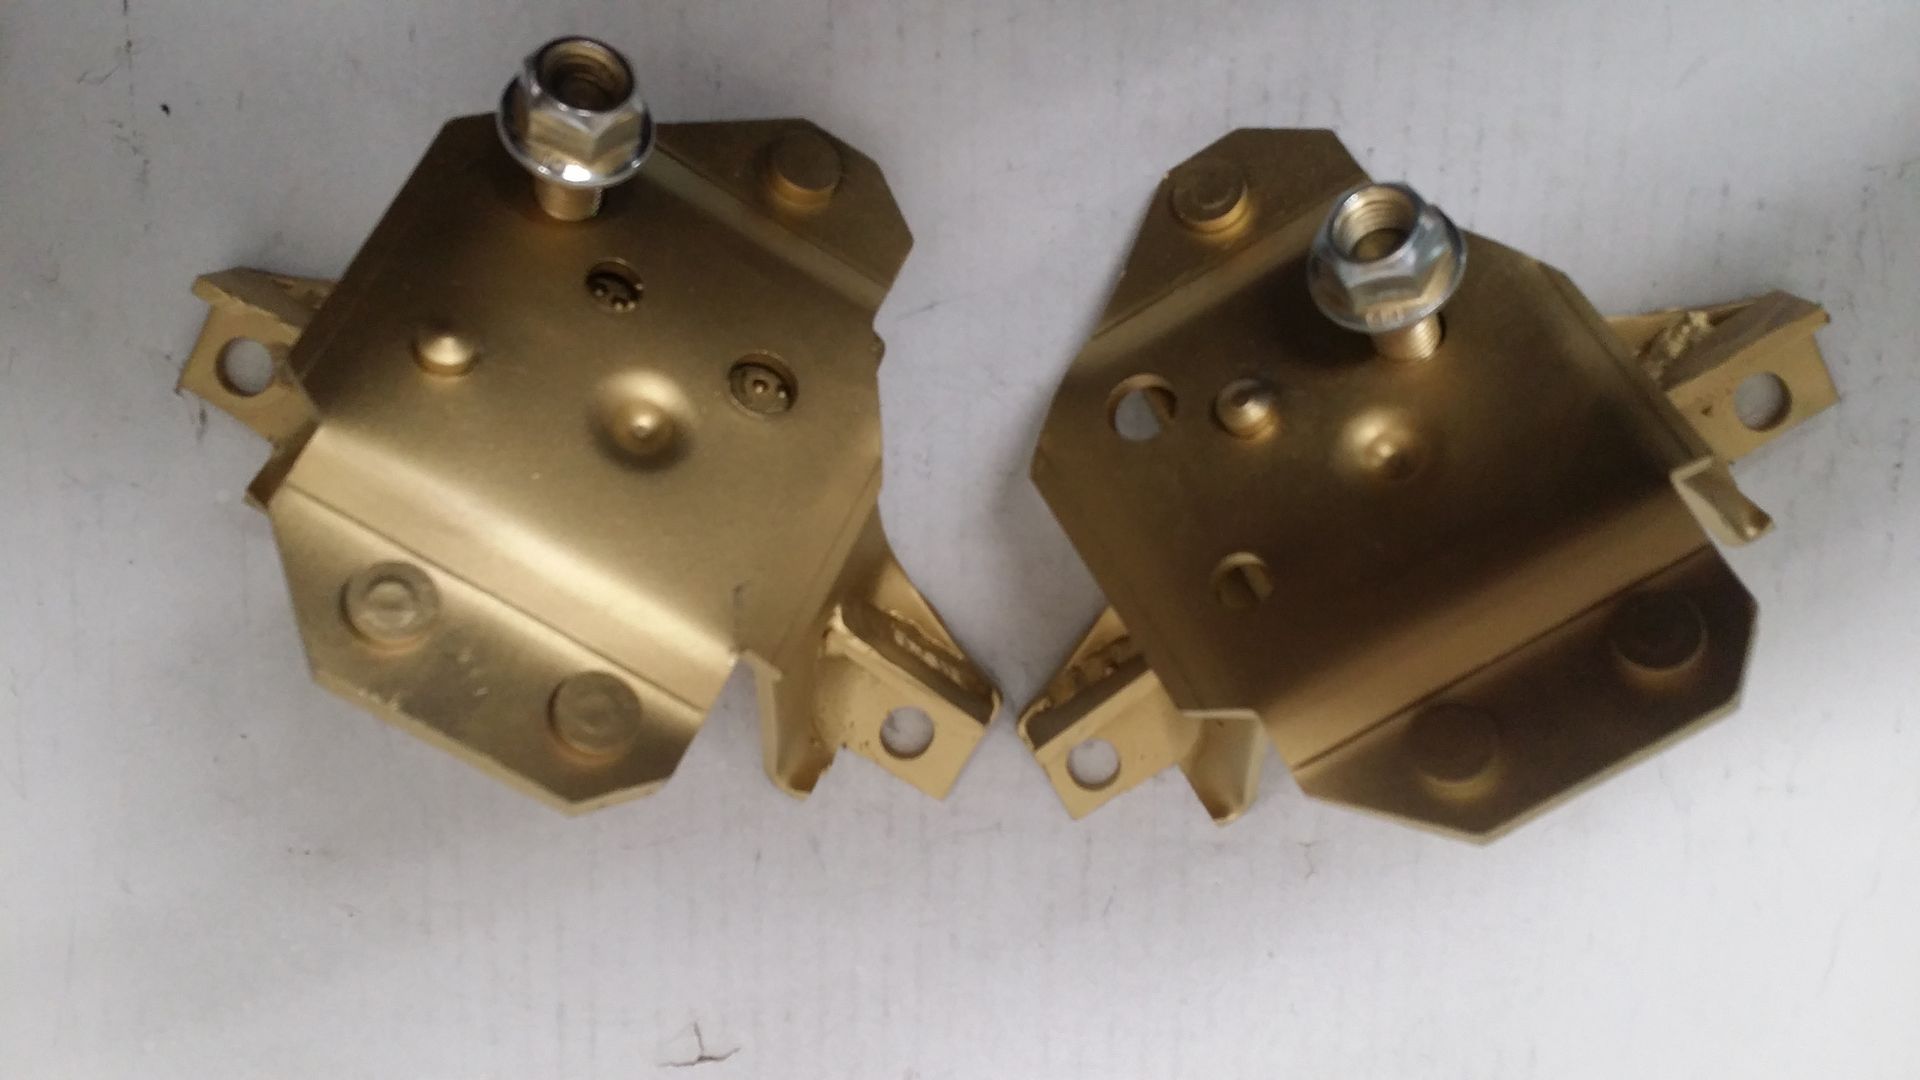
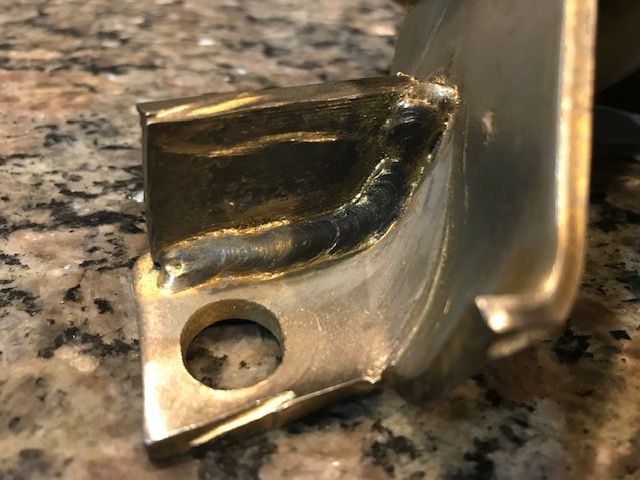
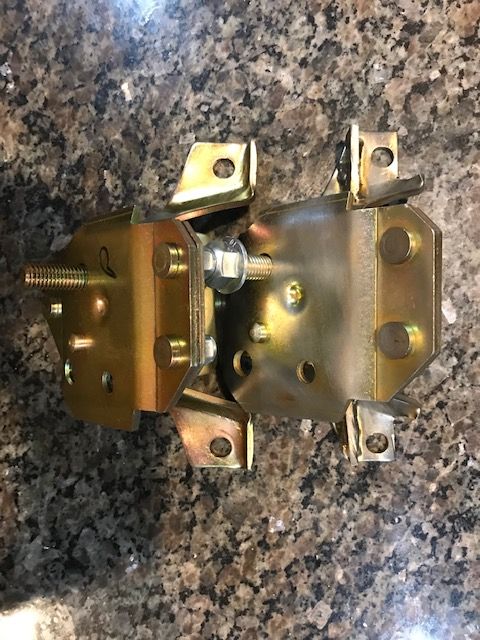
    I've been right on the verge for the past couple of weeks, but kept running into a couple of things that slowed me down. Major one was the engine mounts. As is known, the stock mustang mounts don't get along with the DART block. I started to grind the driver's side mount down and was taking off quite a bit of metal off the mount. I might have taken too much in one area but not enough in another. A little hard to judge taking it on and off. Anyhow, I thought that if I was weakening the front side support, that needed to balanced out in some other way, and I certainly wasn't going to grind on the block.

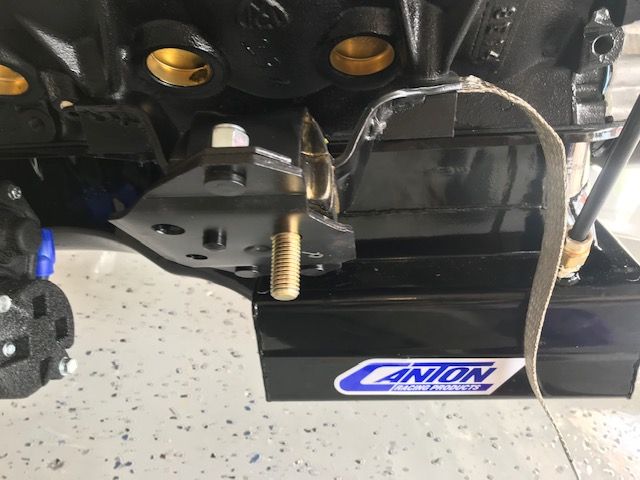
    So enter Mr. Forte. I thought he would have the remedy. Pretty simple really, but he did a great job notching out the mount and then welding in additional support on the other side of the bolt hole. Nice and strong and to handle that torque! Here's a few comparison pics:

    Mounts after surgery:


    Closeup of welded angle:


    Comparison (Original mount of left, modified mount on right)


    Painted and installed:
    MKIV Roadster - #9380 - Complete Kit - Delivered 7/17/18 - SOLD 5/2023
    Build Thread #1: https://thefactoryfiveforum.com/show...V-Build-Thread
    MKIV Roadster - #TBD - Complete Kit - Delivered 11/6/23 - In Progress
    Build Thread #2: https://thefactoryfiveforum.com/show...Build-Thread-2

  6. #165
    cv2065's Avatar
    Join Date
    Dec 2017
    Location
    Orlando, FL
    Posts
    2,044
    Post Thanks / Like
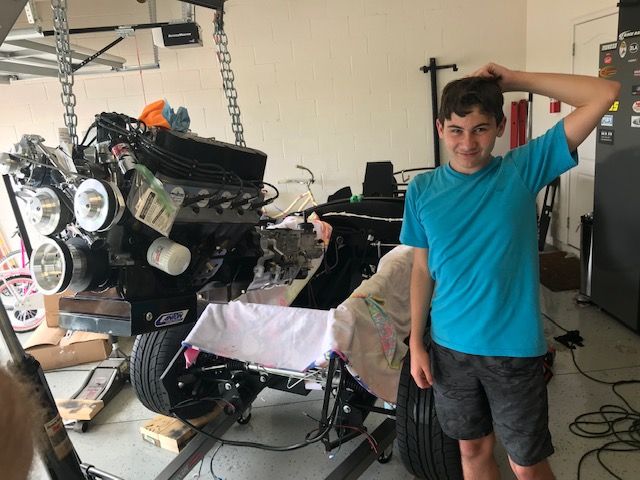
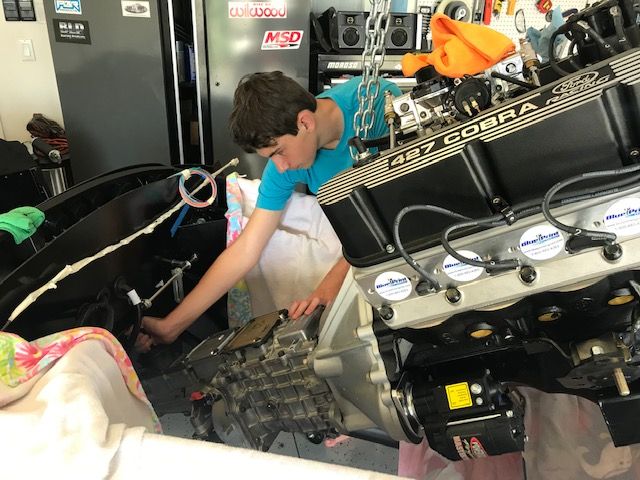
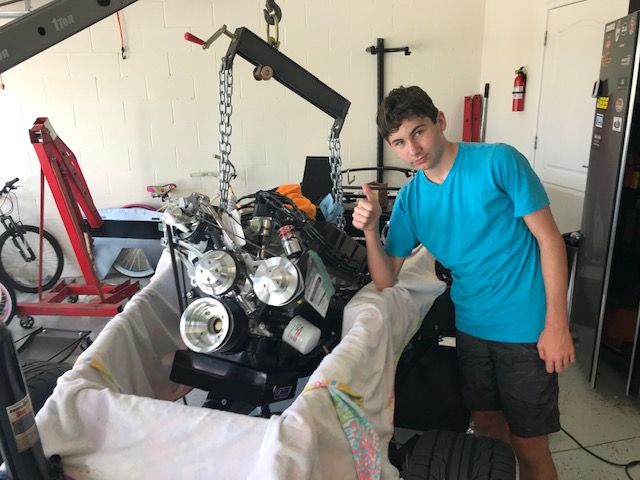
    Now on to the good stuff. Uneventful in terms of getting the engine on the hoist. As everyone knows, the load leveler is mandatory and can't stress enough to grease that thing up unless you want to have some kind of shoulder injury on the deep angles. The Blueprint engines already have the lifting brackets installed, so no need to bolt through anything but the bracket which makes things easy. I did upgrade to 7/16" bolts, which meant I had to drill out the mounts a little as they were 3/8.


    My 13 year old son walked out into the garage at this point...Perfect Timing!! Thanks for the involuntary service my son!

    "Uh...You want me to help with what?"
    Last edited by cv2065; 03-03-2019 at 04:50 PM.
    MKIV Roadster - #9380 - Complete Kit - Delivered 7/17/18 - SOLD 5/2023
    Build Thread #1: https://thefactoryfiveforum.com/show...V-Build-Thread
    MKIV Roadster - #TBD - Complete Kit - Delivered 11/6/23 - In Progress
    Build Thread #2: https://thefactoryfiveforum.com/show...Build-Thread-2

  7. Thanks BluePrintEngines thanked for this post
    Likes BluePrintEngines liked this post
  8. #166
    cv2065's Avatar
    Join Date
    Dec 2017
    Location
    Orlando, FL
    Posts
    2,044
    Post Thanks / Like
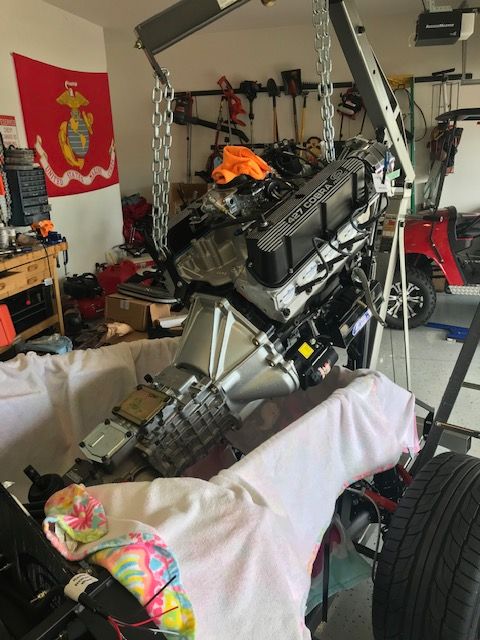
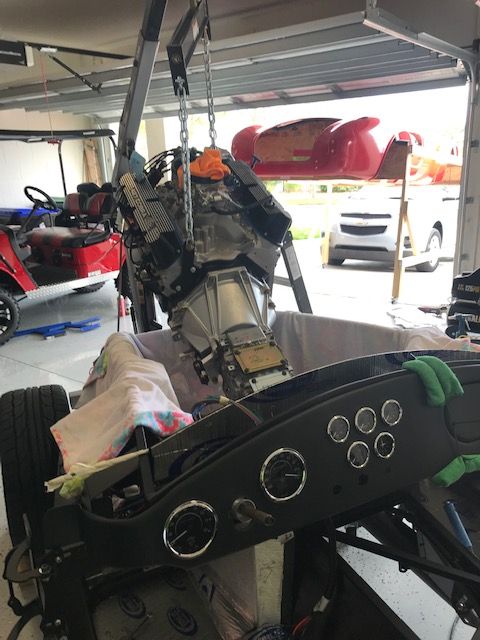
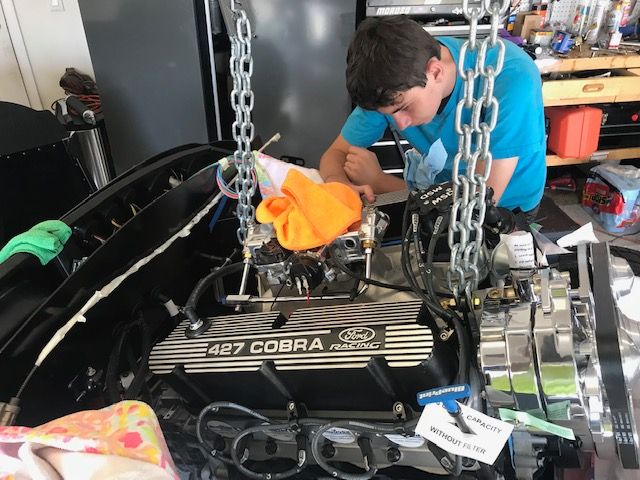
    So, on to the installation. Happy to say that nothing got nicked, banged or scratched. It was seamless in that regard. I had the towels there but really didn't need them. Took it nice and slow and my assistant did a great job.


    Last edited by cv2065; 03-03-2019 at 04:43 PM.
    MKIV Roadster - #9380 - Complete Kit - Delivered 7/17/18 - SOLD 5/2023
    Build Thread #1: https://thefactoryfiveforum.com/show...V-Build-Thread
    MKIV Roadster - #TBD - Complete Kit - Delivered 11/6/23 - In Progress
    Build Thread #2: https://thefactoryfiveforum.com/show...Build-Thread-2

  9. Thanks BluePrintEngines thanked for this post
    Likes BluePrintEngines liked this post
  10. #167
    cv2065's Avatar
    Join Date
    Dec 2017
    Location
    Orlando, FL
    Posts
    2,044
    Post Thanks / Like
    Now it wasn't all roses. I did have a little trouble getting the notches on both sides to seat. Probably sat the engine up and down off the mounts a half a dozen times, making little adjustments here and there. The focus was with the leveler. It really needed to be perfectly centered in the bay in order for it to seat 99% of the way. The passenger side always had no problem going in, but the driver's side kept hanging about 1/16" off. So, called my Bud Carl (Badasp), and gave me the idea to loosen the motor mount on that side. I did that, then took a 2x4 and tapped the mount into the place, then tightened the mounts back up (45 ft-lbs). Problem solved! Bolts from mount to frame tightened to 50 ft-lbs.


    Last edited by cv2065; 03-03-2019 at 07:34 PM.
    MKIV Roadster - #9380 - Complete Kit - Delivered 7/17/18 - SOLD 5/2023
    Build Thread #1: https://thefactoryfiveforum.com/show...V-Build-Thread
    MKIV Roadster - #TBD - Complete Kit - Delivered 11/6/23 - In Progress
    Build Thread #2: https://thefactoryfiveforum.com/show...Build-Thread-2

  11. Likes PeteMeindl liked this post
  12. #168
    cv2065's Avatar
    Join Date
    Dec 2017
    Location
    Orlando, FL
    Posts
    2,044
    Post Thanks / Like
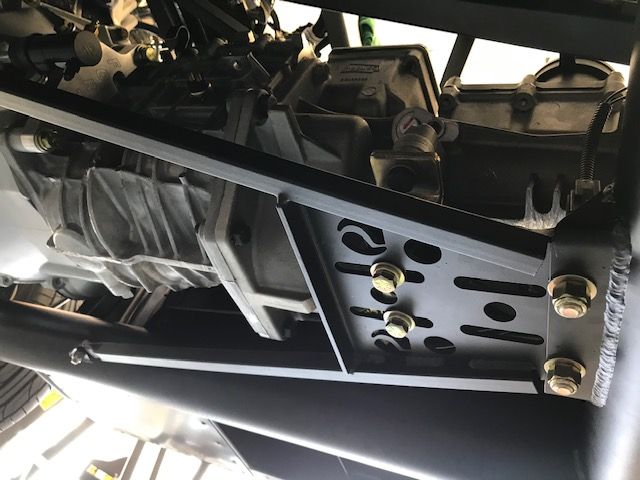
    I kept the transmission supported with my floor jack until ready to install the A-frame. Installed it on the top of the mounts and everything bolted up very easily. Dropped the transmission then installed the 2 trans mount bolts. Had to shift the trans over to the driver's side about 1/8" to get one of the bolts to align but pretty easy overall.


    Only other issues I had was that I had to disconnect my fuel line from my regulator that is on the firewall, as the valve cover was not going to clear the braided line. I may have to get a 90 degree connector there. I also had to pull my starter as the position that I had it in was not going to clear the 4" beam. I just rotated it a bit and reinstalled.

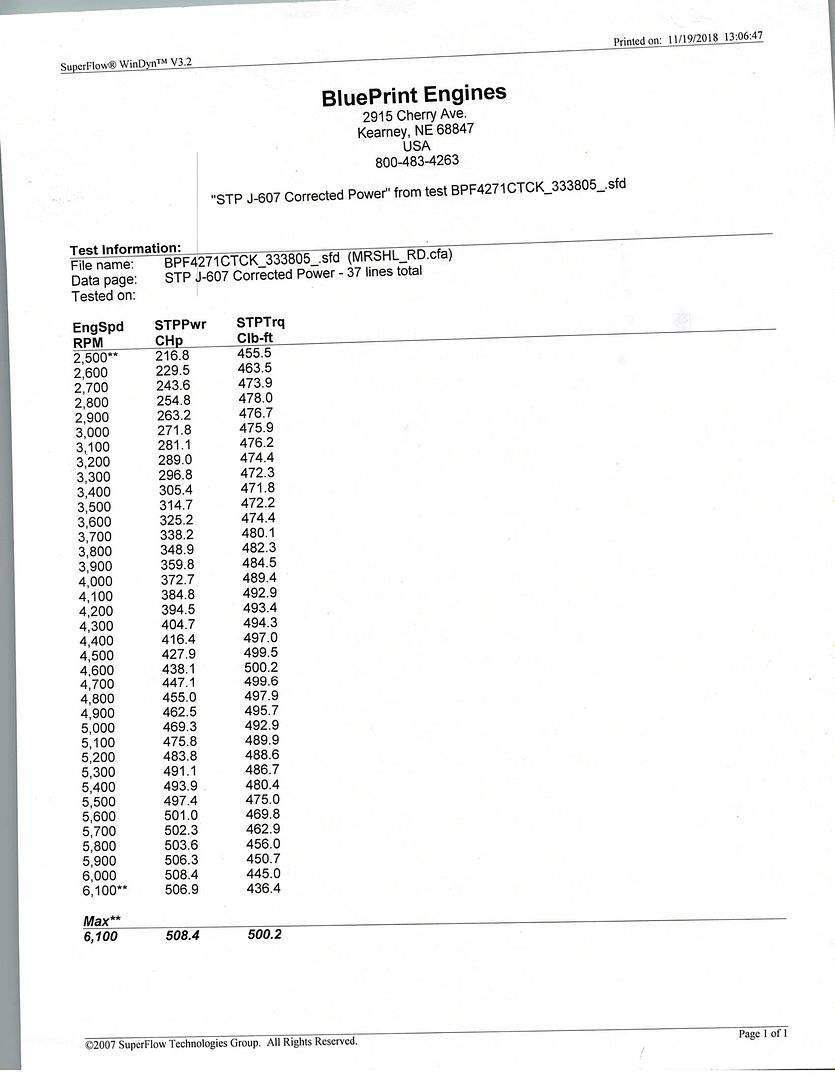
    Next up is a first start hopefully in the next two weeks. Here's the BP Dyno:

    Last edited by cv2065; 08-01-2019 at 11:59 PM.
    MKIV Roadster - #9380 - Complete Kit - Delivered 7/17/18 - SOLD 5/2023
    Build Thread #1: https://thefactoryfiveforum.com/show...V-Build-Thread
    MKIV Roadster - #TBD - Complete Kit - Delivered 11/6/23 - In Progress
    Build Thread #2: https://thefactoryfiveforum.com/show...Build-Thread-2

  13. #169
    Papa's Avatar
    Join Date
    Dec 2016
    Location
    Mexico, MO
    Posts
    5,678
    Post Thanks / Like
    Congratulations on the big milestone! It starts getting a lot more real once the engine is installed.

    Dave
    My Build Thread: http://thefactoryfiveforum.com/showt...ter-Build-9754
    (Most viewed Roadster build thread on this forum!)

    Delivered: 6/17/2017
    First Start: 12/30/2017
    Completed: 12/7/2019
    Legal: 1/30/2020

    Member of the Mile-Hi Cobra Club
    Dave's Cobra YouTube Channel: https://www.youtube.com/channel/UCbk...npK1UZHj4R-bYQ
    Agora 1:8 Scale Cobra Build: https://thefactoryfiveforum.com/show...l-Build-Thread

  14. #170

    Join Date
    May 2018
    Location
    Park City, Utah, USA
    Posts
    394
    Post Thanks / Like
    That's great, CV! Congratulations!

  15. #171

    Join Date
    Mar 2017
    Location
    Norway / Merritt Island FL
    Posts
    162
    Post Thanks / Like
    Looks good! Ready to go-cart at Easter?

  16. #172
    cv2065's Avatar
    Join Date
    Dec 2017
    Location
    Orlando, FL
    Posts
    2,044
    Post Thanks / Like
    Quote Originally Posted by Sigurd View Post
    Looks good! Ready to go-cart at Easter?
    Thanks guys! I would definitely like to be go carting by Easter. You going to be back?
    MKIV Roadster - #9380 - Complete Kit - Delivered 7/17/18 - SOLD 5/2023
    Build Thread #1: https://thefactoryfiveforum.com/show...V-Build-Thread
    MKIV Roadster - #TBD - Complete Kit - Delivered 11/6/23 - In Progress
    Build Thread #2: https://thefactoryfiveforum.com/show...Build-Thread-2

  17. #173
    BadAsp427's Avatar
    Join Date
    Jul 2018
    Location
    Greeneville, TN
    Posts
    1,179
    Post Thanks / Like
    Awesome Job... That is a purrrrty motor.... Like Papa said, now it really starts getting/feeling real...

    Mk4 20th Anniversary #8690 (#8 of 20) Purchased 8/18/18----Build Started 8/19/18
    Build Thread Click Here / Registry Entry Click Here / BluePrint Engines 347ci / TKO600
    Carb/Heater/Heated Seats/Cruise Control/Drop Trunk & Battery/Custom Cubby

  18. #174
    Straversi's Avatar
    Join Date
    Nov 2014
    Location
    Palos Verdes, CA
    Posts
    1,278
    Post Thanks / Like
    Looks great. Congrats. Your son will have a fun Monday telling everyone in school how he dropped the motor in the Cobra over the weekend!
    -Steve.
    Mk IV #8901 - Complete kit, Coyote, TKO-600, IRS. Ordered 5/23/16, Delivered 7/14/16, First Start 8/13/17, First Go-Kart 10/22/17, Registered and Completed 10/18/18. Build Thread: http://thefactoryfiveforum.com/showt...V-Coyote-Build Graduation Thread: https://thefactoryfiveforum.com/show...-Roadster-8901

  19. #175
    BluePrintEngines's Avatar
    Join Date
    Nov 2015
    Location
    Kearney, NE
    Posts
    292
    Post Thanks / Like
    Coming along nicely! engine looks great in there!!!!
    Check out our crate engine offerings at www.factoryfiveengines.com
    Give us a call at 1.800.483.4263

  20. #176
    cv2065's Avatar
    Join Date
    Dec 2017
    Location
    Orlando, FL
    Posts
    2,044
    Post Thanks / Like
    Haven't updated in a while, but making steady progress.

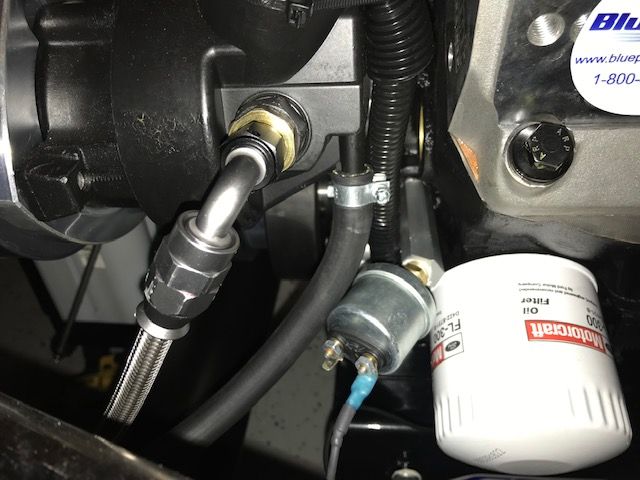
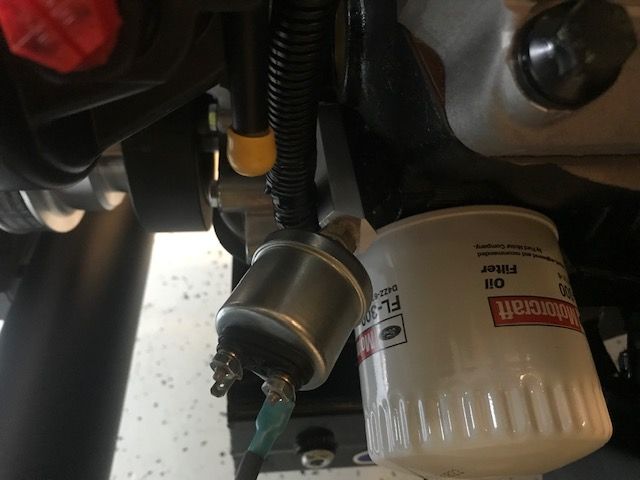
    Started on the sensors and engine wiring. With sensor installation, everything was straight forward except the oil pressure gauge. As has been mentioned, I needed to space the module out away from the side of the oil filter, so used the LMR oil pressure gauge extender, model #LRS-9278A. Paul had pointed this piece out in his build thread. It's a bit on the expensive side for what it is, but works and looks great.


    I had a goal of making as clean of an engine compartment as I could while running as few wire looms as possible. I've run the alternator, water temp, oil pressure, fan, coil and electric choke.

    Most of the wiring was run in two looms, one on each side of the engine bay. Water temp, oil pressure and coil wiring came underneath the engine mounts, under the oil filter and up behind the power steering module. Alternator wiring ran underneath the engine mounts and up behind the alternator. All looks very clean and out of sight.
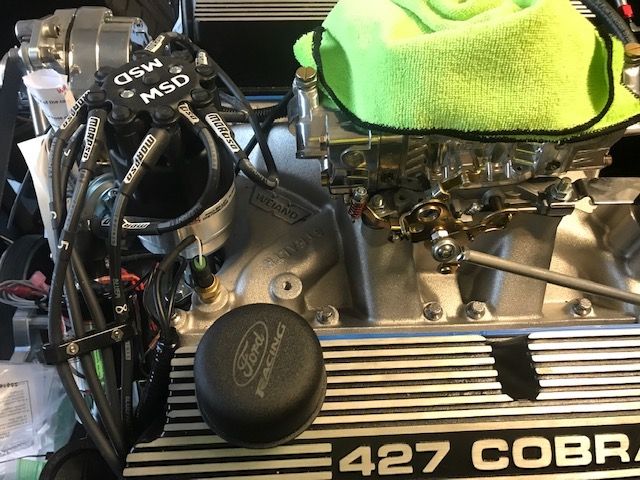


    Electric choke and fan sensor wiring was a little more difficult to conceal since it is all on top of the intake. I just ran my loom on the inside of the fuel rail. Not ideal from a hiding standpoint, but looks OK. I may think about how to better hide it later. Maybe a 1/4" loom would work better.


    Next up is getting the battery and starter wiring situated. I purchased a distribution block and will be running my battery to the block, then to the starter. I will also run the other two red wires to the distribution block. The blue solenoid wire will run directly to the starter. Just have to figure out the best place for the block.
    Last edited by cv2065; 04-13-2019 at 08:46 PM.
    MKIV Roadster - #9380 - Complete Kit - Delivered 7/17/18 - SOLD 5/2023
    Build Thread #1: https://thefactoryfiveforum.com/show...V-Build-Thread
    MKIV Roadster - #TBD - Complete Kit - Delivered 11/6/23 - In Progress
    Build Thread #2: https://thefactoryfiveforum.com/show...Build-Thread-2

  21. #177
    cv2065's Avatar
    Join Date
    Dec 2017
    Location
    Orlando, FL
    Posts
    2,044
    Post Thanks / Like
    Driveshaft went in with a bit of a struggle. There really is only one way that shaft will go in, and even then it almost looked like it was too much of an angle but with a little trans lube on the yoke, it eventually made it in. That little piece doesn't look like much, but I swear it weighed the same as a traditional driveshaft.
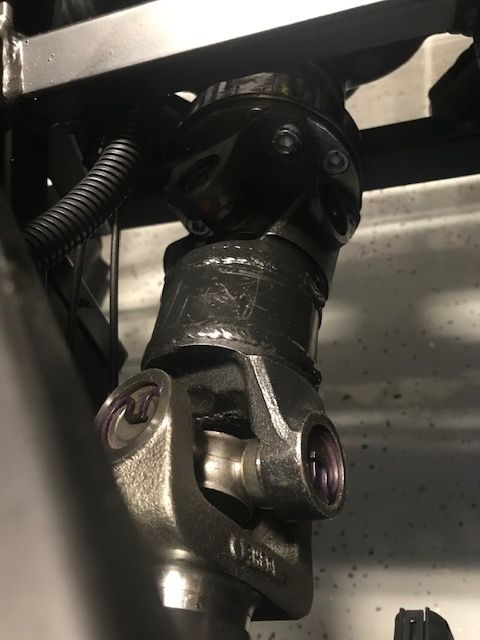


    I had two sets of 12.9 cap screws for the driveshaft. One is 3/4" and the other 1". Was told by FFR, and David Williamson on the forum, that if you have an aluminum flange, then use the longer 1" bolts. Steel flange use the 3/4", as it is a shallower mount. If you use the longer 1" bolts with the steel flange, they almost secure flush, but still bottom out...maybe less than 1/16". I didn't use the 3/4", as I shaved off about a 1/8" off the longer bolts and used those as I wanted the longer thread engagement.
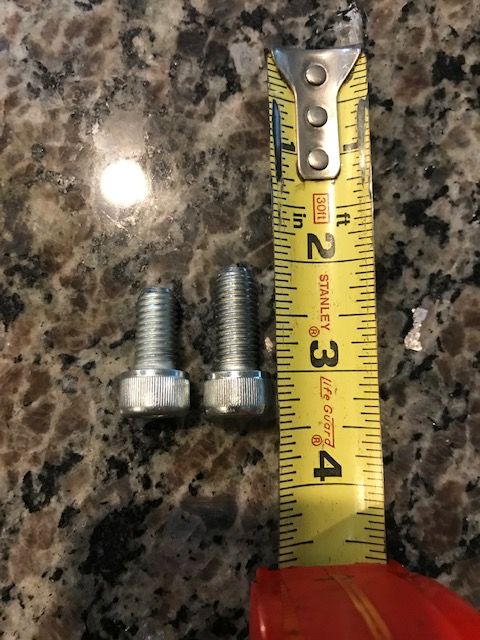


    Bolts get tightened up to 70 ft/lbs. These need to be tightened up coming in from the top. If you try to tighten up from the bottom, you cannot get your torque wrench on it as there is not enough clearance, unless you have a really long extension. Blue loctite as prescribed in the instructions.
    MKIV Roadster - #9380 - Complete Kit - Delivered 7/17/18 - SOLD 5/2023
    Build Thread #1: https://thefactoryfiveforum.com/show...V-Build-Thread
    MKIV Roadster - #TBD - Complete Kit - Delivered 11/6/23 - In Progress
    Build Thread #2: https://thefactoryfiveforum.com/show...Build-Thread-2

  22. #178
    cv2065's Avatar
    Join Date
    Dec 2017
    Location
    Orlando, FL
    Posts
    2,044
    Post Thanks / Like
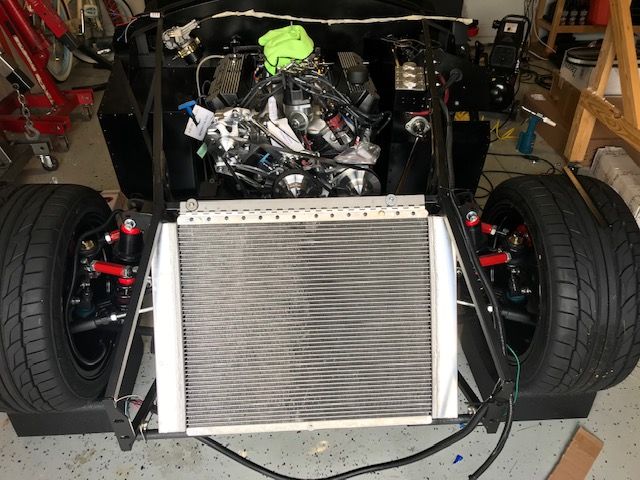
    Next up was my radiator. This was another one of those projects that seem to linger around for a couple of weeks. My plan was to secure the radiator to the top FFR style, then use the Breeze lower support. All was going great until I got to the bottom support, and my radiator was about 3/4" too high, and the bottom support could not make contact with the radiator.
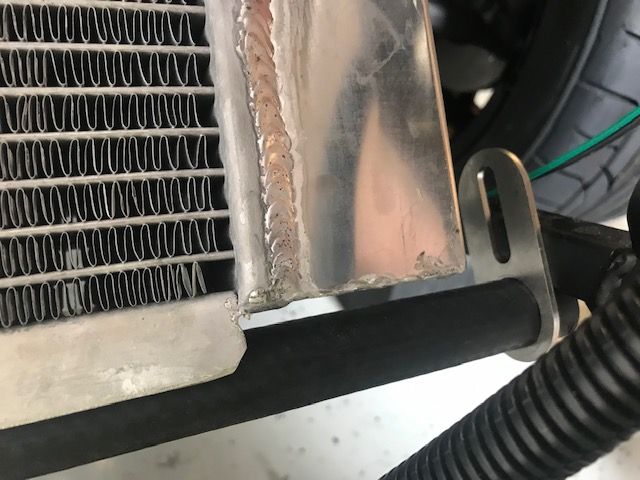
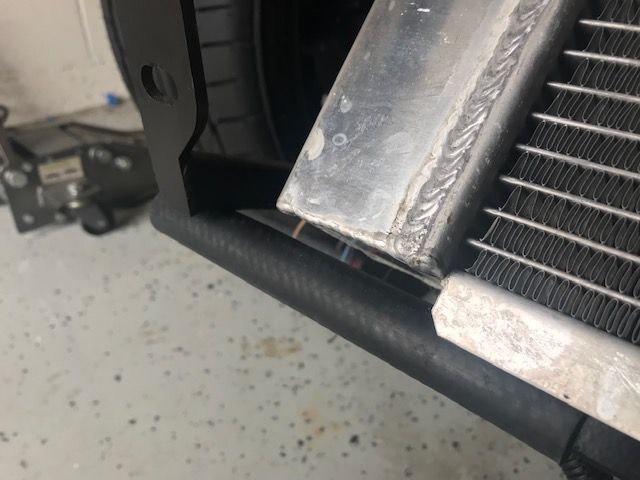


    I contacted Mark from Breeze and he said that he runs into this every once in a while, and offered up the Breeze top hinge kit as a solution, as it drops the radiator down anywhere from 3/4" to maybe 1.5". Kit came in a couple of days.

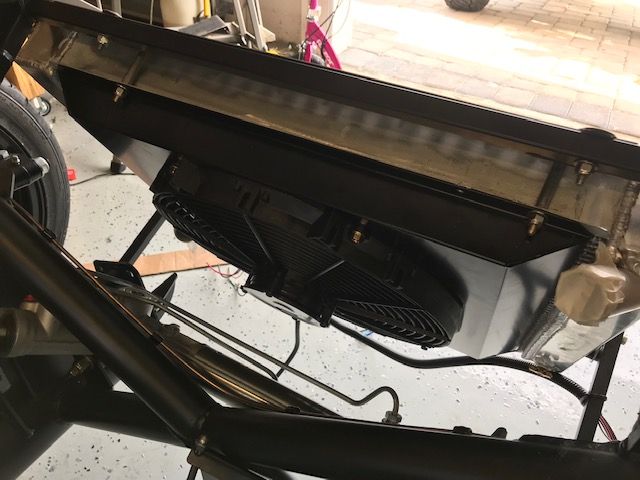
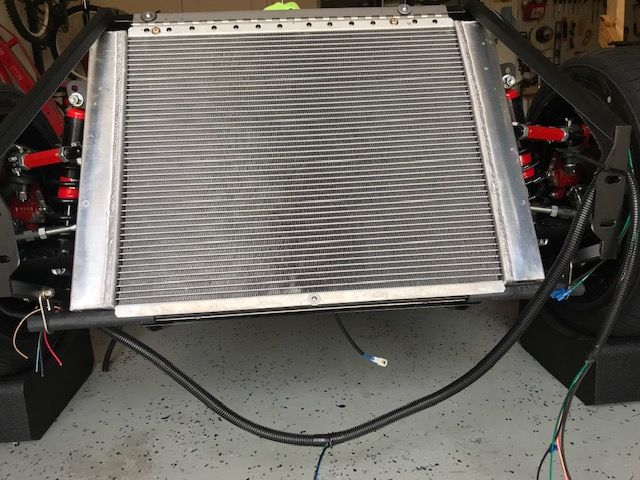
    I thought I'd get the maximum drop from the hinge, so I secured to the 3/4" tubes that are welded on to the frame. This unfortunately dropped the radiator too much, so per Breeze instructions, had to lop off the 2-3/4" tube pieces with a cut off wheel, clean them up with a grinder, repaint and secure the radiator right to the frame. Worked like a champ and is at the perfect angle of 58 degrees. I'm using the Replica Parts radiator panel so that requires a few more degrees from the traditional 51.

    The Breeze upper hinge kit is nice in design, in that it uses two bolts that go all the way through the two top radiator flanges, as well as the fan, to provide overall support for the weight of the radiator. The aluminum flanges on the FFR radiator are thin and easily damaged, so you have to drill carefully.

    One thing I did notice is that the passenger side 3/4" tube that is welded on to the frame is offset to the left. Although radiator is centered, the bolts are offset when you look at them which messes with my OCD. Carl and I were talking that maybe its for Mustang donor builds or another build all together, but who knows?


    Last edited by cv2065; 04-13-2019 at 09:27 PM.
    MKIV Roadster - #9380 - Complete Kit - Delivered 7/17/18 - SOLD 5/2023
    Build Thread #1: https://thefactoryfiveforum.com/show...V-Build-Thread
    MKIV Roadster - #TBD - Complete Kit - Delivered 11/6/23 - In Progress
    Build Thread #2: https://thefactoryfiveforum.com/show...Build-Thread-2

  23. #179
    cv2065's Avatar
    Join Date
    Dec 2017
    Location
    Orlando, FL
    Posts
    2,044
    Post Thanks / Like
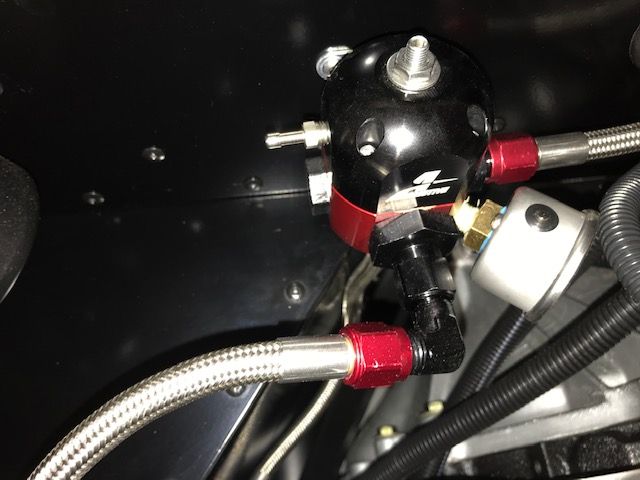
    I also got around to buying a couple of new fittings for my Aeromotive fuel line setup in the engine bay. Once the engine was installed, it sat a little to close to the regulator, so needed a 90 degree elbow from Russell to accommodate. Worked great and fuel system is 100%.
    MKIV Roadster - #9380 - Complete Kit - Delivered 7/17/18 - SOLD 5/2023
    Build Thread #1: https://thefactoryfiveforum.com/show...V-Build-Thread
    MKIV Roadster - #TBD - Complete Kit - Delivered 11/6/23 - In Progress
    Build Thread #2: https://thefactoryfiveforum.com/show...Build-Thread-2

  24. Likes Boydster liked this post
  25. #180
    cv2065's Avatar
    Join Date
    Dec 2017
    Location
    Orlando, FL
    Posts
    2,044
    Post Thanks / Like
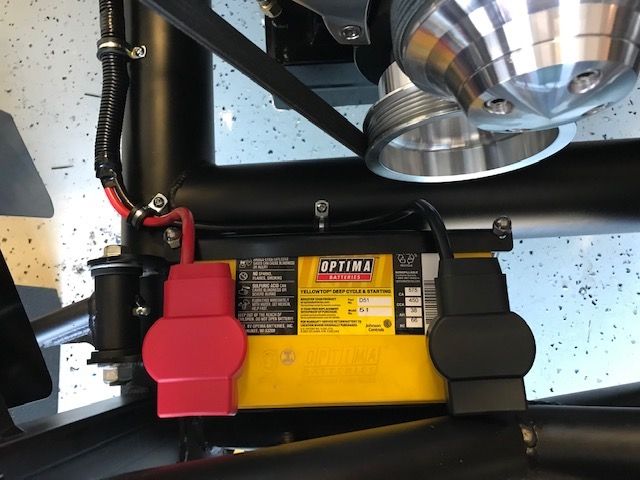
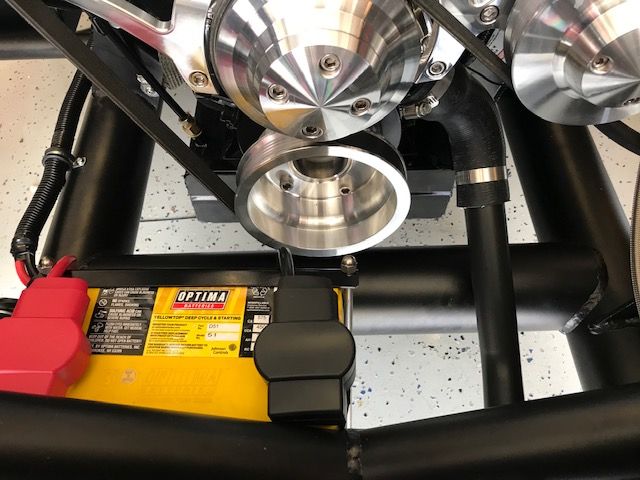
    Getting the engine side electrical wrapped up and finally installed my battery. Due to a few forum suggestions, I opted for the Yellow top Optima battery. It's a nice piece as it fits the Breeze battery box perfectly. I purchased at Advance Auto and was out the door for about $200 with 20% off and had an old battery core laying around the garage. Saved another $22. The model was simply listed as D51 on their website.

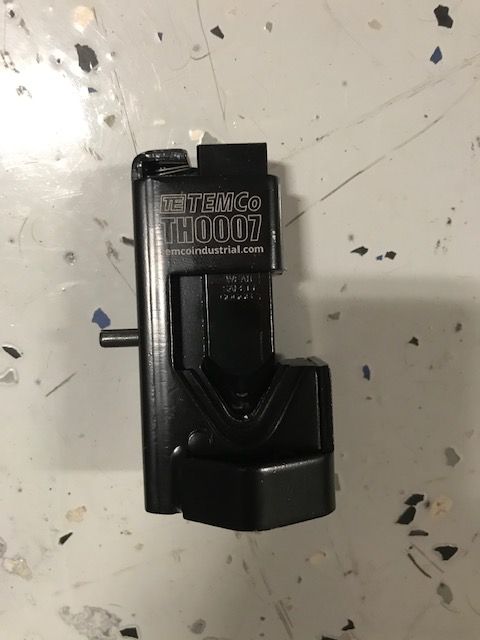
    Wiring was uneventful just getting the cables to the right length and crimping the lugs. I didn't use the solder battery fittings from Breeze, I decided to crimp my own. I did find a new favorite tool, the Temco TH0007 lug crimper tool. Man this thing is fun to use and makes solid crimps. Get on Amazon for about $25.


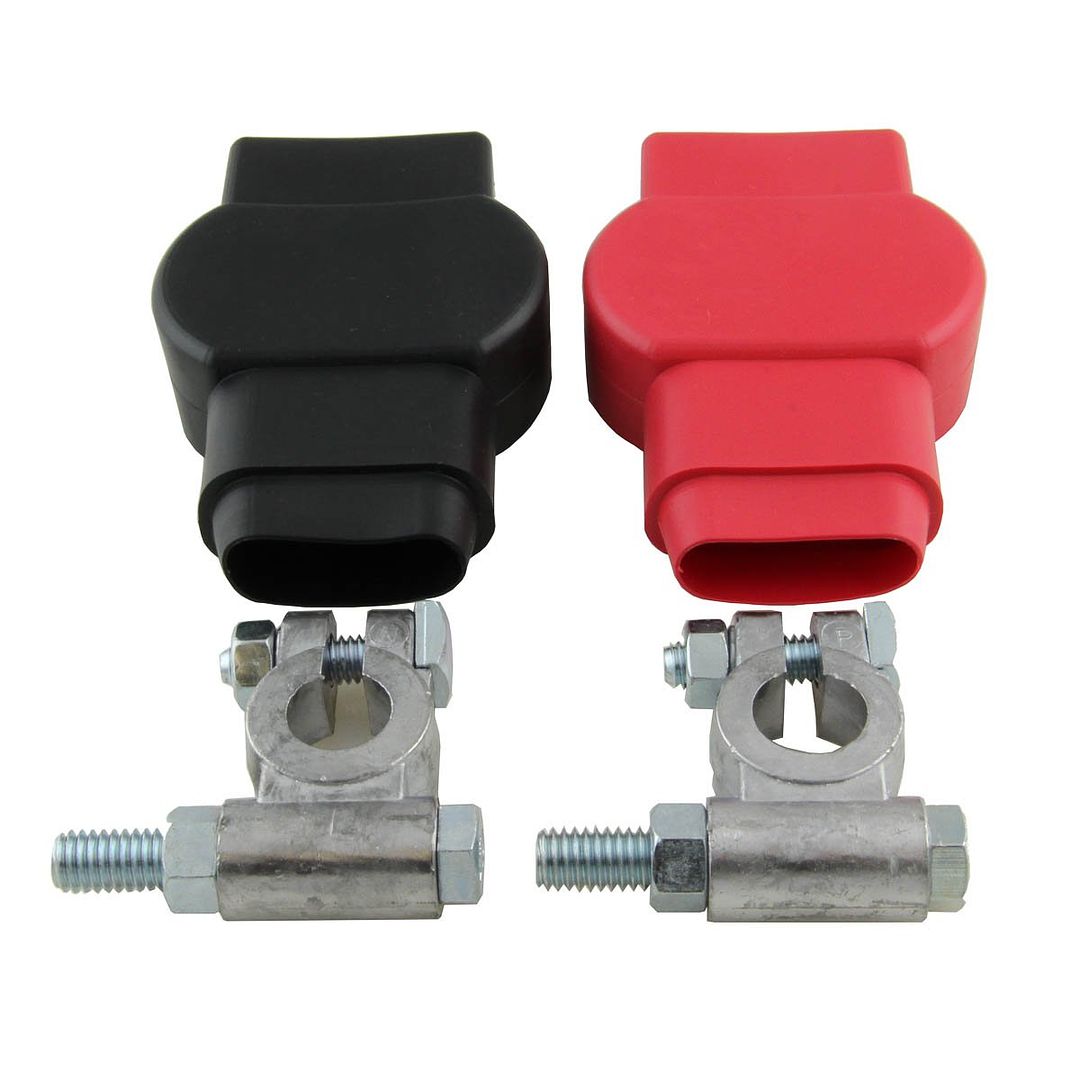
    I also bought 'Military Spec' battery terminals so that I can remove the battery cables without pulling the entire terminal. How about those terminal protectors?? Go big or go home!


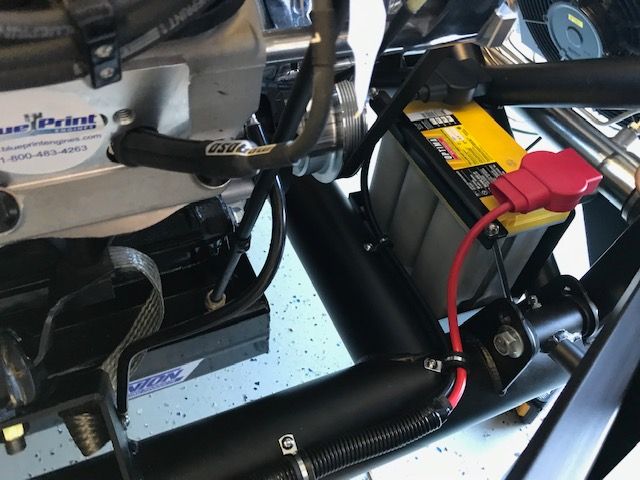
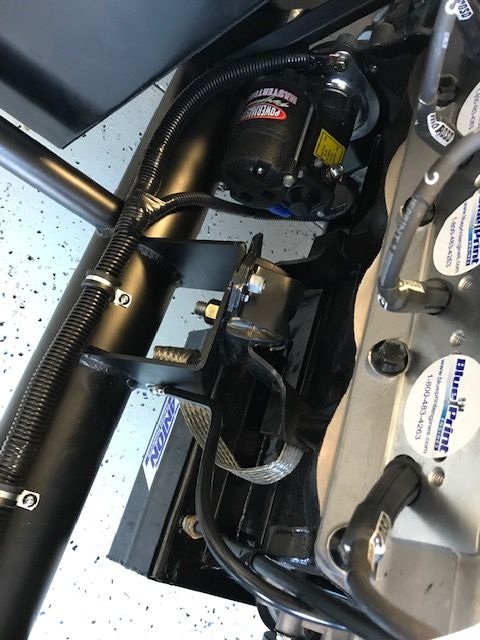
    I followed the Breeze directions for the most part in terms of running the cables to the starter and grounds. Negative cable went to the starter mounting bolt and positive to the starter solenoid. I ran a chassis ground jumper from the battery as well as a ground from block to frame. I drilled and tapped all screws to 1/4-28. All came out great with stainless hardware, but next time I would use 1/4-20, as the fine threads are hard to find. I have about 4" or so between my battery and the engine pulley, so had to route close to the battery.


    Loom and electrical tape works well and keeps it clean, but electrical tape wants to come loose in some areas. I'm using the 3M Super 33+...thought that was good stuff. Anyone have any suggestions on a good substitute that will stay put?
    Last edited by cv2065; 04-21-2019 at 01:21 PM.
    MKIV Roadster - #9380 - Complete Kit - Delivered 7/17/18 - SOLD 5/2023
    Build Thread #1: https://thefactoryfiveforum.com/show...V-Build-Thread
    MKIV Roadster - #TBD - Complete Kit - Delivered 11/6/23 - In Progress
    Build Thread #2: https://thefactoryfiveforum.com/show...Build-Thread-2

  26. Likes GoDadGo, Higgybulin, GTBradley liked this post
  27. #181
    cv2065's Avatar
    Join Date
    Dec 2017
    Location
    Orlando, FL
    Posts
    2,044
    Post Thanks / Like
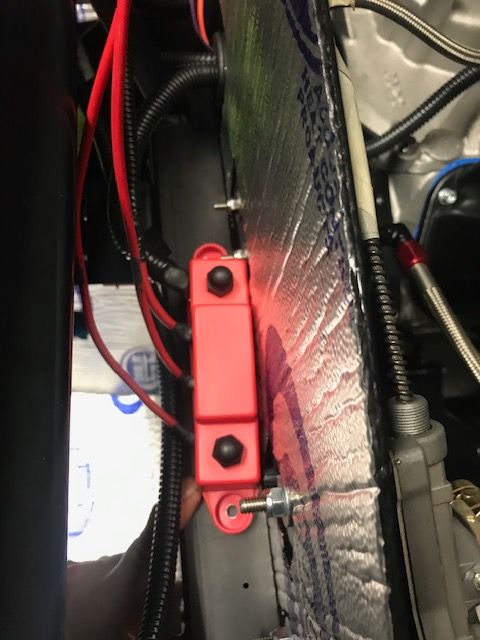
    Final connections to my engine wiring. Taking an inspiration from Papa, I took the loom apart, ran the 3 power leads through the firewall to a distribution box that I'll be fastening to the 2" beam just behind the glove box. Wired up another 4 gauge wire and took that from the starter to the box. The smaller starter wire and brown alternator wire (not hooked up), had a separate loom and ran down to the starter. I also had to run the alternator wire by itself, as it was coming up short when reaching the alternator if kept in the FFR loom. Wiring is NOT my favorite thing to do, but seemed to come out great.

    I won't secure it completely until I get my underdash panel back in after first start.
    Last edited by cv2065; 04-21-2019 at 02:19 PM.
    MKIV Roadster - #9380 - Complete Kit - Delivered 7/17/18 - SOLD 5/2023
    Build Thread #1: https://thefactoryfiveforum.com/show...V-Build-Thread
    MKIV Roadster - #TBD - Complete Kit - Delivered 11/6/23 - In Progress
    Build Thread #2: https://thefactoryfiveforum.com/show...Build-Thread-2

  28. Likes GoDadGo, Higgybulin liked this post
  29. #182
    Senior Member edwardb's Avatar
    Join Date
    Feb 2011
    Location
    Lake Orion, Michigan
    Posts
    10,781
    Post Thanks / Like
    Quote Originally Posted by cv2065 View Post
    Loom and electrical tape works well and keeps it clean, but electrical tape wants to come loose in some areas. I'm using the 3M Super 33+...thought that was good stuff. Anyone have any suggestions on a good substitute that will stay put?
    3M Super 33+ is good stuff. Probably among the best. It sticks well if you don't get crazy stretching it. A little tension is OK, but don't pull too hard or it may eventually loosen itself. I always cut it vs. tearing, which stretches it. Also keep your fingers off the sticky side while using it. It should also be fully stuck down. That bridge stretched across your ground loom by the starter isn't going to hold up. Having said that, many avoid electrical tape as much as possible. Decent stuff like the 3M product can get gummy and messy over time. Even though the Ron Francis harness has a ton of it. I like to use shrink sleeving instead, when possible. Available in every size imaginable, including for the ends of convolute. But takes a little planning.
    Last edited by edwardb; 04-21-2019 at 07:18 PM.
    Build 1: Mk3 Roadster #5125. Sold 11/08/2014. Build 2: Mk4 Roadster #7750. Sold 04/10/2017. Build Thread
    Build 3: Mk4 Roadster 20th Anniversary #8674. Sold 09/07/2020. Build Thread and Video. Build 4: Gen 3 Type 65 Coupe #59. Gen 3 Coyote. Legal 03/04/2020. Build Thread and Video
    Build 5: 35 Hot Rod Truck #138. LS3 and 4L65E auto. Rcvd 01/05/2021. Legal 04/20/2023. Build Thread. Sold 11/9/2023.

  30. #183
    cv2065's Avatar
    Join Date
    Dec 2017
    Location
    Orlando, FL
    Posts
    2,044
    Post Thanks / Like
    Quote Originally Posted by edwardb View Post
    3M Super 33+ is good stuff. Probably among the best. It sticks well if you don't get crazy stretching it. A little tension is OK, but don't pull too hard or it may eventually loosen itself. I always cut it vs. tearing, which stretches it. Also keep your fingers off the sticky side while using it. It should also be fully stuck down. That bridge stretched across your ground loom by the starter isn't going to hold up. Having said that, many avoid electrical tape as much as possible. Decent stuff like the 3M product can get gummy and messy over time. Even though the Ron Francis harness has a ton of it. I like to use shrink sleeving instead, when possible. Available in every size imaginable, including for the ends of convolute. But takes a little planning.
    Thanks Paul. Never ceases to amaze me the stuff you guys notice! I'll be cutting that bridge and addressing it later. I had some cloth electrical tape some time ago and it stuck pretty well. I can't remember the brand, but I'll keep your comments in mind with respect to stretching. That may be the bulk of my issue.
    MKIV Roadster - #9380 - Complete Kit - Delivered 7/17/18 - SOLD 5/2023
    Build Thread #1: https://thefactoryfiveforum.com/show...V-Build-Thread
    MKIV Roadster - #TBD - Complete Kit - Delivered 11/6/23 - In Progress
    Build Thread #2: https://thefactoryfiveforum.com/show...Build-Thread-2

  31. #184
    cv2065's Avatar
    Join Date
    Dec 2017
    Location
    Orlando, FL
    Posts
    2,044
    Post Thanks / Like
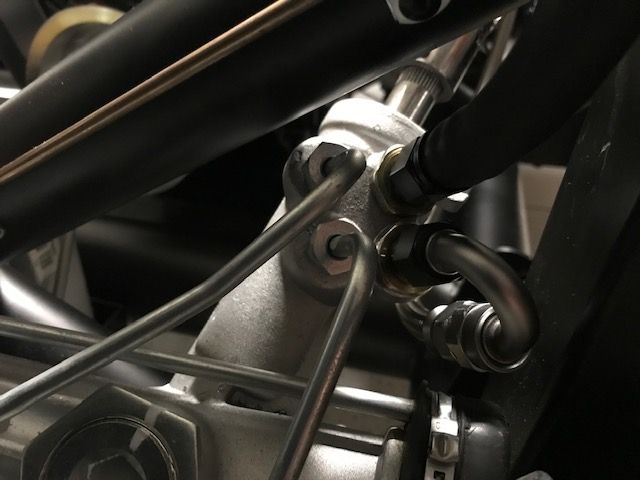
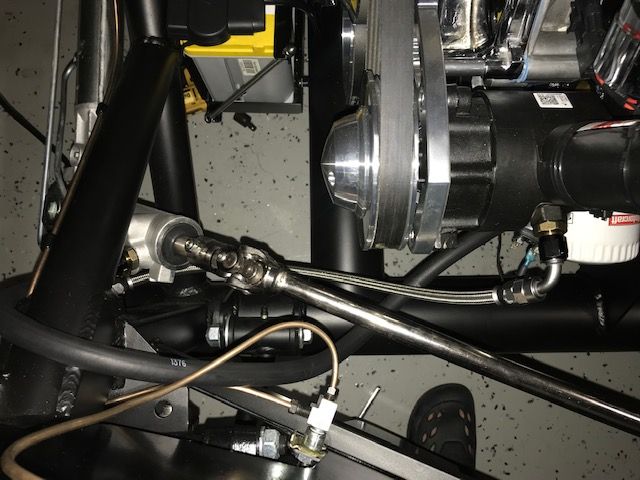
    Power Steering hookup was next on the list. I have to say that the power steering hoses that FFR provides just weren't for me. Seemed like hooking them up was an impossibility, as I could never get the fittings to hook in straight on to the rack without running interference with something else like a cross member, brake line, etc. Not sure why they just can't be direct hook ups to the pump without a lot of curves and angles in the connections themselves. So...called Mark from Breeze and as I've seen in other forums, he had the answer. Here's what he suggested for an order:

    70516 Adapter Fittings (1)
    21102 6AN Braided Hose (3)
    21514 5/8-18 Fitting (1)
    21550 90 Degree Fitting (1)
    21617 3/8" Hose End (1)
    21064 3/8" Hose (3)
    21631 180 Degree Fitting (1)

    Stainless braided hoses were pretty easy to assemble following Mark's directions. The only modification that I had was that Mark provides an additional washer for one of the rack fittings as the input does not have an o-ring chamfer and one needs to be created. The washer was a little too large to sit correctly as it had some interference with the rack itself, so grinding the sides of the washer down a bit and all is good.


    The fittings that Mark sends are top notch and everything went together pretty easily. Hopefully there are no leaks! One thing to note is that I had an issue tightening the bottom fitting with the top fitting in place, as you cannot get a wrench on from the front or the bottom. Not a big deal, but thought I'd note it.


    Headers and Boig Cool Tubes are out to be ceramic coated black...should be back by middle of next week for final assembly before first start!
    Last edited by cv2065; 04-28-2019 at 08:08 AM.
    MKIV Roadster - #9380 - Complete Kit - Delivered 7/17/18 - SOLD 5/2023
    Build Thread #1: https://thefactoryfiveforum.com/show...V-Build-Thread
    MKIV Roadster - #TBD - Complete Kit - Delivered 11/6/23 - In Progress
    Build Thread #2: https://thefactoryfiveforum.com/show...Build-Thread-2

  32. Likes Higgybulin, BadAsp427, Boydster liked this post
  33. #185
    cv2065's Avatar
    Join Date
    Dec 2017
    Location
    Orlando, FL
    Posts
    2,044
    Post Thanks / Like
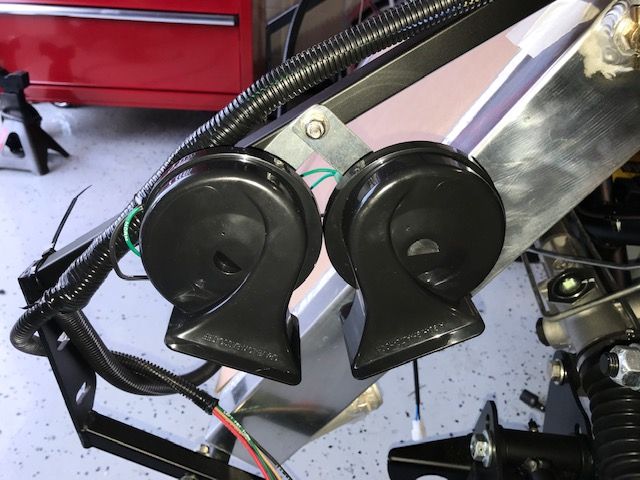
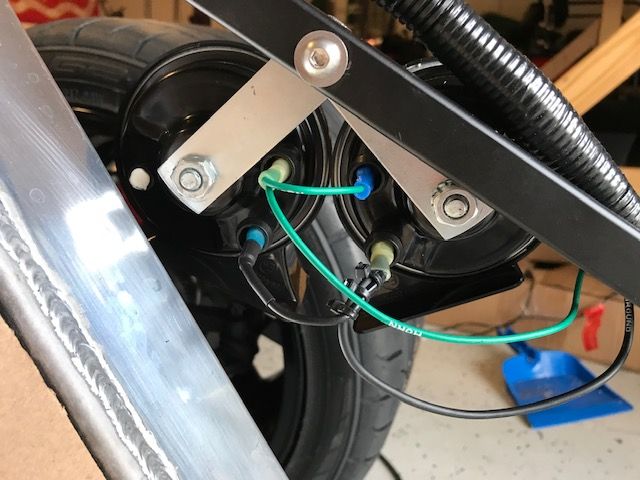
    Waiting on those tubes and headers, went ahead and installed my horns. I didn't deviate from the manual in terms of placement. I did exchange out the FFR provided metal screw with a SS pan head bolt installed from the opposite side to avoid any interference with my Replica Parts radiator panel. I also grinded down the corners on the horn brackets to get them flush with the 3/4" bar. Not sure if that mattered when it comes to body fitment, but took 5 mins. I'll re-route the loomed wiring when I get my lighting configured.

    MKIV Roadster - #9380 - Complete Kit - Delivered 7/17/18 - SOLD 5/2023
    Build Thread #1: https://thefactoryfiveforum.com/show...V-Build-Thread
    MKIV Roadster - #TBD - Complete Kit - Delivered 11/6/23 - In Progress
    Build Thread #2: https://thefactoryfiveforum.com/show...Build-Thread-2

  34. #186
    cv2065's Avatar
    Join Date
    Dec 2017
    Location
    Orlando, FL
    Posts
    2,044
    Post Thanks / Like
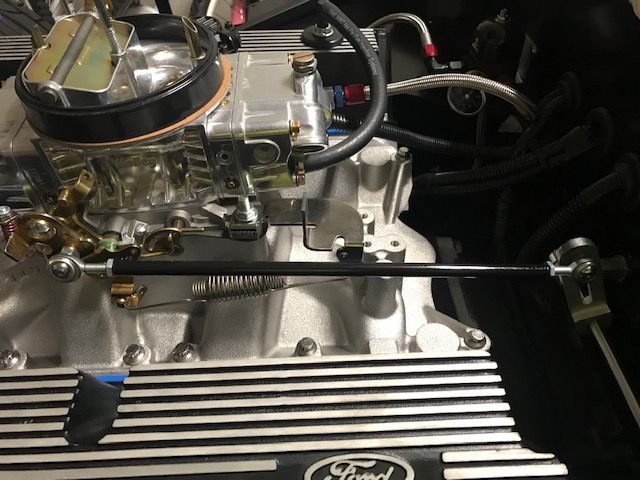
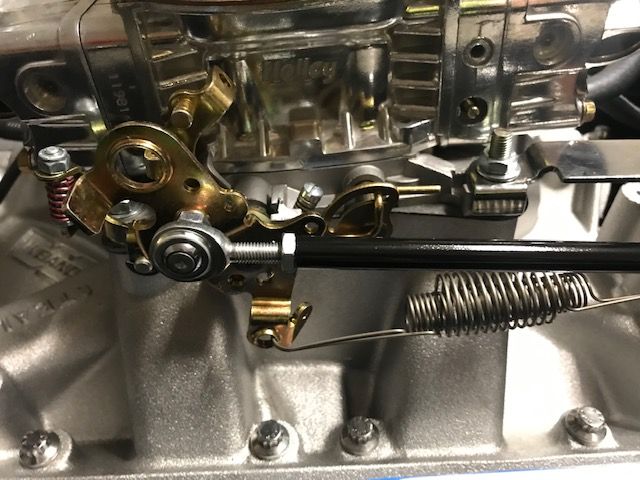
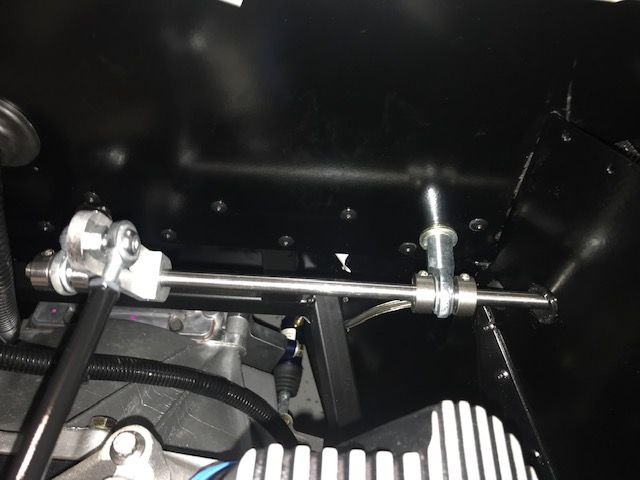
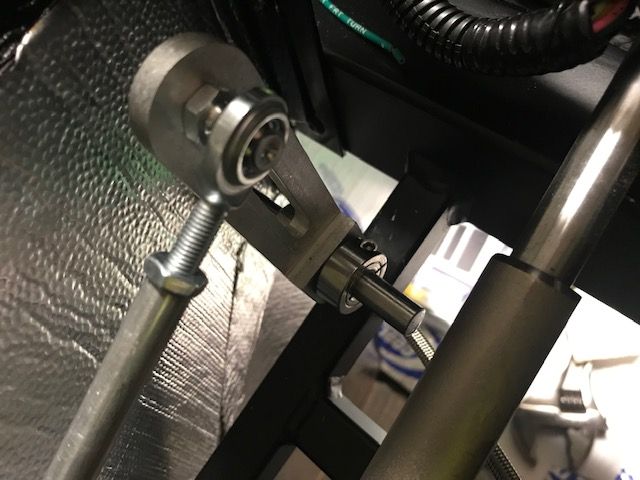
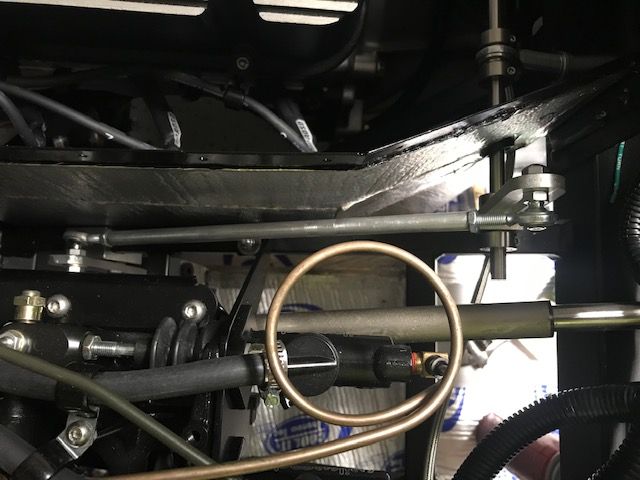
    One step closer to the first start. I was able to get my Forte mechanical linkage completed. Really a nice smooth setup once configured correctly. I ordered a couple more shaft collars from McMasters. In case anyone needs the item number, its #6435K33.


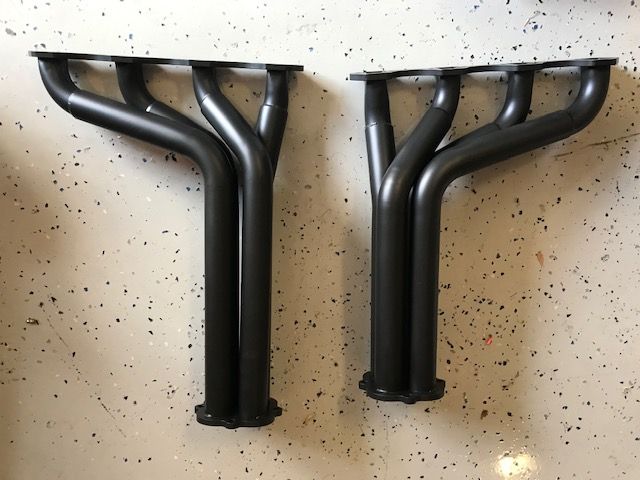
    Headers and coolant tubes are back from the ceramic coater. I'll have those installed this weekend. Add fluids, and I should be ready for the first start!
    MKIV Roadster - #9380 - Complete Kit - Delivered 7/17/18 - SOLD 5/2023
    Build Thread #1: https://thefactoryfiveforum.com/show...V-Build-Thread
    MKIV Roadster - #TBD - Complete Kit - Delivered 11/6/23 - In Progress
    Build Thread #2: https://thefactoryfiveforum.com/show...Build-Thread-2

  35. Likes Straversi liked this post
  36. #187
    BadAsp427's Avatar
    Join Date
    Jul 2018
    Location
    Greeneville, TN
    Posts
    1,179
    Post Thanks / Like
    I can't wait to see that first start video of the BluePrint Beast...

    Mk4 20th Anniversary #8690 (#8 of 20) Purchased 8/18/18----Build Started 8/19/18
    Build Thread Click Here / Registry Entry Click Here / BluePrint Engines 347ci / TKO600
    Carb/Heater/Heated Seats/Cruise Control/Drop Trunk & Battery/Custom Cubby

  37. #188
    cv2065's Avatar
    Join Date
    Dec 2017
    Location
    Orlando, FL
    Posts
    2,044
    Post Thanks / Like
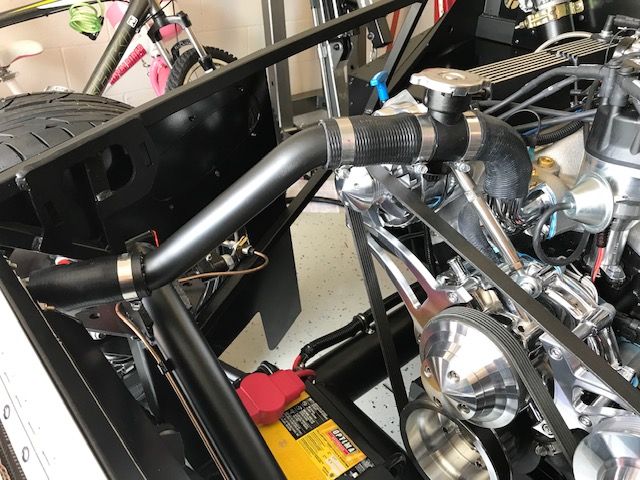
    Boig tubes were installed today. The design is great but the finish on mine wasn't the best when I got them. The tubes still had part/serial numbers imprinted on them and the finish did not look like the pictures. Instead of exchanging them, I was getting my headers ceramic coated, and the guy I go to just threw in the Boig tubes for free, so now they are Satin Black, match the Satin Black of the frame tubes and look really nice.

    Installation was straight forward. I cut down the front 90 degree rubber as far as I could so that the pressure cap sat roughly even with the frame. The lower tube was a little off on fitment, but overall, a nice purchase and glad I added them.

    I left off the front and rear clamps so that I can add fluid here shortly!


    Headers came out great as well. They get installed tomorrow.

    MKIV Roadster - #9380 - Complete Kit - Delivered 7/17/18 - SOLD 5/2023
    Build Thread #1: https://thefactoryfiveforum.com/show...V-Build-Thread
    MKIV Roadster - #TBD - Complete Kit - Delivered 11/6/23 - In Progress
    Build Thread #2: https://thefactoryfiveforum.com/show...Build-Thread-2

  38. Likes Higgybulin, PeteMeindl liked this post
  39. #189
    Junior Member
    Join Date
    May 2019
    Posts
    15
    Post Thanks / Like
    Looking good! I'll probably need to get the number of your powder coat guy

  40. #190
    cv2065's Avatar
    Join Date
    Dec 2017
    Location
    Orlando, FL
    Posts
    2,044
    Post Thanks / Like
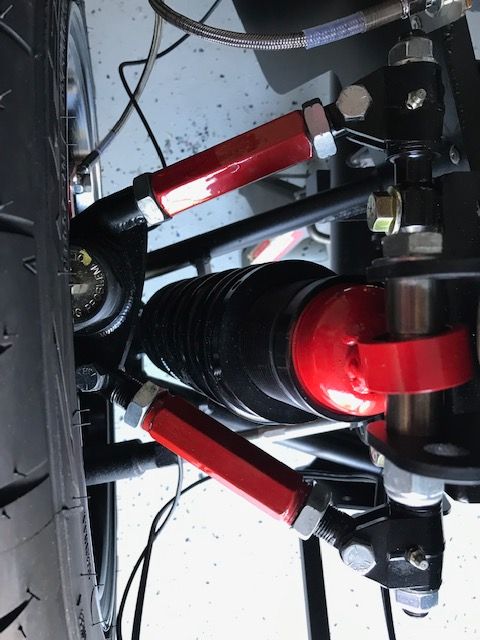
    Haven't updated in a bit, but lots going on! 2 issues on the front suspension needed to be addressed. As much as I hate doing things over, I think these were unavoidable. One was the Moog UCA ball joint boots sagging, and the other was the control arm tubes that needed to be cut in order to get the correct camber/castor for the power steering.

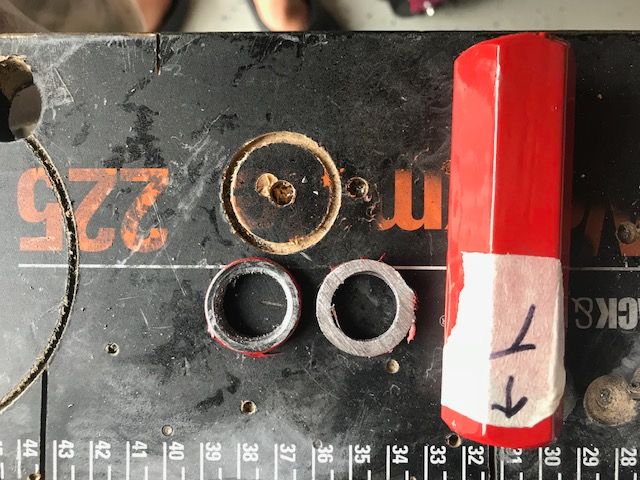
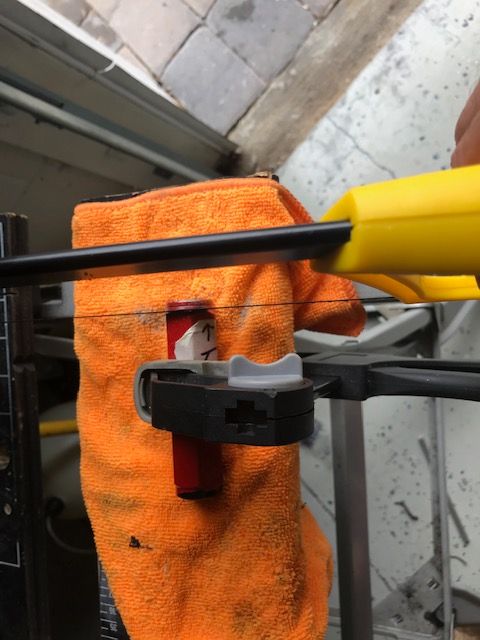
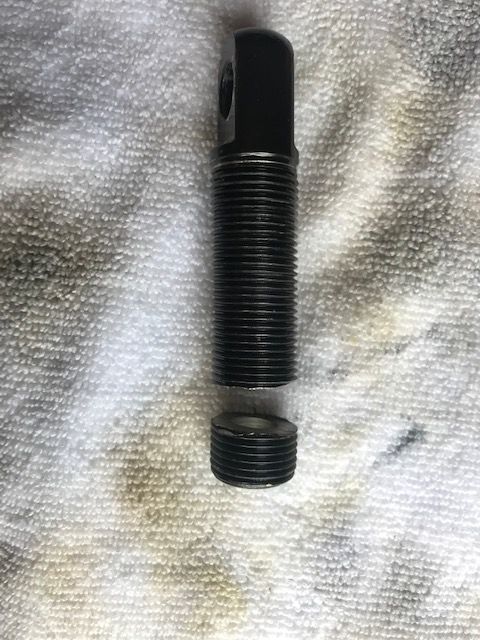
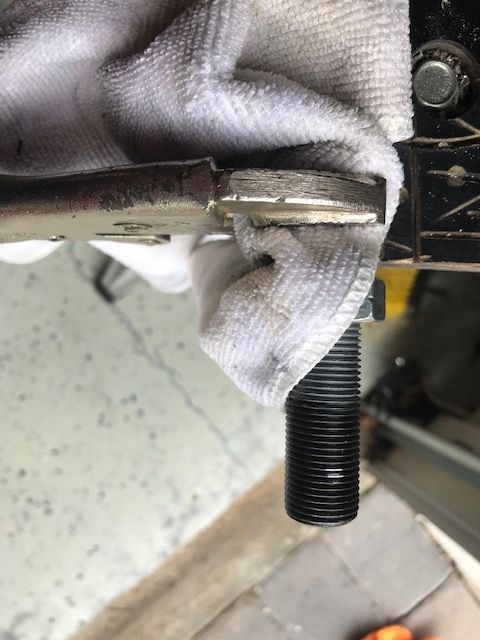
    Cutting the rear tube on the passenger side was not a hard job at all, but as Fixit mentioned, it would have been nice to not have to go back and do things over. I only had to remove two of the three control arm adjustment bolts in order to get at the tube. I used a hack saw with a fine blade and the tube cut pretty easily, just cutting up to the beveled edge (~1/4") off both sides. I also took 1/4" off of both threaded rods as the sleeve will bottom out if you don't. Only challenge there is having to cut the lower threaded rod while it remains on the suspension as you don't want to have to take that apart. Lost some custom red paint on my sleeve, but touched that up before putting it all back together.

    Sleeve Cutting:


    Threaded Rod Cutting:


    Finished product:
    MKIV Roadster - #9380 - Complete Kit - Delivered 7/17/18 - SOLD 5/2023
    Build Thread #1: https://thefactoryfiveforum.com/show...V-Build-Thread
    MKIV Roadster - #TBD - Complete Kit - Delivered 11/6/23 - In Progress
    Build Thread #2: https://thefactoryfiveforum.com/show...Build-Thread-2

  41. Likes PeteMeindl liked this post
  42. #191
    cv2065's Avatar
    Join Date
    Dec 2017
    Location
    Orlando, FL
    Posts
    2,044
    Post Thanks / Like
    Second up was the Moog upper ball joint boots. If you upgrade to the Moog upper ball joints, they are great and thread in nicely. However, using the provided Moog boots is bad news as they are too large and end up pushing in on themselves, then open up and get grease everywhere. Look something like this:
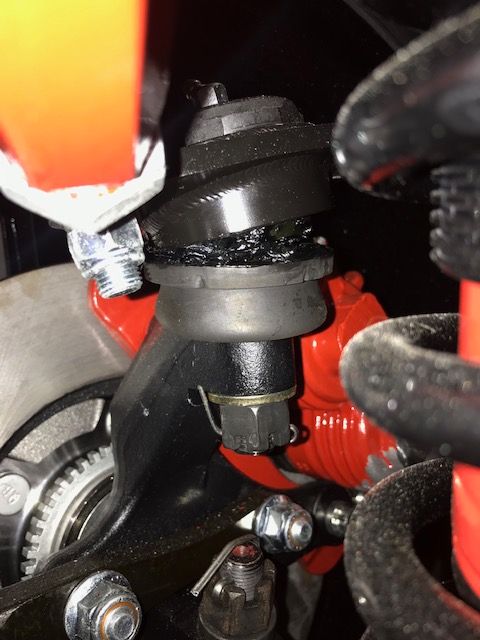


    So, based on edwardb's suggestion, I replaced with Energy Suspension 5.13102G Ball Joint Dust Boots. They are less than $10 on Amazon and look fantastic.

    After Install:
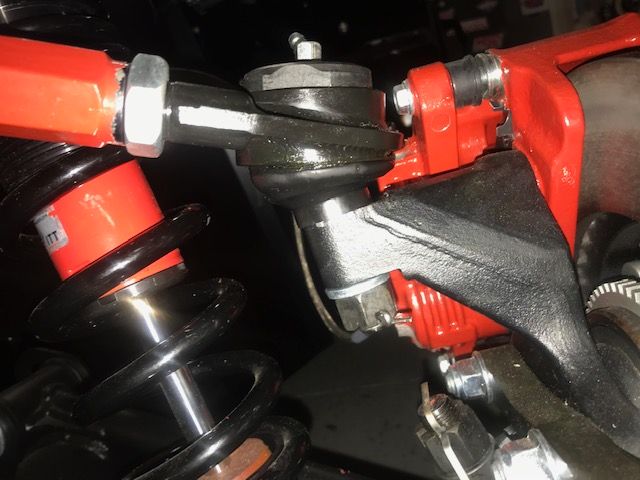
    MKIV Roadster - #9380 - Complete Kit - Delivered 7/17/18 - SOLD 5/2023
    Build Thread #1: https://thefactoryfiveforum.com/show...V-Build-Thread
    MKIV Roadster - #TBD - Complete Kit - Delivered 11/6/23 - In Progress
    Build Thread #2: https://thefactoryfiveforum.com/show...Build-Thread-2

  43. #192
    cv2065's Avatar
    Join Date
    Dec 2017
    Location
    Orlando, FL
    Posts
    2,044
    Post Thanks / Like

    FFR #9380 is ALIVE!

    Really glad to have reached this milestone. Just have to say that Josh and Johnny at Blueprint have been VERY responsive to any questions that I've had along the way...yes, even on weekends. Nice work guys!

    So, this isn't 'exactly' my first start. If I said it was then Carl (BadASP) would probably throw me under the bus for that, so keeping it real. Had a few things to work out with setup, and there is still some fine tuning to do, but overall, very satisfied with how things worked out. Good news is that I only had one leak, and that came out of the radiator hose. Everything else is good to go!

    Thanks again for all the help from the forum to this point. Very much appreciated!

    https://youtu.be/Xhc-DsA50XY
    Last edited by cv2065; 06-02-2019 at 06:32 PM.
    MKIV Roadster - #9380 - Complete Kit - Delivered 7/17/18 - SOLD 5/2023
    Build Thread #1: https://thefactoryfiveforum.com/show...V-Build-Thread
    MKIV Roadster - #TBD - Complete Kit - Delivered 11/6/23 - In Progress
    Build Thread #2: https://thefactoryfiveforum.com/show...Build-Thread-2

  44. Likes Mark Eaton liked this post
  45. #193
    cv2065's Avatar
    Join Date
    Dec 2017
    Location
    Orlando, FL
    Posts
    2,044
    Post Thanks / Like
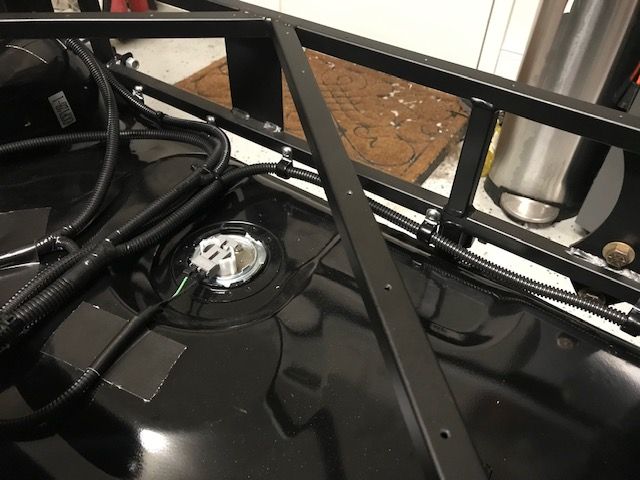
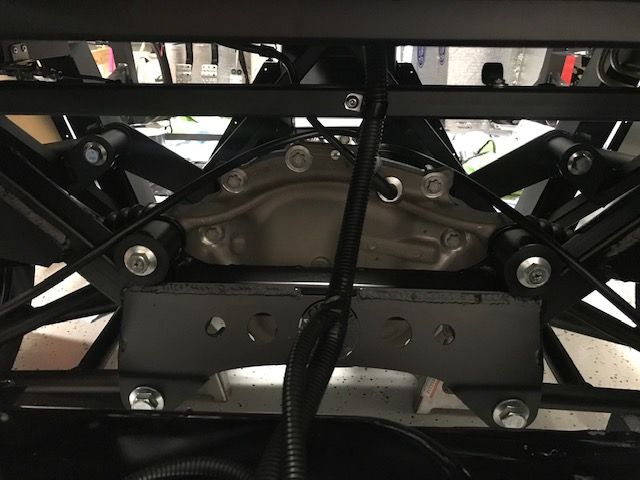
    Once I knew that there were no leaks from the rear fuel system, time to button up the panels and my rear wiring. Tried to tidy this area up as much as possible. Started off with securing the main rear harness on the 3/4" tube right behind the IRS.


    I then tapped for 1/4-20 screws along the rear 3/4" tube for right and rear lighting.


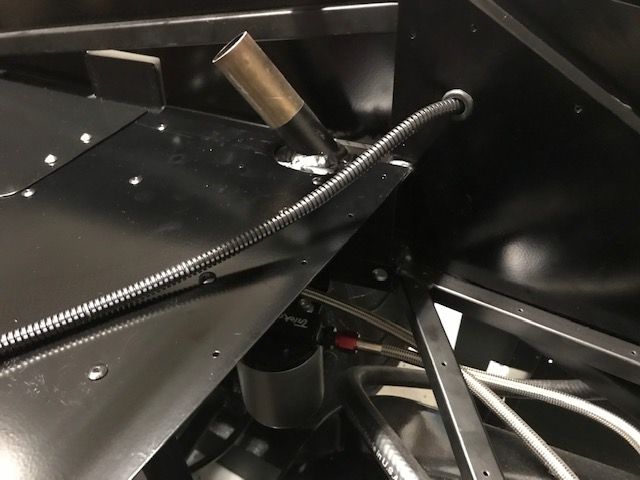
    As others have done, I routed the license plate wiring through the passenger side panel with grommet so that it pops out right at the trunk hoop. Seems like I'll have to extend these two wires when hooking them up, but not sure until the body is on.


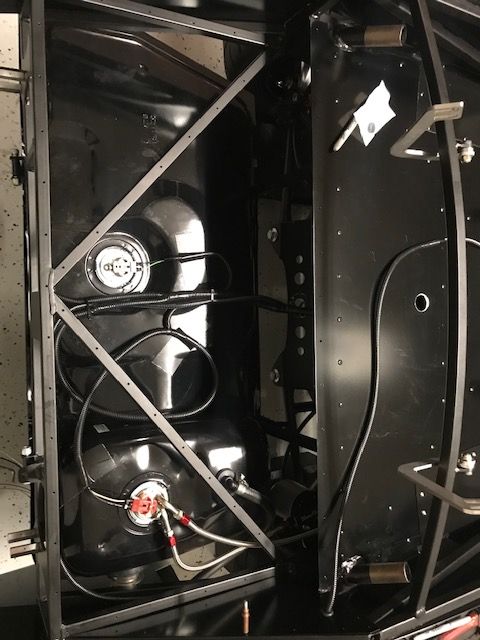
    Final product before the panel goes on. I used a couple of small pieces of Gorilla tape to keep the sensor and fuel pump wiring straight and secured to the tank. Happy with how it turned out.

    Last edited by cv2065; 06-03-2019 at 08:33 AM.
    MKIV Roadster - #9380 - Complete Kit - Delivered 7/17/18 - SOLD 5/2023
    Build Thread #1: https://thefactoryfiveforum.com/show...V-Build-Thread
    MKIV Roadster - #TBD - Complete Kit - Delivered 11/6/23 - In Progress
    Build Thread #2: https://thefactoryfiveforum.com/show...Build-Thread-2

  46. #194
    cv2065's Avatar
    Join Date
    Dec 2017
    Location
    Orlando, FL
    Posts
    2,044
    Post Thanks / Like
    I've been planning out my stereo. I know that topic is up for debate, but I've never had a car without one, so the Cobra will get some tunes. I drilled two 1/2" holes on the front right and left sides of the top trunk panel and added grommets for door speaker wiring. I also drilled a 1" hole right in the center of the top trunk panel that will take the amp power and RCA cables through the trans tunnel to the distribution block and BT stereo housed in the glovebox. It will get a grommet as well, it just hasn't arrived yet. Hard to find 1.25" ID grommets locally for some reason.
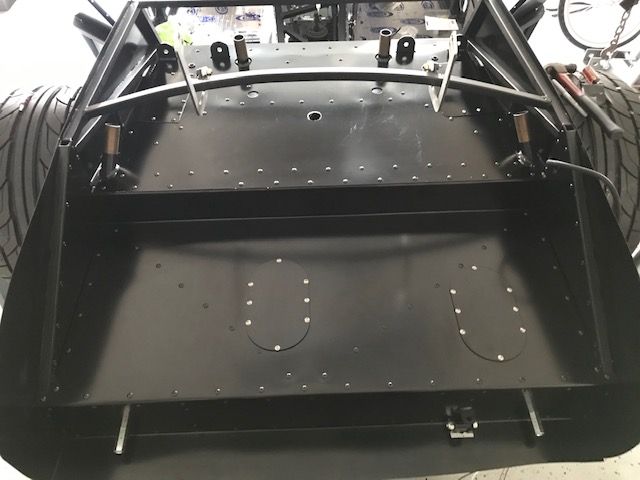


    Once the wiring is in, I can start on my rear cockpit panel.

    Both of my access panels are removable, as I added 6-32 rivet nuts. I also added another custom panel that is right over my fuel line connections. Probably not necessary, but the fuel line connections are right behind the 2" tube and hard to get to from the outside/bottom. I thought it might make it easier if I ever need to adjust or remove if I can get a wrench on it from the top as well as the bottom.
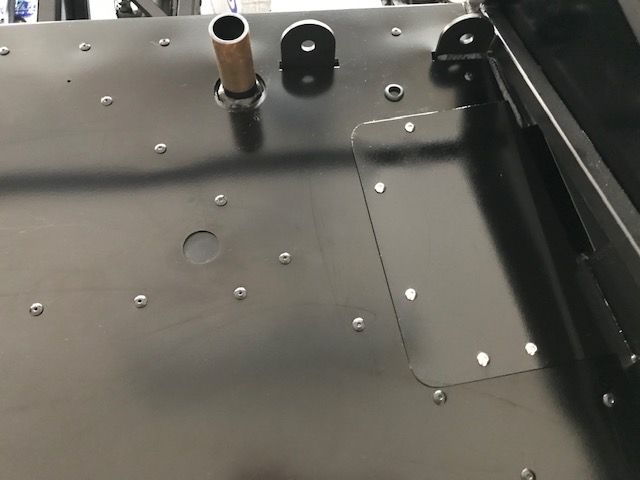

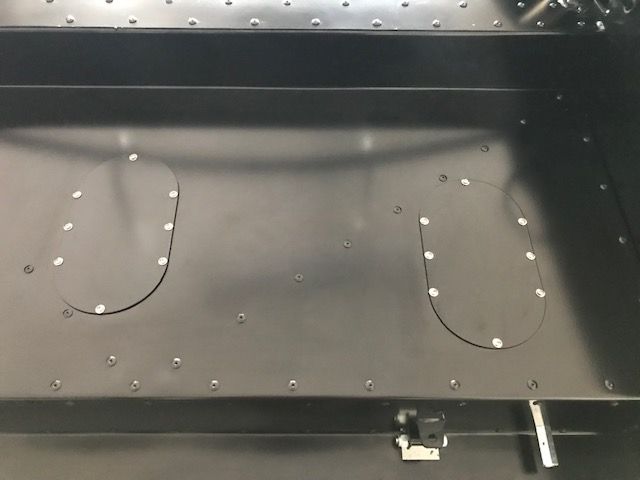


    Just a couple of side notes when I was installing the panels. First one is that the center lower trunk panel has to go in first. Just the rivets on the two triangular side panels causes enough interference where the lower panel can't go in. Instructions say that...but that's what happens when you jump ahead!

    Also, when installing the lower trunk panel, I totally forgot about the tank strap that the panel has to fit over. So had to get the jack out, support the tank and swap out the bolts allowing the panel to sit flush. Again, rookie move, but it worked out.
    Last edited by cv2065; 06-02-2019 at 07:16 PM.
    MKIV Roadster - #9380 - Complete Kit - Delivered 7/17/18 - SOLD 5/2023
    Build Thread #1: https://thefactoryfiveforum.com/show...V-Build-Thread
    MKIV Roadster - #TBD - Complete Kit - Delivered 11/6/23 - In Progress
    Build Thread #2: https://thefactoryfiveforum.com/show...Build-Thread-2

  47. #195
    cv2065's Avatar
    Join Date
    Dec 2017
    Location
    Orlando, FL
    Posts
    2,044
    Post Thanks / Like
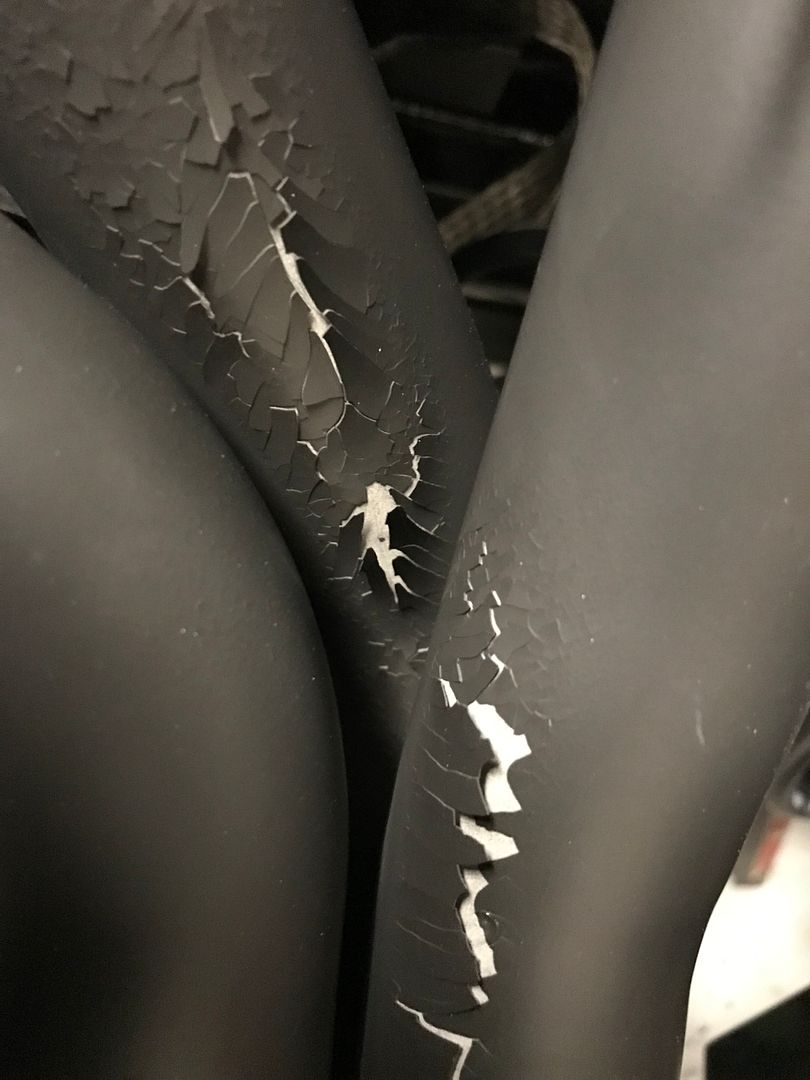
    Looks like my header ceramic coating is flaming off. Bummer! Already contacted the guy to have these redone, but annoying to say the least.
    MKIV Roadster - #9380 - Complete Kit - Delivered 7/17/18 - SOLD 5/2023
    Build Thread #1: https://thefactoryfiveforum.com/show...V-Build-Thread
    MKIV Roadster - #TBD - Complete Kit - Delivered 11/6/23 - In Progress
    Build Thread #2: https://thefactoryfiveforum.com/show...Build-Thread-2

  48. #196
    Senior Member MSumners's Avatar
    Join Date
    Dec 2018
    Location
    Hudsonville, MI
    Posts
    633
    Post Thanks / Like
    Just wanted to say thanks for the detailed posts. I’ve followed your thread from the start and have found it very helpful for my own build. I’ll be following the stereo portion specifically as this is something I’ll be detailing shortly.

    Mike S

  49. Likes cv2065 liked this post
  50. #197
    Boydster's Avatar
    Join Date
    Aug 2014
    Location
    Maryville, TN
    Posts
    1,104
    Post Thanks / Like
    Nice start! The 427 sounds great!
    ---Boyd---
    MkIV #9042 build thread
    www.boss427.us
    427W, TKO600, Moser 3.55 rear.
    Delivered Feb 2017, Graduated Nov 4, 2019

  51. Likes cv2065 liked this post
  52. #198
    Not a waxer Jeff Kleiner's Avatar
    Join Date
    Feb 2011
    Location
    Bloomington, Indiana
    Posts
    8,559
    Post Thanks / Like
    Quote Originally Posted by cv2065 View Post
    Looks like my header ceramic coating is flaming off. Bummer! Already contacted the guy to have these redone, but annoying to say the least.

    Well that's ugly What does he intend to do differently this time?

    Jeff

  53. #199
    cv2065's Avatar
    Join Date
    Dec 2017
    Location
    Orlando, FL
    Posts
    2,044
    Post Thanks / Like
    Quote Originally Posted by Jeff Kleiner View Post
    Well that's ugly What does he intend to do differently this time?

    Jeff
    Good question. I had to call him a couple of times to get these done. Not sure if he was backed up or what, but when I showed up they were just coming out of the oven, so maybe they were rushed during the baking process. I'll be reviewing with him when I drop off this week. Most likely will take my exhaust to another guy that's just down the road from him.
    MKIV Roadster - #9380 - Complete Kit - Delivered 7/17/18 - SOLD 5/2023
    Build Thread #1: https://thefactoryfiveforum.com/show...V-Build-Thread
    MKIV Roadster - #TBD - Complete Kit - Delivered 11/6/23 - In Progress
    Build Thread #2: https://thefactoryfiveforum.com/show...Build-Thread-2

  54. #200

    Join Date
    May 2018
    Location
    Park City, Utah, USA
    Posts
    394
    Post Thanks / Like
    Quote Originally Posted by cv2065 View Post
    Really glad to have reached this milestone. Just have to say that Josh and Johnny at Blueprint have been VERY responsive to any questions that I've had along the way...yes, even on weekends. Nice work guys!

    So, this isn't 'exactly' my first start. If I said it was then Carl (BadASP) would probably throw me under the bus for that, so keeping it real. Had a few things to work out with setup, and there is still some fine tuning to do, but overall, very satisfied with how things worked out. Good news is that I only had one leak, and that came out of the radiator hose. Everything else is good to go!
    Thanks again for all the help from the forum to this point. Very much appreciated!

    https://youtu.be/Xhc-DsA50XY
    Awesome, CV! Congratulations!! Really happy for you.

  55. Likes cv2065 liked this post
Page 5 of 12 FirstFirst ... 34567 ... LastLast

Posting Permissions

  • You may not post new threads
  • You may not post replies
  • You may not post attachments
  • You may not edit your posts
  •  

Brown County Customs

Visit our community sponsor