-
01-02-2020, 11:16 PM
#281

Originally Posted by
Mark Eaton

Did it come with a gasket?
No, you'll have to keep the old one from your current windshield.
-
01-03-2020, 09:56 PM
#282
-
Post Thanks / Like - 0 Thanks, 1 Likes
-
01-03-2020, 10:12 PM
#283
Originally Posted by
cv2065
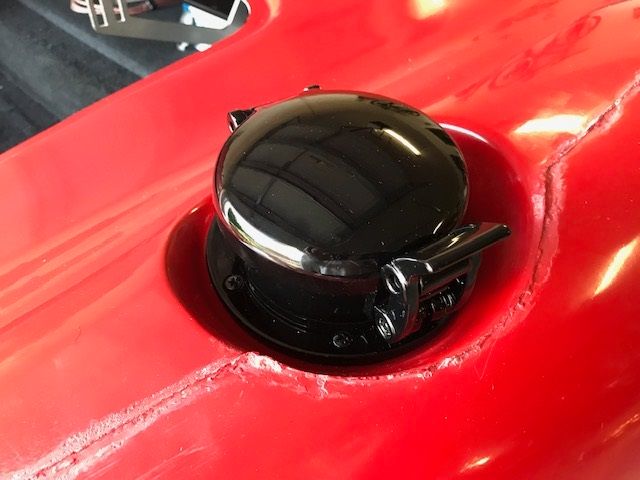
Finished up the filler tube and rear tail lights today. Gas tank cap came out great. I clocked it to about the 1:00 position to match the outboard center of the cutout. I did not use the FFR provided screws, and drilled out the holes a bit. I substituted with stainless 8-32 x 1" bolts with washers and lock nuts. Cutting the filler tube to 5" as prescribed in the directions was a perfect fit. To continue with my blacked out look, I painted the heads of the screws with 2K gloss black epoxy and let dry overnight. I'll do the same with other hardware as well. Much more durable than anything I can buy and I don't have to wait for it.
I also completed my rear tail lights. This took a little longer than I had anticipated. The pre-drilled holes did not align with the lights, so had to be drilled out a bit. Also, had to enlarge the hole for my weather packs to fit and also so that the light would sit flush. The base of each light is about 1-1/4"...the hole from FFR is only 1". I started with widening the sides to accommodate the weather pack first, then widened the hole from top to bottom after that. Used my shop vac and Dremel tool and not only did a great job, but avoided a huge mess with fiberglass dust.
The washers with the lights seemed a bit small, so I stepped them up to a fender washer instead.
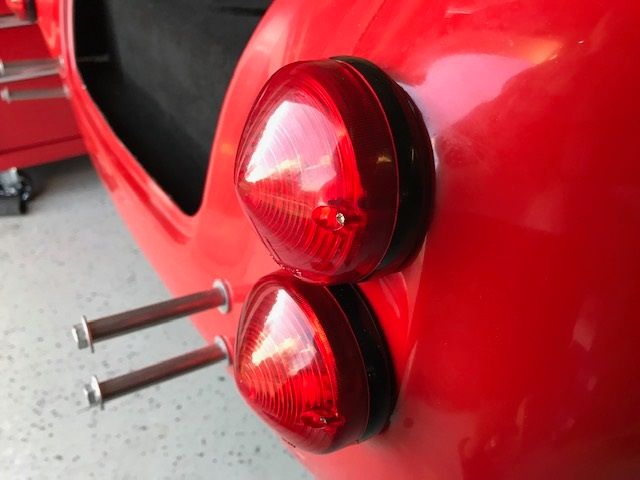
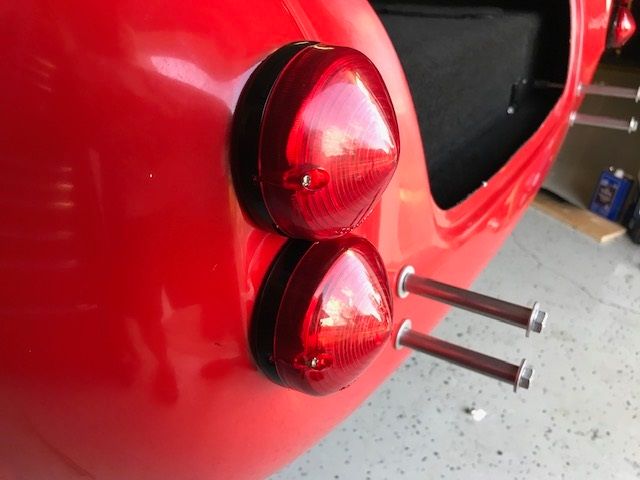
Tested my lights again after install and all is good. I still have to get some all thread to replace the bolts in the back. Now I'm working on my parking lights and head lamps.
Are your blacked out item powdercoated or painted?
-
01-03-2020, 10:13 PM
#284
Originally Posted by
BradCraig
Are your blacked out item powdercoated or painted?
All Powder coated gloss black.
-
01-04-2020, 07:31 PM
#285
Chad, Your build is really coming along and looking great....
-
01-04-2020, 09:36 PM
#286
Originally Posted by
BadAsp427
Chad, Your build is really coming along and looking great....
Thanks dude!
-
01-04-2020, 10:06 PM
#287
Chad, I'm imagining "Fade to Black" from the Rolling Stones playing in your garage as you install your powder coated pieces. Looking great!
I'm really digging the all blacked out look.
Terry
MK IV Build #9659, 3 link, 17's, Forte 347, Sniper EFI, power steering, built for a freak sized person with 17" Kirkey Vintage seats, RT drop trunk, RT turn signal, lots of stuff from Breeze Automotive, Wilwood brakes, paint by Jeff Miller
-
01-05-2020, 06:49 PM
#288
Senior Member

Its going to look really nice once you have it all out together!
Kyle
Complete Kit pickup 09/05/2015, 351w, QF680, 3.55, 3-Link, 15" Halibrands with MT's, Painted Viking blue with Wimbledon white stripes on 03/15/2017. Sold in 08/2018 and totally regret it.
-
01-05-2020, 07:14 PM
#289
Thanks guys. I appreciate the support and compliments. It can seem a bit of a never ending road, especially towards the end...just gotta keep envisioning the pay off!
-
01-07-2020, 08:04 AM
#290
Looking really nice. Almost there...
-
01-07-2020, 05:19 PM
#291
Member

What exactly do the breeze seat mounts do? Do they help recline your seat back at a angle or something?
-
01-07-2020, 05:51 PM
#292
Originally Posted by
nelsond003
What exactly do the breeze seat mounts do? Do they help recline your seat back at a angle or something?
Yes, there is a slight incline with a small amount of additional room. Also comes with some small boards to put into the ends of the seats to keep them from compressing under your thighs.
-
01-07-2020, 06:51 PM
#293
David aka Ducky2009

The blacked-out looks nice. What color are you painting the car?
MK4 Build #9035 Delivered 2/17/17, First Start & Go-Kart 6/2/17, Licensed 9/1/17
Paint - Lightning Blue Metallic, No Hood Scoop, No Stripes
Gen 2 Coyote Engine & TKO-600. Solid Axle, 8.8-3.55, Power Steering, Power Brakes, Dual Roll Bars
Heater and Glove Box, Drop Trunk, Wipers, Radio, FFR Vintage Gauges, Custom Dash
Build Thread:
http://thefactoryfiveforum.com/showt...MK4-Build-9035
-
01-07-2020, 07:09 PM
#294
Originally Posted by
Ducky2009
The blacked-out looks nice. What color are you painting the car?
Thanks Ducky. The Porsche Carmine Red is the direction with black stripes
-
01-08-2020, 07:01 AM
#295
Senior Member
Originally Posted by
cv2065
Thanks Ducky. The Porsche Carmine Red is the direction with black stripes
That will look awesome IMHO. I am not a big red fan but I do like that combo, beautiful red with black stripes and accents will look really good. This was actually a combo I was thinking about for my next roadster.
Kyle
Complete Kit pickup 09/05/2015, 351w, QF680, 3.55, 3-Link, 15" Halibrands with MT's, Painted Viking blue with Wimbledon white stripes on 03/15/2017. Sold in 08/2018 and totally regret it.
-
01-10-2020, 02:56 PM
#296
Senior Member

Who did your center console?
I am also in Orlando.
- Michael
-
01-10-2020, 04:26 PM
#297
Originally Posted by
Hacksaw84
Who did your center console?
I am also in Orlando.
- Michael
I took it to Kelly's Upholstery...he's downtown. Kind of quirky, but definitely a car guy. If he does some work and quotes a price, get it in writing. The guy tends to forget a bit, but stands behind his work. I think he may have visited Mary Jane a little too frequently.
-
01-15-2020, 07:57 PM
#298
-
01-15-2020, 08:13 PM
#299
Not a waxer

Originally Posted by
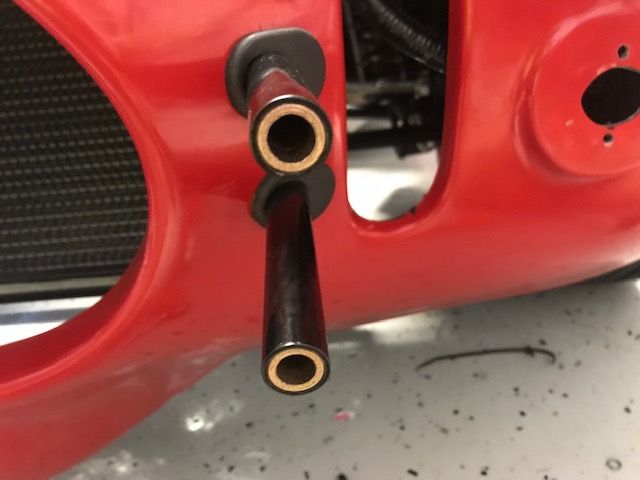
cv2065
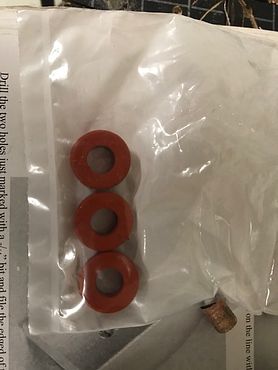
... I took a page out of Edwardb's playbook and ordered some 7/16" bronze sleeves that inserted into the 3/4" tubes (2 per tube) so that the 6.5" bolt would feed through without any slop...
You could have saved some effort, and probably a few bucks, by ordering #12927 Stainless Steel tubing from Online Metals; .750" OD X .625" ID.
But ya' didn't ask 
Good to talk with you the other evening!
Jeff
-
Post Thanks / Like - 1 Thanks, 0 Likes
-
01-15-2020, 08:26 PM
#300
Originally Posted by
Jeff Kleiner
You could have saved some effort, and probably a few bucks, by ordering #12927 Stainless Steel tubing from Online Metals; .750" OD X .625" ID.
But ya' didn't ask
Good to talk with you the other evening!
Jeff
Now ya tell me Jeff!  Great speaking with you as well!
-
01-15-2020, 09:56 PM
#301


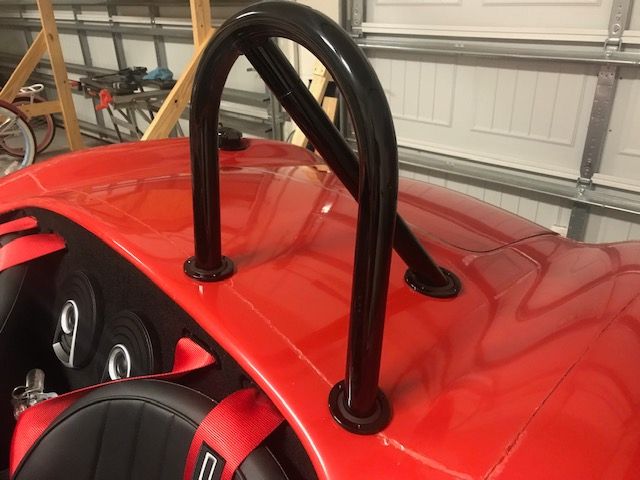
I also made some progress on body fitting. First started on the roll bars. I was going to start with the windshield but I broke one of the brass retainers putting the frame back on, so that had to be sidelined until replacements arrived. The roll bar holes had to be enlarged a bit. One mistake that I was making was remembering which way the holes needed to be enlarged, as the bars seem to sit at a slight slant. So you think you have to clearance one way, but its actually the opposite. Or maybe that's just me...
Had to take the bars off a few times in order to lightly sand a few burs off of the drilled holes and inside of the tube. Always seems to fit better the first time around! Definitely a friction fit. I may take the roll bar off again before sending to Jeff and have powdercoated again, as I have a couple of scratches that are killing my OCD. The black gloss looks so good....

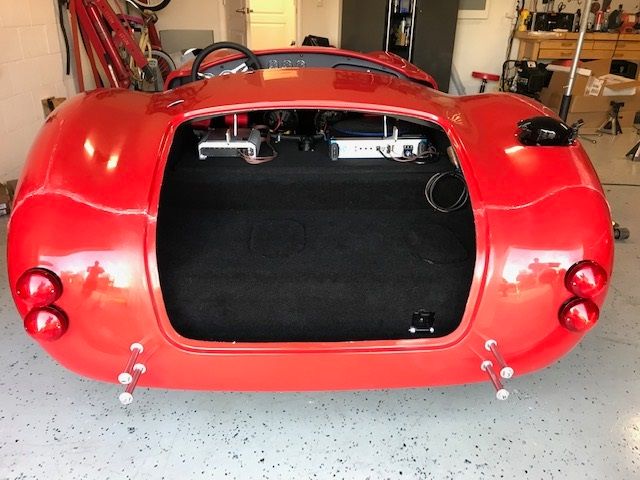
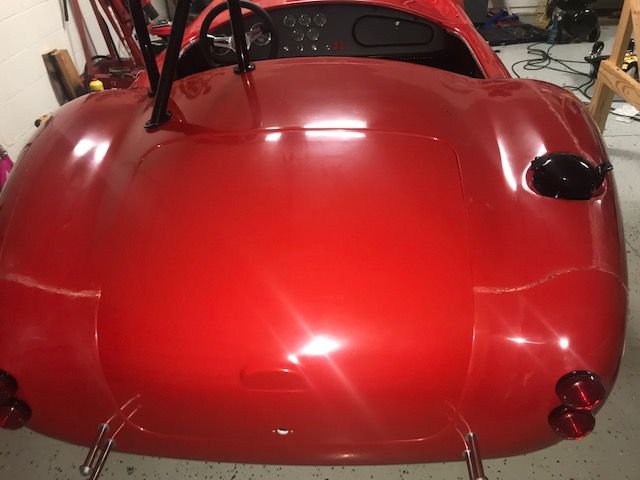
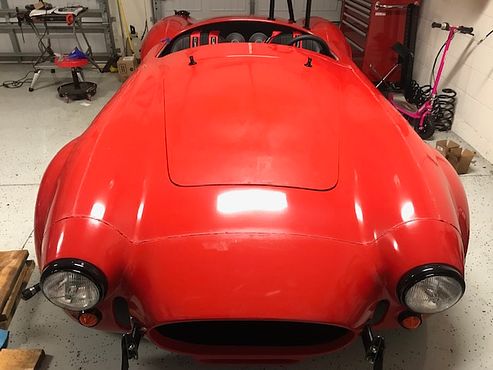
Up next was the trunk. I thought that it would fit a little better, but Jeff put my mind at ease as its cut large and typically won't sit in the hole on first fit. I need to take off roughly 1/4" off the bottom lip of the lid in order to make it sit down. You can see it sticking up a bit in these photos. When I took it around the block today, nobody seems to care or notice for that matter....at least until the doors flew open around the corners.. I'll take care of this when the arm heals up and I can get some more done, but for now, looks pretty sweet...at least in head on pictures!
Doors were next. Passenger side door almost fell into place. Had to push the body in all the way to get it to align with the bottom of the door when securing to the body. Certainly not perfect by any means, but enough to get me rolling down the road until paint and body. Driver's side door was of course a different story. This looks to be a push and pull affair at the bottom. I didn't have the time to get a full adjustment but just enough to fit into the hole. This is another one on my list to fit a little better when I am able. I read that both of these may change a bit when the front elephant ears are installed, but just didn't have the time for additional fitting.
Aside from continued fitting of what I have on the car, still have the hood and windshield to install. Gotta hate it when a torn bicep gets in the way!!
-
01-15-2020, 10:02 PM
#302
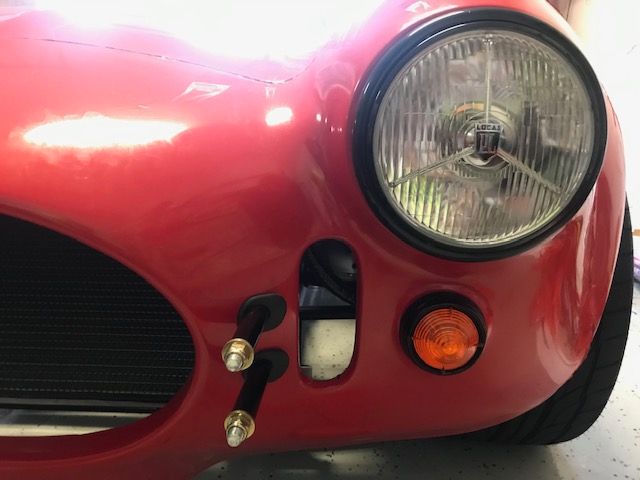
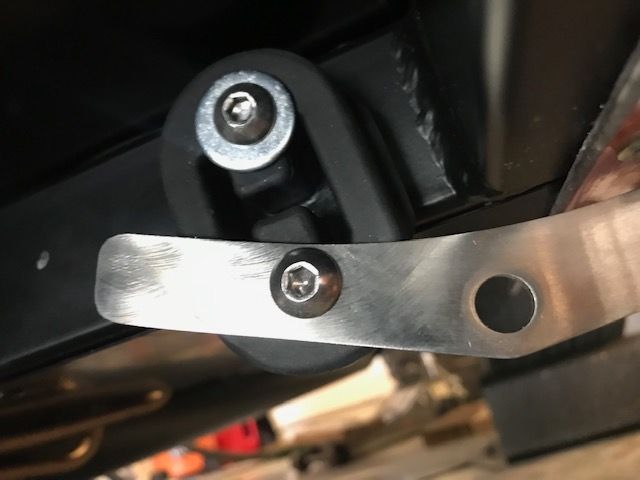
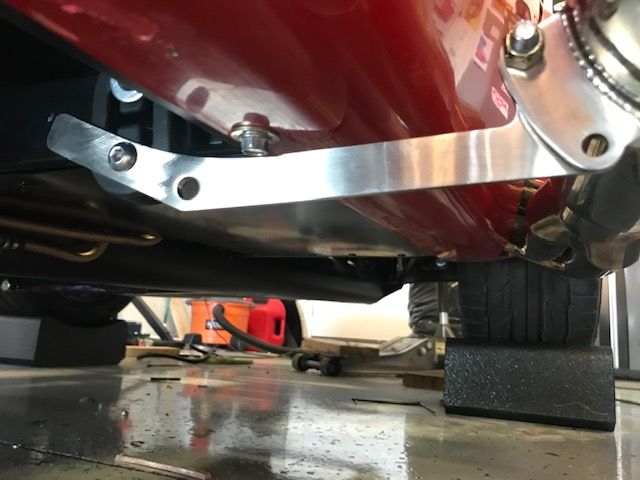
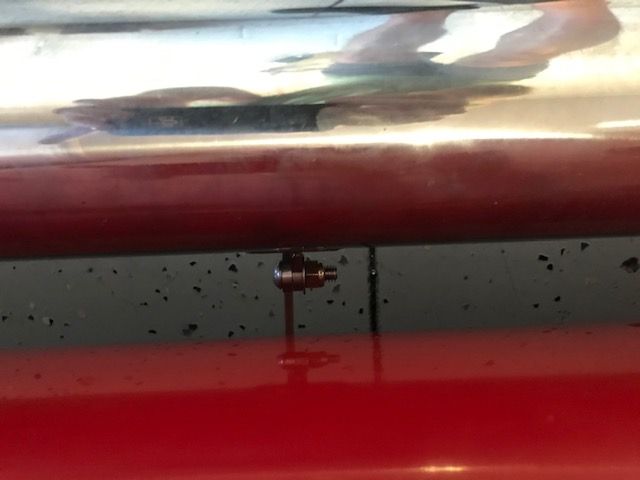
Forgot to mention I also installed my side pipe hangers. I never have liked the sidepipes just hanging in the air, and wanted to get these on before my final trip around the neighborhood for a few weeks.
After reading Kleiner's post about one bolt on the side pipe flange to relieve stress, I kept that in mind as I was hanging the rest of it. My brackets were not aligning completely, so I drilled another hole, 5/16" tap on the 2" tube, and cut off the end of the bracket, only using the large rubber bumper and not two. then I snugged up the bolt on the side pipe flange...not too tight though. I think it will work just fine!
Last edited by cv2065; 01-15-2020 at 10:04 PM.
-
01-16-2020, 07:14 AM
#303
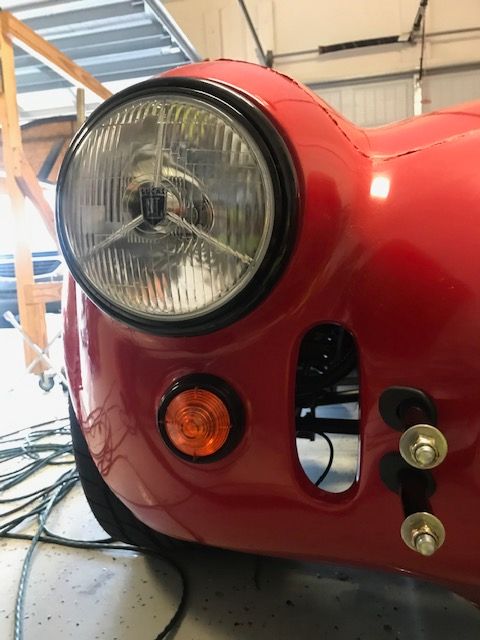
Not a waxer
Well Chad, with the end of the hanger cut off and no rigid mount to the chassis at the far end for the weight of the pipes to act against that isn't really doing anything. As you now have it you have two pivots, one at the rubber and the other at the pipe/hanger attachment, but no stationary point. This will not carry any weight or stop the pipe from moving vertically. In this modified configuration you actually could use the second bolt at the pipe and hanger intersection---this would effectively make the hanger an extension of the pipe. Although this would be kind of backwards from how the system was intended to work since it would allow for more movement in both axis than the original design at least it would bear some of the weight.
Jeff
Last edited by Jeff Kleiner; 01-16-2020 at 07:19 AM.
-
01-16-2020, 12:39 PM
#304
Thanks Jeff. I see what you are saying. I’ll have to revisit them in a couple of weeks. Thanks for looking and feedback!
-
03-05-2020, 01:18 AM
#305
Originally Posted by
cv2065
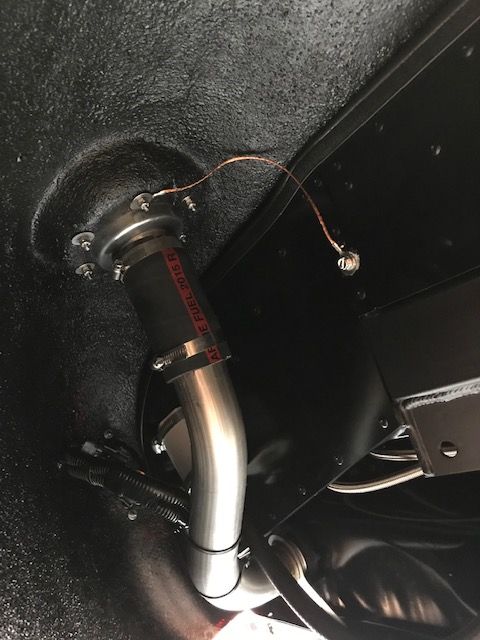
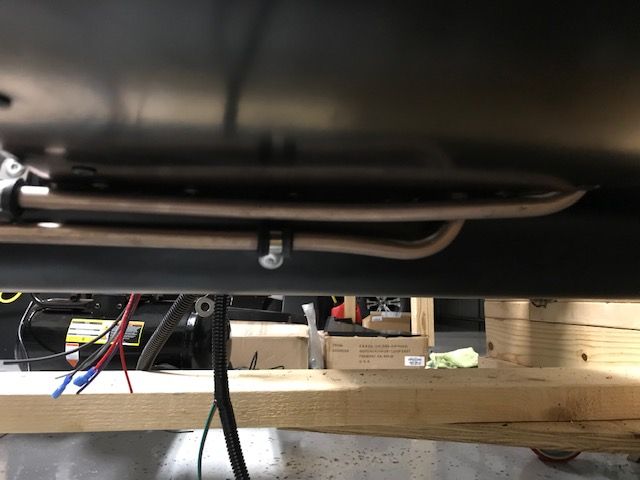
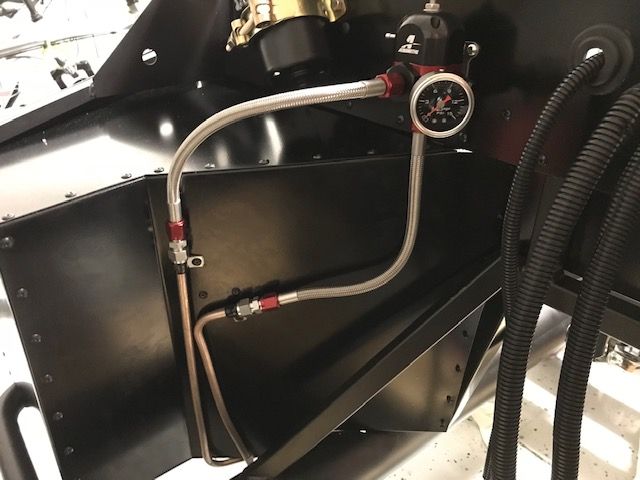
Finally was able to complete my re-run of my fuel lines. Pretty happy with them with respect to the complexity of the bends. I did have some limitations with the bender I was using, as there is only so close you can get to the next bend. I'd say that 2.5" is about the minimum space you can have in-between bends, but it all worked out really well since many of the tubes are indeed 2". I've got 3/8" lines including the return.
So, starting at the rear of the tank and ran 6AN flexible lines from the tank to the Trick Flow Filter. I used all pre-made Russell flexible lines. They are a little expensive but good quality and you can get them in 12" increments.

Trick Flow to my Ham-Let Fittings and the start of the 3/8" hard lines. I used a 50' roll of NiCopp line from Amazon and used 4 compression fittings. I pressure tested these fittings at 85 psi before I installed in the car just in case I had a leak. Test was good. First time I've used these and very high quality. I got mine for $15 each from Breeze Automotive.
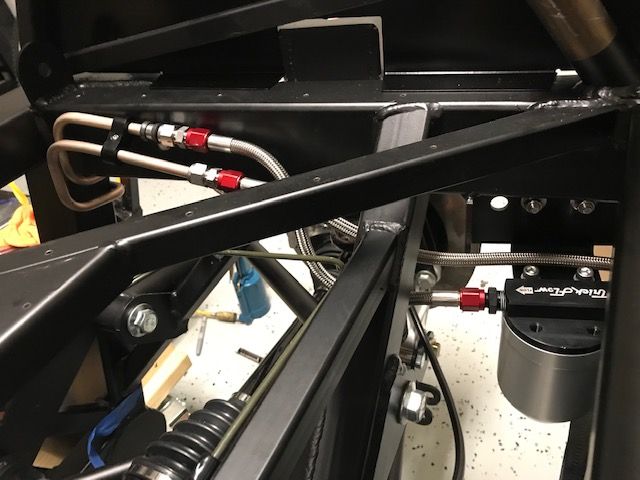
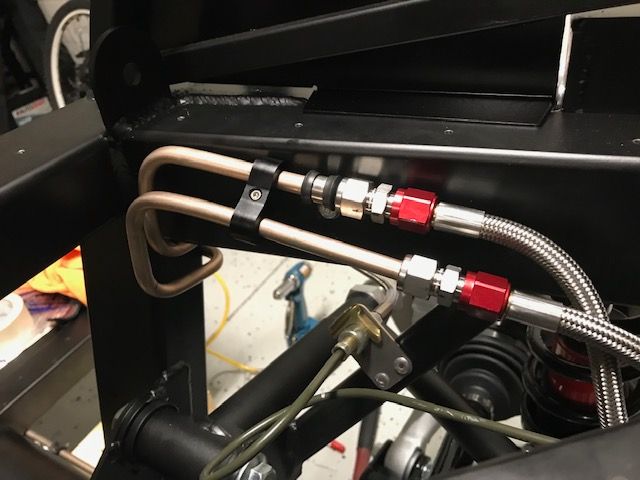
Hard lines bent around the 2" tubing and down to the 4" tube.
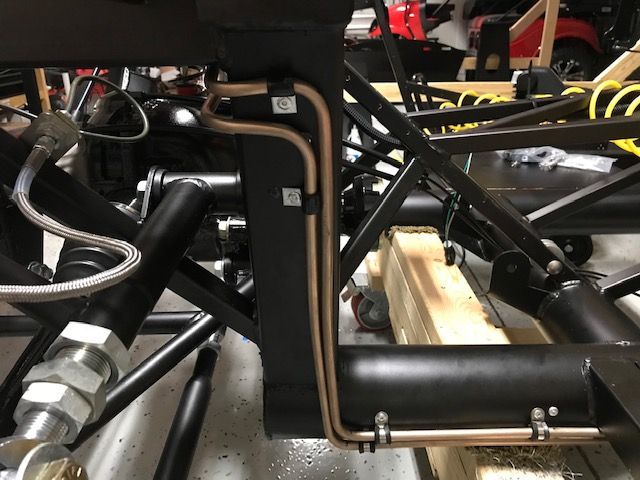
Down the 4" tube.
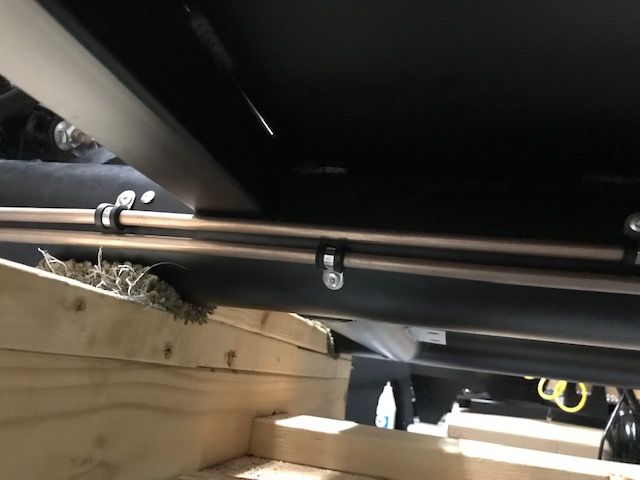
Up into the passenger side footbox.
And then to the AN hoses that lead to my fuel regulator. Ideally I needed about an inch or so more tubing, but instead of making another line, I bent the tubing a bit to accommodate my fuel regulator. I have my input coming straight out of the face of the regulator and the output coming straight down. I wanted to have the least amount of hard bends in the flex hose as possible, so I could have cut the output hard line shorter to keep things all parallel, but I was afraid that I might not be able to access the fitting once the engine is in. Looks a little uneven by my OCD meter, but its functional.
Did you flare the 3/8 hardline to the compression fitting, and how was it accomplished, I am liking your fuel setup along with Pauls'. looking at taking that route.
Semper Fidelis
Last edited by jiriza84641; 03-05-2020 at 01:31 AM.
-
03-05-2020, 09:14 AM
#306
The hardline is not flared into the compression fitting. It just fits around the end of the cut tubing. You can get your compression fittings from Breeze. Just let Mark know what you need and he'll hook you up.
-
03-05-2020, 09:46 AM
#307
Senior Member

Right. Was waiting for that response. No flare required for those Ham-Let Let-Lok fittings that Mark sells. They have an internal wedge that compresses into the line when tightened per the instructions. Rated for PSI much higher than we'll ever see on these builds. Not cheap, but super high quality and will not fail. Quickest and best way to get from a hard line to an -AN fitting that I've found. Used them on multiple builds. Also can't be completely removed once installed. So keep that in mind.
Last edited by edwardb; 03-05-2020 at 11:16 PM.
Build 1: Mk3 Roadster #5125. Sold 11/08/2014.
Build 2: Mk4 Roadster #7750. Sold 04/10/2017.
Build Thread
Build 3: Mk4 Roadster 20th Anniversary #8674. Sold 09/07/2020.
Build Thread and
Video.
Build 4: Gen 3 Type 65 Coupe #59. Gen 3 Coyote. Legal 03/04/2020.
Build Thread and
Video
Build 5: 35 Hot Rod Truck #138. LS3 and 4L65E auto. Rcvd 01/05/2021. Legal 04/20/2023.
Build Thread. Sold 11/9/2023.
-
03-05-2020, 07:20 PM
#308
Originally Posted by
edwardb
Right. Was waiting for that response. No flare required for those Ham-Let Let-Lok fittings that Mark sells. They have an internal wedge that compresses into the line when tightened per the instructions. Rated for PSI much higher than we'll have see on these builds. Not cheap, but super high quality and will not fail. Quickest and best way to get from a hard line to an -AN fitting that I've found. Used them on multiple builds. Also can't be completely removed once installed. So keep that in mind.
Good to know that they won't fail, its either the hardline route with compression fittings, or a braided flexible line. Thanks
-
03-29-2020, 06:23 PM
#309
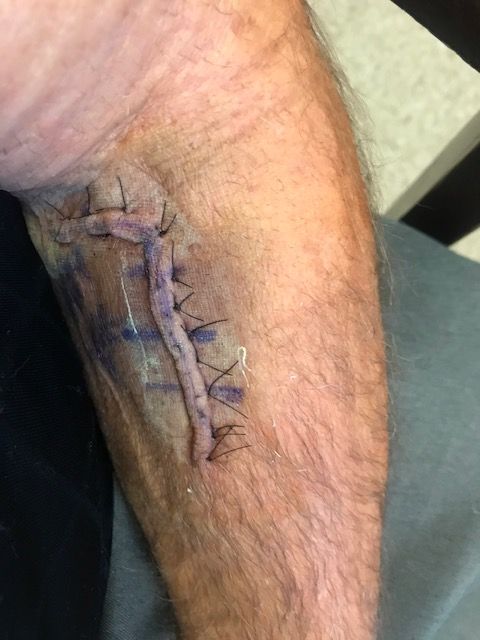
Well, it's been over 10 weeks since my distel biceps repair surgery, and all seems to be going well. 12 weeks is the full recovery, but I'll be giving the bicep until 14 weeks before I get crazy, just to be sure. Anyhow, Just remember to think things through and don't rush in the garage..as it can cost ya pain, money and time. Here's my momento. This was after 4 weeks...Looks much better now.
Over the past few weeks, I've been getting back into the garage doing little things. I was able to get my exhaust hangers rehung. FFR sent me out a set for no charge. They are awesome indeed!! Hanging those and drilling them were a challenge with one arm, especially when rolling around on the garage floor trying to get up and down. Took 4 hours when it only should have taken one, but had to get something done! Turned out well, but after I completed them, kind of dawned on me that when the body is finally fit and exhaust pipes are shimmed, I may be doing it over again...oh well, I feel better with them secured until paint time comes around with Mr. Kleiner. I did only secure with one bolt to the exhaust pipe, and just snugged that one up.

I have taken a few drives around the neighborhood to keep the car cranked and lubricated. The kids in the neighborhood are getting wind that it's getting close and have been asking for rides. I'm sure that the adults are right behind them. I could not get the car out of 3rd gear in the neighborhood, so sneaked out on to the main road for about an 1/8 of a mile from entrance to entrance but wasn't able to get to 5th gear. One was a real pucker run..can't wait until I get this thing registered!
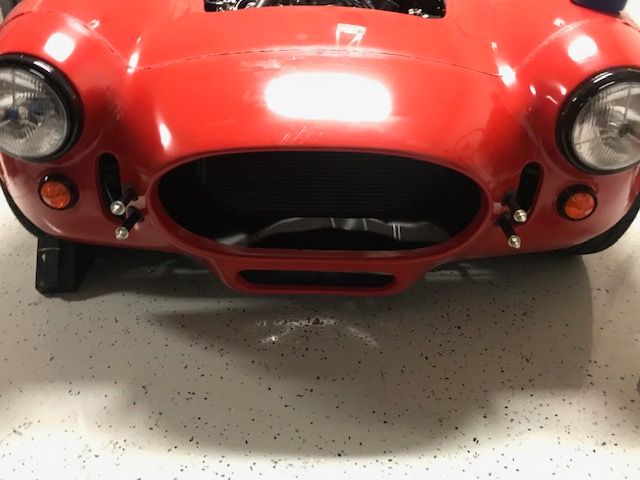
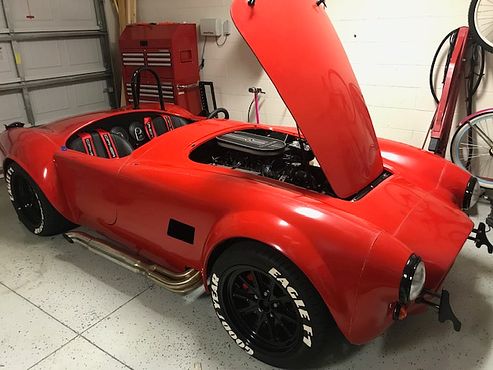
One thing I haven't been able to do is my hood. Finally started on that, but realized that I needed to get Mike Everson's radiator aluminum panel in first. I had this powdercoated black some time ago, so fitted it today. I had to trim about 1/2" off the radiator side and another 1/8" on the front side of it to fit properly. It looks awesome and I highly recommend it as a finishing piece for the front end. Kind of hard to see in the picture with the glare on the gloss black powder coat. Hopefully won't be a rock reflector but that's what repaints are for.

Hood hinges are on the car and will get that on this week for final fitting. Good to be back!
Last edited by cv2065; 03-29-2020 at 06:28 PM.
-
Post Thanks / Like - 0 Thanks, 1 Likes
-
05-17-2020, 10:35 PM
#310
Back in Action
So I'm 18 weeks post op and pretty much back in the garage with only strength as a restriction. As soon as the gyms open back up around here I can get some serious progress going. I have accomplished a few things.
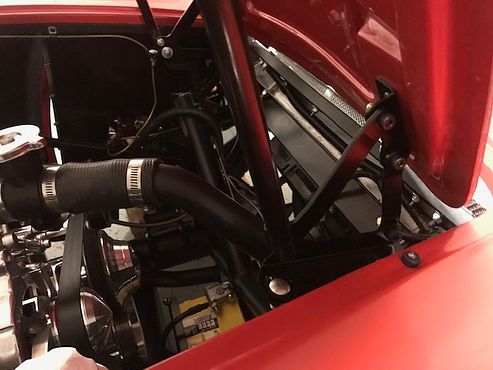
First off, I finally got my windshield back together. After powdercoat, it seemed like the frame was warped or something from the heat and one side was misaligned. In fact, I snapped one of those copper L brackets and had to order another one from FFR. Those have just become available by the way.
So, I bought an Optic Armor piece of polycarbonate and thought if I could control the size a bit when I trimmed it out, that the frame would have an easier time. This was not the case, as I was still having the same issue. So, long story short, thought that maybe the glass, because of its rigidity, could pull the frame back together easier than the pliable Optic Armor and what do you know, when right back together. So I'm saving the Optic Armor in case I need it down the road and have set the windshield aside with the Whitby SS windshield brackets, and should install in the next week or two.
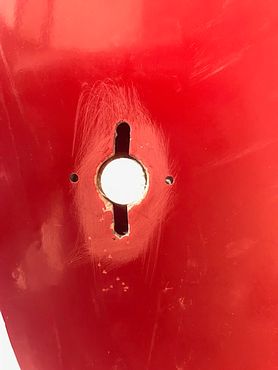
I started on my hood latches and fitment. Followed Edwardb's lead and channeled the holes for the latches, used the low profile 10-32 weld nuts (Mcmaster Carr 98001A125) and used the HSRF to bond it all together. I used an airsaw to channel the holes and found out that masking tape works well when you are cutting to keep the jaggies away from the fiberglass. I read that if you are going to do this, the latches must be oriented horizontally and not vertically. Caught that after the first drilling, so those extra holes will have to be filled. Came out OK and the bond is solid.
I also used 10-32 SS screws to match up with the weld nuts, but had to enlarge the holes in the latches so that they fit.
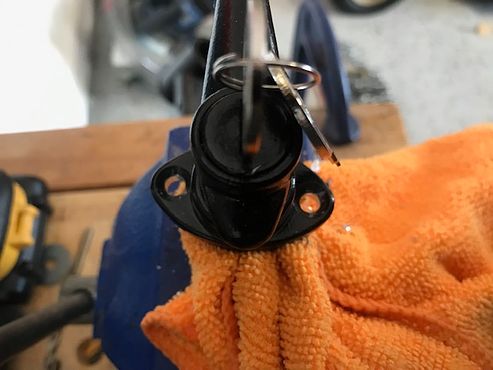
One thing I forgot to mention was the powdercoating of the latches. I initially thought that there might be some plastic in there that would melt with the heat, but after reading about Mark Eaton's experience, I took them back to the powdercoater and sure enough, everything looked great and was functional.
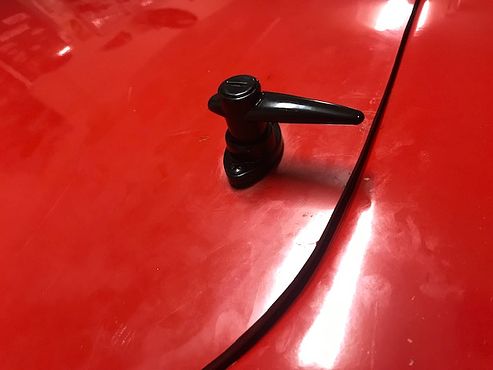
Last part on the latches were the underside. I did buy a couple of the flange bearings that some have finished off the bottom with (Mcmaster Carr #7815K23), securing with HSRF. I decided to go another route, as with those embedded in their permanently against the hood, I wasn't sure how it would fare with paint, so I used a high temp silicone rubber gasket instead (Mcmaster Carr #1061T17). This can be removed and finishes off the hole nicely. I also drilled the latch stud for a cotter pin and put a little blue loctite on the holding screw.
-
05-17-2020, 10:49 PM
#311
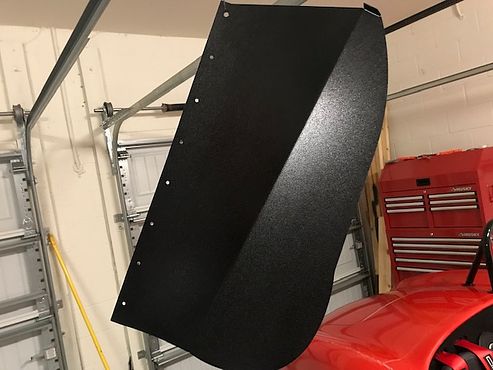
I think I took the hood off and on about 8 times before being happy with the fitment. It's not completely flush but fits the hole, and has plenty of meat in the gap department, so I'm sure it will be enough until Mr. Kleiner gets a hold of it. I think when it was all said and done, I took even amounts off of both sides, maybe 3/16", and another 1/8" off the front. I will say that from FFR, the bottom right corner gapping (when facing the car from the front), seemed to be a little larger than the rest of the corners, so I tried to blend that in with the rest of the trimming without taking any additional off from that area.
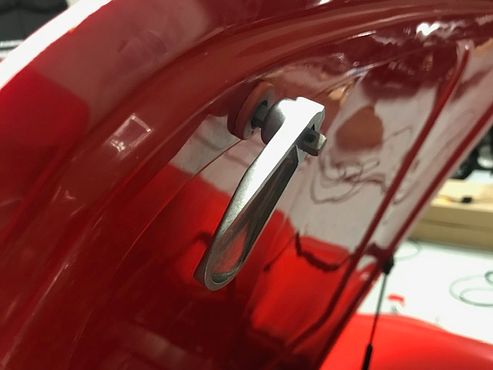
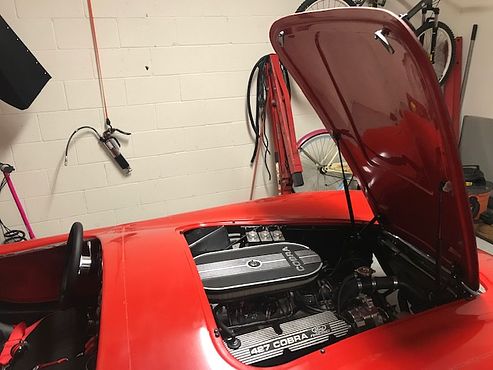
Brackets and gas struts all went in fairly easily. Loosely tightened all, put the hood down, then tightened up from the bottom. The entire system is solid and functions nicely. The only caveat that I have is that my hood lightly kisses the air cleaner. Just barely sits down on it. I'm sure the cut hole in the hood for the air scoop will remedy that, but that's a job for Jeff, as he's seen what I can do with the louver holes...
Only thing left to report is that I finally bed lined my splash panels. I used the Herculiner aerosol which actually came out really nice. Usually the spray nozzle on these cans is garbage, but it held up and gave a nice uniform finish with even aggregate. I'll put some rubber gaskets on these and install them next weekend.
I figure once I get the windshield on and the doors/trunk fitted a little better, I'll have the bulk completed for paint. I have a total of 42 miles on my odometer, and the engine seems to run just a little better every time I get into the car. Very pleased with the Blueprint 427 so far....Just need to get it out and really run it.
Last edited by cv2065; 05-17-2020 at 11:08 PM.
-
Post Thanks / Like - 0 Thanks, 2 Likes
-
05-25-2020, 09:47 AM
#312
Looking fantastic. You are really coming along fast. Love the blacked out trim. I sprayed my elephant ears with rattle can bed liner. I had a bunch left over from doing the engine bay panels. I think that your Herculiner will hold up better since it has that "rubbery" feel and will be more resilient rather than brittle when hit by rocks.
MK IV Build #9659, 3 link, 17's, Forte 347, Sniper EFI, power steering, built for a freak sized person with 17" Kirkey Vintage seats, RT drop trunk, RT turn signal, lots of stuff from Breeze Automotive, Wilwood brakes, paint by Jeff Miller
-
05-25-2020, 11:21 AM
#313
Originally Posted by
cv2065
I have it mounted and it is a beefier, just needs a middle support from replicarparts.com IMHO.
-
05-25-2020, 12:19 PM
#314
Originally Posted by
cv2065
Semper Fidelis Marine!!
-
Post Thanks / Like - 0 Thanks, 1 Likes
-
05-30-2020, 12:27 PM
#315
I did the inside panels as you, but couldn't get a one piece fit, ao I had to make it a three piece. You won't see it when its done anyhow, cause it'll be covered!
-
08-24-2020, 04:46 PM
#316
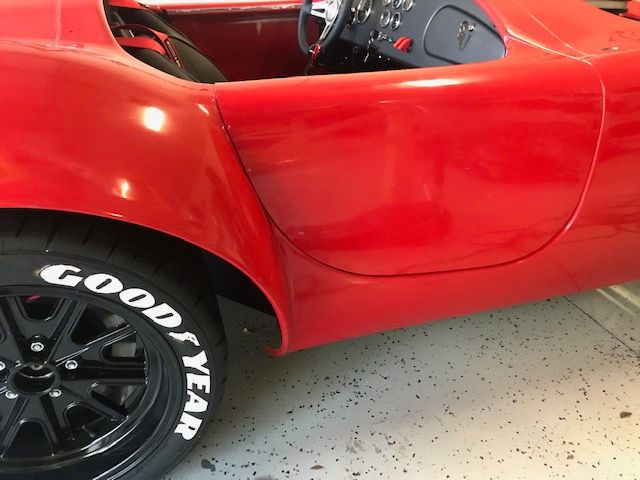
What tires are those that you are running. Do they come with the billboard lettering or are they stick on lettering? They look great.
Colin
FFR MKIV Complete Kit - Blueprint 427 TKO 600 - IRS 3.55 Center section and Spindles.
-
08-25-2020, 10:04 PM
#317
Originally Posted by
Chilly
What tires are those that you are running. Do they come with the billboard lettering or are they stick on lettering? They look great.
Colin
Hey Colin. Those are Nitto NT555 G2's. They have the tire stickers on them. I have the supplier listed in my thread somewhere. If you place them on the tire in the correct spots, they almost look legit!
-
09-27-2020, 09:32 AM
#318
Hi Chad, I'm a week or two away from pulling the trigger on an mk4 kit. I'm in Dr Phillips so in your neck of the woods. I'm also leaning toward a carbed blueprint 427. I just figured I'd ask if you would spec your kit the same way if you were to do it again now that you've made so much progress. Have you kept track of how many hours you've invested so far? Are there any other guys building in the area you know of? Sorry for the thousand questions
Chris
-
09-27-2020, 10:32 AM
#319
Hey Chris. Just sent you a PM
-
09-28-2020, 09:06 AM
#320
Senior Member
Originally Posted by
Rtrhead66
Hi Chad, I'm a week or two away from pulling the trigger on an mk4 kit. I'm in Dr Phillips so in your neck of the woods. I'm also leaning toward a carbed blueprint 427. I just figured I'd ask if you would spec your kit the same way if you were to do it again now that you've made so much progress. Have you kept track of how many hours you've invested so far? Are there any other guys building in the area you know of? Sorry for the thousand questions
Chris
I'm up in Oviedo.
Michael aka @my_cobra_build on Instagram
---------------------------------------------------
Base MK IV Roadster with several options. Body is Lamborghini Grigio Lynx w/ Audi Vesuvius Gray stripes. 25th Anniversary FFR wheels. Seats and interior by Intatrim.
Gen1 Coyote w/ Comp Cams & Cobrajet manifold. Tremec TKO 600 w/ a midshift kit. 2015 IRS w/ 3.73 Torsen diff. FFR Headers, Gas N Pipes, Power steering & power brakes.


 Thanks:
  Likes:


 Reply With Quote