-
05-15-2019, 07:21 PM
#921
Senior Member


Originally Posted by
Pearldrummer7

Garage is warm in the winter, and (more importantly, in NC) cool in the summer.
Say that again? NC? Where has gone CO?
Frank
818 chassis #181 powered by a '93 VW VR6 Turbo GT3582R
Go-karted Aug 5, 2016 - Then May 19+21, 2017
Tracked May 27/July 26, 2017
Build time before being driveable on Sep 27, 2019: over 6000h
Build Completed Winter 2021
-
05-16-2019, 01:03 PM
#922
Senior Member

Originally Posted by
Frank818
Say that again? NC? Where has gone CO?
I moved from NY to NC with New Belgium ~2.5 years ago. I spend some time out at our first plant (CO) but I'm mostly down South (and more importantly, that's where my garage/house are) 
-
05-16-2019, 04:54 PM
#923
Senior Member
Oh! Ok I thought you fully moved to CO back then.
Well as long as you continue painting on your wall every single track you track onto, that is really awesome! I love the idea! Those are trophies, even when you get disqualified from some of those races due to, I dunno, lack of fuel, say... loollll
Frank
818 chassis #181 powered by a '93 VW VR6 Turbo GT3582R
Go-karted Aug 5, 2016 - Then May 19+21, 2017
Tracked May 27/July 26, 2017
Build time before being driveable on Sep 27, 2019: over 6000h
Build Completed Winter 2021
-
09-26-2019, 06:54 AM
#924
Senior Member
about 90% done with the re-wiring. Trimmed a lot of stuff, made things the right length (less there and back), separated them into distinct harnesses a bit better, and color coded the sections. Check out how clean my rear light harness is! Hoping to shove the harness into the car this weekend


-
Post Thanks / Like - 0 Thanks, 2 Likes
-
09-27-2019, 07:35 PM
#925
Senior Member
You trimmed to save weight?
You did that lime green wire sleeve? Looks nice!
Frank
818 chassis #181 powered by a '93 VW VR6 Turbo GT3582R
Go-karted Aug 5, 2016 - Then May 19+21, 2017
Tracked May 27/July 26, 2017
Build time before being driveable on Sep 27, 2019: over 6000h
Build Completed Winter 2021
-
10-01-2019, 06:47 AM
#926
Senior Member
Originally Posted by
Frank818
You trimmed to save weight?
You did that lime green wire sleeve? Looks nice!
I actually mostly trimmed it while waiting for my transmission to be fixed (it's back now), but it was kind of a mess and not color coded at all. It's a lot prettier now. This wrap SUCKS to apply but it's quite nice.

filled this box up twice with scrap wire.
This is what it looks like laid out. Not great but a lot nicer than before. Bunch less wires, nicer connectors, some color coding, and a lot less messy

-
Post Thanks / Like - 0 Thanks, 2 Likes
-
10-01-2019, 11:31 AM
#927
Senior Member
That's nice, man!
A couple hours more and your awesome race car will look like mine (but running well).
Frank
818 chassis #181 powered by a '93 VW VR6 Turbo GT3582R
Go-karted Aug 5, 2016 - Then May 19+21, 2017
Tracked May 27/July 26, 2017
Build time before being driveable on Sep 27, 2019: over 6000h
Build Completed Winter 2021
-
Post Thanks / Like - 0 Thanks, 1 Likes
-
10-07-2019, 08:25 AM
#928
Senior Member
So, I put the harness in the car. It feels much more organized and protected than before! Still not as clean as an iWire harness, but I've had fun and the price is certainly right.
I'm thinking I'm gonna put the engine compartment fuse box and the interior fuse box in the center tunnel, and build a little hatch to access them. Thinking I'll put it here and then cut out the red section of the tunnel cover to make it accessible (hinged or clipped in, perhaps?)

-
10-07-2019, 07:16 PM
#929
Senior Member
Yes make sure the fuse box is accessible!! Don't do like me... loll
Frank
818 chassis #181 powered by a '93 VW VR6 Turbo GT3582R
Go-karted Aug 5, 2016 - Then May 19+21, 2017
Tracked May 27/July 26, 2017
Build time before being driveable on Sep 27, 2019: over 6000h
Build Completed Winter 2021
-
10-08-2019, 07:28 AM
#930
Senior Member
-
Post Thanks / Like - 0 Thanks, 1 Likes
-
10-08-2019, 09:18 AM
#931

Yes, I love Technology

You could play around with using thin aluminum sheet (super thin stuff - hardware store flashing is cheap but a little hard to work without crinkling it) as a dash cover plate. Then if holes need to be changed later you just make a new aluminum plate. Aluminum can be painted or powder coated although it can be fussy about "stick" sometimes. Or if you are into wood grain, some veneer or wood look vinyl over aluminum or direct to the dash, again something that lets you re-do if ever needed. Done carefully even a sheet of thin lexan / polycarbonate would work.
So possible materials to make a face plate, most of which are Home Depot, Menards, etc:
aluminum sheet such as .03 thick
aluminum flashing
plastic sheet - lexan / polycarbonate
formica / equivalent laminate
Vinyl / Naugahyde with/without a stiffener backing like al flashing / even thin cardboard
wood grain - veneer products
wood grain look - automotive stick on vinyls
hobby craft type plywood panels - some are incredibly thin - hobby stores, hobby lobby, Menards (not sure they go thin enough)
For bonding to the dash consider some screws or rivets, otherwise glue it on. That adhesive I used in my build thread to do the vinyl to the dash holds like crazy.
-
Post Thanks / Like - 1 Thanks, 0 Likes
-
10-08-2019, 01:23 PM
#932
Senior Member
Originally Posted by
aquillen
You could play around with using thin aluminum sheet (super thin stuff - hardware store flashing is cheap but a little hard to work without crinkling it) as a dash cover plate. Then if holes need to be changed later you just make a new aluminum plate. Aluminum can be painted or powder coated although it can be fussy about "stick" sometimes. Or if you are into wood grain, some veneer or wood look vinyl over aluminum or direct to the dash, again something that lets you re-do if ever needed. Done carefully even a sheet of thin lexan / polycarbonate would work.
So possible materials to make a face plate, most of which are Home Depot, Menards, etc:
aluminum sheet such as .03 thick
aluminum flashing
plastic sheet - lexan / polycarbonate
formica / equivalent laminate
Vinyl / Naugahyde with/without a stiffener backing like al flashing / even thin cardboard
wood grain - veneer products
wood grain look - automotive stick on vinyls
hobby craft type plywood panels - some are incredibly thin - hobby stores, hobby lobby, Menards (not sure they go thin enough)
For bonding to the dash consider some screws or rivets, otherwise glue it on. That adhesive I used in my build thread to do the vinyl to the dash holds like crazy.
Art-- I just looked through your thread extensively. It's extremely impressive what you've done to the interior. I think I'm going to take a page (or a chapter) out of your book. Appreciate the suggestions man
-
11-04-2019, 06:47 AM
#933
Senior Member
So, while the engine is out, I figured I would (re) replace my leaking cam seal and try to figure out why that happened. I took off the timing belt following the FSM, and when I did the tensioner sprung and spun the driver's side cams. Not a lot, but the valve can interfere with both the piston and each other. So I've ordered a leakdown tester (happy to receive any advice on giving it a test). A few friends said it's unlikely that they're damaged but I am worried about it. Anyone with experience on that front?
Good excuse to clean the engine up a bit.

-
11-04-2019, 06:59 PM
#934
Hey frank which radiator shroud did you go with?
-
11-06-2019, 10:31 AM
#935


Originally Posted by
Pearldrummer7
So, while the engine is out, I figured I would (re) replace my leaking cam seal and try to figure out why that happened. I took off the timing belt following the FSM, and when I did the tensioner sprung and spun the driver's side cams. Not a lot, but the valve can interfere with both the piston and each other. So I've ordered a leakdown tester (happy to receive any advice on giving it a test). A few friends said it's unlikely that they're damaged but I am worried about it. Anyone with experience on that front?
Good excuse to clean the engine up a bit.
It's extremely unlikely the valves are damaged if you had the crank in the correct position when you took the belt off. If you think about it, what causes the cams to spin a little? It's because they are slightly under tension of the valve springs. When you take the belt off and they turn they are just being turned by the valve spring pressure, and that pressure is closing the valves, not opening them further. So they are moving away from interference, not towards it. And they only spin enough to bring all the valves to closed so the tension is gone.
Of course it's completely different if you lose a timing belt while the engine is running.
A leak down test is good anyways for lots of reasons, so go ahead and do it, but if you have a leakdown issue it's probably not because the valves are damaged from taking the belt off.
"Good Judgement comes from Experience. Experience comes from Bad Judgement"
Owner: Colonel Red Racing
eBAy Store:
http://stores.ebay.com/colonelredracing
818R ICSCC SPM
Palatov DP4 - ICSCC Sports Racer
-
Post Thanks / Like - 1 Thanks, 0 Likes
-
11-06-2019, 01:31 PM
#936
Senior Member
Originally Posted by
Sgt.Gator
It's extremely unlikely the valves are damaged if you had the crank in the correct position when you took the belt off. If you think about it, what causes the cams to spin a little? It's because they are slightly under tension of the valve springs. When you take the belt off and they turn they are just being turned by the valve spring pressure, and that pressure is closing the valves, not opening them further. So they are moving away from interference, not towards it. And they only spin enough to bring all the valves to closed so the tension is gone.
Of course it's completely different if you lose a timing belt while the engine is running.
A leak down test is good anyways for lots of reasons, so go ahead and do it, but if you have a leakdown issue it's probably not because the valves are damaged from taking the belt off.
I was not thinking about which way the valves were springing, which is of course away from the piston. I just got nervous with the bolded warning in the FSM. I'm still gonna do a leakdown test (hopefully tonight) and see how it is, but the more I read and think about it, the less likely it seems that it's damaged while not running. It'll be telling!
I appreciate the reassurance, Gator!
-
11-06-2019, 01:35 PM
#937
Senior Member
Originally Posted by
Newkitguy
Hey frank which radiator shroud did you go with?
Hey! I have no radiator shroud; just running with the mounts from Mechie3/Zero Decibel Motorsports and the stock radiator. Were you thinking of Canadian Frank with his (now blue) new-front-end 818? Can't find exactly where the shroud is but it's around or after here
https://thefactoryfiveforum.com/show...-Thread/page36
Fun fact, I have his old spare nose from when he upgraded (years ago)
-
11-06-2019, 06:44 PM
#938
-
11-11-2019, 08:16 AM
#939
Senior Member
-
11-11-2019, 12:45 PM
#940
Senior Member
No way!!!! That red carpet is exactly the same my parents had until 2 months ago! Did you steal it from them? hahahahahahah
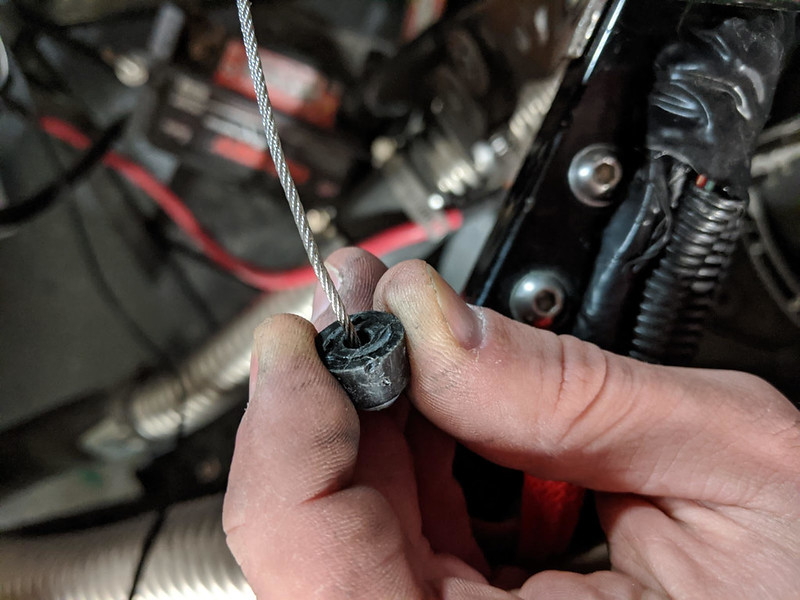
That's a nice cam holder tool, you got 2 sides to work on and I guess it's a lot easier when the engine is out. Happy I got a VR6 for those 2 reasons, though.
Are those the corrugated hoses you got from me?
Frank
818 chassis #181 powered by a '93 VW VR6 Turbo GT3582R
Go-karted Aug 5, 2016 - Then May 19+21, 2017
Tracked May 27/July 26, 2017
Build time before being driveable on Sep 27, 2019: over 6000h
Build Completed Winter 2021
-
11-11-2019, 01:41 PM
#941
Senior Member
Originally Posted by
Frank818
No way!!!! That red carpet is exactly the same my parents had until 2 months ago! Did you steal it from them? hahahahahahah
That's a nice cam holder tool, you got 2 sides to work on and I guess it's a lot easier when the engine is out. Happy I got a VR6 for those 2 reasons, though.
Are those the corrugated hoses you got from me?
haha they're actually from my SO's parents. Her father collects foreign rugs and gave us a ton of them. I had to pinky promise to not damage the few in the shop
Yes they are the hoses from you; I love these things. Jealous of VR6 timing; seems easier than the Subie
-
11-17-2019, 02:56 PM
#942
Senior Member
I checked valve clearances while in here. Pretty close, but all a little loose. Intake range from 0.23mm to 0.25mm (spec is 0.20 +- 0.02), and exhaust is anywhere from 0.30 to 0.38(spec is 0.25 +- 0.02). I have the old shim over bucket style, which isn't fantastic. But since loose is conservative vs tight, I'll take a little power loss and leave well enough alone, don't y'all agree?
-
11-17-2019, 04:18 PM
#943
Tazio Nuvolari wannabe

I think I'd leave it. I don't know if more heat makes clearances close, but certainly the wear of seat and valve close up the gap. Mods can effect it.
ON my race engine, with beehive springs and 272 high lift cams, I once set the valves on the tight side and after a year and something I burnt two valves (started seeing compression loss).
-
11-17-2019, 07:54 PM
#944
Senior Member
Originally Posted by
Pearldrummer7
Jealous of VR6 timing; seems easier than the Subie
I'm really happy my body parts and tubing are in good use on your car, keep things going, man.
Speaking of cam timing, https://thefactoryfiveforum.com/show...l=1#post388687
Originally Posted by
Pearldrummer7
I'll take a little power loss and leave well enough alone, don't y'all agree?
It's a race car, no power loss allowed (no out of gas as well!), make it as powerful as possible and rebuild the engine after every track day. loolll
Sorry I can't seriously help on this one.
Frank
818 chassis #181 powered by a '93 VW VR6 Turbo GT3582R
Go-karted Aug 5, 2016 - Then May 19+21, 2017
Tracked May 27/July 26, 2017
Build time before being driveable on Sep 27, 2019: over 6000h
Build Completed Winter 2021
-
11-22-2019, 09:48 AM
#945
Senior Member
Originally Posted by
Scargo
I think I'd leave it. I don't know if more heat makes clearances close, but certainly the wear of seat and valve close up the gap. Mods can effect it.
ON my race engine, with beehive springs and 272 high lift cams, I once set the valves on the tight side and after a year and something I burnt two valves (started seeing compression loss).
Figured, I've heard these horror stories enough times. Trying not to see the valves again for a few years.
I started to torque the caps back to spec and it felt WAY too difficult, and the cam shafts couldn't even rotate freely at that torque. I started looking around and found a thread talking about how 14.5 ft*lbs is a misprint and is only for the rear camshalt bolts (8mm). The cap 6mm ones are 7 ft*lbs, which feels MUCH more correct. I got to thinking about it, dug out some old RTV from that mess on the engine, and found where this got the previous owner too. Explains the gobs of RTV there. Careful if you're torquing a bolt according to the FSM, there's mistakes in it!!

-
11-30-2019, 10:57 AM
#946
Senior Member

Make sure to change those sub strap mount points- They are very unsafe there. They need to be under the seat. Your Family Jewels with thank you if you have an accident.
Thanks- Chad
818R-SOLD!!!- Go Karted 7/20/14/ Officially raced NASA ST2- 2/28/15
2016 Elan NP01 Prototype Racecar Chassis #20
1969 Porsche 911ST Vintage Race Car
1972 Porsche 911T (#'s matching undergoing nut & bolt resto in my garage)
-
12-03-2019, 07:17 AM
#947
Senior Member
Originally Posted by
C.Plavan
Make sure to change those sub strap mount points- They are very unsafe there. They need to be under the seat. Your Family Jewels with thank you if you have an accident.
added to the to-do list. Thanks for the suggestion, Chad!

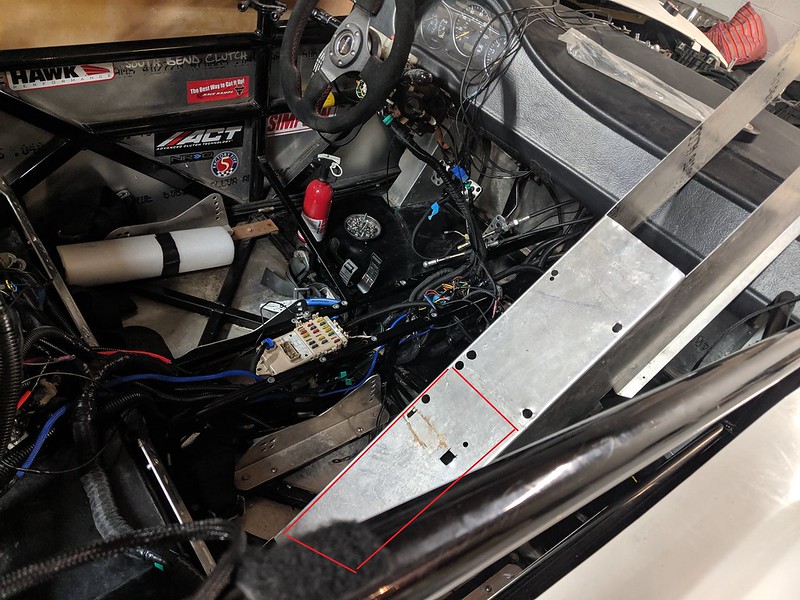
Made a new switch panel, because my old one was embarrassingly bad.
The second I sat down Vern joined me. Doesn't like being in the race car but loves to be around it.

-
Post Thanks / Like - 1 Thanks, 1 Likes
-
12-07-2019, 06:23 AM
#948
Senior Member
Just make sure there won't be any cat fur flying around and sticking on those cams!
Frank
818 chassis #181 powered by a '93 VW VR6 Turbo GT3582R
Go-karted Aug 5, 2016 - Then May 19+21, 2017
Tracked May 27/July 26, 2017
Build time before being driveable on Sep 27, 2019: over 6000h
Build Completed Winter 2021
-
01-08-2020, 12:49 PM
#949
Senior Member
-
Post Thanks / Like - 0 Thanks, 1 Likes
-
01-13-2020, 01:45 PM
#950
Senior Member
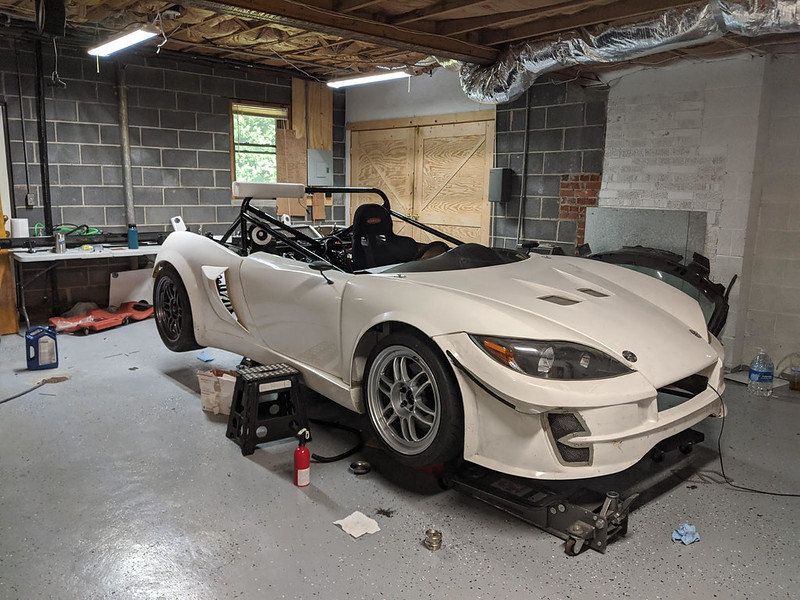
engine is in! wiring, plumbing, clutch tonight or tomorrow, then tranny!

-
01-13-2020, 04:38 PM
#951
You can save yourself some potential challenges if you remove that metal shield plate from the bottom of the engine before you try to slide the tranny in. It is much easier to take it on and off than it is to line up the tranny with it in place.
-
01-15-2020, 07:38 AM
#952
Senior Member
Originally Posted by
sgarrett
You can save yourself some potential challenges if you remove that metal shield plate from the bottom of the engine before you try to slide the tranny in. It is much easier to take it on and off than it is to line up the tranny with it in place.
I did that, and it was much easier. Also, I didn't realize how gross that little plate was until I took it off and started cleaning....ew.

Got a bunch of stuff in! Lot left to do (torque things, intercooler pluming, fluids, plugging tons of stuff in) but it's getting closer!
-
Post Thanks / Like - 0 Thanks, 2 Likes
-
03-30-2020, 11:11 AM
#953
Senior Member
-
03-30-2020, 11:33 PM
#954
Senior Member

818S/C : Chassis #25 with 06 WRX 2.5 turbo, ABS, cruise, PS, A/C, Apple CarPlay, rear camera, power windows & locks, leather & other complexities. Sold 10/19 with 5,800 miles.
Mk3 Roadster #6228 4.6L, T45, IRS, PS, PB, ABS, Cruise, Koni's, 17" Halibrands, red w/ silver - 9K miles then sold @ Barrett-Jackson Jan 2011 (got back cash spent).
-
04-07-2020, 07:56 AM
#955
Senior Member
Put the seat in to recruit my lovely SO to help me bleed brakes and clutch. Getting really close to a test-start. Sounds silly since it ran last time I started it (1.5 years ago or so) but I'm still nervous about all the changes working smoothly.
Sat in that seat for WAY too long. I'm so excited!

-
Post Thanks / Like - 0 Thanks, 2 Likes
-
04-07-2020, 08:40 AM
#956
Yes, I love Technology
Sitting in the seat now and then, but not being able to drive = excellent motivator.
-
04-07-2020, 09:21 AM
#957
Originally Posted by
aquillen
Sitting in the seat now and then, but not being able to drive = excellent motivator.
YES!!! I totally agree.
-
04-23-2020, 12:55 PM
#958
Senior Member
-
04-23-2020, 06:39 PM
#959
Senior Member

Oh man, that's a smoking deal on that wing. I have the same one, but paid full price 
-
04-26-2020, 04:49 PM
#960
Senior Member
Your garage is really cool, is that the one with wall drawings of every race tracks you raced on?
And do you have more pix of that black and red bike?
Frank
818 chassis #181 powered by a '93 VW VR6 Turbo GT3582R
Go-karted Aug 5, 2016 - Then May 19+21, 2017
Tracked May 27/July 26, 2017
Build time before being driveable on Sep 27, 2019: over 6000h
Build Completed Winter 2021


 Thanks:
  Likes:


 Reply With Quote