Forte's

Visit our community sponsor

Thanks Thanks:  21
Likes Likes:  218
Page 6 of 9 FirstFirst ... 45678 ... LastLast
Results 201 to 240 of 338

Thread: Art's 818 build

  1. #201

    Yes, I love Technology
    aquillen's Avatar
    Join Date
    Feb 2016
    Location
    NW Indiana
    Posts
    756
    Post Thanks / Like
    Additional "trim" rings cut on a bandsaw, and the back plate too. The trim rings give purchase for a perimeter of aluminum sheet (lets the tiny bit of internal heat transfer out easier than a full acrylic box would, and easier to construct). The aluminum gets screwed to the perimeter rings with 4-40 flat head machine screws (drill and tap the plastic).


    Gluing a trim ring to one of the upper or lower sheets, in this case uppper (out facing one):


    Not to be left out, the reflector and LED parts of the donor are chopped up, rebuilt with a piece of printed circuit board, and so on, to create a new reflective and functional light module (one of 8 to be constructed). Top is original, bottom the new part:


    So far:

    .

    .

  2. #202
    Senior Member Hobby Racer's Avatar
    Join Date
    Feb 2011
    Location
    Syracuse, NY
    Posts
    1,308
    Post Thanks / Like
    All I can say is WOW!! Your skills are as varied as they are amazing. Thanks for sharing!
    MK3.1 Roadster completed 2011
    818R built with EZ36R H6 completed 2018
    818R rebuild with a JDM Honda K24A

  3. #203

    Yes, I love Technology
    aquillen's Avatar
    Join Date
    Feb 2016
    Location
    NW Indiana
    Posts
    756
    Post Thanks / Like
    Thanks!

    I've mostly been sewing upholstery for my seats, where I bartered for sewing machine time & expert guidance at a nearby business, for the last several days so finishing the tail light circuitry is going really slow, but I got some time on it this weekend...

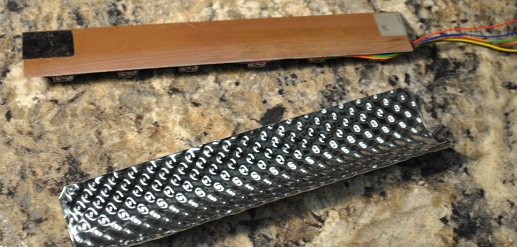
    The curved parabolic chromed plastic reflectors from the original Impala brake lights created "hot spots" with a crescent shape light pattern, because I shortened the distance between the LED/reflector and the red lens. I solved this by replacing the Impala's reflectors with curved stainless steel sheet that has a dimpled surface. This is the same stuff I got to make heat shields for my exhaust (have made some but not completed yet - no posts yet). Now the lights have a good even appearance.

    Studying a 2013 Impala on the street the other day, I could see that the brake light on that car has best intensity at about 5 feet height at about 100 feet back (= a driver in a car following from behind no doubt). So I setup the angle of my internal parts to mimic that.

    6 LED's from the Impala third brake light on my printed circuit board. I put chrome mylar film on the circuit board unused area. This bounces incoming light back out = reflector mode when tail light is not on at all.

    Curved stainless steel reflector waiting to be fastened to the board -


    The curved SS reflector gets soldered along the top edge to the back side of the LED circuit board (which is copper plated on both sides). Soldering these parts together cuts down on things inside the overall assembly that will rely solely on glue which I always have a little distrust for.


    A "light module" and the housing it will go into...


    The four light modules glued into the housing. They get tack glued in spots with a Locktite plastic bonder "instant" adhesive which does hold to acrylic with excellent strength, but not a high strength bond to stainless. Next I will run a bead between all mating edges of each module to the housing using JB Weld's plastic bonder. At least one acrylic supplier reports this is an excellent and trustworthy adhesive (and it tests pretty good on the stainless too.)

    The collection of wires will be used along with a chip I will program to have sweeping - sequential turn lights on some of the light bars.


    Camera doesn't capture "on" appearance very well but it is something like this - looks great in person happy to say -

    Last edited by aquillen; 12-22-2019 at 07:10 PM.

  4. Thanks Jetfuel thanked for this post
    Likes Mitch Wright, AZPete liked this post
  5. #204

    Join Date
    Oct 2013
    Location
    Puyallup, WA
    Posts
    576
    Post Thanks / Like
    Wow....

  6. #205

    Yes, I love Technology
    aquillen's Avatar
    Join Date
    Feb 2016
    Location
    NW Indiana
    Posts
    756
    Post Thanks / Like
    Upholstery rework on the seats in progress. Now I know why they get a lot of money to do this kind of stuff. I have a pro holding my hand, otherwise this would not be happening. Just sewing the hex patterns on the back and butt cloths has taken hours (about 4 per)!

    But I'm getting there. Tomorrow I'm doing the French top stitch seams on the lower bolsters which I peiced together this morning. He said that will be the hardest thing to do and have it look good. So we'll know soon -


    ...
    on the upper seat backs I'm hoping these will look good. CNC cut from 1/8" steel plate, aluminum back pan routed from 1/4" plate. Fun to make too

  7. Likes DSR-3, Mitch Wright liked this post
  8. #206

    Yes, I love Technology
    aquillen's Avatar
    Join Date
    Feb 2016
    Location
    NW Indiana
    Posts
    756
    Post Thanks / Like
    Silk purse from a sow's ear. My Pep-Boys closeout seats were downright cheap, but had terrible cloth, seams pulling apart just from test sittings. The gentleman at the upholstery shop that walked me through doing my own seat recoverings says they look close to pro, he'd get about $1500 each to do this. He also said he would never do the "hex quilt" by hand - would farm it to a computer sewing shop. Took me about a month of 1/2 day's each week day to complete both. Oh and a good chunk of one weekend to make the 818 emblems. It was all worth it. Much gratitude to Winston at S&S Upholstery in DeMotte Indiana.
    ...

    ...
    And for sure, prices you pay for custom upholstery work are worth it. This involves a lot of detail, careful work, know-how and physical labor.

  9. #207
    Senior Member
    Join Date
    Feb 2019
    Location
    Houston, TX
    Posts
    1,057
    Post Thanks / Like
    Looks fantastic Art, your patience and perseverance is staggering.

  10. #208
    Senior Member
    Join Date
    Sep 2015
    Location
    Hamersville, Ohio
    Posts
    826
    Post Thanks / Like
    Nice work Art! I think we all could learn a lot from you! You’ve built an 818 berlinetta.

  11. #209
    Senior Member
    Join Date
    Jul 2017
    Location
    The Villages Fl.
    Posts
    152
    Post Thanks / Like
    Wow!!! They look Great!

  12. #210

    Yes, I love Technology
    aquillen's Avatar
    Join Date
    Feb 2016
    Location
    NW Indiana
    Posts
    756
    Post Thanks / Like
    Seats are in - yea!


    Doors and windows roughed in, working on upholstering & controls going into the door cards.

  13. Likes DSR-3, Mitch Wright liked this post
  14. #211
    Senior Member Jetfuel's Avatar
    Join Date
    Aug 2018
    Location
    Indianapolis
    Posts
    396
    Post Thanks / Like
    ..way to go Art....you'll be sewing your own Hawaiian shirts in no time at all..

  15. #212
    Senior Member
    Join Date
    Sep 2013
    Location
    Chicago, IL
    Posts
    571
    Post Thanks / Like
    That's straight up stud work. Wow! I've always wanted to dabble in upholstery (it was my father's trade as a young man), but I never thought an "amateur" could get these results. Inspiring...dangerous ('cause now you have my head spinning)...but super good looking work!

    Best,
    -j
    "Weight transfer is the enemy."

    Executive Director
    The Community Garage

  16. Likes Jetfuel liked this post
  17. #213
    Senior Member
    Join Date
    Apr 2015
    Location
    Andover, MA
    Posts
    530
    Post Thanks / Like
    Art, inspiring work! I've been thinking about selling my 818 project, but your creative solutions are making me want to re-tackle all the little things that have been bugging me about the build! I will be checking in more often now to see what else you come up with!

  18. Likes Jetfuel liked this post
  19. #214

    Yes, I love Technology
    aquillen's Avatar
    Join Date
    Feb 2016
    Location
    NW Indiana
    Posts
    756
    Post Thanks / Like
    Thanks guys ! ben1272 - hope you get back into it - think back to when you were first getting the project, resurrect that excitement. Worth it, not everyone builds a car.

  20. Likes Jetfuel liked this post
  21. #215

    Yes, I love Technology
    aquillen's Avatar
    Join Date
    Feb 2016
    Location
    NW Indiana
    Posts
    756
    Post Thanks / Like

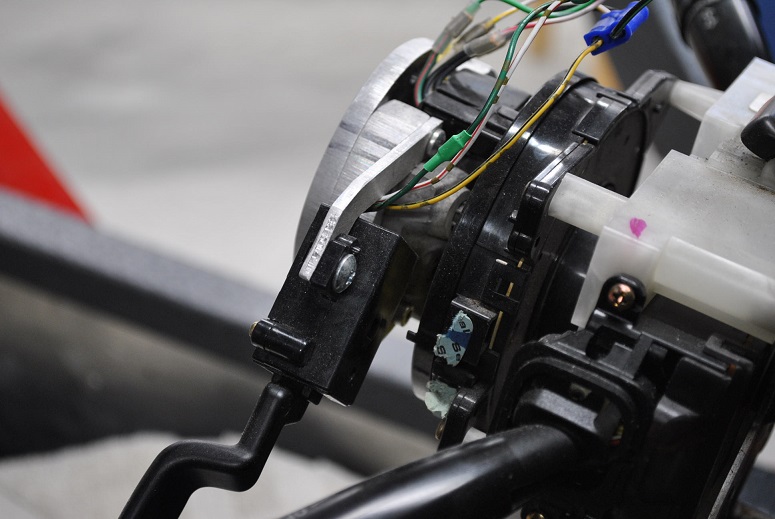
    Cruise control lever

    As always I jump around on my project - otherwise some of the longer items get me bored, or I just let the wheels turn for some days to come up with ideas while I tackle something else. So here come some short subjects (some took a long time).

    I have an NRG steering wheel, but made the adapter for it instead of buying. I want cruise because it helps me keep from getting tickets for a certain behavior (13 over the years). Since I made my adapter it wasn't so bad "making an adapter for the adapter" for the control lever. There is enough wiring in the horn clock spring to handle the cruise.


    .

    .

    .


    I'll have to add an image of the wheel installed, the lever peeks out just below the right spoke between the wheel and center.
    Last edited by aquillen; 03-21-2020 at 08:33 AM.

  22. #216

    Yes, I love Technology
    aquillen's Avatar
    Join Date
    Feb 2016
    Location
    NW Indiana
    Posts
    756
    Post Thanks / Like

    Body - Door - window seal

    The coupe kit's window seal strips (hard flocked) that go on the upper window frame seemed too hard - and with the less than ideal window curve and travel behavior this compromises getting a good seal, at least in my build. I found this particular seal on Amazon seller "Seal Rubber" (after obtaining several kinds from multiple sources) that seemed to work well. Also the thickness of the frame has to be ground down to fit the supplied seal. Some grinding still has to happen with this alternate seal, but not as much. In addition, I'm using this same seal around the door frame to body, and some other places on my build.

    Trim Seal with Side Bulb | PVC Plastic Trim with EPDM Rubber Bulb Seal | Fits 1/4” Edge, 3/8” Bulb Seal Diameter


    This is a fairly soft rubber and when a side window is traveling upward it deforms this a lot during the first couple inches of contact along the rear edge of the window. To help prevent tearing the rubber, I will wrap just the affected area of rubber with Steele Rubber Products' Bowdrill tape 70-1175-65. This is old school stuff used way back in the day to help make tough but flexible seals for windows and such on cars.

    There is plenty of forum info on the window fit, so I'm just listing a couple points on my build, this bit and a piece further below on the bronze regulator sliders. First to set the window to frame clearance I made some 1/2" thick wood blocks and just taped them in place to space the window from the frame while I played with the regulator mounts:


    To use the same seal around the door frame to body, I bend open the u-channel part of the seal to become a flat piece that fits/traps between the inner plastic door card and the fiberglass door skin.
    .
    The next area to seal is a big open area just in front of the mirror mount steel plate.This area is a gap between the door inside wall and the outside wall of the dashboard, dash close off aluminum and the windshield frame. I made these aluminum pieces that fasten to the FFR parts which get mounted near to the sides of the dashboard. These extend the kickplate walls upward so the seals on the doors can contact these parts to seal all the way up the door sides...
    .
    Rubber seal supplied with the kit (or my version above) can now seal against this lower part to the body (the facing arrows in the below picture), But there is nothing to seal in the upper area (circled):

    .
    next post shows the fix
    Last edited by aquillen; 03-21-2020 at 08:40 AM.

  23. #217

    Yes, I love Technology
    aquillen's Avatar
    Join Date
    Feb 2016
    Location
    NW Indiana
    Posts
    756
    Post Thanks / Like
    Made left and right versions of this after some CAD (cardboard) work:


    .

    .
    I spot welded my parts to the supplied FFR parts, but rivets would do.

    Tough spot to photograph but if you study this you can see the fit-up. A little bit of goo-seal will wrap this up later.


    .
    A scrap of the seal being tested -


    I finished these parts with power coat so they would slide against the rubber seal better and not corrode to a rough finish some day.
    Last edited by aquillen; 03-21-2020 at 08:34 AM.

  24. #218

    Yes, I love Technology
    aquillen's Avatar
    Join Date
    Feb 2016
    Location
    NW Indiana
    Posts
    756
    Post Thanks / Like

    Windshield wiper

    There is a wiper thread but I have a lot of pictures to post so rather than clog that thread I'm keeping it here. Will put a link on that thread. More wiper threads -

    https://thefactoryfiveforum.com/show...556#post403556

    https://thefactoryfiveforum.com/show...868#post243868

    https://thefactoryfiveforum.com/show...l=1#post222064

    https://thefactoryfiveforum.com/show...l=1#post211202


    I could imagine someone wanting to make up a compact unit this same way - so lots of pix for U. Also, almost every thing from donor parts (my "donor" is the random Subaru parts pulled a my nearby LKQ yards). And so nearly every part I've pulled I have torn down, rebuilt the internals. In this case the wiper motor/gearbox was opened, cleaned, greased. The wiper pivot shaft was pulled, cleaned and greased, and I'll show how to get that apart if you want.

    I wanted to use a donor unit, but fold it as small as I could. I've got a coolant air catch burp bottle, washer fluid bottle, remote reservoirs in there and want to move the battery in and out through the gap front and center without taking other things apart. So the motor/wiper guts needed to be compact. I also wanted no-cut on the hood and fully closed hood to boot. Some others have posted their wiper fits without cutting the hood, but not sure how they pull that off using the thickness of the wiper arm lower part. I only have 1/2 inch between the hood and glass.


    .

    .
    A donor arm was chopped off a couple inches up from the pivot mount bolt. My new arms are of 1/4 x 1/2 aluminum, a very stiff version of alloy from McMaster Carr that I had in the junk box. The new arms are trapped onto the original arm via a pressed in place steel box I welded up.


    .
    Up top I have this -

    .
    A donor arm was chopped and bent to fit. Then welded to a flat plate, that was screwed from underneath with 4 alloy steel screws. The got cut flush to the aluminum bars then peened in place.

    .
    After all the fab a bit of powdercoat dressed it nicely
    Last edited by aquillen; 03-21-2020 at 08:51 AM.

  25. #219

    Yes, I love Technology
    aquillen's Avatar
    Join Date
    Feb 2016
    Location
    NW Indiana
    Posts
    756
    Post Thanks / Like

    .

    .

    .

    .

    .

  26. #220

    Yes, I love Technology
    aquillen's Avatar
    Join Date
    Feb 2016
    Location
    NW Indiana
    Posts
    756
    Post Thanks / Like

    .

    .

    .

    .

    .
    This plate protects the fluid hoses from the link arm should it separate and flop about. I changed to the rough and ready ball links since the Subaru ones do wear and fail, and pulling them on and off of the old parts isn't the best treatment either.

  27. #221

    Yes, I love Technology
    aquillen's Avatar
    Join Date
    Feb 2016
    Location
    NW Indiana
    Posts
    756
    Post Thanks / Like

    Clean and lube a wiper arm pivot bearing

    There is a tiny clip ring at the top of the pivot shaft. Pry this out with a small knife tip, etc. Pull off the trapped washer, then push the entire shaft down and out of the housing. Use a long screwdriver to push out each of the plastic bushings (or leave them in place). Clean old grease out of the internal housing. Wheel bearing grease or waterproof motorcycle grease such as Belray (my fav) should work fine for another 20 years...


  28. #222

    Yes, I love Technology
    aquillen's Avatar
    Join Date
    Feb 2016
    Location
    NW Indiana
    Posts
    756
    Post Thanks / Like

    Fresh air inlet

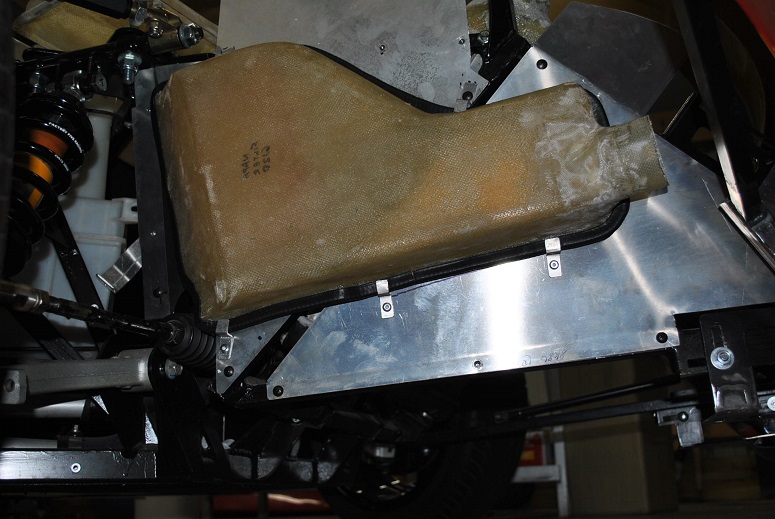
    Recall I have a duct system with controls that can select fresh air or recirc air. This is the duct I made up to get air from the nose into a port in the bottom of the dash close off aluminum plate. I won't add the final pieces of flex hose to this until I finish painting the car and have put the hood back on. So I don't have pix of the hose pieces. Use your imagination...

    Air comes in at the far right of the nose trim:


    .
    Making the fiberglass composite collector for that opening:

    .

    .

    .

    .

  29. #223

    Yes, I love Technology
    aquillen's Avatar
    Join Date
    Feb 2016
    Location
    NW Indiana
    Posts
    756
    Post Thanks / Like
    A cabin air filter was selected from NAPA for it's small size. Then a pair of air boxes were made to fit on each side of the radiator close off aluminum plates -


    .
    The air duct at the nose is routed to the front part of this outside box. These boxes are also fiberglass layed over foam that was covered with packing tape. The tape allows the foam to be painted with polyester resin without melting the foam, and later the foam can be easily pulled out and discarded.

    A couple screws hold the outer cover in place at the top, it swings out on retainer clips and then can be removed to service the filter...


    Aha -here is the filter:


    .
    The inner air box gets riveted in place.The filter is installed and removed from the outside. Inner box is ready to install. Some paint will dress these later. The inner box outlet points downward and is plummed along the bottom of the front and then up into the bottom of the dash close off aluminum plate. Once the air gets in there it is directed by my air control box mounted on top of the close off aluminum plate. Clamshell hood makes this rig possible with such easy access !


    .

  30. Likes Hobby Racer, Zach34, Mitch Wright liked this post
  31. #224

    Yes, I love Technology
    aquillen's Avatar
    Join Date
    Feb 2016
    Location
    NW Indiana
    Posts
    756
    Post Thanks / Like

    Window regulator - stiffening - bronze shoes

    Lance Corsi devised an improvement to the window track guides by adding bronze slider shoes. He is right, this really tightens up the windows so they feel like you can grab them and not break something immediately. I guess the only drawback to doing this is they are stiffer and move with authority against the rubber seals - i.e. harder on the seals. So you have to work carefully on the exact positions of the regulators since you can't rely on slop letting things "fall/flex" into place.

    Corsi's info is posted here, posted by Bob_N_Cinci, starting on #14:

    https://thefactoryfiveforum.com/show...ghlight=bronze

    I did the same thing but happened to have some 1" round bronze on hand. Much smaller but certainly strong enough for this task. Brass would work but bronze slides better. Cut with bandsaw, hacksaw, moto-tool, etc. Screws are hardened 6-32. These may seem small but the original stuff is plastic, still there for backup, and these are actually pretty tough.

    Since this is 1" dia. bronze rod you can work out the dimensions from looking at images. I got 4 sliders from each 10mm thick disc that I cut from the rod.

    I suggest using a calcium based slider grease such as Lubriplate.


    .

    .

    .

    .

    .
    Last edited by aquillen; 05-19-2020 at 08:19 AM.

  32. Thanks DSR-3 thanked for this post
  33. #225
    Senior Member
    Join Date
    Mar 2014
    Location
    Oakley, CA
    Posts
    387
    Post Thanks / Like
    Incredible work, Art. If anything, these cars are pulling the creative juices out of us.

  34. Likes Mitch Wright liked this post
  35. #226
    Senior Member Hobby Racer's Avatar
    Join Date
    Feb 2011
    Location
    Syracuse, NY
    Posts
    1,308
    Post Thanks / Like
    Great job on the custom fiberglass work. I really want to try making fiberglass paints like that. What type of foam do you use and what type of release agent?
    MK3.1 Roadster completed 2011
    818R built with EZ36R H6 completed 2018
    818R rebuild with a JDM Honda K24A

  36. #227
    Senior Member
    Join Date
    Apr 2014
    Posts
    104
    Post Thanks / Like
    hey art you interested in making another set of those bronze window guides? id be interested in a set

  37. #228

    Yes, I love Technology
    aquillen's Avatar
    Join Date
    Feb 2016
    Location
    NW Indiana
    Posts
    756
    Post Thanks / Like
    Quote Originally Posted by Hobby Racer View Post
    Great job on the custom fiberglass work. I really want to try making fiberglass paints like that. What type of foam do you use and what type of release agent?
    Foam was scraps from some packaging of furniture we got a while back. White super light weight is handy for this. On curvy stuff, I paint it with 5 minute epoxy - hobby shops have larger bottles of that. It cracks away from the fiberglass resin (polyester or vinylester) with ease. Once the 5 minute is hard then I lay on the glass (or carbon fiber) and resin. When all is done I remove the inside foam and tape/epoxy leaving the finished item.

    Epoxy painted over foam might not peal away from an epoxy type laminating resin such as Fiberglast's epoxy products. But if it stays there it doesn't hurt either for many designs, or you can put a few coats of carnauba(sp?) wax on the epoxy/foam form for a mold release. The foam can be chewed out with tools or very easily dissolved away with acetone or several other solvents (takes very little solvent). Sometimes I use an econo can of brake cleaner.

    Another release agent method is wrap the foam with either cellophane packaging tape or electrical tape. Either one will pull away from the hard resin with little effort. I use electrical tape for curvy stuff. Look for econo wide rolls of electircal tape at discount stores for example.

    When you get fancier than the above it is time to look into real mold techniques using plug molds, female shells and wax/spray in mold release agents. The above are one-off items that need very little in prep nor high quality finish. I will soon post my airbox/airfilter in CF parts using the above technique and you'll see even the above can produce very nice looking finish parts.
    Last edited by aquillen; 03-23-2020 at 05:41 PM.

  38. Likes AZPete liked this post
  39. #229

    Yes, I love Technology
    aquillen's Avatar
    Join Date
    Feb 2016
    Location
    NW Indiana
    Posts
    756
    Post Thanks / Like
    Quote Originally Posted by Newkitguy View Post
    hey art you interested in making another set of those bronze window guides? id be interested in a set
    I've helped here and there some other tiny items for guys. Payback-forward - either way... You can have these for the postage - 15 minute job for me. PM me.

  40. #230
    Senior Member
    Join Date
    Sep 2015
    Location
    Hamersville, Ohio
    Posts
    826
    Post Thanks / Like
    Art, you are a master builder! I’m flattered that you found my window excerpt worth emulating. I don’t know what you did as a career, but you are truly gifted!

  41. Likes Mitch Wright liked this post
  42. #231
    Senior Member
    Join Date
    Apr 2014
    Posts
    104
    Post Thanks / Like
    Quote Originally Posted by aquillen View Post
    I've helped here and there some other tiny items for guys. Payback-forward - either way... You can have these for the postage - 15 minute job for me. PM me.
    Art shot you a PM thank you so much i appreciate it so much you are super gifted I would probably end up hurting myself if i tried emulating some of your work!

  43. #232
    Member
    Join Date
    Aug 2017
    Posts
    90
    Post Thanks / Like
    Quote Originally Posted by aquillen View Post
    I've helped here and there some other tiny items for guys. Payback-forward - either way... You can have these for the postage - 15 minute job for me. PM me.
    Tiny? TINY?

    I'd hardly call the help you provided me tiny. You, sir, are a giant among men.

  44. #233

    Yes, I love Technology
    aquillen's Avatar
    Join Date
    Feb 2016
    Location
    NW Indiana
    Posts
    756
    Post Thanks / Like
    I really just enjoy helping you guys out. It's the way I've always done for family, friends, neighbors and work partners. Somehow it has always been rewarding to me just as much. I recommend the method to anyone.

  45. Likes DSR-3 liked this post
  46. #234

    Yes, I love Technology
    aquillen's Avatar
    Join Date
    Feb 2016
    Location
    NW Indiana
    Posts
    756
    Post Thanks / Like
    J Bowman over in Ohio is building his 818S with an H6 and automatic. We trade ideas and sometimes parts (mostly him to me)...

    He finished his engine wiring and had his first start over the weekend. And when he called me was he ever stoked and happy - it fired up on the first try.

    So here is another 3.0 build running on the factory ECM, first start:

    https://res.cloudinary.com/aq007/vid...4_0_i8i6gc.3g2

    It's a cell phone format video so may not play on everything, but does work in (some ?) Windows Media versions, VLC players, and on my Linux it is fine...

    Congrats Jamie !

  47. Likes Kurk818, Mitch Wright liked this post
  48. #235
    Junior Member
    Join Date
    Apr 2016
    Posts
    20
    Post Thanks / Like
    Art thank you so much I couldn't of done with out your help. you are brilliant and a great friend

  49. Likes Kurk818 liked this post
  50. #236
    Junior Member
    Join Date
    Dec 2018
    Posts
    1
    Post Thanks / Like
    Art, I just spent several hours reading your build thread. This is amazing stuff. BTW, Ian says hi! That goofy Canadian lives across the street from me and we are good friends and constantly golfing together and giving each other sh*t by text.

  51. #237

    Yes, I love Technology
    aquillen's Avatar
    Join Date
    Feb 2016
    Location
    NW Indiana
    Posts
    756
    Post Thanks / Like
    Both of you should get into the 818 builds..... ynot? Ian and I go back a ways.

  52. #238

    Yes, I love Technology
    aquillen's Avatar
    Join Date
    Feb 2016
    Location
    NW Indiana
    Posts
    756
    Post Thanks / Like

    Intake air filters - more carbon fiber

    Finally got around to the air filters. A pair of K&N conical filters using twist locks on the big end - fit into these housing/tubes. Connect to the 818's side ports from the overhead intake. Not a small amount of work to make these but really came out nice. Rubber boots from (I think) a Subaru something, or maybe a Honda (?) I forgot to take notes at the scrap yard. Haven't put all the hose clamps on just yet.


    .

  53. Likes STiPWRD, AZPete liked this post
  54. #239

    Yes, I love Technology
    aquillen's Avatar
    Join Date
    Feb 2016
    Location
    NW Indiana
    Posts
    756
    Post Thanks / Like

    Headlight buckets - another version

    Here is my take on setting up the Hella's so they can be removed easily for service or whatever reason. I'm probably going to make some halo rings for the front, but still mulling that over... white SMT LED's embedded in transucent white plastic rings. When I get bored with the other items I'll probably go4it.

    The Hella snap-in mounts go into my aluminum plates, mounted on studs. Can adjust the studs and of course the Hella adjusters too. I lost one of the bags of plastic Hella ball-snap thingies for a week. Chasing those on the Internet was a fiasco. Almost called Hella / and or / make my own then found the bag which had fallen into my throttle linkage scraps box. What a relief... I'm sure you all know that drill.

    To get the low beam shutter cutoff pattern to be "level" to the road the lamps must be rotated. About 0.3" additional cut in the original plastic snap in holes gets the rotation needed for my build. In the original positions, the lamps are rotated so that the outside edge of the beams are higher on each side than the inside. I think it was 12 degrees give or take, but didn't write it down.

    Still have some seal work to do, but there is no glueing of the lamp parts in this setup.


    .

    .

    .

    .
    Last edited by aquillen; 04-23-2020 at 11:14 PM.

  55. Likes octobersknight liked this post
  56. #240

    Yes, I love Technology
    aquillen's Avatar
    Join Date
    Feb 2016
    Location
    NW Indiana
    Posts
    756
    Post Thanks / Like
    The buckets will be held by clamps that are trapped under studs epoxied from underneath. The buckets will have foam weatherstrip (plan as of today, subject to revision) between the hood and bucket top. The topside lens will be mounted to the top of the hood using an optically clear UV resistant silicone sealant which is designed for assembly of solar cells (hence high trust for this job, sold by McMaster-Carr). I don't plan to paint the lenses at all. The body paint will show up through the lens and from rough testing with some spray paint it should look fine. I'm halfway through making plaster of paris molds from the supplied lenses. I will then replicate those lenses so I can destructive test as necessary to heat and bend away at my replica lenses with abandon until I get a pair that fit the body line better.

    I cut a circle at the nose for one of those nice FFR badges, where you see the backing plate I put under the cutout. The other plates are resting pads for under-hood support bumpers. The strip at the bottom is a teflon slider pad for the wiper arms - they just brush this location when the wiper is at rest. Allows me to keep the 1/2" clearance between the hood and window glass and sneak my wiper arm in between.

    If you look close over on the right you can see a 2016 Camaro side marker mounted. I'll have to post some pix of all that later.

    Last edited by aquillen; 04-23-2020 at 09:57 PM.

Page 6 of 9 FirstFirst ... 45678 ... LastLast

Posting Permissions

  • You may not post new threads
  • You may not post replies
  • You may not post attachments
  • You may not edit your posts
  •  

FFMetal

Visit our community sponsor