-
Senior Member

Yep, just needs moved over a bit. Fashion a bracket or buy the one listed above.
Rich
818S in progress. 2007 WRX sedan donor.
Powered up: 7-8-14, First Start: 7-20-14, Go kart: 8-19-14
-

Originally Posted by
Goldwing

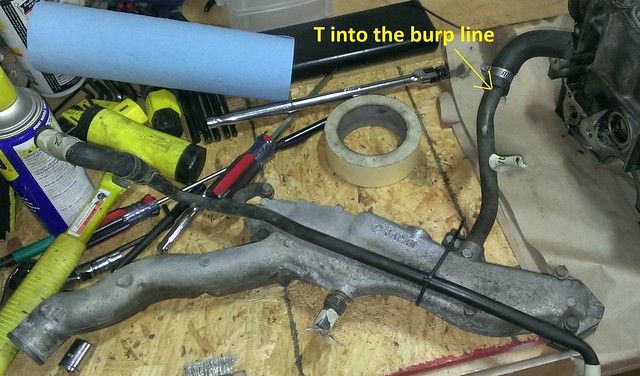
Yes, that's what I did, just one overflow bottle in the rear. I capped the line off the radiator neck, and ran a burp line off the top right of the radiator back to the coolant reservoir, as is stock wrx, by the turbo (with an extra tee as it passes the water outlet burp line added via Wayne's mod) to help get any trapped air sent to the back where it can get purged.
Hi Rich,
so I see this topic has been revisited again........ I saw in the FFR manual update they added a burp line. did you basically end up with the schematics below?
dougs final coolant routing sketch.JPGfinal coolant routing schematic.JPG
-
Moonlight Performance


That's basically what most people are doing now. It's what I'm doing.
-
Senior Member

Rather than drilling and tapping the coolant pipe. I'm going to tie the currently unused heater core pipe to the burp line/filler tank. I feel that this is safer, easier and accomplishes the same thing.
-
Senior Member
Originally Posted by
dougkirkbride
Yep.
Rich
818S in progress. 2007 WRX sedan donor.
Powered up: 7-8-14, First Start: 7-20-14, Go kart: 8-19-14
-
Can the mod be done with coolant in the system or should I drain first? I cannot get the cooling to work so this mod is my last shot.
thanks
Mike
-
Senior Member

If you're talking about adding the barbed connector, I did it with coolant in the system. Works great.
-
Senior Member

Last edited by Bob_n_Cincy; 07-01-2016 at 06:33 PM.
-
Originally Posted by
Buzz Skyline
If you're talking about adding the barbed connector, I did it with coolant in the system. Works great.
I am talking about the barbed connector. How far back on the tube did you drill?
-
Moonlight Performance
Originally Posted by
mquam99
I am talking about the barbed connector. How far back on the tube did you drill?
Here you go:
http://thefactoryfiveforum.com/showt...ing-System-Mod
-
Originally Posted by
Goldwing
There are stainless versions available for $50-$60. 42 draft designs has one.
The 42DD "stainless" y pipe is a standard $10 aluminum in line water temp sensor adapter with a $0.50 bass 45deg NPT barb screwed into it. It should be a suitable replacement to drilling the crossover pipe if you have already installed the engine.
https://www.amazon.com/Dewhel-Alumin...tor+water+temp
-
thanks for the help everyone. I ended up getting that barbed connector installed and the system is now cooling correctly. what a great mod. Thanks!!!
-
Administrator


Originally Posted by
mquam99
thanks for the help everyone. I ended up getting that barbed connector installed and the system is now cooling correctly. what a great mod. Thanks!!!
Your welcome 
-
hi all, after reading this I think I have a good understanding of the vent system but just to clarify I have Wayne's mod which is teed into the vent line from the top passengers side of the radiator running all the way back to the degas tank for the turbo. I now have a solid cap for the front radiator and plugged the original overflow line from it.
I have Bought an expansion tank for the rear turbo degas tank which has a port on the bottom to allow fluid to be pushed in and drawn out through the cap and has a tiny little hole to allow the vacuum procedure. Does that overflow tank/inlet need to be mounted higher than the degas tank for it to work? Or since its on vacuum with the degas tank radiator cap it doesn't matter the height differential? It is currently mounted about level with the degas tank.
What style of radiator cap are you guys using for the rear degas tank? Are most radiator caps a draw and vent style? Or do I need to find a special style. Is the standard pressure 0.6 bar?
Thanks for the advice!
-
I did Waynes mod and jacked up the front as high as I could and then raised the radiator
even higher, then added coolant into the radiator until it came out of the reservoir.
Now have flow thru the heater core and the top radiator hose is hot and the bottom
is cooler, ran engine for 30 minutes and after fans came temp only got to halfway.
I think all the air is out now.
-
Read all of the above. Have done Wayne's mod. I tee'd off of the Radiator line from the NPT fitting, so both go to an expansion tank in the rear. I have an expansion tank in the front as well, that is connected to the radiator and AWIC radiator. For some reason I never see expansion into the rear tank. Even if it is super hot. Only in the front, off the radiator. Radiator Cap is 1.1 BAR and Mishimoto Degas tank cap is 1.3. Thoughts?
Also, how can I tell if both allow return of coolant vs. just expansion?
Thanks
-
Administrator
I plug the overflow outlet from the radiator. Put the 1.3 cap on the radiator and the 1.1 on the degas tank. Use the front tank for the AWIC.
-
Senior Member
Originally Posted by
mrbiglar
Read all of the above. Have done Wayne's mod. I tee'd off of the Radiator line from the NPT fitting, so both go to an expansion tank in the rear. I have an expansion tank in the front as well, that is connected to the radiator and AWIC radiator. For some reason I never see expansion into the rear tank. Even if it is super hot. Only in the front, off the radiator. Radiator Cap is 1.1 BAR and Mishimoto Degas tank cap is 1.3. Thoughts?
Also, how can I tell if both allow return of coolant vs. just expansion?
Thanks
Mrbiglar,
It sounds like you are on the right track.
You have 2 expansion tanks attached to your engine coolant. I don't think this is a good idea. As you could discharge into one thank and the suck back out of the other tank. After a couple cycles you could be sucking air into the system.
I believe the line you have coming off the bleed port (top right corner of the radiator) is the one going to the rear expansion tank.
The only change I think you need to make, is to change you radiator cap to a totally sealed one. (or just seal the port on the side of the cap)
My oem radiator did not have a cap.
nocap.jpg
Bob
Last edited by Bob_n_Cincy; 08-13-2017 at 11:29 PM.
-
Makes sense. Thanks Wayne and Bob.
-
Resurrecting this old thread -
I have Wayne's mod done, but the engine is still heating up a ton. I unbolted the expansion tank and moved it over to try and let it burp but it kept burping and eventually overflowed ( ), when I turned the car off hot radiator fluid burped all over the place (which was fun). Do I have to burp the expansion tank or is the procedure for this to top off the expansion tank cold, lift the front of the car and fill/burp the radiator? Went through a lot of coolant tonight but at least I got the car to idle long enough to get this hot
-
I fought this for weeks. Finally gave up and got the right tool Money well spent:
https://www.harborfreight.com/Coolin...Kit-64985.html
Perhaps you can find one to borrow. Filled with no air in under 10 minutes.
-
Post Thanks / Like - 1 Thanks, 0 Likes
 DSR-3
DSR-3 thanked for this post
-
Originally Posted by
Ajzride
This is definitely the way to go. I also elevated the front of the car and filled from the radiator cap area. It might be overkill, but I had no overheating issues after using the vacuum fill and elevating the front end.
-
So I'm thinking it might be something more interesting than air being present in the system (but I'm totally guessing).
I started by jacking up the front to make the radiator the highest point in the system (the rear was still up but the front was higher).
My ECU is reading ~200 degrees coolant; however, the first time I burped it today the coolant was pretty much cool to the touch (had to constantly scoop coolant out with a cup since it was completely filling the no-spill funnel thing). Each time I turned off the car, the coolant would go back out of the funnel into the system (+maybe a little bit more? was hard to tell since I had to funnel it out and then put it back each time)... All through this process I was able to squeeze the top radiator hose easily and air would come out; however, it *NEVER* got harder to squeeze and constantly had air bubbles?
Each time the coolant would get warmer; however, never too hot to handle (nor would it have made for good hot chocolate, not even close to that warm!). I'm thinking that there's a water flow restriction somewhere in the route from the expansion tank -> radiator since it was getting to the 3rd tick on the dash but the coolant was just "warm" and I was able to constantly squeeze the upper hose.
My hose route is the following:
expansion tank .png
Purple = Wayne's mod + long line to radiator
Red = coolant overflow
yellow = turbo
On the radiator side the place where the overflow is supposed to be (under the cap) is plugged and not routed to a T.
The "long line to radiator" is the same as this picture's "Hose H" - pWen09H.jpg
EDIT: I tried to burp the system ~10-15 times today before giving up...
EDIT2: I guess I'm a bit confused why so much coolant starts to get into the no-spill funnel instead of a constant flow, does it mean that the inlet isn't pumping the water fast enough and the flow egress of the engine is too much?
Last edited by gearnoob; 04-22-2020 at 11:04 AM.
-
It sounds like you are fighting the same thing I am. For some reason I'm not getting enough hot water circulated back to the thermostat and it never opens, so the pump never circulates, i just get some conductive heat transfer from the block into the coolant lines. I tested this by removing my thermostat and the entire system circulates and the water in the radiator gets up to 200 degrees like you would expect. However I have verified twice that the thermostat works by testing it on a stove with a thermometer.
Wish I could tell you what the answer is because i've still not solved it, my next step is to install a few inches of clear hose at the thermostat housing so I can visually watch the water circulating and see how much I get.
-
Senior Member

Originally Posted by
gearnoob
My hose route is the following:
expansion tank .png
Purple = Wayne's mod + long line to radiator
Red = coolant overflow
yellow = radiator
In your photo, the yellow hose needs to go to the turbo, not the radiator. This hose takes the hot coolant from the turbo. The purple and red hoses are hooked up properly. Once the engine starts warming up and you see the coolant get close to the top of the expansion tank, close the cap.
It may take a few cycles to get all the air out of the cooling system. I used a similar tool to the one Ajzride recommended. It is well worth the money. The one from HF probably works just as good.
https://www.amazon.com/UView-550000-...ywords=airlift
If this doesn't work, make sure your thermostat is working properly.
-
Originally Posted by
Ajzride
It sounds like you are fighting the same thing I am. For some reason I'm not getting enough hot water circulated back to the thermostat and it never opens, so the pump never circulates, i just get some conductive heat transfer from the block into the coolant lines. I tested this by removing my thermostat and the entire system circulates and the water in the radiator gets up to 200 degrees like you would expect. However I have verified twice that the thermostat works by testing it on a stove with a thermometer.
Wish I could tell you what the answer is because i've still not solved it, my next step is to install a few inches of clear hose at the thermostat housing so I can visually watch the water circulating and see how much I get.
I don't recall how it came up, but somewhere in my build process one of the FF techs suggested eliminating the thermostat. Given that I have used this approach in various race cars, and that I did not plan to drive the 818 in the Winter I left the thermostat out. I did include a flow restrictor (thermostat flange with the guts removed) in it's place. I won't claim to have had no trouble burping, but with the yellow funnel and Wayne's mod I was successful. The car does not seem to take an inordinate time to warm up even on cool days and does not overheat on hot days.
-
Senior Member

Buy or borrow the tool. I fought the first fill on my 818, and I have a very simple, high-point bleed, non-turbo system. I also added a couple weep holes in the thermostat plate, as that has helped on previous cars. It still took too much effort.
It's not unique to this car/engines. I recently fought a G35 for a day of fills, burps, drains, raise/lower etc, and never could get it purged. I (we) gave up and took it to a friend with "the tool" and instant success!
818S #332, EZ30R H6, California licensed 01/2019
-
Post Thanks / Like - 0 Thanks, 1 Likes
-
Originally Posted by
idf
I don't recall how it came up, but somewhere in my build process one of the FF techs suggested eliminating the thermostat. Given that I have used this approach in various race cars, and that I did not plan to drive the 818 in the Winter I left the thermostat out. I did include a flow restrictor (thermostat flange with the guts removed) in it's place. I won't claim to have had no trouble burping, but with the yellow funnel and Wayne's mod I was successful. The car does not seem to take an inordinate time to warm up even on cool days and does not overheat on hot days.
Since the gasket mounts to the thermostat, this is the only way to do it. I didn't hack up a thermostat but did make a plate the same size with a hole the size of a quarter in it to hold the seal for testing. I would prefer to have the thermostat though, even if not driving int he winter, because temperature under 185 affects the idle circuit logic. At idle it takes about 12 minutes to reach 185 for mine.
-
Originally Posted by
Ajzride
It sounds like you are fighting the same thing I am. For some reason I'm not getting enough hot water circulated back to the thermostat and it never opens, so the pump never circulates, i just get some conductive heat transfer from the block into the coolant lines. I tested this by removing my thermostat and the entire system circulates and the water in the radiator gets up to 200 degrees like you would expect. However I have verified twice that the thermostat works by testing it on a stove with a thermometer.
Wish I could tell you what the answer is because i've still not solved it, my next step is to install a few inches of clear hose at the thermostat housing so I can visually watch the water circulating and see how much I get.
Have you tried to measure the temperature of the coolant at the thermostat? Maybe tapping in and seeing the temperature would show that the distance the coolant is traveling is inadvertently cooling it down somehow and therefore not opening the thermostat all the way? (again, complete guess)
-
Originally Posted by
STiPWRD
In your photo, the yellow hose needs to go to the turbo, not the radiator. This hose takes the hot coolant from the turbo. The purple and red hoses are hooked up properly. Once the engine starts warming up and you see the coolant get close to the top of the expansion tank, close the cap.
It may take a few cycles to get all the air out of the cooling system. I used a similar tool to the one Ajzride recommended. It is well worth the money. The one from HF probably works just as good.
https://www.amazon.com/UView-550000-...ywords=airlift
If this doesn't work, make sure your thermostat is working properly.
Oops, I meant Turbo. Edited!!
-
Originally Posted by
Ajzride
It sounds like you are fighting the same thing I am. For some reason I'm not getting enough hot water circulated back to the thermostat and it never opens, so the pump never circulates, i just get some conductive heat transfer from the block into the coolant lines. I tested this by removing my thermostat and the entire system circulates and the water in the radiator gets up to 200 degrees like you would expect. However I have verified twice that the thermostat works by testing it on a stove with a thermometer.
Wish I could tell you what the answer is because i've still not solved it, my next step is to install a few inches of clear hose at the thermostat housing so I can visually watch the water circulating and see how much I get.
Well damn, looks like I am in the same boat as you...
Took the thermostat off and burped it with no problem (I think!), gotta confirm tomorrow.
-
I drilled six holes in the thermostat today and it allowed plenty of flow, in fact I probably should have only done 3 or 4 holes. It took 16 minutes at idle for the fan to come on.
Holy Thermostat.jpg
-
Have had the same struggles the past week, i also drained the system and drilled 3 holes in the thermostat. Works so far but time will tell.
-
Senior Member

Call me boring and old school, but I've bled my cooling system successfully many times without a special funnel and without lifting the front end. I just followed the Subaru FSM:
FILLING OF ENGINE COOLANT
1) Pour cooling system conditioner through the filter neck. Cooling system protective agent: COOLING SYSTEM CONDITIONER (Part No.SOA635071)
2) Fill engine coolant into the coolant filler tank up to filler neck position. Coolant capacity (fill up to “FULL” level):
AT model Approx. 7.6 2(8.0 US qt, 6.7 Imp qt) MT model Approx. 7.7 2(8.1 US qt, 6.8 Imp qt)
CAUTION: Do not mix up the coolant filler tank side cap with radiator side cap.
NOTE: • Do not remove the radiator side cap when filling engine coolant.
• The SUBARU Genuine Coolant containing antifreeze and anti-rust agents is especially made for SUBARU engine, which has an aluminum crankcase.
Always use SUBARU Genuine Coolant, since other coolant may cause corrosion.
3) Fill engine coolant into the reservoir tank up to “FULL” level.
4) Close the coolant filler tank cap, start the engine and race 5 to 6 times at less than 3,000 rpm, then stop the engine. (Complete this operation within 40 seconds.)
5) Wait for one minute after the engine stops, open the coolant filler tank cap. If the engine coolant level drops, add engine coolant to the filler neck position of radiator.
6) Perform the procedures 4) and 5) again.
7) Attach the coolant filler tank cap and reservoir tank cap properly.
8) Start the engine and operate the heater at maximum hot position and the blower speed setting to “LO”.
9) Run the engine at 2,000 rpm or less until radiator fan starts and stops.
NOTE:
• Be careful with the engine coolant temperature gauge to prevent overheating.
• If the radiator hose becomes to harden by the pressure of engine coolant, air bleeding operation seems to be almost completed.
10) Stop the engine and wait until engine coolant temperature lowers to 30°C (86°F) or less.
11) Open the coolant filler tank cap. If the engine coolant level drops, add engine coolant into the coolant filler tank up to the filler neck position and
the reservoir tank to “FULL” level.
12) Attach the coolant filler tank cap and reservoir tank cap properly.
13) Operate the heater at maximum hot position and the blower speed setting to “LO” and start the engine. Race at less than 3,000 rpm. If the flowing
sound is heard from heater core, repeat the procedures from step 9).
14) Install the collector cover.
818S/C : Chassis #25 with 06 WRX 2.5 turbo, ABS, cruise, PS, A/C, Apple CarPlay, rear camera, power windows & locks, leather & other complexities. Sold 10/19 with 5,800 miles.
Mk3 Roadster #6228 4.6L, T45, IRS, PS, PB, ABS, Cruise, Koni's, 17" Halibrands, red w/ silver - 9K miles then sold @ Barrett-Jackson Jan 2011 (got back cash spent).
-
Post Thanks / Like - 1 Thanks, 0 Likes
-
I made my modifications today, will try to fill tomorrow.
-
Originally Posted by
AZPete
Call me boring and old school, but I've bled my cooling system successfully many times without a special funnel and without lifting the front end. I just followed the Subaru FSM:
FILLING OF ENGINE COOLANT
...
14) Install the collector cover.
Pete
I appreciate the information, this is not something I have seen before and I'll be sure to try it out when I fill my system tonight, but burping the system only seems be half the problem at times.. Some of our cars, even when burped properly fail to generate enough flow to heat up the thermostat and allow it open. I don't know if it is certain years, Turbo vs NA, aftermarket water pumps, etc that causes the issue. But I'm 100% positive my system was properly burped (with no heater core hooked up), and still would not open the thermostat. The block was getting hot but nothing was circulating back to the thermostat to cause it to open. I know that is not the topic of this thread, which is burping, but the two issues can be hard to diagnose from each other initially, so the information being placed here can be useful.
-
Hi Guys,
I just want to double check with everyone having issues with their thermostat opening that they have looped back the coolant lines after removing the heater core? If you have just plugged off these lines without looping them back together then you have lost a vital circulation loop that will help open the thermostat. Please see the picture I have marked up below to see what I mean by that as it circulates the hot water back from the coolant cross over pipe to the back side of the thermo stat again.Screen Shot 2020-05-21 at 2.13.05 PM.png
-
Originally Posted by
iblackwe
Hi Guys,
I just want to double check with everyone having issues with their thermostat opening that they have looped back the coolant lines after removing the heater core? If you have just plugged off these lines without looping them back together then you have lost a vital circulation loop that will help open the thermostat. Please see the picture I have marked up below to see what I mean by that as it circulates the hot water back from the coolant cross over pipe to the back side of the thermo stat again.
Screen Shot 2020-05-21 at 2.13.05 PM.png
I have had it looped back at times, and connected to the heater core at times, never plugged off. The water pump still wouldn't generate any flow through that line until I drilled holes in the thermostat.
-
Post Thanks / Like - 1 Thanks, 0 Likes
-
Well, I made my modifications yesterday and filled the system today, and while I think my modifications helped, I have incomplete data. The primary issue I was trying to solve with my modifications was getting a good fill of the heater core and the block at the same time, but it turns out that some time in the last 6 weeks, my heater valve has stopped moving, so that is what was causing the heater core to stay cold, not an issue with filling the system.


 Thanks:
  Likes:


 Reply With Quote
