Forte's

Visit our community sponsor

Thanks Thanks:  216
Likes Likes:  443
Page 8 of 15 FirstFirst ... 678910 ... LastLast
Results 281 to 320 of 569

Thread: Fmans Dart 427 build #9818 - 14" Leather steering wheel

  1. #281
    Senior Member Fman's Avatar
    Join Date
    Jan 2020
    Location
    State of Jefferson
    Posts
    1,285
    Post Thanks / Like

    Liquid chrome

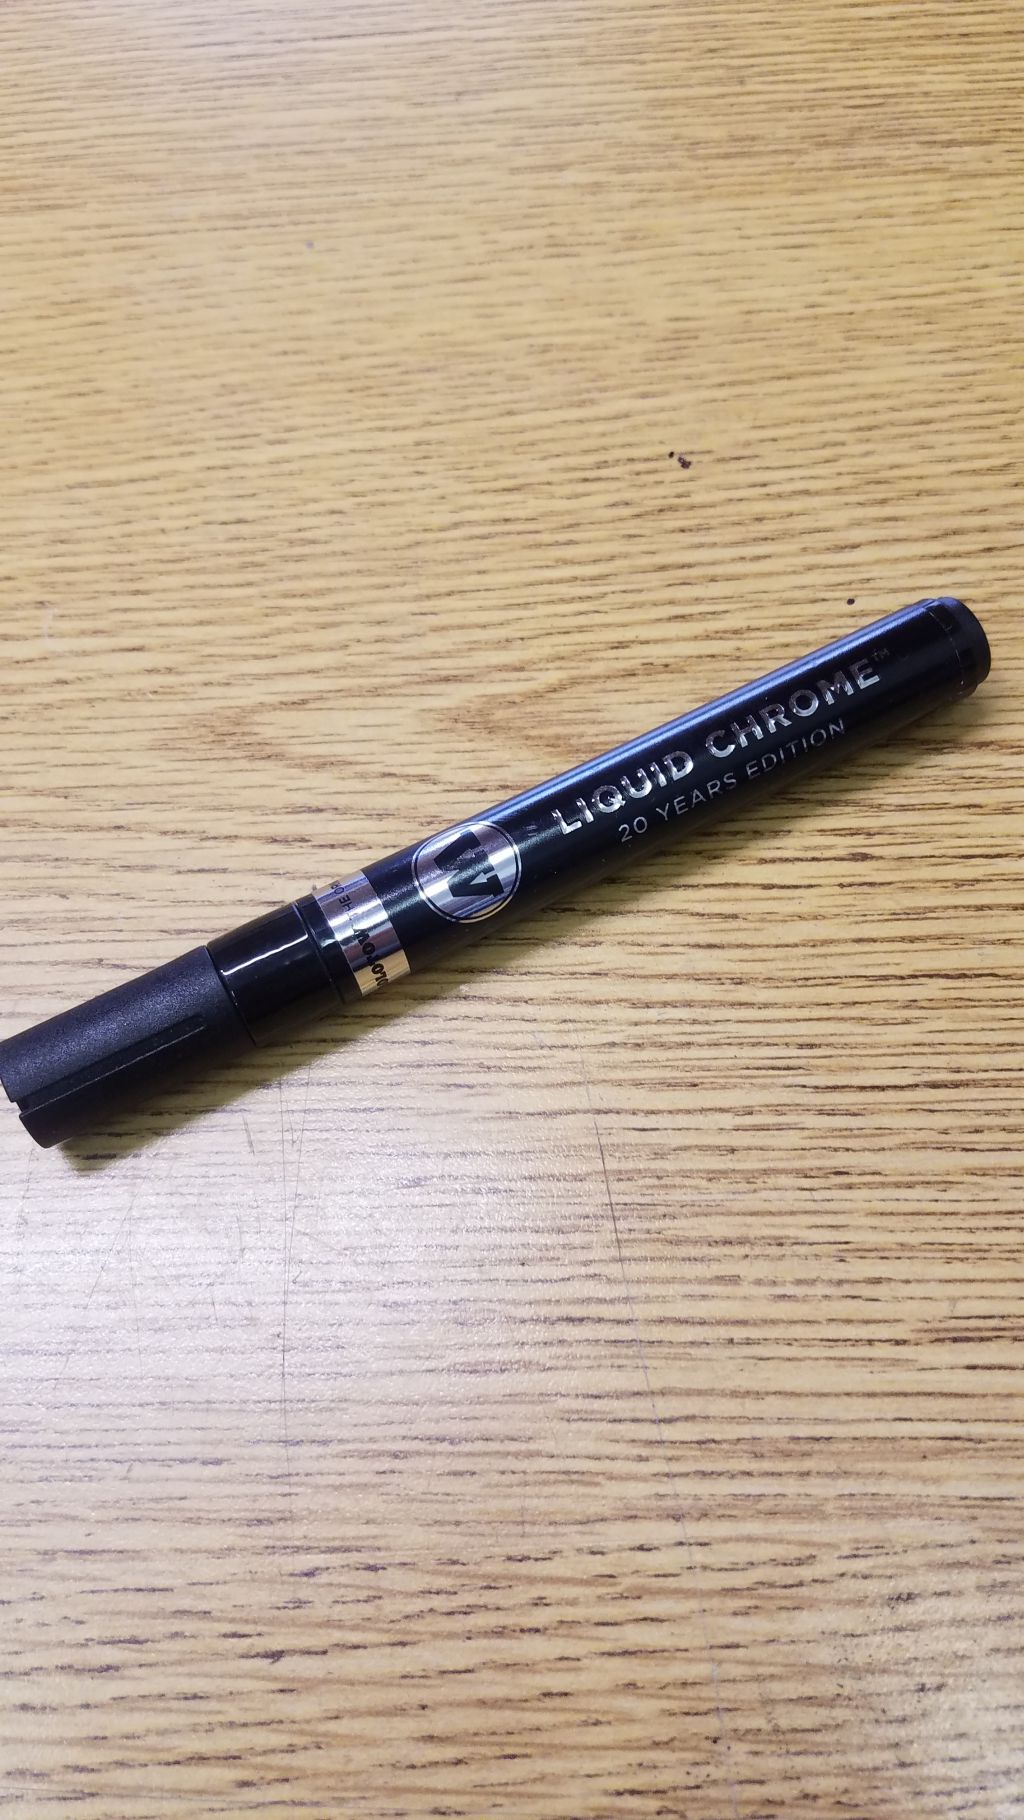
    When I drilled the trunk holes I had a large chip happen. I was not really too concerned about it because it is in the trunk, but I found some liquid chrome that did a great job of hiding the chip. This stuff can be used to touch up any chip in chrome on the car or your roll bar. Simple to use and easy to apply.


    After the liquid chrome touch up


    Here is a link to liquid chrome I ordered

    https://www.amazon.com/gp/product/B0...?ie=UTF8&psc=1

    Last edited by Fman; 01-26-2021 at 04:23 PM.
    Build #9818 completed 04/2021 - Dart SBF 427, PF4 EFI, TKO600 Build thread: https://thefactoryfiveforum.com/show...utton-head-mod
    Build review video:https://www.youtube.com/watch?v=k6IAbo2sFt4&t=1111s My finished car: https://thefactoryfiveforum.com/atta...7&d=1638415131

  2. #282
    BadAsp427's Avatar
    Join Date
    Jul 2018
    Location
    Greeneville, TN
    Posts
    1,177
    Post Thanks / Like
    I like the cup holders, I have similar. I think you will find that they will blow out, I don't think the "O" rings will hold them in. If they do, here is the fix I did after mine blew out and went flying... Click Here.

    Mk4 20th Anniversary #8690 (#8 of 20) Purchased 8/18/18----Build Started 8/19/18
    Build Thread Click Here / Registry Entry Click Here / BluePrint Engines 347ci / TKO600
    Carb/Heater/Heated Seats/Cruise Control/Drop Trunk & Battery/Custom Cubby

  3. Thanks Fman thanked for this post
    Likes Fman, Ted G liked this post
  4. #283
    Senior Member Fman's Avatar
    Join Date
    Jan 2020
    Location
    State of Jefferson
    Posts
    1,285
    Post Thanks / Like
    Quote Originally Posted by BadAsp427 View Post
    I like the cup holders, I have similar. I think you will find that they will blow out, I don't think the "O" rings will hold them in. If they do, here is the fix I did after mine blew out and went flying... Click Here.
    Carl, great idea... thanks for sharing. Definitely do not want a cup holder flying out! Looks like a couple clamps are going to be in my future.
    Build #9818 completed 04/2021 - Dart SBF 427, PF4 EFI, TKO600 Build thread: https://thefactoryfiveforum.com/show...utton-head-mod
    Build review video:https://www.youtube.com/watch?v=k6IAbo2sFt4&t=1111s My finished car: https://thefactoryfiveforum.com/atta...7&d=1638415131

  5. #284
    Senior Member Fman's Avatar
    Join Date
    Jan 2020
    Location
    State of Jefferson
    Posts
    1,285
    Post Thanks / Like

    Spinner eaze, reverse light

    With all the rain happening not much to do other than work on the Cobra. I wanted to get my spinners on the wheels, I picked up some Spinner Eaze and Silicon O rings to help with the install. I also did some more "pre" wiring while the body is off. I ran my all my wires for the reverse light, third brake light and front aux/fog light. Much easier doing this now then after the body is on.

    Torqued all lug nuts to specs and installed spinners I did phone a friend (Vspeeds, BB767) to confirm I was installing them the correct direction. Thanks Eddie and Brian for the help! I have them on hand tight right now did not want to go crazy tight with them. Also did not use the set screw not 100% sure about using it. Have heard set screw could gal the threads, maybe someone can confirm if I should use it?


    Cobra Valley Spinner Eaze and Silicon O rings
    http://performanceunlimited.com/cobr...innereaze.html

    https://www.amazon.com/gp/product/B0...?ie=UTF8&psc=1

    or

    Silicon O rings from Theoringstore.com
    S70329 : AS568-329 S70 FDA Silicone (VMQ) 70 Duro O-Ring


    If you are wanting a reverse light to pass inspection here is the location for the TKo600 with the adaptor. If I am not mistaken I believe this adaptor plug will also work with a T-5.

    https://www.summitracing.com/parts/SUM-890108

    Last edited by Fman; 02-02-2021 at 12:20 AM.
    Build #9818 completed 04/2021 - Dart SBF 427, PF4 EFI, TKO600 Build thread: https://thefactoryfiveforum.com/show...utton-head-mod
    Build review video:https://www.youtube.com/watch?v=k6IAbo2sFt4&t=1111s My finished car: https://thefactoryfiveforum.com/atta...7&d=1638415131

  6. #285
    TMartinLVNV's Avatar
    Join Date
    Jun 2019
    Location
    Las Vegas, NV
    Posts
    885
    Post Thanks / Like
    Fman. I've read not to use the set screws and, as a result, I have never used them. I just tighten by hand and give them a light whack with a rubber mallet. After a few drives, tap them again with the mallet. If any move, whack them a little more. Not scientific, but seems to work and you will shortly get a feel for how much you need to keep them tight. They should tighten opposite the direction of rotation of the car moving forward. If I remember correctly, tighten in the direction of the rear of the car.

    The O-rings make the assembly process much easier. I used anti-seize ln the threads of mine. However, I will be switching to the Spinner Eaze next time I have to take my wheels off.
    MK IV Build #9659, 3 link, 17's, Forte 347, Sniper EFI, power steering, built for a freak sized person with 17" Kirkey Vintage seats, RT drop trunk, RT turn signal, lots of stuff from Breeze Automotive, Wilwood brakes, paint by Jeff Miller

  7. #286
    25th Anniversary #9772 toadster's Avatar
    Join Date
    May 2011
    Location
    Folsom, CA
    Posts
    1,813
    Post Thanks / Like
    looking good Travis!! what are you doing for a reverse light?

    yes, with all this rain and wind, should be building a boat
    Todd
    25th Anniversary MkIV | #20 of 25 | Build #9772
    https://cobradreams.com/ <- my build!

  8. #287
    Senior Member Fman's Avatar
    Join Date
    Jan 2020
    Location
    State of Jefferson
    Posts
    1,285
    Post Thanks / Like
    Quote Originally Posted by TMartinLVNV View Post
    Fman. I've read not to use the set screws and, as a result, I have never used them. I just tighten by hand and give them a light whack with a rubber mallet. After a few drives, tap them again with the mallet. If any move, whack them a little more. Not scientific, but seems to work and you will shortly get a feel for how much you need to keep them tight. They should tighten opposite the direction of rotation of the car moving forward. If I remember correctly, tighten in the direction of the rear of the car.

    The O-rings make the assembly process much easier. I used anti-seize ln the threads of mine. However, I will be switching to the Spinner Eaze next time I have to take my wheels off.
    Terry, thanks for the clarification on the set screw.

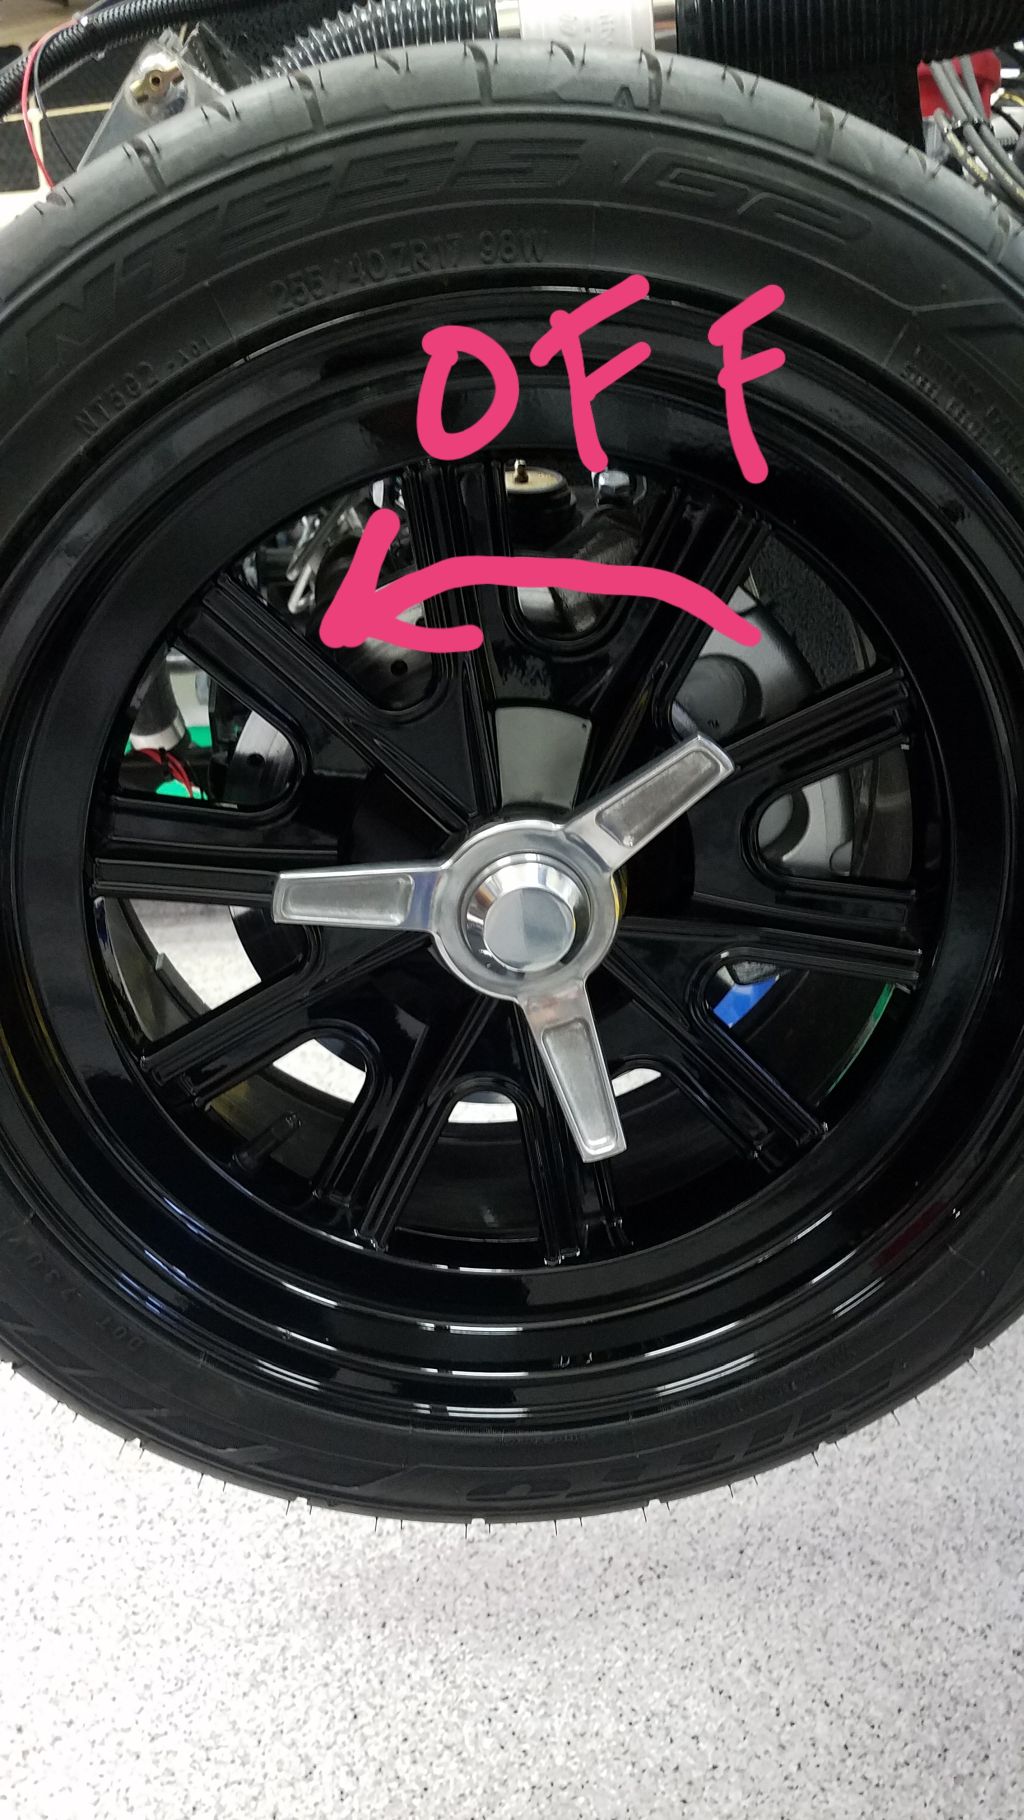
    Here is the way I have them mounted, basically forward to take off, towards rear of the car to tighten. Hopefully this is correct I will give them a light tap and call it good. I have loosened them once just to make sure they release and they broke away pretty easily. I just used a small spread of the spinner eaze on the threads, directions say it does not take much. Stuff is kind of goopy and messy.
    Build #9818 completed 04/2021 - Dart SBF 427, PF4 EFI, TKO600 Build thread: https://thefactoryfiveforum.com/show...utton-head-mod
    Build review video:https://www.youtube.com/watch?v=k6IAbo2sFt4&t=1111s My finished car: https://thefactoryfiveforum.com/atta...7&d=1638415131

  9. #288
    Senior Member Fman's Avatar
    Join Date
    Jan 2020
    Location
    State of Jefferson
    Posts
    1,285
    Post Thanks / Like
    Quote Originally Posted by toadster View Post
    looking good Travis!! what are you doing for a reverse light?

    yes, with all this rain and wind, should be building a boat
    Hi Todd, I picked up these lights. I will mount one right under the bottom center of the car. These are not DOT approved but I read a post where someone used them in CA and passed light inspection. Not sure if I will keep them after inspection is done.

    https://www.amazon.com/gp/product/B0...?ie=UTF8&psc=1
    Build #9818 completed 04/2021 - Dart SBF 427, PF4 EFI, TKO600 Build thread: https://thefactoryfiveforum.com/show...utton-head-mod
    Build review video:https://www.youtube.com/watch?v=k6IAbo2sFt4&t=1111s My finished car: https://thefactoryfiveforum.com/atta...7&d=1638415131

  10. Likes toadster liked this post
  11. #289
    Senior Member Fman's Avatar
    Join Date
    Jan 2020
    Location
    State of Jefferson
    Posts
    1,285
    Post Thanks / Like

    Cobra Herb - door panel

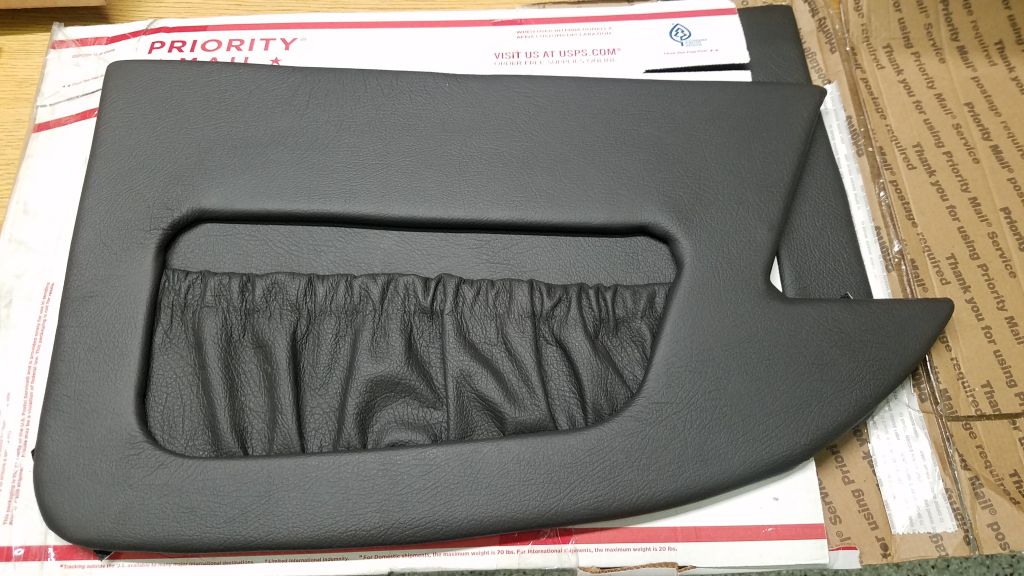
    I also opened up my door panel package from Cobra Herb, I sent him some pieces of my leather hyde I am using on the car (dash, center console) to match up to interior. He did a really nice job on these and they will be a perfect match.

    These are his "standard" panel

    https://cobra-herb.tripod.com/
    Build #9818 completed 04/2021 - Dart SBF 427, PF4 EFI, TKO600 Build thread: https://thefactoryfiveforum.com/show...utton-head-mod
    Build review video:https://www.youtube.com/watch?v=k6IAbo2sFt4&t=1111s My finished car: https://thefactoryfiveforum.com/atta...7&d=1638415131

  12. Likes 460.465USMC liked this post
  13. #290
    TMartinLVNV's Avatar
    Join Date
    Jun 2019
    Location
    Las Vegas, NV
    Posts
    885
    Post Thanks / Like
    "Here is the way I have them mounted, basically forward to take off, towards rear of the car to tighten. Hopefully this is correct "

    You got it!
    MK IV Build #9659, 3 link, 17's, Forte 347, Sniper EFI, power steering, built for a freak sized person with 17" Kirkey Vintage seats, RT drop trunk, RT turn signal, lots of stuff from Breeze Automotive, Wilwood brakes, paint by Jeff Miller

  14. Thanks Fman thanked for this post
    Likes Fman liked this post
  15. #291
    Senior Member GTBradley's Avatar
    Join Date
    Nov 2018
    Location
    Centennial, CO
    Posts
    1,708
    Post Thanks / Like
    It helps to understand why the spinners are reverse threaded on the right side of the car. The spinning motion of the wheels will tend to tighten the left side as they turn forward, but on the right side it would tend to loosen them because the forward motion acts in the same direct as loosening a right hand thread, thus a left hand thread is used. My first car was British and had wire wheels with knock off hubs and my dad was certain that I would loose a wheel at some point, so he hammered this point home.

    As far as treatment of the spinners go, I use the o-ring, the set screw, no lube and a dead blow hammer to tighten. I figure as long as the threads are kept clean of corrosion they will do fine. The set screw has not done any real damage to the threads and in 3500 miles I’ve never had a spinner come lose or refuse to come off when I needed it too.

    BTW, those door panels are one of the best purchases I made, very handy!
    Last edited by GTBradley; 02-01-2021 at 10:36 AM.
    Bradley

    Build thread - Mk4, Coyote, IRS, Wilwood brakes, old-style soft top and accessories.

    The distance between "finished" and finished is literally infinite.

  16. Thanks Fman thanked for this post
    Likes Fman liked this post
  17. #292
    Senior Member Fman's Avatar
    Join Date
    Jan 2020
    Location
    State of Jefferson
    Posts
    1,285
    Post Thanks / Like
    Quote Originally Posted by GTBradley View Post
    It helps to understand why the spinners are reverse threaded on the right side of the car. The spinning motion of the wheels will tend to tighten the left side as they turn forward, but on the right side it would tend to loosen them because the forward motion acts in the same direct as loosening a right hand thread, thus a left hand thread is used. My first car was British and had wire wheels with knock off hubs and my dad was certain that I would loose a wheel at some point, so he hammered this point home.

    As far as treatment of the spinners go, I use the o-ring, the set screw, no lube and a dead blow hammer to tighten. I figure as long as the threads are kept clean of corrosion they will do fine. The set screw has not done any real damage to the threads and in 3500 miles I’ve never had a spinner come lose or refuse to come off when I needed it too.

    BTW, those door panels are one of the best purchases I made, very handy!
    Totally makes sense, although it is a little confusing when you first get everything set up. Good to know about the set screw, I might use that and just snug it up.

    I am still really impressed with Cobra Herb and how good of a job he did on the panels. And I can see that pouch is going to come in handy for small items. I feel like I have some basic necessity items covered with this car, I can hold a Venti Coffee in my cup holder, turn on heated seats and storage pockets in my door panels Life is good!
    Last edited by Fman; 02-02-2021 at 12:26 AM.
    Build #9818 completed 04/2021 - Dart SBF 427, PF4 EFI, TKO600 Build thread: https://thefactoryfiveforum.com/show...utton-head-mod
    Build review video:https://www.youtube.com/watch?v=k6IAbo2sFt4&t=1111s My finished car: https://thefactoryfiveforum.com/atta...7&d=1638415131

  18. Likes GTBradley liked this post
  19. #293
    Senior Member John Ibele's Avatar
    Join Date
    Sep 2011
    Location
    Minneapolis, MN
    Posts
    720
    Post Thanks / Like
    Quote Originally Posted by GTBradley View Post
    BTW, those door panels are one of the best purchases I made, very handy!
    Quote Originally Posted by Fman View Post
    I am still really impressed with Cobra Herb and how good of a job he did on the panels. And I can see that pouch is going to come in handy for small items.
    Okay, fine, adding that to the build plan. Good thing this is a hobby and not a project with a budget ...
    MK4 #7838: IRS 3.55 TrueTrac T5z Dart 347
    The drawing is from ~7th grade, mid-1970s
    Meandering, leisurely build thread is here

  20. Likes GTBradley, Fman liked this post
  21. #294
    Senior Member Fman's Avatar
    Join Date
    Jan 2020
    Location
    State of Jefferson
    Posts
    1,285
    Post Thanks / Like
    Quote Originally Posted by John Ibele View Post
    Okay, fine, adding that to the build plan. Good thing this is a hobby and not a project with a budget ...
    As soon as you press the order button for a FFR Cobra the word budget is never thought about or discussed again! just remember you cant take it with you....

    And those door panels are well worth the $160 Cobra Herb charges.
    Build #9818 completed 04/2021 - Dart SBF 427, PF4 EFI, TKO600 Build thread: https://thefactoryfiveforum.com/show...utton-head-mod
    Build review video:https://www.youtube.com/watch?v=k6IAbo2sFt4&t=1111s My finished car: https://thefactoryfiveforum.com/atta...7&d=1638415131

  22. Likes John Ibele liked this post
  23. #295
    Senior Member egchewy79's Avatar
    Join Date
    May 2017
    Location
    Dublin, OH
    Posts
    1,884
    Post Thanks / Like
    Quote Originally Posted by Fman View Post
    As soon as you press the order button for a FFR Cobra the word budget is never thought about or discussed again! just remember you cant take it with you....

    And those door panels are well worth the $160 Cobra Herb charges.
    if you're lucky, you might catch one of Herb's flash sales. he'll give a discount for the first 10-20 people who respond to his post. that's how I got mine.

  24. Likes Fman liked this post
  25. #296
    Senior Member 460.465USMC's Avatar
    Join Date
    Aug 2019
    Location
    Spokane, WA
    Posts
    937
    Post Thanks / Like
    Quote Originally Posted by John Ibele View Post
    Okay, fine, adding that to the build plan. Good thing this is a hobby and not a project with a budget ...
    X2 on the panels. I looked at his website, and may consider the wider versions. Very similar in price, We'll see once I get closer to that part of my build.

    And, yeah, to quote Sir Paul (and others), "Budget...what budget?!?"
    Chris
    Coupe complete kit delivered: 4/22/24. Build Thread. Coyote. T-56. IRS w/3.55. Wilwoods. PS. HVAC. Side windows.
    MK4 Complete kit. Build Thread Index. Delivered: 10/15/2020. Legal: 7/25/23. Coyote Gen3. TKO600 (0.64 OD). IRS w/3.55. PS. Wilwoods. Sway bars. This build is dedicated to my son, Benjamin. Build Thread.

  26. #297
    Senior Member Fman's Avatar
    Join Date
    Jan 2020
    Location
    State of Jefferson
    Posts
    1,285
    Post Thanks / Like

    H3R Extinguisher, door straps, pedal adjustment

    I figured it was a good idea to have some type of extinguisher in this car, with my profession I have seen plenty of cars catch on fire and burn to the ground. At very least better to have a fighting chance of extinguishing a small fire. Hopefully I never have to use it.

    I chose to go with this 1lb H3R with a Goldfire quick release bracket, it has a cool looking billet PULL lever on top and seems to be well made. With the breeze cubby storage it was a tight squeeze but I think it will work. The Pull lever does stick up about 1/2" into the storage area but I believe there is still plenty of room to get items in and out of the cubby hole. I also still have room under the extinguisher to access the charging ports.

    I picked up the extinguisher from Summit
    https://www.summitracing.com/parts/HTR-MX100B

    Goldfire extinguisher mount from good ole Amazon
    https://www.amazon.com/gp/product/B0...?ie=UTF8&psc=1


    Like many others I used some black suede dye to do the door straps, it comes with a nice applicator and only takes a couple coats. Definitely want to wear some gloves when applying this stuff, will stain anything it comes in contact with.

    https://www.amazon.com/gp/product/B0...?ie=UTF8&psc=1


    After go-karting a few times I have been struggling with the pedal box and having the brake and gas pedal interfering with each other when pressing on them. I have size 13 feet and this pedal box does not like big feet, so I ended up moving the brake and clutch pad out even further. I also adjusted the Russ Thomspon gas pedal. This setup seems to be working better, I will probably also buy some type of driving shoes to narrow up my feet as much as possible.

    Last edited by Fman; 02-06-2021 at 03:31 PM.
    Build #9818 completed 04/2021 - Dart SBF 427, PF4 EFI, TKO600 Build thread: https://thefactoryfiveforum.com/show...utton-head-mod
    Build review video:https://www.youtube.com/watch?v=k6IAbo2sFt4&t=1111s My finished car: https://thefactoryfiveforum.com/atta...7&d=1638415131

  27. Likes Ted G liked this post
  28. #298

    Steve >> aka: GoDadGo
    GoDadGo's Avatar
    Join Date
    Feb 2015
    Location
    Slidell, Louisiana
    Posts
    6,609
    Post Thanks / Like
    Blog Entries
    1
    You Do Darn Good Work Fman!

  29. Thanks Fman thanked for this post
    Likes Fman liked this post
  30. #299
    Senior Member Fman's Avatar
    Join Date
    Jan 2020
    Location
    State of Jefferson
    Posts
    1,285
    Post Thanks / Like
    Quote Originally Posted by GoDadGo View Post
    You Do Darn Good Work Fman!
    Thank you, just copying a lot of mods from yourself and other builders on this forum. It is kind of odd, I am reaching a point where my car is about at the point where I can't do much more on it until the body goes back on. Even after that milestone there are only a few small items left to take care of and I could be on the road!

    I took my wife out for a go-kart run today, weather was beautiful here...64 and sunny. it was awesome to look over and see her in the passenger seat! she really enjoyed it...cant wait to take it out for a nice long drive someday
    Build #9818 completed 04/2021 - Dart SBF 427, PF4 EFI, TKO600 Build thread: https://thefactoryfiveforum.com/show...utton-head-mod
    Build review video:https://www.youtube.com/watch?v=k6IAbo2sFt4&t=1111s My finished car: https://thefactoryfiveforum.com/atta...7&d=1638415131

  31. #300
    Senior Member 460.465USMC's Avatar
    Join Date
    Aug 2019
    Location
    Spokane, WA
    Posts
    937
    Post Thanks / Like
    Thanks for the recommend on the extinguisher, Travis. Good to see what an expert in the field is using to protect himself, and his roadster! Made a note of it.
    Chris
    Coupe complete kit delivered: 4/22/24. Build Thread. Coyote. T-56. IRS w/3.55. Wilwoods. PS. HVAC. Side windows.
    MK4 Complete kit. Build Thread Index. Delivered: 10/15/2020. Legal: 7/25/23. Coyote Gen3. TKO600 (0.64 OD). IRS w/3.55. PS. Wilwoods. Sway bars. This build is dedicated to my son, Benjamin. Build Thread.

  32. Thanks Fman thanked for this post
  33. #301
    Mark Eaton's Avatar
    Join Date
    Apr 2017
    Location
    Medford, Oregon
    Posts
    756
    Post Thanks / Like
    Quote Originally Posted by Fman View Post

    After go-karting a few times I have been struggling with the pedal box and having the brake and gas pedal interfering with each other when pressing on them. I have size 13 feet and this pedal box does not like big feet, so I ended up moving the brake and clutch pad out even further. I also adjusted the Russ Thomspon gas pedal. This setup seems to be working better, I will probably also buy some type of driving shoes to narrow up my feet as much as possible.
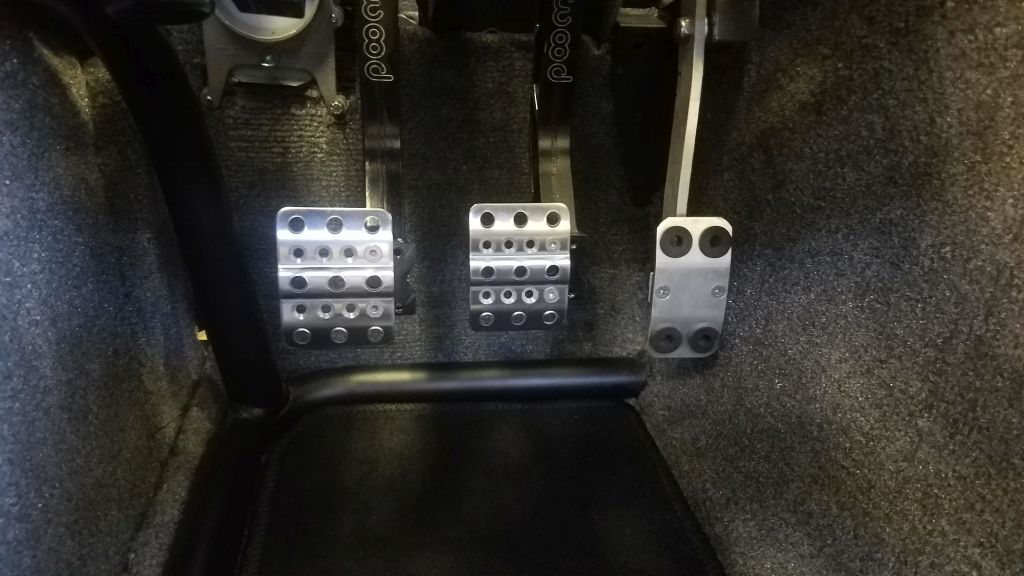
    I bought some Puma Drift Cats for driving. I'm pretty happy with them.
    MK4 #9130 , complete kit, arrived 8/10/2017, Street Legal 2/14/2020.
    DART SHP 347, EFI, TKO600, IRS
    http://thefactoryfiveforum.com/showt...n-Build-Thread

  34. Thanks Fman thanked for this post
    Likes Fman liked this post
  35. #302
    Senior Member
    Join Date
    Mar 2011
    Location
    Heart of Dixie, Alabama
    Posts
    1,875
    Post Thanks / Like
    You need to consider a dead pedal. Ask me how I know.
    20th Anniversary Mk IV, A50XS Coyote, TKO 600, Trunk Drop Box, Trunk Battery Box, Cubby Hole, Seat Heaters, Radiator hanger and shroud.

  36. #303
    Senior Member Fman's Avatar
    Join Date
    Jan 2020
    Location
    State of Jefferson
    Posts
    1,285
    Post Thanks / Like
    Quote Originally Posted by 460.465USMC View Post
    Thanks for the recommend on the extinguisher, Travis. Good to see what an expert in the field is using to protect himself, and his roadster! Made a note of it.
    I am easily replaceable more concerned about the roadster

    I have noticed a lot of guys will also keep a 5lb extinguisher in the trunk. The 1lb extinguishers are good for a quick knockdown to prevent a larger fire. Hopefully nobody ever has to use one for there car, that would definitely be a bad day.
    Build #9818 completed 04/2021 - Dart SBF 427, PF4 EFI, TKO600 Build thread: https://thefactoryfiveforum.com/show...utton-head-mod
    Build review video:https://www.youtube.com/watch?v=k6IAbo2sFt4&t=1111s My finished car: https://thefactoryfiveforum.com/atta...7&d=1638415131

  37. #304
    Senior Member Fman's Avatar
    Join Date
    Jan 2020
    Location
    State of Jefferson
    Posts
    1,285
    Post Thanks / Like
    Quote Originally Posted by Railroad View Post
    You need to consider a dead pedal. Ask me how I know.
    Any pics on what you are using? I have considered adding it.
    Build #9818 completed 04/2021 - Dart SBF 427, PF4 EFI, TKO600 Build thread: https://thefactoryfiveforum.com/show...utton-head-mod
    Build review video:https://www.youtube.com/watch?v=k6IAbo2sFt4&t=1111s My finished car: https://thefactoryfiveforum.com/atta...7&d=1638415131

  38. #305
    Senior Member John Ibele's Avatar
    Join Date
    Sep 2011
    Location
    Minneapolis, MN
    Posts
    720
    Post Thanks / Like
    Here's one idea. I used some aluminum L-bracket material from HD or Ace, cut some ears on it and bent them to fit the frame on the outside of the footbox:


    I cut a blank out of 0.090" aluminum plate:


    I spent some quality time with the drill and the countersink bit and ended up with this:


    A quick hit with a sanding block and some 320 grit gave it a nice consistent satin finish. It provides a good foot rest with my foot below the stomp switch for the hi-beams, and there's plenty of room to lift my foot up and hit the switch:


    One more note: I decided after looking at the dead pedal in place for a bit that it looked wrong with the curvy shape on the right side. Great, its shaped to the foot but you don't need all that support on a dead pedal. I'd put it in my dune buggy if I ever wanted to own a dune buggy. Which I don't.

    I trimmed it to a straight rectangle shape with just the two columns of lightening holes and it looks much better now. More functional and race ready. Still all the support for the foot right where you need it. I can pull measurements off and take a photo of the refined shape tonight if you like.

    Cheers,

    -- John

    PS Size 11 shoes.
    Last edited by John Ibele; 02-08-2021 at 12:18 PM.
    MK4 #7838: IRS 3.55 TrueTrac T5z Dart 347
    The drawing is from ~7th grade, mid-1970s
    Meandering, leisurely build thread is here

  39. Likes toadster, Fman liked this post
  40. #306
    25th Anniversary #9772 toadster's Avatar
    Join Date
    May 2011
    Location
    Folsom, CA
    Posts
    1,813
    Post Thanks / Like
    Quote Originally Posted by John Ibele View Post
    I spent some quality time with the drill and the countersink bit and ended up with this:


    is that a foot button for high/low beams? looks awesome!
    Todd
    25th Anniversary MkIV | #20 of 25 | Build #9772
    https://cobradreams.com/ <- my build!

  41. Thanks John Ibele thanked for this post
  42. #307
    Senior Member Fman's Avatar
    Join Date
    Jan 2020
    Location
    State of Jefferson
    Posts
    1,285
    Post Thanks / Like
    Quote Originally Posted by John Ibele View Post
    Here's one idea. I used some aluminum L-bracket material from HD or Ace, cut some ears on it and bent them to fit the frame on the outside of the footbox:


    I cut a blank out of 0.090" aluminum plate:


    I spent some quality time with the drill and the countersink bit and ended up with this:


    A quick hit with a sanding block and some 320 grit gave it a nice consistent satin finish. It provides a good foot rest with my foot below the stomp switch for the hi-beams, and there's plenty of room to lift my foot up and hit the switch:


    One more note: I decided after looking at the dead pedal in place for a bit that it looked wrong with the curvy shape on the right side. Great, its shaped to the foot but you don't need all that support on a dead pedal. I'd put it in my dune buggy if I ever wanted to own a dune buggy. Which I don't.

    I trimmed it to a straight rectangle shape with just the two columns of lightening holes and it looks much better now. More functional and race ready. Still all the support for the foot right where you need it. I can pull measurements off and take a photo of the refined shape tonight if you like.

    Cheers,

    -- John

    PS Size 11 shoes.
    Nice work! that looks awesome. I think I am going to just go with a basic 2" (w) 5 1/2" (l) piece similar to what breeze sells and keep it simple and easy. Planning on using Rivnuts to make it removable.
    Build #9818 completed 04/2021 - Dart SBF 427, PF4 EFI, TKO600 Build thread: https://thefactoryfiveforum.com/show...utton-head-mod
    Build review video:https://www.youtube.com/watch?v=k6IAbo2sFt4&t=1111s My finished car: https://thefactoryfiveforum.com/atta...7&d=1638415131

  43. Likes John Ibele liked this post
  44. #308
    Senior Member Fman's Avatar
    Join Date
    Jan 2020
    Location
    State of Jefferson
    Posts
    1,285
    Post Thanks / Like
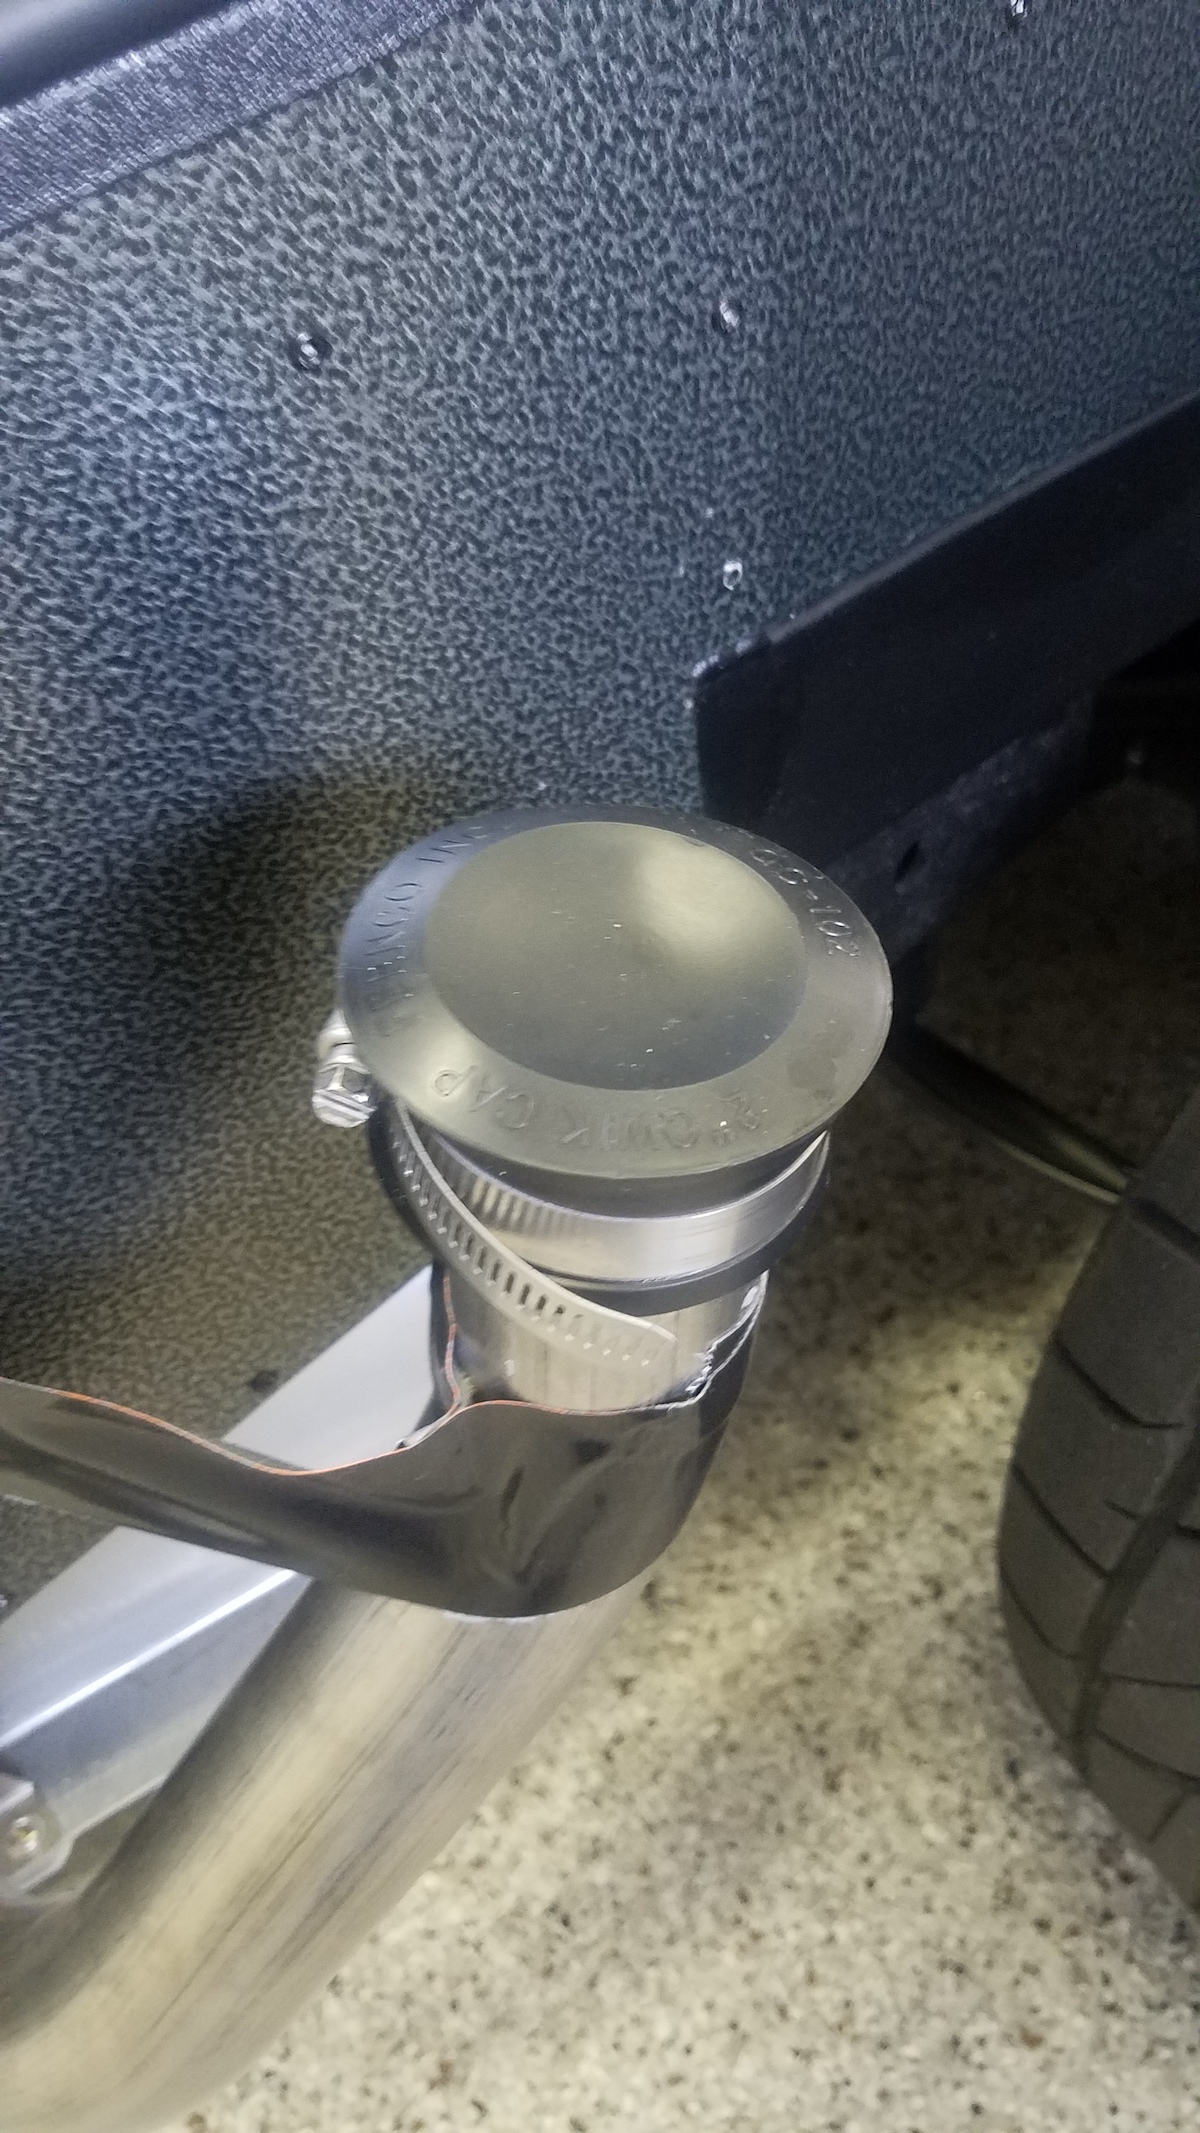
    I was at the big orange today and found a 2" quick cap, if you are in go-kart this comes in real handy for a fuel cap. It is easy to remove/install and does a good job sealing off all the fumes. Prior, I was using some gorilla tape and every time I went to add some fuel it was a PIA.

    I think at HD they are $3 you can also find one on Amazon
    https://www.amazon.com/Fernco-QC-102...1&rps=1&sr=8-5
    Last edited by Fman; 02-21-2021 at 11:03 AM.
    Build #9818 completed 04/2021 - Dart SBF 427, PF4 EFI, TKO600 Build thread: https://thefactoryfiveforum.com/show...utton-head-mod
    Build review video:https://www.youtube.com/watch?v=k6IAbo2sFt4&t=1111s My finished car: https://thefactoryfiveforum.com/atta...7&d=1638415131

  45. #309
    Senior Member 460.465USMC's Avatar
    Join Date
    Aug 2019
    Location
    Spokane, WA
    Posts
    937
    Post Thanks / Like
    Quote Originally Posted by Fman View Post
    I was at the big orange today and found a 2" quick cap, if you are in go-kart this comes in real handy for the a fuel cap. It is easy to remove/install and does a good job sealing off all the fumes. Prior, I was using some gorilla tape and every time I went to add some fuel it was a PIA.

    I think at HD they are $3 you can also find one on Amazon
    https://www.amazon.com/Fernco-QC-102...1&rps=1&sr=8-5
    Great idea, Travis! Noted. I especially like tips that are very functional AND cheap!
    Chris
    Coupe complete kit delivered: 4/22/24. Build Thread. Coyote. T-56. IRS w/3.55. Wilwoods. PS. HVAC. Side windows.
    MK4 Complete kit. Build Thread Index. Delivered: 10/15/2020. Legal: 7/25/23. Coyote Gen3. TKO600 (0.64 OD). IRS w/3.55. PS. Wilwoods. Sway bars. This build is dedicated to my son, Benjamin. Build Thread.

  46. #310
    Senior Member 460.465USMC's Avatar
    Join Date
    Aug 2019
    Location
    Spokane, WA
    Posts
    937
    Post Thanks / Like
    Quote Originally Posted by John Ibele View Post
    I cut a blank out of 0.090" aluminum plate:

    A quick hit with a sanding block and some 320 grit gave it a nice consistent satin finish. It provides a good foot rest with my foot below the stomp switch for the hi-beams, and there's plenty of room to lift my foot up and hit the switch:...

    I trimmed it to a straight rectangle shape with just the two columns of lightening holes and it looks much better now. More functional and race ready. Still all the support for the foot right where you need it. I can pull measurements off and take a photo of the refined shape tonight if you like.

    Cheers,

    -- John

    PS Size 11 shoes.
    Hi John. If it's not too much trouble I would gladly accept a photo with measurements, etc. Can you PM it to me?
    Chris
    Coupe complete kit delivered: 4/22/24. Build Thread. Coyote. T-56. IRS w/3.55. Wilwoods. PS. HVAC. Side windows.
    MK4 Complete kit. Build Thread Index. Delivered: 10/15/2020. Legal: 7/25/23. Coyote Gen3. TKO600 (0.64 OD). IRS w/3.55. PS. Wilwoods. Sway bars. This build is dedicated to my son, Benjamin. Build Thread.

  47. #311
    Senior Member JB in NOVA's Avatar
    Join Date
    Apr 2020
    Location
    Virginia
    Posts
    388
    Post Thanks / Like
    Quote Originally Posted by Railroad View Post
    You need to consider a dead pedal. Ask me how I know.
    OK, I'm adding this to my "to do" list. Thanks for sharing!
    MKIV Complete Kit #9822 l BluePrint 347 EFI l TKO600 l Power Steering l Heater/Defrost l Build Thread

  48. #312
    Senior Member Fman's Avatar
    Join Date
    Jan 2020
    Location
    State of Jefferson
    Posts
    1,285
    Post Thanks / Like

    Budget FA vent cable addition

    I had installed a manual gate for my fresh air system, after reaching down a few times to open and close the vent I decided to improve it by adding a cable push/pull system to open and close the vents. This is also much easier to do now than once the body goes on the car. I picked up two choke cables and a pack of cable stops.

    Dorman choke cable:
    https://www.amazon.com/gp/product/B0...?ie=UTF8&psc=1

    Dorman cable stops:
    https://www.amazon.com/gp/product/B0...?ie=UTF8&psc=1

    I ended up using some 1" L alum channel I had in my garage to make the bracket to hold the pull lever. This cable system is really nice to open and close the gates and is much easier than reaching down with your hand and doing it on the gate. It was a cheap upgrade less than $20 all in.

    Here is drivers side cable run, I wanted to keep it away from foot box pedals and throttle linkage. It runs on the outside of the fuse box. I had to flip the gate 180 degrees to allow the actual gate to slide upward to open. Pretty easy swap, couple new holes and had to add extra piece of carpet to patch up the small gap. I also trimmed some of the sheet metal on the vent to clear the back of the pedal box assembly. The cable is held in place with a cushion clamp that is bolted with a nylock nut to the footbox.


    I mounted the pull knob on outside of the drivers lower cross member area. The passenger side is in the same place. This seems to be a good spot, even with knob pulled out 2.5" there is plenty of clearance to get in and out of the car.


    Passenger side gate and pull knob, no modification was needed other than drilling a small hole in the actual gate. The cable runs along the top of the footbox and hooks around the back area to the gate. All of this is completed hidden and cant be seen when car is on the ground.


    Last edited by Fman; 02-11-2021 at 03:54 PM.
    Build #9818 completed 04/2021 - Dart SBF 427, PF4 EFI, TKO600 Build thread: https://thefactoryfiveforum.com/show...utton-head-mod
    Build review video:https://www.youtube.com/watch?v=k6IAbo2sFt4&t=1111s My finished car: https://thefactoryfiveforum.com/atta...7&d=1638415131

  49. Likes toadster, Straversi liked this post
  50. #313
    Senior Member Fman's Avatar
    Join Date
    Jan 2020
    Location
    State of Jefferson
    Posts
    1,285
    Post Thanks / Like

    Roll bar headrest mod aka Neck saver!

    I really like the nostalgic look of the low back seats in a Cobra but one of the problems is you have no neck support if the unfortunate happened. I started to look on the forum and found a mod that I really wanted to add to my build. I wanted to add a headrest and found another builder (Skidd) used a wheel chair calf pad which turns out to be cheap and about perfect size. I then took the pad to my upholstery guy and had him cover them with the leather hyde I am using on the car. This was relatively a cheap mod, about $150 total with all materials including upholstery.

    Here are the wheel chair calf pads I picked up:
    https://www.amazon.com/gp/product/B0...?ie=UTF8&psc=1

    These are the rollbar clamps I ended up using:
    https://www.amazon.com/gp/product/B0...?ie=UTF8&psc=1

    After mounting the roll bar clamps I mounted the base plate for the head rest. I used stainless hardware for the install.


    I cut a piece of 2" wide x 1/8" alum stock I had in my garage. It is a good thickness for this application, plenty strong. I ended up using 500 grit and wet sanded it down and followed it up with some Mothers metal polish. Once the brace was mounted I used the 4 bolts to affix the head rest to the base plate. I went with black bolts I picked up from Ace hardware.


    This is the wheel chair calf pad covered in the leather hyde


    The roll bar clamps have nice thick rubber grommets to protect the chrome on the roll bar. They can easily be adjusted up and down on the roll bar. They are not fully tightened down in this pic, they will pull together even more at full clamp force.


    I cut the braces to be inside the head rest base plate


    Last edited by Fman; 02-18-2021 at 04:15 PM.
    Build #9818 completed 04/2021 - Dart SBF 427, PF4 EFI, TKO600 Build thread: https://thefactoryfiveforum.com/show...utton-head-mod
    Build review video:https://www.youtube.com/watch?v=k6IAbo2sFt4&t=1111s My finished car: https://thefactoryfiveforum.com/atta...7&d=1638415131

  51. Thanks toadster, 460.465USMC thanked for this post
    Likes bldr.rob, toadster liked this post
  52. #314
    Senior Member Fman's Avatar
    Join Date
    Jan 2020
    Location
    State of Jefferson
    Posts
    1,285
    Post Thanks / Like

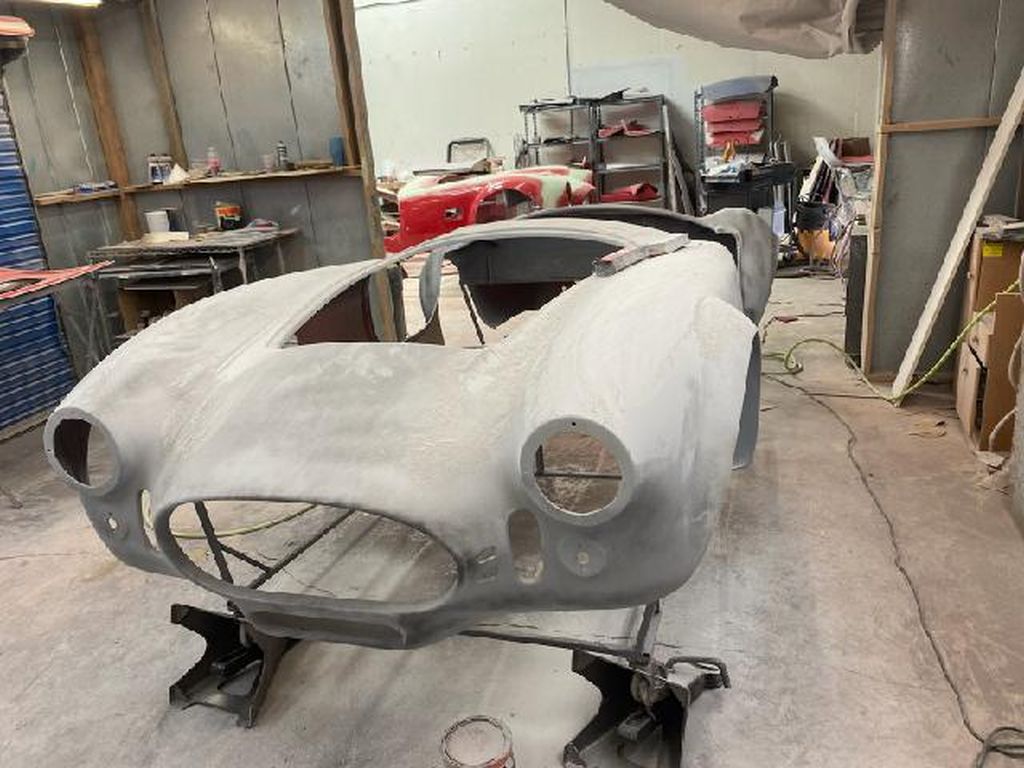
    Blocked for Primer

    Got a nice update today from Ken Pike, my car is being blocked for final primer!
    Build #9818 completed 04/2021 - Dart SBF 427, PF4 EFI, TKO600 Build thread: https://thefactoryfiveforum.com/show...utton-head-mod
    Build review video:https://www.youtube.com/watch?v=k6IAbo2sFt4&t=1111s My finished car: https://thefactoryfiveforum.com/atta...7&d=1638415131

  53. Likes bldr.rob liked this post
  54. #315
    Senior Member Fman's Avatar
    Join Date
    Jan 2020
    Location
    State of Jefferson
    Posts
    1,285
    Post Thanks / Like

    Dead pedal, heel pad

    A couple more "to-do" items on my pre-paint checklist before I rivet up the drivers side footbox. I decided to install a dead pedal from recommendations of many on the forum.

    The dead pedal is from 1/8" alum stock I cut and bent myself. I made it 1 3/8" wide by 5 1/2" long, 2" wide seems to be more standard size. I wanted it a little more narrow to free up some more space in the pedal box and not have my foot interfering with it when using the clutch pedal. I added a piece of grip tape on it, seems to be a good fit for my foot.


    I mounted it a little forward in front of the clutch pedal, this seems to be a personal preference item. Some go behind it, I liked how I can roll my foot off it onto the clutch and never have my foot behind the clutch pedal.


    I used 4 rivnuts to hold the pedal that make it removable just incase I ever want to take it out.


    I also found this heel pad for the Cobra mats on Amazon:
    https://www.amazon.com/gp/product/B0...?ie=UTF8&psc=1

    They seem to be about the perfect size and affix with six screws that go into the underside of the pad.


    Also put one on the passenger side.

    Last edited by Fman; 02-20-2021 at 09:26 PM.
    Build #9818 completed 04/2021 - Dart SBF 427, PF4 EFI, TKO600 Build thread: https://thefactoryfiveforum.com/show...utton-head-mod
    Build review video:https://www.youtube.com/watch?v=k6IAbo2sFt4&t=1111s My finished car: https://thefactoryfiveforum.com/atta...7&d=1638415131

  55. Thanks GTBradley thanked for this post
    Likes JB in NOVA liked this post
  56. #316
    Senior Member Fman's Avatar
    Join Date
    Jan 2020
    Location
    State of Jefferson
    Posts
    1,285
    Post Thanks / Like

    Ken Pike update - Final primer completed!

    Hearing your phone ding and seeing it is from Ken Pike is always good! final primer is now finished. Ken said about two weeks and some color will be on the roadster.


    Build #9818 completed 04/2021 - Dart SBF 427, PF4 EFI, TKO600 Build thread: https://thefactoryfiveforum.com/show...utton-head-mod
    Build review video:https://www.youtube.com/watch?v=k6IAbo2sFt4&t=1111s My finished car: https://thefactoryfiveforum.com/atta...7&d=1638415131

  57. Likes toadster liked this post
  58. #317
    Senior Member Fman's Avatar
    Join Date
    Jan 2020
    Location
    State of Jefferson
    Posts
    1,285
    Post Thanks / Like
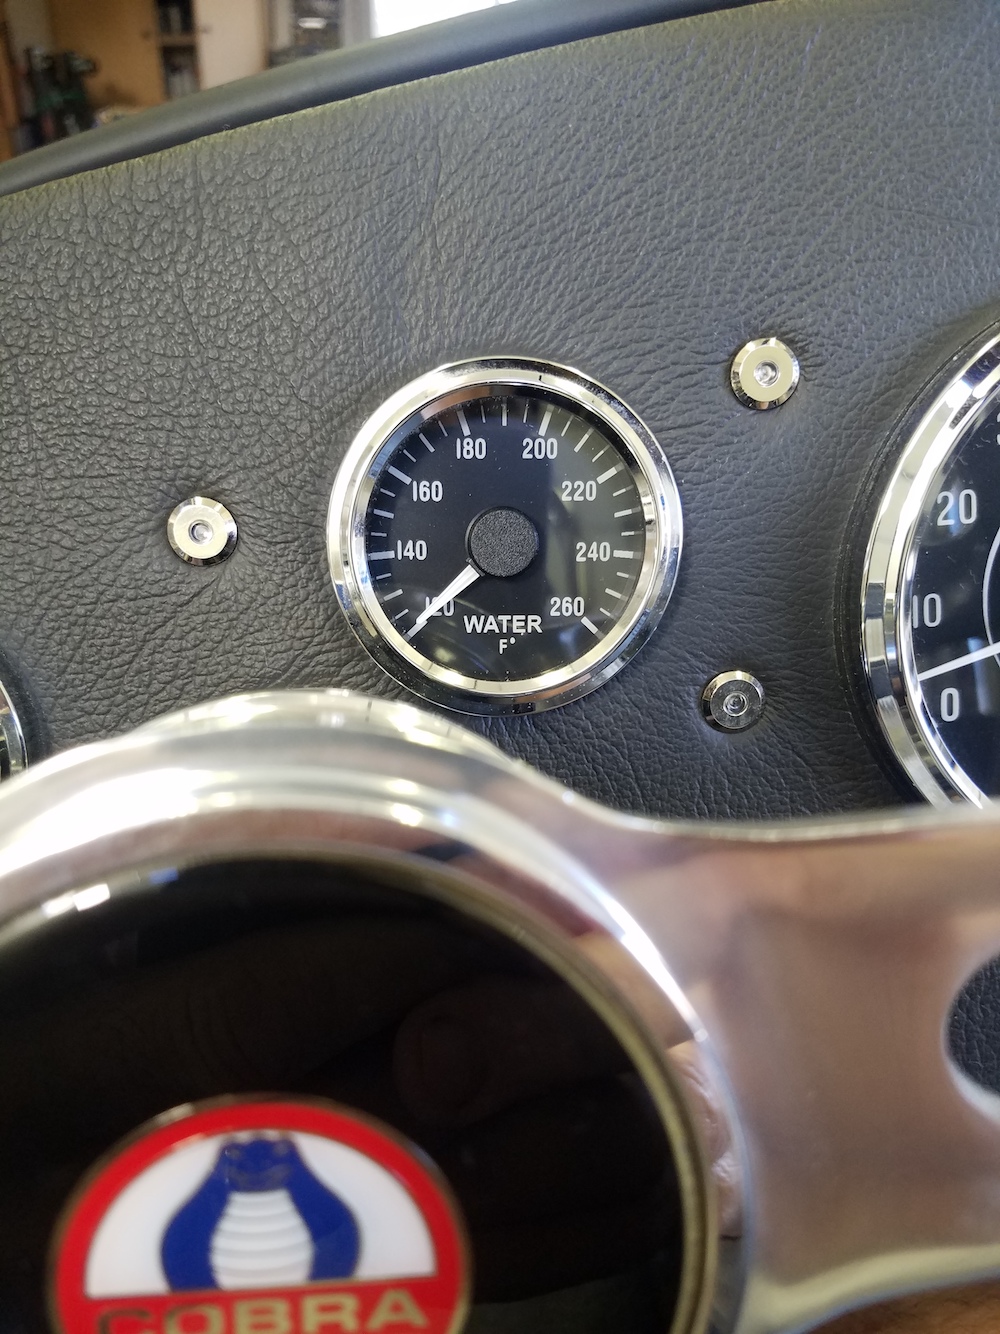
    Received my Speed hut temp gauge, they converted it from Celsius to Fahrenheit. I was not a fan of the Celsius display, felt like I was doing math conversions in my head every time I looked at the gauge...and I am not good at math! It is a $14 charge plus shipping and about a two week turn around time to have the gauge converted over.
    Last edited by Fman; 02-24-2021 at 01:04 AM.
    Build #9818 completed 04/2021 - Dart SBF 427, PF4 EFI, TKO600 Build thread: https://thefactoryfiveforum.com/show...utton-head-mod
    Build review video:https://www.youtube.com/watch?v=k6IAbo2sFt4&t=1111s My finished car: https://thefactoryfiveforum.com/atta...7&d=1638415131

  59. Thanks 460.465USMC thanked for this post
    Likes toadster liked this post
  60. #318
    Senior Member Fman's Avatar
    Join Date
    Jan 2020
    Location
    State of Jefferson
    Posts
    1,285
    Post Thanks / Like

    Wilwood remote brake bias adjuster

    I decided to install a remote brake bias adjuster on my build, I am not sure how much I will actually use it but definitely will be a "nice to have" item. I do not think my brakes are adjusted 100% properly right now, so I am planning on fine tuning as I begin to drive the car. I ended up going with the Wilwood brake adjuster knob and Tilton 90 degree 3/8-24 adaptor. If you choose to do this the only modification is the Wilwood inner cable is too large and will not fit into the Tilton adaptor without enlarging the hole. Not really a big deal but I am sure the Tilton bias adjuster would fit without modification.

    I tried initally to install without the 90 degree adaptor and it was not going to work. There is just not enough room on either end of the bias adjuster, for a clean install you definitely need the over priced Tilton fitting and they are definitely proud of that little sucker!

    Wilwood remote brake bias adjuster:
    https://www.amazon.com/gp/product/B0...?ie=UTF8&psc=1

    Tilton 90 degree adaptor: (3/8-24)
    https://www.summitracing.com/parts/til-72-560

    I mounted the knob on the right side under the dash, I chose this spot because it is easily accessible when driving, cant really be seen when car is on the ground and does not interfere with driving or getting in and out the car. It seems to be turning easy with no binding and a smooth operation. I did have to move my inertia switch over to make it fit (just realized I have to put a rivet in that hole)


    I routed the cable up under the dash


    I added a pillow clamp to hold the cable and keep it away from every coming near the Forte throttle linkage


    A shot of the Tilton 90 degree adaptor with the cable mounted

    Last edited by Fman; 02-24-2021 at 07:21 PM.
    Build #9818 completed 04/2021 - Dart SBF 427, PF4 EFI, TKO600 Build thread: https://thefactoryfiveforum.com/show...utton-head-mod
    Build review video:https://www.youtube.com/watch?v=k6IAbo2sFt4&t=1111s My finished car: https://thefactoryfiveforum.com/atta...7&d=1638415131

  61. Thanks 460.465USMC thanked for this post
    Likes JB in NOVA, JohnK, toadster, GTBradley liked this post
  62. #319
    Senior Member Fman's Avatar
    Join Date
    Jan 2020
    Location
    State of Jefferson
    Posts
    1,285
    Post Thanks / Like

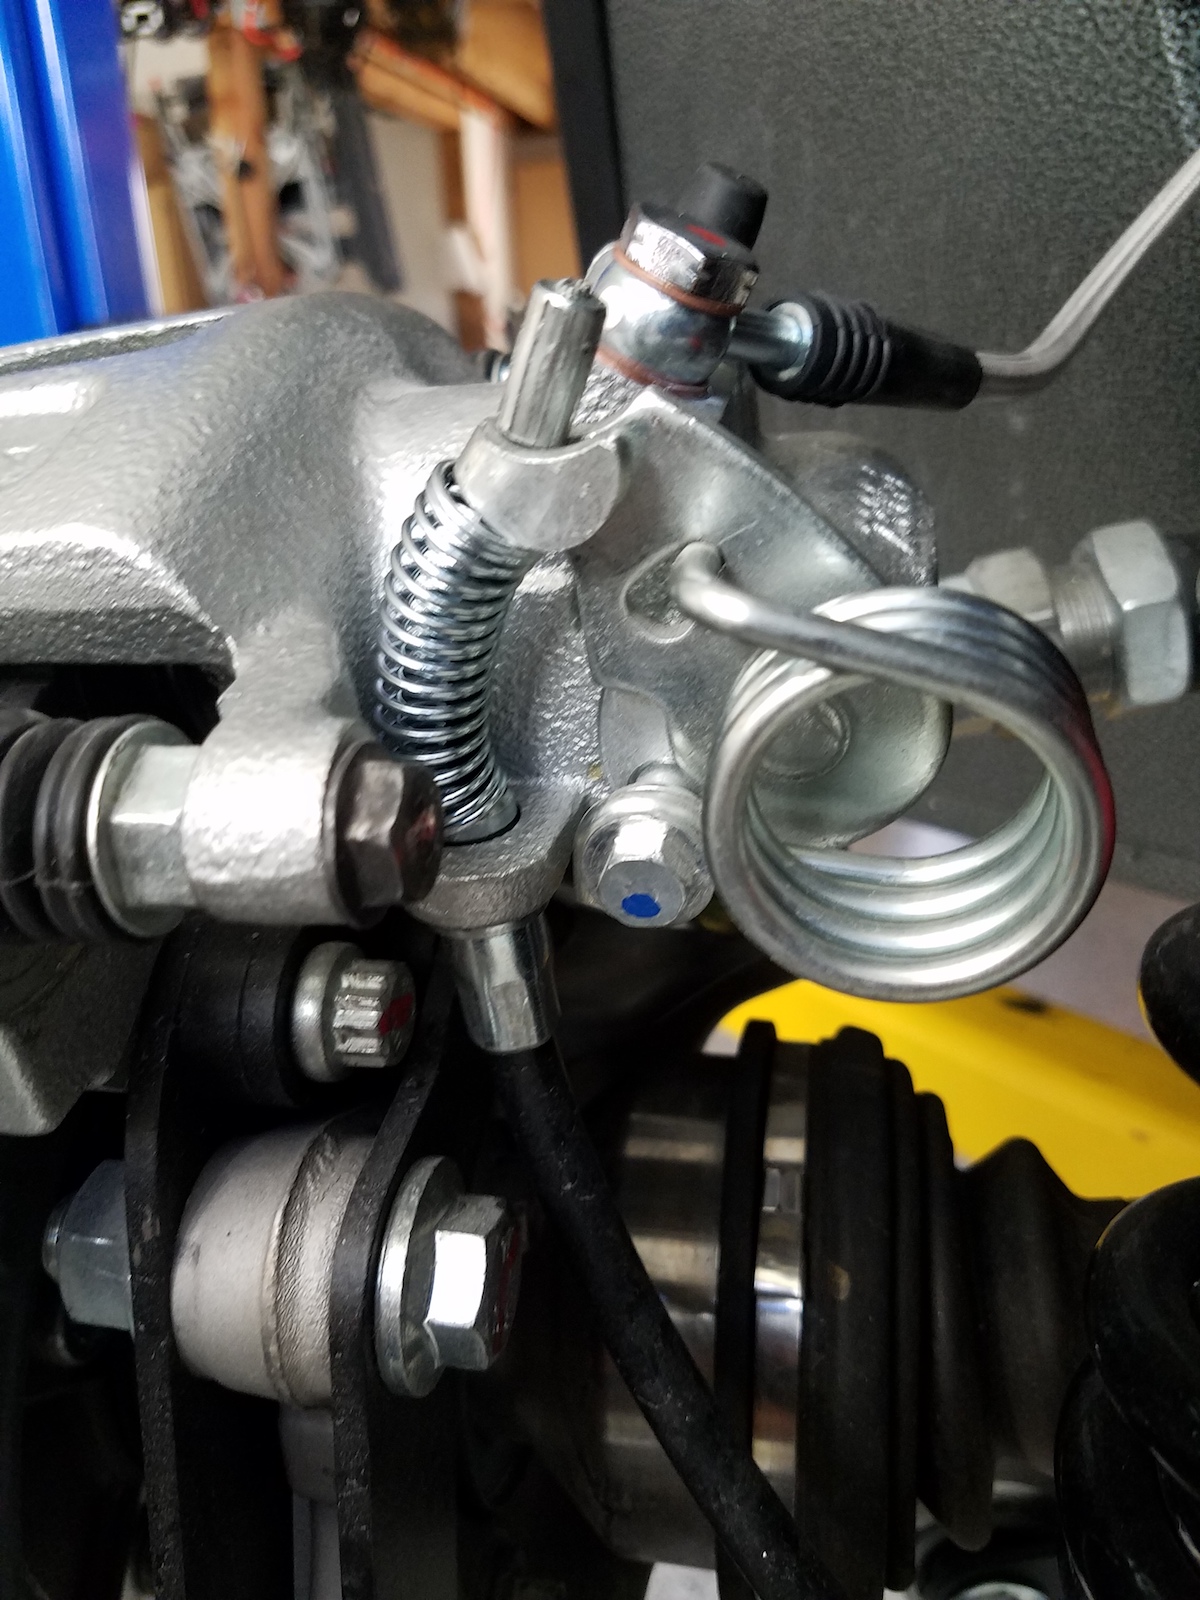
    Mustang E-brake spring mod

    There have been a few people that have had issues with the Mustang rear brake calipers not disengaging when the e-brake is released. I figured I would add the "spring brake" modification to avoid this happening. A shout out to Alexmak (aka fastest quarantine builder on the east coast) for giving me the links to pick up the necessary springs. Thanks again Alex!

    Picked them up from Amazon:
    https://www.amazon.com/gp/product/B0...?ie=UTF8&psc=1

    https://www.amazon.com/gp/product/B0...?ie=UTF8&psc=1

    You run the larger 9705 inside the 9712 for a double spring setup.

    Springs installed on the rear caliper
    Build #9818 completed 04/2021 - Dart SBF 427, PF4 EFI, TKO600 Build thread: https://thefactoryfiveforum.com/show...utton-head-mod
    Build review video:https://www.youtube.com/watch?v=k6IAbo2sFt4&t=1111s My finished car: https://thefactoryfiveforum.com/atta...7&d=1638415131

  63. Thanks WIS89, Geoff H thanked for this post
    Likes JB in NOVA, WIS89, toadster liked this post
  64. #320
    Senior Member Fman's Avatar
    Join Date
    Jan 2020
    Location
    State of Jefferson
    Posts
    1,285
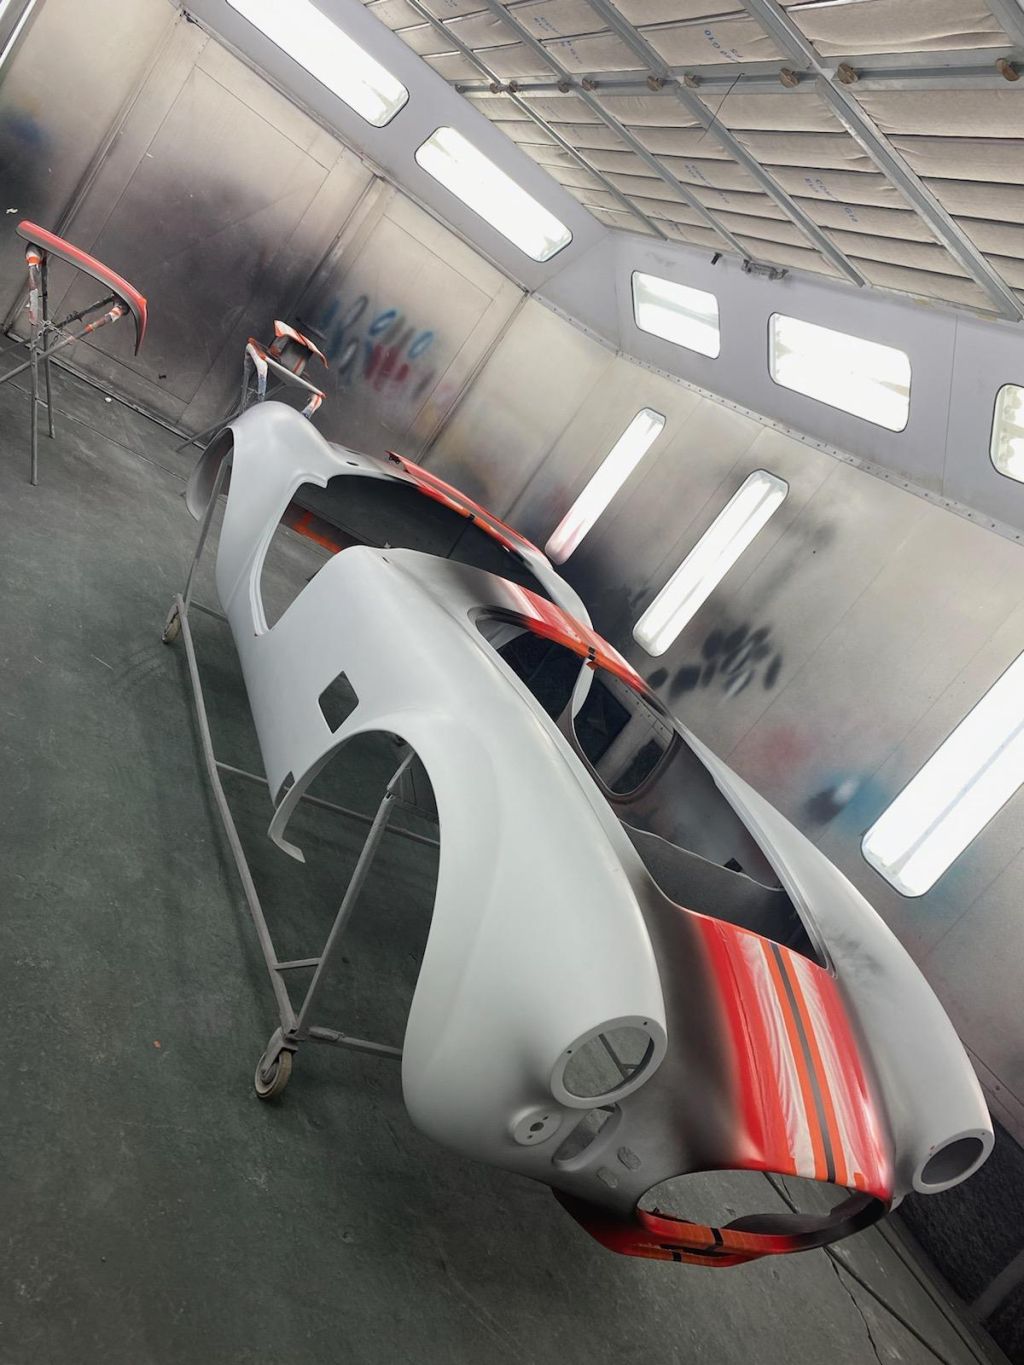
    Post Thanks / Like

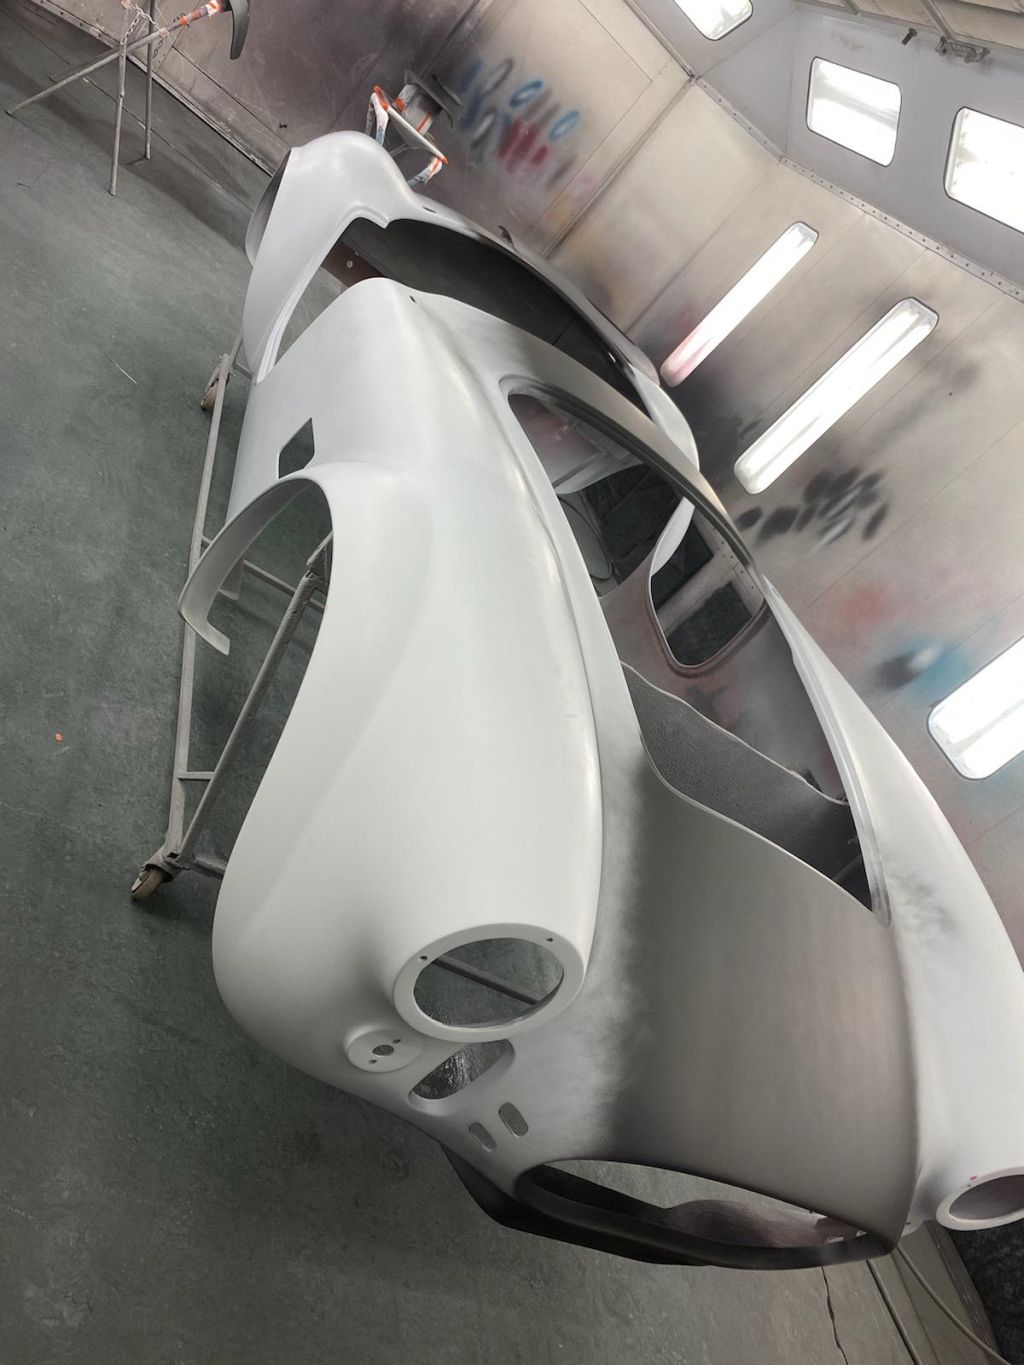
    Let the striping begin...

    Ken is making some more progress, stripes are starting to come to life!

    Build #9818 completed 04/2021 - Dart SBF 427, PF4 EFI, TKO600 Build thread: https://thefactoryfiveforum.com/show...utton-head-mod
    Build review video:https://www.youtube.com/watch?v=k6IAbo2sFt4&t=1111s My finished car: https://thefactoryfiveforum.com/atta...7&d=1638415131

  65. Thanks toadster thanked for this post
Page 8 of 15 FirstFirst ... 678910 ... LastLast

Posting Permissions

  • You may not post new threads
  • You may not post replies
  • You may not post attachments
  • You may not edit your posts
  •  

Stewart Transport

Visit our community sponsor