-
Senior Member

Junkyard Gen 3 F-150 Coyote
I laid out in my Coupe build thread what I plan to do for the engine build, but here are the cliff notes:
Junkyard 2018 F-150 Coyote was picked up for ~$3200 from a wrecked truck. I plan to convert this to the same configuration as the Mustang Gen 3 Coyote, there is a twist coming at the end of this post (my teaser to keep you reading ). What I found you need for the conversion:
Engine harness - The F-150 uses a MAP sensor (yes it's speed density tuned) and you'll need the Mustang engine harness to work with the FPCP
Timing Cover - Accessories are just arranged differently on the truck
Cam shafts - different firing order, plus they are wimpier than the Mustang GT units
Intake manifold - Plays nicer with the mustang engine harness and performance is better. I went with a GT350 unit, but the Mustang is probably better bang for the buck.
Timing phasers - They can either be replaced or re-marked for the Mustang timing. Check out this write up for more details: https://thefactoryfiveforum.com/show...l=1#post421587
Harmonic balancer - Only needed if you're running A/C. The truck has a 4 rib for the A/C and mustang kit requires a 6 rib.
That's it, that's what you NEED. This should cost in the realm of ~$1500 - 1700 for all those parts depending on availability and patient you are waiting for back order stuff. So depending on how much you can source an F-150 motor for that means you could be in the ball park of a Gen 3 for $5K. Now it would be a used motor so that adds risk plus this just gets you to where you're at with the crate motor configuration. You'll still need the alternator kit, low profile oil pan and pick-up, flywheel (if running a manual trans), FPCP, headers and so on.
Why might you want to go through all of this logistics you may ask?? Well, there is a chance to save ~$3-4K on a Gen 3 engine and unlike previous Gen Coyotes the Gen 3 shares more of the same parts with it's Mustang brother:
Compression ratio - same 12:1
Rotating assembly (crank, rods, pistons, wrist pins, bearings) - same exact part numbers
Heads - same
Valves, valve springs, followers, lash adjusters - all the same. With the exception of the cams and valve covers the whole head assemblies are identical.
Injectors, both DI and port - same
Fuel rail and all the DI stuff - same
As mentioned above the valve covers are different part numbers, but they both mount to the same heads and I believe (have not 100% confirmed yet) the only differences in them are mounting bosses for the wiring harness christmas tree push pins thingys. The main engine harness differences are in those areas dealing with CMCV configuration and the added MAP sensor that the Mustang does not have.
The oil pump is different on the truck, the gears are slightly thinner. If upgrading gears pay particular attention to this or get the mustang unit ($65 - $75) then upgrade with the thicker mustang gears. I imagine the thicker gears would provide a bit more oil flow.
What I did different from above:
Got a whole new timing set, there's a part number for it in the Ford Performance catalog. Not cheap, but on a used engine I felt it was prudent to replace. I got a whole host of new seals for all the cooling components, same logic with the used engine. Once I got the engine home from the junkyard I did find a lot of oil build up in the intake tract and actually found sludge in the oil pump, not sure it ever saw an oil change in it's short life and it may have had a bad PCV valve so that is also getting replaced. The pistons had what I considered pretty extensive carbon build up, I suspect it was an oil consumer which is a common F-150 Coyote problem. So I pulled the pistons and rods, cleaned them all up and will be installing them with a new set of Gapless ring from Total Seal. No issues with new rings on a used motor according to Total Seal since these gen 3 blocks have the plasma sprayed in cylinder liners.
Moving on, also upgraded to an ATI super damper since I needed one anyways. Went for an MMR lightweight water pump pulley and their secondary chain tensioner for the driver's side to properly tension on the slack side of the chain.
Lastly, the heads are getting a port and valve job on them. This is actually the last thing I'm waiting on before I can reassemble the engine. I'm staying with the stock head gaskets as they are good MLS pieces and can be obtained for ~$40 a piece which is a fraction of any aftermarket head gaskets.
OK, that was a lot so here's the twist. I'm exploring the possibility of putting in a voodoo crankshaft and having a hybrid voodoo/coyote engine. I pressed the test and ford happily sold me the crankshaft which is sitting in a crate awaiting it's fate, lol. This creates some challenges:
1. Firing order will have to change. I'm working with two different cam companies to see if they can make a custom set for this firing order. COVID has made all of these kinds of things move much slower and frankly I have plenty of time to export this before I need a running engine in my build. To deal with spark and injectors firing order, my plan is to re-pin the engine harness PMC connector to accommodate the new firing order.
2. Tuning...this is probably still the largest unknown at this time. I know there are fuel trims for left and right cylinder banks and re-pinning the harness could have some implications there, but I'm not sure to what degree. Theoretically with the flat plane crank firing order efficiency from one cylinder to the next should be much more similar since there are no firing events in a row on the same cylinder bank. If anyone has experience with Coyote tuning (Gen 3 with FPCP in particular) I would greatly appreciate them weighing in!
3. The listed stroke on the voodoo crank is 0.012 longer than on the Coyote. I believe a thicker head gasket will take care of this. Ford has a set of thicker head gaskets they dubbed for "rebuilds". I have yet to find out what the compressed thickness is of either the stock or this thicker head gasket. Again if anyone has knowledge on this please share! My calculations show the stock head gasket thickness to be in the ball park of 0.040, but this is just an approximation based on book engine specs that ford performance shared with me. If anyone wants those specs PM me and I can send you the document they sent me.
4. The unknown, unknowns...Let the spears fly! Am I off my rocker or does this seem like a seriously cool thing to try (obviously I'm in the latter camp at the moment)?
The good thing is if the Gen 3 Coyote with a flat plane crank doesn't workout I have everything I need (awaiting heads from machinist) to put it together and install in the car.
Cheers,
Patrick
-
Senior Member

You might want to consider upgrading the oil pump. The F150 pump has sintered gears that are a known weak spot on tuned or high rpm use engines. https://www.hotrod.com/articles/ford...ump-gear-swap/
Mike............
FFR2100 - 331 with KB supercharger - T5 - 5 link rear 3.08's and T2 Torsen.
-
Taking parts from one motor to make another motor faster....
That's the definition of hot rodding and the foundation of this hobby. Go for it. Cant wait to see the results.
-Steve
-
Senior Member


Originally Posted by
Mike N

My apologies, I didn't state correctly in the initial post. I upgraded the F-150 oil pump with billet gear from MMR. Completely agree, the factory gears in any of these pumps are a weakness.
-
Senior Member


Originally Posted by
Straversi

Taking parts from one motor to make another motor faster....
That's the definition of hot rodding and the foundation of this hobby. Go for it. Cant wait to see the results.
-Steve
Thanks! I'll keep the forum posted with the progress.
-
Senior Member

Sounds like a great plan!
I'm doing a Coyote/Voodoo build and started before there was all the know-how of mixing and matching and firing order fixes. Keep posting progress, I'll look forward to the updates
Gen 3 Type 65 Coupe builder
-
Senior Member


Originally Posted by
q4stix

Sounds like a great plan!
I'm doing a Coyote/Voodoo build and started before there was all the know-how of mixing and matching and firing order fixes. Keep posting progress, I'll look forward to the updates
What combination or configuration of Coyote/Voodoo are you pursuing?
-
Senior Member

-
Senior Member


Originally Posted by
Snowman

What combination or configuration of Coyote/Voodoo are you pursuing?
Sorry I didn't see this earlier. It's essentially a Gen 2 Voodoo setup using a Coyote block and forged Coyote internals. Again, having waited until now to start I probably would have done a Gen 3 block because of the better cylinder liners and slightly bigger bore but the money has already been spent and my entire rotating assembly is balanced so there's no sense changing pistons and such now.
Gen 3 Type 65 Coupe builder
-
Senior Member


Originally Posted by
q4stix

Sorry I didn't see this earlier. It's essentially a Gen 2 Voodoo setup using a Coyote block and forged Coyote internals. Again, having waited until now to start I probably would have done a Gen 3 block because of the better cylinder liners and slightly bigger bore but the money has already been spent and my entire rotating assembly is balanced so there's no sense changing pistons and such now.
Are you using the the flat plane crank?
-
Senior Member

Yep. I haven't assembled everything but it's all ready to be built up. I've been wanting to get my suspension figured out before I take time to tackle that.

I know everyone talks about the vibration but I'm willing to see what it actually amounts to. I've driven a GT350 owned by a coworker and the vibration felt minimal. Granted that was with all the passive damping in the car, but still...
Gen 3 Type 65 Coupe builder
-
Senior Member


Originally Posted by
q4stix

Yep. I haven't assembled everything but it's all ready to be built up. I've been wanting to get my suspension figured out before I take time to tackle that.

I know everyone talks about the vibration but I'm willing to see what it actually amounts to. I've driven a GT350 owned by a coworker and the vibration felt minimal. Granted that was with all the passive damping in the car, but still...
Just in case you are not aware they hang balance weights off the cats to help with vibration. Not sure how much vibration you will get assuming you are running sidepipes without those weights.
-
Senior Member

Engine update: some loses, but gained experience
First thing, custom Gen 3 cams for a 180 degree crank are a no-go at present. The folks at MMR were very candid with me about this. There is one company that manufactures the cam cores for Coyotes. This is where Comp gets their cores and most others that have aftermarket Coyote cams on the market have obtained cores through Comp. That core manufacturer only does large volume so one-offs like I'm looking for are just not in cards. The only option for what I'm looking for is to have cams whittled out of a piece of billet stock and that is some serious $$$ I'm not willing to spend. So for now the voodoo crank will sit safely in its shipping crate for some other future project, likely a gen 3 coyote block with GT350 heads.
Next, I had torn the junkyard engine down to everything, but the crank. A friend and coworker who is now my engine building mentor (he's been drag racing for decades and is a wealth of knowledge) urged me to pull the crank. I'm glad I did as I found a bunch of pitting on one of the main journals. Interestingly enough the main bearings all looked really good so I'm thinking the pitting was a manufacturing defect and it might be good for ford OEM standards. I have no idea how their QA process works, but regardless I'm not interested in running a crank that looks like that. Also, once I got the crank out I had a much better look at the cylinder liners in sunlight and saw some wear I wasn't too happy about.
As this is kind of not great news, the interesting part is I have a new block and crank on the way shipped to my door step for $1300. Not the most painful thing I could have experienced. Also, while researching new bearings I kept seeing different "grade" bearings for the mains on the ford parts websites. I contacted ford tech and they shared this document with me:
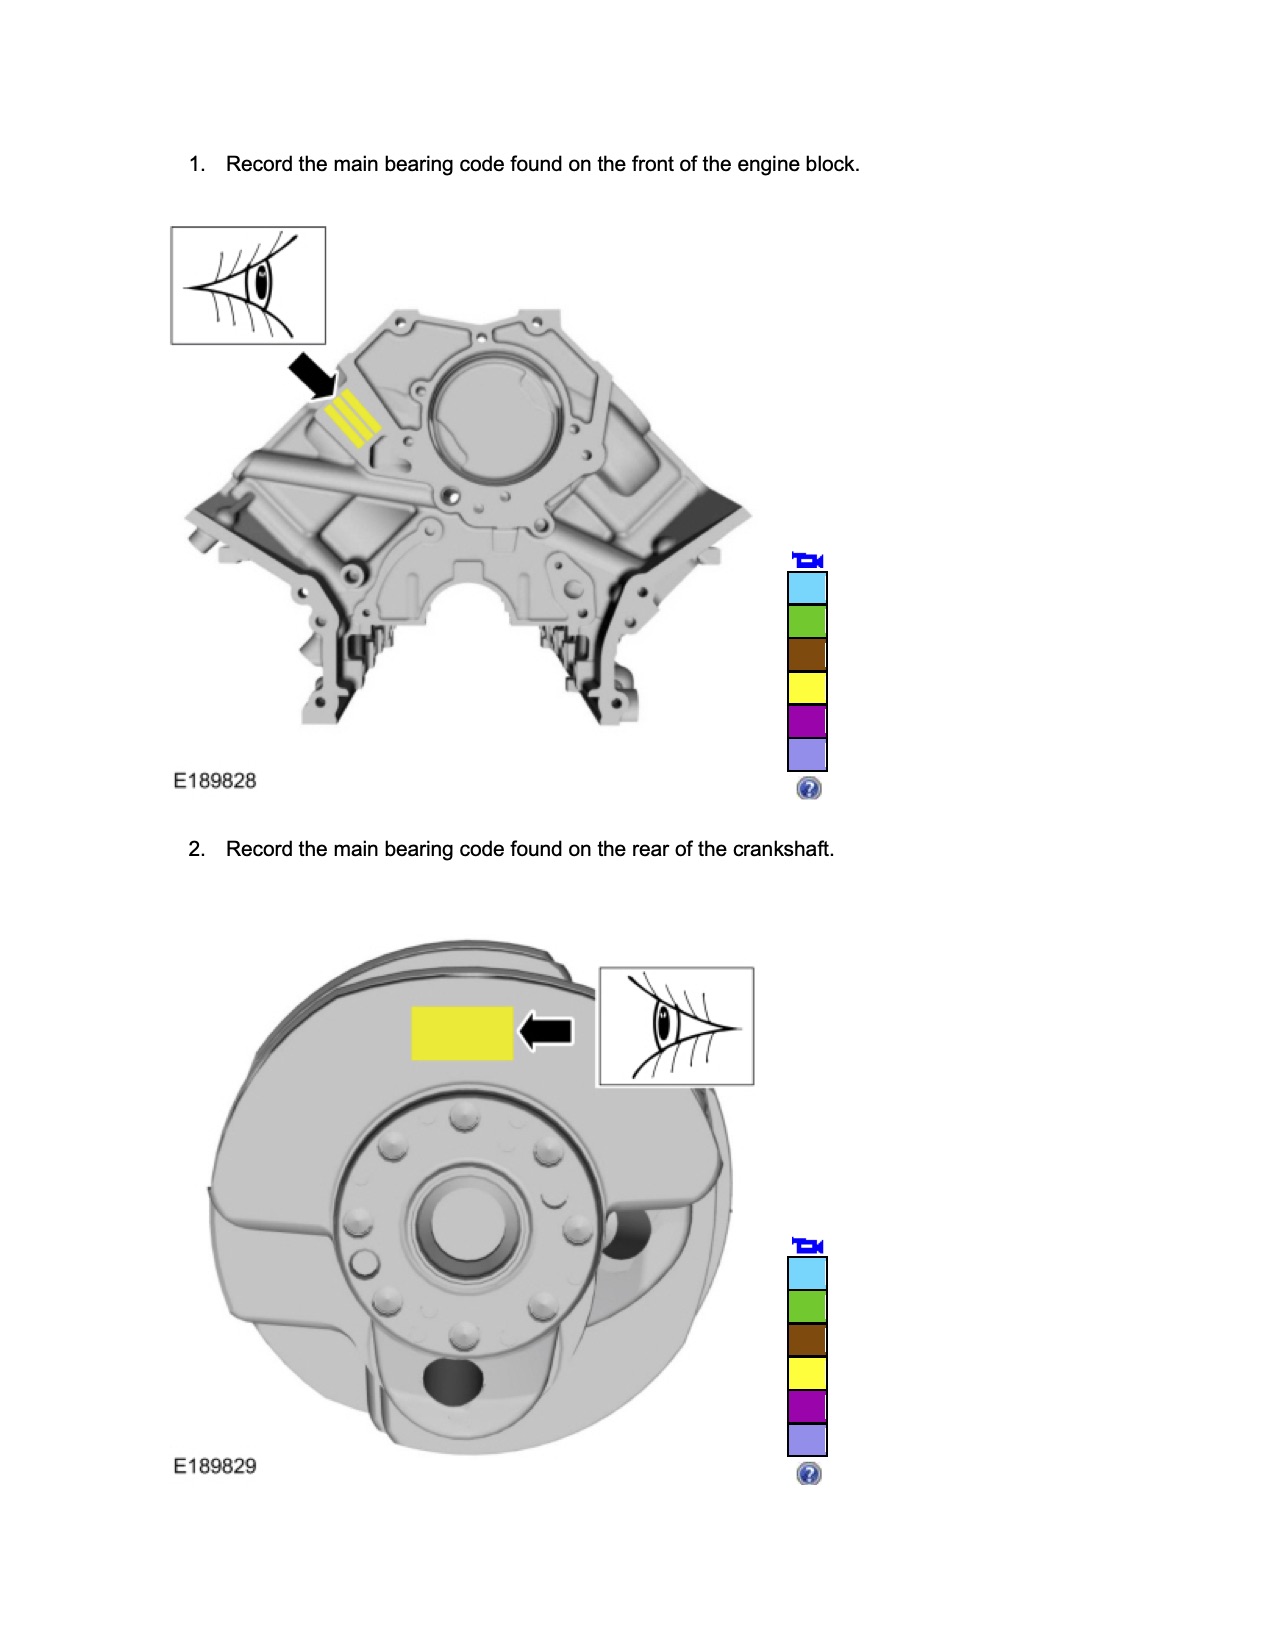
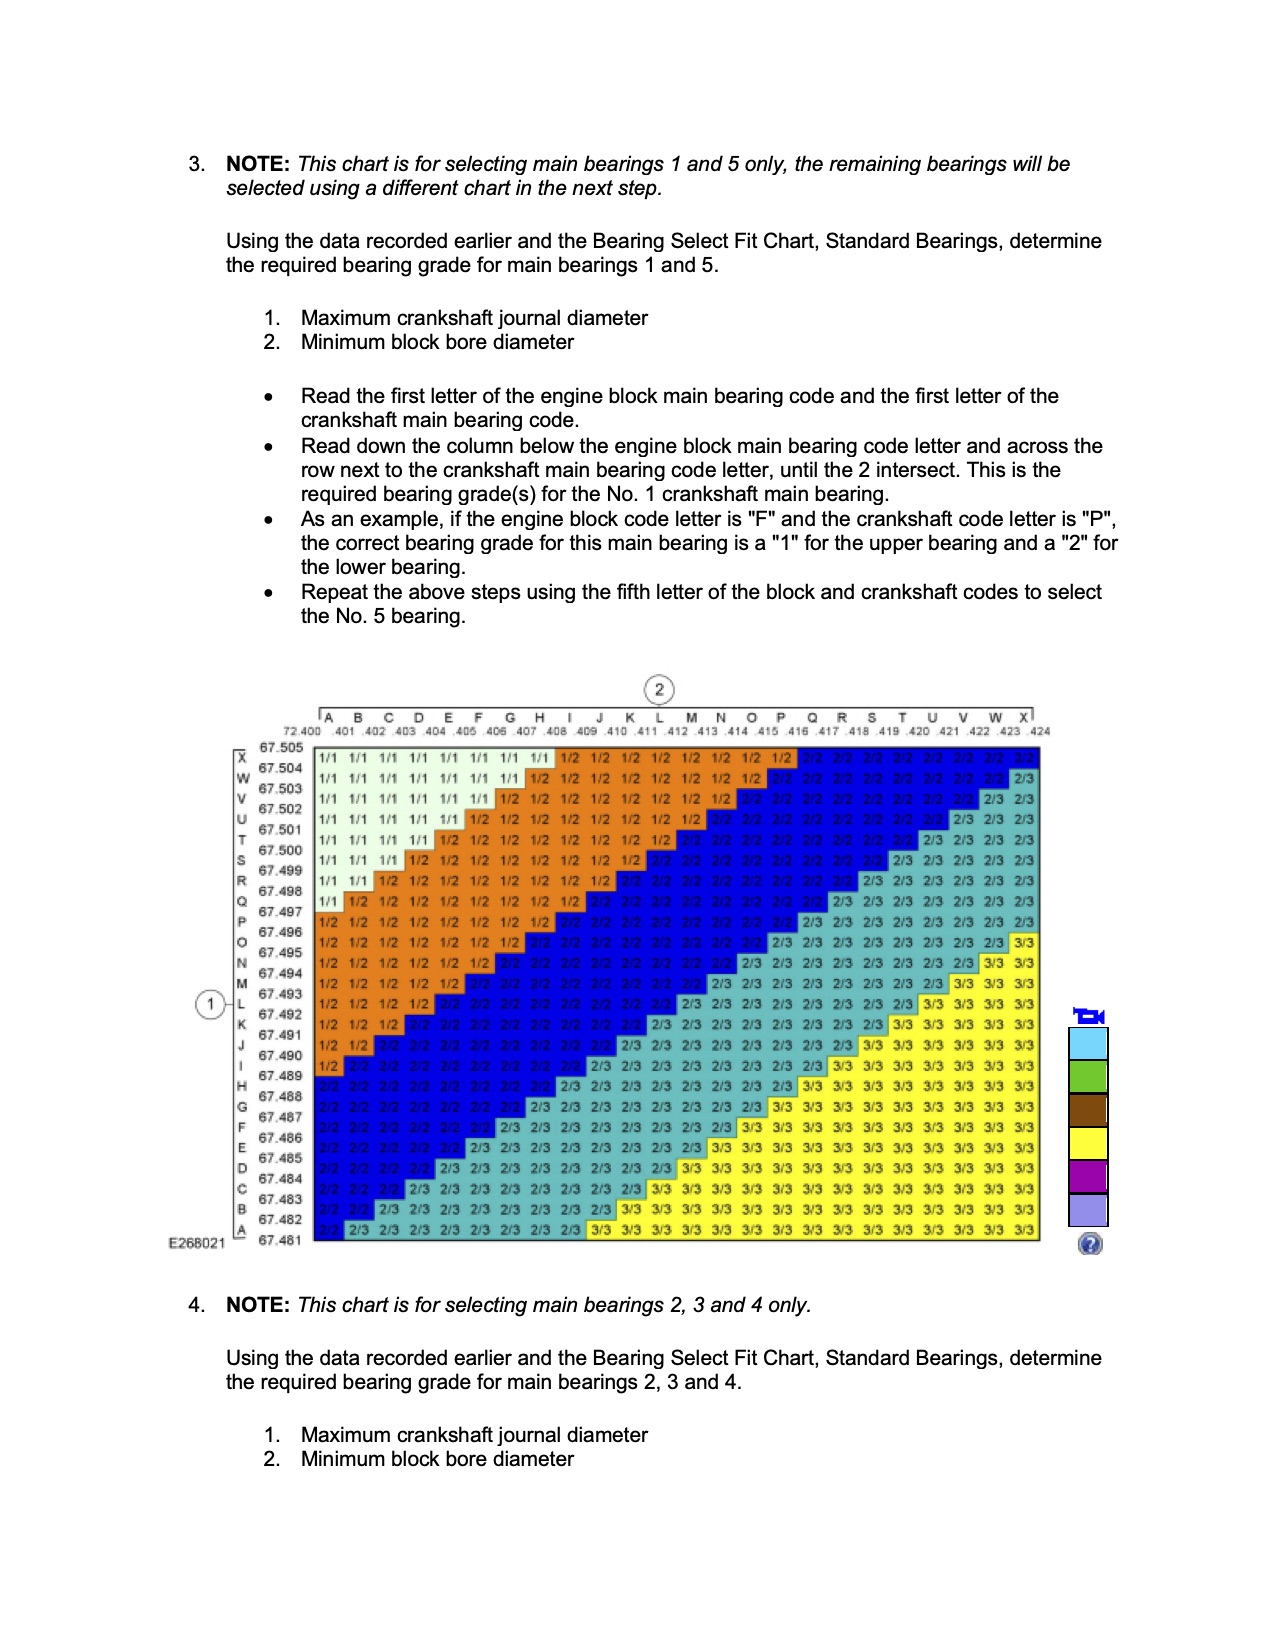
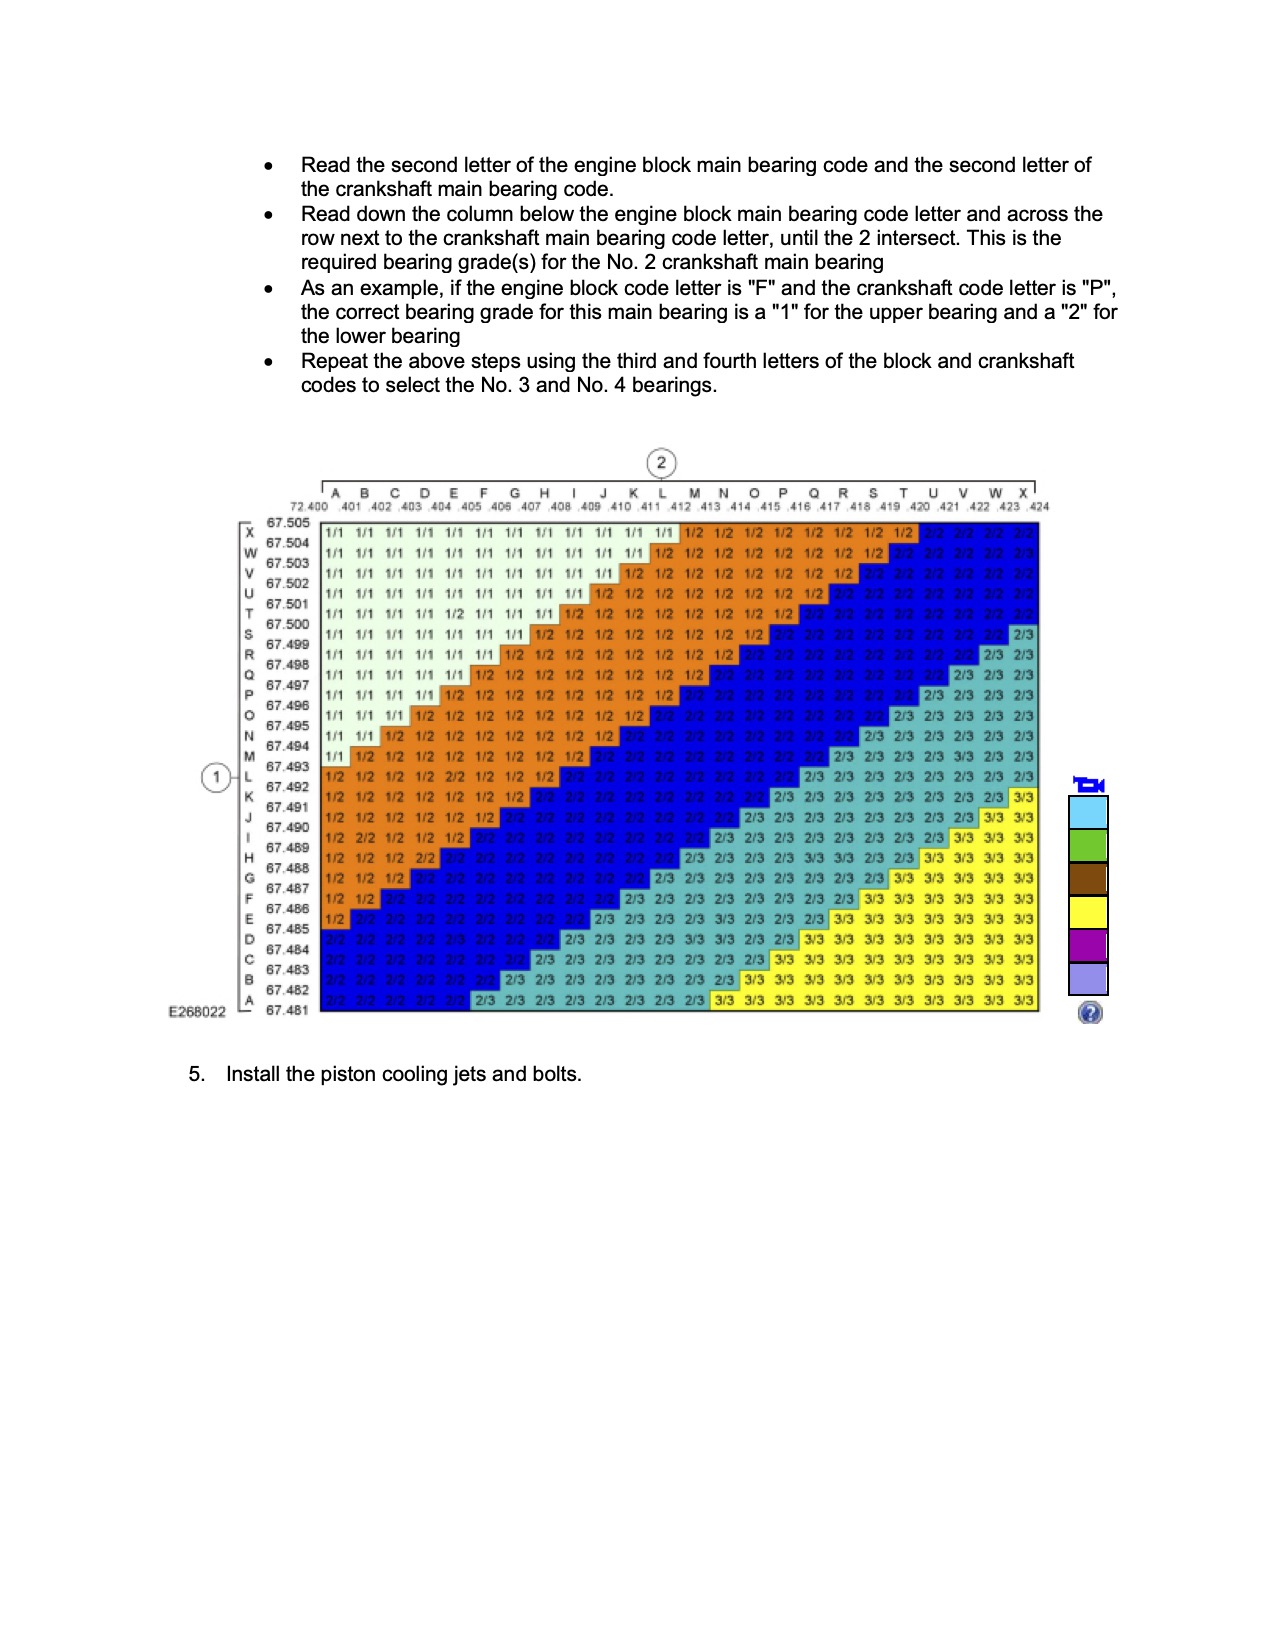
Kinda cool to learn about the bearings and how Ford manages their tolerances for the factory builds. Also, the main bearing clearances are actually quite tight listed as 0.0010 – 0.0018in in the manual. This is quite a bit tighter than the typical .001 per inch of journal diameter (2.567 nominal). What I've learned, and please correct me if my assumptions are incorrect, Ford's variable valve timing phasers like to work on thinner oils hence the Ford 5W-20 oil. I'm also assuming that this lighter weight oil allows and/or possibly necessitates a tighter bearing clearance to maintain oil pressure throughout the whole oil system. So if you plan to build a Coyote and plan to run the timing phasers then it would seem the best route is to run ford specs for bearing clearances and the recommended oil.
Now a counter to this is the voodoo. I have read some articles that say the voodoo should be run on heavier weight oils for track use as they will provide more protection with more heat being dumped into the oil with heavier engine use. That could negate the argument about phasers needing lighter weight oils and maybe the whole light weight oil thing is all about engineers trying to meet some efficiency goal or some other reason I really have no knowledge of at all, lol. Regardless I'll be building this engine up with the ford specs and I'll also be using the ford bearings, which come coated (bottom half) and verify clearance with plasitigage.
Conclusion: my junkyard engine gamble did not pay off. I'm not upset about this as I've learned a ton about the Coyote in the process, made a new connection with a friend and coworker and am lucky enough that, although not infinite, my budget can tolerate things like this. Plus, I get the satisfaction that I know exactly what is going into my engine build and can honestly say I built it myself. Hopefully my antics will help another builder to make more educated decisions for themselves and save them some money and/or heartache.
Cheers,
Patrick
-
Post Thanks / Like - 1 Thanks, 0 Likes
-
Senior Member

...or the tight bearing clearances are due to the aluminum block "growing" more than an iron block. This is probably the more likely reason...occam's razor 
-
Senior Member

Snowman,
Have you contacted L and M about the cams? https://lmengines.com/
I just spoke with someone who has their custom grind GT350 cams so I looked them up. Might be worth asking even if the response is the same. Maybe you'll get lucky!
Gen 3 Type 65 Coupe builder
-
Senior Member


Originally Posted by
q4stix

Snowman,
Have you contacted L and M about the cams?
https://lmengines.com/
I just spoke with someone who has their custom grind GT350 cams so I looked them up. Might be worth asking even if the response is the same. Maybe you'll get lucky!
That's actually one of the first places I started looking and I've talked with Michael at L&M a couple of times. He's an awesome guy and super knowledgeable. There are some custom cam manufactures overseas that could also be possibilities, but I'll build this as a straight Gen 3 Coyote and work that stuff in the background over time for future projects.
-
Senior Member

Engine Assembly Part 1
So I had previously posted about my woes with the junkyard F-150 plan. No worries, learning a ton along the way and I'm quite happy with what I was able to build. One of the last components needed before the engine could be assembled were the main bearings. This turned into a mini-fiasco, mostly because I'm stubborn, but also because I wanted to use Ford OEM bearings.
I ordered all the main and rod bearings from Tasca to start with. The rod bearings all came in with no issues. The mains were a different story. The issue boiled down to packaging which created a chewed bearing half.
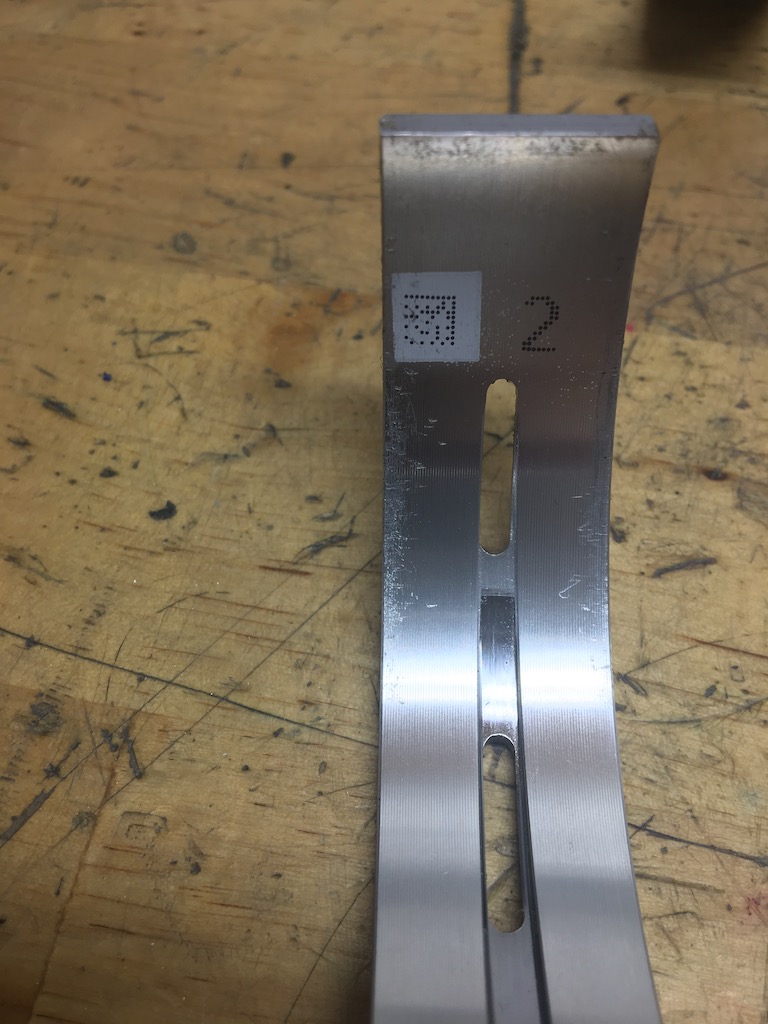
This is a representation of how the damage occurred:
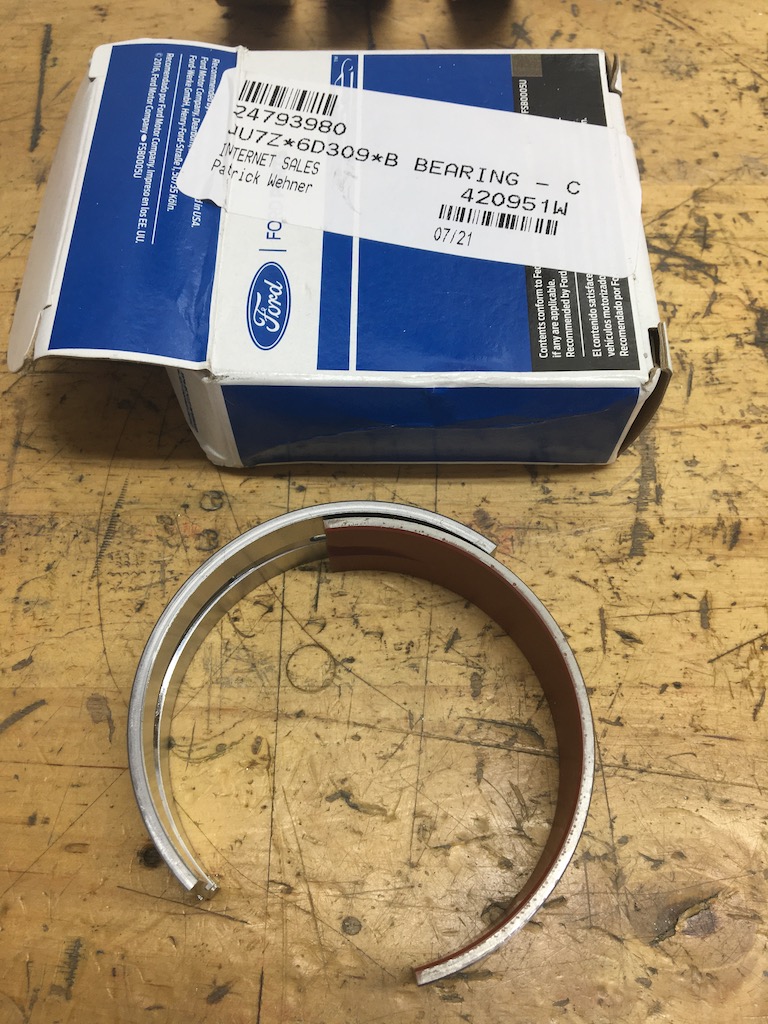
Instead of waiting to go back and forth with Tasca I reached out to the local Ford dealer who have always been outstanding for parts and they continue to be so, but still the problem was with the packing from Ford (or whoever makes the bearings for them). After ordering all of the bearings in the Bakersfield area I was able to piece together enough good halves in the correct part #s to match the clearances spelled out by the codes stamped on the crank and block. I still think that is just a really neat system they devised and the tolerances they hold to are less than .0001 inch. Ford uses metric to the third decimal and honestly there just isn't affordable equipment available to the DIY guy to measure with that kind of accuracy.
While trying to sort out this small logistical headache I continued work on the block prep. I have a brand new block from Ford and at $800 I felt that was really worth it since they come with mains line honed and cylinders finish honed. Quick recap: the junkyard block was showing a fair bit of wear in the cylinder liners so it will be saved for a future project...think sleeved for drag race prep Back on track...the first step was to clean up all of the super sharp edges on all of the machined surfaces, there are a lot of machined surfaces on the coyote block! Since the aluminum is very soft in comparison to iron and I didn't want to take much material off, just soften things so I could work on the engine without bleeding all over it, I elected to use files and 320 sandpaper. Next was to remove all of the casting flash which wasn't all that much, but there was a fair amount around oil and coolant passages, this was treated with the die grinder/carbide burr and a very light touch. Last bit was to make sure the oil pump and remote oil filter adapter passages line up with their corresponding passages in the block. Oil pump was spot on, oil filter adapter not so much.

The purple sharpie is hard to see against the blue anodizing, but you can kind of make it out. Purple is just what was handy at the moment, lol.
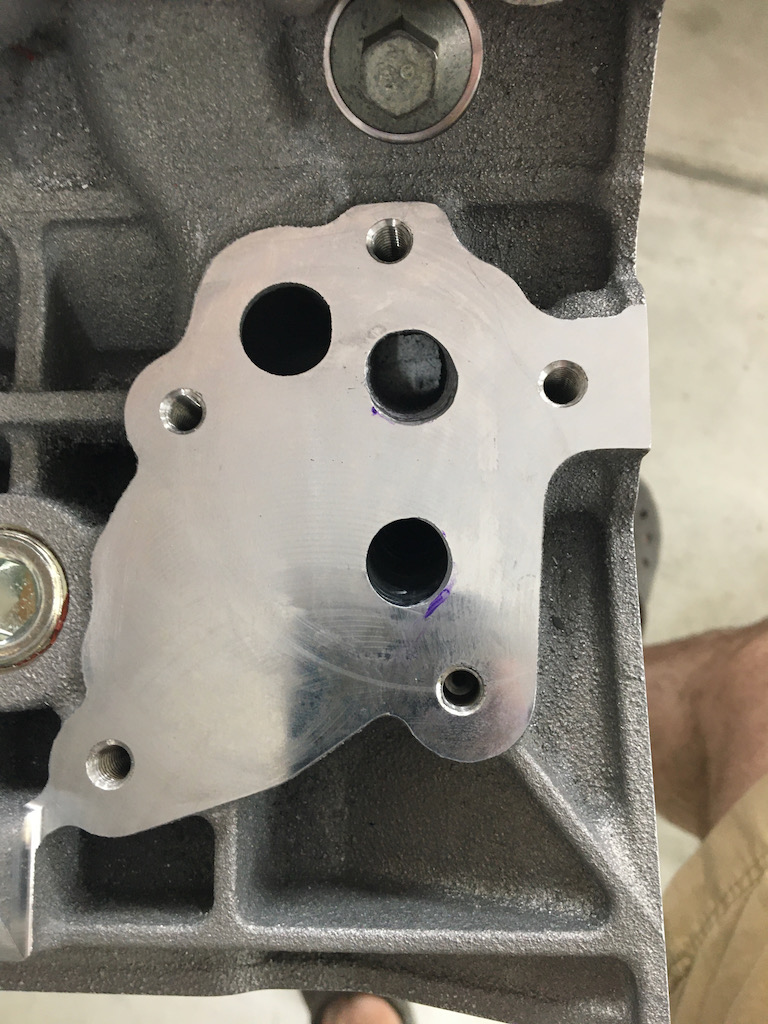
Block passages after grinding.
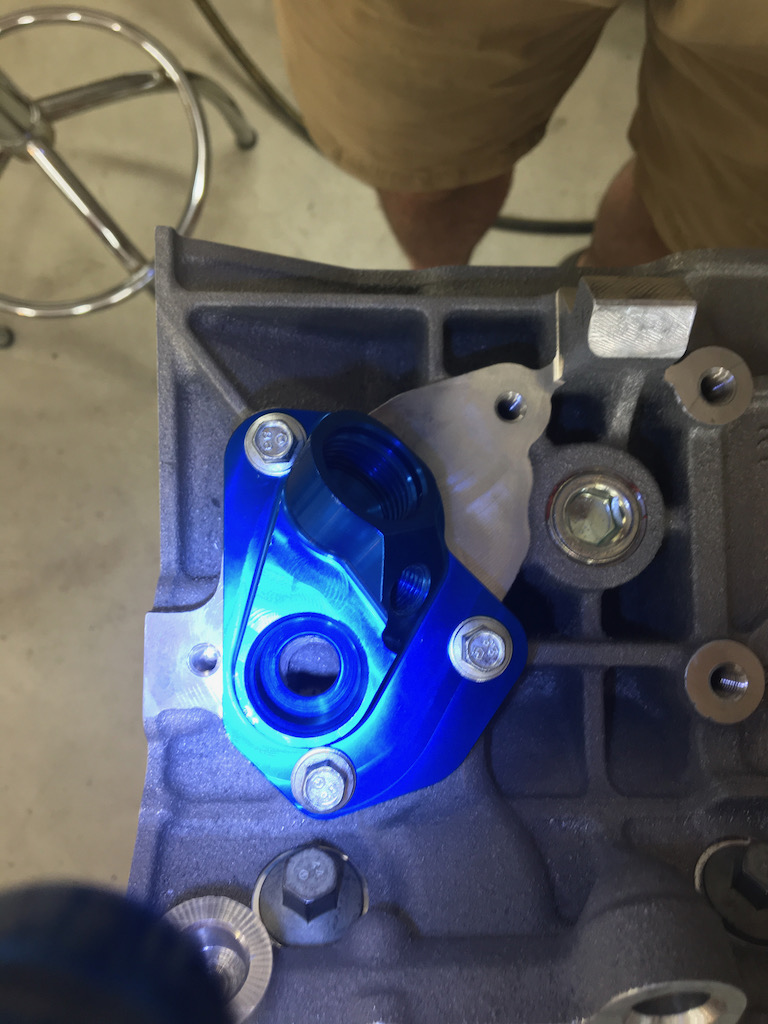
And now a very nice smooth transition from block to adapter.
Very happy with the block prep and the final step was to give the block as thorough a bath as I can manage with soap, tooth brush and bore brushes in my driveway. After the compressed air blow drying in every possible orifice the cylinders were treated to a coating of WD40, block was wrapped in plastic and awaited its new main bearings for build up.
This process took me about a week to complete by spending an hour or two on weeknights after work and then a good bit of a Saturday afternoon for the block bath. Sorry I didn't get any pictures of the block all clean and sparkly, I'm not terribly good about remembering to snap photos when I get in a good garage groove
More engine building to come...
Cheers,
Patrick
-
Senior Member

Engine Assembly Part 2
The short block assembly was straightforward or at least I think it was since this is the first one I've ever done. Seemed to go just like it does on TV. I did a check with plastigage more as a sanity check as I was pretty confident in the Ford bearing numbering system and the plastigage just confirmed that everything looked right. I did use stock main bolts as the price delta in ARP's was pretty high and I don't see going back into the bottom end again unless something goes bad and then I'll be out quite a bit more $$$ in that event. Rod bolts were also stock but mostly because I used stock rods. I don't think the bolts are something you could really upgrade without using different rods. I did accidentally smoke one rod bolt as I followed the wrong torque spec. Had to order new ones to replace as they are TTY and I proved that in one fell swoop of the torque wrench. No harm came to anything other than the bolt and more time for new ones to come in from the local ford dealer. Pretty inexpensive mistake as they are only a few bucks a piece, no complaints there.
I think I mentioned this before, but I'm the worst at remembering to snap photos of progress so unfortunately I don't have any pictures of assembling the short block, you'll just have to trust me it went well and resulted in this once the heads were on:
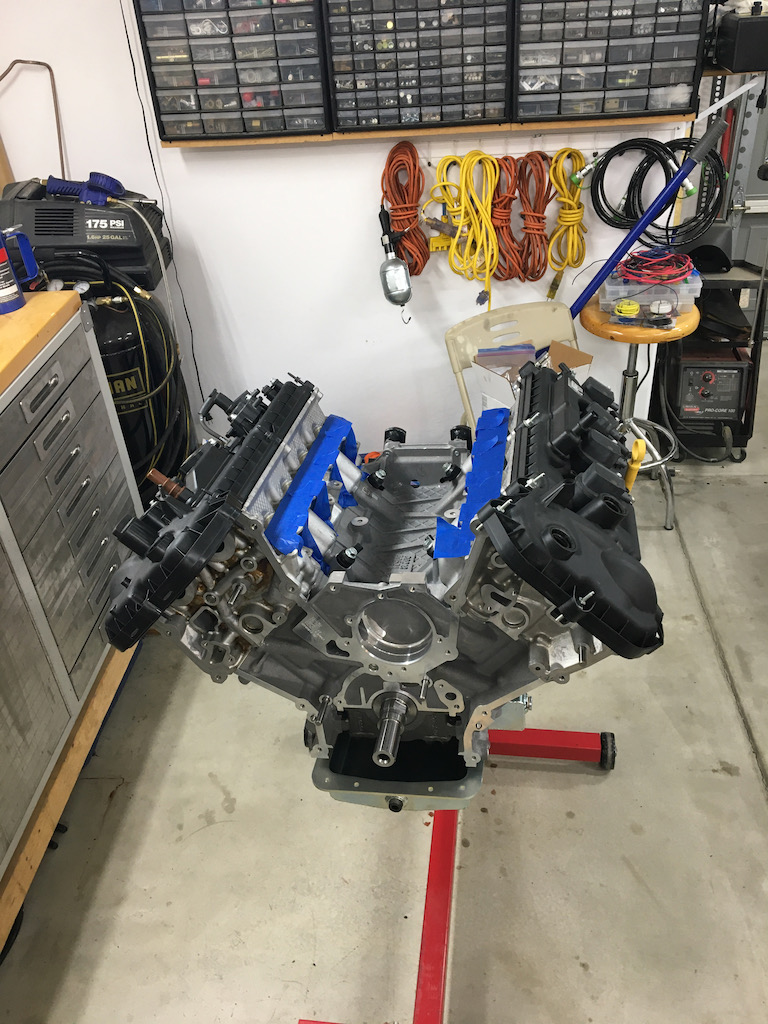
Stuck the valve covers on there to keep debris out. Oil pan was just hung with a few bolts to catch the drips from the assembly lube. Was doing this on weeknights in short sessions.
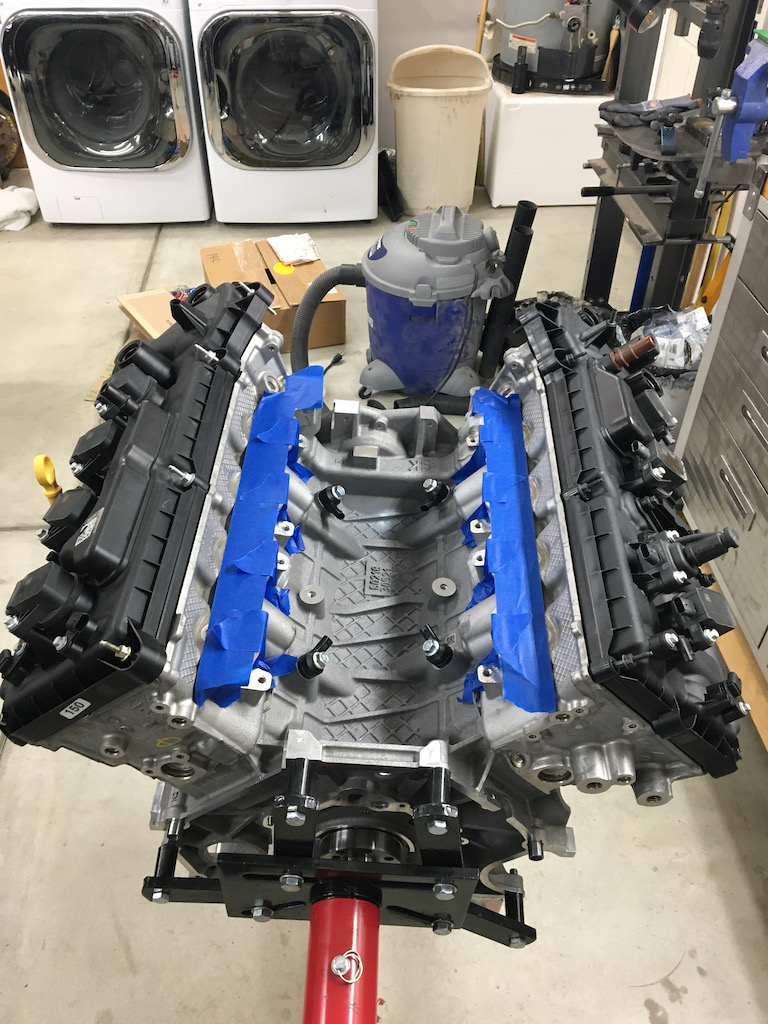
I also used the factory pistons and crank (did end up with a new one since the junkyard one had some pitting on a main journal, documented in previous posts and in the Coyote thread). I opted for total seal's gapless rings which are clever. There seems to be some controversy out there about them, more of an old school vs new school thing, but talked to total seal about them a handful of times and I guess they are good salesmen, lol. Also, since the Gen3 is a different bore size than previous Coyote I ended up sending them a piston to make sure I got the correct sized rings. Hopefully they used that to update their database (I never looked back to check). Awful nice bunch of guys at total seal. Only the top rings required filing and not much at that. With the rotating assembly installed I checked the rotating torque and I can't remember the exact numbers, but it could be measured with my inch-pound wrench so that was pretty cool.
This will probably sound pretty dumb, but my heart was actually racing when I knocked the first piston in the hole. I've never done that before and I was seriously nervous that I would break a ring right out of the gate. Thankfully no issues whatsoever, they all glided in smooth as glass which I largely attribute to using one the of the bore size specific tapered ring compressors. I felt the $30 was cheap insurance on a task I've never done before.
Next up was installing the new Mustang cams and doing the timing. Still seems crazy to me you can get those cams for the cost of a good high performance pushrod engine cam. Happy to capitalize on economy of scale. Timing is really pretty darn easy on these, but I can see where it could be much more challenging with the engine installed...as most things tend to be. Lots of good videos out there on how to do it so I just followed one that referenced the ford service manual.
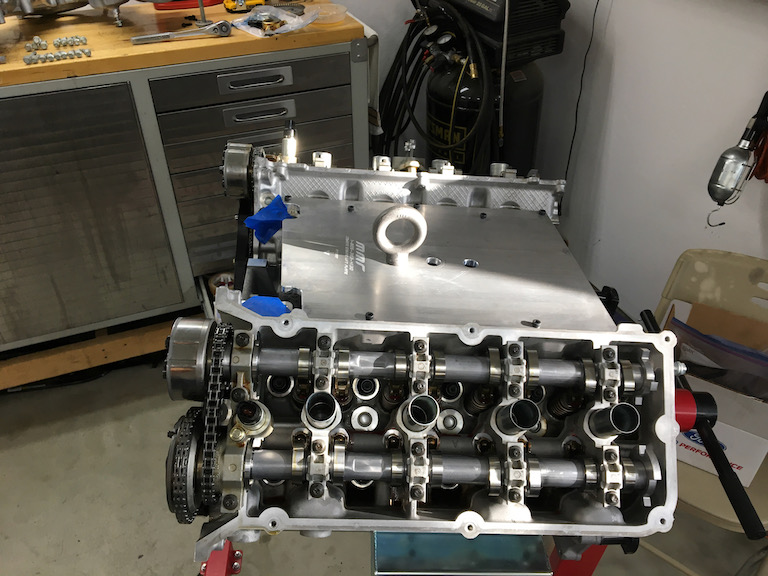

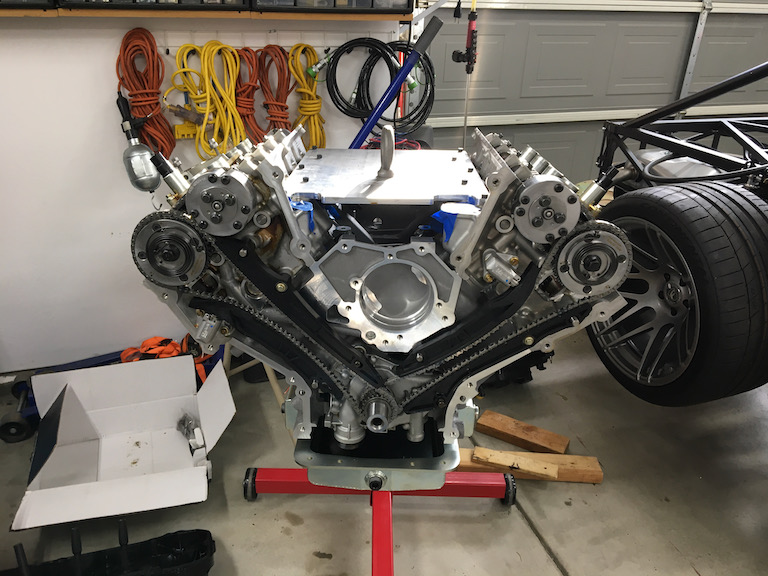
I did use ARP head studs and glad I did. The factory TTY bolts have a ridiculously high torque sequence. I broke two different 15mm sockets getting them out. The ARP's get torqued to 125 lb-ft which it still a lot, but seemed way more manageable than when I was trying to break the factory ones loose.
Last note about the heads. Took them to MMR and they did their CNC porting and valve job. While they were in there I had them check the valve guides, which were good, replace the valve seals and they were kind enough to through in a new set of factory springs they had sitting on the shelf. No charge on the springs which was pretty cool of them. The old ones were so dirty from an engine that clearly did not see frequent oil changes that it was easier to replace than clean them. MMR stated that California is so strict about solvent usage that it's just not worth their time to clean stuff like those springs.
I think that will wrap it up for this post.
Cheers,
Patrick
-
Senior Member

Engine Assembly Part 3
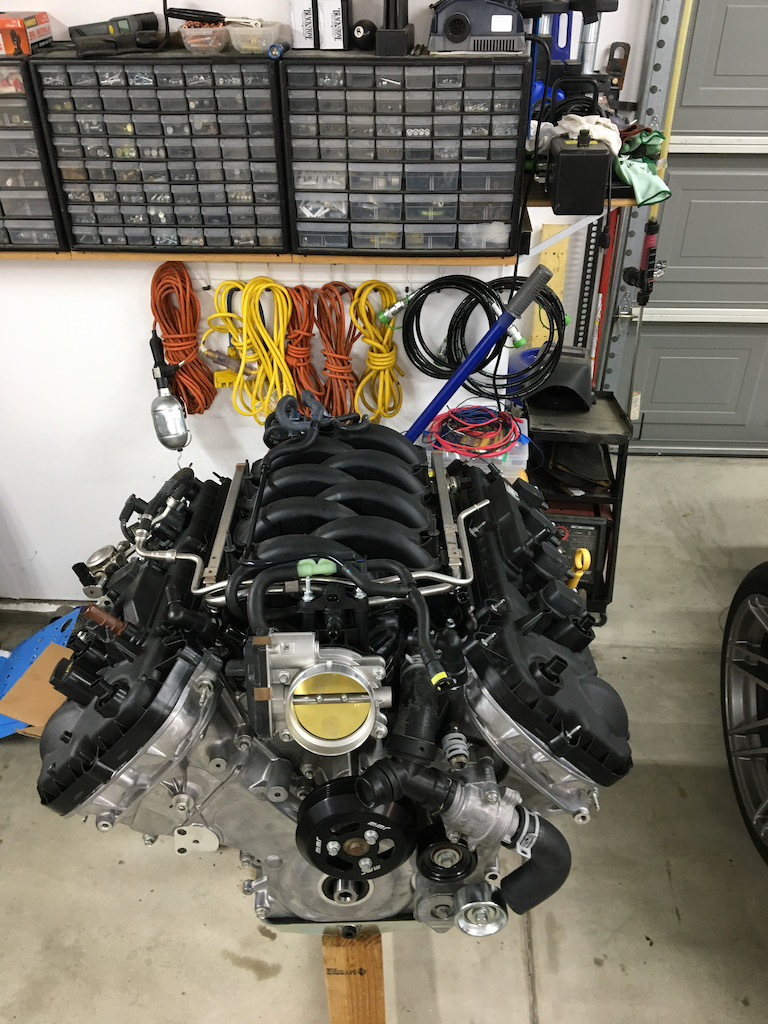
As I've stated before, I'm not brilliant about taking photos when I should. So this is the glam shot of the assembled engine minus the wiring harness, which will be the primary topic for this installment of the engine assembly. Before that just a few notes on the remainder of the assembly. With all of the challenging parts completed the rest was rather straightforward...timing cover, oil pan and valve covers are all very easy to knock out and as long as you take your time and keep surfaces clean, add the few spots of RTV where there are joints in the various covers then leaks shouldn't be a problem. The rear main seal retainer caused me a little grief as the seal didn't come with any kind of sleeve to make it slide over the crank shaft more easily, but I ended up making something out of some card stock which worked OK. In hind sight I should have also put some kind of a slippery tape on the card stock as it kind of dragged on the seal lips when removing it. Thankfully no issues with rear main leaks so I think I'm out of the woods on that one.
Next up it's time for some engine wiring harness surgery...
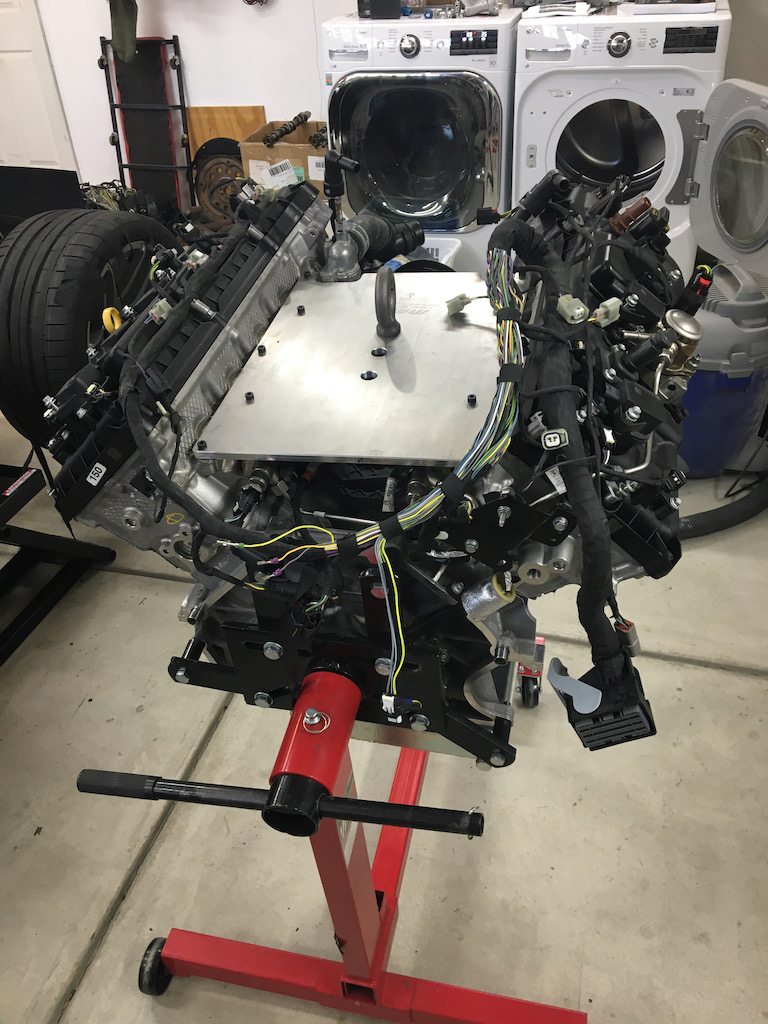
There were two main things to address here. 1) The computer mounting location dictated that I fold the harness towards the back which requires lengthening the wires to the throttle body and the passenger side intake cam phaser solenoid thingy. 2) Since I decided to use the GT350 intake manifold the CMVC connectors are different (basically Gen 2 vs. Gen 3).
For the 1st item, since I had gotten this from a junkyard F150 I still had the harness for that and the F150 harness is considerably longer than the Mustang so I pilfered those wires and connector from the donor harness which worked out to be just the right length I needed. They are easy to de-pin from the ECU connector so it was straightforward, just with the annoyance of unwrapping and re-wrapping the harness. Thankfully that fabric style tape from the factory is reusable as long as it's not too old and/or dirty. You just have to take your time and be careful with it. In the end it pretty much looks like a factory job. For the cam phaser solenoid I did have to cut and splice one wire that is common to many of the sensors, but since there was an existing splice I just cut that out and replaced the splice with my longer wires. No added splices or other connections...goal achieved.
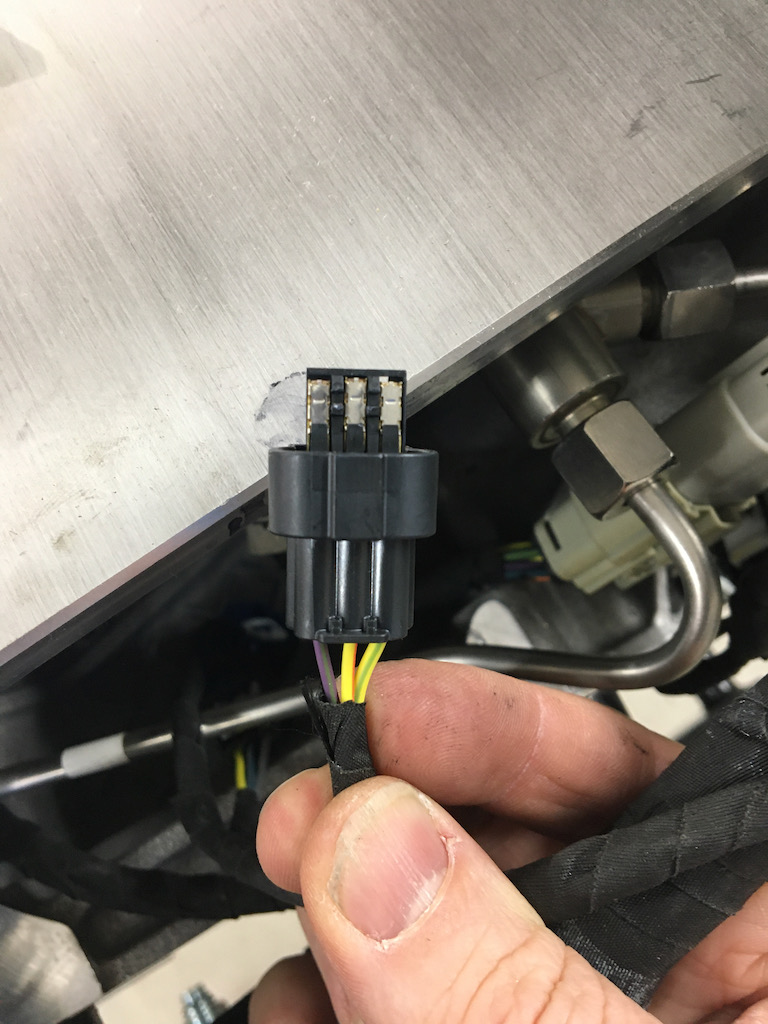
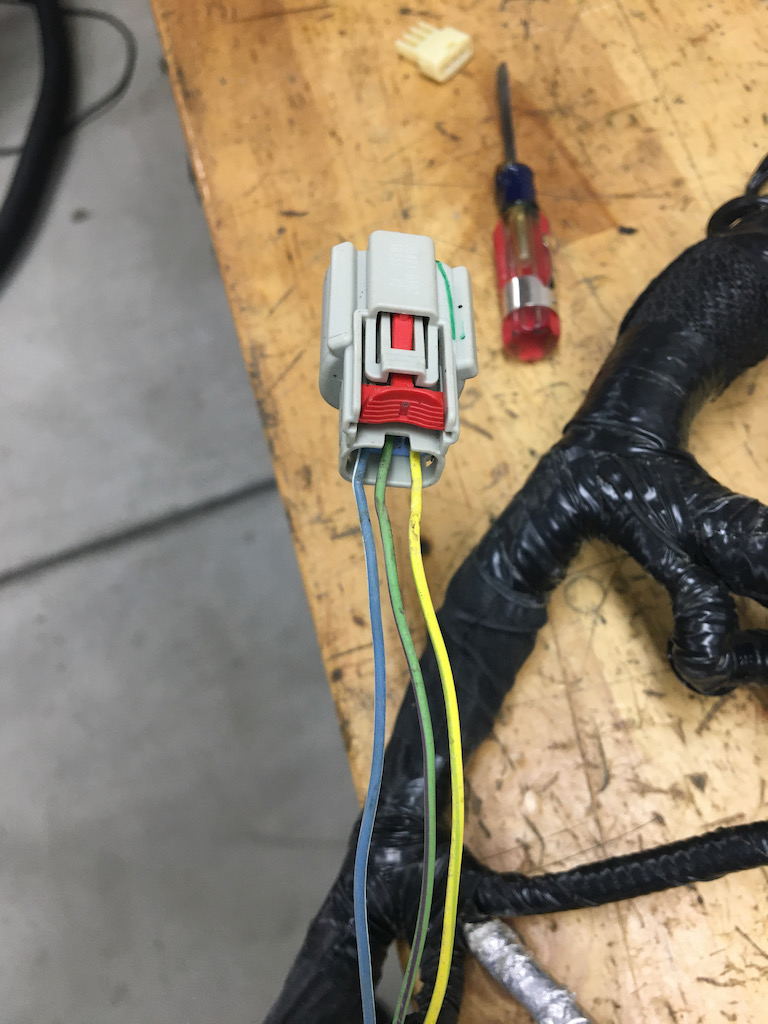
For the second item, this was a bit more challenging and annoying to say the least. From what I can tell the difference between the Gen 2 and Gen 3 CMCV setup respectively is two vs. one solenoid valves and the position sensors are independent of the vacuum actuators. The solenoid valve was an easy fix with a vacuum "T" fitting to remove the second solenoid...problem solved! Interestingly there are kits to go from a Gen 2 to a Gen 3 manifold setup since the 2018 intake was so good compared to previous ones, but not the other way around. I know the Bullit model had at the GT350 intake on a Gen 3 so I thought I could source something from the dealership, but unfortunately this was one time they were not able to come through for me. In the end I found a gen 2 F-150 harness on eBay and picked that up for a decently cheap price. This time I did have to do some splicing, but it worked out well and things seem to working correctly. Of course the wire colors are also different so there was a bit of deductive guess work involved and it came down to a 50/50 shot of getting two of the three wires in the connectors right. I think I got lucky, but I need to check my data logs in HP tuners to be sure. The third wire was common to both sensors so I was confident in that one.
Gen 3 connector:
Gen 2 connector:
FWIW, the runners are actuating fine when it runs and there are no codes being thrown. Again, I'll check the data logs to be sure.
Now that all the wiring surgery was completed it was time to get this thing mated to the T-56. So first up was indexing the bell housing. I opted for the indexing plate from Bowler transmission which made the job a snap. I did have to clean up a couple of the bolt holes on the laser cut plate, but otherwise it went smoothly with good results so no need for offset guide pins, yay!
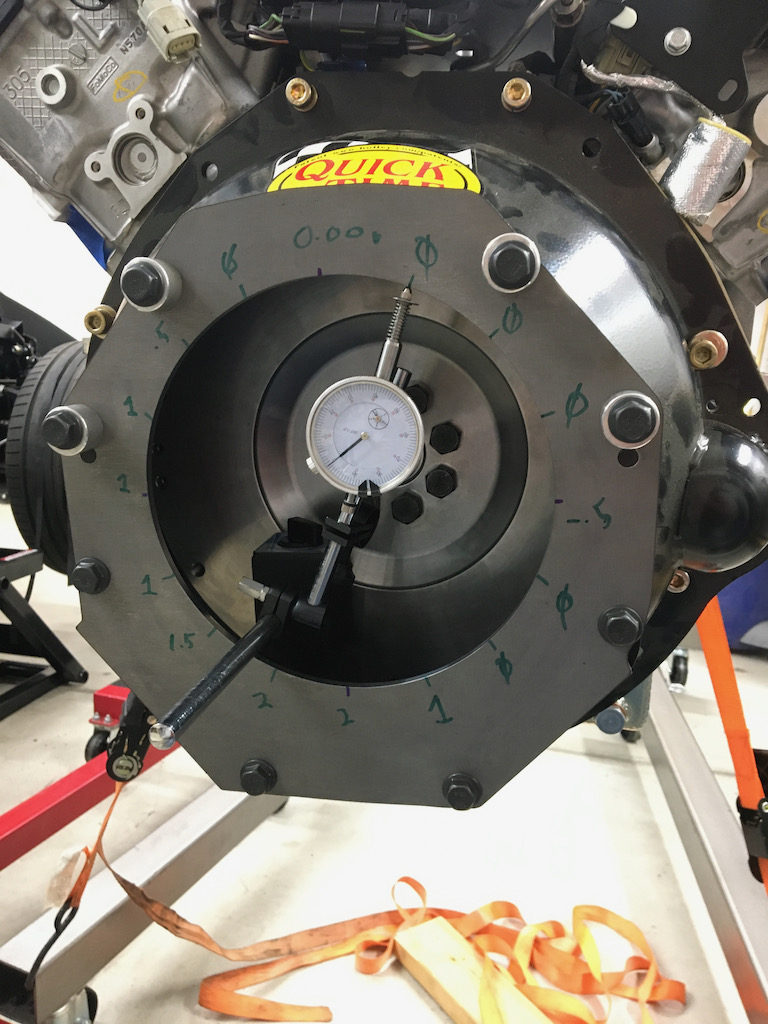
The clutch install was per the instructions and really not too difficult setting up the hydraulic throwout bearing from tilton. Trans matted smoothly to the engine and all was torqued to spec so I think I can call this a completed power unit.


The clutch was the ford performance part that looks like a re-branded center force and it functions quite well. The flywheel is also the ford performance billet unit that clocks in around 20lbs.
One other part I didn't mention previously, but is barely noticeable in the last picture is the ATI super damper. I picked up the one that has an aluminum hub and aluminum pulleys. It literally weights HALF of the stock part. The only thing quirky about it is you have to warm the aluminum hub up before pressing it onto the crank. ATI recommends boiling it, so that's exactly what I did and it worked out just like the instructions said it would. High quality part and maybe it'll be extra useful in the future if I decide to dry sump this engine. I really like the setup from Dailey Engineering, but future upgrade...finish the car first!
That wraps up the engine assembly and now I'll move on getting the car ready to receive the engine.
Cheers,
Patrick
-
Senior Member

Flat Plane crank, not quite a dead idea yet...
I picked up HP tuners a short while back and I've been doing a lot of learning on the subject with a lot more to go. Something I've found in HP tuners that is super helpful are descriptions for each field that can be modified. When you read the tune out of an ECU all of the specific parameter that can be modified show a short description of the parameter when you hover your cursor over them. I stumbled on one labeled firing order...yes it appears you can alter the firing order in HP tuners with the factory ECUs. They specifically recommend against messing with that for logical reasons, but what that tells me is to run a voodoo firing order is now an order of magnitude easier with the cams shafts being the only thing standing in my way. I have an idea I want to explore with the cams which will at least solve the problem for the intake cams, but I'll have to order up a voodoo cam to see if it's even possible so I'll leave that alone for now.
I won't be doing anything in the near term about this, but just wanted to put it out there that it's not a dead subject quite yet.
Cheers,
Patrick
-
Very interesting thread, sorry to hear that the Voodoo path was not in the cards as yet.
Question, in your research did you look at building the equivalent of a 5.2L ALUMINATOR XS crate engine? Ford Performance says they are rated at 580 HP, a considerable boost over the stock 3rd gen Coyote. With all the work you have gone to to build your own engine, curious as to why you did not go down that path?
MK4 base kit, 2004 Mach 1 donor, 4.6L DOHC, TR-3650 5-speed, narrowed stock axle with 3.55 gears and TruTrac, PS, PB, ABS, 17" Halibrand replica wheels, started 12/2011, registered 9/2014, sold 3/1/2018.
1970 Mustang Fastback Coyote powered Boss 302 tribute. Started 10/14/16.
Gen 3 Coupe Base Kit non-donor build. Ordered 4/5/2024 to be received August 2024.
-
Senior Member


Originally Posted by
Alan_C

Very interesting thread, sorry to hear that the Voodoo path was not in the cards as yet.
Question, in your research did you look at building the equivalent of a 5.2L ALUMINATOR XS crate engine? Ford Performance says they are rated at 580 HP, a considerable boost over the stock 3rd gen Coyote. With all the work you have gone to to build your own engine, curious as to why you did not go down that path?
That's a good question! The short answer is hindsight, lol.
The original idea was really just to take a junkyard F-150 gen 3 and convert it over to Mustang form. Then I kept learning about ford mod motors and went down a rabbit hole. The F-150 motor was not exactly a fine specimen so it got a few go fast goodies. All in all I'm quite happy with it and it runs well even without being tuned. Once the car is complete and I can start really tuning on it I'll get the rough edges smoothed out then take it in for a proper dyno session. I have a running list of potential upgrades for the car and maybe I'll do the flat plane as one of them. For now the focus is on finishing the car this year...paint with Jeff Miller in June and things should really start coming together.
Cheers,
Patrick
-
Senior Member


Originally Posted by
Alan_C

.....building the equivalent of a 5.2L ALUMINATOR XS crate engine? Ford Performance says they are rated at 580 HP, a considerable boost over the stock 3rd gen Coyote. .....
If I remember correctly, the 580 was a number put out with a Cobra Jet intake, long tube headers, 100 octane, etc.
In our cars we're already getting a less restrictive intake path (plus in Snowman's case a GT350 manifold) and headers compared to stock so I'm guessing there's a smaller difference than the numbers initially suggest.
Gen 3 Type 65 Coupe builder
-
Good point, I was just looking at the advertised numbers. I wonder how much would be lost with a GT or GT350 intake on it.
MK4 base kit, 2004 Mach 1 donor, 4.6L DOHC, TR-3650 5-speed, narrowed stock axle with 3.55 gears and TruTrac, PS, PB, ABS, 17" Halibrand replica wheels, started 12/2011, registered 9/2014, sold 3/1/2018.
1970 Mustang Fastback Coyote powered Boss 302 tribute. Started 10/14/16.
Gen 3 Coupe Base Kit non-donor build. Ordered 4/5/2024 to be received August 2024.
-
Senior Member

I think a good way to consider it (since it's helps me think about my Gen 2 setup with a GT350 intake and GT350 heads), is to look at the 5.0L vs 5.2L and then the GT vs GT350 vs Cobra Jet manifold.

Then overlay the differences with the intake manifold shootout that Mark Gearhart's article tested:
https://www.motortrend.com/how-to/dy...on-gen-3-crate
It shows the 2018 GT manifold nearly identical to the GT350 up until 7500rpm (actually a tad better for the area under the curve), and then the same peak as the Cobra Jet but my guess is that it drops off quickly after 7500rpm because they didn't show that part of the dyno. With the GT350 revving to 8250 and the Cobra Jet meant for even higher, I'm thinking it really depends on how you use the engine at that point for which manifold you want.

Now back to Snowman's thread where I let him reply haha
Gen 3 Type 65 Coupe builder
-
Senior Member


Originally Posted by
q4stix

Now back to Snowman's thread where I let him reply haha
This is all good stuff and I'm happy to see the discussion.
There is a part of me that wonders how close a voodoo/gen3 coyote combo with porting, tuning and roughly equivalent mods could get to the HP and torque/cube numbers of the new Z06 LT6. I'm sure that would be a ridiculously expensive endeavor, but I'm also sure it would be fun to try. Based on that comparison the HP would need to have 620 out of 5.0L (308 ci) to match. Interestingly the torque required to match is only 425 which is pretty much already there.
These are all the things I think about, but probably shouldn't 
). What I found you need for the conversion:


 Thanks:
  Likes:


 Reply With Quote


