-
05-19-2021, 08:09 PM
#121
Senior Member

Welcome back, John. Look forward to following along as you get back into it.
MKIV Complete Kit #9494 l Delivered 1/5/19 l First Start
11/28/20 l First Go-kart
4/11/21 l Carb'd 347 l Mid-shift TKO600 l 3.55 IRS l P/S l Forte Mechanical Throttle Linkage l RT Turn Signal, Drop Trunk l Breeze Upper/Lower Radiator Support, Fan Shroud l Boig Upper/Lower Cool Tubes & Quiet Pipes l 18" FFR Gasser Wheels l
Build Thread
-
05-19-2021, 11:04 PM
#122
Thanks Tony! I've been able to spend some time working on the car this week, and I'm really happy to see it moving forward again.
MkIV Roadster build: Gen 2 Coyote, IRS, TKO600. Ordered 10/24/18. Delivered 1/29/19. Engine installed 8/8/21. First start 9/12/21. First go-kart 9/17/21. Off to paint 4/11/22. Back from paint 12/30/22.
Build thread here.
-
05-19-2021, 11:26 PM
#123


Greek Guys' Garage Roadster Build #9509 (Prep for Lizard Skin)
Quick (OK, maybe not so quick) update on the work from the last few days. This will undoubtedly be an overly long-winded post about prepping to spray Lizard Skin heat and sound insulation because... well, I spent an insane amount of time on it compared to how long I thought it would take.
First off, there was a whole lot of this:
Like, a ridiculous amount of time spent sanding and scotchbrite'ing every little nook and cranny of the cockpit and trunk. This was a combination of 80 grit disks on a pneumatic RO sander, 80 grit paper to sand by hand in all the tight spaces, and scotchbrite pads for in-between and around all the rivets.
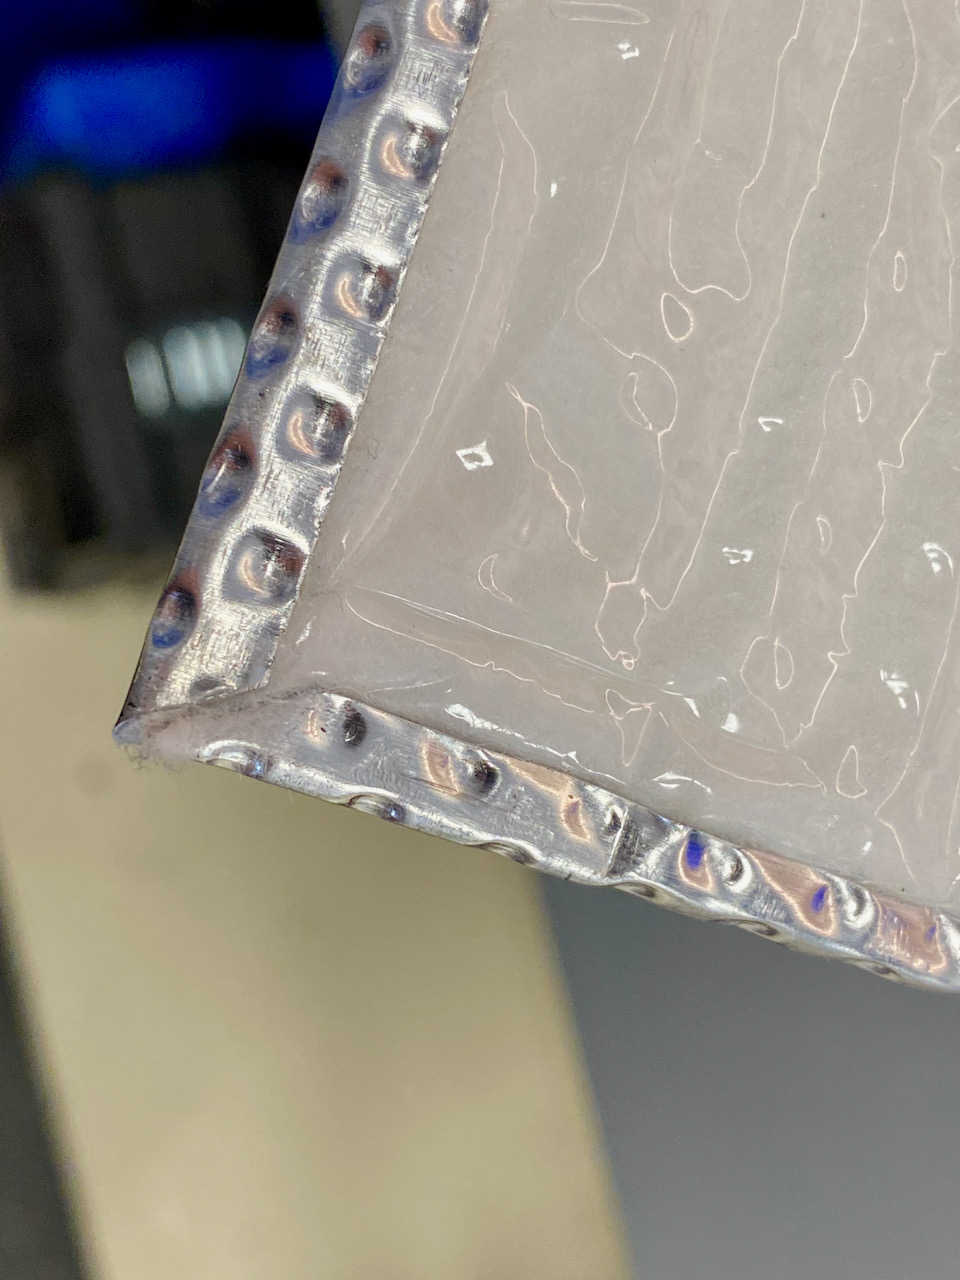
Once that was done, and I had vacuumed, blown with compressed air, and then wiped down with acetone all the panels it was time to patch any gaps. I also ran the wires for the heated seats. For the smaller gaps I backed the hole from the outside with gorilla tape, and applied epoxy to the hole. You can see all the dark grey epoxy spots in all the corners.
For a few of the larger gaps, like the bottom inside of the drivers footbox, I first laid down some foil tape, and then coated that with epoxy.
Once cured, the epoxy really makes this a very rigid joint. I will come back and lay down some Dynatron seam sealer on the outside (engine compartment side) of that joint later on as added insurance, but it's plenty strong now and totally sealed up. I did the same with the round tube coming out of the passenger footbox.
Once that was finished, it was time to start masking everything off.

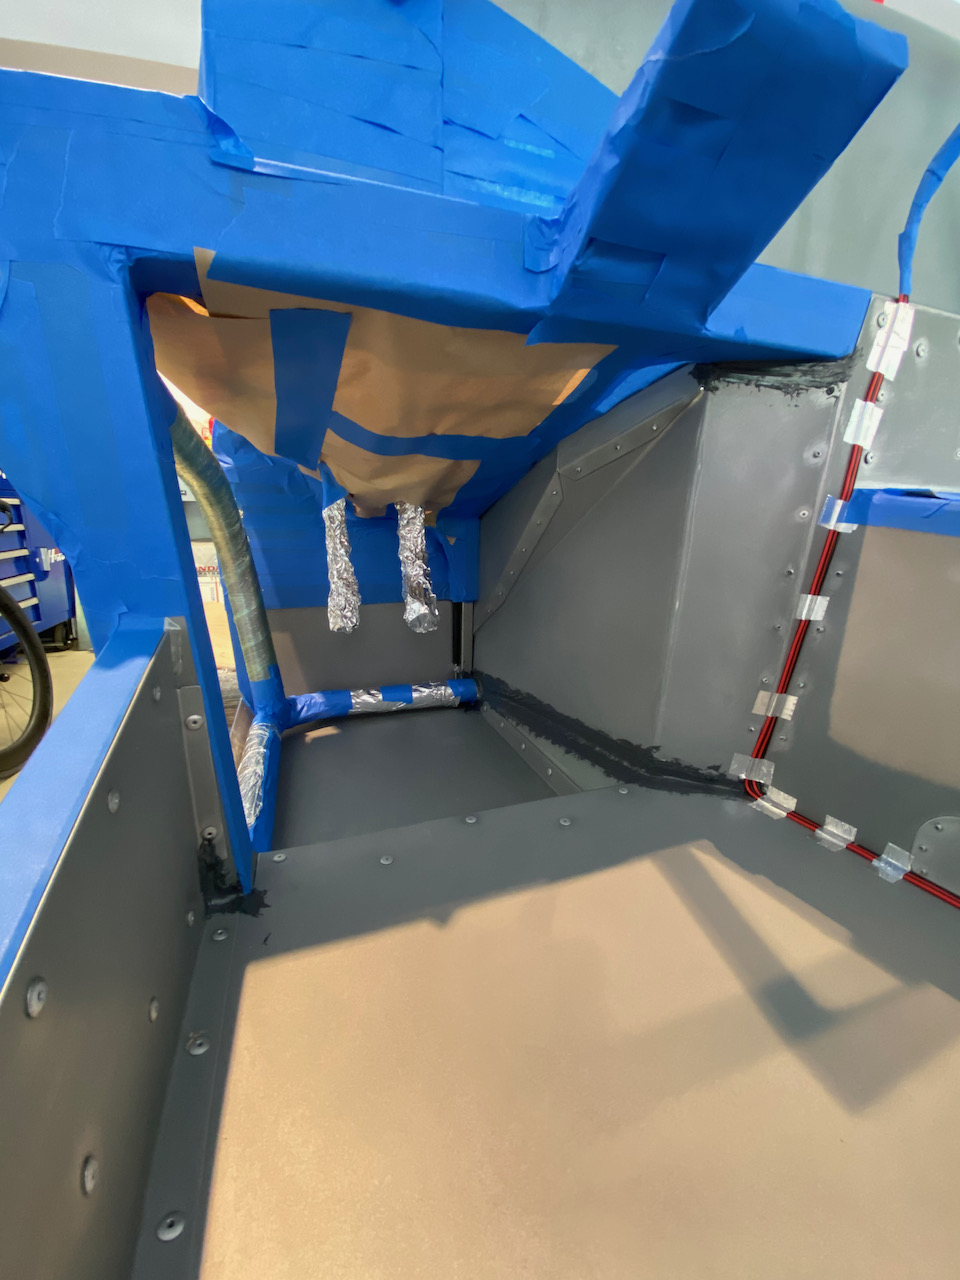
Once everything was masked off, I came back and sprayed all the remaining exposed foil tape, as well as all the epoxy, with some automotive primer to ensure proper adhesion with the Lizard Skin.
I have some Zip Wall poles from a prior remodel we did, and they came in extremely handy. With some 10' x 20' plastic drop cloths I was able to put up a spray booth of sorts in just a few minutes. Hopefully this will keep overspray off all the garage cabinets, the wife's car, etc.
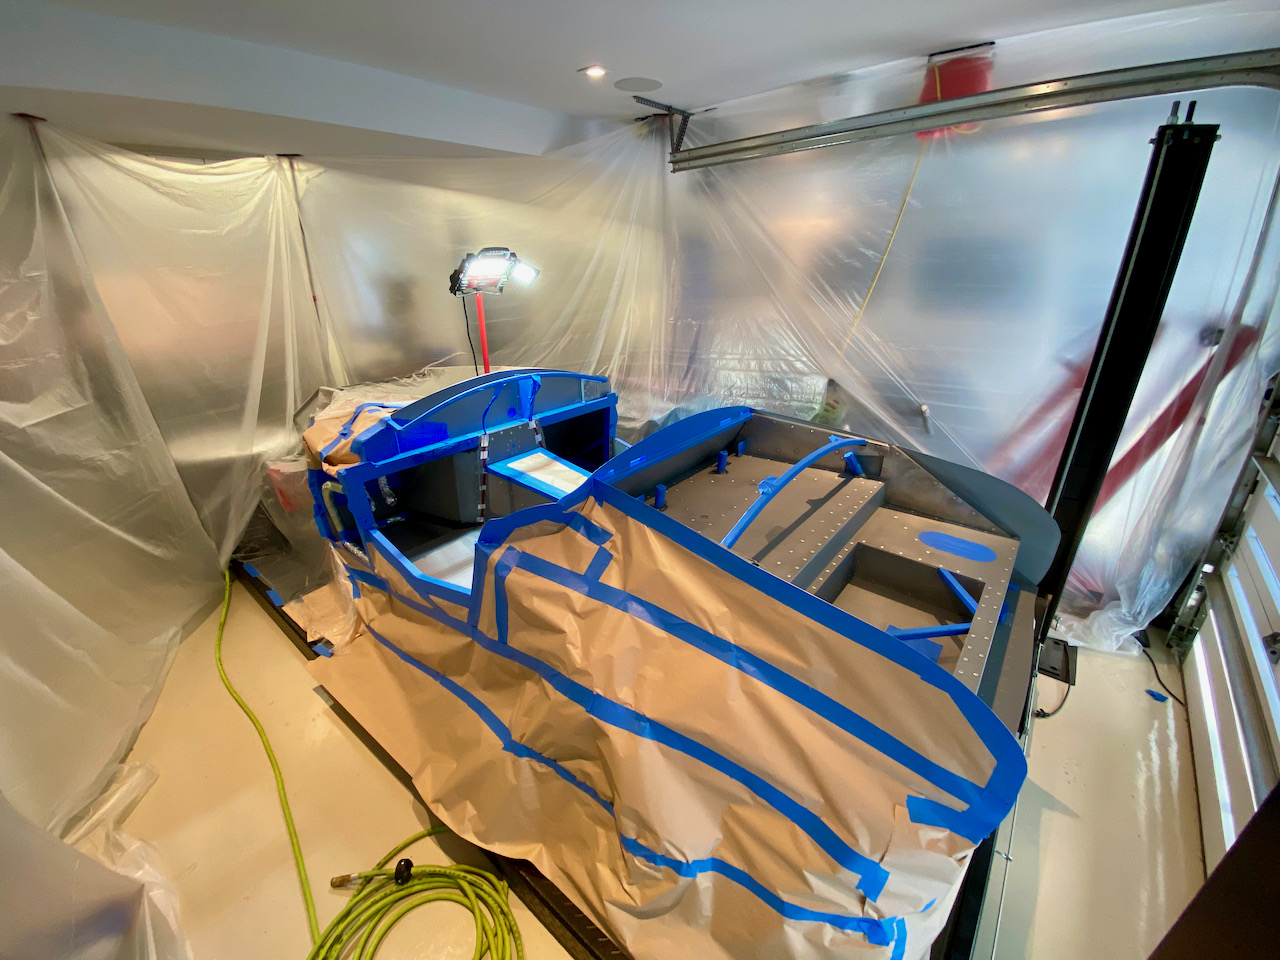
Tomorrow I'm out of town but I'm planning to spray the sound insulation on Friday and ceramic heat insulation on Saturday. This will be a big monkey off my back when it's done. It feels funny to spend so much time on something that will eventually be entirely buried under carpet, but I am sure that it will still play a big role in the overall quality of the car when it's finished.
MkIV Roadster build: Gen 2 Coyote, IRS, TKO600. Ordered 10/24/18. Delivered 1/29/19. Engine installed 8/8/21. First start 9/12/21. First go-kart 9/17/21. Off to paint 4/11/22. Back from paint 12/30/22.
Build thread here.
-
05-19-2021, 11:38 PM
#124
Senior Member

Looking good John, I will be curious how well that lizard skin works on cutting down heat. I get a good amount of heat in my footbox, I used the cool mat. The engine compartment in these cars throw a lot of heat.
-
05-19-2021, 11:48 PM
#125
Hey Travis. I'm encouraged by all the research I've done as well as the positive reviews of Lizard Skin by Paul and others here. I've also read from a lot of folks how getting all the gaps sealed up is super-critical to controlling engine compartment heat from entering the cockpit, so I've been paying a lot of attention to that. I have a few other ideas on additional ways to keep the heat under control. I've had my headers with catalytic converters, side pipes and heat shields ceramic coated by Jet Hot Coatings (Ultra Extreme 2500 coating on the headers and Extreme 1300 on the side pipes and heat shields). Fingers crossed that all of this pays off.
Last edited by JohnK; 05-19-2021 at 11:58 PM.
MkIV Roadster build: Gen 2 Coyote, IRS, TKO600. Ordered 10/24/18. Delivered 1/29/19. Engine installed 8/8/21. First start 9/12/21. First go-kart 9/17/21. Off to paint 4/11/22. Back from paint 12/30/22.
Build thread here.
-
Post Thanks / Like - 0 Thanks, 1 Likes
 Fman
Fman liked this post
-
05-20-2021, 08:57 PM
#126
Senior Member

I don't know anything about Lizard Skin, but your prep looks top notch to me! Underneath your carpet is going to look better than mine on the outside! You have the patience of a saint. Nice work.
Chris
Coupe complete kit delivered: 4/22/24.
Build Thread. Coyote. T-56. IRS w/3.55. Wilwoods. PS. HVAC. Side windows.
MK4 Complete kit.
Build Thread Index. Delivered: 10/15/2020. Legal: 7/25/23. Coyote Gen3. TKO600 (0.64 OD). IRS w/3.55. PS. Wilwoods. Sway bars. This build is dedicated to my son, Benjamin.
Build Thread.
-
Post Thanks / Like - 1 Thanks, 1 Likes
 JohnK
JohnK thanked for this post
-
05-23-2021, 10:46 PM
#127
Greek Guys' Garage Roadster Build #9509 (Lizard Skin complete)
After finally completing the seemingly never-ending prep to spray Lizard Skin a few days ago, I was finally able to spray the sound insulation on Friday and the ceramic heat insulation on Saturday.
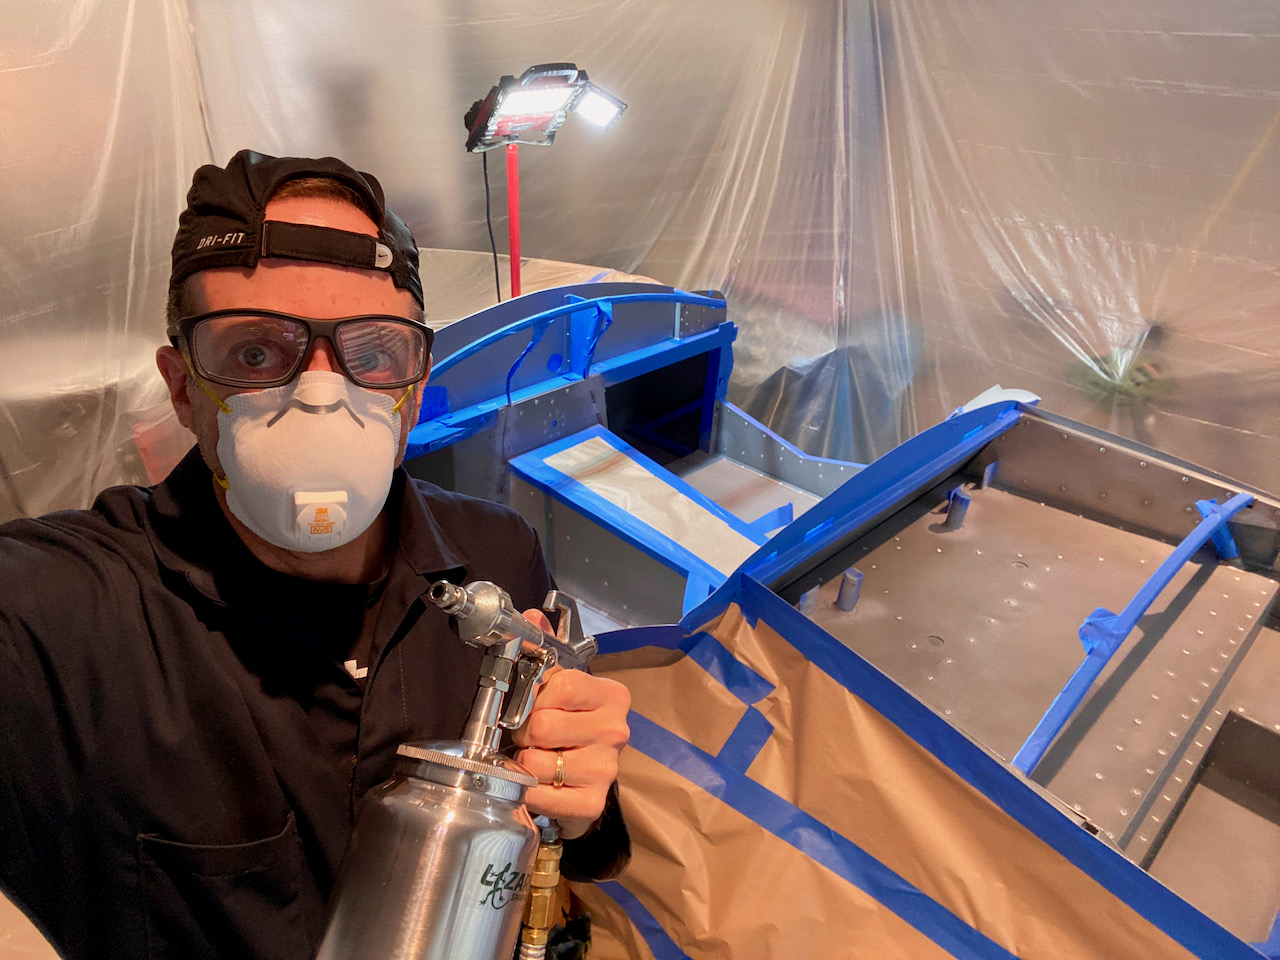
I spent a lot of time reading Paul's (Edwardb) excellent write up in his roadster build thread (here) as well as his even more detailed write-up on spraying Lizard Skin in the other forum (link is in the post linked here). These posts, along with the information available on the Lizard Skin website, made the whole process pretty straightforward. I started with the gun settings Paul recommended (60 psi and 1-1/2 turns out on the nozzle for the sound insulation, and 70 psi and 2 turns out on the nozzle for the heat insulation) and they worked out really well for me without need for modification.
My plan for the heat insulation was to spray several lighter coats in the cockpit and trunk in two "sessions" rather than just two thicker coats to avoid having the coating run and sag. My goal was to spray several light coats until I'd used up half the bucket, then wait 1-2 hours for that to set up and then come back and spray several more light coats until I'd used up the rest of the bucket. this worked out well, and ended up working out to be about three light coats in the first session, and then three more light coats plus a fourth coat on key areas in the second session. I let that cure for 24 hours and came back the next day to spray the heat insulation.
The heat insulation is a MUCH thicker product than the sound insulation, so it needed the added air pressure and larger orifice, but it sprayed pretty well once the gun was set up properly. My plan was to use a similar approach as I'd used with the sound insulation (except only spraying the cockpit), but the heat insulation went on a lot thicker. I ended up doing two somewhat-thin coats in the first session and three more coats in the second session. Once it had set up for an hour or so, I started unmasking everything. I managed to get the car fully unmasked by the end of the day, and then spent the entire next day cleaning up the rest of the garage, which was a disaster despite all the drop cloths I'd laid down.
The whole process was FAR more work that I expected but in the end I'm very pleased with how it turned out. If I had to guess, I would say it's actually more work than cutting and laying down a stick-on insulation product, but the benefit of the LS product is that it seals up all the gaps and lays down very nicely and evenly.
Now, on to electrical work and engine installation!
MkIV Roadster build: Gen 2 Coyote, IRS, TKO600. Ordered 10/24/18. Delivered 1/29/19. Engine installed 8/8/21. First start 9/12/21. First go-kart 9/17/21. Off to paint 4/11/22. Back from paint 12/30/22.
Build thread here.
-
Post Thanks / Like - 0 Thanks, 1 Likes
Fman liked this post
-
05-24-2021, 11:25 AM
#128
Looks outstanding keep up the strong work
-
Post Thanks / Like - 1 Thanks, 0 Likes
JohnK thanked for this post
-
05-25-2021, 04:16 PM
#129
Senior Member
Looks like it turned out fabulous, John. I'll be curious to eventually hear your feedback on the performance of the heat insulation. I'm using a stick-on heat/thermal option, Thermo-tec. Great work!
Chris
Coupe complete kit delivered: 4/22/24.
Build Thread. Coyote. T-56. IRS w/3.55. Wilwoods. PS. HVAC. Side windows.
MK4 Complete kit.
Build Thread Index. Delivered: 10/15/2020. Legal: 7/25/23. Coyote Gen3. TKO600 (0.64 OD). IRS w/3.55. PS. Wilwoods. Sway bars. This build is dedicated to my son, Benjamin.
Build Thread.
-
Post Thanks / Like - 1 Thanks, 0 Likes
JohnK thanked for this post
-
05-25-2021, 07:59 PM
#130
Looks awesome. All of the hard work definitely shows.
MK4 Complete Kit, EFI 427W/TKO 600, 2015 IRS
Ordered: 11/6/20, Kit Completion: 2/13/21, Picked Up: 2/16/21, Build Started: 2/19/21, First Start: 6/13/21, Go Kart: 8/15/21, Sent for Paint: 12/23/21, Back From Paint: 6/16/22, Street Legal: 7/11/22
-
Post Thanks / Like - 1 Thanks, 0 Likes
JohnK thanked for this post
-
05-25-2021, 10:00 PM
#131
Greek Guys' Garage Roadster Build #9509 (Start of wiring)
Thanks everyone! I appreciate the kind words.
I didn't have much time yesterday to work on the car, but I did at least get out to the garage and managed to get the coyote harness stuffed through the firewall and the PDM mounted. Nothing earth-shattering here... pretty much the same spot that many other have mounted it.
Today I was able to spend a bit more time digging into the wiring. I got the RF front and chassis harnesses installed. Here's the fuse panel mounted in place:
Next I spent some time "dieting out" some of the wires that are not needed, like the 33 Hot Rod column wiring, clutch safety switch wires, brown alternator sense wire, as well as the cooling fan wires from the front harness. I terminated all the cut wires with double-wall adhesive-lined heat shrink to seal the ends.
I spent the afternoon stripping back the cockpit side of the coyote harness. I wanted to relocate certain connectors to different areas, and I ended up having to strip the harness almost all the way back to the firewall to do that. For example the OBD2 port, MIL, throttle and clutch bottom connectors are all grouped together on the end of the harness. The throttle and clutch bottom connectors need to go in the DS footbox, the MIL needs to do to the dash, and the OBD2 port is TBD until I work on the layout of the under dash brace. Kudos to whomever wrapped this harness. They clearly put a lot of love (and electrical tape) into it.
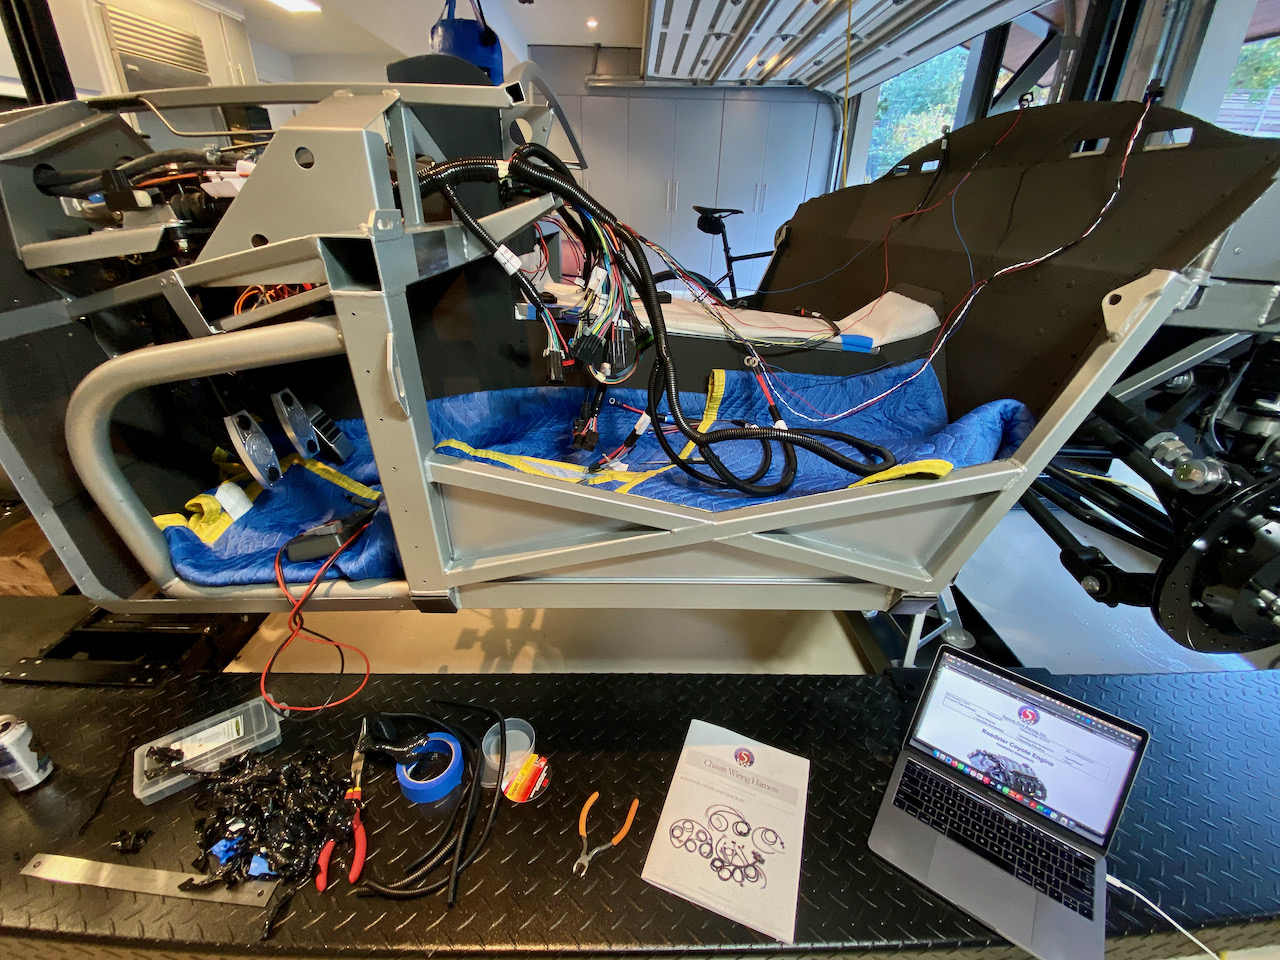
I now have all the coyote harness cockpit-side connectors freed up to move wherever they need to go. It looks pretty ugly at the moment, but I feel like I have a much better handle on things after spending a whole day of "up-close and personal" time with the wiring.
MkIV Roadster build: Gen 2 Coyote, IRS, TKO600. Ordered 10/24/18. Delivered 1/29/19. Engine installed 8/8/21. First start 9/12/21. First go-kart 9/17/21. Off to paint 4/11/22. Back from paint 12/30/22.
Build thread here.
-
05-26-2021, 11:59 AM
#132
Senior Member
Thanks for sharing the details and pictures, John. It's like looking into a crystal ball and seeing my future, that is if I can ever get my brake lines finished. Did you go with the Gen 2 or Gen 3 Coyote? When I ordered my drivetrain it was too late to get the Gen 2, so I have the Gen 3.
Chris
Coupe complete kit delivered: 4/22/24.
Build Thread. Coyote. T-56. IRS w/3.55. Wilwoods. PS. HVAC. Side windows.
MK4 Complete kit.
Build Thread Index. Delivered: 10/15/2020. Legal: 7/25/23. Coyote Gen3. TKO600 (0.64 OD). IRS w/3.55. PS. Wilwoods. Sway bars. This build is dedicated to my son, Benjamin.
Build Thread.
-
05-26-2021, 12:34 PM
#133
Hey Chris, I have a Gen 2 coyote. I started the build a few months after the Gen 3 had started shipping but Gen 2's were still available. It seemed like the more tried-and-true way to go at that time. For example, there was no oil pickup available at that time to work with the Moroso oil pan on the Gen 3. Clearly, I greatly overestimated how fast I was going to progress through the build, so this poor engine has been sitting here for quite a while now, but I'm hopeful that I'm just about ready to (FINALLY) drop it in soon.
I had largely ignored the wiring portions of other people's build threads in the past, as it just made my head explode, but I'm now at the point where I really need to dig in and understand it. I'm taking it in little logical chunks - "OK, let me really dig into and understand the alternator wiring" as an example. Doing it this way helps me better understand each "system" within the overall wiring scheme, which makes it a bit more manageable. Right now I'm just doing some basic teardown and getting rid of the stuff I obviously don't need, but I haven't finished putting my dash together yet, so I'll need to shift gears and do that before I can start putting things where they belong.
What I was really hoping to do was get all the engine compartment power wiring finalized so I could drop the engine in. I placed a large Del City order last week for all the battery terminals, crimp connectors, etc. that I needed for that. I had to laugh when I got the shipment notification and it showed literally EVERYTHING except for one single battery terminal was backordered. I got my one battery terminal in the mail yesterday, but that won't get me very far toward the goal so hopefully the rest of the stuff trickles in sooner than later.
MkIV Roadster build: Gen 2 Coyote, IRS, TKO600. Ordered 10/24/18. Delivered 1/29/19. Engine installed 8/8/21. First start 9/12/21. First go-kart 9/17/21. Off to paint 4/11/22. Back from paint 12/30/22.
Build thread here.
-
05-26-2021, 02:18 PM
#134
Greek Guys' Garage Roadster Build #9509 (glove box dumb luck)
Here's a quick update on the dash. As previously mentioned, I had a custom dash fabricated that included a glove box opening with a flange formed into it. I've been debating for a while the best way to form the glove box, and how best to attach it to the dash. What I had completely forgotten was that ages ago (back when I was planning to make my own dash from a blank) I had ordered a glove box kit from Alex's custom interiors and it's been sitting down in my basement. Sometimes it pays to be a hoarder.
I was sure there was no way I could be lucky enough to have the molded plastic back of Alex's glove box kit fit the opening of the dash. Well, I must be living right, because, well...
I honestly can't believe my luck at the moment. It's as if one was designed for the other. I know that they must both be at least loosely based on a real Cobra dash, but the odds of them fitting together that well are slim at best. I'm going to go buy a lottery ticket today.
MkIV Roadster build: Gen 2 Coyote, IRS, TKO600. Ordered 10/24/18. Delivered 1/29/19. Engine installed 8/8/21. First start 9/12/21. First go-kart 9/17/21. Off to paint 4/11/22. Back from paint 12/30/22.
Build thread here.
-
Post Thanks / Like - 0 Thanks, 3 Likes
-
05-27-2021, 10:16 AM
#135
Still enjoy seeing the updates on your build, though mine is mostly finished.
-
Post Thanks / Like - 1 Thanks, 0 Likes
JohnK thanked for this post
-
05-27-2021, 02:33 PM
#136
Nice work John
Good to see you have time to get back to your build.
Sent you a private msg.
-
Post Thanks / Like - 1 Thanks, 0 Likes
JohnK thanked for this post
-
05-27-2021, 02:34 PM
#137
Dont forget the lottery ticket
-
Post Thanks / Like - 0 Thanks, 1 Likes
-
05-27-2021, 02:57 PM
#138

Originally Posted by
v1-vr

Nice work John
Good to see you have time to get back to your build.
Sent you a private msg.
Thanks! Just replied to your PM. Congratulations again on getting the engine installed.
MkIV Roadster build: Gen 2 Coyote, IRS, TKO600. Ordered 10/24/18. Delivered 1/29/19. Engine installed 8/8/21. First start 9/12/21. First go-kart 9/17/21. Off to paint 4/11/22. Back from paint 12/30/22.
Build thread here.
-
Post Thanks / Like - 0 Thanks, 1 Likes
ED67 liked this post
-
05-27-2021, 11:38 PM
#139
Senior Member
After your hard work on the lizard skin install I think you were due to hit the Easy button on the glove box! That's cool.
Chris
Coupe complete kit delivered: 4/22/24.
Build Thread. Coyote. T-56. IRS w/3.55. Wilwoods. PS. HVAC. Side windows.
MK4 Complete kit.
Build Thread Index. Delivered: 10/15/2020. Legal: 7/25/23. Coyote Gen3. TKO600 (0.64 OD). IRS w/3.55. PS. Wilwoods. Sway bars. This build is dedicated to my son, Benjamin.
Build Thread.
-
Post Thanks / Like - 1 Thanks, 1 Likes
JohnK thanked for this post
-
06-01-2021, 04:44 PM
#140
Greek Guys' Garage Roadster Build #9509 (dash work)
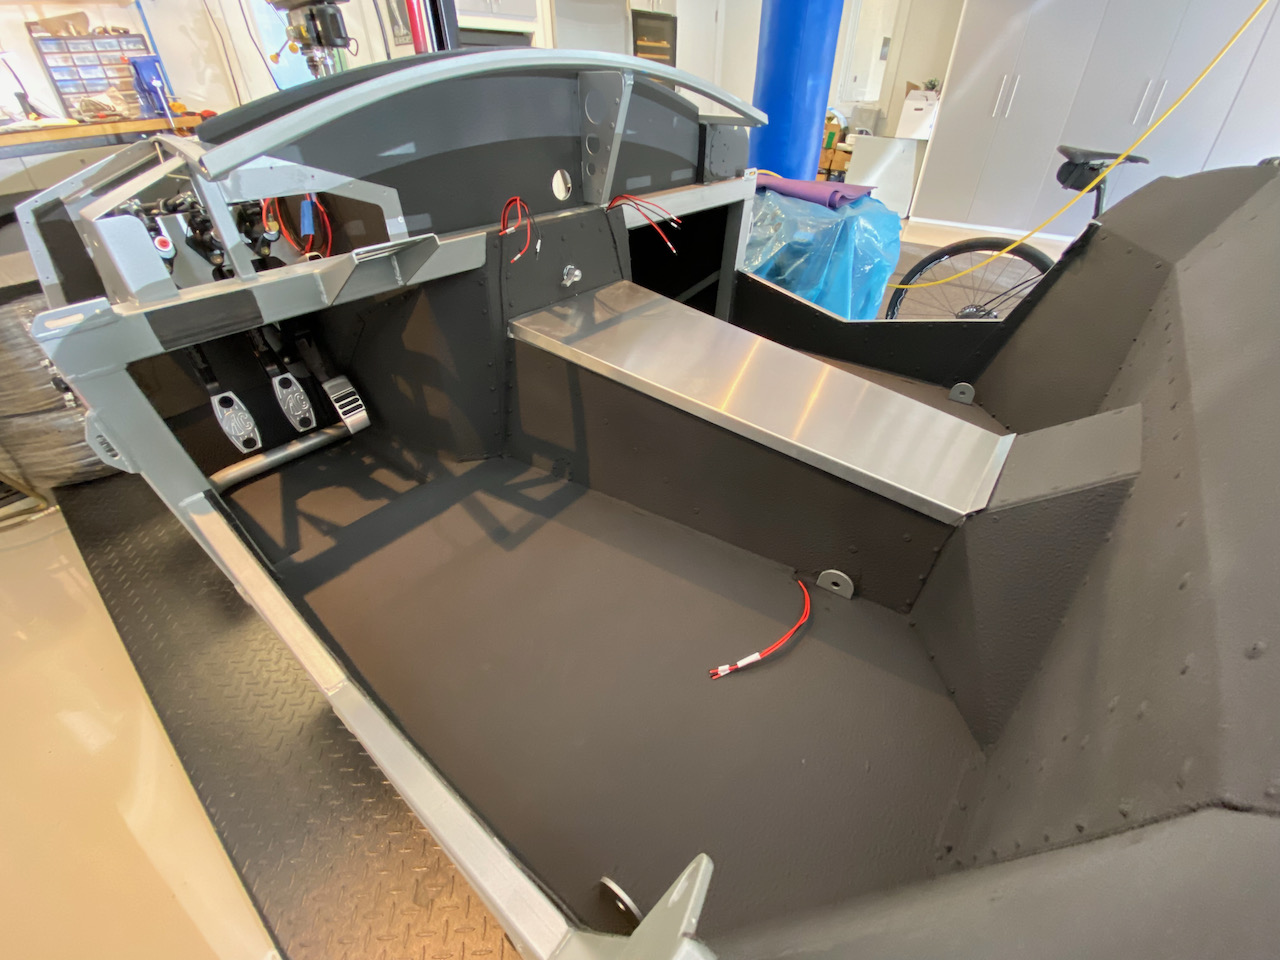
Just a quick update as I continue work on the dash. I wanted to lock down the dash position so I can finalize the dash mounting and the under dash filler panels, so I installed the Russ Thompson turn signal system yesterday. This also gave me a chance to mock up the steering wheel with the NRG quick release. I temporarily set the seat on the Breeze adjustable seat base and was able to sit in the car and get my first real sense of the ergonomics. I was pleased to discover that there's plenty of leg room, in fact I'll likely need to move the seat forward a bit from it max rearward position. I also really like the height, angle distance and size of the steering wheel. I'm glad I went with a smaller wheel. Even with that, having it be removable will clearly make getting in and out easier. A couple of learnings: First, I definitely need to do something about throttle/brake pedal clearance. I'm sure that lower-profile driving shoes will help a lot vs. the running shoes I was wearing, but even the narrower AC Cobra replica brake pedal is still a very night fit. I may go back to the Wilwood pedals and try shifting them to the left and trimming them down a bit. Second, I think I want even a bit more angle than what is built into the Breeze base. But overall I'm really pleased with how everything felt as a first pass.
MkIV Roadster build: Gen 2 Coyote, IRS, TKO600. Ordered 10/24/18. Delivered 1/29/19. Engine installed 8/8/21. First start 9/12/21. First go-kart 9/17/21. Off to paint 4/11/22. Back from paint 12/30/22.
Build thread here.
-
Post Thanks / Like - 0 Thanks, 1 Likes
-
06-08-2021, 09:03 PM
#141
-
Post Thanks / Like - 0 Thanks, 2 Likes
-
06-13-2021, 12:28 AM
#142
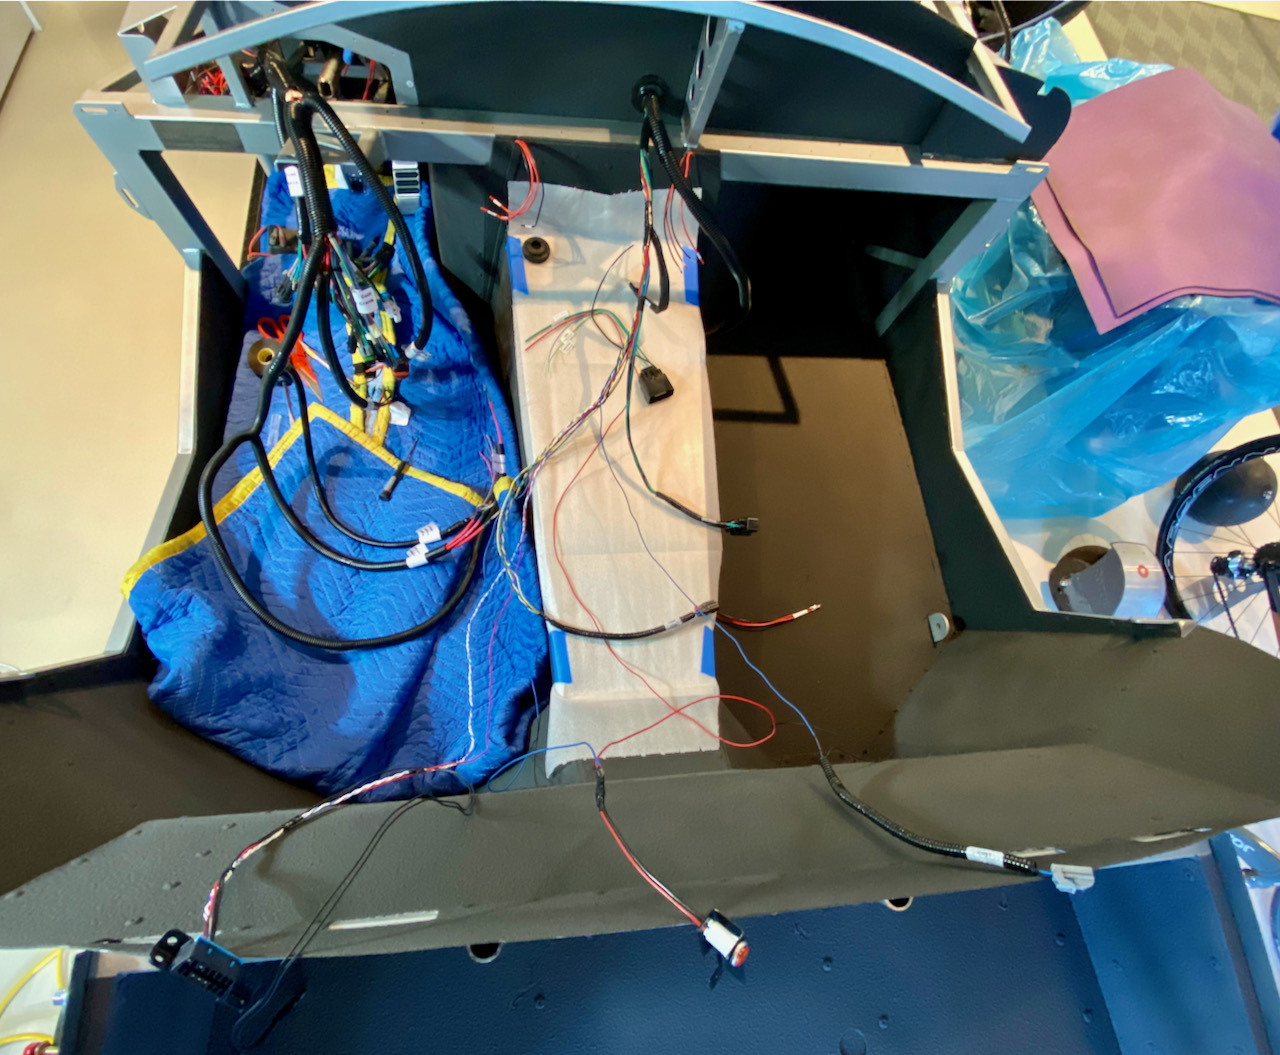
Greek Guys' Garage Roadster Build #9509 (starting power wiring)
Part backorders are unfortunately a fact of life from pretty much every vendor at the moment so I've had to jump around between working on wiring, the dash, and other assorted projects depending on what parts I have on hand. I finally got enough of my Del City and West Marine orders fulfilled to be able to start on some power wiring.
I started by making a small bracket for the 250A master fuse. I spray painted silver with the paint my powder coater provided that matches the PC. It think it turned out pretty nice:
Like many things on this build, I feel like I spend a ton of time on parts that will never be seen, but I love the process of fabricating little things so it's all good.
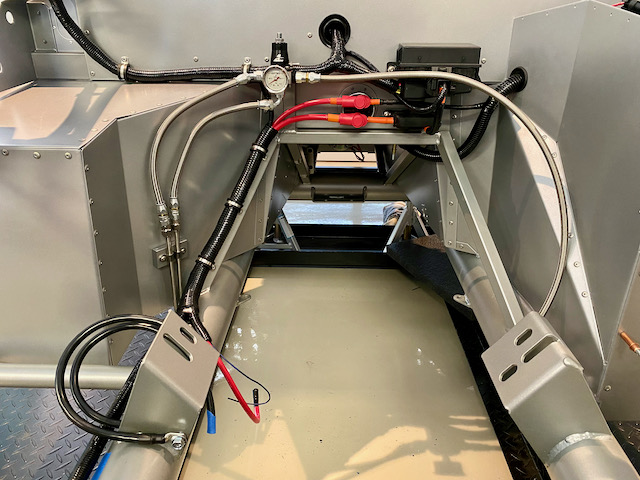
The basic layout of the power wiring on this build attempts to replicate what Paul B. did on his roadster build, so I'm not going to go into great detail explaining things that he invariably explains much better in his build threads. Here is a quick "in process" shot of what I've been able to do so far with the parts I have on hand. I have the 2 ga. wire that will run to the battery, as well as the 4 ga. wire that will run to the starter in place (wires running to the left from the top and bottom posts of the master shutoff). I also have the 4 ga. wire from the master shutoff to the 250A master fuse in place, as well as the 8 ga. wire that runs into the footbox and connects to the main bus bar. I also finally got around to finalizing the hole in the DS footbox and routed the rear harness, along with the 8 ga. power wire, through the footbox.

Still looking a bit rough, and there's more wiring to do before I start putting things in looms and tidying up, but I'm happy to finally be able to start working on the power wiring.
MkIV Roadster build: Gen 2 Coyote, IRS, TKO600. Ordered 10/24/18. Delivered 1/29/19. Engine installed 8/8/21. First start 9/12/21. First go-kart 9/17/21. Off to paint 4/11/22. Back from paint 12/30/22.
Build thread here.
-
06-13-2021, 11:52 AM
#143
Senior Member
Looking good, John! I'm looking forward to tackling the wiring. Your install is clean!
Chris
Coupe complete kit delivered: 4/22/24.
Build Thread. Coyote. T-56. IRS w/3.55. Wilwoods. PS. HVAC. Side windows.
MK4 Complete kit.
Build Thread Index. Delivered: 10/15/2020. Legal: 7/25/23. Coyote Gen3. TKO600 (0.64 OD). IRS w/3.55. PS. Wilwoods. Sway bars. This build is dedicated to my son, Benjamin.
Build Thread.
-
Post Thanks / Like - 1 Thanks, 0 Likes
JohnK thanked for this post
-
07-10-2021, 10:59 PM
#144
Greek Guys' Garage Roadster Build #9509 (finishing power wiring)
I've been gone for a couple of weeks. We took a family vacation to Greece, and had an amazing time sailing in the Ionian Islands. It was definitely tough to come home after that.

I'm mostly un-jetlagged now, and back at work on the roadster wrapping up the power wiring. Here's the battery in the Breeze front-mounted box:
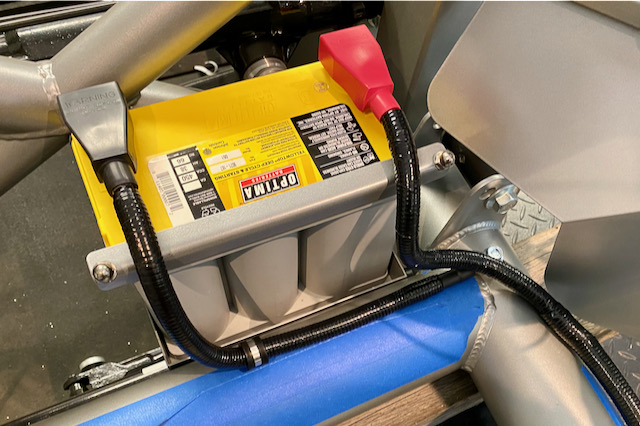
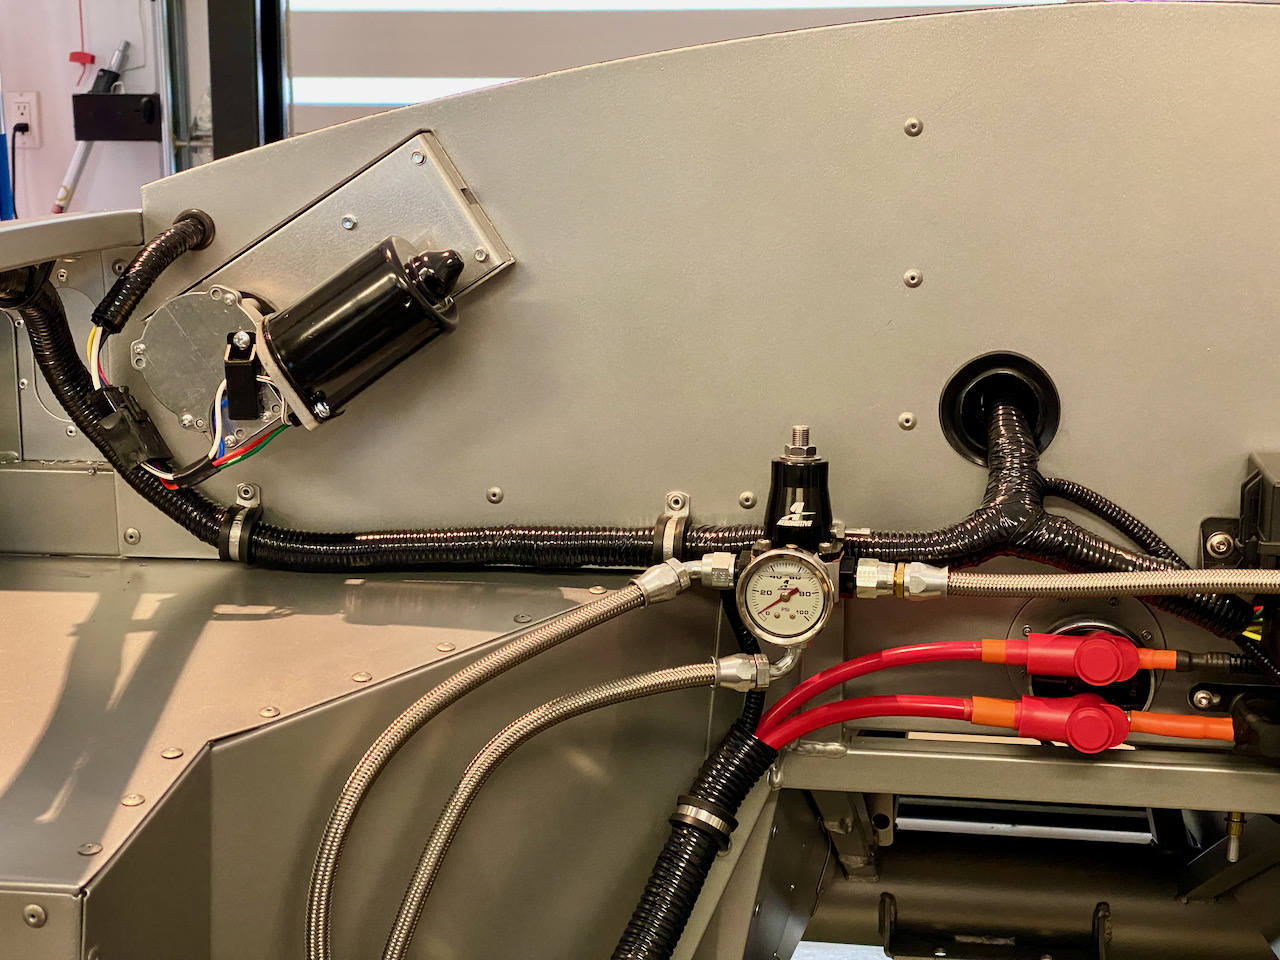
Tough to see in the previous photo is the drilled and tapped 3/8-16 bolt for the ground for the battery, along with the ground for the coyote harness. I used fusion battery terminals, and a heavy-duty fusion connector for the other end of the negative cable. It's thick enough that I was able to take it over to the combo bench sander and sand a curve in the bottom of the lug that matches the curve of the 4" frame tube pretty closely. The Dremel and a wire brush made quick work of removing the powder coat under the lug, and a little dielectric grease will keep it from corroding.
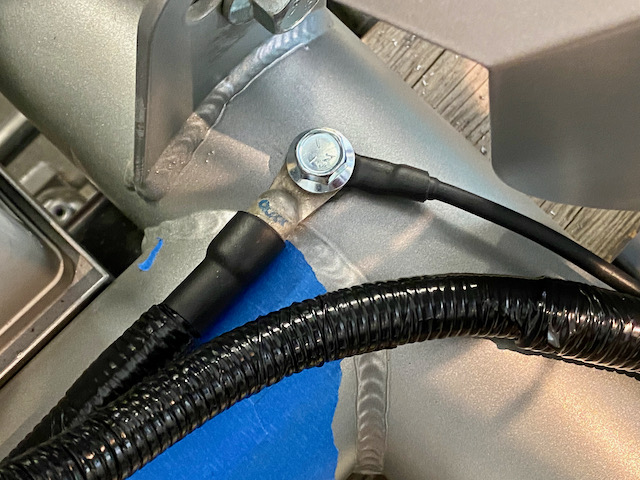
The rest of the power wiring scheme is a pretty faithful copy of Paul's (EdwardB) roadster power wiring. I've left the starter wires long and unterminated for now, until the engine is in. I've also preliminarily mounted a second ground strap to the engine mounting bracket that will provide another grounding point from the engine to the frame. A third ground will likely be added from one of the starter mounting bolts to the frame:
The 2 ga. wire running to the lower post of the master disconnect from the left comes from the battery. The 4 ga. wire running from the top post to the left goes back to the starter. From the top post going right is an 8 ga. wire that runs to the bus bar behind the dash and will feed the RF harness. The 4 ga. wire running from the bottom post to the right goes to the megafuse and then on to the coyote PDB.
If anyone sees anything here that I've screwed up, please let me know. 
I'm getting pretty close to being able to drop the engine in now. I want to install the wiper motor first, and have a few items to do on the engine itself before it's ready to install. but it's close now.
Anything else I should be doing in the engine bay before dropping the engine in?
MkIV Roadster build: Gen 2 Coyote, IRS, TKO600. Ordered 10/24/18. Delivered 1/29/19. Engine installed 8/8/21. First start 9/12/21. First go-kart 9/17/21. Off to paint 4/11/22. Back from paint 12/30/22.
Build thread here.
-
Post Thanks / Like - 0 Thanks, 4 Likes
-
07-11-2021, 02:33 PM
#145
Man, that looks very clean and well done... Nice work!!!
-
Post Thanks / Like - 1 Thanks, 0 Likes
JohnK thanked for this post
-
07-11-2021, 09:27 PM
#146
Senior Member
Sounds like a great vacation, John! I saw some happy faces!
Looking forward to seeing you drop in the motor.
Chris
Coupe complete kit delivered: 4/22/24.
Build Thread. Coyote. T-56. IRS w/3.55. Wilwoods. PS. HVAC. Side windows.
MK4 Complete kit.
Build Thread Index. Delivered: 10/15/2020. Legal: 7/25/23. Coyote Gen3. TKO600 (0.64 OD). IRS w/3.55. PS. Wilwoods. Sway bars. This build is dedicated to my son, Benjamin.
Build Thread.
-
Post Thanks / Like - 1 Thanks, 0 Likes
JohnK thanked for this post
-
07-16-2021, 12:28 AM
#147
Greek Guys' Garage Roadster Build #9509 (wiper motor and more heat insulation)
I've been plugging away at some small remaining items that I want to finish before dropping in the engine.
First up was installing the wiper motor. After hearing a lot of less-than-flattering things about the FFR wipers, I was intrigued by Paul's installation of the Specialty Power Windows wiper kit on his coupe. I decided to order a kit (model WWK-2) a while back to check it out. I started off by testing to see if I could control the wiper motor with a Lucas wiper toggle, and had good results with that early test here. Now it was time to install the motor on the firewall. The motor unit is quite a bit larger than the FFR unit, and it took a bit of fiddling to find a position that would put the drive cable at the correct angle, but I think that where it landed will work out just fine. Not sure how well it would fit if I'd decided to install a heater, but without a heater in the way I had plenty of room to play around. The motor will have to come off again to grease it, clock it, and do the final assembly, but at least I have the position nailed down now and have the wiring in place for it. I'll also paint the bare galvanized box around the drive housing to match the powder coat when I take it off for final assembly.
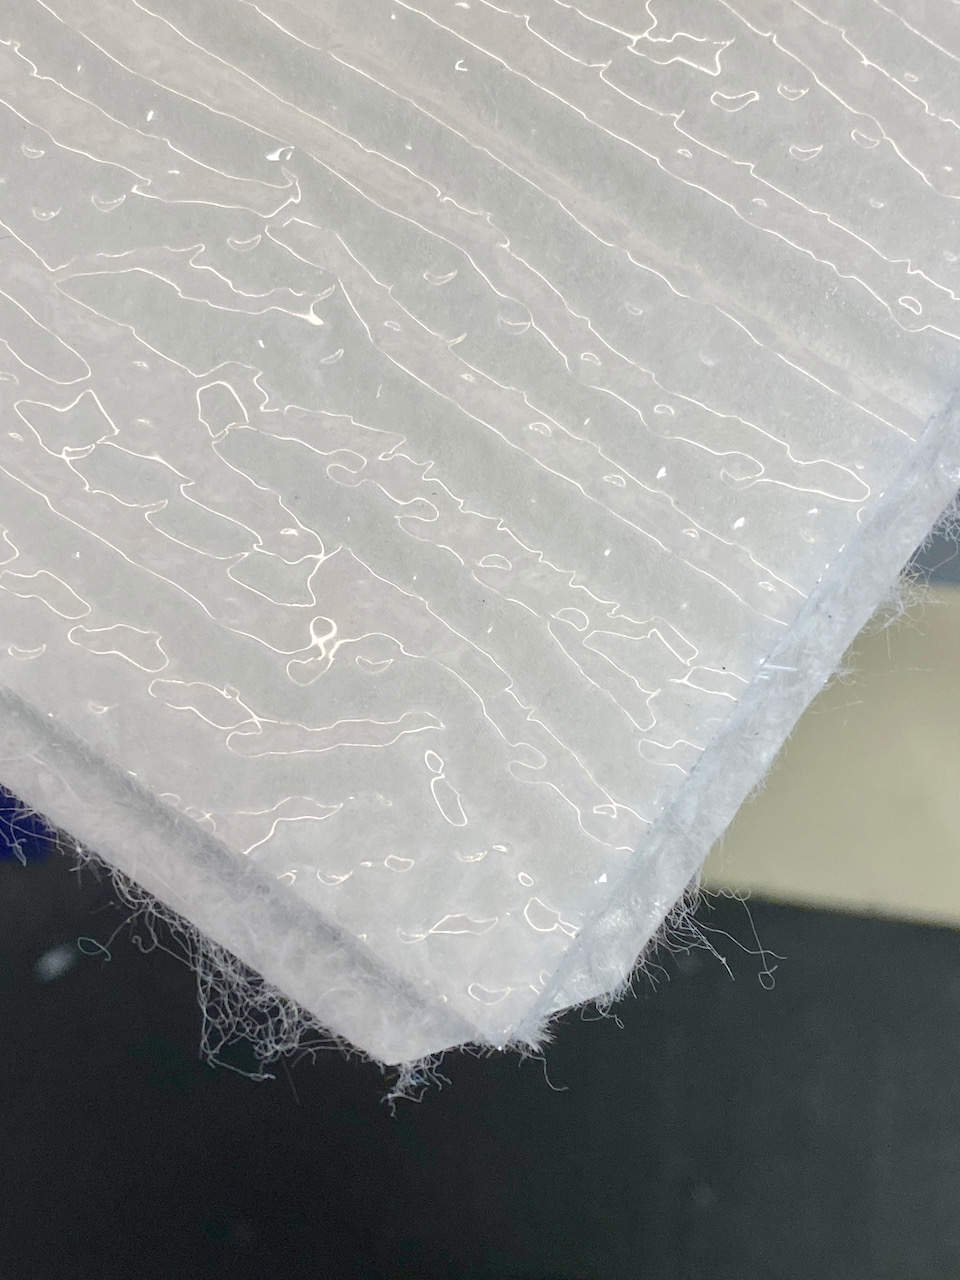
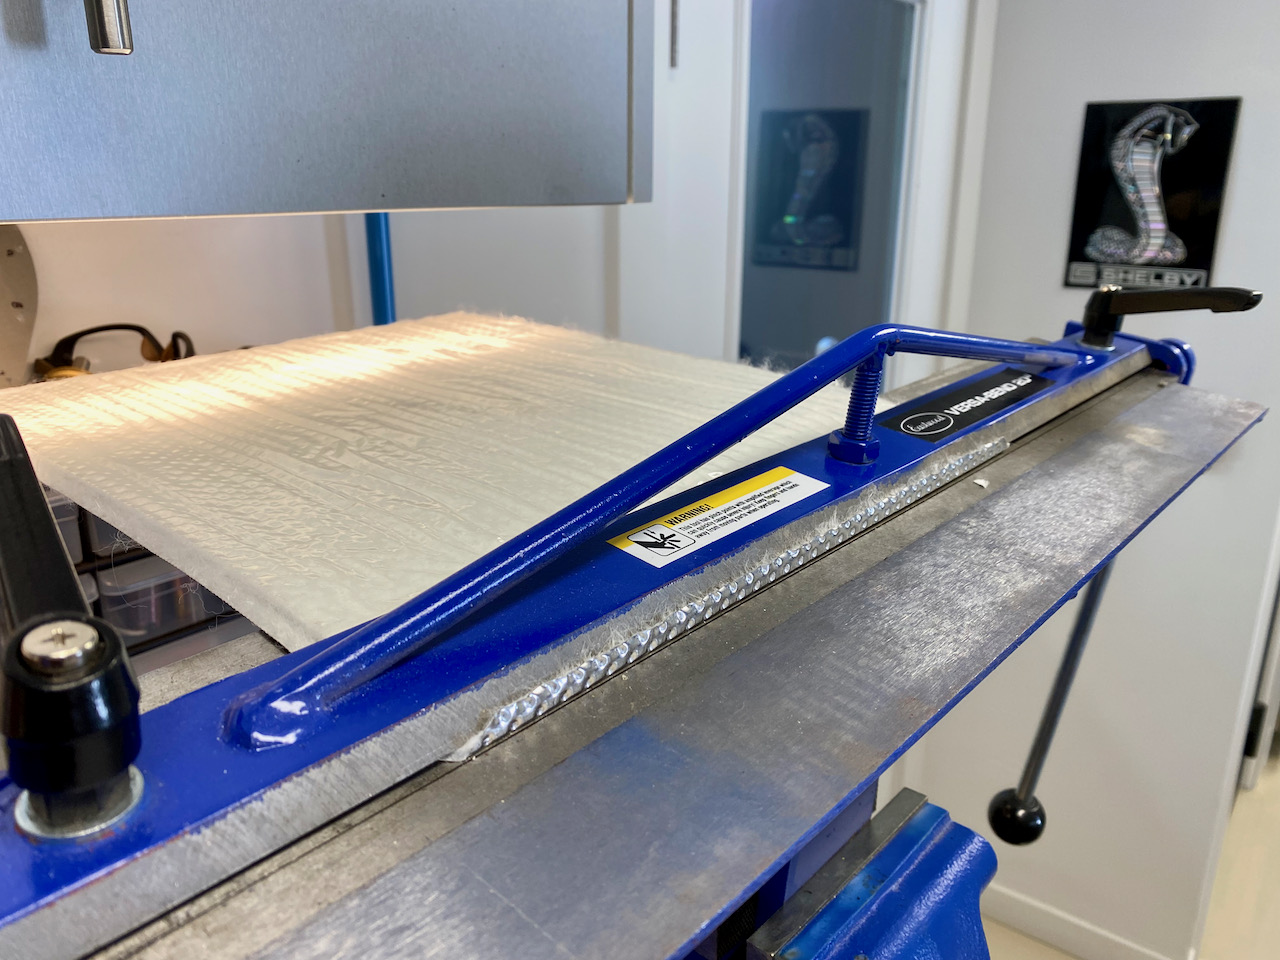
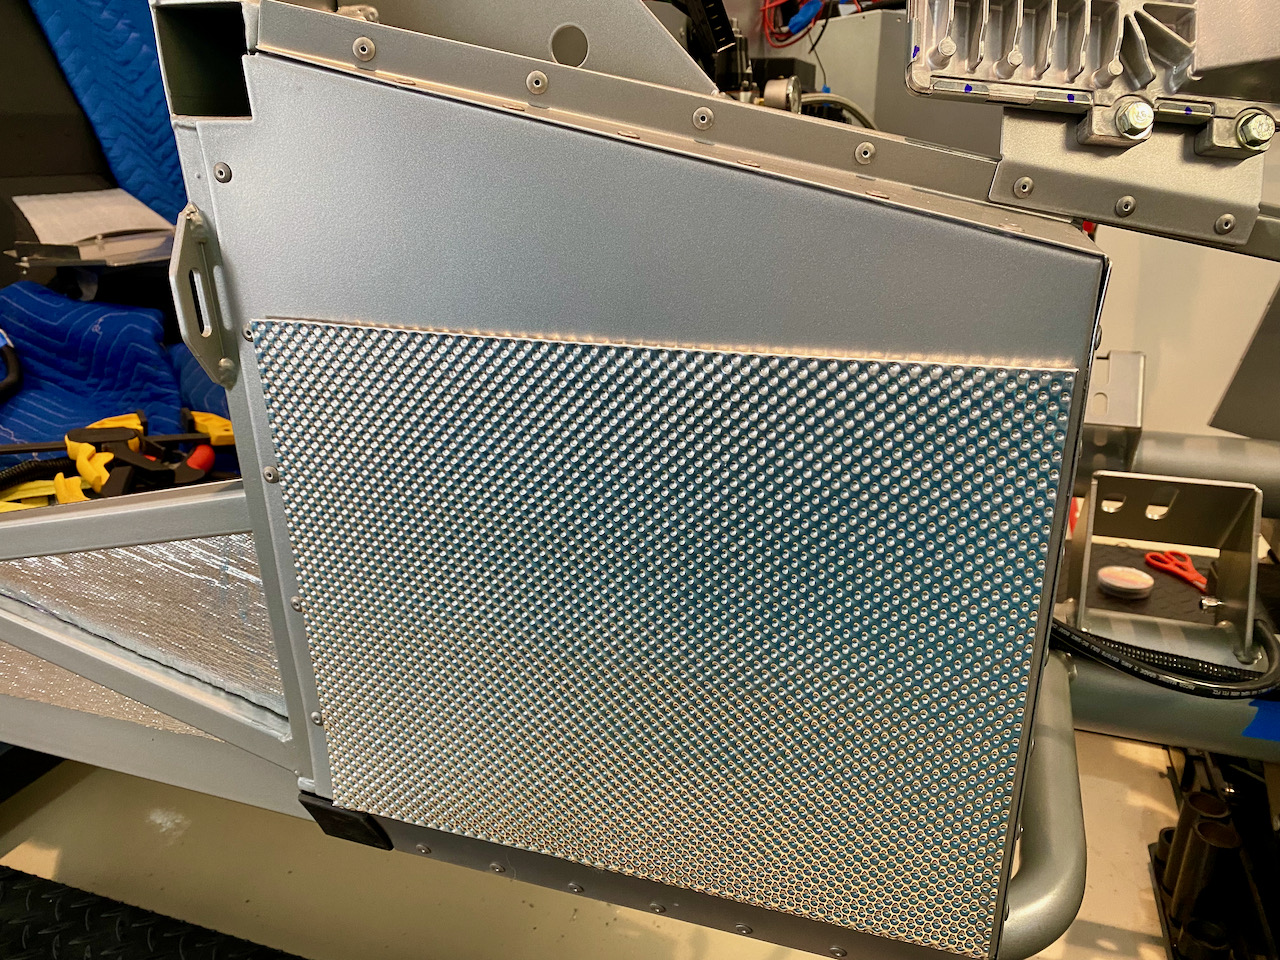
Next up was some more heat shielding around the footboxes. I'm using DEI "Floor and Tunnel Shield II" on the sides of the footboxes. This is a dimpled aluminum product with a 3/16" adhesive heat barrier under it. It's very easy to cut with a box knife or scissors. I made a template, cut the piece to size, then trimmed back a 1/4" of the heat barrier on all sides. I used my Eastwood VersaBend tool to fold the edges over on themselves so I'd end up with a nice clean rounded edge all around, and then stuck the piece in place. I opted to go with the dimpled aluminum on the sides of the footboxes. It'll likely oxidize over time but they'll never be seen once the body is on so I don't really care. For the more visible parts of the footboxes in the engine compartment DEI makes a similar heat shield with stainless steel rather than aluminum. I have a couple sheets of that material on order, and will be covering the front and insides of the footboxes with that material (using the same technique) once it arrives.
MkIV Roadster build: Gen 2 Coyote, IRS, TKO600. Ordered 10/24/18. Delivered 1/29/19. Engine installed 8/8/21. First start 9/12/21. First go-kart 9/17/21. Off to paint 4/11/22. Back from paint 12/30/22.
Build thread here.
-
Post Thanks / Like - 0 Thanks, 4 Likes
-
07-16-2021, 02:57 PM
#148
Senior Member
That Eastwood metal brake looks like a quality tool. I like how it can be attached to a bench vise as well.
Chris
Coupe complete kit delivered: 4/22/24.
Build Thread. Coyote. T-56. IRS w/3.55. Wilwoods. PS. HVAC. Side windows.
MK4 Complete kit.
Build Thread Index. Delivered: 10/15/2020. Legal: 7/25/23. Coyote Gen3. TKO600 (0.64 OD). IRS w/3.55. PS. Wilwoods. Sway bars. This build is dedicated to my son, Benjamin.
Build Thread.
-
07-16-2021, 03:09 PM
#149
Originally Posted by
460.465USMC
That Eastwood metal brake looks like a quality tool. I like how it can be attached to a bench vise as well.
Sometimes I wish I had a proper box and pan brake but I don't really have the room for it at the moment. The versa bend gets the job done for small, basic pieces and I can slide it under my toolbox when I'm not using it and it's completely out of the way.
MkIV Roadster build: Gen 2 Coyote, IRS, TKO600. Ordered 10/24/18. Delivered 1/29/19. Engine installed 8/8/21. First start 9/12/21. First go-kart 9/17/21. Off to paint 4/11/22. Back from paint 12/30/22.
Build thread here.
-
07-16-2021, 09:08 PM
#150
Senior Member
Smart move on heat insulation imo you can't have enough of it. I've been battling it since the warmer summer months have set in. I used sticky shield and it has helped quite a bit.
Build is looking great, looking forward to seeing your first start!
-
Post Thanks / Like - 1 Thanks, 0 Likes
JohnK thanked for this post
-
07-17-2021, 01:54 AM
#151
Senior Member

Hi John,
I used exactly the same heat insulation product on my foot boxes and firewall. It is truly excellent. The company I purchased it from in Australia removed all labelling from the boxes, so I never knew who the OEM was. At least I know now!
The good news I can pass on is that I've never had a problem with heat build up in my foot boxes. We have some pretty hot weather over here and in addition, I made sure I took the time to exclude any air getting from the engine compartment into the cabin. To look for any potential air leaks, I had a friend come over and we darkened the garage. Then he worked from the engine compartment with a torch while I was in the cabin looking for any light penetrating through. Whenever I saw light shining through we kept sealing those areas with various methods until it was completely dark. Job done.
For anyone who is interested, don't underestimate how even the smallest leak can really heat up your foot boxes. A short while back I was doing some modifications to my car which ended up with a 1 inch hole open in the driver side foot box. I took the car for a test run and was amazed at how my legs were getting roasted. The hole was in line with the headers. Even though I run a Coyote which are known to be cool running and my headers are thermally wrapped, I was still amazed how much heat was pumping through.
It is definitely worth taking the time to source and seal off any leaks.
Cheers Nigel
Last edited by Nigel Allen; 07-17-2021 at 02:02 AM.
Mk.4 FFR supplied Right hand drive
Received 12/2012 completed 12/2019
Gen1 Coyote / TKO600 / IRS
Lots of mods to make compliant for Australian design rules
-
Post Thanks / Like - 1 Thanks, 0 Likes
JohnK thanked for this post
-
07-17-2021, 10:45 PM
#152
Originally Posted by
JohnK
For a few of the larger gaps, like the bottom inside of the drivers footbox, I first laid down some foil tape, and then coated that with epoxy.
Once cured, the epoxy really makes this a very rigid joint. I will come back and lay down some Dynatron seam sealer on the outside (engine compartment side) of that joint later on as added insurance, but it's plenty strong now and totally sealed up. I did the same with the round tube coming out of the passenger footbox.
Great looking build!! What Epoxy did you use over the foil tape to fill the gaps?
-
07-18-2021, 12:22 AM
#153
Originally Posted by
Jammer369
Great looking build!! What Epoxy did you use over the foil tape to fill the gaps?
Thank you very much! I really appreciate it.
That's just good ol' JB Weld.
MkIV Roadster build: Gen 2 Coyote, IRS, TKO600. Ordered 10/24/18. Delivered 1/29/19. Engine installed 8/8/21. First start 9/12/21. First go-kart 9/17/21. Off to paint 4/11/22. Back from paint 12/30/22.
Build thread here.
-
Post Thanks / Like - 1 Thanks, 0 Likes
-
07-18-2021, 09:24 PM
#154
Greek Guys' Garage Roadster Build #9509 (Tilton HRB setup question)
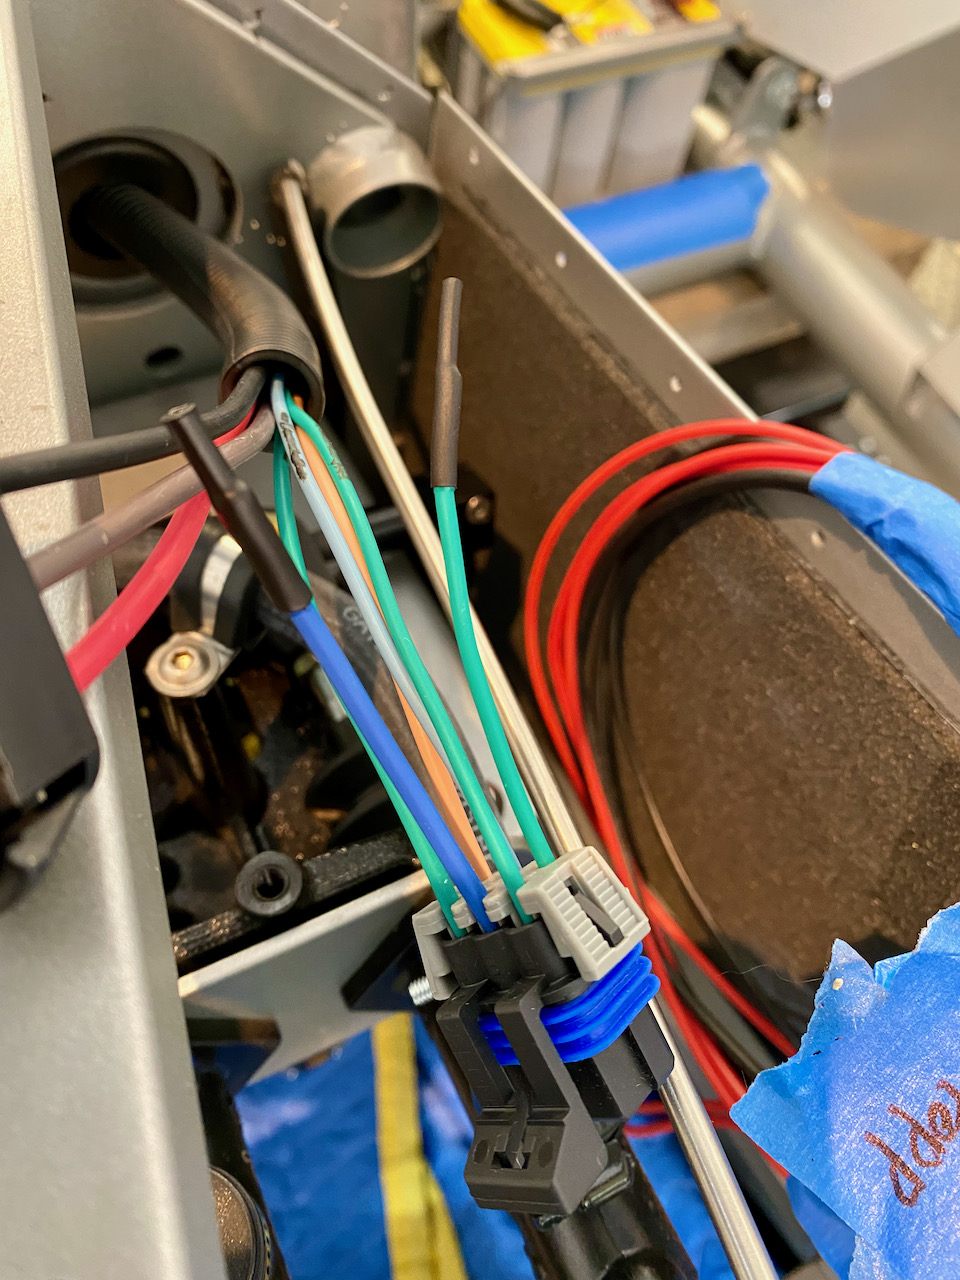
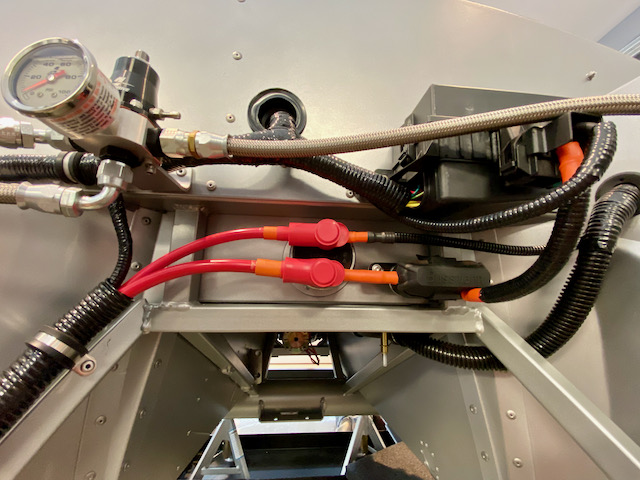
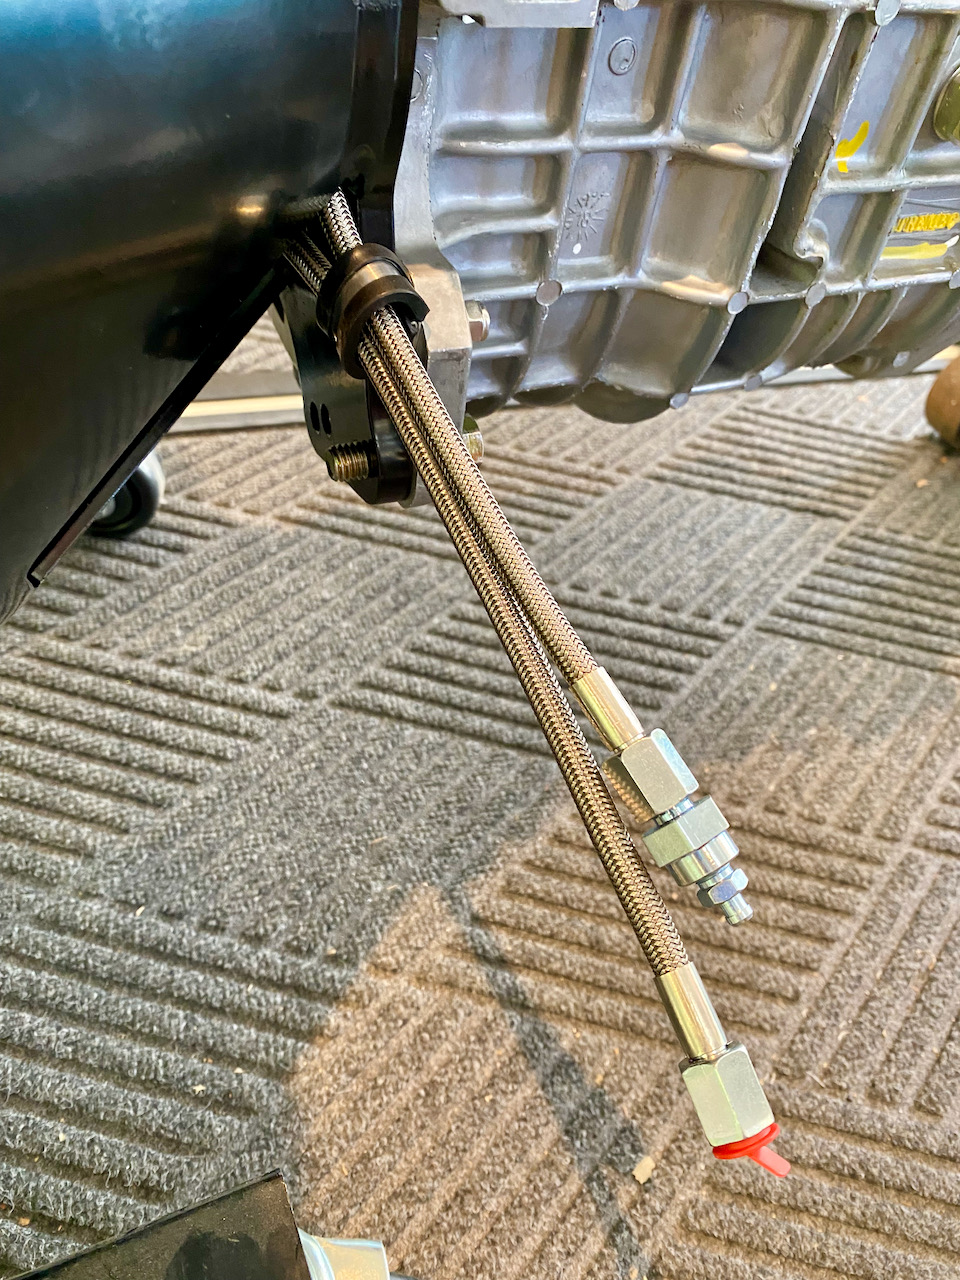
Some time ago I installed Forte's hydraulic clutch release when I did the engine/trans assembly. Since that time, I've been doing a lot of research and reading. If there's one thing I hate more than having to re-do things I've done before, it's second-guessing things I could have done differently. With that in mind, I made the decision to replace the Forte's hydraulic clutch release with a Tilton 6000-series hydraulic release bearing before installing the engine in the chassis. I wasn't looking forward to tearing down the engine/trans that I'd already assembled, but that's the price of indecision. 
Overall, the process went smoothly. There's a great video by Tilton on Youtube here that walks you through the process. Between the video and the written instructions it's all pretty straightforward. The only "gotcha" that I've read on the forums is a few folks having issues with the hydraulic lines from the HRB getting damaged by the clutch disk. I really am not looking forward to having to remove the engine/trans to deal with that, so I wanted to make sure I secure the lines in such a way that they don't get damaged. Here's how I've secured them. Does this look like it will keep them out of harm's way?
MkIV Roadster build: Gen 2 Coyote, IRS, TKO600. Ordered 10/24/18. Delivered 1/29/19. Engine installed 8/8/21. First start 9/12/21. First go-kart 9/17/21. Off to paint 4/11/22. Back from paint 12/30/22.
Build thread here.
-
07-18-2021, 10:32 PM
#155
Senior Member

Originally Posted by
JohnK
The only "gotcha" that I've read on the forums is a few folks having issues with the hydraulic lines from the HRB getting damaged by the clutch disk. I really am not looking forward to having to remove the engine/trans to deal with that, so I wanted to make sure I secure the lines in such a way that they don't get damaged. Here's how I've secured them. Does this look like it will keep them out of harm's way?
As one of the guys who had an internal TOB hydraulic line eaten by the clutch disk, this is the same solution I used (after repairing the hydraulic line). It should work fine. I plan to inspect mine frequently to ensure no slack is migrating into the bell housing, but I don't expect any further problems.
MKIV Complete Kit #9822 l BluePrint 347 EFI l TKO600 l Power Steering l Heater/Defrost l
Build Thread
-
07-18-2021, 10:43 PM
#156
MkIV Roadster build: Gen 2 Coyote, IRS, TKO600. Ordered 10/24/18. Delivered 1/29/19. Engine installed 8/8/21. First start 9/12/21. First go-kart 9/17/21. Off to paint 4/11/22. Back from paint 12/30/22.
Build thread here.
-
07-19-2021, 10:13 PM
#157
Senior Member
Hi John. I also have the Forte hydraulic setup. I'm curious what caused you to change course?
Chris
Coupe complete kit delivered: 4/22/24.
Build Thread. Coyote. T-56. IRS w/3.55. Wilwoods. PS. HVAC. Side windows.
MK4 Complete kit.
Build Thread Index. Delivered: 10/15/2020. Legal: 7/25/23. Coyote Gen3. TKO600 (0.64 OD). IRS w/3.55. PS. Wilwoods. Sway bars. This build is dedicated to my son, Benjamin.
Build Thread.
-
07-19-2021, 11:33 PM
#158
Hey Chris, there are pro's and con's to each setup. It was definitely not a clear-cut decision. The external slave is a "tried and true" solution and far simpler to repair in the event of a problem down the road. The internal HRB is self-adjusting as the clutch wears and has a lighter pedal feel (from what I've read). I have an external slave setup on my '67 Mustang and it works fine but is a pretty heavy clutch.
MkIV Roadster build: Gen 2 Coyote, IRS, TKO600. Ordered 10/24/18. Delivered 1/29/19. Engine installed 8/8/21. First start 9/12/21. First go-kart 9/17/21. Off to paint 4/11/22. Back from paint 12/30/22.
Build thread here.
-
07-20-2021, 10:43 AM
#159
Senior Member
Ah. Got it. I've read comments about clutch pedal heaviness as well. I've sat in a MK4 with TKO600 and no clutch assist, and boy was it a heavy clutch. Heavier than I would like, so when I ordered my kit I went with the Forte hydraulic to lighten (hopefully it's noticeable) the clutch pedal feel. It sounds like the internal HRB will bring you closer or match a modern pedal feel, which is very understandable. Thanks for the explanation.
Chris
Coupe complete kit delivered: 4/22/24.
Build Thread. Coyote. T-56. IRS w/3.55. Wilwoods. PS. HVAC. Side windows.
MK4 Complete kit.
Build Thread Index. Delivered: 10/15/2020. Legal: 7/25/23. Coyote Gen3. TKO600 (0.64 OD). IRS w/3.55. PS. Wilwoods. Sway bars. This build is dedicated to my son, Benjamin.
Build Thread.
-
07-24-2021, 05:49 PM
#160
Greek Guys' Garage Roadster Build #9509 (Coyote engine prep)
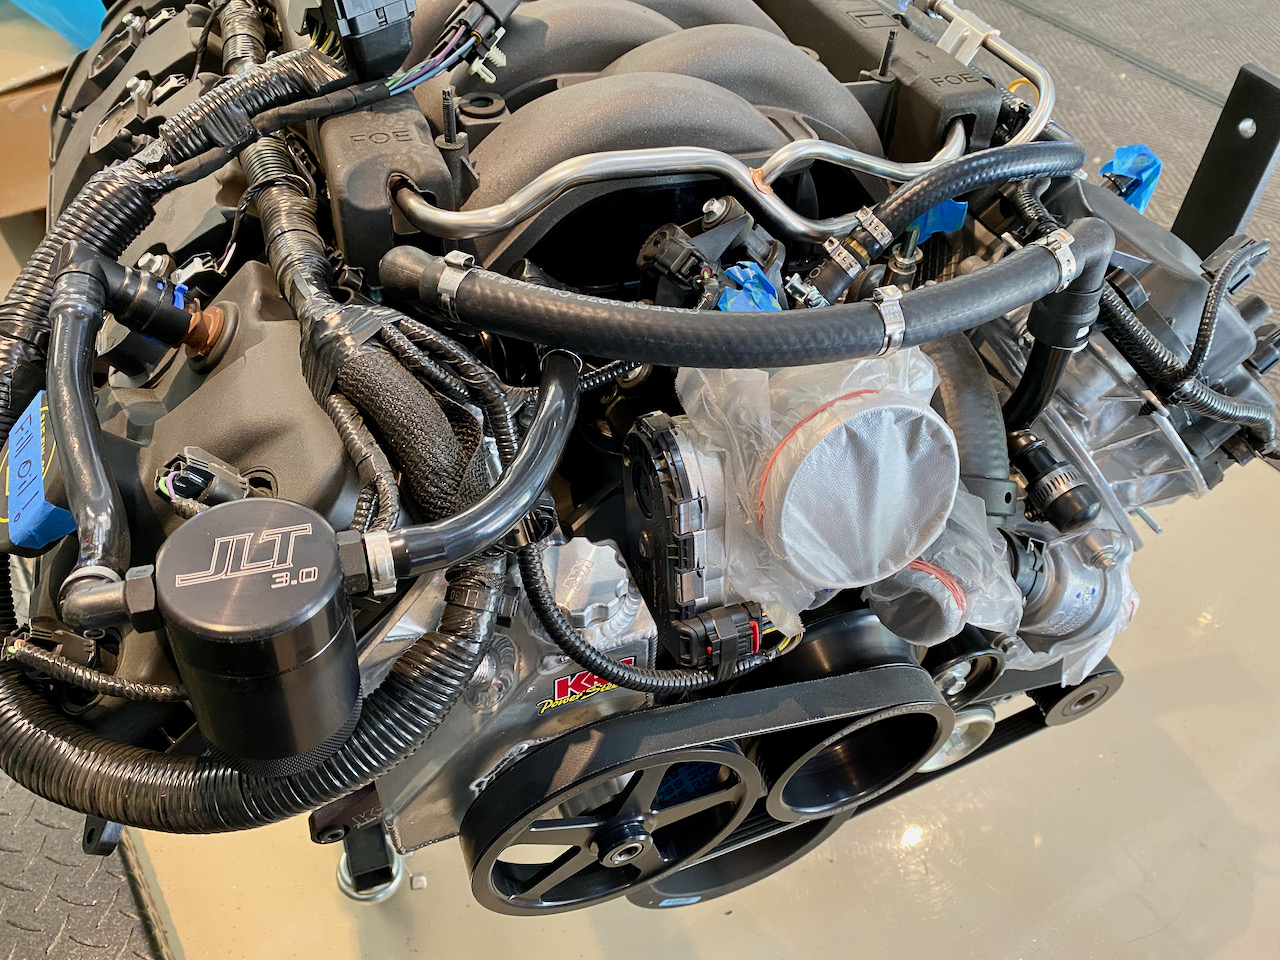
I've been wrapping up some final items on the engine before I drop it in. It's basically ready to go at this point, and the only thing holding up engine install is to finish up the footbox heat shielding. That material should be arriving on Monday (fingers crossed.). Here's the last bit of work I did on the engine. If you all could sanity-check me, especially on the CMCV and heater bypass hoses, I'd appreciate it. In no particular order...
I installed the engine lift brackets, fit-tested the headers and then removed all the M10-1.25 studs that came with the engine. This was also my first look at the Jet Hot ceramic coating on the headers. This is the Ultra Extereme 2500 coating. It's a pretty rough surface texture but can supposedly handle up to 2,500 deg. F. The headers are GP Headers with built-in catalytic converters, so they'll be putting out a fair bit of heat.

I painted the transmission mount adapter, along with the trans mount spacers, then installed the mount on the trans.

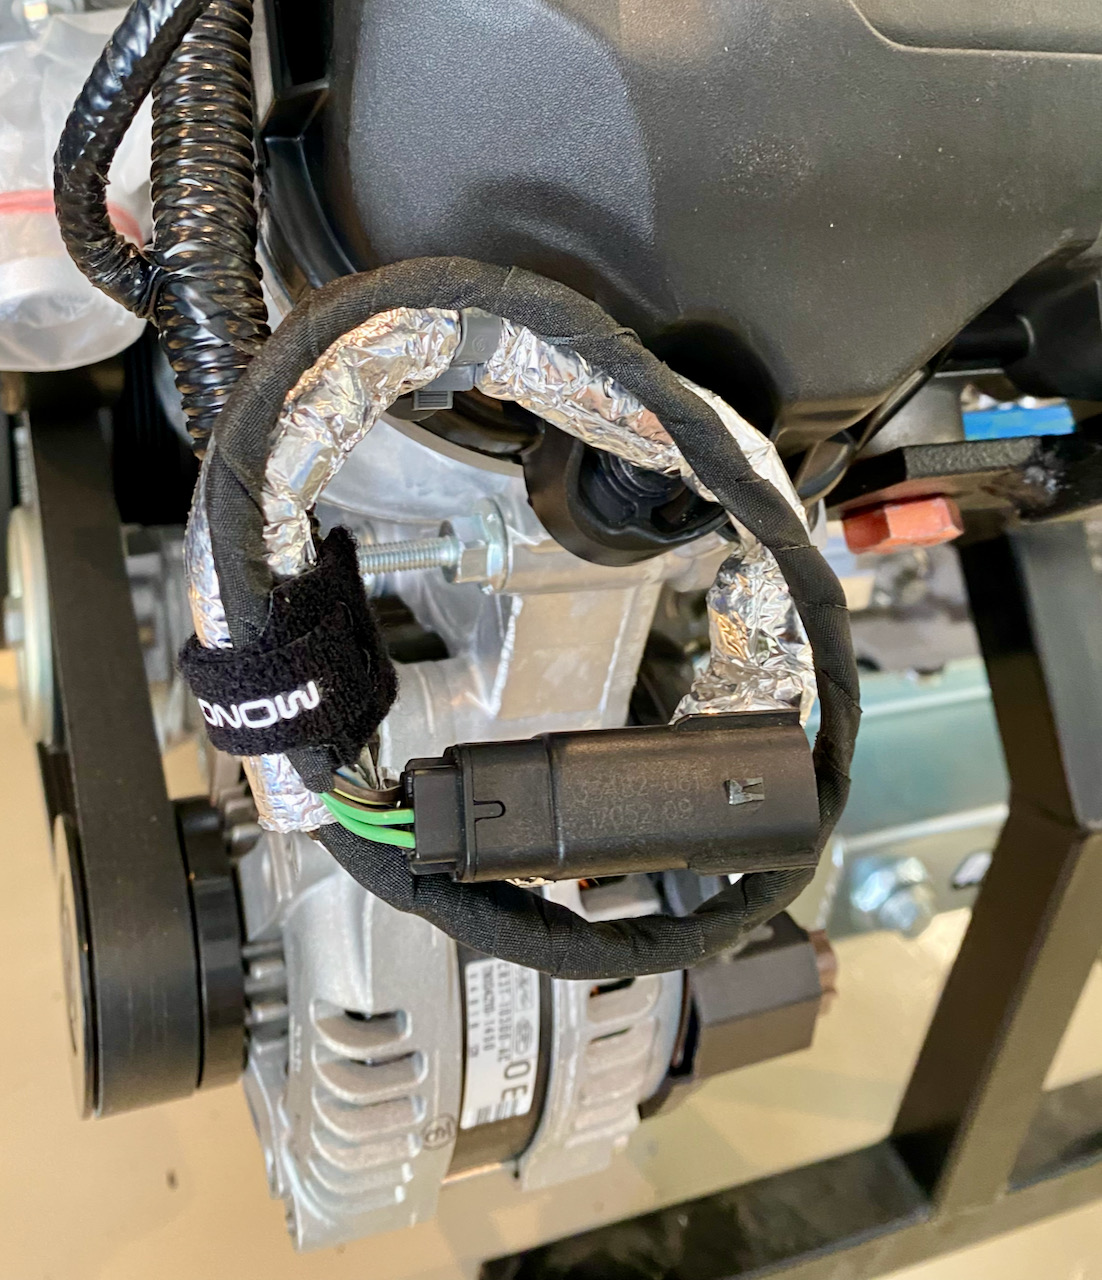
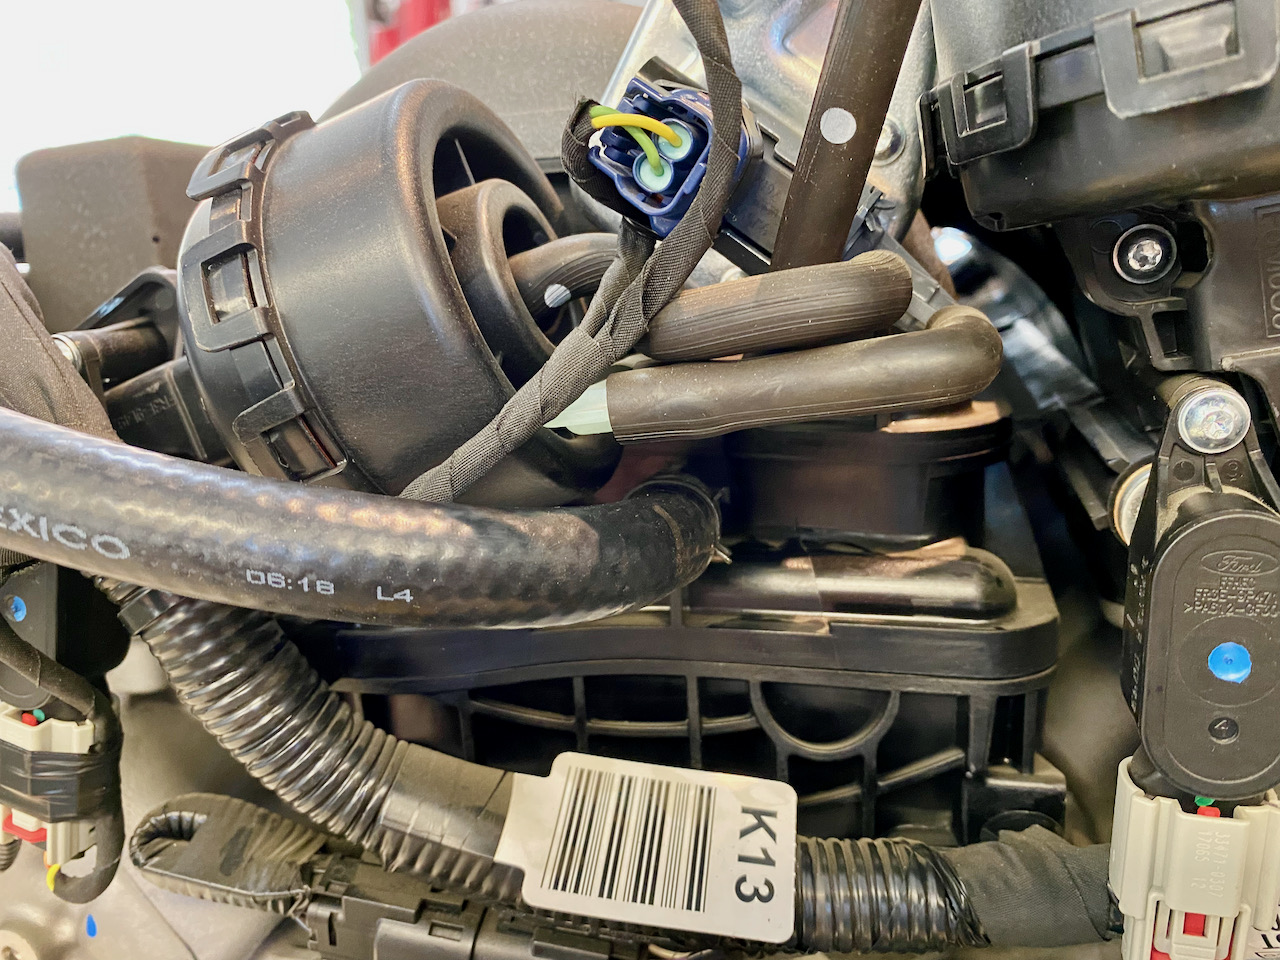
I swapped out the oil pressure sender for the Speedhut unit, and also installed the water temp sensor. I cut the factory oil pressure sensor connector off, heat shrinked the wire and wrapped it into the harness. Since that leg of the harness no longer connects to the oil pressure sender, there's no real reason for it to be routed down there, so I unclipped it, removed the odd mishmash of cloth wrap and plastic convolute and assorted clips and then re-wrapped the end of it all in cloth tape. It's now free to be routed as needed for the exhaust O2 sensor.
Next up were the CMCV vacuum connection and heater bypass hoses. In this photo you can see the PS PCV hose with the JLT Performance oil separator, and the heater bypass hose with the 5/16" restrictor clamped in place in the middle of the hose.
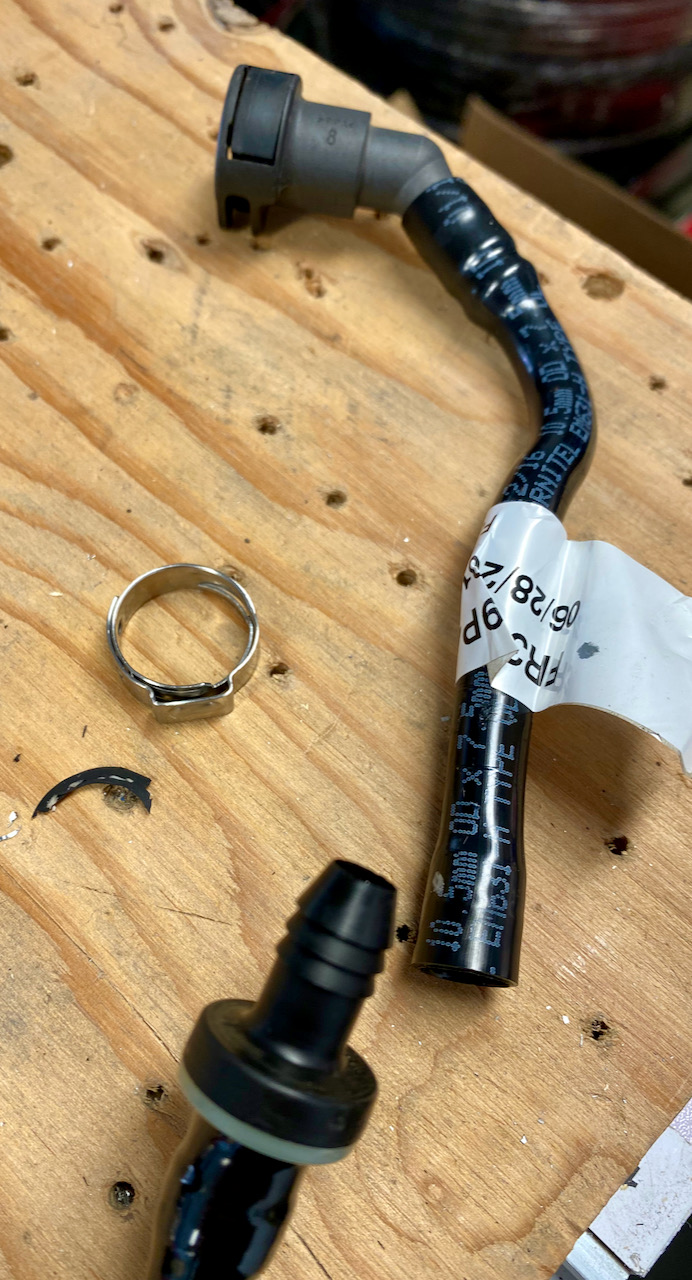
Here's a better look at the CMCV vacuum line, as described in this thread. I made a couple of modifications to those instructions. First, I omitted the tee and vacuum line for the fuel pressure regulator, as the consensus seems to be to not connect the fuel pressure regulator to a vacuum source. Secondly, I removed the factory CMCV line and then removed the check valve from that line and installed it in this new line. The check valve is hard to see in this photo, as it's under a zip tie but it's next to the DS PCV connector. You can see the pinch clamps on either side of it. Also visible is the Let-Lok -6 AN compression fitting that was added to the fuel inlet line.
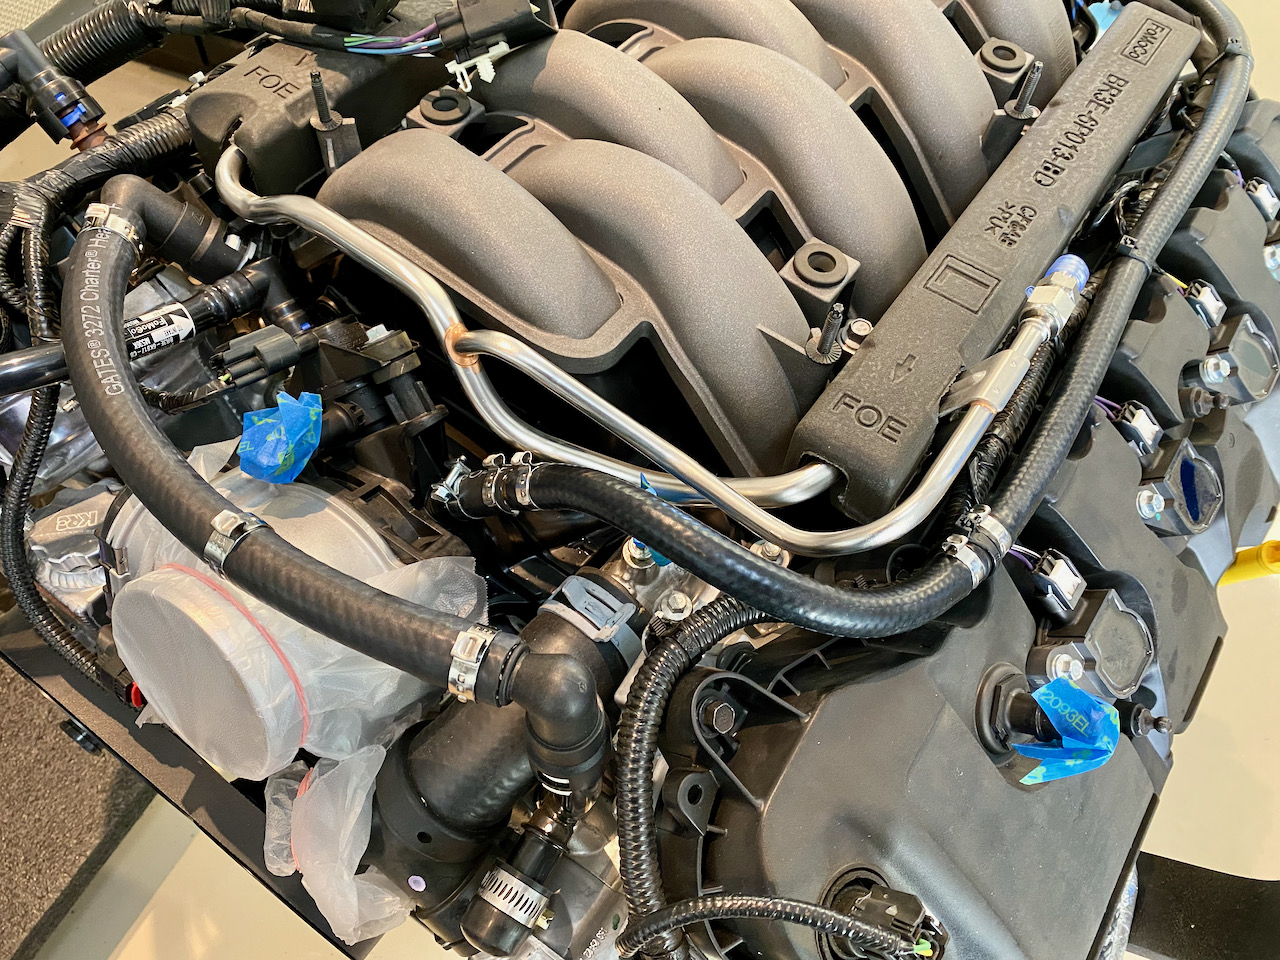
Here's the check valve in the original line:
And finally the rear end of the CMCV line running into the intake manifold where the original line went:
That's it for engine prep. Hopefully this heat shield material shows up soon so I can wrap that up and then round up a few guys and some beer and drop this baby in.
If anyone sees anything I've messed up or am missing, I'd love your input.
Last edited by JohnK; 07-24-2021 at 05:55 PM.
MkIV Roadster build: Gen 2 Coyote, IRS, TKO600. Ordered 10/24/18. Delivered 1/29/19. Engine installed 8/8/21. First start 9/12/21. First go-kart 9/17/21. Off to paint 4/11/22. Back from paint 12/30/22.
Build thread here.
-
Post Thanks / Like - 1 Thanks, 1 Likes


 Thanks:
  Likes:


 Reply With Quote
