-
07-26-2021, 04:35 PM
#161
Senior Member

Wish I could give you some feedback one way or the other, John, but I'm not there yet. Knowing your level of build quality, I'm sure you're well on your way to a successful drop-in, and first start!
Chris
Coupe complete kit delivered: 4/22/24.
Build Thread. Coyote. T-56. IRS w/3.55. Wilwoods. PS. HVAC. Side windows.
MK4 Complete kit.
Build Thread Index. Delivered: 10/15/2020. Legal: 7/25/23. Coyote Gen3. TKO600 (0.64 OD). IRS w/3.55. PS. Wilwoods. Sway bars. This build is dedicated to my son, Benjamin.
Build Thread.
-
Post Thanks / Like - 1 Thanks, 0 Likes
 JohnK
JohnK thanked for this post
-
07-27-2021, 12:49 PM
#162
Wrap the headers prior to install, I have mine ceramic coated too and still gives an extreme amount off heat to the foot boxes and engine compartment. The DEI header wrap actually helped mitigate some heat.
-
07-27-2021, 01:12 PM
#163
Senior Member

sealing off the engine compartment from the cockpit does a ton to reduce heat. I'm still driving in gelcoat, but with some 1.5" water heater pipe insulation stuffed between the body and footbox, there is a substantial difference in heat transferred to your legs. I don't have any heat wrap, special heat shields other than sound deadener around my feet.
-
07-27-2021, 05:40 PM
#164
Thanks everyone. I'm not planning to do any header wrap, but I am planning to add more heat shielding on the engine compartment side of the footboxes - if that material ever shows up. FedEx apparently lost that shipment for a few days. It has now turned up in Sacramento, so I hope that means I have it shortly. I already spent a fair amount of time sealing up all cracks and crevices in the footboxes with a combination of epoxy, seam sealer and Lizard Skin. I'll do one more go-around with a light looking for gaps before carpeting but I think I've got everything pretty tight at this point. The gaps between body and frame/sheetmetal will be dealt with when the body goes on.
Last edited by JohnK; 07-27-2021 at 07:24 PM.
MkIV Roadster build: Gen 2 Coyote, IRS, TKO600. Ordered 10/24/18. Delivered 1/29/19. Engine installed 8/8/21. First start 9/12/21. First go-kart 9/17/21. Off to paint 4/11/22. Back from paint 12/30/22.
Build thread here.
-
07-27-2021, 05:50 PM
#165


Greek Guys' Garage Roadster Build #9509 (leather dash)
I've been impatiently waiting for my heat shield material to show up. I'm not so good at being patient sometimes. However, I got a call this morning that my dash was finished being upholstered, so I spent the morning fitting the gauges and switches to it. I think it turned out pretty nice.
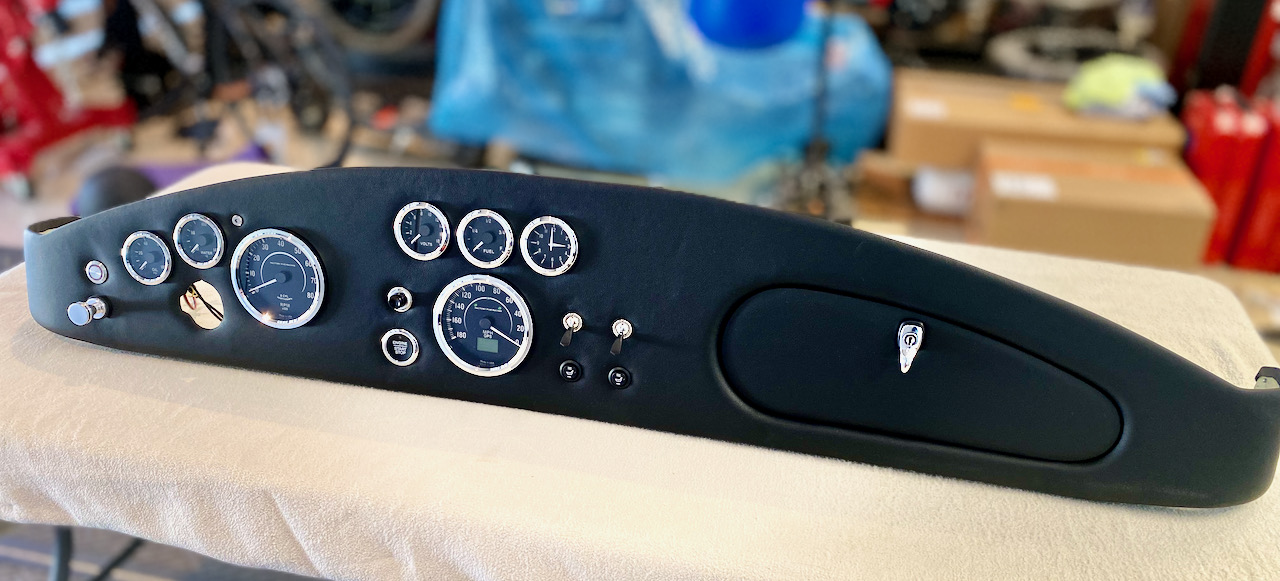
It's got some modern touches (push-button start, electric parking brake button, seat heaters) but it still has the 'almost period correct' look to it. I really like the leather that the shop recommended. It's a matte-sheen leather with a very small grain pattern to it, and it's very UV-resistant. Here's a close-up that shows the texture a bit better:
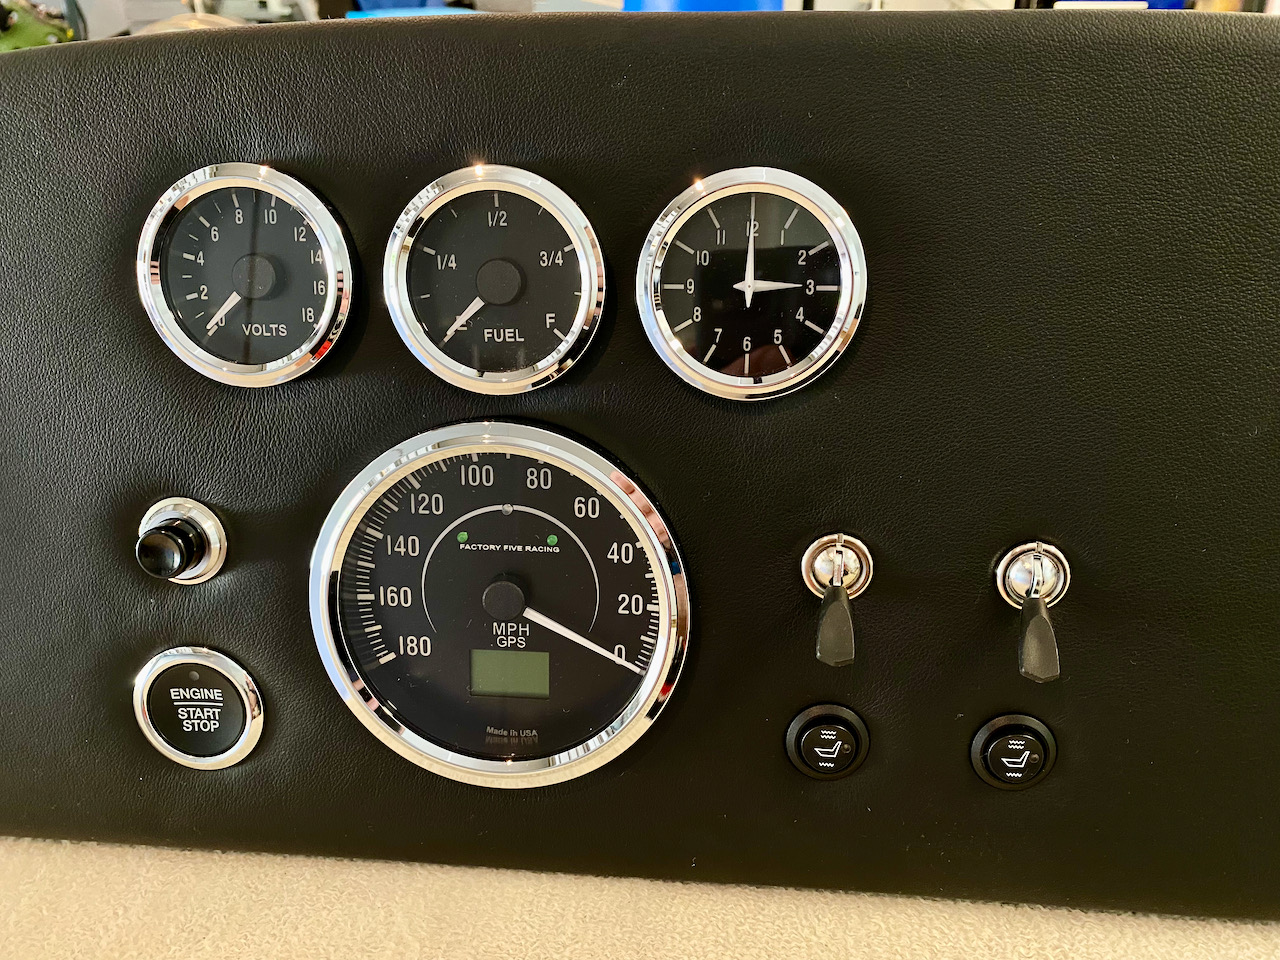
I still need to pull apart the glove box one more time so I can flock the interior of it, so I didn't install the grab handle yet. The holes are there in the sheetmetal dash but they didn't cut them into the leather. It's simple enough to cut them open with an x-acto when I'm ready to do the final assembly of the glove box.
MkIV Roadster build: Gen 2 Coyote, IRS, TKO600. Ordered 10/24/18. Delivered 1/29/19. Engine installed 8/8/21. First start 9/12/21. First go-kart 9/17/21. Off to paint 4/11/22. Back from paint 12/30/22.
Build thread here.
-
Post Thanks / Like - 0 Thanks, 4 Likes
-
07-27-2021, 08:43 PM
#166
25th Anniversary #9772


Originally Posted by
JohnK

I've been impatiently waiting for my heat shield material to show up. I'm not so good at being patient sometimes. However, I got a call this morning that my dash was finished being upholstered, so I spent the morning fitting the gauges and switches to it. I think it turned out pretty nice.
It's got some modern touches (push-button start, electric parking brake button, seat heaters) but it still has the 'almost period correct' look to it. I really like the leather that the shop recommended. It's a matte-sheen leather with a very small grain pattern to it, and it's very UV-resistant. Here's a close-up that shows the texture a bit better:

I still need to pull apart the glove box one more time so I can flock the interior of it, so I didn't install the grab handle yet. The holes are there in the sheetmetal dash but they didn't cut them into the leather. It's simple enough to cut them open with an x-acto when I'm ready to do the final assembly of the glove box.
looks awesome - what's the start/stop button story?
plus your side frame filler is pretty cool, I've always wondered about that!
-
Post Thanks / Like - 1 Thanks, 0 Likes
 JohnK
JohnK thanked for this post
-
07-27-2021, 09:24 PM
#167
Senior Member

Looks great, and very smart layout!
MKIV Complete Kit #9822 l BluePrint 347 EFI l TKO600 l Power Steering l Heater/Defrost l
Build Thread
-
Post Thanks / Like - 1 Thanks, 0 Likes
 JohnK
JohnK thanked for this post
-
07-27-2021, 09:34 PM
#168

Originally Posted by
toadster

looks awesome - what's the start/stop button story?
plus your side frame filler is pretty cool, I've always wondered about that!
Thanks! The start/stop button is part of the Digital Guard Dawg PBS-1 keyless push-button start system. They have a huge assortment of start/stop buttons to choose from that work with the system. This one is actually from a Ford Raptor.
MkIV Roadster build: Gen 2 Coyote, IRS, TKO600. Ordered 10/24/18. Delivered 1/29/19. Engine installed 8/8/21. First start 9/12/21. First go-kart 9/17/21. Off to paint 4/11/22. Back from paint 12/30/22.
Build thread here.
-
07-28-2021, 09:43 AM
#169
25th Anniversary #9772


Originally Posted by
JohnK

Thanks! The start/stop button is part of the
Digital Guard Dawg PBS-1 keyless push-button start system. They have a
huge assortment of start/stop buttons to choose from that work with the system. This one is actually from a Ford Raptor.
ok cool, I'll have to check them out as i have the DGD setup as well - I thought it looked like my start button on my Raptor  LOL
LOL
very cool!
-
Post Thanks / Like - 0 Thanks, 1 Likes
-
08-02-2021, 10:13 PM
#170


Greek Guys' Garage Roadster Build #9509 (heat shielding and wiring)
Getting a couple sheets of the heat shield material turned out to be a logistical &*$%show, but it finally arrived a couple of days ago and I got all the footbox heat shielding wrapped up today. I used the same process described a few posts above. Here's the driver's side footbox:
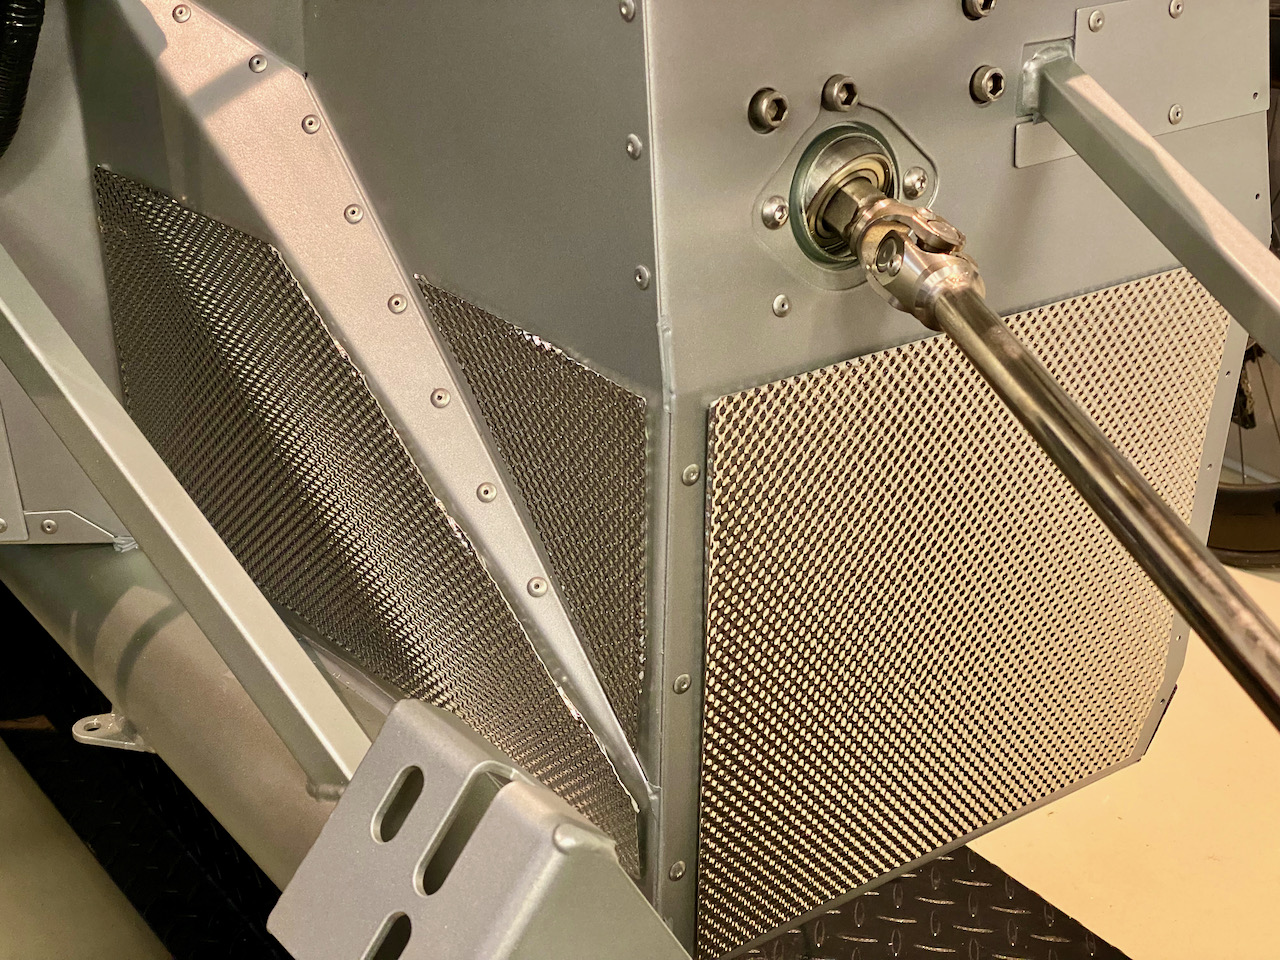
...and the passenger side:
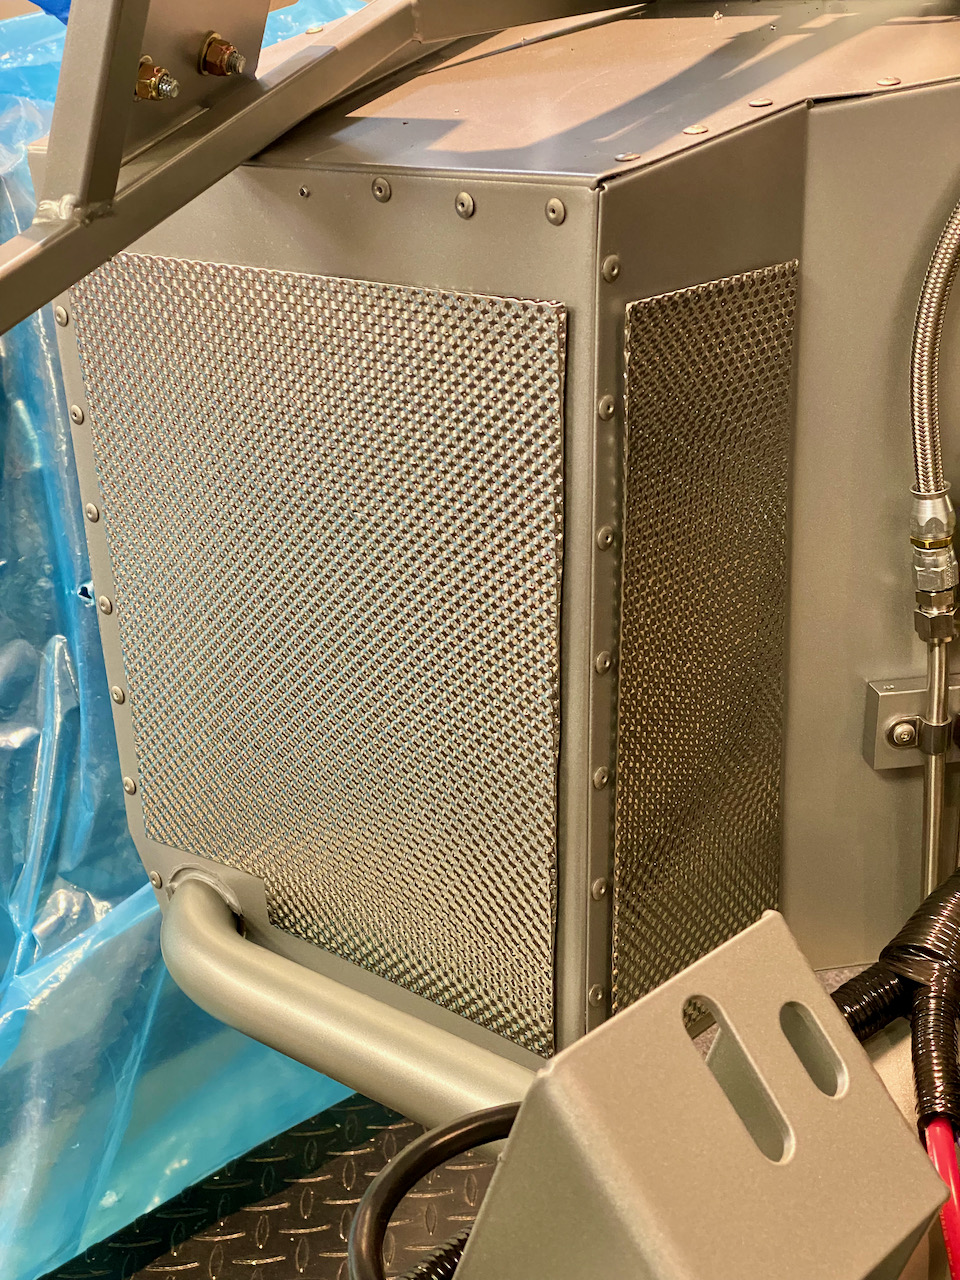
I'm glad that's wrapped up, as that was the main piece remaining to complete before dropping in the engine.
In parallel, I've been working on dash wiring. After studying the RF and Speedhut instructions (along with many threads here) on how to connect the gauges, I made the decision to use the Speedhut gauge sending unit wiring instead of the RF sending unit harness. There are pro's and con's to both. The Speedhut route has fewer unused wires and is already pre-terminated for the water temp sender. With that decision made, I made a harness that included the oil pressure and water temp senders, the tach signal wire, as well as the 8 gauge alternator lead. I routed those along the DS of the intake manifold down to the alternator and gauge senders, and bundled the harness at the rear of the engine for now, until the engine is in. You can see the new bundle tie-wrapped along with the existing wiring and the CMCV tubing. I test-fitted the engine cover to make sure all of this still fits under the cover, and there was still plenty of room to spare, so all's good.

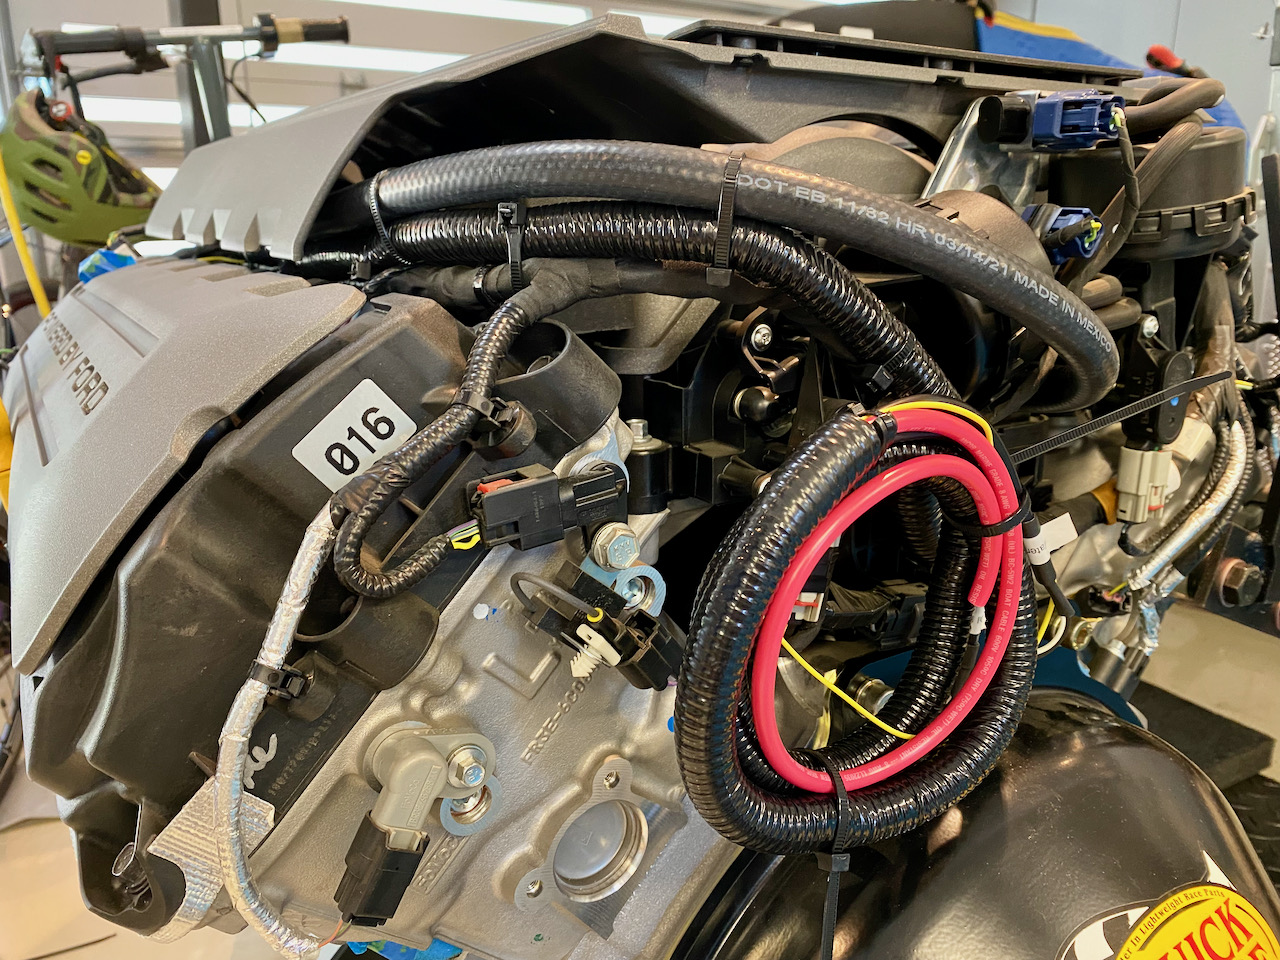
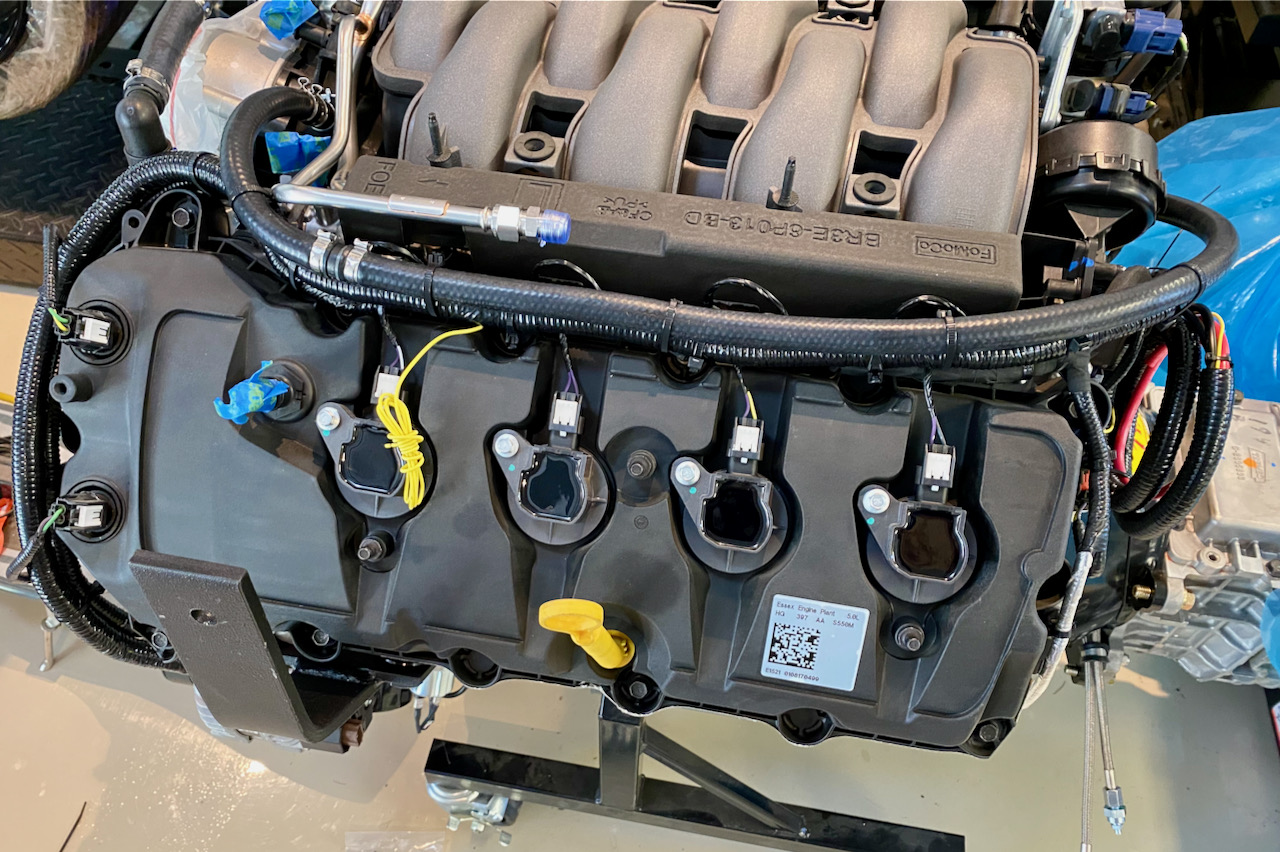
You can see that tach signal lead hanging loose there. I'm waiting for a Posi-Tap that I ordered for that connection to the coil signal wire.
I also added the hole and grommet to the firewall for this new wire bundle.
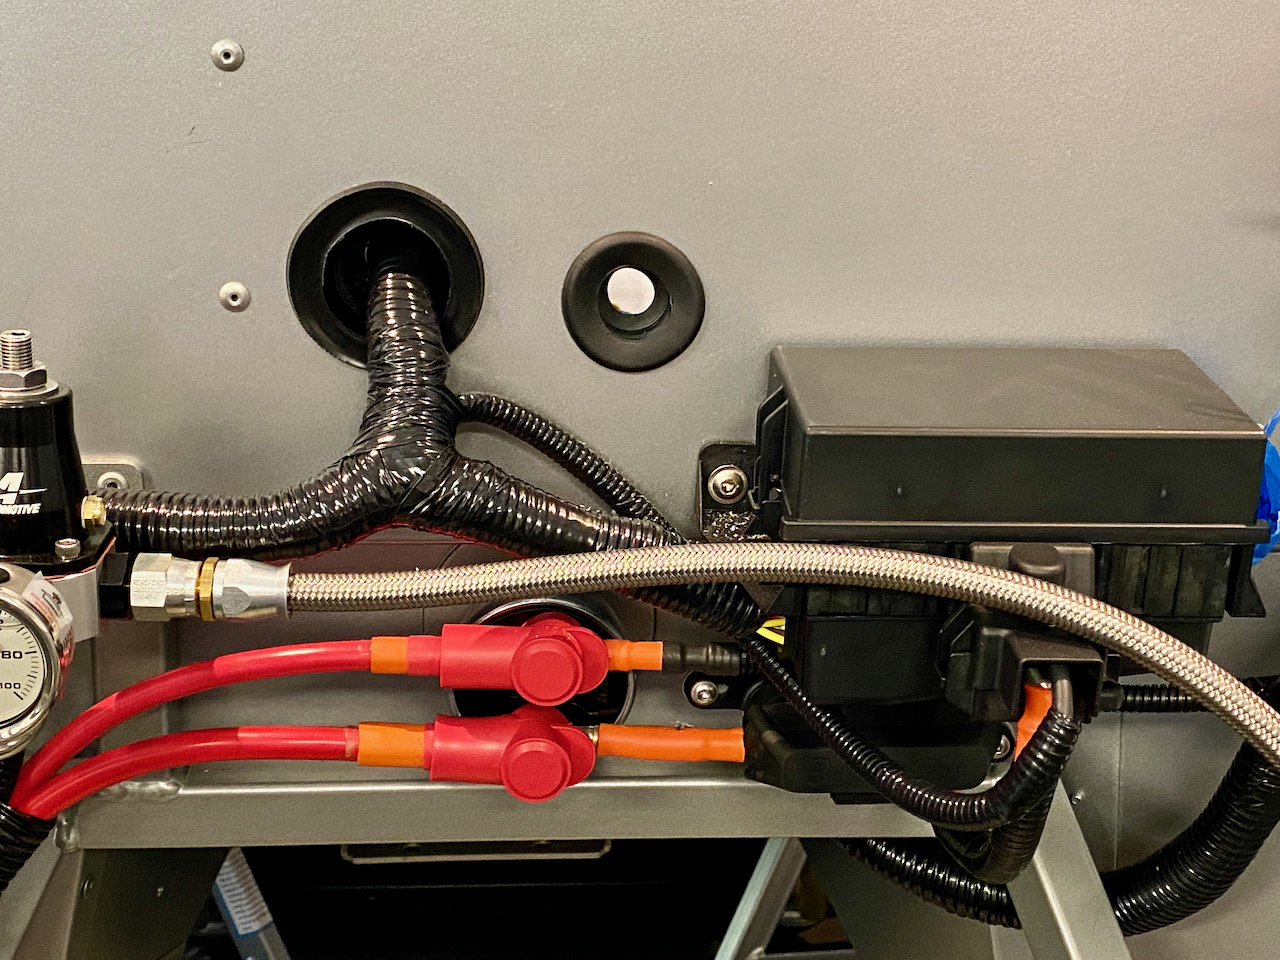
That's all for now. Just plugging away at dash wiring. The next update will hopefully be showing the engine installed.
MkIV Roadster build: Gen 2 Coyote, IRS, TKO600. Ordered 10/24/18. Delivered 1/29/19. Engine installed 8/8/21. First start 9/12/21. First go-kart 9/17/21. Off to paint 4/11/22. Back from paint 12/30/22.
Build thread here.
-
Post Thanks / Like - 0 Thanks, 1 Likes
-
08-03-2021, 10:20 PM
#171


Greek Guys' Garage Roadster Build #9509 (Molex connectors)
I know... I said the next update would be the engine install. I lied. This is a quick update, but a cool one (I think so, anyway).
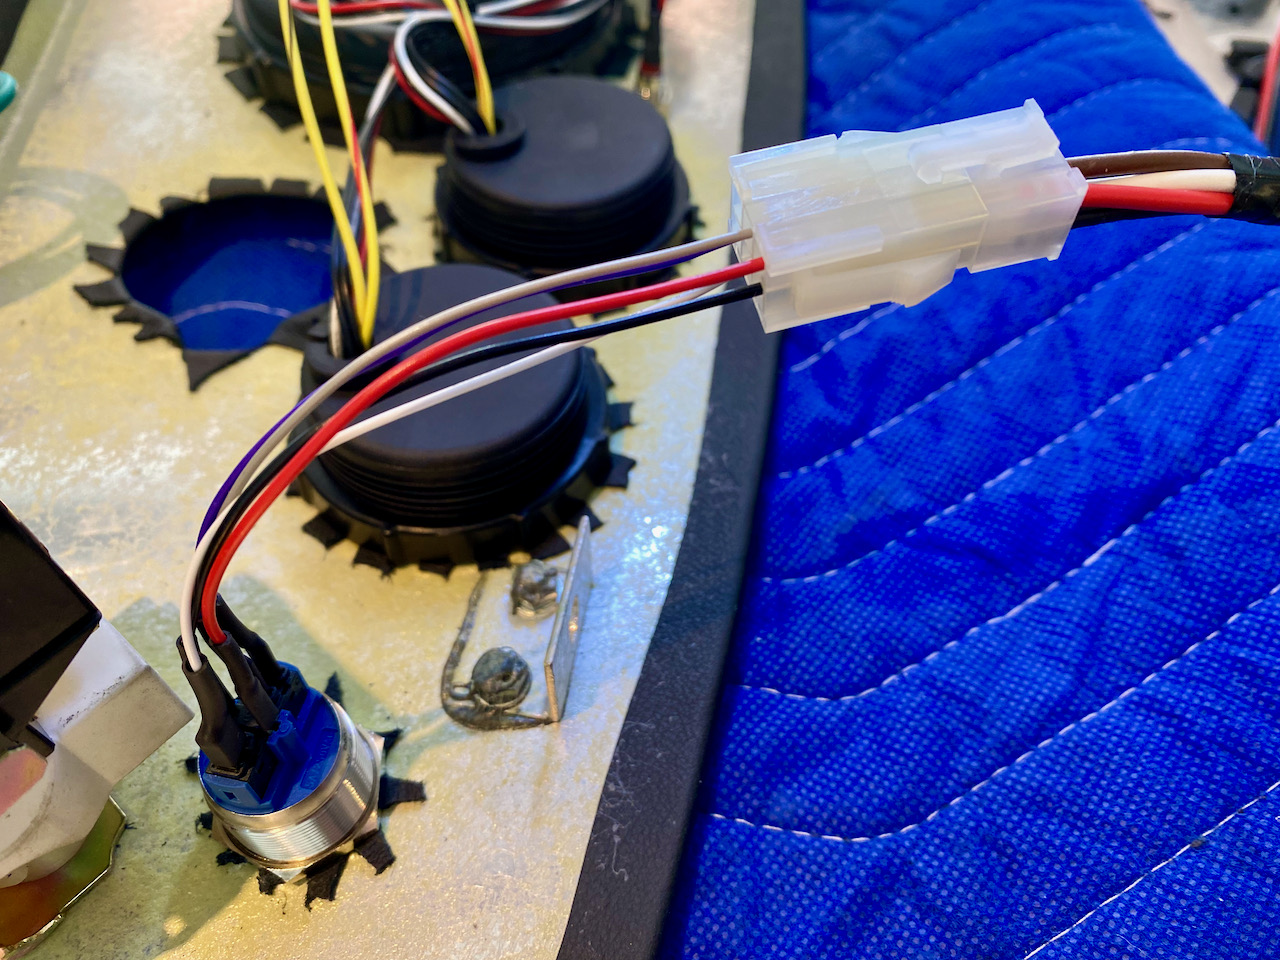
I needed an extension cable for the billet button for the E-Stopp parking brake. The button is on the far left side of the dash and the control box is behind the glove box, and they're about 2-1/2' short of connecting with each other. I called E-Stopp and asked them if they sold extension cables, and their reply was "yeah, we should totally do that because several people have asked for them... but we don't. Sorry." I could have just butt-spliced on some more wire but I hate butt-splices and avoid them wherever I can. So doing what any good builder does, I took this as an excuse to buy a ridiculously expensive tool. In this case it's a Molex crimper for their Mini Fit Jr. line of connectors. They'll handle wire from 18-24 gauge and up to 9A per pin. Perfect for signal wires, and a good complement to using WeatherPaks for larger wires.
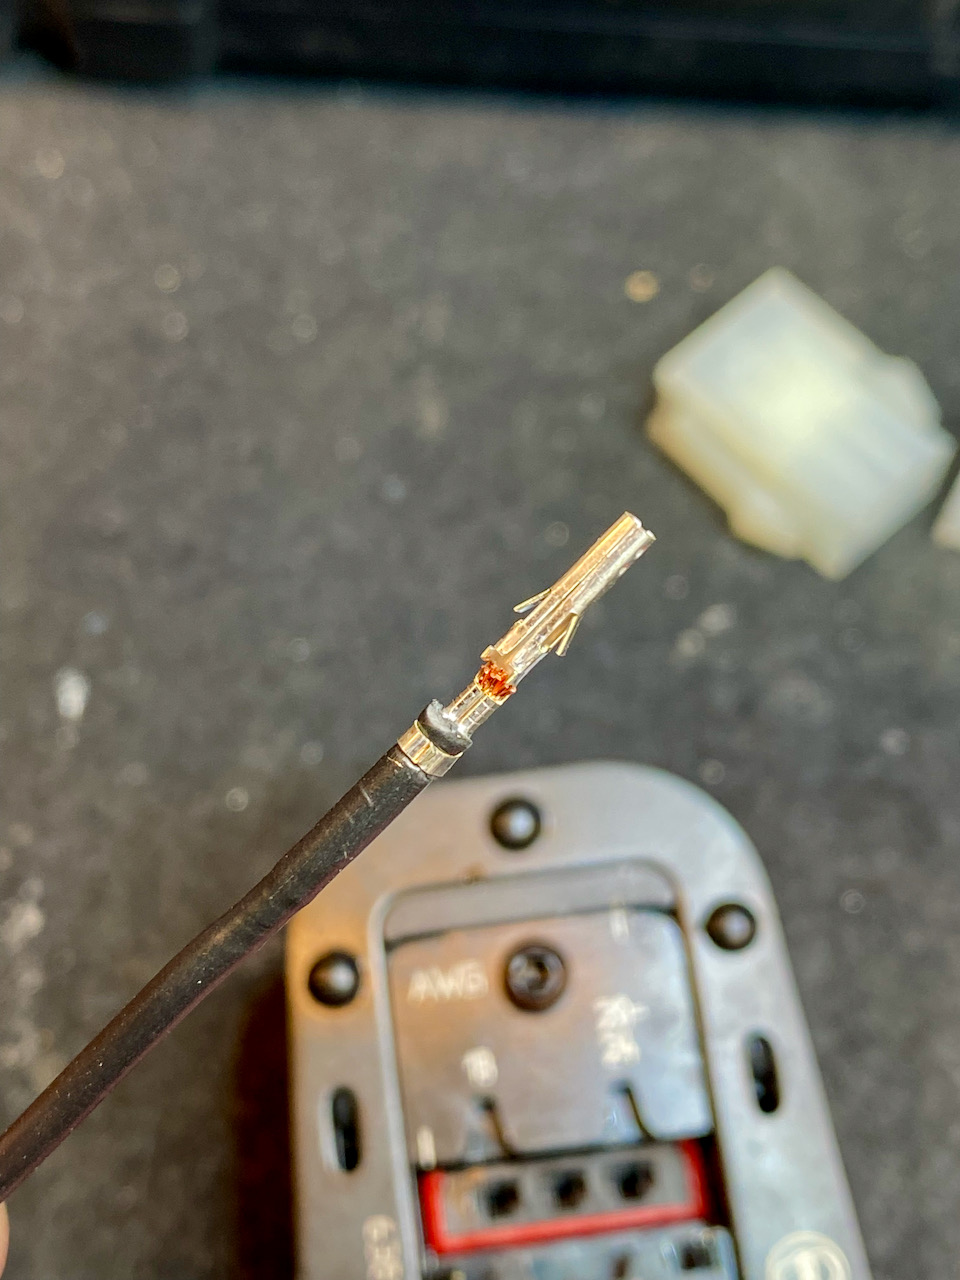
The molex terminals are similar to Weatherpaks, in that there's a primary crimp onto the bare wire, and then a secondary crimp onto the insulation as a strain relief. Unlike my Weatherpak crimper however, the Molex crimper does both crimps at the same time. It's a complicated little crimper, and there was definitely a bit of a learning curve with this crimper, especially with 18 gauge wire. The thinner wires were much easier to crimp. After a little trial-and-error and a few botched crimps, I got the hang of it. I replaced the connectors on either end of the E-Stopp button wire and made an extension, and all's good now. It's nice having this capability in the toolkit (figuratively and literally).
Here's an 18 gauge wire with the terminal crimped on. The secondary crimp onto the insulation was tricky to get right because of the size of the insulation. 18 gauge is definitely overkill for what I was doing here, but it was all I had on hand in multiple colors so I went with it.
here's the extension wire all terminated and ready to go.
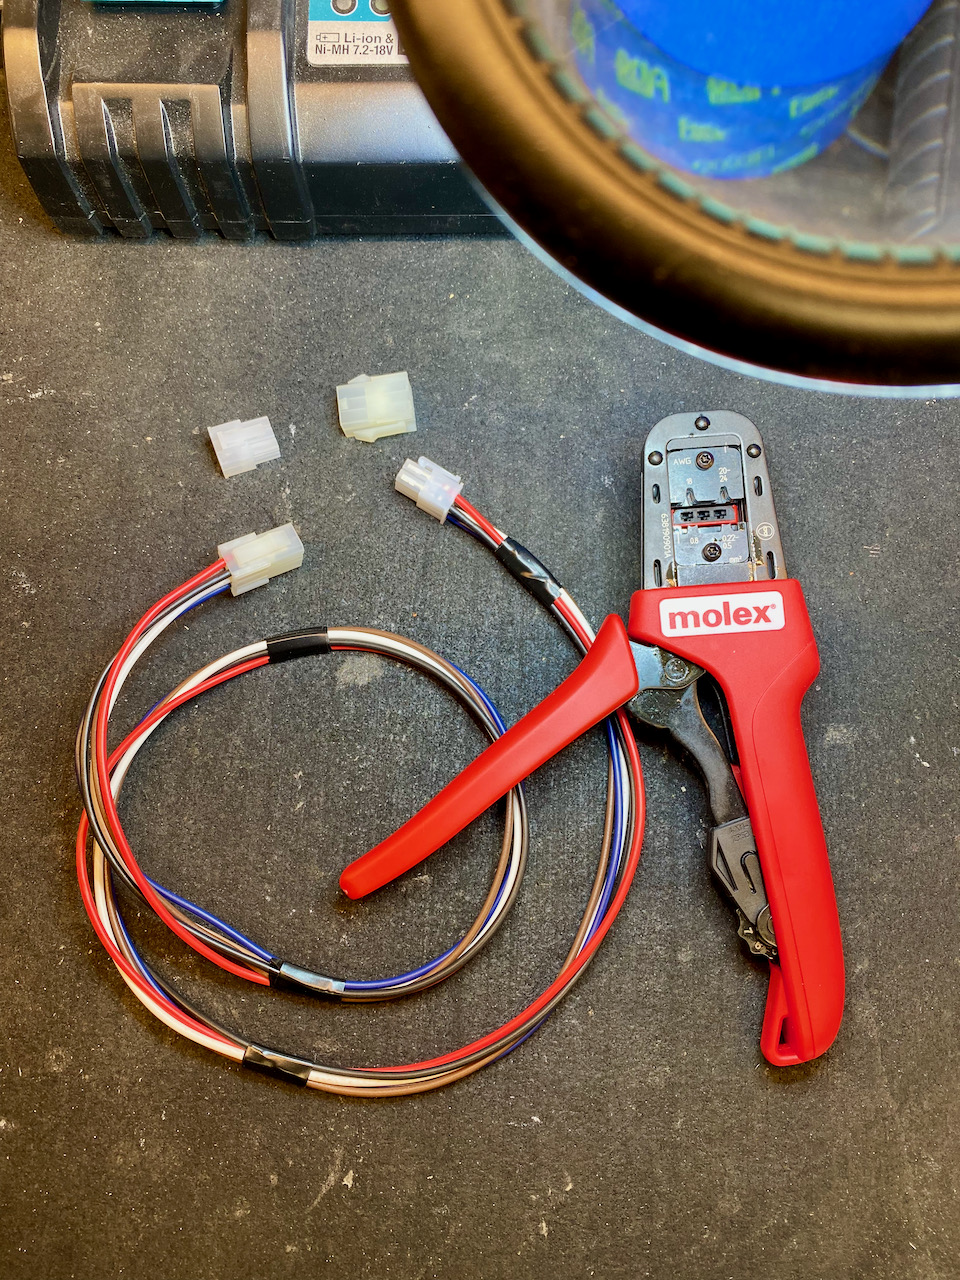
The thinner wires were definitely easier to crimp.
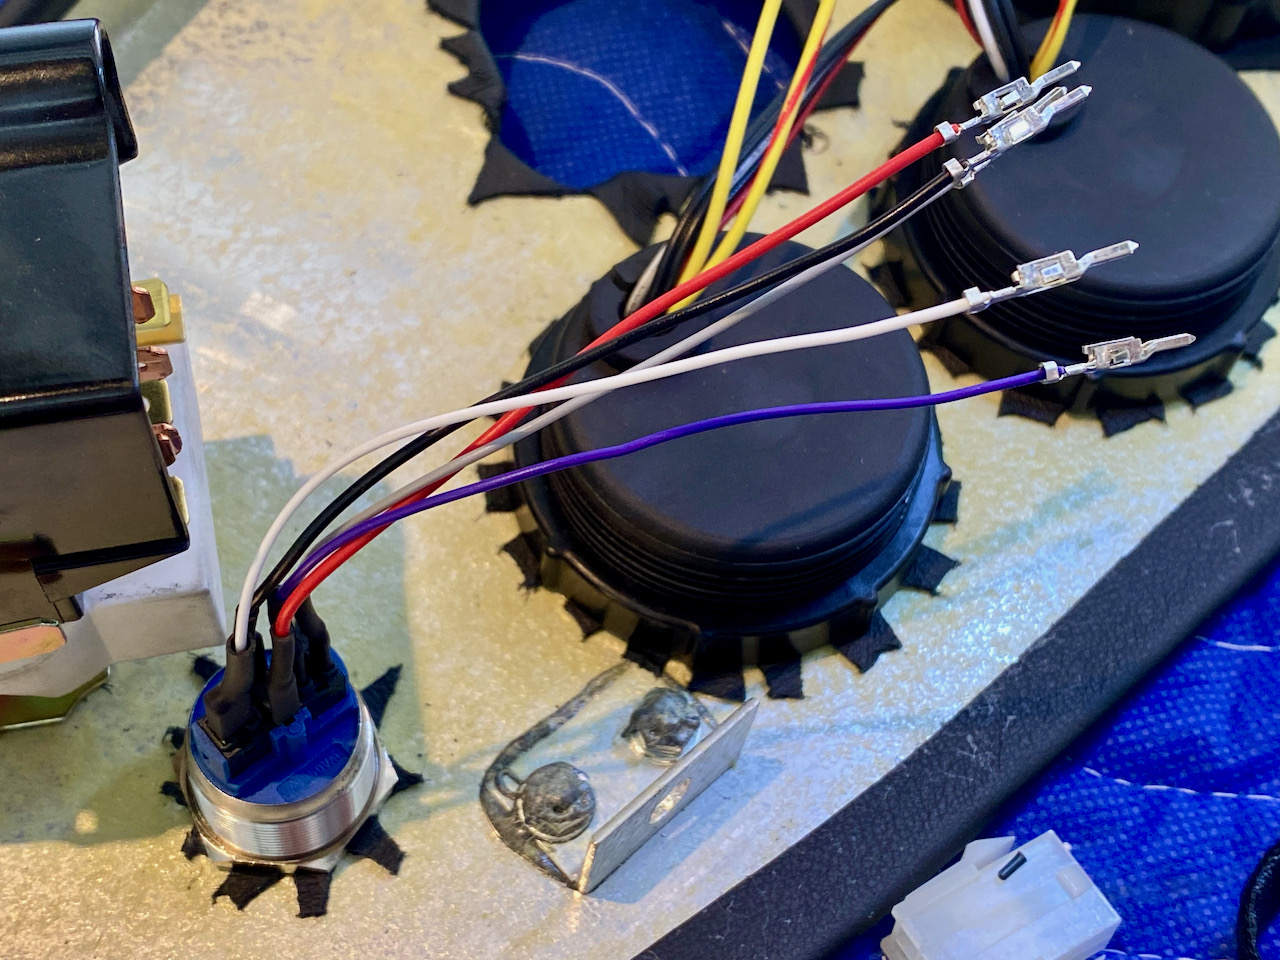
... and here's the final product (before wrapping)
MkIV Roadster build: Gen 2 Coyote, IRS, TKO600. Ordered 10/24/18. Delivered 1/29/19. Engine installed 8/8/21. First start 9/12/21. First go-kart 9/17/21. Off to paint 4/11/22. Back from paint 12/30/22.
Build thread here.
-
Post Thanks / Like - 0 Thanks, 3 Likes
-
08-03-2021, 10:41 PM
#172
Senior Member

Nice work John those molex connectors are pro level... looking forward to seeing the engine dropped in!
One recommendation on heat shield (given to me by HSP) on outside of footbox is to make sure and try and not leave any gaps. Reason being is radiant heat will penetrate the uncovered areas and almost defeat the purpose of having the shield on there. I thought it kind of made sense. Obviously any protection is better than none, they just mentioned to not have any gaps in the sticky shield to allow heat to penetrate. I think the 427 throws out the most engine compartment heat, especially because the headers are so close to the DS footbox. I have a friend with a Coyote and he does not seem to have near as much heat issues as I have been having.
Last edited by Fman; 08-03-2021 at 10:47 PM.
-
Post Thanks / Like - 1 Thanks, 0 Likes
 JohnK
JohnK thanked for this post
-
08-03-2021, 11:38 PM
#173
The companion tools that are nice to have are the extractors that allow you to remove the pins from the connector blocks. Basically they are just small tubes which fit over the pin OD and squish down the locking "tangs", with a plunger to push the pin out.
Alternatively you can get away with using fine brass tubing from the hobby/model train shop and gently pulling the pin out by the attached wire.
-
Post Thanks / Like - 1 Thanks, 0 Likes
 JohnK
JohnK thanked for this post
-
08-04-2021, 12:09 AM
#174
Thanks - I bought a connector kit with an assortment of 2-12 wire connectors, and it included the extractor tool. If it's anything like the Weatherpak extractor, it's probably 50/50 on actually getting a pin out undamaged.
MkIV Roadster build: Gen 2 Coyote, IRS, TKO600. Ordered 10/24/18. Delivered 1/29/19. Engine installed 8/8/21. First start 9/12/21. First go-kart 9/17/21. Off to paint 4/11/22. Back from paint 12/30/22.
Build thread here.
-
Post Thanks / Like - 0 Thanks, 1 Likes
-
08-09-2021, 10:16 AM
#175


Greek Guys' Garage Roadster Build #9509 (Coyote install)
So, the big day finally came. It was time to install the coyote. I rounded up a few friends, and they brought a few friends, and the next thing you knew... we had an engine install party going on. 
I won't go through a step-by-step instructional because others have covered it far better than I could but I will share a few "gotchas" that we stumbled across.
Here's the 'patient' ready for surgery.
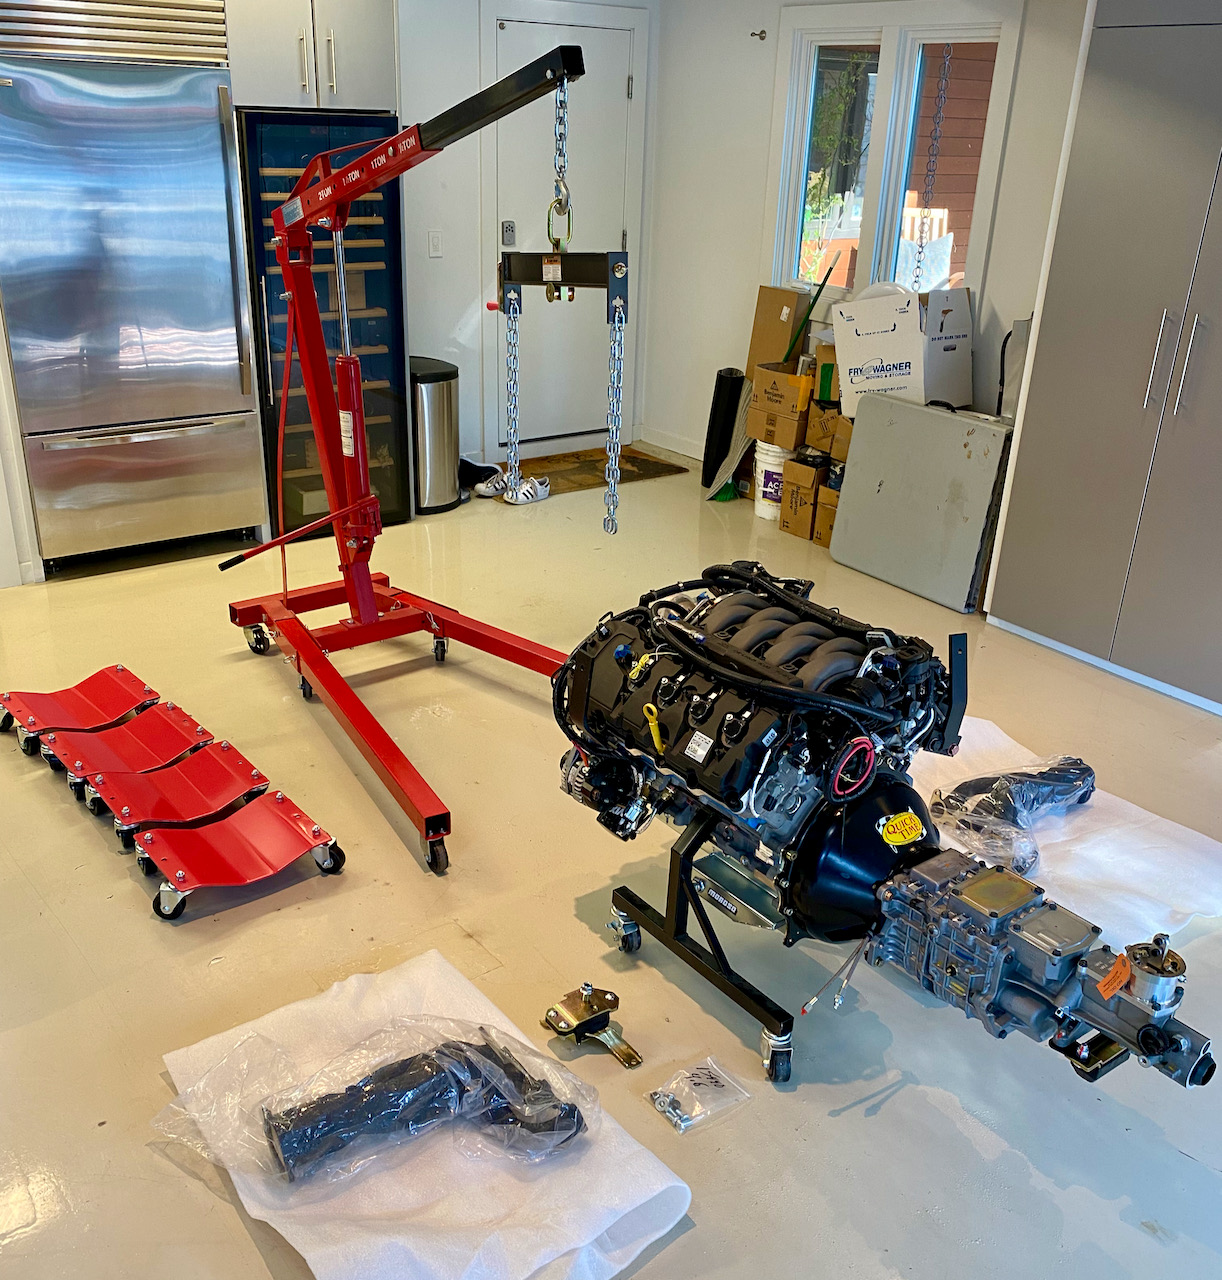
I'm now convinced that all the comments from people about how the engine just 'drops right in' and they were done in 10 minutes, and did it on Christmas Day in their pajamas and whatnot... this has to be some sort of elaborate and well-orchestrated forum joke. It took us about 4 hours and lots of cursing and sweating. It's possible that we're all just dumber than average, though. Here are some learnings, in no particular order.
- The clearance between the engine hoist legs and the chassis 4" tubes is TIGHT. Even with the chassis on rolling dollies we still ended up having to take the casters off the engine hoist to get the legs low enough for the chassis to roll over them.
- Use only as much chain as absolutely necessary on the engine leveler. Once we took the wheels off the engine hoist, we realized that we couldn't raise the engine enough to get it over the 3/4" radiator crossbar. We ended up having to put the engine back on its cradle (again) to shorten the chains in order to be able to raise the engine high enough. By the third time, we looked like a Nascar pit crew putting that engine cradle on and taking it off.

- All the comments about how tight the space is on the DS when installing the header are right. Holy *&*$% that was a bear getting that thing on.
- I recall someone mentioning in their build thread to remove the 1/2 NPT plug on the PS of the oil pan, as it will get hung up on the engine mount on the frame. I looked at that plug beforehand and thought to myself "that thing?! it's so small... no chance it'll be a problem." That POS caused immense heartache. By the time we realized it was a problem, the engine was so far in (and the DS header was on) that we couldn't raise the engine enough to get a hex wrench on it so it came out very unceremoniously with some vise grips. Trust me - remove that plug before installing the engine.
- After we got that oil pan plug off, we thought we were in the home stretch. We then discovered that it is, in fact, possible to get the engine stuck in four places simultaneously. This look on my face pretty much summarizes the WTF feeling we all had. For a few minutes it appeared to all of us that the engine needed to somehow simultaneously go up, down, left and right in order to get unstuck. So we just decided to give it a giant shove - and it fell in place. 

- Have some champagne on ice!
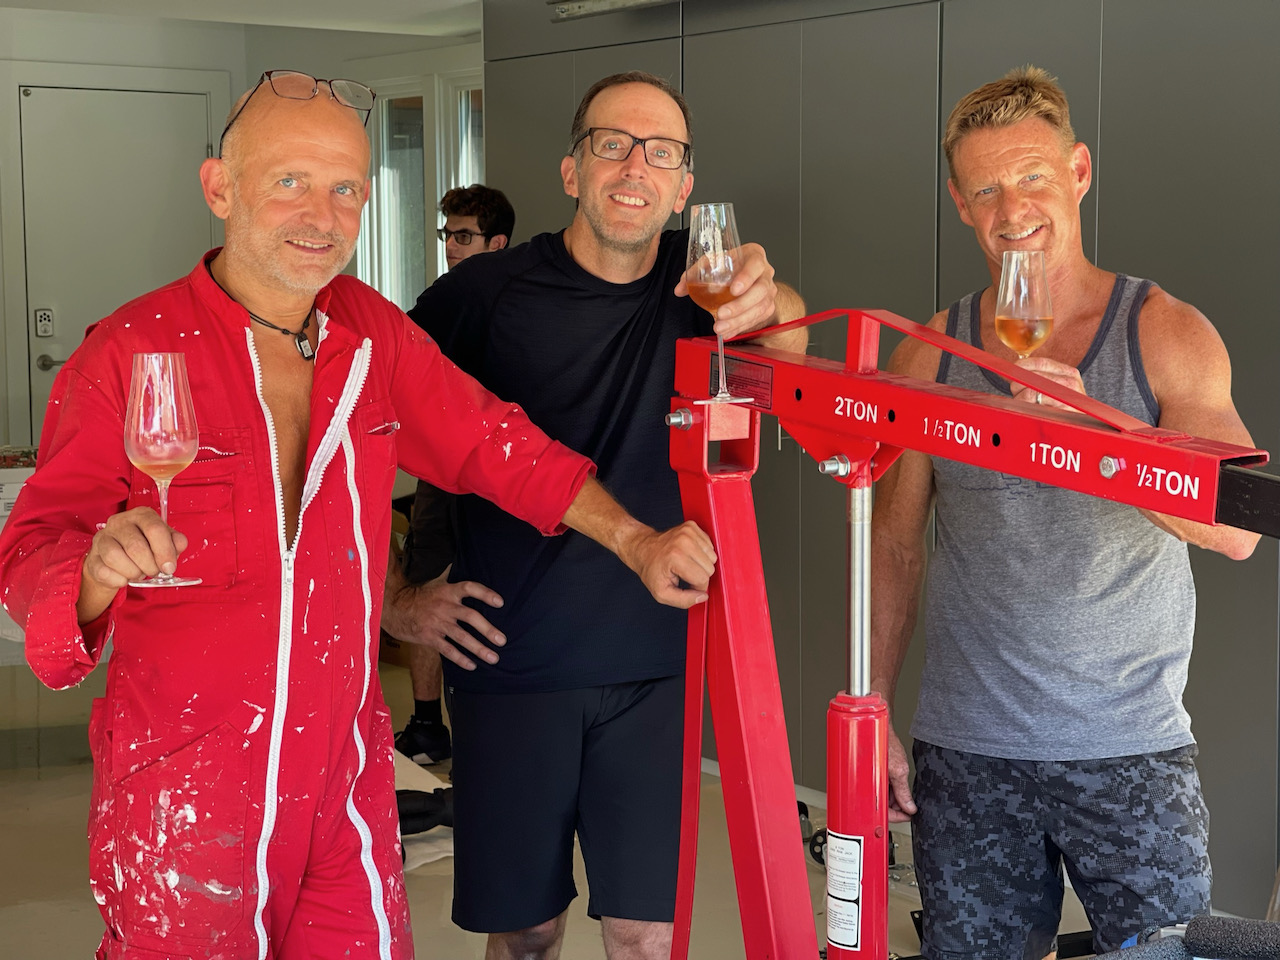
All in all, it was a somewhat nerve-racking but fun and rewarding day. Nobody was injured, everyone had fun, and we all learned a lot. None of us had ever installed an engine before so this was a pretty big milestone. Now, on to the first start!
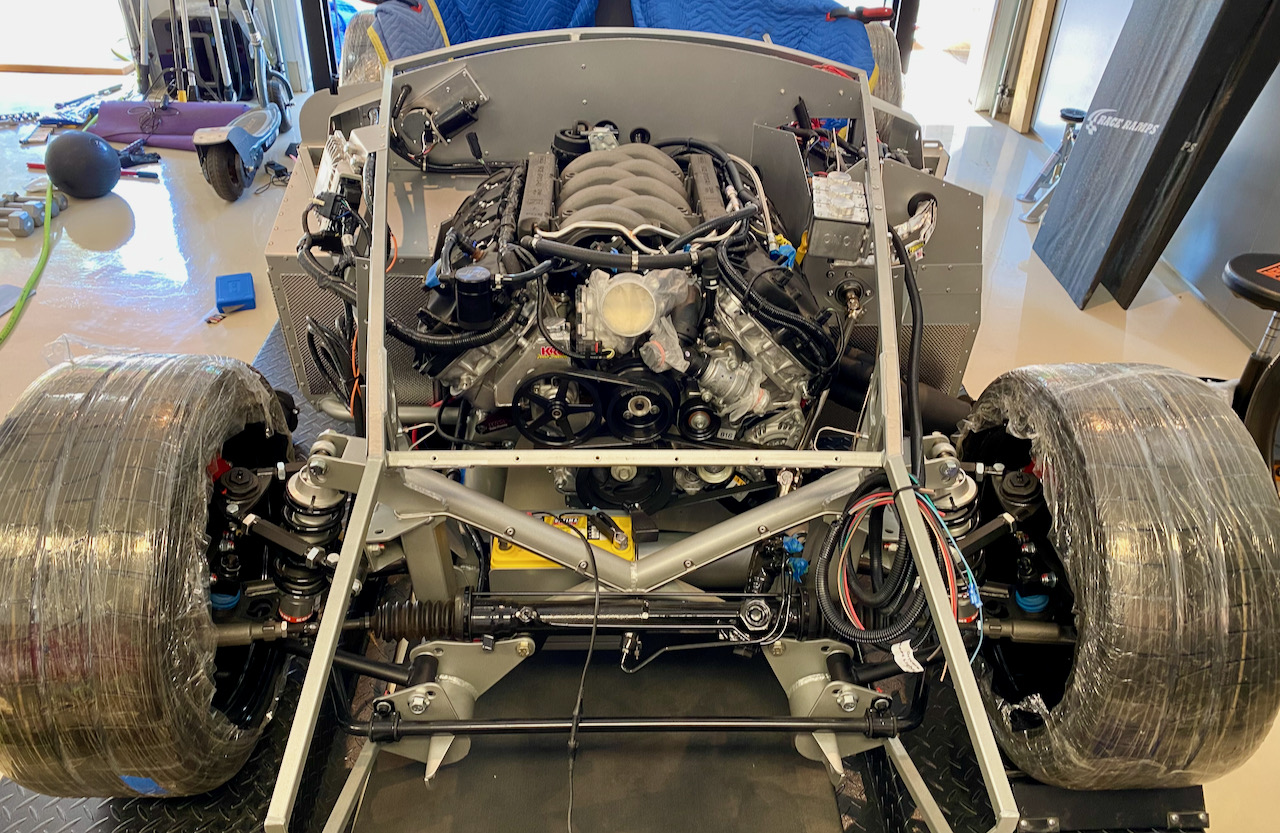
MkIV Roadster build: Gen 2 Coyote, IRS, TKO600. Ordered 10/24/18. Delivered 1/29/19. Engine installed 8/8/21. First start 9/12/21. First go-kart 9/17/21. Off to paint 4/11/22. Back from paint 12/30/22.
Build thread here.
-
Post Thanks / Like - 3 Thanks, 6 Likes
-
08-09-2021, 10:36 AM
#176
25th Anniversary #9772

Awesome!!! Love the build! I'll be there soon!!!
-
Post Thanks / Like - 1 Thanks, 0 Likes
 JohnK
JohnK thanked for this post
-
08-09-2021, 10:44 AM
#177
Thanks Todd. We kept joking (much to our wives' chagrin) that it seemed like we were trying to un-birth a baby but it somehow finally went in there.
MkIV Roadster build: Gen 2 Coyote, IRS, TKO600. Ordered 10/24/18. Delivered 1/29/19. Engine installed 8/8/21. First start 9/12/21. First go-kart 9/17/21. Off to paint 4/11/22. Back from paint 12/30/22.
Build thread here.
-
08-09-2021, 02:21 PM
#178
Senior Member


Originally Posted by
JohnK

I'm now convinced that all the comments from people about how the engine just 'drops right in' and they were done in 10 minutes, and did it on Christmas Day in their pajamas and whatnot... this has to be some sort of elaborate and well-orchestrated forum joke. It took us about 4 hours and lots of cursing and sweating.....the third time, we looked like a Nascar pit crew putting that engine cradle on and taking it off.
All in all, it was a somewhat nerve-racking but fun and rewarding day. Nobody was injured, everyone had fun, and we all learned a lot. None of us had ever installed an engine before so this was a pretty big milestone. Now, on to the first start!
Wahoo! Congrats, John!
I have a feeling when I get to drivetrain install I'll see your four hours and raise you one hour! I think our friends in their Christmas PJs have done this a time, or four. Kind of like you were already at NASCAR pit crew efficiency on the engine cradle after three times.
Looking forward to hearing the rumble of that Coyote on your first start.
Thanks for sharing your lessons learned. This first-timer will need ALL THE HELP he can get, and then some!
P.S. Did you have to remove the steering shaft?
Last edited by 460.465USMC; 08-09-2021 at 02:22 PM.
Reason: Added P.S.
Chris
Coupe complete kit delivered: 4/22/24.
Build Thread. Coyote. T-56. IRS w/3.55. Wilwoods. PS. HVAC. Side windows.
MK4 Complete kit.
Build Thread Index. Delivered: 10/15/2020. Legal: 7/25/23. Coyote Gen3. TKO600 (0.64 OD). IRS w/3.55. PS. Wilwoods. Sway bars. This build is dedicated to my son, Benjamin.
Build Thread.
-
Post Thanks / Like - 0 Thanks, 1 Likes
-
08-09-2021, 02:31 PM
#179
Thanks Chris! Yes, I have a feeling that if I did this a few more times it would go infinitely more smoothly but all in all I'm thrilled with how it turned out for a first effort.
Yes, definitely disconnect the steering shaft at the steering rack and swing it out of the way. You'll probably have to disconnect your brake fluid reservoirs and swing those out of the way too.
MkIV Roadster build: Gen 2 Coyote, IRS, TKO600. Ordered 10/24/18. Delivered 1/29/19. Engine installed 8/8/21. First start 9/12/21. First go-kart 9/17/21. Off to paint 4/11/22. Back from paint 12/30/22.
Build thread here.
-
08-09-2021, 08:13 PM
#180
Senior Member


Originally Posted by
JohnK

Thanks Chris! Yes, I have a feeling that if I did this a few more times it would go infinitely more smoothly but all in all I'm thrilled with how it turned out for a first effort.
Yes, definitely disconnect the steering shaft at the steering rack and swing it out of the way. You'll probably have to disconnect your brake fluid reservoirs and swing those out of the way too.
You don’t know what you don’t know until you know it. The “next time” will be whole orders of magnitude easier. The important thing is you had a blast and can now tell anyone that asks that you put your 450 HP coyote in your bad*** cobra that you built yourself.
Huge milestone. Congrats and what’s shaping into a beautiful build.
Last edited by Blitzboy54; 08-10-2021 at 12:01 PM.
-
Post Thanks / Like - 1 Thanks, 0 Likes
 JohnK
JohnK thanked for this post
-
08-10-2021, 12:00 AM
#181
Senior Member

Way to go John, looking forward to seeing the Coyote come to life! Wont be long now, keep at it!!!
-
Post Thanks / Like - 1 Thanks, 0 Likes
 JohnK
JohnK thanked for this post
-
08-10-2021, 09:06 PM
#182
Senior Member

Hey John, thanks for sharing the honest 'first time around' experience. I'll probably call it something else when I'm in the middle of it, and taking longer than you did! Great milestone!
Cheers,
-- John
MK4 #7838: IRS 3.55 TrueTrac T5z Dart 347
The drawing is from ~7th grade, mid-1970s
Meandering, leisurely build thread is
here
-
Post Thanks / Like - 0 Thanks, 1 Likes
-
08-10-2021, 09:12 PM
#183
You'll call it many, many things when you're in the middle of it but just take your time and enjoy the process and it'll all work out fine! 
MkIV Roadster build: Gen 2 Coyote, IRS, TKO600. Ordered 10/24/18. Delivered 1/29/19. Engine installed 8/8/21. First start 9/12/21. First go-kart 9/17/21. Off to paint 4/11/22. Back from paint 12/30/22.
Build thread here.
-
Post Thanks / Like - 0 Thanks, 1 Likes
-
08-10-2021, 09:26 PM
#184
Senior Member

Fantastic! The build is looking great. Love the shrink wrap on the wheels -- you've thought of everything!
MKIV Complete Kit #9822 l BluePrint 347 EFI l TKO600 l Power Steering l Heater/Defrost l
Build Thread
-
08-10-2021, 10:26 PM
#185
Thanks JB. I appreciate it! I can't take credit for the shrink wrap idea. Like a great many things I've done, I've borrowed ideas from others' build threads. This forum is an incredible resource.
MkIV Roadster build: Gen 2 Coyote, IRS, TKO600. Ordered 10/24/18. Delivered 1/29/19. Engine installed 8/8/21. First start 9/12/21. First go-kart 9/17/21. Off to paint 4/11/22. Back from paint 12/30/22.
Build thread here.
-
08-11-2021, 01:38 PM
#186
Senior Member


Originally Posted by
JohnK

Thanks JB. I appreciate it! I can't take credit for the shrink wrap idea. Like a great many things I've done, I've borrowed ideas from others' build threads. This forum is an incredible resource.
I've been wondering about the shrink wrap on the tires, but was too embarrassed to ask the reason, figuring it was obvious. But have the nerve now...what does it do?
Chris
Coupe complete kit delivered: 4/22/24.
Build Thread. Coyote. T-56. IRS w/3.55. Wilwoods. PS. HVAC. Side windows.
MK4 Complete kit.
Build Thread Index. Delivered: 10/15/2020. Legal: 7/25/23. Coyote Gen3. TKO600 (0.64 OD). IRS w/3.55. PS. Wilwoods. Sway bars. This build is dedicated to my son, Benjamin.
Build Thread.
-
08-11-2021, 05:52 PM
#187
I've heard some people claim that it keeps tires from drying out and cracking. Not sure I buy that. I did it primarily because my garage floor seemed to be perpetually covered in ridiculously sharp little metal fragments from drilling countless holes in the chassis, and I didn't want all that junk getting embedded in the rubber.
MkIV Roadster build: Gen 2 Coyote, IRS, TKO600. Ordered 10/24/18. Delivered 1/29/19. Engine installed 8/8/21. First start 9/12/21. First go-kart 9/17/21. Off to paint 4/11/22. Back from paint 12/30/22.
Build thread here.
-
Post Thanks / Like - 0 Thanks, 2 Likes
-
08-18-2021, 03:20 PM
#188
Senior Member

Hi John. I couldn't seem to find the guage (thickness) of your custom dash. I'm considering options to go with a thicker dash, and may hit my local metal shop for a scrap piece. Sorry if you already spelled this out in your thread somewhere, but I can't seem to find it. Thanks!
Chris
Coupe complete kit delivered: 4/22/24.
Build Thread. Coyote. T-56. IRS w/3.55. Wilwoods. PS. HVAC. Side windows.
MK4 Complete kit.
Build Thread Index. Delivered: 10/15/2020. Legal: 7/25/23. Coyote Gen3. TKO600 (0.64 OD). IRS w/3.55. PS. Wilwoods. Sway bars. This build is dedicated to my son, Benjamin.
Build Thread.
-
08-18-2021, 03:33 PM
#189
Hey Chris. No, I don't think I mentioned it anywhere in my build thread, but it is a thicker gauge aluminum than the FFR dash. IIRC, it's .060 (or 0.63?). I have a scrap piece in the basement if you want an exact measurement, but it somewhere in that ballpark.
MkIV Roadster build: Gen 2 Coyote, IRS, TKO600. Ordered 10/24/18. Delivered 1/29/19. Engine installed 8/8/21. First start 9/12/21. First go-kart 9/17/21. Off to paint 4/11/22. Back from paint 12/30/22.
Build thread here.
-
08-18-2021, 10:18 PM
#190
Senior Member

No need to go to that trouble. I believe 0.060 is a common thickness, and I think about the right guage. I went with 0.090 on my firewall, which is very sturdy. Thinking that might be overkill for the dash, since I will be installing several under-dash support brackets.
Chris
Coupe complete kit delivered: 4/22/24.
Build Thread. Coyote. T-56. IRS w/3.55. Wilwoods. PS. HVAC. Side windows.
MK4 Complete kit.
Build Thread Index. Delivered: 10/15/2020. Legal: 7/25/23. Coyote Gen3. TKO600 (0.64 OD). IRS w/3.55. PS. Wilwoods. Sway bars. This build is dedicated to my son, Benjamin.
Build Thread.
-
08-18-2021, 10:27 PM
#191
Yes, I also have the FFMetals thicker firewall. The dash is not as thick as that. It's also a softer aluminum than 6061 that is better suited to being formed with a shrinker/stretcher in case you're thinking of forming a continuous lip along the bottom edge. There were no visible markings on the aluminum so I can't tell you specifically what alloy it was.
MkIV Roadster build: Gen 2 Coyote, IRS, TKO600. Ordered 10/24/18. Delivered 1/29/19. Engine installed 8/8/21. First start 9/12/21. First go-kart 9/17/21. Off to paint 4/11/22. Back from paint 12/30/22.
Build thread here.
-
08-20-2021, 12:21 PM
#192


Greek Guys' Garage Roadster Build #9509 (little bit of this and a little bit of that)
I've been plugging away at various items over the last few days. In no particular order:
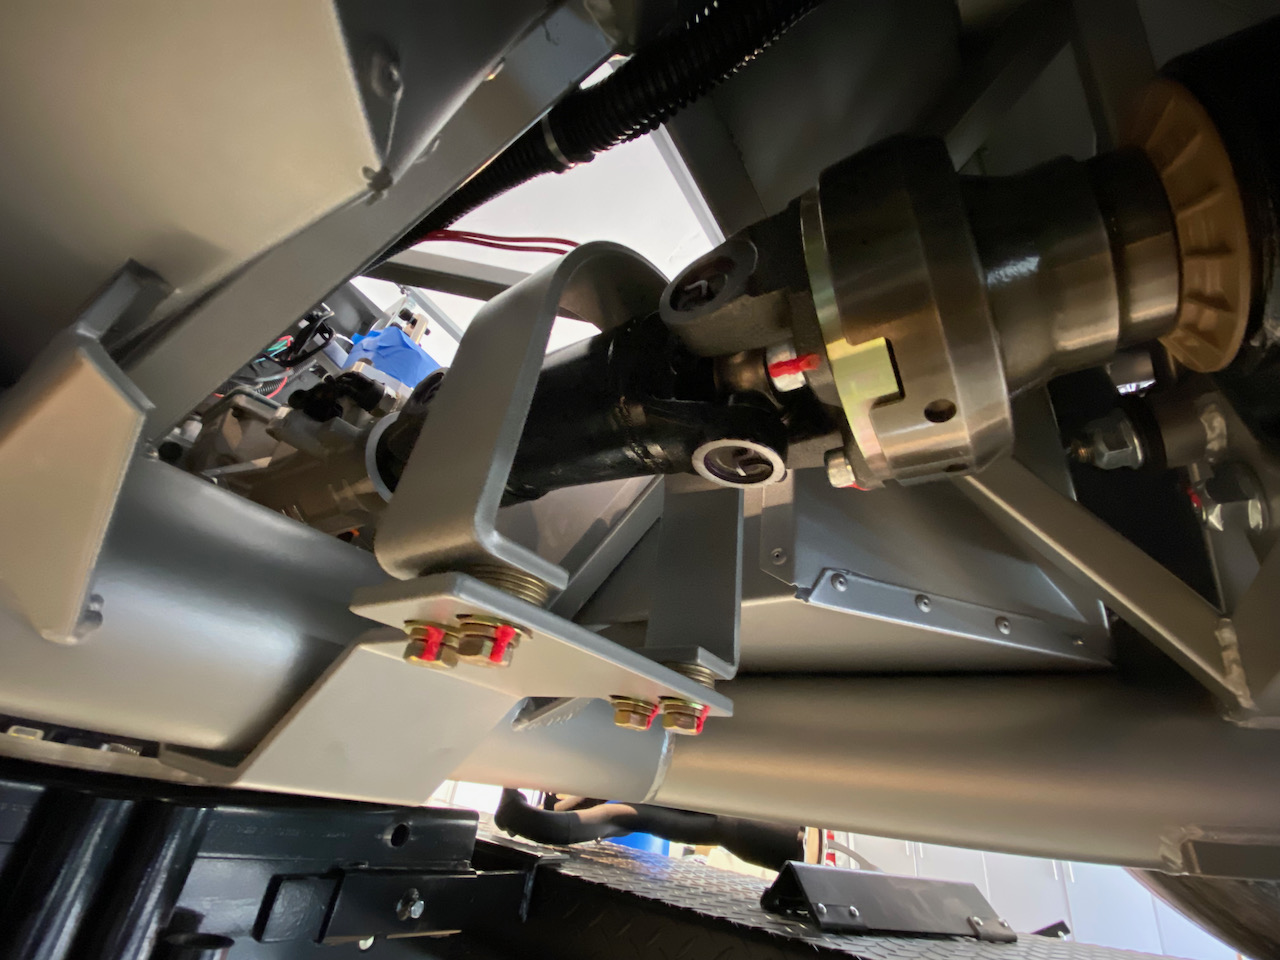
With the engine installed I set out to dial in pinion angle. I felt like I had a decent handle on what that meant. Oh, let me count the ways I was wrong! After some very patient mentoring by NAZ in this thread, I now have pinion angle dialed in, and I was able to install the Metco driveshaft safety loop and tighten down engine mounts, etc.
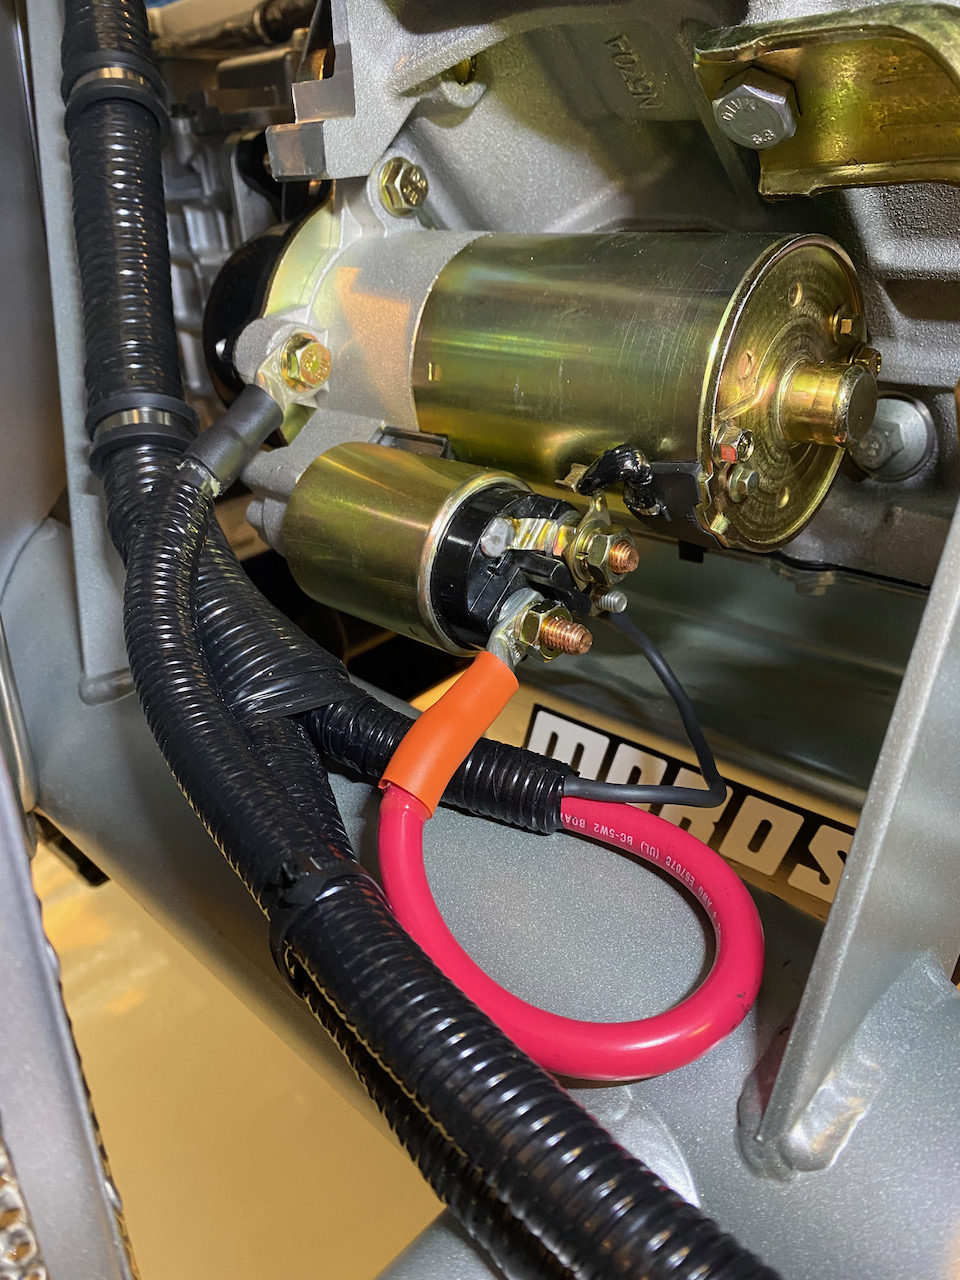
Before installing the PS header, I installed and wired the starter and added a couple of 2 ga. ground wires - one wire from one of the starter mounting bolts to the engine mount, and another from the engine mount up to the tapped bolt that the battery negative bolts to.

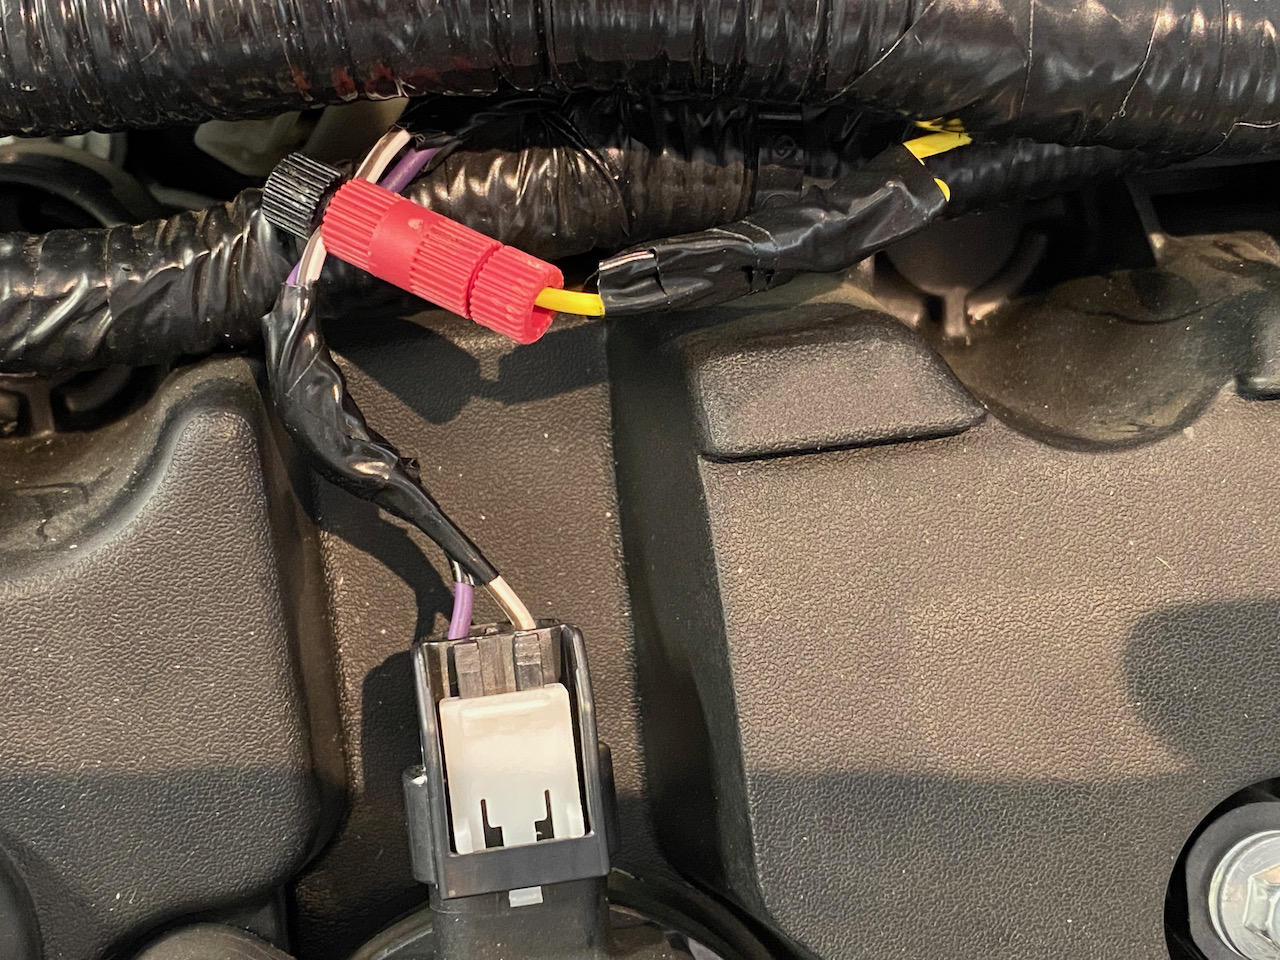
This is a small item - I completed the tach connection to one of the coil wires. I've read about stripping one of these wires and crimping or soldering (or both) onto them. Frankly, this really gave me a lot of concern as they're really small wires and screwing up and damaging one of them would be a real pain to correct. So I hit the "easy button" and used a Posi-Tap for this connection. I've used these types of connectors in the past on motorcycles, including single-cylinder "thumpers" that will literally shake any fastener loose that's not loctited down, and I've never had one come loose on me. I really like them because they're pretty foolproof to install, and very non-invasive as there's only a small needle-like probe that pierces the wire. It can be removed if needed with hardly a trace that it was there, and there's no risk of damage to the wire when installing. I figure if it were to fail, the worst that would happen would be that I lose the tach signal, so I'm totally OK with that.
Here's the Speedhut tach wire tapped into the coil wire. I left a service loop on the SH wire in case I ever need to do anything down the road:
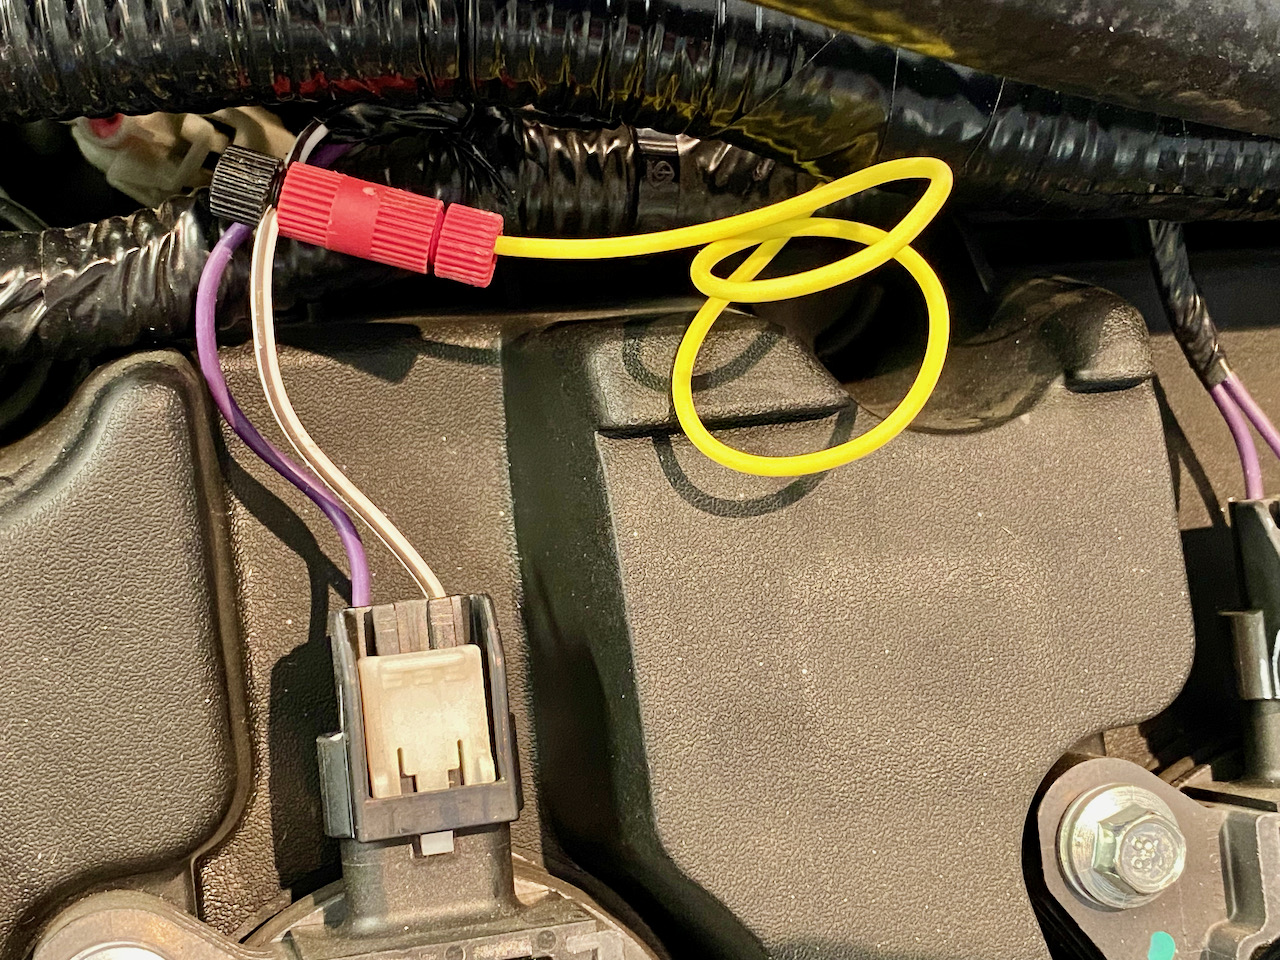
And here it is all wrapped up and finished.
I've got about 5 other things that are "in process" at the moment - most are waiting on some backordered part to move forward, so I'm just bouncing around from task to task right now.
MkIV Roadster build: Gen 2 Coyote, IRS, TKO600. Ordered 10/24/18. Delivered 1/29/19. Engine installed 8/8/21. First start 9/12/21. First go-kart 9/17/21. Off to paint 4/11/22. Back from paint 12/30/22.
Build thread here.
-
Post Thanks / Like - 0 Thanks, 2 Likes
-
08-21-2021, 06:46 PM
#193


Greek Guys' Garage Roadster Build #9509 (Modern Driveline Quick Shifter)
When I ordered the TKO 600 from Liberty's Gears, I had the option of upgrading the shifter from the stock Tremec shifter to the Pro 5.0 shifter. I'd read a lot of great things about that shifter, so it seemed like a worthwhile upgrade. One of the key features of the shifter is a large ring on the top that has adjustable positive stops for the 3rd and 4th gear shifts. Unfortunately, after installing the shifter I discovered that this ring interfered with one of the diagonal braces in the transmission tunnel. It's not obvious in this photo, but the transmission is angled quite a bit to the passenger side (as far as it can go and still be able to bolt in the transmission mount into the A-frame) and the shifter was still interfering with the diagonal brace.
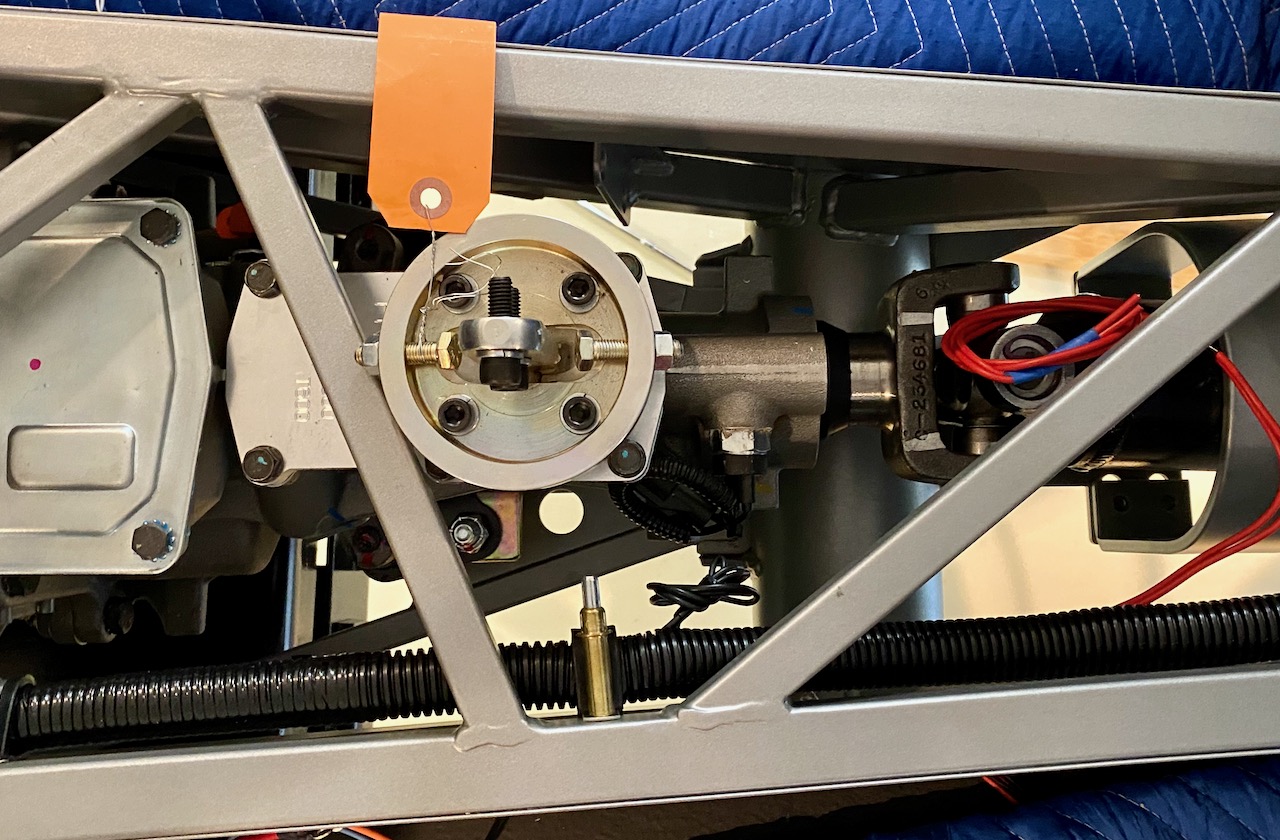
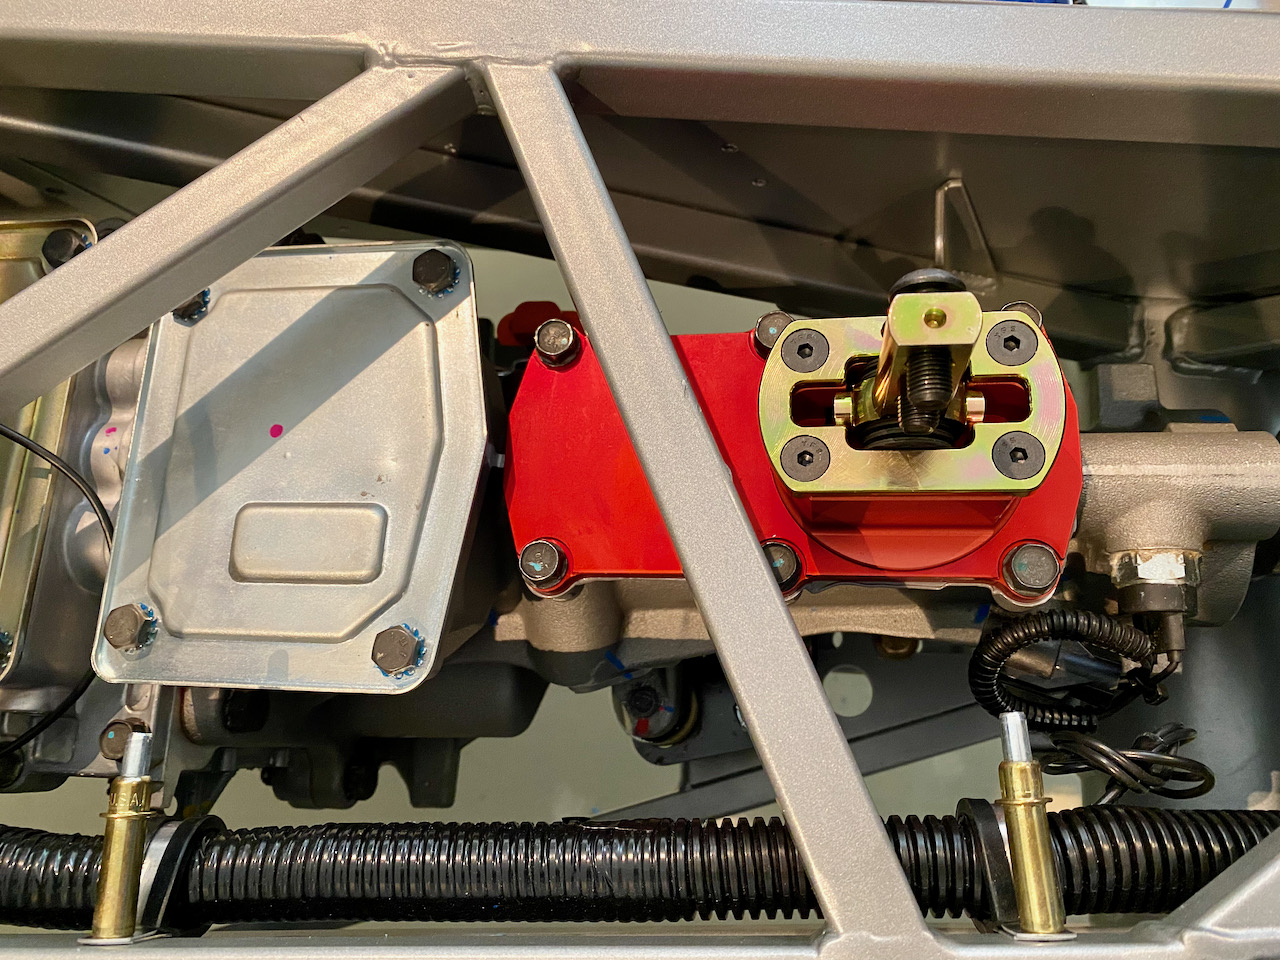
So it was pretty clear that if I wanted to use this shifter I would need to modify or remove the diagonal brace. I know that many folks have cut these braces (usually the one further forward to enable a mid-shift setup) and either reinforced them in some way or just left them, and in fact I was advised by more than one person to just cut it out and not worry about it. Not saying that's right or wrong, but it was a bridge too far for me, and not really worth it IMO for the way I plan to use the car to do this just to have positive stops on the 3rd and 4th gear shifts. So in the end I decided to replace the shifter with a quick shifter from Modern Driveline. This one seems like it's built just as robustly, and is also a shorter throw than the stock Tremec shifter - just without the positive stops. Install was very easy: just six bolts and a thin bead of grey RTV and it's good to go, and now the driveline is perfectly straight.
MkIV Roadster build: Gen 2 Coyote, IRS, TKO600. Ordered 10/24/18. Delivered 1/29/19. Engine installed 8/8/21. First start 9/12/21. First go-kart 9/17/21. Off to paint 4/11/22. Back from paint 12/30/22.
Build thread here.
-
Post Thanks / Like - 0 Thanks, 2 Likes
-
08-23-2021, 06:43 PM
#194
Senior Member

Really appreciate your documentation and pictures, John! This is so helpful to me. Notes are being taken...links are being bookmarked on your thread.
Chris
Coupe complete kit delivered: 4/22/24.
Build Thread. Coyote. T-56. IRS w/3.55. Wilwoods. PS. HVAC. Side windows.
MK4 Complete kit.
Build Thread Index. Delivered: 10/15/2020. Legal: 7/25/23. Coyote Gen3. TKO600 (0.64 OD). IRS w/3.55. PS. Wilwoods. Sway bars. This build is dedicated to my son, Benjamin.
Build Thread.
-
Post Thanks / Like - 1 Thanks, 0 Likes
 JohnK
JohnK thanked for this post
-
08-24-2021, 05:35 PM
#195


Greek Guys' Garage Roadster Build #9509 (coyote harness)
I'm inching closer to first start! All the engine bay wiring for the coyote is now finished, other than the cooling fan. I initially installed the O2 sensors in the headers as indicated in the Ford instructions, and discovered that the passenger side wiring was a couple inches too short, while I had a TON of extra wiring on the drivers side. So I swapped the DS and PS O2 sensors and that worked out much better.
Here's the passenger side. It's tough to see in the photo, but there's a clip on the O2 sensor harness that is attached to the underside of the 3/4 tube. The wire was just barely long enough to sneak around the side of the footbox:

On the driver's side, since I removed the wire and connector for the OEM oil pressure sender, there was no reason for the O2 sensor wire to run down to the oil pan like it was originally routed. I pulled it back and brought it over the lower 3/4 tube and had plenty of extra wire to connect to the O2 sensor:

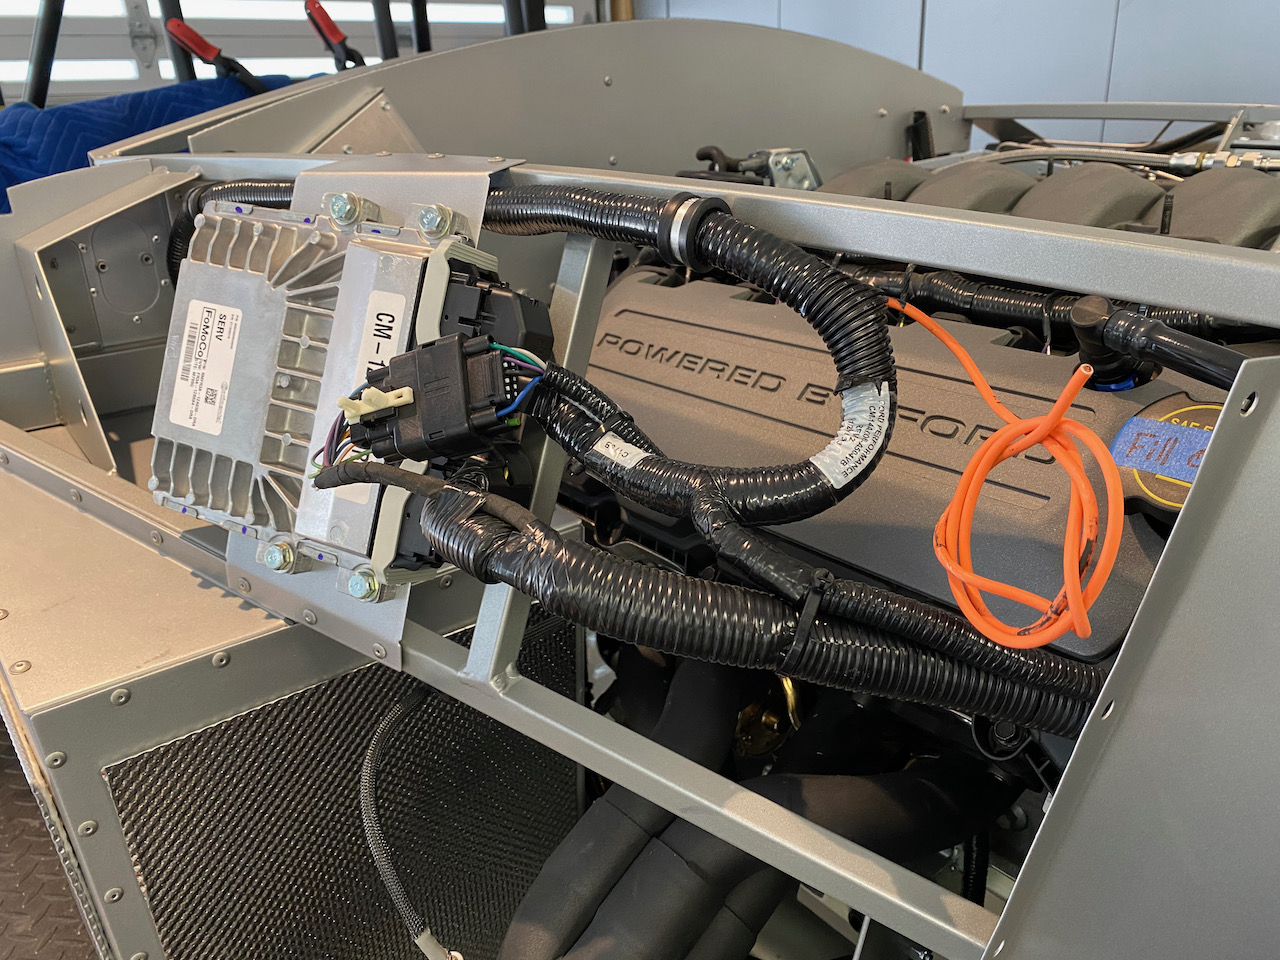
Next up was routing the wire bundle that contains the alternator connector as well as the MAF sensor connector. I started by removing the connector for the intercooler wiring and cut back and sealed off those wires and rewrapped the harness. I'll admit that I struggled a bit to find a good route for this harness. The main issue I was having was that I could either get enough wire for the MAF sensor or the alternator, but not both. After many, many attempts at different routes (and countless cut zip ties) I finally gave up and hit the easy button and threw some money at the problem. I ordered one of these 12" MAF sensor extensions for $24 and now all's well.
Here's a shot of the sort-of final PCM wiring (still need to do the fan wiring):
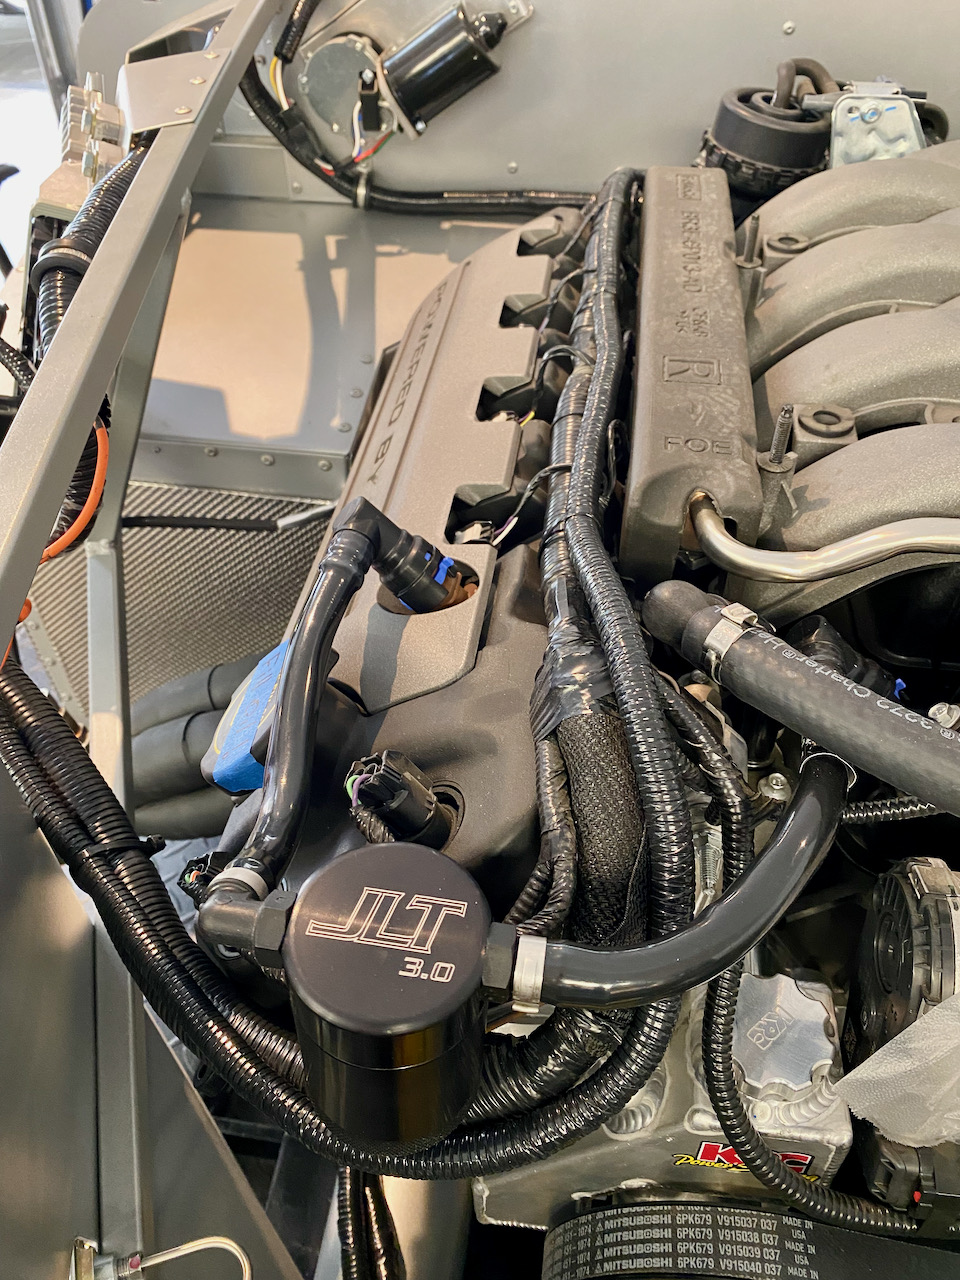
Here's the alternator/MAF harness running under the oil separator then down along the PS of the engine:
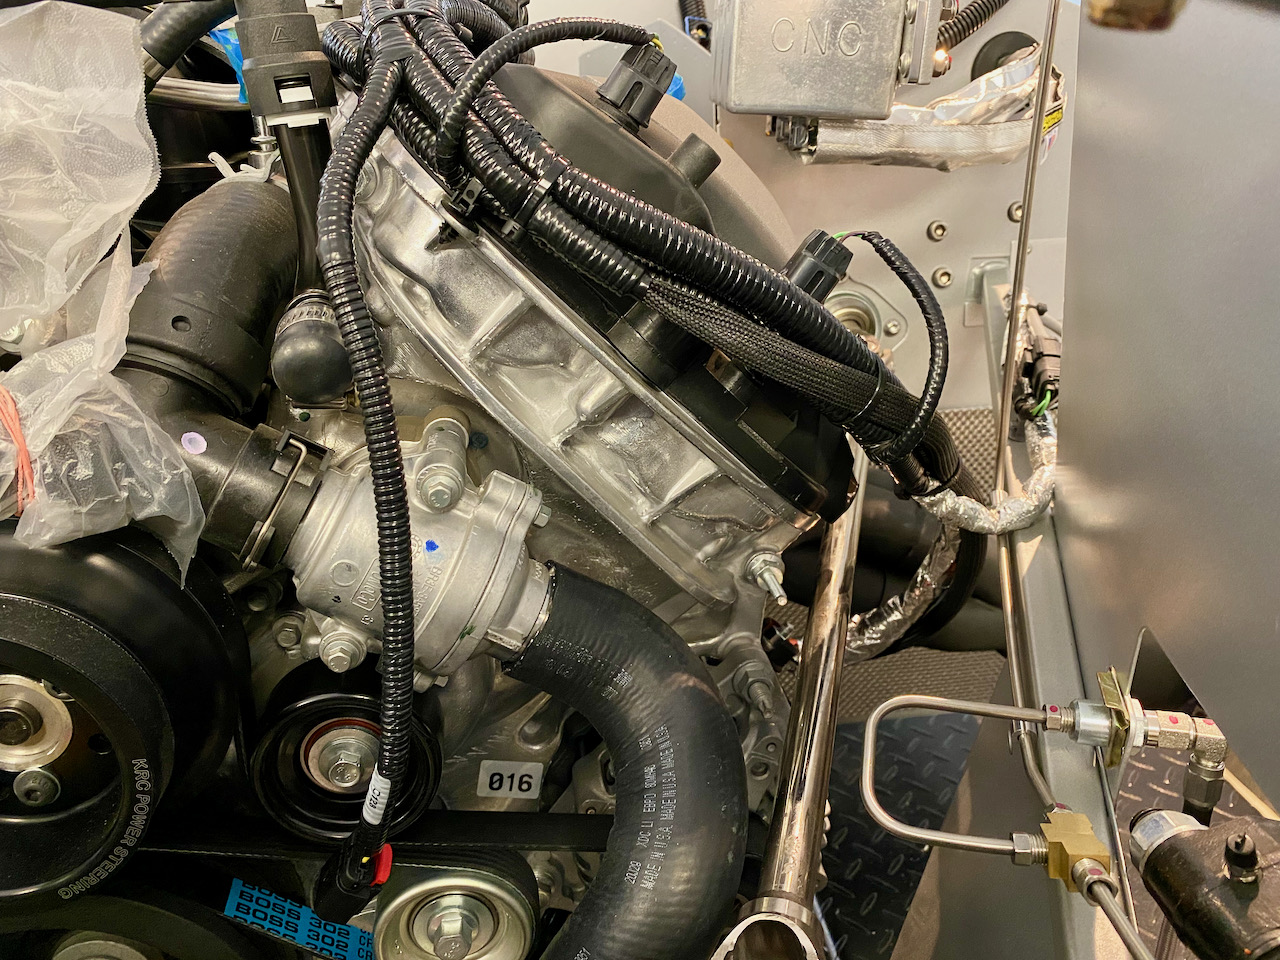
around the back and up the DS of the engine:

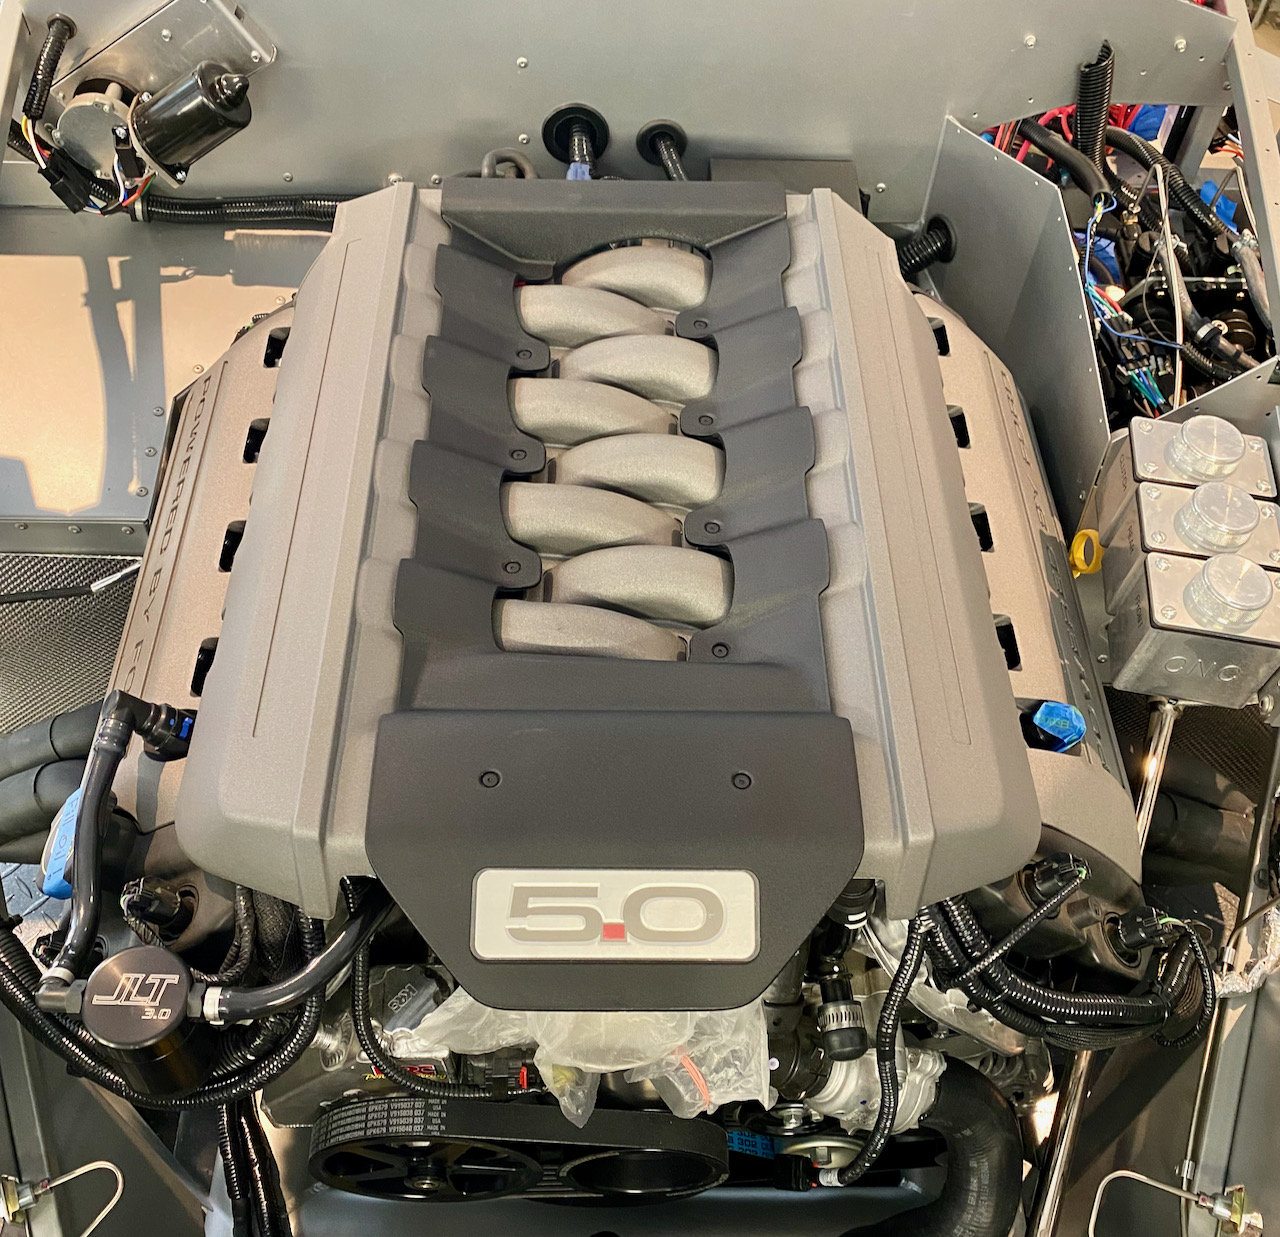
The DS bundle is pretty cramped. It contains the original coil wire harness, the alternator/MAF harness, the sending unit harness and main 8 ga. alternator wire, as well as the CMCV vacuum tubing and the braided steel fuel line. I had to test-fit the cosmetic cover a few times to make sure I was tie-wrapping all of these in a way that it would all fit under the cover, but it all somehow fits under there.

One area in particular that I spent a lot of time cleaning up was where the gauge sending harness and alternator wiring passed around the steering shaft. At first I had it passing between the engine block and steering shaft at the corner of the cylinder head, but I wasn't comfortable with how tight this was. Any engine movement at all, and that bundle would be rubbing on the steering shaft. I was finally able to get everything to loop over the top of the steering shaft to the F-panel and down to the gauge senders and alternator. I'm much happier with this routing now.
MkIV Roadster build: Gen 2 Coyote, IRS, TKO600. Ordered 10/24/18. Delivered 1/29/19. Engine installed 8/8/21. First start 9/12/21. First go-kart 9/17/21. Off to paint 4/11/22. Back from paint 12/30/22.
Build thread here.
-
08-24-2021, 05:37 PM
#196
(continued)...
And here it is looking pretty with the covers on. I have the chrome Ford Performance valve covers but those will stay tucked away safely until final assembly.
Last edited by JohnK; 08-24-2021 at 05:47 PM.
MkIV Roadster build: Gen 2 Coyote, IRS, TKO600. Ordered 10/24/18. Delivered 1/29/19. Engine installed 8/8/21. First start 9/12/21. First go-kart 9/17/21. Off to paint 4/11/22. Back from paint 12/30/22.
Build thread here.
-
Post Thanks / Like - 0 Thanks, 3 Likes
-
08-25-2021, 05:06 AM
#197
Wow, that coyote always looks good in there... I really like the way each person does things just a bit different. They sure fill up the engine compartment. It may just be the angle of the last photo, but can you pull out the oil dip stick. It looks like it is blocked by the reservoirs. Either way, very nice and clean looking work.
-
Post Thanks / Like - 1 Thanks, 0 Likes
 JohnK
JohnK thanked for this post
-
08-25-2021, 08:59 AM
#198
Thank you very much. Yes, it is super tight but it all somehow fits. I'm incredibly impressed by, and thankful for those that were the trailblazers in fitting a coyote into this car. I would have looked at that engine compartment and that engine and been convinced there was no way it was going to fit in there. Knowing that it's been done before has gotten me through more than one moment of doubt.
Yes, it's tight around the oil dipstick but I can pull it out. It comes straight up far enough to free the plastic handle, and then I can push it forward to clear the reservoirs and pull it out.
MkIV Roadster build: Gen 2 Coyote, IRS, TKO600. Ordered 10/24/18. Delivered 1/29/19. Engine installed 8/8/21. First start 9/12/21. First go-kart 9/17/21. Off to paint 4/11/22. Back from paint 12/30/22.
Build thread here.
-
08-31-2021, 08:58 PM
#199
-
Post Thanks / Like - 0 Thanks, 1 Likes
-
09-01-2021, 07:42 AM
#200
For some reason, I want to suggest putting some rtv or silicone on the lower block support you made. This would be applied at the time you last mount the tank. Nice work.
20th Anniversary Mk IV, A50XS Coyote, TKO 600, Trunk Drop Box, Trunk Battery Box, Cubby Hole, Seat Heaters, Radiator hanger and shroud.
-
Post Thanks / Like - 1 Thanks, 0 Likes
 JohnK
JohnK thanked for this post


 Thanks:
  Likes:


 Reply With Quote


 LOL
LOL


