-
09-01-2021, 11:31 AM
#201


Greek Guys' Garage Roadster Build #9509 (Boig Cool Tube)
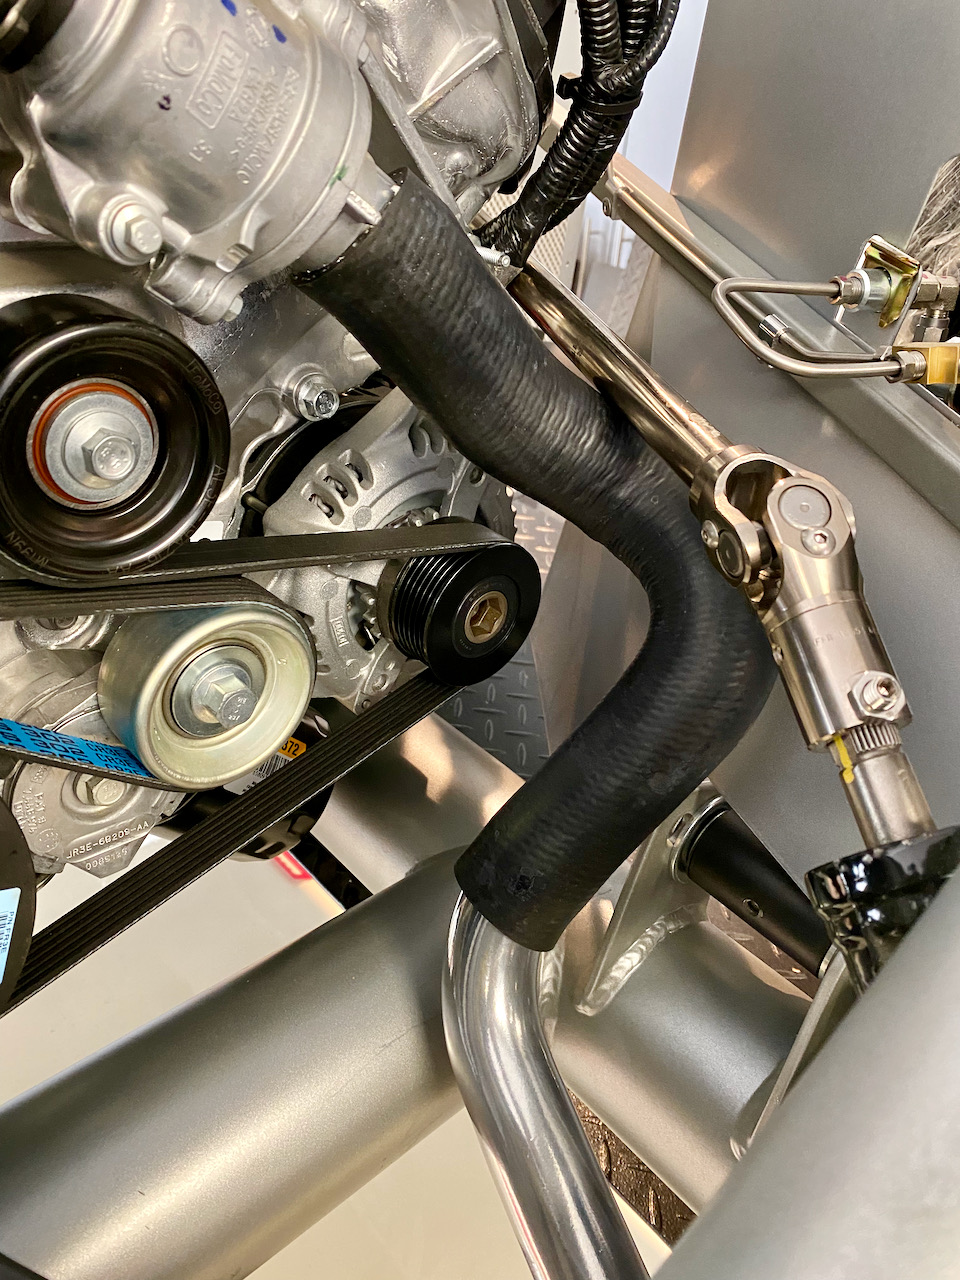
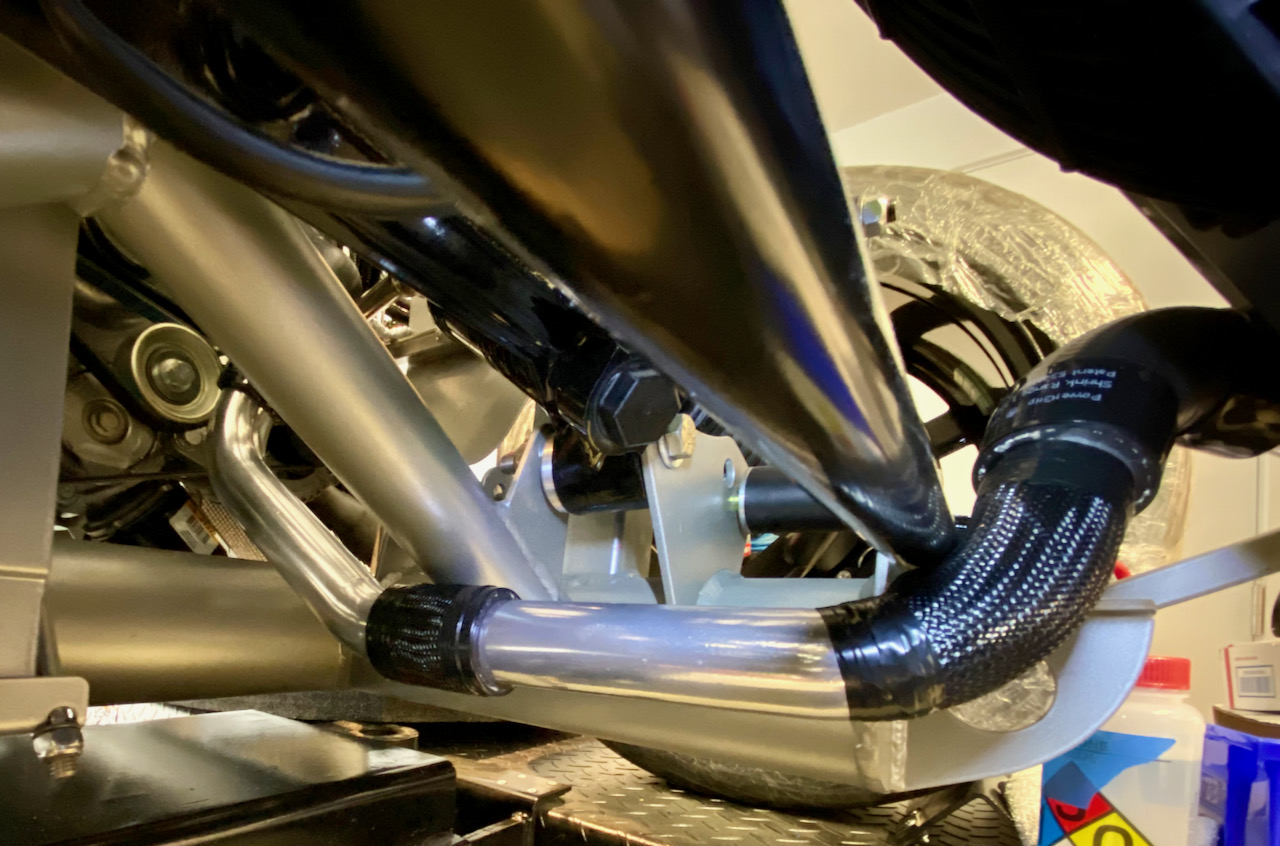
Continuing work on the cooling system, I finished the install of the lower Boig Cool Tube. I initially had some trouble figuring out how to get it aligned correctly. After trading some PM's and having a nice phone conversation with Bob Boig, he explained that he leaves the hoses long intentionally so they can be trimmed to get the best fit. Here's what the engine-side hose looked like at first. That wasn't going to work too well:
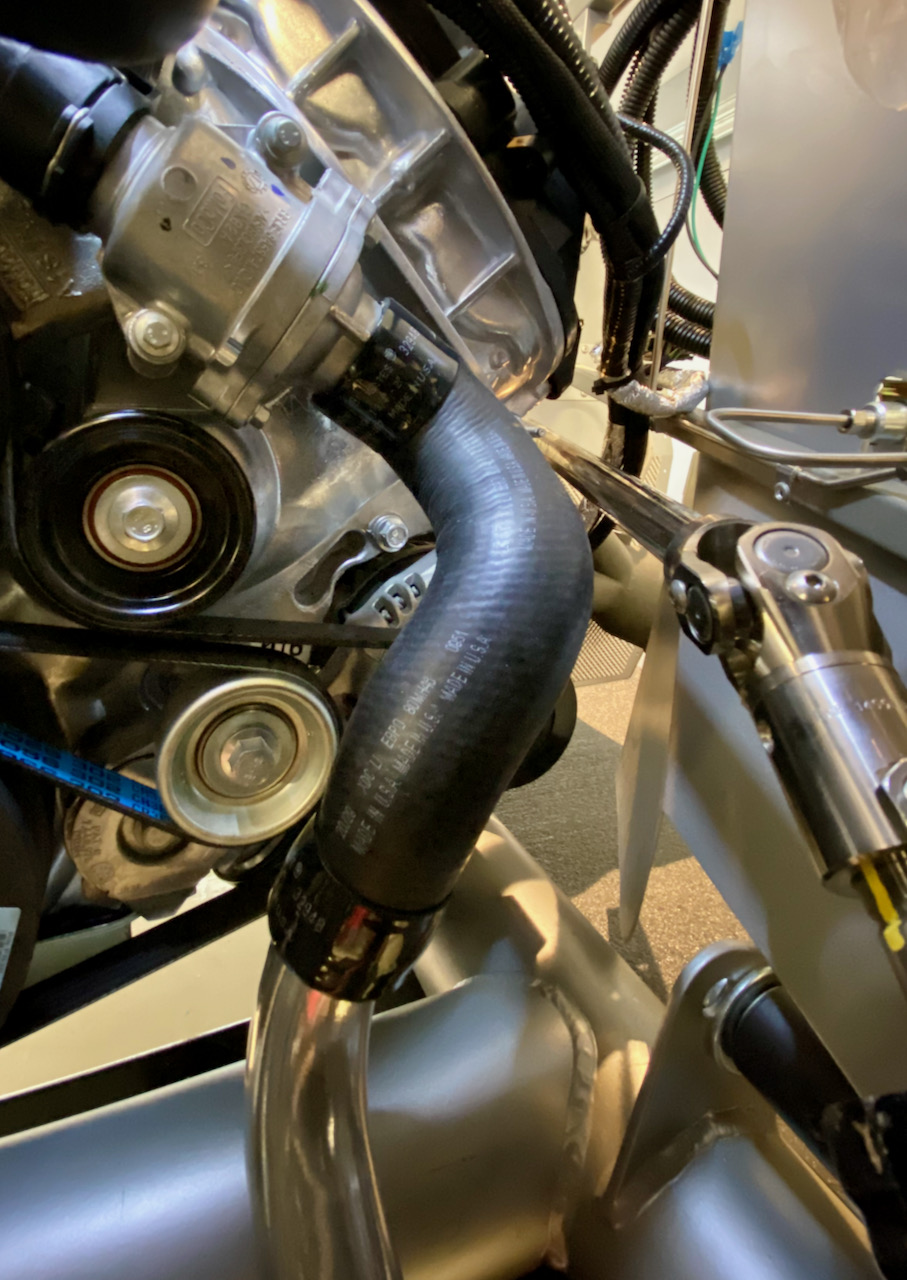
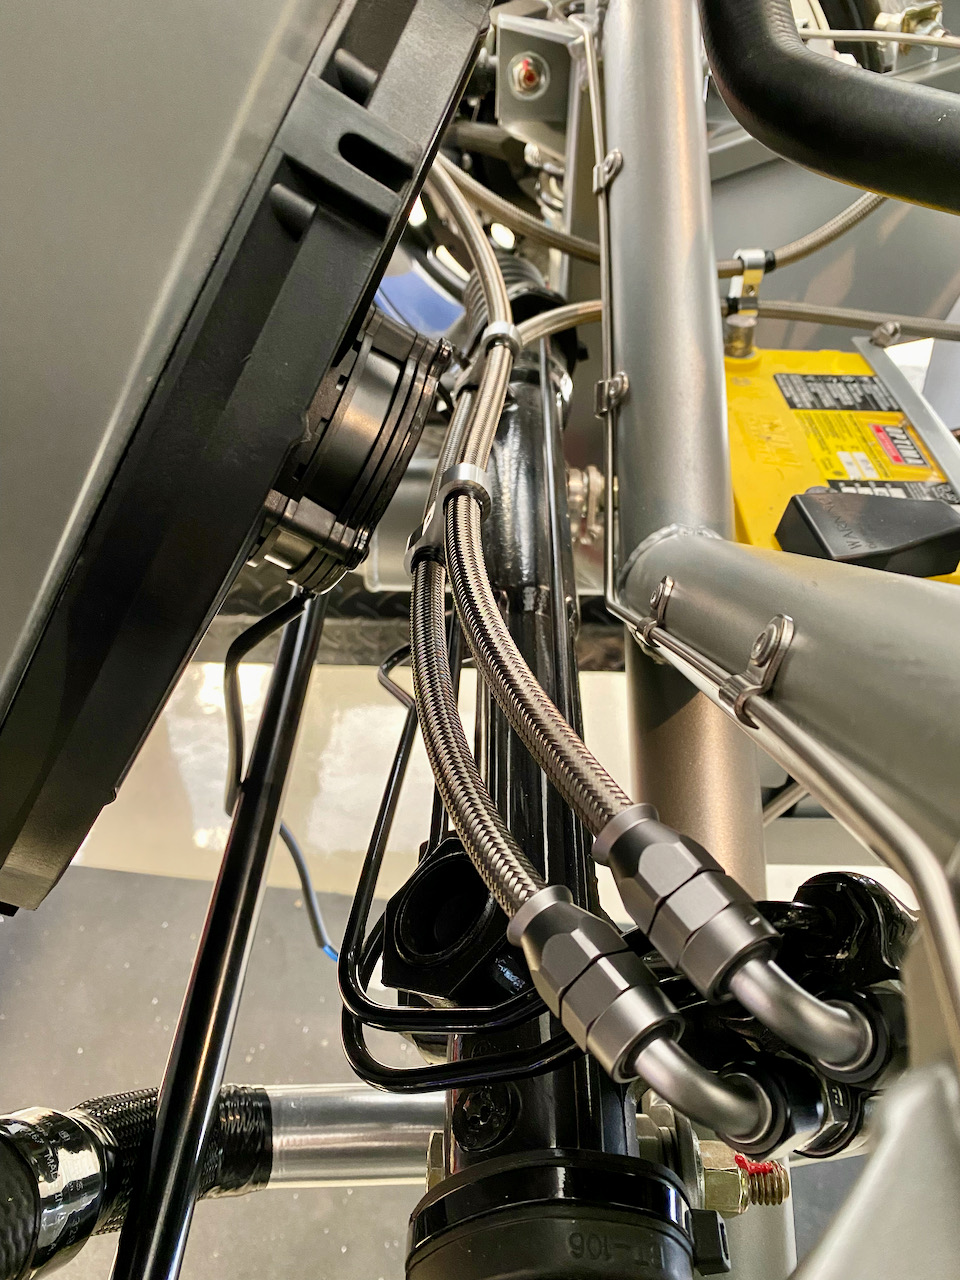
After some judicious trimming, here's how it ended up. I'm happy with the clearance to the steering shaft now:
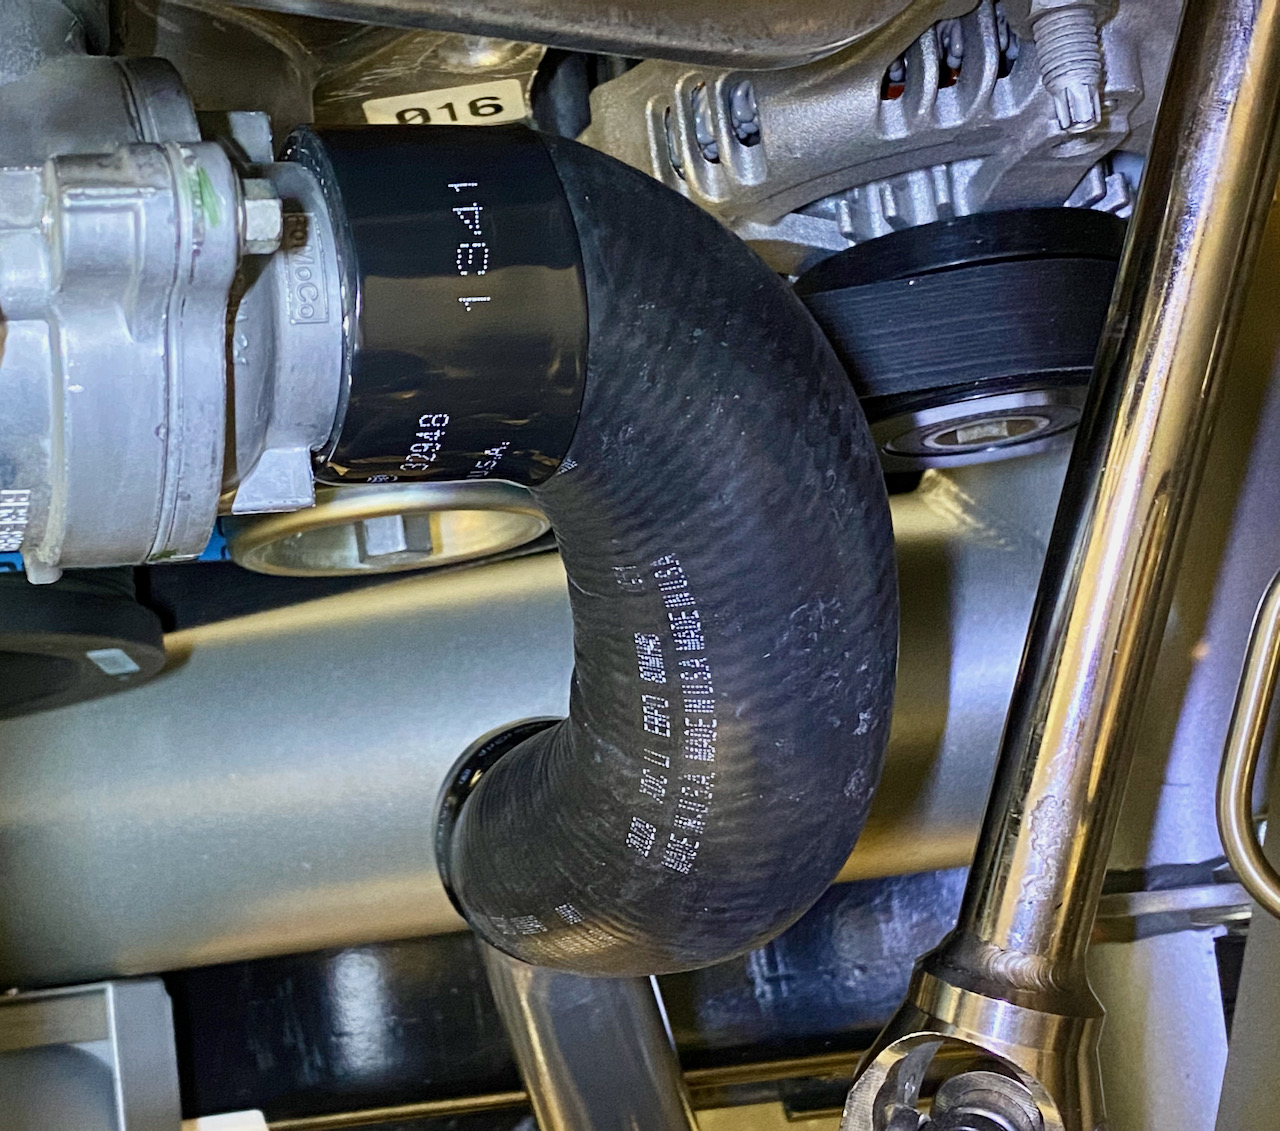
The radiator-end hose was long on both ends and also needed some trimming to fit well. Here's how it looks now:
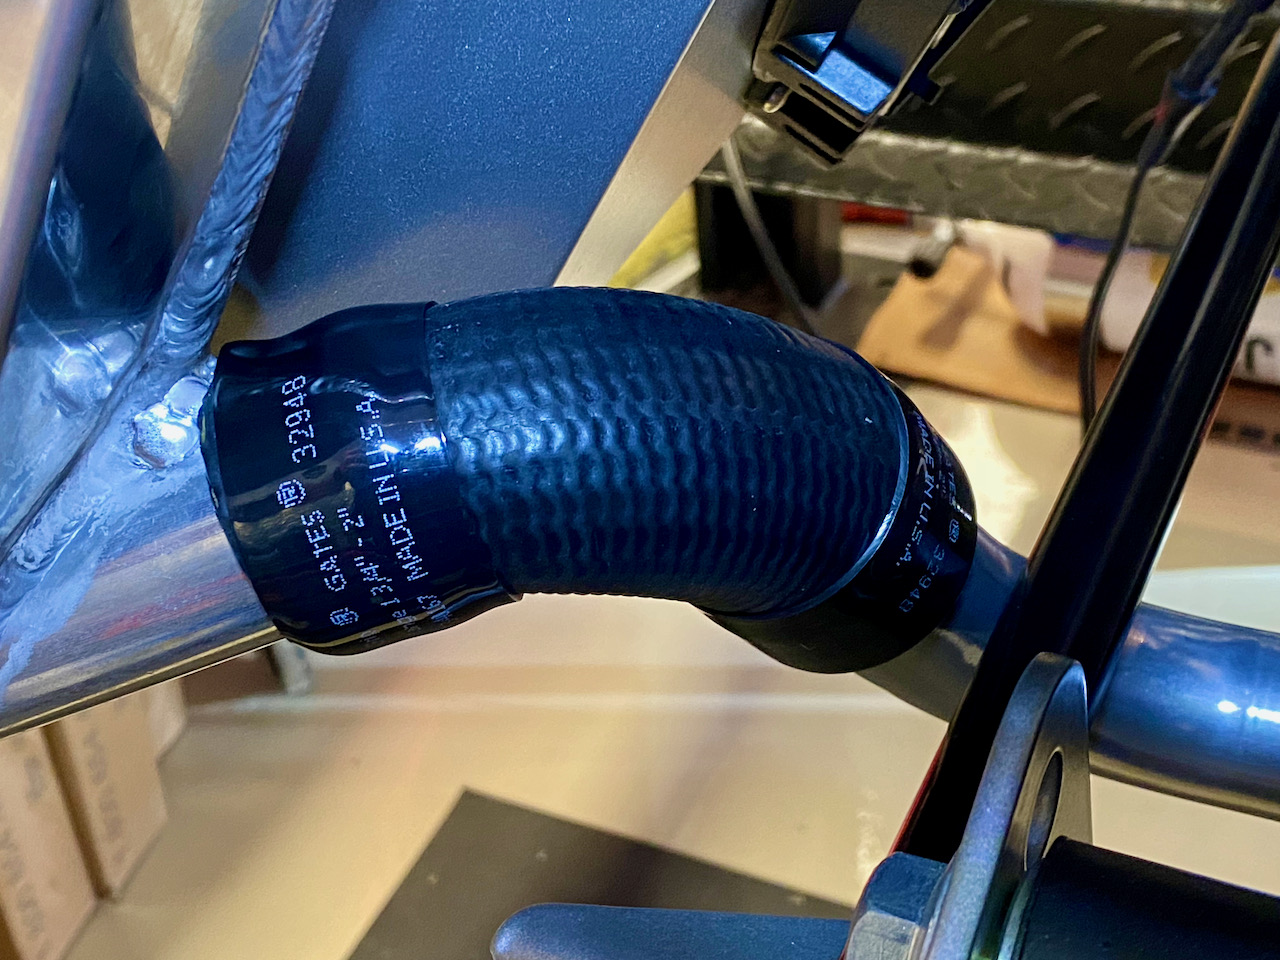
The middle of the tube ran pretty close to the x-brace, so I decided to take a short length of radiator hose and slip it in place and cover it with some of the abrasion guard sleeve that Ford puts on their hoses:
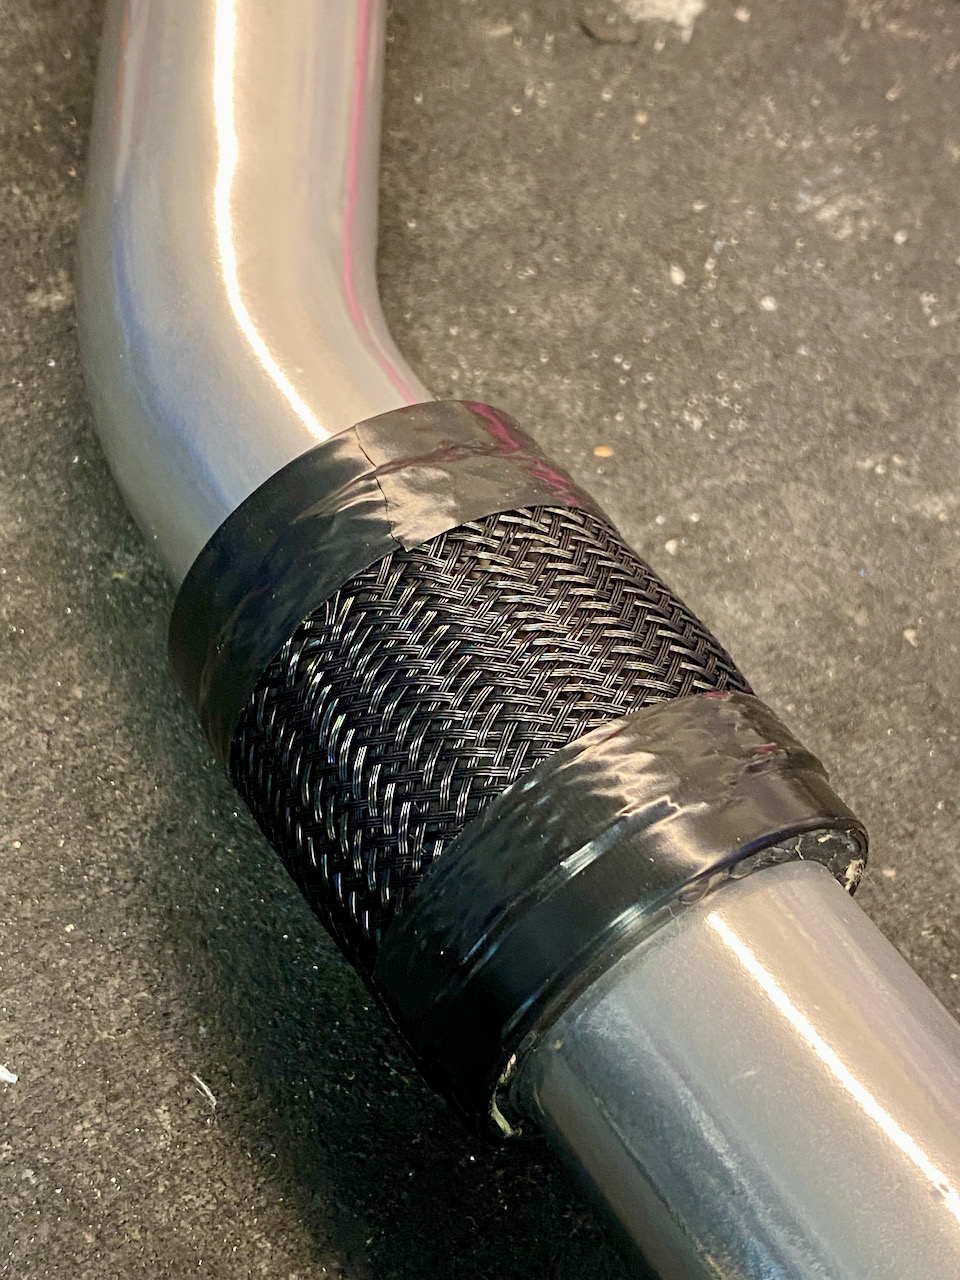
Here's what the whole assembly looked like after much fitting and trimming, before being installed for good:

The front bend of the metal tube still runs pretty close to the sway bar. I trimmed the rubber hose at the radiator outlet as much as I could to get the whole assembly to shift forward as much as possible, but there's not a lot of clearance there (maybe 1/16" to 1/8"). I don't think this will be an issue, but for good measure I put a section of abrasion guard sleeve over the metal tube in that area, and will keep an eye on it once I'm driving to make sure I won't have any problems down the road.
Many thanks to Bob Boig for taking the time to go over it all with me and make sure it all fits properly.
MkIV Roadster build: Gen 2 Coyote, IRS, TKO600. Ordered 10/24/18. Delivered 1/29/19. Engine installed 8/8/21. First start 9/12/21. First go-kart 9/17/21. Off to paint 4/11/22. Back from paint 12/30/22.
Build thread here.
-
Post Thanks / Like - 1 Thanks, 3 Likes
 Moniz
Moniz thanked for this post
-
09-01-2021, 01:04 PM
#202
Member

Konstantinos edo ke Harika apo tyn Arizona.
Keep up the great work and Kaloriziko palikari.
-
Post Thanks / Like - 0 Thanks, 2 Likes
-
09-01-2021, 01:20 PM
#203
Γεια σου Κωσταντίνο! Ευχαριστώ πολύ. Χάρηκα και εγώ. Χαιρετισμούς από την California.
MkIV Roadster build: Gen 2 Coyote, IRS, TKO600. Ordered 10/24/18. Delivered 1/29/19. Engine installed 8/8/21. First start 9/12/21. First go-kart 9/17/21. Off to paint 4/11/22. Back from paint 12/30/22.
Build thread here.
-
Post Thanks / Like - 0 Thanks, 1 Likes
-
09-01-2021, 01:37 PM
#204
Senior Member

breeze makes a bracket that holds the solid tube to the underside of the x member for additional security.
-
Post Thanks / Like - 1 Thanks, 0 Likes
Moniz thanked for this post
-
09-01-2021, 01:40 PM
#205
Thanks, I will look into that! If I could shift the whole thing forward another 1/8" or so and hold it in place with a bracket, I'd feel much better about the clearance to the sway bar. There's enough movement in the rubber hoses to allow it, but it won't sit there on it's own as it is right now.
MkIV Roadster build: Gen 2 Coyote, IRS, TKO600. Ordered 10/24/18. Delivered 1/29/19. Engine installed 8/8/21. First start 9/12/21. First go-kart 9/17/21. Off to paint 4/11/22. Back from paint 12/30/22.
Build thread here.
-
09-01-2021, 03:24 PM
#206
Senior Member
-
Post Thanks / Like - 2 Thanks, 0 Likes
-
09-03-2021, 11:32 PM
#207
Greek Guys' Garage Roadster Build #9509 (cooling system and PS lines)
My upper radiator hose finally showed up, so I was able to finish the cooling system today. Mostly pretty standard per many other coyote installations, but a couple of tidbits that might be interesting.
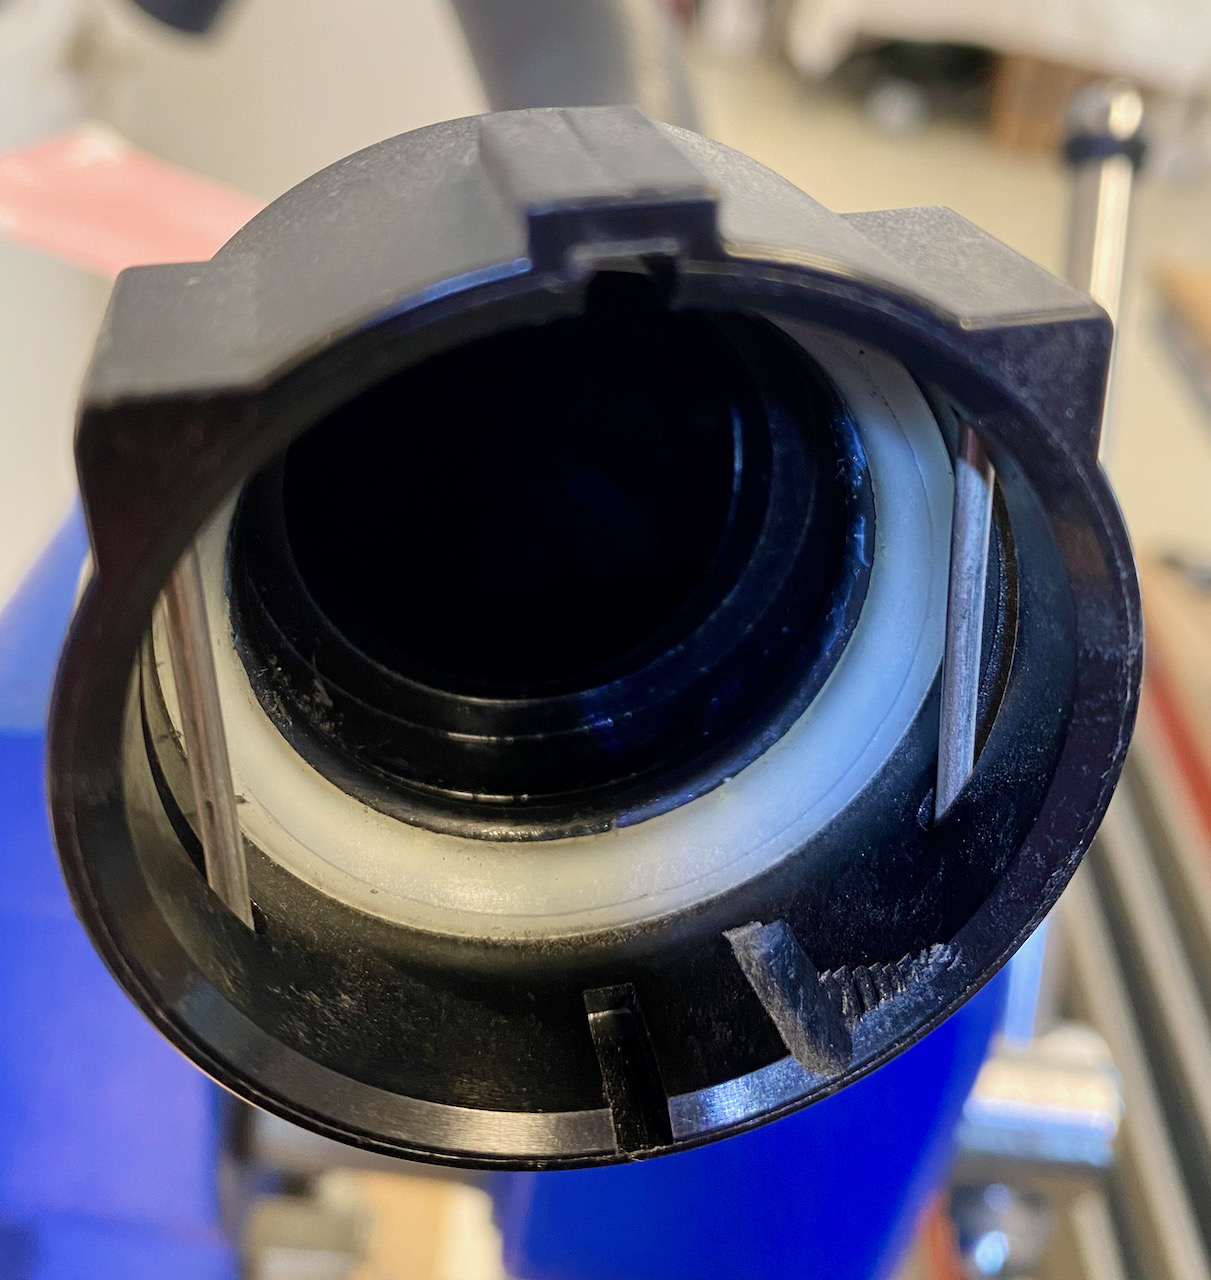
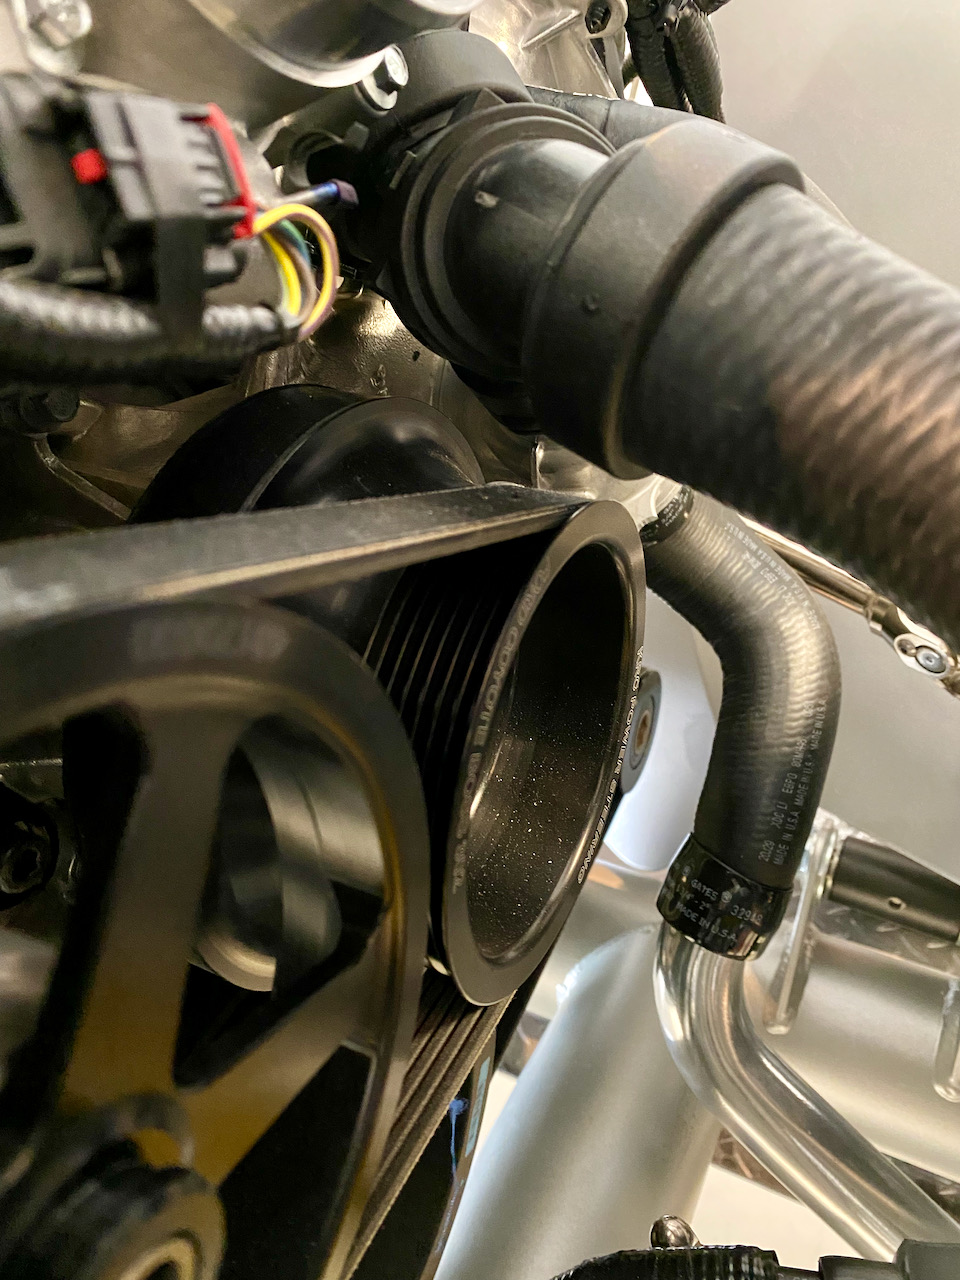
This is the Ford F150 upper radiator hose (CL3Z-8260-A). The engine-side connector has an indexed notch, and when installed it puts the bend in the hose right on the power steering pulley and belt. I recall reading this tip in someone's build thread a while back, but I can't remember who, so thank you to whomever posted this great idea about grinding a new index notch in the fitting with a Dremel to allow the hose to be "clocked" slightly differently, pulling the bend away from the power steering pulley.
The radiator installation itself was pretty straightforward, with the Breeze upper and lower radiator mounts, as well as the Breeze radiator shroud. I am planning to install the Maradyne PWM fan controller as some others have done. One complication is that I also installed the Boig cool tube lower radiator hose as shown previously, which made splicing a coolant sensor adapter into the lower radiator hose impossible. I have a friend who has a metal fabrication business, and he was kind enough to TIG weld a 1/8" NPT bung in side of the radiator right at the outlet fitting, so I was able to install the temperature sensor right in the radiator.

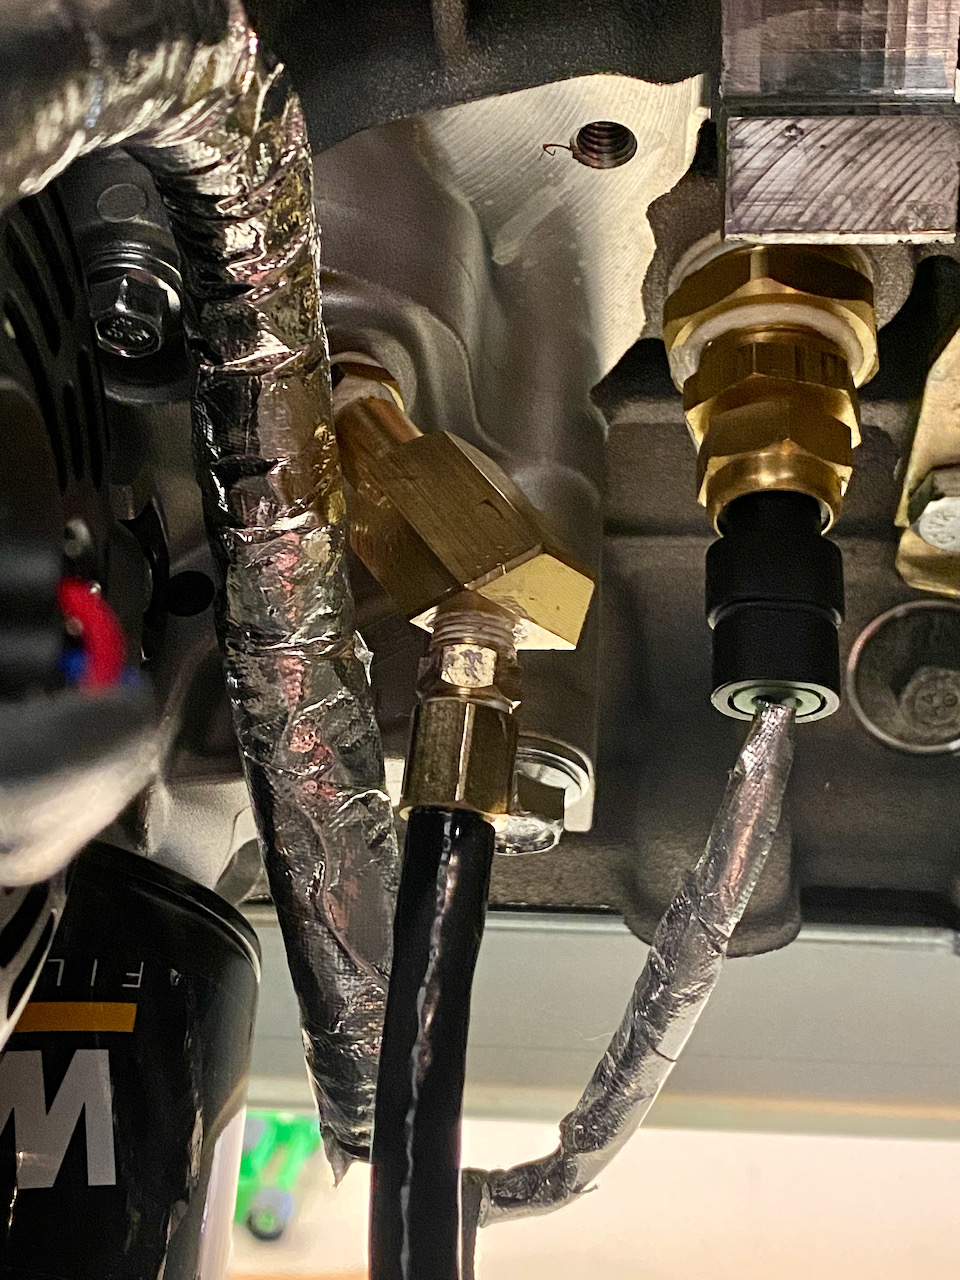
Next up were the power steering hoses. These are all Aeroquip teflon race hose and fittings as provided by Breeze. It took a bit of playing around to get the correctly angled fittings. This how I ended routing the lines.
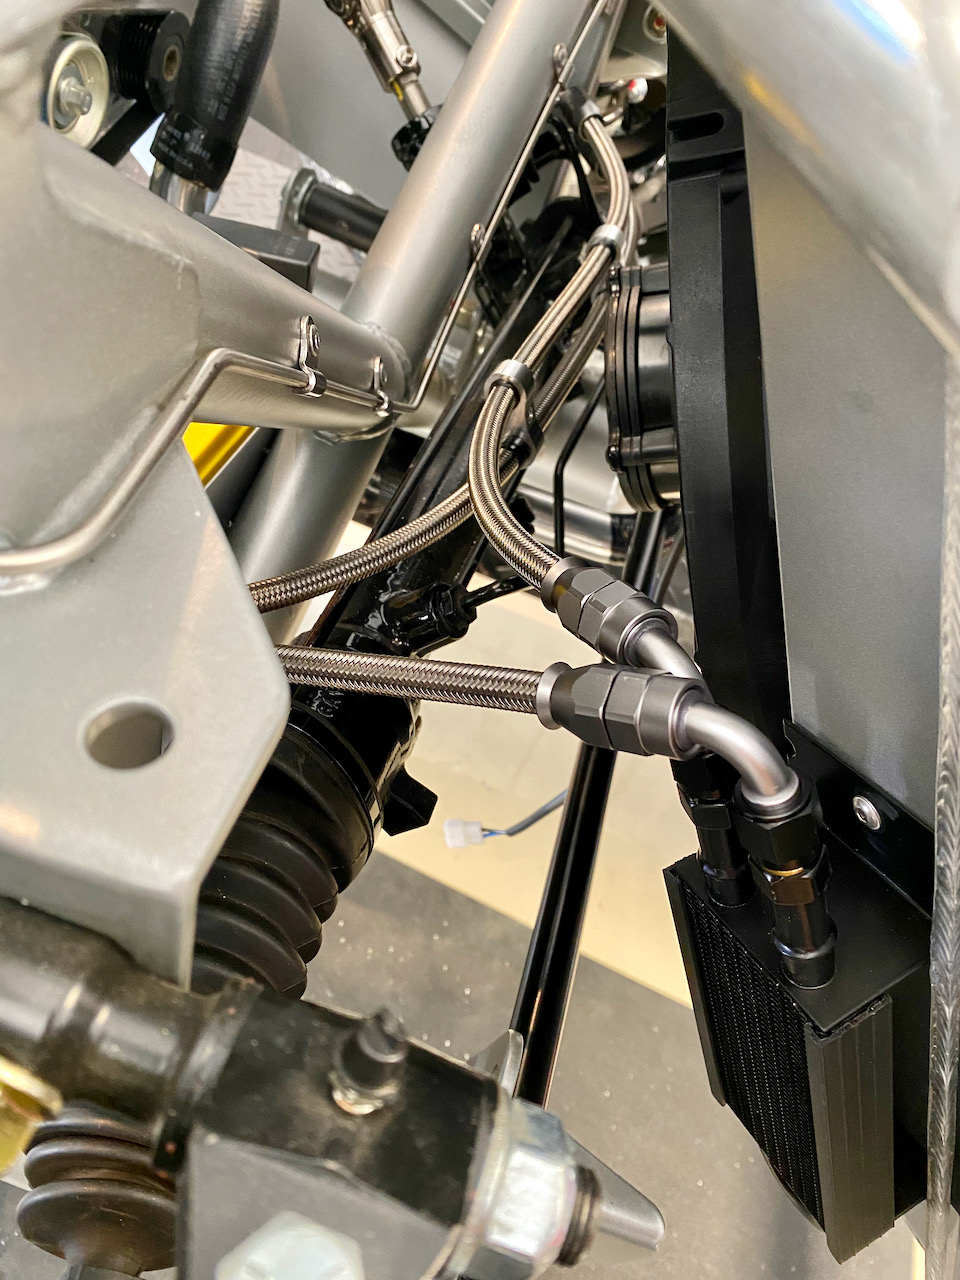
From the power steering rack I used 90 degree fittings. The (bottom) high pressure line loops back to the outlet at the pump, while the (top) lower pressure line routes to a small cooler mounted on the radiator shroud.
Here's a shot of the cooler and the lines running from the rack and on to the pump.
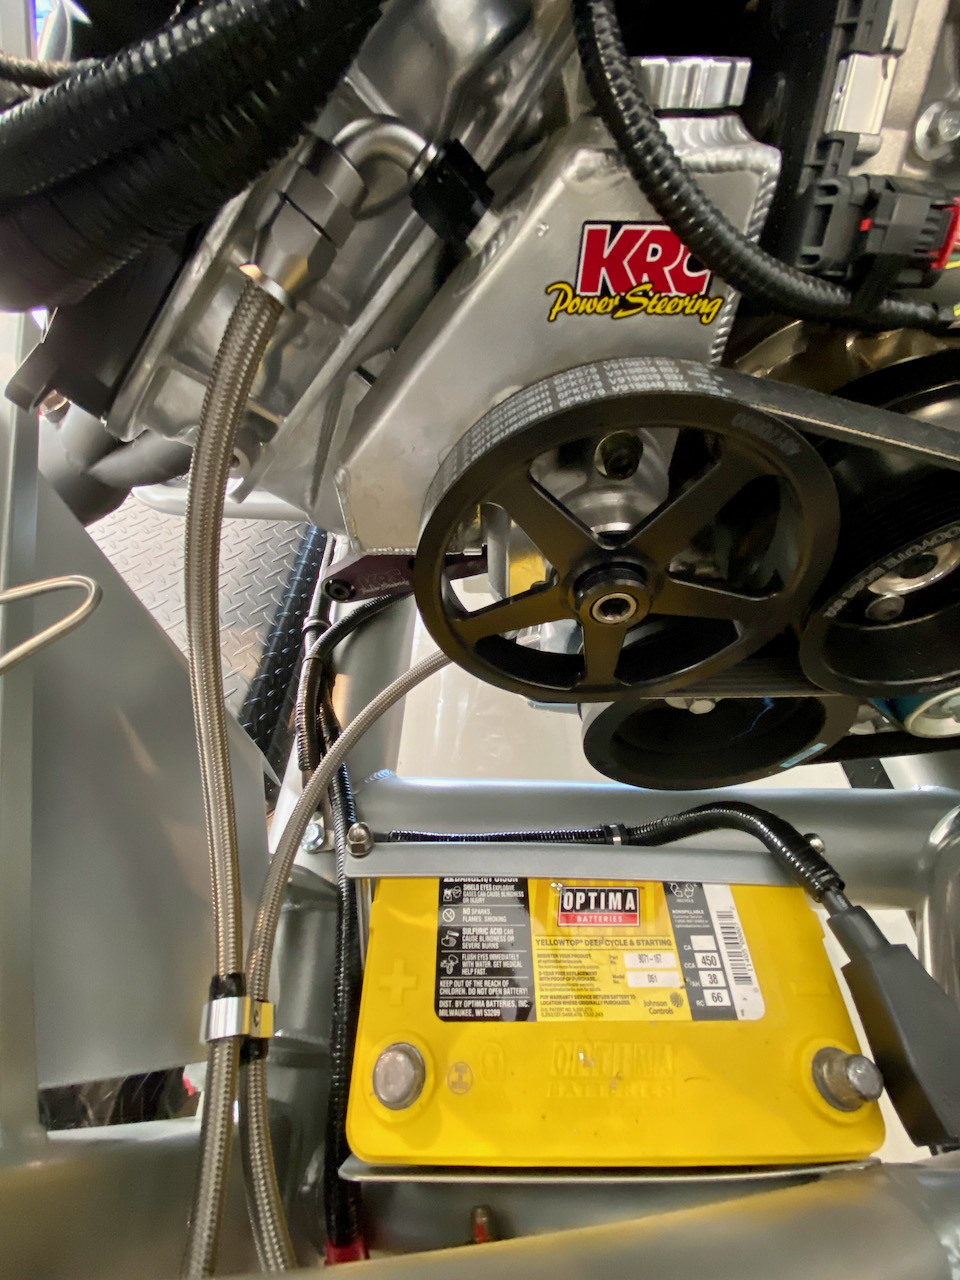
At the pump the return line runs into the top of the reservoir through another 90 degree fitting, while he high pressure line goes to the inlet through a 45 degree fitting. I also replaced the stock orifice with a #4 orifice (smallest available) to reduce the power assist.
MkIV Roadster build: Gen 2 Coyote, IRS, TKO600. Ordered 10/24/18. Delivered 1/29/19. Engine installed 8/8/21. First start 9/12/21. First go-kart 9/17/21. Off to paint 4/11/22. Back from paint 12/30/22.
Build thread here.
-
Post Thanks / Like - 0 Thanks, 1 Likes
-
09-08-2021, 09:38 PM
#208
Senior Member

Great build JohnK! What a treat to watch it. Keep on trucking!
FFR MK4 Roadster (9945) complete kit, delivered 12/4/2020, First start and go kart 5/7/2021. Legal 8/14/2021, Paint finished 7/18/2022 (Viking Blue). 347BPE CI, TKO600, Moser 8.8 3link 3.55, Halibrand 17x9 17x10.5, power steering. Carbon Fiber Dash. Carbon Fiber trans tunnel, adjustable Kirkey Lowback Vintage seats, Vintage gauges, RT drop trunk mod, FFmetal drop battery mod and trans tunnel, Forte front sway bar. Forte mechanical throttle linkage, RT gas pedal.
www.covespringsfarm.com
-
Post Thanks / Like - 1 Thanks, 0 Likes
JohnK thanked for this post
-
09-11-2021, 04:55 PM
#209
Greek Guys' Garage Roadster Build #9509 (wiring)
I've been making some good progress on both sides of the firewall to get ready for first start. On the engine side, as I previously mentioned I wrapped up the cooling system and power steering. Both systems are filled and I purged the PS system of air. I made a few small tweaks to the Spectre air intake by adding the PCV connection to it, as well as adding the Treadstone honeycomb airflow straightener in front of the MAF sensor. I also wired up the cooling fan and the Maradyne PWM fan controller. With that, the engine bay is pretty much ready for first start, with the exception of filling the engine with oil. The engine has been sitting for (ahem... ) a bit longer than I'd anticipated so I'm going to pre-lube it using the garden sprayer technique I've read about here. For $20 it's cheap insurance to make sure we get off to a good start, so to speak.
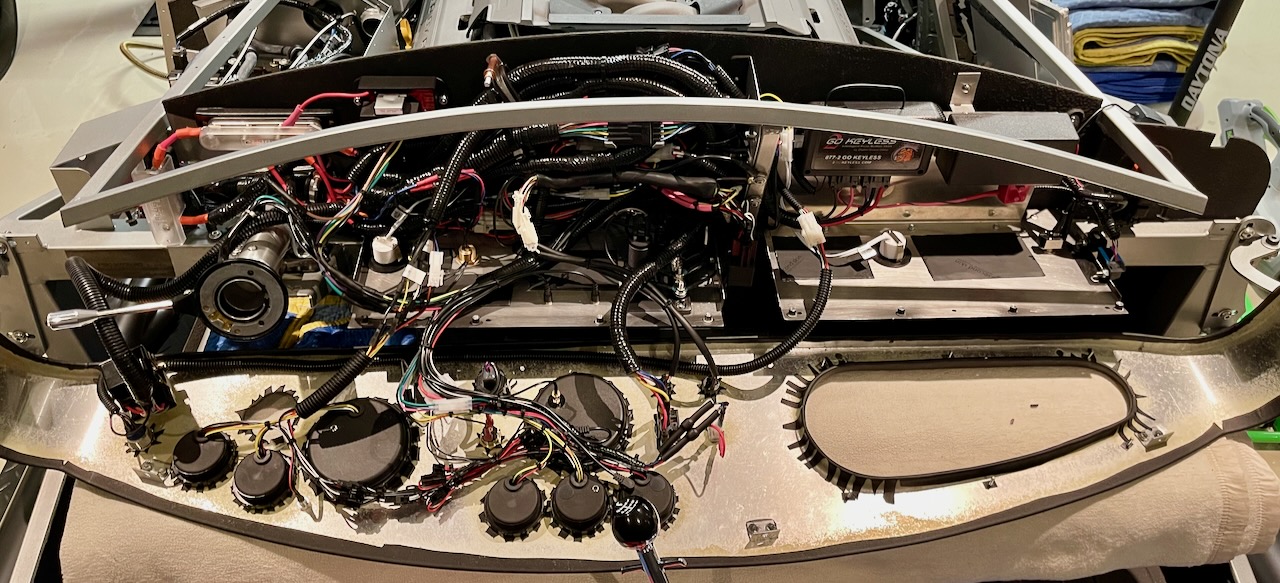
Most of the work this past week was on dash wiring. I've gone from this:
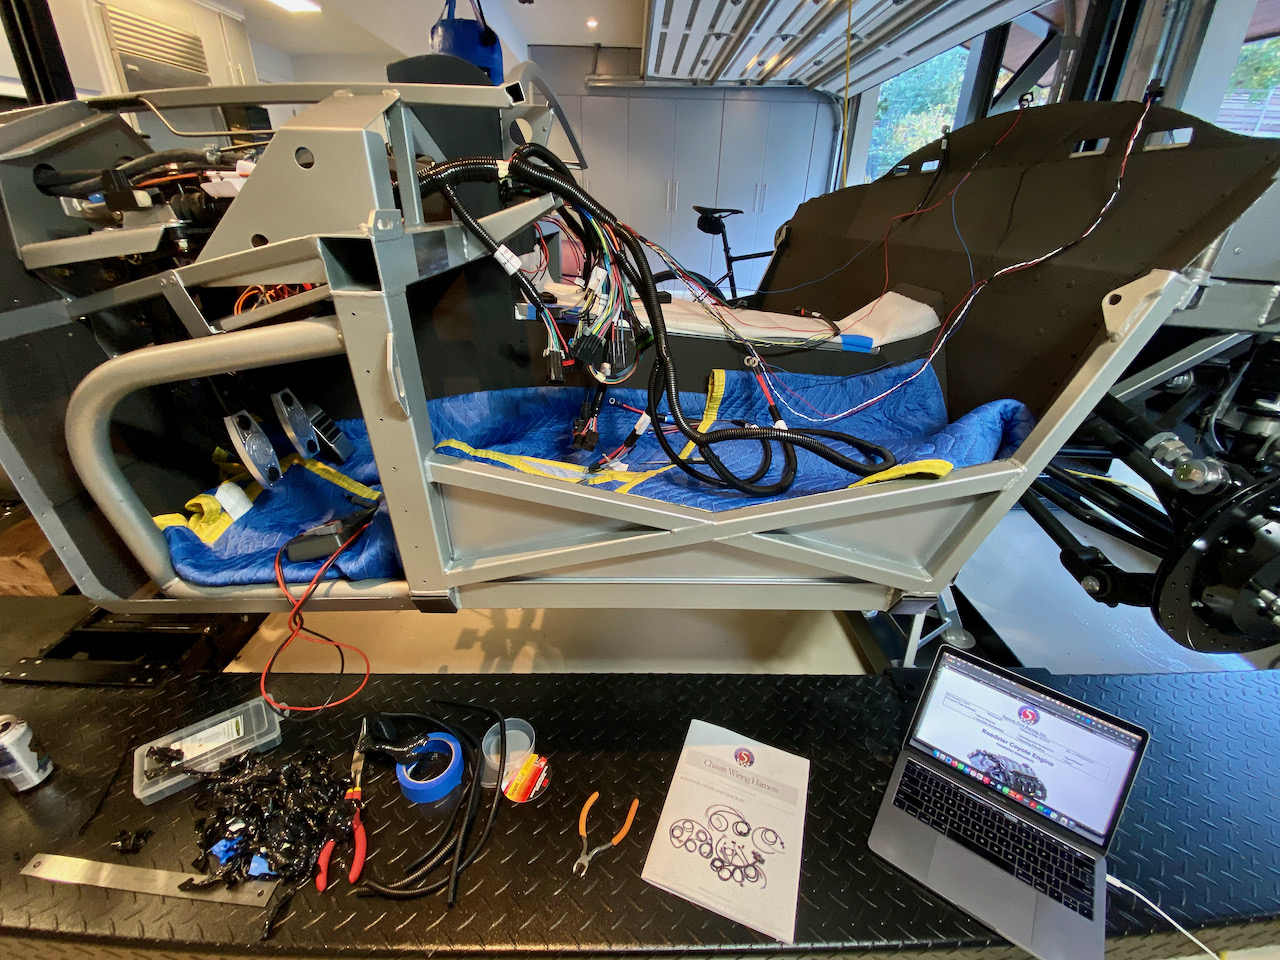
to this:
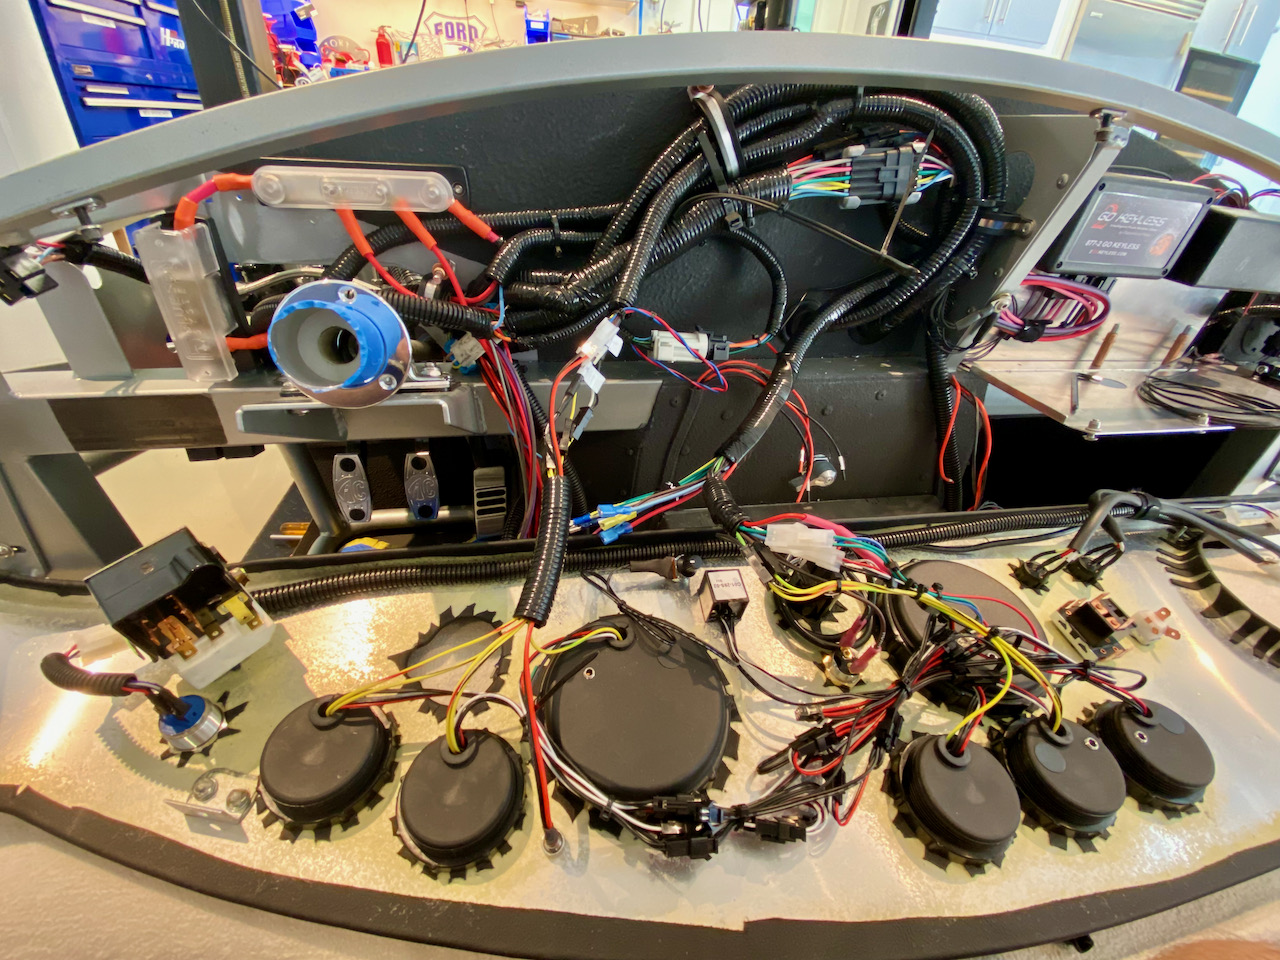
It's not pretty, but it's tidy. I made the decision at the start of the wiring to unwrap both the RF and coyote harnesses almost entirely so I could lay everything out the way I wanted. At some point I had that "oh $&*%" feeling that I'd made a big mistake doing that, but I kept chipping away at it and finally got everything to lay out in some sort of logical fashion. I moved the OBDII port and inertia switch all the way over to the PS, rearranged a bunch of other wiring, and dieted out a bunch of unnecessary stuff. The version of the coyote harness I received only had 5 wires in the "16-way pigtail". It seemed like a big waste of space to leave that giant connector in there. Additionally, if I did keep that connector I'd have to introduce a bunch of butt splices to connect those 5 wires. I try to avoid using butt splices wherever possible, so it was sort of a no-brainer to eliminate that 16-way pigtail connector and replace it with a Weatherpack 5 pin connector. This both reduced the size of the connector, and also allowed me to crimp pin the necessary wires directly into the connector. Not shown in the photo as it's buried behind the other dash connectors, but I also removed the largest of the three connectors in the dash harness. I ended up using the Speedhut gauge sender wires so most of the wires in that large connector were unnecessary. I only needed four of the wires, so I removed that connector and replaced it with a 4-pin Molex connector and saved a TON of space. The gauge power feed daisy chain wires are a bit of a handful. I must have bundled and unbundled those a dozen times and finally just accepted that they're not going to look pretty. So now I've got all the gauges wired up, and all the coyote wiring connected. I've temporarily installed the FFR-provided ignition cylinder/key for first start to simplify things. I've tied in the coyote fuel pump wire to the RF fuel pump relay, and completed the other power wiring to the bus bar, so I think I'm just about ready for first start. There's still a TON of wiring to do here, but it's all stuff that can be done after first start (keyless ignition, E-stopp, headlights, RT turn signal setup with the Ididit relay for hi/low beams, hazard lights, seat heaters, wipers, on and on...)
Just a few remaining items now. I need to bleed the clutch, install the side pipes, fill the tranny with fluid, pre-lube and fill the engine oil and I should be ready to fire her up.
MkIV Roadster build: Gen 2 Coyote, IRS, TKO600. Ordered 10/24/18. Delivered 1/29/19. Engine installed 8/8/21. First start 9/12/21. First go-kart 9/17/21. Off to paint 4/11/22. Back from paint 12/30/22.
Build thread here.
-
Post Thanks / Like - 0 Thanks, 1 Likes
-
09-12-2021, 12:17 PM
#210
25th Anniversary #9772


Originally Posted by
JohnK

I've been making some good progress on both sides of the firewall to get ready for first start. On the engine side, as I previously mentioned I wrapped up the cooling system and power steering. Both systems are filled and I purged the PS system of air. I made a few small tweaks to the Spectre air intake by adding the PCV connection to it, as well as adding the
Treadstone honeycomb airflow straightener in front of the MAF sensor. I also wired up the cooling fan and the Maradyne PWM fan controller. With that, the engine bay is pretty much ready for first start, with the exception of filling the engine with oil. The engine has been sitting for (ahem... ) a bit longer than I'd anticipated so I'm going to pre-lube it using the garden sprayer technique I've read about here. For $20 it's cheap insurance to make sure we get off to a good start, so to speak.
Most of the work this past week was on dash wiring. I've gone from this:
It's not pretty, but it's tidy. I made the decision at the start of the wiring to unwrap both the RF and coyote harnesses almost entirely so I could lay everything out the way I wanted. At some point I had that "oh $&*%" feeling that I'd made a big mistake doing that, but I kept chipping away at it and finally got everything to lay out in some sort of logical fashion. I moved the OBDII port and inertia switch all the way over to the PS, rearranged a bunch of other wiring, and dieted out a bunch of unnecessary stuff.
The version of the coyote harness I received only had 5 wires in the "16-way pigtail". It seemed like a big waste of space to leave that giant connector in there. Additionally, if I did keep that connector I'd have to introduce a bunch of butt splices to connect those 5 wires. I try to avoid using butt splices wherever possible, so it was sort of a no-brainer to eliminate that 16-way pigtail connector and replace it with a Weatherpack 5 pin connector. This both reduced the size of the connector, and also allowed me to crimp pin the necessary wires directly into the connector.
Not shown in the photo as it's buried behind the other dash connectors, but I also removed the largest of the three connectors in the dash harness. I ended up using the Speedhut gauge sender wires so most of the wires in that large connector were unnecessary. I only needed four of the wires, so I removed that connector and replaced it with a 4-pin Molex connector and saved a TON of space. The gauge power feed daisy chain wires are a bit of a handful. I must have bundled and unbundled those a dozen times and finally just accepted that they're not going to look pretty. So now I've got all the gauges wired up, and all the coyote wiring connected.
I've temporarily installed the FFR-provided ignition cylinder/key for first start to simplify things. I've tied in the coyote fuel pump wire to the RF fuel pump relay, and completed the other power wiring to the bus bar, so I think I'm just about ready for first start. There's still a TON of wiring to do here, but it's all stuff that can be done after first start (keyless ignition, E-stopp, headlights, RT turn signal setup with the Ididit relay for hi/low beams, hazard lights, seat heaters, wipers, on and on...)
nice work!!! do you plan on bypassing the ignition key/cylinder altogether?
-
Post Thanks / Like - 1 Thanks, 0 Likes
JohnK thanked for this post
-
09-12-2021, 12:47 PM
#211
Thanks! Yes, eventually I think I will get rid of the entire key/ignition cylinder and just have the Digital Guard Dawg keyless ignition. I've toyed with the idea of keeping the ignition cylinder wired up as a backup located in the under dash filler, but that seems overly complicated.
MkIV Roadster build: Gen 2 Coyote, IRS, TKO600. Ordered 10/24/18. Delivered 1/29/19. Engine installed 8/8/21. First start 9/12/21. First go-kart 9/17/21. Off to paint 4/11/22. Back from paint 12/30/22.
Build thread here.
-
Post Thanks / Like - 0 Thanks, 1 Likes
-
09-13-2021, 10:35 AM
#212
Greek Guys' Garage Roadster Build #9509 (First start!)
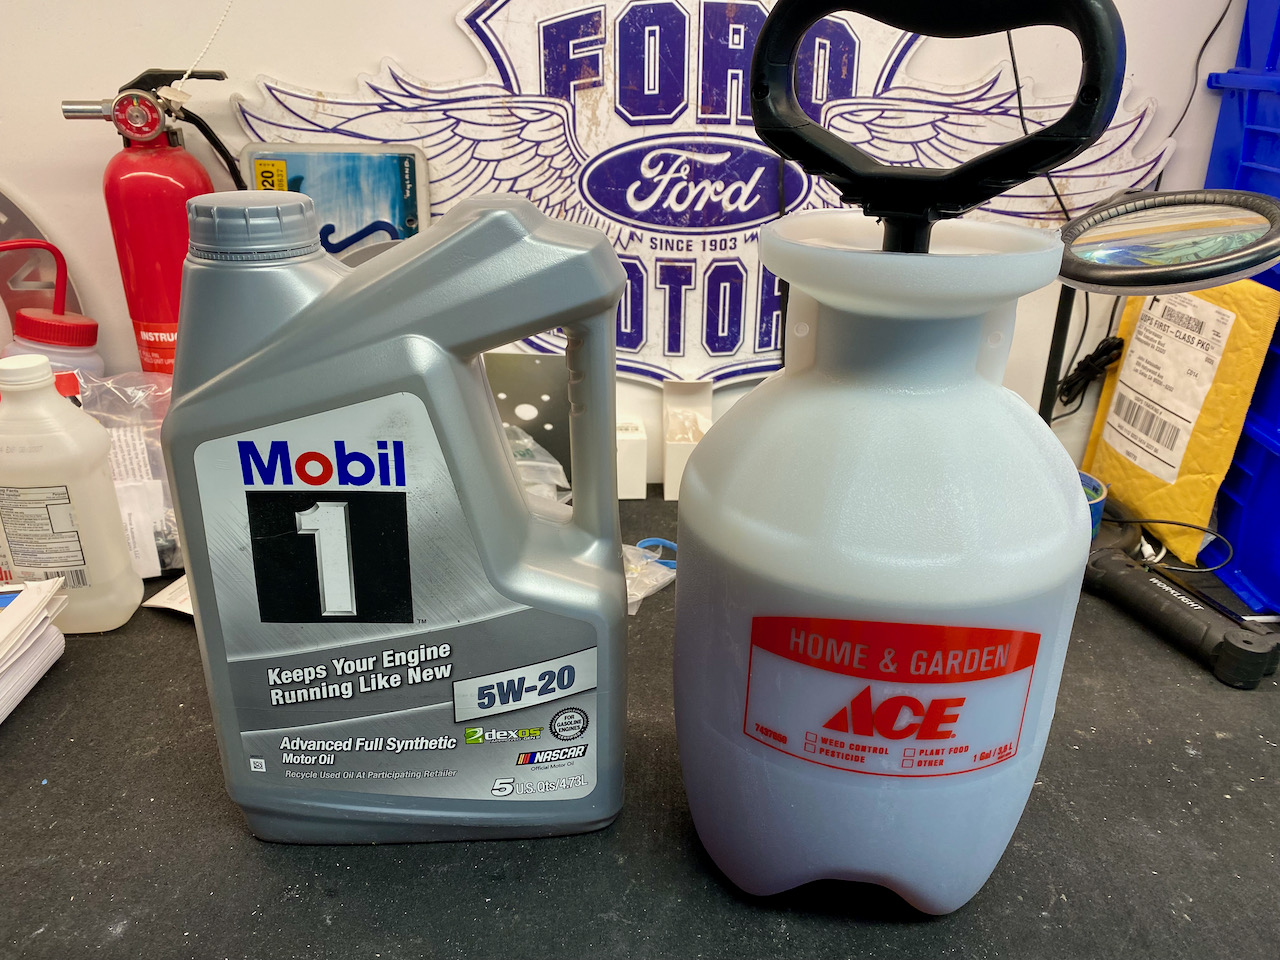
Yesterday I wrapped up a few remaining items I needed to do before being able to start the engine - filled the transmission, put some gas in the tank, connected the battery terminals, and pre-lubed the engine. The build has taken me a bit longer so far than anticipated and I had ordered the engine pretty early on (much earlier than needed, in retrospect) so it's been sitting around for a minute or two. I figured it was cheap insurance to pre-lube it using a garden sprayer as some others have done. I used a $15 1 gallon garden sprayer from the local Ace Hardware. I cut the wand fitting off the end of the hose and replaced it with a 1/8" NPT to 3/16" hose barb fitting, and screwed that into the port that the oil pressure sender normally goes. I pumped 5 quarts of oil through this setup, which filled the oil filter, and pushed oil up through all the oil galleys.
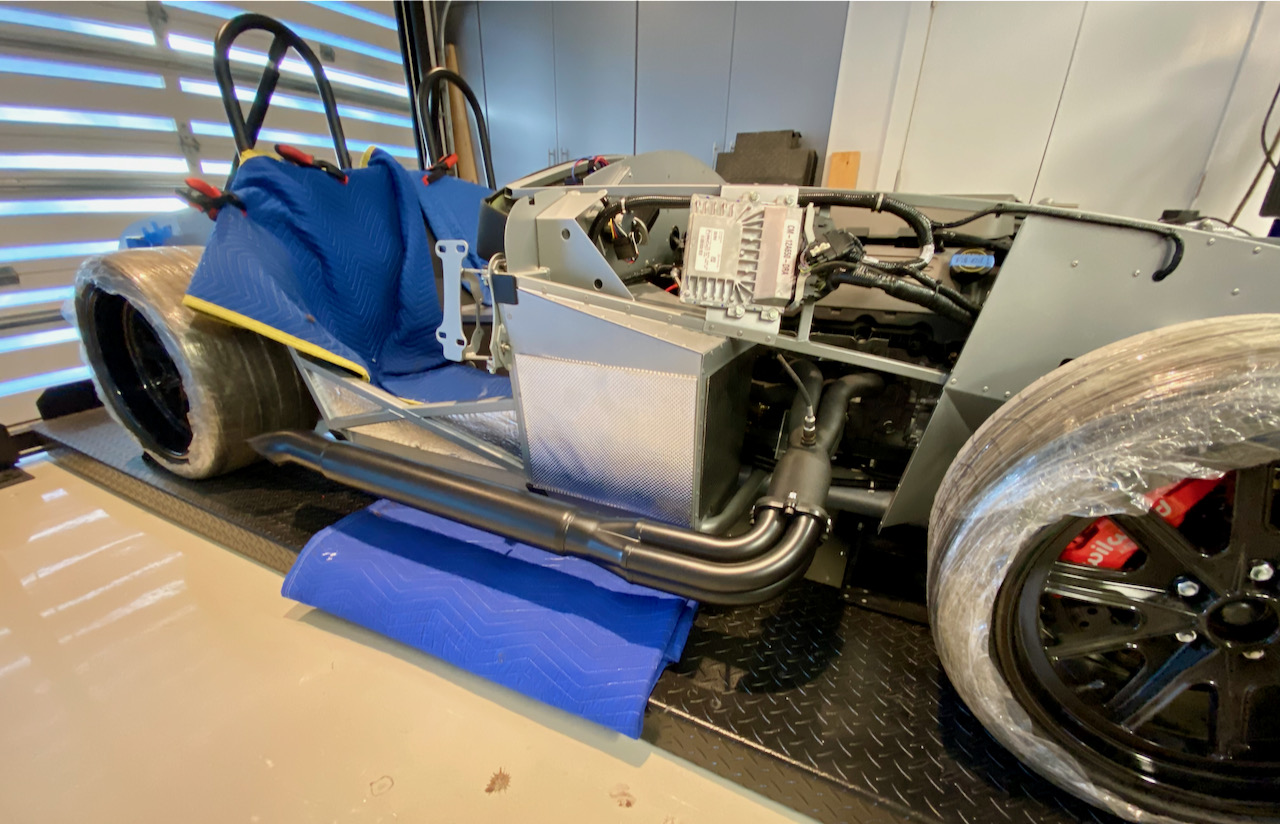
After filling the remaining oil, it was finally ready to start! I had previously pre-checked that the fuel pump turns on briefly when the key is turned to the accessory position, and cycled that a few times to fill the lines. I had also disconnected the inertia switch ground wires and cranked the engine a few times without the fuel pump running to make sure the clutch bottom switch was working properly and the engine would crank, so I was pretty confident that everything was ready go. I filled the cooler with beer, called up a few friends, and fired 'er up! What a sweet sound it was to hear the engine come to life for the first time! Unfortunately the videographer (my wife) was so excited that she failed to actually get the first start on video (she had one job, LOL!). Anyway, you've all seen it a hundred times by now... turn the key and it fires right up like a daily driver. We then cracked open a few beers and talked cars for a couple of hours. Can't think of a better way to spend an afternoon. Here's a gratuitous shot of the car with the ceramic-coated side pipes to at least partially make up for no video.
As soon as I get the clutch line bled, check to see if I need a clutch pedal stop, and heat cycle it a few times to check for leaks and top off fluids I'll be ready to go-kart for the first time.
MkIV Roadster build: Gen 2 Coyote, IRS, TKO600. Ordered 10/24/18. Delivered 1/29/19. Engine installed 8/8/21. First start 9/12/21. First go-kart 9/17/21. Off to paint 4/11/22. Back from paint 12/30/22.
Build thread here.
-
Post Thanks / Like - 0 Thanks, 4 Likes
-
09-14-2021, 12:17 AM
#213
Senior Member

Congratulations John!!! Nice work!
-
Post Thanks / Like - 1 Thanks, 0 Likes
JohnK thanked for this post
-
09-16-2021, 04:57 PM
#214
Greek Guys' Garage Roadster Build #9509 (clutch pedal stop)
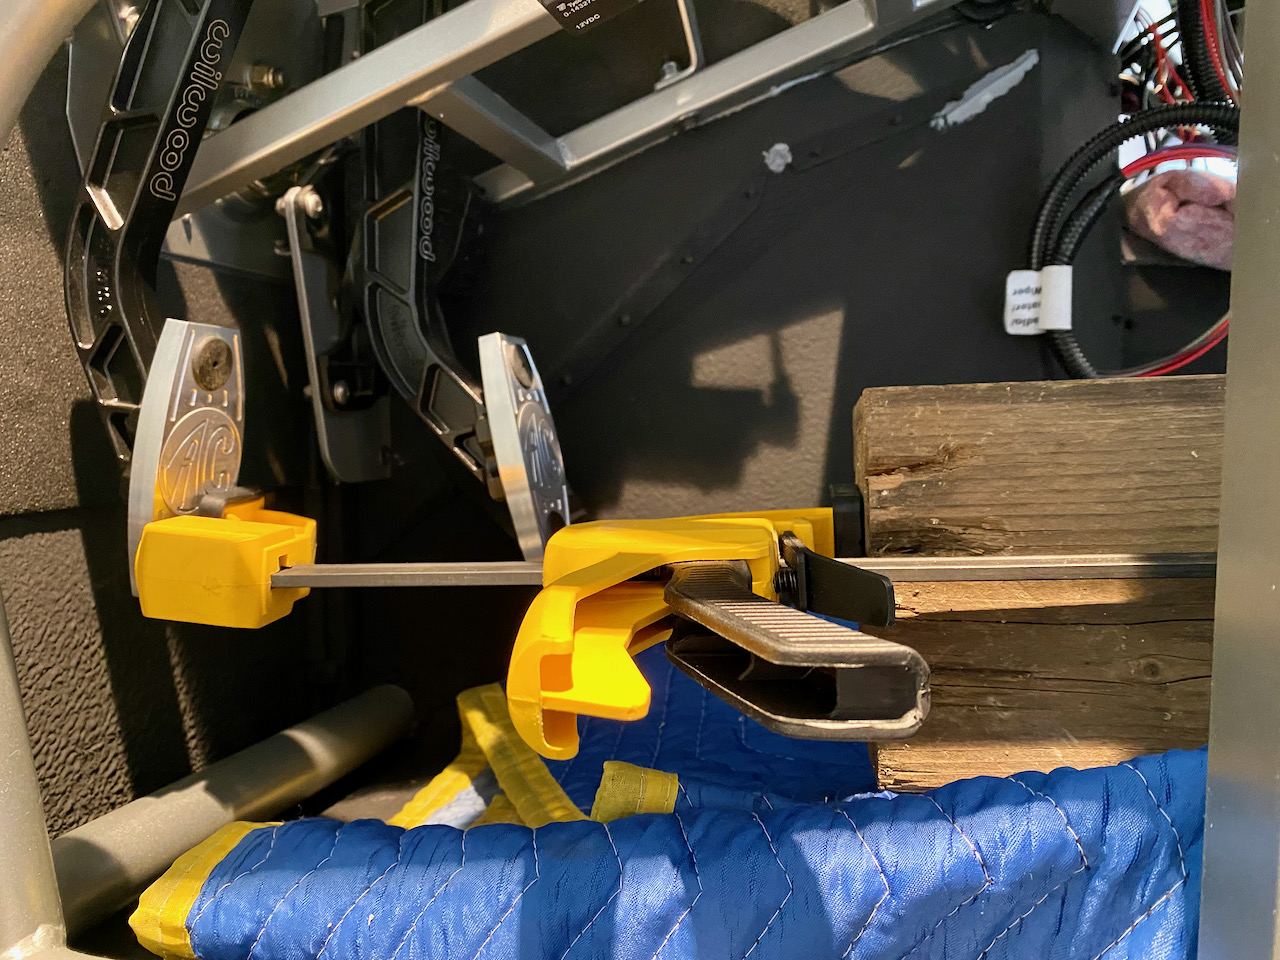
I've been working on getting the clutch dialed in so I can get out there and go kart. I've got a few leaks that I'm chasing, but should get that resolved here shortly. Since I installed a Tilton hydraulic throwout bearing, the other item that needed to be addressed is adding a clutch pedal stop. Tilton recommends limiting clutch pedal travel to 1/4" past the point where the clutch is released, so I first had to find where that point is. I had a big 4x6 laying around that happened to be just the right length to span back to the back wall of the cockpit. I jacked up the rear tires, put a DeWalt spreader/clamp on the end of the 4x6 and gradually pushed the clutch in until I could turn the rear wheels by hand.
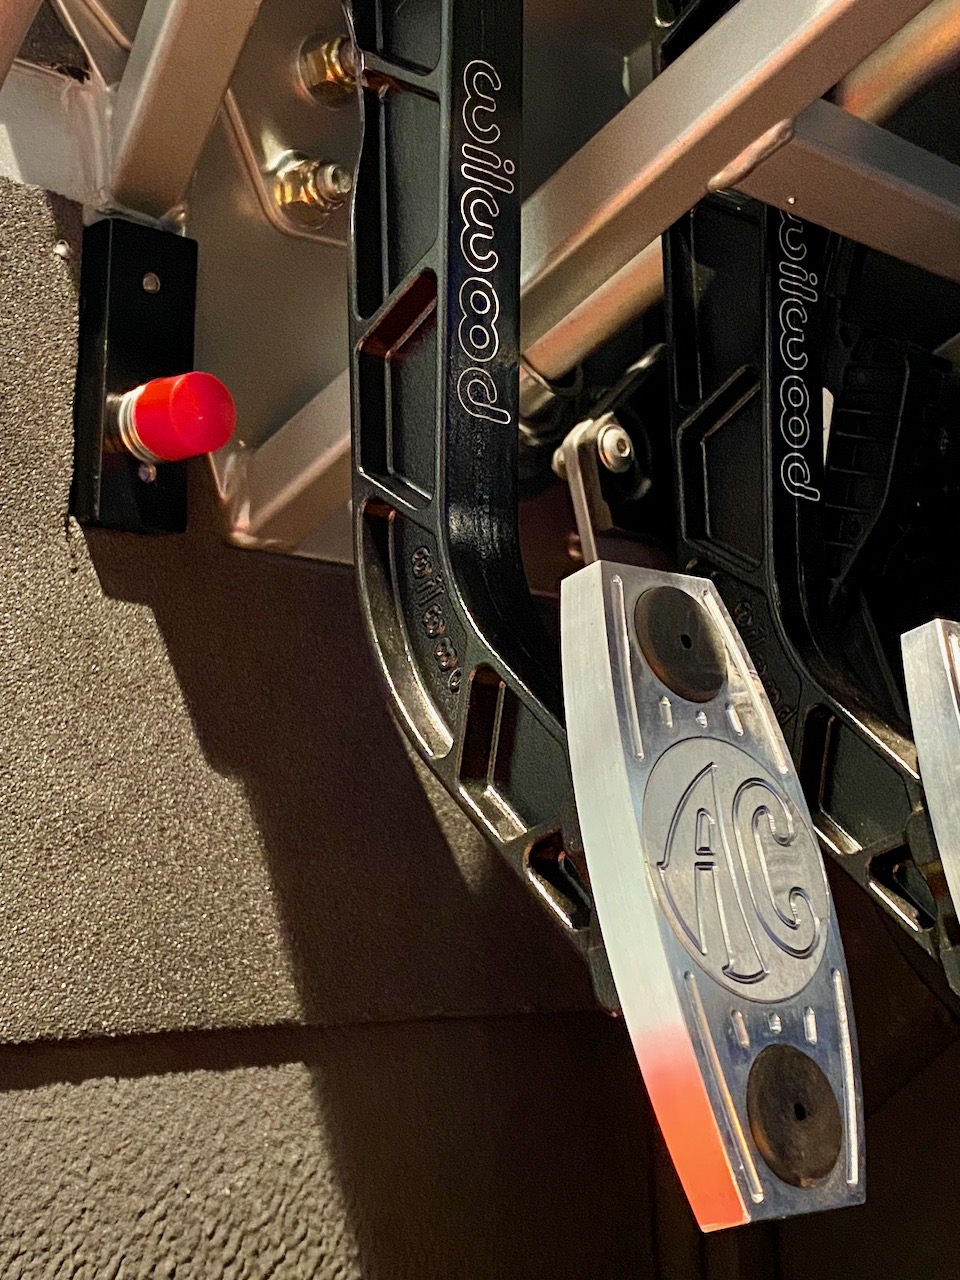
I had some extra 1/2" x 1" aluminum bar stock laying around, so I came up with a design for a stop that screwed to the footbox with two 10-32 screws and then had the pedal stop on a 1/4-20 stud that I could adjust.
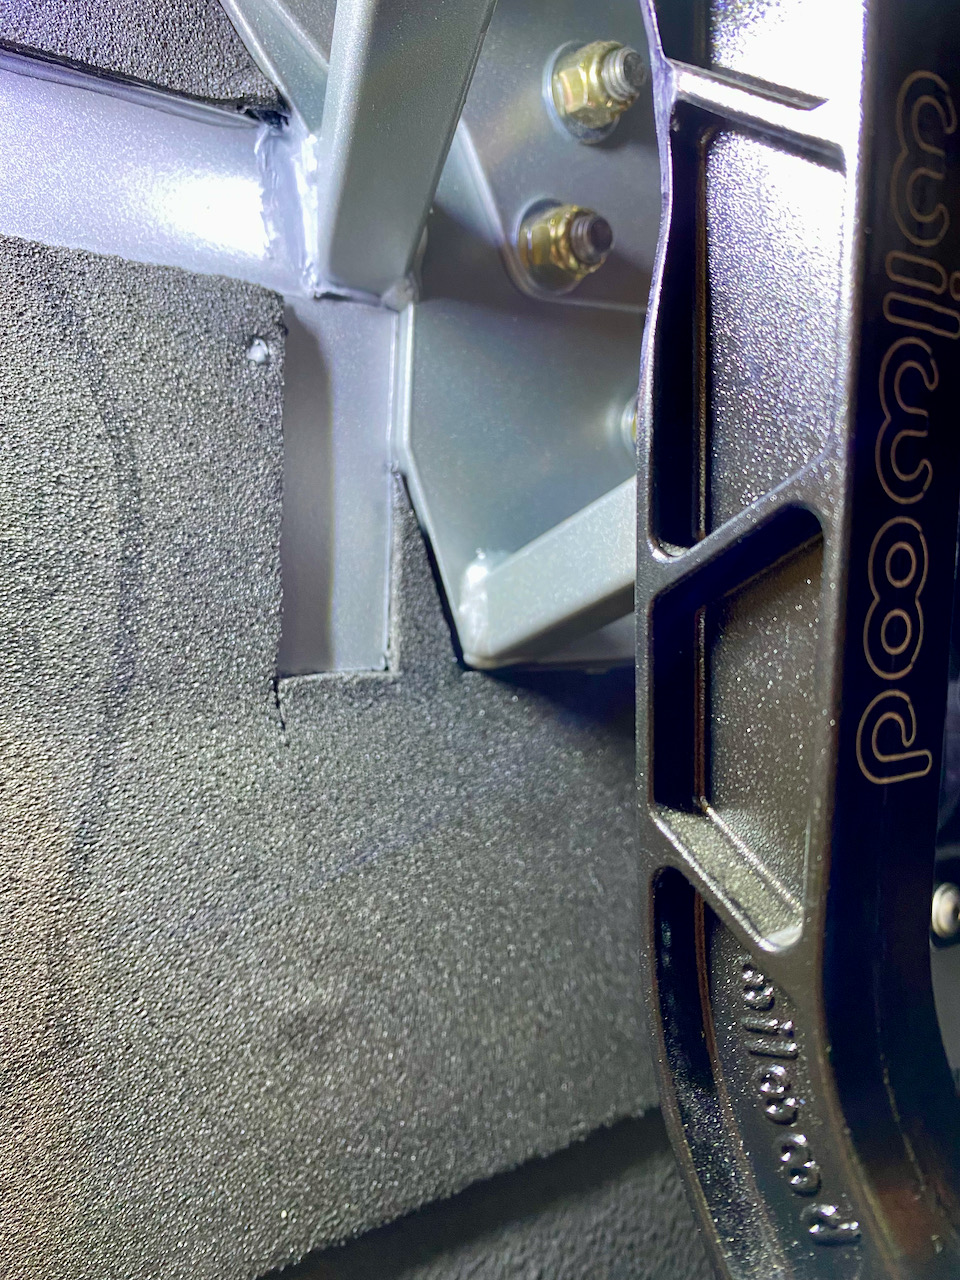
I started by cutting away the sound and heat insulation:
This is what the stop looked like after locating it and drilling/tapping the necessary holes:
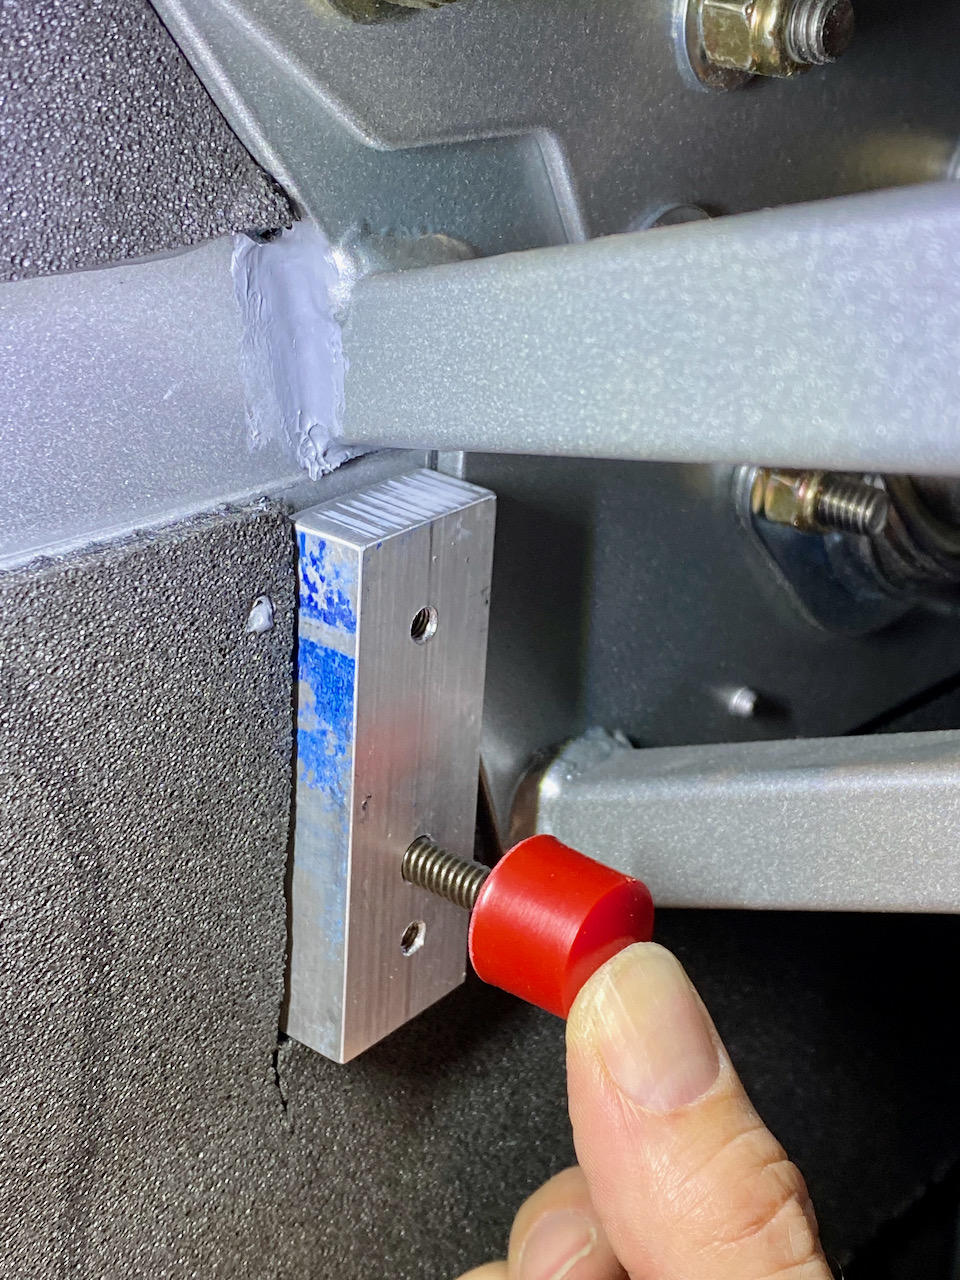
A quick coat of Eastwood chassis black and it was ready to install. Once the stud was cut down to the right length, I shimmed the stop with fender washers that are the same OD as the stop, which gave it a nice, solid feel.
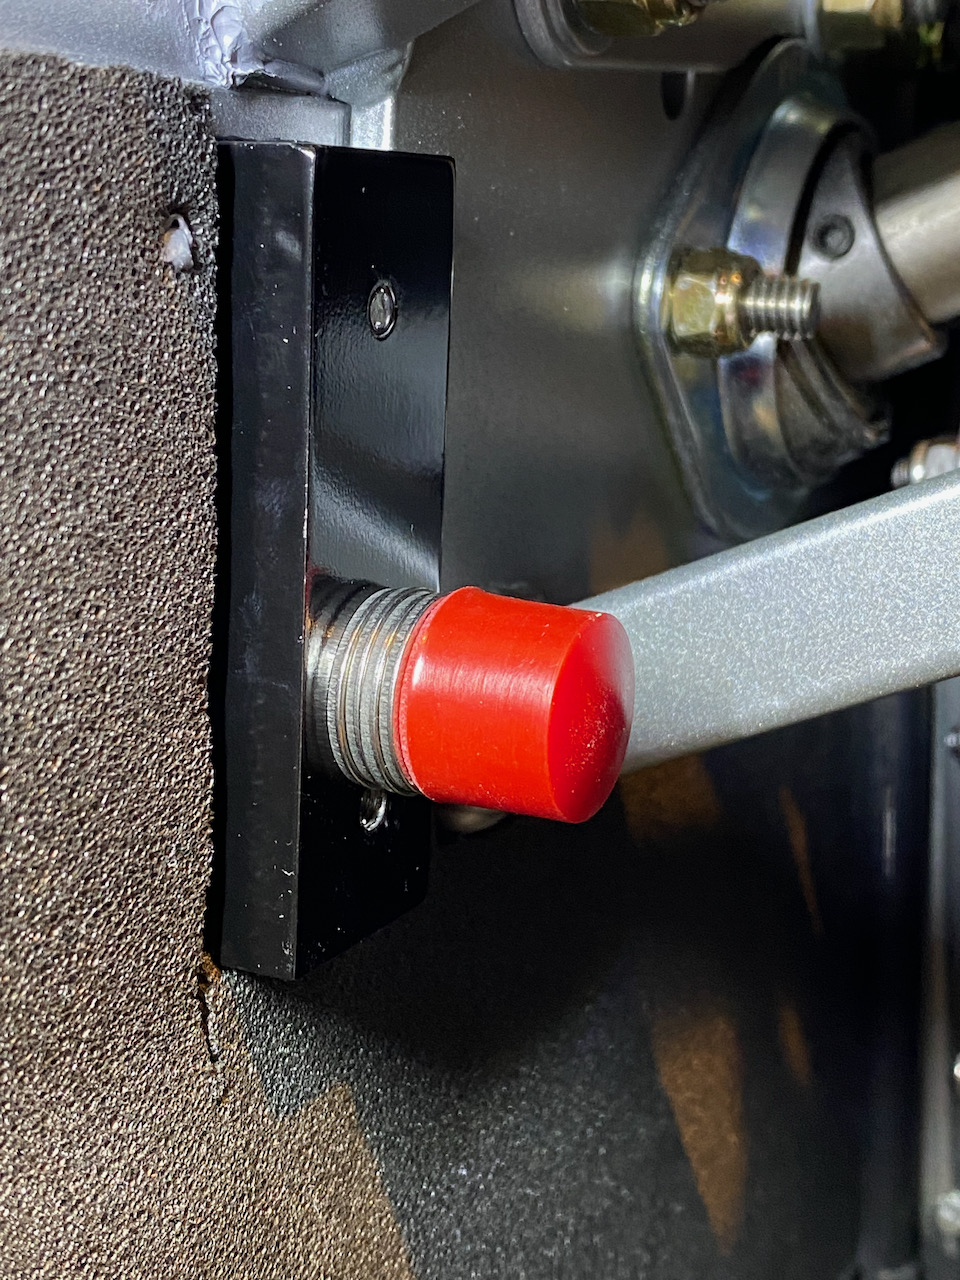
And here's the final product. I thought I ordered a black rubber stop so I was a little surprised when I saw the red one in the box from McMaster, but who doesn't like a little bling on their pedal stop, right?! This is the "medium-soft" rubber compound, which has a very nice cushioned yet firm feel.
MkIV Roadster build: Gen 2 Coyote, IRS, TKO600. Ordered 10/24/18. Delivered 1/29/19. Engine installed 8/8/21. First start 9/12/21. First go-kart 9/17/21. Off to paint 4/11/22. Back from paint 12/30/22.
Build thread here.
-
Post Thanks / Like - 0 Thanks, 2 Likes
-
09-16-2021, 07:17 PM
#215
Greek Guys' Garage Roadster Build #9509 (clutch pedal stop + first start video!)
OK so it turns out that someone did, in fact, get the first start on video! Better late than never... enjoy!
MkIV Roadster build: Gen 2 Coyote, IRS, TKO600. Ordered 10/24/18. Delivered 1/29/19. Engine installed 8/8/21. First start 9/12/21. First go-kart 9/17/21. Off to paint 4/11/22. Back from paint 12/30/22.
Build thread here.
-
Post Thanks / Like - 4 Thanks, 7 Likes
-
09-17-2021, 08:13 AM
#216
Senior Member

There we go! Great sound to go with a great milestone. Congrats.
MK4 #7838: IRS 3.55 TrueTrac T5z Dart 347
The drawing is from ~7th grade, mid-1970s
Meandering, leisurely build thread is
here
-
Post Thanks / Like - 1 Thanks, 0 Likes
JohnK thanked for this post
-
09-17-2021, 09:26 PM
#217
Senior Member

Very nice! That is one clean machine.
MKIV Complete Kit #9822 l BluePrint 347 EFI l TKO600 l Power Steering l Heater/Defrost l
Build Thread
-
Post Thanks / Like - 1 Thanks, 0 Likes
JohnK thanked for this post
-
09-17-2021, 11:47 PM
#218
Greek Guys' Garage Roadster Build #9509 (first go-kart - with video!)
I finally sorted out the issues with my hydraulic clutch (as detailed here) and was able to get out for a first go-kart this evening. Here's a short video:
It's an unbelievable feeling to be able to take 9509 out for a drive, even a short one to the end of the block and back.
Last edited by JohnK; 09-18-2021 at 12:08 AM.
MkIV Roadster build: Gen 2 Coyote, IRS, TKO600. Ordered 10/24/18. Delivered 1/29/19. Engine installed 8/8/21. First start 9/12/21. First go-kart 9/17/21. Off to paint 4/11/22. Back from paint 12/30/22.
Build thread here.
-
Post Thanks / Like - 1 Thanks, 5 Likes
-
09-18-2021, 05:49 PM
#219
-
09-19-2021, 09:27 AM
#220
Wilwood told me, making the threaded shaft longer toward a master cyl increases bias. I have not verified that.
20th Anniversary Mk IV, A50XS Coyote, TKO 600, Trunk Drop Box, Trunk Battery Box, Cubby Hole, Seat Heaters, Radiator hanger and shroud.
-
09-19-2021, 09:35 AM
#221
That's my understanding as well. The FFR manual says this:
"When the balance bar is centered, it pushes equally on both master cylinders creating equal pressure, given that the master cylinders are the same size bore. When adjusted as far as possible toward one master cylinder it will push approximately twice as hard on that cylinder as the other."
MkIV Roadster build: Gen 2 Coyote, IRS, TKO600. Ordered 10/24/18. Delivered 1/29/19. Engine installed 8/8/21. First start 9/12/21. First go-kart 9/17/21. Off to paint 4/11/22. Back from paint 12/30/22.
Build thread here.
-
09-19-2021, 11:47 AM
#222
Senior Member
John FWIW I have my 90 Tilton fitting on same side as you and my decal is the same one you are using, so maybe both of us are wrong. If I recall Tilton or Wilwood had some type of directions to what decal to use depending on what side of the bias bar you mounted the 90 degree fitting. I was actually able to adjust my brake bias on the track last week, the bias adjuster definitely comes in handy and I am glad I installed one.
Last edited by Fman; 09-19-2021 at 10:11 PM.
-
Post Thanks / Like - 1 Thanks, 1 Likes
JohnK thanked for this post
-
09-19-2021, 03:12 PM
#223
Senior Member

Originally Posted by
Fman
John FWIW I have my 90 Tilton fitting on same side as you and my decal is the same one you are using, so maybe both of us are wrong. If I recall Tilton or Wilwood had some type of directions to what decal to use depending on what side of the bias bar you mounted the 90 degree fitting. I was actually able to adjust my brake adjusted on the track last week, the bias adjuster definitely comes in handy and I am glad I installed one.
I've been inspired by both of you on the Bias Adjuster. I ordered one last night and get it installed before I get too far along.
-
Post Thanks / Like - 0 Thanks, 2 Likes
-
09-23-2021, 02:47 PM
#224
Senior Member

Hi John. I've been unplugged from my build and the forum for about a month. Yours is the first thread I'm getting caught up on, and I must admit there was a smile on my face as I saw your progress. I was bummed to read no one recorded your first start, then read on and saw it, as well as your first go-kart. So cool! Was motivating to hear it fire to life! Picked up more ideas from your build--no surprise there. Really cool to see it coming together! Thanks for taking the time to share it.
Chris
Coupe complete kit delivered: 4/22/24.
Build Thread. Coyote. T-56. IRS w/3.55. Wilwoods. PS. HVAC. Side windows.
MK4 Complete kit.
Build Thread Index. Delivered: 10/15/2020. Legal: 7/25/23. Coyote Gen3. TKO600 (0.64 OD). IRS w/3.55. PS. Wilwoods. Sway bars. This build is dedicated to my son, Benjamin.
Build Thread.
-
Post Thanks / Like - 0 Thanks, 1 Likes
-
09-23-2021, 08:27 PM
#225
Thanks Chris! Thinking of the first start and first go-kart still puts a smile on my face too.  Glad to see you back. I can't wait to see updates to your build.
-John
MkIV Roadster build: Gen 2 Coyote, IRS, TKO600. Ordered 10/24/18. Delivered 1/29/19. Engine installed 8/8/21. First start 9/12/21. First go-kart 9/17/21. Off to paint 4/11/22. Back from paint 12/30/22.
Build thread here.
-
11-03-2021, 12:21 AM
#226
Greek Guys' Garage Roadster Build #9509 (dash wiring complete)
The last few weeks have been pretty busy with non-build activity around the house, but I've been trying to sneak out to the garage and get a little bit of work in every day just to keep moving the ball forward. Today I finally hit a bit milestone (in my mind) in wrapping up the last of the dash wiring. I've temporarily connected all the lights and have been able to test everything now - all lights, turn signals, hazards, gauges, keyless ignition, electric parking brake... Everything is working as intended, and no smoke was released in the process.
I did have one small brain fart on the Russ Thompson turn signal wiring. I added a Molex connector inline in the 5-wire harness from the RT turn signal. In the process, I accidentally swapped the common wire and right turn signal wire in the connector, so only my left turn signal was working. I sent an e-mail to Russ this morning explaining my problem, and he called me back this afternoon while I was out running errands, even though he's currently at SEMA. After discussing for a few minutes, he figured out what the problem was over the phone. Sure enough, when I got back home I found those two wires swapped. I had them switched in a few seconds and everything is now working perfectly. Many thanks to Russ for his expert assistance!
Overall, I'm happy with the wiring. I added a bunch of Molex connectors to make dash removal easier down the road, should that be necessary (hopefully it won't be, but better safe than sorry). It's not the prettiest wiring job by a long shot, but everything is bundled up, heat shrinked, secured, and reasonably organized so I'm OK if it doesn't win any beauty awards. Mostly I'm glad it's finished and that it works, and that I can put the dash in place for (hopefully) the final time and move on to the next step.
I thought I'd mention a few items (in no particular order), in case they're of interest to anyone:
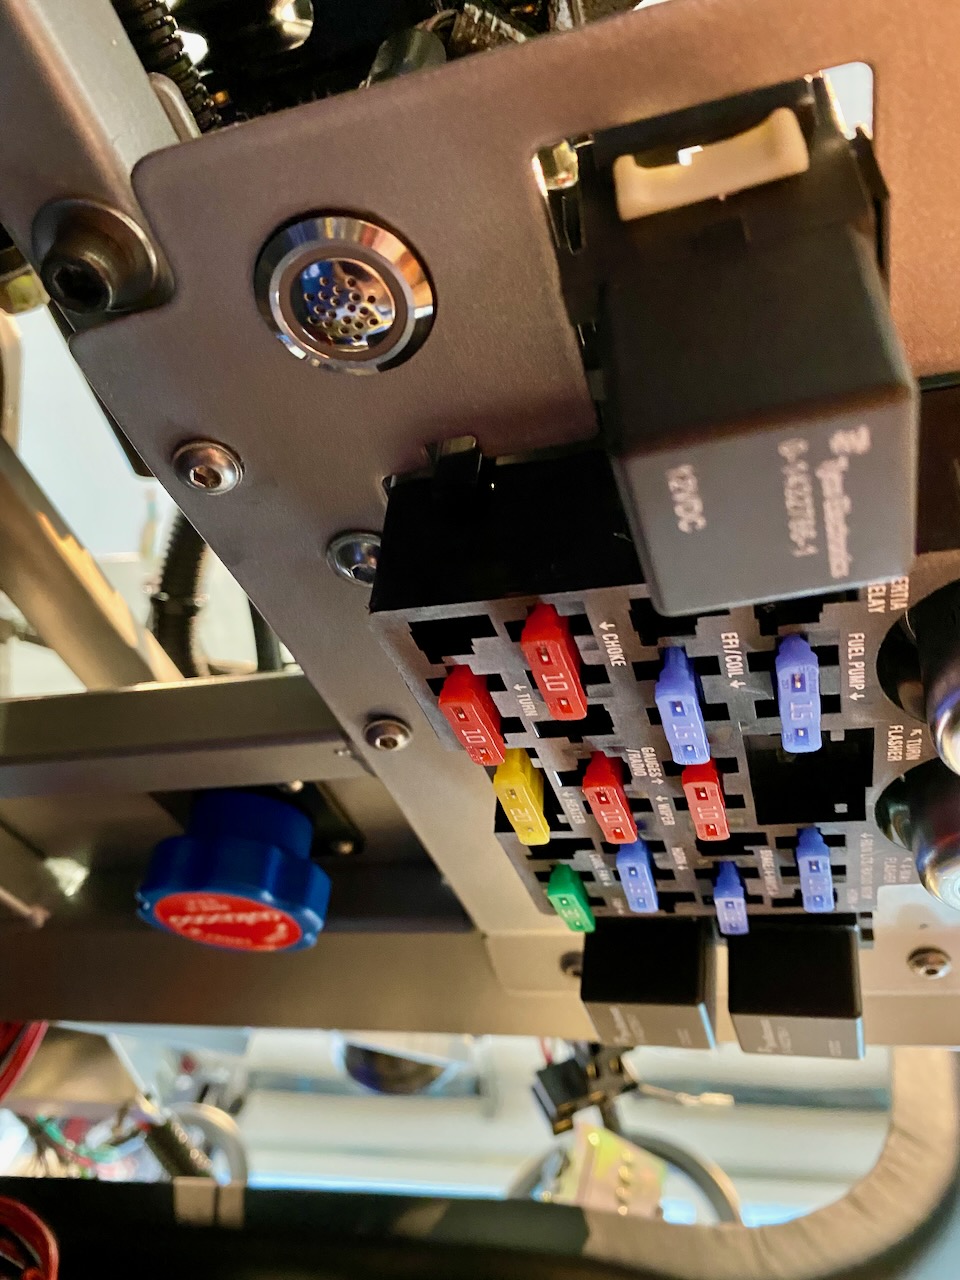
Watsons Streetworks turn signal reminder buzzer: Several people have mentioned that the built-in signal LED's in the Speedhut speedo get washed out in daylight and are hard to see. I didn't want to be "that guy" that's driving down the road cluelessly for miles with their turn signal flashing, so I decided to install a turn signal reminder buzzer. It's a very straightforward installation from a wiring standpoint. I found an unused corner of the fuse panel that was the perfect spot for the buzzer. It emits a somewhat annoying buzzing sound that is loud enough that it's unlikely I'll ever forget my turn signal on.
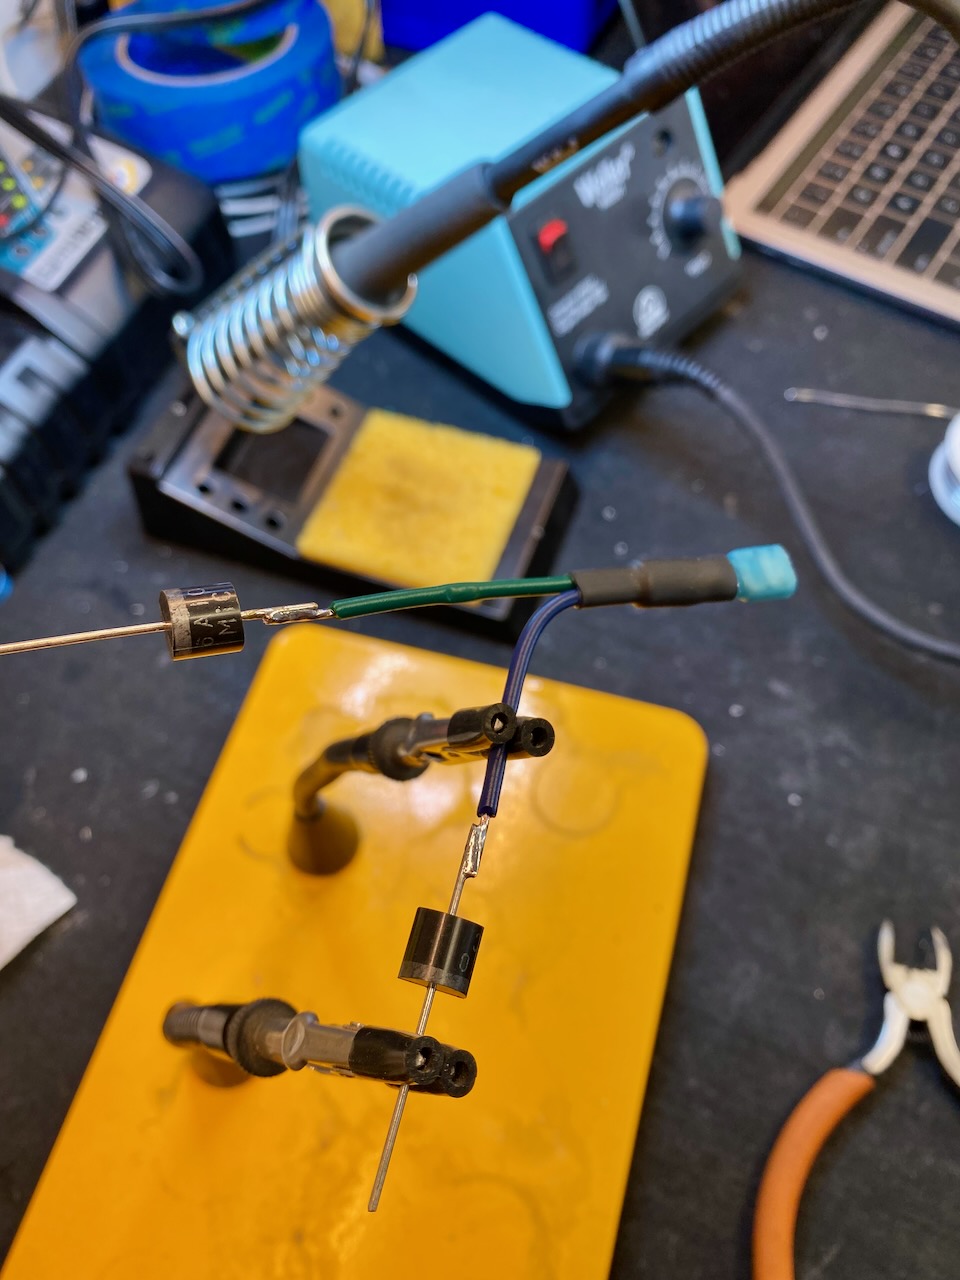
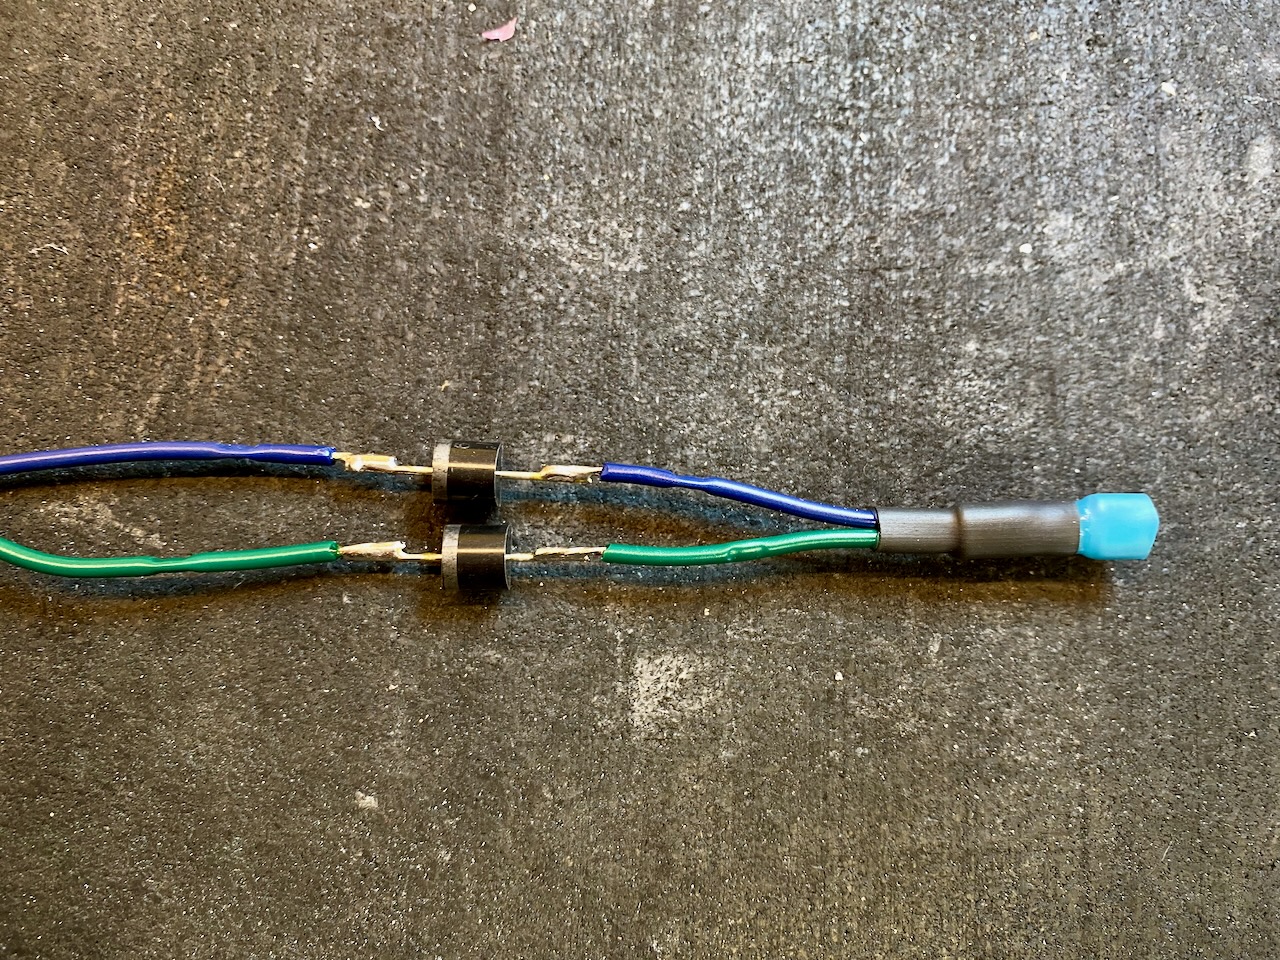
Hazard switch diodes: I wanted to use the Lucas SPST switch in the dash for the hazard lights. To do so requires either a complicated relay setup, or the installation of a couple of diodes inline in the two hazard light wires from the switch. I've never really been good at soldering, but after watching a few YT videos and practicing my tinning techniques and finding the right temperature on the soldering iron, it was actually pretty easy to do. The diodes did get covered in triple-wall adhesive-lined heat shrink prior to installation. You can sort of see them in the first photo.
E-Stopp parking brake "safety" wiring: The E-Stopp parking brake control module includes a blue wire that the instructions say to route to the ignition. The idea being that this will prevent the parking brake from being accidentally set while the engine is running. This seemed like a clunky solution to me. I wanted to be able to set the parking brake while driving, if needed, but I also didn't feel entirely comfortable with no safety in place to prevent accidental engagement. What I decided to do was to to tie the blue wire to the brake switch rather than the ignition, so that the brake pedal has to be depressed to set or release the parking brake. This seems like a reasonable safety measure, while still letting me use the parking brake when needed. The brake switch that I have has two pairs of connectors. One pair is normally open and closes when the brake pedal is pressed. These are the connectors that are used to turn on the brake lights. The other pair of connectors are typically used when this type of switch is used as a clutch safety switch. They are normally closed and open when the brake pedal is pressed. Using this circuit for the E-Stopp safety wire means that the blue wire gets +12V any time the brake pedal isn't pressed (thus preventing the E-Stopp from being set) and the power is interrupted when the brake pedal is pressed, allowing the E-Stopp to be set. I'm much happier with this setup.
Digital Guard Dawg keyless ignition: I wired this up pretty much exactly as described in the instructions. It also has a safety wire that goes to the normally open circuit on the brake switch, so that the brake pedal has to be pressed in order to start the engine. This, in combination with the coyote clutch safety switch, means that both the clutch and the brake have to be pressed in order to start the engine. Since both the DGD and E-Stopp control boxes are mounted behind the glove box, I decided to use the Accessory 2 wire from the DGD module to power the E-Stopp through a 10A self-resetting circuit breaker. This means that the parking brake cannot be set or released unless the keyless ignition is first turned on in accessory mode. I like the added little bit of theft prevention this provides. It likely would not stop someone who *really* wants to steal the car but it may at least slow them down a bit.
Underdash filler panels: In the top photo you can sort of make out two under dash filler panels that run nearly the full length of the dash. These started life as Mike Everson's under dash filler. After extensive massaging I ended up with what you see here. They're painted black on the visible side. I also added patches of Second Skin Damplifier Pro from scraps I had left over. This gets rid of the "tinny" sound of the panels and gives them a more solid feel/sound if you tap on them. Aside from closing up the vast majority of the underside of the dash, they also provide a home for all the switches and buttons I didn't want to have on the face of the dash. These include:
- LED footwell lights in both footwells that are turned on/off by twisting the headlight knob. (this will also turn on/off the trunk light).
- Buttons for the speedo display and for setting the clock
- Blue Sea Systems dual USB charging port
- Dimmer knob for Speedhut gauges
- Mounting point for seat heater relays
- DC coax power port. This is run off of the 30A cooling fan circuit. I bypassed the relay so that the 30A fan fuse gets power all the time. This allows me to plug in my 12V motorcycle heated gear (jacket and gloves) on really cold days since I didn't install a heater. It's wired directly to the battery so it also allows me to use this port to plug in a battery tender using a coax adapter without having to try to get to the battery itself (which is a bit of a PITA given how low it's mounted).
- ground bus bar. All the extra "toys" amounted to a lot of additional ground wires, so I added a bus bar on the under dash panel to accommodate all the extra ground wires.
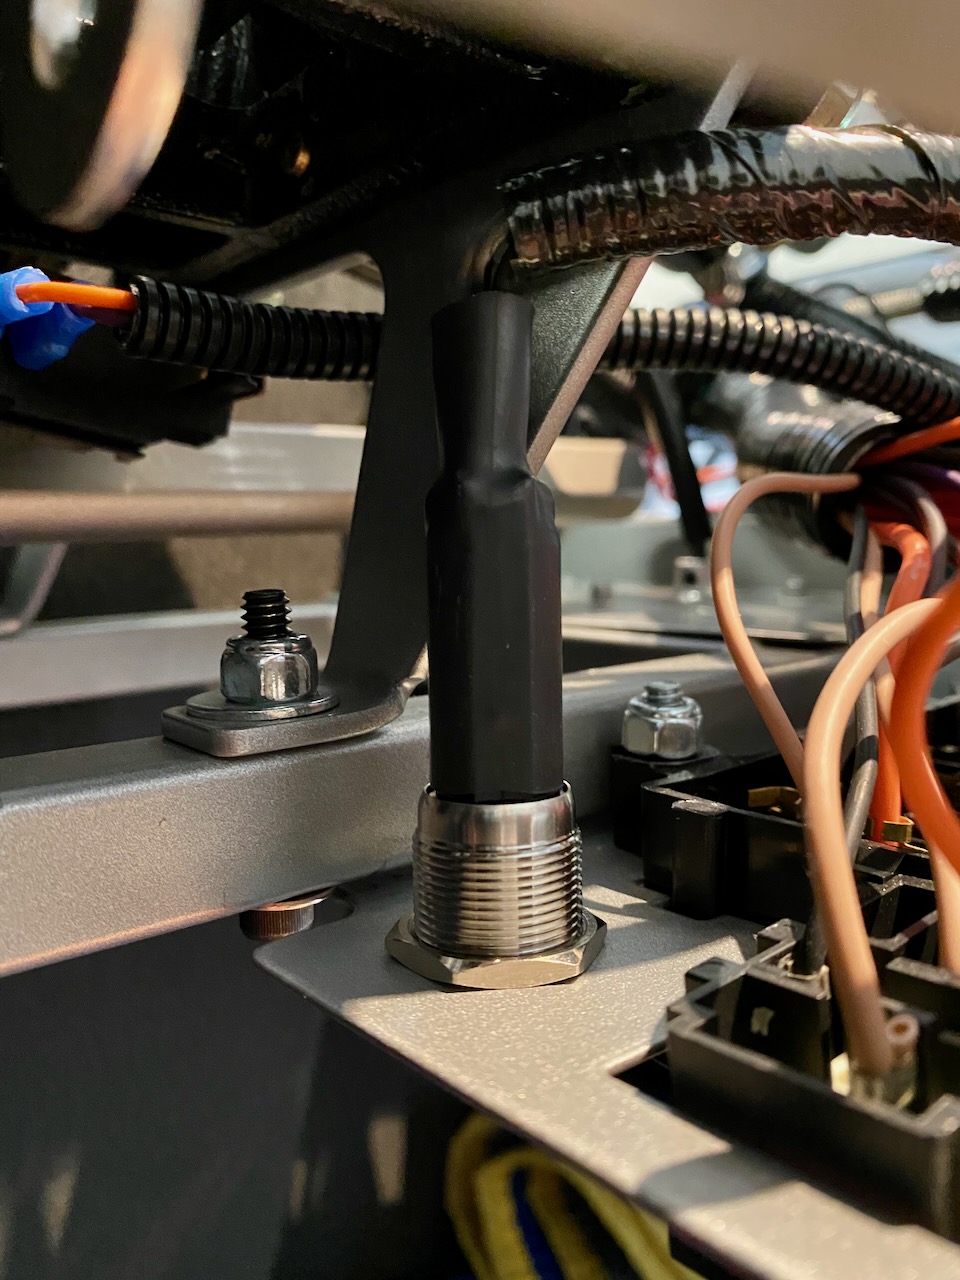
- Inertia switch interrupt. On the far right side of the passenger under dash filler panel, I mounted a simple toggle inline in the ground wire running to the inertia switch. This allows me to cut off the fuel pump circuit if needed.
- Mounting point for the OBDII port on the far right side.
OK, that's pretty much it for dash wiring. Glad to be done with it.
Last edited by JohnK; 11-03-2021 at 09:35 AM.
MkIV Roadster build: Gen 2 Coyote, IRS, TKO600. Ordered 10/24/18. Delivered 1/29/19. Engine installed 8/8/21. First start 9/12/21. First go-kart 9/17/21. Off to paint 4/11/22. Back from paint 12/30/22.
Build thread here.
-
Post Thanks / Like - 0 Thanks, 1 Likes
-
11-03-2021, 10:37 AM
#227
Senior Member
John, the turn signal buzzer is a pure unfettered stroke of genius.
Well done
-
Post Thanks / Like - 1 Thanks, 1 Likes
JohnK thanked for this post
-
11-03-2021, 10:51 AM
#228
Originally Posted by
Blitzboy54
John, the turn signal buzzer is a pure unfettered stroke of genius.
Well done
Thank you, but I can't take credit for the idea. Unsurprisingly, the genius is EdwardB. I'm just good at plagiarizing.
MkIV Roadster build: Gen 2 Coyote, IRS, TKO600. Ordered 10/24/18. Delivered 1/29/19. Engine installed 8/8/21. First start 9/12/21. First go-kart 9/17/21. Off to paint 4/11/22. Back from paint 12/30/22.
Build thread here.
-
Post Thanks / Like - 0 Thanks, 1 Likes
-
11-03-2021, 05:00 PM
#229
Senior Member
Looking great, John. Really nice work and nice photos to go with it.
MK4 #7838: IRS 3.55 TrueTrac T5z Dart 347
The drawing is from ~7th grade, mid-1970s
Meandering, leisurely build thread is
here
-
Post Thanks / Like - 1 Thanks, 0 Likes
JohnK thanked for this post
-
11-03-2021, 05:16 PM
#230
25th Anniversary #9772
-
Post Thanks / Like - 1 Thanks, 0 Likes
JohnK thanked for this post
-
11-03-2021, 10:55 PM
#231
Senior Member
Originally Posted by
JohnK
I finally sorted out the issues with my hydraulic clutch (as detailed
here) and was able to get out for a first go-kart this evening. Here's a short video:
It's an unbelievable feeling to be able to take 9509 out for a drive, even a short one to the end of the block and back.
John, I missed this so I am a little late to the party --- congratulations! Sounds awesome! Have you decided on a color yet?
-
Post Thanks / Like - 1 Thanks, 1 Likes
JohnK thanked for this post
-
11-03-2021, 11:16 PM
#232
Originally Posted by
Fman
John, I missed this so I am a little late to the party --- congratulations! Sounds awesome! Have you decided on a color yet?
Thank you very much! Yes, I've decided on a color... about a thousand times now.  It's become a running joke of sorts in my house. Every time someone walks past I say "hey, come see what color I'm going to paint the roadster!" The whole family now roll their eyes and don't even look anymore. The day I have to make my final choice will likely be the hardest day of my life.
MkIV Roadster build: Gen 2 Coyote, IRS, TKO600. Ordered 10/24/18. Delivered 1/29/19. Engine installed 8/8/21. First start 9/12/21. First go-kart 9/17/21. Off to paint 4/11/22. Back from paint 12/30/22.
Build thread here.
-
11-04-2021, 02:55 PM
#233
Senior Member
Congrats on the electrical milestone! You brought in some nice extra touches. It’s fun to follow along to see the quality of your build. Inspiring and intimidating all at once!
Chris
Coupe complete kit delivered: 4/22/24.
Build Thread. Coyote. T-56. IRS w/3.55. Wilwoods. PS. HVAC. Side windows.
MK4 Complete kit.
Build Thread Index. Delivered: 10/15/2020. Legal: 7/25/23. Coyote Gen3. TKO600 (0.64 OD). IRS w/3.55. PS. Wilwoods. Sway bars. This build is dedicated to my son, Benjamin.
Build Thread.
-
Post Thanks / Like - 1 Thanks, 0 Likes
JohnK thanked for this post
-
11-04-2021, 10:01 PM
#234
Greek Guys' Garage Roadster Build #9509 (Seats! - multiple posts)
A while back I mentioned that I found a set of seats that I really liked. They are the Ultrashield Cobra bucket seats. I loved that they were an aluminum race-style bucket like the Kirkey's and had the slot for the sub strap in them. I thought the looks were "just OK" though, so I decided to have them reupholstered. Here's what they looked like out of the box:
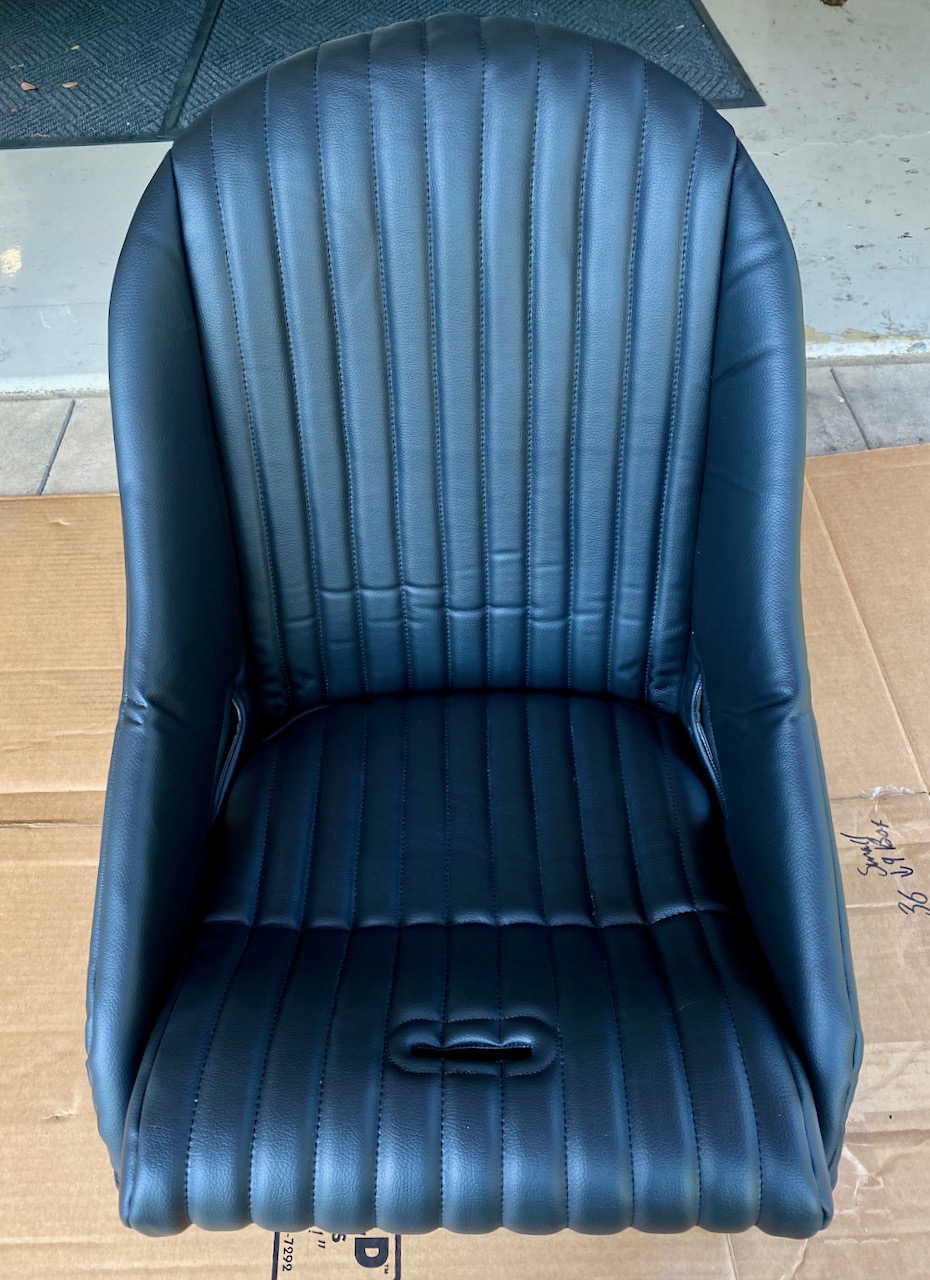
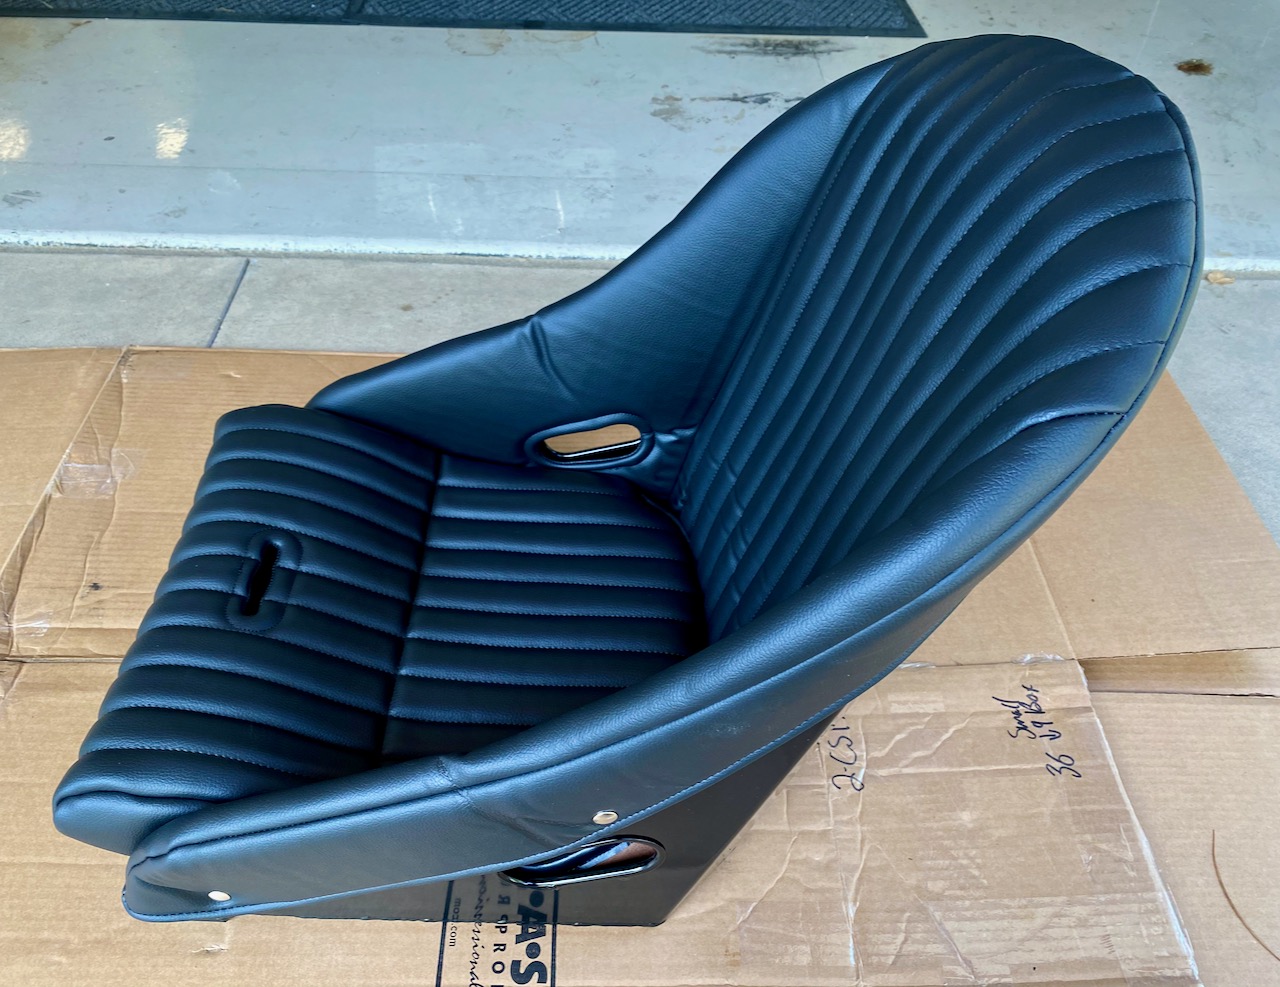
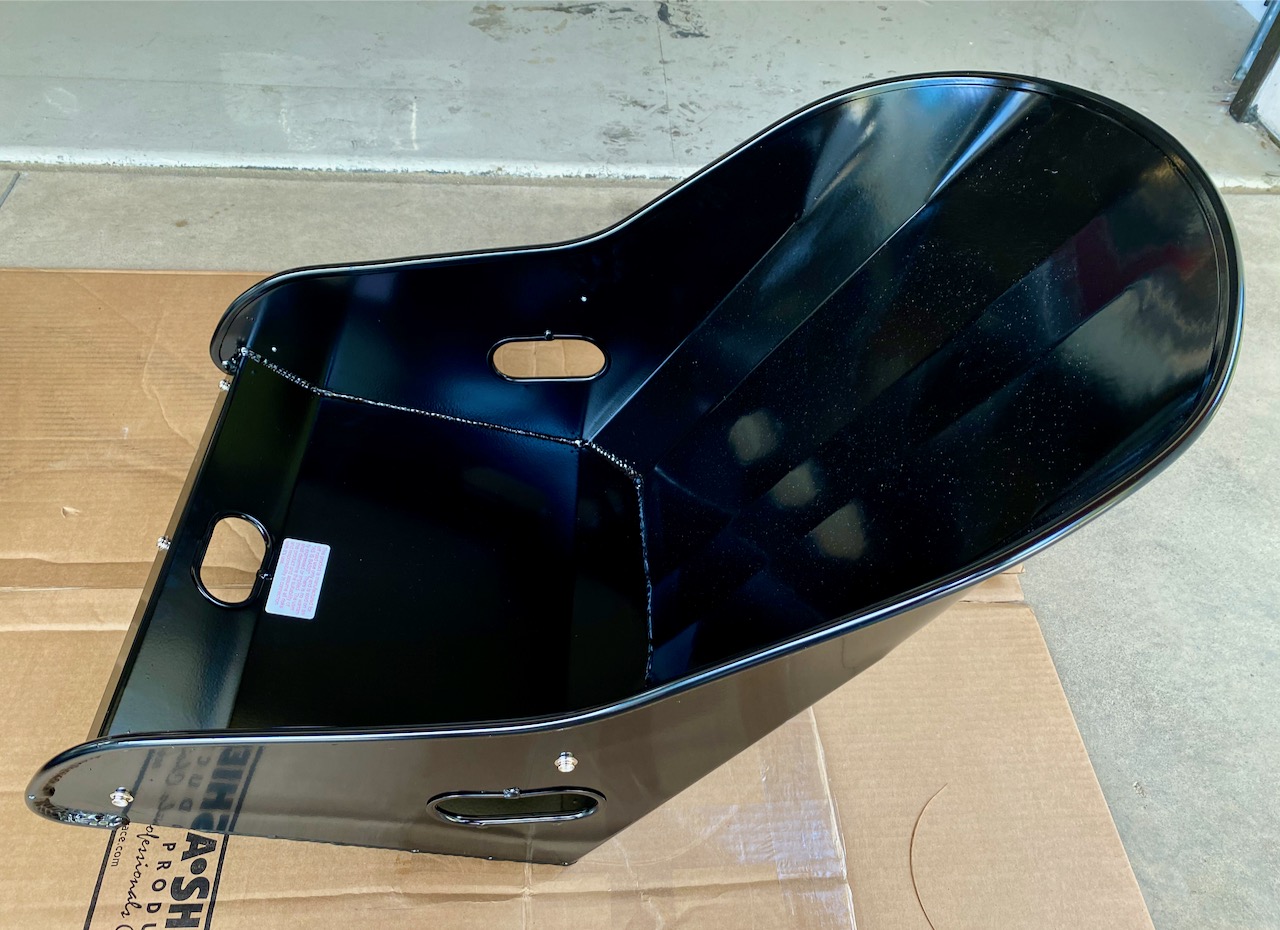
Nothing wrong with them, really, but they could be better.
After some searching, I found a local upholstery shop that got good reviews online, so I stopped by for a visit. I was frankly blown away by the cars these guys were working on, and the quality of work they were doing. There was a $30M Bentley brasser, Mercedes 300SL gullwing, Ferrari's and on and on... Yeah, I think they can handle the upholstery on my car. 
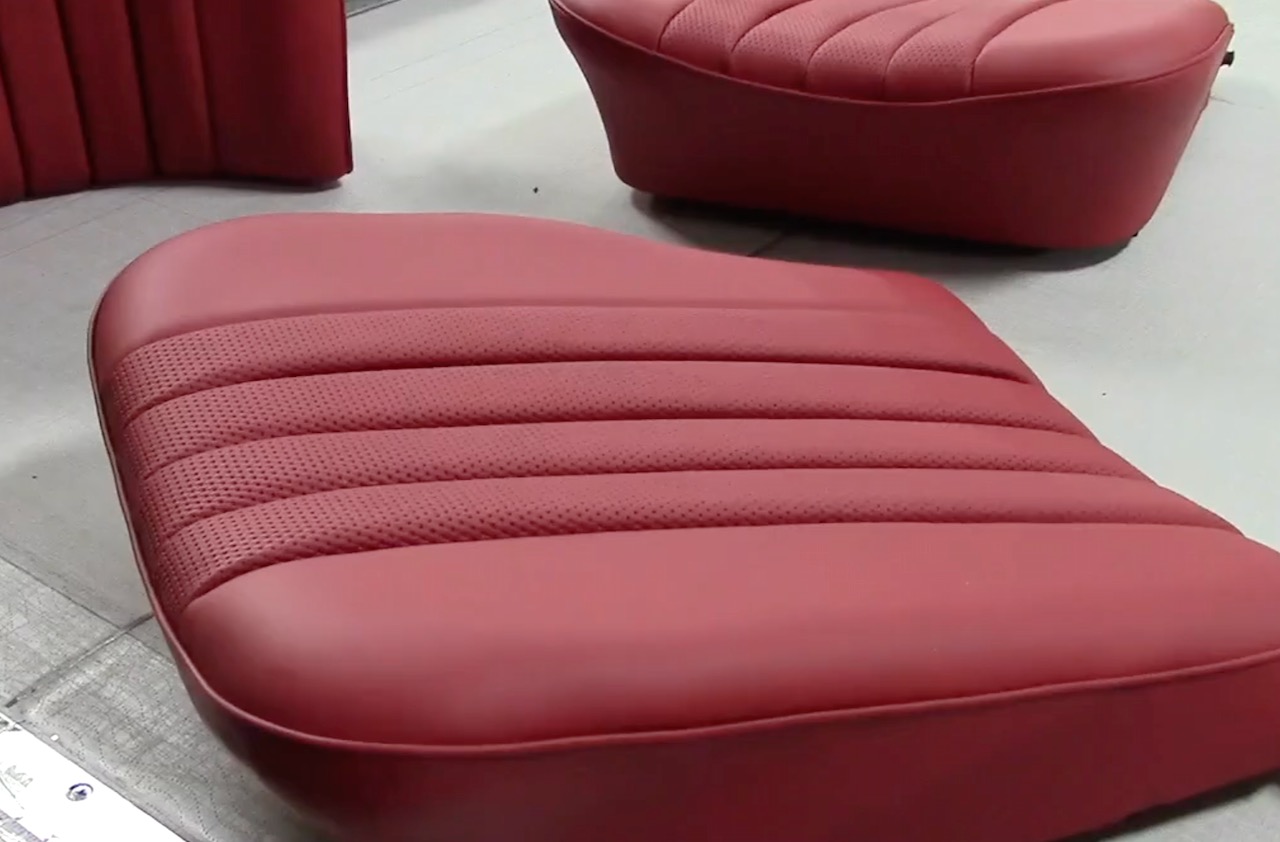
I had done a lot of research online and had some ideas in my head - some specific and some pretty vague. We chatted for a while and I shared some idea photos and I left the seats with them to think about for a bit. My general ideas were as follows: I liked the seat details from the Mercedes 300SL's that had an embossed basketweave pattern in the center pleats with plain leather on the outer edges, like this:
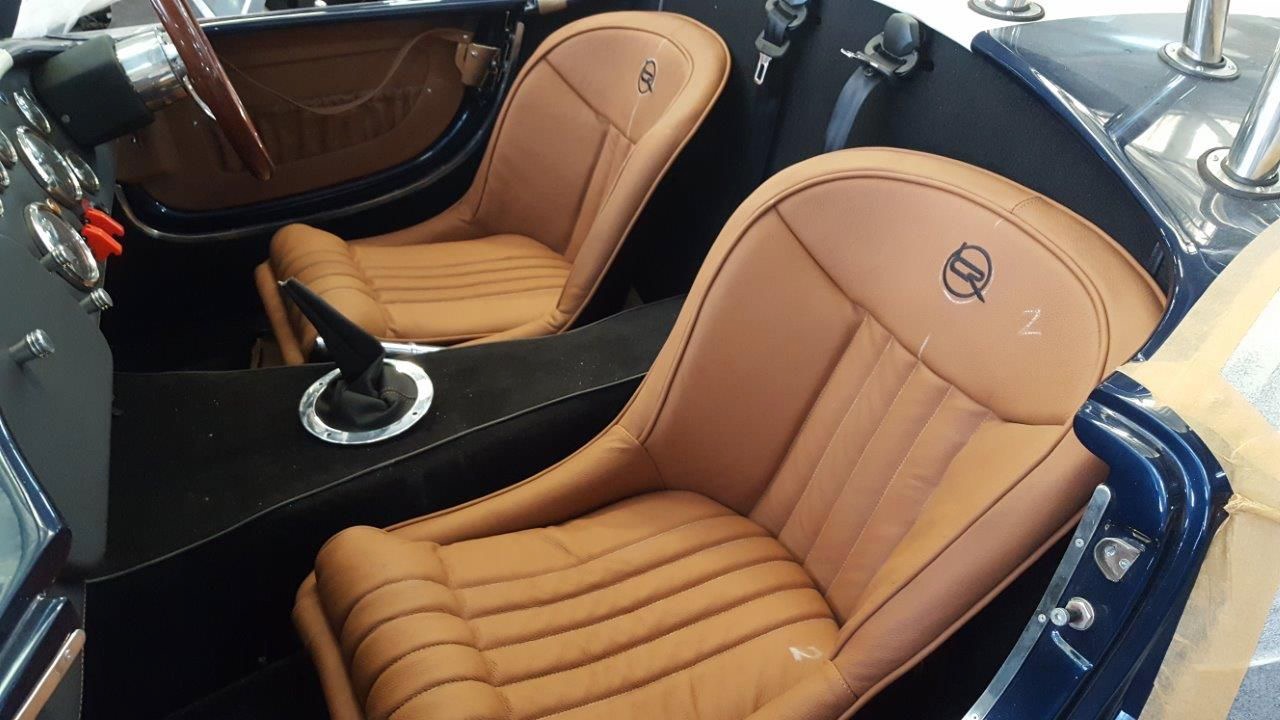
I also liked the scooped stitch detail on the backs of the Backdraft seats, like this:
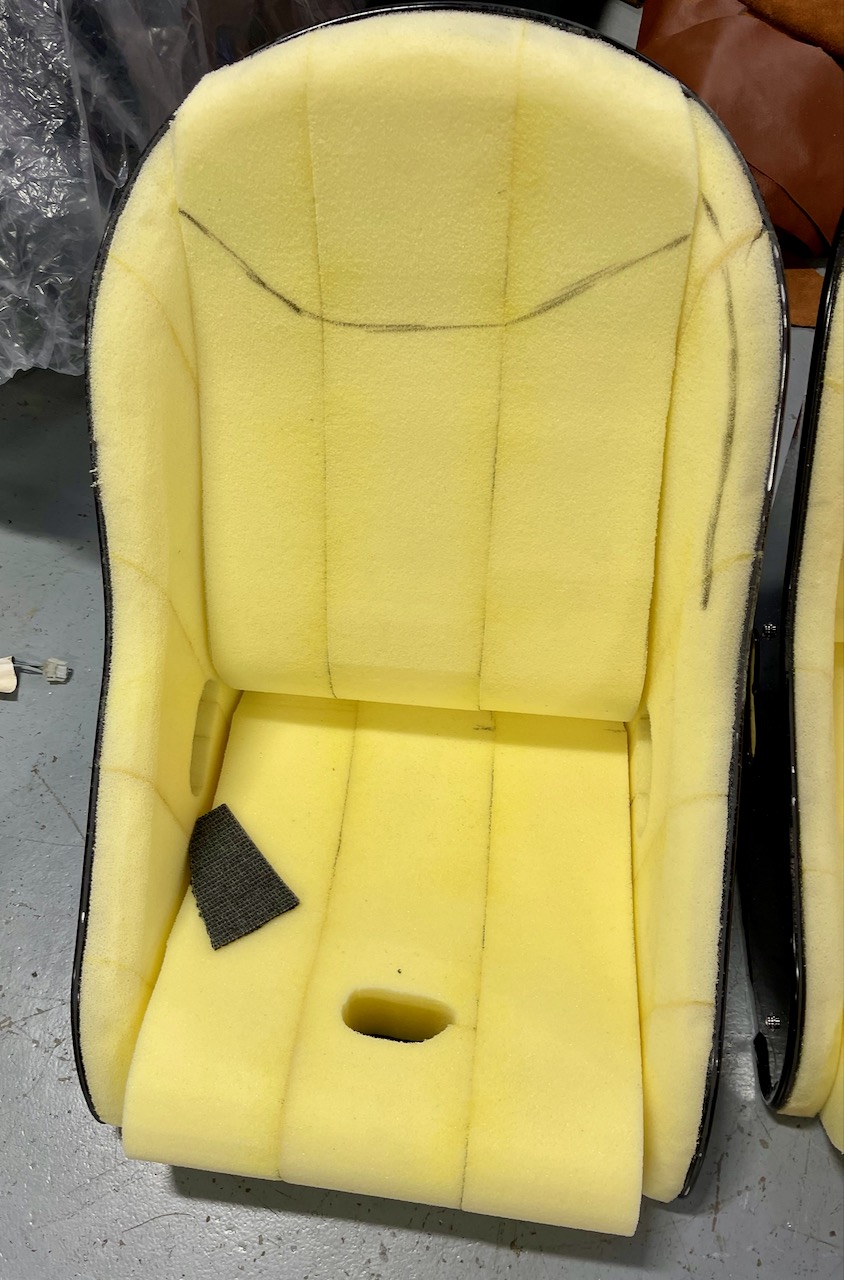
I asked them to custom-fit the foam to my body, add the Cobraheat seat heaters, and add these styling elements to the seats. They're pretty backed up, with a customer backlog of nearly a year, but this was a pretty small job for them so they said they'd try to get to it as quickly as they could. I went back a couple of times to talk details with them, make some design changes, and test-fit the foam inserts in the seats.
(cont.)
MkIV Roadster build: Gen 2 Coyote, IRS, TKO600. Ordered 10/24/18. Delivered 1/29/19. Engine installed 8/8/21. First start 9/12/21. First go-kart 9/17/21. Off to paint 4/11/22. Back from paint 12/30/22.
Build thread here.
-
11-04-2021, 10:08 PM
#235
-
Post Thanks / Like - 0 Thanks, 7 Likes
-
11-05-2021, 09:35 PM
#236
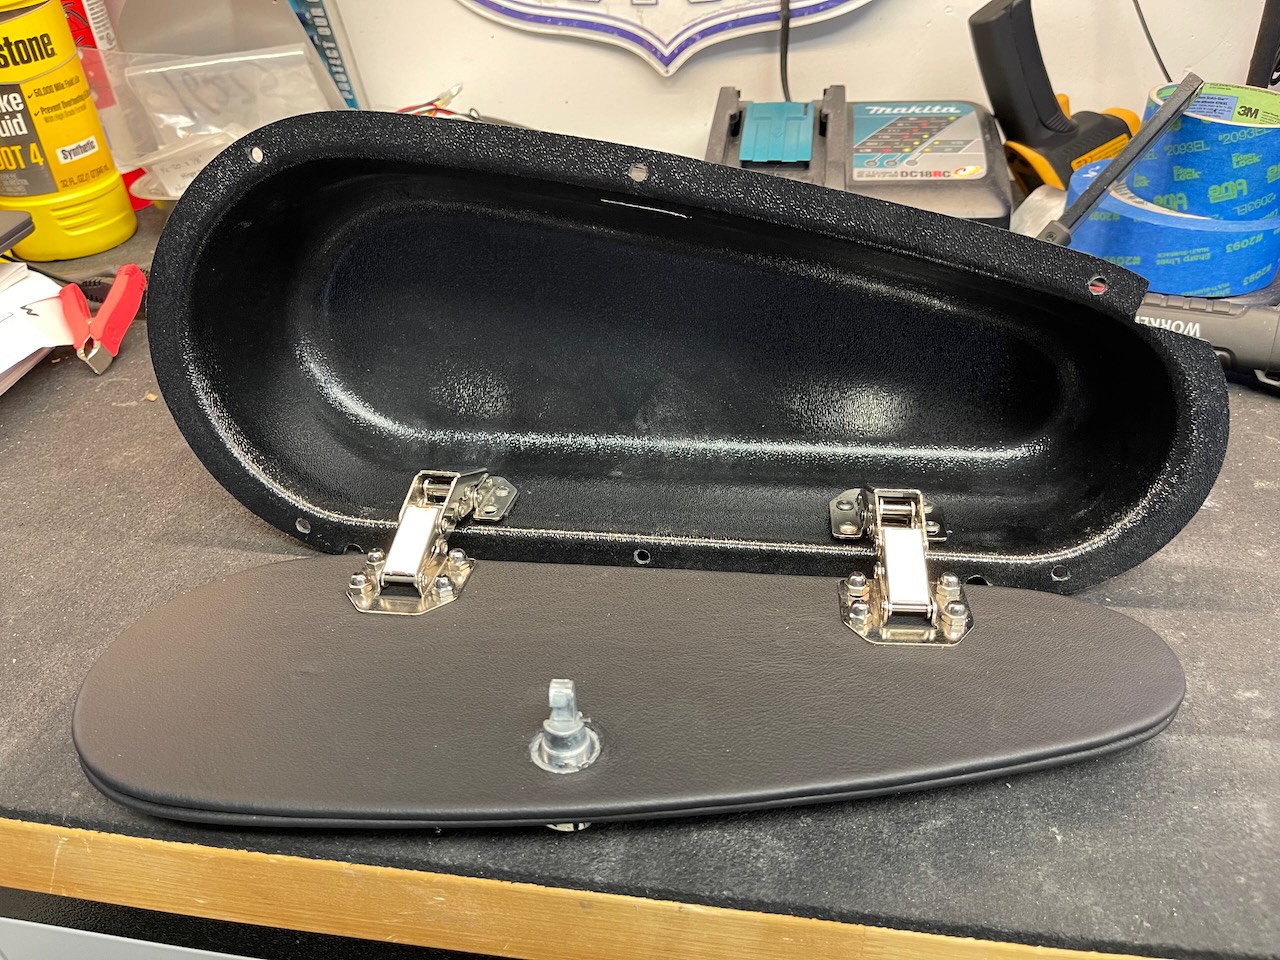
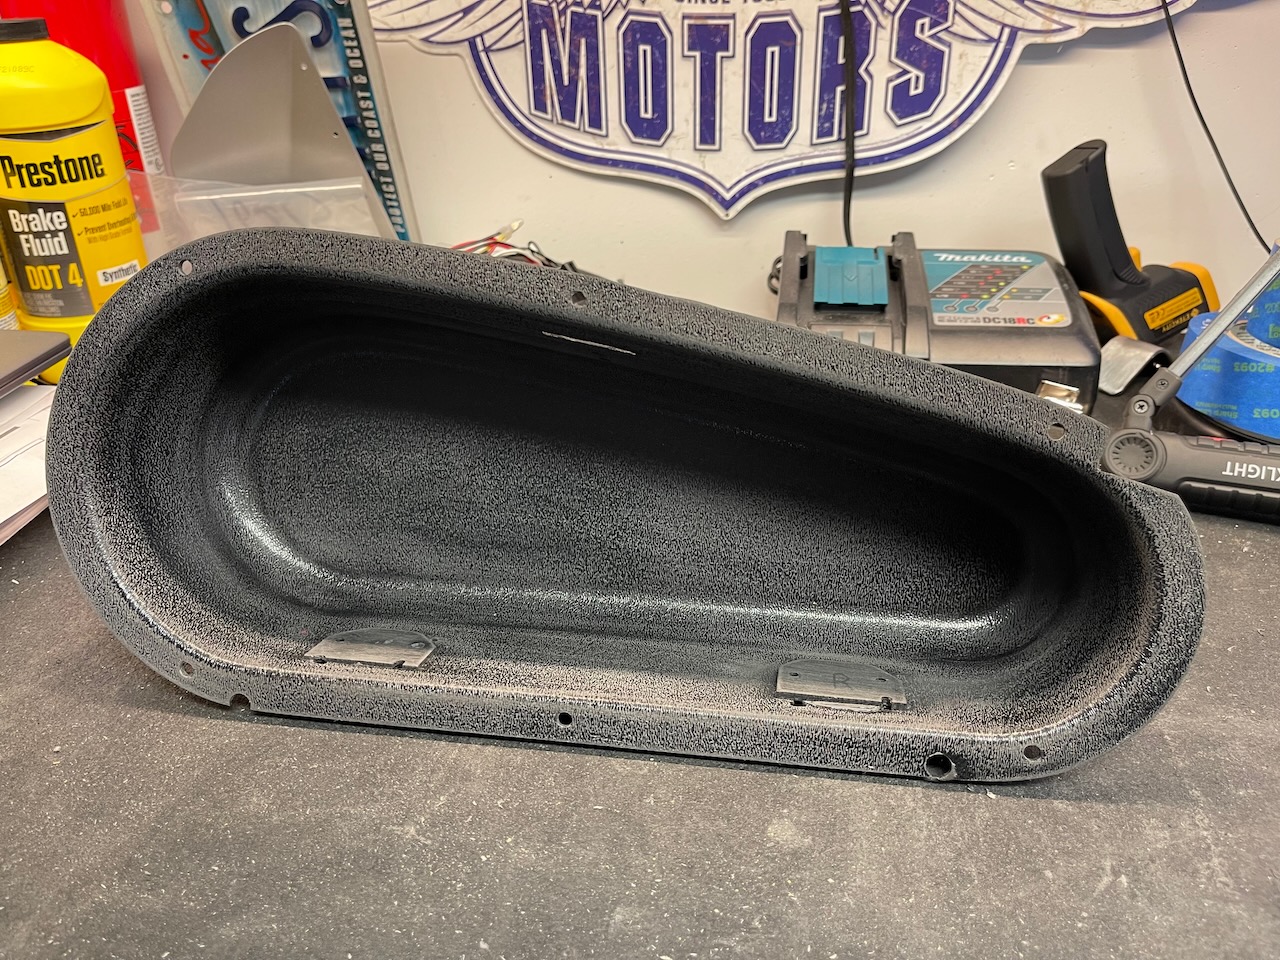
Greek Guys' Garage Roadster Build #9509 (glove box finished)
A while back I gave a preliminary update on the glove box for my dash here. I really lucked out in discovering that the Alex's glove box that I had bought a while back fit perfectly on the custom-formed dash glove box opening. That saved me a ton of work forming my own glove box. However, I didn't care for the textured ABS finish on the glove box so I still had to do some work on it. After weighing my options, I decided that I'd try to flock it using a suede-tex kit from Flock it! If you're not familiar with flocking, it's a velvety finish that you typically see on the inside of jewelry boxes and whatnot. The process is very simple. Here's what I started with:
I began by scuffing the whole box with some 150 grit sandpaper and wiped it down with IPA.
The flocking process itself is pretty straightforward and easy. There are a bunch of videos on YT to give you a sense of it. You apply the color-matched adhesive with a brush or roller (you can also spray it if you're working on a larger project). You load up a bunch of the flocking in the applicator tube and then "shoot" it onto the surface. The glue remains tacky for about 15 minutes, so that's how long you have to get it all covered. For a part this size, that was plenty of time.
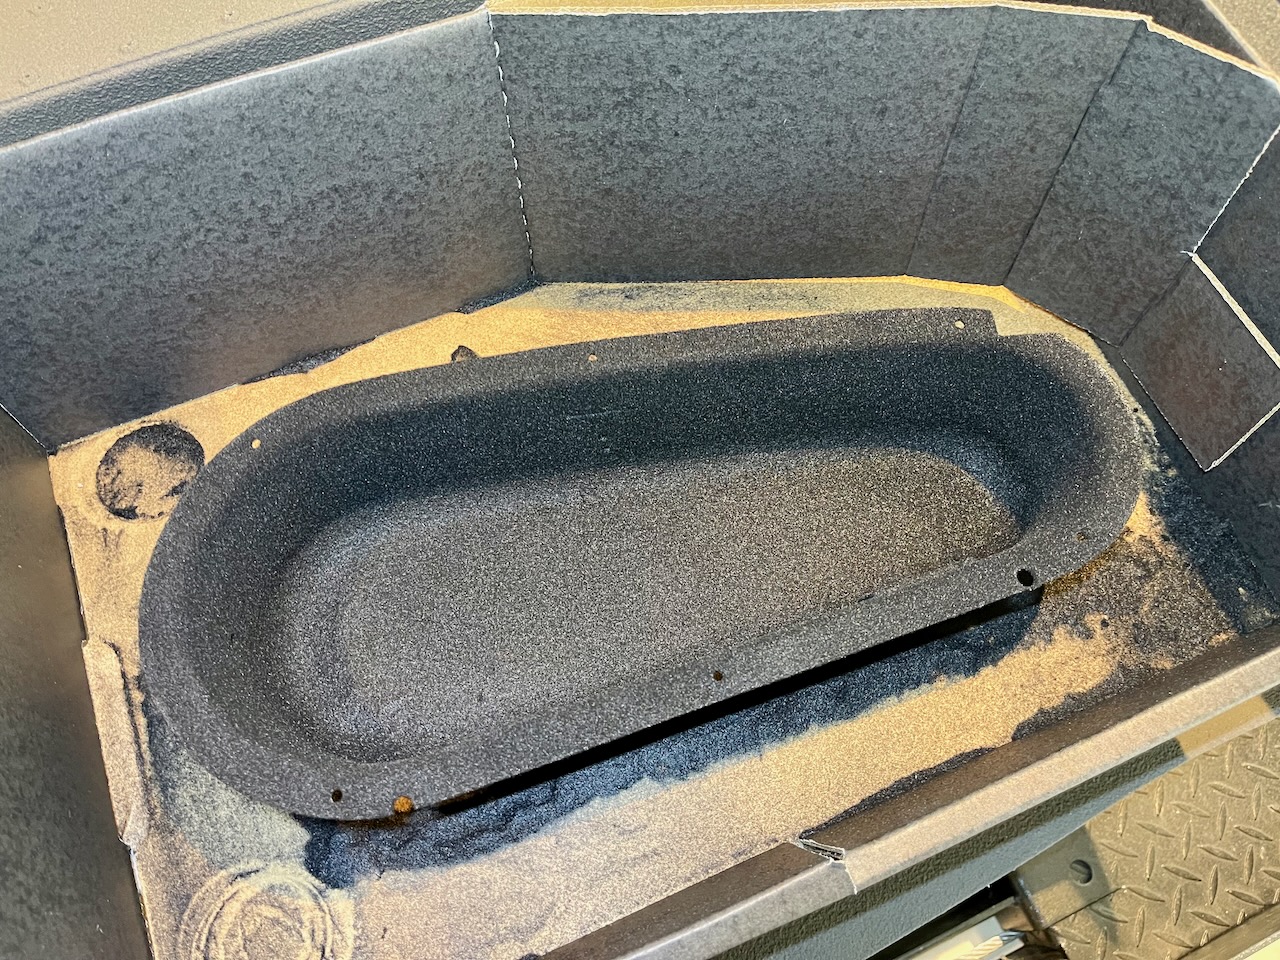
You then have to resist the urge to do anything with it for several days while the glue fully cures. Since the weather here has cooled down quite a bit lately, I left it alone for a week. The glue was still a little soft at the edges but it was cured enough that I could blow off the excess flocking with some compressed air and get on with the assembly of the glove box.
The most time-consuming part of the glove box assembly was the seemingly endless futzing with the latch striker plate to get the latch to work properly, but I eventually got it all dialed in and working well.
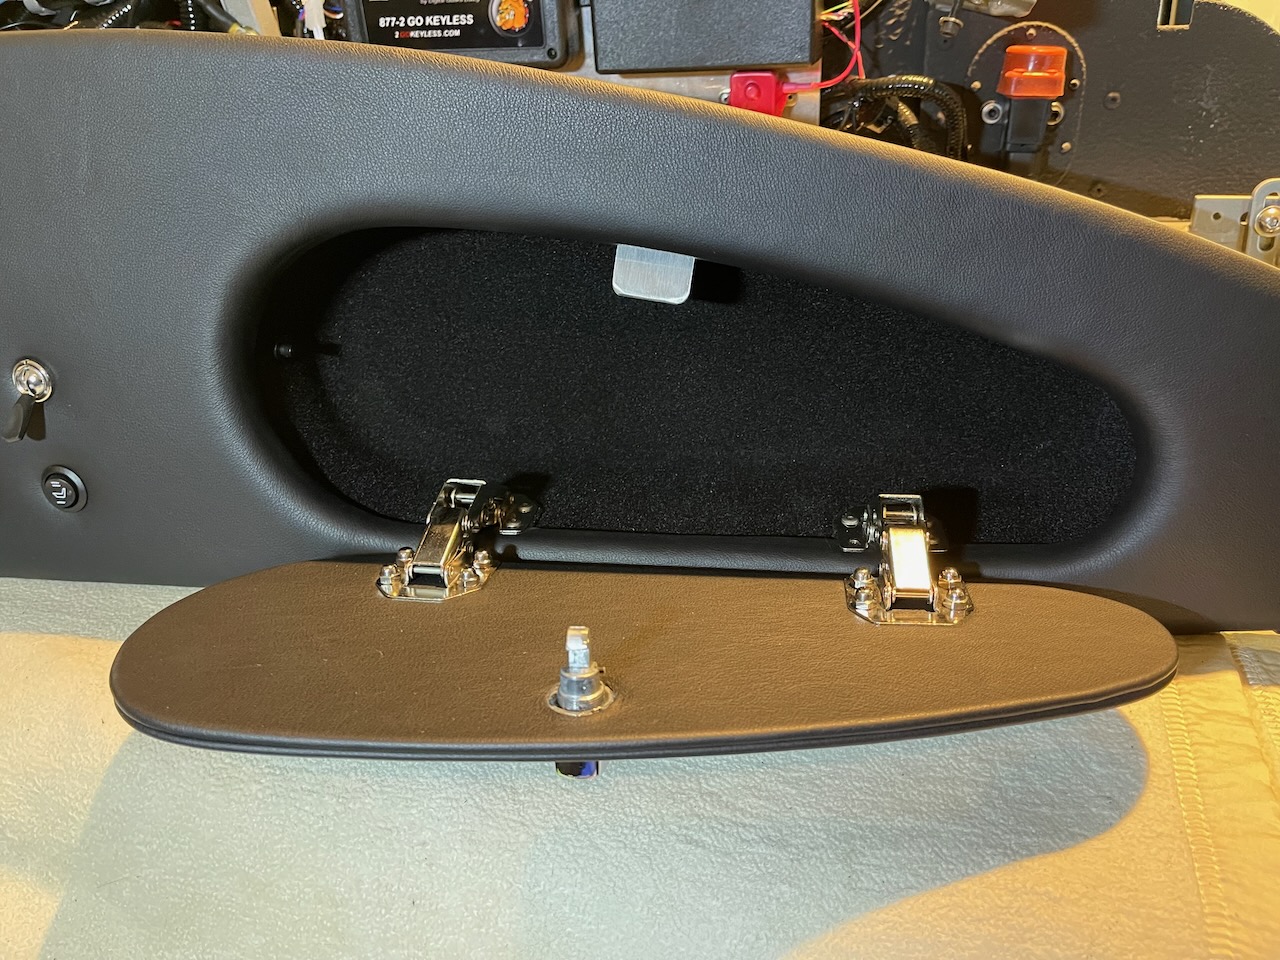
It's nice to have this all put together and working well. The flocking is exactly the look I was going for, and has a nice finished look vs. the bare ABS plastic.
And here's the whole dash...
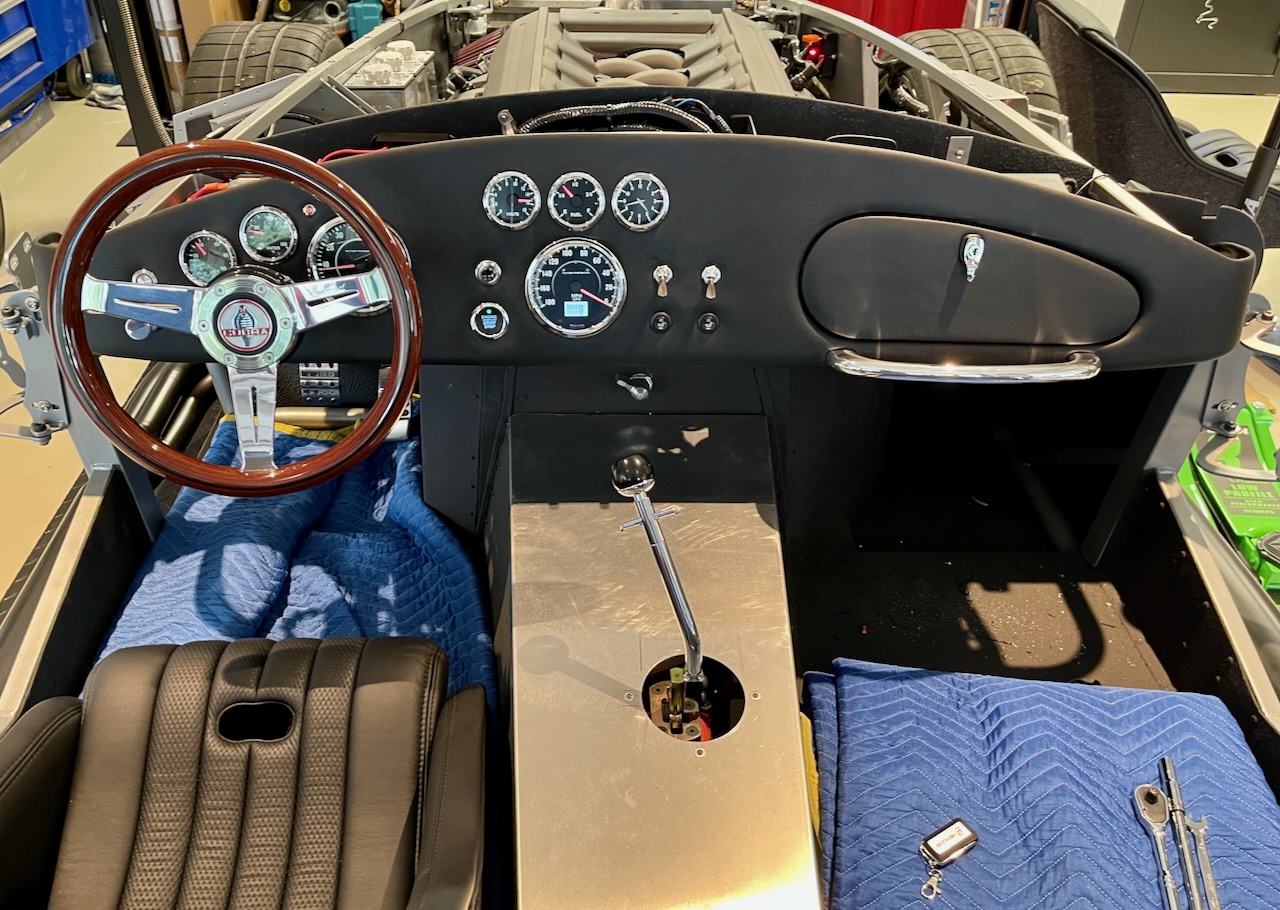
MkIV Roadster build: Gen 2 Coyote, IRS, TKO600. Ordered 10/24/18. Delivered 1/29/19. Engine installed 8/8/21. First start 9/12/21. First go-kart 9/17/21. Off to paint 4/11/22. Back from paint 12/30/22.
Build thread here.
-
Post Thanks / Like - 0 Thanks, 4 Likes
-
11-06-2021, 04:36 PM
#237
25th Anniversary #9772
wow awesome seats and fantastic dash! I like that flocking box! learn something new everyday on here!!!
is this the kit? Inline Tube Black Nylon Flocking Kit
Last edited by toadster; 11-06-2021 at 04:45 PM.
-
Post Thanks / Like - 1 Thanks, 0 Likes
JohnK thanked for this post
-
11-06-2021, 05:22 PM
#238
Thanks! I'm really happy with how both turned out. Getting closer and closer to putting the body on for the first time.
That looks very similar to the kit I bought, except I bought direct from Flock It (see my link above).
MkIV Roadster build: Gen 2 Coyote, IRS, TKO600. Ordered 10/24/18. Delivered 1/29/19. Engine installed 8/8/21. First start 9/12/21. First go-kart 9/17/21. Off to paint 4/11/22. Back from paint 12/30/22.
Build thread here.
-
11-06-2021, 09:10 PM
#239
Senior Member
Originally Posted by
JohnK
In case you can't tell, I'm absolutely giddy with how they turned out. The backs of the seats are carpeted in a German wool square-weave carpet in charcoal color. This is the same carpet that these guys will eventually carpet the entire car with for me, once the body is sent off for paint. To my eye, the seats feature pretty prominently in these cars since the interior is pretty small and pretty spartan, so these are definitely a centerpiece of the interior. Just wow...
Very nice upgrade, John! Those will look fantastic in your cockpit.
Chris
Coupe complete kit delivered: 4/22/24.
Build Thread. Coyote. T-56. IRS w/3.55. Wilwoods. PS. HVAC. Side windows.
MK4 Complete kit.
Build Thread Index. Delivered: 10/15/2020. Legal: 7/25/23. Coyote Gen3. TKO600 (0.64 OD). IRS w/3.55. PS. Wilwoods. Sway bars. This build is dedicated to my son, Benjamin.
Build Thread.
-
Post Thanks / Like - 1 Thanks, 0 Likes
JohnK thanked for this post
-
11-14-2021, 12:04 PM
#240
I took the car out for a quick go-kart yesterday as I was tweaking steering shaft positioning to center the steering wheel. One of the neighbors was out in his driveway so I stopped and we chatted about the build. After a few minutes, he offered to buy the car when it's finished. I haven't even put the body on yet.
MkIV Roadster build: Gen 2 Coyote, IRS, TKO600. Ordered 10/24/18. Delivered 1/29/19. Engine installed 8/8/21. First start 9/12/21. First go-kart 9/17/21. Off to paint 4/11/22. Back from paint 12/30/22.
Build thread here.
-
Post Thanks / Like - 0 Thanks, 2 Likes


 Thanks:
  Likes:


 Reply With Quote