-
Senior Member

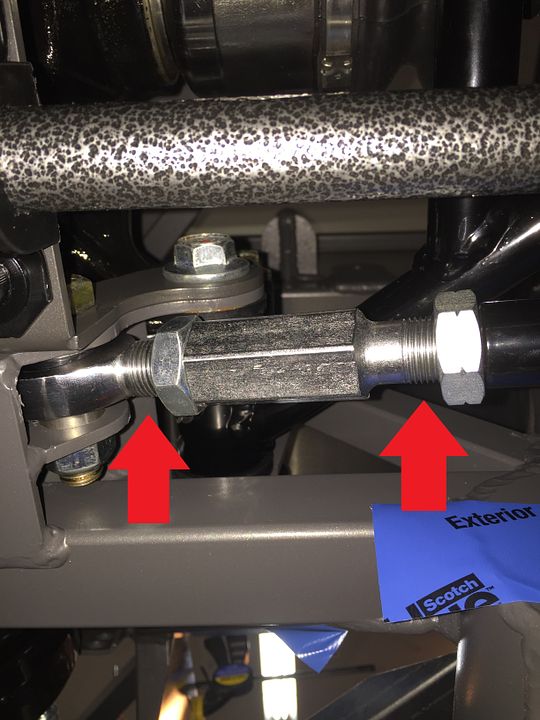
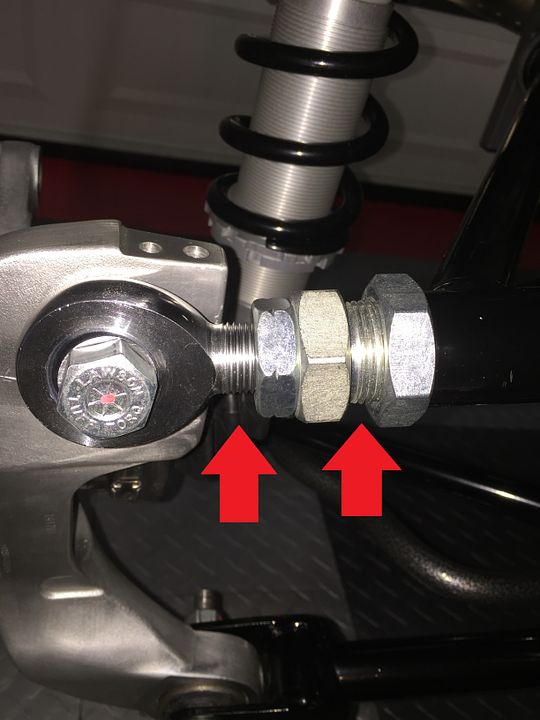
For you guys doing IRS builds, strongly suggest you center the mounting parts centered as shown in these pictures. Equal number of threads on each side. If you don't, you could run out for threads when adjusting. Not explained in the manual that I've noticed. Note this is from a very early IRS build (20th Anniversary Roadster) before the tech upgrade adding the large washer to the bolt on the control arm. Was added later.
Last edited by edwardb; 11-25-2021 at 12:09 AM.
Build 1: Mk3 Roadster #5125. Sold 11/08/2014.
Build 2: Mk4 Roadster #7750. Sold 04/10/2017.
Build Thread
Build 3: Mk4 Roadster 20th Anniversary #8674. Sold 09/07/2020.
Build Thread and
Video.
Build 4: Gen 3 Type 65 Coupe #59. Gen 3 Coyote. Legal 03/04/2020.
Build Thread and
Video
Build 5: 35 Hot Rod Truck #138. LS3 and 4L65E auto. Rcvd 01/05/2021. Legal 04/20/2023.
Build Thread. Sold 11/9/2023.
-
Post Thanks / Like - 2 Thanks, 1 Likes
-

Originally Posted by
edwardb

For you guys doing IRS builds, strongly suggest you center the mounting parts centered as shown in these pictures. Equal number of threads on each side. If you don't, you could run out for threads when adjusting. Not explained in the manual that I've noticed. Note this is from a very early IRS build (20th Anniversary Roadster) before the tech upgrade adding the large washer to the bolt on the control arm. Was added later.
This is one of the many great tips edwardb has posted. I read it and corrected before getting too deep.
Do we have a STICKY with these mandatory tips listed? I can think of several that saved me some grief and frustration.
I wish I had a printed copy of the list, during my build.
I am going to post one a fellow, local builder informed me of, not wanting to impose on this thread.
20th Anniversary Mk IV, A50XS Coyote, TKO 600, Trunk Drop Box, Trunk Battery Box, Cubby Hole, Seat Heaters, Radiator hanger and shroud.
-
Post Thanks / Like - 0 Thanks, 1 Likes
-
Senior Member

Thanks Guys!! Chris, I have referred to your excellent build thread many times, and have it bookmarked. I have also seen edwardb's name everywhere on here as an essential reference. I will go take a look at my tie arms to make sure they are set up as you recommended. I tried to bottom both adjusters out when I put the arms together, so that it would thread evenly on both ends, but I'll make sure I'm set up right. I haven't torqued all of this yet. And by all means Railroad, I am happy to have my thread hijacked with essential information like that. The more places that info is placed, the easier it is for everyone to find.
-
Senior Member
Finishing of rear suspension and brakes.
More progress. My best friend Jimmy came up with the idea of weekly time set aside on a specific night for build time, and it is more acceptable to the family when he comes up with it! So Jimmy and I got to work last night finishing the rear suspension and brakes. Got the shocks put together and installed with minimal difficulty. There are a couple of pages missing from the manual about shock assembly. Those pages were present in the front shock section, so we referred to that. The biggest question was whether to mount the shocks body up or down. It seemed like the manual was implying that the stock red shocks should go in body down, even though the fronts are body up. I see pictures from people's builds with the rear shocks both up and down. Maybe it doesn't matter?

We then torqued all of the IRS bolts we hadn't gotten to yet. From the back of the manual, if I got it right, the spindle to LCA bolts and the spindle to toe links are 120 ft lb and the spindle to UCA are 100 ft lb. We also got the shock mounts at 40 ft lb.
We then tackled the rear brakes. I got the M-2300-MR 13" mustang rear brakes from Mike Forte. FFR sells these, but Mike has them cheaper and I was getting the pumpkin from him anyway. I didn't find much documentation on these. The included instruction sheet has limited info, and the FFR stuff applies to different brakes. The included instructions did indicate which pad retaining clips went where, and where the wear indicators go. They also said that the lock pins go on the bottom of the calipers. I'm pretty sure these are the blue ones, with the rubber grommet on them. So that's the way we put them on.

We also used the black grease for the caliper pins and pad ears, and the orange grease on the back of the pads as an anti-squeal. I hope we got that right. Anyone know about any of that?

Is anyone else using these dust shields?

That was about all the time we had.


I guess maybe next time we will break into either the parking brake and brake lines or maybe the pedal box. I plan on doing a hydraulic clutch. Is there anything on the pedal box side of things that differs from the manual?
-
Senior Member
Some progress
I have spent the last week or so agonizing about brake decisions. I have the 13" 2015 Mustang rear brakes and the small SN95 11" Mustang front brakes. I sort of backed into this situation. I didn't want to spring for the $3400 Wilwoods off the bat, knowing I wouldn't be tracking the car. I figured the stock brakes would be fine for such a light car, not thinking about power assist, or the fact that the default IRS rear brakes would be bigger than the fronts. As I started to put things together, I became unhappy with the small front brakes, so I plan to go with some 13" Mustang Cobra front brakes. Reading the forums also led me to believe that I would be unhappy with unassisted brakes unless I went with the expensive wilwoods. It seems much easier to switch to the wilwoods later if I want to track the car than it would be to add power assist later. So I considered the whitby setup, but wasn't nuts about cutting the frame, and have no idea if I'll have sufficient vacuum with the 363 SBF from Forte, so I think I'll go with Forte's hydroboost setup since I'm doing power steering anyway. It's a little spendy, especially with his wilwood dual master cylinder with built in proportioning valve. So then I wondered if I should just bite the bullet and get the wilwood fronts, stick with the 13" rears I have already paid for and installed, and go with manual brakes. Not much more expensive and certainly simpler. They look really cool too. Again, I'm stuck on it being a bear to add power brakes later, so I think I'll stay with my plan of 13" Cobra front brakes and the Forte hydroboost. I certainly welcome any opinions. I know edwardb has tried both options. This all assumes, of course, that I can get the flange spacer for the hydroboost that Forte currently can't get. I have a request in to FFR and we'll see how that goes. If I can't get it, I guess the issue will be decided.
So this conundrum has me all tied up. I can't do the pedal box until I have all of this decided, and routing the brake lines can't be completed until the hyrdoboost is in. I also need to get the in tank fuel pump for the EFI, so I can't finish that until I do, so I haven't started the fuel lines yet. Don't really want to do a lot of aluminum panels until all of that is sorted out. Analysis paralysis.
In the meantime, I did do the soft brake lines at all four corners, using the bent bracket method in the back recommended by FFR in the manual. I had no problem getting the T-fitting on that way. As nice as some people's hard brake lines look (I'm thinking of you edwardb), I think I'll just use the ones supplied in the kit, along with the insulated clips to rivet to the frame. I have enough extra stuff from breeze, gasn, and russ thompson that I have to get. Merry XMAS to me...


I then moved on to the power steering rack. I definitely caused myself some headache here. The spacers that go in the bushings that mount the rack to the car were in my POL. They came months ago, but were in a separate box, so my steering hardware bag didn't have them. The rack also had bushings pre installed, and the manual was pretty slim in this area, as were the power steering rack supplemental instructions. Nothing said anything about removing existing bushings.

So I was trying to get the rack in with the preinstalled bushings, and needless to say, it didn't work. I banged up my frame pretty good trying to wrestle it in. Now I have nice blue painters tape in that area like I should have before. After a beer break, I went back to the forums and didn't see anyone having any trouble with this, so I tried, and succeeded, to get the preinstalled bushings out, and then located my wayward spacers. They took extensive banging with the dead blow to get in, but once they were in the rack slipped right into the frame.


As has happened every time I have had to attach something to the frame, there has been a lot of misalignment. There was a great deal of hammering to get the mounting bolts through the frame mounts and the rack. The holes just didn't quite line up. It seems to have worked out though and the rack is in. My friend is coming over tonight, so maybe some more work on the steering. I still have to get the tie rod ends on and install the shaft and bearings. I ordered the Moog ES2150RL recommended by edwardb, and they are definitely nicer than the stock items. I guess after that, we'll start working on some of the hard brake lines, at least the ones that don't attach to the master cylinder, and maybe drill and cleco the passenger side footwell.
-
Check with Mike, i got my front wilwood's from him for about $1400 as I recall, he had the best price i could find on them.
-
Senior Member
Yes, that's what I saw too. His prices are usually the best, though even he has experienced some covid cost creep. The front wilwoods will be about the same money as the 13" mustang cobra fronts plus the hydroboost.
-
Senior Member
Steering Shaft and passenger footwell
So I managed to get a little more time in the other night. We put the steering shaft together, preparing the shaft as instructed in the manual. I didn't intend to snug everything up because the pedalbox is still up in the air and I haven't put the aluminum panel on the front of the footbox yet. Everything went pretty smooth.

The recess we drilled in the upper shaft for the set screw might have ended up a little deep, but we were still able to get the jam nut on, so it might be OK. I might turn the shaft over and drill a shallower hole in the other side of the shaft.

The bearings both went in with no issues. No washers were needed on the pillow block. We had plenty of clearance between the shaft and the frame.

We got the steering rack u joint installed as directed, with the set screw between the two rows of splines on the shaft.

When we put the lower shaft in the steering rack u-joint, things weren't quite lining up right. The lower steering shaft seems about 1/2" too long. When it is inserted flush in the upper u joint, and the upper ujoint is pressed all the way up into the flange bearing, the shaft protrudes into the lower steering rack ujoint by about 1/2", which seems to interfere with the ujoint's operation. Moving the shaft about 1/4" back up into the upper ujoint makes it so the shaft doesn't interfere with either ujoint, but it certainly isn't flush as directed in the manual.


Not sure if this is OK, has anyone else run into this? Like I said, the upper ujoint is all the way up into the flange bearing with no clearance, and the lower ujoint is installed properly on the steering rack shaft, with the set screw positioned as directed on the smooth part of the shaft between the two rows of splines. There's no other place to take up any slack, so what gives?
We also managed to mock up the passenger footwell and stick some clecos in. We were getting tired, so I didn't want to start drilling holes.

-
Senior Member
Wilwood Front brakes
Another agonizingly long layoff the build. As usual, its always something. It started with two weeks of agonizing over how to proceed with the brakes. I finally decided to skip power brakes and upgrade to the Wilwood fronts. I then had to aquire those, and while I was at it, I started to plan for pending steps by ordering a bunch of parts from breeze automotive. I got the battery tray, an in tank fuel pump and fuel vent, as well as the storage cubby. All of this agonizing and purchasing was taking up my cobra time, and then Christmas came, and then everyone got Covid, and then we went on vacation, and here we are, weeks since any building.
Further slowing me up was that I unboxed the Wilwood brakes and found this:

I bought the brakes from Mike Forte, and so I asked him about it. He thought they would be fine, as all of that coating comes off the first time you apply the brakes. He consulted with Wilwood anyway, and they agreed, so I decided to press on rather than wait for new parts.
After that delay, I got back at it last night and worked on the brakes. First step was to teach myself how to safety wire. After lots of youtube videos, I got to it, and the first one only took about 5 tries.

After that I got on a roll and things started to go much quicker. Only cut myself once.

I was pretty pleased with myself, and finally feeling like something had been accomplished. Then I turned my expensive brake rotor over and discovered this:

I guess all of the wrestling with the rotor as I fought with the safety wire did a number on that rather fragile finish on the hat. Bummer. It won't be visible with the wheel on the car, but that's still ugly. I'm afraid to try to polish it in any way. I assume its the same coating as is on the rotor itself, so its bound to come off altogether.
I'll try to be more careful with the other one and put something softer on top of my workbench. I should have some time later to keep working on these brakes.
-
Post Thanks / Like - 0 Thanks, 1 Likes
-
Senior Member

Hi Ethan. Glad your family came out of the crud okay, and able to take vacation. I hope it was a good break for you all. My family went through Round 2 of the 'Rona recently. Not nearly as bad for us the second time around.
Good to see you're back at it. Congrats on the rotors and safety wiring. I thought safety wiring was interesting, and kind of fun. Got a bit tedious though by the fourth wheel. I had to use a magnifying glass to thread the wire through the holes.
I was a little surprised to see how much scuff the hat went through on your work surface. That material on your workbench must be a little abrasive. A friendly tip FWIW: if you haven't considered a moving blanket to cover your work surface for tasks like this, I recommend it for your consideration. It not only protects from scratches/scuffs, but bits and pieces like nuts, washers, screws, electrical connectors, etc. tend to stay put. It's not great for every workbench task, but useful for many. I picked up a few from Harbor Freight--about $9 each for the 6' x 6.5'.
Chris
Coupe complete kit delivered: 4/22/24.
Build Thread. Coyote. T-56. IRS w/3.55. Wilwoods. PS. HVAC. Side windows.
MK4 Complete kit.
Build Thread Index. Delivered: 10/15/2020. Legal: 7/25/23. Coyote Gen3. TKO600 (0.64 OD). IRS w/3.55. PS. Wilwoods. Sway bars. This build is dedicated to my son, Benjamin.
Build Thread.
-
Senior Member
The next one only took an hour start to finish, including torquing all of the bolts. The rag on the workbench did the trick. This one is still nice and pretty. Looks like its time for a deep clean for the workbench...


-
Post Thanks / Like - 0 Thanks, 1 Likes
-
Senior Member
Putting the calipers and rotors on the spindles went pretty smoothly. The only hitch I ran into was the big bracket bolts that come with the Wilwood kit. They are so much bigger than the mustang bolts, that there isn't room to get a socket on them, and you can't even get an open ended wrench all the way on. I beat this one up pretty good by having the open ended wrench only part way on. Loosening it was very difficult when I went to take them off.

The mustang bolts didn't use washers, where the Wilwood ones do. So I compromised and kept the washers but used the mustang bolts, which have a head small enough to get a socket on comfortably. The mustang bolts still go all the way through the Wilwood caliper bracket, so that seemed fine to me. Anyone think otherwise?

Never having dealt with brand new rotors and brand new hubs, I didn't know what to do with myself. The light use and limited rain this car will see made me wonder if I really need any anti-seize on the hubs, but I couldn't help myself, and just put a very light coating on the hubs.

My old measuring calipers that I've been meaning to replace finally gave up the ghost while measuring the spacing for the rotors in the calipers. So I'm not done shimming the calipers yet. My new measuring calipers arrive tomorrow, so I'll wrap up the front brakes then.
I paid a visit to Mark Reynolds at Breeze automotive this week to pick up some items, and he showed me his car. He pointed out that he had changed the orientation of his flex line brackets from vertical to horizontal to make a more natural path of movement for the flex lines. This was interesting to me. I'll have to decide whether to drill out the rivets and move those brackets to horizontal. Anyone run into any issues with the flex lines rubbing on anything with the stock vertical orientation?


-
Senior Member
Another long layoff with school vacation and some gruelling work weeks thrown in for good measure. I did get an hour in to shim the front brake calipers and install the flex lines. I ended up using every shim in the package to get the rotors centered, but I got there.

I screwed the hose fittings into the calipers, and sort of guessed how tight they should be, choosing this angle:

That seemed to set the hose up in a good way to avoid binding or catching on anything. Anyone see any issues with this?

After cleanup, I had a few more minutes, so I started looking at the parking brake cable situation. I had not ordered rear brakes from FFR, and instead got the 2015 Mustang GT 13" Rear brakes from Mike Forte with my rear center section (M2300MR, FFR also sells these). I spent a couple of hours looking for my parking brake cables, and couldn't find them anywhere, and couldn't find them in my manifest either. So I emailed FFR and they told me that they only send them if you order rear brakes. That explained why I couldn't find them, so I then ordered some. I confirmed that the ends on the cables they sent would work with the brakes I have, and FFR told me that they would. They sent me the cables and this bracket. I can't figure out what its for at this point.

Furthermore, I can't see how the cylindrical ends of the cable they sent will work with my brake calipers. Anyone have any revelation here on how this works?

Last edited by sohcrates; 03-04-2022 at 09:25 AM.
-
Senior Member

before finalizing your lines, get the wheels on and turn the car lock to lock to make sure the lines don't rub on the wheels/tires.
-
Senior Member
Good tip! Thank you. I don't have tires yet, but I can put the wheels on. Was going to wait as long as possible on the tires since they have a limited shelf life that will probably expire before they will wear out.
-
Senior Member
Hi Ethan. Glad you had a chance to get some garage time. It can be a challenge at times unless you're one of those cool retired types....can't wait to get there myself someday.
So, my front brake caliper fitting and flexline is installed just like yours. I have wheels and tires mounted (fronts are wide at 275/40/R17) , and there is no interference at full lock. I don't have the motor in yet, but from what I can see I don't think clearance will be an issue even with the additional IFS squat from the engine weight.
FWIW: I put some thread sealant on my angled fittings that thread into the Wilwood caliper, though I can't say whether that is required. I thought I asked the forum at the time, but don't recall for sure.
Chris
Coupe complete kit delivered: 4/22/24.
Build Thread. Coyote. T-56. IRS w/3.55. Wilwoods. PS. HVAC. Side windows.
MK4 Complete kit.
Build Thread Index. Delivered: 10/15/2020. Legal: 7/25/23. Coyote Gen3. TKO600 (0.64 OD). IRS w/3.55. PS. Wilwoods. Sway bars. This build is dedicated to my son, Benjamin.
Build Thread.
-
Senior Member
Thanks Chris! Yes, I look forward to retirement too, when I have more time to play. Only 17.5 years left! I thought of thread sealant too, but don't ever remember doing it for any other brake line fittings, so I didn't here. That's super helpful about the wheel clearance. I'm also going with 17"s. I see you did not modify the rear adjustment tubes on your upper control arms, and that you have power steering. I assume you haven't gotten to alignment yet?
-
Senior Member
For alignment so far, I centered the steering rack and the steering wheel. Then I played around a bit with alignment. Just enough to get the PS front wheel pointing forward.
You're right in I haven't cut the rear adjustment sleeves. I do trust the wisdom of the forum, however, I don't have a good way to make clean cuts. Not really the kind of cuts I want to make with my trusty hacksaw. Plus, some forum members say they don't have to. Ultimately, I will make the final decision closer to go-kart time.
Chris
Coupe complete kit delivered: 4/22/24.
Build Thread. Coyote. T-56. IRS w/3.55. Wilwoods. PS. HVAC. Side windows.
MK4 Complete kit.
Build Thread Index. Delivered: 10/15/2020. Legal: 7/25/23. Coyote Gen3. TKO600 (0.64 OD). IRS w/3.55. PS. Wilwoods. Sway bars. This build is dedicated to my son, Benjamin.
Build Thread.
-
Senior Member
I used a sawzall and got a bunch of new blades then smoothed it out with a dremel. Worked pretty good. I didn't want to get to alignment and then have to take that all apart...
You can see the detail in post #24 of my build.
It seemed like the people that got it to work without cutting were just barely getting enough caster with the adjustment maxed out, so I figured more room for adjustment was a good thing even if it would work out ok without the mod. I was terrified to do it but I think it worked out.
-
Senior Member
Got a little more work in yesterday. Didn't have much time, but played with the parking brake cables a little more, and dug out the parts for the pedal box that I'll tackle next. I also installed the FFMetals forward firewall. I'ts clecoed in, as you can see. Can anyone think of any reason not to rivet this in now?


-
Post Thanks / Like - 0 Thanks, 1 Likes
-
Senior Member
Originally Posted by
460.465USMC
FWIW: I put some thread sealant on my angled fittings that thread into the Wilwood caliper, though I can't say whether that is required. I thought I asked the forum at the time, but don't recall for sure.
Originally Posted by
sohcrates
I thought of thread sealant too, but don't ever remember doing it for any other brake line fittings, so I didn't here.
Those inlet fittings on the Wilwood calipers are 1/8-27 NPT. As I recall, have paper stickers over the openings describing the threads. NPT threads always require sealant. Your local parts store will have products that are acceptable. Like from Loctite or Permatex. They are the one kind of fitting we use in our builds where sealant is necessary because they seal on the threads vs. other types that have taper seals in the seats. Like the usual brake line double flared fittings. No sealant there.
Build 1: Mk3 Roadster #5125. Sold 11/08/2014.
Build 2: Mk4 Roadster #7750. Sold 04/10/2017.
Build Thread
Build 3: Mk4 Roadster 20th Anniversary #8674. Sold 09/07/2020.
Build Thread and
Video.
Build 4: Gen 3 Type 65 Coupe #59. Gen 3 Coyote. Legal 03/04/2020.
Build Thread and
Video
Build 5: 35 Hot Rod Truck #138. LS3 and 4L65E auto. Rcvd 01/05/2021. Legal 04/20/2023.
Build Thread. Sold 11/9/2023.
-
Post Thanks / Like - 0 Thanks, 1 Likes
-
Senior Member
Thanks edwardb!! That would have sucked to track down that leak later... what do you like to use for sealant? There seems to be quite a debate about tape vs liquid...
Am I correct that the flared fittings on the cable ends should not get sealant?
Last edited by sohcrates; 03-05-2022 at 12:12 PM.
-
Senior Member
Ethan, when I was asking questions about sealant v. no sealant, Edwardb helped me understand the tape sealant we use for household plumbing repairs is not best for our builds. Not sure if you're referring to that kind? So, I picked up this high temp. Permatex thread sealant from my local Napa.

P.S. Disregard "11/20" date code I put on the packaging. I tend to test the age limits of chemicals, leaving them in my garage cabinet for far too long.  This should help me dispose when age appropriate.
Chris
Coupe complete kit delivered: 4/22/24.
Build Thread. Coyote. T-56. IRS w/3.55. Wilwoods. PS. HVAC. Side windows.
MK4 Complete kit.
Build Thread Index. Delivered: 10/15/2020. Legal: 7/25/23. Coyote Gen3. TKO600 (0.64 OD). IRS w/3.55. PS. Wilwoods. Sway bars. This build is dedicated to my son, Benjamin.
Build Thread.
-
Senior Member
Thanks Chris!! Glad I asked.
-
Senior Member

Originally Posted by
460.465USMC
So, my front brake caliper fitting and flexline is installed just like yours. I have wheels and tires mounted (fronts are wide at 275/40/R17) , and there is no interference at full lock. I don't have the motor in yet, but from what I can see I don't think clearance will be an issue even with the additional IFS squat from the engine weight.
Do you know how long those brake lines are? thanks
-
Senior Member
Looks like about 17 inches as I measure them. It was a little difficult but I didn't want to take them off yet. When I take them off to seal the threads on the NPT fittings I'll take a better measurement.
-
Post Thanks / Like - 1 Thanks, 0 Likes
-
Originally Posted by
Mike.Bray
Do you know how long those brake lines are? thanks
The inventory states them as 14945 20" Stainless Braided 35* Banjo Brake Line (assuming he used the kit ones!)
MK4 Complete Kit #10315 / Coyote G3 / TKX / 427 HardTop
Build Thread Production Date: 2/26/22, Registered 5/19/22, Graduated 3/1/2023
-
Senior Member
I did use the kit ones. They may be 20" with the ends included. I'll measure them when I take them off to seal up the threads.
-
Senior Member
Originally Posted by
JeffP
The inventory states them as 14945 20" Stainless Braided 35* Banjo Brake Line (assuming he used the kit ones!)
Hi Jeff. The braided flex lines in my picture are not the banjo lines that come with the kit. I installed the Wilwood brake kit, which includes the ones shown in the picture. My banjo lines are in my what do I do with these extra parts pile?
Chris
Coupe complete kit delivered: 4/22/24.
Build Thread. Coyote. T-56. IRS w/3.55. Wilwoods. PS. HVAC. Side windows.
MK4 Complete kit.
Build Thread Index. Delivered: 10/15/2020. Legal: 7/25/23. Coyote Gen3. TKO600 (0.64 OD). IRS w/3.55. PS. Wilwoods. Sway bars. This build is dedicated to my son, Benjamin.
Build Thread.
-
Senior Member
Sorry Jeff, I wasn't clear. My situation is just as Chris'. My FFR stainless brake lines, along with the 11" SN95 mustang GT front brakes are in the "what do I do with this perfectly good but nearly useless stuff bin". The lines shown in my photos are the ones that came with the wilwood front brake kit. As I said, I will soon get an actual measurement for you.
-
Originally Posted by
sohcrates
Sorry Jeff, I wasn't clear. My situation is just as Chris'. My FFR stainless brake lines, along with the 11" SN95 mustang GT front brakes are in the "what do I do with this perfectly good but nearly useless stuff bin". The lines shown in my photos are the ones that came with the wilwood front brake kit. As I said, I will soon get an actual measurement for you.
I understand completely! I just wrapped up my Wilwood front brakes today. The stainless lines that came with them are 220-12092, 18”.
MK4 Complete Kit #10315 / Coyote G3 / TKX / 427 HardTop
Build Thread Production Date: 2/26/22, Registered 5/19/22, Graduated 3/1/2023
-
Senior Member
-
Senior Member
-
Senior Member
-
Originally Posted by
sohcrates
I did notice that the build manual references 3 3/8"x 1" socket head bolts in the pedal box hardware pack and one in the pedal assmebly. This seemed confusing to me, as my pedal box hardware pack had 3 of those, plus 2 3/8" x 2" socket head bolts. There were none with the pedals. The manifest says that the 1" are the upper ones and the 2" bolts are the lower ones. I haven't put everything together yet, but I mocked it up using the 2" bolts on the bottom and the 1" bolts on the top. Hopefully this works out, as I only have 3 1" bolts...
I just completed this step yesterday and had the same confusion. No idea where that 4th 1" bolt is supposed to be, but why on earth they wouldn't keep them all together makes no sense. Also only 4 holes and 5 bolts if you go with the 2" ones? Thanks for pointing out the interference, I hadn't noticed it on mine and its there as well. I'll need to resolve that today.
MK4 Complete Kit #10315 / Coyote G3 / TKX / 427 HardTop
Build Thread Production Date: 2/26/22, Registered 5/19/22, Graduated 3/1/2023
-
Senior Member
Glad I'm not the only one with a confusing number of bolts. Maybe it will all make sense when the full pedalbox is in. I'll let you know if I figure it out...
The flange bearing interference was pointed out to me when I was having trouble with the steering shaft. It seemed too long until moving the bearing and flange to the inside of the footbox. The added benefit that was also pointed out to me was that adjustment of the steering wheel on the shaft becomes easier with the bearing on the inside too. Looking around, it seems all the veteran builders put the flange and bearing on the inside of the footbox.
-
Senior Member

Nice progress. And welcome to the e-brake - as you say, once you set it up and see the cables going under the frame it just doesn't look right, feel right, sit right with most builders. If you choose to keep your cables above the frame and redirected through pulleys, the cables will need to be shorter. If you don't have access to the tools to place a swaged end on the shorter cable length, you can use this Lokar part WCA 8070 to hold both cable ends in one block, and then screw a rod end in the center, which can be captured directly in the brake lever assembly. Lokar has some other options in the same page in their online catalog. One image from my approach which borrowed shamelessly from others, but it's just one option. Lots of ways to do this well.

Untitled by John Ibele, on Flickr
MK4 #7838: IRS 3.55 TrueTrac T5z Dart 347
The drawing is from ~7th grade, mid-1970s
Meandering, leisurely build thread is
here
-
Senior Member
Now that I really like. Solves both the issue of moving the cables over the frame and also the clevis rubbing on the bottom of the bracket. I'll have to think on that some more.
-
Getting ready to start our build in a few weeks of one close to what you bought. I will need to hand the body also and saw your straps going through the wheel wells. Do you have anything supporting in the middle? Are you worried about the body bending upward at the ends?
-
Senior Member
Originally Posted by
John Ibele
Nice progress. And welcome to the e-brake - as you say, once you set it up and see the cables going under the frame it just doesn't look right, feel right, sit right with most builders. If you choose to keep your cables above the frame and redirected through pulleys, the cables will need to be shorter. If you don't have access to the tools to place a swaged end on the shorter cable length, you can use
this Lokar part WCA 8070 to hold both cable ends in one block, and then screw a rod end in the center, which can be captured directly in the brake lever assembly. Lokar has some other options in the same page in their online catalog. One image from my approach which borrowed shamelessly from others, but it's just one option. Lots of ways to do this well.
Times two on what John said. I also used the Lokar piece and cut off the ends of the cables, as I didn't have tool/parts to swage on new ends. Plus, with the Lokar piece, easy enough to adjust cable tension if the cables stretch. The difference between John's approach and mine is he made a really cool bracket; overall a much nicer setup. I adjusted my cables so e-brake fully engages in 4-5 clicks.
Chris
Coupe complete kit delivered: 4/22/24.
Build Thread. Coyote. T-56. IRS w/3.55. Wilwoods. PS. HVAC. Side windows.
MK4 Complete kit.
Build Thread Index. Delivered: 10/15/2020. Legal: 7/25/23. Coyote Gen3. TKO600 (0.64 OD). IRS w/3.55. PS. Wilwoods. Sway bars. This build is dedicated to my son, Benjamin.
Build Thread.


 Thanks:
  Likes:


 Reply With Quote

