-
02-22-2023, 07:27 PM
#361

Originally Posted by
Tom Welch

I really like that radiator surround. Did you fabricate it yourself? If so do you have a pattern you can share?
Thanks,
Tom
Thanks so much Tom. No, I can't take credit for it. I bought it from Mike Everson (ReplicaParts). Here's a link to it.
MkIV Roadster build: Gen 2 Coyote, IRS, TKO600. Ordered 10/24/18. Delivered 1/29/19. Engine installed 8/8/21. First start 9/12/21. First go-kart 9/17/21. Off to paint 4/11/22. Back from paint 12/30/22.
Build thread here.
-
03-01-2023, 01:27 PM
#362


Greek Guys' Garage Roadster Build #9509 (Specialty Power Windows wiper install)
My punch list of items that I need to complete in order to start the CA title/registration process is now down to one item - getting the header and side pipe situation sorted. I have another list of a dozen or so other items I need to complete to call the car "finished" so I'll keep plugging away at those while we're working on the exhaust.
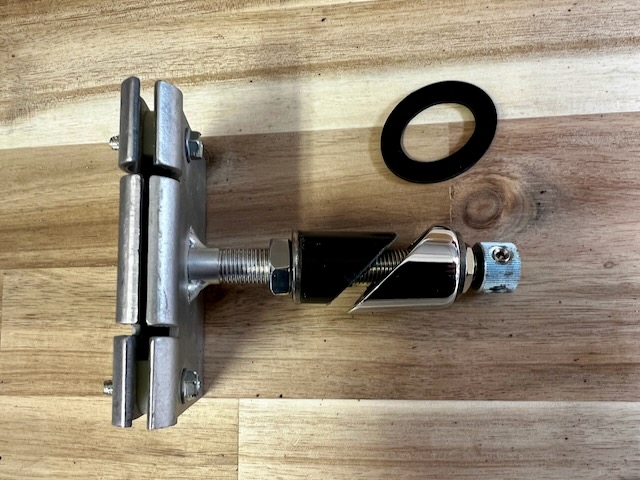
I won't bore everyone with all the details of final assembly, as most of it is pretty textbook and has been discussed elsewhere in great detail. One item I did want to give an update on is the installation of the Specialty Power Windows wiper kit (WWK-2), which I just wrapped up. I had posted here previously about successfully wiring the wiper motor to a Lucas 2 position + park toggle switch. The rest of the installation mostly resembles the installation of the FFR wiper kit. Of note, I had purchased the FFR wiper kit as part of my initial purchase. The only parts I ended up using out of the FFR wiper kit are the two chrome bezels, so now I have a nearly-complete FFR wiper kit for sale. I'm sure someone can use most of the parts as spares so it'll show up in the classifieds sometime soon, or PM me if you're interested.
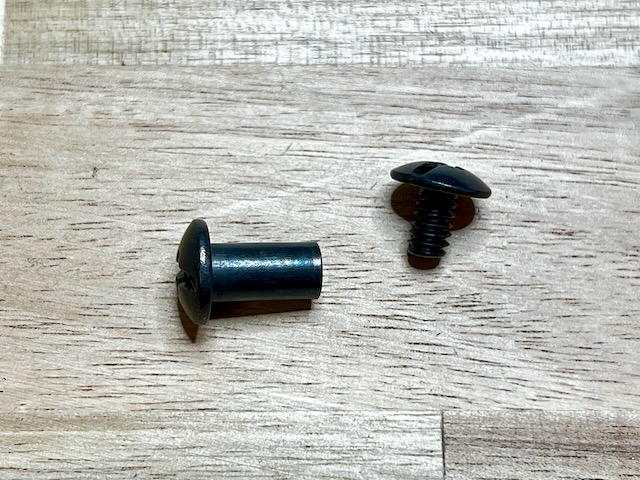
This is what the wiper gearboxes look like, and how they're installed in the body. They're quite a bit more robust than the FFR units. The shaft is narrower - 3/8" vs. 5/8" for the FFR units, so the holes in the body needed to be drilled in the same locations and at the same angles but smaller diameter. To properly position them, I used some 3/8" ID/ 3/4" OD spacer stock on the backside of the gearbox (underhood), cut at a 45* angle. On the outside, I used 3/8" ID/ 5/8" OD spacer stock to center the gearbox shaft in the chrome bezel. The gearbox shafts can be cut to length but I chose to leave them original length and just dial in the fit using the threaded nut on the bottom side.
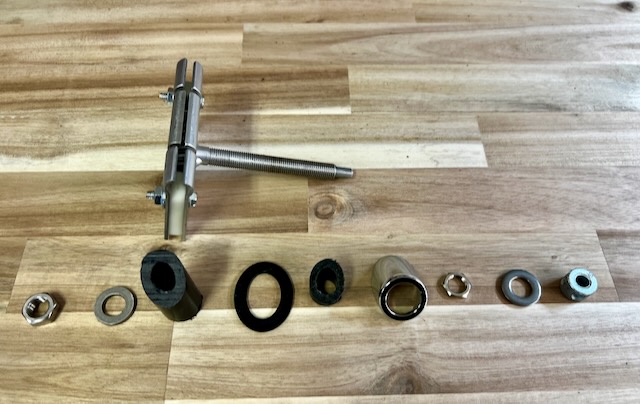
Here's what it looks like all ready to install:
The WWK2 kit comes with 5/8" aluminum tubing, which was easy to bend by hand, and put some simple single flares onto using the Eastwood flaring tool. It's a bit tricky getting decent photos of the whole thing installed, so pardon the bad photos but here's what it all looks like under the cowl.
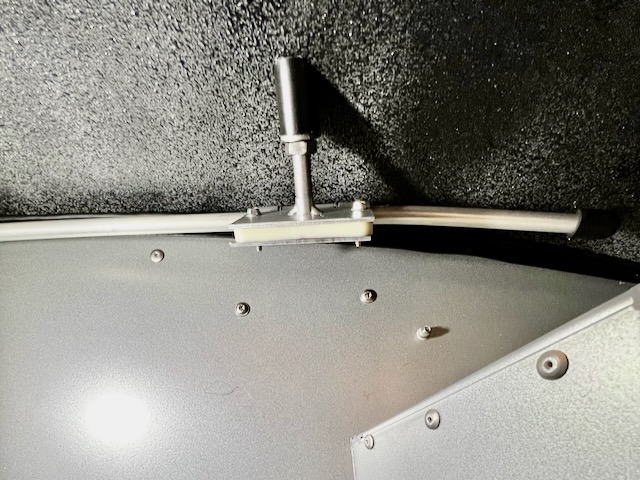
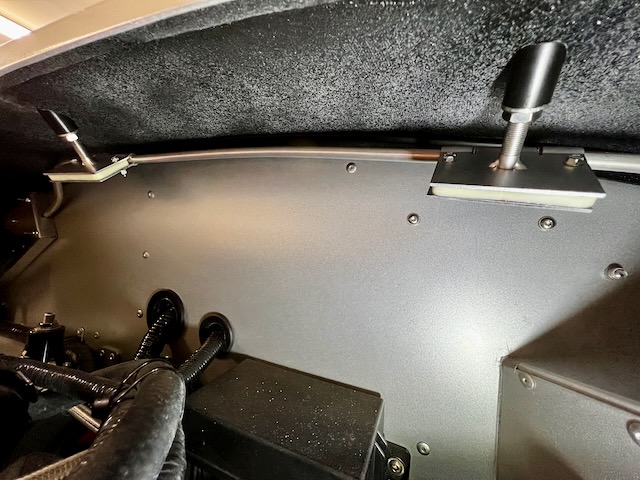

The trickiest part was that small S-bend section connecting the motor with the first gearbox. Getting everything positioned and getting the radiuses in the bends large enough to not interfere with the smooth operation of the wipers took a few attempts but I finally got it right on the last piece of tubing I had. Phew.
The splines on the ends of the gearboxes are a finer pitch than the ones on the FFR gearboxes, which meant I couldn't use the FFR-supplied wiper arms. These are the Specialty Power Windows stainless steel wiper arms (P/N SSPR). The DS arm sat at the correct angle to the bottom of the windshield. The PS arm needed a little adjusting with a propane torch to sit properly, but they now both sit nicely. Now I just need to polish out the heat marks on the PS arm.
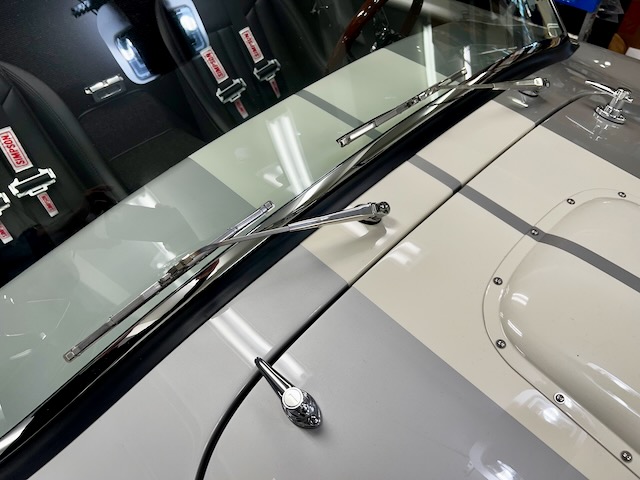
The proof is in the pudding, as they say. Here's a quick video of something you'd never attempt with the FFR wipers... running them on a dry windshield.
Edit: One other item of note for anyone else installing this kit in a roadster - the sweep of the WWK2 kit is adjustable anywhere from 90 degrees to 160 degrees in 10 degree increments. I initially set the sweep to 120 degrees but that was too much and the blades were running onto the chrome windshield frame at the end of the sweep. I dialed it back to 100 degree sweep, which is what's shown in the video. I could probably have pushed it to 110 degrees, but disassembling the entire motor to adjust sweep is a giant mess as it's all packed with grease so I'm quite content with 100 degrees of sweep.
Last edited by JohnK; 03-01-2023 at 01:36 PM.
MkIV Roadster build: Gen 2 Coyote, IRS, TKO600. Ordered 10/24/18. Delivered 1/29/19. Engine installed 8/8/21. First start 9/12/21. First go-kart 9/17/21. Off to paint 4/11/22. Back from paint 12/30/22.
Build thread here.
-
Post Thanks / Like - 1 Thanks, 4 Likes
-
03-01-2023, 03:15 PM
#363
Senior Member

IM stunned at how quiet they are. That's really good stuff. I may retro fit mine.
-
Post Thanks / Like - 1 Thanks, 0 Likes
 JohnK
JohnK thanked for this post
-
03-01-2023, 03:42 PM
#364
Yeah, they really are pretty solid-feeling and sounding. It's unlikely I'll need them a whole lot but nice to know I actually have a set of wipers that will work properly if needed.
MkIV Roadster build: Gen 2 Coyote, IRS, TKO600. Ordered 10/24/18. Delivered 1/29/19. Engine installed 8/8/21. First start 9/12/21. First go-kart 9/17/21. Off to paint 4/11/22. Back from paint 12/30/22.
Build thread here.
-
03-01-2023, 08:20 PM
#365
Senior Member

Did the kit contain a chrome bezel for the front, why did you chose to use FF? If I decided to trade this for the FF kit, would I need something for that? That is way cheaper than the FF kit.
-
03-01-2023, 08:27 PM
#366
No, unfortunately there were no bezels included in the Specialty Power Windows kit, which is why I chose to use the FFR pieces. They do list a 45 degree bezel on their accessory page, but there's no photo so I can't say for sure if it would work or not. I have spoken with them on the phone a few times and they were extremely nice and helpful, so if you're considering it you should give them a call. I'm sure they have a photo of the bezels they could send you.
Edit: The 45 degree bezels that Specialty Power windows sells appear to be unfinished aluminum, but it looks like chrome 45 degree bezels similar to the FFR ones are available here. I've ordered various parts from them before and have always received parts quickly.
Last edited by JohnK; 03-01-2023 at 09:22 PM.
MkIV Roadster build: Gen 2 Coyote, IRS, TKO600. Ordered 10/24/18. Delivered 1/29/19. Engine installed 8/8/21. First start 9/12/21. First go-kart 9/17/21. Off to paint 4/11/22. Back from paint 12/30/22.
Build thread here.
-
Post Thanks / Like - 1 Thanks, 0 Likes
-
03-02-2023, 08:48 PM
#367
Senior Member

Those wipers look legit and high quality, nice work! No surprise from your build, everything is top notch... really one amazing car you have put together. I also hope I get to check out your car sometime in the future!
-
Post Thanks / Like - 1 Thanks, 0 Likes
JohnK thanked for this post
-
03-07-2023, 08:28 PM
#368
Senior Member

Great job with the wiper install! I am using the same Specialty Power Windows wiper kit. I was wondering what size wipers you used? Also, are those arms considered "bent right"?
Thanks,
James
Mk4 Roadster #9974 - Picked Up 1/2021. Complete kit, Gen 2 Ford Coyote / TKX, IRS. Completed 9/2023
-
03-09-2023, 12:25 AM
#369
Hey James. Yes, the wiper arm direction is from the perspective of sitting in the drivers seat, so these are "bent right" (P/N SSBR). FWIW - the length of the arms is adjustable, and I extended them to their max length. The wiper blades are 10" stainless steel flex arms for curved glass (P/N SS10). I hope that helps.
-John
Last edited by JohnK; 03-11-2023 at 11:35 PM.
MkIV Roadster build: Gen 2 Coyote, IRS, TKO600. Ordered 10/24/18. Delivered 1/29/19. Engine installed 8/8/21. First start 9/12/21. First go-kart 9/17/21. Off to paint 4/11/22. Back from paint 12/30/22.
Build thread here.
-
Post Thanks / Like - 1 Thanks, 0 Likes
-
03-11-2023, 11:34 PM
#370
Greek Guys' Garage Roadster Build #9509 (rear wheel well splash guards and liners)
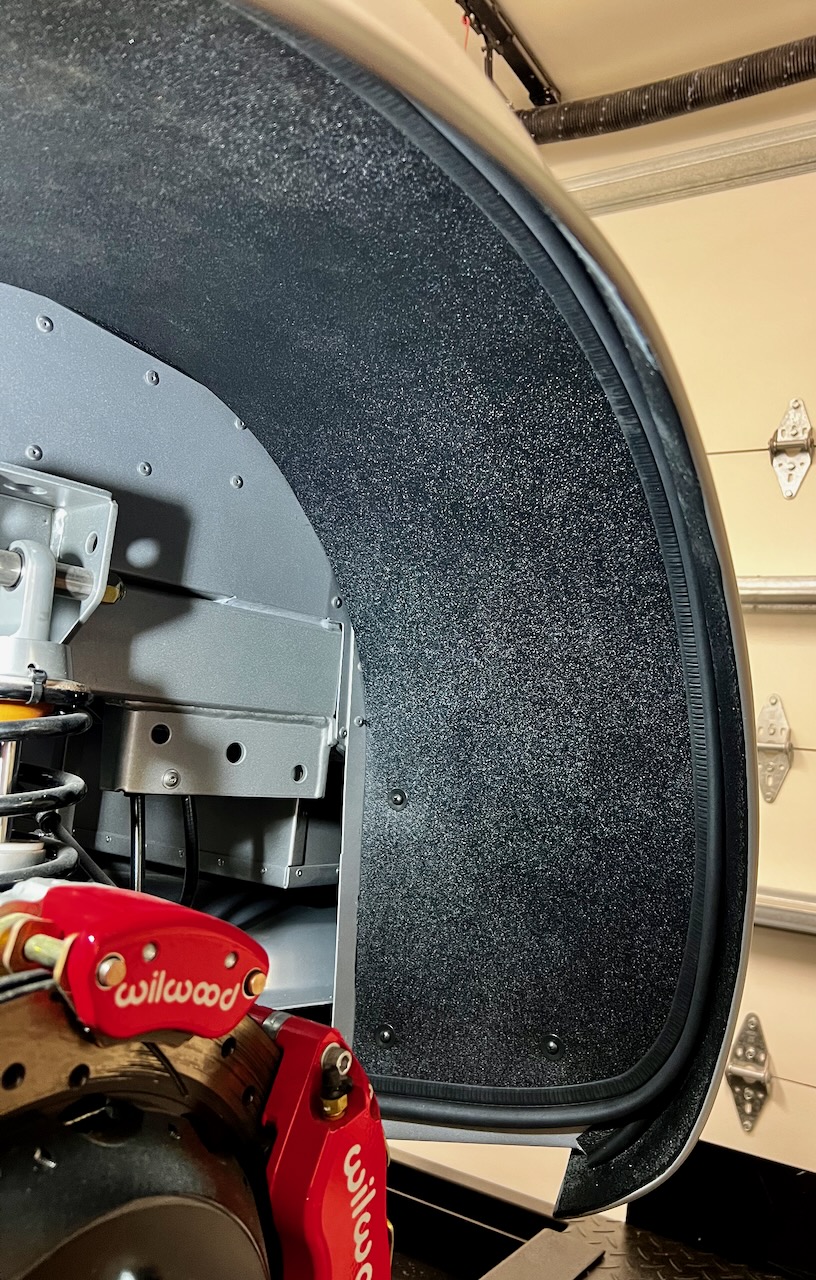
I spent some time over the last few days buttoning up the rear wheel wells. I started off by making a couple of filler panels for the gap at the front of the wheel wells. These would eventually be totally covered up by the wheel well liners so I just kept it simple and didn't bother painting them. It's debatable whether they're even really necessary with wheel well liners but it's peace of mind to have that gap closed up.
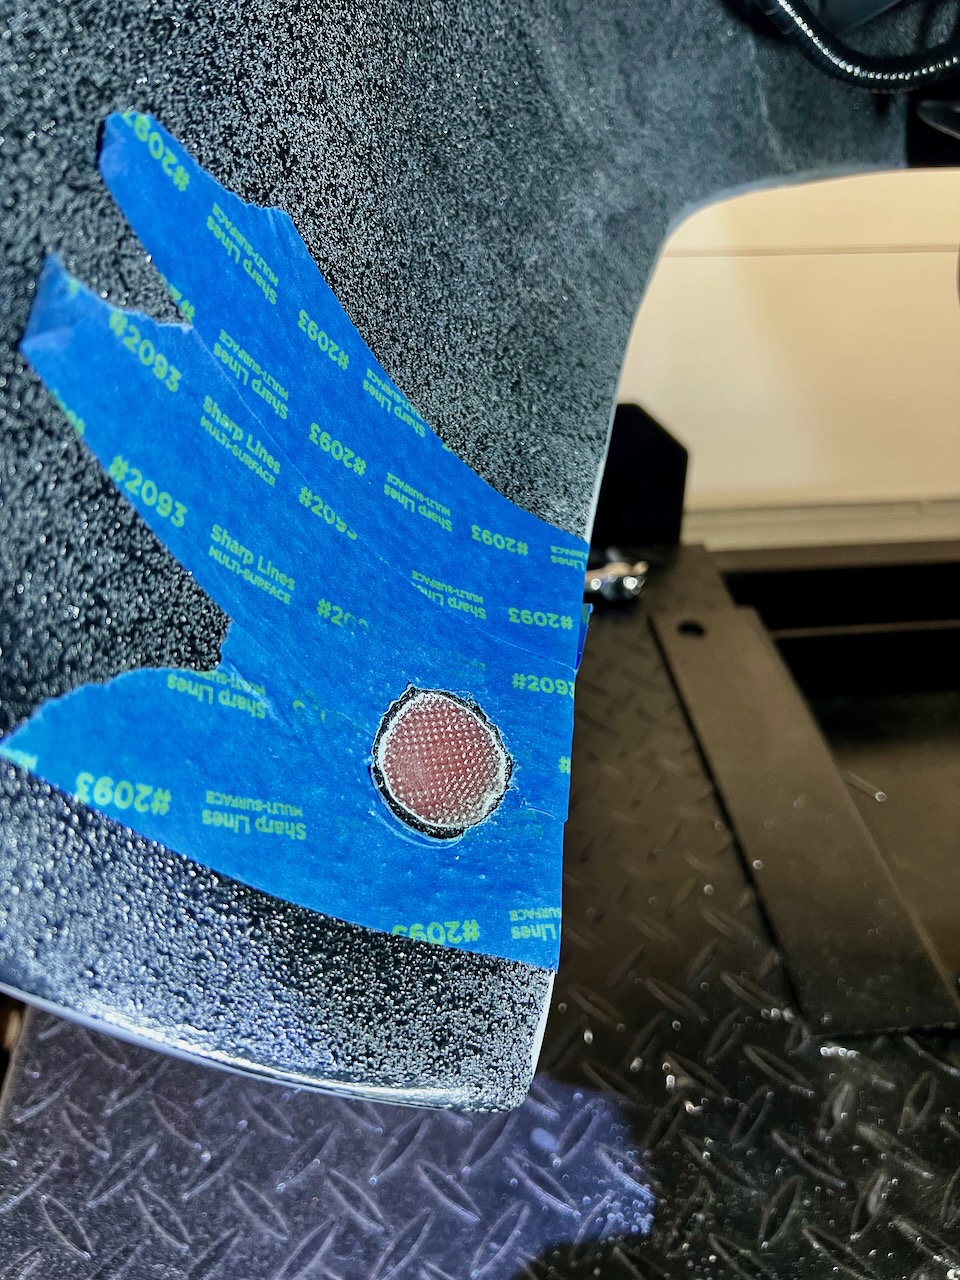
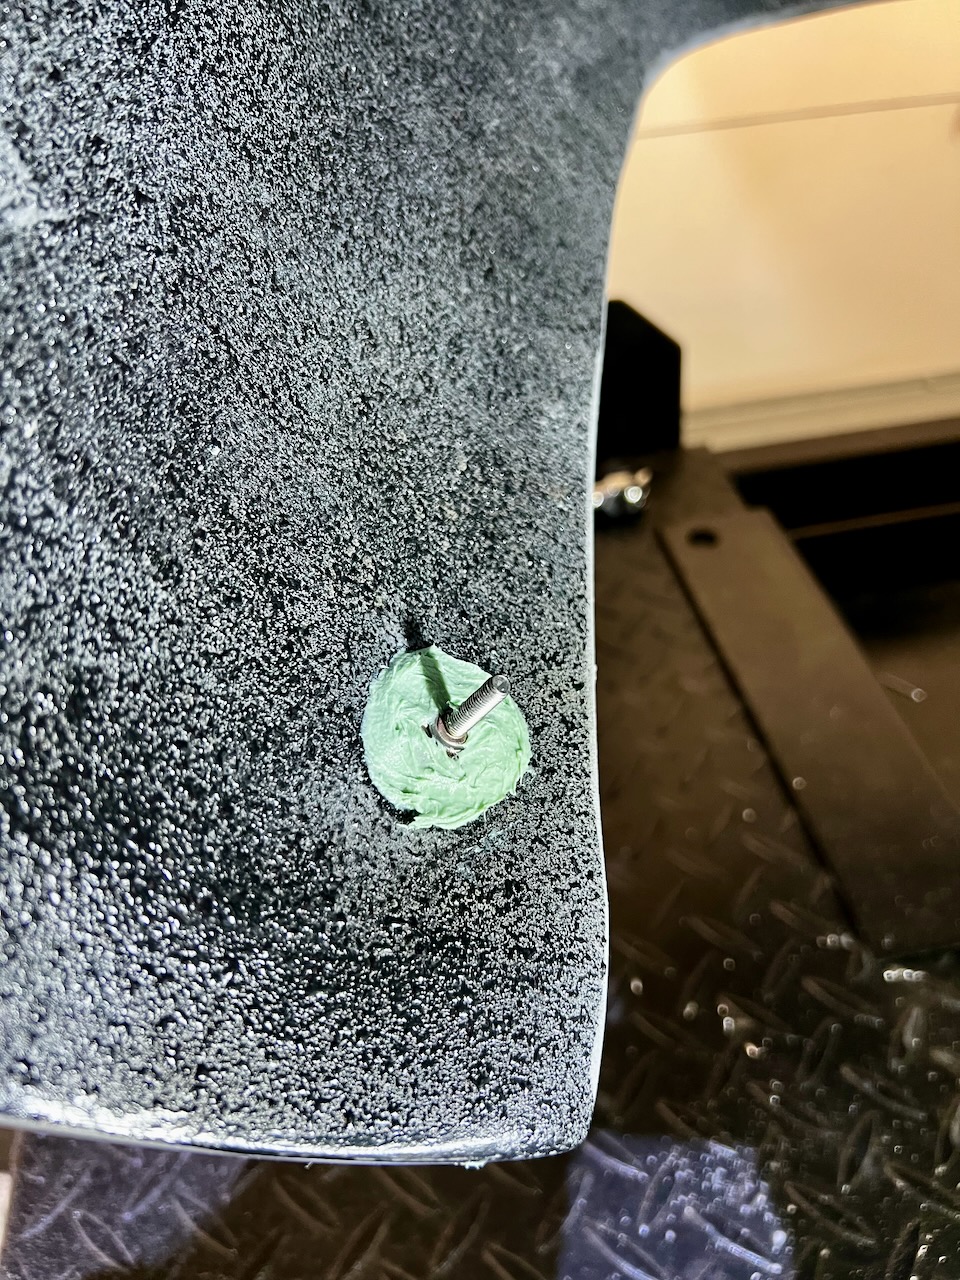
Next up were the splash guards. I didn't want to have bolts visible on the lower rocker attaching the splash guards, so I bonded some studs using HSRF. I started by locating the position of the studs and cleaning off the sprayed on bed liner with a wire wheel on a Dremel, down to clean fiberglass. I roughed that up with 80 grit and then attached the studs with HSRF.
Since I was planning to also install wheel well liners, I wanted the splash guards set far enough back in the wheel well to leave enough room for the liners. It took a little bit of trimming but I was able to set them back a couple of inches further than shown in the manual.
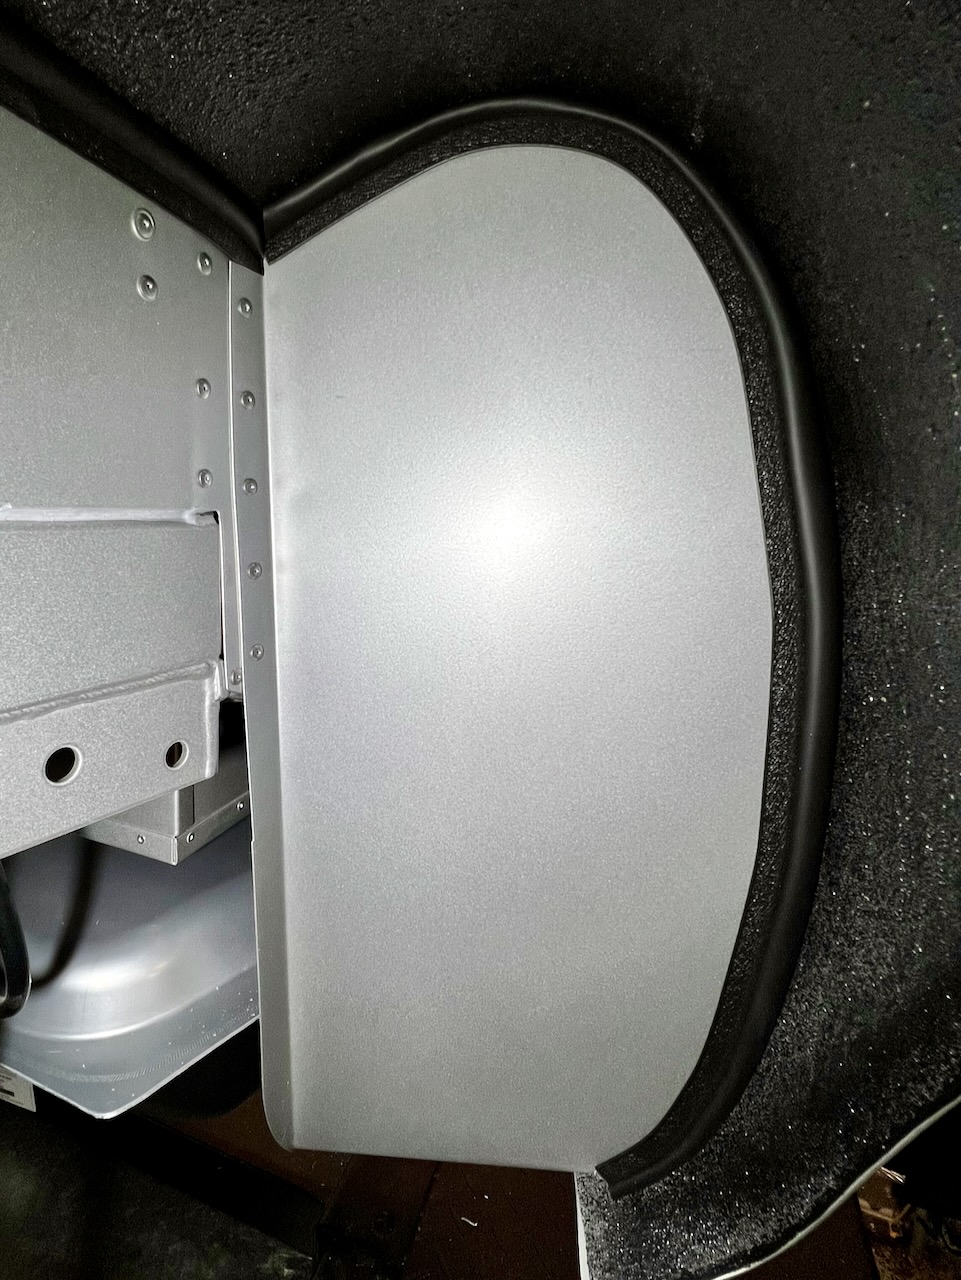
The last step was to install the wheel well liners. These are Alex's wheel well liners. I think they're one of the last sets he made before he stopped making them. I actually sent these to Shane at VRaptor Speedworks a while back and he used them to make the templates for the liners he now sells, so all of you that have bought Shane's liners have a copy of mine.  I like how the liners clean up the look of the wheel wells, but I had a small concern about how (for lack of a better term) "plasticky" they sound when tapping on them so I decided to put a layer of Dynaliner sound damping on the back side of the liners. Probably overkill, but they definitely have a more solid, muted sound now when tapping on them. Will it make any noticeable difference when driving? Who knows.
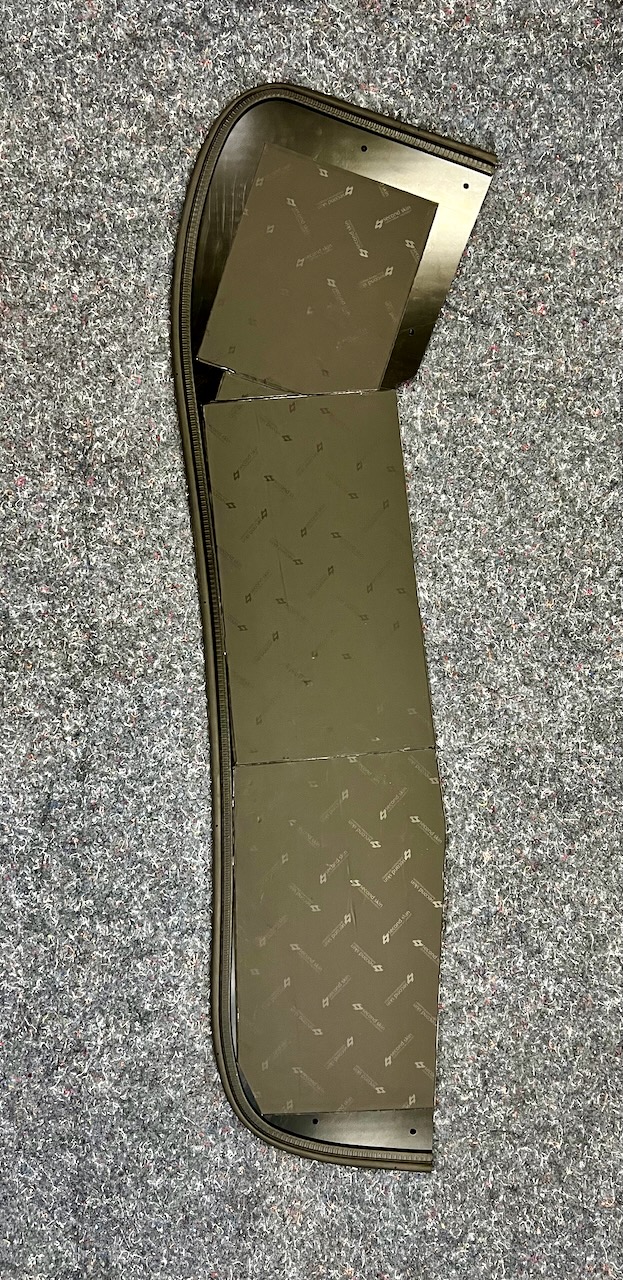
Here they are installed.
Since the rear wheels were off, I wrapped up the day spending some quality time cleaning red dust off the entire rear underside of the car. Holy cow - that stuff got everywhere. I'm sure I'll still be cleaning out red dust years from now.
MkIV Roadster build: Gen 2 Coyote, IRS, TKO600. Ordered 10/24/18. Delivered 1/29/19. Engine installed 8/8/21. First start 9/12/21. First go-kart 9/17/21. Off to paint 4/11/22. Back from paint 12/30/22.
Build thread here.
-
Post Thanks / Like - 1 Thanks, 1 Likes
-
03-12-2023, 01:49 AM
#371
Been waiting for this one!
Did the trimming of the splash guard panel help with wheel well liner fitment? I too was wondering if the wheels will rub if I keep the splash guard in the stock location.
-
03-12-2023, 11:09 AM
#372
No, even with the splash guards in their "normal" location I don't believe there's any concern with tires rubbing on the liners. At least I haven't heard of any, and in looking at how the tire/wheel fits in the wheel well I can't see how it would. My main motivation was that I didn't want to see the bulb seal on the liners anywhere near the fender lip.
MkIV Roadster build: Gen 2 Coyote, IRS, TKO600. Ordered 10/24/18. Delivered 1/29/19. Engine installed 8/8/21. First start 9/12/21. First go-kart 9/17/21. Off to paint 4/11/22. Back from paint 12/30/22.
Build thread here.
-
Post Thanks / Like - 0 Thanks, 1 Likes
-
03-12-2023, 01:06 PM
#373
Looking great and I also am considering these liners.
-
Post Thanks / Like - 1 Thanks, 1 Likes
JohnK thanked for this post
-
03-20-2023, 07:06 PM
#374
Greek Guys' Garage Roadster Build #9509 (starting CA SB100 registration process)
I visited my local DMV today to begin the California SB100 registration process. I want to say a huge thank you to everyone that has posted about their experience going through this. What is very clear is that if I didn't know how the process was supposed to work, I would have gotten absolutely nowhere today. I showed up 10 minutes early for my appointment, and was met by a lady at the front door that provides people with their line number. She asked what I was there for, and then told me I needed to bring the car to start the process.  I explained to her that unless she was willing to issue me a temporary permit, I needed to first submit my application and pay the fees. She shrugged and gave me a number and told me to go sit and wait. I was finally called to one of the windows, and began to explain again that I wanted to begin the SB100 process to register a newly built kit car. (Deer in the headlights stare) " I've never done that before. Hold on." The employee walks over to his co-worker at the next window and literally begs him to trade customers, offering to take 2-3 of his customers in exchange for dealing with me. No deal. He comes back with a sheepish smile and asks to see my paperwork. After a few minutes of shuffling through it, he goes off to talk to his manager. He comes back, asks me a few questions, types a few things in the computer, and goes off to talk to his manager again. This happened three or four more times. When he returned again he asked me to sign a form and showed me the list of fees that I would have to pay. Mind you, he never asked to see any receipts for any of the costs I listed on the "statement of construction" form. He then informed me that he would be keeping the FFR metal VIN tag. "Uh... no, you're not. That gets riveted to the car." "Ah, OK. Make sure you do that." (sigh) After writing a check and gathering up all my paperwork, I was sent over to another window to see the manager about getting a temporary operating permit. The manager is apparently the one person that actually knows about the SB100 process, as she walked me through the next steps before handing me the permit. All in all, a pretty comical experience but I got what I needed. Fees paid, application process started, and a 90 day operating permit.
  The manager must have been in a good mood. I've never heard of anyone getting anything longer than a 30 day temporary permit.
My takeaways from today's visit for those that are reading this and will be going through the CA SB100 process:
- Show up being intimately familiar with the SB100 process. You will need to be the subject matter expert because there's a high likelihood that the person you're dealing with will know nothing about it.
- Don't be afraid to correct them politely. "No, you can't keep my metal VIN tag." "No, I'm not going to drive my car over here without an operating permit." and so on...
- Less paperwork is better. The statement of construction asks for costs for the kit, engine, trans, and "other components". I put the bare minimum on the form and didn't offer up any receipts until asked... and I was never asked. Easy peasy.
I also found out that the DMV can do VIN verification so that saves me a trip to the local CHP office. That's good because they're typically booked 3-4 weeks out. Now that I've started the SB100 process, I can just come back to the DMV without an appt. for the VIN verification any time I want.
I'm sure that there are more thrills in store as I work my way through this process, but it was a decent enough start. I came home and celebrated by riveting on the FFR VIN tag.
MkIV Roadster build: Gen 2 Coyote, IRS, TKO600. Ordered 10/24/18. Delivered 1/29/19. Engine installed 8/8/21. First start 9/12/21. First go-kart 9/17/21. Off to paint 4/11/22. Back from paint 12/30/22.
Build thread here.
-
Post Thanks / Like - 0 Thanks, 3 Likes
-
03-20-2023, 07:40 PM
#375
Thanks for this John,
I am thinking of starting this in April or May, just before Ken finishes my paint. I'll be following closely. I also know of another FFR guy who got a 90 day permit and another who got 3 one-day permits. Good for you!!
#10333 Complete Kit, Carbed 427w, TKX, IRS and many other upgrades
- Order Date: September 11, 2021 - 20th Anniversary of 9/11
- Delivery Day: April 1, 2022 - April Fool's Day
- First Start and Go-Kart: January 20th, 2023
- Graduation Date: July 4th, 2023 - Independence Day!!
- Legal Registration Date: October 4, 2023 - My Birthday!!
Visit my MKIV Build Thread (#10333)
-
Post Thanks / Like - 1 Thanks, 0 Likes
JohnK thanked for this post
-
03-21-2023, 11:32 AM
#376
Originally Posted by
JohnK
...
Here they are installed.
Hey John, would you mind showing a few pictures of how you attached the wheel-well liners to the cockpit side of the wheel well? I tried mocking it up yesterday and couldn't figure out what the correct angle is. Also, did you drill into the cockpit to attach them?
I'm trying to figure out the front ones too. With the "FFMetal F-panel" that allows for bigger wheels the FFR provided panels simply won't fit and I'm wondering if I need them at all. It seems redundant having the aluminum panel there being completely blocked off by the liners. Have you had any luck designing your solution for the front wheels?
-
03-21-2023, 12:14 PM
#377
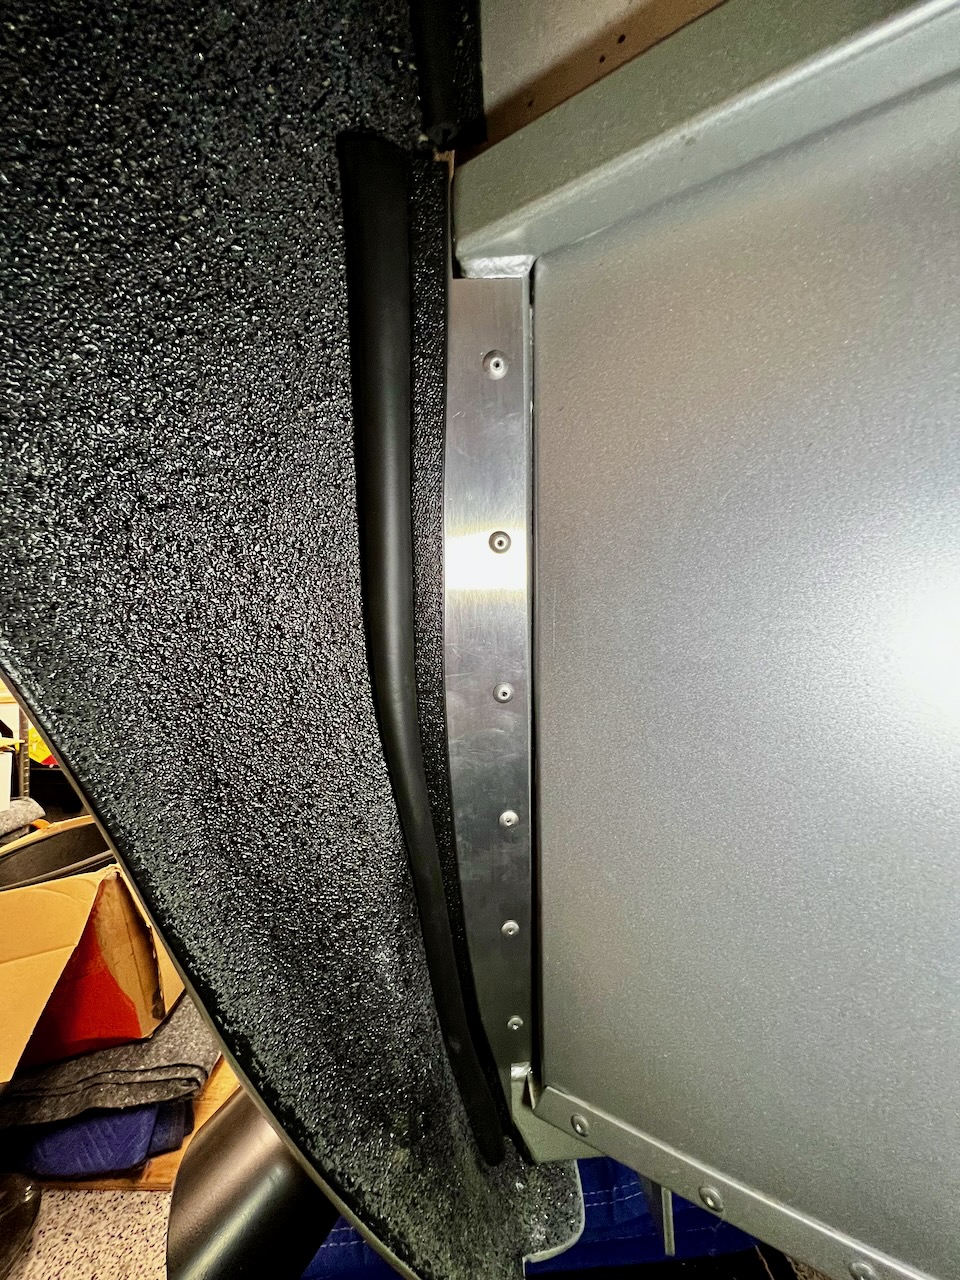
Hey Daniel. Sure, here's a photo of one of the front ends of the rear wheel well liners.
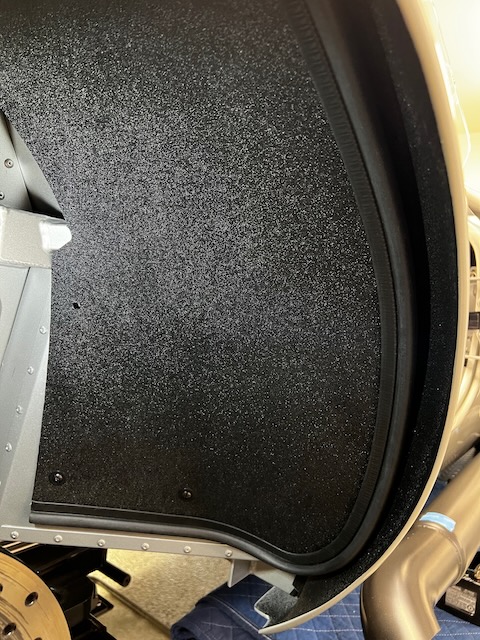
I'm not sure what holes (if any) Shane's liners have pre-drilled. Alex's liners have three holes at the front end of each rear liner, but I only used the bottom two holes to attach them. I did drill through the cockpit wall to attach them. I didn't want to see a nut on either end, so I used some "sex bolts" (binding barrels and screws) from McMaster, along with a washer on the wheel well side. These are 316 stainless steel with a black oxide coating, McMaster P/N 96960A356.
Here's the view from the cockpit side. They're basically invisible.
I'm still sorting out my approach for the front splash guards. Even with the FFR F-panels many folks have reported that the front splash guards are not a great fit. I agree with you that the FFMetal fat tire F-panels complicate matters even further on getting a decent fit. I also questioned whether I even need them if I'm going to install wheel well liners but I like how the splash guards clean up the look from the engine compartment side, and I also think they're useful as an attachment point for the rear of the liners. So far I've been working on the drivers side front. I've trimmed a considerable amount off and I've gotten the upper half of the splash guard to fit properly. One other concern I have is if I want to use the tab to attach the bottom of the splash guard to the body, that puts the splash guard pretty close to the fender lip. With bulb seal on the splash guard, it would push the wheel well liner out to the edge of the fender (or past it). I *think* that my solution is going to be to only install bulb seal on the upper half of the splash guard and trim the lower half back enough to create a gap that the bulb seal on the wheel well liners can nest into. Not sure if any of this makes any sense. I don't have any photos at the moment, as it's all a work in progress but I'll update as I go. I probably won't have any time to work on it until Thursday, and I can only really mock up at the moment as I want to wait to install the new collectors from Georgie and get side pipe fitment finalized before I install the splash guards and liners for good. Man, that was a lot of words to basically say that I don't have a clear idea yet, and it'll be a little while before I do.
MkIV Roadster build: Gen 2 Coyote, IRS, TKO600. Ordered 10/24/18. Delivered 1/29/19. Engine installed 8/8/21. First start 9/12/21. First go-kart 9/17/21. Off to paint 4/11/22. Back from paint 12/30/22.
Build thread here.
-
03-22-2023, 08:04 AM
#378
Senior Member
Originally Posted by
JohnK
I visited my local DMV today to begin the California SB100 registration process. I want to say a
huge thank you to everyone that has posted about their experience going through this. What is very clear is that if I didn't know how the process was supposed to work, I would have gotten absolutely nowhere today. I showed up 10 minutes early for my appointment, and was met by a lady at the front door that provides people with their line number. She asked what I was there for, and then told me I needed to bring the car to start the process.
I explained to her that unless she was willing to issue me a temporary permit, I needed to first submit my application and pay the fees. She shrugged and gave me a number and told me to go sit and wait. I was finally called to one of the windows, and began to explain again that I wanted to begin the SB100 process to register a newly built kit car. (Deer in the headlights stare) " I've never done that before. Hold on." The employee walks over to his co-worker at the next window and literally begs him to trade customers, offering to take 2-3 of his customers in exchange for dealing with me. No deal. He comes back with a sheepish smile and asks to see my paperwork. After a few minutes of shuffling through it, he goes off to talk to his manager. He comes back, asks me a few questions, types a few things in the computer, and goes off to talk to his manager again. This happened three or four more times. When he returned again he asked me to sign a form and showed me the list of fees that I would have to pay. Mind you, he never asked to see any receipts for any of the costs I listed on the "statement of construction" form. He then informed me that he would be keeping the FFR metal VIN tag. "Uh... no, you're not. That gets riveted to the car." "Ah, OK. Make sure you do that." (sigh) After writing a check and gathering up all my paperwork, I was sent over to another window to see the manager about getting a temporary operating permit. The manager is apparently the one person that actually knows about the SB100 process, as she walked me through the next steps before handing me the permit. All in all, a pretty comical experience but I got what I needed. Fees paid, application process started, and a
90 day operating permit.
The manager must have been in a good mood. I've never heard of anyone getting anything longer than a 30 day temporary permit.
My takeaways from today's visit for those that are reading this and will be going through the CA SB100 process:
- Show up being intimately familiar with the SB100 process. You will need to be the subject matter expert because there's a high likelihood that the person you're dealing with will know nothing about it.
- Don't be afraid to correct them politely. "No, you can't keep my metal VIN tag." "No, I'm not going to drive my car over here without an operating permit." and so on...
- Less paperwork is better. The statement of construction asks for costs for the kit, engine, trans, and "other components". I put the bare minimum on the form and didn't offer up any receipts until asked... and I was never asked. Easy peasy.
I also found out that the DMV can do VIN verification so that saves me a trip to the local CHP office. That's good because they're typically booked 3-4 weeks out. Now that I've started the SB100 process, I can just come back to the DMV without an appt. for the VIN verification any time I want.
I'm sure that there are more thrills in store as I work my way through this process, but it was a decent enough start. I came home and celebrated by riveting on the FFR VIN tag.
Choose wisely for your brake and tail light inspection shop, some will actually set up cones and record stopping distances. Not that I did not want to have safe brakes more so did not want some yahoo locking up my tires driving my car. We have a guy in our area that everyone goes to who does the shine the flashlight at the brakes test I also found the CHP inspection to be painless, took me about half hour for them to review my paper work and stamp the new VIN. Biggest delay was getting the BAR appointment for smog inspection. Glad you are making progress and can now drive it, time to get her out on the road John and start racking up some miles!!!
-
Post Thanks / Like - 1 Thanks, 0 Likes
JohnK thanked for this post
-
03-22-2023, 08:15 PM
#379
Hi John, Beautiful build. I am local in Sunnyvale and hope to meet you at some point. Question: where did you get the grab handle mounted on the dash?
-
03-22-2023, 08:26 PM
#380
Thanks so much! Looking forward to meeting you some time.
The grab handle is made by Eddie Marine. P/N 275-24P. It's available at a number of places, including Summit Racing here.
MkIV Roadster build: Gen 2 Coyote, IRS, TKO600. Ordered 10/24/18. Delivered 1/29/19. Engine installed 8/8/21. First start 9/12/21. First go-kart 9/17/21. Off to paint 4/11/22. Back from paint 12/30/22.
Build thread here.
-
03-22-2023, 08:43 PM
#381
Perfect thank you. Off topic, the SB100 process will be a test of patience. Start early!
FFR MKIII 4.6L Kenne Bell supercharged
-
Post Thanks / Like - 0 Thanks, 1 Likes
-
04-20-2023, 09:06 AM
#382
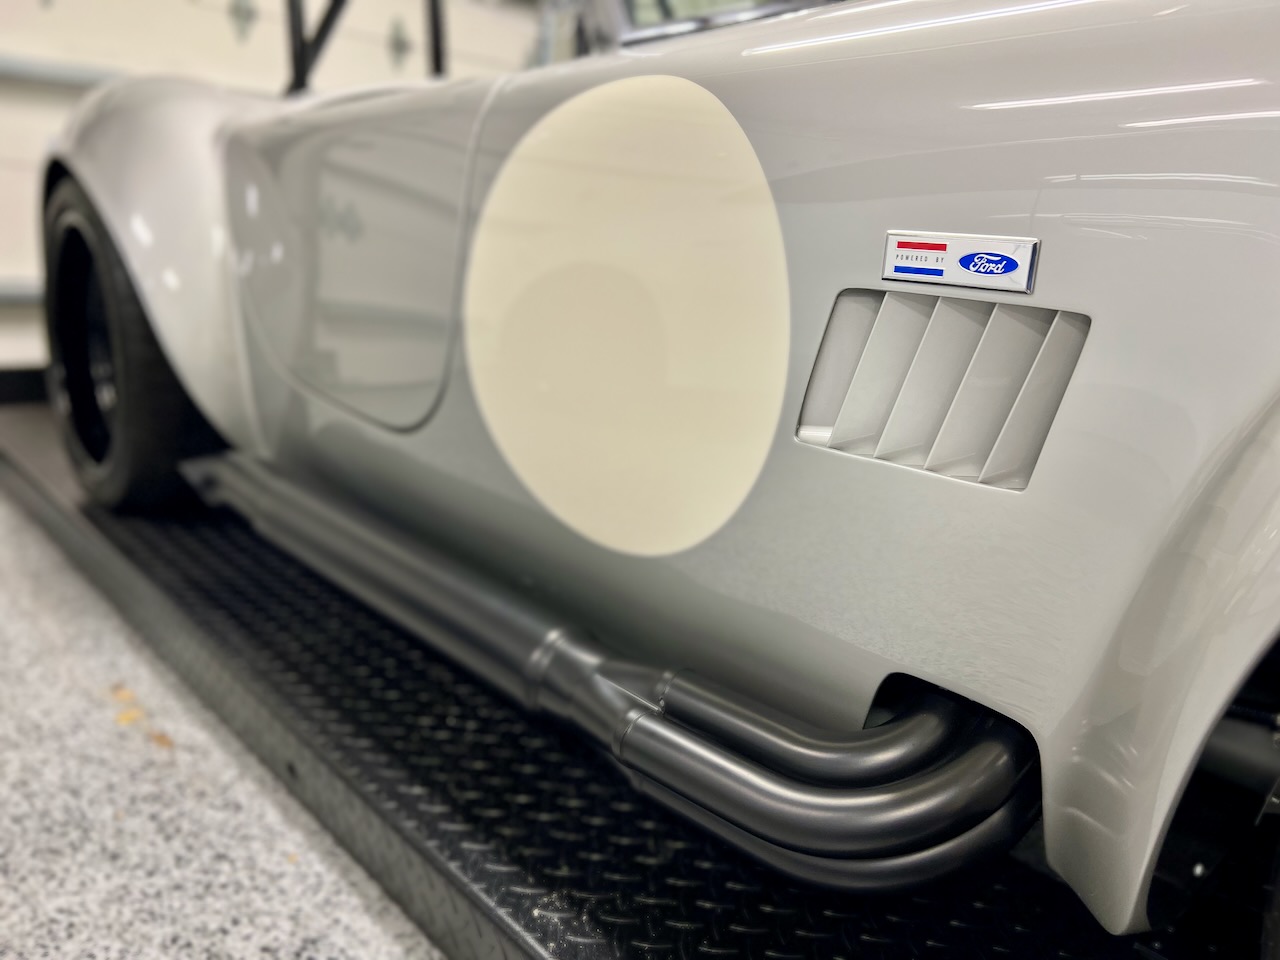
Greek Guys' Garage Roadster Build #9509 (Huge THANKS to Georgie -side pipe install)
It's been a little while since my last update, but there's been a lot going on behind the scenes. As previously discussed, the final fitting of side pipes has been a bit problematic. Soon after posting my initial questions about the problems I was experiencing in another thread, I was contacted by Georgie from Gas-N offering to help. We spoke several times and came up with a plan, which involved replacing my headers with new Gas-N headers with adjustable ball flanges, as well as fabricating custom offset collectors to address my specific fit issues.
At this point, I want to give a huge shout out and a massive thank you! to Georgie. Were it not for his help the only other option would have been for me to make some pretty substantial and unsightly cuts to the body to be able to fit the side pipes. Through this whole process, Georgie has been incredibly generous and helpful, and I owe him a huge debt of gratitude.
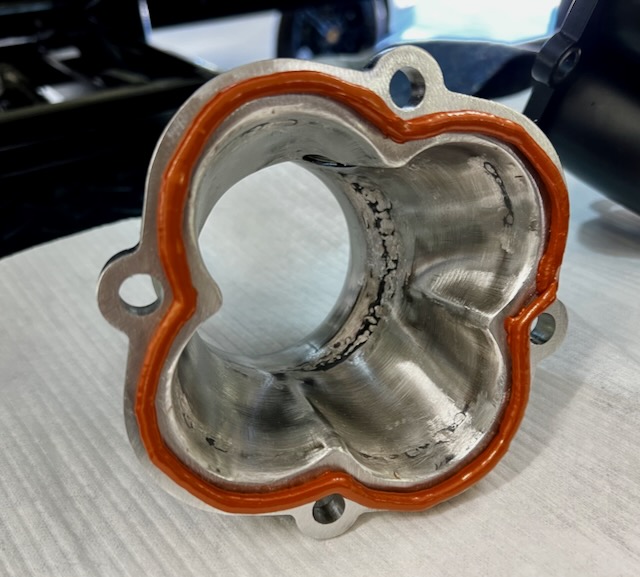
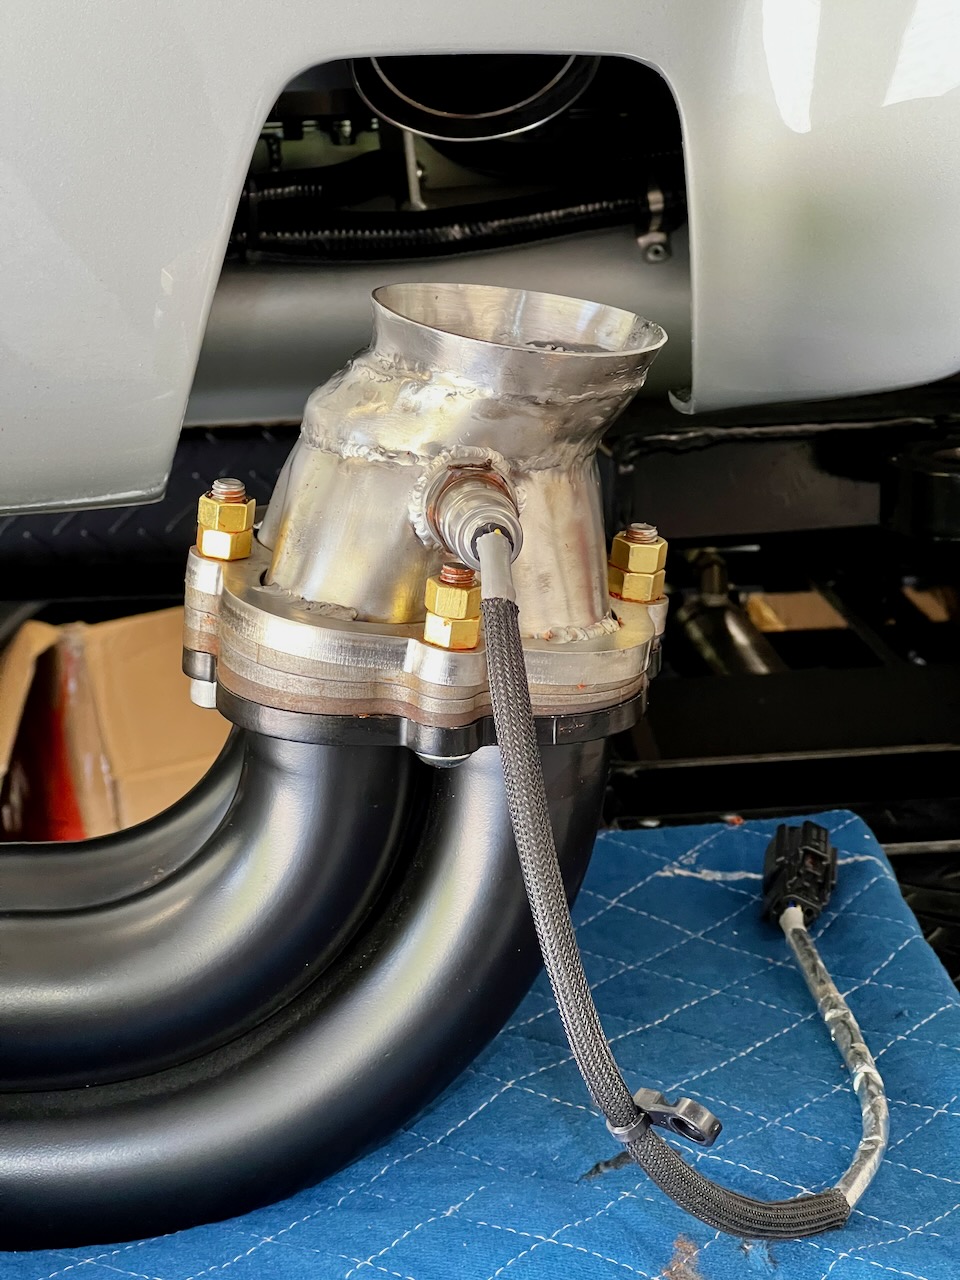
The process of getting the fit dialed in was an iterative one. We started with the standard coyote headers and collectors, and mocked up how much offset I needed on each side. That's documented above in previous posts. After that was determined a set of custom collectors was made. Here's the first version of those custom collectors. Offset collector on the left, stock collector on the right:
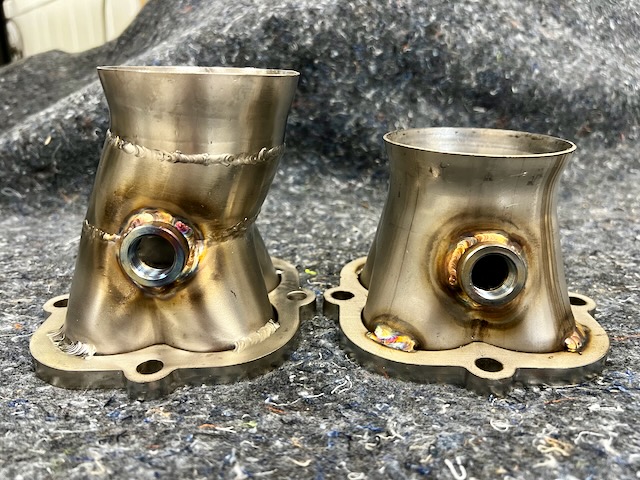
These collectors had the correct amount of offset, but were too long and placed the flanges right up against the body, so unfortunately these wouldn't work. I sent these back to Georgie and they made me a second set with the same offset, but with the length of the original collectors. Here's what version 2 looks like:
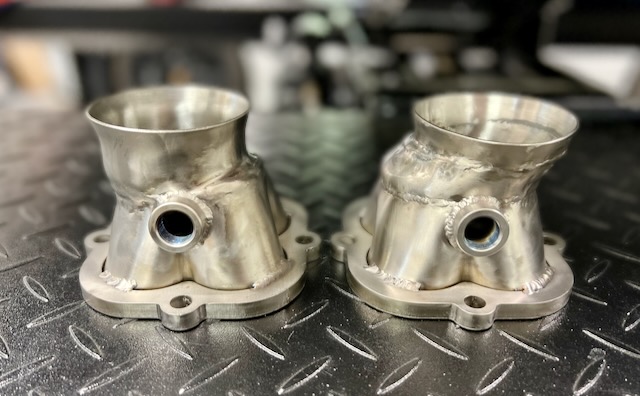
That's some serious custom fabrication work right there! Initial test fitting indicated that the drivers side pipe was now positioned perfectly and was ready for final installation. The passenger side pipe was still positioned a little too far forward in the body cutout, but because these collectors are shorter I have room to work with. A mockup revealed that a couple of Breeze offset wedges will rotate the ball flange backward enough to be able to position the pipe perfectly in the cutout. More on that in a future post.
Now on to final assembly of the drivers side pipe. I opted to use Permaflex Ultra Copper RTV instead of a gasket on the header to side pipe flange. Per Permaflex' instructions, I started by laying a bead of RTV on the flange.
Permaflex advise not to let this set up at all. It needs to be assembled "wet," but initial installation should only be with bolts finger-tight just to the point that the RTV oozes out of the joint a little bit.
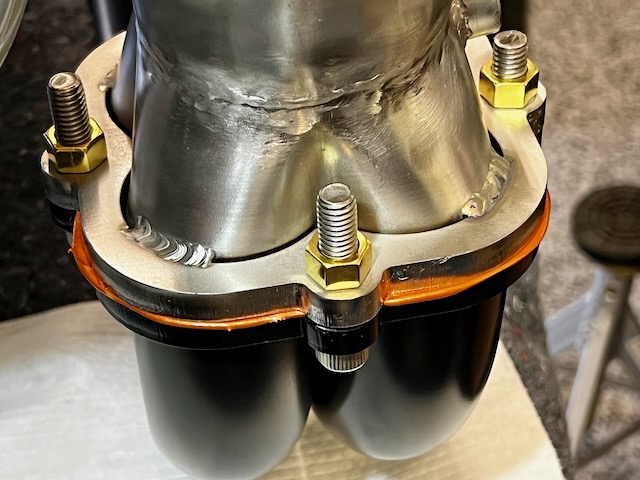
This is then left to set up for one hour, and then torqued to spec and left to cure for 24 hours. I chose to use 18-8 SS bolts (3/8"-16) with brass nuts. For final assembly I also put a dab of ultra copper RTV on the threads of the bolts to act as an anti-seize and a thread locker. After torquing the bolts to spec I installed a second jam nut on each bolt.
Once the RTV has cured for 24 hours whatever has oozed out can be easily broken off, leaving a nice clean joint. Here's the DS pipe ready for installation.
Phew! It's been quite the process to get to this point. We're currently out of town for a few days but by the time I'm back home my Breeze wedges should be there and I can begin final assembly of the passenger side pipe. First "real" drive can't be far off now!
MkIV Roadster build: Gen 2 Coyote, IRS, TKO600. Ordered 10/24/18. Delivered 1/29/19. Engine installed 8/8/21. First start 9/12/21. First go-kart 9/17/21. Off to paint 4/11/22. Back from paint 12/30/22.
Build thread here.
-
Post Thanks / Like - 1 Thanks, 2 Likes
-
04-20-2023, 09:50 AM
#383
25th Anniversary #9772

Originally Posted by
JohnK
It's been a little while since my last update, but there's been a lot going on behind the scenes. As previously discussed, the final fitting of side pipes has been a bit problematic. Soon after posting my initial questions about the problems I was experiencing in another thread, I was contacted by Georgie from Gas-N offering to help. We spoke several times and came up with a plan, which involved replacing my headers with new Gas-N headers with adjustable ball flanges, as well as fabricating custom offset collectors to address my specific fit issues.
At this point, I want to give a huge shout out and a massive
thank you! to Georgie. Were it not for his help the only other option would have been for me to make some pretty substantial and unsightly cuts to the body to be able to fit the side pipes. Through this whole process, Georgie has been incredibly generous and helpful, and I owe him a huge debt of gratitude.
The process of getting the fit dialed in was an iterative one. We started with the standard coyote headers and collectors, and mocked up how much offset I needed on each side. That's documented above in previous posts. After that was determined a set of custom collectors was made. Here's the first version of those custom collectors. Offset collector on the left, stock collector on the right:
These collectors had the correct amount of offset, but were too long and placed the flanges right up against the body, so unfortunately these wouldn't work. I sent these back to Georgie and they made me a second set with the same offset, but with the length of the original collectors. Here's what version 2 looks like:
That's some serious custom fabrication work right there! Initial test fitting indicated that the drivers side pipe was now positioned perfectly and was ready for final installation. The passenger side pipe was still positioned a little too far forward in the body cutout, but because these collectors are shorter I have room to work with. A mockup revealed that a couple of Breeze offset wedges will rotate the ball flange backward enough to be able to position the pipe perfectly in the cutout. More on that in a future post.
Now on to final assembly of the drivers side pipe. I opted to use Permaflex Ultra Copper RTV instead of a gasket on the header to side pipe flange. Per Permaflex' instructions, I started by laying a bead of RTV on the flange.
Permaflex advise not to let this set up at all. It needs to be assembled "wet," but initial installation should only be with bolts finger-tight just to the point that the RTV oozes out of the joint a little bit.
This is then left to set up for one hour, and then torqued to spec and left to cure for 24 hours. I chose to use 18-8 SS bolts (3/8"-16) with brass nuts. For final assembly I also put a dab of ultra copper RTV on the threads of the bolts to act as an anti-seize and a thread locker. After torquing the bolts to spec I installed a second jam nut on each bolt.
Once the RTV has cured for 24 hours whatever has oozed out can be easily broken off, leaving a nice clean joint. Here's the DS pipe ready for installation.
Phew! It's been quite the process to get to this point. We're currently out of town for a few days but by the time I'm back home my Breeze wedges should be there and I can begin final assembly of the passenger side pipe. First "real" drive can't be far off now!
looks amazing! Kudos on a fantastic build!
-
Post Thanks / Like - 1 Thanks, 0 Likes
JohnK thanked for this post
-
04-25-2023, 12:41 AM
#384
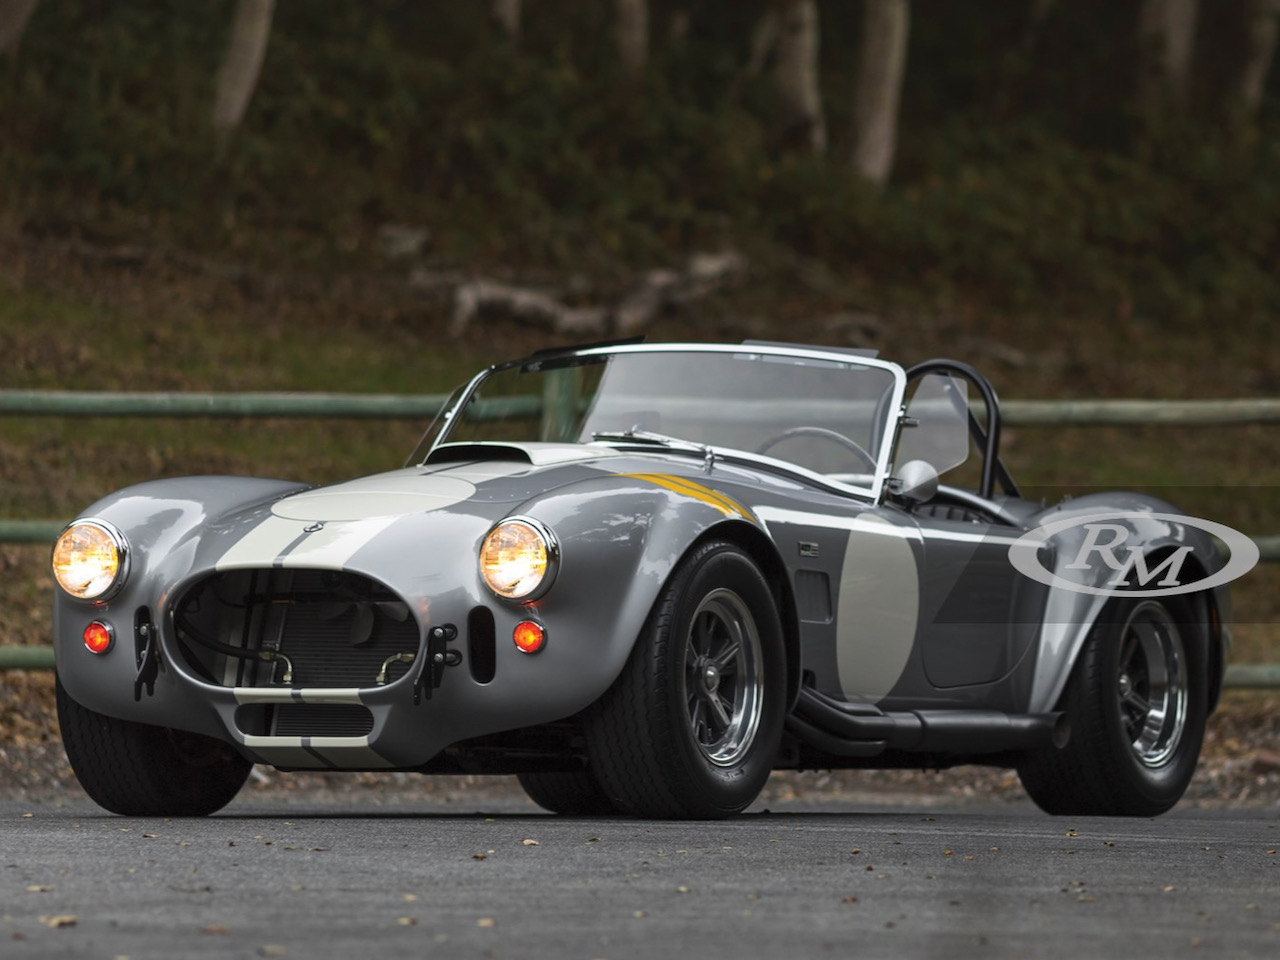
Greek Guys' Garage Roadster Build #9509 (Side pipe install Pt 2)
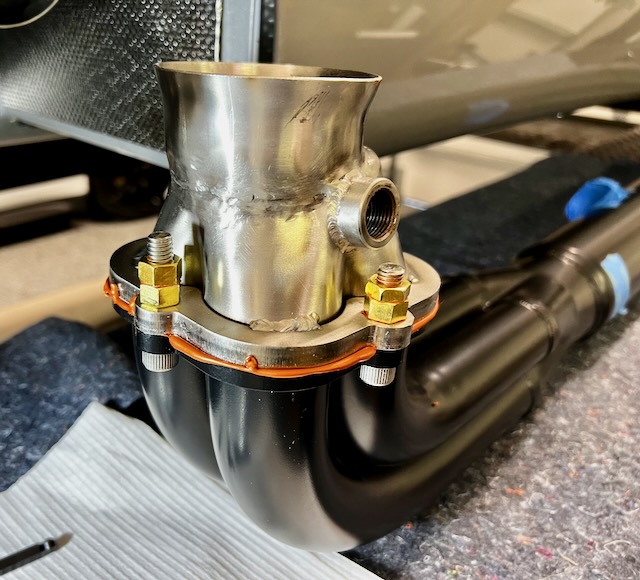
I'll start off with another thank you, this time to all the folks that helped out with my request for exhaust wedges. I realized that I needed a few wedges to get the passenger side pipe positioned properly. Between Mark at Breeze, Daniel (facultyofmusic), cfriedman67 and Georgie I came home from last week's travel to a nice assortment of wedges. After a bit of experimentation and trying out various combinations of wedges while trying to optimize four different pipe fit variables I settled on three large offset wedges (1/4" tapering to 1/16" each). The final assembly followed the same process as the driver side, but was a bit more complicated to put together. Here's the final combination of offset collector and wedge sandwich:
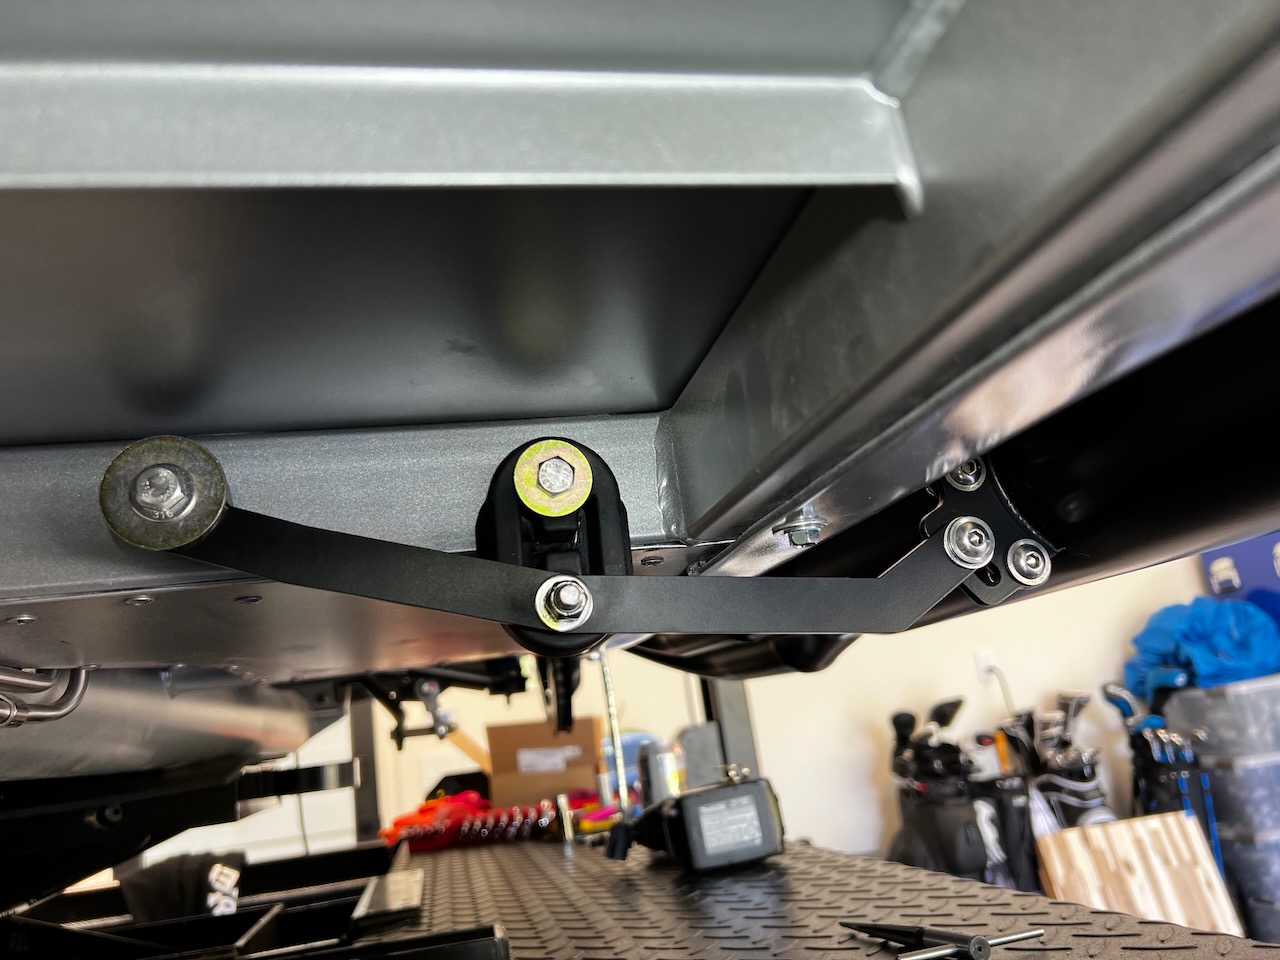
Not the prettiest to look at, but as you'll see in a moment the ends justify the means. The installation of the exhaust hangers was pretty straightforward. I followed Edwardb's suggestion to use heavy duty 5/16-18 rivet nuts (McMaster P/N 95105A155) for the two hanger bolts, rather than running them all the way through the 2" tube into the footwell. I also picked up a compact rivet nut installation tool, which made installing the rivet nuts much easier. I also used SS flange button head screws with SS acorn nuts on the hanger to pipe attachments. Nothing terribly exciting, but it matches the fastener choices throughout the rest of the build.
So after all the angst, hand-wringing, design iterations, hunting down of wedges and freakish amalgams of parts... was it worth it? Well, yes. Here's the drivers side pipe fit now:
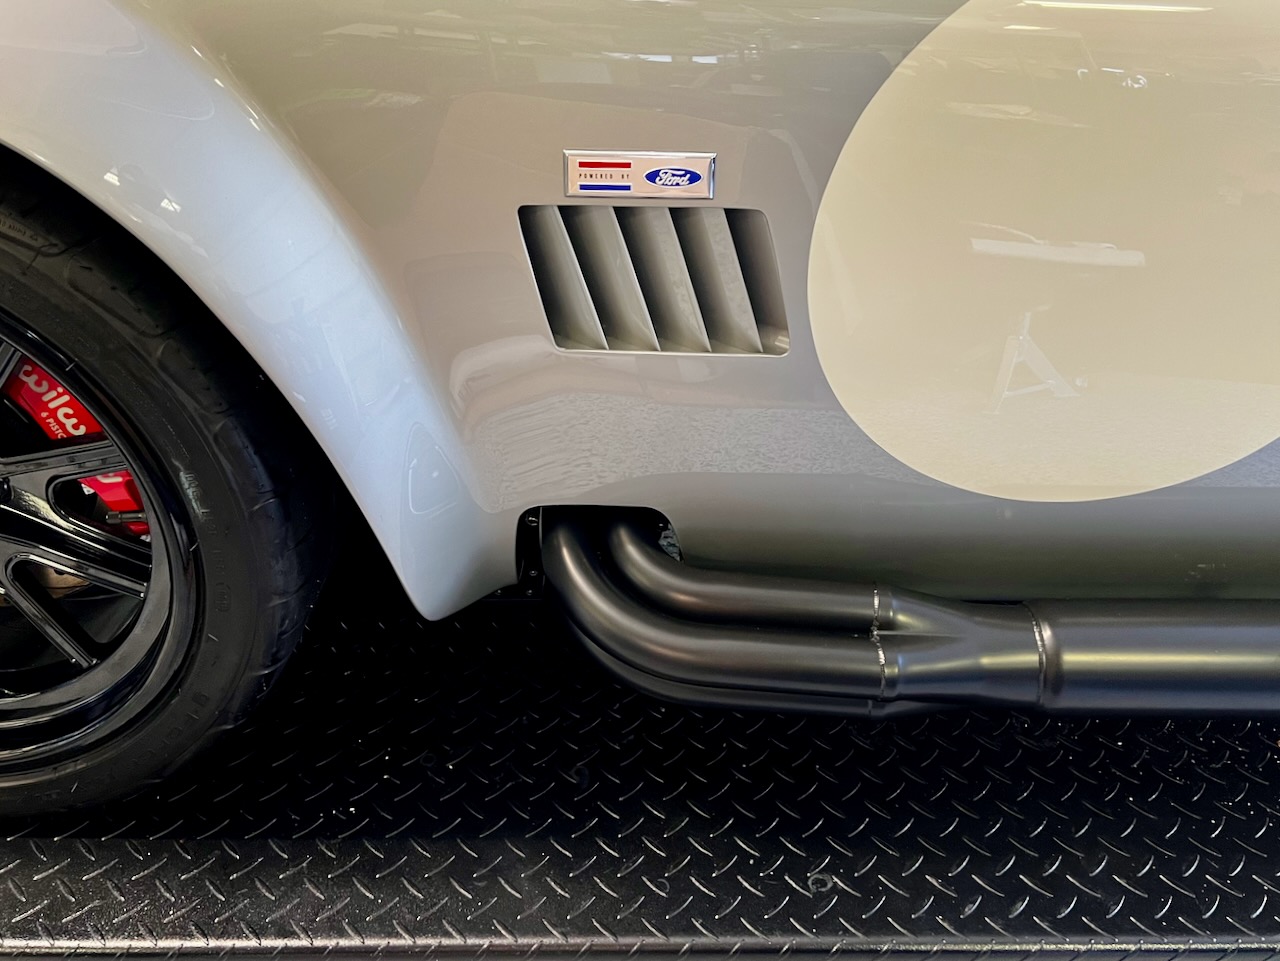
... and the passenger side:
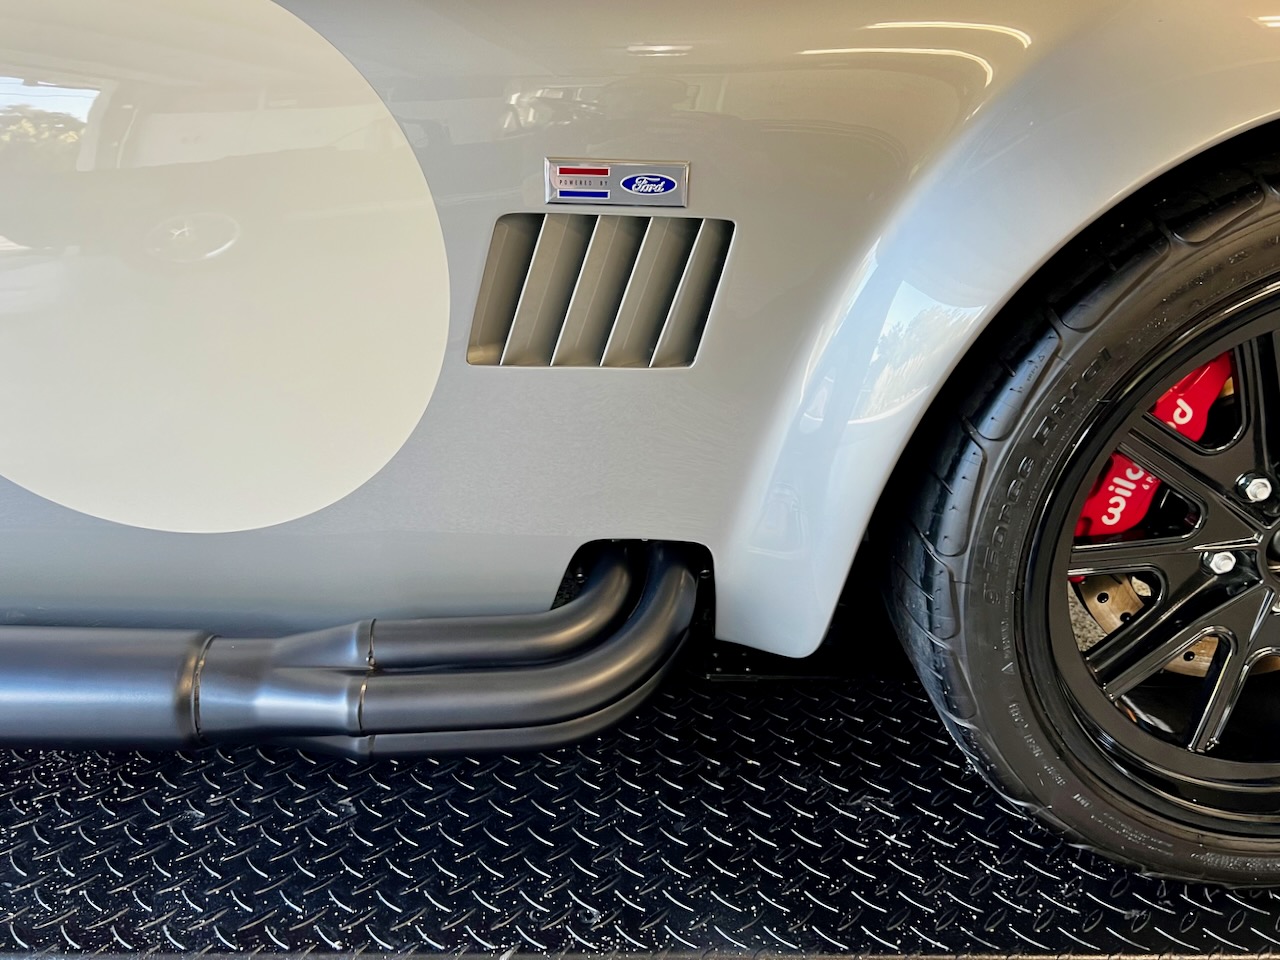
If you've been following along through all of this you'll remember that I couldn't even bolt up the passenger side pipe before. Now both pipes fit perfectly into what are effectively the cutouts that came with the body from FFR without any further enlargement or massaging. They are also perfectly parallel to the body, within an 1/8" of each other in distance from the body, and within 1/16" of each other in height. It's certainly not how I would have chosen to go about fitting side pipes but the fact that I was able to get them to fit into the original body cutouts is a testament to Georgie and his incredible generosity and expertise.
You know what really sucks? Having to wait 24 hours for ultra copper RTV to cure.
First drive tomorrow!
Last edited by JohnK; 04-25-2023 at 12:45 AM.
MkIV Roadster build: Gen 2 Coyote, IRS, TKO600. Ordered 10/24/18. Delivered 1/29/19. Engine installed 8/8/21. First start 9/12/21. First go-kart 9/17/21. Off to paint 4/11/22. Back from paint 12/30/22.
Build thread here.
-
Post Thanks / Like - 2 Thanks, 3 Likes
-
04-25-2023, 08:03 AM
#385
Senior Member
Awesome, those pipes look perfect... nice work on hanging in there for the long haul. One item I had issues with is the pipes sagging about 3/4" in the rear with the Gas 'N rubber mount they supply with the brackets. That rubber mount would heat up and not hold well. I ended up using heavy duty exhaust straps from AutoZone and cut a small piece of .040 alum to help support them better and this took care of the issue. Hopefully you won't have this problem.
Have fun on your first drive!!!!
-
Post Thanks / Like - 2 Thanks, 1 Likes
-
04-25-2023, 09:13 AM
#386
Senior Member
Looks great. Need some whole body glamour shots.
-
Post Thanks / Like - 1 Thanks, 0 Likes
JohnK thanked for this post
-
04-25-2023, 09:31 AM
#387
Senior Member

Sweeeeet! Turned out really nice, John. (I would have expected no less from your build). I'm with Blitzboy on the request for more pictures, and dare I suggest a short video? Top notch quality, sir.
Quick question: I don't recall if you had your side exhaust ceramic coated, or Jet Hot? I like the finish on it.
Chris
Coupe complete kit delivered: 4/22/24.
Build Thread. Coyote. T-56. IRS w/3.55. Wilwoods. PS. HVAC. Side windows.
MK4 Complete kit.
Build Thread Index. Delivered: 10/15/2020. Legal: 7/25/23. Coyote Gen3. TKO600 (0.64 OD). IRS w/3.55. PS. Wilwoods. Sway bars. This build is dedicated to my son, Benjamin.
Build Thread.
-
Post Thanks / Like - 1 Thanks, 0 Likes
JohnK thanked for this post
-
04-25-2023, 09:46 AM
#388
Thanks so much everyone! I'm so happy with how the side pipes turned out, even though they cost me a few months' delay. There are a few more details to button up before "proper" glamour shots, but I'll snap a few photos once she's out in the sunshine. I haven't yet installed the spinners on the wheels and probably won't until after alignment. I also need to install the front elephant ears and wheel well liners after I heat cycle the engine a few times and install the Stage8 locks on the header bolts. I have a few locations in mind for photo shoots once she's 100%.
Chris - the pipes are Jet Hot coated satin black.
MkIV Roadster build: Gen 2 Coyote, IRS, TKO600. Ordered 10/24/18. Delivered 1/29/19. Engine installed 8/8/21. First start 9/12/21. First go-kart 9/17/21. Off to paint 4/11/22. Back from paint 12/30/22.
Build thread here.
-
04-25-2023, 10:00 AM
#389
Not a waxer

Not without challenges but I'm sure happy to hear that you were able to get the pipes sorted out!
Jeff
-
Post Thanks / Like - 1 Thanks, 0 Likes
JohnK thanked for this post
-
04-25-2023, 10:04 AM
#390
Looking great! Now get over here to the Sacramento area and show it off!
#10333 Complete Kit, Carbed 427w, TKX, IRS and many other upgrades
- Order Date: September 11, 2021 - 20th Anniversary of 9/11
- Delivery Day: April 1, 2022 - April Fool's Day
- First Start and Go-Kart: January 20th, 2023
- Graduation Date: July 4th, 2023 - Independence Day!!
- Legal Registration Date: October 4, 2023 - My Birthday!!
Visit my MKIV Build Thread (#10333)
-
Post Thanks / Like - 1 Thanks, 0 Likes
JohnK thanked for this post
-
04-25-2023, 10:18 AM
#391
25th Anniversary #9772
gorgeous! amazed by your handiwork!
-
Post Thanks / Like - 1 Thanks, 0 Likes
JohnK thanked for this post
-
04-25-2023, 11:25 AM
#392
Greek Guys' Garage Roadster Build #9509 (First drive)
Took her out for a coffee this morning and snapped a few pics. All I can say is "wow". This is going to be fun.  Here's her first photo in the sunshine.

MkIV Roadster build: Gen 2 Coyote, IRS, TKO600. Ordered 10/24/18. Delivered 1/29/19. Engine installed 8/8/21. First start 9/12/21. First go-kart 9/17/21. Off to paint 4/11/22. Back from paint 12/30/22.
Build thread here.
-
Post Thanks / Like - 0 Thanks, 5 Likes
-
04-25-2023, 03:45 PM
#393
Senior Member
Wow! Beautiful. Really like the red hash marks as well. Thanks for posting, John.
Chris
Coupe complete kit delivered: 4/22/24.
Build Thread. Coyote. T-56. IRS w/3.55. Wilwoods. PS. HVAC. Side windows.
MK4 Complete kit.
Build Thread Index. Delivered: 10/15/2020. Legal: 7/25/23. Coyote Gen3. TKO600 (0.64 OD). IRS w/3.55. PS. Wilwoods. Sway bars. This build is dedicated to my son, Benjamin.
Build Thread.
-
Post Thanks / Like - 0 Thanks, 1 Likes
-
04-25-2023, 04:18 PM
#394
Senior Member
I second Chris’s comment. Just an absolutely gorgeous car.
Enjoy it.
-
Post Thanks / Like - 0 Thanks, 1 Likes
-
04-25-2023, 05:46 PM
#395
Thanks so much for the kind words everyone! Much appreciated.
I took her out for a quick spin this afternoon and dropped by the DMV to take care of the VIN verification. For those future builders reading this thread, ignore what I previously said about the DMV being able to do VIN verification. Despite having been told this by three separate DMV employees (including the manager) on my previous visit this is not the case. For new builds being titled through the SB100 process, only the CHP can verify the VIN. Oh well, appt made for May 4 at the San Jose CHP station. Thank goodness for that 90 day temporary operating permit.
MkIV Roadster build: Gen 2 Coyote, IRS, TKO600. Ordered 10/24/18. Delivered 1/29/19. Engine installed 8/8/21. First start 9/12/21. First go-kart 9/17/21. Off to paint 4/11/22. Back from paint 12/30/22.
Build thread here.
-
Post Thanks / Like - 0 Thanks, 1 Likes
-
04-25-2023, 07:26 PM
#396
It's amazing to know that your car is one of those that look amazing both from 5 feet away and from 5 inches away. People will go WOW when they walk toward it and when they see the superb quality of the dashboard, console, carpeting, and the other small things they'll go WAAAAAAOOOOOWWWWWW
Sorry that happened at the DMV. The CHP office at San Jose is super efficient and you'll be outta there in no time. It's a long drive tho...
P.S. A lady (can't say who) at the DMV leaned over and whispered to me when I was at the counter "just don't fill in the date. if they catch you say you forgot." LOL!
-
Post Thanks / Like - 1 Thanks, 1 Likes
JohnK thanked for this post
-
04-25-2023, 10:04 PM
#397
Car looks stunning! Love the color combo.
Let's plan an Alice's get together on May 13th so we can check it out.
-
Post Thanks / Like - 1 Thanks, 0 Likes
JohnK thanked for this post
-
04-26-2023, 11:24 AM
#398
Looks fantastic! If I had to nitpick, find. Way to turn the windshield and headlight bezels to black instead of chrome.
-
04-26-2023, 11:42 AM
#399
Originally Posted by
compuatic
Looks fantastic! If I had to nitpick, find. Way to turn the windshield and headlight bezels to black instead of chrome.
Thanks so much! There are quite a few roadsters with blacked-out trim and it's definitely a cool look. However, I'm going for a more "period" look. My inspiration for the aesthetics of the build is CSX3040. I've obviously deviated a bit with modern touches like 18" wheels and I went with red team stripes to match the red Wilwood calipers but the paint scheme and choice of black vs. chrome on exterior trim comes from this beauty:
MkIV Roadster build: Gen 2 Coyote, IRS, TKO600. Ordered 10/24/18. Delivered 1/29/19. Engine installed 8/8/21. First start 9/12/21. First go-kart 9/17/21. Off to paint 4/11/22. Back from paint 12/30/22.
Build thread here.
-
04-26-2023, 12:34 PM
#400
Understood! the black wheels and roll bar threw me off
FFR MKIII 4.6L Kenne Bell supercharged
-
Post Thanks / Like - 1 Thanks, 0 Likes
JohnK thanked for this post


 Thanks:
  Likes:


 Reply With Quote


