Boig Motorsports

Visit our community sponsor

Thanks Thanks:  21
Likes Likes:  42
Page 3 of 4 FirstFirst 1234 LastLast
Results 81 to 120 of 126

Thread: Junbug's Colorado Mk IV Coyote/TKX Build Thread: Exhaust Hangers

  1. #81
    Junior Member
    Join Date
    Feb 2023
    Posts
    21
    Post Thanks / Like
    Bryan, the E-brake mod looks great! I've read Lokar no longer makes the clevis set EdwardB used, so what parts did you end up using? I'm about to tackle the E-brake set up and don't like the idea of routing the cable under the 4". I'm actually shocked FFR still does it. If you don't mind, what pulleys/bolt and clevis set up did you use and where did you get them? I gather you probably used the pulleys from McMaster, #3434T24, but the rest is becoming more interesting to find. I'd appreciate any insight you can provide.

  2. #82
    Senior Member
    Join Date
    Oct 2021
    Location
    Sarasota, FL
    Posts
    280
    Post Thanks / Like
    Bryan,

    I am also getting an engine from Mike Forte, albeit a Boss 347 W/Edelbrock Pro Flo 4 EFI and am looking forward to the install. Can you tell me what engine leveler you used?

    Thanks

    Bill
    Roadster MK4 #10653 Date: 4-27-23; First Start: Oct 2023; Go Kart: Nov 2023; Body and Paint: To Kleiner EDD - April 2024; Graduated: TBD
    SBF Boss 347, Edelbrock ProFlo 4, Milodon Road Race Oil Pan, Tremec TKX 2.87/0.81 OD, IRS Dakota Digital Dash, FFMetal Firewall Forward, BOIG Lower Cool Pipes, Forte's Mechanical Throttle Linkage and Hydraulic Clutch, Breeze Radiator Fan Shroud- Radiator Support Kit and Battery Forward

  3. Thanks Junbug thanked for this post
    Likes Junbug liked this post
  4. #83
    Senior Member Mike.Bray's Avatar
    Join Date
    Dec 2021
    Location
    Flower Mound TX
    Posts
    1,170
    Post Thanks / Like
    Quote Originally Posted by maclonchas View Post
    Bryan,

    I am also getting an engine from Mike Forte, albeit a Boss 347 W/Edelbrock Pro Flo 4 EFI and am looking forward to the install. Can you tell me what engine leveler you used?

    Thanks

    Bill
    I can tell you I tried one from Northern Tool and it was terrible. This one worked really well, worth the money 100%. With it I was able to remove and reinstall the engine/trans by myself.
    My build thread https://thefactoryfiveforum.com/show...Roadster-Build

    Thread on Stainless Steel AN brake lines.

    Thread on fasteners and torque wrenches.

  5. #84
    Senior Member danmas's Avatar
    Join Date
    Jan 2019
    Location
    Mead Colorado
    Posts
    265
    Post Thanks / Like
    Blog Entries
    1
    I lent Junbug mine.

    This one
    Last edited by danmas; 10-14-2023 at 12:09 PM.
    ----
    Mk4 complete kit arrived 10 May 23
    Current BOM

  6. Thanks maclonchas thanked for this post
  7. #85
    Senior Member Junbug's Avatar
    Join Date
    Apr 2022
    Location
    Lafayette, CO
    Posts
    250
    Post Thanks / Like
    Quote Originally Posted by Souleman View Post
    Bryan, the E-brake mod looks great! I've read Lokar no longer makes the clevis set EdwardB used, so what parts did you end up using? I'm about to tackle the E-brake set up and don't like the idea of routing the cable under the 4". I'm actually shocked FFR still does it. If you don't mind, what pulleys/bolt and clevis set up did you use and where did you get them? I gather you probably used the pulleys from McMaster, #3434T24, but the rest is becoming more interesting to find. I'd appreciate any insight you can provide.
    Thanks. I bought the clevis from Summit. The remainder of the parts I bought from my local Ace hardware... Stainless steel bolt and nuts. For the pulleys, yes, #3434T24 is the two I ordered. The bolt that runs through it I also got in stainless from Ace. I don't recall the sizing but I always try to bring in the parts and fit the nuts/bolts in store before I buy. You'll need to cut the ends of the e-brake cables off and thread them through the lokar clevis but it tightens up really well. No movement at all, so far.
    https://www.summitracing.com/parts/LOK-WCA8070
    -Bryan
    Mk4 Roadster w/ IRS, Forte Gen 3 Coyote/TKX, Wilwood Brakes
    Build thread https://thefactoryfiveforum.com/show...oyote-TKX-EFI)
    Ordered: 6/27/22, Delivered: 1/20/23, First Start 10/16/2023, Go-Cart 3/30/2024

  8. #86
    Senior Member Junbug's Avatar
    Join Date
    Apr 2022
    Location
    Lafayette, CO
    Posts
    250
    Post Thanks / Like
    Quote Originally Posted by maclonchas View Post
    Bryan,

    I am also getting an engine from Mike Forte, albeit a Boss 347 W/Edelbrock Pro Flo 4 EFI and am looking forward to the install. Can you tell me what engine leveler you used?

    Thanks

    Bill
    See Danmas post for the link. He was kind enough to share his lift and leveler with me. Worked great. Key is to ensure your engine is level when you start. It will get a bit crooked when tilting it with the type Danmas shared, but once you get it back to level, it dropped it perfectly into the engine mounts.
    -Bryan
    Mk4 Roadster w/ IRS, Forte Gen 3 Coyote/TKX, Wilwood Brakes
    Build thread https://thefactoryfiveforum.com/show...oyote-TKX-EFI)
    Ordered: 6/27/22, Delivered: 1/20/23, First Start 10/16/2023, Go-Cart 3/30/2024

  9. Thanks maclonchas thanked for this post
  10. #87
    Senior Member Junbug's Avatar
    Join Date
    Apr 2022
    Location
    Lafayette, CO
    Posts
    250
    Post Thanks / Like
    Also, Big news! We had our first start today! Video link below. I had a brain fart yesterday when i didn't have power to my ignition. A single question on the forum and a couple of quick answer from some experts here and they straitened me out. I had "dieted" the ignition leg of my harness a bit too much. Once I looked at the wire diagram again I realized I had taken out the IGN->COL cable. Once I dug it out of my box-o-unused/cut cables, everything worked exactly as planned...
    https://youtube.com/shorts/E-yKEphqw...6O24YqbQ28fJCC
    -Bryan
    Mk4 Roadster w/ IRS, Forte Gen 3 Coyote/TKX, Wilwood Brakes
    Build thread https://thefactoryfiveforum.com/show...oyote-TKX-EFI)
    Ordered: 6/27/22, Delivered: 1/20/23, First Start 10/16/2023, Go-Cart 3/30/2024

  11. Likes danmas, maclonchas, zarnold liked this post
  12. #88
    Senior Member Junbug's Avatar
    Join Date
    Apr 2022
    Location
    Lafayette, CO
    Posts
    250
    Post Thanks / Like
    Its been a bit of time since I last updated but since the first start I've slowed down a bit, spent more time with family and went to two weddings, two weekends in a row. Oh, and had a leak in the bathroom that resulted in a full gut and replacement of the shower pan.
    I've completed a handful of small tasks, installed a OEM Ford clutch cable, that is so much smoother than the FFR provided one. Along with the clutch cable I installed a firewall cable adjuster. All of that was pretty straight forward. I also installed my Gasn exhaust pipes and tightened up the ball flanges. They're essentially just hanging off the headers/ball flanges right now but I don't plan to do much go-carting until the spring, and aside from testing my brakes she will stay in the garage all winter (we are already having many nights below freezing).
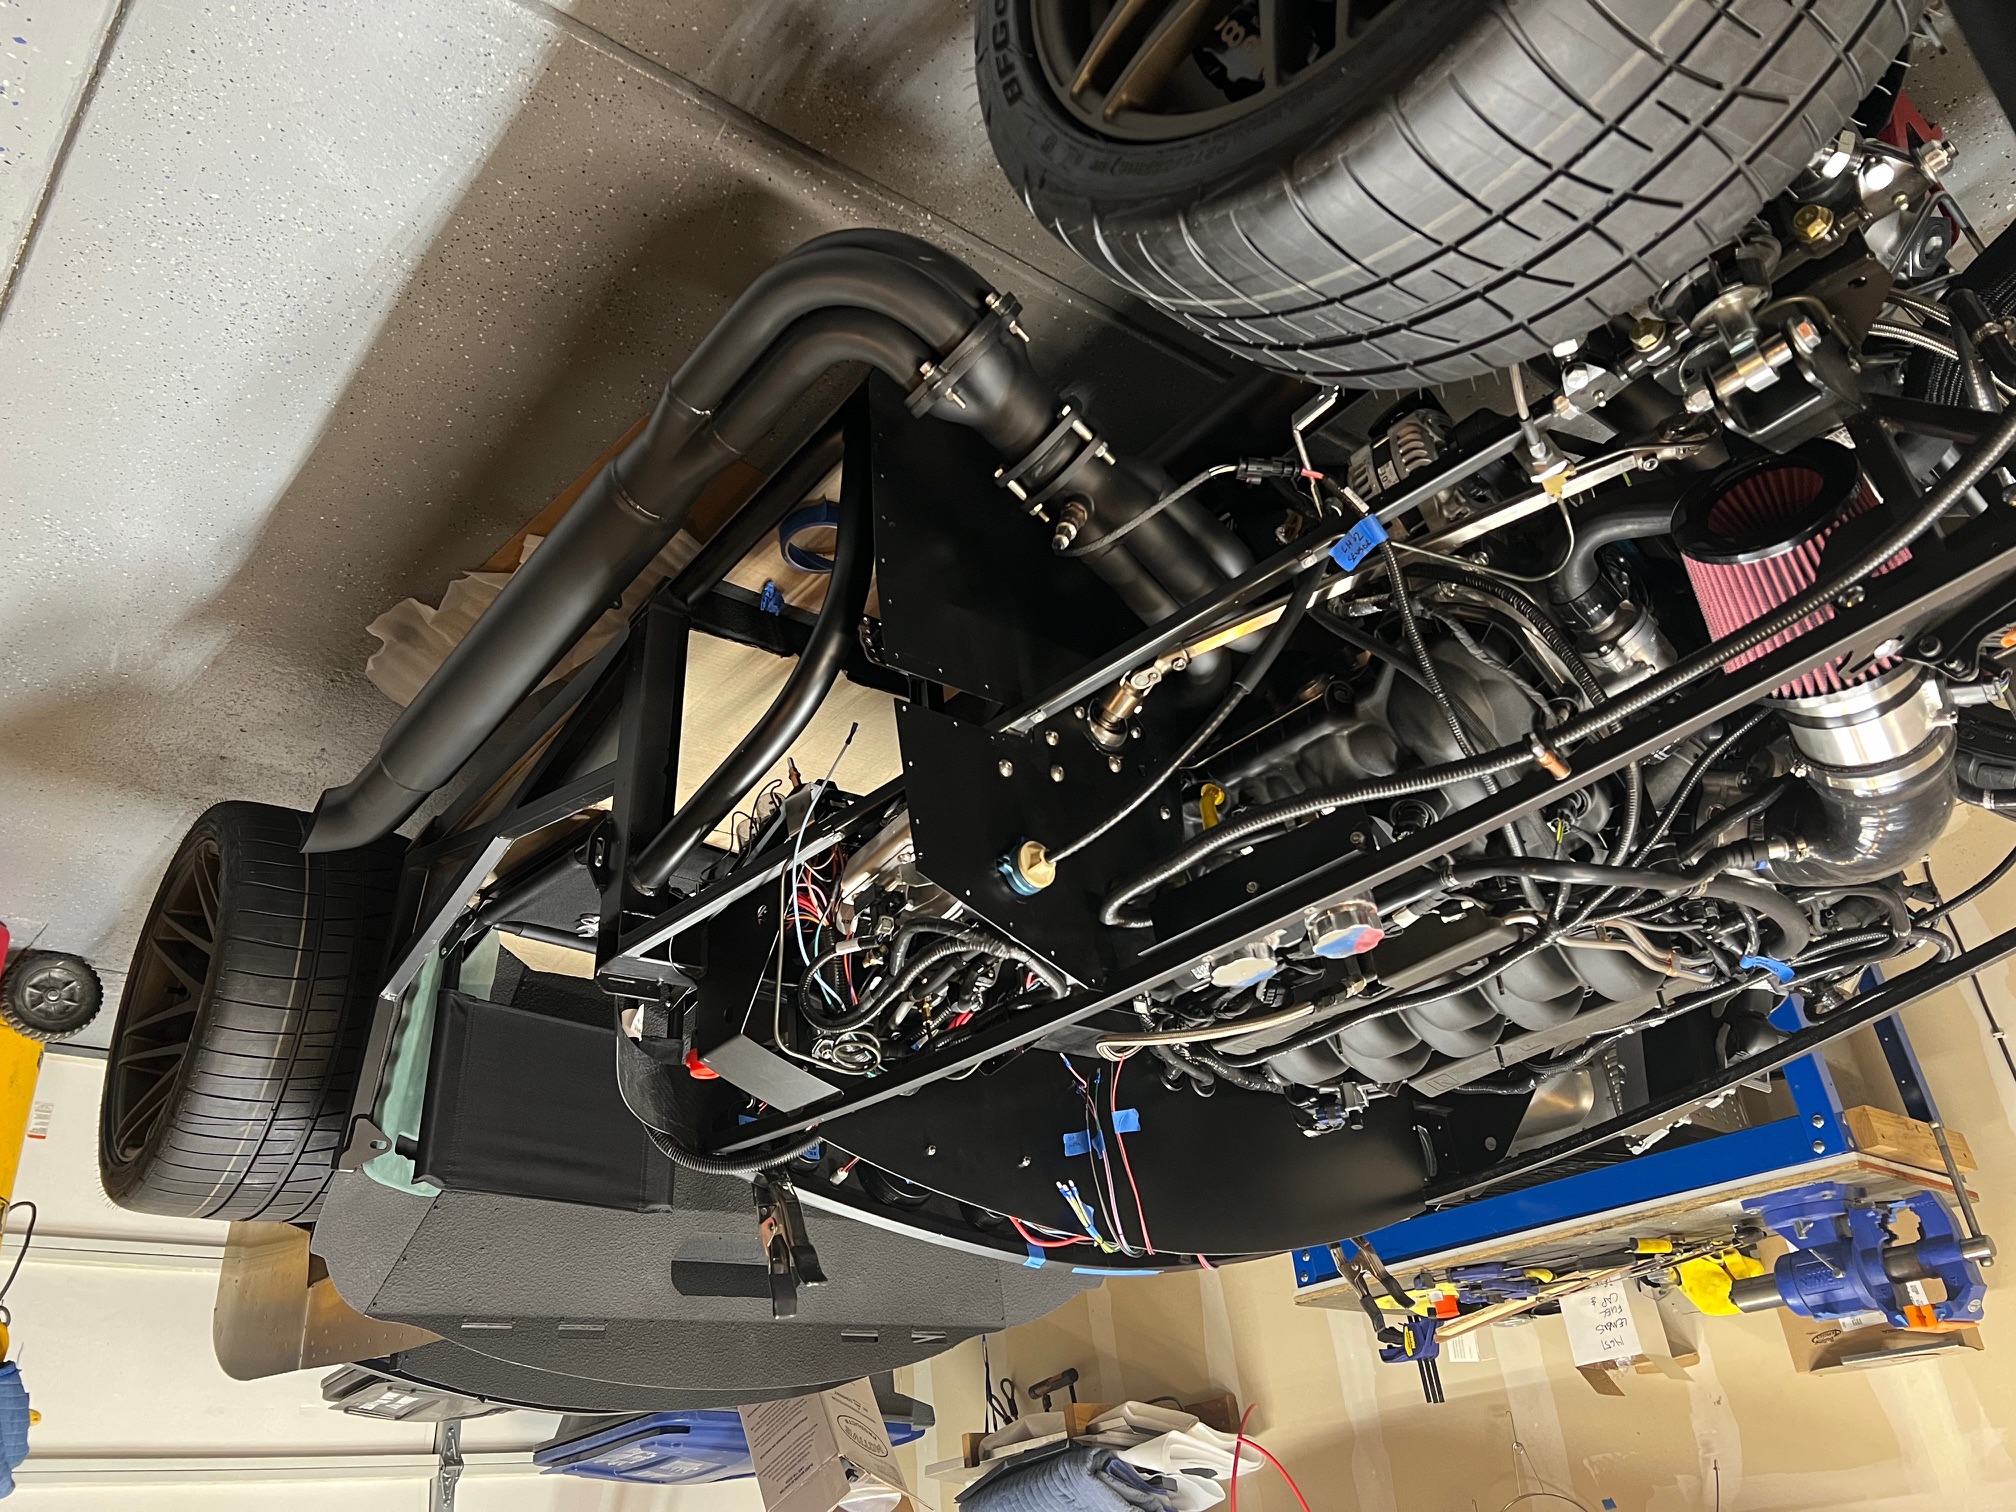
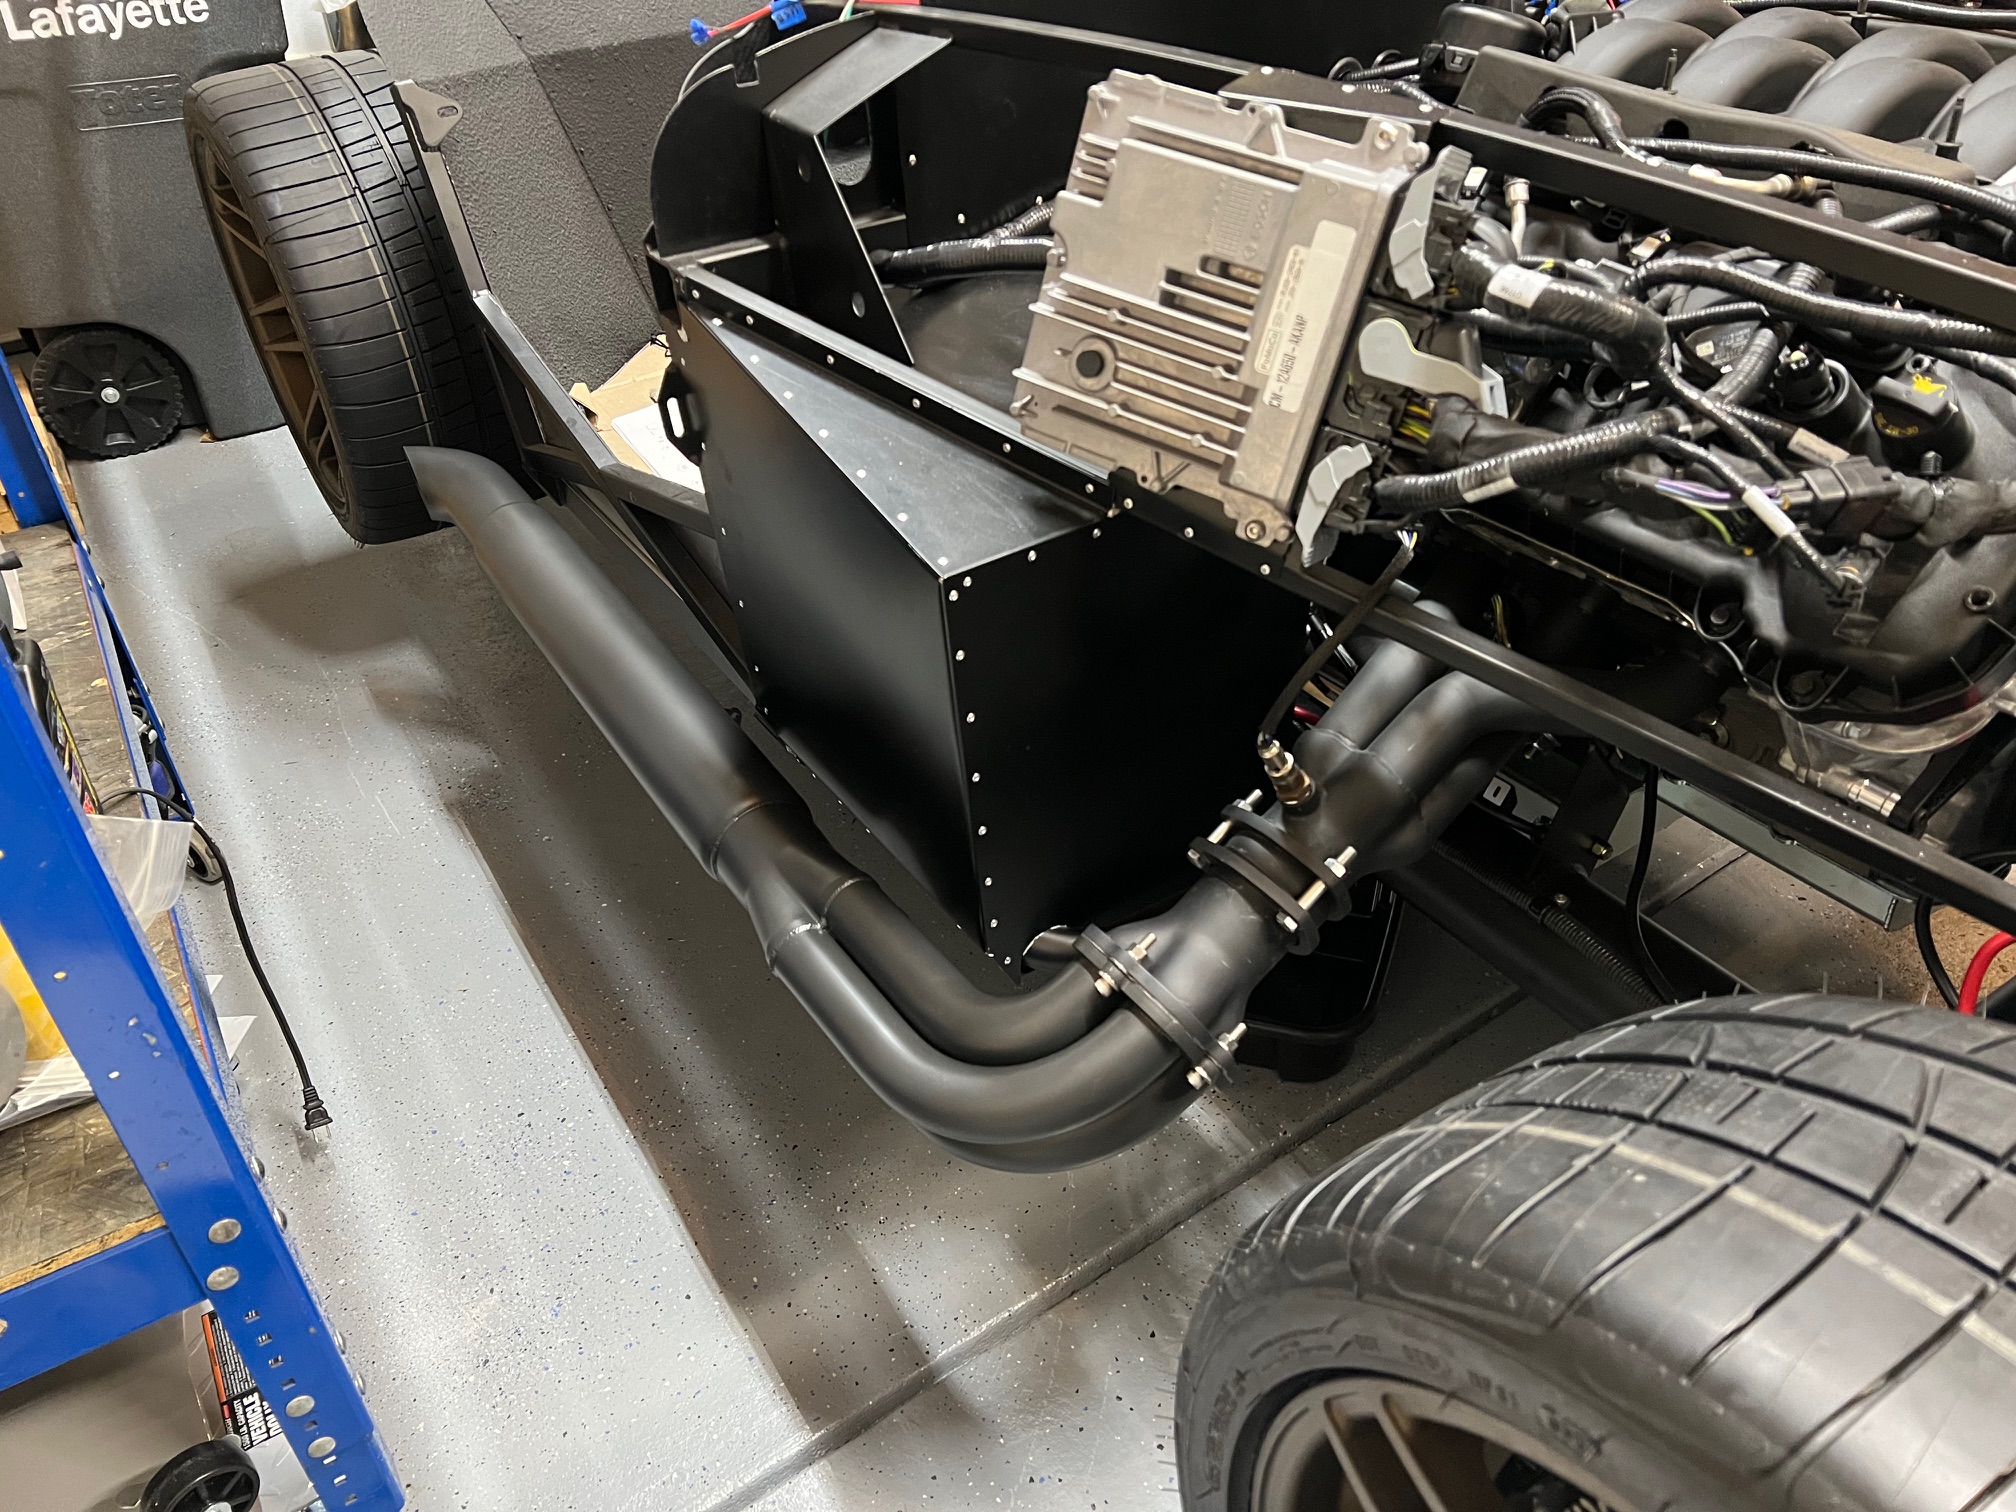

    I'm slowly building my list of sequential tasks to accomplish, and putting thought into how I want to finish my dash wiring, dash mounts, seat sliders, etc.
    -Bryan
    Mk4 Roadster w/ IRS, Forte Gen 3 Coyote/TKX, Wilwood Brakes
    Build thread https://thefactoryfiveforum.com/show...oyote-TKX-EFI)
    Ordered: 6/27/22, Delivered: 1/20/23, First Start 10/16/2023, Go-Cart 3/30/2024

  13. Likes Railroad, 460.465USMC liked this post
  14. #89
    Senior Member Junbug's Avatar
    Join Date
    Apr 2022
    Location
    Lafayette, CO
    Posts
    250
    Post Thanks / Like
    So its been a few weeks, but we've been slowly making some progress... Bled the brakes two weeks ago and after a few boneheaded mistakes got everything snugged up and no leaks. We used a combination of using the Motive pressure bleeder then followed the wilwood bleeding video instructions. The brakes feel solid all around and I plan to bleed them once more before first go cart. We didn't fill the Motive pressure tank with fluid, we just filled the reservoirs (front brakes/rear brakes) and pressurized each system until very few to no bubbles were coming out the bleed lines. I would stop periodically to ensure that the reservoir didn't run out of fluid.
    One tip, go around to all of your brake line joints and unions and verify each is tight. I thought I did this at least two times, but I happened to miss one line that was just finger tight (flexible line from hard line to caliper)... which caused me to believe it was leaking. So I drained the entire front system, then when I went to take the flexible line off, I realized it was barely finger tight! So I suggest checking all the joints/unions more than once! Anyway, I tightened it up, filled the reservoir and pressure bled that system again. No issues once it was tightened up!
    -Bryan
    Mk4 Roadster w/ IRS, Forte Gen 3 Coyote/TKX, Wilwood Brakes
    Build thread https://thefactoryfiveforum.com/show...oyote-TKX-EFI)
    Ordered: 6/27/22, Delivered: 1/20/23, First Start 10/16/2023, Go-Cart 3/30/2024

  15. #90
    Senior Member Junbug's Avatar
    Join Date
    Apr 2022
    Location
    Lafayette, CO
    Posts
    250
    Post Thanks / Like
    I also tested out a new rivnut tool i bought on my fuel system covers in the trunk area. Per some great guidance from someone on the site, they recommended I expand the hole covering the fuel pump connection. Just in case I ever need to get in there, having a bigger hole will make it much easier. I just used part of the piece I cut out of the trunk floor to add the drop trunk to make the new cover. Additionally I decided to make use of some of the spare/extra decorative screws I bought to hold my dash to the frame. I'm not sure if I plan to keep them or not, but I'll see how it looks once the carpet is installed. I also plan to spray the lower trunk area with additional sound insulation, once the weather warms up in the spring... it's been pretty cold the last few weeks in CO!
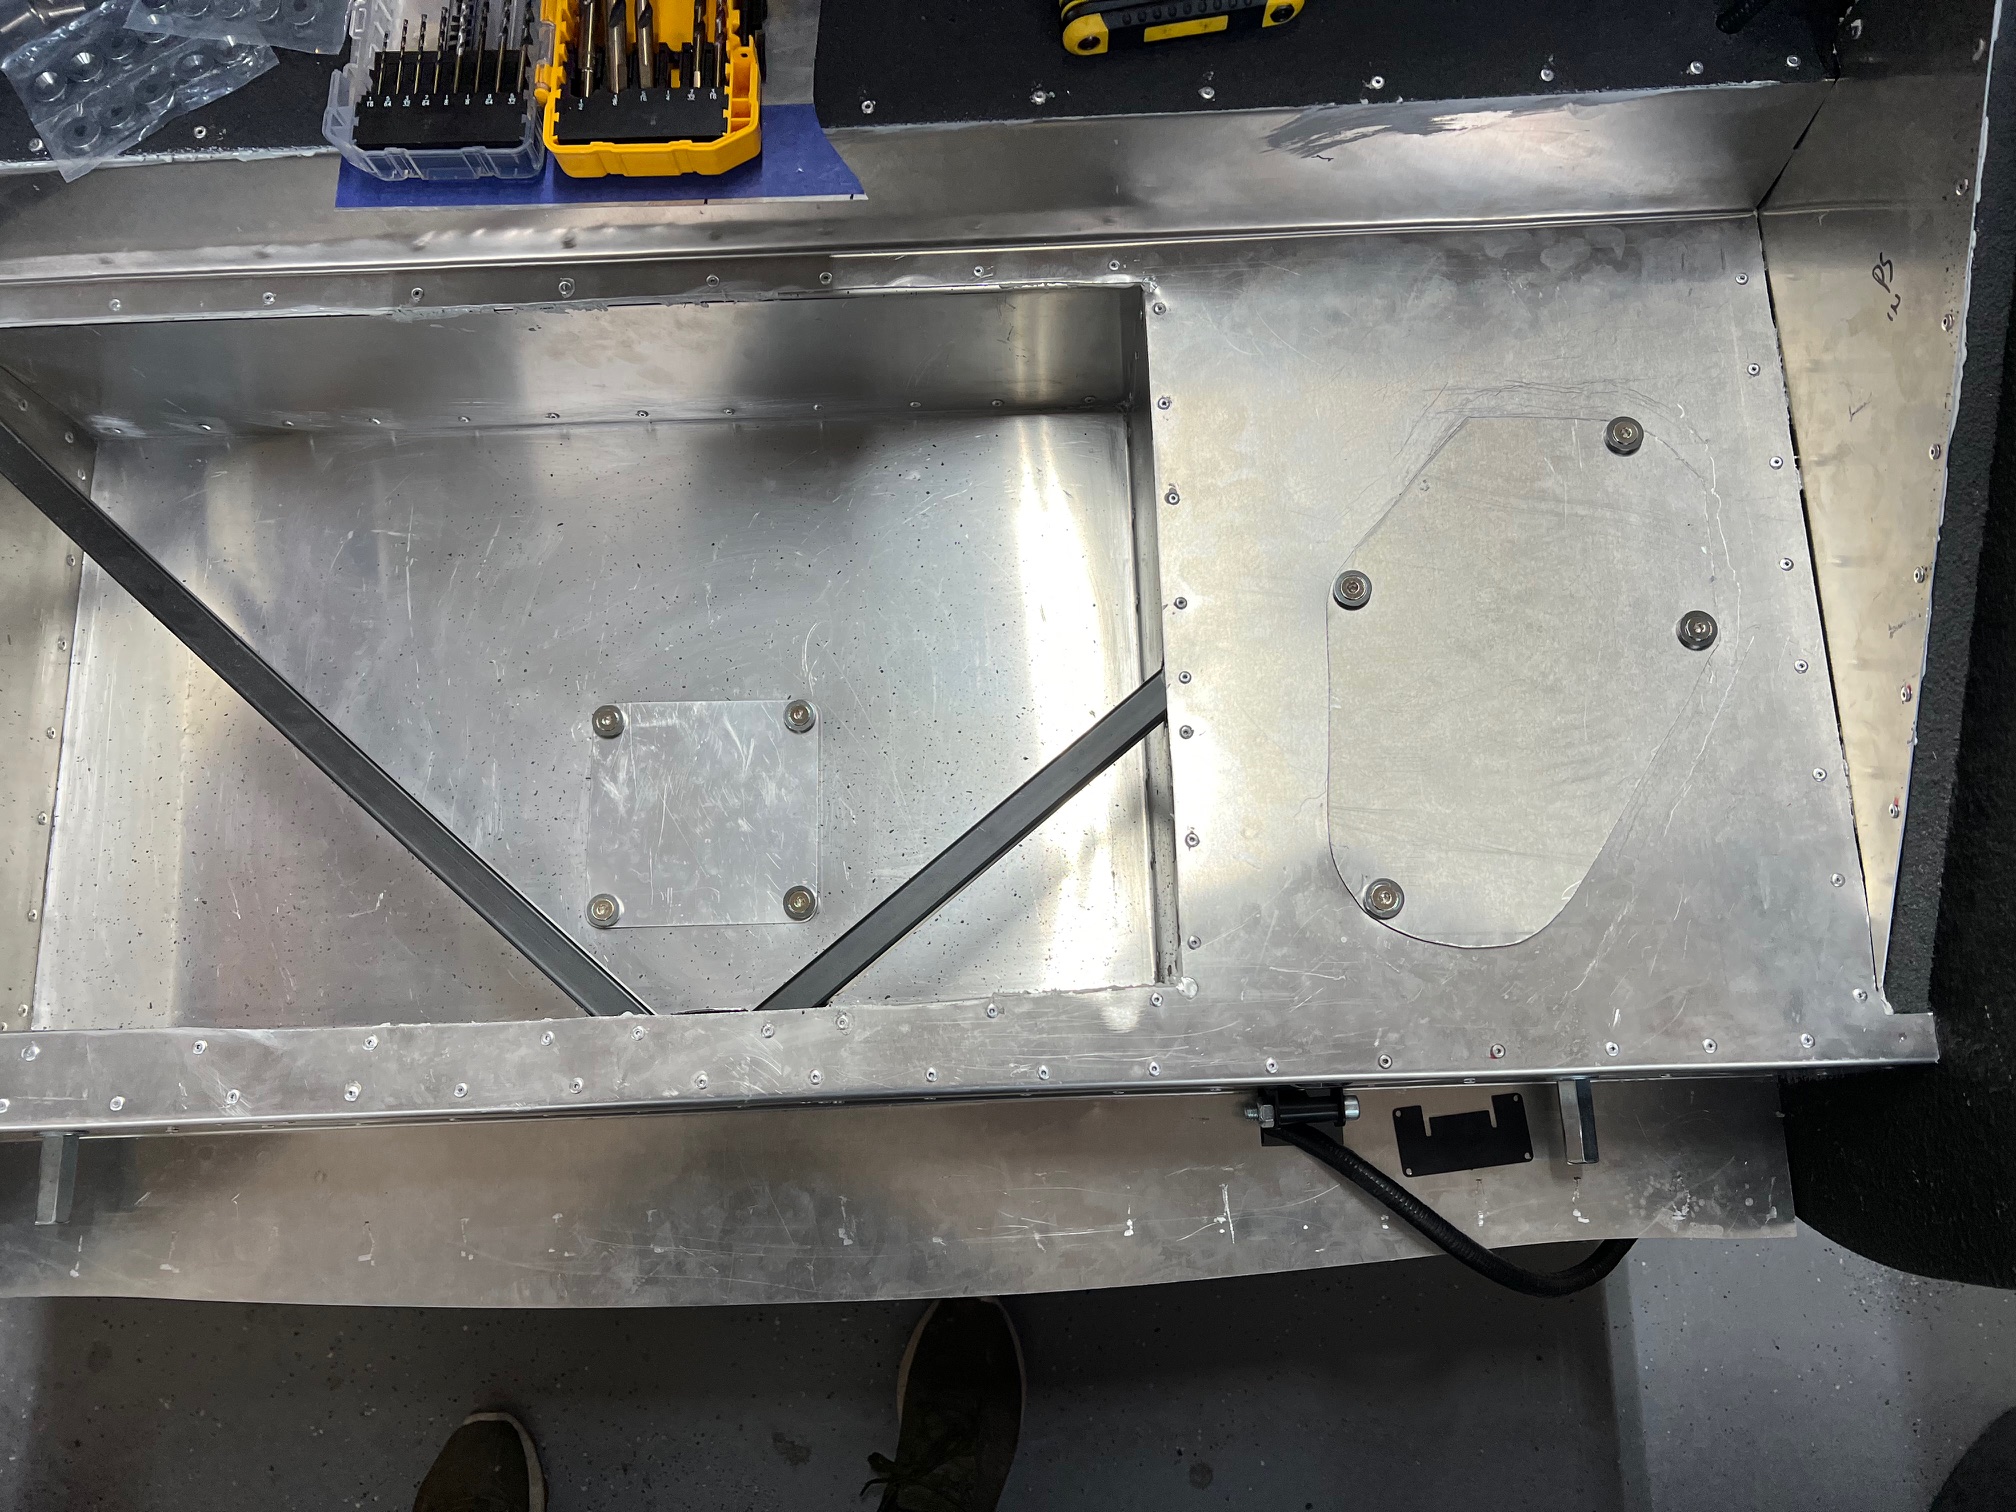
    Last edited by Junbug; 01-21-2024 at 10:19 PM.
    -Bryan
    Mk4 Roadster w/ IRS, Forte Gen 3 Coyote/TKX, Wilwood Brakes
    Build thread https://thefactoryfiveforum.com/show...oyote-TKX-EFI)
    Ordered: 6/27/22, Delivered: 1/20/23, First Start 10/16/2023, Go-Cart 3/30/2024

  16. Likes Justin liked this post
  17. #91
    Senior Member Junbug's Avatar
    Join Date
    Apr 2022
    Location
    Lafayette, CO
    Posts
    250
    Post Thanks / Like
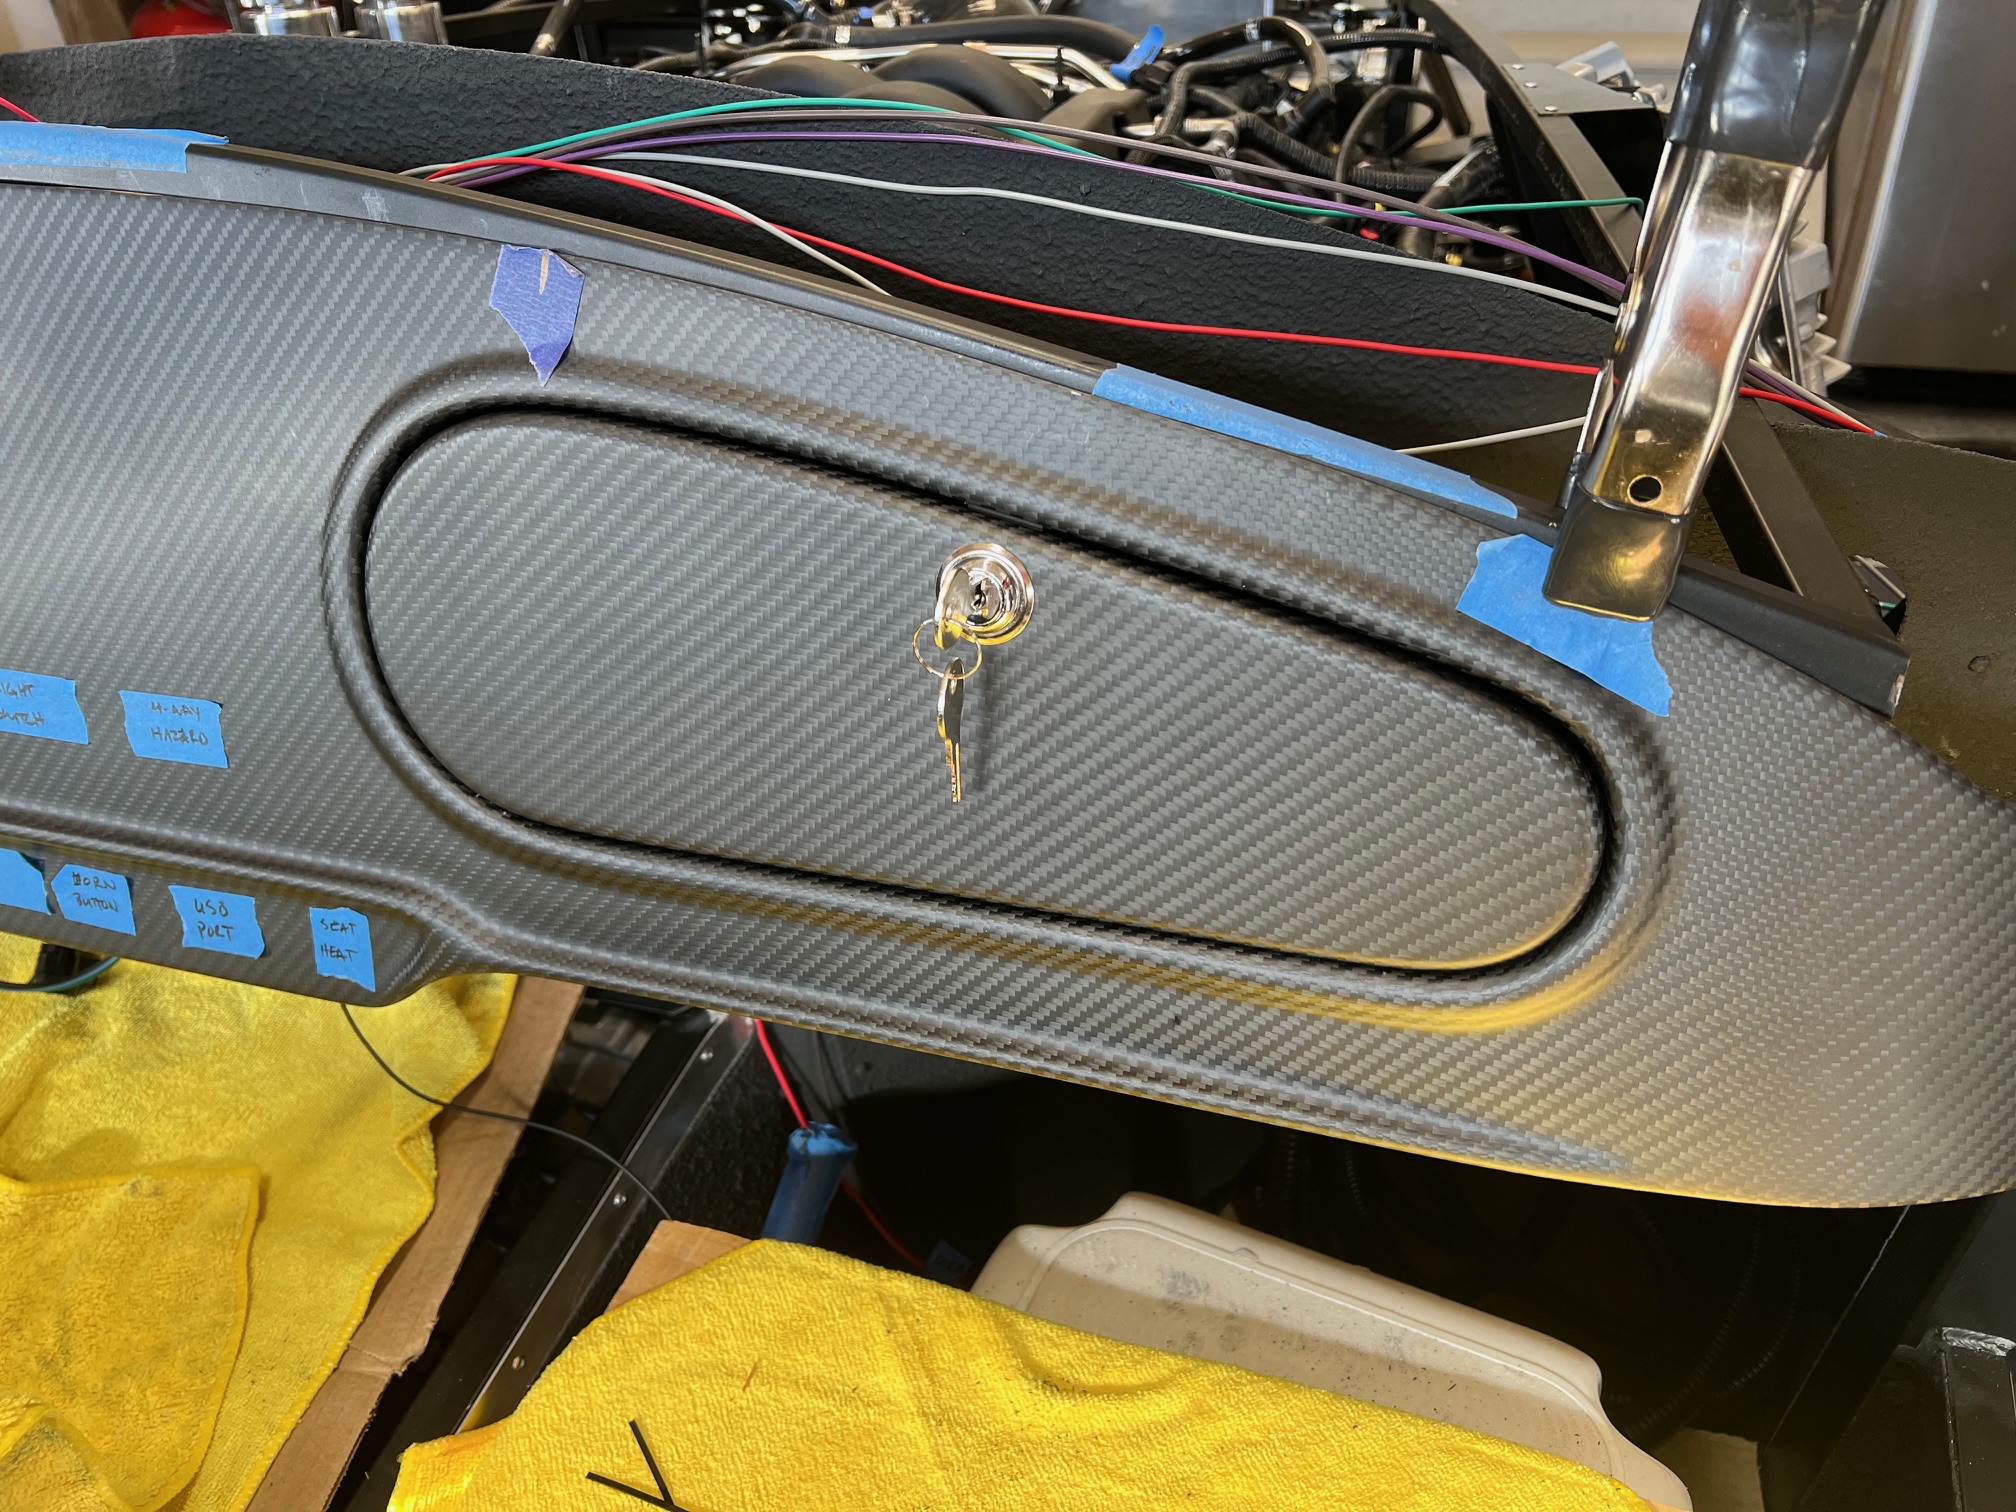
    More incremental progress this weekend. Finally finished putting the glovebox together. I thought it was very tedious and a bit frustrating but in the end it seems fine. I’ll be pulling the locking tab and catch out again to powder coat them but other than that it seems done. I also plan to look into a different locking mechanism on then glovebox door. Opening it can be a bit finicky as your only leverage to pull the door open is using the key. Something with a finger hold or bull tab would be much more convenient.
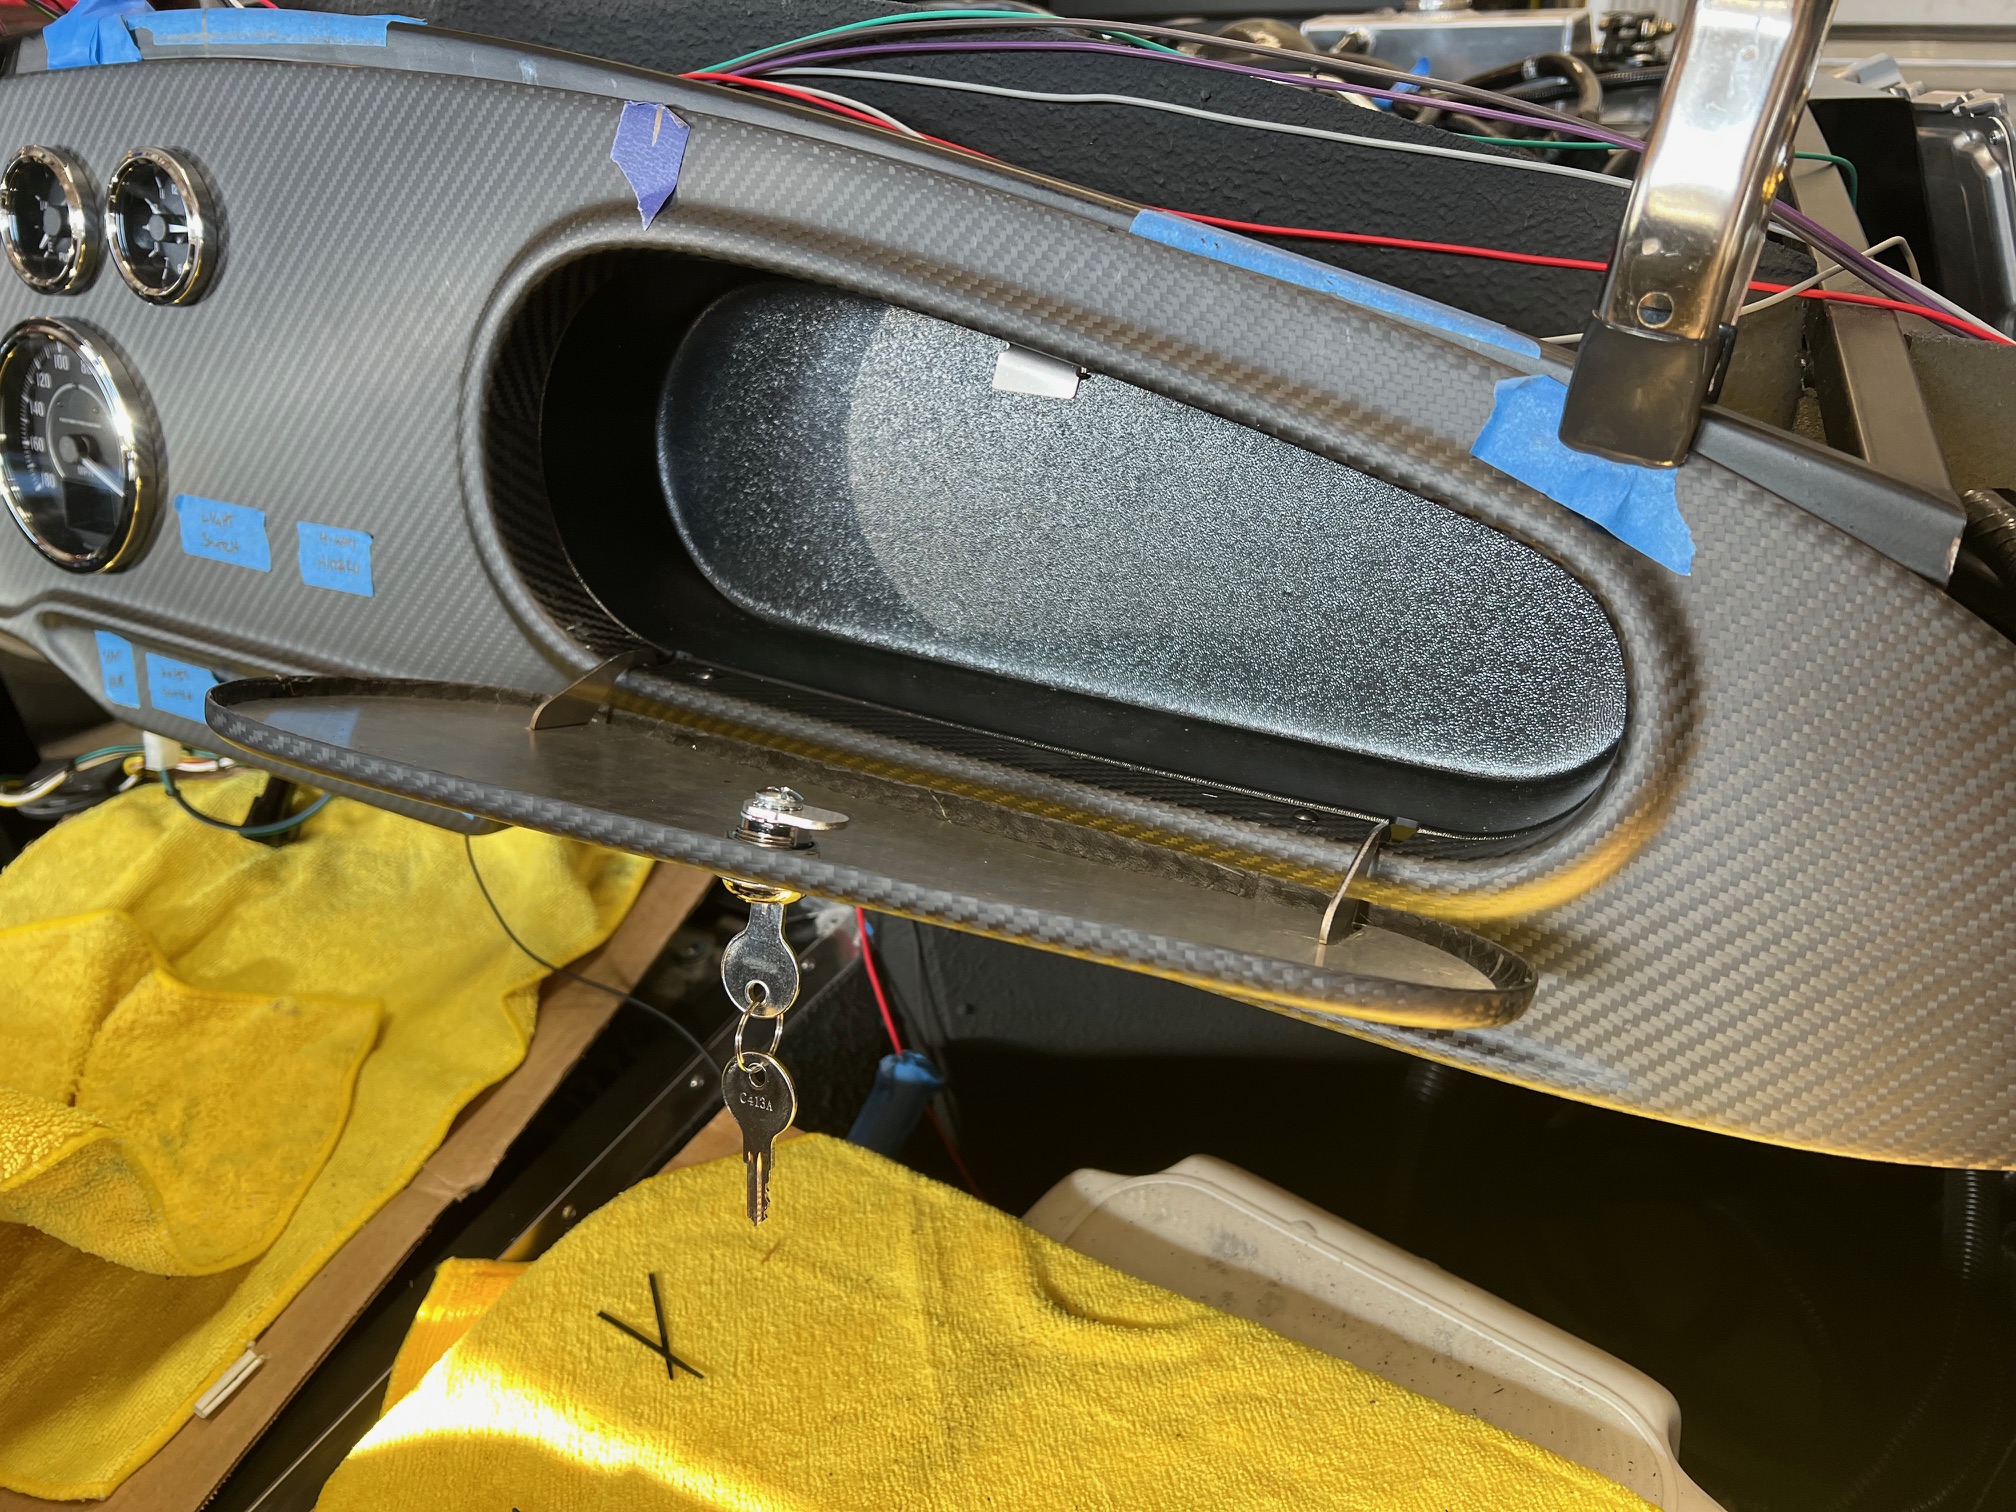
    -Bryan
    Mk4 Roadster w/ IRS, Forte Gen 3 Coyote/TKX, Wilwood Brakes
    Build thread https://thefactoryfiveforum.com/show...oyote-TKX-EFI)
    Ordered: 6/27/22, Delivered: 1/20/23, First Start 10/16/2023, Go-Cart 3/30/2024

  18. #92
    Senior Member Junbug's Avatar
    Join Date
    Apr 2022
    Location
    Lafayette, CO
    Posts
    250
    Post Thanks / Like
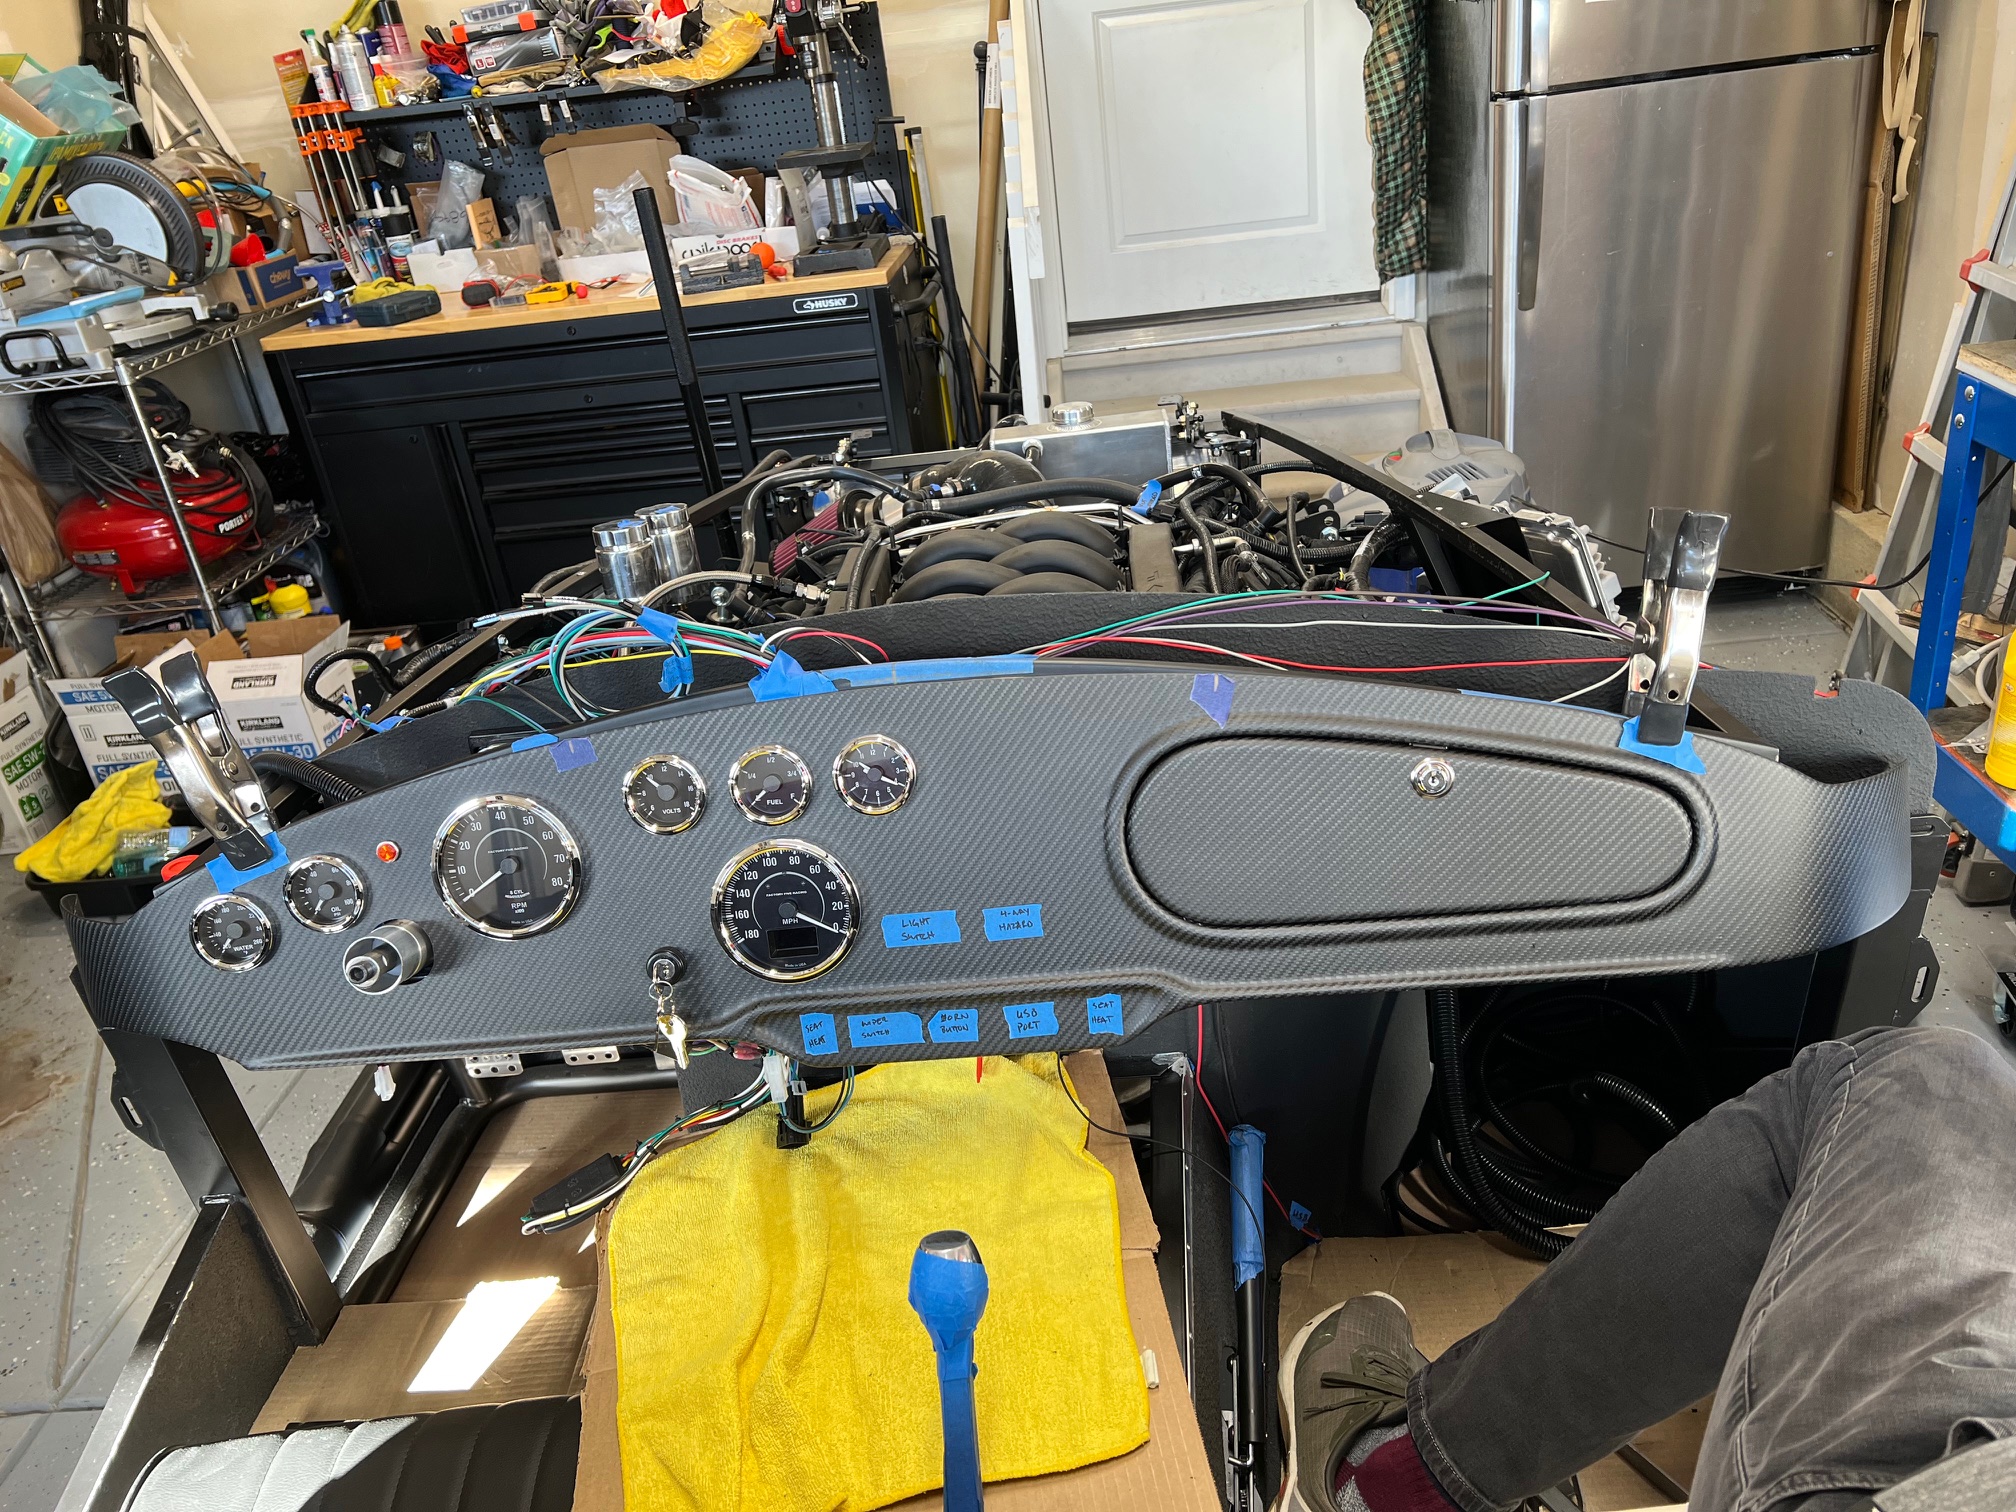
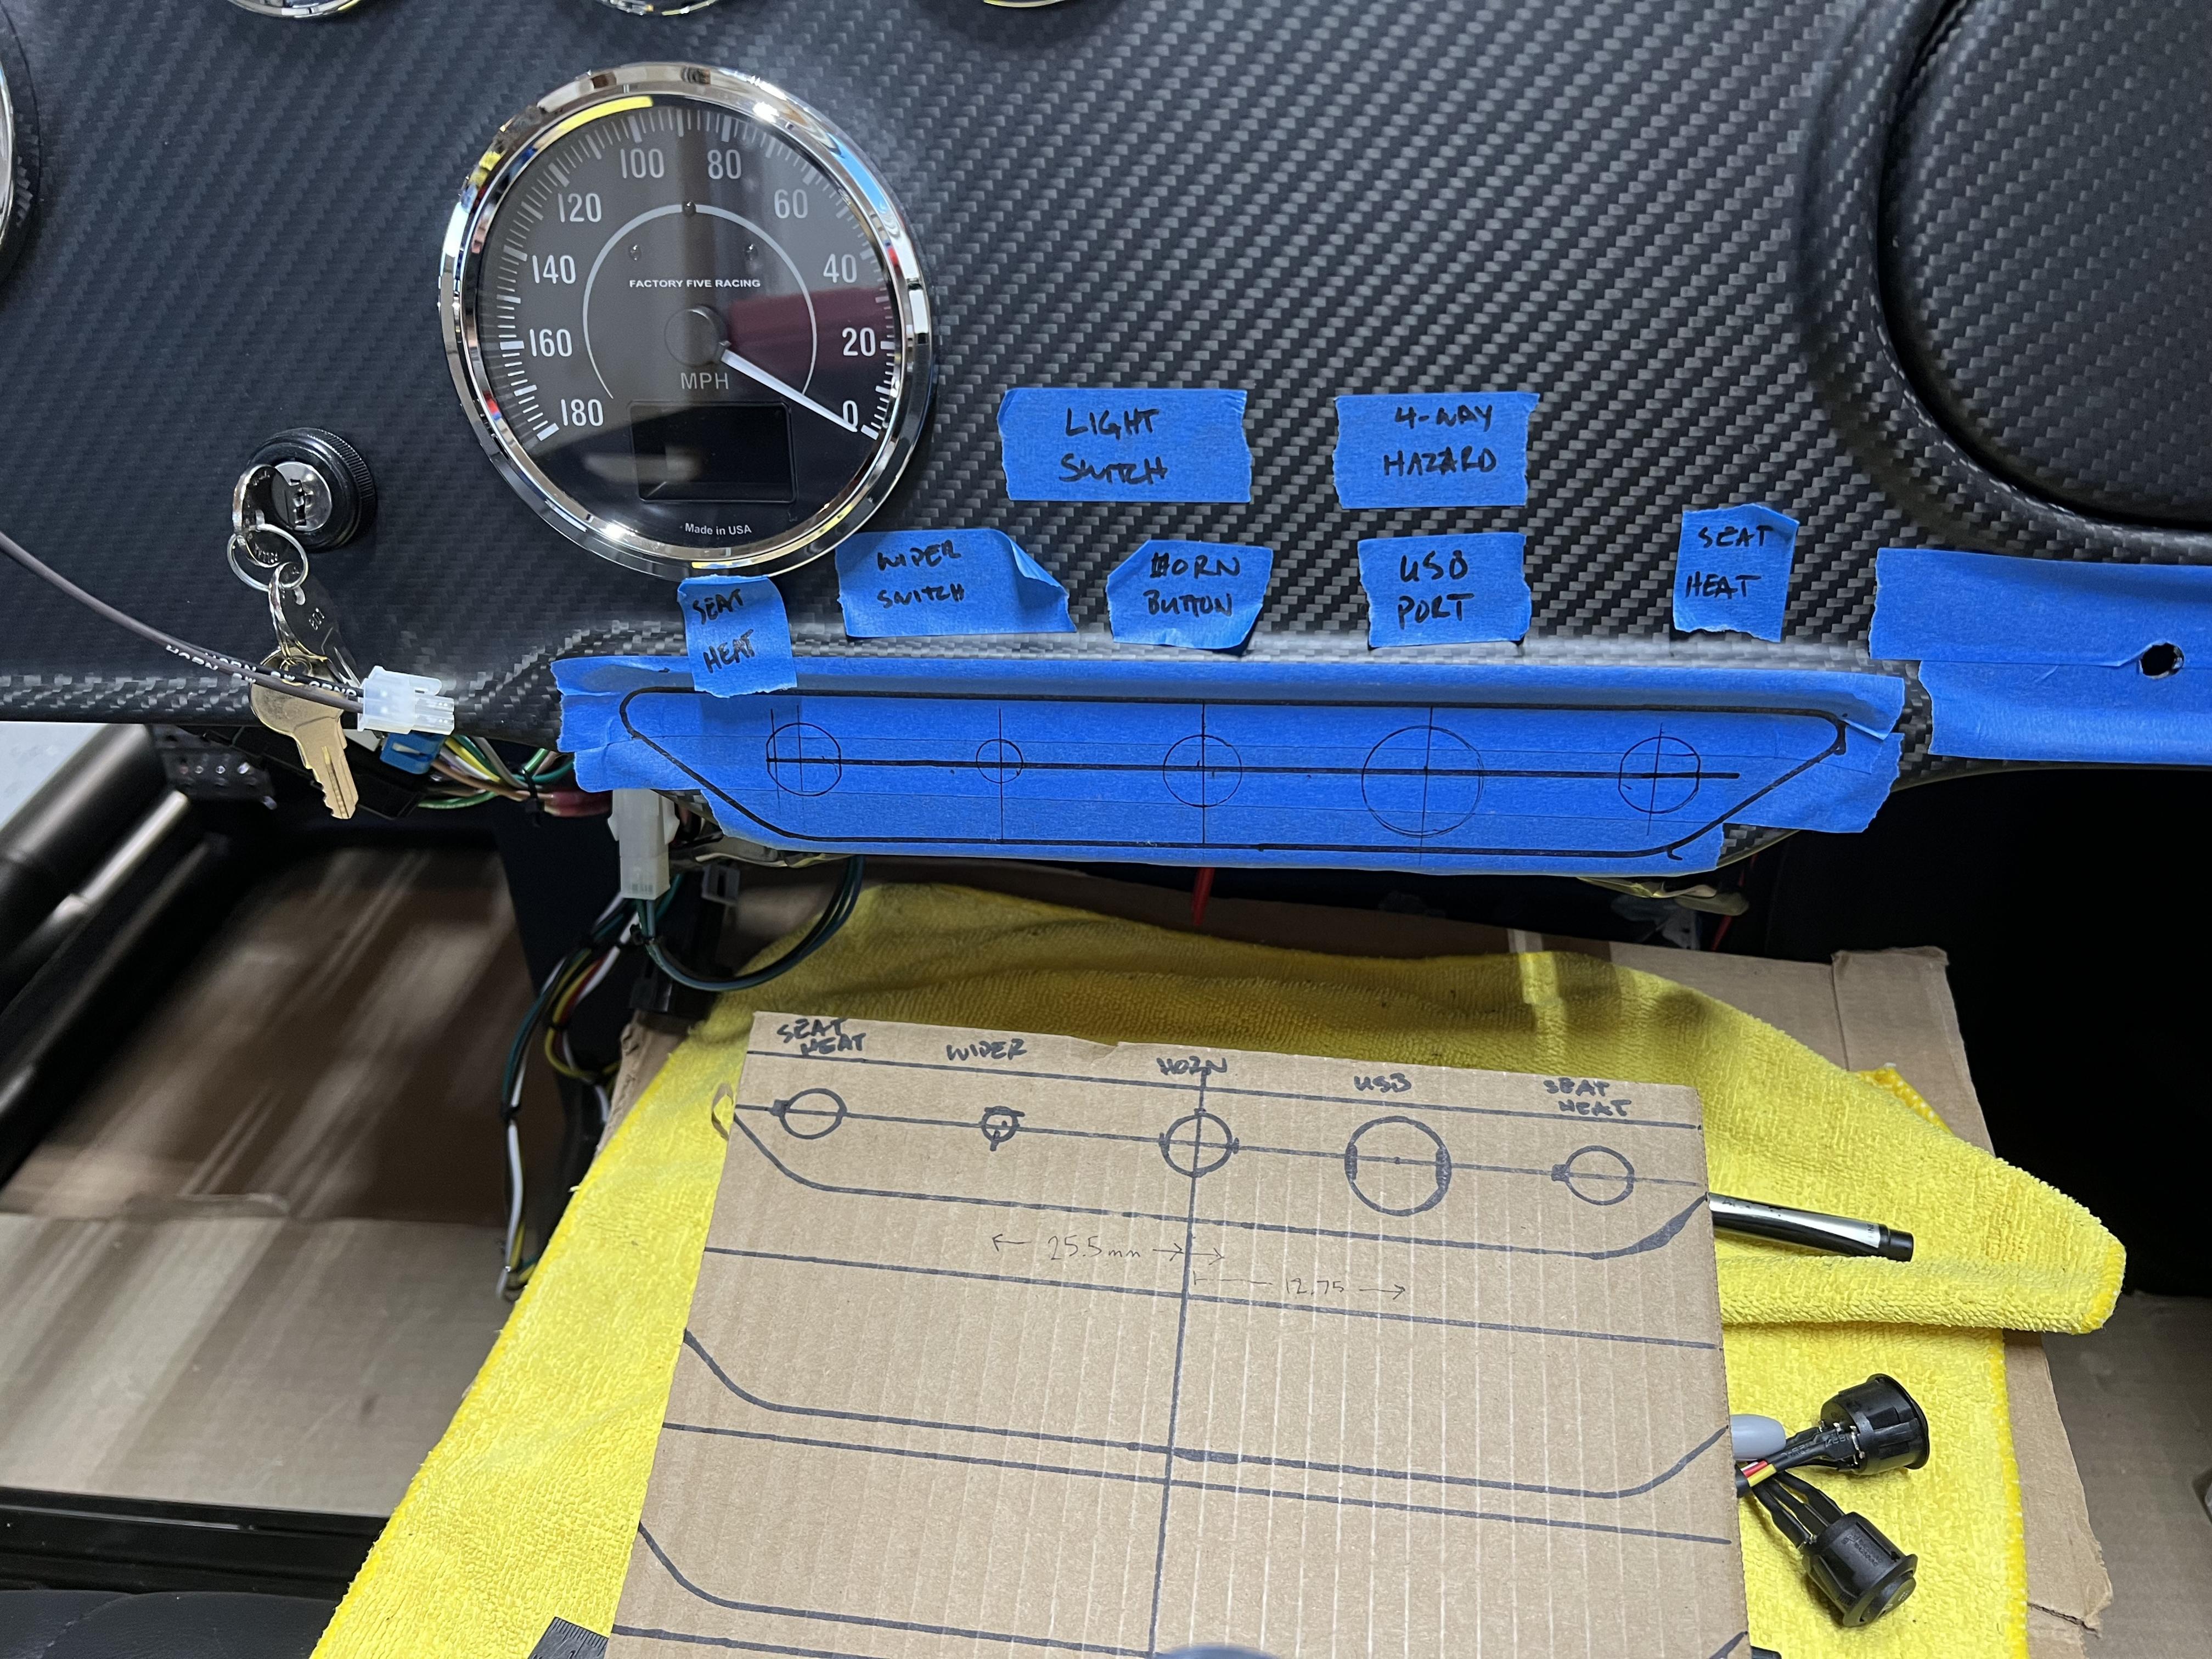
    Also plan to finalize my dash switch locations. Laid things out as you can see in the pics below. Plan to drill and mount things this week. Still working on final locations for my headlight switch as the four-way hazard switch. Somewhere above the lower dash area is the plan.

    -Bryan
    Mk4 Roadster w/ IRS, Forte Gen 3 Coyote/TKX, Wilwood Brakes
    Build thread https://thefactoryfiveforum.com/show...oyote-TKX-EFI)
    Ordered: 6/27/22, Delivered: 1/20/23, First Start 10/16/2023, Go-Cart 3/30/2024

  19. #93
    Senior Member Junbug's Avatar
    Join Date
    Apr 2022
    Location
    Lafayette, CO
    Posts
    250
    Post Thanks / Like
    A little more progress today on the dash. Drilled the final holes for gauge/buttons and switches. Only holes left to drill are for the dash mounts (I plan on having two roughly equal from center.)

    At first I didn't like the contrast between the black plastic and the chrome, but its grown on me, and the amount of work to hand file all the small notches for each is dissuading me from changing them now

    The pic above is from my drivers perspective.

    I plan to put the two holes for mounting the dash near where the dark blue painters tape is with the small gold sharpie marker. Not final on the location yet, but its close to those locations where it won't interfere with the glovebox or any of the dash gauges.
    -Bryan
    Mk4 Roadster w/ IRS, Forte Gen 3 Coyote/TKX, Wilwood Brakes
    Build thread https://thefactoryfiveforum.com/show...oyote-TKX-EFI)
    Ordered: 6/27/22, Delivered: 1/20/23, First Start 10/16/2023, Go-Cart 3/30/2024

  20. Likes Railroad liked this post
  21. #94
    Senior Member Junbug's Avatar
    Join Date
    Apr 2022
    Location
    Lafayette, CO
    Posts
    250
    Post Thanks / Like
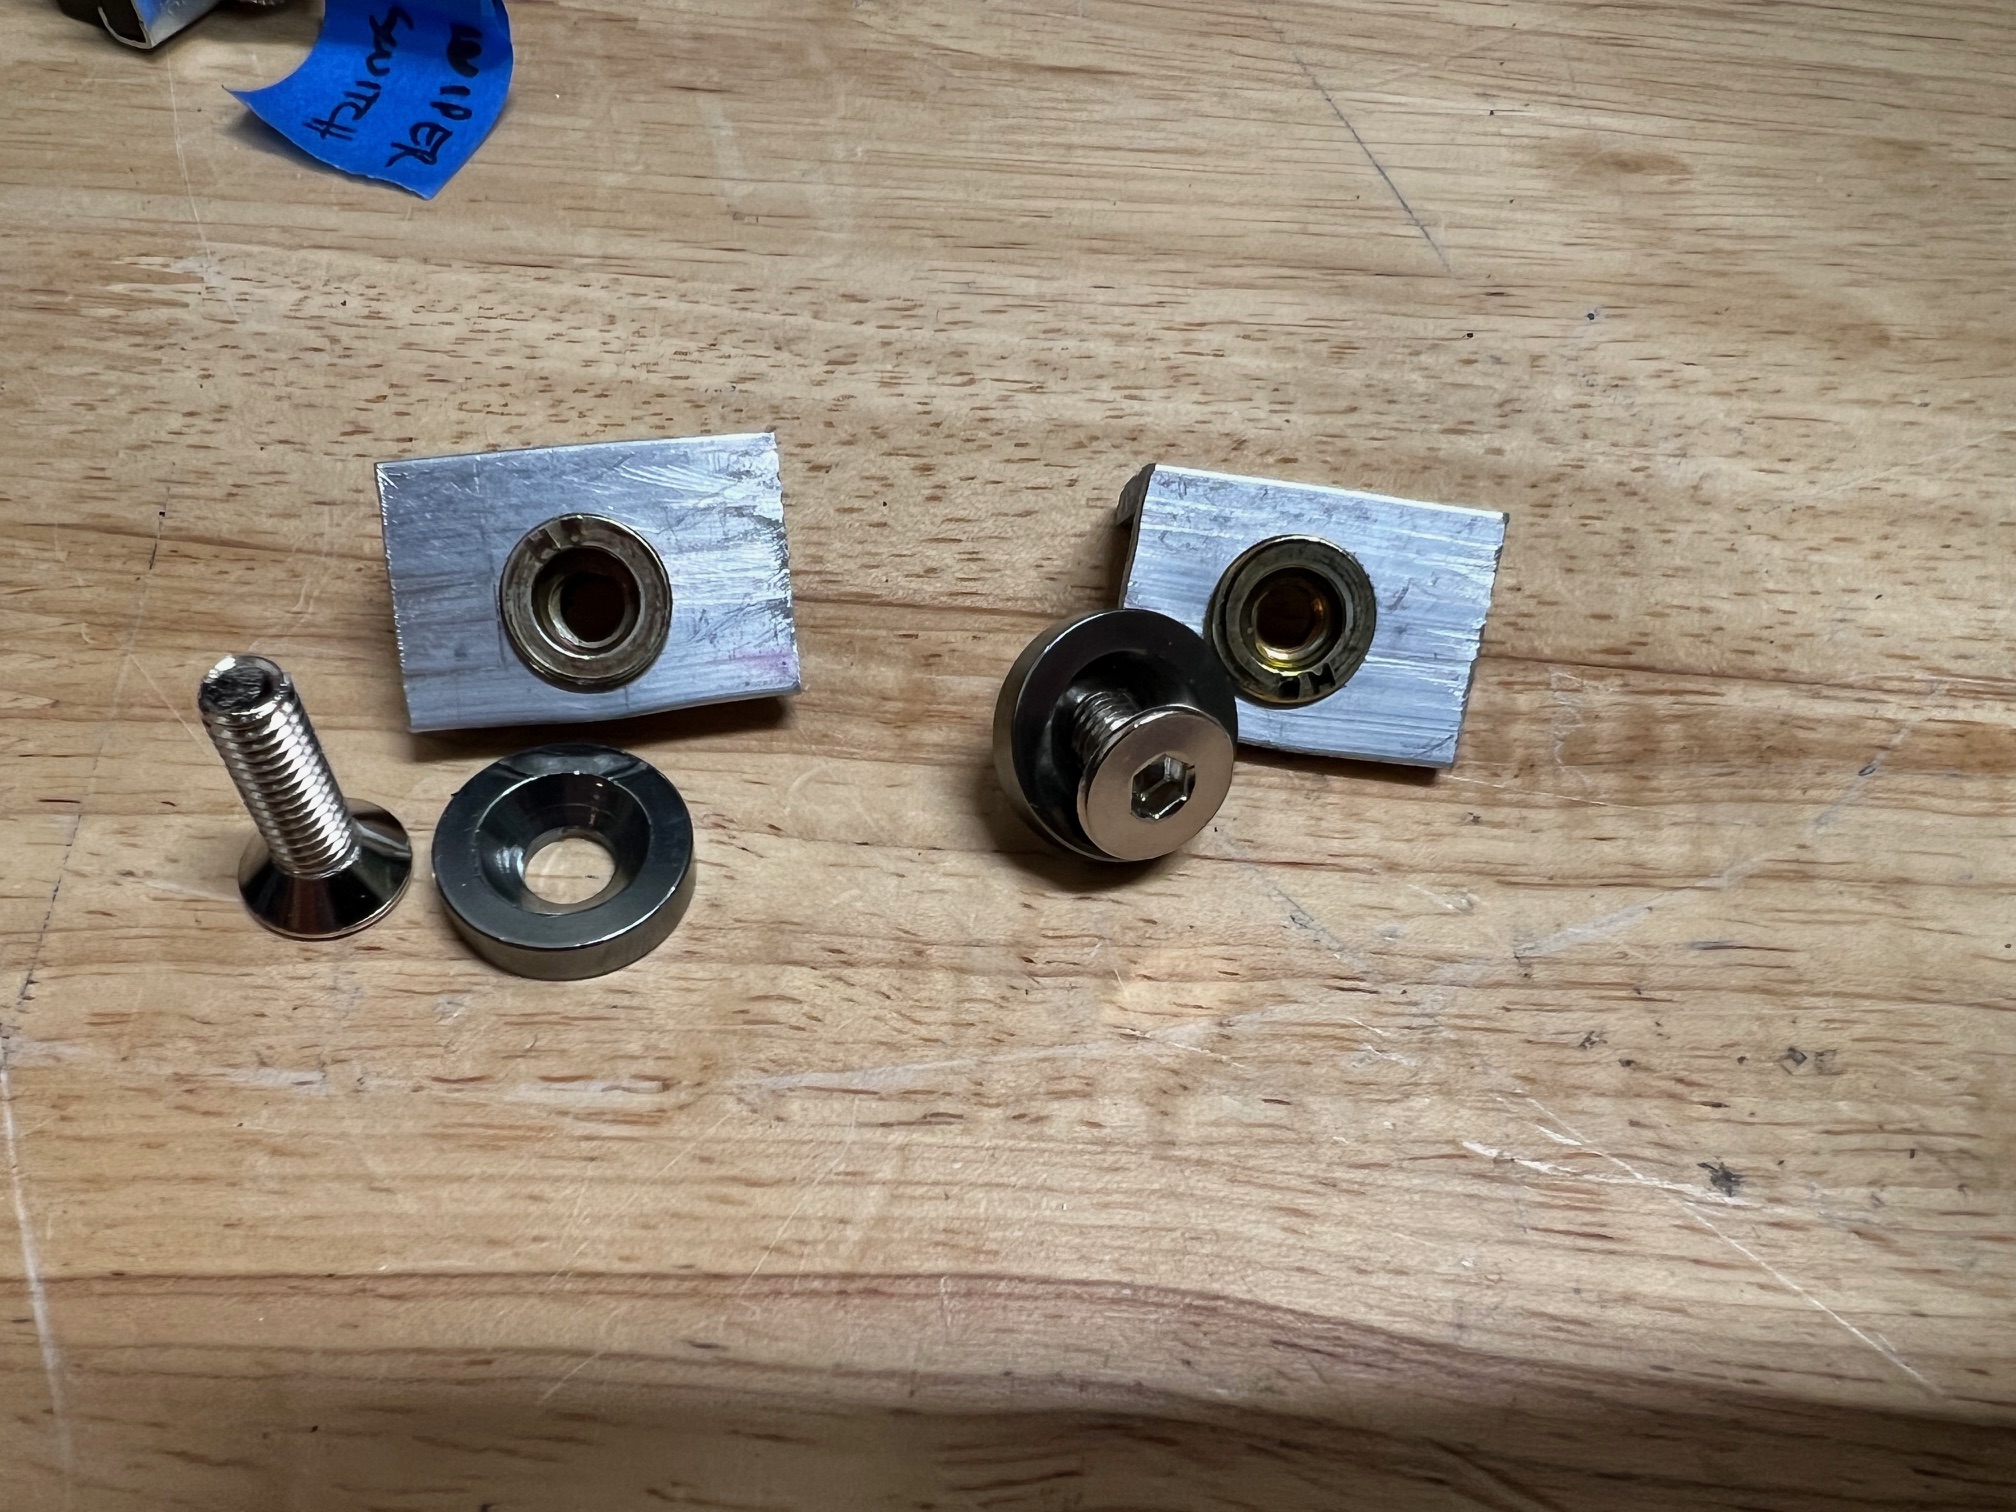
    Here are the brackets I made to go under the top dash rail and the rivnuts, screws and washers that will hold the dash in place. I also have a grab handle under the glovebox with 1/4 inch steel support bars and three different under dash supports (DS, PS, middle) that will help keep the dash in place. I still haven't determined how I plan to secure these tabs to the top rail, but likely either rivets or rivnuts...
    -Bryan
    Mk4 Roadster w/ IRS, Forte Gen 3 Coyote/TKX, Wilwood Brakes
    Build thread https://thefactoryfiveforum.com/show...oyote-TKX-EFI)
    Ordered: 6/27/22, Delivered: 1/20/23, First Start 10/16/2023, Go-Cart 3/30/2024

  22. #95
    Senior Member Junbug's Avatar
    Join Date
    Apr 2022
    Location
    Lafayette, CO
    Posts
    250
    Post Thanks / Like
    So today I finished wiring all the headlights, brakes, taillights and turn signals. Surprisingly, everything worked on the first try. Only things I needed to fix was swap the poles on the 4-way hazards so the switch worked opposite and swap the high beam/low beam wires in the weatherpack connectors to my headlights as I guessed. The wires on the Hellas lights with LED bulbs from Breeze didn't say which was high beam. Pretty quick fix and everything is working perfect. On my RT turn signal i wired up the button on the end of the stalk for hi/low beam and flash to pass. I'm actually very happy all of that is done, and that it went right the first time.
    The IDIDIT relay was easy to wire and I found a nice snug spot where it fit just perfectly.


    Special thanks to Fman and Ted G, as well as Edward B and Papa for their previous posts and guidance on wiring the RT turn signal... The image below was referenced numerous times through the process.

    Tomorrow, I'll be finishing out wiring the courtesy lights on the interior of the cockpit, driver and passenger side, along with adding the FFR provided LED lights to the trunk. I added a wire to the license plate light when I was finalizing the taillight wiring. I'm hoping it works with the courtesy lights.
    Last edited by Junbug; 02-17-2024 at 11:40 PM.
    -Bryan
    Mk4 Roadster w/ IRS, Forte Gen 3 Coyote/TKX, Wilwood Brakes
    Build thread https://thefactoryfiveforum.com/show...oyote-TKX-EFI)
    Ordered: 6/27/22, Delivered: 1/20/23, First Start 10/16/2023, Go-Cart 3/30/2024

  23. #96
    Senior Member Junbug's Avatar
    Join Date
    Apr 2022
    Location
    Lafayette, CO
    Posts
    250
    Post Thanks / Like
    So lots of incremental progress and I finally got around to powder coating again. Did about 3 batches/cycles and caught up on a lot of parts I've been wanting to install but needed them to be PC'ed first. One was the LeMans fuel filler cap. I dis-assembled it into its separate individual moving parts and powder coated the parts individually. Also I got a locking fuel cap from Breeze that resulted in some modification to the filler neck as it gets replaced. The part I'm holding in my had here I cut off, unceremoniously with a hack saw.

    Then the remaining inner hole needed to be expanded a bit to accommodate the new locking filler cap. I did that with a hand router, very slowly and gently.

    Once that was done, I started re-assembling everything.

    View from the bottom with the new locking filler cap installed.

    View from the top.

    Final view of everything assembled.
    -Bryan
    Mk4 Roadster w/ IRS, Forte Gen 3 Coyote/TKX, Wilwood Brakes
    Build thread https://thefactoryfiveforum.com/show...oyote-TKX-EFI)
    Ordered: 6/27/22, Delivered: 1/20/23, First Start 10/16/2023, Go-Cart 3/30/2024

  24. Likes 460.465USMC liked this post
  25. #97
    Senior Member Junbug's Avatar
    Join Date
    Apr 2022
    Location
    Lafayette, CO
    Posts
    250
    Post Thanks / Like
    I also finally finished assembling and mounting the dash.


    Here is a picture of my under dash support for the passenger grab handle. All powder coated 1/8"x1/2" steel with stainless steel hardware. I set rivnuts into the 2"x2" square dash bar that the setup is bolted into. Rock solid.


    Here is my under dash, center console bracket. It's primary function is to hold the courtesy light as well as my gauge adjustment buttons. Made from the original trunk aluminum I cut to install the drop trunk.


    I also installed support brackets on the end of each side of the CF dash, each with a small LED tied to the courtesy light circuit. This one is on the passenger side and you can see a little more of the grab handle supports. You can also see the U-Brackets i put on each support. I plan to drill through the bottom of the dash and put hardware through to keep the dash more secure. That will be later once the dash goes in for "good".

    And drivers side:


    Only remaining tasks on the dash are to drill holes thr
    -Bryan
    Mk4 Roadster w/ IRS, Forte Gen 3 Coyote/TKX, Wilwood Brakes
    Build thread https://thefactoryfiveforum.com/show...oyote-TKX-EFI)
    Ordered: 6/27/22, Delivered: 1/20/23, First Start 10/16/2023, Go-Cart 3/30/2024

  26. Likes zarnold liked this post
  27. #98
    Senior Member mmklaxer's Avatar
    Join Date
    Aug 2015
    Location
    Haslett, MI
    Posts
    301
    Post Thanks / Like
    lookin' good!

  28. Thanks Junbug thanked for this post
  29. #99
    Senior Member Junbug's Avatar
    Join Date
    Apr 2022
    Location
    Lafayette, CO
    Posts
    250
    Post Thanks / Like
    Last weekend I worked a bunch of small but time consuming tasks. I decided to install the trunk struts. Since I installed the Breeze Cubby, i needed to drill or cut through the cubby wall. That wasn't too hard, but I did spend some time ensuring the struts would clear the roll bars. The struts aren't perfectly straight, they have a slight cant toward the inside of the car but the struts function fine and clear while the trunk arms are at both the open and closed positions.


    I ended up using a 1-1/2 inch hole saw and drilled small pilot holes first.

    Here you can see the final location of the DR front pin for the strut. There is about 3/4" clearance between the strut and the roll bar.

    -Bryan
    Mk4 Roadster w/ IRS, Forte Gen 3 Coyote/TKX, Wilwood Brakes
    Build thread https://thefactoryfiveforum.com/show...oyote-TKX-EFI)
    Ordered: 6/27/22, Delivered: 1/20/23, First Start 10/16/2023, Go-Cart 3/30/2024

  30. #100
    Senior Member Junbug's Avatar
    Join Date
    Apr 2022
    Location
    Lafayette, CO
    Posts
    250
    Post Thanks / Like
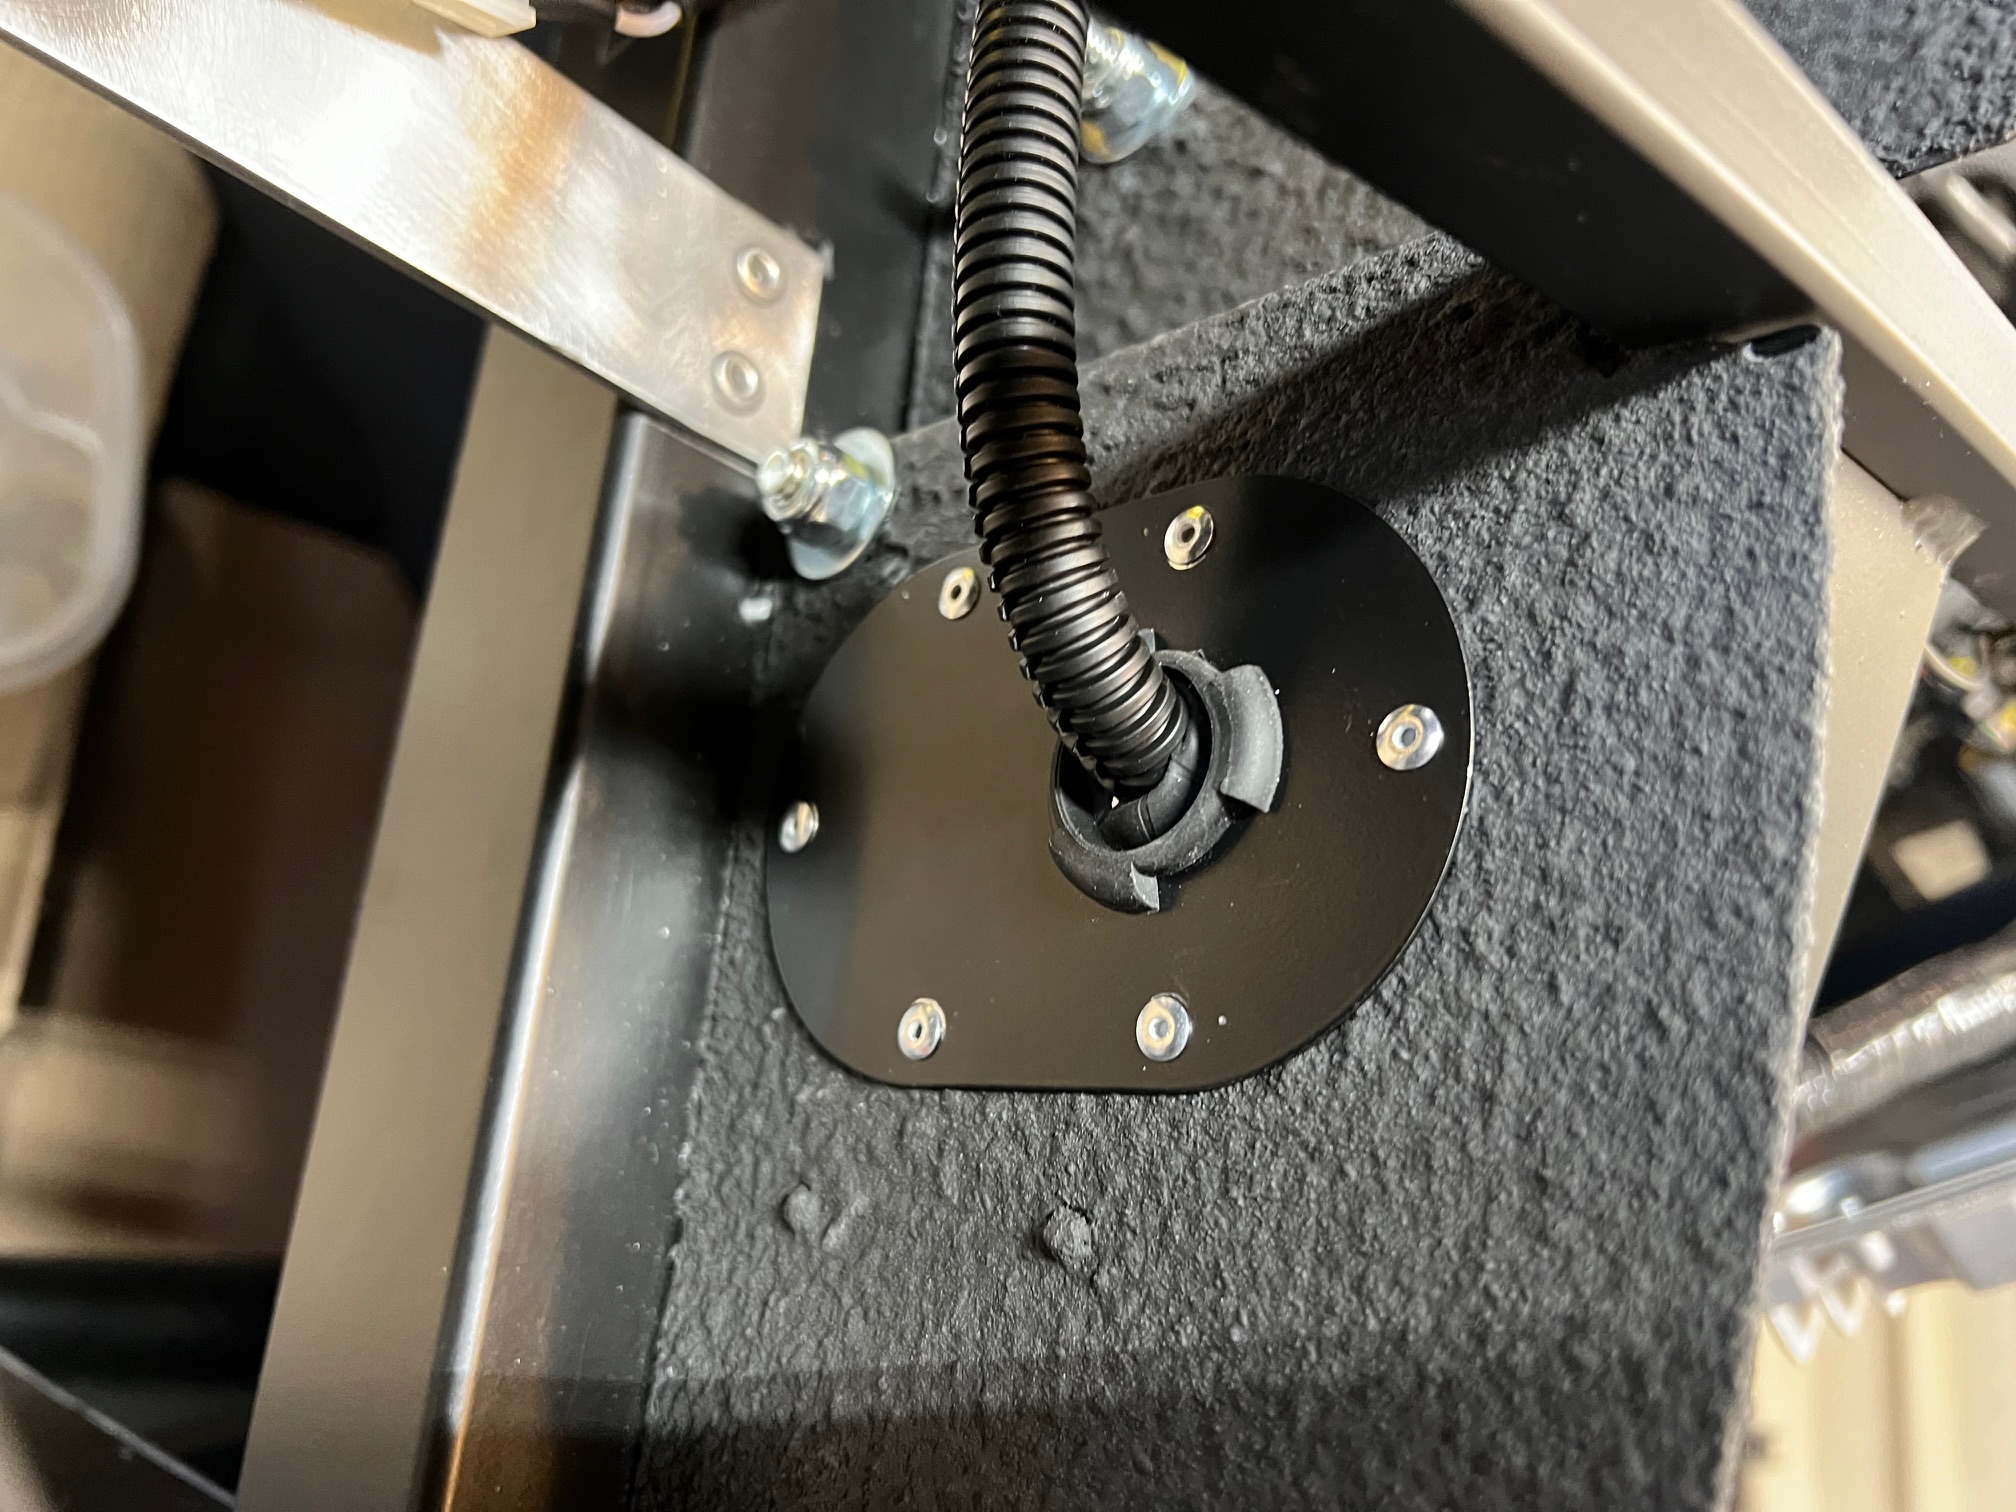
    The next project was final placement of the wiper motor and wiper motor wiring.
    Here's the final location for my wiper motor. There is just enough room for the wiring to clear the top of the motor and stay below the 3/4" bar. Likewise, on the bottom there is enough room for my coyote harness to fit under the motor, and stay snug up against the firewall.


    I used the factory cutout on the PS side of the firewall for the location of the wiper wiring to penetrate. Pretty straight forward.
    -Bryan
    Mk4 Roadster w/ IRS, Forte Gen 3 Coyote/TKX, Wilwood Brakes
    Build thread https://thefactoryfiveforum.com/show...oyote-TKX-EFI)
    Ordered: 6/27/22, Delivered: 1/20/23, First Start 10/16/2023, Go-Cart 3/30/2024

  31. #101
    Senior Member Junbug's Avatar
    Join Date
    Apr 2022
    Location
    Lafayette, CO
    Posts
    250
    Post Thanks / Like
    Lastly I started securing some of the wiring harnesses as well as riveting in the F-panels.


    This last pic is the headlight harness running under the radiator.

    -Bryan
    Mk4 Roadster w/ IRS, Forte Gen 3 Coyote/TKX, Wilwood Brakes
    Build thread https://thefactoryfiveforum.com/show...oyote-TKX-EFI)
    Ordered: 6/27/22, Delivered: 1/20/23, First Start 10/16/2023, Go-Cart 3/30/2024

  32. #102
    Senior Member 460.465USMC's Avatar
    Join Date
    Aug 2019
    Location
    Spokane, WA
    Posts
    992
    Post Thanks / Like
    I like what you're doing, Bryan. Really looks like a quality build. A number of custom touches.
    Chris
    Coupe complete kit delivered: 4/22/24. Build Thread. Coyote. T-56. IRS w/3.55. Wilwoods. PS. HVAC. Side windows.
    MK4 Complete kit. Build Thread Index. Delivered: 10/15/2020. Legal: 7/25/23. Coyote Gen3. TKO600 (0.64 OD). IRS w/3.55. PS. Wilwoods. Sway bars. This build is dedicated to my son, Benjamin. Build Thread.

  33. Thanks Junbug thanked for this post
    Likes Junbug liked this post
  34. #103
    Senior Member Junbug's Avatar
    Join Date
    Apr 2022
    Location
    Lafayette, CO
    Posts
    250
    Post Thanks / Like
    We put the wheels on her, gave her a rough alignment (with strings and following Jeff Kleiner's recommendations on the upper control arms) fired her up and took her out for the first go-cart ride. Both my son and wife came along (at different times)... She ran great, and only one minor issue, considering all that could have gone wrong!
    https://youtu.be/QqAKTAfHerI

    https://youtube.com/shorts/uv2vQP024...M5pIQSPQHK2-nG

    Lots of big smiles!

    Last edited by Junbug; 03-31-2024 at 04:34 PM.
    -Bryan
    Mk4 Roadster w/ IRS, Forte Gen 3 Coyote/TKX, Wilwood Brakes
    Build thread https://thefactoryfiveforum.com/show...oyote-TKX-EFI)
    Ordered: 6/27/22, Delivered: 1/20/23, First Start 10/16/2023, Go-Cart 3/30/2024

  35. Likes 460.465USMC liked this post
  36. #104
    Senior Member Junbug's Avatar
    Join Date
    Apr 2022
    Location
    Lafayette, CO
    Posts
    250
    Post Thanks / Like
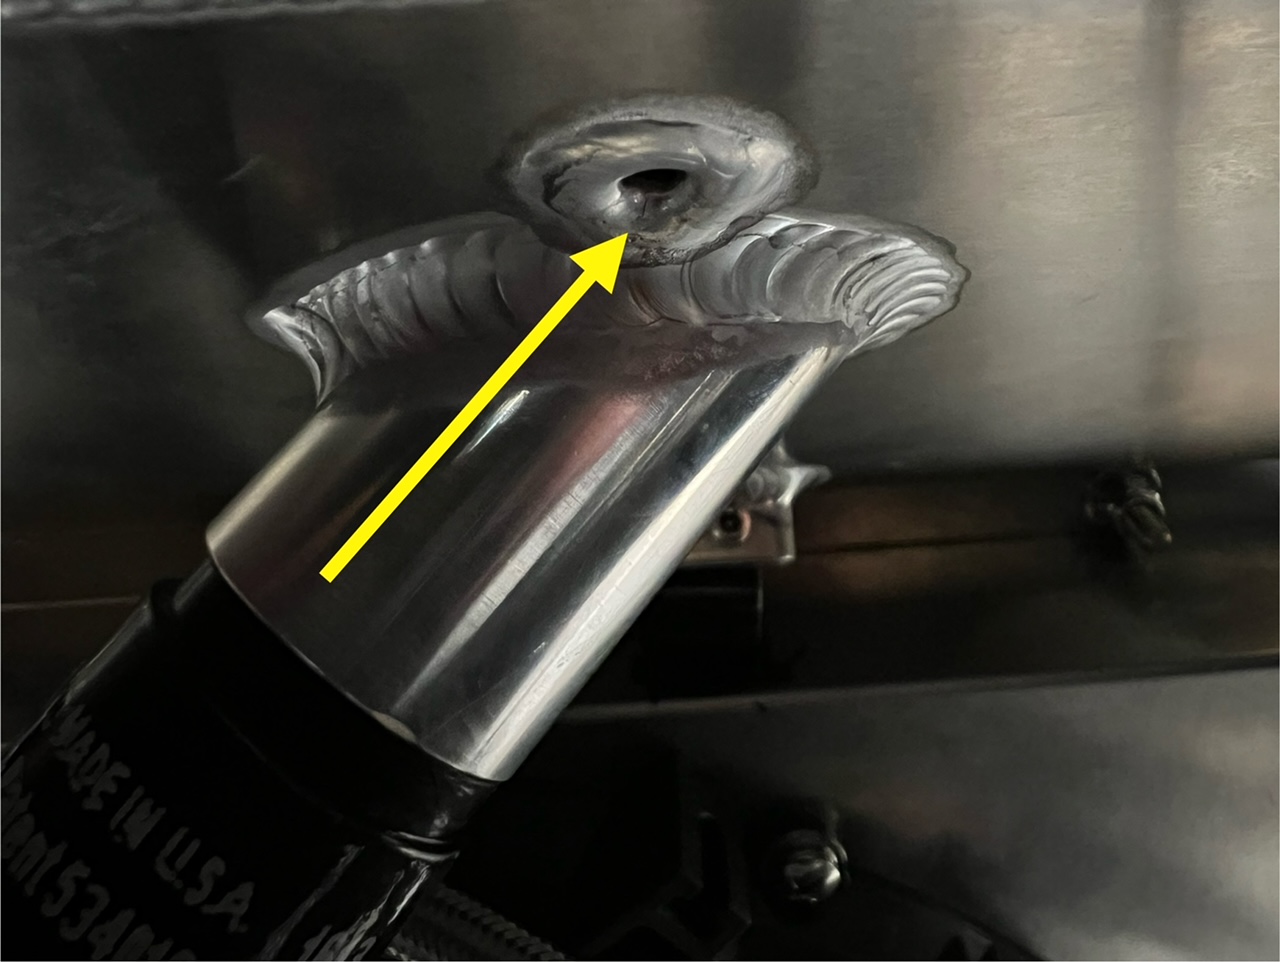
    So, post first drive we went around and checked all joints, unions and connections for leaks, looseness and drips. Nothing to speak of except the coolant expansion tank. I found that there appears to be a small crack or bad weld on the bottom of the tank, where the overpressure release eyelet from the fill cap goes through the tank and comes out the bottom. I verified it wasn't coolant leaking through that eyelet, but rather forming a drip and coming through a small crack/gap in the weld. See point of arrow in pic below. I've reached out to the manufacturer to see what they plan to do. Worst case I'll need to take it to a local aluminum/fab shop and see if they can fix it. I'm not an expert at welding or aluminum welding so I'll go with asking the pro's for advice on this.

    One more disappointing part will be taking off the gates power grip clamps and having to buy new ones...
    -Bryan
    Mk4 Roadster w/ IRS, Forte Gen 3 Coyote/TKX, Wilwood Brakes
    Build thread https://thefactoryfiveforum.com/show...oyote-TKX-EFI)
    Ordered: 6/27/22, Delivered: 1/20/23, First Start 10/16/2023, Go-Cart 3/30/2024

  37. #105
    Senior Member 460.465USMC's Avatar
    Join Date
    Aug 2019
    Location
    Spokane, WA
    Posts
    992
    Post Thanks / Like
    Quote Originally Posted by Junbug View Post
    We put the wheels on her, gave her a rough alignment (with strings and following Jeff Kleiner's recommendations on the upper control arms) fired her up and took her out for the first go-cart ride. Both my son and wife came along (at different times)... She ran great, and only one minor issue, considering all that could have gone wrong!

    Lots of big smiles!
    Congrats, Bryan! Huge milestone with great success.
    Chris
    Coupe complete kit delivered: 4/22/24. Build Thread. Coyote. T-56. IRS w/3.55. Wilwoods. PS. HVAC. Side windows.
    MK4 Complete kit. Build Thread Index. Delivered: 10/15/2020. Legal: 7/25/23. Coyote Gen3. TKO600 (0.64 OD). IRS w/3.55. PS. Wilwoods. Sway bars. This build is dedicated to my son, Benjamin. Build Thread.

  38. Thanks Junbug thanked for this post
  39. #106
    Senior Member Junbug's Avatar
    Join Date
    Apr 2022
    Location
    Lafayette, CO
    Posts
    250
    Post Thanks / Like
    So the company I ordered the expansion tank ended up shipping a new one. Couldn't get a hold of them via phone, or an email response for a few days, but miraculously got a shipping confirmation on Wednesday... The replacement expansion tank should arrive on Monday. So I spend the day draining what fluid I could from the leaking tank, removing the power grip clamps and taking the tank off. Went relatively smoothly, though it was painful cutting the clamps off as they're single use. Ordering more replacements tonight.
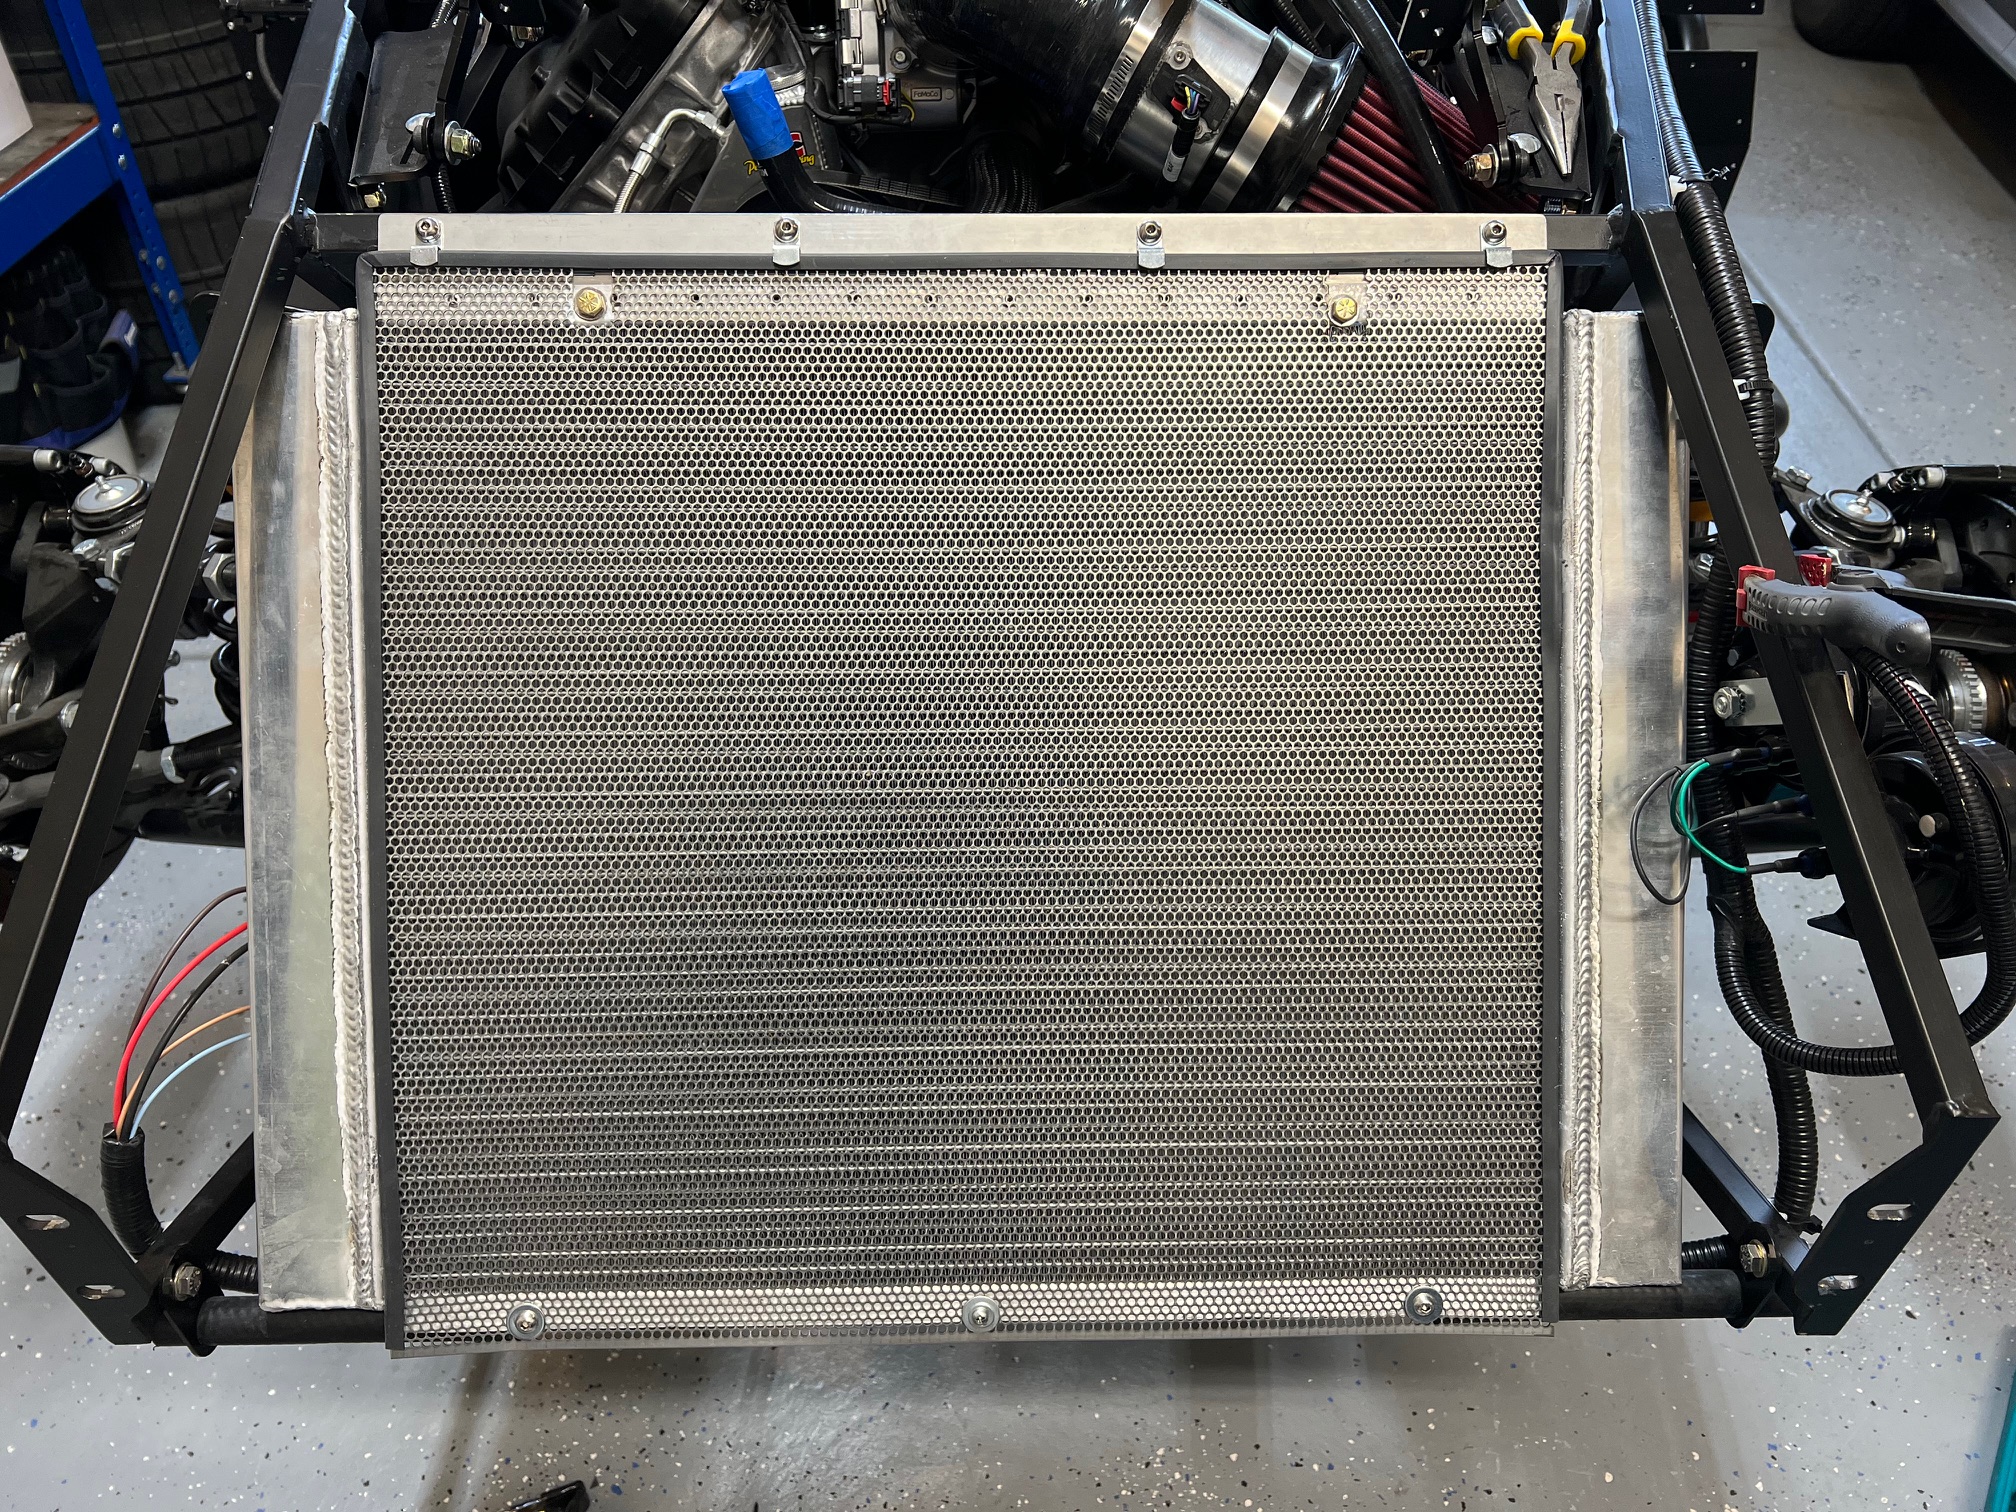
    Additionally I took the time to cut/fit my radiator protector/cover. Tip of the hat to JohnK, as he did the same solution and it seems easy, straight forward and simple. Plus I think it looks great. I may also change out the upper breeze hinge bolts as they contrast with the other stainless bolts, but that's something that can come later.
    -Bryan
    Mk4 Roadster w/ IRS, Forte Gen 3 Coyote/TKX, Wilwood Brakes
    Build thread https://thefactoryfiveforum.com/show...oyote-TKX-EFI)
    Ordered: 6/27/22, Delivered: 1/20/23, First Start 10/16/2023, Go-Cart 3/30/2024

  40. #107
    Senior Member Junbug's Avatar
    Join Date
    Apr 2022
    Location
    Lafayette, CO
    Posts
    250
    Post Thanks / Like
    So life has been busy but I've been knocking out some small tasks here and there. My son graduated from high school and is working this summer getting ready for college in the fall. Some of the small tasks were buttoning up the wiring harness, securing it in place, replaced the coolant expansion tank as it was leaking (new one isn't leaking on test runs!), working on adjusting the brake balance bar, assembling the seat bases and test fitting the seats.

    This past weekend we took the body down from the ceiling lift to prep and spray the inside with Raptor UPR liner. First we sanded the inside by hand, to rough up the surface and knock down any stray fibers or "extra" clumps of epoxy. Then I spent about 4 hrs taping off everything i thought needed. Next was the first spray coat of the UPR Raptor bed liner. I have a big 25 gallon compressor and I never had any issues. Set the regulator at 50 psi UPR (recommends between 40-60 PSI). I bought the kit that came with a spray gun. This first coat I focused on getting even coverage across the entire underbody. It took 2 of the 4 quarts I purchased to get even coverage everywhere.


    I let it sit for 60 mins, as recommended then started on a second coat. For the second coat I focused on getting extra coverage on the underside of the wheel wells. I used the 3rd quart to cover all these areas in detail. I kept one quart in reserve as I haven't decided how to coat the drop trunk and lower trunk area. Since I don't really need heat insulation back there I'll probably spray it with the UPR Raptor rather than the remaining LizardSkin I still have. Also the UPR Raptor cleans up much easier than the Lizardskin.


    Once done with spraying I let it sit for about 45 mins then started to peel off the tape/paper. Came out clean and looking great. Main focus was to avoid future starring of the paint if a rock hits the underside of the body. I also plan to add the wheel-well liners later this summer.

    Next weekend will be test mounting the body for the first time! Wish me luck!
    -Bryan
    Mk4 Roadster w/ IRS, Forte Gen 3 Coyote/TKX, Wilwood Brakes
    Build thread https://thefactoryfiveforum.com/show...oyote-TKX-EFI)
    Ordered: 6/27/22, Delivered: 1/20/23, First Start 10/16/2023, Go-Cart 3/30/2024

  41. #108
    Senior Member Junbug's Avatar
    Join Date
    Apr 2022
    Location
    Lafayette, CO
    Posts
    250
    Post Thanks / Like
    So we test fit the body today for the first time. Nerve racking, but in the end, it fit quite nice. I'll be linking a separate post asking questions about where/what I need to trim and adjust. Overall it went quite well... For prep, I removed the roll bars, removed the steering wheel, put the tires on (though this isn't necessary). Other preparation was to add 3/4" blocks at the intersection of the horizontal square bars along the engine compartment, and the cross bar that holds the upper radiator. Those help keep the body at the right height, making it easier to put your quick jack bolts through the body holes. Also, I didn't have any foam, or bulb seal anywhere... I don't want to tear that up on the first fitment.


    The back end is pushed all the way forward, and just slightly touches the back end of the vertical trunk supports, and rests on the peak of the breeze cubby wall (I may trim that by 1/4" or so). The rear quickjack bolts line up almost perfectly with the Kleiner Trunk mod so I think the back end seems good.
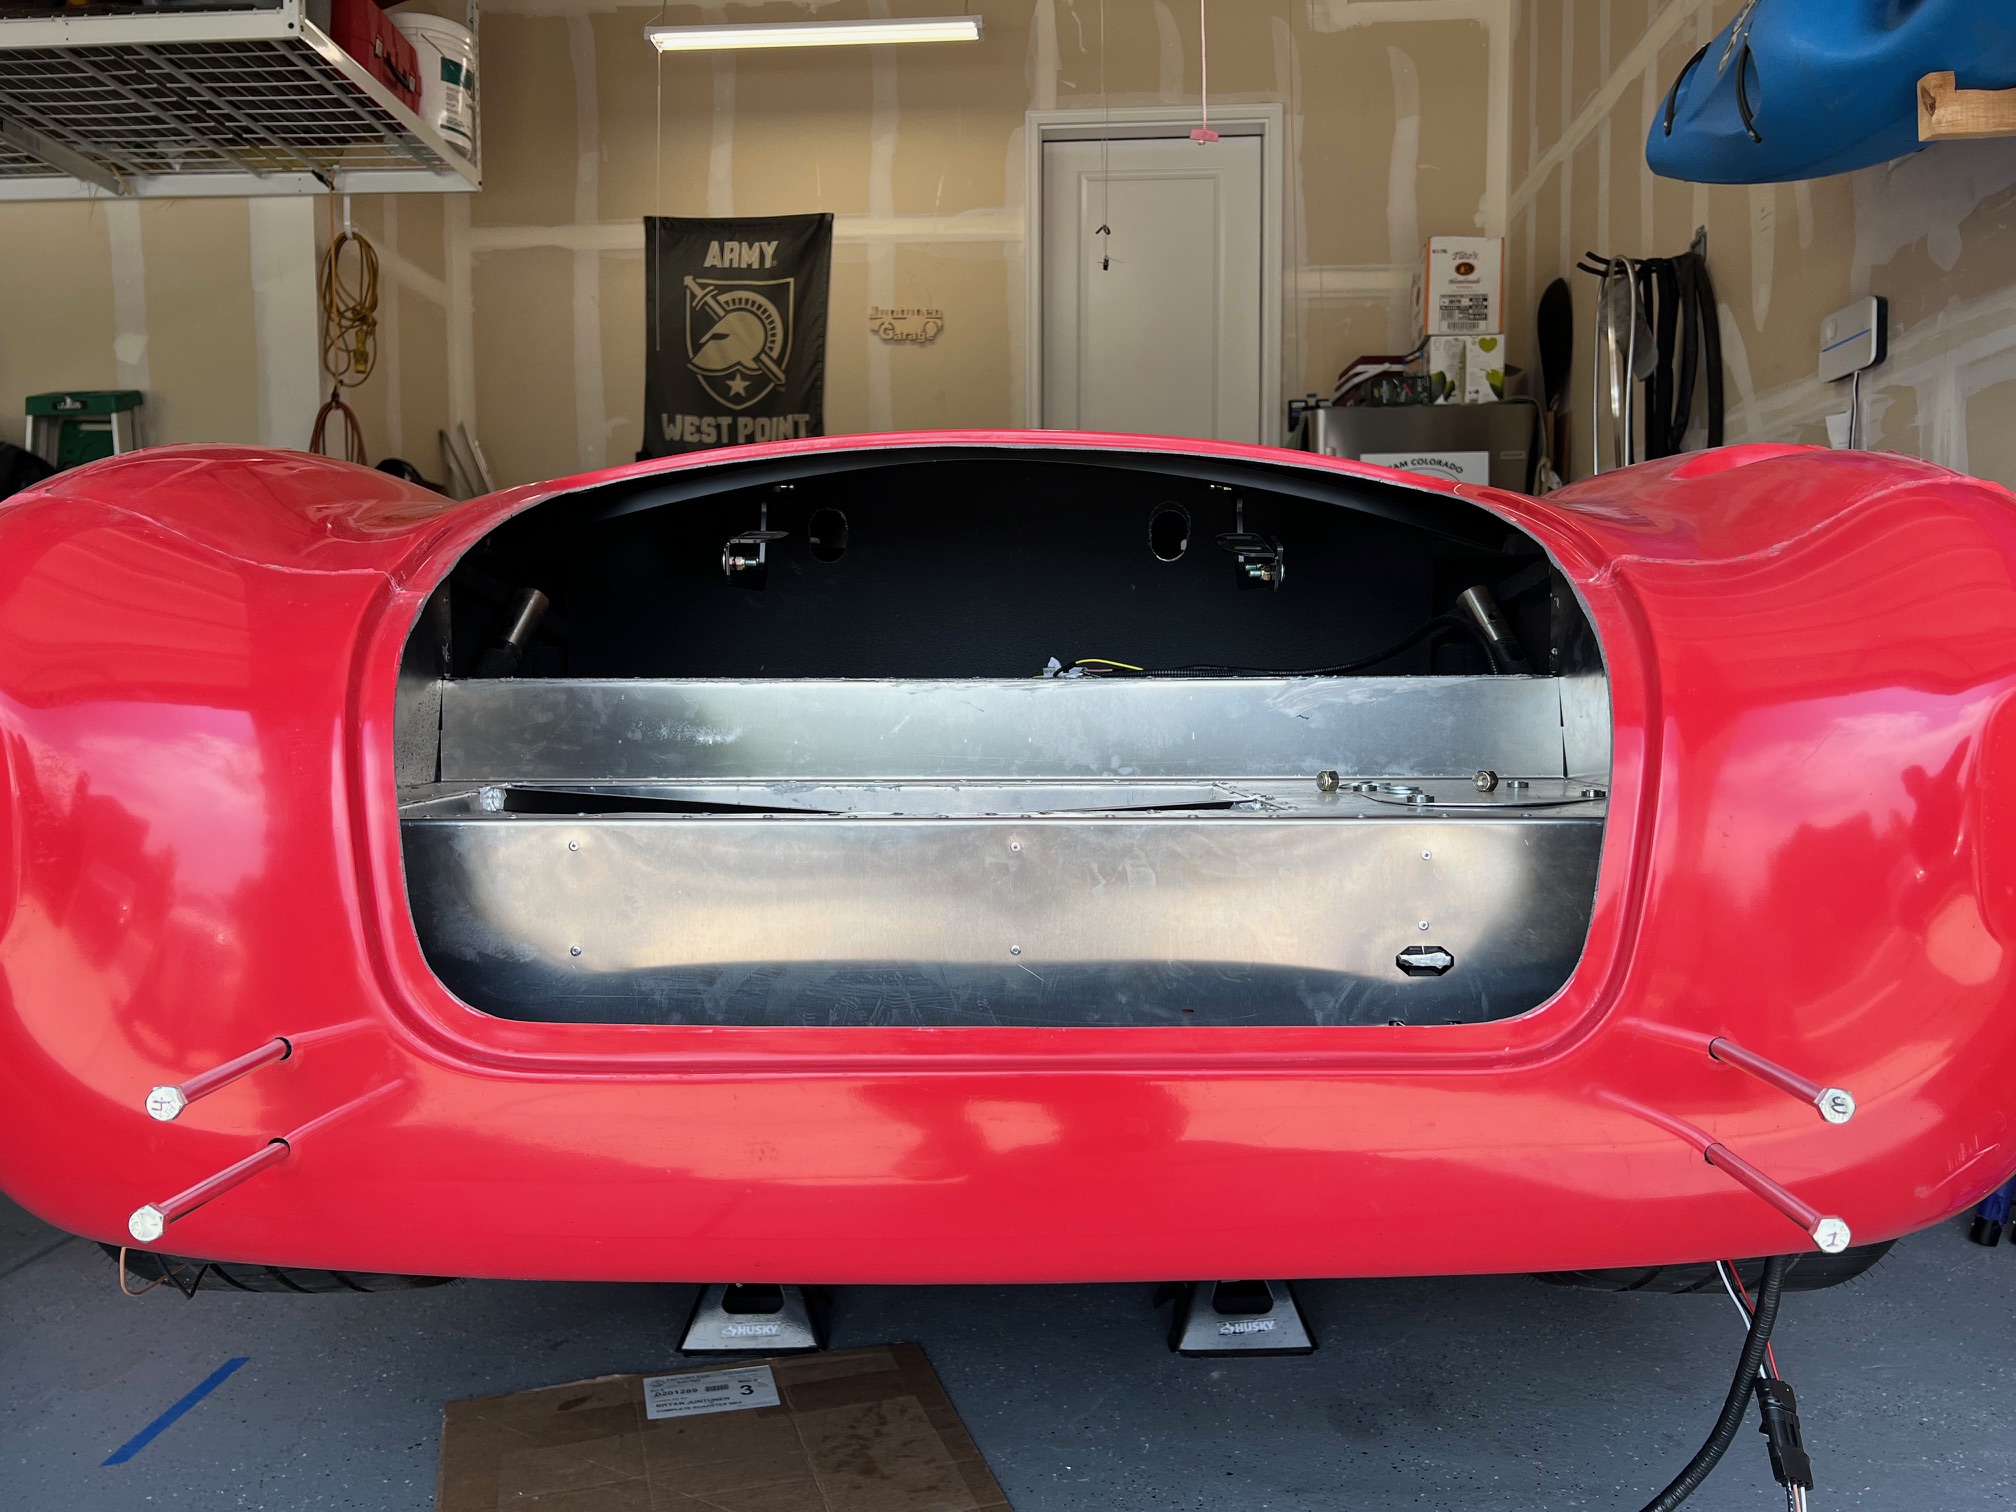

    This is the DS outrigger which I know will need to move about 1/2" toward the passenger side. I believe this will help the engine compartment hole line up more evenly between the two hood hinge support brackets.
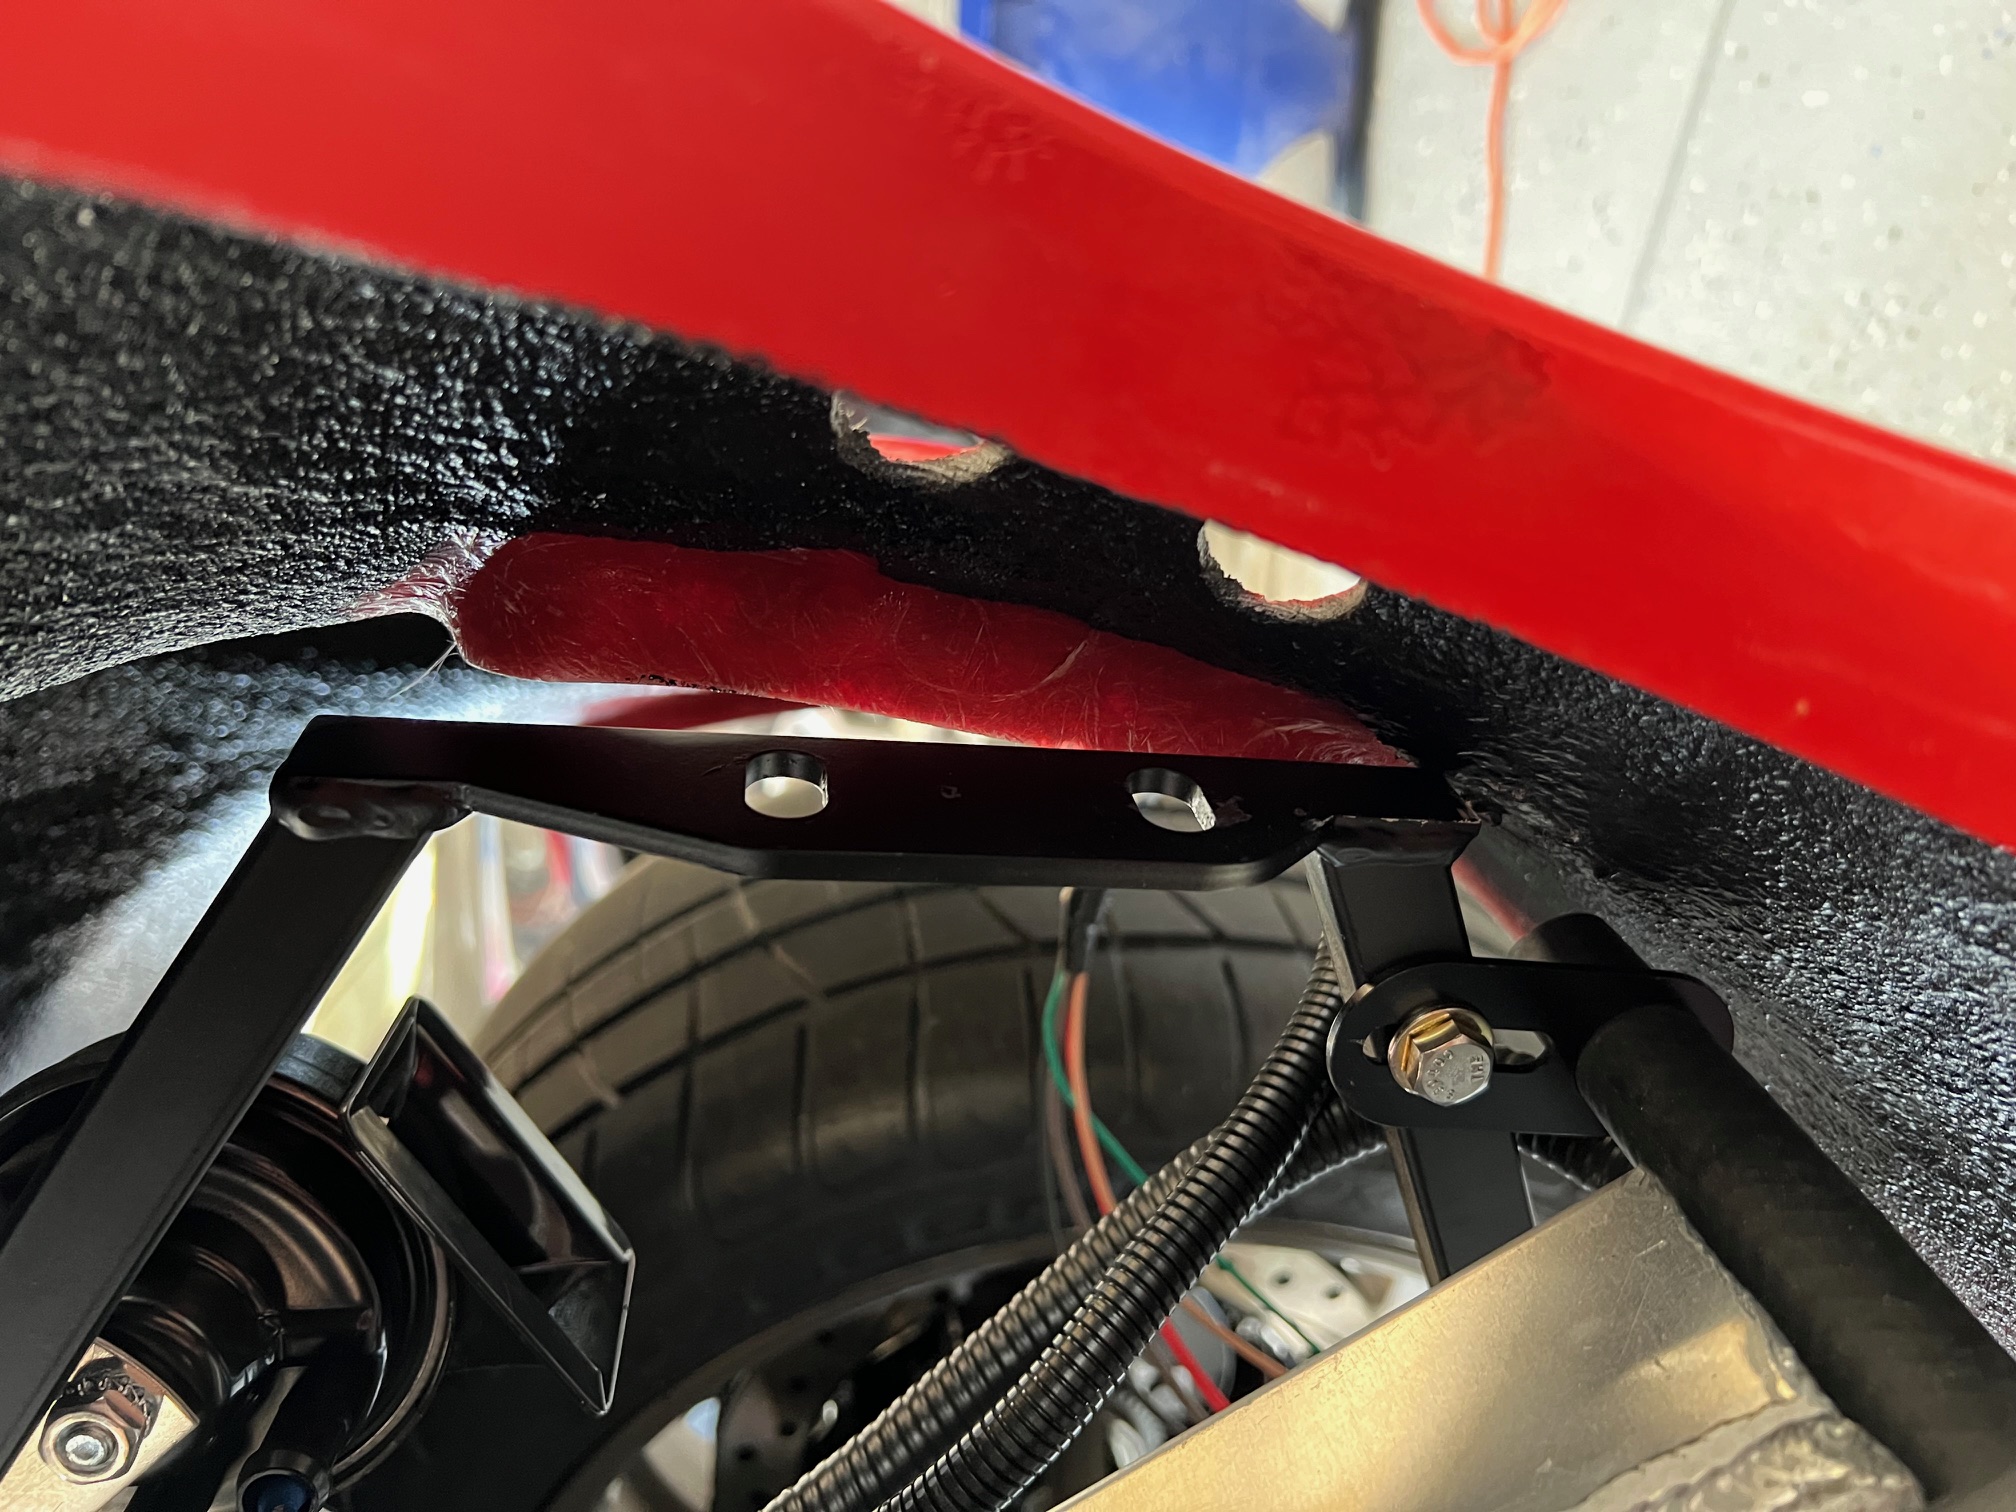

    This is the PS outrigger which I'll likely move about 1/4" to the passenger side, for the same reason above. Likewise I'll make sure the space between the two outriggers stays the same, per the advice on the forum
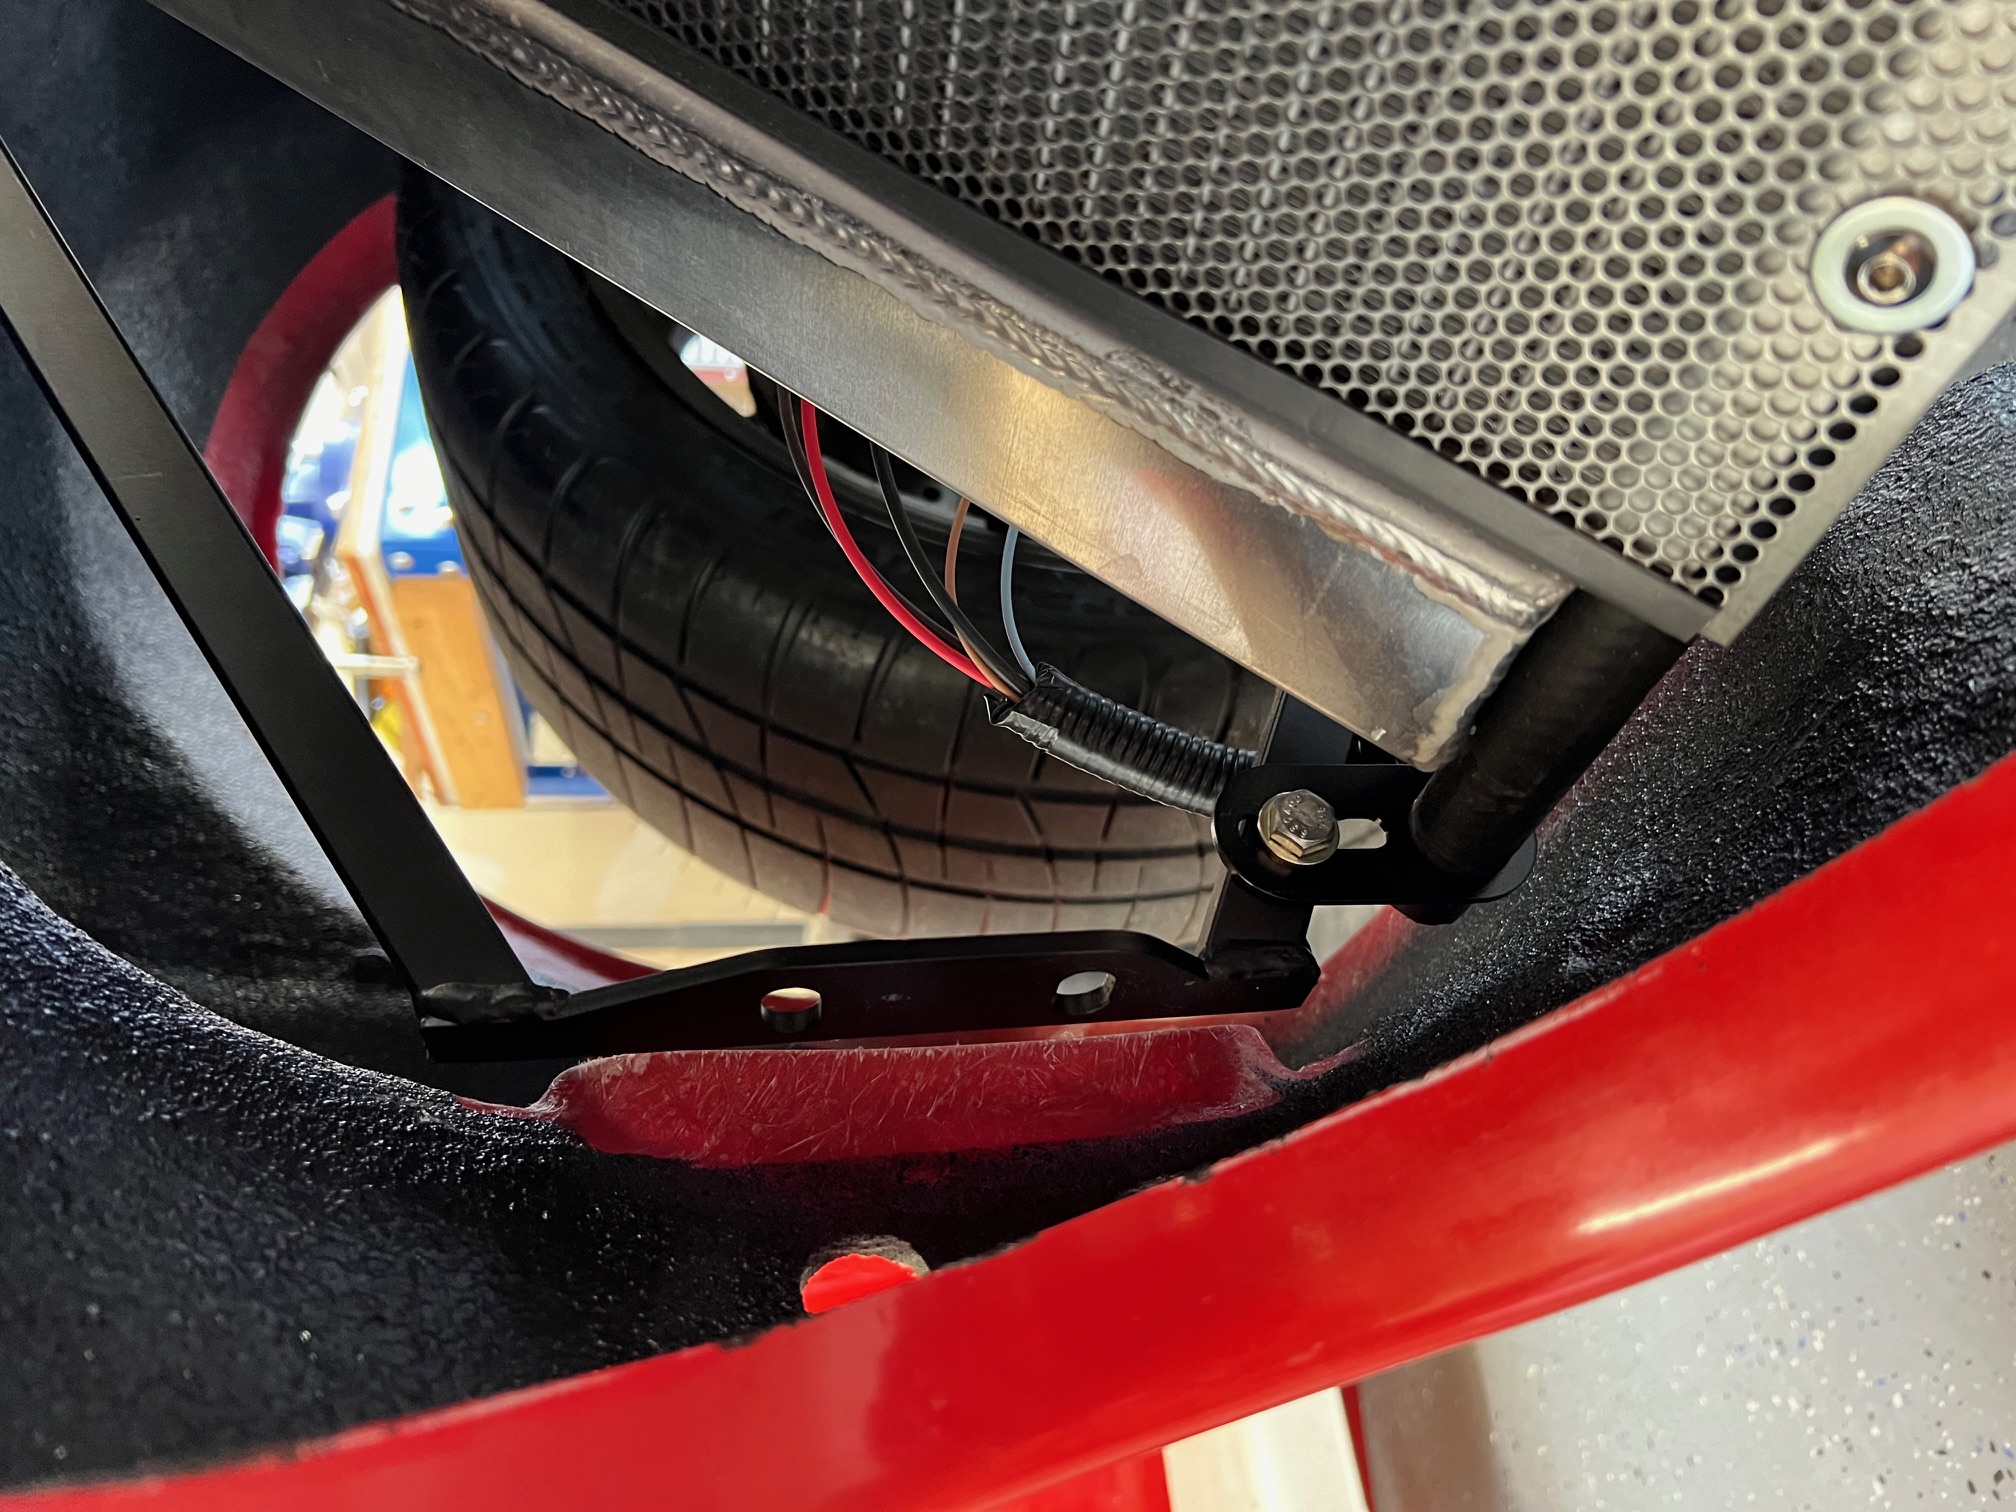

    The engine compartment hole seems OK. I believe the key fitment here is even spacing between each of the hood hinge mounting brackets. You want the same overhang (1/4"-1/2") on each side.


    I know I'll need to do some trimming on the dash rolled edge, especially on the DS. I will first take the body off and adjust the outriggers, then re-fit the body to see what shifts around before measuring and taking any material off the dash rolled edge. The PS seems to have a bit of a gap, but overall fitting quite well.
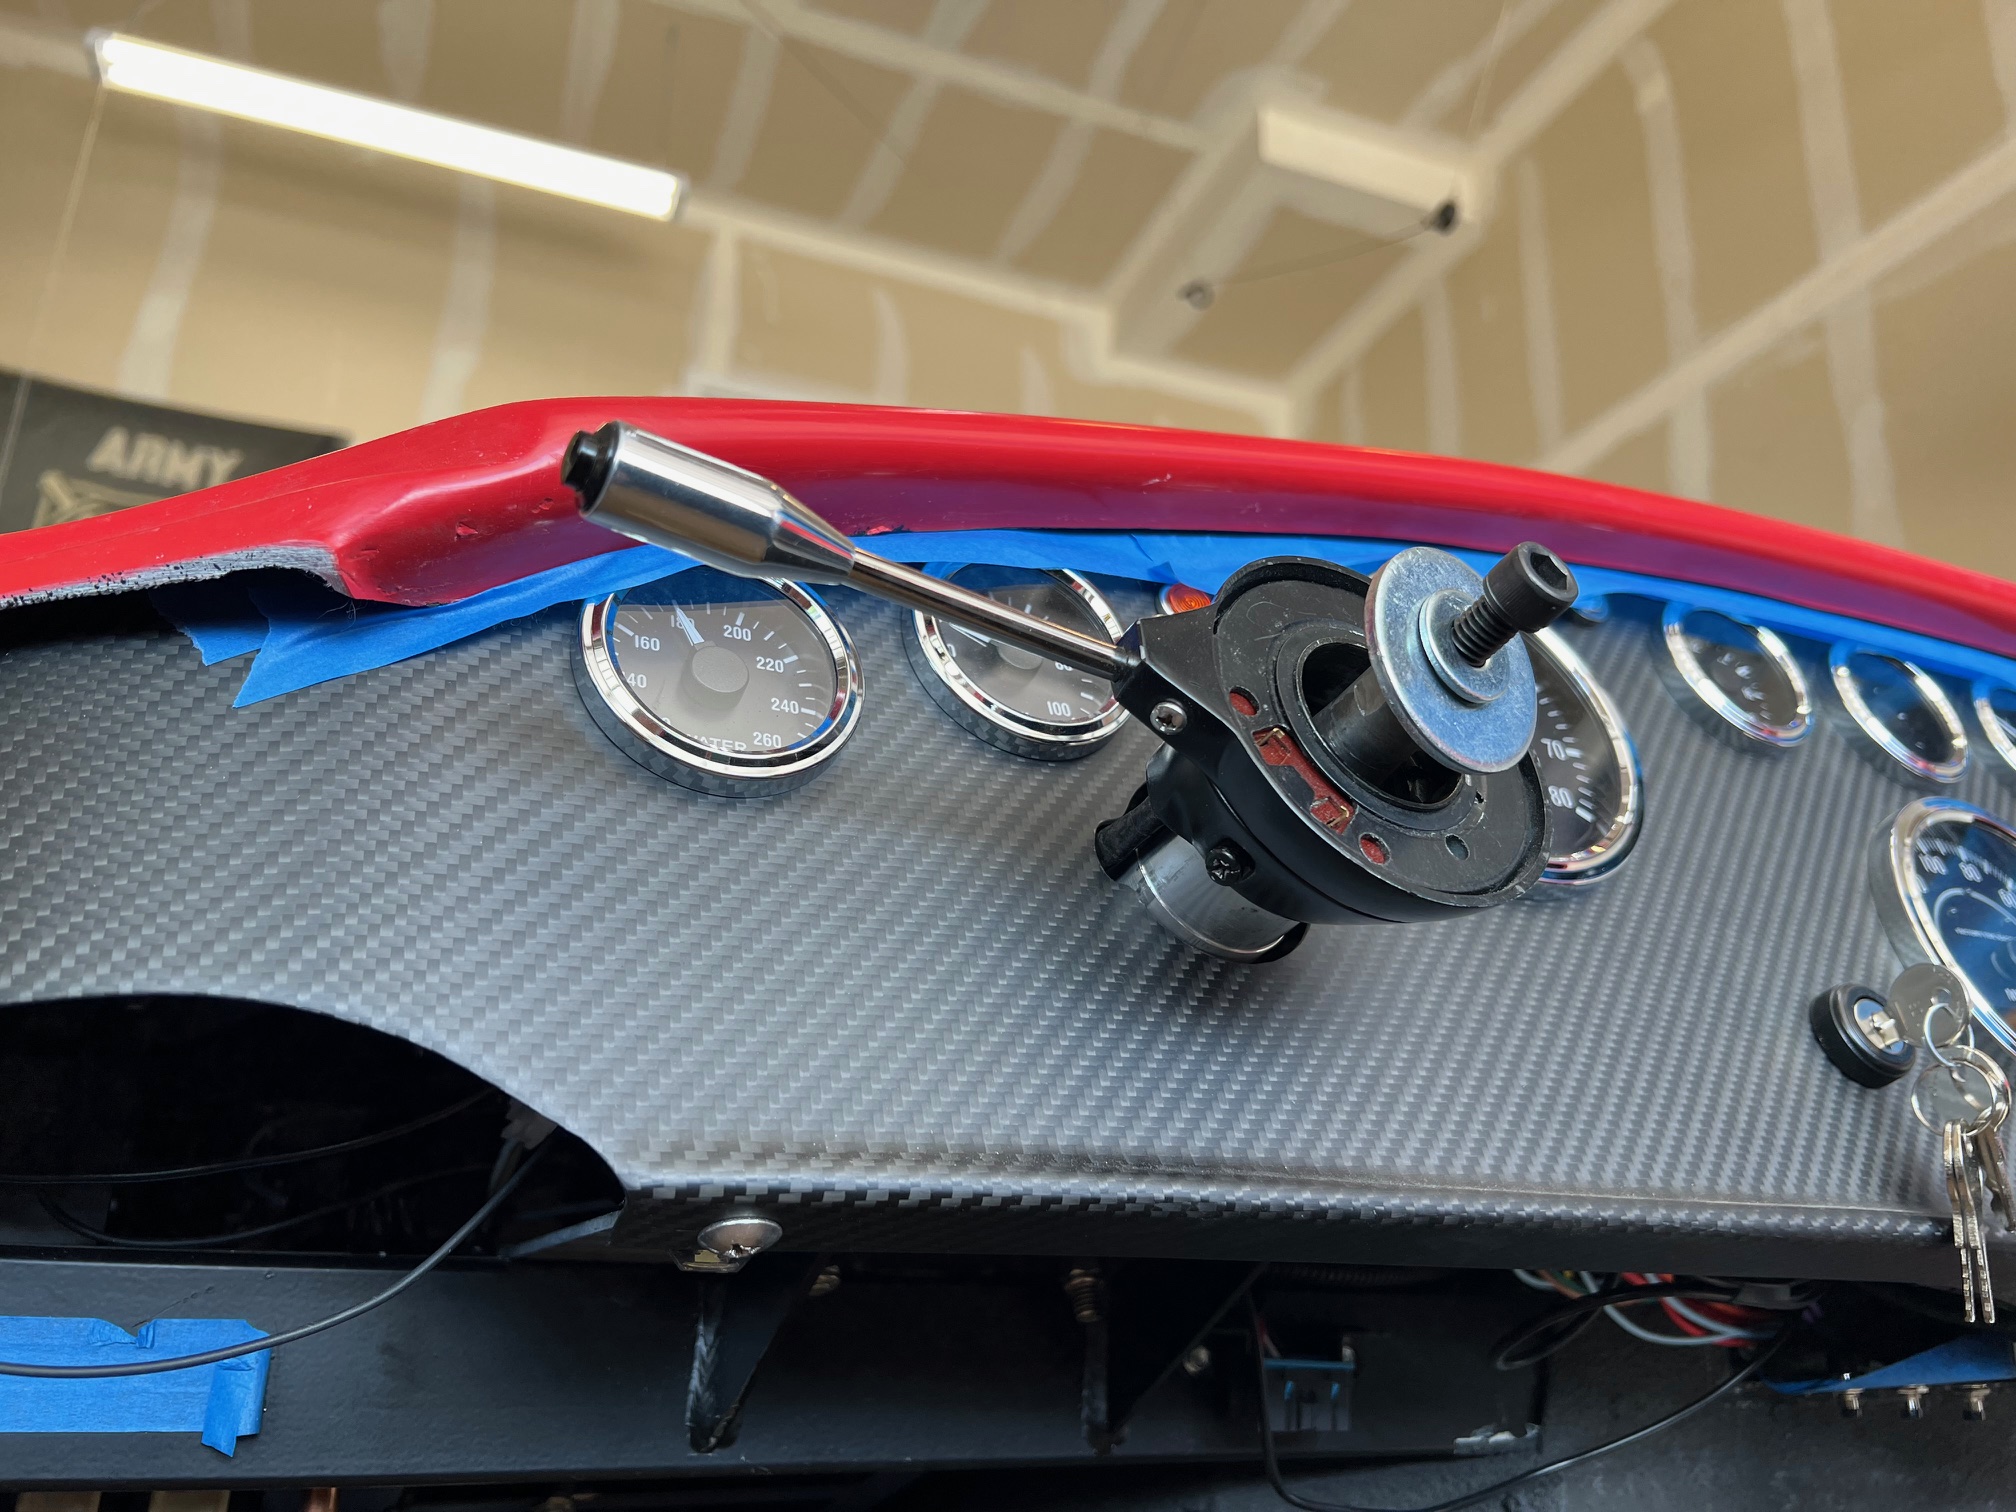
    -Bryan
    Mk4 Roadster w/ IRS, Forte Gen 3 Coyote/TKX, Wilwood Brakes
    Build thread https://thefactoryfiveforum.com/show...oyote-TKX-EFI)
    Ordered: 6/27/22, Delivered: 1/20/23, First Start 10/16/2023, Go-Cart 3/30/2024

  42. #109
    Not a waxer Jeff Kleiner's Avatar
    Join Date
    Feb 2011
    Location
    Bloomington, Indiana
    Posts
    8,539
    Post Thanks / Like
    You really need to have the bulb seal on. Don't try to center the hood opening on the tubes around the engine bay---the hood opening is in the center of the body. You center the nose by measuring from the shock tower to the outer edge of the wheel opening.

    Jeff

  43. #110
    Senior Member Junbug's Avatar
    Join Date
    Apr 2022
    Location
    Lafayette, CO
    Posts
    250
    Post Thanks / Like
    Will do. Thanks Jeff!
    -Bryan
    Mk4 Roadster w/ IRS, Forte Gen 3 Coyote/TKX, Wilwood Brakes
    Build thread https://thefactoryfiveforum.com/show...oyote-TKX-EFI)
    Ordered: 6/27/22, Delivered: 1/20/23, First Start 10/16/2023, Go-Cart 3/30/2024

  44. #111
    Senior Member Junbug's Avatar
    Join Date
    Apr 2022
    Location
    Lafayette, CO
    Posts
    250
    Post Thanks / Like
    Second body fitment and things seem to be lining up well. Added bulb seal and the 1/4" foam on the 3/4" square engine bay bars. Lots of pics below with notes.
    Fit is similar. Body sits about 1/4"-1/2" in front of the door striker plates, trimmed dash roll is now spaced from the dash.


    The body also seems centered... I "adjusted" the front outriggers a bit toward the PS, and now I get about 17-1/4" inches measured from the top of the front shock pillar (same place on both sides)


    Trunk bulb seal is pretty tightly squeezed and everything else seems to be aligned.
    -Bryan
    Mk4 Roadster w/ IRS, Forte Gen 3 Coyote/TKX, Wilwood Brakes
    Build thread https://thefactoryfiveforum.com/show...oyote-TKX-EFI)
    Ordered: 6/27/22, Delivered: 1/20/23, First Start 10/16/2023, Go-Cart 3/30/2024

  45. Likes danmas liked this post
  46. #112
    Senior Member Mike.Bray's Avatar
    Join Date
    Dec 2021
    Location
    Flower Mound TX
    Posts
    1,170
    Post Thanks / Like
    Looking good!
    My build thread https://thefactoryfiveforum.com/show...Roadster-Build

    Thread on Stainless Steel AN brake lines.

    Thread on fasteners and torque wrenches.

  47. #113
    Senior Member Junbug's Avatar
    Join Date
    Apr 2022
    Location
    Lafayette, CO
    Posts
    250
    Post Thanks / Like
    Stayed busy this weekend and added the fuel filler and Le Mans cap. Seems I keep finding small screws and bolts I need to powder coat!


    -Bryan
    Mk4 Roadster w/ IRS, Forte Gen 3 Coyote/TKX, Wilwood Brakes
    Build thread https://thefactoryfiveforum.com/show...oyote-TKX-EFI)
    Ordered: 6/27/22, Delivered: 1/20/23, First Start 10/16/2023, Go-Cart 3/30/2024

  48. #114
    Senior Member Junbug's Avatar
    Join Date
    Apr 2022
    Location
    Lafayette, CO
    Posts
    250
    Post Thanks / Like
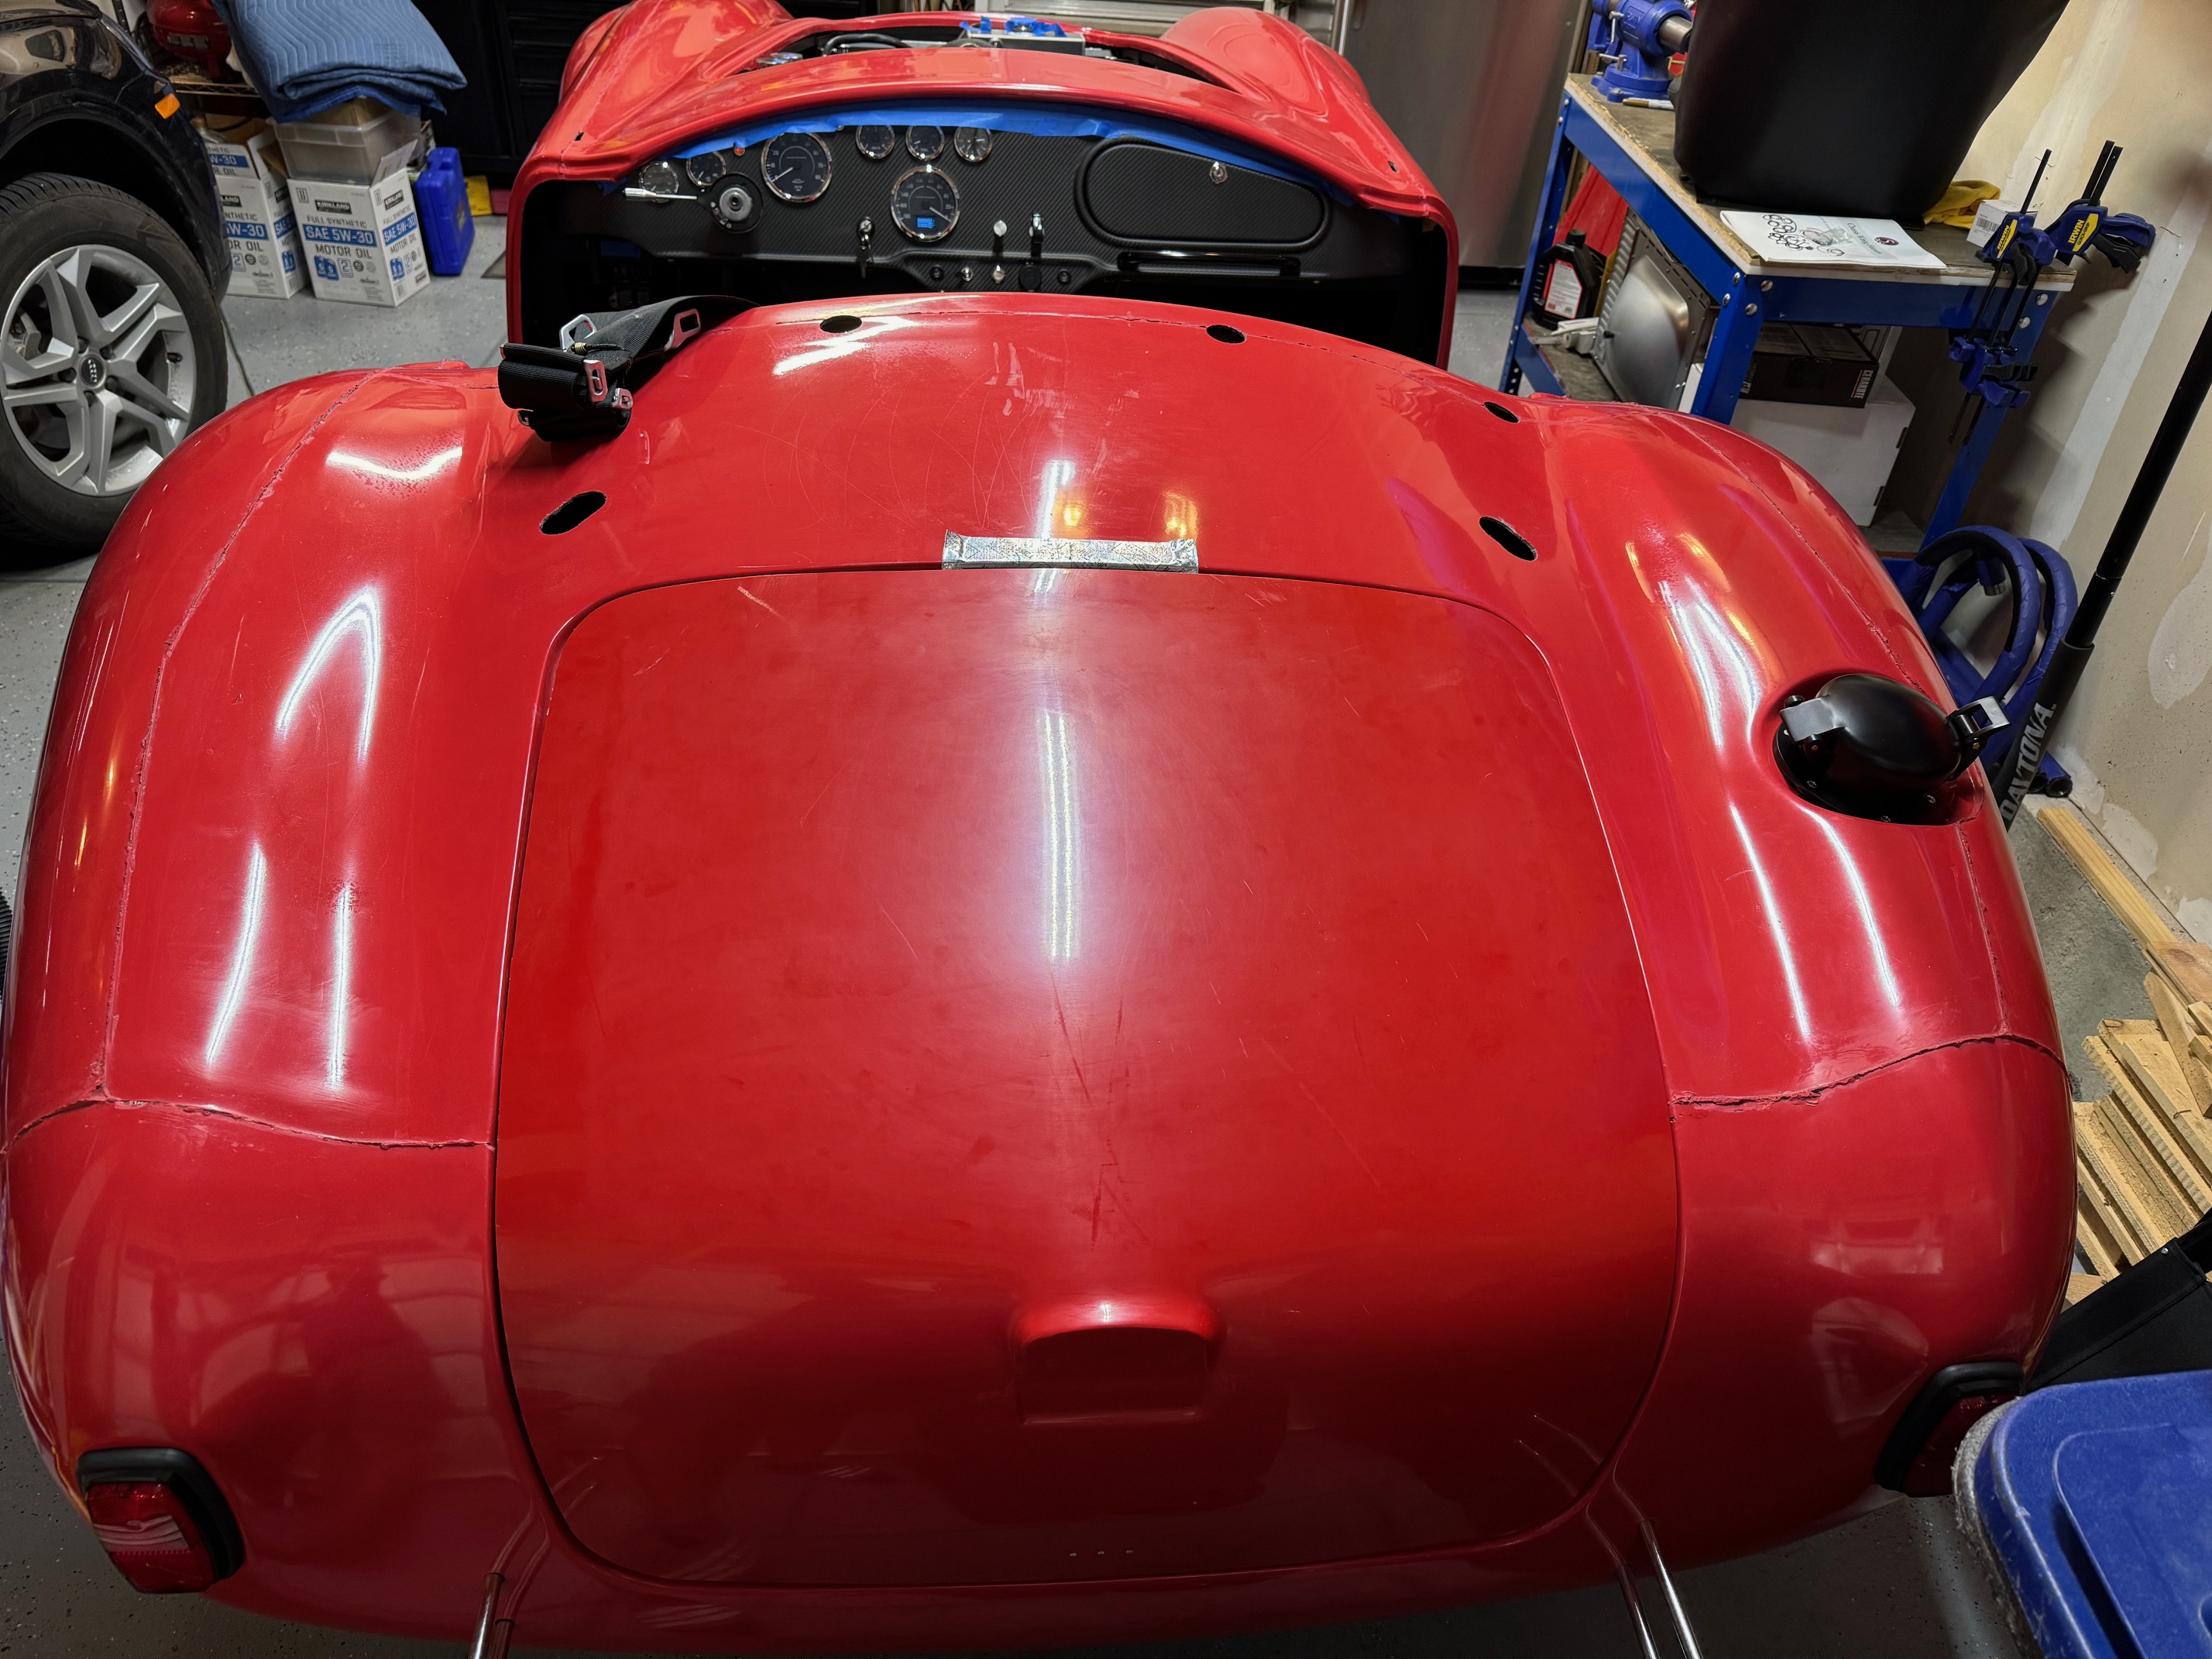
    I also added the weather-strip and fit the trunk... not final but good enough to move forward with other tasks. I also don't want to do too much as Kleiner will be doing the body. I just want to be able to drive this summer!
    -Bryan
    Mk4 Roadster w/ IRS, Forte Gen 3 Coyote/TKX, Wilwood Brakes
    Build thread https://thefactoryfiveforum.com/show...oyote-TKX-EFI)
    Ordered: 6/27/22, Delivered: 1/20/23, First Start 10/16/2023, Go-Cart 3/30/2024

  49. #115
    Senior Member Junbug's Avatar
    Join Date
    Apr 2022
    Location
    Lafayette, CO
    Posts
    250
    Post Thanks / Like
    So I've been slowly making progress on the final body fitment and added the trunk and hood. Hood was a bear to get mounted but pretty easy to adjust once mounted.

    Inside with struts...

    Added the trunk light and license plate holder.
    -Bryan
    Mk4 Roadster w/ IRS, Forte Gen 3 Coyote/TKX, Wilwood Brakes
    Build thread https://thefactoryfiveforum.com/show...oyote-TKX-EFI)
    Ordered: 6/27/22, Delivered: 1/20/23, First Start 10/16/2023, Go-Cart 3/30/2024

  50. Likes danmas liked this post
  51. #116
    Member
    Join Date
    Aug 2023
    Location
    Neenah, WI
    Posts
    55
    Post Thanks / Like
    Quote Originally Posted by Junbug View Post
    Also, Big news! We had our first start today! Video link below. I had a brain fart yesterday when i didn't have power to my ignition. A single question on the forum and a couple of quick answer from some experts here and they straitened me out. I had "dieted" the ignition leg of my harness a bit too much. Once I looked at the wire diagram again I realized I had taken out the IGN->COL cable. Once I dug it out of my box-o-unused/cut cables, everything worked exactly as planned...
    https://youtube.com/shorts/E-yKEphqw...6O24YqbQ28fJCC
    I think i've done the same thing and 1 year later. I have no power at the ignition (Batt. terminal). So how did you fix it? Run a wire from the 12v buss bar to the ignition Batt terminal?

  52. #117
    Senior Member Junbug's Avatar
    Join Date
    Apr 2022
    Location
    Lafayette, CO
    Posts
    250
    Post Thanks / Like
    Quote Originally Posted by Dave108 View Post
    I think i've done the same thing and 1 year later. I have no power at the ignition (Batt. terminal). So how did you fix it? Run a wire from the 12v buss bar to the ignition Batt terminal?
    Dave,
    Sorry for the delayed response. I had "dieted" out the actual power cable to the ignition/key. I hadn't cut it off yet, but it was just flopping around behind the dash. Once I connected it up, verified with the wiring diagram, she started right up, well after turning over a few times she did!
    -Bryan
    -Bryan
    Mk4 Roadster w/ IRS, Forte Gen 3 Coyote/TKX, Wilwood Brakes
    Build thread https://thefactoryfiveforum.com/show...oyote-TKX-EFI)
    Ordered: 6/27/22, Delivered: 1/20/23, First Start 10/16/2023, Go-Cart 3/30/2024

  53. #118
    Senior Member Junbug's Avatar
    Join Date
    Apr 2022
    Location
    Lafayette, CO
    Posts
    250
    Post Thanks / Like
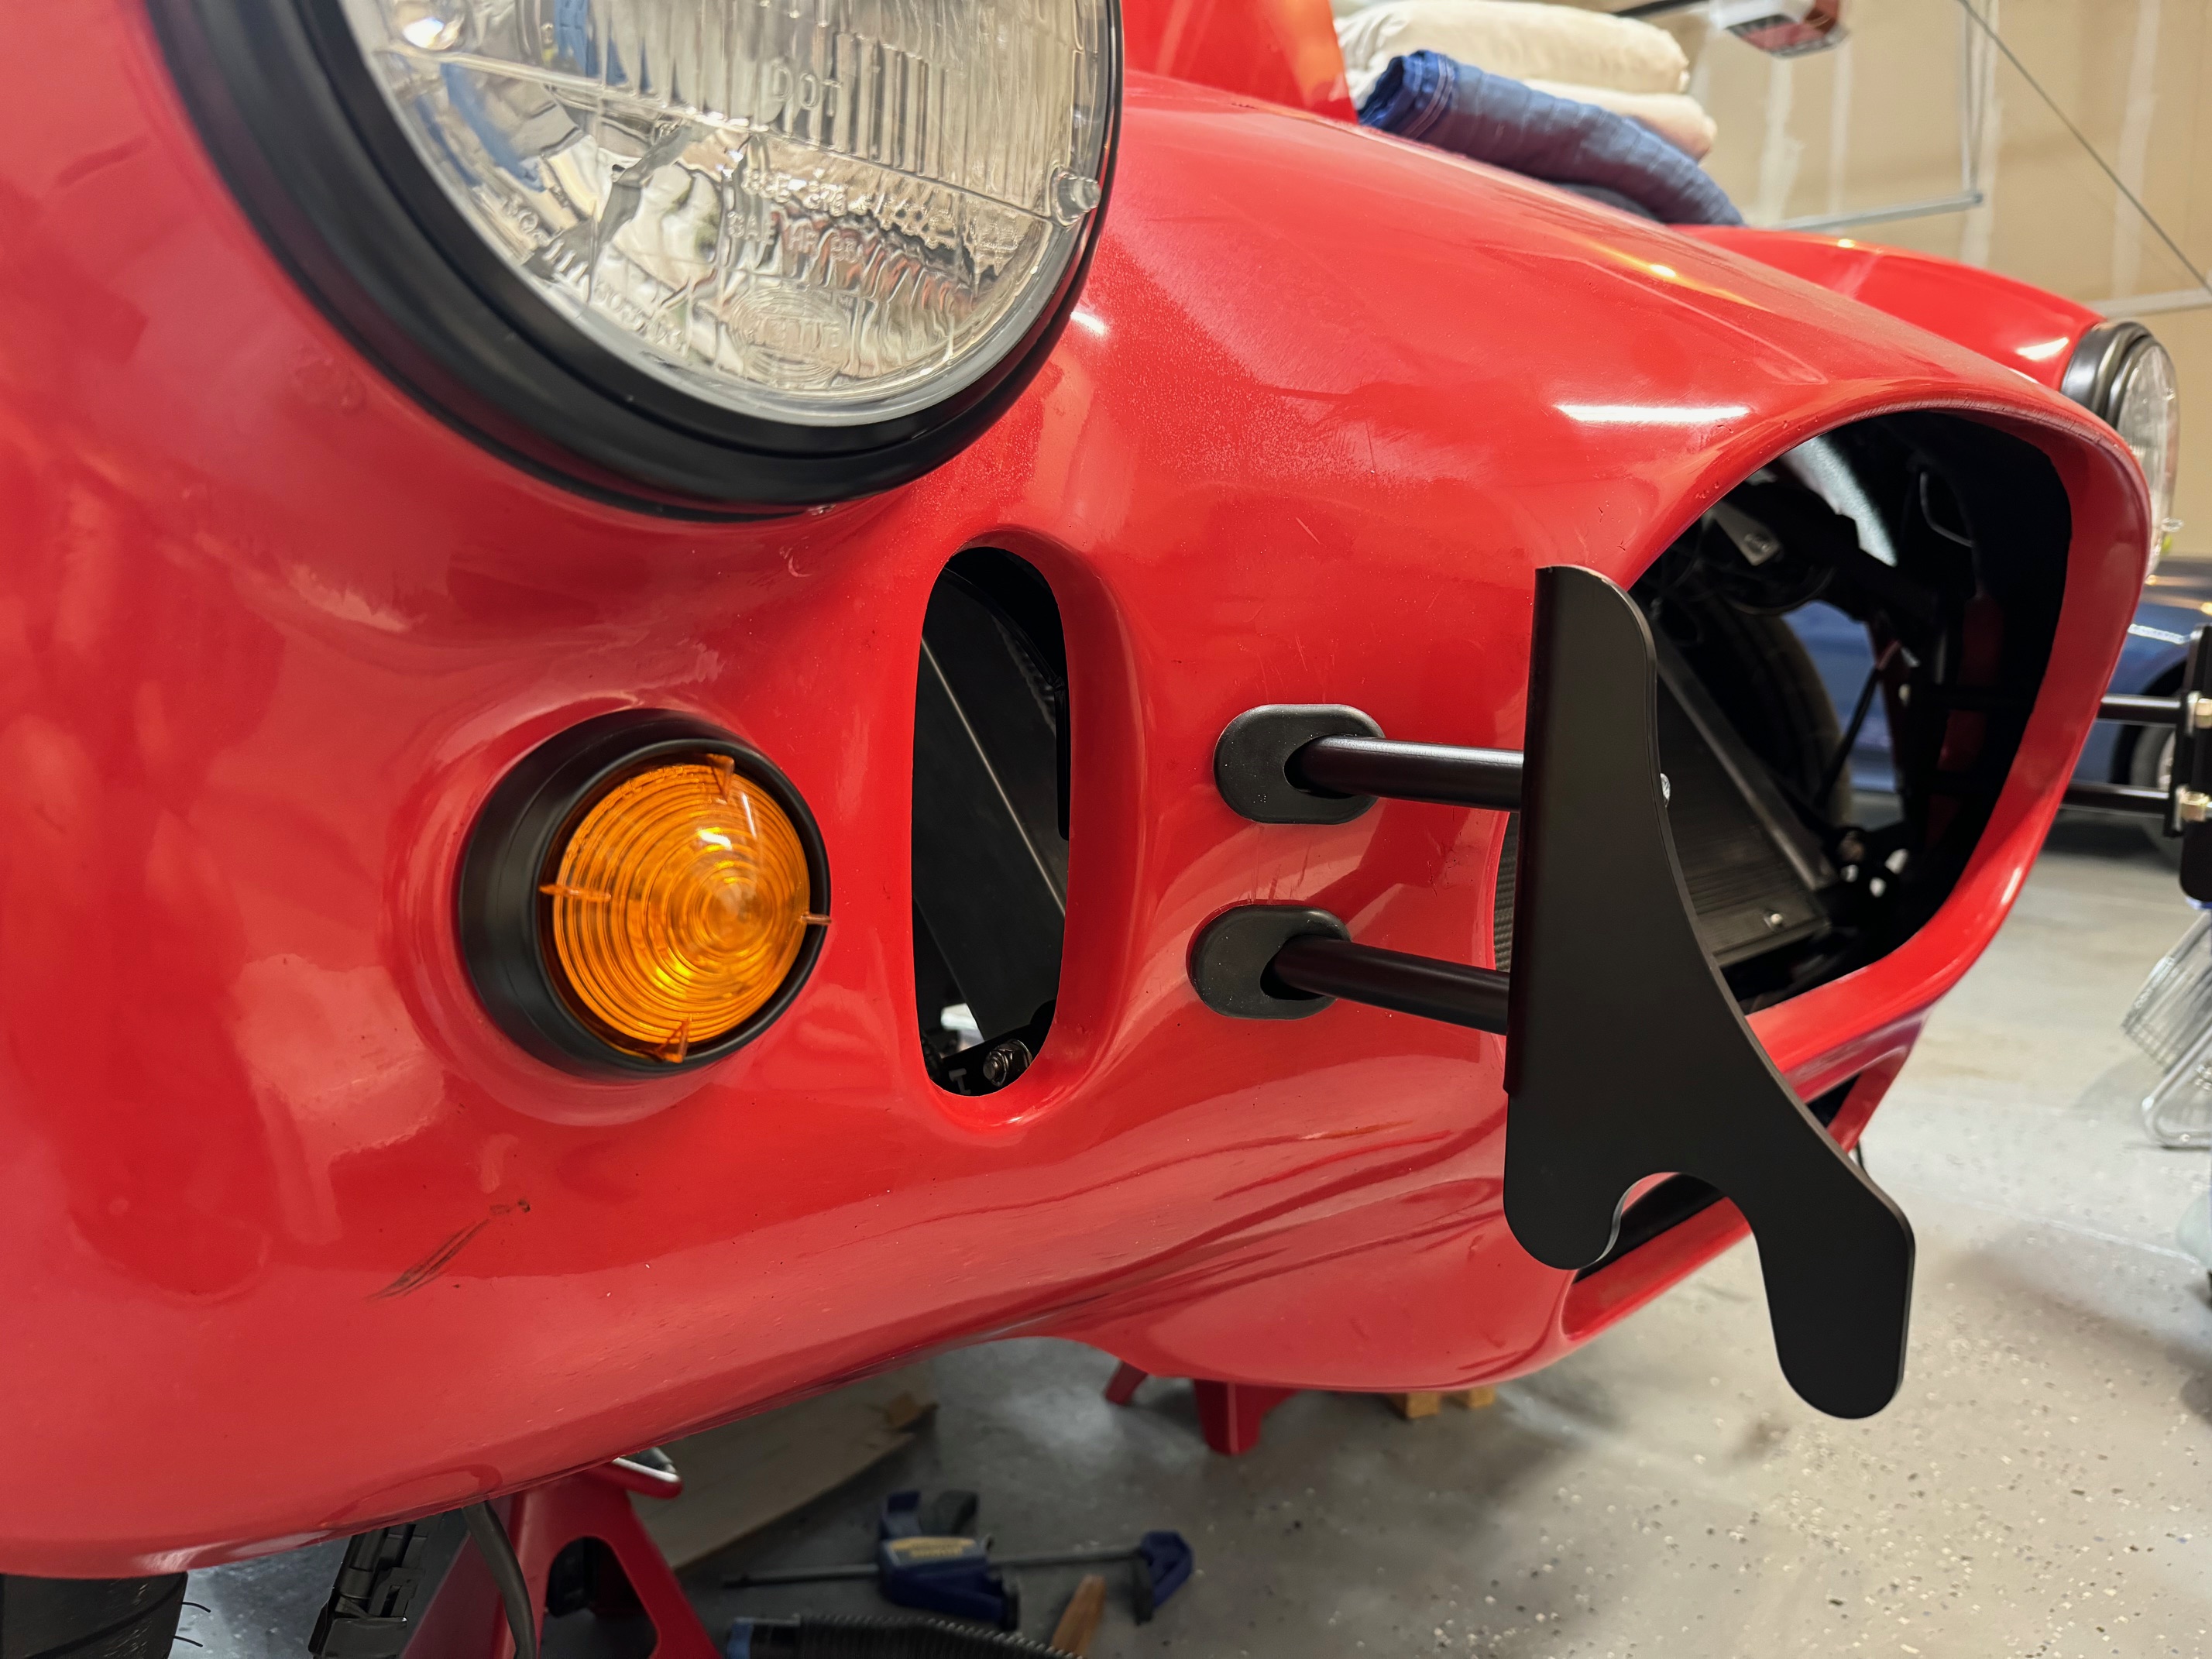
    I made some incremental progress over the last few weeks. Added the front quick jacks after the grommets arrived. I had to shape the body holes a bit which took some time, but I think they look great. I'll likely cut the tips off the bolts so the end cap acorn nuts cover the shiny bolt head. I'll PC those and the washers when the weather cools off a bit. i can't PC the nylon lock nuts but I have some matching spray paint that should keep them muted..

    -Bryan
    Mk4 Roadster w/ IRS, Forte Gen 3 Coyote/TKX, Wilwood Brakes
    Build thread https://thefactoryfiveforum.com/show...oyote-TKX-EFI)
    Ordered: 6/27/22, Delivered: 1/20/23, First Start 10/16/2023, Go-Cart 3/30/2024

  54. #119
    Not a waxer Jeff Kleiner's Avatar
    Join Date
    Feb 2011
    Location
    Bloomington, Indiana
    Posts
    8,539
    Post Thanks / Like
    Pro tip: if you change the quick jack tubes to 3/4" O.D. they'll fit the grommets.

    Jeff

  55. #120
    Senior Member Blitzboy54's Avatar
    Join Date
    Oct 2020
    Location
    Albany, NY
    Posts
    1,420
    Post Thanks / Like
    Quote Originally Posted by Jeff Kleiner View Post
    Pro tip: if you change the quick jack tubes to 3/4" O.D. they'll fit the grommets.

    Jeff
    Good to know
    Build 1 MK4 #10008 - Delivered 03/03/21, Graduated 7/20/22 - Sold 6/6/24
    Build Thread #1 https://thefactoryfiveforum.com/show...been-delivered
    Build 2 MK4 #11061- Delivered 08/24/24
    Build Thread #2 https://thefactoryfiveforum.com/show...006#post562006

Page 3 of 4 FirstFirst 1234 LastLast

Posting Permissions

  • You may not post new threads
  • You may not post replies
  • You may not post attachments
  • You may not edit your posts
  •  

FFMetal

Visit our community sponsor